Chapter 7. The Essential Select Menu

We all have our regular routes that we travel as we go about our daily business. For example, Katrin goes into New York City almost every day, and on most days she goes to the same two areas: midtown and Chelsea. At some point she became aware that she had fallen into a rut. Every day she was taking the same bus and walking the same route. On the few occasions when she went uptown or down to Greenwich Village, she was always amazed at the different faces the Big Apple has. Each neighborhood has its own smells, textures, and feelings.
Working with Adobe Photoshop can be a lot like a daily commute, and it can seem like you’re in a rut and going over the same territory. When making selections, most people simply grab one of the familiar selection tools from the toolbar and hope a quick drag or click will get the job done. To achieve professional results, relying on the standard selection tools may create disappointing results.
Making selections in Photoshop is such a fundamental part of working in the program that an entire menu is devoted to them, the Select menu. In this chapter, you’ll take a closer look at the possibilities offered by the Select menu and work with a variety of images to learn about:
• Using Color Range to select tone and color
• Taking advantage of the amazing power of the Refine Edge dialog
• Transforming a selection
• Saving, activating, and storing selections as alpha channels
Select Menu Introduction
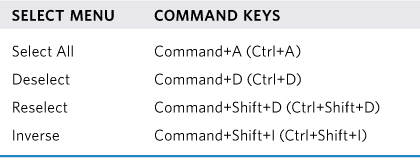
The first four options in the Select menu are so essential for working with selections that we use them during most of our Photoshop sessions, even though we never actually use the Select menu to access them. Learning to use the keyboard shortcuts in TABLE 7.1 will speed up your selection work.
Table 7.1. Select Menu Shortcuts
Select All
In a nutshell, choosing Select > All selects the entire active layer, active image channel, or the entire document if it has only one layer. This may not seem that exciting, but it is very useful. For example, one method of combining images together is to choose Select > All (Command+A [Ctrl+A]) and then Edit > Copy (Command+C [Ctrl+C]) in one file, and then switch to another file and choose Edit > Paste (Command+V [Ctrl+V]) to paste the copied element as a new layer in the active file. Of course, Photoshop offers other ways to do this, and we’ll be covering all of them in more detail when we get to Chapter 8, “Layer Essentials.”
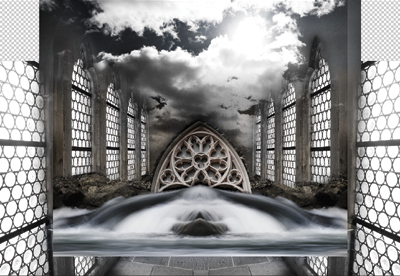
Another use for Select All is to crop off extra image data that is part of the file but does not show in the visible area of the document window. In the creative process of combining and moving image elements, often large portions of images hang over the visible edge of the image area, as shown in the composite in FIGURE 7.1. Photoshop maintains image data outside of the edge of the visible canvas by supporting what Adobe calls big data. This is a great feature because it lets you move image components around without the fear of having them chopped off at the visible image edges. However, a disadvantage of big data support is that the extra, unseen image information adds to the file size.
© SD
Figure 7.1. The Reveal All command (Image > Reveal All) shows the extra image information that is maintained outside of the visible image canvas.
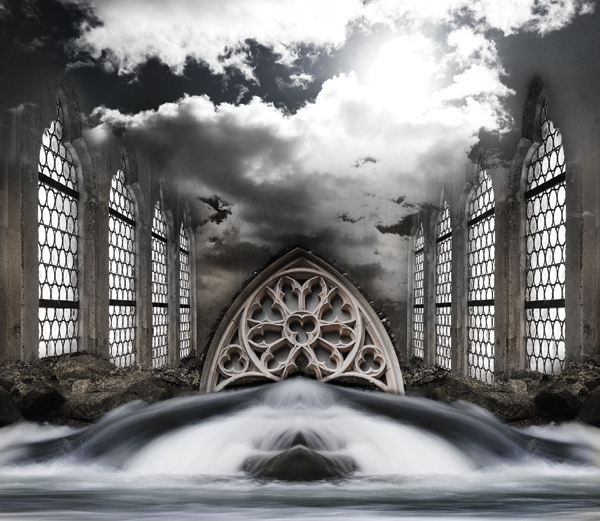
When you have the image elements placed in the finished composition (FIGURE 7.2), you can trim away the big data, which will remove the extraneous image information and reduce the file size of your layered working file.
Figure 7.2. By cropping the final composition to just the visible elements, the file size is reduced.
Select All plays into this process by selecting only the content of the visible image area and disregarding anything you don’t want in the final composition. To locate and trim extra image information that may be bloating your composited files and slowing down your work, follow these steps.
1. Choose Image > Reveal All to see image information that extends beyond the visible edges. Reveal All increases the canvas size, which also increases the file size.
2. Press Command+Z (Ctrl+Z) to undo the Reveal All.
3. Choose Select > All or press Command+A (Ctrl+A).
4. Choose Image > Crop to crop away the extraneous information.
In this example the layered image file decreased from 519 MB to a more manageable 486 MB file. Of course, if you want to preserve the flexibility to reposition a layered element at a later time, you should not crop the image to the visible boundary of the document window. It all depends on what approach works best for your compositing workflow.
Deselect and Reselect
The Deselect command simply “turns off” or drops the selection. To deselect the active selection, press Command+D (Ctrl+D). When using either the Rectangular or Elliptical Marquee tools or the Lasso tool, you can also click outside an active selection to deselect it. When the Polygonal Lasso, the Magnetic Lasso, or the Magic Wand is the active tool, clicking inside the selection will deselect it. Until you get to know how this click technique works with the different selection tools, you can easily create the unintended result of either moving a selection or starting a new selection. We recommend pressing Command+D (Ctrl+D) to deselect a selection simply because it is more efficient and less prone to errors.
Reselect is another indispensable command that will restore the last active selection. How many times have you been working on a selection and accidentally deselected it or, thinking you didn’t need it anymore, deselected it and kept working, only to realize that you needed the same selection again? Don’t panic; just choose Select > Reselect or press Command+Shift+D (Ctrl+Shift+D) to resurrect the last selection you made. The nice thing about this command is that it applies only to a selection, so it is a more specific way to redo a selection than using the History panel, which would also undo any other editing you had done since you deselected the selection.
If you think you might need to use a selection at some future point in the editing process, it is best to save it as an alpha channel (Select > Save Selection). By saving the selection, it exists independently of both the Reselect command and the History panel. Even if you’re not sure whether you will need it again, saving the selection will not add too much to the file size and you can always delete the unneeded alpha channels when you’re sure you don’t need them. Saving selections is covered in more detail later in this chapter.
Inverse
For some images, the best way to make a selection is often to first select the opposite of what you want, as addressed in Chapter 6, “Selection Fundamentals.” In combination with the Quick Selection tool or the Magic Wand, choosing Select > Inverse lets you quickly select objects that are surrounded by simple backgrounds.
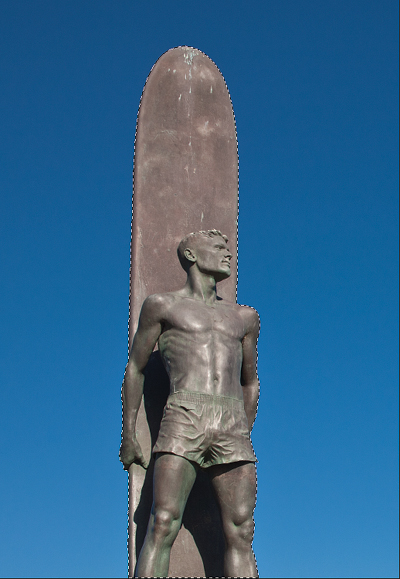
For example, the statue of a surfer in Santa Cruz, California (FIGURE 7.3), is easily selected by using either the Quick Selection tool or the Magic Wand to select the blue sky and then choosing Select > Inverse (Command+Shift+I [Ctrl+Shift+I]).
© SD
Figure 7.3. Inversing a selection of the sky selects the surfer statue.
![]() ch7_surfer_statue.jpg
ch7_surfer_statue.jpg
Select Layers
Although most of the Select menu offers options for creating and modifying selections, in the second section of the menu the use of the word “selection” is a bit misleading because the three commands pertain to the Layers panel and making layers active or inactive in the panel, not creating selections based on the layers.
Select All Layers makes all the layers in the Layers panel active (selected) so that they are highlighted. The one exception is the background layer, which has limited functionality when compared to any other type of layer. Deselect Layers simply changes the Layers panel so that no layers are active. Find Layers is new to Photoshop CS6 and will activate the Find Layers filter field at the top of the Layers panel. This latter option can be useful in a file with many layers and can help you quickly locate a layer by filtering the Layers panel so that it displays only certain types of layers. We’ll discuss this feature more in Chapter 8.
Color Range
The Color Range command is one of the most useful and powerful selection methods in Photoshop because it lets you use existing color and tonal values in the image to create your selection. Color Range is often called “the smart Magic Wand” because it provides you with greater precision and control, and lets you preview the selection you are building as well as edit it before leaving the dialog. Because Color Range can work with partially selected pixels, it is very good at creating selections that maintain subtle color transitions along the edges.
When you choose Select > Color Range, Photoshop examines your foreground color and references it to create an initial selection. If you want to give the program useful information before accessing Color Range, simply use the Eyedropper tool and click on the area you want to select to place the main color of that area into the foreground color swatch. When the Color Range dialog is open, you can also specify other colors or add or subtract colors using the Eyedropper tools in the dialog.
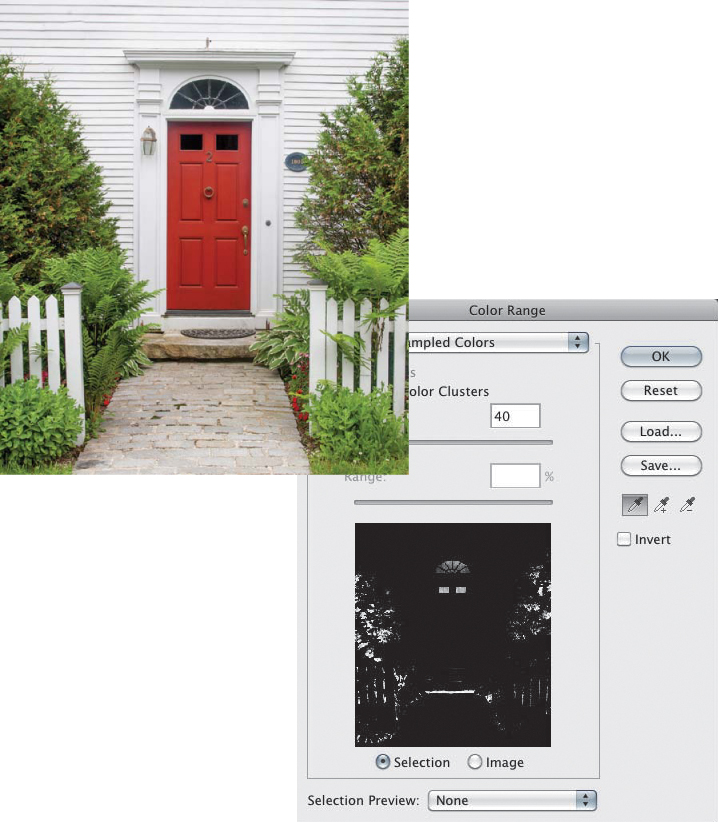
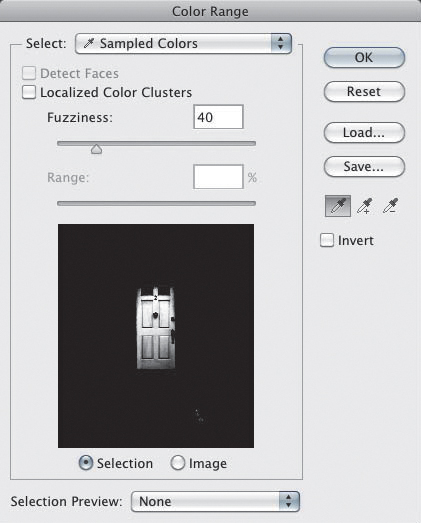
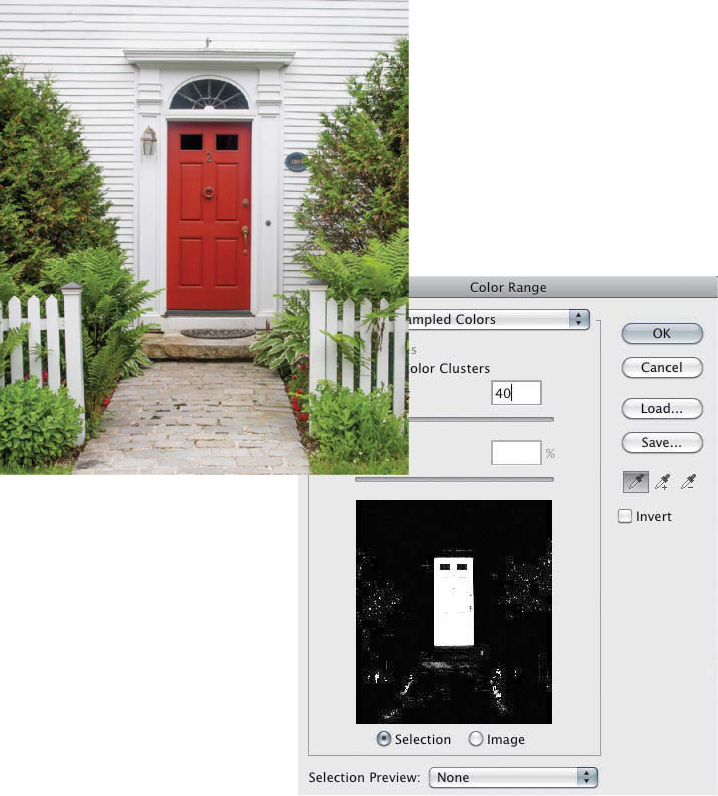
For example, look at the difference between the initial Color Range selections in FIGURE 7.4 and FIGURE 7.5. In Figure 7.4, the foreground color is the default black, and Color Range selected the darkest parts of the image, which isn’t very useful. In Figure 7.5, the red color of the door was sampled with the Eyedropper tool before choosing Color Range, so the initial selection is now based on that red color.
© SD
Figure 7.4. With black as the foreground color, Color Range selects the blacks in the image.
Figure 7.5. By sampling the color of interest before choosing the Color Range command, in this case the red of the door, you start with a better initial selection.
To harness the power of Color Range, it helps to understand the controls and options in the Color Range dialog. Let’s take a closer look at this essential selection tool.
![]() ch7_red_door.jpg
ch7_red_door.jpg
Selecting Sampled Colors
The three eyedroppers in the Color Range dialog are for selecting, adding, and subtracting colors from a selection. You can use them directly on the image in the main document window or within the Color Range dialog preview. Most of the time, we prefer to use the eyedroppers on the image and to watch the dialog preview, which shows a black-and-white rendition of the selection as a mask.
FIGURE 7.6 shows the result of clicking on the center area of the red door to make the initial selection using the default Color Range eyedropper. Because the entire door is not selected, the parts of the door that are not represented by white in the Color Range preview need to be added to the selection. To do this, you can either use the middle eyedropper with the plus sign or Shift-click on the areas you want to add. In the red door example, other reddish areas, such as the brown leaves on the shrubs and red flowers along the walkway, have also been selected. But because they do not overlap the door, you can easily subtract them later with the Marquee or Lasso tool after clicking OK in Color Range. You can also limit the areas that Color Range will select by making a pre-selection, as described in the next section.
Figure 7.6. The initial Color Range selection (left) and the expanded Color Range selection (right).
To take away from a Color Range selection, Option-click (Alt-click) in the image and Photoshop will subtract those colors and tones from your selection. The keyboard shortcuts for adding and subtracting also work when you are dragging across a part of the image with the Color Range eyedroppers.
If you mistakenly click on a color or tone in the Color Range dialog that you don’t want selected, press Command+Z (Ctrl+Z) to undo the last sample point.
Controlling Color Range Focus and Preview Size
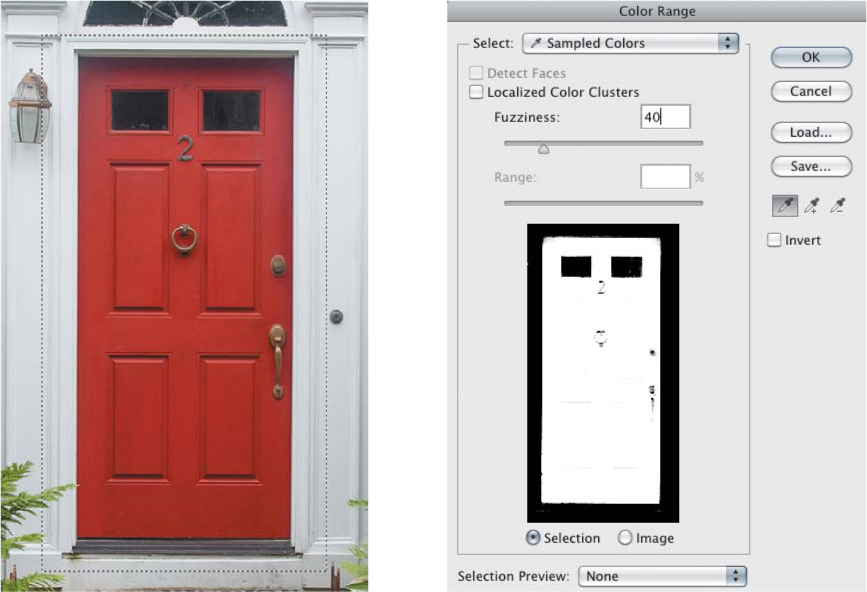
The default preview in the Color Range dialog shows the entire image, which can make it difficult to judge the fine points of a selection mask if you are trying to select a small portion of the image. It also means that other areas of similar color may be added to your selection, as is the case with the red flowers and brown parts of the shrubs in the red door image (FIGURE 7.7). To enlarge the preview so it shows only the part of the image you’re interested in, as well as restrict Color Range to only certain areas, make a pre-selection of the area with the Rectangular Marquee tool before choosing Select > Color Range. The preview will then only show the pre-selected areas, and the selection that Color Range makes will ignore anything outside the pre-selected areas.
Figure 7.7. The initial Color Range selection and the preview in the Color Range dialog are based on the entire image.
1. Before using the Color Range command, select the red door with the Rectangular Marquee tool.
2. Use the default eyedropper in the Color Range dialog to select the red door. Then Shift-click on the parts of the door that are not selected to add them to the selection (FIGURE 7.8).
Figure 7.8. Selecting the area around the door before invoking the Color Range command focuses Color Range on the door.
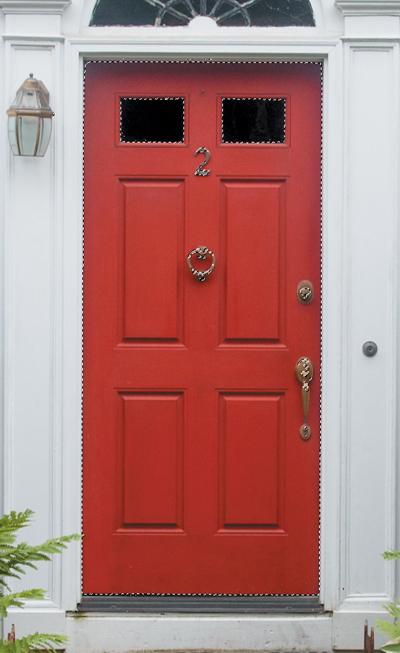
3. Click OK to accept the initial Color Range selection (FIGURE 7.9).
Figure 7.9. The finished Color Range selection of the door.
Fuzziness
The Color Range Fuzziness setting is often equated with the Tolerance setting of the Magic Wand. Although there are similarities, there are also very important differences that make Color Range a more powerful selection tool than the Magic Wand. Like Tolerance, Fuzziness controls whether a pixel will be selected. However, Fuzziness also controls how much of that pixel is selected by controlling the degree to which related colors are included in the selection. Keep in mind that Color Range can select pixels fully and, more important, partially to create selections with realistic color and tonal transitions.
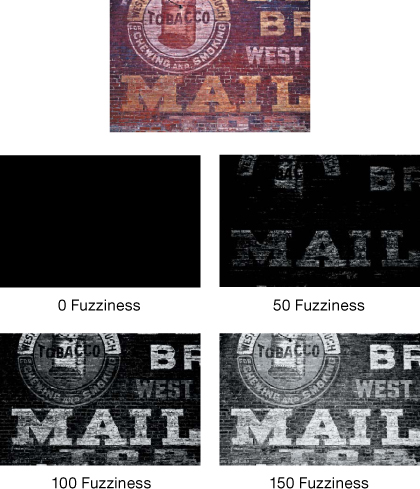
FIGURE 7.10 illustrates how increasing the Fuzziness in increments of 50 changes the tonal transition of the resulting selection, as shown in the grayscale mask. Making a good Color Range selection requires finding a balance between the Fuzziness setting and the number of color samples you take. To select large, general areas of similar color, start with a low Fuzziness setting and sample often. To select a color in a finely detailed image, use a higher Fuzziness setting, because finely detailed areas most likely will contain color contamination from adjacent areas of the image.
Figure 7.10. Increasing the Fuzziness value increases the percentage amount of the selected colors.
We generally prefer to sample more often by Shift-clicking in the areas we want to select rather than cranking the Fuzziness setting too high to make a Color Range selection.
Localized Color Clusters
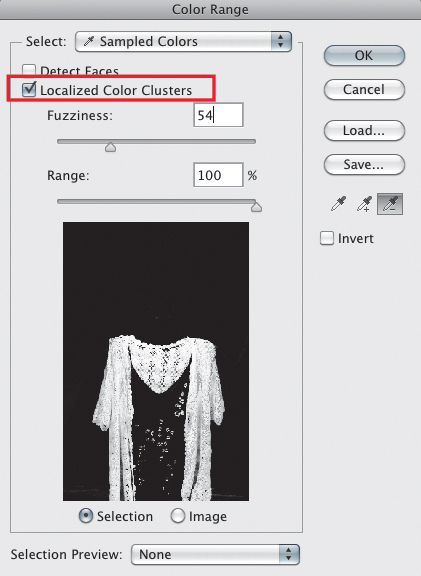
For more refined control, you can select the Localized Color Clusters check box. This feature limits the pixels that are selected by Color Range to within a certain distance from where you clicked (or Shift-clicked) to create a sample area. The distance is controlled by the Range slider, which is activated when you turn on this option. A useful addition in Photoshop CS6 is a Detect Faces option, which also becomes active when you turn on Localized Color Clusters. We’ll cover that option a bit later in this chapter.
![]() ch7_red_knit_dress.jpg
ch7_red_knit_dress.jpg
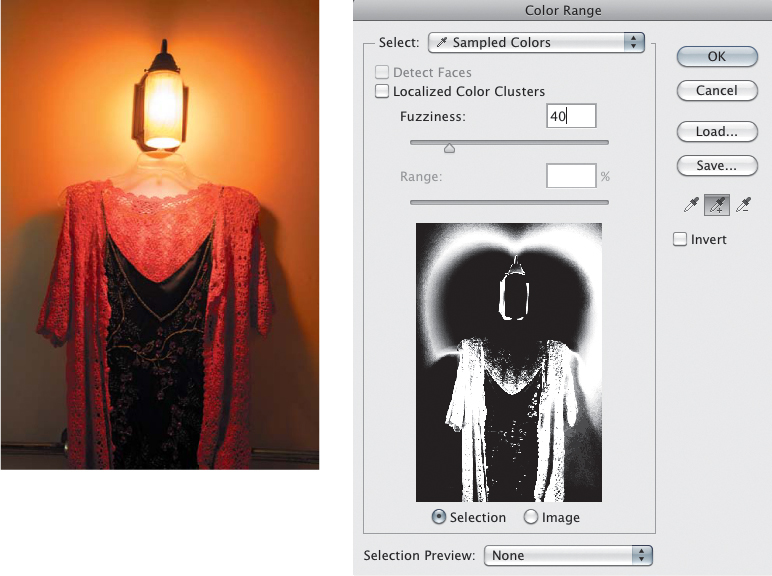
In the example of the red knit dress in FIGURE 7.11, Shift-clicking in the image to add more areas of the red dress into the selection eventually adds in large areas of the wall, which is colored orange from the lamp, even with the Fuzziness set to the default value of 40. Activating Localized Color Clusters immediately limits the selection to the places where you have clicked and the surrounding areas (FIGURE 7.12).
© SD
Figure 7.11. When you try to select the red knit dress, Color Range also wants to select the orange areas on the wall.
Figure 7.12. Turning on Localized Color Clusters limits the selection to areas close to where you have sampled with the Eyedropper tool.
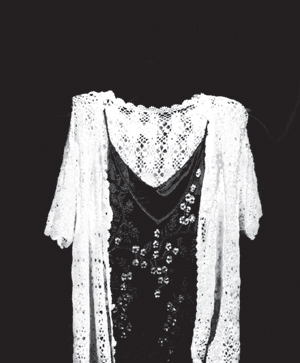
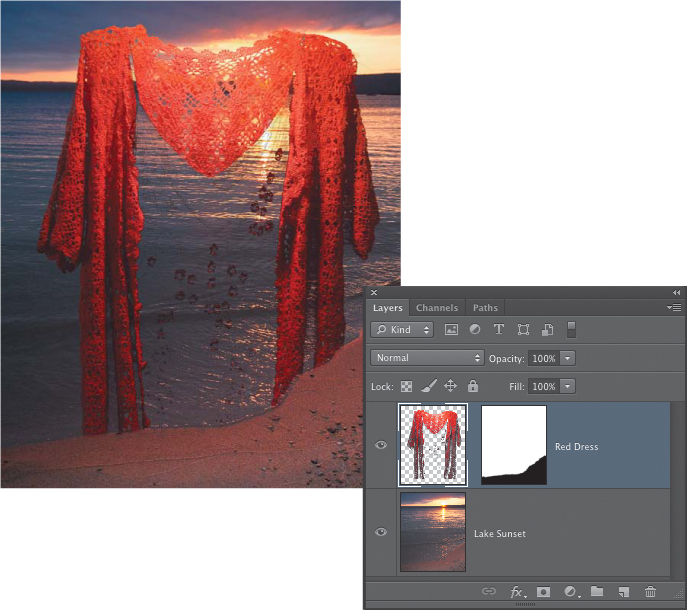
Further work using the subtract eyedropper removes some of the shadow on the wall to the right of the dress. Final additions using the plus eyedropper and increasing the Fuzziness to 54 yields a very good selection of just the red areas of the dress, including the beaded ornamentation on the black dress underneath (FIGURE 7.13). When the selection of the dress is copied and then pasted onto another image as a new layer, you can see how successful this approach was in selecting the delicate lacy structure of the knit fabric (FIGURE 7.14).
Figure 7.13. With Localized Color Clusters turned on, further subtraction and addition adjustments result in a more accurate and refined selection of the red knit dress.
Figure 7.14. The dress is copied and pasted onto a new image using the selection created with Color Range and Localized Color Clusters.
Selection Preview
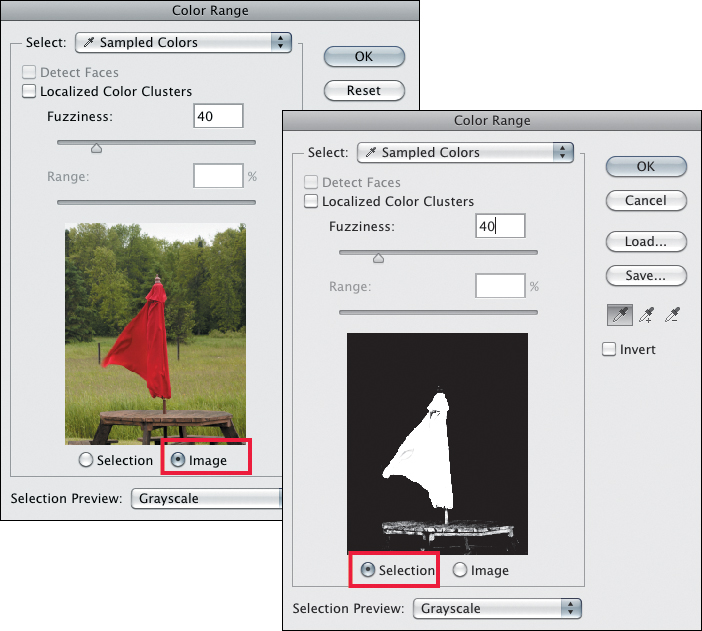
The Color Range dialog includes a number of options for displaying the selection in progress. Two radio buttons—Selection and Image (FIGURE 7.15)—are located under the primary preview area. Clicking Selection displays the selection in progress as a black-and-white mask, and clicking Image displays the actual image (albeit in miniature format).
Figure 7.15. What you see in the preview window of the dialog is controlled by the Selection and Image choice.
To toggle between the Selection and Image displays without having to click the radio buttons, press Command (Ctrl).
In the Selection Preview menu at the bottom of the dialog, five options control how the selection is previewed in the main document window. The default is None. The four additional previews give you a range of choices:
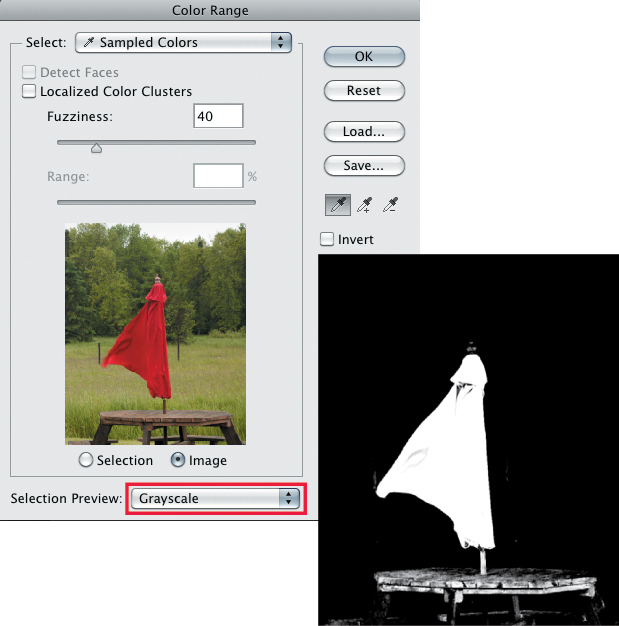
• Grayscale shows what the selection mask will look like if you save it as an alpha channel mask after clicking OK. This view is similar to the black-and-white view in the small dialog preview (FIGURE 7.16).
Figure 7.16. Previewing in grayscale shows you what the grayscale mask will look like.
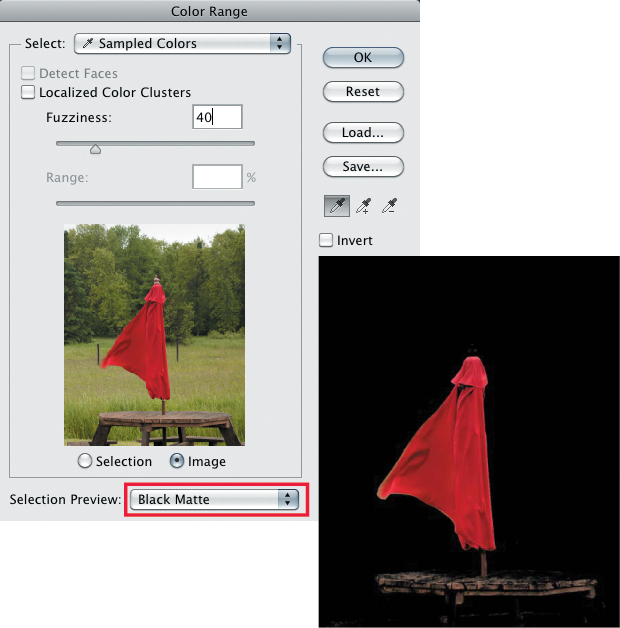
• Black Matte shows what the selected image area will look like when pasted onto a black background (FIGURE 7.17).
Figure 7.17. Previewing the image on a black background.
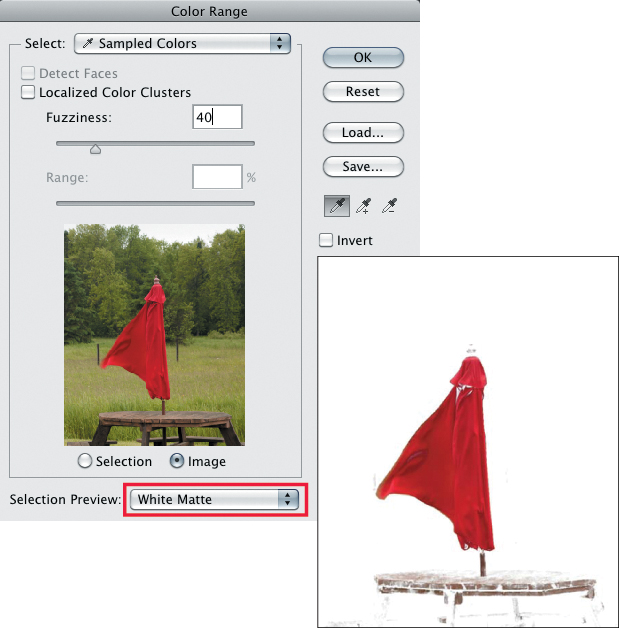
• White Matte shows what the selected image area will look like when pasted onto a white background (FIGURE 7.18).
Figure 7.18. Previewing the image on a white background.
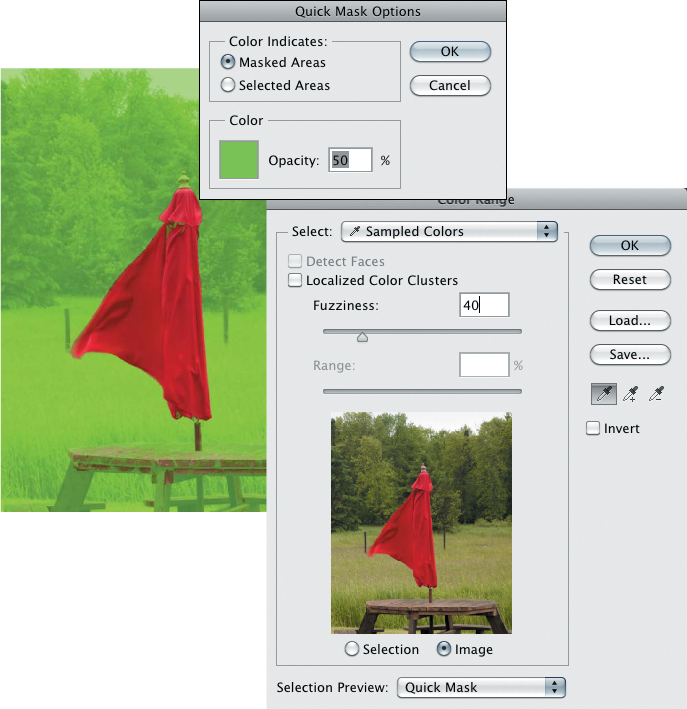
• Quick Mask previews the selection in Quick Mask mode. The Quick Mask default display color is 50 percent red. To change the overlay color while in the Color Range dialog, press Option (Alt) while selecting Quick Mask, and the Quick Mask options will appear (FIGURE 7.19). For the photo of the red umbrella, green is a better color for the Quick Mask overlay.
Figure 7.19. Previewing the selection as a quick mask. If you Option-click (Alt-click) as you select the Quick Mask choice, you can change the color of the Quick Mask Overlay, as well as define whether the color indicates the masked areas or the selected areas.
When you’re working with any of the four preview settings, select the Image radio button under the small preview to see the original image. If you are working with the Selection Preview menu set to None, use the default Selection radio button to see the smaller selection preview in black and white, which will give you a better sense of how changing the Fuzziness setting is influencing the selection outcome.
While the Color Range dialog is active, you can press Command+ (Ctrl+) to zoom in for a closer view, and Command- (Ctrl-) to zoom out.
Selections with Color and Tonal Presets
In addition to building selections based on where you click in the image and the adjustments you make to the Fuzziness and the Localized Color Clusters options, the Color Range dialog also offers a menu of preset colors and tonal ranges. Click the Select menu at the top of the dialog to access these presets. In addition to six primary colors, there are also highlights, midtones, and shadows, as well as the option to select out of gamut colors (colors that cannot be reproduced using the current Proof Setup configuration). Photoshop CS6 offers a new addition to this list that allows for making selections based on skin tones. Although these color and tonal presets are not very useful for making precise masks for composites, they can be used to good effect for color correction or changes to specific tonal regions when used in conjunction with Levels and Curves adjustment layers.
Many Photoshop users scoff at the canned Sample Colors, but on some images we’ve found them to be very useful to select subtle color casts or diffuse tones. When you select one of the default colors, Photoshop looks through the entire image and only selects a pixel if it has a majority of that color in it. The greater the difference between the selected color and the other colors in the list, the more likely that pixel will be selected. Let’s look at how you can use the default colors to create a selection to improve a person’s skin tones.
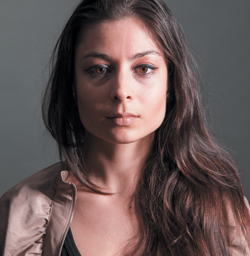
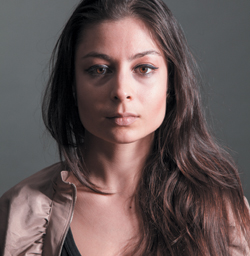
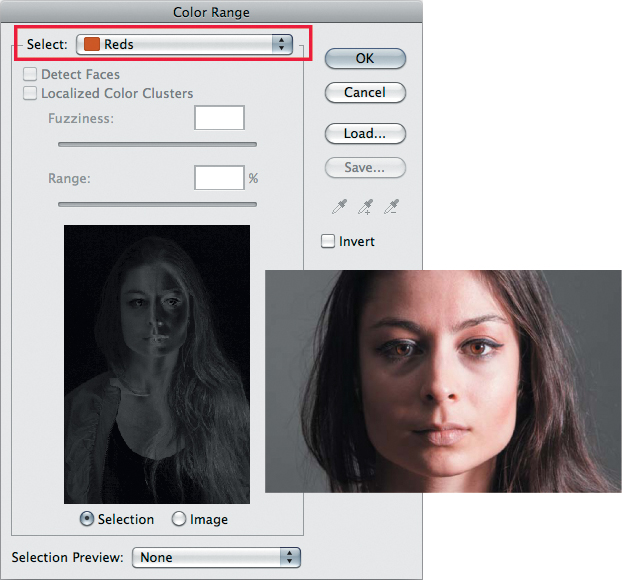
The portrait of the woman in FIGURE 7.20 is fine, but her skin tones are a bit too warm. Reducing the red makes her look more comfortable and less flushed (FIGURE 7.21).
© Greg Gorman
Figure 7.20. Before.
© Greg Gorman
Figure 7.21. With color correction.
![]() ch7_redface.jpg
ch7_redface.jpg
1. Choose Select > Color Range, and from the Select options, choose Reds. Then click OK to create the selection (FIGURE 7.22).
Figure 7.22. Select the Reds color preset in the Color Range dialog to build a selection of the reddest tones on the woman’s face.
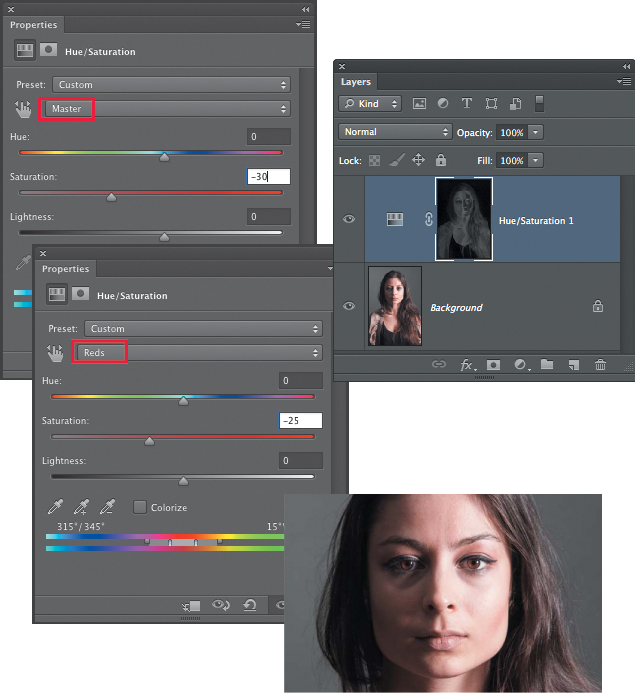
2. Choose Layer > New Adjustment Layer > Hue/Saturation. As soon as you add an adjustment layer with an active selection, Photoshop creates a layer mask based on the selection. Where there are active selections, the mask is light; the inactive areas are dark.
3. Adjust the Hue and the Saturation to reduce the overall master saturation by 30 percent and the red saturation by 25 percent (FIGURE 7.23).
Figure 7.23. Use a Hue/Saturation adjustment layer to reduce the red saturation.
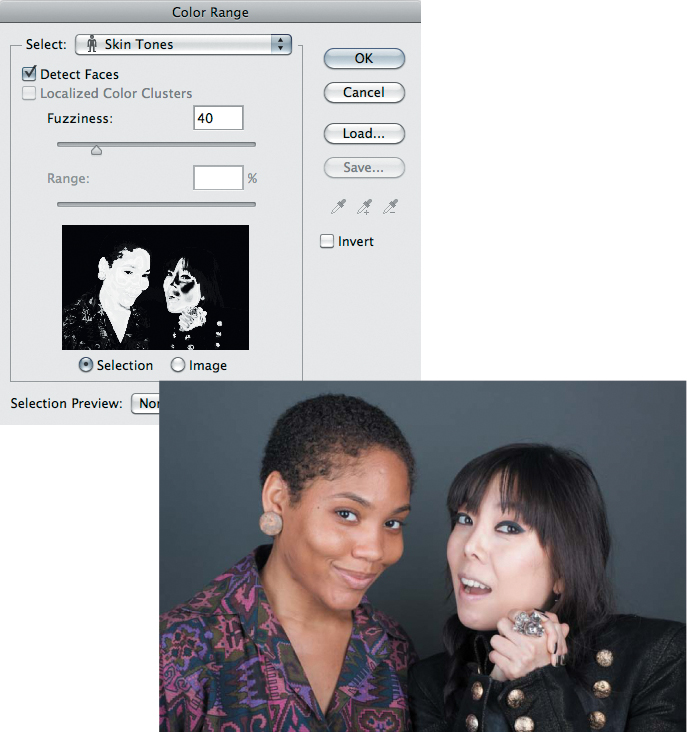
Another choice in the Color Range Select menu is Skin Tones, which as the name suggests, is designed to select areas with colors commonly found in skin tones. It works particularly well when paired with the Detect Faces check box, which is activated automatically when Skin Tones is chosen (FIGURE 7.24). Like the other choices in this menu, the Skin Tones option is more suited to color correction or perhaps retouching purposes and is less useful for creating masks that will be used for multi-image compositing.
© Chris Sellas
Figure 7.24. The Skin Tones option, combined with activating the Detect Faces check box, is useful for selecting skin tones in portraits.
If you often use Color Range and then inverse the selection, you can achieve the same effect more efficiently by selecting Invert in the Color Range dialog before clicking OK.
Using Color Range with a Mask
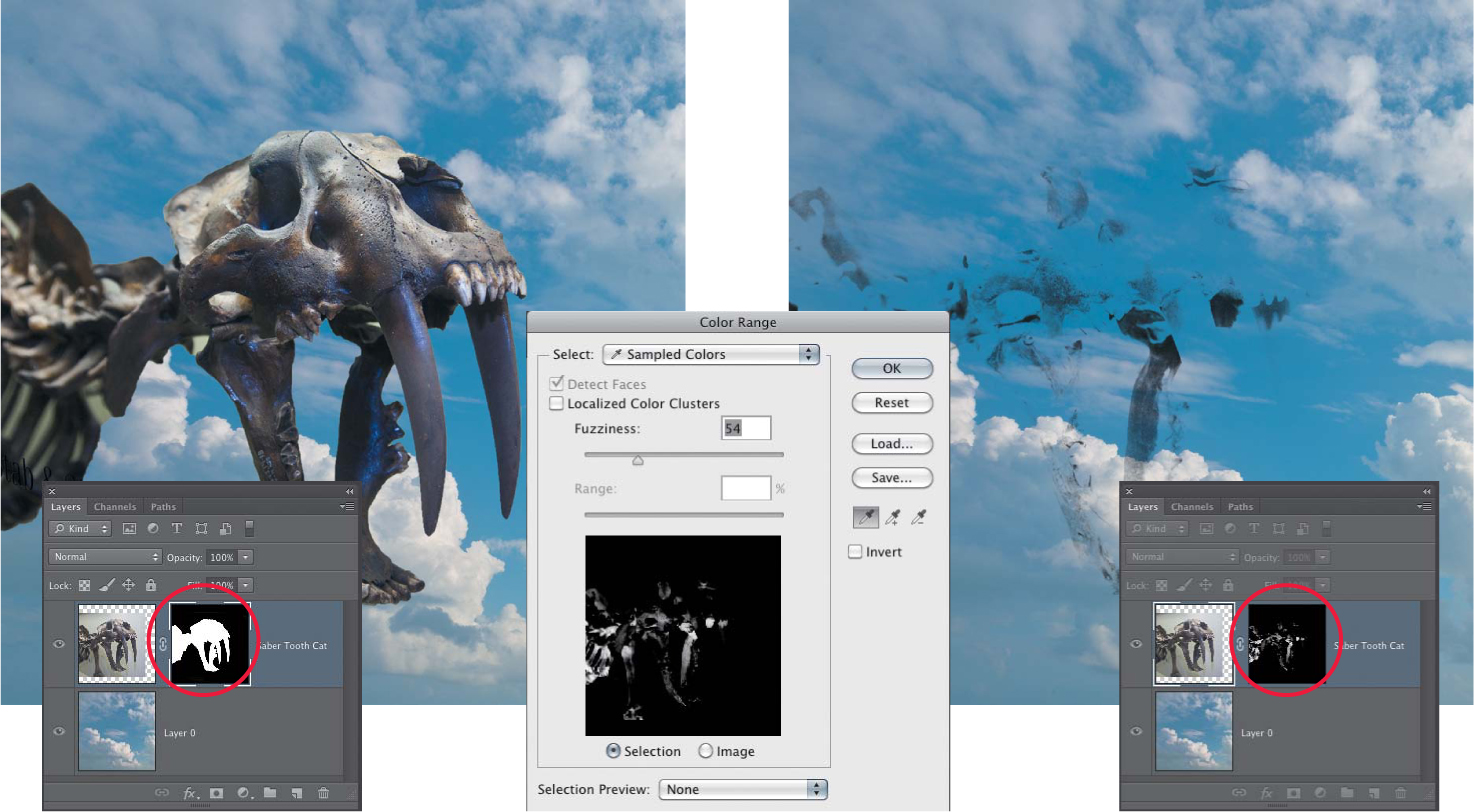
Color Range will affect your image differently if the active layer also has a layer mask attached to it and that mask is active. When no layer mask is present, Color Range functions as described previously: It creates a selection. But when a layer mask is active, Color Range will modify the active mask (FIGURE 7.29). This can be a bit disconcerting at first because it may obliterate much of the careful work you have already put into the active mask! If the mask is part of an active adjustment layer, it will always be affected when Color Range is chosen. If the mask is attached to an image layer, Color Range will only affect it if the mask is the active part of the layer. It will behave normally—that is, it will create a selection—if the layer is the active element. We’ll take a closer look at this aspect of the Color Range dialog in Chapter 9, “Layer Masks.”
© SD
Figure 7.29. When a layer mask is active, as shown on the left, choosing Select > Color Range will modify the mask (right).
Refine Edge
In the Options bar for the Marquee and Lasso selection tools is a setting for feathering the selection. Feathering creates a softer edge with a more gradual transition between the selected and nonselected areas. As mentioned in the previous chapter, the main problem with choosing a Feather setting in the Options bar is that you cannot see the result and must guess at what number might be appropriate. Fortunately, there is a better way to apply edge feathering, as well as other modifications, to a selection and that is to use the Refine Edge dialog.
Refine Edge can be accessed either in the Select menu or via a button in the Options bar when a selection tool is active. In addition to feathering, the Refine Edge dialog includes a number of other very useful controls for modifying the edges of a selection.
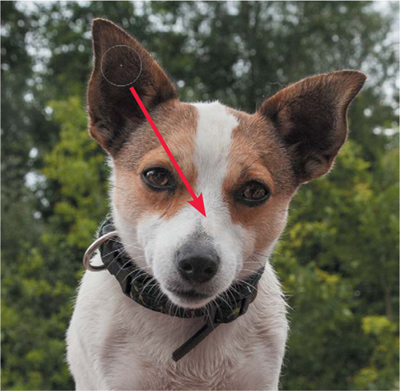
This section will primarily be a detailed exploration of the possibilities offered by the Refine Edge dialog, not a strict step-by-step exercise. To properly cover all of the options in Refine Edge, however, we need to start with a basic selection so we have a selection edge to modify; for that we’ll use the photo of the curious dog.
![]() ch7_curious_dog.jpg
ch7_curious_dog.jpg
1. Choose the Quick Selection tool with the Auto-Enhance option selected, and set the brush size to 100 pixels. Start the selection by dragging diagonally down from the top of the dog’s left ear. Next, drag down from the right ear to complete the selection of the dog’s head (FIGURE 7.30). Continue dragging over the dog’s body until the selection is expanded to cover the entire dog. A few drags with the Quick Selection tool should do it.
© SD
Figure 7.30. Selecting the dog with the Quick Selection tool.
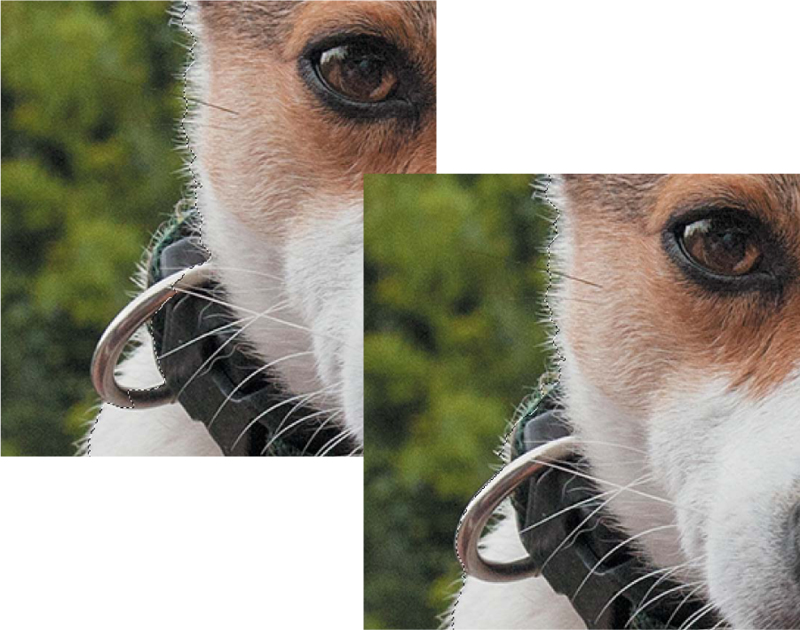
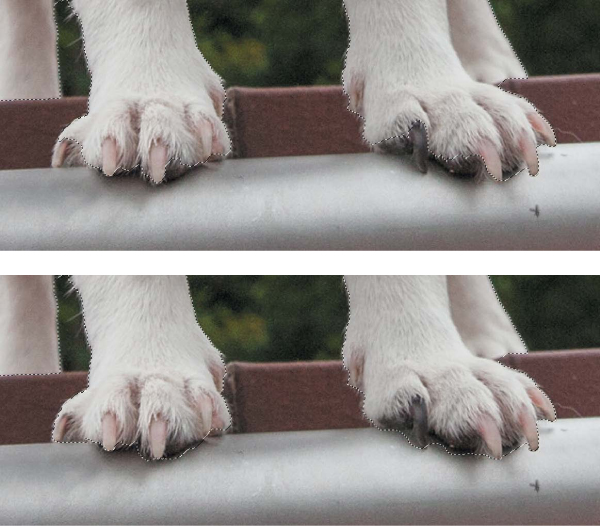
2. Zoom in to make sure that you are not missing any areas, such as by the ring on the dog’s collar (FIGURE 7.31) or the bottom edges of the front feet (FIGURE 7.32). If you see areas that should be selected but are not, just click on them with the Quick Selection tool (for fine work, make the brush size smaller by tapping on the left bracket key).
Figure 7.31. Fine-tuning the selection around the dog’s collar.
Figure 7.32. Fine-tuning the selection around the dog’s feet.
3. With the dog selected, click the Refine Edge button in the Options bar or choose Select > Refine Edge.
View Mode
The Refine Edge dialog is divided into four sections: View Mode, Edge Detection, Adjust Edge, and Output. Click the small disclosure triangle next to the View menu to see the different ways to view the selection in the main document window. Each view has a single-letter keyboard shortcut. Knowing these shortcuts makes switching back and forth between the different views much easier than constantly returning to the menu. Some are more useful than others:
• Marching Ants (M) is the least useful, because it just looks like an ordinary selection, and the marching ants cannot show the subtle edge refinements you can make.
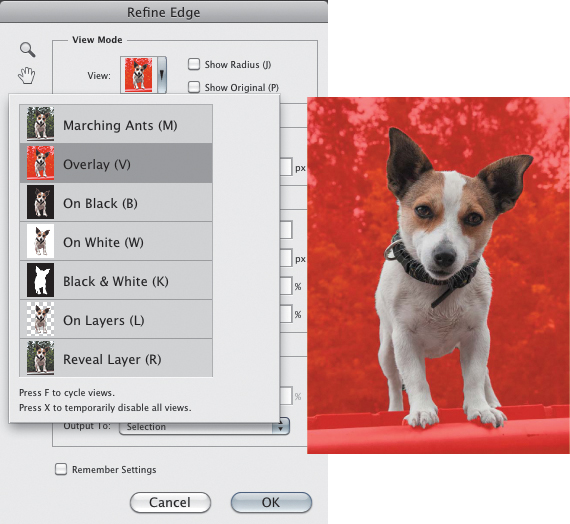
• Overlay (V) view is like seeing a selection in Quick Mask mode. A transparent color overlay (the default is red) covers the areas that are not selected. Option-click (Alt-click) on this view mode to access the Quick Mask options to change the color of the overlay (FIGURE 7.33).
Figure 7.33. Overlay view.
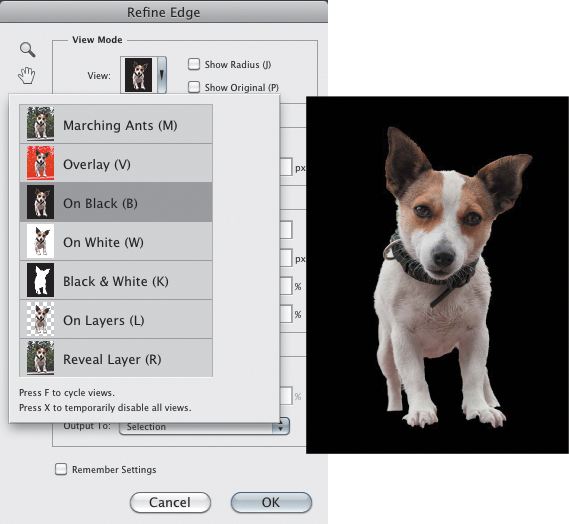
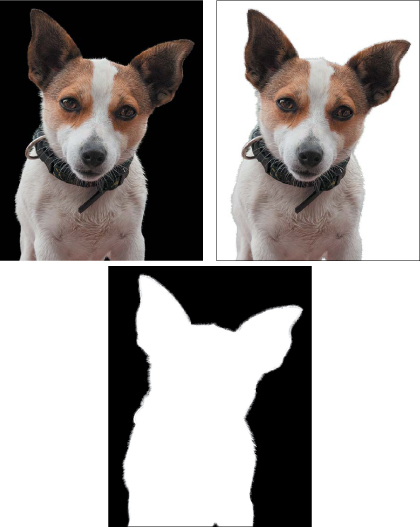
• On Black (B) is the same as the Black Matte view in the Color Range dialog. The selected area is placed on a black background. This view is useful if you’ll be placing the selected object into another image and need to see how the edges blend against a darker background (FIGURE 7.34).
Figure 7.34. On Black view.
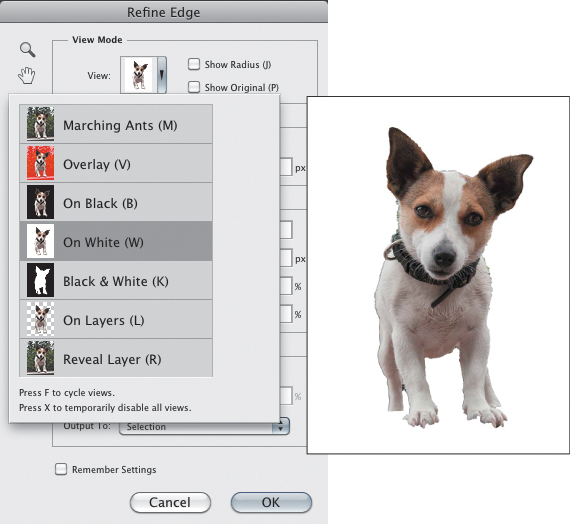
• On White (W) is the same as the White Matte view in the Color Range dialog. The selected area is placed on a white background. This view is useful if you’ll be placing the selected object into another image and need to see how the edges blend against a lighter background (FIGURE 7.35).
Figure 7.35. On White view.
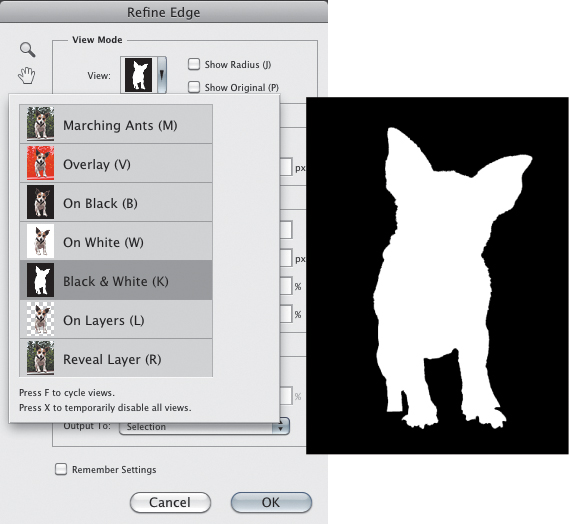
• Black & White (K) view shows the selection as a black-and-white mask, like the grayscale view in the Color Range dialog. In this view you can really see all the subtleties of the edge modifications (FIGURE 7.36).
Figure 7.36. Black & White mask view.
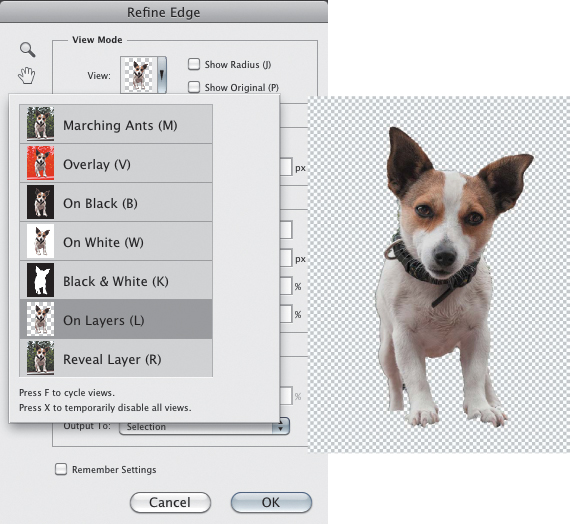
• On Layers (L) view shows the selected area surrounded by transparency, as if it were a separate layer with a layer mask. If there are layers underneath the image, you’ll see how well the selection modifications are working in the entire composite (FIGURE 7.37).
Figure 7.37. On Layers view.
• Reveal Layer (R) shows the entire layer with no masking applied.
For making a selection, the views we use most are Overlay (V), which shows us the Quick Mask view of the selection, and Black & White (K), which shows the selection as a mask channel. If the image you’re working on is already part of a composite and additional image layers are below it, the On Layers (L) view is also quite handy. The usefulness of the On Black (B) or On White (W) matte view really depends on how you’ll be using the selected element in another photo.
You’ll also see the Show Radius and Show Original check boxes in the Refine Edge dialog. We’ll discuss these in the following section when we take a closer look at Edge Detection.
Edge Detection
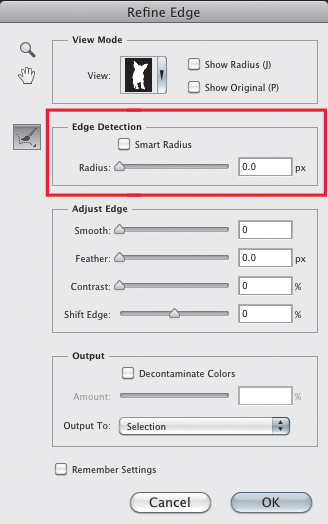
Edge Detection is truly the heart of the selection mojo offered by the Refine Edge dialog. In fact, for some selections, many of the edge adjustments you make can be handled entirely by the Radius slider and its accompanying Smart Radius check box (FIGURE 7.38):
Figure 7.38. The Edge Detection controls.
• Radius slider. This determines the size of the selection border in which edge refinement occurs. Essentially, it tells Photoshop how far out from the current selection edge to look for additional areas that may need to be added to the selection. Low radius settings are best for objects with hard and sharply defined edges, whereas a larger radius setting works best for elements that have softer or more irregular edges.
• Smart Radius. Selecting this option will adjust the radius for the different characteristics found in a selection that has both hard and soft edges. It is less effective if the edge that you are selecting is uniformly hard or soft, or if you want more control by using the Radius slider and the Refinement Brushes, which are found under the Brush tool icon to the left of this section of the dialog.
• Show Radius (J). This check box is located in the View Mode section, but because it pertains to the Radius slider, we’ll discuss it here. As mentioned earlier, the Radius slider tells Photoshop how far out from a selection edge to analyze the image as it refines the edge. Turning on this option shows you the size of the radius in relation to the image. The actual view of the radius will depend on which overall View Mode you are using at the time. The keyboard shortcut J makes no alphabetical sense, but such is Photoshop life!
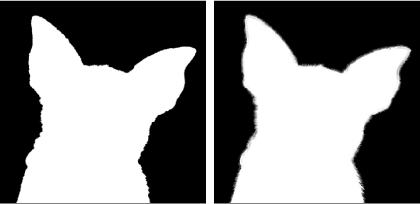
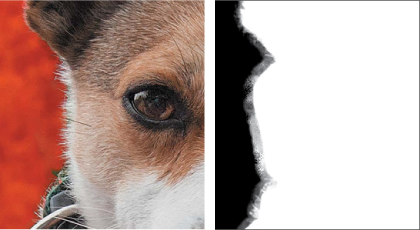
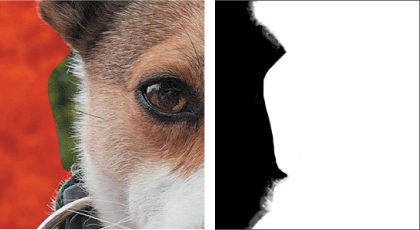
The Black & White view (K) is ideal for evaluating the quality of a selection edge and how it is affected by the different controls. When the Radius slider is set to 10, the edges of the dog, including very subtle details on his coat, are revealed with more accuracy (FIGURE 7.39).
Figure 7.39. Radius at 0 (left). When Radius is set to 10, the fine edges of the dog’s coat are rendered with more accuracy.
With the Show Radius check box selected, you’ll see how large the radius setting is in relation to the actual edge (FIGURE 7.40). You might want to check out Show Radius using the Overlay (V), On Black (B), and On White (W) views, just to get a sense of which are most useful. Show Radius is generally an option you will use for a quick check on the size of the radius, not an option you will have turned on when making fine adjustments.
Figure 7.40. The Show Radius view with the Radius set to 10.
In our quest for a more perfect edge, let’s return to the Black & White (K) view, increase the radius to 20, and turn on Smart Radius. As the radius setting was increased, more pixels surrounding the dog were added to the selection, although at very low opacities. Throughout this process we would occasionally view the image in Overlay, On Black, and On White to see how well the edge of the dog was being defined. For the final adjustment in this section, let’s lower the Radius to 8 with Smart Radius turned on (FIGURE 7.41).
Figure 7.41. Three views of the Edge Detection adjustments: Radius is set to 8 and Smart Radius is on.
Refine Radius tools
To the left of the Radius slider and Smart Radius check box is a Brush tool icon. Click and hold on this icon to display the menu showing the Refine Radius tool and the Erase Refinements tool (FIGURE 7.42). Both tools can be used to help refine the edges of a selection by telling Photoshop where it should look for tricky edge transitions. These tools are useful if there were slight errors in the selection when you first entered the Refine Edge dialog. If you are already used to editing layer masks using the Brush tool, these tools can take a bit of getting used to because they do not behave in the same way.
Figure 7.42. The Refine Radius and Erase Refinements tools.
Refine Radius tool. The Refine Radius Tool, or as Katrin calls it “the Look Again Brush,” analyzes the area you brushed over and tries to determine where the edge should be. It does an excellent job of creating partially selected pixels (gray areas) where there are subtle edge transitions but is not as well suited for creating more distinct edges of fully selected pixels. If larger areas need to be added to the selection, it is probably best to exit the Refine Edge dialog and add them using one of the selection tools, and then reenter Refine Edge to continue your edge enhancements.
Erase Refinements tool. This tool removes any refinements created with the Refine Radius tool and restores the edge to what is was before you used either tool. It does not work like an eraser or as a regular brush when painting with the opposite color (a common task in mask editing); it merely restores the edge to what it was before the Refine Radius tool was used.
To change the size of either of the radius refinement brushes, you can use the Brush Size slider in the Options bar, or tap the left or right bracket keys to make the brush cursor smaller or larger.
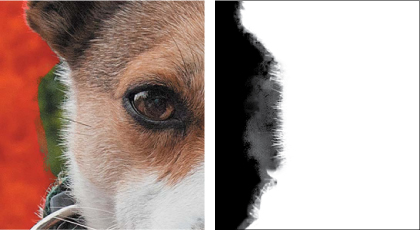
To show how these tools work, we created a selection with a small edge error on the side of the dog’s head (FIGURE 7.43). Brushing over it with the Refine Radius tool did a pretty good job of modifying the edge to more accurately reflect the actual side of the dog’s head (FIGURE 7.44), although a few areas that should have been black were rendered as dark gray. If the edge refinements are output to a new layer with a layer mask, this can easily be fixed with further mask edits (the output options for this dialog are discussed a bit later in the “Output” section). Brushing over the newly refined edge with the Erase Refinements tool restores the original, inaccurate edge (FIGURE 7.45).
Figure 7.43. A selection “error” viewed in Overlay and Black & White views.
Figure 7.44. The Refine Radius tool does a pretty good job of fixing the selection error and creating a more accurate edge.
Figure 7.45. The Erase Refinements tool restores the original edge.
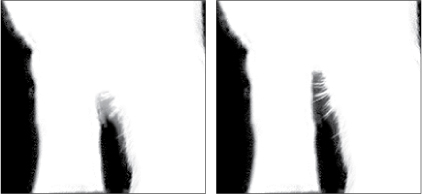
Once you’ve found a Radius amount that works well, carefully inspect the edges to check for any areas where the Refine Radius tool might help. You can hold down the spacebar and press and drag to scroll through the image. On some areas, this tool will work well, such as a small triangular area between the dog’s front and rear legs on the left side of the image (FIGURE 7.46). On other areas, you may need to edit the mask using other methods outside of the Refine Edge dialog.
Figure 7.46. The Refine Radius tool is used to fix a small error on the dog’s legs.
Adjust Edge
In comparison to the Edge Detection controls, the Adjust Edge sliders are not nearly as refined or delicate. These enable you to modify the characteristics of the selection edge, but they do not analyze the actual selected pixels like the Edge Detection sliders do. Still, for some types of selections, these more generalized edge adjustments may be just what you need:
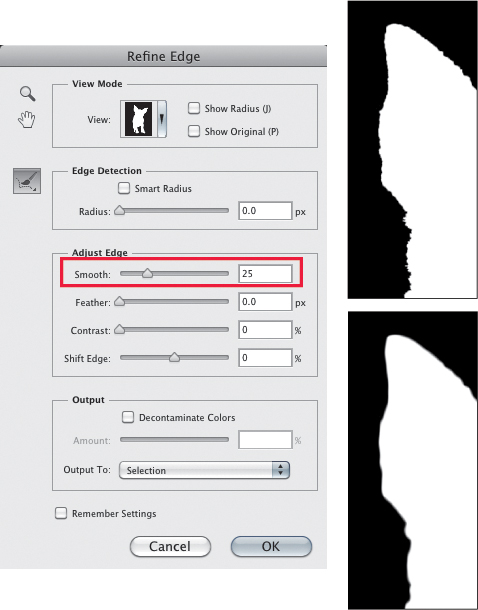
• Smooth. Evens out jagged, irregular areas to create a smoother edge (FIGURE 7.47).
Figure 7.47. The Smooth slider smoothes a selection edge and removes rough, jagged spots.
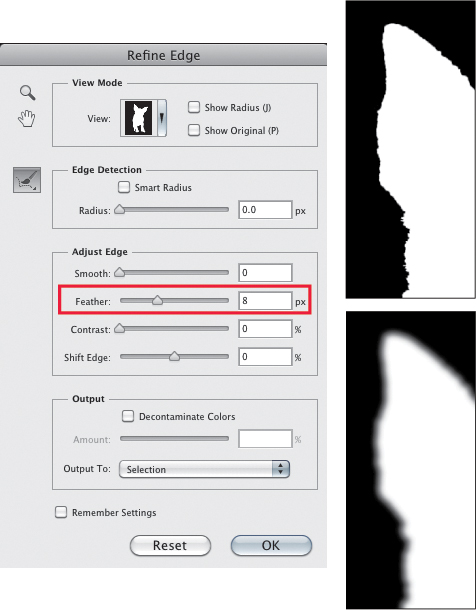
• Feather. Softens the edges of a selection with a uniform blur. Although feathering the edges of a selection is a common task that can help to soften hard, abrupt edges, for more refined edge adjustments, the Feather slider is best used in conjunction with the Radius control, Smart Radius, and the Shift Edge slider (FIGURE 7.48).
Figure 7.48. The Feather slider softens and blurs a selection edge.
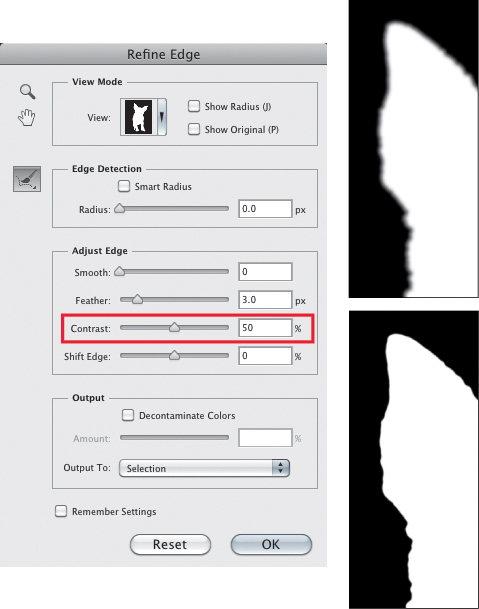
• Contrast. Increases the contrast of a selection edge, making softer areas appear harder and more abrupt. This essentially has the opposite effect of the Feather slider (FIGURE 7.49).
Figure 7.49. The Contrast slider increases contrast or hardness on a selection edge.
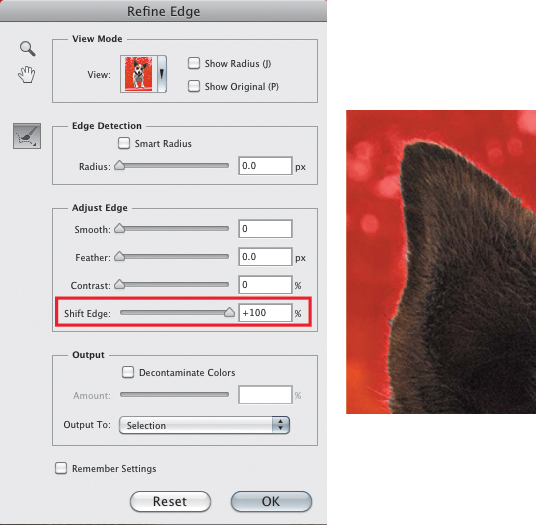
• Shift Edge. Shifts the entire edge of the selection inward or outward, which makes it a very useful control. Negative numbers will contract a selection, making it smaller. Positive numbers will expand the edge and make the selection bigger. This control works best with softer-edged selection borders and can be useful in removing unwanted background colors from the edges of a selection (FIGURE 7.50). We’ll explore other ways to shift the edge of a layer mask in Chapter 9.
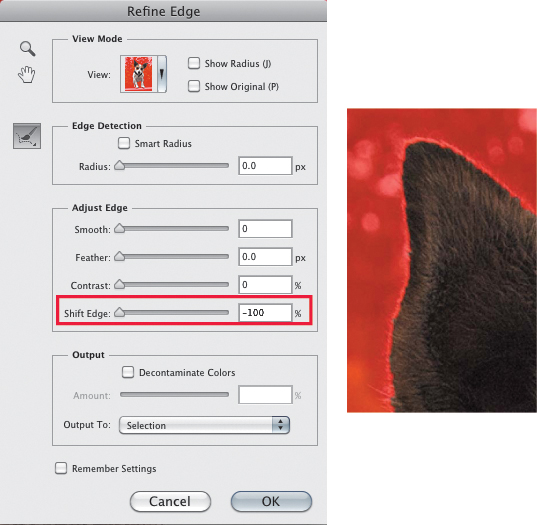
Figure 7.50. The Shift Edge slider moves a selection edge in or out, contracting or expanding the edge by small amounts.
Output
The Output section determines how and where the edge adjustments will be applied. It also offers a very useful feature for decontaminating edge colors to create a better selection, which will, in turn, make your life easier when you add the selected element into another image.
Decontaminate Colors
The Decontaminate Colors option replaces color fringes and color spill along the edge with the color of nearby pixels that are fully selected. The amount of the color replacement along the fringes is proportional to the softness of the selection edges. Due to the way this feature works, it cannot be applied to a selection or to a layer mask on the original layer; a new layer must be created. The default Output option when Decontaminate Colors is selected is to create a new layer with a layer mask.
When this feature is turned on, the Amount slider becomes active. Depending on the selection you’re working with, it may be difficult to see the results.
Zoom in for a closer view and try viewing the image on either black or white, depending on the color of the fringe. Decontaminate Colors often works well in conjunction with the Shift Edge slider as well as the Radius slider in the Edge Detection section.
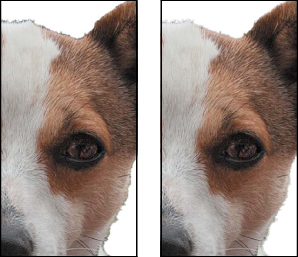
When the dog image is viewed against the white matte, you can see some dark fringes in certain areas, such as the top of his head. With Decontaminate Colors turned on, the Amount set to 100, and the Radius slider set to 0.3 (FIGURE 7.51), there is noticeable lessening of the dark fringe.
Figure 7.51. Decontaminate Colors is off (left); Decontaminate Colors is turned on, Amount = 100, and the Radius is set to 0.3 (right).
Output Options
The default and the first option available in the Output To menu is to apply the changes and return you to a selection in the main image. But there are several other ways you can choose to apply the edge refinements:
• Layer Mask. Creates a layer mask for the active layer, hiding the nonselected areas. If your file has a standard background layer, this option will turn the background into a layer with a layer mask. This is very useful for compositing because it is nondestructive. Of course, in and of itself a selection is also nondestructive but not if you use the selection to copy and paste an object into a new image. In that case nonselected pixels would be deleted. If your selection was perfect, that is not a problem. But if you still need to refine the edges a bit more, using the Layer Mask option is the better and highly recommended way to go.
• New Layer. Makes a copy of the selected area, deletes the nonselected pixels, and places the selected element on a new layer surrounded by transparency.
• New Layer with Layer Mask. Copies the layer to a new layer, and a layer mask is used to hide the nonselected area. No pixels are deleted.
• New Document. Creates a new file with the non-selected pixels deleted and the selected element on a layer surrounded by transparency.
• New Document with Layer Mask. Creates a new file with the nonselected pixels hidden by a layer mask. No pixels are deleted.
Remember Settings
The final option in the Refine Edge dialog is the Remember Settings check box. As its name suggests, it will remember the current settings and use them the next time you work with this dialog. The Remember Settings also apply to the Refine Mask dialog, which is nearly identical to Refine Edge but is used for modifying the edges of layer masks. We’ll be revisiting this functionality in the Refine Mask dialog when we explore layer masks in more detail in Chapter 9.
Setting the Refine Edge (or Refine Mask) dialog to remember a specific configuration of settings can be very useful if you are working on a compositing project where you need to select the same, or very similar, objects in different images. For example, you might be using several photos of the dog to create illustrations for a children’s book or a humorous calendar on the secret life of dogs. Being able to quickly recall the settings that worked well on one image of the dog is a big time-saver, particularly if you have photographed the dog with consistent lighting and with the same background.
Refining the Dog Selection
It’s time to finish the selection of the dog. You’ll be using this selection in an exercise file later in the book so try to refine the edges so they are as accurate as possible. Because you’ll be outputting these refinements to a layer mask, you’ll have additional opportunities later to apply further improvements.
1. Using your newfound knowledge of how the controls in the Refine Edge dialog work, make adjustments that will result in an accurate edge for the selection of the dog.
2. You can also use our settings: Set the Radius to 8 and select the Smart Radius check box. Select the Decontaminate Colors check box and set its Amount slider to 70. With Decontaminate Colors turned on, the Output menu should be set to New Layer with Layer Mask. Click OK to apply the changes.
3. Now you have a new layer of the dog with the non-selected areas hidden by a layer mask. Save this file in the Photoshop format so that you can use it again. Make sure that the Layers check box is selected in the Save As dialog.
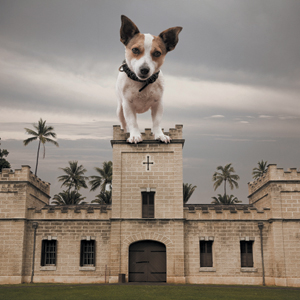
How might you use the masked dog photo in a composite image? When deciding on another photo to add the dog to, what would you need to consider to create a convincing scene (even if that scene was obviously a surreal one)? See FIGURE 7.52 for some clues.
© SD
Figure 7.52. Guard dog.
At the heart of making accurate selections are tools that give you a good “starter selection” and features that let you apply more precise fine-tuning with visual feedback so you can judge the effectiveness of your edits. The Color Range command, the Refine Edge dialog, and its companion for editing layer masks, the Refine Mask command (which we discuss in Chapter 9) are three of the most powerful tools in Photoshop for making and perfecting accurate selections. Spending time to get to know them and know them well is time well spent!
Modify
Most of the commands in the Modify menu (Select > Modify) have been superseded by the superior functionality and visual feedback offered by the Refine Edge dialog. The primary drawback is that all of the Modify options limit you to entering a numeric value and do not offer any form of visual feedback. Still, there may be times when you’ll find these options useful, so it’s worth taking a quick look at them. All of the Modify commands require you to start with an active selection.
Border
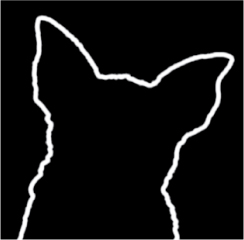
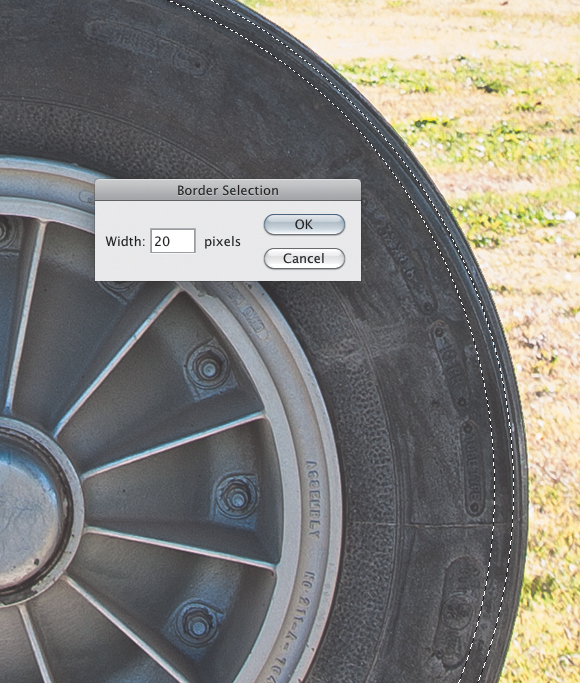
When you choose Modify > Border and enter a numeric value, you tell Photoshop to redraw the selection as a narrow “ribbon” that is the width of the value you typed (FIGURE 7.53). Using a border selection can be very useful when you need to carefully blur, darken, or refine either image edges, or perhaps more useful, the edges of a mask.
© SD
Figure 7.53. The Border option redraws the selection outline into two separate outlines.
Smooth
The Smooth command does exactly that—it smoothes out rough and jagged selection edges. Sharp corners and rough edges will be affected more than straight-line selections. The primary problem with the Smooth command, however, is that you cannot see how the values you choose are affecting the selection. Using the Refine Edge dialog or the Refine Mask command (if you are editing a mask) is a more professional, predictable, controllable, and recommended method for smoothing the edges of a selection.
Expand and Contract
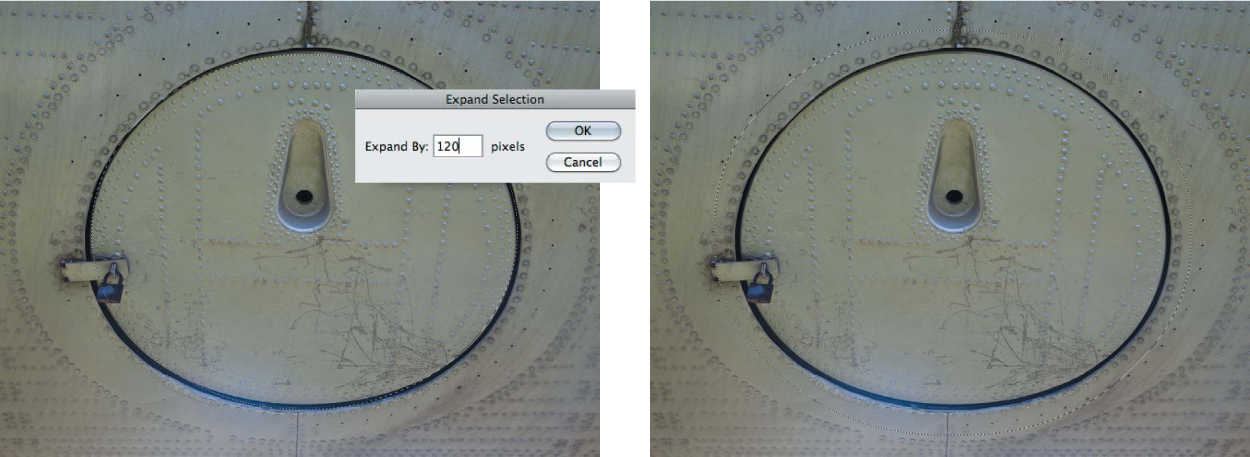
Expand and Contract shifts the edges of a selection in or out in much the same way as the Shift Edge slider in the Refine Edge dialog. If your selection edge is close to the object you want to select, it’s still better to adjust the edge in the Refine Edge dialog because you can see what you’re doing. The primary benefit of the Expand and Contract features in this menu is that they allow you to shift the edge in greater pixel increments than what is available in Refine Edge. This makes it easier to make more broad adjustments to the size of the selection (FIGURE 7.54).
© SD
Figure 7.54. An elliptical selection of this airplane hatch is expanded by 120 pixels, an amount that is not available when using Shift Edge in the Refine Edge dialog.
Feather
We almost never use the Feather command in the Modify menu, and we pass that recommendation on to you. The primary reason is that it is a legacy command from Photoshop’s earlier days, and there are much better ways now to feather/soften a selection or mask. The most obvious way is to use the Refine Edge dialog. In addition, we typically do not apply a feather (i.e., softening) to a selection, preferring instead to apply any feathering modifications to a layer mask once the image has been added as a layer into a composite. This allows us to see how the feathering interacts with the other elements in the collage and enables us to make better creative decisions as to how much feathering is right for the effect we are trying to create. When you’re working with a layer mask, you can either use the Feather slider in the Properties panel (the Masks panel in CS4 and CS5) or the Refine Mask dialog.
Grow and Similar
Just below the Modify options in the Select menu are Grow and Similar. These commands share two attributes: They both require you to start with an active selection, and they both reference the Magic Wand Tolerance setting to determine how far to extend the selection. The Grow option looks only at image areas that are directly connected to the original selection (i.e., contiguous areas); whereas Similar looks throughout the entire image (noncontiguous) for color and tone that fall within the parameters of the Magic Wand Tolerance setting. These commands can be useful in the early stages of modifying a starter selection based on color or tone, but they are not very useful for precision work or changes that require a preview.
Transform Selection
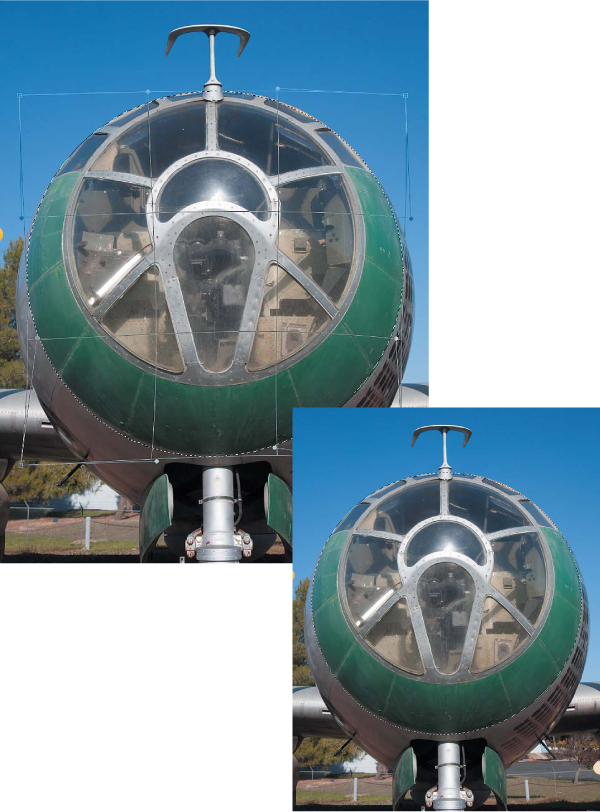
One of the most useful yet overlooked commands is Transform Selection. As you learned in Chapter 6, not every Elliptical or Marquee selection is perfectly sized, and often the object you need to select is crooked or cockeyed. On these occasions, you can choose Select > Transform Selection to finesse the shape of a selection into place. In addition to the main Select menu, you can also Control-click (right-click) inside an active selection to display a context menu that allows access to this command.
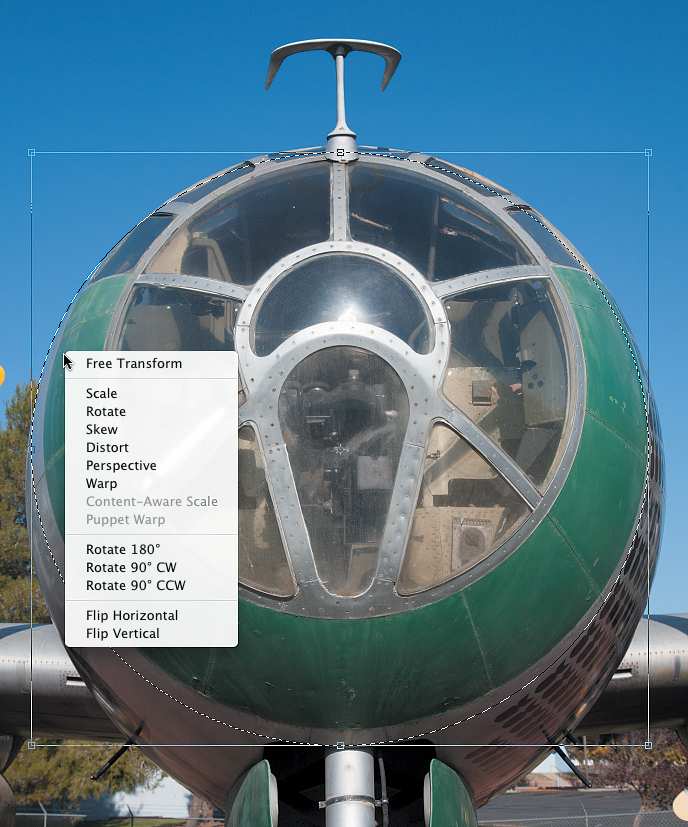
After you choose Transform Selection, a bounding box will be placed around the selection. Control-click (right-click) anywhere inside this transform bounding box to display the context menu, and then choose the desired option (FIGURE 7.55).
© SD
Figure 7.55. Access the Transform Selection controls by Control-clicking (right-clicking) to display the context menu.
The first six options are the most important:
• Scale. Pull on any handle to size the selection. Hold down the Shift key to maintain the original aspect ratio.
• Rotate. Move your mouse a little ways outside the corner handles, and the cursor will become a little curved arrow. Click and drag up or down to rotate the selection. The small crosshair in the middle of the selection controls the axis point of the rotation. You can drag this to a different location to define a new rotational axis point. Drag it back to the center, and when it gets close to its original location, it will snap back into place.
• Skew. Moves the center handles to the left or right or up and down.
• Distort. Lets you position each handle independently, making it one of the most useful transformation options in this menu.
• Perspective. Lets you finesse a selection to match perspective distortions present in the underlying image.
• Warp. Is the Distort option on steroids. It places a grid over the selection and lets you drag anywhere inside the grid to change the shape of the selection. It is very flexible and highly useful for getting a selection to fit just perfectly (FIGURE 7.56).
Figure 7.56. The Warp controls were used to fit the elliptical selection exactly to the front of the B-29 bomber.
Save and Load Selection
Imagine that you’ve spent the better part of 15 minutes (or more) making an incredibly detailed selection. You have labored over it lovingly, even fanatically, to make it as perfect as possible. Then for some reason you accidentally quit Photoshop or there’s a power failure that shuts down your computer (one welcome improvement to Photoshop CS6 is that it now has an Auto-Save feature!). When you’re up and running again, you’re faced with having to do all of that work a second time. To preserve your selection work and your sanity, use the Save Selection command to save and name your selections as alpha channels. Once a selection has been saved as an alpha channel, it is stored in the Channels panel where further edits can be applied to it.
It is very important to save your selection whenever you’ve made a complicated, sweat-inducing selection; when you think, feel, or know that you’ll need that selection again; or when you need to stop working and want to continue later where you left off in the selection process.
When you choose Select > Save Selection, you’re not saving the marching ants outline. Rather, Photoshop takes the internal grayscale image that represents the selected areas and saves that as an alpha channel. An alpha channel is a grayscale addition to the file that defines the selected, nonselected, and partially selected areas of a selection using tones of white, black, and gray. It is different from the red, green, and blue or cyan, magenta, yellow, and black channels that make up the color information in an image. An alpha channel, also referred to as a mask channel, defines where an applied image effect takes place. Typically, this occurs once it is loaded as an active selection, but there are other ways that alpha channels can be used. By itself, an alpha channel in the Channels panel has no visible effect on the image (unless you turn on its visibility, in which case you see the black areas as a transparent colored overlay). It is simply a way of storing the information created when you made a selection so that it can be easily accessed for future use.
We’ll provide a more in-depth look at the possibilities offered by alpha channels in Chapter 10, “The Power of Channel Masking.” For now, it’s important to know that you can save yourself a lot of frustration, heart-ache, self-deprecation, and sometimes tears by using the Save Selection feature as follows.
1. Open an image and make a selection. Take this opportunity to try to put some of your newfound selection skills to work and create something more than just a random circle or rectangle.
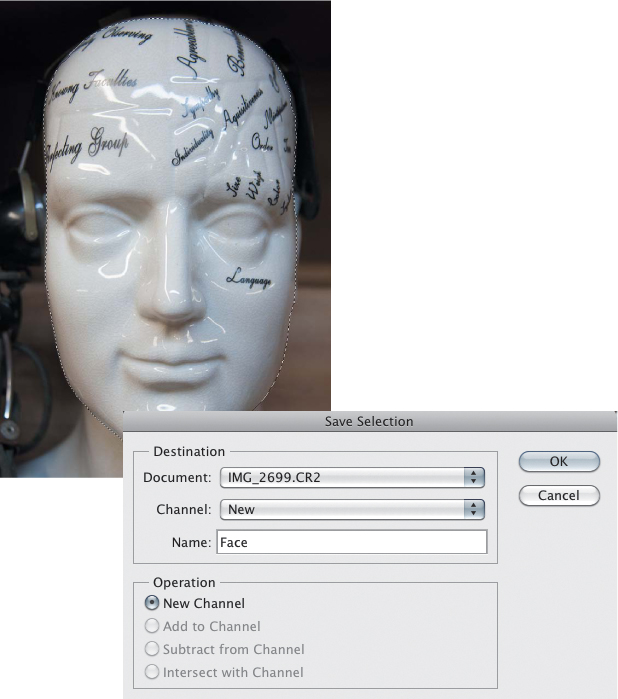
2. Choose Select > Save Selection to open the Save Selection dialog (FIGURE 7.57).
© SD
Figure 7.57. Choose Select > Save Selection to save a selection as an alpha channel.
3. Name the new channel and click OK.
4. As you can see in FIGURE 7.58 and your Channels panel, Photoshop adds an alpha channel with the name you specified. Selected areas are indicated by white, and nonselected areas are black. If you had any partially selected areas in your selection, they would appear as gray in the alpha channel. Notice that Photoshop doesn’t deselect the selection when you save it as an alpha channel.
Figure 7.58. The named alpha channel in the Channels panel.
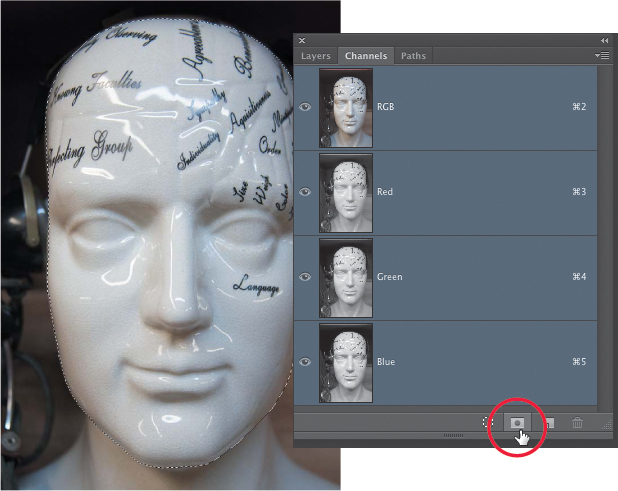
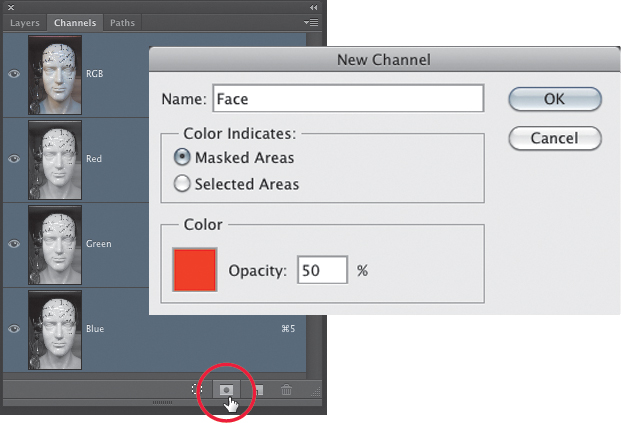
In truth, we rarely save a selection using the menu-based method. Whenever we need to save a selection, we open the Channels panel and click the Save Selection as Alpha Channel button at the bottom of the panel (FIGURE 7.59). This saves the selection as an alpha channel and gives it the default name of “alpha 1.” You can always rename an alpha channel later by clicking on the name and typing a new name. To save a selection and name the alpha channel without using the main Select menu command, Option-click (Alt-click) on the Channel button in the Channels panel to bring up the New Channel dialog (FIGURE 7.60).
Figure 7.59. Clicking the Save Selection as Alpha Channel button in the Channels panel is a convenient shortcut for saving a selection.
Figure 7.60. Option-clicking (Alt-clicking) the Save Selection as Alpha Channel button allows you to name the channel as it is saved.
Load Selection
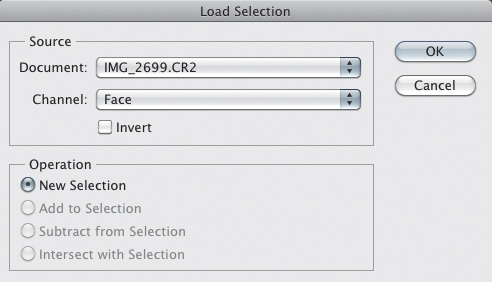
When you save a selection, you can reactivate the alpha channel at any time by choosing Select > Load Selection and selecting the name of the desired channel, as shown in FIGURE 7.61. Using the Load Selection command—or in Photoshop parlance, loading the channel—is another way of saying, “Photoshop, please turn the alpha channel into an active selection so that I can get on with my work.”
Figure 7.61. Choose Select > Load Selection to load an alpha channel as an active selection.
Once again, we rarely use the Load Selection command because there are easier and faster ways to load a channel. From less efficient to most efficient and professional, here is the order that we prefer:
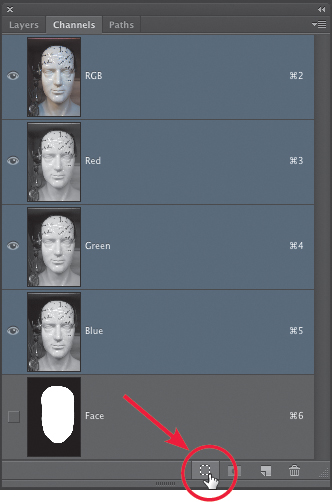
• Click and drag the desired channel to the Load Channel as Selection button at the bottom of the Channels panel (FIGURE 7.62). To work efficiently, avoid clicking and releasing the mouse button and then dragging the channel down to the button. Instead, do it in one motion: Click, hold, and drag with confidence, or as Katrin likes to say, “with schwung.”
Figure 7.62. Load the alpha channel as a selection by dragging it onto the Load Channel as Selection button to activate it.
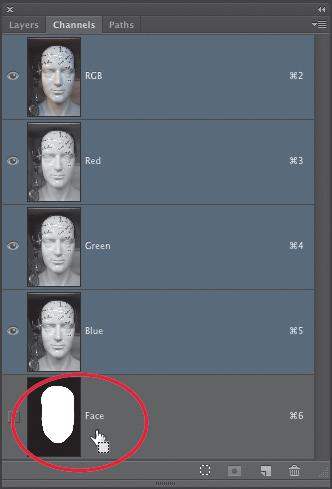
• Command-click (Ctrl-click) on the thumbnail or name of the alpha channel you want to turn into a selection (FIGURE 7.63).
Figure 7.63. Load the alpha channel as a selection by Command-clicking (Ctrl-clicking) on its name or thumbnail.
• Pressing Command+Option+# (Ctrl+Alt+#) is one of our favorite methods for activating an alpha channel. For example, to activate channel 7 in an image, the shortcut would be Command+Option+7 (Ctrl+Alt+7) to load the alpha mask as a selection. We prefer this method because there is no need to even touch the Channels panel to use it (although you do need to know the number associated with the alpha channel you want to load). Anytime we can avoid a menu or a click and drag, we’re all for it. Sadly, this only works up to the number nine.
Just the Alpha Facts
Each alpha channel adds approximately 25 percent to the file size, but only when the image is open. When you save the image to your hard drive and close it, Photoshop uses run-length encoding very efficiently to reduce the amount of information needed to describe the file. Don’t worry; all the data and all your work is still there—Photoshop is just being smart about how it saves the information. Although adding alpha channels does increase the file size, it’s well worth it, particularly when you’re still deep in the creative development phase of the image. Take it from us, although you’ll never regret saving a selection, you will regret not saving one.
Closing Thoughts
Taking advantage of the many useful options and commands in the Select menu is an excellent way to explore new neighborhoods in your Photoshop wanderings and not get stuck in an imaging rut. Of course, there are always new pathways to discover elsewhere in Photoshop, so take your time, look around, and enjoy those new discoveries. But don’t forget to come back once in a while to rediscover the tools and commands in the Select menu. Although not as exciting as other features, they make up some of the most critical functionality in the program, especially because they relate to creating accurate selections. In the following chapter, we’ll take our masking and compositing journey into new territory and explore the many wonderful things that can be done using that essential compositing tool, the Layers panel.

