4. Communicate Using Mail
Email is a prime candidate for liberation from the desktop. A lot of what I do occurs via email, whether I’m corresponding with friends and relatives or tossing around ideas for upcoming projects. But there’s no reason all of that has to happen in front of a computer. Even using a laptop can be a bother when all you want to do is check to see if someone replied to one of your messages.
Using the Mail app on the iPad, you can quickly read and reply to messages and dash off notes you may have otherwise ignored because of the hassle of doing it on the computer. Mail also handles incoming file attachments, making it a gateway for sending and receiving files wirelessly.
Set Up Mail
Most likely, you already have email accounts set up on the computer you use to sync with the iPad. You can also set up an account on the iPad itself—for example, you may want to use a MobileMe account on the iPad for personal mail that isn’t synced to a work computer.
Sync mail accounts from a computer
Mail accounts you’ve set up in Mail on the Mac, or Outlook 2007, Outlook 2003, or Outlook Express under Windows appear in iTunes.
- With the iPad connected to your computer, select its name in the sidebar and then click the Info tab (Figure 4.1).
Figure 4.1. Mail accounts listed in iTunes
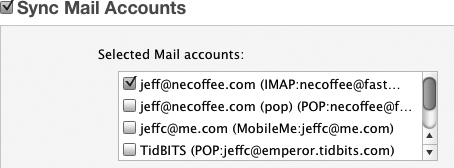
- Click the checkbox for Sync selected Mail accounts, and then enable accounts you wish to access on the iPad.
- Click the Sync button. The accounts’ settings are added to the iPad’s Mail app. Syncing transfers only the account settings, not any of the messages on your computer.
Set up an account on the iPad
If a mail account you want to use isn’t set up on the computer you sync to, it’s easy to add it directly on the iPad. Mail can automatically configure accounts from MobileMe, Gmail, Yahoo Mail, and AOL, as well as Microsoft Exchange accounts, provided you have your account name and password.
Note
The options on the iPad apply only to email accounts you’ve previously created. If you want to sign up for a new service, say a new Gmail account, you need to do that either on your computer or using Safari on the iPad.
- Go to Settings > Mail, Contacts, Calendars.
- Under the Accounts heading, tap the Add Account button.
- Tap a service name that matches your account.
If you get your email from a different provider, tap the Other button, and then tap the Add Mail Account button.
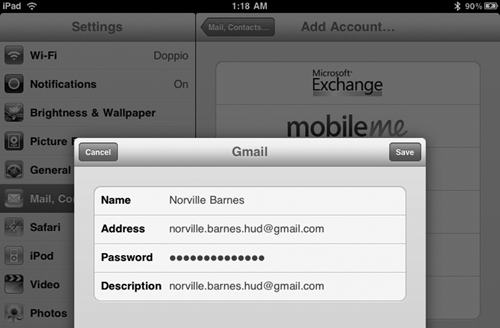
- Enter a name for the account, the email address, and the password (Figure 4.2). The Description field automatically uses the address, but you can edit it separately if you prefer.
Figure 4.2. Enter account information.
- Tap the Save button. After the system verifies the information, the account appears in the Accounts list and you’re done. You can ignore the rest of the following steps. If, however, you’re setting up a MobileMe account, tap the Next button.
If you’re setting up an Other account, enter the account type (IMAP or POP) and the incoming and outgoing mail server information that your provider gave you when you signed up.
- For MobileMe accounts, you can also set up over-the-air syncing of contacts, calendars, and bookmarks. Make any of those services available by tapping their On buttons. (See Chapter 9 for more on syncing personal information.)
Tip
This is a good opportunity to enable MobileMe’s Find My iPad feature, which can locate the iPad on a map if you think it’s lost or stolen. See Chapter 10 for more detail.
- Tap the Save button to finish setting up the account.
Tip
If you’re still having trouble configuring an account, check out this form from Apple to help you get the right information from your service provider: support.apple.com/kb/HT1277.
Read Messages
Before the iPad, I thought the iPhone’s implementation of Mail was fine. Not great, but after all, email is mostly just text, right? Now that I’ve used Mail on the iPad, though, the iPhone version seems like I’m viewing my messages through a keyhole. It will work in a pinch, but the added screen real estate of the iPad makes a huge difference.
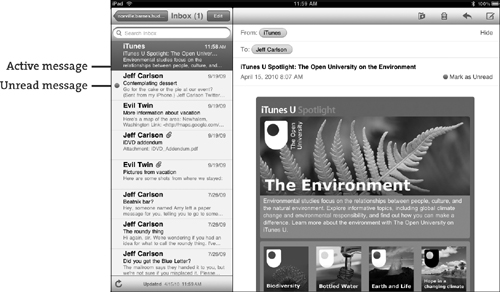
Mail presents two different views of your messages, depending on whether you’re viewing the iPad in landscape or portrait orientation. The widescreen view displays mailboxes in a pane at left, with the currently-selected message at right (Figure 4.3).
Figure 4.3. Mail in landscape orientation
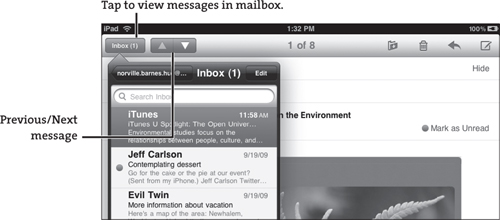
The tall view displays only the current message. To browse messages one by one, tap the Previous and Next buttons (Figure 4.4). Or, to view and access other messages in the mailbox, tap the button at upper left, which is labeled with the name of the active mailbox. A popover containing the messages appears.
Figure 4.4. Mail in portrait orientation
Tip
While reading a message, easily enlarge the body text by spreading two fingers in the reverse-pinch gesture.
As you read your email, Mail recognizes some data types and turns them into links. Tapping a Web address, as you might expect, opens the site in Safari. But Mail can also identify and act on street addresses, phone numbers, and email addresses. Tap an email address, and a new outgoing message is created. Tap a street address, and the Maps app launches and shows you the location.
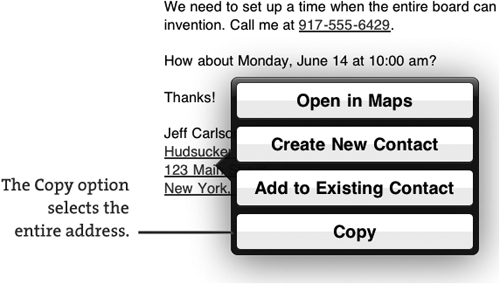
You can also choose how to interact with the data. Tap and hold a link and then choose an option from the popover that appears (Figure 4.5).
Figure 4.5. Acting on a link in a message
Tip
Tap the Details link in the upper-right corner of a message to reveal the To and Cc fields, which are otherwise hidden. (You can also make sure they’re visible by default; go to Settings > Mail, Contacts, Calendars > and set the Show To/Cc Label switch to On.) Showing details also presents the Mark as Unread option, which I often tap after reading an important message to make sure I see the email later when I’m catching up on my computer.
View information about senders and recipients
In its attempt to shield people from complexity, Apple chose to show email senders and recipients as friendly named blobs instead of addresses like “[email protected]”. Those blobs become useful buttons, however.
Tap any sender or recipient to view more information (Figure 4.6). If the person is not in your list of contacts, you can easily add them by tapping the Create New Contact button. The popover changes to let you edit contact information; tap Done to add the person to your Contacts list. Or, tap Add to Existing Contact if this is a different address for someone you already know.
Figure 4.6. Viewing sender information
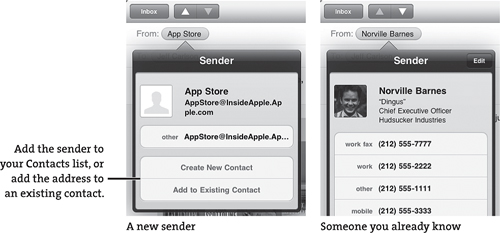
On the other hand, tapping the button of a person already in your address book displays all of their information. That makes it easy to tap their address to view the location in the Maps app, for example.
Tip
Viewing information about a sender or recipient also reveals a neat shortcut. Say you want to send a friend the contact information of someone else you know. Instead of opening to the Contacts app, you can do it from within Mail. Locate a message from—or addressed to—the person whose information you want to share. Tap the person’s name. In the popover that appears, scroll to the bottom of the information and tap the Share Contact button. A new outgoing message is created with the contact’s information stored in a Vcard (.vcf) file as an attachment. When your friend receives the email, he can add the Vcard file to his contact-management software.
Navigate accounts and mailboxes
It’s not unusual for someone to have more than one email account. The interface for accessing them all isn’t obvious, however. Use the controls in the navigation bar that appears either at the top of the left-hand pane (landscape orientation) or at the top of the popover (portrait orientation).
- Starting at the Accounts list, tap the name of an account (Figure 4.7).
Figure 4.7. Navigating an account hierarchy
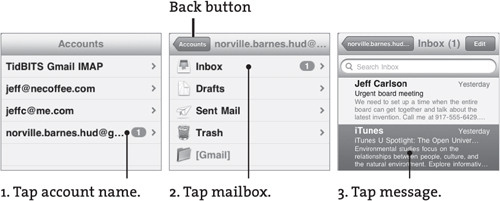
- Tap a mailbox, such as Inbox, to open it.
- Tap the message you want to read.
You can always go back in the hierarchy by tapping the back button. If you’re going from one Inbox and want to view another account’s Inbox, you need to tap back to the Accounts list, choose the other account, and drill down from there.
Tip
To preview more of each message in the mailbox list, go to Settings > Mail, Contacts, Calendars, tap the Preview button, and choose up to five visible lines of text.
Tip
Although you may have hundreds (or thousands!) of messages in a mailbox, Mail keeps the list trim by showing only the 50 most recent items. To view up to 200 messages, go to Settings > Mail, Contacts, Calendars and tap the Show button. You’re given the choice of viewing 25, 50, 75, 100, or 200 recent messages in any given account.
Check for new mail
When the iPad is connected to the Internet, it can check for new messages, even when Mail isn’t the active app, using two methods: Push, where new messages are delivered to Mail as soon as they’re available; and Fetch, where Mail contacts each accounts’ server to see if there are any new messages. Of course, you can also perform a manual check whenever you want.
Check mail manually
Opening the Mail app triggers a check for new messages, so that’s usually all you need to do. If you’re eagerly awaiting a response from someone, you can also tap the Refresh button (![]() ) at the bottom of the side panel or popover to load new mail.
) at the bottom of the side panel or popover to load new mail.
Get new mail using Push
Push is available for MobileMe, Exchange, and Yahoo accounts. Do the following to enable it:
- Go to Settings > Mail, Contacts, Calendars.
- Tap the Fetch New Data button.
- Make sure the Push option is set to On.
Generally, Push applies to all of your accounts that support the feature. However, it’s possible to disable Push for some accounts: On the same Fetch New Data screen above, tap the Advanced button, tap an account name, and then choose the Fetch or Manual option instead of Push.
Check mail on a schedule
For accounts that can’t use Push, you can specify an interval for when Mail does its check, which happens in the background no matter which app is running or if the iPad is asleep.
- Go to Settings > Mail, Contacts, Calendars.
- Tap the Fetch New Data button.
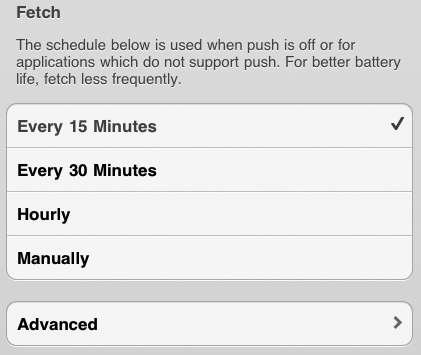
- Tap a time interval to select it (Figure 4.8). If you choose Manually, the accounts are only checked when you open Mail or tap the Refresh button.
Figure 4.8. Specify how often Mail checks for new messages.
Note
Since the iPad is a mobile device, it’s likely you could be checking mail using the 3G network connection or on a Wi-Fi network that doesn’t belong to you, like at a coffee shop. If you’re concerned about securing the Internet connection, see Chapter 10 to learn how to set up a VPN (virtual private network).
When new mail arrives, the Mail icon on the Home screen appears with a badge indicating the total number of unread messages in all accounts. The mailbox navigation button within Mail also displays an unread message count, although the number applies only to that mailbox (Figure 4.9).
Figure 4.9. New mail indicators
![]()
View file attachments
Although email isn’t the most effective delivery mechanism for sending files, people frequently attach documents to messages. Mail on the iPad does a good job of handling the most common types of files you’re likely to encounter, such as images, PDF files, and Microsoft Word, among others.
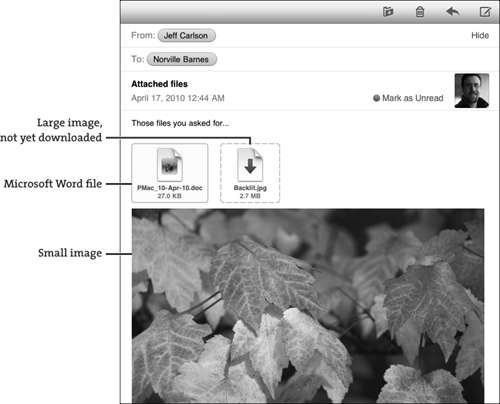
A file attachment is included in the body of a message (Figure 4.10, on the next page). The appearance of the attachment depends on the file’s type and size:
• Images generally appear unaltered, as long as Mail can preview the format.
• Large files are not automatically downloaded, and appear with a dotted outline and generic download icon.
• A file that Mail cannot display within the message body shows up as an icon containing the file name and size.
Figure 4.10. File attachments
To preview or open an attachment, do the following:
- Tap the icon to see a full screen preview (if Mail can read it), which Apple calls Quick Look.
- In the preview, tap the Open In button in the upper-right corner of the screen. A popover lists which apps can work with the file; tap one to launch the app and open the file. (If the button doesn’t appear, there is no software installed that can read the file.)
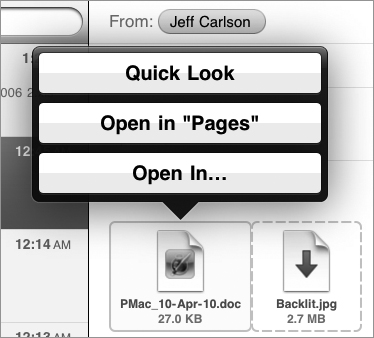
You can also access those options directly without first viewing the Quick Look preview. Touch and hold the icon until a popover appears with options to open in a compatible app or to choose another (Figure 4.11).
Figure 4.11. Choose how to view or open the attachment.
Tip
Apps must be written to run on the iPad in order to take advantage of the capability to open file attachments. Mail doesn’t recognize apps that run only on the iPhone or iPod touch.
Compose Messages
If only we could sit back in lounge chairs, feet propped on a table, and read email all day long like the people in Apple’s iPad commercials. Alas, email demands interaction, so at some point you’ll find yourself writing new messages and replying to existing ones.
Create a new message
In Mail, do the following:
- Tap the New Message button (
 ). An empty message appears.
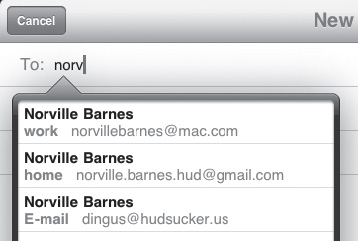
 - In the To field, begin typing the name of the person you want to send the email to. Mail displays a list of possible contacts (Figure 4.12, on the next page); tap one to enter it.
Figure 4.12. List of suggested mail recipients
You can also tap the Add (
 ) button to view a popover containing all your contacts; scroll or use the Search field to locate the person you want.
 - If you want to copy other people on the message, tap the Cc/Bcc, From field. Enter addresses into the Cc (carbon copy) or Bcc (blind carbon copy) fields.
If you prefer to send the message from another account, tap the From field and choose one from the popover that appears.
Tip
Mail’s preferences include an option to specify a default outgoing account (go to Settings > Mail, Contacts, Calendars, tap the Default Account button, and select one of your accounts). However, the setting applies only when you’re creating new messages in other apps, such as when you send a link to a Web page in Safari. When you create a new message in Mail, the message is addressed as coming from whichever account you’re currently viewing.
- Tap the Subject field and enter a short title or summary. (Don’t leave it blank; many mail servers flag messages with empty Subject lines as spam.)
- Type your message into the main field (Figure 4.13).
Figure 4.13. Writing the email message
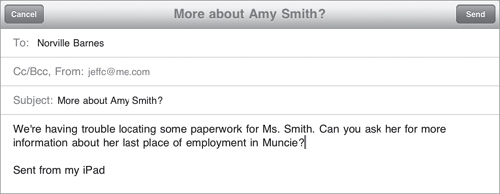
- When you’re finished, tap the Send button.
If you’re not ready to dispatch the message, tap the Cancel button and then tap Save to store the email in the Drafts folder for editing and sending later.
Note
Outgoing messages have the text “Sent from my iPad” appended to the end, a bit of text called a signature. You can change the text in Mail’s preferences. Go to Settings > Mail, Contacts, Calendars and tap the Signature button. Edit the text to whatever you like, then apply the change by returning to the Mail, Contacts, Calendars screen.
Tip
Mail’s messages can handle more than just text, as I mentioned when talking about opening file attachments earlier. For outgoing messages, for example, this means you could copy a block of content on a Web page in Safari—with its text formatting and graphics—and paste it into a Mail message.
Reply to a message or forward it
When a message requires a response, reply to the sender by doing the following:
- With a message open, tap the Reply/Forward button (
 ).
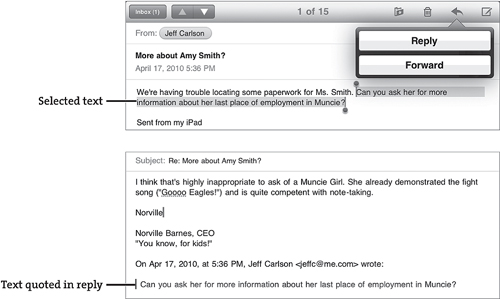
). - Tap Reply in the popover that appears. A new outgoing message is created, with the contents of the previous method quoted at the bottom of the message area.
- Type your reply and then tap Send.
Tip
When you reply or forward a message, the entire referenced message is quoted. Often it’s better to include just one relevant line or paragraph that you’re responding to. Before tapping the Reply/Forward button, select the range of text to quote; only that section appears (Figure 4.14).
Figure 4.14. Replying with selected text
Note
There’s no way to attach a file in an outgoing message within Mail. That doesn’t mean attachments aren’t possible, though. You just need to do it from whichever app has the content you wish to share via email. For example, in the Photos app you can share a photo by email, which creates a new outgoing mail message with the photo already attached.
Manage Messages
It doesn’t take long before email starts to pile up, and even though it’s not the same as a foot-high stack of paper letters, I find there’s a psychic drain when confronting an Inbox with hundreds of messages. Mail on the iPad doesn’t have the same depth of features for managing email that you’ll find in a desktop application, but it does let you delete, file, and search for messages.
Delete a message
Unless you’re an obsessive archivist, don’t try to keep every message that comes your way. To delete a message after you’ve read it, tap the Delete (![]() ) button in the toolbar. The message is moved to the account’s Trash folder.
) button in the toolbar. The message is moved to the account’s Trash folder.
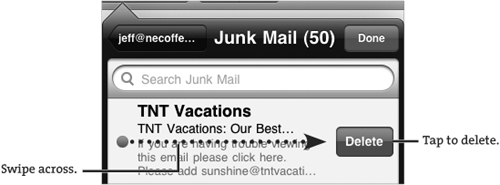
Even better, you don’t need to read a message to delete it. When you’re viewing the contents of a mailbox and see a message that’s clearly undesirable (yes, I get a lot of spam, can you tell?), do this: swipe one finger across the item from the left or the right. Then tap the Delete button that appears (Figure 4.15).
Figure 4.15. Swipe to delete.
Move a message
To keep a message but get it out of the way in your Inbox, file it in another folder within your account.
- With the message open, tap the Move button (
 ).
). - Tap a mailbox in the Mailboxes list in the sidebar to move the message there (Figure 4.16).
Figure 4.16. Moving a message

Delete or move multiple messages
Sending messages to the Trash or to other mailboxes one-by-one will make you crazy if there are many to process. Instead, delete or move them in batches.
- Display the contents of a mailbox, either by tapping its name in the toolbar in portrait orientation or by turning the iPad to landscape orientation.
- Tap the Edit button in the navigation bar.
- Tap the messages you wish to delete or move. The ones you select gain a red checkmark and appear in a stack to the right (Figure 4.17).
Figure 4.17. Process multiple messages
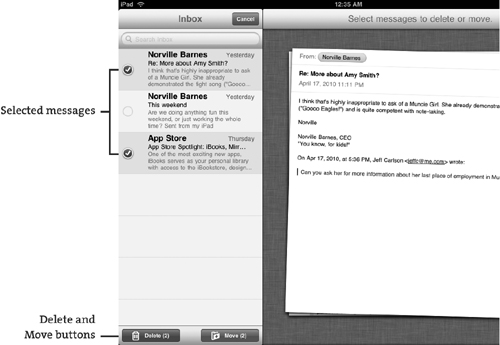
- Tap the Delete or Move button at the lower-left corner of the mailbox. Or, tap the Cancel button at the top if you change your mind.
Search for messages
A powerful tool in managing piles of email is the capability to find something quickly by performing a search. In this respect, Mail provides some help, though I’m hoping for more in the future.
- Go to the mailbox you want to search and then tap the Search field.
- Tap a button to specify which portion of the messages should be searched: the From field, the To field, the Subject field, or All.
- Type a term in the Search field. Results appear in the list (Figure 4.18).
Figure 4.18. Searching a mailbox

- Tap a message to read it.
Mail initially looks through the messages that have been downloaded to the iPad. If you don’t find what you’re looking for, tap the Continue Search on Server option at the bottom of the list to query the mail server for more results.
Tip
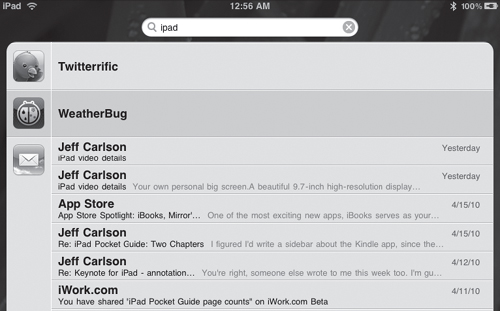
Another limitation of Mail’s built-in search is that you can only peer into one mailbox at a time. There’s a better way, however. Go to the Home screen and perform a Spotlight search instead (Figure 4.19). You’ll get results from every searchable app, but it’s easy enough to scroll down to the Mail messages, which are pulled from all mailboxes.
Figure 4.19. Search results using Spotlight