Chapter 1. Naked Eyes: Retouching Eyes
If you came to this chapter intro page expecting to read something insightful about retouching eyes—stop right now, turn back a few pages, and read “Seven Things You’ll Wish You Had Known Before Reading This Book” first. Then you’ll either: (a) be in the right state of mind for this chapter intro, or (b) you’ll skip it, because you’re the really serious type, and reading it will just make you irritated (more than you normally are, which is plenty). Now, if you’re still reading, I’m assuming that you’ve either: (a) read the “Seven Things...” and you’re cool with reading these chapter intros, or (b) you actually are that serious no-nonsense type, yet you didn’t stop and go back to read the “Seven Things...” section, which means you’re not good at taking simple directions, in which case, I wouldn’t just skip the chapter intros, I’d skip the whole rest of this book, because it’s all about taking direction. But for everybody else (the cool people), I’m going to sneak in an actual nugget of semi-useful information here—please don’t expect this in any future chapter intro, because it goes against everything I believe in (including unicorns and The Force). The nugget is this: This is the biggest chapter in the book, and I cover all sorts of different retouches for the eyes because the eyes are so incredibly important. Don’t worry, you’re not going to use them all on any one image, but the closer cropped your subject is, and the larger their eyes appear in the image, the more retouches you might want to consider. However, if you do wind up retouching a cyclops, you will probably use them all, but the good news is: you only have to retouch one eyebrow. One last thing: this chapter, “Naked Eyes,” is named after the UK-based band that did the song “(There’s) Always Something There to Remind Me” back in 1982. Worse yet: I knew that without looking it up. Sad, I know.
Increasing Contrast in the Iris
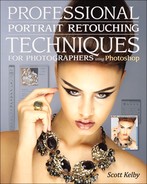
One of the secrets to really making eyes look captivating is to add contrast to the iris. It really brings out the color and depth of the eyes, without adding artificial color, and although it’s really easy to do, it delivers pretty amazing results.
Step One:
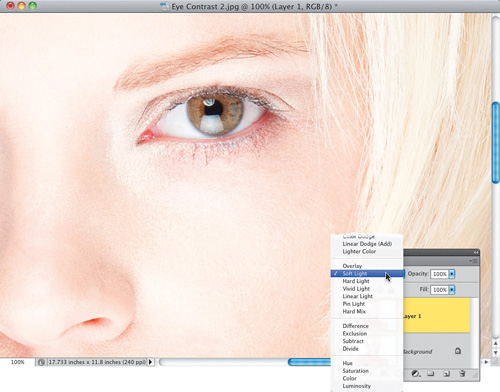
Here, our subject’s eyes look kind of flat, and almost hazy, because they’re really lacking contrast. So, to start off, we need to duplicate the Background layer by pressing Command-J (PC: Ctrl-J; or just drag the Background layer in the Layers panel onto the Create a New Layer icon at the bottom of the panel). Next, zoom in tight on the eyes. You’re going to be zooming in tight quite a bit when you’re retouching, so learning this quick way to zoom in can be a real timesaver: If you press-and-hold Command-Spacebar (PC: Ctrl-Spacebar), your cursor temporarily switches to the Zoom tool (the one that looks like a magnifying glass). Just click-and-drag this tool on the area you want to zoom in on (in this case, the eye on the right) and it zooms right into that spot. (Note: On a Mac, you’ll probably need to go to your Keyboard Shortcuts System Preferences and turn this system shortcut off first for it to work this way in Photoshop.)
Step Two:
Although there are a number of different ways to add contrast to a photo in Photoshop, this is probably the fastest and most efficient. At the top of the Layers panel, just change the blend mode of this duplicate layer from Normal to Soft Light (as shown here). This makes the entire image much more contrasty, but of course we don’t want all that—we just want her iris more contrasty. Don’t worry; we’re going to fix that in a moment.
Step Three:
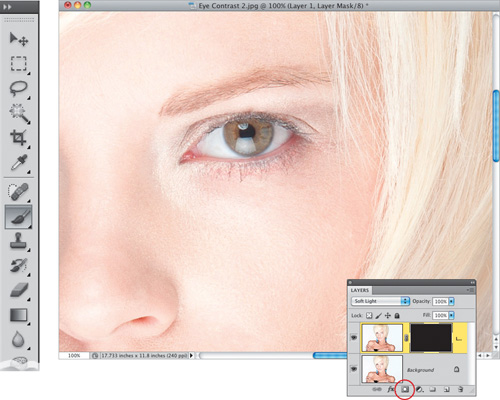
Press-and-hold the Option (PC: Alt) key and click on the Add Layer Mask icon at the bottom of the Layers panel (it’s shown circled here in red). What this does is hides that really contrasty version of your image behind a black mask (so, it’s still there—you just can’t see it). The image now looks like it did when we first opened it (notice that her skin looks back to normal now?). Next, we’ll use the Brush tool to paint over the iris (and pupil) to reveal the super-contrasty version of it. So, start by getting the Brush tool from the Toolbox (you actually might as well get used to using the keyboard shortcut for the Brush tool—just press the B key).
Step Four:
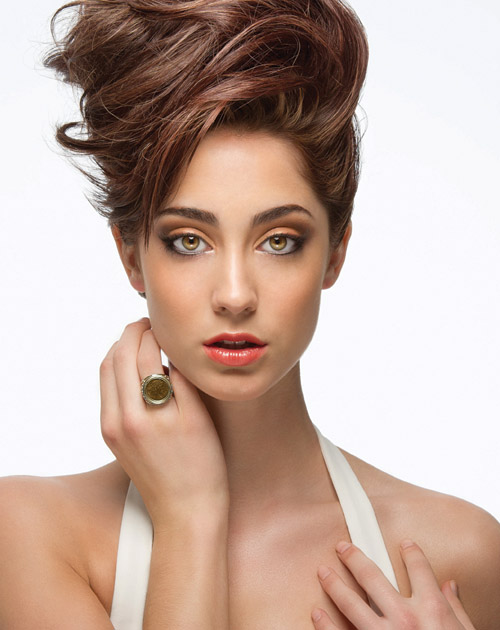
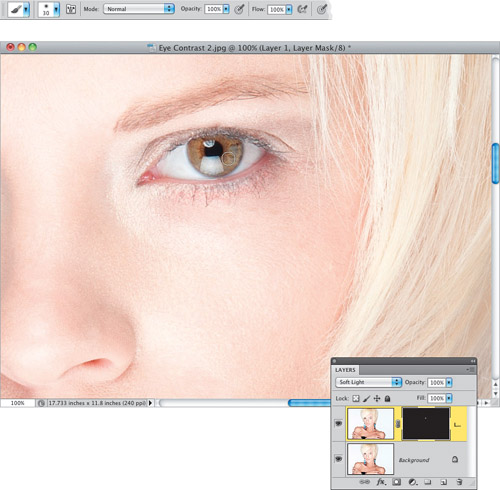
Make sure that your Foreground color is set to white (since your layer mask is black, you’ll want to paint in the opposite color—white) and choose a small, soft-edged brush from the Brush Picker in the Options Bar. Begin painting over the iris (and pupil, as shown here), and as you paint, the much more contrasty version of it is revealed, yet the rest of the photo remains untouched. If you make a mistake, just press the X key to switch your Foreground color to black, and paint over the area where you messed up to hide it again. When you’ve fixed your mistake, press X again to toggle the Foreground color back to white and continue painting over the iris (and pupil) to complete your contrast retouch.
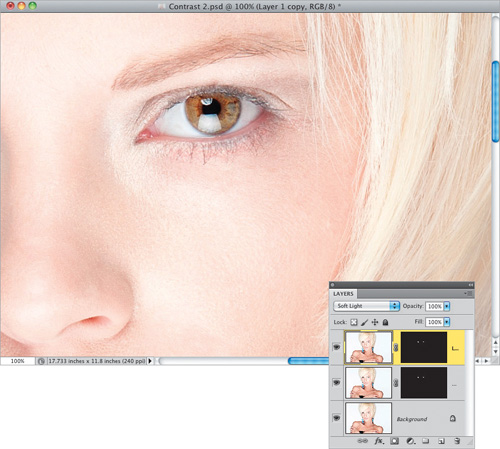
If, after painting in the iris, you think you need even more contrast, just duplicate the top layer. Since the eye is already masked, you’ll see just the iris and pupil become even more contrasty.
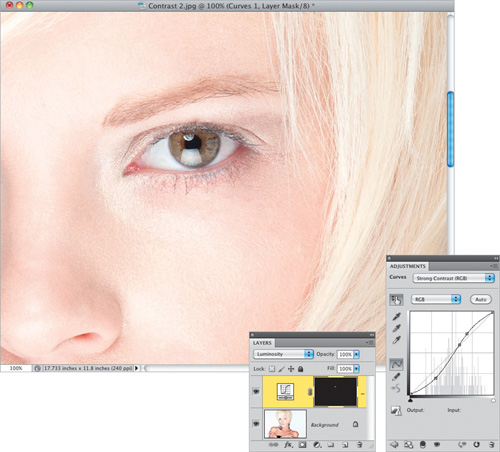
Another Tip: Using Curves
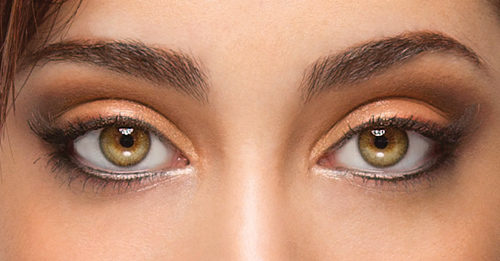
Instead of using a Soft Light layer to add more contrast to the iris, try an adjustment layer. Just click on the Create New Adjustment Layer icon at the bottom of the Layers panel and choose Curves from pop-up menu. Then, from the Curves pop-up menu at the top of the Adjustments panel, choose Strong Contrast (RGB). Press Command-I (PC: Ctrl-I) to Invert the layer mask and hide the contrasty version of your image behind a black mask. With your Foreground color set to white, get the Brush tool, choose a medium, soft-edged brush at 100% Opacity, and paint over the eyes to add lots of contrast (as seen here). Tweaking the contrast like this can tend to actually change the color of the eyes, so since we just want more contrast, change the layer’s blend mode from Normal to Luminosity, so you get the contrast, but not the color shift.
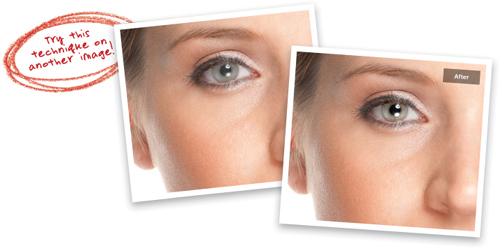
Download this practice image. See pg. xi.
Darkening the Outer Rim of the Iris
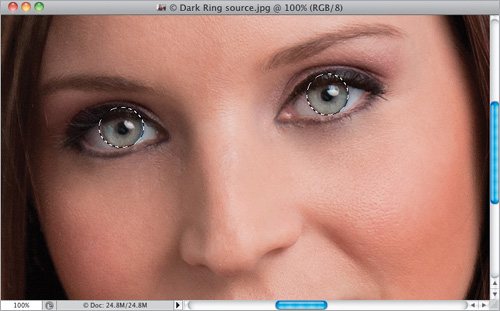
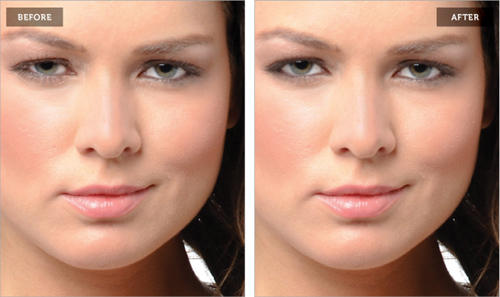
If you look closely at a person’s iris, there’s a slightly dark ring that goes around the outside edge of it, and making this ring darker helps enhance the overall look of the eye. This is one of those subtle little things you do that, by itself, may not seem like it makes a big difference, but add this in with the other things in this chapter, and it becomes one of those little things that helps take your retouch of the eyes to another level.
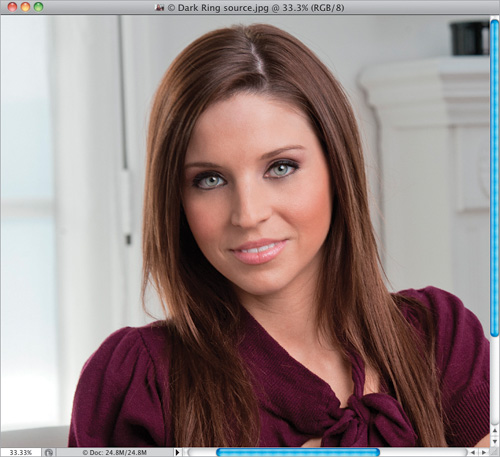
Step One:
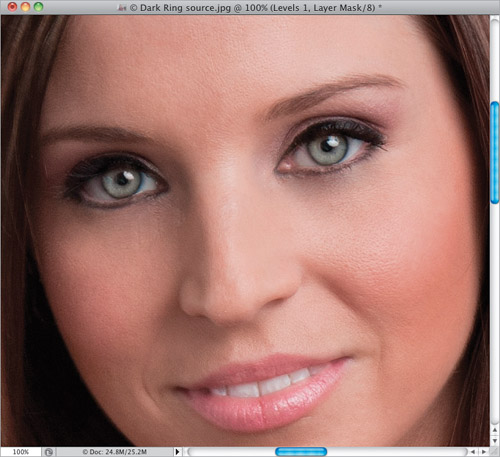
Here’s the image we’re going to be working on (you can download it from the companion website mentioned in the book’s introduction and follow right along).
Step Two:
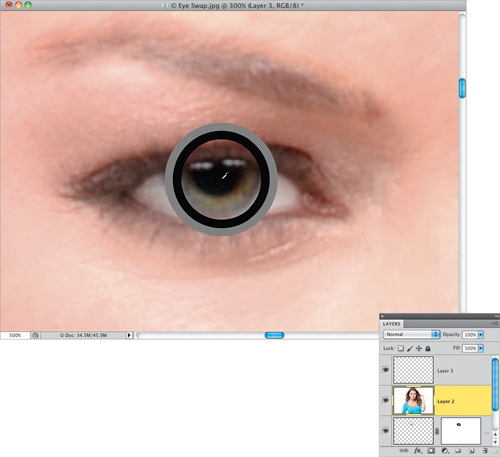
Zoom in on the eyes, then get the Elliptical Marquee tool (press Shift-M until you have it) and make a circular selection around the entire iris of one eye. It’s okay if it extends over the top or bottom of the iris, just get as close as you can in making a selection that completely covers it. (Note: If you have a problem getting the iris selected right on the money, try this trick: while you’re dragging out the selection, press-and-hold the Spacebar. This lets you reposition the selection as you’re dragging it out over the iris, and now selecting it should be a cinch. Also, if your subject’s head is turned and the iris isn’t perfectly round, go under the Select menu and choose Transform Selection. Then, Command-click [PC: Ctrl-click] on any one of the handles of the bounding box to distort the selection and fit it to the iris.) Then, press-and-hold the Shift key and select the other iris (holding the Shift key lets you create another selection, while keeping your first one).
Step Three:
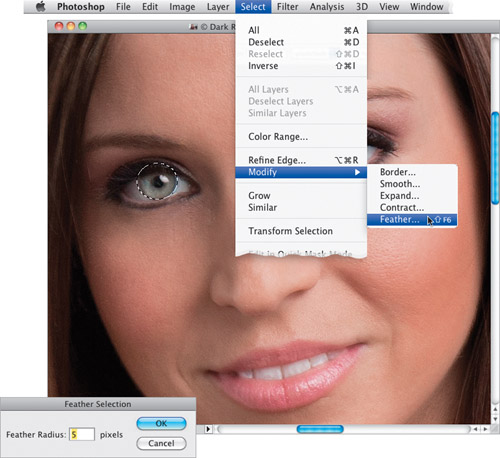
Go under the Select menu, under Modify, and choose Feather (as shown here). When the Feather Selection dialog appears, enter 5 pixels and click OK to soften the edges of the selection, so the retouch blends smoothly with the rest of the iris.
Step Four:
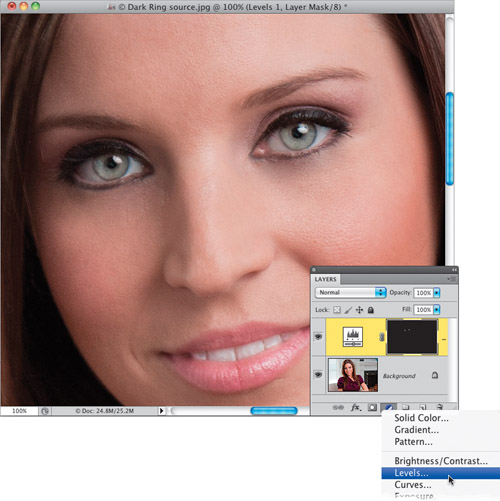
Click on the Create New Adjustment Layer icon at the bottom of the Layers panel and choose Levels from the pop-up menu. Since you had selections already in place, this automatically creates a mask for you, so you’ll see the adjustment layer has a black mask to the right of it with both eyes already masked (sweet!).
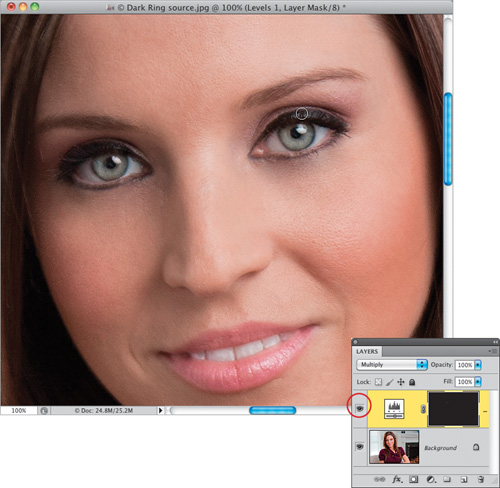
Step Five:
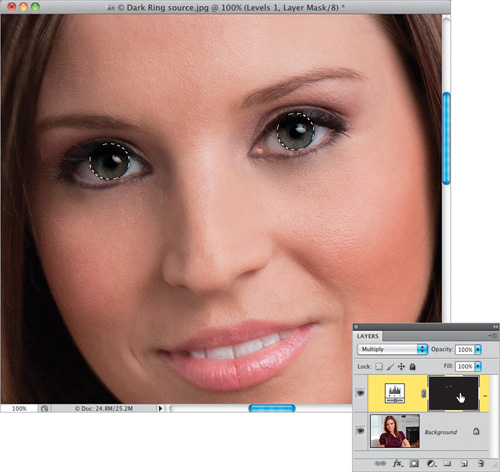
At the top of the Layers panel, change the blend mode of this adjustment layer to Multiply, which gives you a much darker version of the iris. The problem is, though, her entire iris is now darker (well, both are actually) and we just want the outside rings to be darker, so we’ll need to fix that. Start by pressing-and-holding the Command (PC: Ctrl) key and, in the Layers panel, click directly on the black layer mask thumbnail to reload your original selection on both eyes (as seen here).
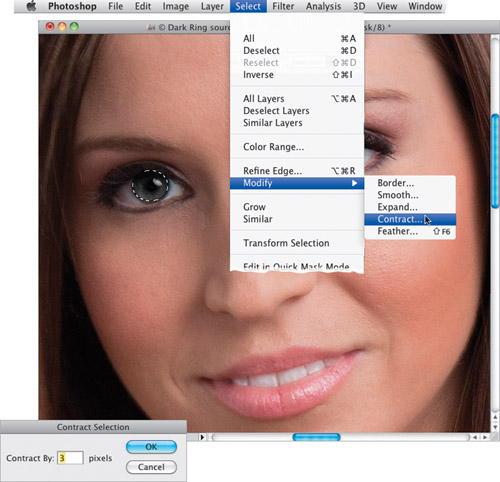
Step Six:
Now, we need to shrink the selection around each iris just a little bit, so go under the Select menu, under Modify, and choose Contract (as shown here). When the Contract Selection dialog appears, enter 3 pixels and click OK. This shrinks your selection by 3 pixels (giving you a slightly smaller circular selection).
Step Seven:
Make sure your Foreground color is set to white, then press the Delete (PC: Backspace) key to knock a hole out of the center of your darker iris adjustment layer. What you’re left with is a darker enhanced edge ring around each iris that blends in perfectly with the rest of them. Now, you can Deselect by pressing Command-D (PC: Ctrl-D).
Step Eight:
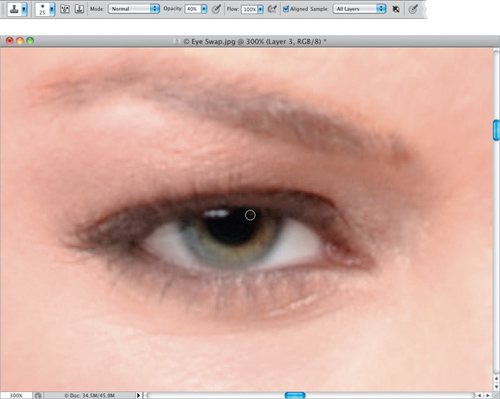
To get rid of those extra areas that were selected above each iris, first press X to switch your Foreground color to black (so when you paint, it hides the darker areas), press B to get the Brush tool, choose a small, soft-edged brush from the Brush Picker, and paint around the outside of each iris, being careful not to actually paint over edge of the iris, or you’ll erase the darkening we just added. A good trick to see if you’ve erased everything outside the iris is to simply toggle this adjustment layer on/off a few times (click on the Eye icon to the left of the layer’s thumbnail; it’s circled here in red) and you’ll instantly see if anything’s left over outside the dark area. If you see something, just paint over it in black to hide it.
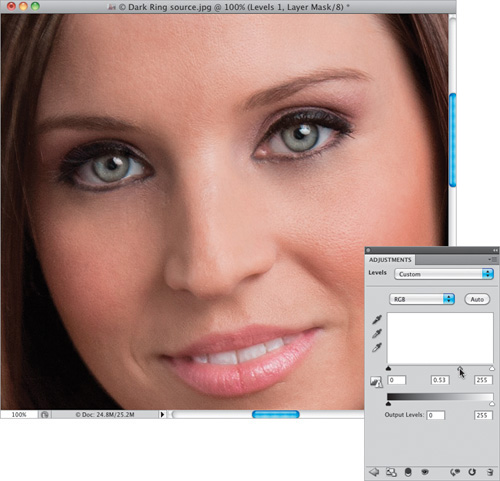
Step Nine:
If you want to adjust how dark this outer ring is, since you’ve already got a mask in place (thanks to the adjustment layer), it’s really simple. All you have to do is go to the Adjustments panel and drag the midtones Input Levels slider (the gray triangle in middle) to the right (as shown here) to make the outer ring even darker, or to the left to lighten it a bit.
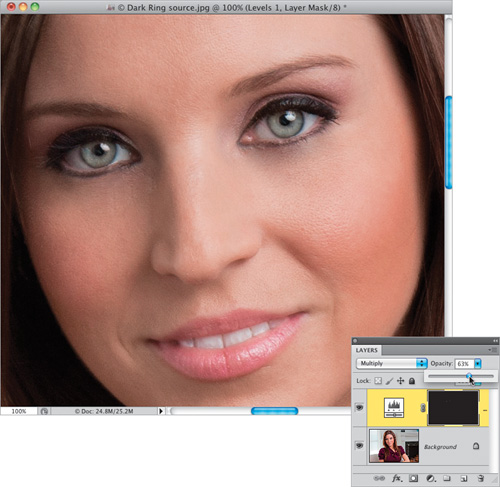
Step 10:
Another way to control the amount of your retouch is to lower the overall Opacity of your adjustment layer (as shown here, where I’m lowering it to 63%, because I felt the outer ring was too dark). You won’t necessarily need to do this if you just darkened the midtones in the ring in Step Nine. You’re more likely to lower the Opacity if you felt the ring was too dark when you first applied it, with nothing but the Multiply adjustment layer (in other words, before you applied the Levels tweak in Step Nine).
Download this image. See pg. xi.
Adding More Life to the Eyes
This is another quick trick you can use to add more sparkle and life to the irises. Although it’s a really simple retouch, you’ll be surprised at how much it adds, and I do this to nearly every eye retouch I do.
Step One:
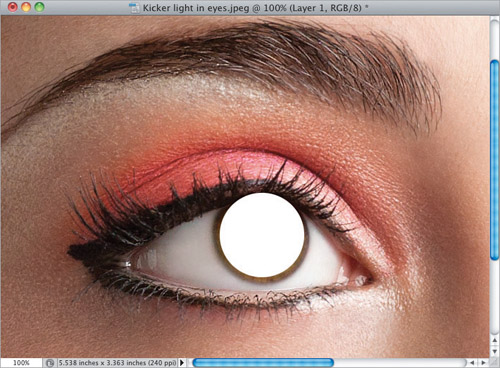
Zoom in on an eye where you want to add more sparkle to the iris. Click on the Create a New Layer icon at the bottom of the Layers panel to create a new blank layer. Then get the Elliptical Marquee tool (press Shift-M until you have it), press-and-hold the Shift key, and draw a circular selection that’s just inside the iris (as shown here; holding the Shift key keeps your selection round).
Step Two:
Press D, then X to set your Foreground color to white, then press Option-Delete (PC: Alt-Backspace) to fill this circular selection with white. Press Command-D (PC: Ctrl-D) to Deselect.
Step Three:
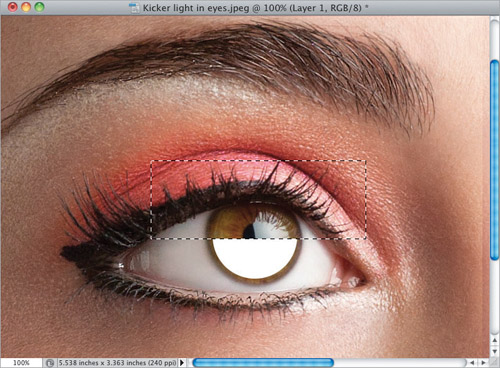
Now, get the Rectangular Marquee tool (press Shift-M until you have it) and draw a large rectangular selection over the top half of your white circle (like the one shown here). Press the Delete (PC: Backspace) key to knock a rectangular hole out of your white circle (basically, slicing it in half) and then deselect.
Step Four:
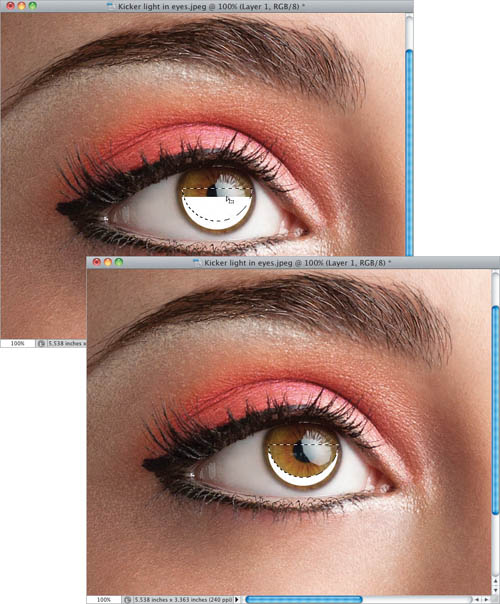
Go to the Layers panel, press-and-hold the Command (PC: Ctrl) key and click once on the white half-circle’s layer thumbnail to put a selection around it. Now, move your cursor inside the selected area in your image (you should still have the Rectangular Marquee tool active) and drag that half-circle selection up a bit (like you see here), so the white area beneath the selection is the shape of a melon slice. Press Delete to knock a hole out of that half circle, leaving just that melon shape. Now, go ahead and deselect.
Step Five:
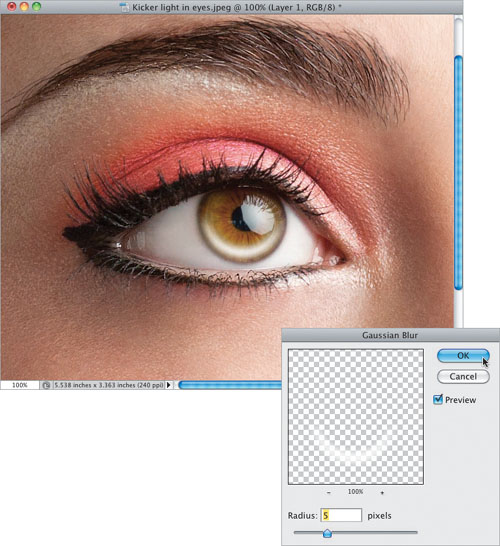
Go under the Filter menu, under Blur, and choose Gaussian Blur. When the dialog appears, enter 5 pixels, and then click OK to make the melon shape blurred with nice soft edges (as seen here). By the way, depending on the image, you may have to choose a higher, or possibly even a lower, number. Your goal is to make it look reasonably soft around the edges, like what you see here.
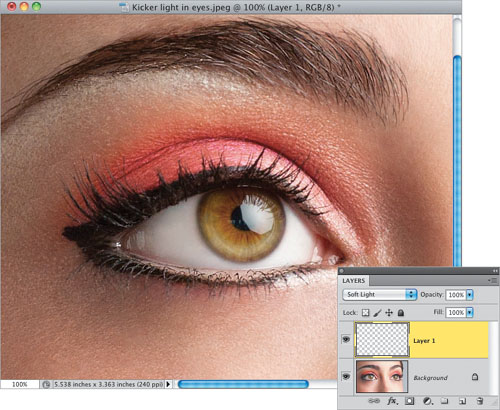
Step Six:
Now, to get this white, soft, melon shape to blend in with the iris beneath it, go to the top of the Layers panel and change the blend mode for this layer from Normal to Soft Light (as shown here). You can see how this adds a bright kicker on the bottom half of the iris.
Step Seven:
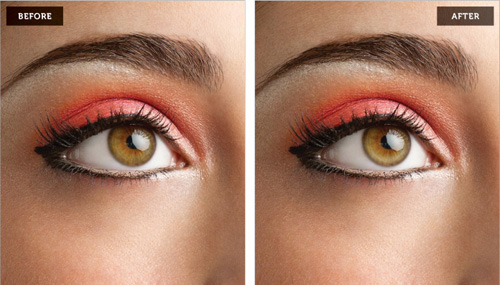
If you think this kicker looks a bit too bright, you can lower the layer’s Opacity to tone down the effect (here I lowered it to 80%).

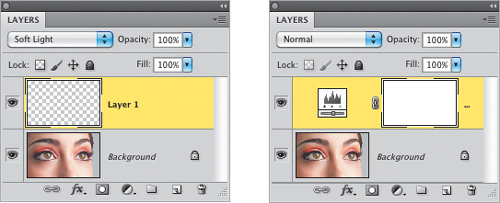
Tip: Blend Mode or Adjustment Layer?
You’ll probably notice that sometimes I brighten things using a layer blend mode (like we did here), and sometimes I use a Levels adjustment layer instead. So, why do I choose one over the other? Generally, if I know that the effect is going to be too bright, and I’m most likely going to wind up toning it down,
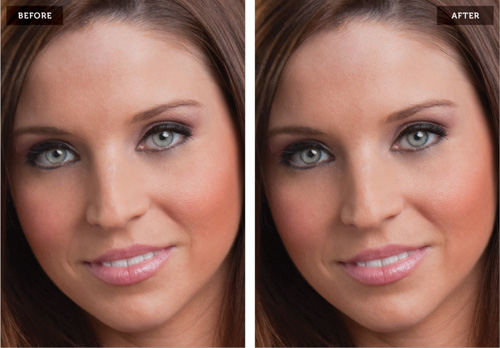
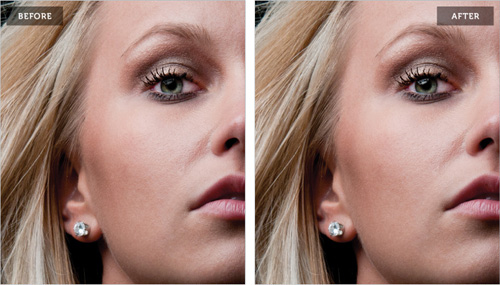
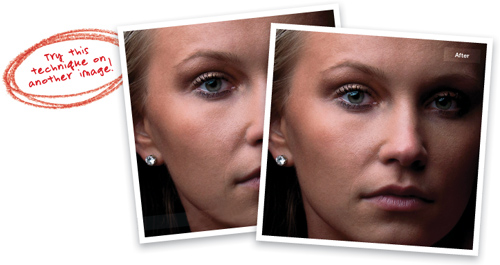
I just go with a Soft Light layer because it’s faster. However, if I’m not sure what my adjustment is going to be, or if I think I might need to make it lighter after I’ve applied it (rather than toning it down), then I use a Levels adjustment layer. That way, if I need to tweak it, I can double-click on the Levels adjustment layer and adjust the settings. A before and after is shown on the next page.
Download this image. See pg. xi.
Enhancing and/or Creating Catch Lights
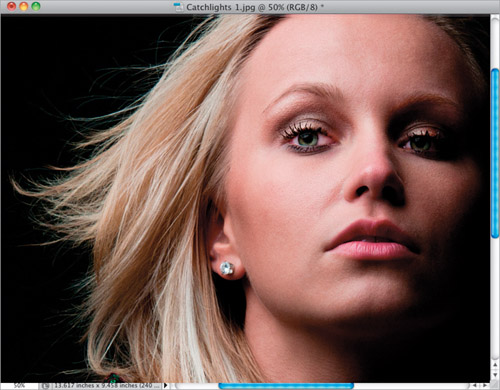
Catch lights are those white dots that appear in the eyes in images and are reflections of the light source that’s lighting the subject. Those white dots actually add sparkle to the eyes and keep them from looking kinda flat and dead (like round pools of black nothingness). If you’re outdoors, the catch light will usually be a round dot (a reflection of the sun). But in a studio shot, not only will the catch light be created by your studio lights, you’ll be able to see the shape and position of your softbox or umbrella in that catch light. Here’s how to enhance existing catch lights, or add some if there aren’t any.
Step One:
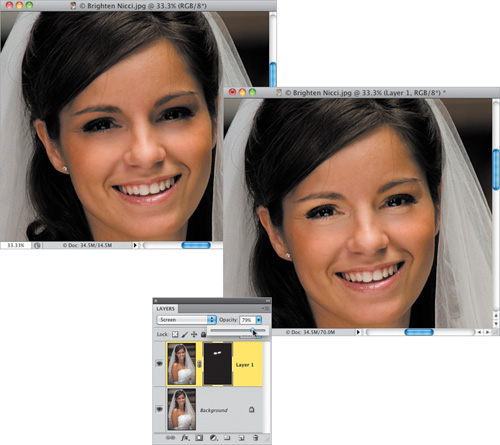
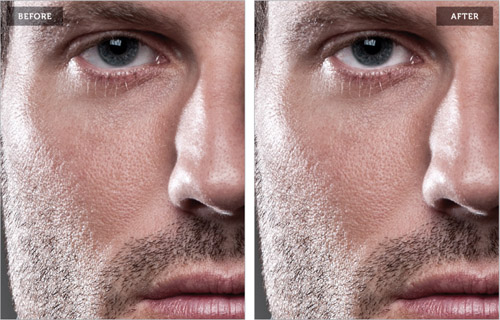
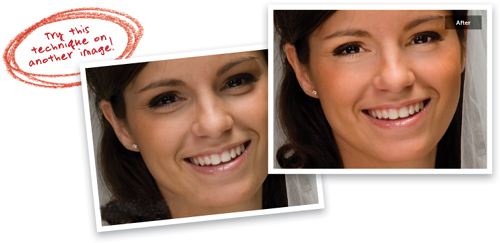
Here’s the first image we’re going to retouch (this one is for enhancing catch lights that are already there). Although her eyes are fairly well lit, the catch lights in them are pretty dim, and that really makes her eyes lack that sparkle that makes a portrait come alive. This first technique is pretty straightforward; you’re going to brighten the overall highlights, and a little bit of the midtones, and then hide that brighter version and paint over just the highlights to make them really apparent.
Step Two:
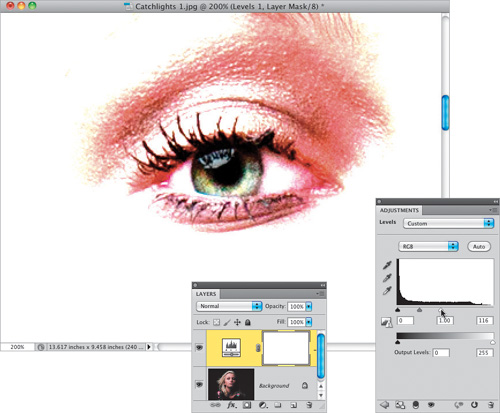
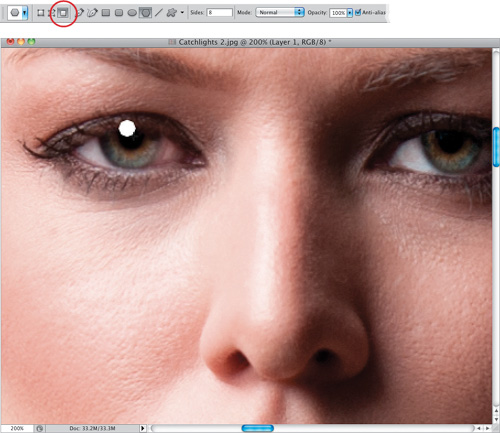
Start by zooming in tight on the eye on the left (here, we’re at 200%), and then click on the Create New Adjustment Layer icon at the bottom of the Layers panel and choose Levels from the pop-up menu. In the Adjustments panel, grab the highlights Input Levels slider (the white triangle on the right beneath the histogram) and drag it quite a bit over to the left to brighten the highlights (you’ll notice that the midtones Input Levels slider [the gray triangle in the middle] moves along with it, though not nearly as far). Keep dragging until the catch light reflection of your light source is nice and bright (as seen here at the top of the iris). Of course, this totally blows out your subject’s skin, hair, and everything else, but don’t sweat that—we’ll fix this in the next step.
Step Three:
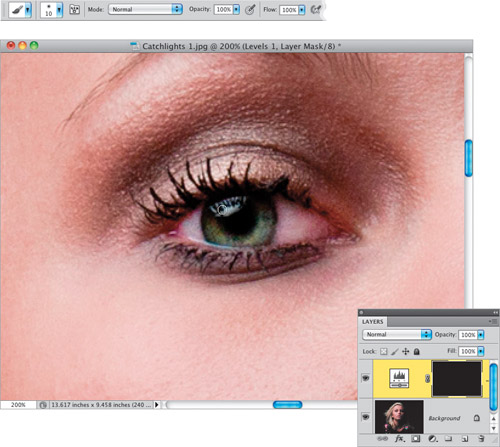
Press Command-I (PC: Ctrl-I) to Invert your adjustment layer’s layer mask. This makes the mask black, which hides the brighter version of your image. Now, press B to get the Brush tool, make sure your Foreground color is set to white, choose a small, soft-edged brush from the Brush Picker up in the Options Bar, and paint over just the catch light (as shown here, where you can see my brush-tip cursor right over the catch light). As you paint, the much brighter version of the catch light appears. Once you’re done with the eye on the left, go ahead and paint over the catch light in the eye on the right.
Step Four:
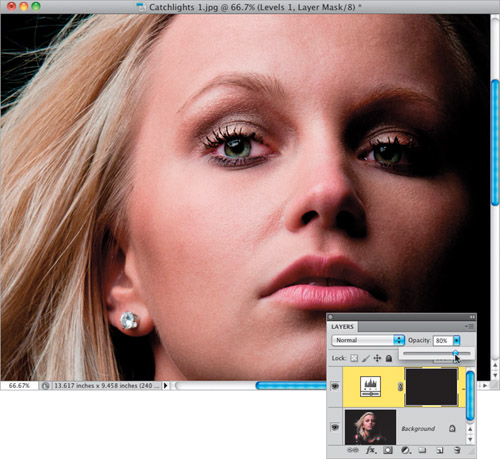
One of the great advantages of using adjustment layers (besides the whole masking thing you just did) is that they are layers in the first place, which means you can lower the Opacity if the brightening seems too much (here, I’ve lowered it to 80% for a more natural look). You could also just go back to the Adjustments panel and drag the highlights Input Levels slider back to the right a bit. The catch lights will already be masked because of what you did back in Step Three, so making this adjustment will only affect them. As you can see, the enhancing part is pretty simple, so let’s move on to what to do if your subject doesn’t have any catch lights at all.
Download this image. See pg. xi.
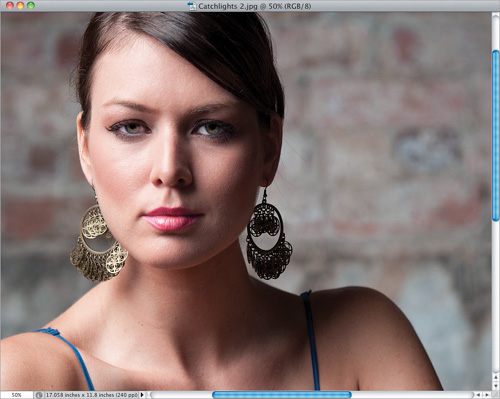
Step Five:
Here’s our second image and, if you look at her eyes, you’ll see they have no reflection in them at all—they look kind of “dead.” So, we’re going to create our own light source catch lights, and add them to the eyes to bring them back to life, and add lots of sparkle. By the way, it’s not our subject’s fault that she doesn’t have catch lights. In this case, the lack of them was caused by where I positioned my lights—at the tall height and angle they were at, they weren’t able to cast a reflection in her eyes. So, basically it’s my mistake (and so I have to fix it, right?).
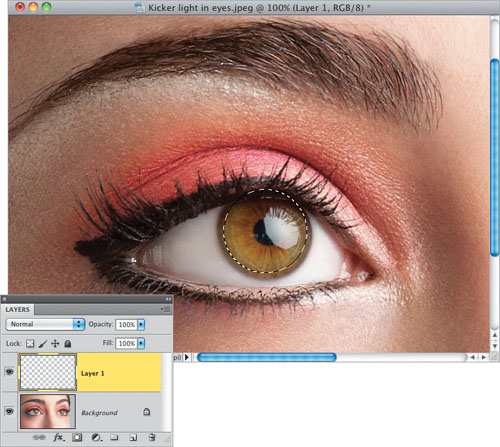
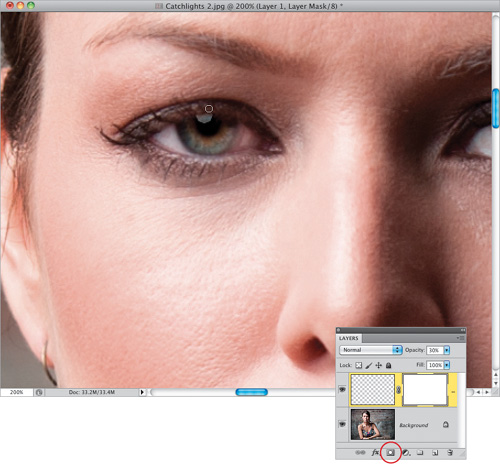
Step Six:
Start by zooming in on the eyes (I’m at 100% here), then go to the Layers panel, and click on the Create a New Layer icon at the bottom of the panel (circled here in red) to create a new blank layer. Now, you have to choose which shape softbox or umbrella you want to reflect in her eyes. If you want a standard square or rectangular softbox reflection, you’ll need to grab the Rectangular Marquee tool (M). If you used a beauty dish for the shot (or you want to make it look like it was shot in sunlight), then grab the Elliptical Marquee tool (press Shift-M until you have it) and, to make a round selection for your catch light, just press-and-hold the Shift key. If you want to have your reflection look like an umbrella or an octagon-shaped large softbox (very popular for portraits), then grab the Polygon tool from the Toolbox (as shown here), and then in the Options Bar, enter 8 in the Sides field (also shown here).
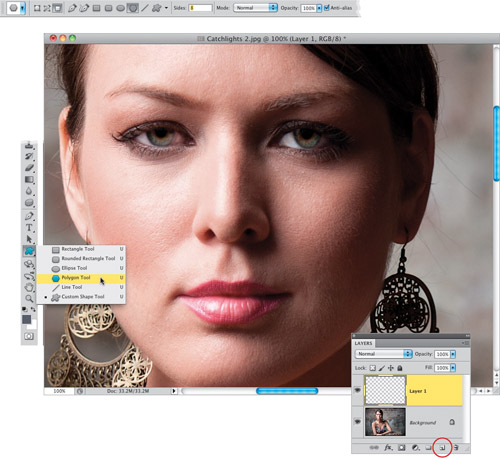
Step Seven:
If you’re using the Polygon tool, first make sure that the Fill Pixels icon is selected in the Options Bar (it’s circled here in red). This sets the tool so it draws just regular pixels, and doesn’t create a Path or a Shape layer. Now, press D, then X to set your Foreground color to white, then take the tool and drag out a small polygonal shape over the portion of the pupil where you want the catch light to appear (as seen here, where I dragged a polygon over the left side of the pupil on the eye on the left. Oh, and I also zoomed in more, to 200%). If you’re using the Rectangular Marquee tool or the Elliptical Marquee tool instead, also set your Foreground color to white, and then drag out your selection. Now, fill your selection with white by pressing Option-Delete (PC: Alt-Backspace), then Deselect by pressing Command-D (PC: Ctrl-D). Note: As you’re dragging out your shape, you can press-and-hold the Spacebar to reposition your selection as you’re dragging (this works with any of the tools mentioned in this step).
Step Eight:
If part of your catch light overlaps any other part of the eye area (like mine does here, where the top of the catch light extends over onto her top eyelid), then click on the Add Layer Mask icon at the bottom of the Layers panel (shown circled here in red) to add a layer mask. Now, at the top of the Layers panel, lower the Opacity of your catch light layer enough to make your catch light shape transparent, so you can see the eyelid behind it. Press X to set your Foreground color to black, then get the Brush tool (B), choose a small, soft-edged brush from the Brush Picker, and just paint right over the part that overlaps the eyelid (as seen here) to erase it. We’re not done yet, but we’re almost there.
Step Nine:
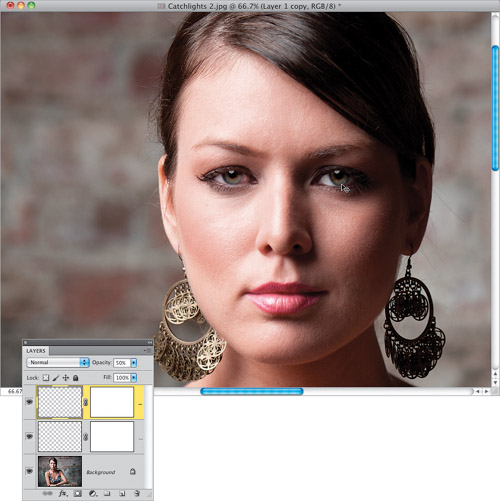
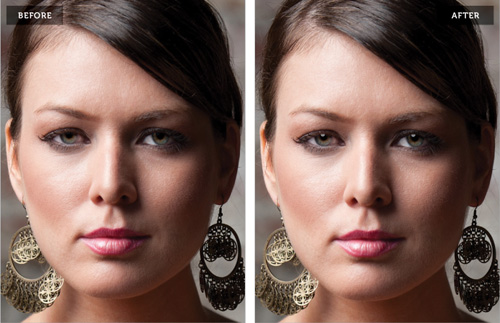
You’ll need to raise your layer Opacity back up a bit, so the catch light looks natural (here I raised mine from 30%, which was low enough for me to easily see through so I could erase the overlap, to 50%, where it looks natural). Of course, at this point, we’ve only done one eye, so press Command-J (PC: Ctrl-J) to duplicate the catch light layer, and with the Move tool (V), drag this duplicate catch light layer over to the eye on the right, so it gets a similar catch light, too (as seen here). Now, when a real catch light goes over part of the pupil (and part of the iris), usually you will see a gradation from light to dark as it goes over the pupil. The pupil absorbs light, so the catch light is usually darker over it. To make your catch light look more natural, lower the Opacity setting on your brush and paint in black on the layer mask over the pupil to darken the catch light. A before and after is shown on the next page, and you can see what a difference adding a catch light can make.
Download this image. See pg. xi.
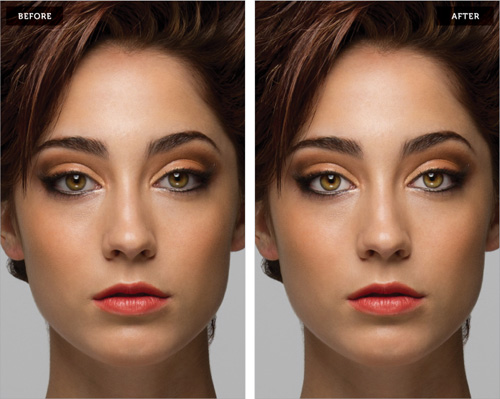
Brightening the Whites of the Eyes
This is a retouch I do to every single photo where my subject’s eyes are open. It seems like no matter how much light you get into the eyes during the shoot, the whites of the eyes end up off-white at best, but usually a light gray. This is one of those retouches that you just have to do once or twice—even if you think the eyes look white enough—because once you see the difference, you’ll do this every single time. It makes that big a difference.
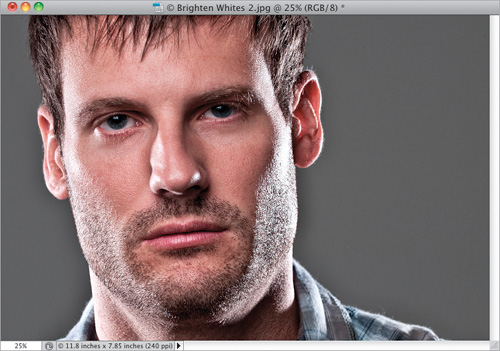
Step One:
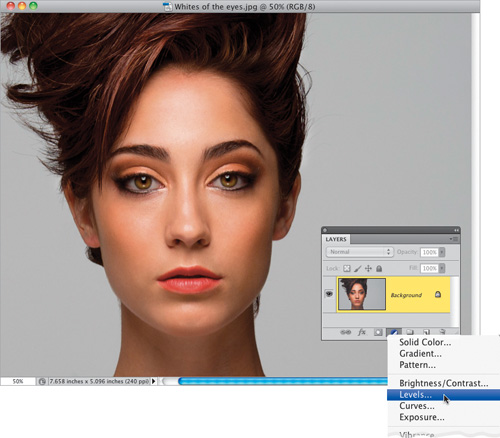
I’m going to show you two different methods for brightening the whites of the eyes. Here’s the first image we’re going to work on. It’s pretty well lit, but as is often the case, the whites of her eyes look almost gray (or off-white at the very least). So, start by clicking on the Create New Adjustment Layer’s icon at the bottom of the Layers panel and choosing Levels (as shown here). By the way, it doesn’t really matter which adjustment you add at this point—we just need some adjustment layer, any adjustment layer, so we can change its blend mode. Why not just duplicate the Background layer? Because doing it this way doesn’t add any size to your Photoshop document, which keeps Photoshop running faster. Hey, it all adds up. (Again, you can download this image from the website mentioned in “Seven Things You’ll Wish You Had Known Before Reading This Book.” While you’re there, why not read the six other things? ;-)
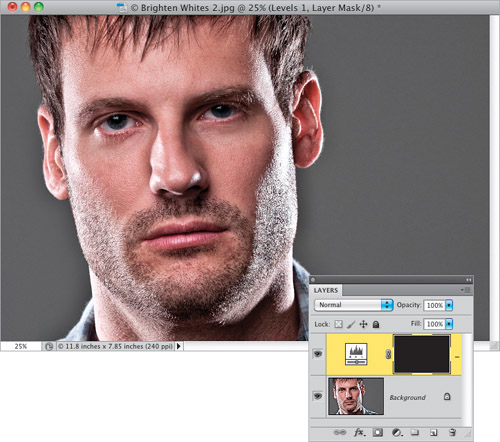
Step Two:
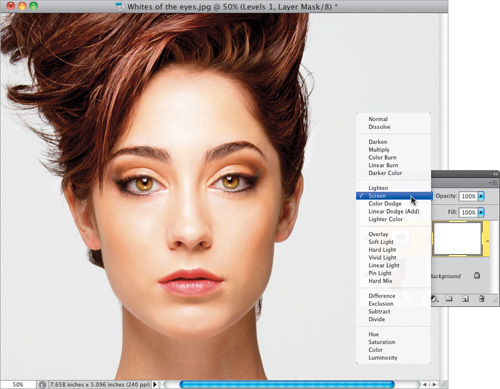
At the top of the Layers panel, change your blend mode for this adjustment layer from Normal to Screen. The Screen blend mode makes your image much brighter (compare the brighter image shown here with the one in Step One and you’ll see what I mean).
Step Three:
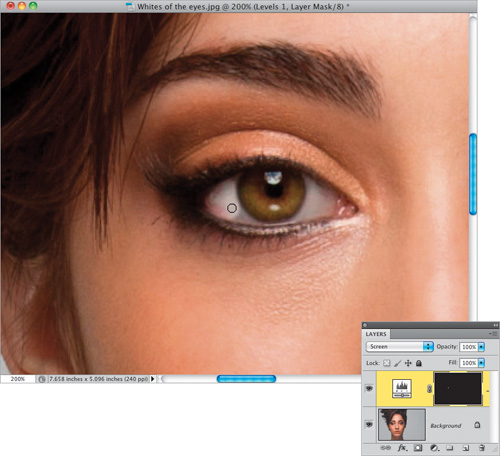
The problem with our image at this point is we only want the whites of her eyes brighter (and maybe her irises), but not her skin or anything else. So, we’ll have to do some simple masking. Start by pressing Command-I (PC: Ctrl-I), which inverts the layer mask, making it black and hiding the brightening brought on by changing the blend mode to Screen.

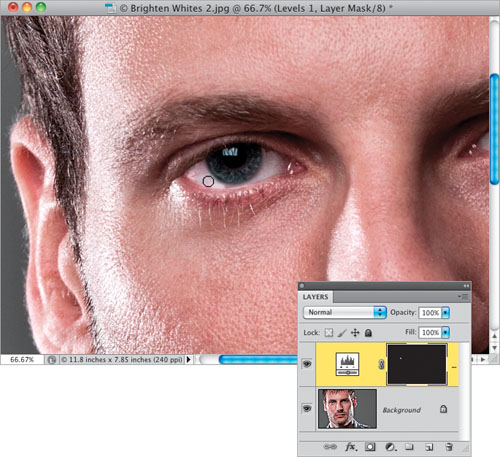
Step Four:
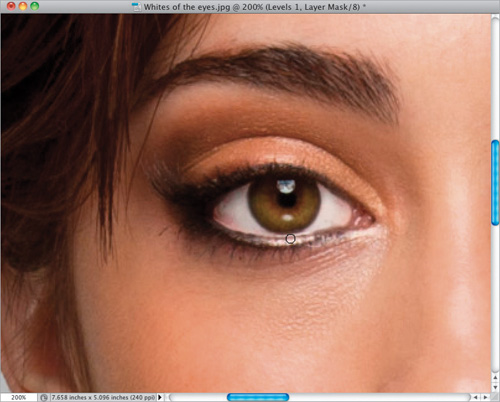
Zoom in on one of the eyes, press X to switch your Foreground color to white, then press B to get the Brush tool. Choose a very small, soft-edged brush from the Brush Picker in the Options Bar, and begin painting over the whites of the eyes (as shown here, where I’m painting over the left side of the eye on the left). As you paint, this area becomes much brighter, because you’re revealing the Screen layer you applied earlier.
Step Five:
The tricky part of this technique comes when you try to paint that little bit of white that appears right below the iris. It’s just so tiny that getting in there and doing it without spilling over onto the edge of the iris, or the bottom eyelid, is really a pain. So, what’s the solution? Don’t worry about it—just paint right over the whites, and if your brush extends over onto the iris or the bottom eyelid (like you see here), it’s okay. The reason it’s okay is I’ve found it’s much easier to erase the spillover than it is to try to paint it just right with a super-small brush. After all, you’ve already got a layer mask applied; to clean this up will be a five-second fix (as you’ll see in the next step).
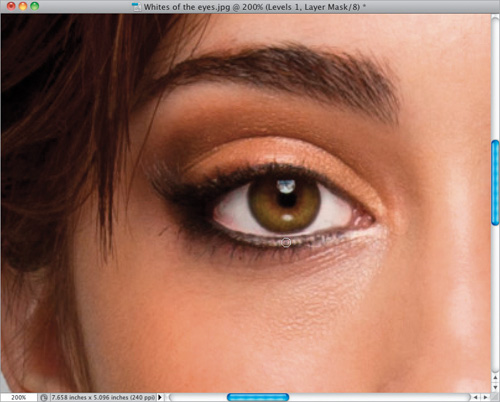
Step Six:
To get rid of the spillover (brightening of the iris or lower eyelid), just press the letter X to set your Foreground color to black, then paint over the spillover to remove it (as shown here). It couldn’t be easier or faster. When you’re done, just press X again to swap your Foreground and Background colors, making white your Foreground color again. Now, move over to the other eye and do the same thing.
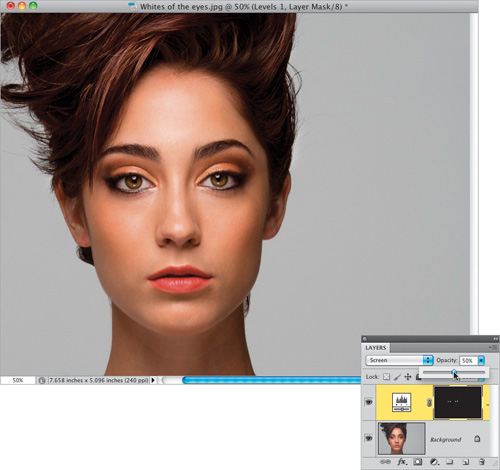
Step Seven:
When you’re done painting over both eyes, they’ll probably look too white (giving your subject a freaky, possessed look), so in most cases, leaving the Opacity of this layer at 100% is unlikely. The best way to judge how white the whites of the eyes should be is to zoom out (like you see here), then lower the Opacity of this layer to around 50% and see how that looks. If it’s still too bright, lower it a little bit more. The Opacity slider becomes your “whiteness amount slider,” so just adjust it to where it looks natural, but brighter than it was before. A before/after is shown on the next page (I painted over the irises a little bit, too. They looked a little dark). Then, I’ll show you an alternative that offers a little more control (because you don’t have much control over how bright Screen mode is). This alternative method lets you make things brighter in either the midtones, highlights, or both.
Tip: Brightening the Entire Eye Socket
If you need to lighten the entire eye socket area, you can use the Screen blend mode, but in a slightly different way. Press Command-J (PC: Ctrl-J) to duplicate the Background layer, then change the blend mode to Screen to make the whole image brighter. Option-click (PC: Alt-click) on the Add Layer Mask icon in the Layers panel to hide this brighter version behind a black mask. With your Foreground color set to white, get the Brush tool (B), and choose a medium-sized, soft-edged brush set to 100% Opacity. Now, paint over her eyes and the surrounding eye socket areas. I know she looks like she’s been lying in the sun with sunglasses on, but we’ll fix that by lowering the layer’s Opacity until the brightening matches the rest of her face. If any edges look brighter, switch your Foreground color to black and paint right over them.
Step Eight:
The alternative technique actually uses the options in the Levels adjustment layer (but we leave the blend mode set to Normal). Doing it this way, you can really adjust the whites just the way you want them—adjusting the highlights and midtones, either together or separately. Here’s the image we’ll use for this technique.
Step Nine:
Choose Levels from the Layers panel’s Create New Adjustment Layer icon’s pop-up menu and then, in the Adjustments panel, drag the highlights Input Levels slider (the white triangle under the right side of the histogram) to the left quite a bit. If you want to make the whites of the eyes really bright (like this photo needs), drag the center midtones Input Levels slider to the left, as well (as shown here). You can see the whole photo is really bright now and that it’s a different, edgier kind of bright than Screen mode brings. (By the way, which method is “right?” That’s easy—the one that looks the best to you. If you try the Screen method and don’t like the results, then try this Levels method, or vice versa.)

Step 10:
Press Command-I (PC: Ctrl-I), which inverts the layer mask, making it black and hiding the Levels brightening behind that mask.
Step 11:
Zoom in on one of the eyes, make sure your Foreground color is set to white, then press B to get the Brush tool. Choose a very small, soft-edged brush from the Brush Picker, and begin painting over the whites of the eyes (as shown here, where I’m painting over the left side of the eye on the left). Basically, you’re going to follow the same steps as before—including painting over the bottom eyelid, so you can get the whites under the iris, and then painting the spillover away, then painting the other eye, and then zooming back out and lowering the opacity. So, the rest of the technique is pretty much the same, but the actual whitening uses Levels instead of Screen. The good news is that now you have two techniques for whitening eyes in your bag of tricks, rather than just one.
Download this image. See pg. xi.
Removing Eye Veins
Over the years, I’ve tried just about every trick for “getting the red out” and removing red eye veins—everything from the Healing Brush, to the Patch tool, to the Clone Stamp—but I don’t think any of them work nearly as well as this simple, fast technique that removes all the veins, yet leaves the eyes looking clean and clear. This is also a great technique for removing contact lenses visible in your subject’s eyes.
Step One:
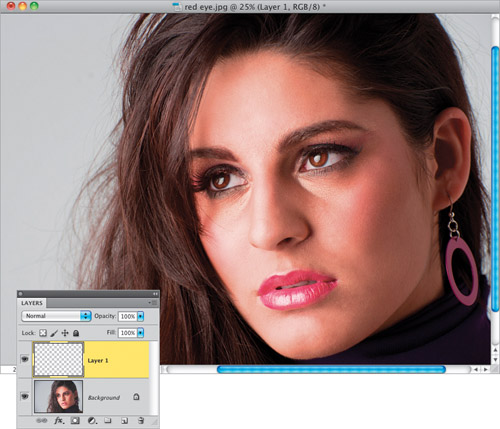
Here’s the image we’re going to retouch, and if you look at the eye on the right, you can see some red veins that need to be removed. We’re at a 25% magnification here, but you’re going to need to zoom in to at least 100% to really see what you’re working on, so grab the Zoom tool (Z) and zoom in on the eye on the right. Then, click on the Create a New Layer icon at the bottom of the Layers panel to create a new blank layer.
Step Two:
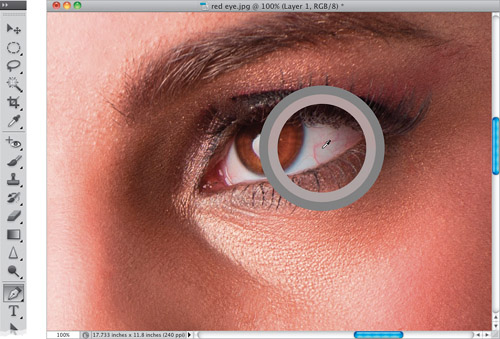
You’re going to remove these red veins using two tools: the Brush tool and the Eyedropper tool. So, get the Brush tool (B), then press-and-hold the Option (PC: Alt) key and your cursor will temporarily switch to the Eyedropper tool, so you can sample any color in your image to instantly make it your Foreground color. You’re going to want to click the Eyedropper tool right near the red vein you want to remove (as shown here, where I’m clicking the Eyedropper tool right below the vein I want to remove). A large circular ring appears around your Eyedropper tool when you click—the inside of the ring shows the exact color you just sampled and the outside of it is a neutral gray to help you see the color without being influenced by surrounding color (but just for the record, I don’t think that idea actually works—at least not with that small a ring, but hey, that’s just me).
Step Three:
Let go of the Option key to return to the Brush tool, set your brush Opacity (up in the Options Bar) to 20%, and choose a small, soft-edged brush that’s just a little bit larger than the vein you want to remove. Now, just start painting a few strokes right over the vein, and in just moments—it’s gone! Remember, at 20% opacity, the paint builds up, so you have a lot of control as you build up your paint over the vein, so don’t be afraid to go over the same stroke more than once. Since the eye itself is a sphere, the shading changes as you move across the eye, so be sure to sample again near what you’re painting over as you’re removing these veins, so the color and tone stay right on the money (I resampled about 10 or 12 times during this retouch).

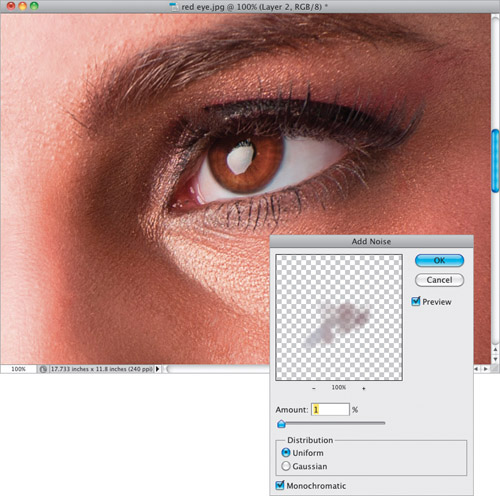
Step Four:
Lastly, to keep the whites of the eyes from looking pasty after your retouch, we’re going to add a tiny bit of noise to your retouch layer. Go under the Filter menu, under Noise and choose Add Noise. When the filter dialog appears, choose 1%, click on the Uniform radio button, and turn on the Monochromatic checkbox. Click OK to add this texture to your retouch. Although it’s subtle, it does make a difference. A before/after is shown on the next page.
Download this image. See pg. xi.
Changing Eye Color
While you wouldn’t normally change your subject’s eye color if you were just shooting a portrait for them, if you’re shooting for a client, the art director might call on you to change eye color to match the color of an outfit, or a scene, or for just about any reason at all. Luckily, this is usually one of the easiest retouches to pull off.
Step One:
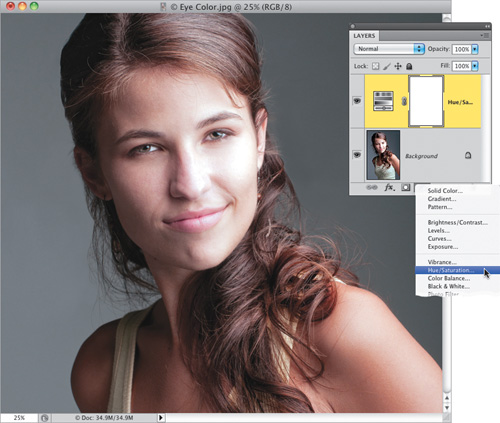
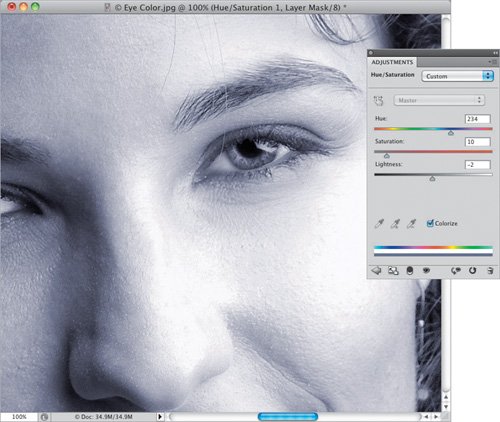
In this image, our subject has hazel eyes and we want to change them to blue. So, start by clicking on the Create New Adjustment Layer icon at the bottom of the Layers panel and choosing Hue/Saturation from the pop-up menu.
Step Two:
Zoom in on the eye on the right and then, to choose a new eye color, start by turning on the Colorize checkbox in the Adjustments panel. Choose a blue color by dragging the Hue slider to the right to a blue hue. Here, I dragged the Hue slider over to 234. Of course, this makes the entire image appear blue, but we’ll deal with that in the next step. For now, my concern is that the blue is too vibrant and artificial looking, so to take the intensity of the blue down, lower the Saturation amount to just 10. Lastly, you can control the brightness of the blue using the Lightness slider. Here, I just tweaked it a tiny bit by lowering the Lightness to −2, which just darkened up the blue a bit.
Step Three:
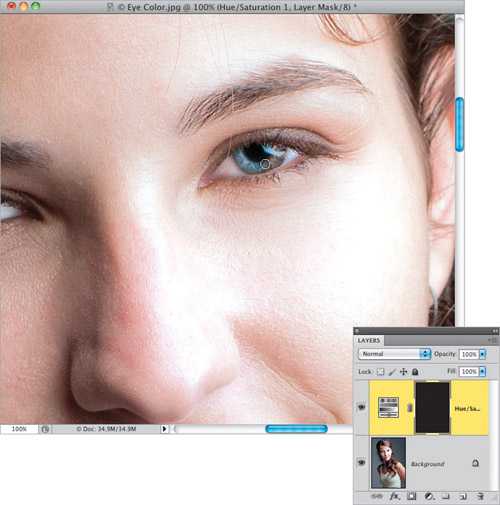
To keep the entire photo from having this blue tint, just press Command-I (PC: Ctrl-I), which inverts the layer mask on the adjustment layer, making the mask black and hiding the blue tint behind it. Now, get the Brush tool (B), choose a small, soft-edged brush from the Brush Picker, make sure your Foreground color is set to white, and paint over just the iris (avoiding the black pupil, as shown here). As you paint, the eye takes on that blue tint (as seen here).
Step Four:
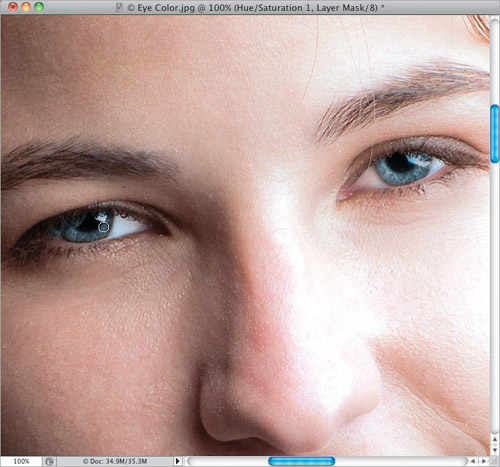
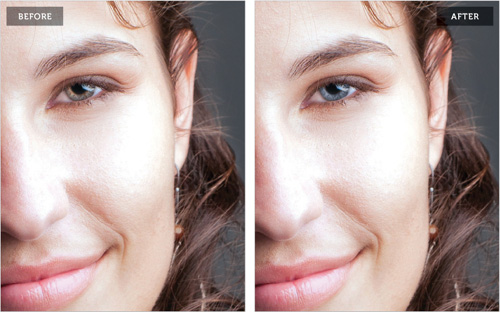
Here’s how it looks when you paint in the other eye, as well. Because you lowered the Saturation and tweaked the Lightness, the blue color looks very natural. Of course, you still have the option of backing off that blue a bit by lowering the Opacity of the adjustment layer at the top of the Layers panel.
Tip
When changing the color of dark eyes, you may need to drag the Lightness slider to the right a tiny bit in the Adjustments panel. Don’t take it too far, though, or it’ll just look fake.
Download this image. See pg ix.
Reducing Dark Circles Under Eyes
Although you don’t see this on the cover of magazines, most people have dark circles under their eyes. In fact, as long as your subject isn’t four years old, it’s almost a certainty that they’re going to have some kind of dark circles under their eyes. And, depending on the lighting you use, you can make them less noticeable, or more so, but they’re almost always there. Here’s not only how to reduce or remove them, but how to deal with one of the most annoying side effects of using the Healing Brush (or the Patch tool) to do this type of retouch.
Step One:
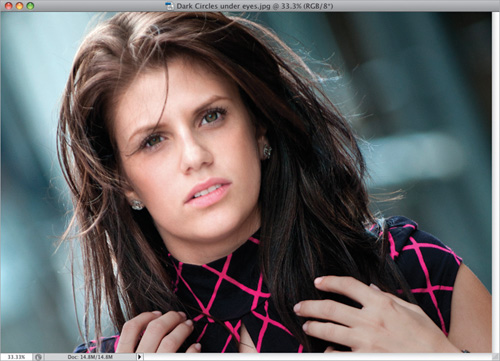
Open a photo that has dark circles beneath the eyes that you want to lessen (you have to choose whether you want to reduce them or remove them all together. You’ll have to make the call based on the subject’s age—if they’re over 30, just reduce them).
Step Two:
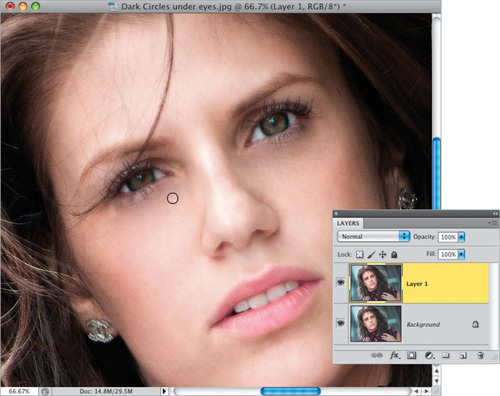
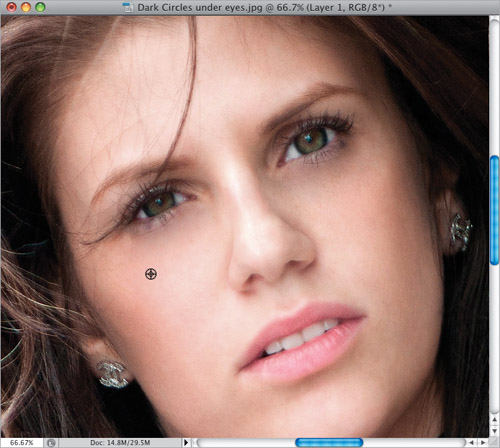
Start by zooming in on the eye area and then pressing Command-J (PC: Ctrl-J) to duplicate the Background layer (so we’re working on a copy of the Background. This is important, because we’re going to use this layer to control the amount of removal later on). Get the Healing Brush tool (press Shift-J until you have it) and, in the Options Bar, choose a small, hard-edged brush from the Brush Picker, and make sure the Sample pop-up menu is set to Current Layer. Now, totally remove the dark areas by Option-clicking (PC: Alt-clicking) in a nearby area that has kind of the same skin tone as where the dark areas are (usually just below the dark area). Then, paint over the dark areas (and wrinkles) to get completely rid of them as best you can (as seen here). It looks a little artificial at this point (though, you see this look on magazine covers all the time), but we’ll adjust that later. For now, just remove the dark areas.
Step Three:
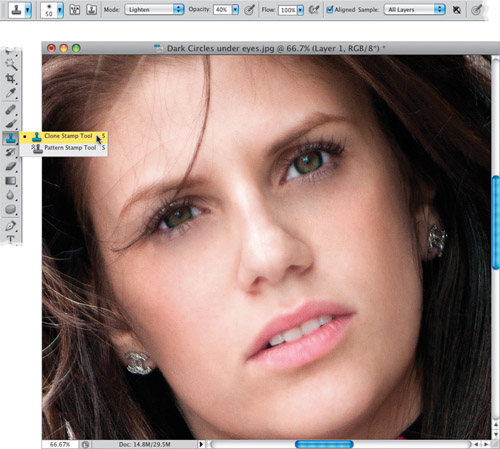
Although the Healing Brush does a pretty decent job of getting rid of the dark areas, it usually leaves kind of a smeared dark area under the eye, which stinks, because you’re trying to remove the dark circle, right? So, this retouch usually requires two tools: you start with the Healing Brush (like we just did in Step Two) and then you switch to the Clone Stamp tool. So, get the Clone Stamp tool (S) from the Toolbox, then go up to the Options Bar, lower the Opacity of it to around 40%, then change the Mode pop-up menu to Lighten (that way, when you use the Clone Stamp tool, you’ll only affect areas that are darker than the area you sampled).
Step Four:
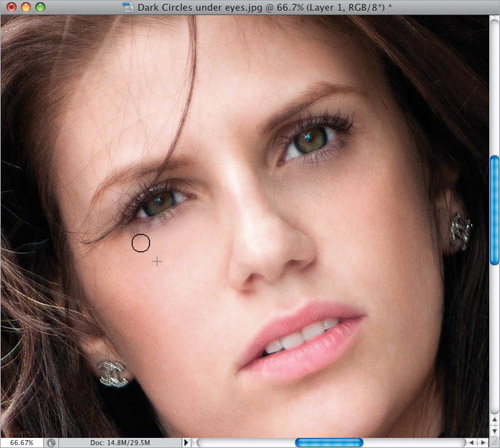
Press-and-hold the Option (PC: Alt) key and click once in an area near the eye that isn’t affected by the dark circles. If the cheeks aren’t too rosy (like in this image), you can click there to sample, but more likely you’ll sample an area just below the dark circles under the eyes.
Step Five:
Now, take the Clone Stamp tool and paint a stroke (from left to right) over the dark circles to lessen or remove them. It may take two or more strokes for them to pretty much disappear (go right, then back to the left, and so on), so don’t be afraid to go back over the same area again, if the first stroke didn’t work.
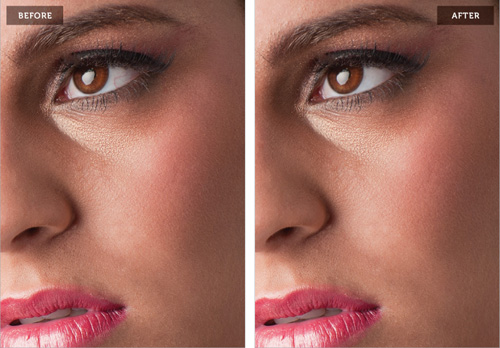
Step Six:
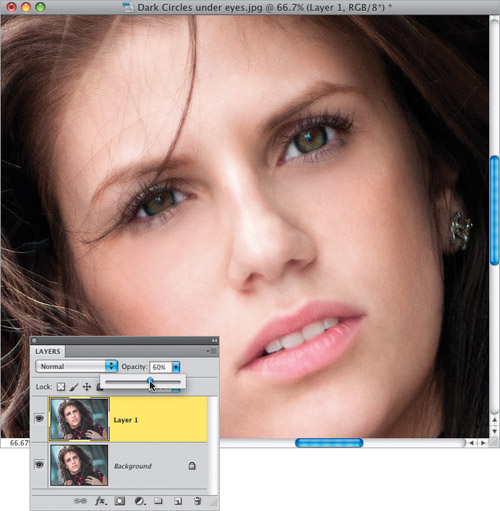
You can control the amount of dark circle area and wrinkles appearing under the eye by lowering the Opacity of the top layer. Here, I’ve lowered it to 60%, so just a little tiny bit of the natural dark circle area and wrinkle appear, and of course, the whole retouch now looks much more natural. That being said, remember—there may be situations where, as the retoucher, you decide that for a particular subject (or intended use) you don’t want any dark circles or wrinkles to appear whatsoever. If that’s the case, just leave the layer opacity at 100%. But, that’s a call only you can make. A before and after (at 60% opacity) is shown on the next page.
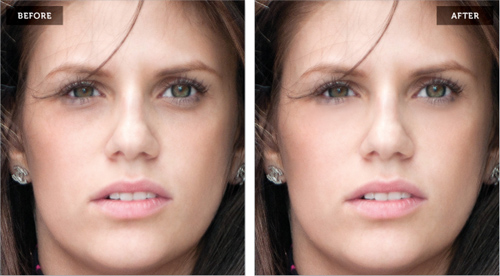

Download this image. See pg. xi.
Making Eyes Larger (or Smaller)
This is a very common retouch, especially in fashion or glamour images, because big eyes really draw a viewer’s attention (and we generally seem to love big eyes. Look at any Disney cartoon and notice the size of the eyes in their drawn characters. They’re huge! But they’re huge because they look great). Here’s how to make your subject’s eyes a little bit larger and how to use a slightly different technique if your subject has...ahem...bug eyes.
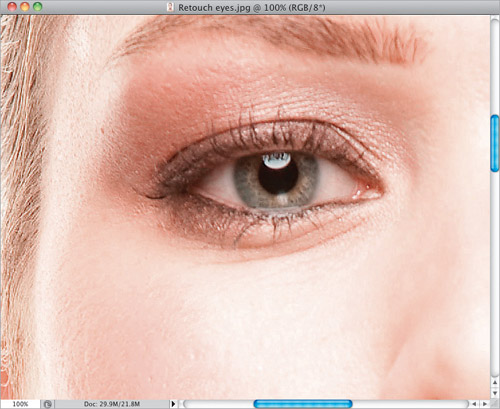
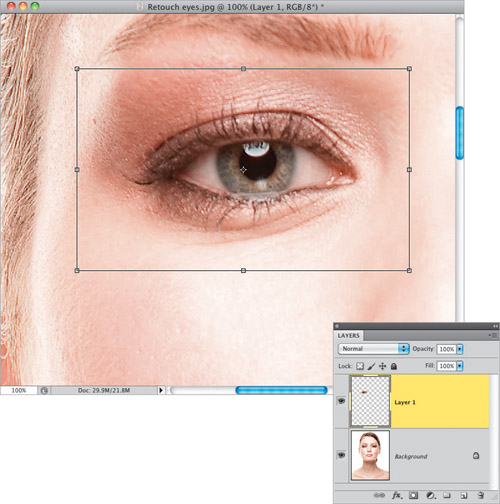
Step One:
Here’s a regular-sized eye we want to enhance by making it larger. (By the way, if you want to download the images I’m using here in the book to follow along with, I provided the URL for the book’s companion website in the front of the book in “Seven Things You’ll Wish You Had Known Before Reading This Book.” See? This is one of those things.)
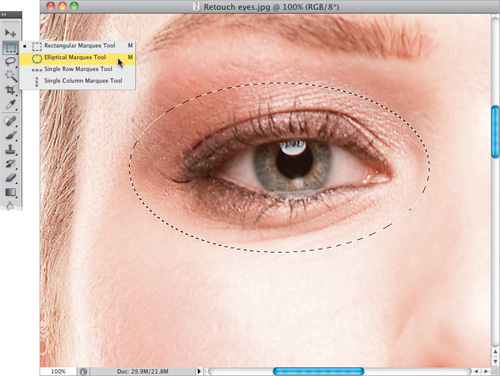
Step Two:
Get the Elliptical Marquee tool from the Toolbox (or press Shift-M until you have it. Honestly, I don’t know anybody who calls it that. We all just call it the “Round Selection” tool), and make an oval-shaped selection around the eye, like you see here. Make sure you fully enclose the eyelashes inside your selected area, but don’t make the selection any larger than necessary—make it pretty much like the size you see here. If you need to move the selection around as you’re creating it, just press-and-hold the Spacebar.
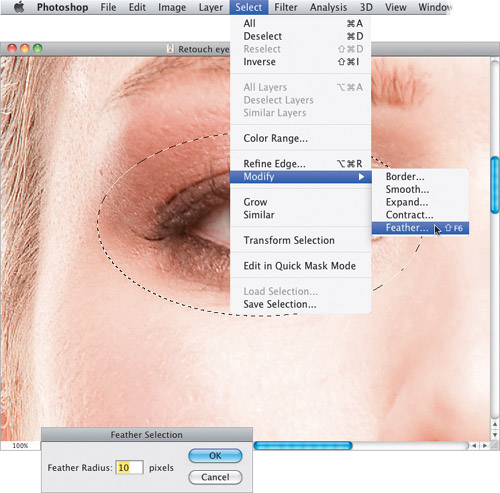
Step Three:
To help hide the retouch, we’re going to soften the edge of our selection by adding a feather to it. Go under the Select menu, under Modify, and choose Feather (as shown here). In the Feather Selection dialog, enter 10 pixels and click OK. This softens the edge all the way around the oval, so you won’t see a hard edge around the area we’re about to adjust.
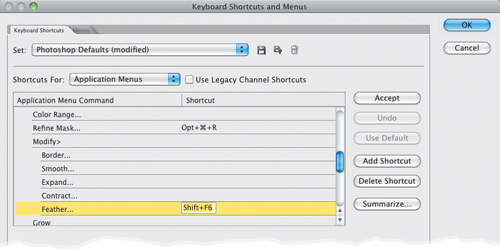
Tip: Feather Selection Shortcut
We use feathering a lot throughout this book, so you might as well learn the keyboard shortcut now to save you loads of time later—it’s Shift-F6. If you hate that keyboard shortcut (I do), you can create a custom shortcut by going under the Edit menu and choosing Keyboard Shortcuts. On the Keyboard Shortcuts tab of the Keyboard Shortcuts and Menus dialog, click on the right-facing arrow to the left of Select and scroll down to Modify. Click on the existing shortcut for Feather, type in a new one (mine’s Command-Option-Shift-F), and click OK.
Step Four:
Now, you’re going to copy that selected area of the eye up onto its own separate layer. So, press Command-J (PC: Ctrl-J) to do that and then press Command-T (PC: Ctrl-T) to bring up Free Transform, which puts a bounding box around your eye copy layer (as seen here).
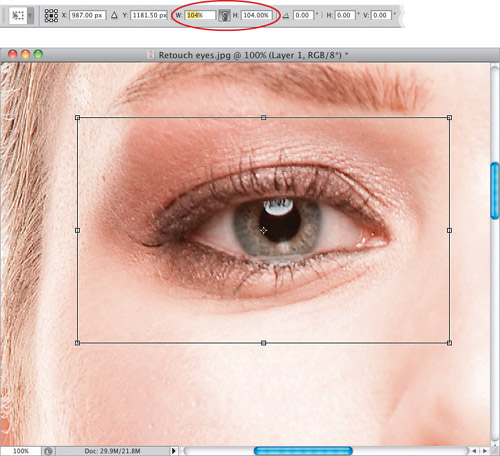
Step Five:
In the Options Bar, you’ll see W (width) and H (height) fields. First, click on the little link icon that appears between the two fields to link them together, so when you type in a width, the height will increase the same exact amount. Now, enter a percentage of how much larger you want the eye. Start with 104% (which is actually just 4% larger) and you see the entire eye grow in size. By the way, 4% may not sound like a lot, but it’s actually a fairly large move, as you’ll see when you try it yourself. I’ve increased as much as 6%, but usually anything above that, and it can start to look kind of obvious. But, of course, it depends on the image, so use your best discretion. If 9% or 10% looks good, go for it. Press Return (PC: Enter) to lock in the transformation.
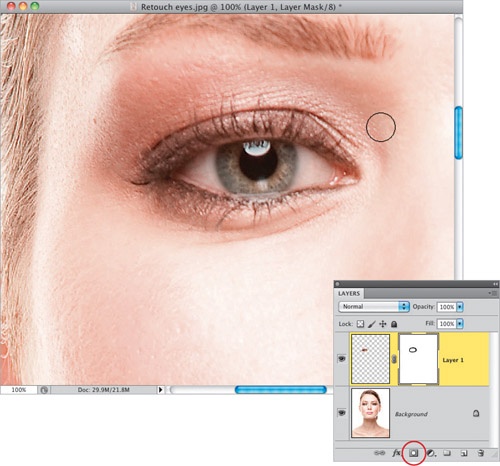
Step Six:
Because we feathered the edges of the oval selection, it’s fairly likely that, at first, you won’t see any edges overlapping whatsoever. But if you zoom in tighter, you might see a little extra skin from the larger eye overlapping a bit. If you do, it’s easy to fix. Just click on the Add Layer Mask icon at the bottom of the Layers panel (shown circled here in red). Press X to set your Foreground color to black, then press B to get the Brush tool, and choose a medium-sized, soft-edged brush from the Brush Picker in the Options Bar. Now, just paint over the edges of the larger eye to blend them smoothly away and into the original skin surrounding the eye on the Background layer. You might have to go all the way around the eye, but just try not to erase the eyelashes. Everything else outside that is fair game.
Step Seven:
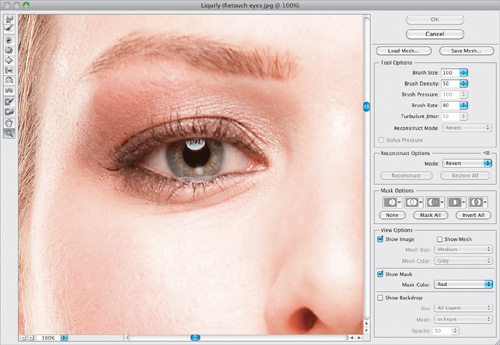
Another way to increase eye size is to use the Liquify filter. This way works best if you just want to increase the iris itself, and not the rest of the eye and eyelashes, but you can make it work to increase the entire eye (like we just did) if you want. So, start by going under the Filter menu and choosing Liquify (it’s right near the top of the list) to bring up the Liquify dialog you see here. Get the Zoom tool (Z) from the Toolbox in the top left of the dialog and zoom in on an eye.
Step Eight:
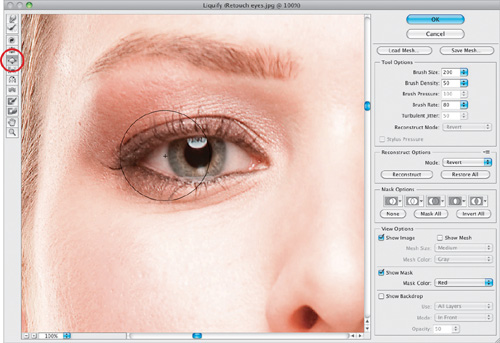
Now, get the Bloat tool (B) from the Toolbox (it’s the fifth tool down, shown circled here in red) and make your Brush Size a little larger than the eye itself. Here’s another keyboard shortcut you’re going to want to know, because you’ll be changing brush sizes quite a bit inside this dialog: Press-and-hold the Shift key and then press the Left Bracket key to make the brush smaller or the Right Bracket key to make it larger (the bracket keys are to the right of the letter P on your keyboard). This shortcut decreases/increases the brush size in increments of 20. Here, I had to press Shift-Right-Bracket key a few times to make my brush really large. (Note: If you’re not comfortable with the keyboard shortcuts, you can use the Brush Size slider, which is near the top right of the dialog, in the Tool Options section.) Now, move your brush over the left side of the eye and click twice to increase the size of that side of the eye.
Step Nine:
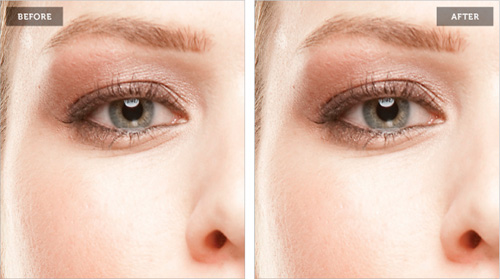
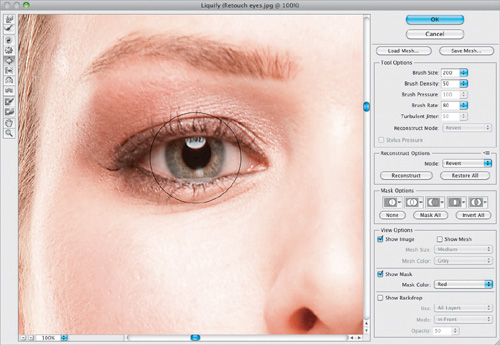
Move your brush over the center of the eye, click twice again, and that area increases in size. (By the way, if you just wanted the iris bigger, you’d start in the middle and click two or three times to increase just the size of the iris. This brush kind of bulges from the center out, so it works great for making just the iris larger.) Because each click makes the eye bulge out a little larger, you want to move evenly from left to right, so if you click once on the left side of the eye, then you want to be consistent as you move across the eye to the right—click once each time. If you click twice on the left (like we did here), then you need to click twice each time as you move across the eye, so it looks even. Don’t paint with this tool, just click. When you reach the far right, if it looks good to you, click the OK button. Also, if you mess up (sometimes you’ll click once, and it applies like 10 clicks at once), just press Command-Z (PC: Ctrl-Z) to undo that click, then do it again. See the next page for a before and after using Liquify.
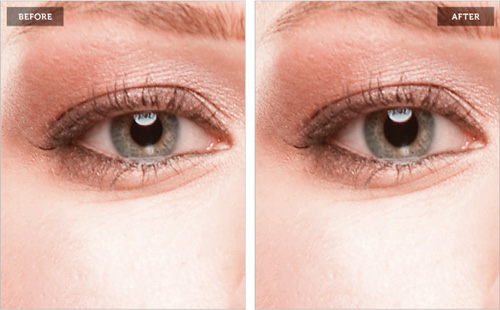
Download this image. See pg. xi.
Swapping One Eye for the Other
If your subject has one eye that is larger, smaller, or open more than the other eye, or if they have a “lazy eye” or any other physical reason where you’d want to swap one eye for the other (including the very common instance where your subject’s hair is covering one eye, and where it would be too hard or too time consuming to repair), here’s a tried and true way to use one eye to fix the other:
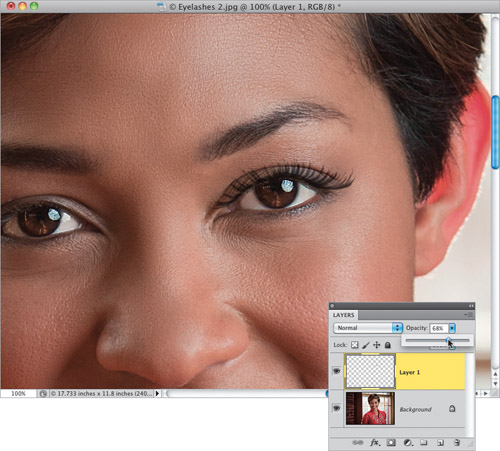
Step One:
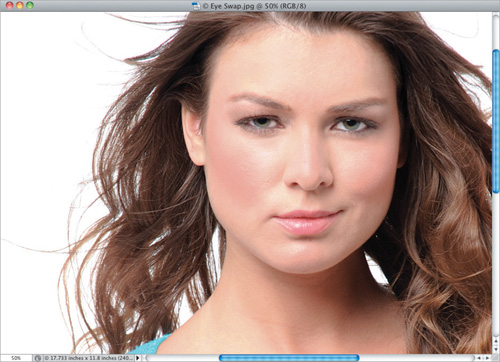
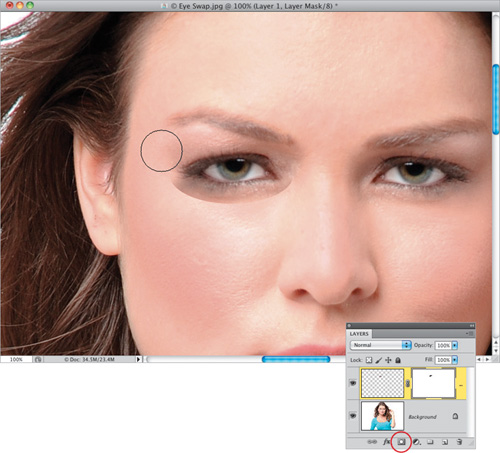
Here’s the image we’re going to retouch, and if you look at her eyes, you’ll see that the eye on the right is open wider than the one on the left. So, what we’re going to do is use a copy of the one on the right to fix the one on the left, so that they’re both open the same amount.
Step Two:
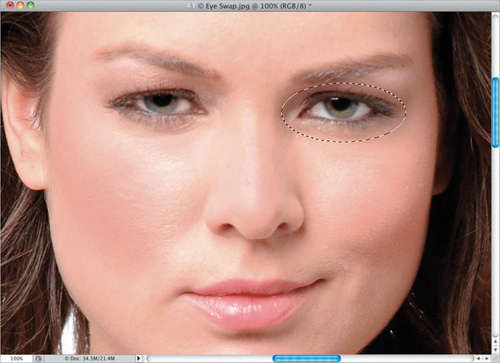
Start by getting the Zoom tool (Z) and zooming in on the eyes. Then, with the Elliptical Marquee tool (press Shift-M until you have it), make a selection around the entire eye on the right. It’s okay if you get a lot of extra area around it—it doesn’t matter at this point, we’ll deal with that later. For now, just drag out your selection around the entire eye like you see here. By the way, we won’t need to feather this selection, because we’re going to mask the excess eye area away later with a soft-edged brush.
Step Three:
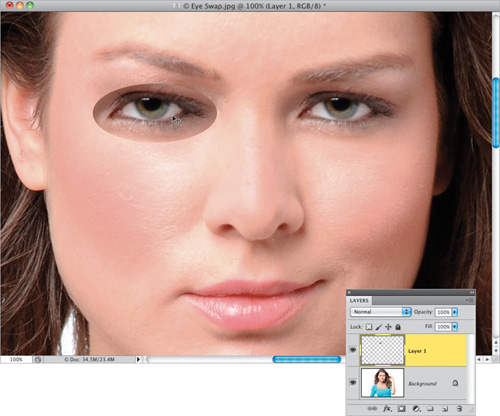
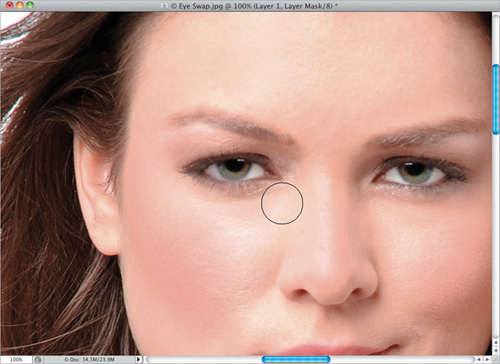
You’re going to need to put the selected area up on its own separate layer, so press Command-J (PC: Ctrl-J). Get the Move tool (V) and drag this copied eye area on the right over so it covers the eye on the left (as shown here). The lighting on the eye on the right is different than it is on the one on the left, so it’s really going to stand out a lot (as seen here), but we’ll deal with that in just moment. For now, just kind of get that copied eye in the area of the one on the left. Now, you’re probably concerned about more than just the lighting on the copied eye, because now our subject has two left eyes (which looks kinda creepy), so we’ll fix that in the next step.
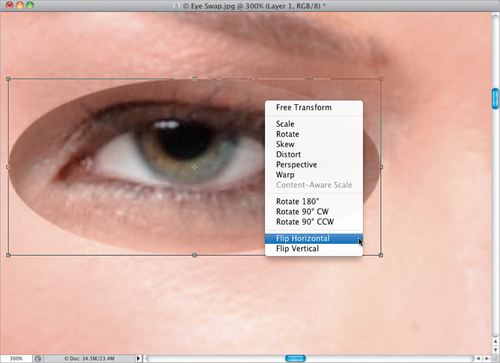
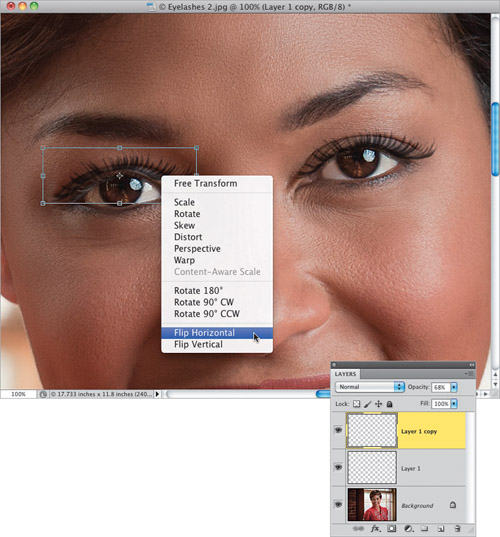
Step Four:
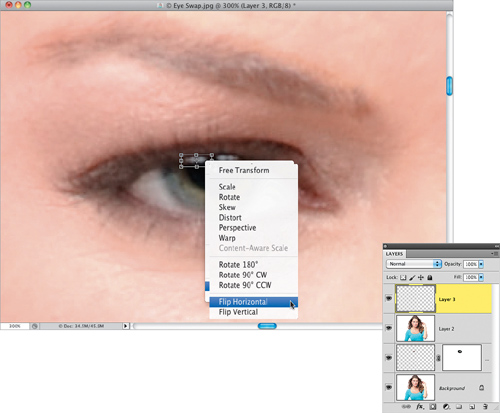
Zoom in more on the eye on the left and then press Command-T (PC: Ctrl-T) to bring up Free Transform. Right-click anywhere inside the Free Transform bounding box and a pop-up menu of transformations appears. Choose Flip Horizontal from this menu (as shown here) to flip this copied eye horizontally, so it becomes a left eye. Don’t press Return (PC: Enter) to lock in the transformation just yet, though.
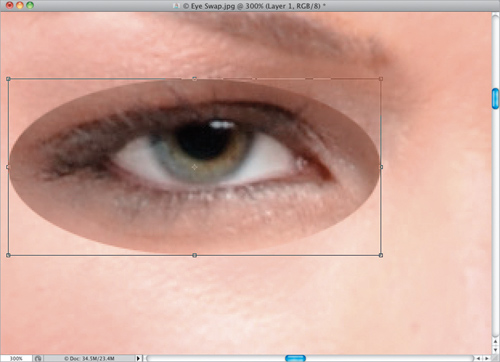
Step Five:
Here’s the copied eye layer after it’s been flipped horizontally, and you can see it now looks like a right eye (though there’s still some work to be done).
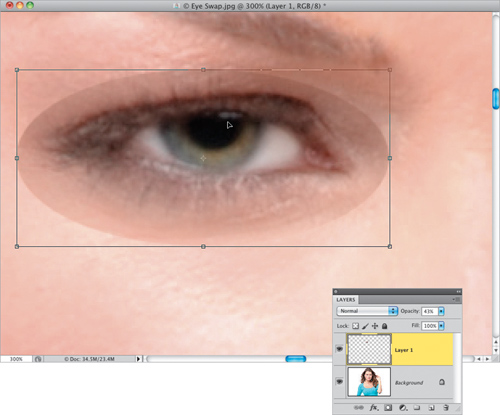
Step Six:
Now we have to align this new eye so it fits perfectly over the old eye (if it’s too high, or too far to the left or right, it will look weird). The trick is to, while the Free Transform bounding box is still in place, go to the Layers panel and lower the Opacity of this layer, so you can actually see through the layer (in this case, I lowered it to 43%). That way, you can see the original eye (on the layer below), which you can now use to align the two eyes (use the iris as a guide). Drag it to where it’s fairly close, then use the Arrow keys on your keyboard to nudge it perfectly into place. Once you get it pretty close, I find it’s helpful to lower the Opacity to 0, then back up to 100%, and compare how it looks. You shouldn’t see a whole lot of movement when you hide and reveal the copied eye from 0% to 100%. If you see much movement (like it moves left or right, or up or down), you don’t have it properly aligned, so try lowering the Opacity even more and try again.
Step Seven:
Once you feel like you’ve got them pretty well lined up, then you can raise the Opacity back to 100%, press Return (PC: Enter) to lock in your transformation, and you’re ready to move on. Two quick things: (1) I leave Free Transform in place while I’m nudging things around in case I need to tweak the size of the copied eye a bit to match. Sometimes I need to make it a tiny bit bigger or smaller, depending on which way my subject is facing, or which eye is closest to the camera. And (2) I usually show/hide the eye a few times at this point just to make sure it’s right on the money (click on the Eye icon to the left of your copied layer to show/hide it).
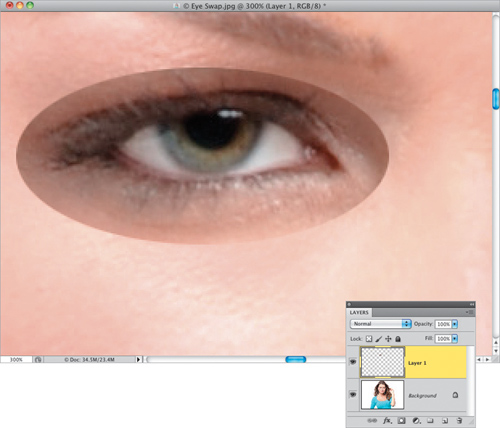
Step Eight:
Now, we’re going to get rid of the excess area around the eye. First, click on the Add Layer Mask icon at the bottom of the Layers panel (it’s shown circled here in red). Then, get the Brush tool (B), choose a large, soft-edged brush from the Brush Picker in the Options Bar, and with your Foreground color set to black, gently paint over the excess area around the eye, so just the eye remains. Here, I’m painting over the top-left side of the copied eye (I zoomed back out a little so I could see what I was doing better). You’ll be surprised how easy this is using a large, soft-edged brush. Because the edges of the brush are so soft, it’s easy to just paint away the edges while staying far away from them, and letting the outside edge of your brush do all the work.
Step Nine:
Continue painting around the outside of the eye with your black, soft-edged brush, until just the eye itself is left, and all the excess has been brushed away (as seen here).
Step 10:
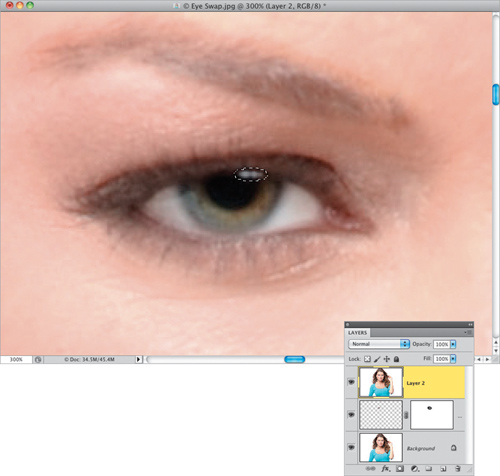
Now, it’s time to hide your tracks a bit. One dead giveaway that you’ve done an eye swap is that the catch light in the new eye on the left is on the wrong side of the eye. Since the copied eye was flipped, your catch lights are now cross-eyed (a dead giveaway), so you’ll have to move the catch light itself to the other side of the eye (don’t worry—it’s easier than it sounds). First, let’s create a merged layer, which is a new layer that looks like a flattened version of our image. That way, if we need to go back to this layer again, for whatever reason, it’s still there. So, press Command-Option-Shift-E (PC: Ctrl-Alt-Shift-E) to create a new merged layer at the top of the layer stack. Then, get the Elliptical Marquee tool again, and drag out a small circular selection around the catch light in the copied eye, with a few extra pixels of black around the outside (as shown here).
Step 11:
Press Command-J (PC: Ctrl-J) to put this catch light up on its own separate layer and then press Command-T (PC: Ctrl-T) to bring up Free Transform. With the Move tool (V), drag this catch light copy straight over to the left side of the pupil to where it should have been if we hadn’t faked it. Now, Right-click anywhere inside the Free Transform bounding box, and choose Flip Horizontal from the pop-up menu (that’s right—we’re going to flip that catch light back to how it would have looked in the original eye on the left). Press Return (PC: Enter) to lock in your transformation.
Step 12:
In the Layers panel, click on Layer 2 (the layer with the backwards catch light) to make it active. You can either use the Eyedropper tool (I) and click anywhere on the pupil to sample its color (as shown here), and then simply paint over the old catch light using a very small, soft-edged brush, or you can use the Clone Stamp tool (S) to clone part of the pupil over the old catch light. Either method will work, so choose whichever is more comfortable to you.
Step 13:
Here, I used the Clone Stamp tool to do my dirty work. I Option-clicked (PC: Alt-clicked) on the pupil to use that as my cloning source (the area I’m going to use to clone over my old catch light), then I painted directly over the old catch light (as seen here) to clone the sampled pupil right over it. (If this doesn’t work for you, in the Options Bar, make sure you have the Mode set to Normal and All Layers selected in the Sample pop-up menu.) The final thing I usually do is to just clone away one or two of the eyelashes on Layer 2, so the two eyes don’t have identical eyelashes. I’ve found just cloning away one or two makes it look different enough. See a side-by-side comparison on the next page.
This second practice image is tricky, because she’s not facing the camera directly, so if you use the technique as is, she’ll look cross-eyed. Here’s how to get around that: At the end of Step Three, add a layer mask and erase the eye itself, leaving just the eyelids and lashes from the copied eye visible. Then, add a new blank layer below that layer. Get the Clone Stamp tool (S), make sure it’s set to sample All Layers in the Options Bar, then Option-click (PC: Alt-click) on the pupil of the good eye, move over to where the other eye should be, and clone in the good iris and pupil over the other eye. Since they’re on their own layer, you can erase any parts that overlap.
Download this image. See pg. xi.
Enhancing Eyelashes
Retouching eyelashes is pretty tough, because you basically have to create them. So, to make things easier, I asked my buddy Corey Barker (who’s a wizard with Photoshop’s brushes) to work with professional makeup artist Shelley Giard to come up with a set of brushes for creating great-looking eyelashes (you get these for free, by the way), including one-click complete lashes. But, his set of brushes also includes individual eyelash hair brushes that work brilliantly (thanks to a little Photoshop trick), and I’ll show you the long way, too, using them to create new eyelashes (just in case you’re charging by the hour).
Step One:
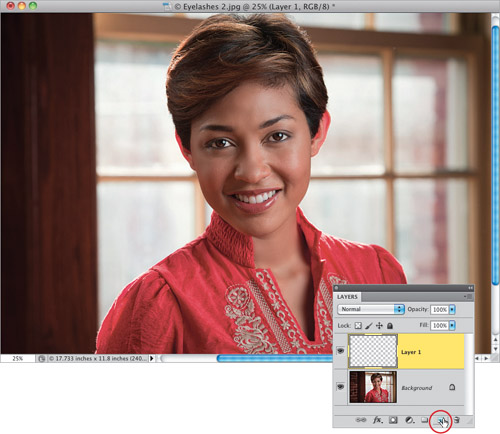
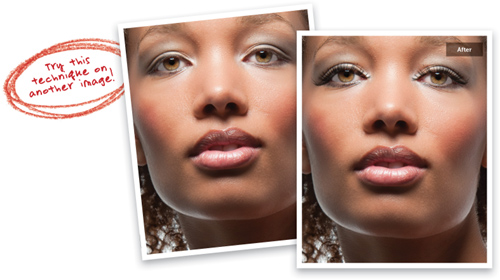
Here’s the image that we want to add some pretty fabulous lashes to (see, this is what happens when you start hanging around makeup artists. You start using words like “fabulous” and “luscious,” and other terms you normally wouldn’t use while playing Call of Duty: Black Ops). We’re going to build the eyelashes on their own separate layers, so start by creating your first new blank layer by clicking on the Create a New Layer icon at the bottom of the Layers panel (as shown here).
Step Two:
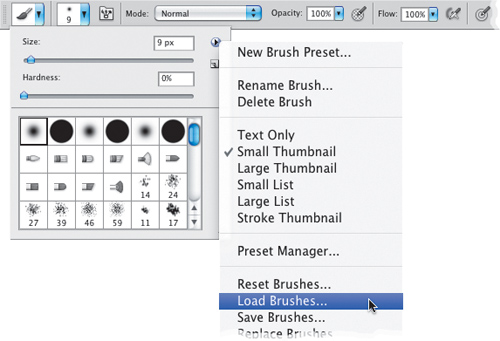
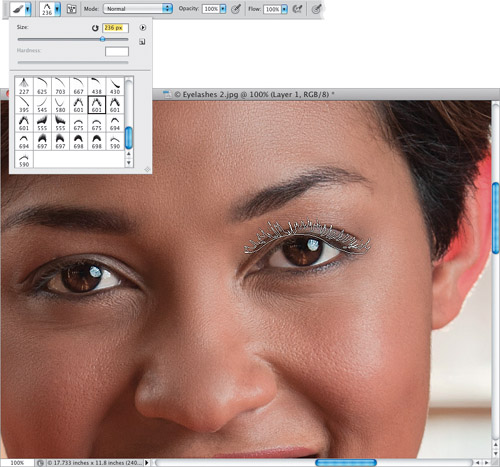
Like I said above, we’ve created a set of custom eyelash brushes just for you (again, big thanks to Corey Barker and Shelley Giard) and you can download these from the book’s companion website (you’ll find the address in the book’s intro). To get these custom eyelash brushes into Photoshop, first get the Brush tool (B), then click on the Brush icon on the far-left side of the Options Bar (the second icon from the left) to open the Brush Picker. From the Brush Picker’s flyout menu, choose Load Brushes, and then find the “Scott’s Eyelash Brush Set.abr” file that you downloaded (I believe “abr” stands for “Asian Boat Rat”) and click Open (PC: Load).
Step Three:
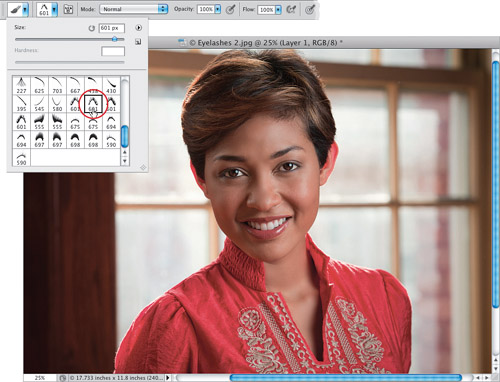
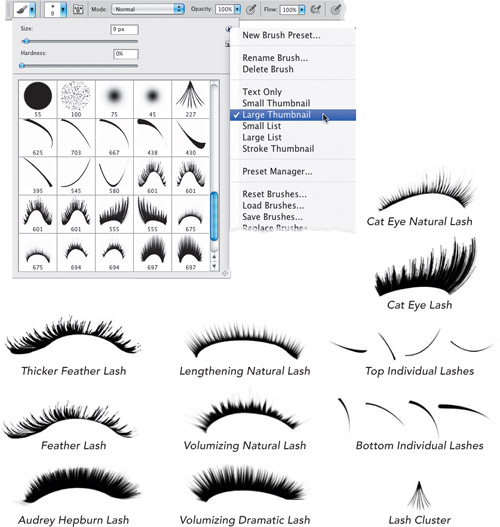
These new eyelash brushes will appear at the bottom of the Picker beneath your regular brushes (as seen here. You’ll see right- and left-eye versions of each brush). We made the brush sizes really large (some as high as almost 700 pixels), so you can use them on very-high-res images—like 18- to 24-megapixel. The only downside is that if you’re not working on very-high-res images like this, you’ll have to lower the size of the brush to fit your subject (it’s easy enough, though, you just change the Size at the top of the Picker, but it is an extra step). Now, you have to decide if you want to go with some really dramatic eyelashes—maybe some cat-eye eyelashes—or something a bit more conservative. Since she’s wearing a pretty conservative outfit (it doesn’t look like she’s on her way out to a club), we’ll go with something a bit tamer. Click on the Feather Lash Right brush we loaded (the first 601 pixel brush, as shown here; the second 601 brush is a similar shape—it’s just thicker).
Note: By the way, when you load the brushes and look at their thumbnails in the Brush Picker, they’ll appear arched and looked squished in the square thumbnails (you’ll see how they’re really shaped by looking at your cursor, once you choose a brush). If you want to see them at a larger thumbnail size in the Picker, choose Large Thumbnail from the Picker’s flyout menu.
Step Four:
Zoom in on the eye on the right of the image and then, in the Brush Picker, lower the Size of this brush until it’s about the approximate size of the eye you want to add it to. I move the brush to approximately where I think it might go (as shown here), so I can make a reasonable estimate about how big to make it (in this case, I lowered the slider from 601 pixels down to around 236).
Step Five:
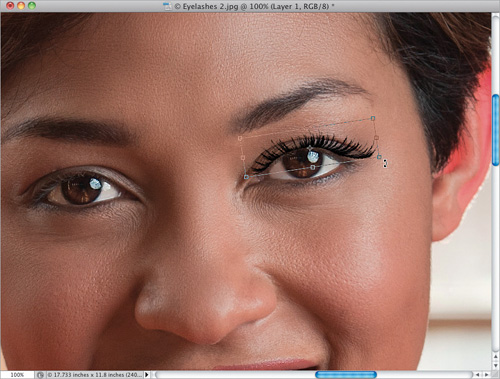
Now, press D to set your Foreground color to black, and click once near where you want the eyelash to appear. At this point, it won’t be the exact right size, or rotation, or any of that stuff, but we at least need a starting point. So, just click it once (as shown here). Remember, it’s on that blank layer you created back in Step One, so you’ll have a lot of flexibility about its size and shape after the fact.

Step Six:
The eyelash needs to be rotated a bit to fit her eye, so press Command-T (PC: Ctrl-T) to bring up Free Transform. Click anywhere within the Free Transform bounding box and drag the eyelash, so it’s in a better position. Now, move your cursor outside the bounding box, and you’ll see that your cursor has changed into a two-headed arrow. Click-and-drag counterclockwise to rotate the eyelash, so it’s more in line with the eye (as shown here).
Step Seven:
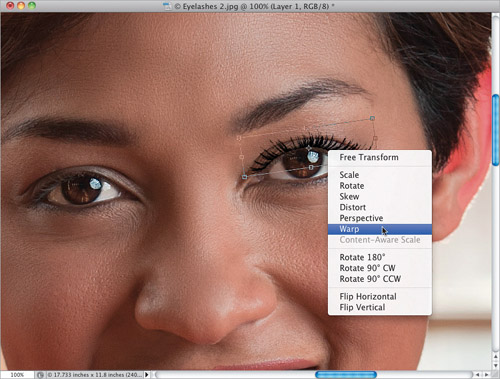
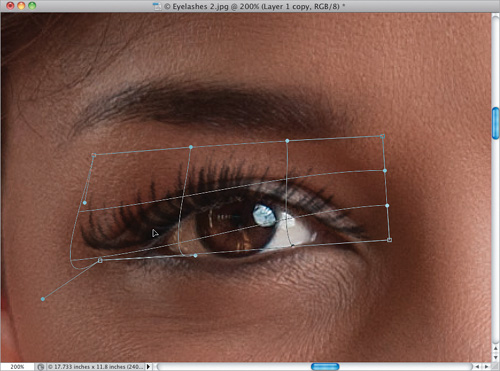
To make it actually fit the eye perfectly, we’re going to warp it. While your Free Transform bounding box is still in place, just Right-click anywhere inside the box, and from the pop-up menu that appears, choose Warp (as shown here).
Step Eight:
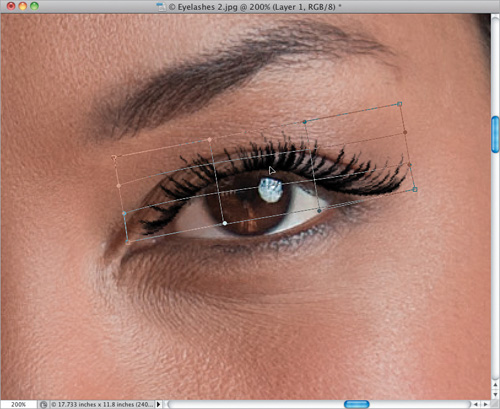
The cool thing about Warp is that it lets you pretty much treat whatever you’re working on (in this case, her eyelash) as if you were using the Liquify filter. You just click anywhere within those nine squares and drag it to reposition it. You don’t even have to be clicking on one of those lines—just click-and-drag right on the image, right where you want to move the eyelash, and it’ll move and bend like it was liquid (well, less like water, and more like molasses). This lets you pretty much just slide it around until it wraps right around the eyelid (as shown here). I had to nudge it up in the middle to make the eyelash arc more, but again, it’s just a matter of clicking-and-dragging the lash where you want it to go.
Step Nine:
Once you have the eyelash positioned right where you want it, press Return (PC: Enter) to lock in your Free Transform changes. To make the eyelashes blend in better with the existing eyelashes (and to look more natural), I normally lower the Opacity at bit. Here, I lowered it to around 65%, and now it looks much more natural. Now, the top eyelash of one eye is done, and luckily, doing the other eye only takes a fraction of the time, because we use the first eyelash to build the second.
Step 10:
Press Command-J (PC: Ctrl-J) to duplicate your eyelash layer, then get the Move tool (V) and drag it over the other eye. Now, at this point, you have two right top eyelashes (even though I provided you with both right and left eyelash brushes in my custom set, since this one is already tweaked, you might as well use it and save some time). You’ll need to flip this copied right eyelash over horizontally, so it becomes a left eyelash. So, just go to Free Transform, Right-click inside the bounding box, and choose Flip Horizontal from the pop-up menu (as shown here).
Step 11:
You’re now going to do a minor tweak to the shape of the eyelash, so it’s a perfect fit on the eye on the left, as well (rarely are both eyes the exact same size and shape). Right-click inside the bounding box again, but this time choose Warp. You can warp this eyelash to be a perfect fit in just seconds by dragging it around like it’s liquid (as shown here). When you’re done, press Return.
Step 12:
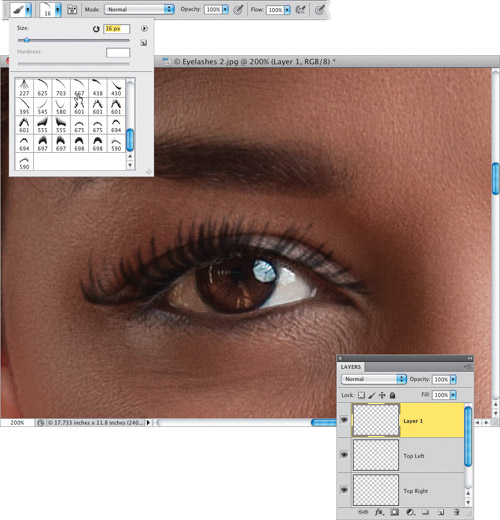
Before we move on to the bottom eyelashes, let’s go ahead and start to name our layers (I don’t worry about this when it’s just one or two layers. But, once you get above three layers, it’s a real time saver to know which layer is which, so you don’t have to guess). In the Layers panel, double-click directly on the first eyelash layer’s name, and name it “Top Right” and then name the copied layer “Top Left.” Now, add a new blank layer for the bottom lashes to the top of the layer stack, then go back to the Brush Picker and scroll to the single eyelash brushes. This sounds like it’s going to be hard, but honestly, it’s a breeze. Start by choosing Bottom Lash 3 (the 687-pixel single-hair brush; yeah, that’s one huge brush) and then you’re going to need to lower your brush Size to around 16 pixels (as shown here).
Step 13:
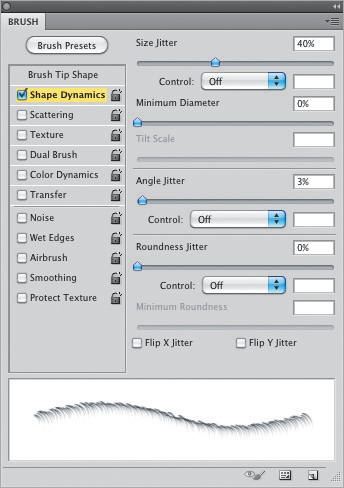
Now, you’re going to paint in the bottom lashes. The problem is that every lash you paint will look exactly the same—the same size, angle, etc.—and it’ll look pretty weird. Luckily, there’s a Photoshop trick to slightly vary the size and angle of each eyelash every time you click, so they look more random and much more realistic. You turn this feature on in the Brush panel (click on the Brush panel icon to the right of the Brush icon in the Options Bar to open it). In the section on the left, turn on the Shape Dynamics checkbox. To automatically vary the size of each hair, drag the Size Jitter slider to 40%, and to vary the angle of each hair, drag the Angle Jitter slider to 3% (that’s really all you need). Also, make sure the Control pop-up menu at the top of the panel is set to Off (as seen here; if Smoothing is turned on in the section on the left, turn it off). You can see the difference these settings make in the preview window at the bottom of the panel.
Step 14:
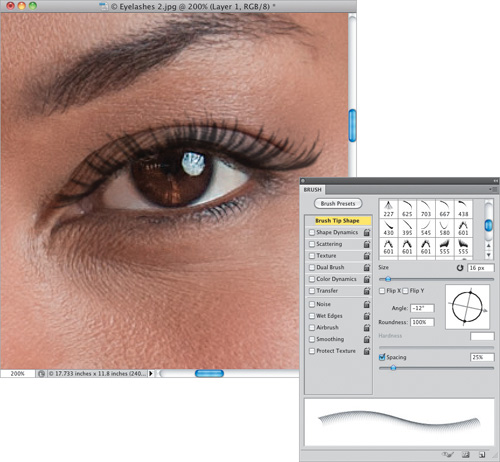
Real eyelashes aren’t all at the same angle as you move from left to right under the eye, so you’re going to have to manually vary them as you go. To do this, at the top left of the Brush panel, click on Brush Tip Shape. You see that circular Angle preview in the middle right of the panel? You’re going to use that to slightly turn your brush after each five or six clicks. I start from the right beneath the eye and make a few clicks (as seen here), then click-and-drag the Angle preview clockwise a little to change the angle (here, I dragged it to −12°). Luckily, the eyelash brush cursor changes onscreen as you do this, so you can hold it up near the eye, make a slight rotation in the Brush panel, and you’ll see how the cursor changes. This is much easier and more intuitive than it sounds, so give it a try.
Step 15:
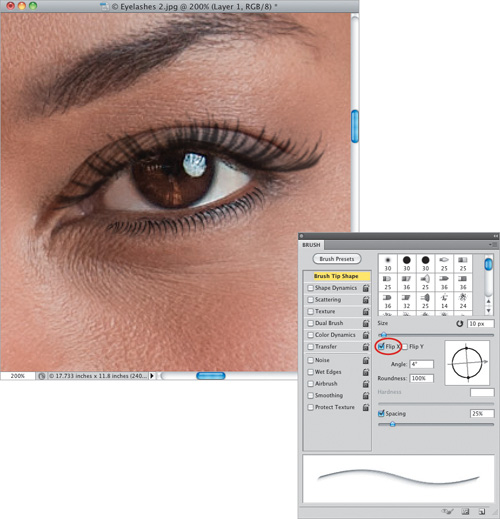
Now, paint a few more lashes, then rotate the brush again in the Brush panel. When you get to the middle of the eye, you’re going to have to flip the brush, so the eye lashes fan out like they normally would (they blend to the left on the inside, they’re almost straight in the middle, and then they bend to the right as it gets closer to the outside—the part closest the ear. Look at the top lash to see what I mean about how they bend from the left side, straight in the middle, then they bend right). Once you get past the middle, to make the flip, just turn on the Flip X checkbox in the middle of the Brush panel (shown circled here in red), and then rotate the Angle preview, so your lashes are going in the right direction. As you get to the inside of the eye (the part closest to the nose), the size of the eyelashes shrink as well, so be sure to drag the Size slider in the Brush panel to the left a bit (here, I decreased the size to around 10 pixels, from 16 pixels).
Step 16:
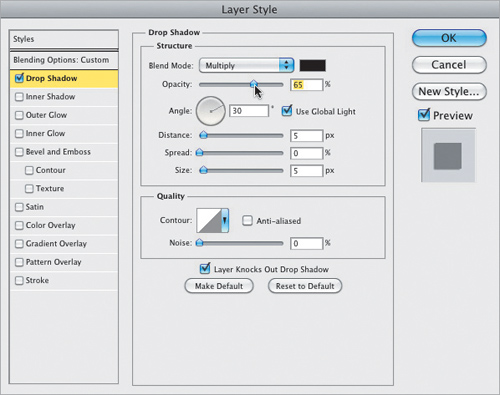
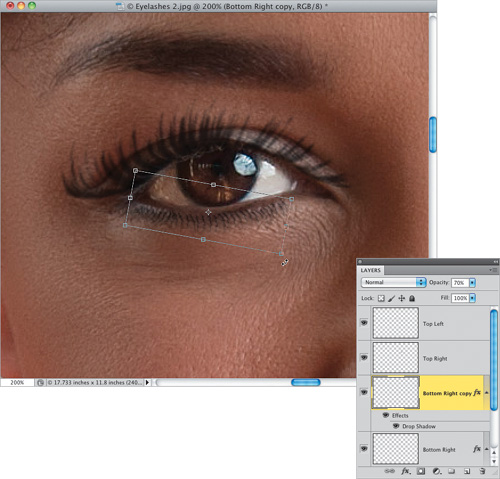
Lower the Opacity of this bottom eyelash layer to help blend it in with the real lashes underneath. To add a little depth and dimension to the bottom eyelashes, just add a layer style. Click on the Add a Layer Style icon at the bottom of the Layers panel, choose Drop Shadow from the pop-up menu, and then lower the Opacity to around 65%. Also, this is a good time to not only rename your bottom-right lash layer, but to do a little housekeeping and put them into an order that makes sense.
Step 17:
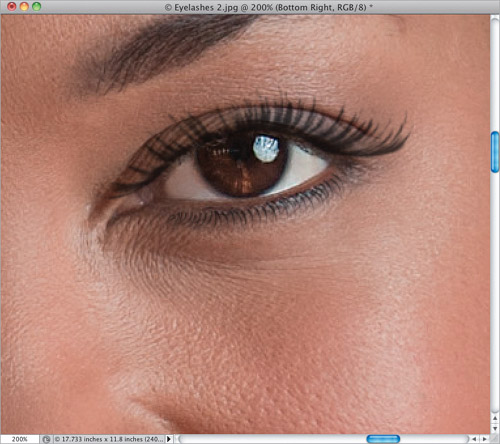
Now, you’re going to pull the same trick with the bottom lash that you did with the top—we’re going to duplicate that Bottom Right layer and use it for the bottom-left eyelash on the other eye. So, go ahead and duplicate your Bottom Right layer, and with the Move tool (V), drag it over to the other eye and position it as close as you can. Then bring up Free Transform again and move your cursor outside the bounding box to rotate it into position (as shown here).
Step 18:
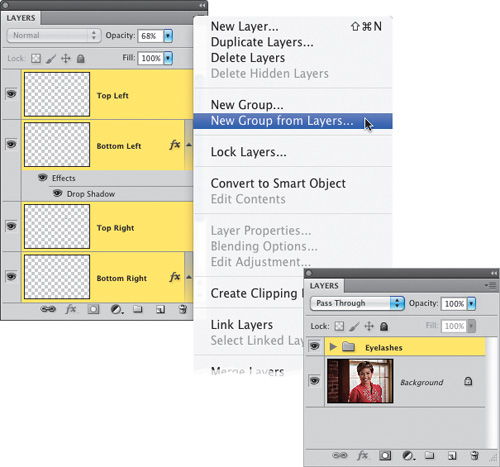
Lastly, go ahead and rename this duplicate layer “Bottom Left” and then put it right below the Top Left layer. Once you’ve got a full set of lashes built like this for your image, to keep things organized, let’s put them into a folder (Photoshop calls this a Group). This does two things: (1) it keeps your Layers panel from getting cluttered up with dozens of layers as you work, which can really slow you down and add visual confusion, and (2) now you can see a before/after of your eyelashes with just one click (showing or hiding the Eyelashes group) by clicking on the Eye icon to the left of its name. To get these four layers into a group, click on any of the eyelash layers, press-and-hold the Command (PC: Ctrl) key, and then click on the other eyelash layers to select them. Now, from the Layers panel’s flyout menu at the top right of the panel, choose New Group from Layers (as shown here), give this group a name, and they’re now all in one convenient folder.

Download this image. See pg. xi.
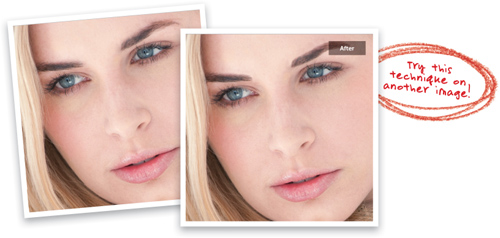
Creating Beautiful Eyebrows
This is one part of the portrait retouching process that a lot of photographers just skip over, probably because it’s fairly subtle, but again, this is one of those little things that help give the entire image a more professional look. Once you’ve done a few, this is also one of those retouches that will really stick out like a sore thumb to you in photos where the photographer didn’t retouch the eyebrows. At the end of the technique, I’ll also show you a quickie version that does a pretty darn good job of trimming those brows fast.
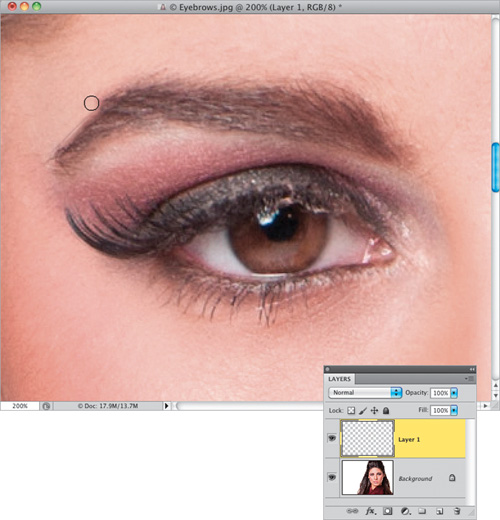
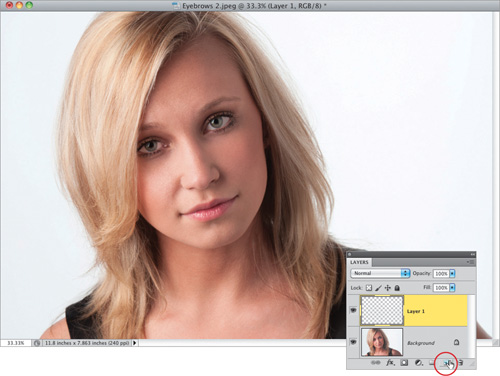
Step One:
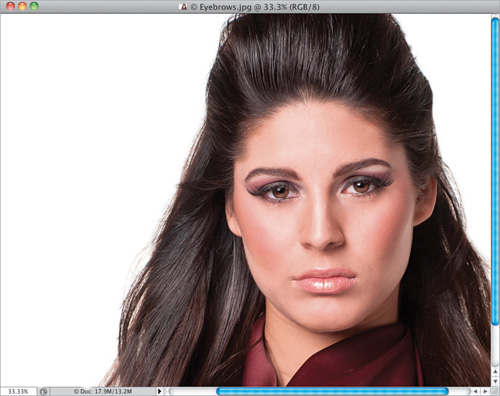
Here’s the image we want to retouch, and while our subject’s eyebrows aren’t at all bad, we can take them up that extra notch and make them look really beautiful.
Step Two:
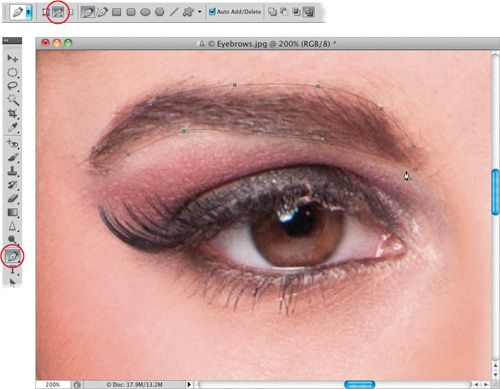
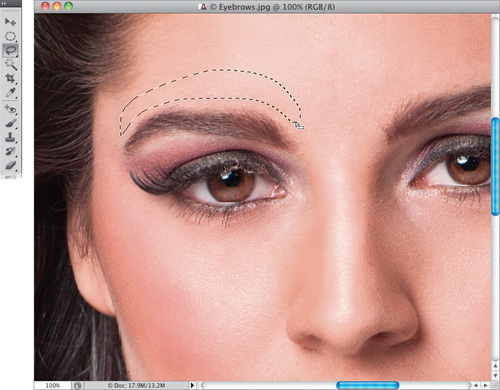
Zoom in tight on the eyebrow on the left, then get the Pen tool (P) and make sure the Paths icon is selected in the Options Bar. (By the way, if you’re brand new to this tool, I created a special video just for you, showing you how to use it. It’s one of those tools you really want to know how to use to make great selections. Learning how to use the Pen tool will take your skills up a big notch, so make sure you check out the video. You can find it on the book’s companion website mentioned at the beginning of the book in “Seven Things You’ll Wish You Had Known Before Reading This Book.”) What you’re going to do here with the Pen tool is draw out a path in the shape that you’d like the eyebrow to be (as seen here. Be mindful of the original shape of the eyebrow as you draw your path, so it doesn’t look too freaky or fake). The Pen tool kind of works like a “connect the dots” tool, so if you click in one spot, move to another area, and click again, it draws a straight line between the two points. However, if instead of just clicking, you click-hold-and-drag, it lets you curve the path, which is what I did here to create a path around her eyebrow.
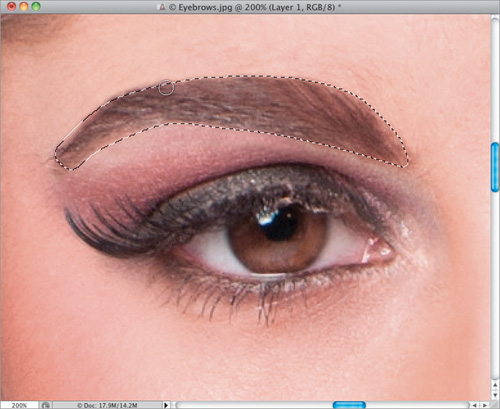
Step Three:
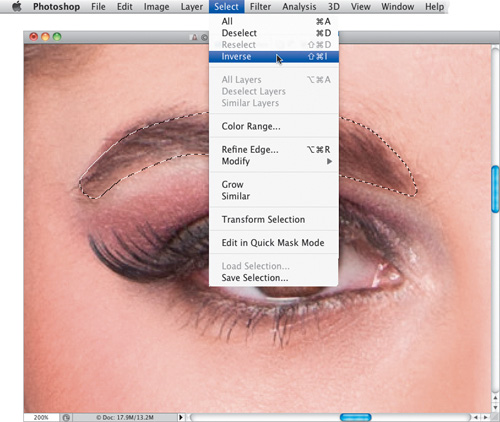
Once you’ve drawn your path where you’d like the eyebrow to be shaped, you’ll want to turn that path into a regular selection by pressing Command-Return (PC: Ctrl-Enter). Now that you have a selection around your eyebrow, we’ll work on trimming away everything outside the selection first (which is a big part of this process—removing excess eyebrow), so go under the Select menu and choose Inverse (as shown here). This inverses your selection, so that instead of having a selection around the eyebrow, you have a selection of everything but the eyebrow (if you zoom out, you’ll see the selection border around the photo). The reason we do this is to protect the eyebrow—you can’t accidentally erase any part of the eyebrow you originally selected at this point, because it’s the only part of the photo not selected.
Step Four:
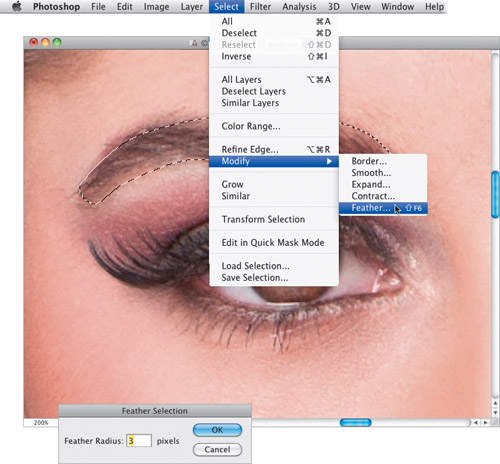
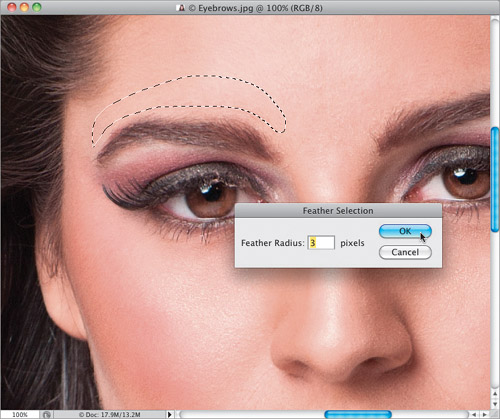
Now, to soften the transition between the eyebrow and the retouch, go under the Select menu, under Modify, and choose Feather. Enter 3 pixels in the Feather Selection dialog (seen here) and click OK to soften the edges of your selection.
Step Five:
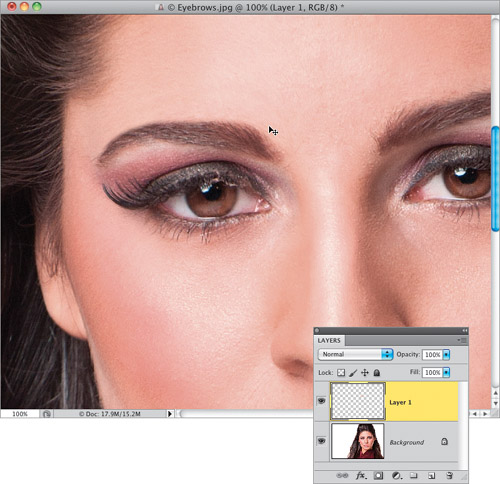
Before we do any retouching, go ahead and create a new blank layer (by clicking on the Create a New Layer icon at the bottom of the Layers panel). Now, press Command-H (PC: Ctrl-H) to hide your selection from view (your selection is still in place, but you no longer have to see those annoying “marching ants” while you retouch). (Note: When you press Command-H on a Mac, you may get a dialog asking if you want to hide Photoshop or hide its extras. Just click the Hide Extras button.) Now, your first thought might be to grab the Healing Brush, but since your retouch will be right up against the eyebrow (which could cause the Healing Brush to smear the edges—it likes things to be all by themselves, like an island, and doesn’t do well when what you’re removing is touching something else), get the Clone Stamp tool (S) instead, and choose a small, soft-edged brush from the Brush Picker. Now, press-and-hold the Option (PC: Alt) key and click once just above the part of the eyebrow that extends outside your selected area to sample that area and start cloning over the parts of the eyebrow that extend outside your selection (as shown here).
Step Six:
Once you’ve cloned around the top of the eyebrow, go ahead and clone the bottom (underside) of it (as seen here), as well as both ends (if the skin tone changes as you move around the eyebrow, Option-click again to resample a closer area to where you’re cloning). Anything outside your selection (which you hid in Step Five, so it’s not distracting) gets trimmed away. Here, I’m trimming away the bottom side of the eyebrow and you can see it starting to take shape (although we’re not done yet).
Step Seven:
Now that you’ve trimmed away the excess on the eyebrow, you’re going to fill in what’s still there by, again, cloning. Start by going back under the Select menu and choosing Inverse once again. This inverses the selection, so now just the eyebrow itself is selected (by the way, when you choose Inverse, it makes your hidden selection visible again, so if you want, you can hide it again by pressing Command-H).

Step Eight:
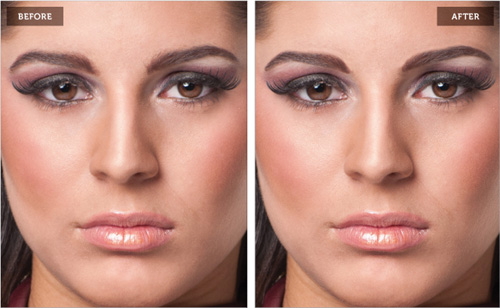
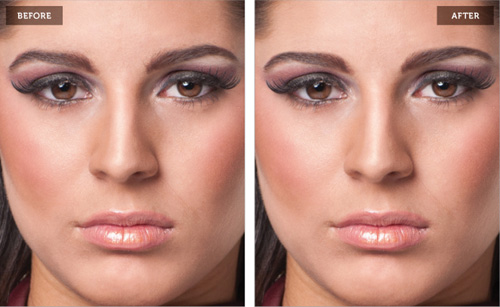
With the Clone Stamp tool still selected, what you’re going to do is Option-click inside the eyebrow itself to sample an area, and then you’re going to clone in the direction of the hair, painting from right to left to extend the eyebrow hair out toward the edges. If you clone an area and you see a repeating pattern (where some of the hair looks obviously duplicated), then sample a different area and paint over the duplicate. Fill in all those little gaps for full and smooth eyebrows that fill in your entire selected shape, then press Command-D (PC: Ctrl-D) to Deselect. Now, go to the Layers panel, click on the Background layer, and do the exact same thing for the other eyebrow. A before/after of the retouch is shown on the next page.
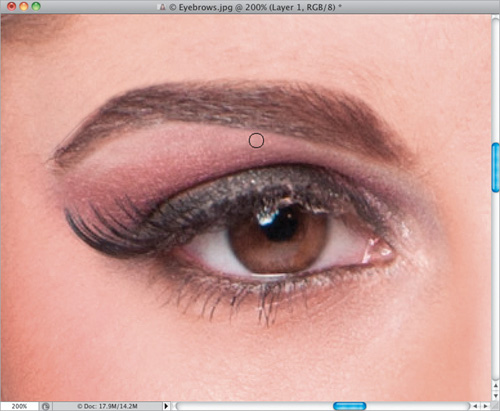
Step Nine:
Here’s an alternate method when you need to do a quickie fix, and although this one is really quick, it does a surprisingly good job. You’re going to draw a selection about ![]() ″ to ¼″ right above the eyebrow that needs trimming (as shown here). So, start by getting the Lasso tool (L) and drawing out the bottom of the shape—make it kind of like the shape of the eyebrow itself. The sides and top don’t really matter (because you’re not going to use them), but I generally make my selection the shape of an eyebrow, like you see here.
″ to ¼″ right above the eyebrow that needs trimming (as shown here). So, start by getting the Lasso tool (L) and drawing out the bottom of the shape—make it kind of like the shape of the eyebrow itself. The sides and top don’t really matter (because you’re not going to use them), but I generally make my selection the shape of an eyebrow, like you see here.
Step 10:
You need to soften the edges of the selection just a little bit, so go under the Select menu, under Modify, and choose Feather. When the dialog appears, enter 3 pixels (just enough to add a little bit of edge softening), and click OK (as shown here).
Step 11:
Now, press Command-J (PC: Ctrl-J) to place that selected area up on its own separate layer. Switch to the Move tool (V) and drag that shape down over the top of the eyebrow (as shown here) and look at how it perfectly trims the top of the eyebrow. Now, go to the Layers panel, click on the Background layer, and do the exact same thing for the other eyebrow. A before and after is shown on the right, and as you can see, it does a pretty nice job.
Download this image. See pg. xi.
Making Fuller Eyebrows
One thing we don’t want in eyebrows is gaps, but as you might expect, it’s very common to find just that. So, we can literally paint in a few extra hairs to cover up those gaps. Now, if you’re thinking, “I’m not good at painting,” you don’t have to worry. What you’re going to do here is so simple that you’ll be able to pull it off the first time around, even if you’re using a mouse (rather than a tablet).
Step One:
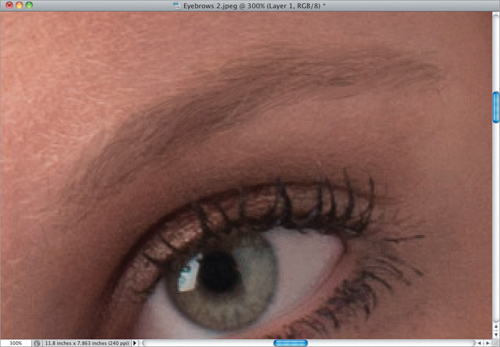
Here’s the image we’re going to add fuller eyebrows to. Start by clicking on the Create a New Layer icon at the bottom of the Layers panel to create a new blank layer where we’ll do all of our retouching (as shown here).
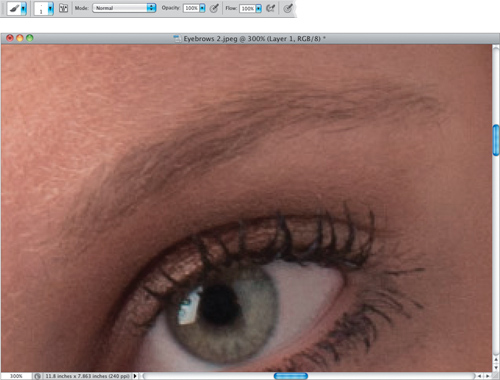
Step Two:
You’re going to need to zoom in really tight for this one—I zoomed in to 300% on the eyebrow on the right. Now, get the Brush tool (B) and choose a very, very small, soft-edged brush from the Brush Picker that’s about the size of the hairs in the eyebrow (here I chose a 1-pixel, soft-edged brush. Of course, you’ll have to choose the size based on the photo you’re working on. The way I composed this image, it’s not really super-tight in on her face, so once we zoom in, a 1-pixel brush is about the size of her eyebrow hair in this photo).
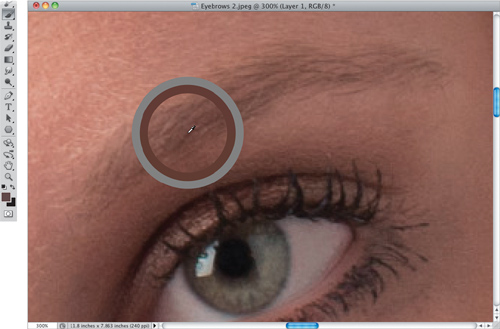
Step Three:
Start by pressing-and-holding the Option (PC: Alt) key, and your Brush tool will temporarily change into the Eyedropper tool, so you can steal a color from the eyebrow hair itself. Click right on a dark area of eyebrow (as shown here) to snag that color as your new Foreground color. Eyebrow hair is usually a slightly different shade as you move from one end of the eyebrow to the other, so don’t be surprised if you have to resample the color a number of times while you’re working on the eyebrow.
Step Four:
Now, you’re going to paint in your own eyebrow hairs, right over any place that has gaps or is thin within the eyebrow (as shown here, where I’ve painted a few dark brown strokes). It looks pretty bad at this point, and will soon look even worse, but don’t worry, it all comes together in the last step. Paint little strokes going from left to right, and follow the direction of the existing hairs as you fill in the gaps.

Step Five:
It’s now starting to look really full, and really bad. The brown strokes don’t look very real, and they stand out, but that’s all going to change very soon—for now just keep painting nice little strokes. If you’re using a tablet and pen, just make little flicking-type strokes that follow the direction of the hairs. Make sure you do both ends, and taper off at the end closest to the ear.
Step Six:
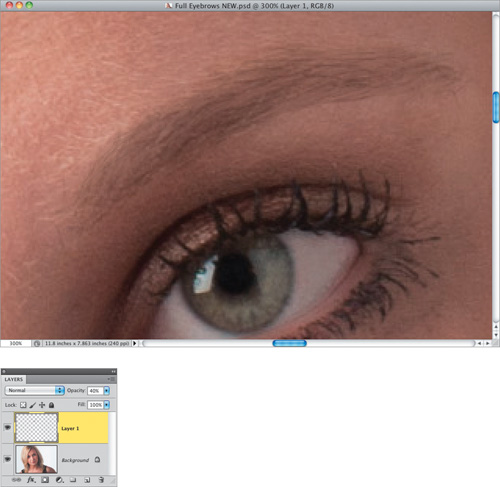
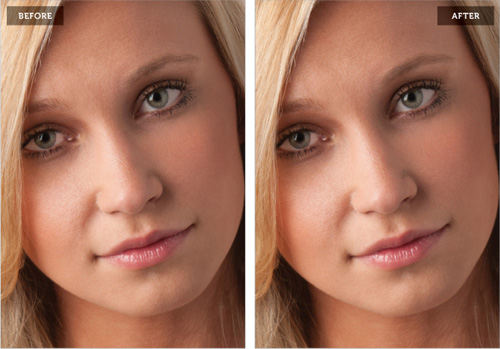
To blend your painted eyebrow hair with the real eyebrow hair, you have two choices: (1) Just lower the Opacity of this layer until the two blend together (here, I had to lower it to around 40% for a nice combination). Or, (2) change the layer blend mode to Multiply (from the layer blend mode pop-up menu at the top of the Layers panel) and then lower the Opacity to around 30% (Multiply mode does some blending on its own, but it also darkens as it blends, so you usually have to lower the Opacity more than you would if you just left it in Normal mode. But, depending on the eyebrows, Multiply mode usually looks better. You just have to try both and see which one works for the image you’re retouching). A before and after is shown on the facing page, using the Multiply mode method.
Download this image. See pg. xi.
Darkening the Eyebrows
In those cases where the eyebrows look pretty full, but just need a quick darkening, here’s a really quick way to get there. Don’t let the fact that we’re using Curves throw you off if you’ve never used Curves before. We’re going to do something so simple, you won’t even break a sweat. Plus, once you’ve learned this technique, you can use it anytime you need anything darkened.
Step One:
In this image, her eyebrows are a little light and need to be darkened. So, click on the Create New Adjustment Layer icon at the bottom of the Layers panel and choose Curves from the pop-up menu. Then, from the Curves pop-up menu at the top of the Adjustments panel, choose Darker (RGB) to darken the midtones in the image. Press Command-I (PC: Ctrl-I) to Invert the adjustment layer’s mask, and hide this darker version behind a black mask. Grab the Brush tool (B), choose a small, soft-edged brush, make sure your Foreground color is set to white, and paint over just her eyebrows to make them darker (as seen here, where I’m painting the eyebrow on the right).
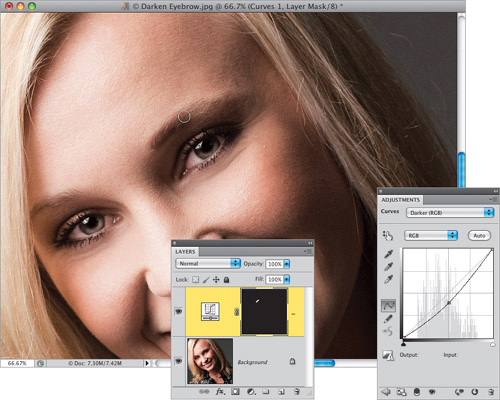
Step Two:
If you think her eyebrows need to be even darker, just go to the Adjustments panel, click on the center point of the curve, and drag it farther down (as I have here). Since you already masked the eyebrows, as you drag the curve downward, only the eyebrows get darker. However, darkening the midtones can change the color of the eyebrows, as well. So, change the adjustment layer’s blend mode to Luminosity (as seen here) to keep the color looking the same, but give them the added darkening they need. If they look a little too dark, you can simply lower the Opacity of the adjustment layer (as I did here, where I lowered it to 75%).
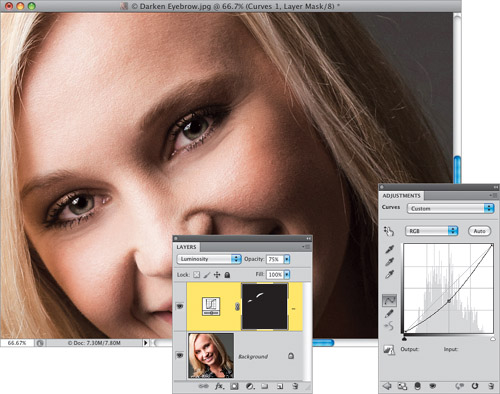
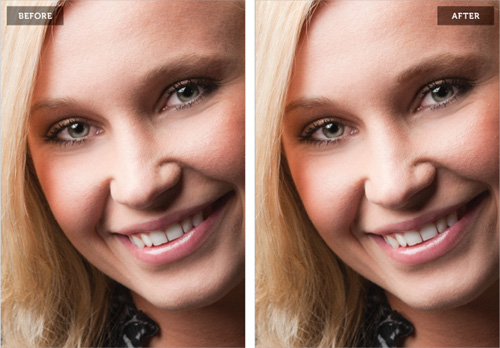
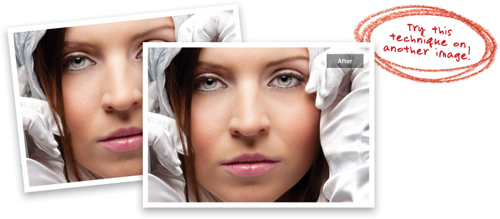
Download this image. See pg. xi.
Sharpening Eyes to Make Them Sparkle
Sharpening is the final retouch I do to the eyes, and it’s this finishing touch that can really make your subject’s eyes sparkle. As you’ll learn throughout this book, we don’t generally sharpen the entire image at once—it’s usually just a part here and a part there, and this is one of those instances where spot sharpening really makes a big difference. Plus, we’re going to do this using the most advanced form of Photoshop sharpening ever, which was introduced in Photoshop CS5.
Step One:
Here’s the image we’re going to retouch, and although I already applied a basic sharpening to the whole image, using the Unsharp Mask filter, I usually sharpen the eyes separately to really give them that sparkle that makes them look alive. I generally do this sharpening on a duplicate of the Background layer. That way, (1) I can easily toggle the layer on/off to see a before/after while I’m sharpening, (2) I can lower the Opacity amount of the layer if I think I’ve over-sharpened the eyes, or (3) I can delete the layer altogether if I decide I don’t want any sharpening at all. So, press Command-J (PC: Ctrl-J) to duplicate the Background layer.
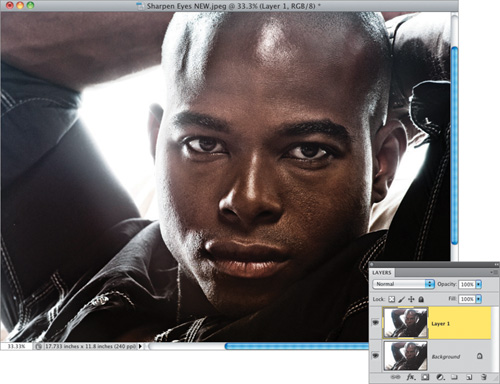
Step Two:
In the Toolbox, nested under the Blur tool, you’ll find the Sharpen tool (seen here). It has been in Photoshop for many years, but it has been pretty much unusable, because it usually did more harm than good. It was a harsh type of sharpening that seemed to have a personal grudge against pixels, but that all changed in Photoshop CS5, when Adobe’s engineers decided to not only fix this tool, but to make it Photoshop’s most advanced sharpening tool (I got that straight from one of Adobe’s own Photoshop product managers). This comes courtesy of the Protect Detail checkbox in the Options Bar, so make darn sure that’s turned on (as shown here, circled in red), or you’ll be using the old version of the Sharpen tool (with the old results).
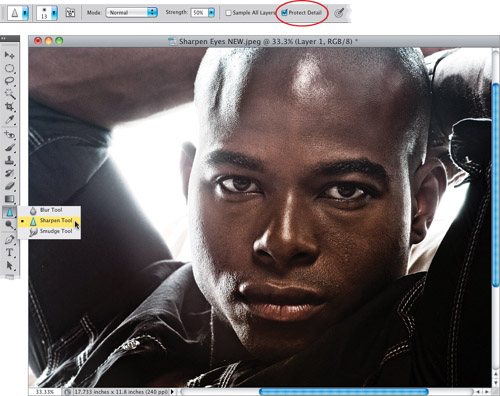
Step Three:
Zoom in on the eyes, then take the Sharpen tool, and paint over an iris. If you look up at the Options Bar, you’ll see that the default setting for the Strength is 50%, but I recommend setting it down to around 20%, so the sharpening builds up as you paint over the eye. Using a lower amount like this gives you more control because you’re adding sharpening in layers, rather than all at once. Don’t just paint over the inside of the eye—sharpening is all about edges. So, make sure your brush cursor extends just a tiny bit outside the edge of the iris (as seen here). Do the same thing with the other eye, and keep in mind that since you did this on a layer, if you need to, you can lower the Opacity of this layer, which lowers the amount of sharpening you’ve applied to the eyes.
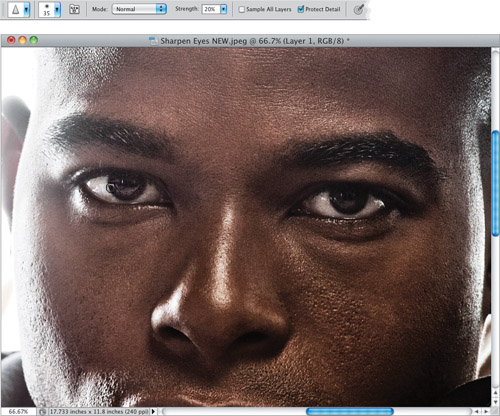
Step Four:
Now, since doing any kind of sharpening can sharpen random bits of noise or change the colors, change the layer’s blend mode from Normal to Luminosity. A before/after of the retouch is shown on the next page.
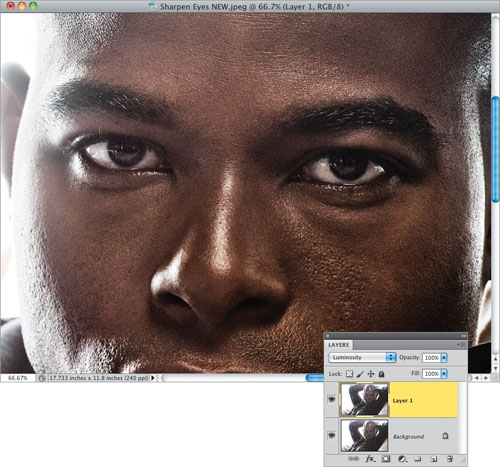
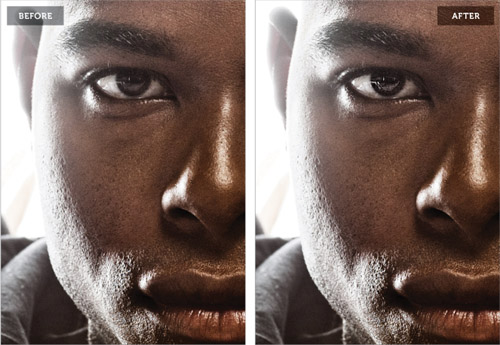
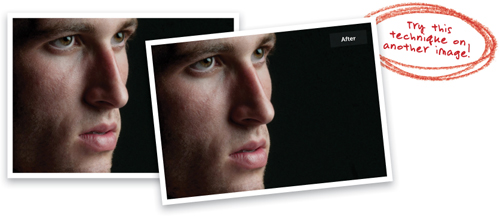
Download this image. See pg. xi.