Chapter 5. Lipps, Inc.: Retouching the Lips and Mouth
If you’re thinking, “Aren’t the mouth and lips kinda the same thing?” then you need this chapter more than I thought. You see, the lips are actually designed to aid in the intake of food and to help articulate both sound and speech, where the mouth is the part that gets you in trouble (well, it gets my kids in trouble if they get “mouthy.” Of course, they get in trouble if they get “lippy,” too, but that’s only because they should be taking in food more and articulating both sound and speech less). Either way, they are different as best as I can tell. For one thing, your lips don’t have teeth. Well, mine don’t anyway. But, have you ever taken a really good look at someone’s teeth? I mean really gotten in there, rooting around like a periodontist on a weekend pass? Well, I can tell you, I’ve done it (with my dog), and it’s pretty disgusting, and that’s why it’s so important to retouch teeth (and floss, but I can tell you, my dog doesn’t like it one bit). Anyway, all sorts of funky things can happen to a person’s lips, like chapping, or cracking, or chapping and cracking, or crackling, or there can be tiny bits of Cracker Jack on them, too—the list goes on and on. And don’t get me started about the teeth. First, there’s yellowing, which comes primarily from eating corn or squash, which is why I never eat either, and instead I only eat white fruits and vegetables, like parsnips, shallots, and cauliflower (have you ever had a parsnip, shallot, and cauliflower hoagie? Try one, and I guarantee you’ll find yourself considering suicide). Anyway, this chapter has a retouch for all those horrible maladies that can befall a set of lips and a mouth, and before you know it, your subject will like be looking like Angelina Pitt’s.
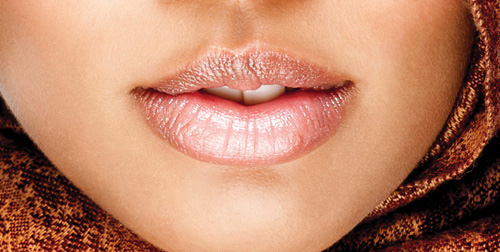
Making Lips Larger
In the same way we find larger eyes more attractive, larger lips have wide appeal, too, so a fairly common retouch is to make the lips larger. This is one of those retouches that can look really funky if you go too far, because not every subject can pull off the “big-lip look” (so to speak), so remember that a little “big” goes a long way with this retouch.
Step One:
Here’s the image we’re retouching, and while the size of her lips actually looks pretty good with the symmetry of her face, when you make them a little bigger, they look a little better. While, technically, you could do this retouch using the Liquify filter, I think this technique, which doesn’t distort the lips at all, gives a much more realistic result.
Step Two:
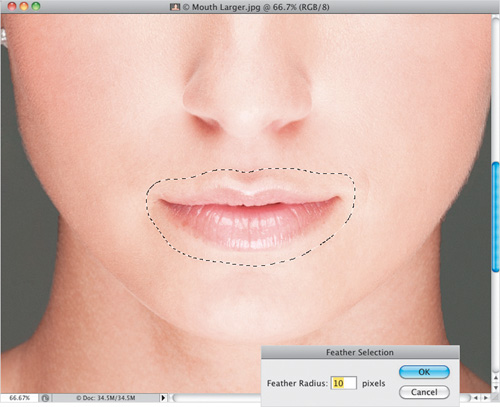
Zoom in on the lips, then get the Lasso tool (L) and draw a very loose selection around them. Notice that I didn’t just select the lips themselves, but quite a bit of skin around them, as well. This is key to making your retouch easy, because it’s easier to blend skin with skin, than skin with the edges of lips. So, don’t be shy when making your selection—make it nice and loose, like the one I made here. Now, to soften the edges of your selection (so it blends in smoothly), go under the Select menu, under Modify, and choose Feather. When the Feather Selection dialog appears, we’re going to enter a larger number than usual—type in 10 (as shown here)—and then click OK to soften those edges. Next, press Command-J (PC: Ctrl-J) to duplicate this selection and place it up on its own separate layer.
Step Three:
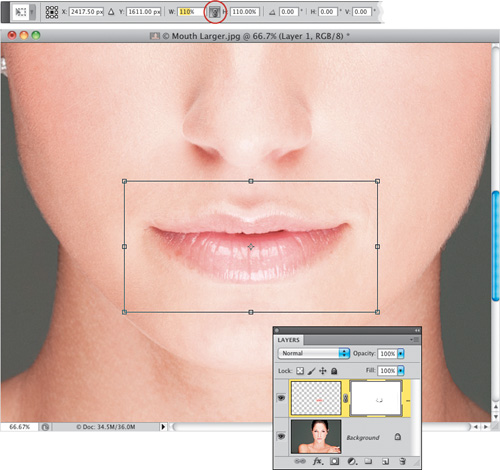
Press Command-T (PC: Ctrl-T) to bring up the Free Transform bounding box around the lips and skin area you copied to its own separate layer. Then, go up to the Options Bar, and click on the link icon (shown circled here in red) in between the W and H fields, so the width and height amounts are linked together (so when you enter a number in the W field, the H field gets the exact same amount). Now, in the W field, type in 110% (which automatically enters 110% in the H field for you) to increase the size of the lips by 10%. Of course, you could just press-and-hold the Shift key, grab a corner point, and drag outward, but you’re more likely to overdo it that way. A 10% size increase is an amount you can usually get away with without anyone knowing you retouched it. Any bigger and it starts to look fake (unless your subject has really thin lips, in which case, you just have to use your best judgment on how big to make them).
Step Four:
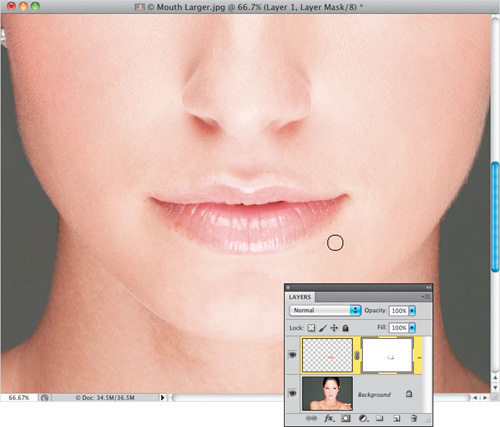
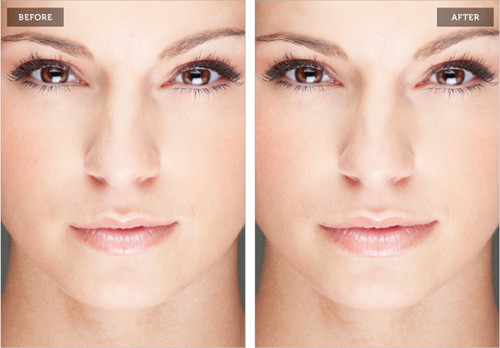
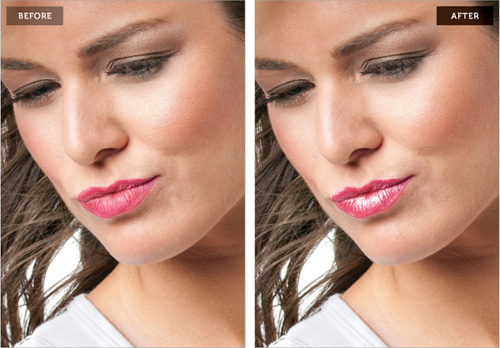
Press Return (PC: Enter) to lock in your transformation, and don’t be surprised if things look amazingly good at this point. That’s because of the large Feather amount you added, which, in many cases, blends the skin on the top layer with the skin on the Background layer, but there’s only one sure way to check. Toggle the top layer on/off a few times (by clicking on the Eye icon to the left of the layer) and see if you see any visible edge. If you do, just click on the Add Layer Mask icon at the bottom of the Layers panel, then get the Brush tool (B), and choose a small, soft-edged brush from the Brush Picker. With your Foreground color set to black, just brush along any visible edge to make it blend in (as shown here). By the way, the edge was so subtle here, I had to toggle it on/off to see it at all. A before/after of the retouch is shown on the next page.
Download this image. See pg. xi.
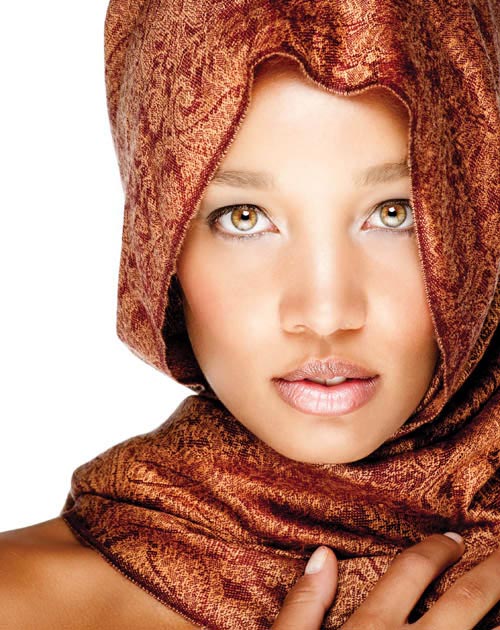
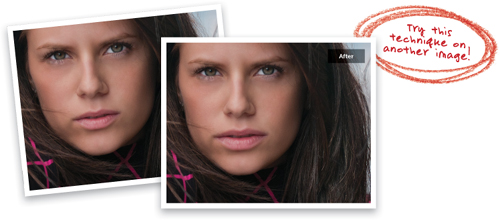
Creating Glossy Lips
Besides making them bigger, one of the most requested retouches for lips is to make them look glossy. My favorite method is to use the Color Range feature to select the existing highlights in the lips and then enhance those.
Step One:
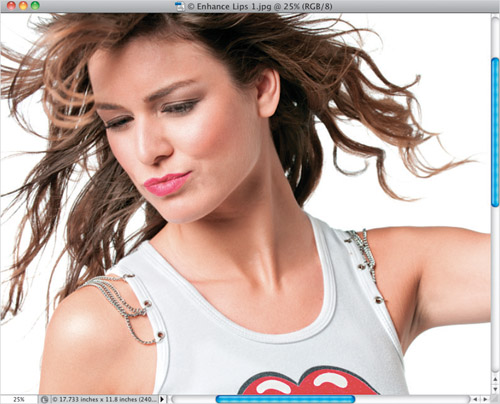
Here’s the image we’re going to work on, and although there are a few highlights in her lips, they’re really pretty flat looking and don’t have that glossy look. So, we’re going to take what’s there and enhance it to make them look shiny and glossy, and we’re going to make Photoshop do all the heavy lifting.
Step Two:
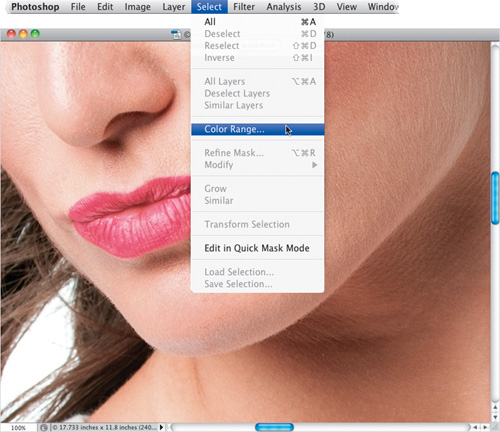
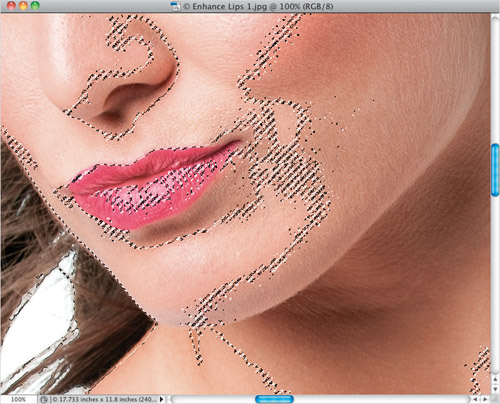
Start by zooming in tight on the lips, so you can really see them, then go under the Select menu and choose Color Range (as shown here). Color Range lets you make a selection based on a range of color, but it also has a feature most folks don’t realize, and that is the ability to have it select just the shadows, midtones, or highlights in an image, and that’s what we’re going to take advantage of here.
Step Three:
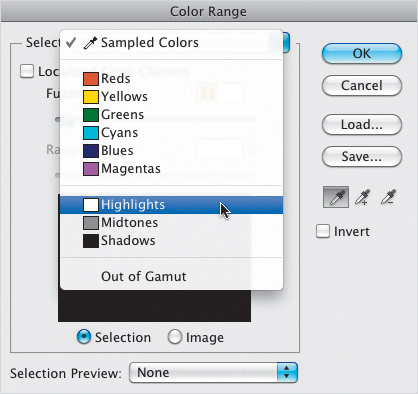
When the Color Range dialog appears, from the Select pop-up menu at the top, you’re going to choose Highlights, as shown here. (By the way, that Select menu is where you choose which method you want Color Range to use to make its selection. The default being Sampled Colors, which makes it start selecting where you click the eyedropper tool. In this case, we don’t need that, but I just thought you might like to know.)
Step Four:
When you set the Select menu to High-lights and click OK, it makes a selection of all the highlight areas in your image (as seen here). Don’t let what you see onscreen throw you, though, because the way Photoshop is designed, it can’t accurately display certain very small selected areas, so you’ll find that it usually selects much more than you see selected with the “marching ants” selection borders. So, even if it doesn’t look like it did much, just go ahead and roll with it for now.
Step Five:
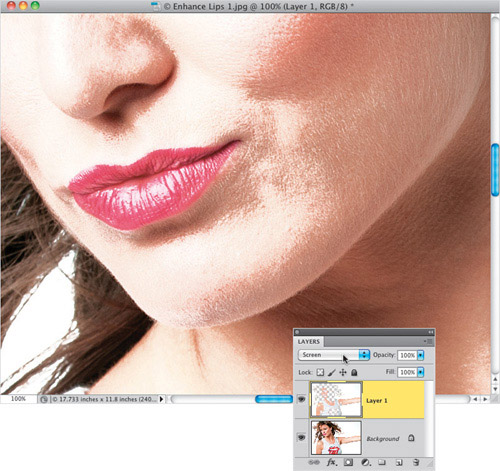
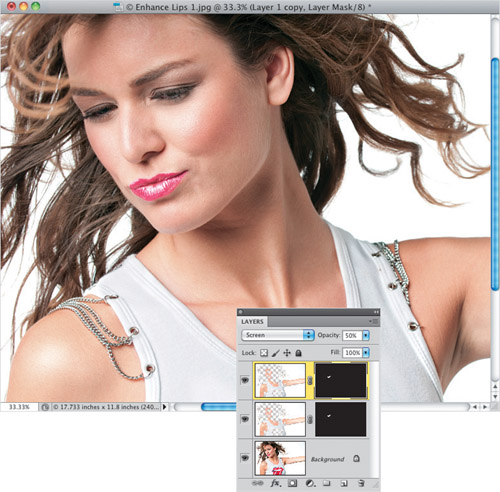
Press Command-J (PC: Ctrl-J) to take the selected areas and copy them up onto their own separate layer. Now, to make the highlights even brighter, at the top of the Layers panel, change the blend mode of this layer from Normal to Screen (as shown here), and now it’s really bright. Of course, it doesn’t look very good at this point, but that’s just because all we really want is the highlights on the lips—not that all that other stuff (which makes the skin look blotchy and harsh), but we’ll fix that in the next step.
Step Six:
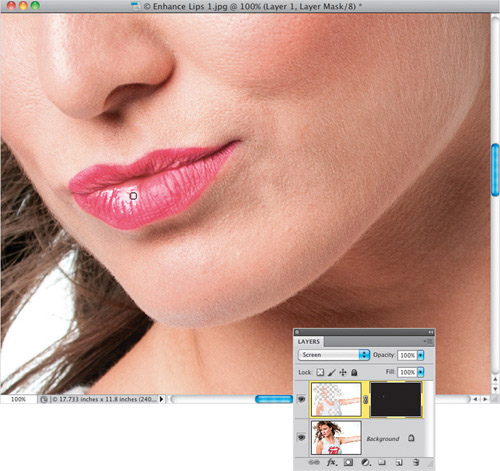
Press-and-hold the Option (PC: Alt) key and click on the Add Layer Mask icon at the bottom of the Layers panel. This adds a black layer mask to your layer, hiding the brighter Screen layer behind that mask, so your photo looks back to normal. Now, with your Foreground color set to white, get the Brush tool (B), choose a small, soft-edged brush set to 100% Opacity in the Options Bar, and paint over the highlight areas on the lips. They immediately start to look glossy as you reveal the brighter highlights from the Screen layer (as seen here).
Step Seven:
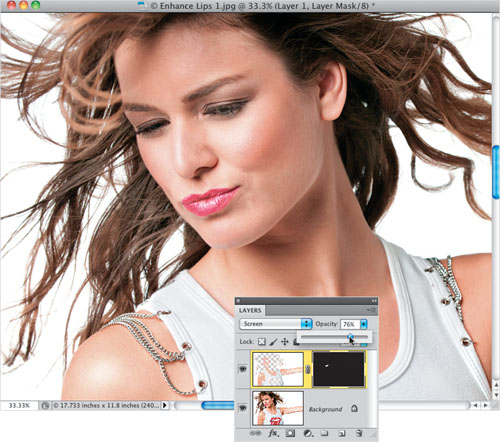
Paint over both lips to reveal the enhanced highlights, which makes them look glossy, as seen here. If they’re too bright, you can always lower the Opacity (like I did here, where I lowered it to around 75%). That’s the advantage of having the highlights on their own separate layer—you can reduce their strength.
Step Eight:
But what if you need more highlights—you need them to be brighter? If that’s the case, just duplicate the Screen layer (press Command-J) and it becomes twice as bright without doing anything else. Of course, if one Screen layer isn’t enough, two is probably too much, right? If that happens, just lower the Opacity of the second Screen layer (if you lower it to 50%, then you’ll be at 1½ strength. Pretty cool, eh?).
Download this image. See pg. xi.
Applying or Tweaking Lipstick
If you want to change the color of your subject’s lipstick, or if they didn’t wear any lipstick at all, here’s how to tweak the existing color, and add lipstick if you need it (well, not you, but the subject. You knew what I meant, right?).
Step One:
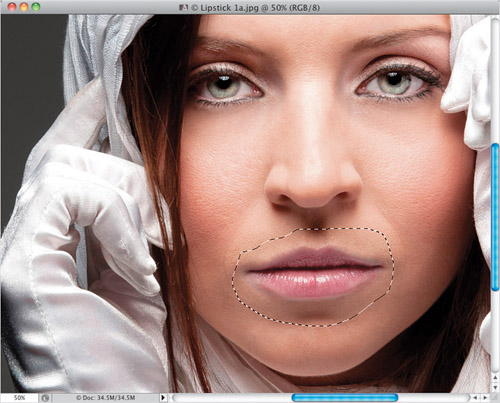
Here, our subject chose a lipstick color that’s very muted to match the overall mood and tone of the photo, but if you wanted to punch up that color (maybe you want to draw attention to her lips or bring them out more), the retouch is a pretty quick and easy one.
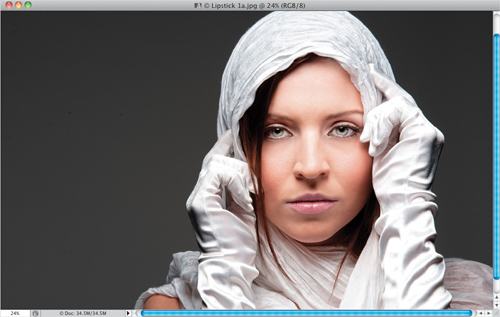
Step Two:
Zoom in on the lips, get the Lasso tool (L), and draw a very large, loose selection around the lips and the skin area around them. We’re doing this, rather than carefully making the selection of the lips, because getting rid of that extra selected area is literally a 15-second job, and much easier than making a really accurate lip selection. That’s not always the case in retouching, but in this one, it works just fine. So, make a Lasso selection like the one you see here.
Step Three:
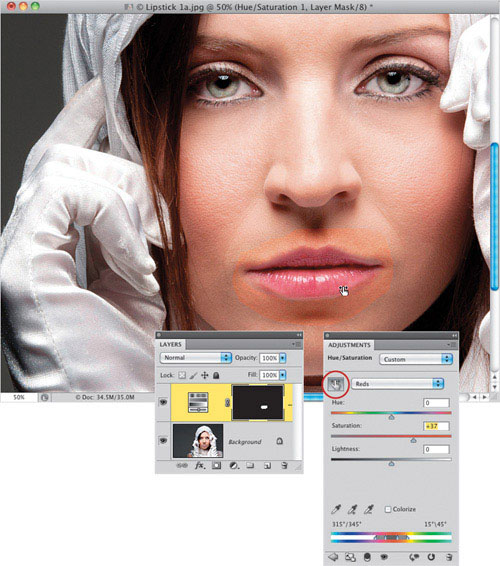
Next, click on the Create New Adjustment Layer icon at the bottom of the Layers panel, and choose Hue/Saturation from the pop-up menu. Since you have a selection already in place, it adds a black layer mask with just your selected area available for adjustment, which is just what we need. In the Adjustments panel, click on the Targeted Adjustment tool (or TAT, for short) that lives in the upper-left corner of the panel (it’s shown circled here in red). Then, click that tool directly on one of her lips (I clicked it on her bottom lip, just below the large highlight area in the center of it) and drag to the right. As you do this, Hue/Saturation senses which colors are under your cursor and it adjusts the saturation for just those colors. Here, it switched to the Reds channel, and increased the Saturation, which affected both the lips and the skin around it (as seen here).
Step Four:
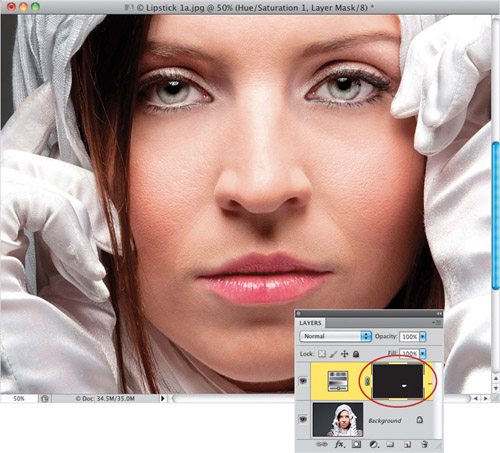
Now that you’ve given her a new shade of lipstick (a more saturated, vivid color, in this case), get the Brush tool (B), and with your Foreground color set to black, paint right over the selected skin areas to mask them away. This is the 15-second part—it’s amazingly easy to remove this extra area. Just keep in mind that when people put on lipstick, there’s generally a little overspill, so it helps to zoom in close to make sure you don’t erase the overspill areas, which would return you to the original lipstick color. Here, I’ve erased the extra skin on the right side, but you’ll continue all the way around the mask.

Step Five:
Here’s what it looks like after you’ve removed all the extra skin. If you want to make sure you didn’t accidentally miss an area, press-and-hold the Option (PC: Alt) key, and click directly on the black layer mask thumbnail in the Layers panel (it’s shown circled here in red), and it will just show you the mask. Now, you can just paint right over any areas outside the lips themselves that appear in white. Option-click on the layer mask again to return to your full-color image.
Step Six:
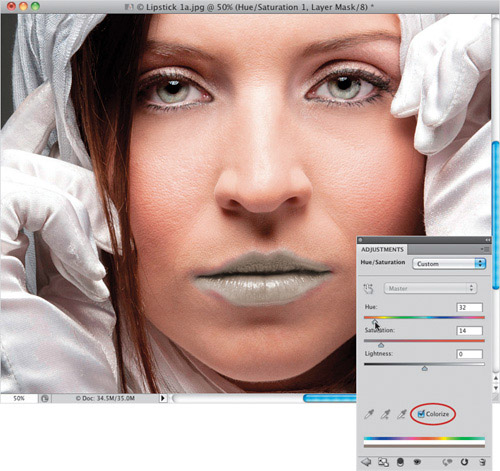
If your subject didn’t wear lipstick, or you want to do a pretty major color change, then you’d still do the first couple steps (selecting the lip area and all that stuff). But, after you create the Hue/Saturation adjustment layer, you need to turn on the Colorize checkbox at the bottom of the Adjustments panel (circled here in red), and now you’re adding a tint to the selected area. This tint is pretty strong, so to keep things from looking overly freaky, you’ll have to lower the Saturation amount quite a bit. Here, I’ve shifted the Hue, so the color of her lips kind of matches her eyes, which looks terrible by the way, but at least it shows how drastic a move you can make using the Colorize checkbox.
Download this image. See pg. xi.
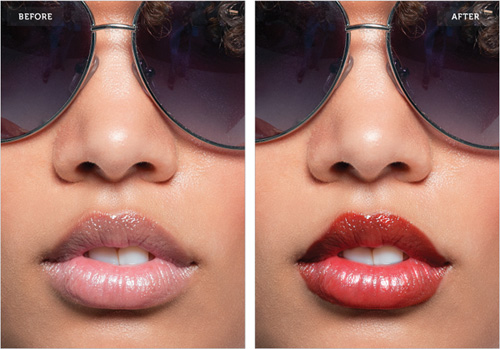
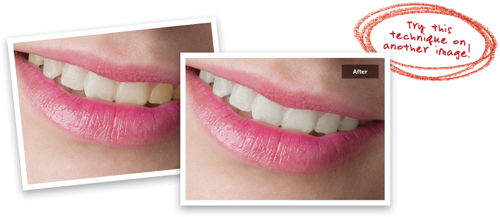
Changing the Shade of Lip Color
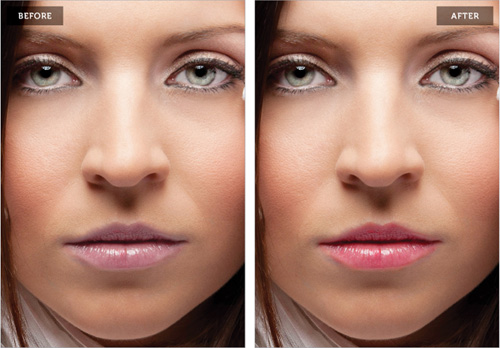
This is a really handy technique for making the lips really stand out by shifting the shade of the lip color, brightening the natural highlights, and then lastly, doing a quick cleanup to give you really gorgeous lips.
Step One:
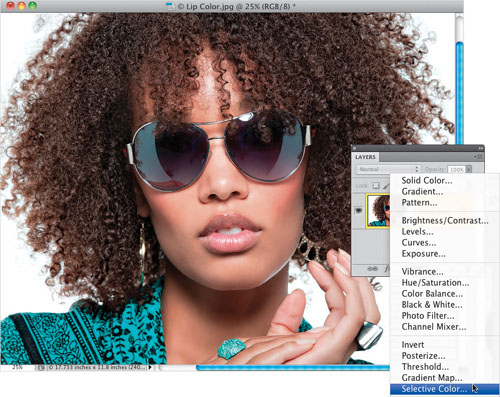
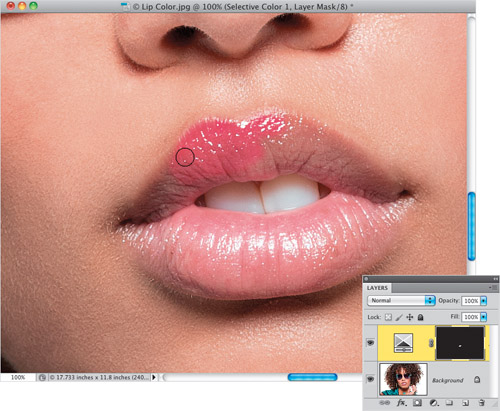
Here’s the image we’re going to retouch by shifting the shade of the lips. If we wanted to change the entire color to something completely different, we’d probably reach for a Hue/Saturation adjustment layer (like we did in the previous technique), but in this case, we’re just going to shift the color that’s already there. My favorite option for doing this is Selective Color, so click on the Create New Adjustment Layer icon at the bottom of the Layers panel and choose Selective Color from the pop-up menu (as shown here).
Step Two:
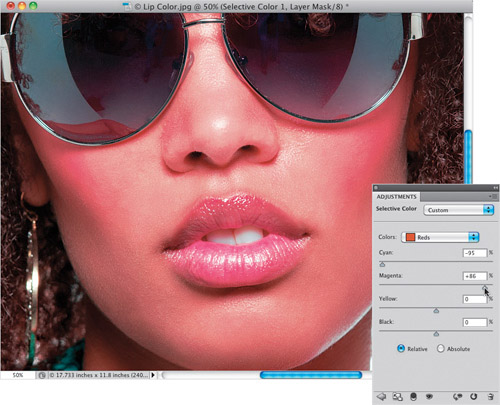
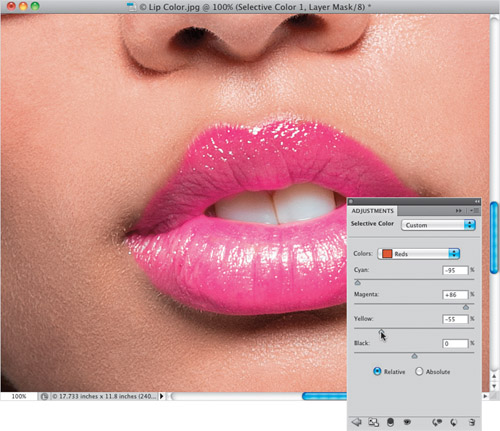
When the Selective Color options appear in the Adjustments panel, by default the Reds are already selected, so all you have to do is move the top three sliders to push the lip color to a different shade (the fourth slider, Black, controls the lightness or darkness of the Reds). Let’s start out by clicking-and-dragging the Cyan slider almost all the way to the left (I dragged it to −95%), then let’s drag the Magenta slider almost all the way to the right (as shown here, where I dragged it to 86%). Of course, it doesn’t just change the shade of the lips, it shifts the red for the entire image, but don’t worry—we’ll fix that next.
Step Three:
Press Command-I (PC: Ctrl-I) to Invert the Selective Color adjustment layer’s layer mask, which hides the red color version behind a black mask (as seen here in the Layers panel). Now, with your Foreground color set to white, get the Brush tool (B), and choose a small, soft-edged brush set to 100% Opacity in the Options Bar. Then, carefully start painting over the lips (as shown here), and the new shade appears as you paint.
Step Four:
Continue painting until the lips are fully painted in, as seen here (this is another case where having a tablet and wireless pen really pays off, because painting in the lips like this with a pen takes all of 10 seconds).

Step Five:
If you want to shift the shade to something different, try dragging the Yellow slider to the left—as seen here, where I dragged it over to −55%. Look at the difference in the shade now.
Step Six:
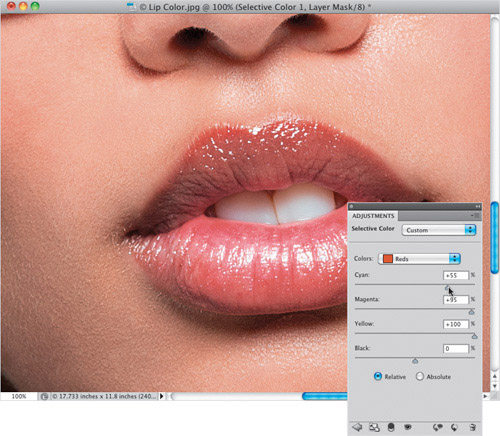
If you want more of a red look to the lips, just increase the amounts of Cyan and Yellow by dragging them both way over to the right. Here, I dragged Yellow all the way over 100%, and then Cyan to 55% (I also increased Magenta a bit to 95%), and the lip color is really starting to look good.
Step Seven:
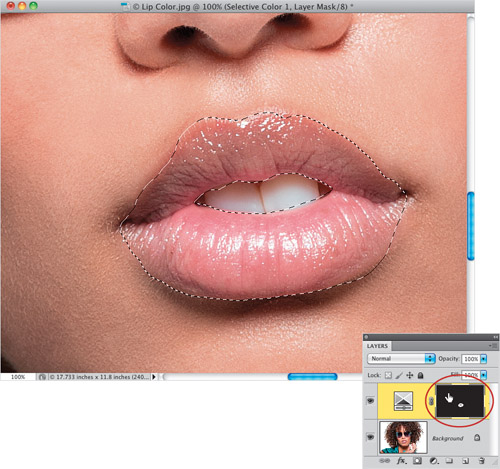
If you want that deep, rich, ruby red lip look, here’s what to do: Start by returning all your Selective Color sliders to 0% (just choose Default from the Selective Color pop-up menu at the top of the panel), so they’re not having any effect at all, and the lips are back to how they looked when you first opened the image. Now, press-and-hold the Command (PC: Ctrl) key and click directly on the black layer mask thumbnail over in the Layers panel (as shown circled here in red). This puts a selection around the lips, made from the mask you painted earlier.
Step Eight:
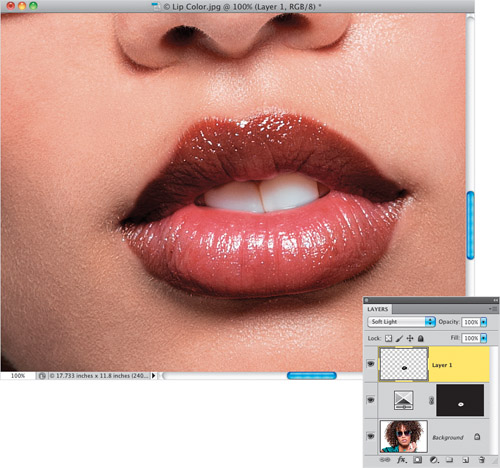
Now, click on the Create a New Layer icon at the bottom of the Layers panel to create a new blank layer, press D to set your Foreground color to black, and then press Option-Delete (PC: Alt-Backspace) to fill your lip selection with solid black. I know it looks bad at this point, but that’s all about to change. Go to the top of the Layers panel and change the layer blend mode from Normal to Soft Light and bam—the lips become that ruby red (as shown here). But, because your Selective Color adjustment layer is below it, you still have control (as you’ll see in the next step). Press Command-D (PC: Ctrl-D) to Deselect.
Step Nine:
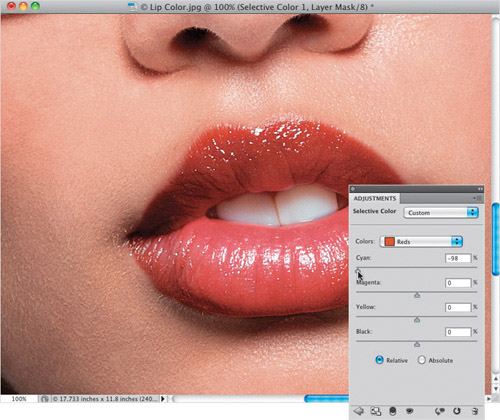
In the Layers panel, click on the Selective Color adjustment layer and then in the Adjustments panel, drag the Cyan slider back over to the left. Here, I dragged it over to −98%, and look how it shifts the shade once again.
Step 10:
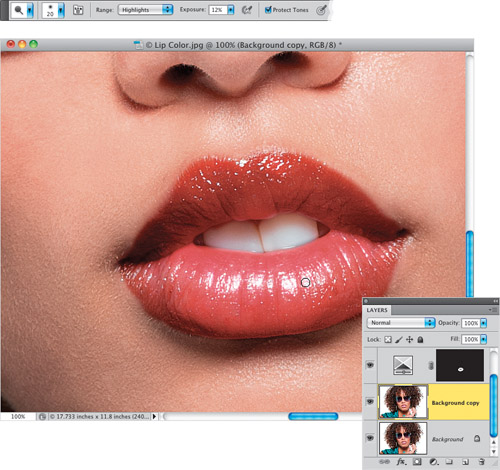
That’s the end of the shade-shifting part, but if you’ve got spare time and really wanted to go in and take things a step further, I would start by brightening up the highlights on her lips. You can use the technique found on page 227, or if you want to do something quicker, just click on the Background layer in the Layers panel and press Command-J (PC: Ctrl-J) to duplicate it. Get the Dodge tool (O), and up in the Options Bar, set the Exposure to around 12% and make sure Highlights is selected in the Range pop-up menu. Then, with a small, soft-edged brush, paint a few strokes over all the bright highlight areas in the lips to make them even brighter (as seen here, where I’m painting over the highlight on her bottom lip). This makes a bigger difference than you might think.
Step 11:
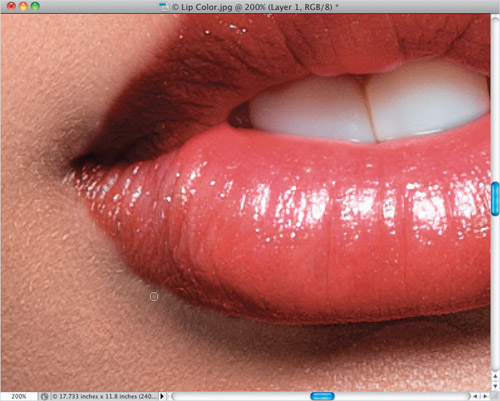
If you have a few more minutes, you could clean up the inside and the outside of the lips a bit. If you’ve got lots of time, you could do one of the skin softening techniques in Chapter 2. But, more likely, if you’ve got an extra five minutes or so, you’ll just want to get in there with the Healing Brush and Clone Stamp tool and remove all those little hairs under her lip and on the corner of her mouth. Do the inside of the lips with a very small Healing Brush (press Shift-J until you have it), and just Option-click (PC: Alt-click) to sample a nearby clean area and then click over little specks, spots, and anything that looks out of place. When you get to the little hairs under her lip, switch to the Clone Stamp tool (S), lower the brush Opacity to 35% in the Options Bar, choose a very small, soft-edged brush, zoom in tight, and then just Option-click to sample a clean area and clone those little hairs away (as shown here, where I’m cloning under her lip). A before/after of the retouch is shown on the next page.

Download this image. See pg. xi.
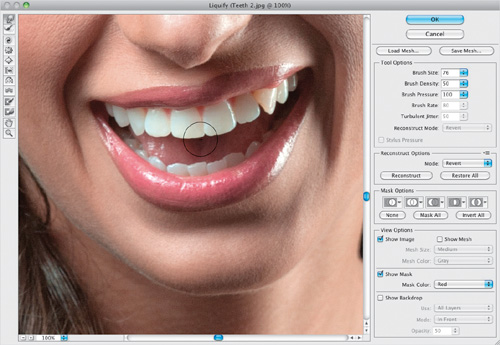
Repairing Teeth
Depending on your subject, this can be just a minor tweak, or a major reconstruction. Luckily, in most cases, you’ll be able to fix most problems with teeth using the Liquify filter, but sometimes, you have to rebuild a tooth or two from scratch. Note: I did a teeth rebuild once during a live retouching workshop, and a dentist came up to me right after my session to scold me, because I apparently flattened out a tooth he said was essential for chewing food. He felt better once I reminded him that the photo wasn’t going to eat anything. ;-)
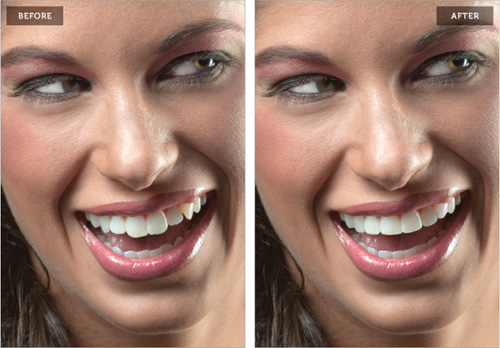
Step One:
Here’s the image with teeth we want to retouch. First, let’s evaluate what we need to do: I see that the two front teeth are a little too long compared to the rest of the other teeth (the front two should be a little longer than the surrounding others, but just a little). So, that’s one thing to fix. Then, I would remove some of the points from the canine teeth, and repair the gap on the canine tooth on the right. Lastly, I would straighten out the bottom teeth.

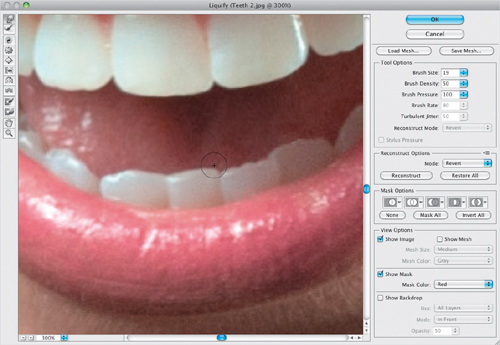
Step Two:
Go under the Filter menu and choose Liquify. When the Liquify dialog appears (shown here), start by zooming in tight (press Command-+ [PC: Ctrl-+] a few times). Then, make sure you have the first tool at the top of the Toolbox selected (on the left side of the dialog; it’s called the Forward Warp tool, which lets you nudge things around like they were made of molasses). The key to working with the Liquify filter is to make a number of very small moves—don’t just get a big brush and push stuff around. Make your brush size (from the Brush Size field on the right) a little larger than what you’re retouching (here, my brush is a little larger than one of the two front teeth). Now, just gently nudge the front teeth upward a few times each to shorten them, and then once or twice in the center between them to make them even. Also, while you’re there, you can flatten out the bottoms of them, too—just choose a smaller brush and gently nudge them upward. It’s already looking better.
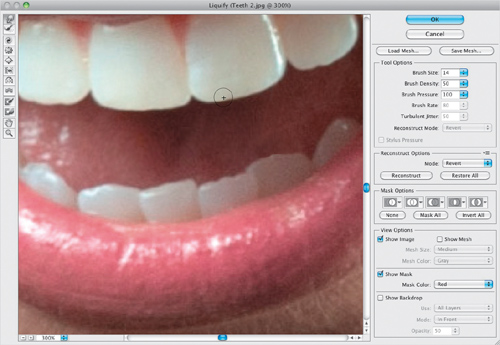
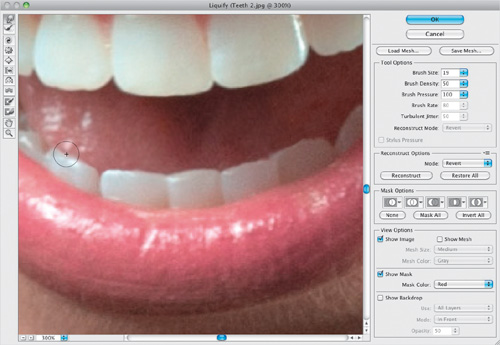
Step Three:
Now, if you look closely, you can see that on the bottom of the front tooth on the right, there’s a little indent that we can easily fix. Make your brush size really small (just a tiny bit bigger than the indent), and pull down on the indent until it lines up with the rest of the bottom of the tooth to make it nice and flat and smooth (as seen here). Let’s now work on the two teeth on either side of the front two—same tool, same technique, smaller brush (because these teeth are smaller in size). Gently nudge these teeth downward a little to make them longer. Keep gently nudging them downward, until they’re almost as long as the front two (but not quite as long).
Tip: Quick Before and After
If you want to see a quick before and after of your retouch, just turn the Show Backdrop checkbox (near the bottom right of the dialog) on and off.
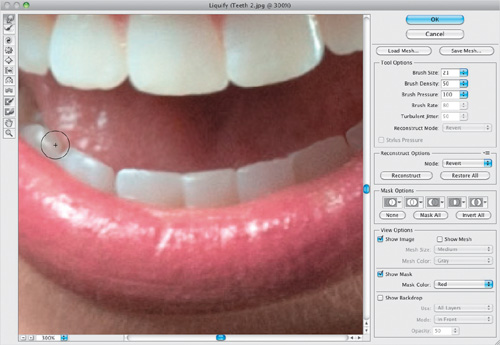
Step Four:
Now, go to the canine tooth on the left (you can see my brush cursor there), and just push upward on the pointy part with the same tool (gently, gently, using a few little nudges—don’t nudge it all at one time). This helps flatten it out a bit, but of course, now she won’t be able to chew—hey, it’s cheaper than buying caps. Once we’re done in Liquify, we’ll fix the gap on the other pointy canine tooth manually. But, you can go ahead and fix the other top teeth.

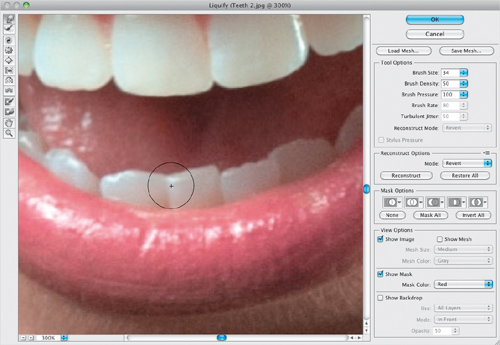
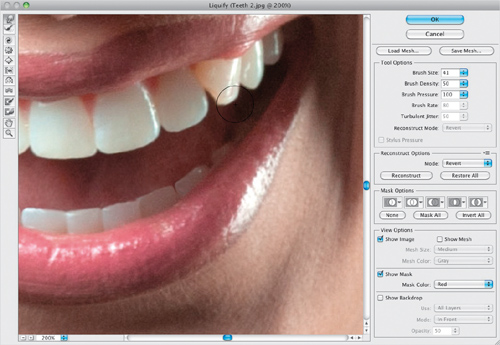
Step Five:
Using the same tool, we’re now going to start straightening the bottom teeth. The bottom-middle tooth on the left is leaning toward the left, so with the Forward Warp tool, choose a brush size like the one you see here, click right on the line to the left of the tooth, then click-and-hold, and nudge that line over to the right to straighten it out a bit (like you see here). Now, the rest of this is going to be nudging the tops of the bottom teeth down, nudging the lines between them to the left or right to make them straighter, and pulling up where the teeth start to slant downward.
Step Six:
Again, you’re going to use that same brush, but a little smaller brush size. So, start by pushing the top right of that same bottom-middle tooth down along the right edge of the tooth, because it’s extending upward too far. Again, just gently nudge it down using a few strokes. Do you see a pattern in this type of retouching? Most of the time, unless it’s something very large you have to move, you’re better off moving it a little, letting go of the brush, and moving it a little more, releasing, then doing it again and again—very small increments work best.
Step Seven:
If you look at the next tooth to the left, you’ll see the left side of it slopes down a bit. So, you’re going to have to pull that side up, so it’s flat (as shown here) and aligns with the other bottom teeth. Same technique, same brush, just repeat what you’ve been doing with small, subtle nudges.

Step Eight:
Now, move to the next tooth to the left and build up the right side of the tooth (it’s sloping downward), then nudge down the left side of the tooth. Just a little bit more Liquify work to go, but you can see the bottom row is already looking much better.
Step Nine:
Move to the next tooth on the left, and do the same thing, then move to the bottom teeth on the other side and fix those, as well (you kind of have to fix all of them in this image, though I usually just worry about the ones in front).
Step 10:
Now, we’re going to work on that other pointy canine tooth in the top right, but first, we can do one last thing here in Liquify to make our job easier. Make the brush size larger, then remove the “pointyness” (yes, that’s a word. Okay, it’s not, but it should be) by nudging the bottom of the tooth upward a bit (as shown here). You can now click OK to apply all your Liquify filter changes, and we can get to work on filling that pointy tooth’s gap.
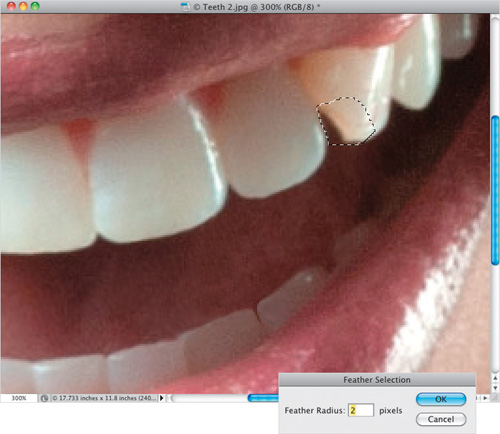
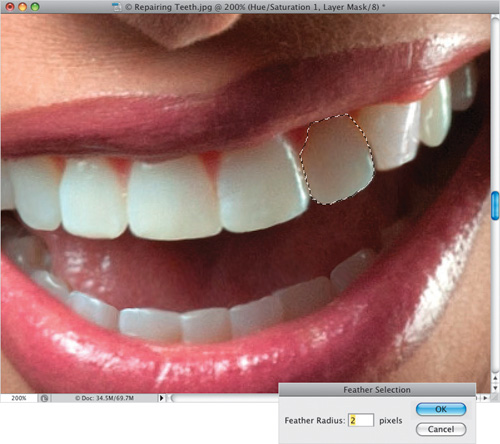
Step 11:
You’re going to need to make a selection in a shape that you want to add to the tooth, so I’m making a selection that covers the gap, and snuggles up against the other tooth (as seen here). I made this with the Lasso tool (L), but you can use any tool you’re comfortable with (my first choice is usually the Pen tool, because making a precise path and turning that into a selection usually gives you the best results—it just takes a little longer. But, since I have a tablet and wireless pen, it was just too easy to draw this quick little selection with the Lasso tool). You’re going to want to soften the edges of your selection (so it doesn’t look harsh where your new tooth area meets the tooth beside it), so go under the Select menu, under Modify and choose Feather. Enter 2 pixels in the Feather Selection dialog (shown here) for just a little softening, and click OK.
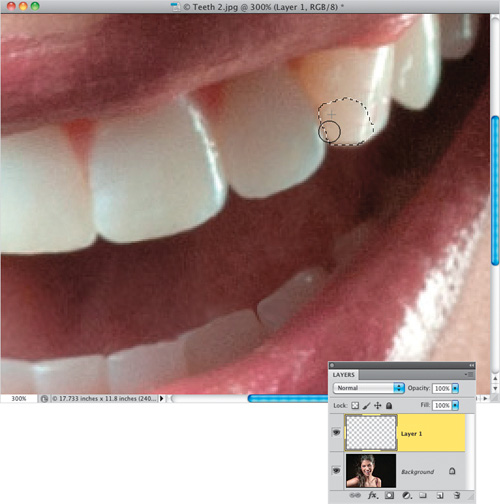
Step 12:
Create a new, blank layer by clicking on the Create a New Layer icon at the bottom of the Layers panel, and then get the Clone Stamp tool (S), so we can cover up that gap by cloning in some of the tooth from above the gap. From the Brush Picker, choose a small, soft-edged brush, then Option-click (PC: Alt-click) on a highlight area on the tooth to sample that area for cloning. Move straight down and start painting over that gap. Don’t worry, you won’t accidentally paint over the other tooth. By putting a selection in place first, it’s like putting up a fence—you can’t paint outside that fenced-in area. So, just paint right across until it’s all cloned in.
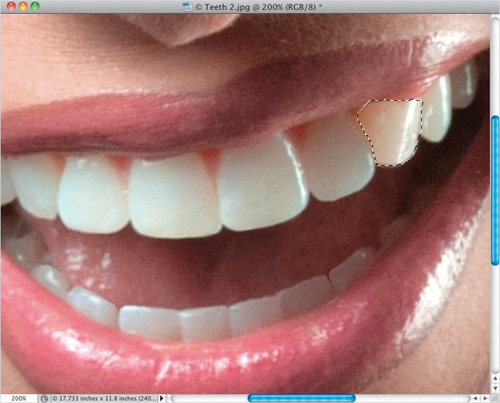
Step 13:
Now, press Command-D (PC: Ctrl-D) to Deselect and see your newly cloned tooth, then press Command-E (PC: Ctrl-E) to merge the layers. In this particular case, the tooth looks weird—not because of the retouch, but because of how the real light falls on that tooth. It’s brighter than the other teeth, and that brightness looks kind of yellow, so we’ll need to deal with that. Again, you won’t normally have to do this, but just in case this happens to you, at least you’ll know what to do. Get the Lasso tool again (or the selection tool of your choice) and make a selection around that entire brighter, yellower tooth (as seen here). Add a 1-pixel feather, if you like, to slightly soften the edge.
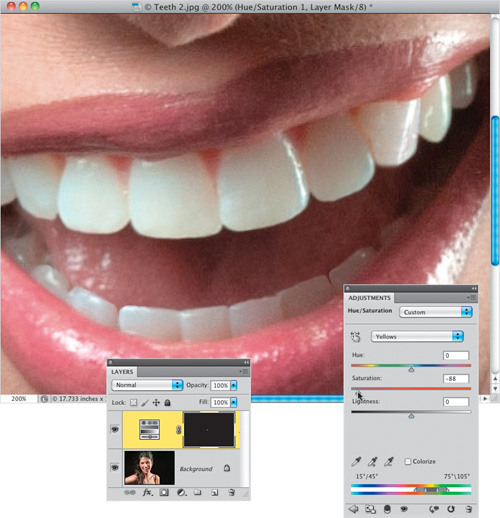
Step 14:
At the bottom of the Layers panel, click on the Create New Adjustment Layer icon and choose Hue/Saturation from the pop-up menu. From the second pop-up menu at the top of the Adjustments panel, choose Yellows, then drag the Saturation slider to the left (as shown here) until the yellow in the tooth goes away (here, I had to drag it nearly all the way to the left, so it matched the other teeth), then deselect.
Step 15:
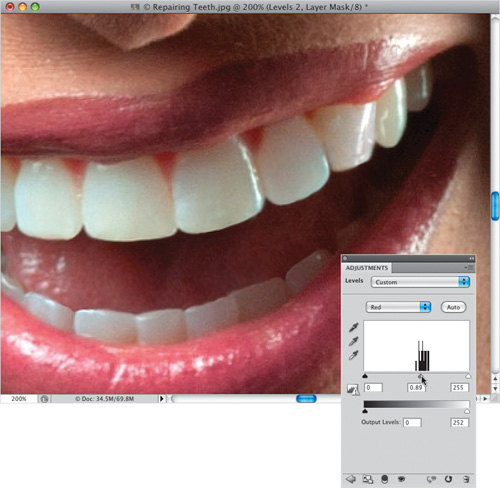
The last thing we’re going to do here is to brighten the tooth to the left of the tooth we just fixed. It has a little bit of a shadow on it, and we want to make it look like it’s more in line with the other teeth. So, get the Lasso tool again and make a selection of that tooth. Add a 2-pixel feather, to soften the edges a little.
Step 16:
Click on the Create New Adjustment Layer icon again, but this time, choose Levels. In this image, there is a lot of red in the shadow area, so when the Levels options appear in the Adjustments panel, change the pop-up menu above the histogram to Red. Now, drag the gray midtones Input Levels slider, under the histogram, to the right a little to reduce the reds and brighten the area. Each image will be different, so you’ll just have to go through each color in the pop-up menu, and drag the midtones or shadows Input Levels slider until the color matches the surrounding teeth better. Here, I also switched to Green and dragged the shadows Input Levels slider to 3, then switched to Blue and dragged the midtones Input Levels slider to 1.06.
Download this image. See pg. xi.
Tip
You can fix all of the gaps in between the teeth here in Liquify, but be sure to use the Freeze Mask tool (F) to freeze teeth next to the ones you’re working on.
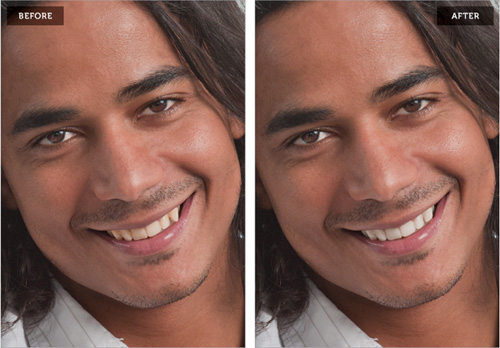
Whitening Teeth and Reducing Yellowing
Nice white teeth look just beautiful (which is one reason why so many people each year spend thousands on porcelain veneer caps), but most people have some-to-moderate yellowing. In most cases, you’ll pretty much want to remove all the yellow, and even do a little brightening, but if your subject has very yellow teeth, you won’t be able to remove all the yellowing, or they’ll look obviously retouched. So, in those cases, you’ll just reduce and tone down the amount of yellowing, so it’s not distracting. Here’s how to do both:
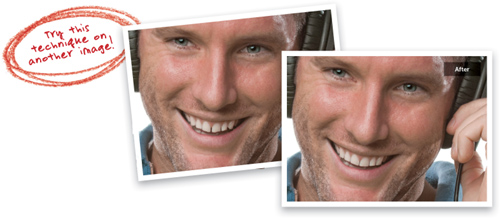
Step One:
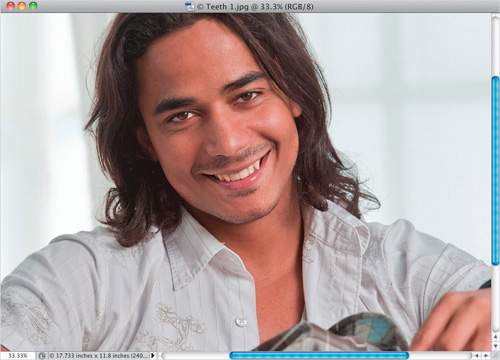
Here’s the image we want to retouch, and our subject’s teeth have just a slight yellow discoloration. Nothing major, and in fact, I think with everything around him being white (his shirt, the background, etc.), it probably makes it stand out more, where normally you wouldn’t notice at all. But when we do the retouch, and you see the final image, you’ll see it was worth it.
Step Two:
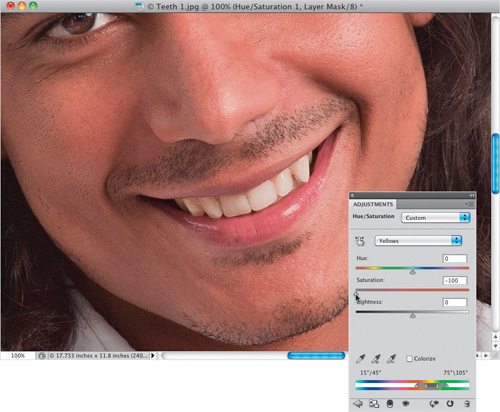
Zoom in on the teeth, then click on the Create New Adjustment Layer icon at the bottom of the Layers panel and choose Hue/Saturation from the pop-up menu. In the Adjustments panel, change the second pop-up menu at the top from Master to Yellows, then drag the Saturation slider all the way to the left (as shown here) to remove all the yellows from the entire image. Now, take a look at the teeth and see how they look. In 99% of the cases, they’ll look great at this point, but in this particular case, they still seem to have a hint of color in them, which usually means there’s some red in there, as well.
Step Three:
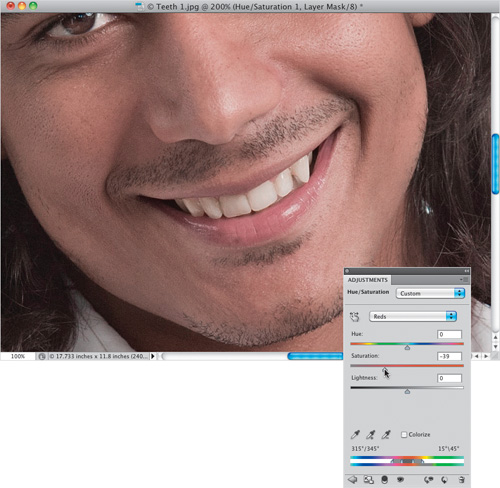
Switch the same pop-up menu to Reds now (as shown here), reduce the Saturation a bit (as shown), and now the teeth look right. Of course, we’ve totally trashed his skin, but we’ll fix that in the next step.
Step Four:
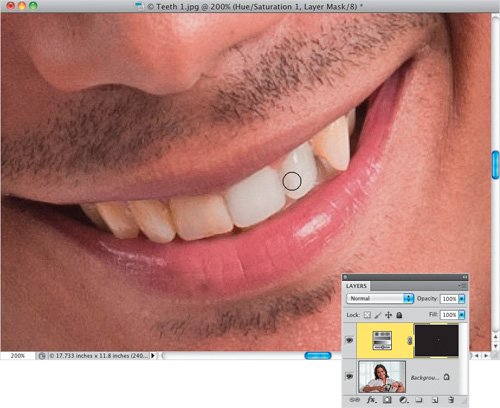
Press Command-I (PC: Ctrl-I) to Invert the Hue/Saturation adjustment layer’s layer mask, turning it black. Now his skin looks normal, because the entire adjustment we just made is hidden behind that black mask. We just have to paint over his teeth to reveal the retouch, so make sure your Foreground color is set to white, get the Brush tool (B), choose a small, soft-edged brush (like the one you see here) from the Brush Picker, and start painting over the teeth. As you do, the yellowing is replaced with nice white teeth (as seen here, where I’m painting over two of his teeth). We’re not quite done yet, though.
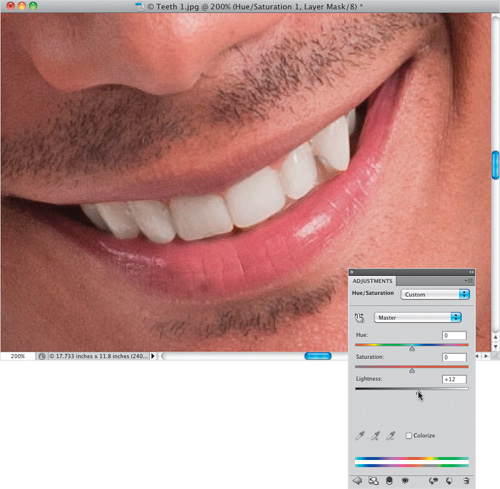
Step Five:
Continue painting over all the teeth until all the yellow is gone (as seen here). Now, you’ve created a mask for the teeth, so any other changes you make in the Hue/Saturation Adjustments panel will only affect the teeth, right? Right! So, let’s brighten his teeth a bit, as well. Switch that pop-up menu at the top of the panel back to Master, then drag the Lightness slider to the right just a little bit (as shown here). It’s easy to get carried away with this slider, so be careful not to overdo it. Here, I only increased the brightness to +12. If you go much farther, it can start to look really fake (depending on the image, of course. Some need more lightening than others).
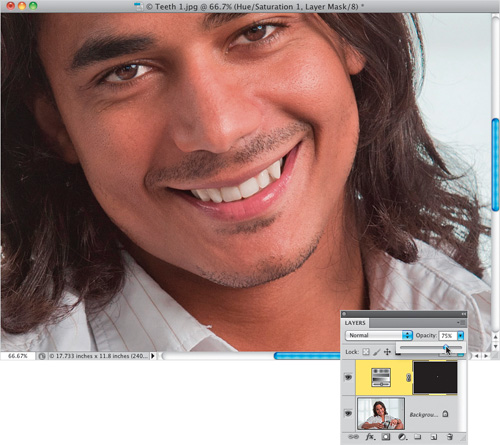
Step Six:
At this point, you’ve removed all the yellowing and brightened the teeth. One thing to keep an eye out for is that your teeth don’t look gray, because you’ve removed so much of the color. If you think that’s the case (and in this one, it might be), then you can go to the top of the Layers panel and lower the Opacity of your Hue/Saturation adjustment layer to bring back just a little hint of the color. Here, I’ve dropped the Opacity to around 75%, and that was just enough to make the color of the teeth look very natural.
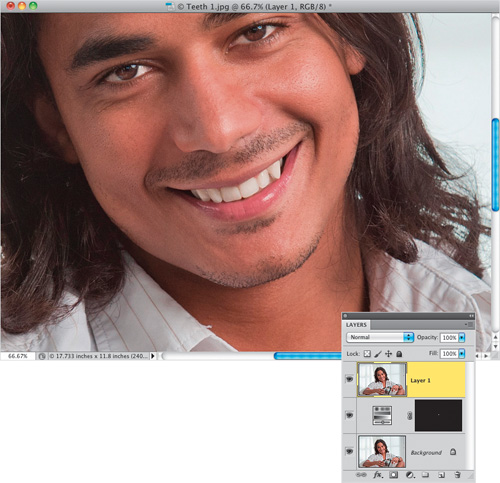
Step Seven:
To finish things off, I would adjust the pointy canine tooth on the right using part of the “Repairing Teeth” technique you just learned on the previous pages. But first, you’ll need to flatten your layers, so press Command-Option-Shift-E (PC: Ctrl-Alt-Shift-E) to merge your layers into a new layer, creating a flattened version of your image at the top of your layer stack.
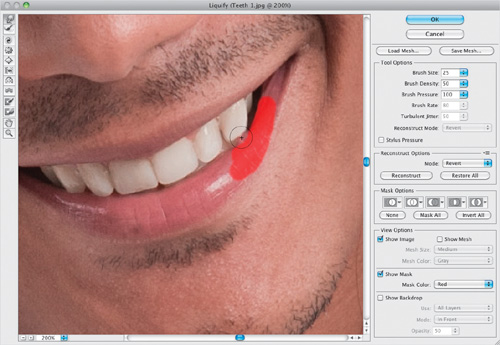
Step Eight:
Luckily, in this case, you can do the whole thing just using Liquify, but because the tooth is nearly touching his bottom lip, you’re going to have to use a second tool in Liquify to keep his lip from moving. You’re going to use the Freeze Mask tool to freeze his bottom lip, so it stays in place when you nudge up the pointy tooth. So, from the Filter menu, choose Liquify, then get the Freeze Mask tool (it’s the fourth tool from the bottom in the Toolbox), and paint over his bottom lip right below that tooth. As you paint with the Freeze Mask tool, it paints in red (as seen here). Now, get the Forward Warp tool (W) and use it to nudge the pointy part of the tooth upward, and then you can nudge part of it over to fill in the gap. You’ll find this is surprisingly easy to do and it takes just a few seconds. When you’re done, click OK to compete your retouch.
Download this image. See pg. xi.