Chapter 3. Face to Face: Reshaping Facial Features

Every profession winds up developing its own special jargon, which helps people quickly and effectively communicate with others in their same line of work. Well, not surprisingly, retouchers have their own jargon, too, and since you’re going to be doing some of your own retouching, you don’t want to feel out of place when you get around a full-time retoucher, so you’ll want to learn some of their lingo so you can “talk the talk.” The first thing to learn is that retouchers see a person’s face very differently than photographers do. For example, let’s say you’re shooting a portrait session, and your subject casually jokes that they think their nose is “a little too big” (a hint they want it retouched). So, you might say to a friend, “I did that headshot of Cindy, and she wants me to reduce her nose a little bit.” However, a pro retoucher would never say that. For example, here’s a typical conversation between two retouchers looking at a photo of your subject, Cindy. “Hey, Frank, did you see the schnoz on that model?” And his retouching colleague might answer back, “How you plannin’ on taming that big honker? Pucker tool?” Then the first guy would answer back, “I dunno. That’s one heck of a beak!” It’s that kind of crisp, to-the-point communication that enables retouchers to work as efficiently as possible. Now, as photographers, we’re not expected to refer to every subject who has love handles as having “lard bags,” nor will they look down upon us if we call excess skin at the top of their neck a “double chin,” when retouchers refer to it simply as “nasty neck fat.” You’re not expected to know all of this lingo yet, but if I were you, I’d start testing a few of these out on your portrait subjects right away, so you’re fluent when the time comes.
Reshaping the Face and Head
If you need to make an adjustment to your subject’s cheeks, chin, ears, or even their head, the first place I go is to the Liquify filter, because it was born for retouches like this. The thing you have to watch out for in a retouch like this is that you don’t move parts of the face or head that you don’t want to be reshaped, so we’re going to spend part of our time letting the Liquify filter know what’s okay to move, and what needs to stay put.
Step One:
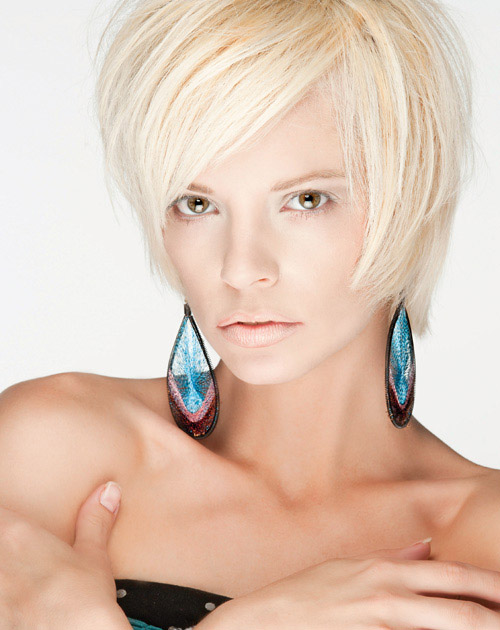
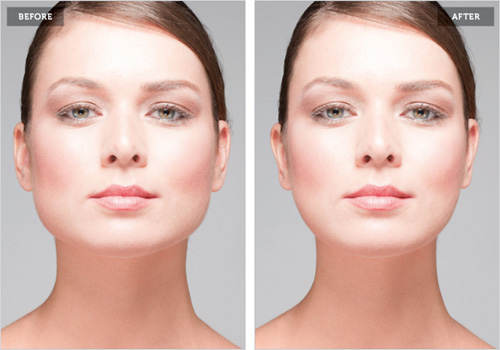
Here’s our shot to retouch. It’s a classic beauty-style shot (I always jokingly refer to this as the “Oil of Olay” look), and typically this look has your subject’s hair pulled back tightly behind her head in a ponytail (which means you have to clone out any of it that peeks out from behind her neck. Honestly, it’s easier just to tape it in place behind her neck during the shoot than to have to retouch it later). In this retouch, we’re going to primarily tuck in the left and right sides of her jaw, and we’re going to tuck in the ear on the left side, but at the end, I’m going to reshape her entire head, even though it really doesn’t need it (so if you need to do it, at least you’ll know how).
Step Two:
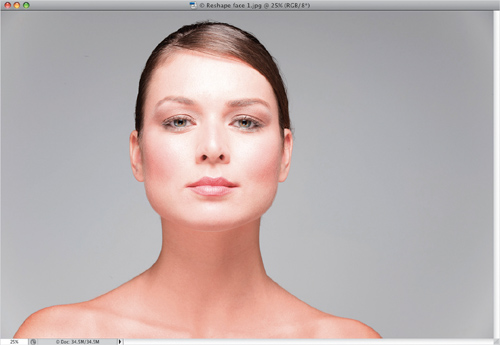
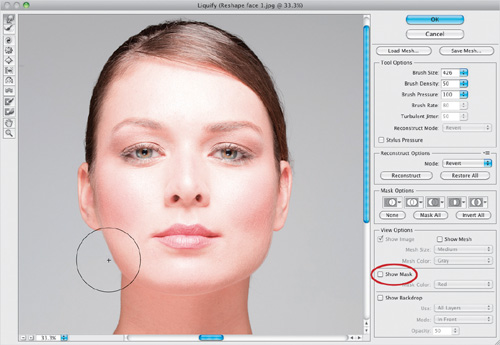
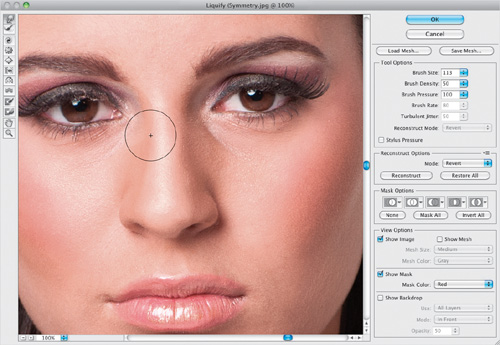
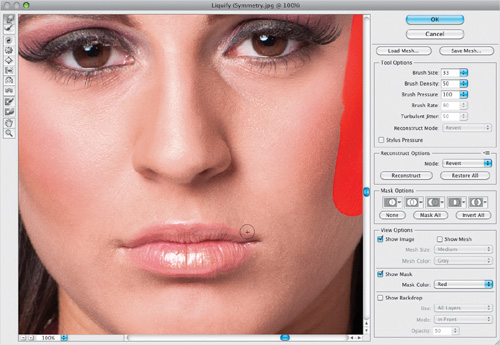
Go under the Filter menu and choose Liquify. When the Liquify dialog appears, choose the Freeze Mask tool (F) from the Toolbox (it’s shown circled here in red), and paint over all the facial features on your subject’s face that you don’t want moved when you do your retouch. You literally just paint over the lips, nose, eyes, eyebrows, forehead, and surrounding skin to basically “lock down” those areas (as shown here). As you paint, a red tint appears over those areas to show you which areas are frozen. By the way, if you make a mistake and accidentally freeze something you didn’t want frozen, you can paint over it with the Thaw Mask tool (I am not making this up), which appears directly below the Freeze Mask tool in the Toolbox.
Step Three:
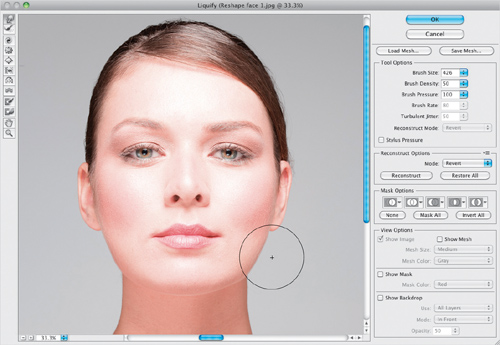
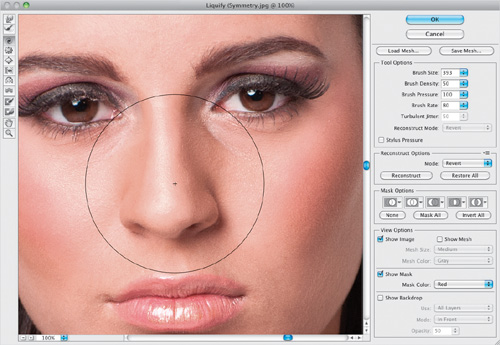
Now that your frozen area is in place, you don’t really need to see that distracting red oval in the center of your image, so I always hide it by going to the View Options at the bottom right and turning off the Show Mask checkbox (it’s shown circled here in red). Next, get the Forward Warp tool (W), and choose a brush that’s a little larger than the area you want to adjust, then, using very small, gentle little nudges, tuck in the left side of the jaw a bit (as shown here). By making the brush this large, it moves the whole area as one unit. If you make it much smaller, you run the risk of moving just part of the jaw, and then you have to go back and try to retouch your mistake, so in this one particular case, bigger is better. Now, just tuck in that side a bit by nudging your brush inward at a 45° angle toward her face. Remember, gentle little moves—just nudge it. Note: Moving things too much with Liquify is a common mistake you can see even in major magazines, causing that funky squished or stretched-pixel look. So, be careful out there, and use the Liquify tools judiciously.


Tip: Faster Brush Size Changing
Using the Command-[ (Left Bracket key; PC: Ctrl-[) or Command-] (Right Bracket key; Ctrl-]) shortcut to change your brush size (the first making it smaller, the latter making it larger) is notoriously slow because it goes up/down in 1-pixel increments. To greatly speed things up in Liquify, use the Shift key (so it’s Shift-[), which jumps up/down 20 pixels at a time. This Shift shortcut is the only way I resize brushes—the 1-pixel method is just too slow.
Step Four:
Next, go to the jaw on the right side and tuck that in a bit, as well. Again, small, gentle nudges look best. After you’re done, take a look at the side of her neck on both sides—right below where you retouched. Now that you’ve moved her jaw in, you might want to make a small inward move near the top of her neck, as well, using the same brush and same technique (totally up to you).
Step Five:
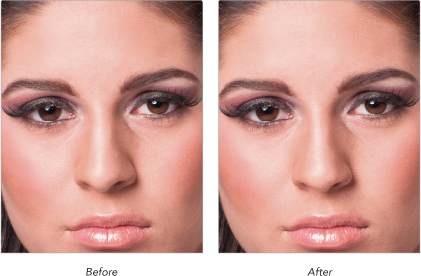
Click OK and take a look at your results (a mini before/after is shown here). You can see what a difference this retouching move made. Now, I would generally stop at this point, but while we’re here, I want to fix the ear on the left side (it’s sticking out farther than the one on the right), and we’re going to reshape her head to make it even less round (which, again, isn’t necessary, but it gives you an idea of what can be done when you need to).

Step Six:
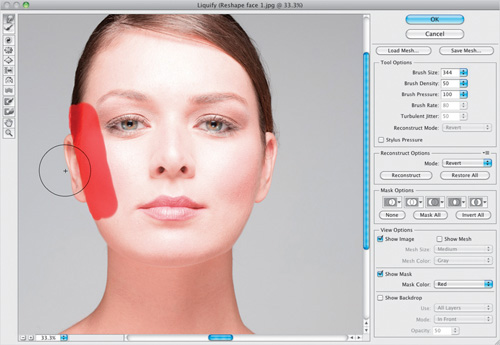
We’re going to use the same technique here that we just used to reshape her jaw—we’re going to freeze the part of the face that’s touching the ear, then we’re going to nudge the ear in a little bit. Start by going back into Liquify and getting the Freeze Mask tool, then paint right down the edge of her face on the left side, leaving the ear untouched. That way, when we nudge her ear inward, it won’t change the shape of her face—only the ear will be affected. Get the Forward Warp tool again, make the brush a little smaller than the ear (so we can mostly focus on moving the center of the ear inward), and nudge it in toward her face (as shown here), and after just a few little nudges—it’s fixed.
Step Seven:
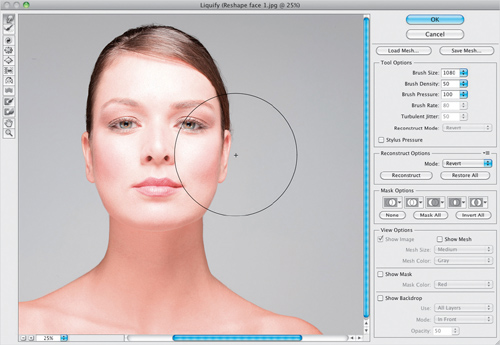
We’re going to do the whole head reshaping now—just for practice. Start by freezing the center of her face again and hiding the mask, like we did back in Step Two. Next, using the Forward Warp tool, make your brush really huge (don’t forget that Shift key tip from back after Step Three) and nudge over the entire left side of her head (as shown here).

Step Eight:
Now, switch over to the right side of her head and do the exact same thing, using that huge brush and smooth, small, gentle nudges in toward her face.
Step Nine:
Lastly, shrink down that brush and tuck in the sides of her neck. Since we’ve made her head much thinner, you don’t want her trim little head sitting on some big ol’ thick neck. Now, while this is much thinner than I personally would make her head, I’ve seen images that have had this type of thinning done and more. It’s all a matter of taste (yours and the client’s), but now at least you know what can be done if you need to.

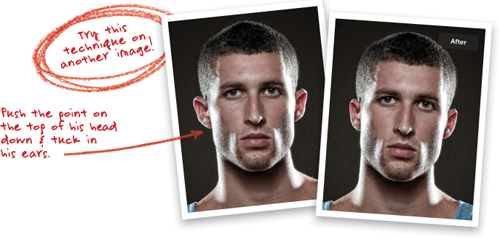
Download this image. See pg. xi.
Making Features More Symmetrical
More often than not, the features on your subject’s face won’t be perfectly symmetrical (one eye might be higher than the other, or their nose might be a little crooked at the nostrils or the bridge, or one side of their smile might extend higher than the other, and so on). Luckily, you can bring all these misaligned features back into alignment using just a few tools, and some techniques you’ve already learned (but we do get to learn a helpful new tool this time, as well).
Step One:
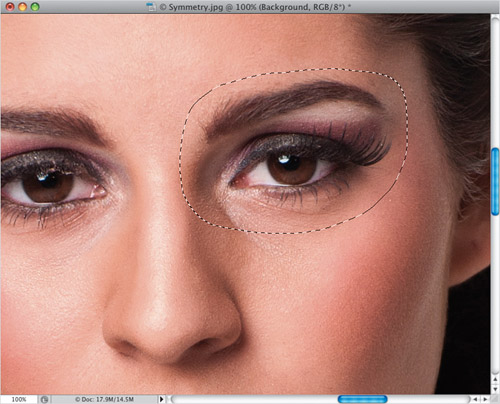
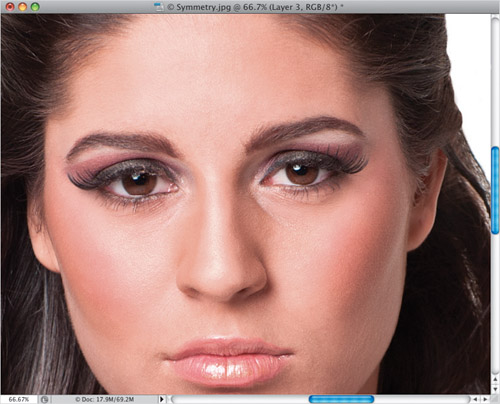
Here’s the image we want to retouch, and if you really study her face, you’ll see that the eye on the left is a little smaller and the eyelid is not as open as the eye on the right. However, the eye on the right is also up a little higher and angled in a bit more than the one on the left (just two eyes, and yet there are four differences between them). Also, take a look at her ears—the one on the right is sticking out more than the one on the left (mostly because of how her hair is situated, but nevertheless, it looks different). Her nose is slightly larger on the right side than the left, and it’s twisted just a tiny bit. Lastly, take a look at her lips, and compare the left side with the right, and you’ll see the shape changes from one side to the other. Now, you’re going to retouch all of that.

Step Two:
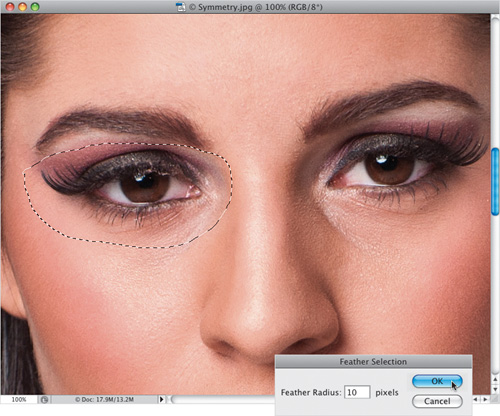
We’ll start by evening out the size of the eyes. Get the Lasso tool (L) and make a very loose selection around the eye on the left (as shown here). Make sure you include plenty of skin around the eye area, but not the eyebrow. Now, to soften the edge of the selection (which will help it blend in better after we resize it), go under the Select menu, under Modify, and choose Feather. When the Feather Selection dialog appears, enter 10 pixels (as shown here) and click OK.
Step Three:
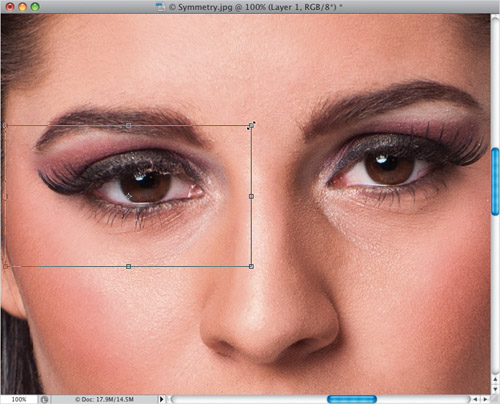
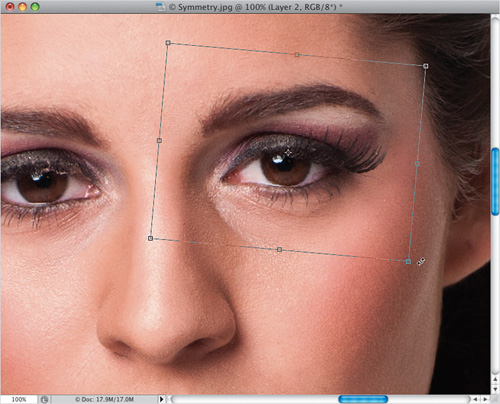
Press Command-J (PC: Ctrl-J) to copy your selected eye area up to its own layer. Now, to resize it, you’re going to use Free Transform, so press Command-T (PC: Ctrl-T). When the Free Transform bounding box appears, press-and-hold the Shift and Option (PC: Alt) keys, so when you drag a point it does two things: (1) it stays proportional as you drag, so you don’t distort the eye, and (2) it increases in size outward from the center point, rather than from a corner point (that’s what the Option key brings to the party). Now, grab a corner point and drag outward until the size of the eye on the left approximately matches the size of the one on the right (as shown here). Press Return (PC: Enter) to lock in your resizing.
Step Four:
Go ahead and adjust the other eye. First, click back on the Background layer but then, this time, make your lasso selection around both the eye and eyebrow (as shown here), because we’re going to need to move them together as a unit. Don’t forget to add a 10-pixel feather to soften the edges.
Step Five:
Duplicate this selection and bring up Free Transform again, but this time you’re going to use the Down Arrow key on your keyboard to nudge the eye and eyebrow combo down a few pixels until the eyes line up straight across from each other. Next, move your cursor outside the bounding box and your cursor changes into a two-headed arrow (as seen here). Now, you need to rotate the eye clockwise a little bit, so it matches the eye on the left. Press Return when you’re done, then press Command-Option-Shift-E (PC: Ctrl-Alt-Shift-E) to merge all your layers into a new layer on top of the layer stack.
Step Six:
Next, you’re going to work on opening the eyelid on the left side a bit. With your merged layer active, go under the Filter menu, and choose Liquify. Get the Freeze Mask tool (F) and paint over her eyebrow on the left. That freezes it in place, so it can’t be accidentally moved while you’re adjusting the eyelid. Now, get the Forward Warp tool (W), choose a small brush size, and gently nudge her eyelid above the eye on the left up just a little bit (it’s hard to see my brush cursor here, because it’s black and we’re over a dark part of the image, but I started above her pupil making very small, gentle nudges just a tiny bit upward. It doesn’t have to move a bunch—just a little. Remember, you’re trying to match the eye on the right, so keep an eye on how it looks as you’re nudging, so you don’t move too far). Don’t click OK yet.
Step Seven:
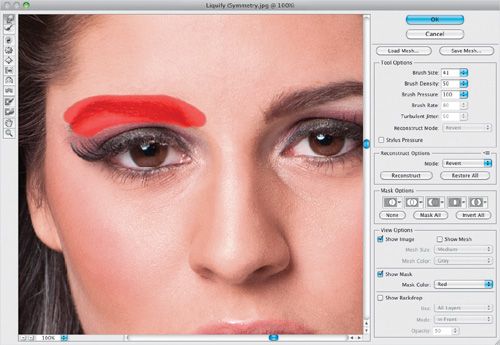
Now, let’s work on making both sides of her nose more symmetrical. We’re going to start by shrinking the right side of the nose using the Pucker tool (S). This tool basically collapses the pixels under it, so you have to be very gentle with it (are you sensing a theme here?). Don’t paint with it. Instead, just lightly click, and each time you do, it kind of shrinks whatever is under the brush, with the greatest effect happening in the center of the brush. Get a large brush (like you see here) and just click over the right nostril a few times, very gently. Don’t be surprised if after one of your clicks, all of a sudden, the entire side of the nose gets sucked in and it looks horrible. I’ve always said this is a bug in Liquify, but I haven’t gotten anybody at Adobe to agree yet—it’s like the sensitivity suddenly jumps to 100. Anyway, when it happens to you, just press Command-Z (PC: Ctrl-Z) to Undo the cave-in and try again with very light clicks, not strokes.
Step Eight:
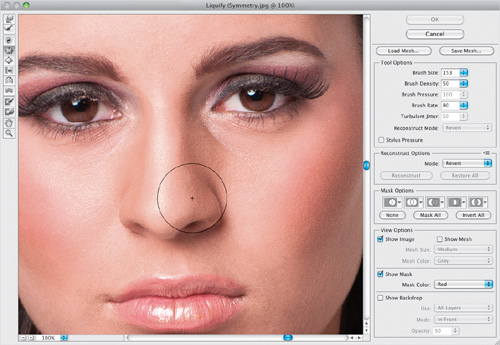
Once you get the right side of the nose to more or less match the left side, you’ll see that the nostrils aren’t matching up. To fix this, you’ll need to nudge the top of the nostril on the right down a bit using the Forward Warp tool (W) with a slightly smaller brush, as shown here. It will take a few nudges to get it pretty close to how the one on the left side looks, just remember the rule—small, gentle nudges. If you mess up, undo, and try it again.

Step Nine:
Now, look at the bridge of the nose. The left side is out of line a bit (versus the right side), so take your brush and just nudge it into line (as shown here).
Step 10:
Our last retouch on the nose will be to slightly twist the entire nose counterclockwise to make it straight. You do this using the Twirl Clockwise tool (C; it twists things, kind of like a whirlpool, as you click-and-hold it down). Choose a huge brush size that covers the entire nose (like you see here). By default, the tool wants to twirl in a clockwise rotation, so to go counterclockwise you need to press-and-hold the Option (PC: Alt) key first, then click-and-hold the tool over the nose (like you see here) for just a moment or two. As soon as you do, you’ll see the nose start to twirl (and you’ll immediately get what this tool does). Release the mouse button when the nose looks straight. If you mess up, just undo, and then try again.
Step 11:
Don’t click OK yet, but here’s a mini before/after of just the changes to the nose. The changes looks much more subtle at this small size than they will on your screen, and you’ll see it much better at the end of the retouch, but I at least wanted you to see the nose retouch at this point.
Step 12:
Looking at the retouch up to this point, take a closer look at her ear on the right side, and the right side of her lips. As mentioned back in Step One, to have everything look more symmetrical, we’re going to have to adjust them so both sides are somewhat similar. So, in the Liquify dialog, get the Freeze Mask tool and paint over the side of her face near her right ear to freeze it. Then, get the Forward Warp tool again and nudge her ear in a bit (as seen here).
Step 13:
Now, shrink your brush size way down, and let’s balance out the lips by just nudging the right side of the top lip down a bit, and basically nudging the right side around until it looks more like the left side (as shown here). I know that all these changes look very subtle, but in a moment, they’ll all come together to create a very pleasing symmetrical look for your subject’s features.
Step 14:
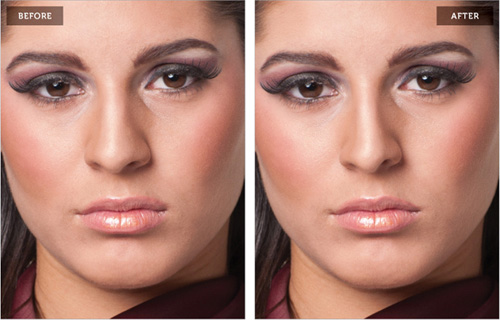
Click OK in the Liquify dialog to see how the changes you just made look in the overall composite image (seen here). A before and after, that’s zoomed out a bit, so you can really see how it affects the overall face symmetry, is shown on the next page. Things to look for: eye size, rotation, eye-lid fix, and alignment. The right side of the nose matches the left. The lips are more balanced, and the ears are balanced, as well
Tip
Here, I lifted the eye on the left a bit, so it aligned better with the one on the right.
Download this image. See pg. xi.
Sculpting the Face by Dodging & Burning
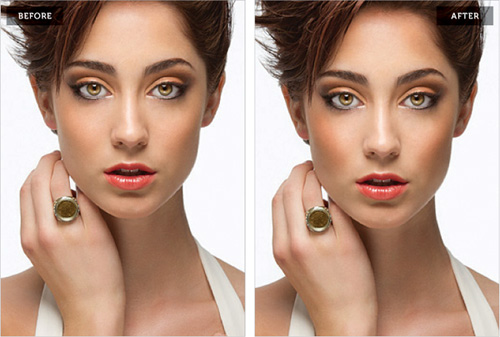
This is a very popular technique that accentuates the existing highlights and shadows in your subject’s face, and gives the face lots of depth and dimension for a really pleasing look. This adds so much dimension, I take the extra time to do this to nearly every image I retouch, so for me, it’s almost like a “finishing move” that gives the image that extra depth.
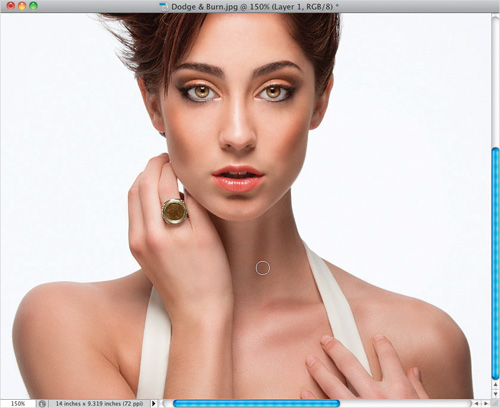
Step One:
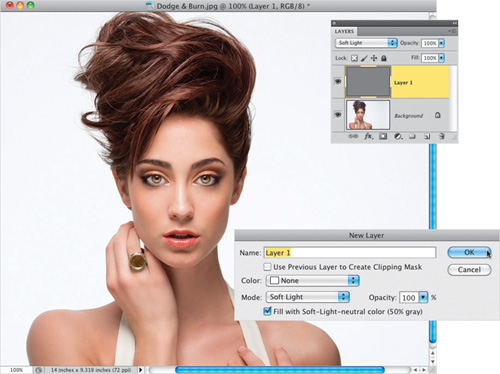
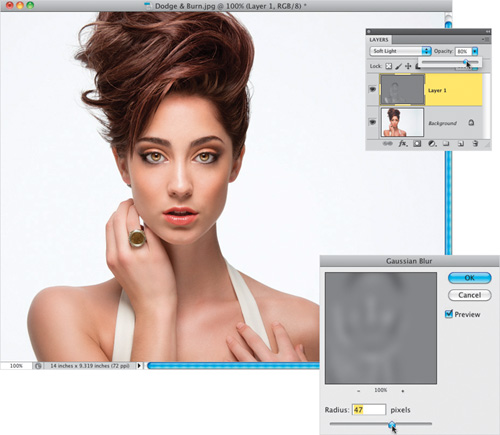
Here’s the image we’re going to use for our dodging and burning project. (Note: This dodging-and-burning technique is for sculpting the face. It’s not to be confused with the dodging-and-burning technique used by high-end retouchers for smoothing skin, using the pixel-by-pixel, pore-by-pore method.) Start by going to the Layers panel and choosing New Layer from the panel’s flyout menu. In the New Layer dialog (shown here), change the blend Mode to Soft Light, then turn on the Fill with Soft-Light-Neutral Color (50% Gray) checkbox, and click OK. This adds a new layer filled with 50% gray (as you see here), but because it’s set to Soft Light, it appears transparent, which makes it perfect for dodging and burning, because later we can blur this layer to soften the effect.
Step Two:
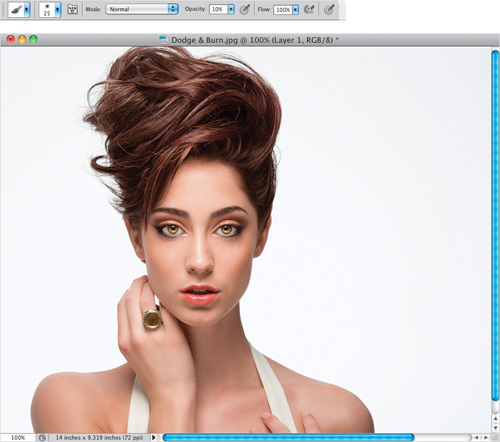
Get the Brush tool (B), choose a mediumsized, soft-edged brush from the Brush Picker up in the Options Bar, and while you’re there, lower the brush Opacity amount to 10%. You want to be able to gradually build up your strokes as you go (of course, if you’re using a Wacom tablet, just leave your Opacity set at 100%, and use the Pressure Sensitivity of the tablet to control the buildup of your strokes).
Step Three:
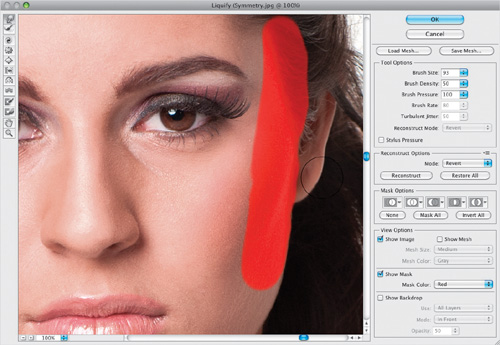
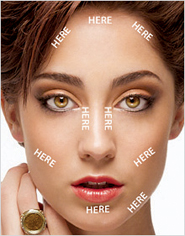
Now, here’s what we’re going to do: on this new layer, we’re going to paint over the dark shadow areas in black to make them darker, and then paint over the highlight areas in white to make them brighter (so, things that extend out from the face get brighter, and the shadow areas get darker). Here, with my Foreground color set to black, I’m making a few strokes along her cheek on the left to darken that area. So, exactly what areas are we going to darken? Basically, we darken the areas on either side of the bridge of her nose, right under her bottom lip, and along the cheekbones on either side of her face.

Step Four:
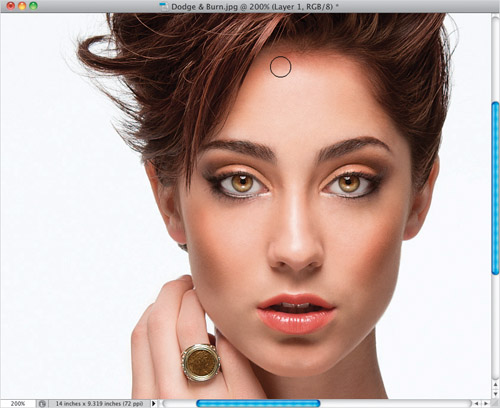
Another area I always burn is right along the hairline, all the way around her forehead (as shown here), kind of making a semi-circle going from her left ear, up to the top of her head, then down to the other ear. In this case, some of her hair is blocking me from going all the way down on the left side of her face, but that’s perfectly fine.
Tip: Changing the Ring Color
The ring the model is wearing was actually a dark green when I took the shot, but I didn’t think it matched her eyes very well with it that close to her face. So, with the Elliptical Marquee tool (press Shift-M until you have it), I put a circular selection around the center of the ring, went under the Select menu, under Modify, chose Feather, and added a 2-pixel feather to soften the edge a bit. Then, I pressed Command-Shift-U (PC: Ctrl-Shift-U) to Desaturate the green part of the ring, making it black and white. While my selection was still in place, I added a new blank layer, got the Eyedropper tool (I), clicked it once on her iris to steal that color and make it my Foreground color, then pressed Option-Delete (PC: Alt-Backspace) to fill the circle with that color. Then, I changed the layer blend mode to Color and deselected. That’s it.
Step Five:
After the face, I move down to the subject’s neck and darken all the shadow areas there and on their shoulders and arms, if they’re visible (as seen here). I follow the contours of the skin, so where you see my cursor, I’m painting almost up-and-down strokes (at a little bit of an angle). When I’m doing dodging and burning like this, I prefer to take a few extra strokes, and make the burning really dark (which makes it easier for me to see what I’m doing as I go), knowing that later, I’ll be able to control the amount by lowering the opacity of the layer. Once you’ve burned over all the shadow areas, it’s time to do your brightening by switching your Foreground color to white.
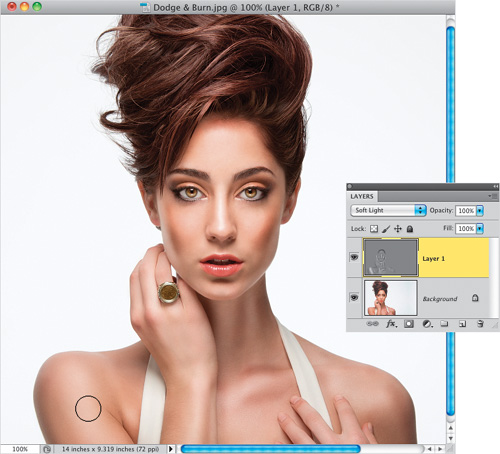
Step Six:
Now, it’s decision time. You can do your dodging on the same layer you did your burning on, or if you want even more control, you can choose to do your dodging on its own separate layer, so you can vary its opacity separately from the burning layer (just so you know, I usually do mine on the same layer). If you want to keep them separate, then create another Soft-Light-Neutral Color (50% Gray) layer just like you did in Step One, and then do your dodging on that layer. Again, I do both on the same layer myself, so that’s what we’ll be doing here. Now, with your Foreground color set to white, and using the same brush settings, start painting over the highlight areas to make them even brighter. Here, I’m painting over that highlight that runs along the edge of her chin on the right. This highlight is there because of the way I backlit the shot in the studio, so it won’t always be there, but since it’s a highlight, I accentuate it with dodging. Don’t forget to follow the contours of her skin, painting long strokes from the bottom of her chin up to the side of her cheek.

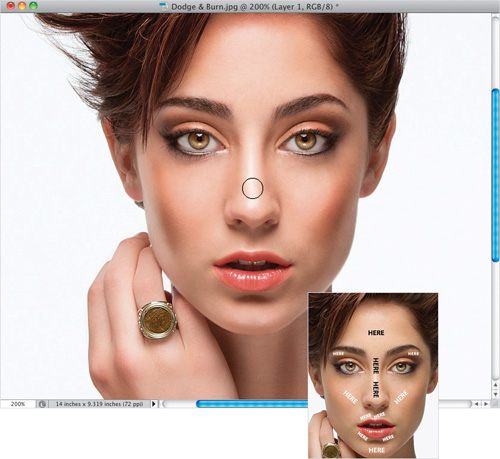
Step Seven:
So, which things do we brighten when we’re dodging? Typically, I brighten any areas that protrude outward from her face, so I dodge the highlight that runs the length of the center of her nose (as shown here), I dodge both cheeks just outside the dark area that surrounds the bridge of her nose, then the center of her forehead, the center of the front of her chin, the two little ridges right above her top lip, the area just above her eyes (where eye shadow goes), and just below the bottom left and right sides of her lips. You’ll have to vary your brush size—making the brush smaller for small areas (like her chin, or right above her top lip) and much larger for things like highlights down her arms or shoulders.
Step Eight:
I continue by dodging the highlights on her neck, hands, shoulders, and pretty much everywhere there are highlights created by the lighting I used. Basically, if it’s bright, I make it brighter, and if you look in the Layers panel, you can see how the darker and lighter areas appear on that gray layer. Also, by now you’re probably thinking that this dodging and burning looks really obvious, and way over the top, and at this stage, it does. But, don’t worry, we’re not done yet.
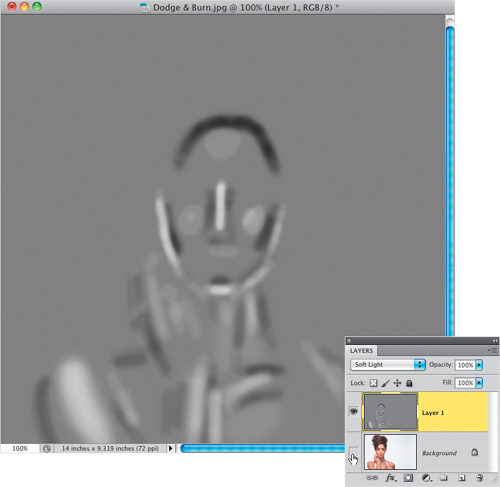
Step Nine:
Here, I hid the Background layer (by clicking on the Eye icon to the left of the layer), so can you see what we’ve really done, which is to paint a bunch of black, white, and gray strokes over our subject. You’ll also notice that the brush strokes don’t seem very soft, which is why the next step is so important, and it’s one of the two final things we do to control the amount of this retouch.
Step 10:
Turn the Background layer back on, so you can really see what’s happening to your dodging and burning. To soften your strokes, go under the Filter menu, under Blur, and choose Gaussian Blur. Now, you’re going to blur the living daylights out of those paint strokes to make them much softer and smoother, and have them blend nicely with the rest of the image. When the Gaussian Blur dialog appears, drag the Radius slider quite a bit to the right to totally blur your strokes (as seen here, where I dragged to 47 pixels) and have them smoothly blend the dodging and burning. It helps to toggle the Preview checkbox in the dialog on/off a few times, so you can really see the effect it has and to help choose the right amount of blurring. When you’ve found the right amount, click OK. Now, you get to dial in just the amount of overall dodging and burning by going to the top of the Layers panel and lowering the Opacity of your dodging/burning layer. If you used two different layers (one for dodging; one for burning), then you can use the Opacity slider to control each individually. In the final image, I lowered the Opacity to around 80%, but I often go much lower than that. Here, I wanted to leave it higher, though, for example purposes.
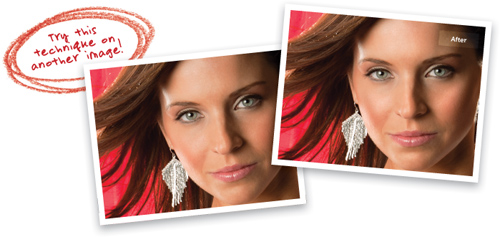
Download this image. See pg. xi.