Chapter 3 Introduction to CUDA C
If you read Chapter 1, we hope we have convinced you of both the immense computational power of graphics processors and that you are just the programmer to harness it. And if you continued through Chapter 2, you should have a functioning environment set up in order to compile and run the code you’ll be writing in CUDA C. If you skipped the first chapters, perhaps you’re just skimming for code samples, perhaps you randomly opened to this page while browsing at a bookstore, or maybe you’re just dying to get started; that’s OK, too (we won’t tell). Either way, you’re ready to get started with the first code examples, so let’s go.
3.1 Chapter Objectives
Through the course of this chapter, you will accomplish the following:
• You will write your first lines of code in CUDA C.
• You will learn the difference between code written for the host and code written for a device.
• You will learn how to run device code from the host.
• You will learn about the ways device memory can be used on CUDA-capable devices.
• You will learn how to query your system for
information on its CUDA-capable devices.
3.2 A First Program
Since we intend to learn CUDA C by example, let’s take a look at our first example of CUDA C. In accordance with the laws governing written works of computer programming, we begin by examining a “Hello, World!” example.
3.2.1 Hello, World!
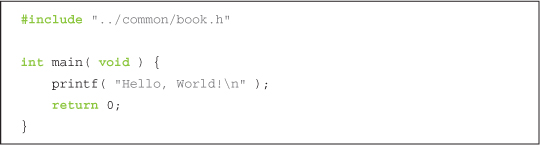
At this point, no doubt you’re wondering whether this book is a scam. Is this just C? Does CUDA C even exist? The answers to these questions are both in the affirmative; this book is not an elaborate ruse. This simple “Hello, World!” example is meant to illustrate that, at its most basic, there is no difference between CUDA C and the standard C to which you have grown accustomed.
The simplicity of this example stems from the fact that it runs entirely on the host. This will be one of the important distinctions made in this book; we refer to the CPU and the system’s memory as the host and refer to the GPU and its memory as the device. This example resembles almost all the code you have ever written because it simply ignores any computing devices outside the host.
To remedy that sinking feeling that you’ve invested in nothing more than an expensive collection of trivialities, we will gradually build upon this simple example. Let’s look at something that uses the GPU (a device) to execute code. A function that executes on the device is typically called a kernel.
3.2.2 A Kernel Call
Now we will build upon our example with some code that should look more foreign than our plain-vanilla “Hello, World!” program.
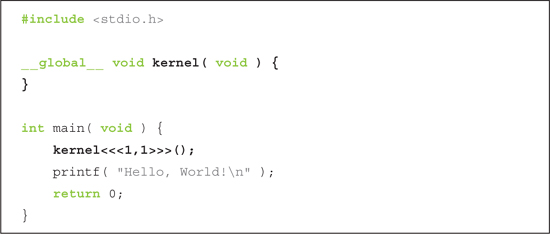
This program makes two notable additions to the original “Hello, World!” example:
• An empty function named kernel() qualified with __global__
• A call to the empty function, embellished with <<<1,1>>>
As we saw in the previous section, code is compiled by your system’s standard C compiler by default. For example, GNU gcc might compile your host code on Linux operating systems, while Microsoft Visual C compiles it on Windows systems. The NVIDIA tools simply feed this host compiler your code, and everything behaves as it would in a world without CUDA.
Now we see that CUDA C adds the __global__ qualifier to standard C. This mechanism alerts the compiler that a function should be compiled to run on a device instead of the host. In this simple example, nvcc gives the function kernel() to the compiler that handles device code, and it feeds main() to the host compiler as it did in the previous example.
So, what is the mysterious call to kernel(), and why must we vandalize our standard C with angle brackets and a numeric tuple? Brace yourself, because this is where the magic happens.
We have seen that CUDA C needed a linguistic method for marking a function as device code. There is nothing special about this; it is shorthand to send host code to one compiler and device code to another compiler. The trick is actually in calling the device code from the host code. One of the benefits of CUDA C is that it provides this language integration so that device function calls look very much like host function calls. Later we will discuss what actually happens behind the scenes, but suffice to say that the CUDA compiler and runtime take care of the messy business of invoking device code from the host.
So, the mysterious-looking call invokes device code, but why the angle brackets and numbers? The angle brackets denote arguments we plan to pass to the runtime system. These are not arguments to the device code but are parameters that will influence how the runtime will launch our device code. We will learn about these parameters to the runtime in the next chapter. Arguments to the device code itself get passed within the parentheses, just like any other function invocation.
3.2.3 Passing Parameters
We’ve promised the ability to pass parameters to our kernel, and the time has come for us to make good on that promise. Consider the following enhancement to our “Hello, World!” application:

You will notice a handful of new lines here, but these changes introduce only two concepts:
• We can pass parameters to a kernel as we would with any C function.
• We need to allocate memory to do anything useful on a device, such as return values to the host.
There is nothing special about passing parameters to a kernel. The angle-bracket syntax notwithstanding, a kernel call looks and acts exactly like any function call in standard C. The runtime system takes care of any complexity introduced by the fact that these parameters need to get from the host to the device.
The more interesting addition is the allocation of memory using cudaMalloc(). This call behaves very similarly to the standard C call malloc(), but it tells the CUDA runtime to allocate the memory on the device. The first argument is a pointer to the pointer you want to hold the address of the newly allocated memory, and the second parameter is the size of the allocation you want to make. Besides the fact that your allocated memory pointer is not the function’s return value, this is identical behavior to malloc(), right down to the void* return type. The HANDLE_ERROR() that surrounds these calls is a utility macro that we have provided as part of this book’s support code. It simply detects that the call has returned an error, prints the associated error message, and exits the application with an EXIT_FAILURE code. Although you are free to use this code in your own applications, it is highly likely that this error-handling code will be insufficient in production code.
This raises a subtle but important point. Much of the simplicity and power of CUDA C derives from the ability to blur the line between host and device code. However, it is the responsibility of the programmer not to dereference the pointer returned by cudaMalloc() from code that executes on the host. Host code may pass this pointer around, perform arithmetic on it, or even cast it to a different type. But you cannot use it to read or write from memory.
Unfortunately, the compiler cannot protect you from this mistake, either. It will be perfectly happy to allow dereferences of device pointers in your host code because it looks like any other pointer in the application. We can summarize the restrictions on the usage of device pointers as follows:
You can pass pointers allocated with cudaMalloc() to functions that execute on the device.
You can use pointers allocated with cudaMalloc() to read or write memory from code that executes on the device.
You can pass pointers allocated with cudaMalloc() to functions that execute on the host.
You cannot use pointers allocated with cudaMalloc() to read or write memory from code that executes on the host.
If you’ve been reading carefully, you might have anticipated the next lesson: We can’t use standard C’s free() function to release memory we’ve allocated with cudaMalloc(). To free memory we’ve allocated with cudaMalloc(), we need to use a call to cudaFree(), which behaves exactly like free() does.
We’ve seen how to use the host to allocate and free memory on the device, but we’ve also made it painfully clear that you cannot modify this memory from the host. The remaining two lines of the sample program illustrate two of the most common methods for accessing device memory—by using device pointers from within device code and by using calls to cudaMemcpy().
We use pointers from within device code exactly the same way we use them in standard C that runs on the host code. The statement *c = a + b is as simple as it looks. It adds the parameters a and b together and stores the result in the memory pointed to by c. We hope this is almost too easy to even be interesting.
We listed the ways in which we can and cannot use device pointers from within device and host code. These caveats translate exactly as one might imagine when considering host pointers. Although we are free to pass host pointers around in device code, we run into trouble when we attempt to use a host pointer to access memory from within device code. To summarize, host pointers can access memory from host code, and device pointers can access memory from device code.
As promised, we can also access memory on a device through calls to cudaMemcpy() from host code. These calls behave exactly like standard C memcpy() with an additional parameter to specify which of the source and destination pointers point to device memory. In the example, notice that the last parameter to cudaMemcpy() is cudaMemcpyDeviceToHost, instructing the runtime that the source pointer is a device pointer and the destination pointer is a host pointer.
Unsurprisingly, cudaMemcpyHostToDevice would indicate the opposite situation, where the source data is on the host and the destination is an address on the device. Finally, we can even specify that both pointers are on the device by passing cudaMemcpyDeviceToDevice. If the source and destination pointers are both on the host, we would simply use standard C’s memcpy() routine to copy between them.
3.3 Querying Devices
Since we would like to be allocating memory and executing code on our device, it would be useful if our program had a way of knowing how much memory and what types of capabilities the device had. Furthermore, it is relatively common for people to have more than one CUDA-capable device per computer. In situations like this, we will definitely want a way to determine which processor is which.
For example, many motherboards ship with integrated NVIDIA graphics processors. When a manufacturer or user adds a discrete graphics processor to this computer, it then possesses two CUDA-capable processors. Some NVIDIA products, like the GeForce GTX 295, ship with two GPUs on a single card. Computers that contain products such as this will also show two CUDA-capable processors.
Before we get too deep into writing device code, we would love to have a mechanism for determining which devices (if any) are present and what capabilities each device supports. Fortunately, there is a very easy interface to determine this information. First, we will want to know how many devices in the system were built on the CUDA Architecture. These devices will be capable of executing kernels written in CUDA C. To get the count of CUDA devices, we call cudaGetDeviceCount(). Needless to say, we anticipate receiving an award for Most Creative Function Name.

After calling cudaGetDeviceCount(), we can then iterate through the devices and query relevant information about each. The CUDA runtime returns us these properties in a structure of type cudaDeviceProp. What kind of properties can we retrieve? As of CUDA 3.0, the cudaDeviceProp structure contains the following:
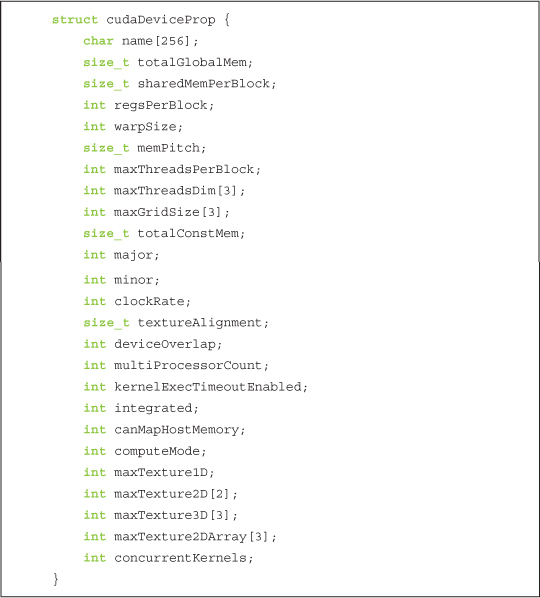
Some of these are self-explanatory; others bear some additional description (see Table 3.1).
Table 3.1 CUDA Device Properties
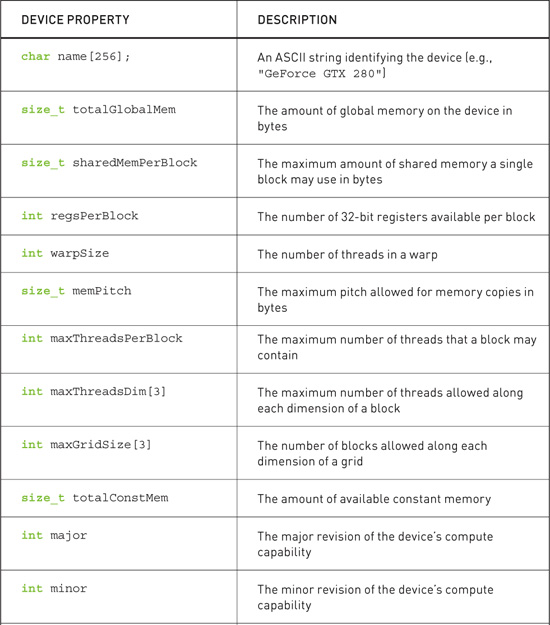
We’d like to avoid going too far, too fast down our rabbit hole, so we will not go into extensive detail about these properties now. In fact, the previous list is missing some important details about some of these properties, so you will want to consult the NVIDIA CUDA Reference Manual for more information. When you move on to write your own applications, these properties will prove extremely useful. However, for now we will simply show how to query each device and report the properties of each. So far, our device query looks something like this:
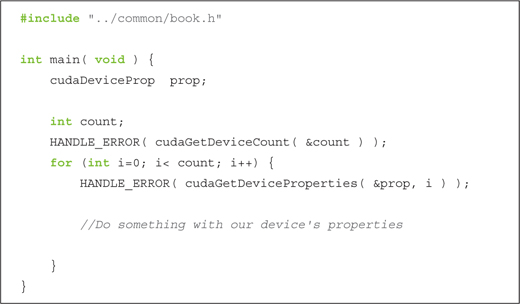
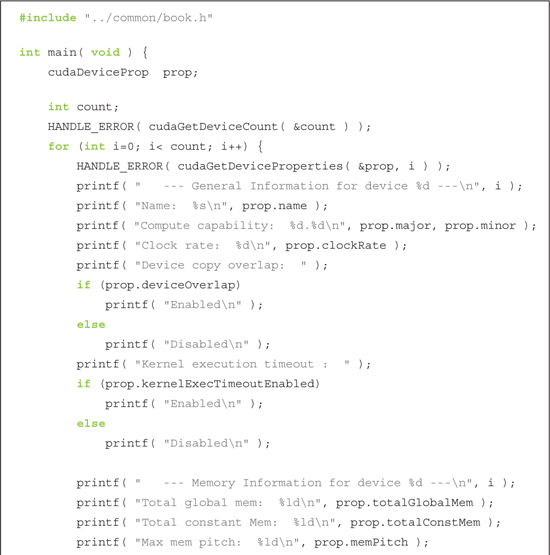
Now that we know each of the fields available to us, we can expand on the ambiguous “Do something...” section and implement something marginally less trivial:

3.4 Using Device Properties
Other than writing an application that handily prints every detail of every CUDA-capable card, why might we be interested in the properties of each device in our system? Since we as software developers want everyone to think our software is fast, we might be interested in choosing the GPU with the most multiprocessors on which to run our code. Or if the kernel needs close interaction with the CPU, we might be interested in running our code on the integrated GPU that shares system memory with the CPU. These are both properties we can query with cudaGetDeviceProperties().
Suppose that we are writing an application that depends on having double-precision floating-point support. After a quick consultation with Appendix A of the NVIDIA CUDA Programming Guide, we know that cards that have compute capability 1.3 or higher support double-precision floating-point math. So to successfully run the double-precision application that we’ve written, we need to find at least one device of compute capability 1.3 or higher.
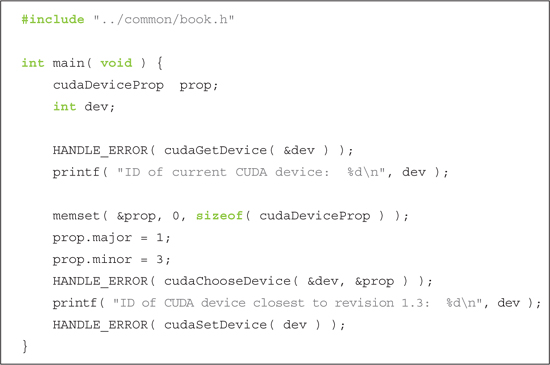
Based on what we have seen with cudaGetDeviceCount() and cudaGetDeviceProperties(), we could iterate through each device and look for one that either has a major version greater than 1 or has a major version of 1 and minor version greater than or equal to 3. But since this relatively common procedure is also relatively annoying to perform, the CUDA runtime offers us an automated way to do this. We first fill a cudaDeviceProp structure with the properties we need our device to have.

After filling a cudaDeviceProp structure, we pass it to cudaChooseDevice() to have the CUDA runtime find a device that satisfies this constraint. The call to cudaChooseDevice() returns a device ID that we can then pass to cudaSetDevice(). From this point forward, all device operations will take place on the device we found in cudaChooseDevice().
Systems with multiple GPUs are becoming more and more common. For example, many of NVIDIA’s motherboard chipsets contain integrated, CUDA-capable GPUs. When a discrete GPU is added to one of these systems, you suddenly have a multi-GPU platform. Moreover, NVIDIA’s SLI technology allows multiple discrete GPUs to be installed side by side. In either of these cases, your application may have a preference of one GPU over another. If your application depends on certain features of the GPU or depends on having the fastest GPU in the system, you should familiarize yourself with this API because there is no guarantee that the CUDA runtime will choose the best or most appropriate GPU for your application.
3.5 Chapter Review
We’ve finally gotten our hands dirty writing CUDA C, and ideally it has been less painful than you might have suspected. Fundamentally, CUDA C is standard C with some ornamentation to allow us to specify which code should run on the device and which should run on the host. By adding the keyword __global__ before a function, we indicated to the compiler that we intend to run the function on the GPU. To use the GPU’s dedicated memory, we also learned a CUDA API similar to C’s malloc(), memcpy(), and free() APIs. The CUDA versions of these functions, cudaMalloc(), cudaMemcpy(), and cudaFree(), allow us to allocate device memory, copy data between the device and host, and free the device memory when we’ve finished with it.
As we progress through this book, we will see more interesting examples of how we can effectively use the device as a massively parallel coprocessor. For now, you should know how easy it is to get started with CUDA C, and in the next chapter we will see how easy it is to execute parallel code on the GPU.