
Chapter 7. Graphics Programming
• DISPLAYING INFORMATION IN A COMPONENT
• USING SPECIAL FONTS FOR TEXT
To this point, you have seen only how to write programs that take input from the keyboard, fuss with it, and then display the results on a console screen. This is not what most users want now. Modern programs don’t work this way and neither do web pages. This chapter starts you on the road to writing Java programs that use a graphical user interface (GUI). In particular, you learn how to write programs that size and locate windows on the screen, display text with multiple fonts in a window, display images, and so on. This gives you a useful, valuable repertoire of skills that you will put to good use in subsequent chapters as you write interesting programs.
The next two chapters show you how to process events, such as keystrokes and mouse clicks, and how to add interface elements, such as menus and buttons, to your applications. When you finish these three chapters, you will know the essentials for writing graphical applications. For more sophisticated graphics programming techniques, we refer you to Volume II.
If, on the other hand, you intend to use Java for server-side programming only and are not interested in writing GUI programming, you can safely skip these chapters.
Introducing Swing
When Java 1.0 was introduced, it contained a class library, which Sun called the Abstract Window Toolkit (AWT), for basic GUI programming. The basic AWT library deals with user interface elements by delegating their creation and behavior to the native GUI toolkit on each target platform (Windows, Solaris, Macintosh, and so on). For example, if you used the original AWT to put a text box on a Java window, an underlying “peer” text box actually handled the text input. The resulting program could then, in theory, run on any of these platforms, with the “look and feel” of the target platform—hence Sun’s trademarked slogan “Write Once, Run Anywhere.”
The peer-based approach worked well for simple applications, but it soon became apparent that it was fiendishly difficult to write a high-quality portable graphics library that depended on native user interface elements. User interface elements such as menus, scrollbars, and text fields can have subtle differences in behavior on different platforms. It was hard, therefore, to give users a consistent and predictable experience with this approach. Moreover, some graphical environments (such as X11/Motif) do not have as rich a collection of user interface components as does Windows or the Macintosh. This in turn further limits a portable library based on peers to a “lowest common denominator” approach. As a result, GUI applications built with the AWT simply did not look as nice as native Windows or Macintosh applications, nor did they have the kind of functionality that users of those platforms had come to expect. More depressingly, there were different bugs in the AWT user interface library on the different platforms. Developers complained that they needed to test their applications on each platform, a practice derisively called “write once, debug everywhere.”
In 1996, Netscape created a GUI library they called the IFC (Internet Foundation Classes) that used an entirely different approach. User interface elements, such as buttons, menus, and so on, were painted onto blank windows. The only functionality required from the underlying windowing system was a way to put up windows and to paint on the window. Thus, Netscape’s IFC widgets looked and behaved the same no matter which platform the program ran on. Sun worked with Netscape to perfect this approach, creating a user interface library with the code name “Swing.” Swing was available as an extension to Java 1.1 and became a part of the standard library in Java SE 1.2.
Since, as Duke Ellington said, “It Don’t Mean a Thing If It Ain’t Got That Swing,” Swing is now the official name for the non-peer-based GUI toolkit. Swing is part of the Java Foundation Classes (JFC). The full JFC is vast and contains far more than the Swing GUI toolkit. JFC features not only include the Swing components but also an accessibility API, a 2D API, and a drag-and-drop API.
Swing is not a complete replacement for the AWT—it is built on top of the AWT architecture. Swing simply gives you more capable user interface components. You use the foundations of the AWT, in particular, event handling, whenever you write a Swing program. From now on, we say “Swing” when we mean the “painted” user interface classes, and we say “AWT” when we mean the underlying mechanisms of the windowing toolkit, such as event handling.
Of course, Swing-based user interface elements will be somewhat slower to appear on the user’s screen than the peer-based components used by the AWT. Our experience is that on any reasonably modern machine, the speed difference shouldn’t be a problem. On the other hand, the reasons to choose Swing are overwhelming:
• Swing has a rich and convenient set of user interface elements.
• Swing has few dependencies on the underlying platform; it is therefore less prone to platform-specific bugs.
• Swing gives a consistent user experience across platforms.
Still, the third plus is also a potential drawback: If the user interface elements look the same on all platforms, then they will look different from the native controls and thus users will be less familiar with them.
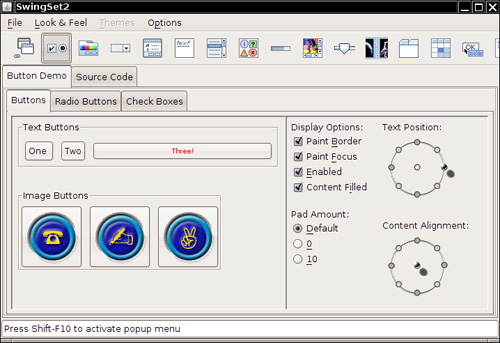
Swing solves this problem in a very elegant way. Programmers writing Swing programs can give the program a specific “look and feel.” For example, Figures 7–1 and 7–2 show the same program running with the Windows and the GTK look and feel.
Figure 7–1. The Windows look and feel of Swing
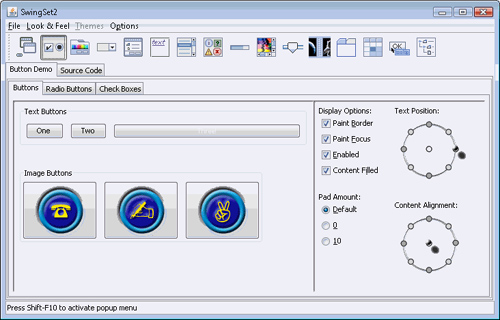
Figure 7–2. The GTK look and feel of Swing
Furthermore, Sun developed a platform-independent look and feel that was called “Metal” until the marketing folks renamed it as the “Java look and feel.” However, most programmers continue to use the term “Metal,” and we will do the same in this book.
Some people criticized Metal as being stodgy, and the look was freshened up for the Java SE 5.0 release (see Figure 7–3). Now the Metal look supports multiple themes—minor variations in colors and fonts. The default theme is called “Ocean.”
Figure 7–3. The Ocean theme of the Metal look and feel

In Java SE 6, Sun improved the support for the native look and feel for Windows and GTK. A Swing application will now pick up color scheme customizations and faithfully render the throbbing buttons and scrollbars that have become fashionable.
Some users prefer that their Java applications use the native look and feel of their platforms, others like Metal or a third-party look and feel. As you will see in Chapter 8, it is very easy to let your users choose their favorite look and feel
Although we won’t have space in this book to tell you how to do it, Java programmers can extend an existing look and feel or even design a totally new look and feel. This is a tedious process that involves specifying how each Swing component is painted. Some developers have done just that, especially when porting Java to nontraditional platforms such as kiosk terminals or handheld devices. See http://www.javootoo.com for a collection of interesting look-and-feel implementations.
Java SE 5.0 introduced a look and feel, called Synth, that makes this process easier. In Synth, you can define a new look and feel by providing image files and XML descriptors, without doing any programming.
Most Java user interface programming is nowadays done in Swing, with one notable exception. The Eclipse integrated development environment uses a graphics toolkit called SWT that is similar to the AWT, mapping to native components on various platforms. You can find articles describing SWT at http://www.eclipse.org/articles/.
If you have programmed Microsoft Windows applications with Visual Basic or C#, you know about the ease of use that comes with the graphical layout tools and resource editors these products provide. These tools let you design the visual appearance of your application, and then they generate much (often all) of the GUI code for you. GUI builders are available for Java programming, but we feel that in order to use these tools effectively, you should know how to build a user interface manually. The remainder of this chapter tells you the basics about displaying a window and painting its contents.
Creating a Frame
A top-level window (that is, a window that is not contained inside another window) is called a frame in Java. The AWT library has a class, called Frame, for this top level. The Swing version of this class is called JFrame and extends the Frame class. The JFrame is one of the few Swing components that is not painted on a canvas. Thus, the decorations (buttons, title bar, icons, and so on) are drawn by the user’s windowing system, not by Swing.
Most Swing component classes start with a “J”: JButton, JFrame, and so on. There are classes such as Button and Frame, but they are AWT components. If you accidentally omit a “J”, your program may still compile and run, but the mixture of Swing and AWT components can lead to visual and behavioral inconsistencies.
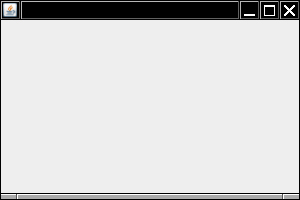
In this section, we go over the most common methods for working with a Swing JFrame. Listing 7–1 lists a simple program that displays an empty frame on the screen, as illustrated in Figure 7–4.
Figure 7–4. The simplest visible frame
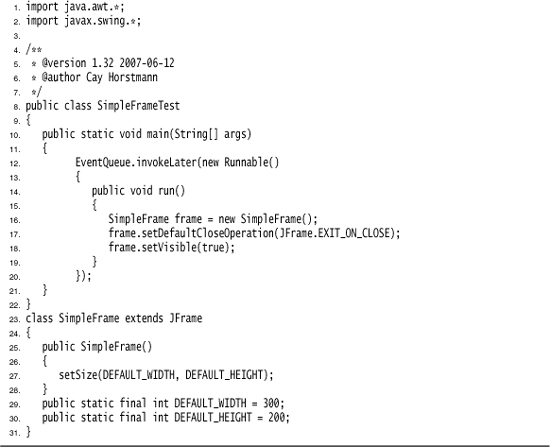
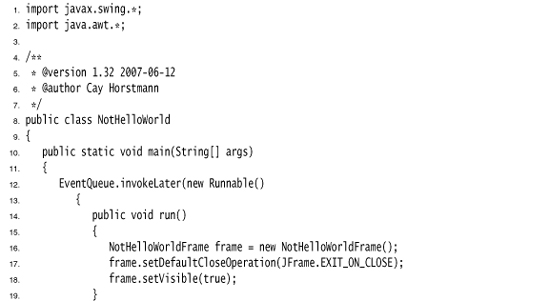
Listing 7–1. SimpleFrameTest.java
Let’s work through this program, line by line.
The Swing classes are placed in the javax.swing package. The package name javax indicates a Java extension package, not a core package. For historical reasons, Swing is considered an extension. However, it is present in every Java SE implementation since version 1.2.
By default, a frame has a rather useless size of 0 × 0 pixels. We define a subclass SimpleFrame whose constructor sets the size to 300 × 200 pixels. This is the only difference between a SimpleFrame and a JFrame.
In the main method of the SimpleFrameTest class, we construct a SimpleFrame object and make it visible.
There are two technical issues that we need to address in every Swing program.
First, all Swing components must be configured from the event dispatch thread, the thread of control that passes events such as mouse clicks and keystrokes to the user interface components. The following code fragment is used to execute statements in the event dispatch thread:

We discuss the details in Chapter 14. For now, you should simply consider it a magic incantation that is used to start a Swing program.
You will see many Swing programs that do not initialize the user interface in the event dispatch thread. It used to be perfectly acceptable to carry out the initialization in the main thread. Sadly, as Swing components got more complex, the programmers at Sun were no longer able to guarantee the safety of that approach. The probability of an error is extremely low, but you would not want to be one of the unlucky few who encounter an intermittent problem. It is better to do the right thing, even if the code looks rather mysterious.
Next, we define what should happen when the user closes the application’s frame. For this particular program, we want the program to exit. To select this behavior, we use the statement
frame.setDefaultCloseOperation(JFrame.EXIT_ON_CLOSE);
In other programs with multiple frames, you would not want the program to exit just because the user closes one of the frames. By default, a frame is hidden when the user closes it, but the program does not terminate. (It might have been nice if the program terminated after the last frame became invisible, but that is not how Swing works.)
Simply constructing a frame does not automatically display it. Frames start their life invisible. That gives the programmer the chance to add components into the frame before showing it for the first time. To show the frame, the main method calls the setVisible method of the frame.
Before Java SE 5.0, it was possible to use the show method that the JFrame class inherits from the superclass Window. The Window class has a superclass Component that also has a show method. The Component.show method was deprecated in Java SE 1.2. You are supposed to call setVisible(true) instead if you want to show a component. However, until Java SE 1.4, the Window.show method was not deprecated. In fact, it was quite useful, making the window visible and bringing it to the front. Sadly, that benefit was lost on the deprecation police, and Java SE 5.0 deprecated the show method for windows as well.
After scheduling the initialization statements, the main method exits. Note that exiting main does not terminate the program, just the main thread. The event dispatch thread keeps the program alive until it is terminated, either by closing the frame or by calling the System.exit method.
The running program is shown in Figure 7–4 on page 286—it is a truly boring top-level window. As you can see in the figure, the title bar and surrounding decorations, such as resize corners, are drawn by the operating system and not the Swing library. If you run the same program in Windows, GTK, or the Mac, the frame decorations are different. The Swing library draws everything inside the frame. In this program, it just fills the frame with a default background color.
As of Java SE 1.4, you can turn off all frame decorations by calling frame.setUndecorated(true).
Positioning a Frame
The JFrame class itself has only a few methods for changing how frames look. Of course, through the magic of inheritance, most of the methods for working with the size and position of a frame come from the various superclasses of JFrame. Here are some of the most important methods:
• The setLocation and setBounds methods for setting the position of the frame
• The setIconImage method, which tells the windowing system which icon to display in the title bar, task switcher window, and so on
• The setTitle method for changing the text in the title bar
• The setResizable method, which takes a boolean to determine if a frame will be resizeable by the user
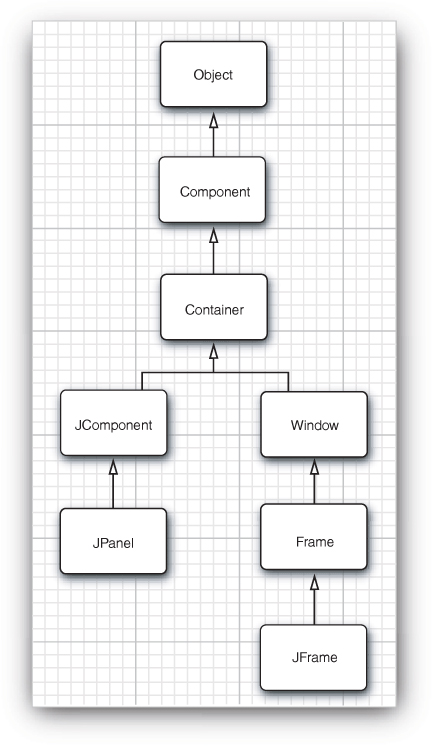
Figure 7–5 illustrates the inheritance hierarchy for the JFrame class.
Figure 7–5. Inheritance hierarchy for the frame and component classes in AWT and Swing
The API notes for this section give what we think are the most important methods for giving frames the proper look and feel. Some of these methods are defined in the JFrame class. Others come from the various superclasses of JFrame. At some point, you may need to search the API docs to see if there are methods for some special purpose. Unfortunately, that is a bit tedious to do with inherited methods. For example, the toFront method is applicable to objects of type JFrame, but because it is simply inherited from the Window class, the JFrame documentation doesn’t explain it. If you feel that there should be a method to do something and it isn’t explained in the documentation for the class you are working with, try looking at the API documentation for the methods of the superclasses of that class. The top of each API page has hyperlinks to the superclasses, and inherited methods are listed below the method summary for the new and overridden methods.
As the API notes indicate, the Component class (which is the ancestor of all GUI objects) and the Window class (which is the superclass of the Frame class) are where you need to look to find the methods to resize and reshape frames. For example, the setLocation method in the Component class is one way to reposition a component. If you make the call
setLocation(x, y)
the top-left corner is located x pixels across and y pixels down, where (0, 0) is the top-left corner of the screen. Similarly, the setBounds method in Component lets you resize and relocate a component (in particular, a JFrame) in one step, as
setBounds(x, y, width, height)
Alternatively, you can give the windowing system control on window placement. If you call
setLocationByPlatform(true);
before displaying the window, the windowing system picks the location (but not the size), typically with a slight offset from the last window.
For a frame, the coordinates of the setLocation and setBounds are taken relative to the whole screen. As you will see in Chapter 9, for other components inside a container, the measurements are taken relative to the container.
Frame Properties
Many methods of component classes come in getter/setter pairs, such as the following methods of the Frame class:
public String getTitle()
public void setTitle(String title)
Such a getter/setter pair is called a property. A property has a name and a type. The name is obtained by changing the first letter after the get or set to lowercase. For example, the Frame class has a property with name title and type String.
Conceptually, title is a property of the frame. When we set the property, we expect that the title changes on the user’s screen. When we get the property, we expect that we get back the value that we set.
We do not know (or care) how the Frame class implements this property. Perhaps it simply uses its peer frame to store the title. Perhaps it has an instance field
private String title; // not required for property
If the class does have a matching instance field, we don’t know (or care) how the getter and setter methods are implemented. Perhaps they just read and write the instance field. Perhaps they do more, such as notifying the windowing system whenever the title changes.
There is one exception to the get/set convention: For properties of type boolean, the getter starts with is. For example, the following two methods define the locationByPlatform property:
public boolean isLocationByPlatform()
public void setLocationByPlatform(boolean b)
We will look at properties in much greater detail in Chapter 8 of Volume II.
Many programming languages, in particular, Visual Basic and C#, have built-in support for properties. It is possible that a future version of Java will also have a language construct for properties.
Determining a Good Frame Size
Remember: if you don’t explicitly size a frame, all frames will default to being 0 by 0 pixels. To keep our example programs simple, we resize the frames to a size that we hope works acceptably on most displays. However, in a professional application, you should check the resolution of the user’s screen and write code that resizes the frames accordingly: a window that looks nice on a laptop screen will look like a postage stamp on a high-resolution screen.
To find out the screen size, use the following steps. Call the static getDefaultToolkit method of the Toolkit class to get the Toolkit object. (The Toolkit class is a dumping ground for a variety of methods that interface with the native windowing system.) Then call the getScreenSize method, which returns the screen size as a Dimension object. A Dimension object simultaneously stores a width and a height, in public (!) instance variables width and height. Here is the code:
Toolkit kit = Toolkit.getDefaultToolkit();
Dimension screenSize = kit.getScreenSize();
int screenWidth = screenSize.width;
int screenHeight = screenSize.height;
We use 50% of these values for the frame size, and tell the windowing system to position the frame:
setSize(screenWidth / 2, screenHeight / 2);
setLocationByPlatform(true);
We also supply an icon. Because the representation of images is also system dependent, we again use the toolkit to load an image. Then, we set the image as the icon for the frame:
Image img = kit.getImage("icon.jpg");
setIconImage(img);
Depending on your operating system, you can see the icon in various places. For example, in Windows, the icon is displayed in the top-left corner of the window, and you can see it in the list of active tasks when you press ALT+TAB.
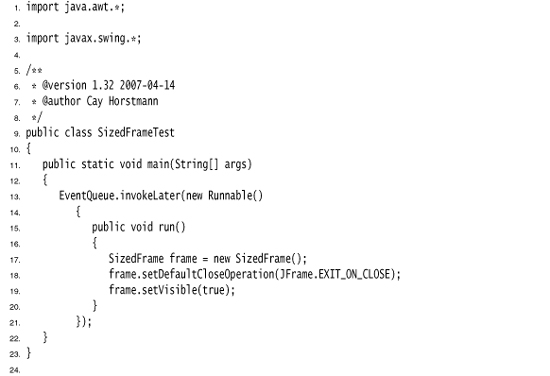
Listing 7–2 is the complete program. When you run the program, pay attention to the “Core Java” icon.
Here are a few additional tips for dealing with frames:
• If your frame contains only standard components such as buttons and text fields, you can simply call the pack method to set the frame size. The frame will be set to the smallest size that contains all components. It is quite common to set the main frame of a program to the maximum size. As of Java SE 1.4, you can simply maximize a frame by calling
frame.setExtendedState(Frame.MAXIMIZED_BOTH);
• It is also a good idea to remember how the user positions and sizes the frame of your application and restore those bounds when you start the application again. You will see in Chapter 10 how to use the Preferences API for this purpose.
• If you write an application that takes advantage of multiple display screens, use the GraphicsEnvironment and GraphicsDevice classes to find the dimensions of the display screens.
• The GraphicsDevice class also lets you execute your application in full-screen mode.
Listing 7–2. SizedFrameTest.java
• boolean isVisible()
• void setVisible(boolean b)
• void setSize(int width, int height) 1.1
• void setLocation(int x, int y) 1.1
• void setBounds(int x, int y, int width, int height) 1.1
• Dimension getSize() 1.1
• void setSize(Dimension d) 1.1
• void toFront()
• void toBack()
• boolean isLocationByPlatform() 5.0
• void setLocationByPlatform(boolean b) 5.0
• boolean isResizable()
• void setResizable(boolean b)
• String getTitle()
• void setTitle(String s)
• Image getIconImage()
• void setIconImage(Image image)
• void setUndecorated(boolean b) 1.4
• int getExtendedState() 1.4
• void setExtendedState(int state) 1.4
Frame.NORMAL
Frame.ICONIFIED
Frame.MAXIMIZED_HORIZ
Frame.MAXIMIZED_VERT
Frame.MAXIMIZED_BOTH
• static Toolkit getDefaultToolkit()
• Dimension getScreenSize()
• Image getImage(String filename)
Displaying Information in a Component
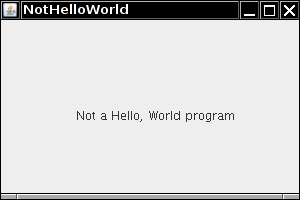
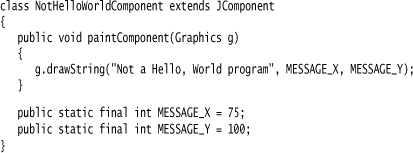
In this section, we show you how to display information inside a frame. For example, rather than displaying “Not a Hello, World program” in text mode in a console window as we did in Chapter 3, we display the message in a frame, as shown in Figure 7–6.
Figure 7–6. A frame that displays information
You could draw the message string directly onto a frame, but that is not considered good programming practice. In Java, frames are really designed to be containers for components such as a menu bar and other user interface elements. You normally draw on another component which you add to the frame.
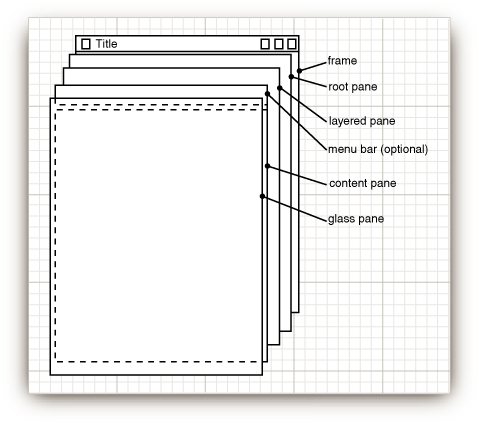
The structure of a JFrame is surprisingly complex. Look at Figure 7–7, which shows the makeup of a JFrame. As you can see, four panes are layered in a JFrame. The root pane, layered pane, and glass pane are of no interest to us; they are required to organize the menu bar and content pane and to implement the look and feel. The part that most concerns Swing programmers is the content pane. When designing a frame, you add components into the content pane, using code such as the following:
Container contentPane = frame.getContentPane();
Component c = . . .;
contentPane.add(c);
Figure 7–7. Internal structure of a JFrame
Up to Java SE 1.4, the add method of the JFrame class was defined to throw an exception with the message “Do not use JFrame.add(). Use JFrame.getContentPane().add() instead.” As of Java SE 5.0, the JFrame.add method has given up trying to reeducate programmers, and it simply calls add on the content pane.
Thus, as of Java SE 5.0, you can simply use the call
frame.add(c);
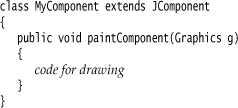
In our case, we want to add a single component to the frame onto which we will draw our message. To draw on a component, you define a class that extends JComponent and override the paintComponent method in that class.
The paintComponent method takes one parameter of type Graphics. A Graphics object remembers a collection of settings for drawing images and text, such as the font you set or the current color. All drawing in Java must go through a Graphics object. It has methods that draw patterns, images, and text.
The Graphics parameter is similar to a device context in Windows or a graphics context in X11 programming.
Here’s how to make a component onto which you can draw:
Each time a window needs to be redrawn, no matter what the reason, the event handler notifies the component. This causes the paintComponent methods of all components to be executed.
Never call the paintComponent method yourself. It is called automatically whenever a part of your application needs to be redrawn, and you should not interfere with this automatic process.
What sorts of actions trigger this automatic response? For example, painting occurs because the user increased the size of the window or minimized and then restored the window. If the user popped up another window and it covered an existing window and then made the overlaid window disappear, the application window that was covered is now corrupted and will need to be repainted. (The graphics system does not save the pixels underneath.) And, of course, when the window is displayed for the first time, it needs to process the code that specifies how and where it should draw the initial elements.
If you need to force repainting of the screen, call the repaint method instead of paintComponent. The repaint method will cause paintComponent to be called for all components, with a properly configured Graphics object.
As you saw in the code fragment above, the paintComponent method takes a single parameter of type Graphics. Measurement on a Graphics object for screen display is done in pixels. The (0, 0) coordinate denotes the top-left corner of the component on whose surface you are drawing.
Displaying text is considered a special kind of drawing. The Graphics class has a drawString method that has the following syntax:
g.drawString(text, x, y)
In our case, we want to draw the string "Not a Hello, World Program" in our original window, roughly one-quarter of the way across and halfway down. Although we don’t yet know how to measure the size of the string, we’ll start the string at coordinates (75, 100). This means the first character in the string will start at a position 75 pixels to the right and 100 pixels down. (Actually, it is the baseline for the text that is 100 pixels down—see page 313 for more on how text is measured.) Thus, our paintComponent method looks like this:
Listing 7–3 shows the complete code.
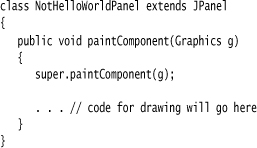
Instead of extending JComponent, some programmers prefer to extend the JPanel class. A JPanel is intended to be a container that can contain other components, but it is also possible to paint on it. There is just one difference. A panel is opaque, which means that it is responsible for painting all pixels within its bounds. The easiest way to achieve that is to paint the panel with the background color, by calling super.paintComponent in the paintComponent method of each panel subclass:
Listing 7–3. NotHelloWorld.java

• Container getContentPane()
• Component add(Component c)
• void repaint()
• public void repaint(int x, int y, int width, int height)
• void paintComponent(Graphics g)
Working with 2D Shapes
Starting with Java 1.0, the Graphics class had methods to draw lines, rectangles, ellipses, and so on. But those drawing operations are very limited. For example, you cannot vary the line thickness and you cannot rotate the shapes.
Java SE 1.2 introduced the Java 2D library, which implements a powerful set of graphical operations. In this chapter, we only look at the basics of the Java 2D library—see the Advanced AWT chapter in Volume II for more information on the advanced features.
To draw shapes in the Java 2D library, you need to obtain an object of the Graphics2D class. This class is a subclass of the Graphics class. Ever since Java SE 2, methods such as paintComponent automatically receive an object of the Graphics2D class. Simply use a cast, as follows:

The Java 2D library organizes geometric shapes in an object-oriented fashion. In particular, there are classes to represent lines, rectangles, and ellipses:
Line2D
Rectangle2D
Ellipse2D
These classes all implement the Shape interface.
The Java 2D library supports more complex shapes—in particular, arcs, quadratic and cubic curves, and general paths. See Chapter 7 of Volume II for more information.
To draw a shape, you first create an object of a class that implements the Shape interface and then call the draw method of the Graphics2D class. For example:
Rectangle2D rect = . . .;
g2.draw(rect);
Before the Java 2D library appeared, programmers used methods of the Graphics class such as drawRectangle to draw shapes. Superficially, the old-style method calls look a bit simpler. However, by using the Java 2D library, you keep your options open—you can later enhance your drawings with some of the many tools that the Java 2D library supplies.
Using the Java 2D shape classes introduces some complexity. Unlike the 1.0 draw methods, which used integer pixel coordinates, the Java 2D shapes use floating-point coordinates. In many cases, that is a great convenience because it allows you to specify your shapes in coordinates that are meaningful to you (such as millimeters or inches) and then translate to pixels. The Java 2D library uses single-precision float quantities for many of its internal floating-point calculations. Single precision is sufficient—after all, the ultimate purpose of the geometric computations is to set pixels on the screen or printer. As long as any roundoff errors stay within one pixel, the visual outcome is not affected. Furthermore, float computations are faster on some platforms, and float values require half the storage of double values.
However, manipulating float values is sometimes inconvenient for the programmer because the Java programming language is adamant about requiring casts when converting double values into float values. For example, consider the following statement:
float f = 1.2; // Error
This statement does not compile because the constant 1.2 has type double, and the compiler is nervous about loss of precision. The remedy is to add an F suffix to the floating-point constant:
float f = 1.2F; // Ok
Now consider this statement:
Rectangle2D r = . . .
float f = r.getWidth(); // Error
This statement does not compile either, for the same reason. The getWidth method returns a double. This time, the remedy is to provide a cast:
float f = (float) r.getWidth(); // Ok
Because the suffixes and casts are a bit of a pain, the designers of the 2D library decided to supply two versions of each shape class: one with float coordinates for frugal programmers, and one with double coordinates for the lazy ones. (In this book, we fall into the second camp and use double coordinates whenever we can.)
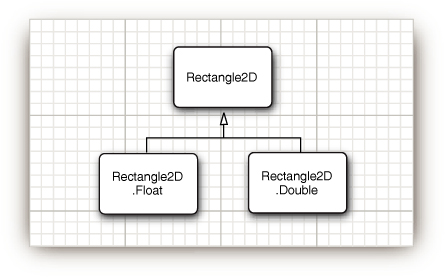
The library designers chose a curious, and initially confusing, method for packaging these choices. Consider the Rectangle2D class. This is an abstract class with two concrete subclasses, which are also static inner classes:
Rectangle2D.Float
Rectangle2D.Double
Figure 7–8 shows the inheritance diagram.
Figure 7–8. 2D rectangle classes
It is best to try to ignore the fact that the two concrete classes are static inner classes—that is just a gimmick to avoid names such as FloatRectangle2D and DoubleRectangle2D. (For more information on static inner classes, see Chapter 6.)
When you construct a Rectangle2D.Float object, you supply the coordinates as float numbers. For a Rectangle2D.Double object, you supply them as double numbers.
Rectangle2D.Float floatRect = new Rectangle2D.Float(10.0F, 25.0F, 22.5F, 20.0F);
Rectangle2D.Double doubleRect = new Rectangle2D.Double(10.0, 25.0, 22.5, 20.0);
Actually, because both Rectangle2D.Float and Rectangle2D.Double extend the common Rectangle2D class and the methods in the subclasses simply override methods in the Rectangle2D superclass, there is no benefit in remembering the exact shape type. You can simply use Rectangle2D variables to hold the rectangle references.
Rectangle2D floatRect = new Rectangle2D.Float(10.0F, 25.0F, 22.5F, 20.0F);
Rectangle2D doubleRect = new Rectangle2D.Double(10.0, 25.0, 22.5, 20.0);
That is, you only need to use the pesky inner classes when you construct the shape objects.
The construction parameters denote the top-left corner, width, and height of the rectangle.
Actually, the Rectangle2D.Float class has one additional method that is not inherited from Rectangle2D, namely, setRect(float x, float y, float h, float w). You lose that method if you store the Rectangle2D.Float reference in a Rectangle2D variable. But it is not a big loss—the Rectangle2D class has a setRect method with double parameters.
The Rectangle2D methods use double parameters and return values. For example, the getWidth method returns a double value, even if the width is stored as a float in a Rectangle2D.Float object.
Simply use the Double shape classes to avoid dealing with float values altogether. However, if you are constructing thousands of shape objects, then you can consider using the Float classes to conserve memory.
What we just discussed for the Rectangle2D classes holds for the other shape classes as well. Furthermore, there is a Point2D class with subclasses Point2D.Float and Point2D.Double. Here is how to make a point object.
Point2D p = new Point2D.Double(10, 20);
The Point2D class is very useful—it is more object oriented to work with Point2D objects than with separate x- and y- values. Many constructors and methods accept Point2D parameters. We suggest that you use Point2D objects when you can—they usually make geometric computations easier to understand.
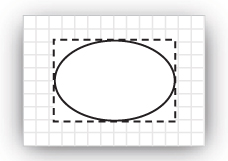
The classes Rectangle2D and Ellipse2D both inherit from the common superclass RectangularShape. Admittedly, ellipses are not rectangular, but they have a bounding rectangle (see Figure 7–9).
Figure 7–9. The bounding rectangle of an ellipse
The RectangularShape class defines over 20 methods that are common to these shapes, among them such useful methods as getWidth, getHeight, getCenterX, and getCenterY (but sadly, at the time of this writing, not a getCenter method that returns the center as a Point2D object).
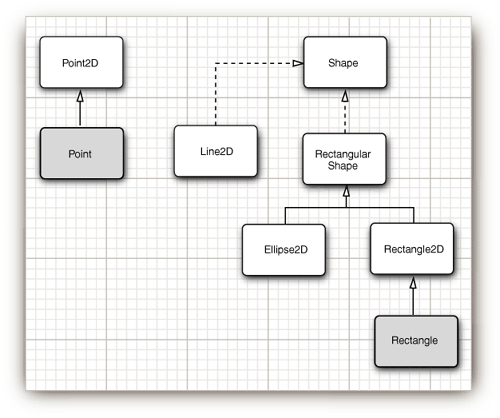
Finally, a couple of legacy classes from Java 1.0 have been fitted into the shape class hierarchy. The Rectangle and Point classes, which store a rectangle and a point with integer coordinates, extend the Rectangle2D and Point2D classes.
Figure 7–10 shows the relationships between the shape classes. However, the Double and Float subclasses are omitted. Legacy classes are marked with a gray fill.
Figure 7–10. Relationships between the shape classes
Rectangle2D and Ellipse2D objects are simple to construct. You need to specify
• The x- and y-coordinates of the top-left corner; and
• The width and height.
For ellipses, these refer to the bounding rectangle. For example,
Ellipse2D e = new Ellipse2D.Double(150, 200, 100, 50);
constructs an ellipse that is bounded by a rectangle with the top-left corner at (150, 200), width 100, and height 50.
However, sometimes you don’t have the top-left corner readily available. It is quite common to have two diagonal corner points of a rectangle, but perhaps they aren’t the top-left and bottom-right corners. You can’t simply construct a rectangle as
Rectangle2D rect = new Rectangle2D.Double(px, py, qx - px, qy - py); // Error
If p isn’t the top-left corner, one or both of the coordinate differences will be negative and the rectangle will come out empty. In that case, first create a blank rectangle and use the setFrameFromDiagonal method, as follows:
Rectangle2D rect = new Rectangle2D.Double();
rect.setFrameFromDiagonal(px, py, qx, qy);
Or, even better, if you know the corner points as Point2D objects p and q, then
rect.setFrameFromDiagonal(p, q);
When constructing an ellipse, you usually know the center, width, and height, and not the corner points of the bounding rectangle (which don’t even lie on the ellipse). The setFrameFromCenter method uses the center point, but it still requires one of the four corner points. Thus, you will usually end up constructing an ellipse as follows:
Ellipse2D ellipse = new Ellipse2D.Double(centerX - width / 2, centerY - height / 2, width, height);
To construct a line, you supply the start and end points, either as Point2D objects or as pairs of numbers:
Line2D line = new Line2D.Double(start, end);
or
Line2D line = new Line2D.Double(startX, startY, endX, endY);
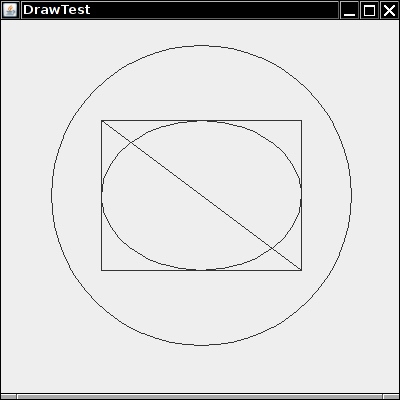
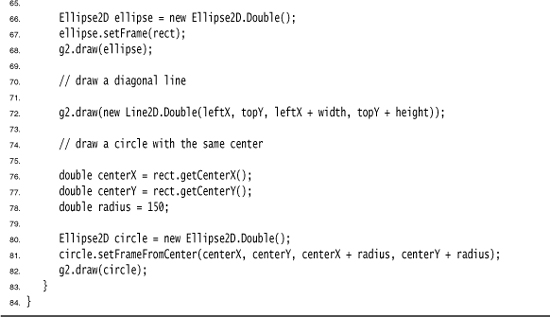
The program in Listing 7–4 draws a rectangle, the ellipse that is enclosed in the rectangle, a diagonal of the rectangle, and a circle that has the same center as the rectangle. Figure 7–11 shows the result.
Figure 7–11. Drawing geometric shapes
![]()
java.awt.geom.RectangularShape 1.2
• double getCenterX()
• double getCenterY()
• double getMinX()
• double getMinY()
• double getMaxX()
• double getMaxY()
• double getWidth()
• double getHeight()
• double getX()
• double getY()
![]()
java.awt.geom.Rectangle2D.Double 1.2
• Rectangle2D.Double(double x, double y, double w, double h)
![]()
java.awt.geom.Rectangle2D.Float 1.2
• Rectangle2D.Float(float x, float y, float w, float h)
![]()
java.awt.geom.Ellipse2D.Double 1.2
• Ellipse2D.Double(double x, double y, double w, double h)
![]()
java.awt.geom.Point2D.Double 1.2
• Point2D.Double(double x, double y)
![]()
java.awt.geom.Line2D.Double 1.2
• Line2D.Double(Point2D start, Point2D end)
• Line2D.Double(double startX, double startY, double endX, double endY)
Using Color
The setPaint method of the Graphics2D class lets you select a color that is used for all subsequent drawing operations on the graphics context. For example:
g2.setPaint(Color.RED);
g2.drawString("Warning!", 100, 100);
You can fill the interiors of closed shapes (such as rectangles or ellipses) with a color. Simply call fill instead of draw:
Rectangle2D rect = . . .;
g2.setPaint(Color.RED);
g2.fill(rect); // fills rect with red color
To draw in multiple colors, you select a color, draw or fill, then select another color, and draw or fill again.
You define colors with the Color class. The java.awt.Color class offers predefined constants for the following 13 standard colors:
BLACK, BLUE, CYAN, DARK_GRAY, GRAY, GREEN, LIGHT_GRAY, MAGENTA, ORANGE, PINK, RED, WHITE, YELLOW
Before Java SE 1.4, color constant names were lowercase, such as Color.red. This is odd because the standard coding convention is to write constants in uppercase. You can now write the standard color names in uppercase or, for backward compatibility, in lowercase.
You can specify a custom color by creating a Color object by its red, green, and blue components. Using a scale of 0–255 (that is, one byte) for the redness, blueness, and greenness, call the Color constructor like this:
Color(int redness, int greenness, int blueness)
Here is an example of setting a custom color:
g2.setPaint(new Color(0, 128, 128)); // a dull blue-green
g2.drawString("Welcome!", 75, 125);
In addition to solid colors, you can select more complex “paint” settings, such as varying hues or images. See the Advanced AWT chapter in Volume II for more details. If you use a Graphics object instead of a Graphics2D object, you need to use the setColor method to set colors.
To set the background color, you use the setBackground method of the Component class, an ancestor of JComponent.
MyComponent p = new MyComponent();
p.setBackground(Color.PINK);
There is also a setForeground method. It specifies the default color that is used for drawing on the component.
The brighter() and darker() methods of the Color class produce, as their names suggest, either brighter or darker versions of the current color. Using the brighter method is also a good way to highlight an item. Actually, brighter() is just a little bit brighter. To make a color really stand out, apply it three times: c.brighter().brighter().brighter().
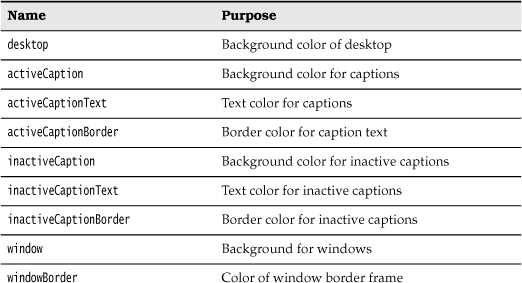
Java gives you predefined names for many more colors in its SystemColor class. The constants in this class encapsulate the colors used for various elements of the user’s system. For example,
p.setBackground(SystemColor.window)
sets the background color of the component to the default used by all windows on the user’s desktop. (The background is filled in whenever the window is repainted.) Using the colors in the SystemColor class is particularly useful when you want to draw user interface elements so that the colors match those already found on the user’s desktop. Table 7–1 lists the system color names and their meanings.
• Color(int r, int g, int b)

• Color getColor()
• void setColor(Color c)
![]()
• Paint getPaint()
• void setPaint(Paint p)
• void fill(Shape s)
• Color getBackground()
• void setBackground(Color c)
![]()
• Color getForeground()
• void setForeground(Color c)
![]()
Using Special Fonts for Text
The “Not a Hello, World” program at the beginning of this chapter displayed a string in the default font. Often, you want to show text in a different font. You specify a font by its font face name. A font face name is composed of a font family name, such as “Helvetica,” and an optional suffix such as “Bold.” For example, the font faces “Helvetica” and “Helvetica Bold” are both considered to be part of the family named “Helvetica.”
To find out which fonts are available on a particular computer, call the getAvailableFontFamilyNames method of the GraphicsEnvironment class. The method returns an array of strings that contains the names of all available fonts. To obtain an instance of the GraphicsEnvironment class that describes the graphics environment of the user’s system, use the static getLocalGraphicsEnvironment method. Thus, the following program prints the names of all fonts on your system:
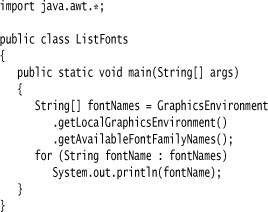
On one system, the list starts out like this:
Abadi MT Condensed Light
Arial
Arial Black
Arial Narrow
Arioso
Baskerville
Binner Gothic
. . .
and goes on for another 70 fonts or so.
Font face names can be trademarked, and font designs can be copyrighted in some jurisdictions. Thus, the distribution of fonts often involves royalty payments to a font foundry. Of course, just as there are inexpensive imitations of famous perfumes, there are lookalikes for name-brand fonts. For example, the Helvetica imitation that is shipped with Windows is called Arial.
To establish a common baseline, the AWT defines five logical font names:
SansSerif
Serif
Monospaced
Dialog
DialogInput
These names are always mapped to fonts that actually exist on the client machine. For example, on a Windows system, SansSerif is mapped to Arial.
In addition, the Sun JDK always includes three font families named “Lucida Sans,” “Lucida Bright,” and “Lucida Sans Typewriter.”
To draw characters in a font, you must first create an object of the class Font. You specify the font face name, the font style, and the point size. Here is an example of how you construct a Font object:
Font sansbold14 = new Font("SansSerif", Font.BOLD, 14);
The third argument is the point size. Points are commonly used in typography to indicate the size of a font. There are 72 points per inch.
You can use a logical font name in the place of a font face name in the Font constructor. You specify the style (plain, bold, italic, or bold italic) by setting the second Font constructor argument to one of the following values:
Font.PLAIN
Font.BOLD
Font.ITALIC
Font.BOLD + Font.ITALIC
The mapping from logical to physical font names is defined in the fontconfig.properties file in the jre/lib subdirectory of the Java installation. See http://java.sun.com/javase/6/docs/technotes/guides/intl/fontconfig.html for information on this file.
You can read font files in TrueType or PostScript Type 1 formats. You need an input stream for the font—typically from a file or URL. (See Chapter 1 of Volume II for more information on streams.) Then call the static Font.createFont method:
URL url = new URL("http://www.fonts.com/Wingbats.ttf");
InputStream in = url.openStream();
Font f1 = Font.createFont(Font.TRUETYPE_FONT, in);
The font is plain with a font size of 1 point. Use the deriveFont method to get a font of the desired size:
Font f = f1.deriveFont(14.0F);
There are two overloaded versions of the deriveFont method. One of them (with a float parameter) sets the font size, the other (with an int parameter) sets the font style. Thus, f1.deriveFont(14) sets the style and not the size! (The result is an italic font because it happens that the binary representation of 14 sets the ITALIC bit but not the BOLD bit.)
The Java fonts contain the usual ASCII characters as well as symbols. For example, if you print the character 'u2297' in the Dialog font, then you get a ⊗ character. Only those symbols that are defined in the Unicode character set are available.
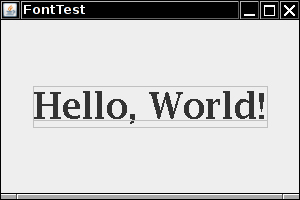
Here’s the code that displays the string “Hello, World!” in the standard sans serif font on your system, using 14-point bold type:
Font sansbold14 = new Font("SansSerif", Font.BOLD, 14);
g2.setFont(sansbold14);
String message = "Hello, World!";
g2.drawString(message, 75, 100);
Next, let’s center the string in its component rather than drawing it at an arbitrary position. We need to know the width and height of the string in pixels. These dimensions depend on three factors:
• The font used (in our case, sans serif, bold, 14 point);
• The string (in our case, “Hello, World!”); and
• The device on which the font is drawn (in our case, the user’s screen).
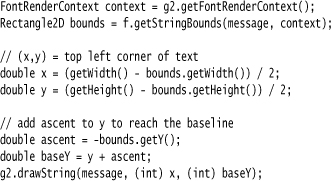
To obtain an object that represents the font characteristics of the screen device, you call the getFontRenderContext method of the Graphics2D class. It returns an object of the FontRenderContext class. You simply pass that object to the getStringBounds method of the Font class:
FontRenderContext context = g2.getFontRenderContext();
Rectangle2D bounds = f.getStringBounds(message, context);
The getStringBounds method returns a rectangle that encloses the string.
To interpret the dimensions of that rectangle, you should know some basic typesetting terms (see Figure 7–12). The baseline is the imaginary line where, for example, the bottom of a character like “e” rests. The ascent is the distance from the baseline to the top of an ascender, which is the upper part of a letter like “b” or “k,” or an uppercase character. The descent is the distance from the baseline to a descender, which is the lower portion of a letter like “p” or “g.”
Figure 7–12. Typesetting terms illustrated
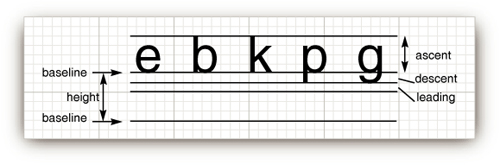
Leading is the space between the descent of one line and the ascent of the next line. (The term has its origin from the strips of lead that typesetters used to separate lines.) The height of a font is the distance between successive baselines, which is the same as descent + leading + ascent.
The width of the rectangle that the getStringBounds method returns is the horizontal extent of the string. The height of the rectangle is the sum of ascent, descent, and leading. The rectangle has its origin at the baseline of the string. The top y-coordinate of the rectangle is negative. Thus, you can obtain string width, height, and ascent as follows:
double stringWidth = bounds.getWidth();
double stringHeight = bounds.getHeight();
double ascent = -bounds.getY();
If you need to know the descent or leading, you need to use the getLineMetrics method of the Font class. That method returns an object of the LineMetrics class, which has methods to obtain the descent and leading:
LineMetrics metrics = f.getLineMetrics(message, context);
float descent = metrics.getDescent();
float leading = metrics.getLeading();
The following code uses all this information to center a string in its surrounding component:
To understand the centering, consider that getWidth() returns the width of the component. A portion of that width, namely, bounds.getWidth(), is occupied by the message string. The remainder should be equally distributed on both sides. Therefore, the blank space on each side is half the difference. The same reasoning applies to the height.
When you need to compute layout dimensions outside the paintComponent method, you can’t obtain the font render context from the Graphics2D object. Instead, call the getFontMetrics method of the JComponent class and then call getFontRenderContext.
FontRenderContext context = getFontMetrics(f).getFontRenderContext();
To show that the positioning is accurate, the sample program also draws the baseline and the bounding rectangle. Figure 7–13 shows the screen display; Listing 7–5 is the program listing.
Figure 7–13. Drawing the baseline and string bounds

![]()
• Font(String name, int style, int size)

• String getFontName()
• String getFamily()
• String getName()
• Rectangle2D getStringBounds(String s, FontRenderContext context) 1.2
• LineMetrics getLineMetrics(String s, FontRenderContext context) 1.2
• Font deriveFont(int style) 1.2
• Font deriveFont(float size) 1.2
• Font deriveFont(int style, float size) 1.2
• float getAscent()
• float getDescent()
• float getLeading()
• float getHeight()
• Font getFont()
• void setFont(Font font)
![]()
• void drawString(String str, int x, int y)

• FontRenderContext getFontRenderContext()
• void drawString(String str, float x, float y)

• FontMetrics getFontMetrics(Font f) 5.0
• FontRenderContext getFontRenderContext() 1.2
Displaying Images
You have already seen how to build up simple drawings by painting lines and shapes. Complex images, such as photographs, are usually generated externally, for example, with a scanner or special image-manipulation software. (As you will see in Volume II, it is also possible to produce an image, pixel by pixel, and store the result in an array. This procedure is common for fractal images, for example.)
Once images are stored in local files or someplace on the Internet, you can read them into a Java application and display them on Graphics objects. As of Java SE 1.4, reading an image is very simple. If the image is stored in a local file, call
String filename = "...";
Image image = ImageIO.read(new File(filename));
Otherwise, you can supply a URL:
String urlname = "...";
Image image = ImageIO.read(new URL(urlname));
The read method throws an IOException if the image is not available. We discuss the general topic of exception handling in Chapter 11. For now, our sample program just catches that exception and prints a stack trace if it occurs.
Now the variable image contains a reference to an object that encapsulates the image data. You can display the image with the drawImage method of the Graphics class.
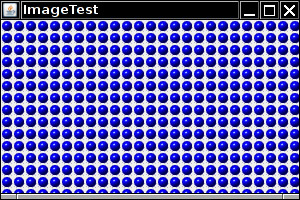
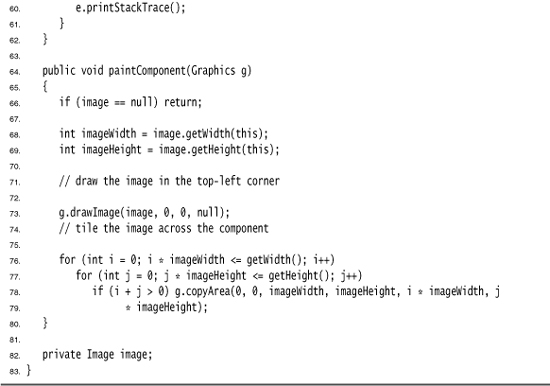
Listing 7–6 takes this a little bit further and tiles the window with the graphics image. The result looks like the screen shown in Figure 7–14. We do the tiling in the paintComponent method. We first draw one copy of the image in the top-left corner and then use the copyArea call to copy it into the entire window:

Figure 7–14. Window with tiled graphics image
Listing 7–6 shows the full source code of the image display program.

• static BufferedImage read(File f)
• static BufferedImage read(URL u)
• boolean drawImage(Image img, int x, int y, ImageObserver observer)
• boolean drawImage(Image img, int x, int y, int width, int height, ImageObserver observer)
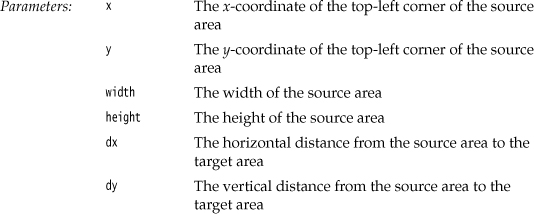
• void copyArea(int x, int y, int width, int height, int dx, int dy)
This concludes our introduction to Java graphics programming. For more advanced techniques, you can turn to the discussion about 2D graphics and image manipulation in Volume II. In the next chapter, you will learn how your programs react to user input.