
LESSON 2. Creating Your Profile
In this lesson, you learn how to create a LinkedIn profile that generates results.
Viewing a LinkedIn Profile
Profiles form the foundation of LinkedIn. Your profile is your LinkedIn calling card, providing a quick snapshot of your professional background and experience.
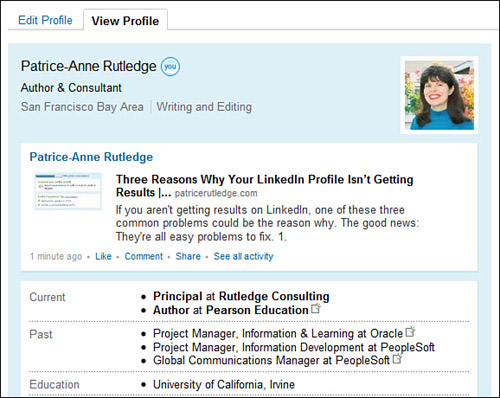
Figure 2.1 illustrates a sample LinkedIn profile.
Figure 2.1. A solid profile generates positive results on LinkedIn.
A profile can include the following:
• A summary of your professional experience and specialties
• Your current status with comments from your network
• A list of the positions you’ve held and your major accomplishments at each
• A list of the educational institutions you’ve attended and your major accomplishments at each
• A list of the educational institutions you’ve attended and your major accomplishments at each
• Sections where you can list certifications, the languages you speak, your publications, patents, and specific skills you have
• Professional recommendations
• Data from LinkedIn applications such as your blog feed, Amazon reading list, shared presentations, attached resume, and more
• A list of your LinkedIn connections
• Information about your interests, association memberships, honors, and awards
• Your contact settings
• A list of your opportunity preferences
Creating a Profile That Achieves Your Goals
Before you create your profile, you need to think strategically about what you want to accomplish. Here are some tips for creating a quality profile:
• Set goals for what you want to achieve on LinkedIn. Are you looking for a job? Do you want to develop your business and find new clients? Are you a recruiter seeking passive job candidates? Make sure that everything you include in your profile works toward achieving that goal.
• Make a list of keywords that relate to your experience, education, certifications, profession, and industry. Every industry has its buzzwords, and you need to include these if they’re terms a recruiter or potential client would search for. For example, an IT professional might include keywords such as Java, Oracle, SAP, or AJAX. A project manager might select PMP, PMI, UML, SDLC, or Six Sigma. A public relations professional, on the other hand, could choose PRSA, APR, or social media.
• Have your current resume handy for easier profile completion. You can refer to it for any necessary dates or other data you might have forgotten.
Caution: A Profile Isn’t a Resume
Remember, though, that a profile shouldn’t duplicate your resume. A profile is a strategic summary of your professional background designed to achieve specific goals.
Tip: Use the Box.net Files Application to Attach Documents to Your Profile
If you really do want to include a resume on your LinkedIn profile, consider adding the Box.net Files application. With Box.net, you can share files such as PDF or Word documents on your profile. See Lesson 13, “Using LinkedIn Applications,” for more information about Box.net.
• Check for spelling and grammar errors. Nothing detracts more from a good profile than numerous typos.
• Remember that most people just scan your profile. You need to capture their attention quickly and not overwhelm them with unnecessary details that detract from your goals.
• Keep it professional. A few personal details such as your interests help humanize your profile, but too much emphasis on outside activities also detracts from your professional goals.
Caution: Protect Your Privacy
Keep privacy issues in mind as you complete your profile. Enter only data that you’re willing to share publicly.
Understanding Profile Completeness
To view your own profile, select Edit Profile from the Profile drop-down menu on the global navigation bar. The Profile page opens with the Edit Profile tab selected, shown in Figure 2.2.
Figure 2.2. Create your profile on the Edit Profile page.
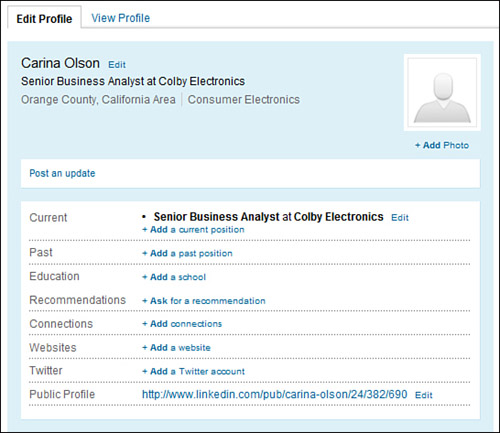
On the right side of your screen, you’ll see a box that displays your profile completeness. It should be about 25% at this point, just for signing up for a LinkedIn account. This box displays a list of the additional percentage points you receive for completing specific tasks.
Note: How LinkedIn Calculates Completeness
You might notice that adding the listed percentages to your existing 25% still doesn’t amount to 100%. That’s because you need at least two past positions and three recommendations to achieve profile completeness.
To achieve a profile completeness of 100%, you need to complete the following items:
• Your current position
• At least two past positions
• Your education
• A profile summary
• A profile photo
• Your specialties
• At least three recommendations
Having a complete profile encourages people to network with you. In fact, LinkedIn indicates that users with complete profiles are 40 times more likely to receive opportunities than those with incomplete profiles.
Tip: Move Beyond What a Computer Thinks Is Complete
Just filling out the required fields to achieve 100% completion doesn’t guarantee success. You also need the right profile content. A few words in a field might count toward a computer’s view of “completeness,” but it won’t be effective if your profile still contains minimal information.
Entering Basic Profile Information
Now that you have a plan for creating a solid profile, it’s time to get started entering data. To add more content to the basic profile that LinkedIn creates when you sign up, select Edit Profile from the Profile drop-down menu on the global navigation bar.
The Edit Profile tab displays your name, title, company, location, and industry based on the data you entered when you signed up. Click the Edit link next to your name to open the Basic Information page.
The Basic Information page also includes several new fields. These include
• Former/Maiden Name: If you’ve changed your name at any point during your career, it could be difficult for former classmates or colleagues to find you. Entering your former or maiden name makes it easier when people search for your former name.
• Display Name: By default, LinkedIn displays your full name. If you have strong privacy concerns, you can choose to display only your first name and last initial to anyone other than your own connections.
• Professional Headline: LinkedIn uses a combination of your title and company name as your professional headline, which should be sufficient for most people. You might want to customize this, however, if you’re seeking work, are self-employed, or maintain more than one job. Some people include targeted keywords, professional certifications, or degrees in their professional headlines.
Some examples:
• PMP-certified IT Project Manager Seeking New Opportunities
• Bestselling Author, Coach, and Business Consultant
• Public Relations Executive, MBA, APR, Fellow PRSA
Make your changes and then click the Save Changes button to return to the Edit Profile tab.
Tip: Let the LinkedIn World Know What You’re Doing
The Post an Update link on the Edit Profile tab prompts you to share information with your LinkedIn connections. You can enter something now or wait until you have connections who can actually view your updates. See Lesson 5, “Managing and Updating Your Profile,” for more information about updates.
Adding Positions
Although you already entered your current job title and company when you created your LinkedIn account, you’ll want to expand on that basic information. To do so, click the Edit link next to your current position on the Edit Profile tab to open the Edit Position page, shown in Figure 2.3.
Figure 2.3. Let other LinkedIn members know about your professional success.

Enter a brief description of your current position, make any additional changes to the information you previously entered, and click the Update button.
Here are a few tips on what to include in the Description field:
• Use keywords: Think of the terms people would search for and use them in your description. For example, if you work in IT, mention actual technologies rather than vague generalizations.
• Emphasize accomplishments over job duties: For example, rather than say that you’re responsible for sales, focus on your sales achievements and awards.
• Be brief: The Description field is a summary, not a detailed resume.
• Keep your goals in mind: If you want to attract recruiters, think about what would interest them in a potential candidate. If you’re seeking clients for your business, focus on what would make them want to hire you.
Note: Remove Positions You No Longer Want to Appear on Your Profile
Click the Remove This Position link on the Edit Position page to delete that position from LinkedIn.
If you hold more than one current job, click the Add a Current Position link on the Edit Profile tab to add another current position. This is particularly useful for self-employed or independent professionals who have several income sources. For example, if you’re an author, consultant, and blogger, you could choose to combine these activities under one position or create a unique position for each activity.
Add past positions by clicking the Add a Past Position link on the Edit Profile tab. Adding past positions is important because it provides a clearer view of your background and makes it easier to connect with your former colleagues at previous companies.
Tip: Focus on the Last 10 to 15 Years of Employment
If you have extensive experience, it’s a good idea to focus only on the past 10 to 15 years of your work life unless an early position in your career is very relevant to your current goals.
Adding Educational Information
Next, you’ll add information about your educational background. LinkedIn uses this information to help you connect easily with former classmates.
Consider the following best practices when choosing what educational information to enter:
• Include colleges and universities from which you received a degree.
• Include relevant certificates and continuing education course-work. For example, if you’re looking for a job in a new field and have completed a related certificate, you should include this information.
• Don’t include every continuing education course or seminar you’ve ever taken. It’s important to be strategic, not prolific.
• Don’t include your high school information unless you’re still in college, are a recent graduate, or specifically want to reconnect with high school classmates.
To enter educational information, follow these steps:
- Click the Add a School link on the Edit Profile tab. The Add Education page opens, shown in Figure 2.4.
Figure 2.4. Provide a summary of your educational accomplishments.
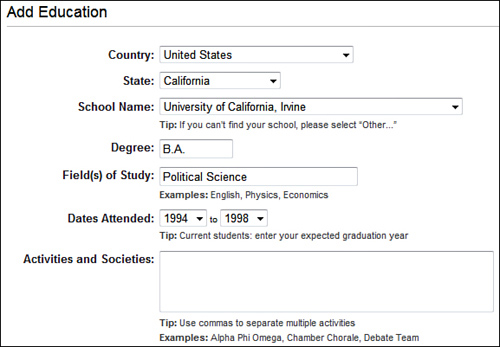
- Select your country (and state, if you’re in the United States).
- Select your school name from the drop-down list that displays. If you can’t find your school in the list, scroll down to the end and select Other. You can then enter your school name manually in the Type School Name field.
- Enter your degree, such as BA, BS, or MBA.
- Enter your field(s) of study. This can be your major, an area of concentration, or the name of a certificate.
- In the Dates Attended fields, enter the years you attended. If you’re still a student, enter your anticipated year of graduation in the second field.
Note: Deciding Whether to Include Graduation Years
The decision whether to include your year of graduation is a personal choice for many experienced professionals. LinkedIn doesn’t require you to list the year you graduated; this is an optional field. Keep in mind, however, that LinkedIn won’t be able to automatically search for your former classmates if you omit your graduation year. You would need to perform a manual search for former classmates.
- List relevant activities in the Activities and Societies field. This might include honors, study abroad, and any extracurricular activities.
- Add any additional notes about your educational experience.
- Click the Save Changes button to return to the Edit Profile tab.
Note: Enter Only Relevant Information
You don’t need to complete all the fields on the Add Education page to provide an accurate picture of your educational background. For example, details about your participation with the ski club or theater groups 20 years ago won’t add real value to your LinkedIn profile unless they relate to your current career. Entering the most pertinent data ensures that people who read your profile focus on what’s relevant.
The next section on the Edit Profile tab, Recommendations, encourages you to request professional recommendations. My recommendation, however, is for you to first complete your profile and then add connections before requesting recommendations. See Lesson 10, “Requesting and Providing Recommendations” for more information about LinkedIn recommendations.
Adding Website Links and Other Additional Information
To list websites on your LinkedIn profile—as well as add other information about your interests and achievements—follow these steps:
- Click the Add a Website link on the Edit Profile tab. The Additional Information page opens, shown in Figure 2.5.
Figure 2.5. Add links to your website or blog on your LinkedIn profile.
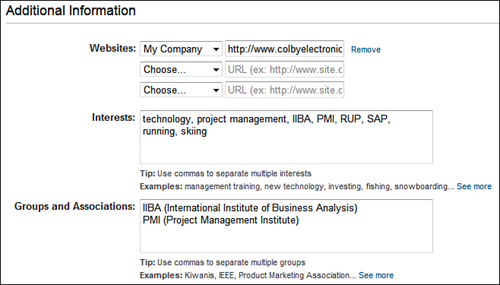
- From the Websites drop-down list, select the type of link you want to add. Options include My Website, My Company, My Blog, My RSS Feed, My Portfolio, or Other. If you select Other, a text box appears in which you can enter the name of your choice.
Tip: Gain Name Recognition for Your Sites
You can use the Other option to gain name recognition for your site or blog. For example, if you have a blog called Project Management Best Practices, you might prefer to create a link with that name rather than using the generic “My Website” or “My Blog.” In addition, you can use this field to link to your business’s Facebook page other social sites.
- Enter the complete URL of the site you want to link to, such as http://www.patricerutledge.com.
Note: You Can List a Maximum of Three Sites
To avoid clutter and prevent link spam, you can enter only three websites on your LinkedIn profile. If you have more than three sites to consider, think carefully about which sites would generate the most interest on a business networking site such as LinkedIn.
- In the Interests text box, enter a list of your professional and personal interests. Be sure to use commas to separate interests so this content is searchable. Each interest becomes a link on your actual profile that you can click to search for others who share your interests. Again, think about meaningful keywords for this section rather than lengthy descriptions.
- List the groups and associations to which you belong. Use commas to separate this information as well because the terms also become searchable links on your profile.
- List any honors and awards you’ve received.
- Click the Save Changes button to update your profile and return to the Edit Profile page.
Integrating Your LinkedIn Account with Twitter
If you have an account on Twitter (www.twitter.com), you might want to consider integrating it with LinkedIn. By doing so, you can share selected Twitter updates.
To set up LinkedIn to integrate with Twitter, follow these steps:
- On the Edit Profile tab, click the Add a Twitter Account link.
- In the pop-up box, enter your Twitter username or email as well as your password. If you’re already logged in to Twitter, LinkedIn skips this step.
- Click the Allow button.
- In the next pop-up box (see Figure 2.6), specify whether you want to share all your tweets in your LinkedIn status or only selected tweets. In general, it’s a good idea to be selective in sharing your tweets on LinkedIn. If you’re a frequent Twitter user, some of your tweets might appear out of context on LinkedIn. To share only specific tweets, use the #in or #li hashtag at the end of any tweet you want to post as a LinkedIn status.
Figure 2.6. Share your tweets on LinkedIn.

- Click the Save Settings button.
To make changes to the way you integrate LinkedIn and Twitter, click the Edit link to the right of the Twitter field on the Edit Profile tab. On the Twitter Settings page, you can hide your Twitter username on your profile, change the way you share your tweets, remove Twitter integration, or add another Twitter account. See Lesson 4, “Customizing Your LinkedIn Settings,” for more information about the Twitter Settings page.
You can also share your LinkedIn updates on Twitter by selecting the Twitter check box when you post updates (see Lesson 5). To further integrate your LinkedIn and Twitter accounts, consider adding the Tweets application to share your latest tweets on your profile and home page (see Lesson 13.
Customizing Your Public Profile
LinkedIn makes a public version of your profile available to all web users, regardless of whether they’re LinkedIn members or connected to you. When someone searches your name on Google or Yahoo!, for example, the public version of your profile appears in search results. Although a public profile is a great way to promote your career and gain visibility, it isn’t for everyone. Don’t worry. You have control over exactly what others can view on your profile. You can even hide your profile from public view if you choose.
By default, your public LinkedIn URL looks something like this: http://www.linkedin.com/pub/patrice-rutledge/13/521/845. The numbers in this URL address aren’t very user-friendly, however, so you’ll want to customize your public profile URL to something easier to remember such as www.linkedin.com/in/patriceannerutledge.
To do so, follow these steps:
- On the Edit Profile tab, click the Edit link to the right of your Public Profile URL. The Public Profile page opens, as shown in Figure 2.7.
Figure 2.7. Create a user-friendly URL for your LinkedIn public profile.
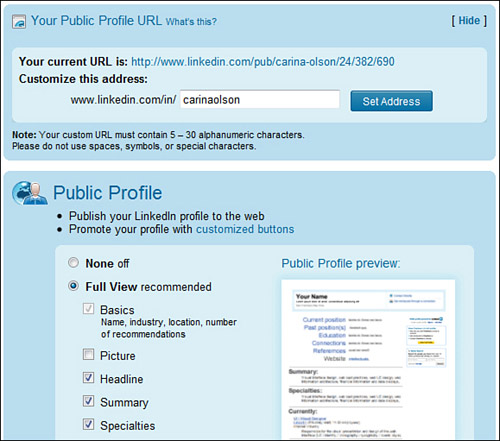
- Enter the custom URL you prefer. Using your first name and last name as one string of characters is a good choice. Spaces, symbols, and special characters aren’t allowed in your URL.
- Click the Set Address button to save your changes.
- In the Public Profile section, clear the check box next to any fields you do not want to appear on your public profile.
- Click the Save Changes button to update your public profile.
- Click the View My Public Profile as Others See It link to preview what your public profile looks like on the web.
Adding Profile Sections
LinkedIn enables you to add sections to your profile that share information about your certifications, languages spoken, patents, publications, and skills.
To add a section to your profile, follow these steps:
- On the Edit Profile tab, click the Add Sections link. The Add Sections dialog box opens, shown in Figure 2.8.
Figure 2.8. Add sections to your profile to share more information about your achievements.
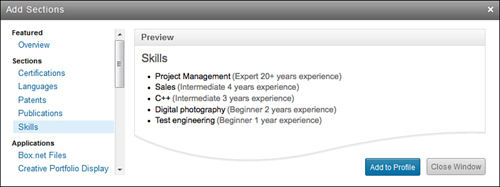
- On the left side of the box, select the type of section you want to add. Choices include Certifications, Languages, Patents, Publications, or Skills. In this example, we’ll choose Skills, one of the most popular sections to add. Be aware that if you choose another option, the remaining steps will differ.
- Click the Add to Profile button. Depending on your choice in step 3, a new LinkedIn page opens. Because we chose Skills, the Add Skills page opens. Figure 2.9 shows this page.
Figure 2.9. Let prospective employers and clients know about your skills.
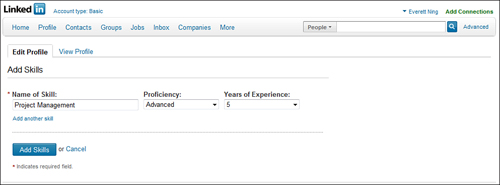
- Enter the name of a specific skill and select your proficiency level and years of experience from the drop-down lists. For example, if you’re a project manager, you could list Project Management as one of your skills.
- To add another skill, click the Add Another Skill link.
- When you finish adding skills, click the Add Skills button to add your content to your profile.
After adding a section to your profile, you can edit or delete this content by clicking the Edit link next to the profile section.
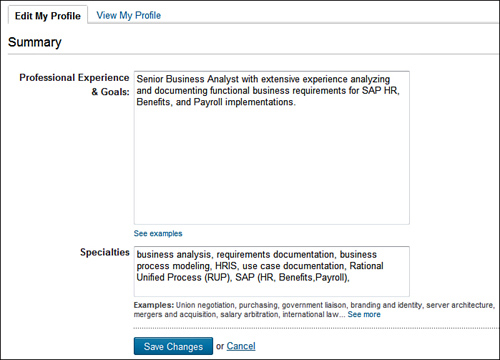
Adding a Profile Summary
The next section on the Edit Profile tab asks you to enter a profile summary. This is an important step because people scanning your profile often read this section first.
To create your summary, follow these steps:
- On the Edit Profile tab, click the Edit link to the right of the Summary heading. The Summary page opens, shown in Figure 2.10.
Figure 2.10. Provide a concise summary of your professional accomplishments.
Tip: Review Other Profiles in Your Industry
To get some ideas about what to include in your summary section, analyze the profiles of others in your profession or industry. Each industry has its own buzzwords and “personality,” so what works for one professional might not be as appropriate for another.
- Enter a summary of your professional experience and goals. In addition to summarizing your professional experience, you can also use this field to indicate that you’re looking for job opportunities (assuming you’re currently unemployed), recruiting staff, accepting new clients, or seeking new business partners, for example. Be sure to keep it professional, however. This is not the place for an advertisement or sales hype.
- List your specialties in the Specialties in Your Industries of Expertise field.
- Click the Save Changes button to return to the Edit Profile tab.
The next four sections—Experience, Education, Recommendations, and Additional Information—appeared earlier on the Edit Profile tab. You can click the Edit links in any of these sections to make additional changes, or you can continue to the next section.
Adding Personal Information
Near the bottom of the Edit Profile tab, you’ll find the Personal Information section. In this section, you can enter the following data: phone, address, IM (instant message), birthday, and marital status.
If you want to add any of this information to your profile, click the Add link to open the Personal Information page. The Birthday, Birth Year, and Marital Status fields display a lock button next to them. Click this button to restrict visibility to only your connections or only your network.
Caution: Consider Your Personal Privacy
Entering any data in the Personal Information section is optional. Carefully consider your personal privacy before making any personal information public, even to a restricted group of people.
Specifying Contact Settings
Next, specify what types of messages you’ll accept and what opportunities you’re interested in. To update the Contact Settings page, shown in Figure 2.11, follow these steps:
Figure 2.11. Tell other LinkedIn members about your contact preferences.
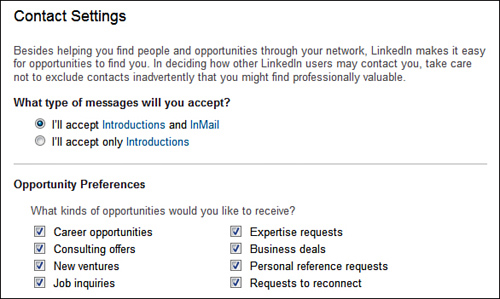
- At the bottom of the Edit Profile tab, click the Edit link next to the Contact Settings heading.
- In the What Type Of Messages Will You Accept? field, indicate whether you’ll accept both introductions and InMail or if you’ll accept only introductions. See Lesson 6, “Communicating with Other LinkedIn Members,” for more information about InMail and introductions. In general, accepting InMail is a good idea if you want people you don’t know to be able to contact you, such as recruiters.
- In the Opportunity Preferences section, indicate the opportunities you’re open to. If you’re looking for a job or recruiting staff, for example, it’s important to let people know this. Your options include
• Career opportunities
• Expertise requests
• Consulting offers
• Business deals
• New ventures
• Personal reference requests
• Job inquiries
• Requests to reconnect
- Enter the advice you would give to members considering contacting you. In this text box, you can indicate that you’re open to connecting with new people, you want to connect only with people you know, and so forth.
- Click the Save Changes button to return to the Edit Profile tab.
Just below the Contact Settings section on the Edit Profile tab is the Applications section, which suggests several applications you can add to your profile. See Lesson 13 for more information about the many ways you can benefit from LinkedIn applications.
Adding a Profile Photo
Finally, you should add a photo to your LinkedIn profile. A photo helps bring your profile to life and sets you apart from other LinkedIn members. A professional headshot works best on your LinkedIn profile.
To upload your photo, follow these steps:
- At the top of the Edit Profile tab, click the Add Photo link. The Edit Photo page appears, as shown in Figure 2.12.
Figure 2.12. Let a professional photo bring your LinkedIn profile to life.
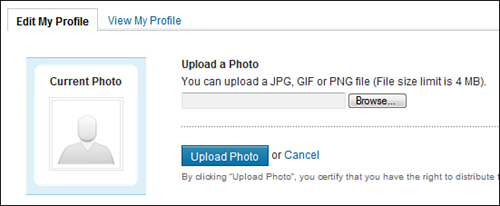
- Click the Browse button to open the File Upload dialog box. Depending on your browser or operating system, this dialog box could have a different name.
- Select the photo you want to upload and click the Open button. Depending on your browser or operating system, the name of this button could vary.
- Click the Upload Photo button. LinkedIn shows you a preview of how your photo will appear on your profile.
- Use LinkedIn’s resizing tool to make any modifications, and click the Save Photo button to complete the upload process.
- Indicate your photo visibility preferences. You can specify that your photo is visible to your connections, to your network, or to everyone. Note that your connections include only the people you directly connect with; your network includes the people connected to your connections.
- Click the Save Settings button to finish the upload and return to the Edit Profile tab.
Tip: Easily Replace or Remove Your Photo
If you want to replace or remove your profile photo, click the Edit link below your photo on the Edit Profile tab. Here you can upload a new photo or click the Delete Photo link to remove your photo.
Viewing Your Profile
To preview your profile, click the View Profile tab on the Profile page. Review all your entries carefully, checking for content accuracy as well as for grammar and spelling errors. If necessary, revise any of your entries by clicking the Edit link next to the item you want edit.
See Lesson 5 for information about keeping your profile updated, printing your profile, and promoting your profile on the web.
Note: You Can Create Profiles in Multiple Languages
If you speak a language other than English, consider creating a profile in that language as well. To do so, click the Create Your Profile in Another Language link on the Edit Profile tab (it’s just below your greeting on the right side of the page).
Summary
In this lesson, you learned how to create a quality profile that should help you achieve your goals on LinkedIn. Next, it’s time to start adding connections.