
LESSON 3. Adding and Managing Connections
In this lesson, you learn how to develop a solid LinkedIn connection strategy, connect with other members, and manage your contacts.
Developing a Connection Strategy
After creating a strong profile, the next step in making the most of your LinkedIn experience is developing a solid network of professional connections. Before you add connections to LinkedIn, however, you should develop a connection strategy that matches your goals and networking philosophy.
Tip: Match Your Connection Strategy with LinkedIn Goals
In Lesson 1, “Introducing LinkedIn,” you established goals for what you want to accomplish on LinkedIn. Be sure that your connection strategy helps you meet these goals. For example, if you’re looking for a new job in a specific industry, your focus will be to connect with recruiters and other professionals in that industry. If your LinkedIn goal is to develop your business or build a platform, you might want to connect with a broader spectrum of people.
The three most common approaches are
• Connect only with people you know. LinkedIn members who follow this approach connect only with colleagues, classmates, and associates they personally know or who their known connections recommend to them.
• Connect with people you know plus strategic contacts you would like to know. With this approach, you connect with people you know and also seek out strategic connections who match your networking goals.
• Connect with anyone and everyone. Some LinkedIn members, particularly those who want to use the site for business development purposes, are open networkers and like to connect with as many people as possible and make special efforts to connect with thousands of people.
Plain English: Open Networker
An open networker is a LinkedIn member who is open to connecting with people they don’t know. Several LinkedIn groups exist for open networkers, such as LION (LinkedIn Open Networker) and TopLinked. Although it’s a good idea to network with new people and develop a mutually beneficial business relationship, be careful not to abuse open networking by connecting indiscriminately just to amass a very large network. Don’t treat your LinkedIn network as a numbers game.
Which approach is best? There is no one right answer for everyone. LinkedIn members have their own goals as to what they hope to accomplish on the site as well as their own networking strategies and comfort levels.
To get started, consider connecting with current and former colleagues, current and former classmates, friends and other acquaintances, and fellow members of professional associations.
Who to connect with beyond these obvious contacts depends on your connection strategy and networking philosophy.
Building Your Network
LinkedIn offers several ways to build your network. You can
• Import your webmail or desktop email contacts and search for them on LinkedIn.
• Search for current and former colleagues based on the companies listed on your profile.
• Search for current and former classmates based on the schools listed on your profile.
• Search for other people you know using LinkedIn’s advanced search functionality.
• Send an invitation request to someone who doesn’t use LinkedIn yet.
Keep in mind that you don’t need to use all these methods to develop your pool of LinkedIn connections. For example, you might not want to connect with all your webmail or address book contacts. Or your webmail account might contain personal email addresses, not the email addresses your contacts used to sign up for LinkedIn.
Importing Webmail Contacts
If you have an email account with a popular webmail provider (such as Windows Live Hotmail, Gmail, Yahoo! Mail, or AOL), LinkedIn can import the email addresses of your web contacts.
To import webmail contacts, follow these steps:
- Click the Add Connections link above the global navigation bar.
- In the See Who You Already Know on LinkedIn box, enter your Email and Password for the email account whose contacts you want to import.
- Click the Continue button. LinkedIn imports the contacts from your webmail contact list and displays a list of these contacts, as shown in Figure 3.1.
Figure 3.1. Select the webmail contacts you want to connect with on LinkedIn.
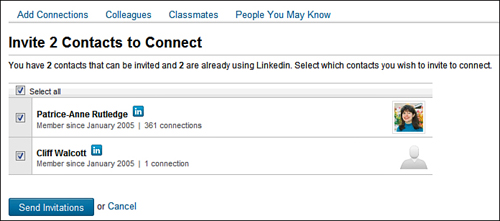
- Select the check box to the left of each contact’s name you want to invite to connect on LinkedIn.
- Click the Send Invitations button to send your invitations. Your contacts will receive your invitations to connect on LinkedIn and choose to accept or reject them.
Note: Confirm Your Email Address Before Connecting
You can’t send invitations to connect until you confirm your email address. If you need to request a new confirmation message from LinkedIn, go to the global navigation bar, click the down arrow to the left of your name, and select Settings from the drop-down menu. On the Account & Settings page, click the Email Addresses link. Select the email address you want to confirm and click the Send Confirmation Message button. LinkedIn sends you an email with confirmation instructions.
Importing Contacts from Other Email Systems
Although LinkedIn imports webmail contacts automatically, you need to export your contacts from other email systems as a separate step. To do so, follow the instructions your email system provides for exporting your email address book data to one of the following:
• A comma-separated values (CSV) file, which is a computer file with a .CSV filename extension in which fields are separated by commas
• A vCard file, which is a file format with a .VCF filename extension, for electronic business cards
• A tab-separated file with a .TXT filename extension, which is a computer file in which fields are separated by tabs
LinkedIn accepts the following files for import:
• CSV files from Microsoft Outlook
• CSV or tab-separated files from Palm Desktop
• CSV files from ACT!
• vCard files from Palm Desktop
• vCard files from Mac OX X Address Book
To import a file exported from an email system, follow these steps:
- Click the Add Connections link above the global navigation bar.
- In the See Who You Already Know on LinkedIn box, click the Import Your Desktop Email Contacts link.
- Click the Browse button to select the appropriate file on your computer. Depending on your browser or operating system, the name of this dialog box and button might vary.
- In the File Upload dialog box, select the file you want to upload and click the Open button. Depending on your browser or operating system, the name of this dialog box and button might vary.
- Click the Upload File button. LinkedIn imports the contacts from your webmail contact list and displays a list of these contacts (refer to Figure 3.1).
- Select the check box to the left of each contact’s name you want to invite to connect on LinkedIn. Be aware that importing your contacts doesn’t mean they automatically become LinkedIn connections. You must still manually choose whom to connect with.
- Click the Send Invitations button to send your invitations.
Connecting with Current or Past Colleagues
To connect with current or past colleagues, follow these steps:
- Click the Add Connections link above the global navigation bar.
- Click the Colleagues tab, shown in Figure 3.2.
Figure 3.2. Connecting with your current and past colleagues is a great way to build your online network.
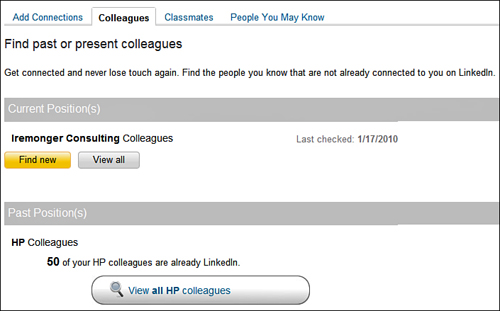
- Based on the current and past positions you entered on your profile, LinkedIn displays related company names and buttons that help you locate potential matches. Click the button that best matches the search you want LinkedIn to perform.
- From the list of potential matches, select the individuals you know and want to connect with by placing a check box before their names.
- Click the Send Invitations button to send invitations to these people.
Tip: Personalize Your Invitation
Select the Add a Personal Note with Your Invitation? check box to add a personalized greeting to your invitation to connect. Personalizing your request is particularly useful when reaching out to colleagues you haven’t worked with in a while.
Connecting with Former Classmates
To connect with current or former classmates, follow these steps:
- Click the Add Connections link above the global navigation bar.
- Click the Classmates tab.
- Click the link for the university you want to search from the list of schools from your profile.
- View the search results and click the Invite link for the classmates you want to connect with.
Tip: Revise Your Search Parameters for Better Results
You can narrow or widen your search results by selecting View Graduation Year Only or View All Years Attended.
Connecting with Other LinkedIn Members
By now, you should have a good start on developing your LinkedIn network. Here are a few other suggestions for finding worthwhile connections on LinkedIn:
• Review the list of people your connections are connected to, which displays in their profile. It’s very likely that you know some of the same people and would like to connect with them as well. View the profile of the person you want to connect with and click the Add [person’s name] to Your Network link to send an invitation. For example, to connect with Felice Mantei, you would click the Add Felice to Your Network link.
• Search for individuals by name in the Search People box on the top navigation menu. Click the Add to Network link to the right of the person you want to connect with to create and send an invitation.
• Search by keyword and location on the Advanced Search page to find local members of your professional associations. Click the Advanced link on the top navigation menu to access this page. For example, you could search for the keyword PRSA (for the Public Relations Society of America) and the ZIP code 92606 within a 25-mile radius to find fellow PRSA members in Orange County, California.
• Search for potential connections among the members of any LinkedIn groups to which you belong. The Members tab provides a list of all group members with a link to their profiles. Remember, however, not to spam fellow group members with connection invitations. Be selective in determining who you want to connect with.
See Lesson 7, “Searching on LinkedIn,” for more information on searching for people.
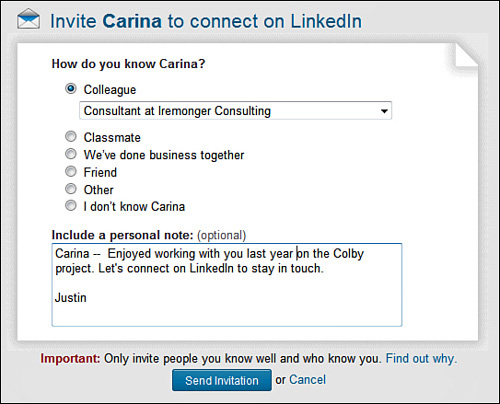
When you click the Add to Network link from any of these options, a page prompting you to create an invitation appears, shown in Figure 3.3.
Figure 3.3. Specify how you know a target connection before sending an invitation.
To create an invitation on this page, follow these steps:
- Select how you know your target connection from these options:
• Colleague: Select a company from the drop-down list that appears.
• Classmate: Select a school from the drop-down list that appears.
• We’ve Done Business Together: Select a company from the drop-down list that appears.
• Friend
• Groups: Select a LinkedIn group from the drop-down list that appears.
• Other: Enter the person’s email address.
• I Don’t Know [First Name]
- Include a personal note in the text box explaining why you want to connect on LinkedIn. This is particularly important if you don’t know the person you want to connect with.
- Click the Send Invitation button to send your invitation to connect.
See Lesson 6, “Communicating with Other LinkedIn Members,” for more information on viewing the status of connection invitations and other messages.
Tip: Consider Other Options for Contacting People You Don’t Know
Two other ways of connecting with people you don’t know are to send an InMail or request an introduction. See Lesson 6 for more information on InMail and introductions.
Connecting with People Not on LinkedIn
If you discover that some of your real-world networking contacts aren’t using LinkedIn yet, it’s easy to invite them:
- Click the Add Connections link above the global navigation bar to open the Add Connections page.
- In the Enter Email Address box (see Figure 3.4), enter the email address of the person or persons you want to invite. Separate multiple addresses with a comma.
Figure 3.4. Invite your real-world connections to join LinkedIn.
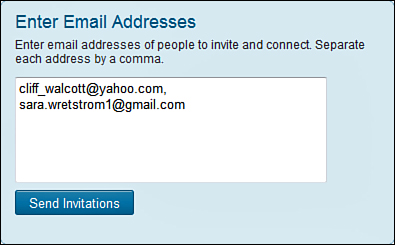
- Click the Send Invitations button to send invitations.
Responding to Connection Invitations
In addition to sending invitations to connect, you might also receive invitations. To respond to an invitation, follow these steps:
- Click the Inbox link on the global navigation bar to open your Inbox. If you have new messages, LinkedIn displays the number of messages in parentheses, such as Inbox (2).
- Click the Invitations tab to view your open invitations, shown in Figure 3.5. Alternatively, you can also view new invitation requests in your Inbox preview on your home page.
Figure 3.5. See who wants to connect with you on the Invitations tab.
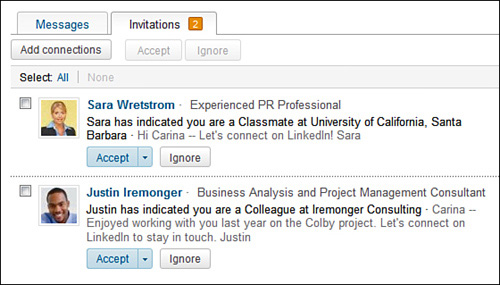
- If you would like to open the individual’s profile, click the sender’s name. Reviewing a LinkedIn member’s profile can help you remember more about someone you don’t know well or decide whether to connect with someone you don’t know at all.
- Take one of the following actions:
• If you want to add the person to your network, click the Accept button.
• If you want to send a message to the person who initiated the invitation before accepting or declining, click the down arrow to the right of the Accept button and select Reply from the menu. For example, you might want to ask why this person wants to connect before accepting.
• If you don’t want to accept this invitation, click the Ignore button. LinkedIn moves this invitation to your Archived folder where you can view and respond to this invitation at a later time. After ignoring an invitation, LinkedIn provides two additional options: the I Don’t Know [First Name] link and the Report as Spam link. Selecting the I Don’t Know link blocks this person from inviting you again and alerts LinkedIn that this was an unwanted invitation request. Selecting the Report as Spam link reports the sender to LinkedIn.
Caution: Think Carefully Before Clicking the I Don’t Know or Report as Spam Links
Because LinkedIn can penalize other users for sending too many requests to people they don’t know—or for sending spam—think carefully before choosing these options. Selecting one of these options is too harsh if it’s a genuine request from someone you just don’t want to connect with.
When you accept invitations, LinkedIn adds those members as 1st degree connections in your network. You can add notes about the person and edit their contact information in the Contact Information section on the right side of their profile.
Managing Your Connections
After you develop your LinkedIn network, you need an easy way to find and manage your existing connections. The My Connections page offers several ways to do this.
Click the Contacts link on the global navigation bar to open the My Connections page, which displays a list of your connections (see Figure 3.6).
Figure 3.6. Find, contact, and manage your connections on the My Connections page.
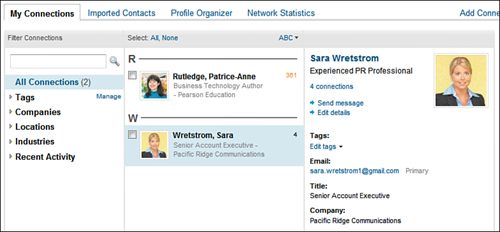
Select a connection to display more information on the right side of the screen. Here you can click this person’s name to open her profile, click the Send Message link to send a message on LinkedIn, edit details such as IM username or birthday, view an email address and work information, or enter tags that identify how you know this person. Clicking the Edit Tags link enables you to apply any of the following tags to a connection: classmates, colleagues, friends, group members, or partners.
If you have many connections, it might be difficult to find the person you’re looking for. LinkedIn offers several ways to filter your connections. You can
• Hover your mouse over the ABC link to select a letter of the alphabet. LinkedIn displays only connections with a last name starting with that letter.
• Enter a keyword in the search box and then click the Search button.
• Narrow your results by tag, company, location, industry, or recent activity.
Removing Connections
If you decide that you no longer want to connect with someone on LinkedIn, you can remove that person as a connection:
- Click the Contacts link on the global navigation bar to open the My Connections page.
- Click the Remove Connections link in the upper-right corner of the page.
- Select the check box next to the connections you want to remove.
- Click the Remove Connections button.
People you remove are no longer able to view any data that can be viewed only by actual connections and they also can’t send you direct messages. LinkedIn, however, doesn’t notify them of the fact they have been removed.
Caution: Remove Connections for the Right Reason
Be sure that a connection really warrants removal before proceeding with the removal process. For example, if a connection you don’t know well is bothering you with requests, spam, or sales pitches, this person is probably a connection worth removing. Removing former colleagues or associates simply because you haven’t seen them in a while or don’t work with them anymore, however, can be shortsighted.
Viewing Your Network Statistics
The Network Statistics page provides some interesting statistics about your network, including your total number of connections, the number of members you can reach through an introduction, the number of new people in your network, and much more. To view these stats, select Network Statistics from the Contacts drop-down menu on the global navigation bar.
Summary
In this lesson, you learned how to develop a connection strategy that suits your goals and started developing your own network. Next, it’s time to customize your LinkedIn settings to give you the optimal online networking experience.