
Chapter 9. Automating Tasks
In this chapter, you will learn the following:
• Creating and running scripts that can access the CLI and WUI
• Using CLI batch commands for simple automation
• Managing configuration files with external scripts
Administering ESA from Outside Servers
Chapter 5, “Command-Line Interface,” and Chapter 6, “Additional Management Services,” covered the AsyncOS web user interface (WUI) and command-line interface (CLI) in depth with the intent of giving an administrator the knowledge and skills he needs to manage Email Security Appliance (ESA). This chapter uses the CLI and WUI as interfaces for machine interaction, using commands and scripts on external servers to poll information from the ESAs and even to send data and change configuration.
The ESA does not make provision for any third-party scripting or software to be installed and run locally. However, it does provide a CLI that can be used in batch mode and several WUI interaction features that can be used for automation.
Using CLI batch commands is simple, and it’s ideal for accomplishing tasks for which the ESA has no built-in feature. Those generally fall into a few categories:
• Monitoring: You may have a need for retrieving data from an ESA on a regular basis for monitoring the system for availability, response time, and performance. Although SNMP is designed specifically for monitoring by external services, a number of interesting operational attributes are simply not included in SNMP. You might have a need to monitor specific performance attributes or check email delivery status to specific destinations. For example, if you want to monitor the number of active inbound or outbound connections, the amount of disk space for logging, or the last date and time of an anti-virus (AV) rules update, you must use an external script.
• Configuration backup: An administrator can always manually export configuration files from the WUI or CLI, but if you want regular backups on a particular schedule, you can automate the export.
• Automatic configuration changes: If you regularly need to change the data in a table or feature of the ESA, based on input from an external source, scripting the change is the best approach. Many of the WUI and CLI tables can be scripted, although some are easier than others. For example, if your valid recipient addresses are stored in a SQL database and not available through LDAP, you can export a static list of recipients and import the result into the ESA RAT. Another common configuration change is to add or replace items in a dictionary of words and phrases, like confidential terms used by a filter for intellectual property protection.
• External reporting systems: You may want to export data for summarization and long-term storage, or compare data from the ESA with other inputs. Although much of the reporting and tracking can be manually exported in the WUI, you might have a need for regular exports at specified intervals.
This chapter contains many shell command and scripting-language automation examples. All these examples are intentionally short and simple to illustrate a given approach to automation.
None of the examples have thorough error checking and perform no argument checking, blindly assuming that the input is correctly formatted. Some of the scripts, if used in production, would require that they store passwords in the clear. All of this is dangerous from a security perspective: Anyone that can run the scripts would be able to change ESA configuration and possibly compromise security.
It is strongly recommended that any automation scripts you use take this into account and perform proper error and argument checking rather than blindly trusting user input. I also suggest using accounts other than the superuser “admin” account, running scripts with the minimum privilege level necessary to execute the task.
CLI Automation Examples
To run CLI commands in batch mode (as opposed to interactively), you need to have tools that can automate connecting to a remote host and executing commands. If you’re using Telnet to access the CLI on your ESA, you’ll have a lot of options available, as it is not difficult to simply read and write from a Telnet connection. As previously stated, Telnet is not a good choice because it lacks security, and SSH is altogether better even for CLI connections entirely within your own network. For these reasons, I focus on CLI interactions that exclusively use SSH. Of course, if you prefer to use Telnet, this chapter is still directly applicable.
SSH Clients
SSH is the natural protocol for automating CLI tasks from a remote server. Virtually all UNIX-like systems, including Linux, BSD, and MacOS X, include an SSH client. For Windows, we previously described PuTTY in Chapter 5. Another utility provided by the PuTTY project is plink.exe, a command-prompt version of PuTTY that functions much like any other SSH client. Plink can be used to automate CLI tasks on the ESA.
To support truly noninteractive scripting, you must set up SSH keys on the SSH server (in this case, on the ESA using sshconfig) and on the SSH client. This process is described for Windows and UNIX systems in Chapter 5. Before experimenting with scripting, test to confirm that you can connect an SSH client to the ESA without being prompted for a password.
For example, here’s a simple SSH command that runs the ESA command mailconfig in batch mode:
ssh [email protected] "mailconfig [email protected] y"
Here’s the equivalent under Windows command shell using Plink:
plink.exe [email protected] "mailconfig [email protected] y"
Note that it is possible to provide the plink program with a password via the –pw argument, but I recommend against this; instead, I highly recommend using SSH key authentication. Storing passwords in remote scripts in plain text is a massive security hole. Using SSH keys in place of passwords also means that your scripts won’t be affected by password changes on the ESA. You don’t have to use the admin account; any account with a role that allows the appropriate CLI command to be run will work.
Expect
Expect is a standard UNIX-scripting tool for automating command-line–based protocols, like Telnet. It can also be used for SSH and is ideal for manipulating the ESA CLI. In addition to the expect tool itself, many programming languages have built-in support for expect or expect-like scripting features. Expect scripts are written in plain ASCII text, in a syntax derived from Tcl. (It’s freely available from http://expect.nist.gov/.)
Expect gets its name from one of the two major commands in any script: send and expect. These are fairly self-explanatory. send takes a string argument, which is passed directly to the program being controlled. expect parses the output of the program being controlled, waiting for a match on the string argument that you provide.
For ESA automation, send/expect work in pairs to issue commands and wait for the ESA to respond with another prompt. For example, this pair:
send "hoststatus
"
expect "[]> "
Issues the hoststatus command to the CLI and waits for the ESA to display a prompt. A script that automates hoststatus would then issue the domain with another send command.
Example 9-1 shows a simple expect script that adds a domain entry to the destination controls table, setting TLS to required. This script uses SSH to log in, but for simplicity, it does not deal with password logins. You must have SSH keys installed on your ESA for this script to work, or modify the script to support password logins to SSH. The domain to be added to the destination controls table for TLS required is passed as an argument to the script.
Example 9-1. Expect Script Example for Automating Destination Controls
#!/usr/bin/expect -f
set domain [lindex $argv 0]
spawn ssh [email protected]
expect "> "
send "destconfig
"
expect "[]> "
send "new
"
expect "[]> "
send "$domain
"
expect "]> "
send "N
"
expect "]> "
send "N
"
expect "]> "
send "N
"
expect "]> "
send "Y
"
expect "]> "
send "3
"
expect "]> "
send "N
"
expect "]> "
send "N
"
expect "]> "
send "
"
expect "> "
send "commit
"
expect "[]> "
send "added $domain to destconfig for TLS required
"
expect "> "
send "exit
"
You can run this script from any system with expect, either by invoking it directly:
expect destconfig.exp cisco.com
Or, on UNIX systems where expect is installed, you can execute this script:
./destconfig.exp cisco.com
Just remember that your script file needs to have execute permissions set in the shell.
Perl
Of numerous languages that can be used for automating command-line tasks, Perl is my favorite. Normally, I won’t resort to a Perl script for simple tasks, like exporting a configuration file, where you are not really concerned about the output; I save scripting for tasks that require formatting input, parsing output or stringing together multiple commands.
All the Perl scripts listed in this section are targeted and tested on UNIX-based Perl distributions version 5.8 and later. They further assume that SSH keys have been installed on the ESA, as described in Chapter 5. You must have SSH keys installed and tested before these scripts work noninteractively.
A number of SSH modules are available for Perl, notably the Net::SSH used here, which is a wrapper around an SSH client. There’s also Net::SSH::Perl for a Perl-native SSH implementation, and Net::SSH2, which is a Perl interface to the libssh2 library. (For more information, see the Perl archive at hwww.cpan.org.)
Perl has distributions available for Windows, but because of the lack of a native SSH client or library, the Net::SSH module simply won’t work. We’ll address some of the issues with Perl on Windows later.
As an example, suppose I wanted to check a group of ESAs on a regular basis and monitor its RAID status. Like many monitoring tasks, you can do this via SNMP, but for this example, let’s assume we need another way to do it. A Perl script is ideal for this, allowing us to loop through a list of ESAs, outputting the serial number and RAID status of each. Because the output of the version command lists a series of attributes and values separated by a colon character, I’m using the Perl split function to extract the values. The complete listing is shown in Example 9-2.
Example 9-2. Source Code for RAIDstatus.pl, an ESA Monitoring Script
#!/usr/bin/perl
use strict;
use Net::SSH qw (sshopen2);
my @hostList = ("esa01.cisco.com", "esa02.cisco.com");
my $esaHost;
foreach $esaHost (@hostList) {
my ($reader, $writer);
my ($name, $value) = "";
my $serial = "";
my $raidstatus = "";
# open the connection to the current host
if (sshopen2("admin@$esaHost", *reader, *writer, "version")) {
while (<reader>) {
chomp; # remove newline character if present
($name, $value) = split /:/; # break the line into attribute /
value pairs
if ($name =~ /Serial #/) {
$serial = $value;
}
elsif ($name =~ /RAID Status/) {
$raidstatus = $value;
}
}
print "$esaHost, serial $serial, RAID $raidstatus
";
close reader;
close writer;
}
}
In these examples, we’re using the Net::SSH module for Perl, which is commonly available under most UNIX Perl distributions. If you don’t have this module, or would rather not use it, but have a regular UNIX SSH client, instead of using the module, you can use the system function call to invoke the SSH client directly. Gathering output from the command is handled simply with the Perl open function. Example 9-3 shows a snippet of code that accomplishes this.
Example 9-3. Source Code Snippet for RAIDstatus.pl That Invokes an SSH Client
#!/usr/bin/perl
use strict;
my @hostList = ("esa01.cisco.com", "esa02.cisco.com");
my $esaHost;
foreach $esaHost (@hostList) {
my ($name, $value) = "";
my $serial = "";
my $raidstatus = "";
if (open (SSH, "ssh admin@$esaHost version|")) {
while (<SSH>) {
chomp;
($name, $value) = split /:/;
if ($name =~ /Serial #/) {
$serial = $value;
}
elsif ($name =~ /RAID Status/) {
$raidstatus = $value;
}
}
print "$esaHost, serial $serial, RAID $raidstatus
";
}
}
CLI Automation from Microsoft Windows Servers
Most of the CLI automation examples to this point focused on tools found only on UNIX or UNIX-like systems, or that have limitations when run on Windows operating systems (OS). SSH is a particular sore point, because the protocol is not natively available in the OS as a client or programmatically in libraries.
You have a few options to automate ESA tasks from Windows servers:
• Use the free plink.exe program from the PuTTY project in place of SSH commands and pscp.exe in place of SCP. Plink provides support for SSH v2 and commands can be sent just as with any UNIX SSH client. In conjunction with a Perl interpreter for Windows, you can run Perl scripts that issue commands over SSH with plink.
• Use a commercially available component library for SSH that is compatible with the programming environment you’re using. With the establishment of the .NET component standard, many vendors provide components for Internet protocols like SSH that are not traditionally used under Windows.
• Use Telnet in place of, or in addition to, SSH on the ESAs. Telnet is widely supported, and the ESA CLI can be automated with any script that can open a TCP connection. The drawback is that the Telnet protocol is not encrypted, and login credentials are sent in the clear, so take other security precautions to prevent interception or sniffing.
• Use the Cygwin project to support Linux tools and utilities under Windows. The Perl and Python interpreters are supported under Cygwin, as are SSH clients and libraries. There’s even a version of Expect under Cygwin.
• Use a commercially available automation software package or library. There are commercially available versions of Expect for Windows.
Another option that we’ll address later in this chapter is to skip the CLI and use the WUI for automation tasks. Because it’s just HTTP (or HTTPS), there is a lot of native client support in Windows.
Let’s look at a Perl example of the RAIDstatus tool, written in Perl that will run under a Perl interpreter for Windows. The source code is shown in Example 9-4. It’s similar to Example 9-2, but instead of using SSH, it uses plink.exe. For simplicity, this script assumes that plink and the putty private key are in the current working directory or in an accessible path. Plink offers the ability to provide both a username and password as arguments, which is convenient and avoids the need for installing SSH keys on the ESA. If you choose to include a password in your script, take care to protect the script contents. This example assumes that your SSH public key has been installed in the ESA. Refer to Chapter 5 for details on using SSH keys with PuTTY.
Example 9-4. Source Code for RAIDstatus.pl, Suitable for Running in Windows
#!/usr/bin/perl
use strict;
my @hostList = ("esa01.cisco.com", "esa02.cisco.com");
my $esaHost;
foreach $esaHost (@hostList) {
my ($name, $value) = "";
my $serial = "";
my $raidstatus = "";
if (open (PLINK, "plink.exe -i id_rsa.ppk admin@$esaHost version|")) {
while (<PLINK>) {
chomp;
($name, $value) = split /:/;
if ($name =~ /Serial #/) {
$serial = $value;
}
elsif ($name =~ /RAID Status/) {
$raidstatus = $value;
}
}
print "$esaHost, serial $serial, RAID $raidstatus
";
}
}
WUI Automation Examples
Compared to the process of automating tasks via the CLI, scripting the WUI is more complex. Although the primary intent of both the CLI and WUI is interaction with a live, human administrator, the practice of scripting a shell login is long established, and the various SSH clients in the industry have extensive support for noninteractive logins. Also, when using documented and supported CLI commands, the format and availability of the commands is unlikely to change across releases of AsyncOS. No such consistency is promised for the WUI; while the forms, pages, and asset locations have remained stable over many ESA software releases, it’s not guaranteed to remain the same in the future.
Despite the warnings, there are many good reasons to automate using the WUI. In some cases, like for reporting or XML data, there is simply no other way to access the information.
Polling Data from the ESA
Most of the data from the WUI and CLI is intended for a human audience using those interfaces directly. However, there are a number of ways to do automatic monitoring. The primary means of machine monitoring is via SNMP, which is covered in Chapter 6. SNMP MIBs do not cover all possible metrics on the ESA, so if you’re looking to monitor counters, like performance or connection counts, or look at the delivery status of a particular destination, you have to find other means.
Retrieving XML Data Pages
The CLI examples provided in the first part of this chapter can be used to pull monitoring data from a running ESA. For example, a SSH command like
ssh [email protected] "antispamstatus"
gives you information about the latest anti-spam rule updates. Similarly, running the command version, like we did for our RAID status tool
ssh [email protected] "version"
results in output that’s easy to parse. The output of version is a simple list of name: value pairs separated by colon; any script can easily parse and examine the content.
What if you need other data from the CLI, such as that given by the command status detail? You can also run this command remotely and parse the data. You’ll have to learn the format and parse the values that this command provides. If you’d prefer not to use SSH or want something more structured, the ESA offers an XML format export for some of its monitoring commands, including status detail.
You reach the XML pages like you would any URL, but these are not linked anywhere in the WUI; you have to manually enter them:
https://esa02.cisco.com/xml/status
You are prompted by the browser to log in, using any active credentials on the ESA. This is an HTTP login prompt, so the actual behavior depends on your browser. This authentication is different from the normal form-based authentication that the WUI uses, and your script must handle it. Another way of providing authentication is to embed it in the URL, like this:
https://report:[email protected]/xml/status
But, this requires that you store those credentials in your script or in a bookmark. At the very least, you should create a guest user account for this purpose.
Depending on what your browser does with unformatted XML, you may be prompted to save the file, or it may display in the browser window. Here’s typical output from the XML status URL:
<?xml version="1.0" encoding="ISO-8859-1" standalone="yes" ?>
- <status build="phoebe 7.5.0-472" hostname="esa02.cisco.com" time
stamp="20110630141053">
<birth_time timestamp="20110630083158 (5h 38m 55s)" />
<last_counter_reset timestamp="" />
<system status="online" />
<oldest_message secs="0" mid="0" />
- <features>
<feature name="Sophos" time_remaining="-2502703" />
<feature name="Bounce Verification" time_remaining="Dormant/Perpetual" />
<feature name="Central Mgmt" time_remaining="-1031362" />
<feature name="IronPort Anti-Spam" time_remaining="-2502703" />
<feature name="IronPort Email Encryption" time_remaining="-2502703" />
<feature name="RSA Email Data Loss Prevention" time_remaining="-2502703" />
<feature name="Receiving" time_remaining="Dormant/Perpetual" />
<feature name="Outbreak Filters" time_remaining="-2502703" />
</features>
- <counters>
<counter name="inj_msgs" reset="10" uptime="0" lifetime="10" />
<counter name="inj_recips" reset="10" uptime="0" lifetime="10" />
<counter name="gen_bounce_recips" reset="5" uptime="0" lifetime="5" />
<counter name="rejected_recips" reset="0" uptime="0" lifetime="0" />
<counter name="dropped_msgs" reset="0" uptime="0" lifetime="0" />
<counter name="soft_bounced_evts" reset="0" uptime="0" lifetime="0" />
<counter name="completed_recips" reset="10" uptime="0" lifetime="10" />
<counter name="hard_bounced_recips" reset="10" uptime="0" lifetime="10" />
<counter name="dns_hard_bounced_recips" reset="5" uptime="0" lifetime="5" />
<counter name="5xx_hard_bounced_recips" reset="0" uptime="0" lifetime="0" />
<counter name="filter_hard_bounced_recips" reset="0" uptime="0" lifetime="0" />
<counter name="expired_hard_bounced_recips" reset="5" uptime="0" lifetime="5" />
<counter name="other_hard_bounced_recips" reset="0" uptime="0" lifetime="0" />
<counter name="delivered_recips" reset="0" uptime="0" lifetime="0" />
<counter name="deleted_recips" reset="0" uptime="0" lifetime="0" />
<counter name="global_unsub_hits" reset="0" uptime="0" lifetime="0" />
</counters>
<current_ids message_id="10" injection_conn_id="7" delivery_conn_id="36" />
<rates>
<rate name="inj_msgs" last_1_min="0" last_5_min="0" last_15_min="0" />
<rate name="inj_recips" last_1_min="0" last_5_min="0" last_15_min="0" />
<rate name="soft_bounced_evts" last_1_min="0" last_5_min="0" last_15_min="0" />
<rate name="completed_recips" last_1_min="0" last_5_min="0" last_15_min="0" />
<rate name="hard_bounced_recips" last_1_min="0" last_5_min="0" last_15_min="0" />
<rate name="delivered_recips" last_1_min="0" last_5_min="0" last_15_min="0" />
</rates>
<gauges>
<gauge name="ram_utilization" current="1" />
<gauge name="total_utilization" current="0" />
<gauge name="cpu_utilization" current="0" />
<gauge name="av_utilization" current="0" />
<gauge name="case_utilization" current="0" />
<gauge name="bm_utilization" current="0" />
<gauge name="disk_utilization" current="0" />
<gauge name="resource_conservation" current="0" />
<gauge name="log_used" current="5" />
<gauge name="log_available" current="46G" />
<gauge name="conn_in" current="0" />
<gauge name="conn_out" current="0" />
<gauge name="active_recips" current="0" />
<gauge name="unattempted_recips" current="0" />
<gauge name="attempted_recips" current="0" />
<gauge name="msgs_in_work_queue" current="0" />
<gauge name="dests_in_memory" current="3" />
<gauge name="kbytes_used" current="0" />
<gauge name="kbytes_free" current="8388608" />
<gauge name="msgs_in_quarantine" current="0" />
<gauge name="kbytes_in_quarantine" current="0" />
<gauge name="reporting_utilization" current="0" />
<gauge name="quarantine_utilization" current="0" />
</gauges>
</status>
As you can see, this includes all the data in the status detail command, but it’s organized into a hierarchical XML format.
There are other XML pages. Table 9-1 lists all the available XML URLs.
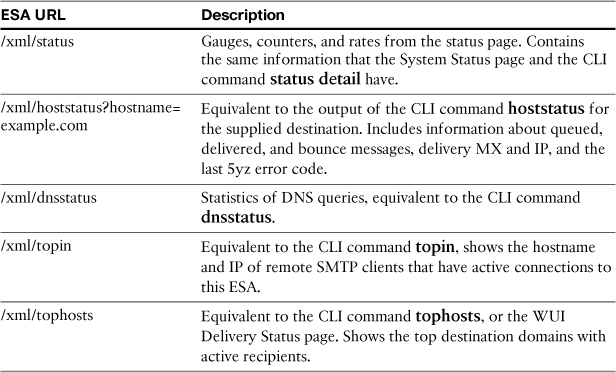
Using XML Export for Monitoring
Let’s look at a script example that uses the hoststatus XML data to monitor a given destination. The ESA does not generate alerts when delivery queues have undelivered messages, unless the queues reach such a depth that the appliance is running out of resources. Resource conservation of that type usually means that there are millions of undelivered messages, when the problem has been ongoing for many hours. Queued messages are normal, and storing them until they can be delivered is one of the primary tasks of a Message Transfer Agent (MTA), but you may be interested to know if the ESA is queuing messages that should be delivered immediately. It could indicate that reliable delivery hosts, like your internal groupware servers, are down or not accepting connections.
SNMP can provide monitoring for the work queue and overall queue disk usage, but what if you’re interested in queue depth to a specific destination, such as your local domains? You might want to be alerted if there are more than 100 messages currently queued for delivery to your groupware servers, because that might indicate a network or server issue, and it certainly means that messages are being delayed in delivery.
Example 9-5 shows the complete Perl script that pulls the hoststatus information, parses the output, and prints a message if the queue depth for the specified domain exceeds the supplied threshold.
Example 9-5. Simple Perl Script for Polling XML Data
#!/usr/bin/perl
use strict;
# load the modules for web (HTTP) and SSL requests
use LWP::UserAgent;
use HTTP::Request::Common;
use Crypt::SSLeay;
# ESA host and credentials. You could easily make these specified as arguments to
the script
my $user = "admin";
my $pass = "ironport";
my $host = "esa02.cisco.com";
my $domain = "cisco.com";
my $threshold = 100;
# make the web request and pass credentials
my $request = new HTTP::Request (GET=>"https://$host/xml/
hoststatus?hostname=$domain") or die $!;
$request->authorization_basic ($user, $pass);
my $response;
my $agent = new LWP::UserAgent;
# check the status of the request; if it's empty, quit the script
if ($request) {
$response = $agent->request ($request);
}
else {
die $!;
}
my $xmlHostData;
# check the result, and if it's not an error, extract the body content
if ($response->is_error) {
print $response->error_as_HTML();
exit;
}
else {
$xmlHostData = $response->content;
}
# search through the XML data for the active recipients line, and extract the cur
rent count
if ($xmlHostData =~ /active_recips" current="(d+)"/) {
if ($1 > $threshold) {
print "Alert threshold exceeded: found $1 active recipients for $domain
";
}
}
This script can be used as the basis for a full alert system, either writing data to a remote logging host or sending an email to an administrator or administrative alias. If you are going to use email, it’s not a good idea to send alert messages through an ESA with a queue backup, especially for your local domains.
Normally, this is something you would want to run on a regular schedule, either using a job scheduler like cron on a UNIX-like system or Windows Scheduled Tasks under Windows. Running it every 5 minutes is adequate for catching serious queue backup problems.
Pushing Data to the ESA and Making Configuration Changes
If you have configuration changes that need to be made on a regular basis, you’ll be interested in automating those changes, especially if those changes depend on data from an external source.
Some common automatic configuration needs include
• Email aliases: If you have a table of aliases for recipient routing or address list expansion, and this data is not available for lookup in LDAP, you can import the data using the aliasconfig command. This can easily be automated with SCP and SSH commands.
• Recipient Access Table: You can import domains or individual email addresses to the RAT. If you don’t have your recipient information in LDAP, or the domains you accept mail for changes often, you can import this data automatically.
• Dictionaries: If you’re filtering based on keywords and phrases, and these change on a regular basis, you can use the dictionaryconfig command to add entries to a dictionary or even to replace the entire dictionary.
For any command that you need for automation, the first step to take is to determine if the configuration change is available using a CLI batch command. You can use help <command> in the CLI to get a complete list of supported batch options and examples of their use. For example, the tasks in the previous list can be automated respectively with
aliasconfig import alias.txt
listenerconfig edit IncomingMail rcptaccess new cisco.com
dictionaryconfig edit Confidential new Secret
After each, you also need to commit the change. I dig deeper into these topics in the following sections.
Changing Configuration Settings Using the CLI
Scripting can also be used to string together multiple steps required to automate some task. For example, suppose your ESA environment makes use of aliases to rewrite recipient addresses. An outside username, like [email protected], needs to be rewritten to [email protected]. Further, suppose the list of aliases is hundreds or thousands of entries long, and changes daily. Ideally, this kind of aliasing should be done via LDAP routing queries on the ESA, but what if the information isn’t available via LDAP and instead is in a database or in a text file? A shell, batch, or Perl script can handle this. The two steps required here are to transfer the file to the ESA using FTP or SCP, and then issue the aliasconfig batch command to import the file. Finally, as with any configuration change, we must commit the change.
Suppose your aliases are stored in a plain ASCII text file, in a format like this:
[email protected]: [email protected]
Here, the text file contains one alias entry per line. Example 9-6 shows the complete listing for a UNIX shell script that does this. Note that we are not parsing or modifying the input; the script assumes that the alias file is in the correct format for ESA import.
To commit the change, we simply append the commit command to aliasconfig import so that it’s all done in a single session. Issuing two separate SSH commands does not work, because the first SSH command exits its login session and closes the connection after it issues aliasconfig. These must be done in one SSH session, separating the commands with a semicolon.
Example 9-6. Source Code for aliasimport.sh, a Shell Script for Importing Aliases from a Text File
#!/bin/bash
scp alias.txt [email protected]:/configuration
ssh [email protected] "aliasconfig import alias.txt; commit alias"
The Windows equivalent, using plink.exe for SSH commands and pscp.exe for SCP, is a batch file shown in Example 9-7. This hardly requires anything as complex as a batch file, but it’s useful for grouping together the commands. If the alias file was being extracted from a database, for example, you could pull and format the data before copying the file over and importing it into the ESA.
Example 9-7. Windows Batch File for Alias Import Tasks
pscp.exe -pw ironport alias.txt [email protected]:/configuration
plink.exe -pw ironport admin@esa02 "aliasconfig import alias.txt; commit alias"
Another situation where a script comes in handy is in automating provisioning. Most organizations own just a few email domains and a small list of delivery destinations for those domains, and maintenance is very low. But, in environments that deal with hundreds or thousands of domains, such as service providers, web-hosting firms, or email archiving services, maintaining the list of local requires more effort. This is especially true if the list changes regularly.
Example 9-8 is a listing for domainProvision.pl, which adds a given email domain to the ESA RAT and SMTPRoutes table.
Example 9-8. Source Code for domainProvision.pl
#!/usr/bin/perl
use strict;
use Net::SSH qw(sshopen2);
sub usage () {
print "usage:
$0 <domain to add> <smtproute destination>
";
exit (0);
}
if (@ARGV < 2) {
usage ();
}
my $domain = $ARGV[0];
my $destination = $ARGV[1];
my $rcptAccessCommand = "listenerconfig edit IncomingMail rcptaccess new
$domain
";
my $smtpRoutesCommand = "smtproutes new $domain $destination
";
my $commitCommand = "commit "added RAT and SMTPRoutes entry for $domain"
";
my $tmp;
if (sshopen2("[email protected]", *READER, *WRITER)) {
print WRITER $rcptAccessCommand;
$tmp = <READER>;
print WRITER $smtpRoutesCommand;
$tmp = <READER>;
print WRITER $commitCommand;
$tmp = <READER>;
print WRITER "exit
";
$tmp = <READER>;
}
You can run this script with just two arguments—the domain and the delivery destination:
domainProvision.pl cisco.com 10.1.17.122
The script could easily be expanded to support two or more destinations for a given domain.
Committing Changes Using the CLI
To make configuration changes to the ESA with the CLI, you must issue the commit command and supply a comment (or just press Enter). The same is required of automated configuration changes.
If you’re using a batch command, like we saw earlier, you need to string the commit command together with the configuration batch command. In other words, you must do this:
aliasconfig import alias.txt; commit alias
aliasconfig import alias.txt
commit alias
Running commands through an SSH client in multiple calls creates multiple sessions, losing any configuration changes. You must issue all of your commands in a single session, and the ESA provides the semicolon notation for this.
Changing Configuration Settings Using the WUI
Changing the configuration settings using the WUI is less straightforward than using the CLI, chiefly because the WUI is intended for human interaction using a browser. It has the further difficulty that, unlike when retrieving XML status pages, the WUI doesn’t allow for web server login directly, but rather requires that the script actually login using the ESA’s login forms.
Most configuration changes in the WUI are performed using HTML forms that use either GET or POST methods. Manipulating data with GET URLs is fairly easy, once you identify the appropriate argument names and values. Most of the POST forms can actually be converted into a GET method.
Despite these challenges, once the basics of logging in, using cookies, and manipulating form URLs is done, you’ll have a framework that you can build additional configuration scripts with.
Every script that manipulates configuration through the WUI must perform three basic tasks (at a minimum):
1. Log in to the ESA using the https://hostname/login GET URL. Save the sid cookie for use in the next steps; sid represents the session id of the currently logged in user.
2. Make configuration changes using GET URLs. Each HTTP request must include the sid cookie from the first step.
3. Commit the changes using the https://hostname/commit GET URL. Again, this request must include the sid cookie from the first step.
We deal with committing the changes in the next section. We first look at logging in and making a configuration change. Example 9-9 provides a VBScript listing of a script that logs into an ESA.
Example 9-9. VBScript Example of ESA WUI Login
'''''''''''''''''''''''''''
' esalogin.vbs
'
' VBScript example for logging into WUI
' on Cisco IronPort ESA, and SMA appliances
' Created by: Chris Porter
' [email protected]
' Apr 2011
'
'
dim user
user = "admin"
dim pass
pass = "password"
dim loginURL
loginURL = "https://esa02.cisco.com/login?username=" & user & "&password=" & pass &
"&action:Login=Login"
dim sidCookie
Set webClient = WScript.CreateObject ("MSXML2. serverXMLHttp")
webClient.open "GET", loginURL, False ' use the login GET URL
webClient.setOption 2, 13056 ' ignore HTTPS cert issues
webClient.send ""
If err.Number = 0 Then
sidCookie = webClient.getResponseHeader ("Set-Cookie") '
retrieve the SID cookie if we logged in properly
Else
WScript.Echo "Error: " & err.Number & ": " & err.Description
End If
All this script does at this point is log in and save the cookies that the login script sends via the Set-Cookie header. For the script to be able to make configuration changes, or to commit them, you need to save the sid cookie. Whenever you make a subsequent request, the sid cookie will need to be submitted with that request.
Example 9-10 shows the next step, which is actually making a configuration change. In this case, we add a domain to the destination controls table, setting TLS connections to Required.
Example 9-10. ESA Configuration Change
dim configURL
configURL = configURL = "https://esa02.cisco.com/mail_policies/destination_control?
action=Add&pg=1&screen=mail_policies.destination_control&no_goodtable_action=
0&new_name=example.com&host_concurrency=0&messages_per_connection=0&recipient=
0&table_tls=2"
webClient.open "GET", configURL, False
webClient.setRequestHeader "Cookie", sidCookie ' return the SID
webClient.send
The URLs for configuration changes aren’t documented, but the HTML source of the ESA WUI pages can easily be examined for the scripts and their arguments. Most of the ESA configuration changes are done through POST or GET form submissions, and the POST submissions can be converted to GET by supplying the correct arguments. Most browsers offer web-development tools or plugins that can make it easier to dissect the forms and URLs in the ESA WUI.
Committing Changes Using the WUI
After the required configuration changes are submitted, a script must commit the changes. This can be done with yet another GET URL, as shown in Example 9-11.
Example 9-11. ESA Commit Changes
dim commitURL
commitURL = "https://esa02.cisco.com/commit?action=Commit&screen=commit&logout=
&comment=TLS%20required%20for%20new%20domain"
webClient.open "GET", commitURL, False
webClient.setRequestHeader "Cookie", sidCookie ' return the SID
webClient.send
At this point, we have a framework for a script that logs in, issues a configuration change, and commits the change. The configuration change can be anything that suits your purpose; just change the configURL parameter in the appropriate place in the script.
Retrieving Reporting Data from the WUI
The data that makes up the reports in the WUI is available for export. If you’re browsing a report, each of the tables and charts has an Export... link at its lower right that produces a comma-separated values (CSV) text file containing the relevant data.
The data that is exported reflects the current selected time range in the WUI. Each export link is just a URL, though, with CGI arguments reflecting the time range and report type. Because each report is an HTTP GET URL, you can easily write a script that retrieves reporting data.
Data Export URLs
There are a large number of report pages in the WUI, and each report has multiple export links. The export URLs can all be accessed with the same base URL to the report engine:
https://<esa hostname>/monitor/reports/report
The parameters to this URL determine the report type, time range, and export format. You must use the parameter names and values that the ESA expects or you’ll get 404 not found or other error responses from the ESA. If you specify a set of parameters that yields a report that has no data, you won’t get an error. Instead, you get an empty file.
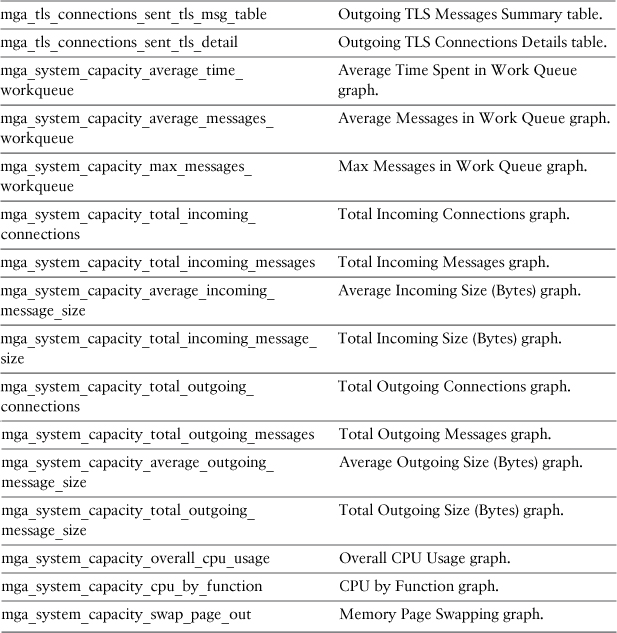
The report type is dictated by two parameters, which specify which particular chunk of data you want to export. The first parameter is report_def_id, and it signifies the high-level report you’re retrieving. The possible values for this parameter, listed in Table 9-2, correspond to the reports in the Monitor menu in the WUI.
Table 9-2. ESA Export Report Types: Parameter Report_def_id
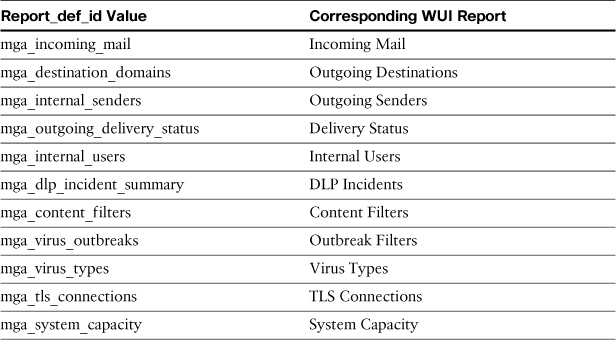
The other pages in the WUI Monitor menu don’t have exportable data in this format. System Status can be exported several other ways, as we have seen.
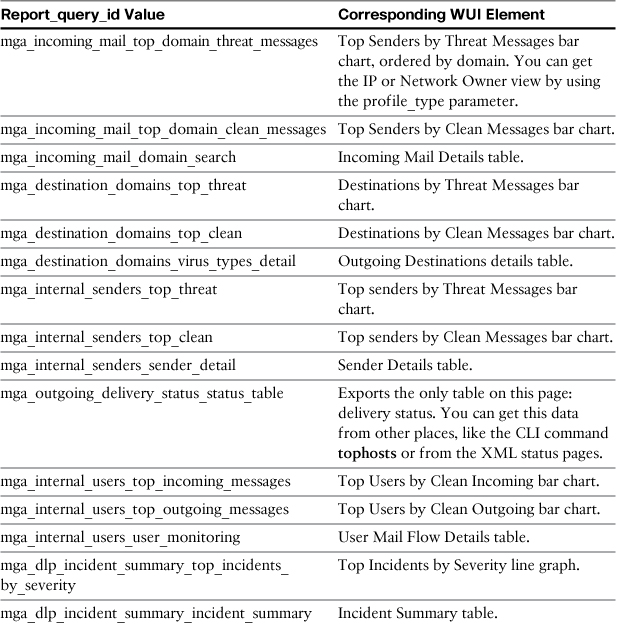
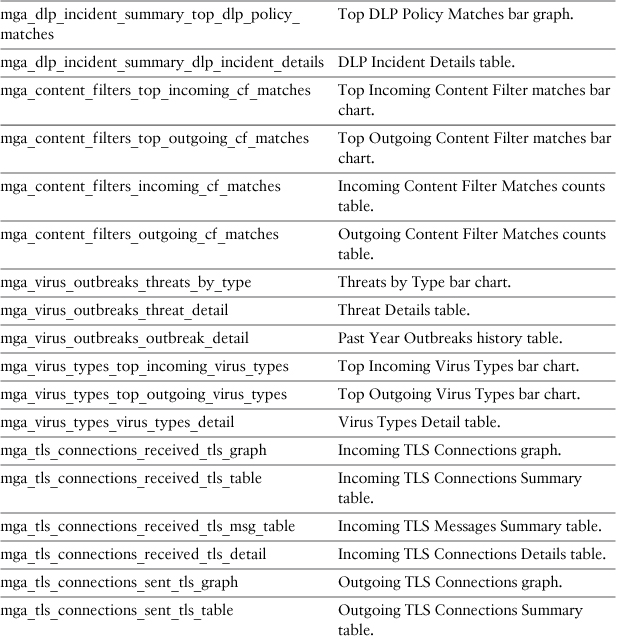
After you specify the global report type, you need to specify the actual data to be exported in the parameter named report_query_id. The values for this parameter are listed in Table 9-3. Not all pairs of report_def_id and report_query_id are valid; only combinations of query ID that correspond with their global report types will generate data. Luckily, it’s easy to determine the relationship just from the name, because the report_query_id values all start with their corresponding report_def_id values.
Table 9-3. ESA Export Report Types: Parameter report_query_id
For example, to export the data from the Top Users by Clean Incoming Messages graph on the upper left of the WUI Internal Users report, you would add these arguments to the URL:
https://<esa hostname>/monitor/reports/report?report_def_id=mga_internal_
users&report_query_id=mga_internal_top_incoming_messages
Next, you need to specify the time range for the exported data. The start and end date and times of the exported data are controlled through the date_range parameter, which can be current_hour, current_day, current_week, or current_month. Continuing with the example, looking at the data for the last day gives us a URL like this:
https://<esa hostname>/monitor/reports/report?report_def_id=mga_internal_
users&report_query_id=mga_internal_top_incoming_messages&date_range=current_day
Finally, to get a complete URL, we need to specify the export format. The export format is simple; the parameter name is format and the only possible value is CSV because that’s the only format the ESA supports for export:
https://<esa hostname>/monitor/reports/report?report_def_id=mga_inter
nal_users&report_query_id=mga_internal_users_top_incoming_messages&date_
range=current_day&format=csv
To get some reports in a different view, or the data in a different sort order, you need to pass a couple of other parameters in the URL. For the incoming mail reports, you add the profile_type parameter to get data by IP or network owner. If you exclude the parameter entirely, you get the Domain view:
https://<esa hostname>/monitor/reports/report?report_def_id=mga_incom
ing_mail&report_query_id=mga_incoming_mail_top_domain_threat_messages&date_
range=current_day&format=csv&profile_type=ipaddr
Other Data Export Topics
If you build some export URLs and request them with a browser or scripting tool, you’ll get a feel for what kind of data is in each report export. In most cases, there’s more data in the Export than you see on the screen in the WUI, and it’s arranged differently. The first thing you’re likely to notice is that most of the reports include timestamp information, in both UNIX epoch and human-readable formats.
This is because the data that you’ll see in the exported CSV is not quite the same as what you see in the WUI—it’s actually the raw data that goes into making up the charts and tables that you see on each report page. Each CSV breaks up the requested time period into intervals, so that, for example, an export of a table with a Time Range of Day actually exports data by the hour.
Let’s look at a concrete example. Figure 9-1 is the Past Day view of Incoming Mail on an ESA. It shows the top-ten domains attempting to send unwanted messages to this ESA.
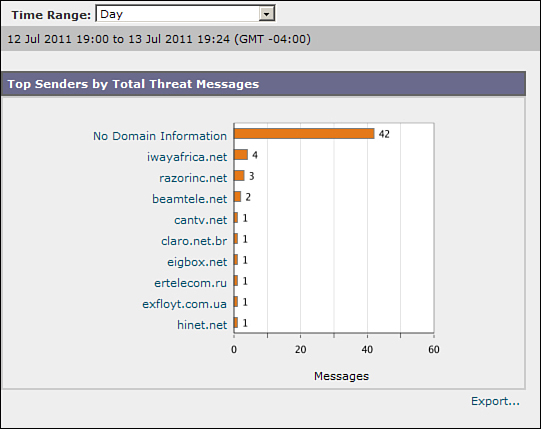
Figure 9-1. Past Day Chart for Top Threat Message Senders
The export of the chart, however, gives us that same data broken into hourly segments, and it includes more data. In fact, it includes all domains that have at least one threat message attempt in the last day. The CSV listing of this export is shown in Example 9-12.
Example 9-12. CSV Export of Daily Data Showing Hourly Segments
Begin Timestamp,End Timestamp,Begin Date,End Date,Domain,Messages
1310511600.0,1310515199.0,2011-07-12 23:00 GMT,2011-07-12 23:59 GMT,unknown domain,1
1310518800.0,1310522399.0,2011-07-13 01:00 GMT,2011-07-13 01:59 GMT,irtel.ru,1
1310518800.0,1310522399.0,2011-07-13 01:00 GMT,2011-07-13 01:59 GMT,prima.net.ar,1
1310518800.0,1310522399.0,2011-07-13 01:00 GMT,2011-07-13 01:59 GMT,speedy.com.ar,1
1310518800.0,1310522399.0,2011-07-13 01:00 GMT,2011-07-13 01:59 GMT,unknown domain,1
1310518800.0,1310522399.0,2011-07-13 01:00 GMT,2011-07-13 01:59 GMT,virtua.com.br,1
1310522400.0,1310525999.0,2011-07-13 02:00 GMT,2011-07-13 02:59 GMT,unknown domain,2
1310551200.0,1310554799.0,2011-07-13 10:00 GMT,2011-07-13 10:59 GMT,ertelecom.ru,1
1310551200.0,1310554799.0,2011-07-13 10:00 GMT,2011-07-13 10:59 GMT,hinet.net,1
1310551200.0,1310554799.0,2011-07-13 10:00 GMT,2011-07-13 10:59 GMT,hol.gr,1
1310551200.0,1310554799.0,2011-07-13 10:00 GMT,2011-07-13 10:59 GMT,romtelecom.net,1
1310551200.0,1310554799.0,2011-07-13 10:00 GMT,2011-07-13 10:59 GMT,triolan.net,1
1310551200.0,1310554799.0,2011-07-13 10:00 GMT,2011-07-13 10:59 GMT,unknown domain,1
1310551200.0,1310554799.0,2011-07-13 10:00 GMT,2011-07-13 10:59 GMT,wateen.net,1
1310554800.0,1310558399.0,2011-07-13 11:00 GMT,2011-07-13 11:59 GMT,eigbox.net,1
1310558400.0,1310561999.0,2011-07-13 12:00 GMT,2011-07-13 12:59 GMT,seed.net.tw,1
1310558400.0,1310561999.0,2011-07-13 12:00 GMT,2011-07-13 12:59 GMT,unknown domain,4
1310562000.0,1310565599.0,2011-07-13 13:00 GMT,2011-07-13 13:59 GMT,unknown domain,1
1310565600.0,1310569199.0,2011-07-13 14:00 GMT,2011-07-13 14:59 GMT,razorinc.net,1
1310565600.0,1310569199.0,2011-07-13 14:00 GMT,2011-07-13 14:59 GMT,unknown domain,7
1310569200.0,1310572799.0,2011-07-13 15:00 GMT,2011-07-13 15:59 GMT,razorinc.net,1
1310572800.0,1310576399.0,2011-07-13 16:00 GMT,2011-07-13 16:59 GMT,speedy.net.pe,1
1310572800.0,1310576399.0,2011-07-13 16:00 GMT,2011-07-13 16:59 GMT,unknown domain,7
1310576400.0,1310579999.0,2011-07-13 17:00 GMT,2011-07-13 17:59 GMT,beamtele.net,2
1310576400.0,1310579999.0,2011-07-13 17:00 GMT,2011-07-13 17:59 GMT,lightpath.net,1
1310576400.0,1310579999.0,2011-07-13 17:00 GMT,2011-07-13 17:59 GMT,unknown domain,6
1310576400.0,1310579999.0,2011-07-13 17:00 GMT,2011-07-13 17:59 GMT,upcbroadband.cz,1
1310580000.0,1310583599.0,2011-07-13 18:00 GMT,2011-07-13 18:59 GMT,unknown domain,2
1310580000.0,1310583599.0,2011-07-13 18:00 GMT,2011-07-13 18:59 GMT,veloxzone.com.br,1
1310583600.0,1310587199.0,2011-07-13 19:00 GMT,2011-07-13 19:59 GMT,claro.net.br,1
1310583600.0,1310587199.0,2011-07-13 19:00 GMT,2011-07-13 19:59 GMT,unknown domain,2
1310587200.0,1310590799.0,2011-07-13 20:00 GMT,2011-07-13 20:59 GMT,iwayafrica.net,4
1310587200.0,1310590799.0,2011-07-13 20:00 GMT,2011-07-13 20:59 GMT,levonline.com,1
1310587200.0,1310590799.0,2011-07-13 20:00 GMT,2011-07-13 20:59 GMT,unknown domain,6
1310590800.0,1310594399.0,2011-07-13 21:00 GMT,2011-07-13 21:59 GMT,cantv.net,1
1310590800.0,1310594399.0,2011-07-13 21:00 GMT,2011-07-13 21:59 GMT,exfloyt.com.ua,1
1310590800.0,1310594399.0,2011-07-13 21:00 GMT,2011-07-13 21:59 GMT,razorinc.net,1
1310590800.0,1310594399.0,2011-07-13 21:00 GMT,2011-07-13 21:59 GMT,telkom.net.id,1
1310590800.0,1310594399.0,2011-07-13 21:00 GMT,2011-07-13 21:59 GMT,unknown domain,1
1310594400.0,1310597999.0,2011-07-13 22:00 GMT,2011-07-13 22:59 GMT,unknown domain,1
1310598000.0,1310601599.0,2011-07-13 23:00 GMT,2011-07-13 23:59 GMT,rr.com,1
This difference in export can be frustrating if you just want what you see in the WUI, but it delivers more data (in this case, more domains) and adds time interval information about each sender. If you really want to summarize the data for a particular day, you have two choices: Export the weekly report and find the particular day you’re interested in, or export the daily report and summarize the totals across all hourly periods.
In the example in the next section, I take the second approach, summing the data across all hours to create a report for a single day.
Example Script
Now that we are able to retrieve the data, what should we do with it? Because the resulting format is in CSV and is ideal for use in spreadsheets and charts, let’s add it to a spreadsheet and graph the data.
Example 9-13 is a listing for a VBScript program that uses Microsoft Excel objects to graph data about incoming threat messages. Essentially, I recreated the graph from the Incoming Mail page for the past day, but with all the data available for that 24-hour period rather than just the top senders. With the flexibility of scripting, and the data ending up in Excel, you’ll be able to do whatever you like with it.
Example 9-13. Data Export and Manipulation from WUI
'''''''''''''''''''''''''''
' threatReport.vbs
'
' VBScript example for retrieving data from report Export
' on Cisco IronPort ESA appliances
' Created by: Chris Porter
' [email protected]
' Jun 2011
'
'
dim user
user = "report"
dim pass
pass = "ironport"
dim loginURL
loginURL = "https://esa02.cisco.com/login?username=" & user & "&password=" & pass &
"&action:Login=Login"
dim reportURL
reportURL = "https://esa02.cisco.com/monitor/reports/report?date_range=current_
day&report_def_id=mga_incoming_mail&profile_type=domain&report_query_id=mga_
incoming_mail_top_domain_threat_messages&format=csv"
dim sidCookie
Set webClient = WScript.CreateObject ("MSXML2.serverXMLHttp")
' log in to the ESA, ignoring HTTPS cert errors
webClient.open "GET", loginURL, False
webClient.setOption 2, 13056
webClient.send ""
' store the SID cookie if we logged in properly
If err.Number = 0 Then
sidCookie = webClient.getResponseHeader ("Set-Cookie")
Else
WScript.Echo "Error: " & err.Number & ": " & err.Description
End If
' retrieve the report data
webClient.open "GET", reportURL, False
' return the SID cookie we got when we logged in
webClient.setRequestHeader "Cookie", sidCookie
webClient.send
If err.Number > 0 Then
WScript.Echo "Error: " & err.Number & ": " & err.Description
End If
' examine the returned data
dim responseLines
responseLines = Split (webClient.responseText, vbCrLf) ' split the response by
line
responseLineCount = ubound(responseLines)
redim preserve responseLines (responseLineCount-1) ' get rid of last,blank
line
' use a dictionary to keep track of unique domains
Set resultsDictionary = WScript.CreateObject ("Scripting.Dictionary")
for each csvLine in responseLines
csvArr = Split (csvLine, ",")
domain = csvArr(4)
msgcount = csvArr(5)
If (resultsDictionary.Exists (domain)) Then
resultsDictionary.Item (domain) = CInt(resultsDictionary.Item(domain))
+ msgcount
Else
resultsDictionary.Add domain, msgcount
End If
next
' put the results into an array
dim connectionArray ()
redim connectionArray (resultsDictionary.Count, 2)
i=0
for each domain in resultsDictionary
connectionArray (i,0) = domain
connectionArray (i,1) = resultsDictionary.Item(domain)
i = i+1
next
' create an Excel worksheet and chart
dim appExcel
set appExcel = createobject("Excel.Application")
appExcel.Visible = true
dim wb
set wb = appExcel.workbooks.add
dim reportRange
set reportRange = wb.ActiveSheet.Range("A1").Resize(resultsDictionary.Count, 2)
reportRange.value = connectionArray
wb.Charts.Add
wb.ActiveChart.SetSourceData appExcel.Sheets ("Sheet1").Range("A:B")
wb.ActiveChart.ChartType = 54 ' xl3DColumnClustered
appExcel.UserControl = true
WScript.Quit
Figure 9-2 shows the resulting graph, as displayed in Microsoft Excel 2007.
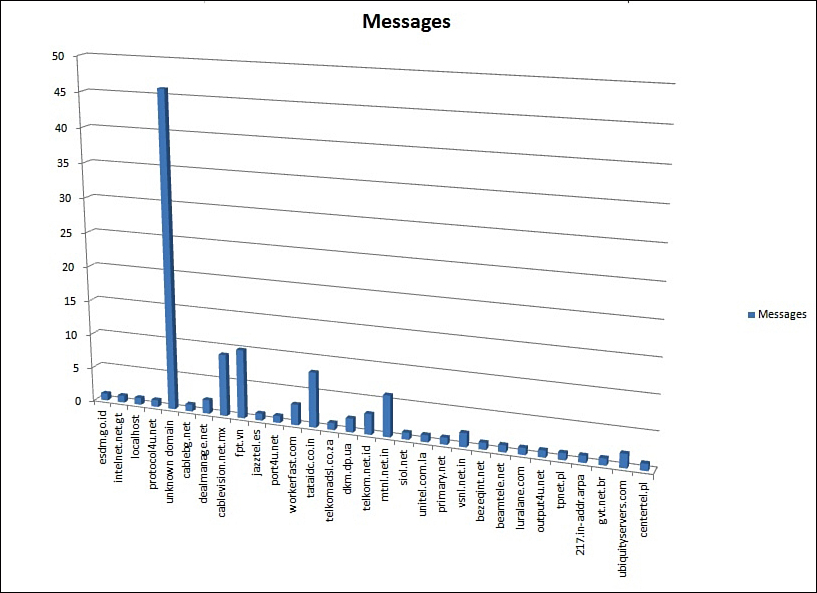
Figure 9-2. Results of the ThreatReport Script
Summary
Much of the ESA monitoring, reporting, and configuration is intended for interactive use by humans, but we’ve shed some light on using CLI batch commands and WUI reporting URLs with scripts running on external systems. Hopefully, the examples give you a place to start for your own automation needs.
Cisco provides batch commands for all CLI operations that we have put to good use in making simple configuration commands. Some examples of scripts that can compile and transfer text data for import into an ESA table were also shown.
The next chapter examines another critical administrative topic: configuration files in XML format.