
Chapter 15. Advanced Topics
In this chapter, you will learn the following:
• New protocols for authentication of email senders
• New challenges in regulatory compliance that place pressure on messaging directors
• How to protect an organization’s intellectual property in email
Recent Developments
Recent industry noise might convince you that email as a communications medium is on its way out. However, the raw statistics don’t bear this out; although daily Internet email volumes fluctuate day to day, it’s apparent that volumes of Internet and internal email are on the rise. As of this writing, the Cisco statistics on spam and other threat messages shows a change in approach from high volume, less sophisticated, advertising junk to lower volumes of sophisticated fraud, but the numbers of both continue to be high.
Although other communication technologies arise and gain popularity with consumers and businesses, none are about to replace email in business, government, or education. New technologies with value usually complement existing ones, not replace them. Most companies still use telephone, email, and instant messaging (IM) to conduct business; social networking and dedicated collaboration tools will find a home alongside them in most environments. The future is naturally difficult to predict, and technology futures are legendary for authors that dare to make predictions. But, there are a few developments in the venerable world of SMTP email in the last few years that are worth mentioning, and new technology standards are emerging. Email has also become the subject of legislation in many countries and in most U.S. states, either directly through laws regarding electronic communication or indirectly through restrictions on the transmission of private information, regardless of form. Regulatory compliance in your jurisdiction may impose obligations on how you handle email communication with outside organizations, and the future inevitably means more of this type of legislation. Industry or organizational requirements may also dictate how and whether email is used to handle proprietary or confidential information. Detecting and controlling the information contained in email messages is the stated goal of Data Loss Prevention (DLP) features on the Email Security Appliance (ESA), so I examine those capabilities.
Authentication Standards
One of the major sources of headaches with Internet email is the lack of sender authentication in SMTP. SMTP provides no mechanism to verify that the sender address, specified in the SMTP MAIL FROM command or in the visible From header, is being legitimately used. In fact, SMTP specifically provides for a number of cases where these addresses can be “spoofed” for legitimate purposes. The reality is that you cannot always trust, or always mistrust, the sender address.
With the wide adoption of email and SMTP to transfer it, it’s extremely unlikely that a change in the protocol itself would be welcomed. It would be difficult to justify—despite its problems, SMTP has been scaling to meet the global Internet email volumes for almost 30 years.
So, as with many other IP problems in the past, the proposed solution takes the form of optional, but recommended, add-on protocols to provide proof that you are who you say you are when sending Internet email. Today, there are two fundamental approaches: path verification, which proves that the IP addresses of hosts sending messages are authorized to send for a particular domain; and message authentication, which uses public-key cryptography to digitally sign messages. The two approaches are complementary and can be used together. Either way, the goal is to allow legitimate senders at a particular domain to prove that they are authorized to use it and to make it easier for recipients to recognize fraudulent use of that domain.
It’s also important to define what these authentication standards are not. They are designed to reduce or eliminate the fraudulent use of domains in sender addresses, as is often the case in fraud, phishing, or other social-engineering email messages. They are not designed as an anti-spam mechanism, and messages that pass the authentication check should not necessarily be construed as good messages. In reality, the spam, virus, or fraud senders can, and do, use these authentication mechanisms. All the better for us—authentication means more information we can identify these bad senders with.
Adoption of these authentication standards is ongoing, with SPF the most widely adopted as of this writing. Adoption is the challenge here: Many organizations won’t see definitive benefits to sender authentication until more senders sign or publish and more recipients verify. There are some immediate tangible benefits to using these standards, however.
Verification has the benefit of being able to clearly identify some fraudulent senders, and eliminate their messages before it reaches their user base. For commonly phished domains in the financial and retail industry, you’re protecting your users’ personal information by allowing their Internet service providers (ISP) to eliminate clearly fraudulent messages. Publishing and signing has benefits for your organization in terms of brand protection: Recipients can more confidently trust messages, and service providers are less likely to send messages to spam folders.
Path-Authentication Standards: SPF and SIDF
The first attempts at establishing a protocol for sender authentication were based on the idea of a “reverse MX” record in Domain Name System (DNS). Since early in the history of SMTP, DNS MX records have provided the means of identifying where messages for a given domain should be sent. Unfortunately, MXs do not constrain where messages sent from a particular domain should originate. If a DNS record offered the reverse of an MX, we could easily determine where email messages with a particular sender address should originate. Domain owners could control the use of their domains, and fraudulent senders would be easily discovered.
Two authentication proposals—Sender Policy Framework (SPF) and Sender ID Framework (SIDF)—attempt to provide this information. The idea is, in summary, to list the IP addresses that are authorized to send mail for a specific domain and to make this list available via DNS. The DNS record is a TXT query for the sending domain. When the receiving Message Transfer Agent (MTA) accepts a message, it looks up the appropriate domain via DNS TXT query and compares the lookup results to the IP of the connecting host. You can do the lookup manually using nslookup on most operating systems (OS):
nslookup –q=txt example.com
I think of SPF as being an acronym for “Sender Permitted From,” because that perfectly illustrates the idea. Here’s an example SPF DNS TXT record:
example.com IN TXT "v=spf1 ip4:204.15.82.0/24 ~all"
SPF is evaluated from left to right. All SPF records must start with the version tag v=spf1. SIDF uses the same format, but with version v=spf2.0, and there’s some difference in how the sender is computed, which I cover later in this chapter. After the version tag, the record consists of a series of SPF parameters called mechanisms. This simple example uses one host mechanism, ip4, which specifies an IP address or range. The last entry in the record is the all mechanism, which matches all other hosts and IPs. There are a few others, which are listed in Table 15-1. For the mechanisms that operate on domain names, you can either specify a domain for the test or let the client use the domain of the sender of the message in question.

Each mechanism can be prefixed by one of four qualifiers (+, -, ?, and ~) that tell the receiving side how to treat hosts that match that mechanism. The + character tells the recipient that IPs that match that mechanism pass the SPF test. It’s the default and so it isn’t necessary to explicitly include it. That is,
"v=spf1 +a +ip4:192.168.6.0/24 –all"
is the same as
"v=spf1 a ip4:192.168.6.0/24 –all"
The other three qualifiers are typically only used with the all mechanism, which specifies what to do with all other hosts and IPs (meaning the rest of the Internet). It should be last in the SPF record. The – (dash) character indicates a failure; any connecting IP that matches that mechanism is treated as an SPF failure. It’s a certain verdict: You’re telling the reader of your SPF record that hosts that match this are not authorized and should not be trusted. The ? (question mark) prefix indicates that the receiver should treat matching hosts neutrally; that is, don’t consider them to actually be a match or a mismatch. The ~ (tilde) prefix indicates a soft failure—that the host isn’t explicitly allowed, but that the receiver still shouldn’t act on the message. These last two can be thought of as “testing” modes, asking recipients to perform the SPF check but not to act on the verdicts.
To be really effective, SPF records should be published with -all at the end to allow receiving MTAs to treat failures as fraud. The goal is to allow the recipients to act on the messages that didn’t really come from your hosts. If you’re just starting with SPF, and you’re not sure that your SPF record is complete and final, use ?all or ~all to indicate that. For example:
"v=spf1 ip4:192.168.6.0/24 ~all"
This tells recipients that hosts outside of that network range are not known valid IPs for the domain, but that they shouldn’t drop the messages. It’s a good way to start using SPF, but your final goal should be to move to –all whenever possible.
Determining the Identity of the Sender
I described SPF and SIDF as tests against the domain of the message sender, derived from the SMTP MAIL FROM command. There’s actually more to it than that. Both SPF and SIDF specify how to calculate the domain of the sender, although the protocols differ on what the sender of a message is determined to be.
For SPF, either the domain from the SMTP MAIL FROM or the domain of the host in the SMTP HELO banner can be used. For messages with an empty MAIL FROM, like bounces and system-generated messages, the HELO check is used. If the two are different, the sending host should be checked against SPF records for both domains. A successful result for either implies an SPF pass verdict for the message. For example, this partial SMTP conversation:
220 mail.example.com ESMTP
EHLO esa02.cisco.com
250-mail.example.com
250-8BITMIME
250-SIZE 20971520
250 STARTTLS
MAIL FROM: [email protected]
250 sender <[email protected]> ok
should check both the cisco.com and ironport.com DNS TXT records for SPF. If either one matches the connecting host, the SPF check passes.
SIDF goes further, providing a means of calculating the identity depending on what’s specified in the DNS record. It can use the same MAIL FROM identity that SPF does, but SIDF also provides other means of defining the sender identity, controlled by the SIDF DNS text record. Table 15-2 lists the possible values.
Table 15-2. SIDF Identity Values
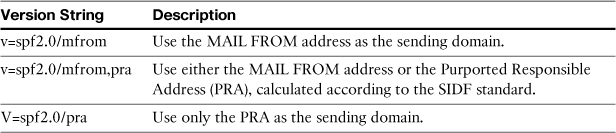
SIDF defines the notion of a Purported Responsible Address (PRA) to use in the DNS queries to the sender domain. The PRA is determined by looking for the headers Resent-Sender, Resent-From, Sender, and From in that order. The header must have a single value that contains a domain name. In most messages, the PRA ends up being the visible From header that users see.
Another part of the SIDF protocol states that the recipient should accept and evaluate “v=spf1” records, but calculate the sender address according to the “v=spf2.0/mfrom,pra” method.
Unfortunately, the PRA of a message may differ from the MAIL FROM or HELO sender, so SPF and SIDF can have a conflicting opinion on the true sender of the message. It means that if we apply the SIDF rules to an SPF record, we can reach a failure verdict when it would pass under the original SPF specification. SIDF effectively overrides existing SPF records and forces them to be interpreted in a way that the original SPF record creator didn’t intend.
Because of this unresolved incompatibility, SIDF is not currently widely adopted, and its future as a proper Internet specification is in doubt. I recommend that you consider SPF and DKIM first and foremost when considering using sender-authentication specifications.
Deploying SPF
The process of deploying SPF for your domains is fairly straightforward. Note that this process doesn’t require configuration on the ESA. Because messages and addresses aren’t modified by SPF, you don’t need to do anything other than publish an SPF record to have your outbound mail flow be SPF verified. I’ll return to ESA configuration when discussing SPF verification of senders. Publishing SPF for your domains requires these steps:
1. Identify the legitimate sources of mail: For any given domain, you must determine the IP addresses that are sending mail to the Internet. When in doubt, be generous in what you include. For example, if your organization owns a large network block, it’s better to include the entire CIDR range for your organization if you’re not sure which specific IPs do the sending. If you have third-party senders that send using your domain, you should include their IP ranges or reference their SPF record with the include mechanism.
2. Construct the SPF record: Use a wizard or manually build the SPF record. All records must include the SPF version in the v tag and at least one mechanism.
3. Publish the SPF record: SPF records must be in DNS as TXT records for the sending domain. For each domain, you must publish a separate record.
To help you with this task, there are several SPF wizards on the web that will create an appropriate record based on your answers to a few questions about your email environment. If you’re not certain that your list of sending servers is authoritative, use the ~all mechanism, but your ultimate goal should be a complete record and the –all mechanism.
Here’s one last important recommendation about SPF records. If your organization owns domains that are not used for sending mail whatsoever, you can preempt their use in fraudulent messages by publishing a blank SPF record like this:
example.com IN TXT "v=spf1 –all"
This allows email recipients to block all messages using that sender domain.
SPF Challenges
One of the chief complaints about SPF is that the specification does not account for mail forwarders—that is, legitimate senders that resend mail on behalf of other domains. For example, a user that has a university alumnus email address, like this:
Email sent to this address is accepted and redelivered to another address, based on the user’s preferences. If the message is delivered intact with the original envelope and body sender, the forwarding service’s IPs will not pass an SPF check for those domains. Any such service that redelivers messages intact is in the position of spoofing legitimate domains as it forwards the message. Other examples of mail forwarders include mailing lists and discussion groups that forward messages intact from one sender to many recipients. If you publish SPF records, be aware that any forwarder accepting messages from one of your users won’t be included and will fail the SPF check. For the forwarding services themselves, there are solutions to this problem, the simplest of which is just using a new, local, envelope sender address.
A bigger issue may just be a conflict between your organization’s policies and the intent of SPF. The goal of SPF is to provide a small list of valid sending hosts for a given domain, and this may conflict with your organization’s preferences for use of the domain. You may want to allow roaming senders to use their email addresses from a variety of locations, without requiring VPN or authentication. For some environments, it may simply be impossible to narrow down the possible source IPs for all senders in the domain.
Another subtle challenge with SPF is an issue with DNS in many environments. DNS is a protocol that primarily uses UDP/53 for resolving records. However, many administrators are not aware that DNS also requires TCP/53, and as a result, many email MTAs on the Internet have firewall rules preventing TCP connections on port 53, preventing DNS from using TCP. Why is this an issue with SPF? DNS clients shift from UDP to TCP when the resulting record is larger than 512 bytes, too large for UDP. Some SPF records are too large for DNS via UDP, forcing the client to switch to TCP. If your SPF record requires DNS via TCP, many sites will not be able to resolve the record due to their misconfiguration, and may reach an error or failure verdict when receiving messages. Many organizations do not realize that DNS uses TCP, so they do not allow port 53 TCP connections for DNS resolution. The results of tests in your environment, or via independent DNS testers, may show that SPF resolves correctly, but you can still have issues with some SMTP servers. The best way to avoid this is to keep your SPF records as short as possible—make use of CIDR ranges where possible.
Using SPF and SIDF Verification on ESA
With SPF and SIDF, publishing records is all in DNS, and there’s nothing to configure on the ESA. However, if you want to take action on SPF results from Internet senders, you need to configure the ESA to perform the lookups and verification, and then use content filters to act on the SPF verdicts.
Start by enabling SPF/SIDF verification in the HAT for each mail flow policy in which you want to perform the tests. This setting simply performs the appropriate DNS lookups and if an SPF record is found, evaluates the conditions based on the computed sender address of the message. The verdict is stored for later use.
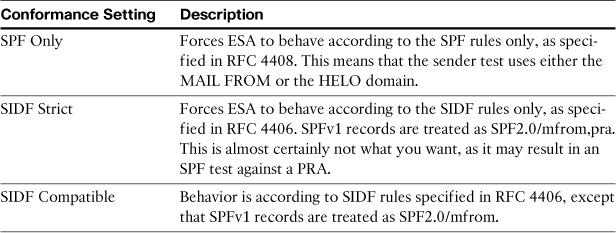
The option for SIDF conformance level deals with the conflict between the SPF and SIDF specifications. Remember that SIDF specifies that SPFv1 records should be treated as spf2.0/mfrom,pra, which for many domains conflicts with the SPF MAIL FROM and HELO identities. The ESA provides you with a choice of handling this. Table 15-3 describes the conformance settings. Unless you have a specific reason to change it, I recommend using the default: SIDF Compatible.
Table 15-3. SIDF Conformance Levels on ESA
Now that you have your basic SPF verification options in place in the HAT, the ESA is performing the tests and recording the verdicts. To make use of these verdicts, you must create a content filter to act on them. Table 15-4 describes the possible SPF verdicts.
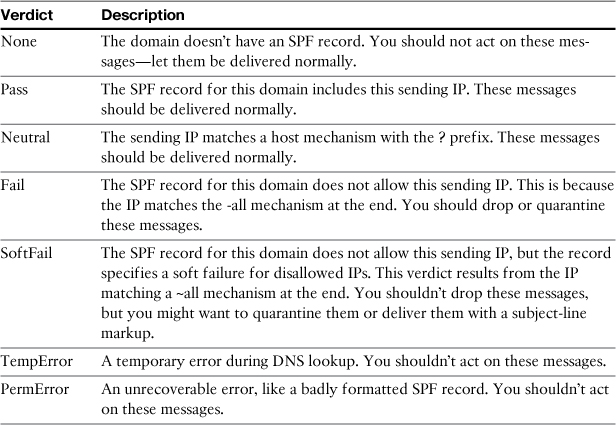
Of these, the most definitive, and the one you can freely act on to change message processing, is Fail. A failure verdict indicates that the IP is not listed among the authorized hosts for this domain, and the domain has specified that you should treat mismatches as a hard failure; in other words, it’s a spoofing attempt. For example, suppose your ESA receives an inbound SMTP connection from 192.168.10.20, and the client uses a MAIL FROM of [email protected]. The SPF record looks like this:
example.com IN TXT "v=spf1 ip4:192.168.6.0/24 –all"
It does not include 192.168.10.20—and thus, the client fails the test. You can drop or quarantine any messages from this client that uses MAIL FROM example.com.
Figure 15-1 shows a content filter that drops messages based on the SPF failure verdict.
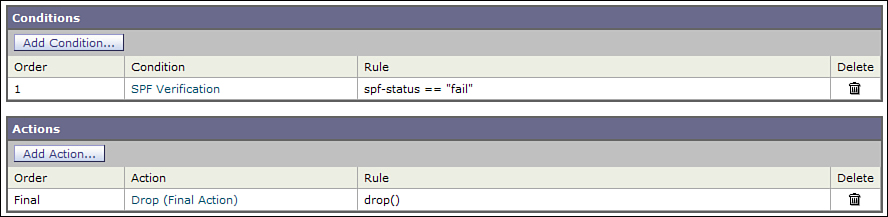
Figure 15-1. SPF Fail Content Filter
Figure 15-2 shows a content filter that quarantines SPF soft-failure verdicts. This is more aggressive and could potentially result in false positives, but it may stop more fraud messages.

Figure 15-2. SPF SoftFail Content Filter
Message Authentication: DKIM
DomainKeys Identified Mail evolved from two similar standards: DomainKeys from Yahoo! and Internet Identified Mail from Cisco. The goal is to provide authentication for individual messages originating from a domain, rather than authentication for the IP source of such messages. To accomplish this, DKIM uses public-key cryptography. The sender hashes the message body and some headers and signs it with the private key known only to the sender. The signature is added to the message in the DKIM-signature header. To verify the message, the recipient performs the same hash with the same data. The recipient must retrieve the sender’s public key via DNS and validates the message signature.
Because it uses public-key technology to sign a hash of message headers and body, the signature also provides proof of nonmodification—that is, a valid signature not only proves the authenticity of the source, it proves that the message hasn’t been modified in transit. DKIM signatures operate on message headers and bodies, and so the signature is expected to be valid even if the message is relayed across multiple MTAs.
Unlike SPF, there’s work involved on the ESA for both DKIM signing and verification.
ESA still supports the earlier Domain Keys specification in addition to DKIM. Because Domain Keys is effectively deprecated, you should prefer DKIM over Domain Keys unless you have a good reason to do so, such as support for a legacy configuration. You can also sign messages with both technologies, but there’s not any good reason to do so.
If you’re planning a new message authentication deployment, the choice is easy: Use DKIM and don’t bother with Domain Keys.
Enabling DKIM Signing on ESA
To start DKIM signing messages on the ESA, you have to perform several steps for every local domain that you want to sign messages for. Luckily, the ESA makes this easy:
1. Create a signing key. Go to the Signing Keys page under the Mail Policies menu and add a signing key. You can either import a key or generate one directly by choosing the key size.
2. Create a domain profile. On the Domain Profiles page under the Mail Policies menu, click the Add Profile button to get started. You need to provide the domain name you’re signing and the signing key. There are many other options here that are discussed later; the defaults are sensible.
3. Generate and publish the DNS TXT record. The ESA generates the appropriate record from the DKIM domain profiles page. For any valid profile, the link labeled Generate gives you the string value that should be published as a DNS TXT record for the appropriate domain. As with SPF, be careful with the size of this record, because some recipients may have problems retrieving DNS records over 512 bytes.
Of course, ensure that the DNS text record is published before signing any messages, or recipients will be unable to verify the validity of signed messages. The ESA even has a test for DKIM profiles that performs the same DNS lookup that recipients will, and you should make sure that this test passes before you start signing messages.
The DKIM-Signature Header
Before I get further into configuration of DKIM signing on the ESA, it makes sense to describe what a DKIM signature is. All the authentication information that DKIM adds is written to a single header in the message called DKIM-Signature. It includes information about the sender, DKIM version, the headers that are hashed and signed, the body length that’s hashed and signed, signature and hash algorithms, and the resulting signature itself.
Here’s an example signature added to a message:
DKIM-Signature: v=1; a=rsa-sha256; c=simple/simple; d=example.com; i=@
example.com; q=dns/txt; s=usermail; t=1322839742; x=1354375742; h=message-
id:from:to:subject:date:mime-version; bh=6Q3o7H71IqtCMyICTU5zF3l4XSUpTvSG6dWMW
D71BSo=; b=lCxegm/RWwetbp3IkHsGU8kw14SDaHkmegCC6GCFaRbkyS4TwIlr2Lapajk1++bzVX9+
pkmdSNwtIsWIFA8eZ5Gf4bWJPsGVQpHkxoUoHhl/qKkuKA/6da8qOAXHeI876oBf+/haZhimQwPEC
3wbdSgj3aRT2fu39pjtLDOFXo8=;
This SMTP header includes the signature and other data in tag=value pairs. The tags contain enough information for the recipient to perform the same hash operation and verify the signature.
This particular signature indicates that it’s signed for the domain example.com, has a selector of “usermail,” and the headers message-id, from, to, subject, date, and mime-version have been included in the hash. It specified DKIM version 1, the only version supported as of this writing, and a signature algorithm of RSA and hash algorithm of 256-bit SHA.
DKIM Selectors and DNS
To validate a received message, the recipient needs three things: the message, the DKIM signature header, and the sending domain’s public DKIM record. The first two—the message and the signature header—should already be present in the email message body. In fact, the trigger for DKIM verification is the presence of the DKIM-signature header itself, so the recipient won’t start verifying unless that header is present. The recipient gets the public DKIM record from DNS by querying for a TXT record for a hostname of the form:
selector._domainkey.example.com
The selector is written into the DKIM signature by the ESA, and it’s one of the options you’re required to specify when creating a DKIM profile. A selector is an arbitrary string label that the recipient will retrieve from the message’s DKIM signature. The recipient uses that string, prepended to the domain’s DKIM namespace, when constructing the hostname for DNS lookup. Essentially, selectors allow you to use multiple DKIM profiles and key pairs for a single domain and specify which one you’re using for that message.
Other DKIM Signing Options
The DKIM-signature header must include enough information for the recipient to look up the sender’s public key, perform the message hash, and make the cryptographic verification, and so the ESA always includes those required pairs in the signature. You can add a number of optional tags to the signature, too. The available optional DKIM tags and their use are described in Table 15-5. ESA, by default, includes i, q, t, and x tags.
Table 15-5. DKIM Signature Tags
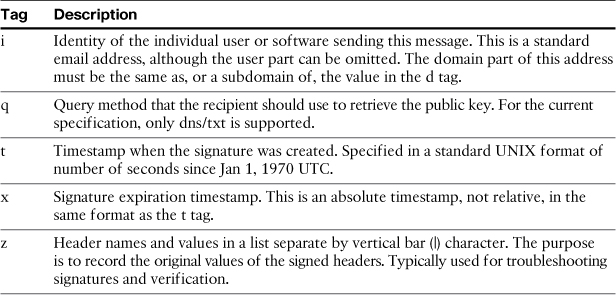
Other tags that you see in the DKIM signature, like v, c, s, h, b, and bh, are not optional and so are always added by the ESA if the message is signed. You do have some control over what is used for some of the tag values in the DKIM profile. Those other options are:
• Canonicalization: Controls how the recipient should treat minor message modifications that some MTAs perform, like combining whitespace or changing capitalization of headers. Simple means that the sender signed the headers as-is without modification. Relaxed means that whitespace has been folded together per the DKIM spec.
• Headers to sign: DKIM hashes and signs the value of a standard set of headers that includes Date, Subject, From, To, Message-ID, and MIME-version. You can add additional headers to sign, but be careful about what headers you choose; you should not pick headers, like Received, that are typically modified by MTAs as a message goes to final delivery. If you sign a header whose value changes, the recipient will reach a DKIM failure verdict.
• Body length to sign: There are three options in the DKIM profile: Whole Body Implied, Whole Body Auto-Determined, or Sign First n Bytes. The first two, obviously, hash the entire message body; the difference is whether or not later additions to the body are tolerated or not. The last option allows you to specify how much of the body to sign. The sensible default is Whole Body Implied, which makes it possible to detect modifications to any part of the message body.
In most environments, the profile defaults are adequate. Signing the entire message body has performance implications, as discussed in the next section.
DKIM Signing Performance
Because of the cryptography involved in signing messages, DKIM affects the performance of the ESA, reducing peak throughput compared to an unburdened configuration. If you’re already doing heavy work on outbound mail traffic, such as antivirus, content filtering, or DLP filtering, the additional overhead for DKIM is lower by comparison, and you likely won’t see any change in CPU utilization or in your peak throughput. Performance in those burdened configurations is dictated by the throughput of the scanning engines, not by DKIM signing.
You can do several things to keep DKIM signing performance high. First, shorter signing keys means higher performance. Shorter keys also mean weaker cryptography but because the purpose of DKIM is sender authentication and message hashing, and not encryption of the contents, shorter keys don’t pose much of a security risk. As of this writing, 768-bit keys are still not trivial to brute force, and obtaining the key only means that the attacker can fraudulently sign messages. Aside from that, it’s simple to generate new key pairs in the unlikely result of a compromised key.
Another way to keep DKIM performance high is to sign less of the message body. To do this, choose the option to sign the first n bytes instead of the “whole body” options, and use an appropriate value. A small value, like 1 K (1024) reduces the performance hit and makes it more predictable. You can even set this to zero, causing the ESA to sign only the headers. The tradeoff of signing only a portion of the message is in detecting message modifications; unhashed portions of the message could be modified after signature without being detectable.
DKIM Verification on ESA
Using the DKIM verification features on ESA is similar to that for SPF: Turn on the DKIM verification tests in the HAT mail flow policies and act on the verdicts in content filters.
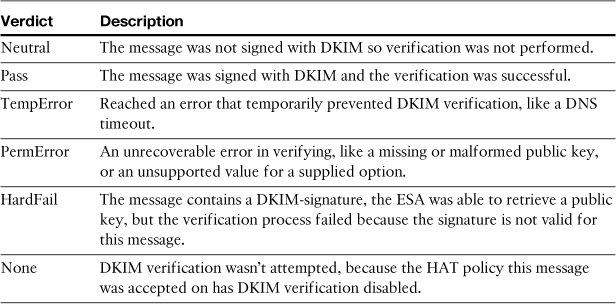
Table 15-6 lists the available verdicts and their descriptions.
DKIM Challenges
DKIM is a sophisticated specification that requires some thought both for signing and verification. Adoption is uneven but slowly growing, with many prominent webmail and broadband service providers supporting verification. There are a couple of known limitations that you should be aware of as you plan to start using it.
DKIM verification at the recipient side is triggered by the presence of the DKIM-signature header, so unsigned messages won’t be verified. This means that although you may sign 100% of your outgoing mail, a fraud perpetrator can send out unsigned messages that won’t go through the DKIM process at all. In other words, there’s no way for you as a sender to tell recipients that all unsigned mail for the domain is fraudulent. An extension to DKIM called Author Domain Signing Practices (ADSP) is a proposal documented in RFC 5617 to allow senders to specify such rules, but as of this writing, it has not been widely adopted. More recently, a draft proposal called Domain-based Message Authentication, Reporting & Conformance (DMARC) has been created with the intention of standardizing how recipients treat both SPF and DKIM authentication and authentication failures.
Updating or changing DKIM signing keys over time can create a situation in verification of older signatures. When you change keys and alter the DNS records, messages signed with older keys can’t be verified any longer. This could create a problem if you “flash cutover” to new keys with the same selector because, for a short period of time, you can have messages in the wild with the old signature but only new keys in DNS. The expiration (x) tag in the signature is designed to provide a time limit on verification. Even if expiration is ignored, it’s extremely unlikely a recipient will be verifying older, stored messages, as there’s no value to doing so. You can avoid this problem by changing keys and selectors so that the older signatures can still be verified. After a short period, certainly within a week, you can retire the old keys and selectors. That allows enough time for any message stuck in queues anywhere to be delivered and verified or dropped.
DKIM and SPF Recommendations
When deciding to go ahead with either one or both authentication standards, the best place to start is examining and documenting your email environment. For SPF especially, you need to know all the valid IP sources of mail for your domain. If you use the recommended “First hop in, last hop out” architecture with the ESAs, preventing any other internal hosts from being an SMTP source, you’re in great shape. Be aware, however, that many organizations use external providers to send mail “on behalf of,” and you may not even be aware of this traffic. It’s easy enough to allow an external sender to use your domain, as long as you know about it. For SPF, your DNS TXT record needs to cover all the valid source hosts. For DKIM, that’s less important because you can use selectors, and not necessarily have to sign all your outgoing mail, but it’s still important to be aware of the valid sources.
For the path authentication standards, SPF enjoys much wider adoption than SIDF. At the time of this writing, it seems unlikely that the SIDF standard will ever reach a critical mass. You should focus solely on SPF instead.
SPF host mechanism rules other than the IP address ranges require the receiver to perform additional DNS queries. In the case of ptr and mx mechanisms, multiple DNS queries are required. Each DNS lookup increases the time and effort for the recipient to validate, and increases the chance of encountering a DNS timeout or lookup error. You should prefer ip4 and ip6 mechanisms as a rule, then, or at least you should order your SPF record to put IP ranges first so that clients can optimize their lookups—remember that, with SPF, first match wins. In other words, this record:
"v=spf1 a mx ip4:192.168.6.0/24 –all"
is slightly better expressed as:
"v=spf1 ip4:192.168.6.0/24 a mx –all"
But even better is eliminating the a and mx mechanisms in favor of IP:
"v=spf1 ip4:192.168.6.0/24 ip4:172.19.0.0/16 –all"
This, of course, may have its drawbacks in terms of maintenance should your IP ranges change.
Signing with DKIM comes with a number of recommendations. First, if you’re signing on multiple ESAs for the same domain and selector, make sure all the outbound gateways have the same signing keys and profile configuration. Create the keys on one and import them into the other. You can use the same key for different profiles, and hence for different domains, but you still need to publish the DNS TXT record once for each selector/domain combination.
DKIM selectors are flexible enough to be used for a variety of purposes. You can create separate selectors for different classes of email: user-to-user versus application generated, for example. You can also use them to sign a portion of traffic, allowing you to adopt DKIM on a step-by-step basis.
Regulatory Compliance
Regulatory compliance that affects IT organizations is a large and involved topic that encompasses many different protocols and processes. Some compliance rules are specified and enforced by private parties or industry groups through contracts and others by public legislation. Some email compliance rules are defined by your own organization. Some are precise in their requirements for prevention and remediation, and some are maddeningly nebulous. Organizations must have a complete strategy for regulatory compliance that involves access control, secure storage, and leak detection. Such a complete strategy is beyond the scope of this book. It would be incorrect to suggest that a single policy engine on the ESA would suddenly make an organization compliant, or even that email should be your sole area of concern. However, the ESA can be a key component in a compliance strategy, because of the prominence of email as a communication medium.
The ESA provides features to help customers meet regulatory compliance and intellectual property protection through the integration of a scanning and policy engine from RSA Data Security. Like other third-party products on the platform, the engine is thoroughly integrated into the ESA pipeline and its configuration is through the familiar ESA WUI and CLI. DLP is a separately licensed feature that requires an active license key.
I examine the DLP policies and features on the appliance later in this chapter. Before that, I want to cover some of the concepts and terms that will be used throughout.
General Concepts
Many different kinds of regulatory and industry compliance operate on common information entities that can be encountered in email messages and their attachments. Some of these are not precisely defined by legislation or industry, while others have specific definitions. The ESA’s DLP policies are specifically designed to search for these entities, using matching rules called classifiers. There are built-in classifiers for a large number of information entities, and you can create your own. Classifiers are grouped together in policies.
The requirements that affect email boil down to two components: identify information that should not be transmitted in email by persons not authorized to do so, and taking action on non-compliant messages to stop their transmission or to make it compliant.
Personally Identifiable Information (PII)
PII is one of the more nebulous terms in regulatory compliance. It can be interpreted as any set of data that can be used to identify a particular individual.
The focus of most PII discussions tends to be identifying numbers: unique identification numbers on government documentation like driver’s licenses, passports, and social insurance cards. In the U.S., the familiar nine-digit Social Security Number (SSN) is of chief concern. But, other data falls into this category: unique patient identifiers in healthcare, banking account numbers, even phone numbers and street addresses. In essence, if I can read an email and identify an individual person from its contents, it contains personally identifiable information. To be personally identifiable, a number must somehow be associated with other data—a passport number by itself doesn’t identify a person, but in conjunction with a personal name, phone number, and a street address, it does.
The ESA’s data classification includes honoring the rules for particular identifying numbers. Passport numbers in most countries have a fixed number of digits. Not all area and group digits in U.S. SSNs are valid. Many ID numbers have a checksum or check digit to confirm their validity.
Payment Card Data
Payment card refers to credit, debit, prepaid, and ATM cards used by consumers and businesses. The data is not necessarily just card numbers, but also related cardholder information.
Protecting this information to reduce fraud is the purpose of the Payment Card Industry Data Security Standard (PCI-DSS), and discussion of payment card data is usually under the context of compliance with this standard. Organizations that store, process, and transmit this data are required to take steps to secure the data. If the path of transmission is the ESA, you can use it to recognize and act on messages that contain payment card information.
Finding payment card numbers in email messages requires more depth than can be accomplished with regular expression searches. Most payment card numbers have a fixed length of digits and may or may not have delimiters, but they also require some additional verification such as a checksum. The ESA DLP features perform the appropriate checksum for all the classifiers it uses, whenever appropriate.
Personal Financial Information
Regulations and legislation focusing on financial transactions define the entities that are used in banking and investment accounts. These identification numbers may have an industry standard format or be dictated by legislation, depending on jurisdiction, or may be defined only by an individual organization. If your organization handles personal financial information specific to your organization, you have to define your own classifiers in addition to the industry-standard ones.
Common entities in this category include American Bankers Association (ABA) routing numbers, used to identify individual banking organizations in the U.S., Society for Worldwide Interbank Financial Telecommunication (SWIFT) codes for similar purpose in other countries, and Committee on Uniform Security Identification Procedures (CUSIP) codes, which identify financial securities in North America.
Mitigation
Most regulations and industry standards have rules for handling sensitive data. Some information cannot be transmitted at all. The ESA allows you to send the message back to the user, notify someone else in the organization, or hold it in quarantine for manual review.
Most regulations allow for the transmission of data between business entities or between business and consumers if that information is encrypted in transit. The ESA allows you to choose encryption actions for DLP violations, namely TLS encryption for SMTP connections and Envelope encryption for message bodies, or both.
Data Loss Prevention (DLP)
The topics of Regulatory Compliance and Data Loss Prevention (DLP) often go hand-in-hand, but your organization may have the need to examine email messages for reasons other than compliance. DLP is often used to enforce business confidentiality and protect intellectual property. Sometimes, DLP is as simple as enforcing encryption or preventing email traffic between certain individuals.
The ESA’s DLP technology is licensed from RSA, the security division of EMC, a recognized leader in the market. The RSA DLP engine provides both the scanning technology that examines the messages, and the predefined matching rules and policies that define violations. You can use the built-in policies with or without customizations, or you can build your own custom policies that make use of the predefined data entities that RSA defines.
As a strategy, DLP excels at helping organizations discover business processes that routinely violate regulations or company policy. For example, DLP can easily detect an ecommerce application that sends automated receipts to purchasers that includes their payment card information. It can uncover users that are mishandling data due to lack of training or simple carelessness. It’s less suited to discover deliberate information breaches by determined individuals, but it can still trip up users’ intent on distributing sensitive data.
Enabling Data Loss Prevention Policies
Creating and applying DLP policies to email messages requires the same steps that the other ESA filtering engines require:
1. Enable DLP globally: The engine and global options are controlled on the RSA Email DLP page of the Security Service menu. You must have a valid license key to enable the engine.
2. Add and customize DLP policies: The RSA Email DLP engine ships with more than 100 predefined policies for regulatory and industry compliance, and you can create your own custom policies. This “library” of policies can be managed in the DLP Policy Manager page of the Mail Policies menu.
3. Apply one or more DLP policies to the outgoing mail policies: DLP policies aren’t active until you add them to one or more of your outgoing mail policies, just as you do with content filters. By tying policies to LDAP in outgoing mail policies, you can achieve per-user or per-group DLP.
Note that DLP is only part of the outgoing mail policies as of AsyncOS 7.5 and can only be applied to outgoing mail.
Adding a DLP Policy
All DLP policies start by clicking the Add DLP Policy... button in the WUI DLP Policy Manager page on the Mail Policies Menu. All new policies start from one of the predefined templates. If you want to start from scratch with a blank policy, choose Custom Policy at the bottom of the list. Custom policies are targeted for users who know the kind of data they’re searching for.
How should you choose which of the other policy templates to start from? If you’re configuring the ESA because of a particular regulation or industry security standard, clearly you should start with the relevant predefined template. Even if you’re not subject to a particular regulation, or in a jurisdiction not governed by specific rules, these policies cover common data entities and make a good start. For jurisdictions and industries that haven’t yet adopted such rules, it’s likely that when they do, they will follow the established pattern of existing regulations. If you have a general need to identify a particular entity—like U.S. SSNs or credit card numbers—independent of any particular regulation, start with one of the policies in the Privacy Protection category. As a last resort, if you need to match multiple IDs, or data that’s not otherwise covered, or if you want the most flexibility in tuning, choose the Custom Policy option.
Once you choose a policy template, the customization and actions page comes up. At a minimum, you must define the action to take on critical violations to submit the page, although you can simply accept the default action of Deliver, which records the violation but does not act on the messages.
Taking Action on Matching Messages
The policy actions for messages that trigger a match are grouped under the heading Severity Settings in the WUI page for each policy. This marks a major difference between DLP and ESA content filters: A DLP policy match always includes a severity score that represents the likelihood that this message violates the rules. The severity takes into account the type of content that matches as well as the number of matches. A standalone nine-digit number may receive a low severity score in a HIPAA policy, while a list of U.S. SSNs and street addresses receive a higher severity. Some individual entities score a higher severity than others: An individual credit card number might score 10 points while an expiration date only scores 2.
After the message is examined by a policy, its total numeric score is compared against the severity scale for that policy to determine the severity category. Each category then defines an action that can be taken on the messages. The severity categories are critical, high, medium, and low, and the score ranges for each category are set at the bottom of the page. Every severity category “inherits” the action of the category above it, unless you override that inheritance by configuring a different action at other levels. Using this, you can, for example, specify that medium, high, and critical violations be quarantined while low violations be delivered with encryption.
The actions that you can use for DLP violations are similar to those of content filters:
• Deliver: The message continues to delivery, with or without modifications. The match and the severity are recorded for reporting and tracking. You can choose to encrypt the message, either with TLS or envelope encryption.
• Quarantine: This stops processing of the message and sends it to the specified local system quarantine. Administrative users or designated guest accounts can review, release, or delete the message per the available quarantine controls. No access is provided to end users; this option is intended to allow an administrator or policy officer the chance to review a message for violations.
• Drop: The message is immediately discarded. There are no configurable options, but you can use notifications under the advanced options.
In addition to the three basic verdicts, there are three advanced options under each of the main verdicts:
• Modify the message: Change the subject, add a header, or add disclaimer text above or below the message body. Messages using the Drop action cannot be modified.
• Modify the delivery: Alter the destination host or send a blind carbon-copy (BCC) to another email address. If you use BCC, the original message continues delivery to the original recipients. Messages using the Drop action cannot be modified.
• Send a notification: Sends a new message to sender or specified recipients, notifying them of the violation. You can either use the predefined standard notification or create your own in the Text Resources page of the Mail Policies menu. You can also include the original message as an attachment. Notifications are good for training users on appropriate content by sending them their messages back. Notifications can be used in conjunction with the Drop action.
There is an important difference between content filter and DLP actions. When any DLP action is taken because of a match on that policy, the message does not continue to further DLP policies; that is, there can be at most only one matching DLP policy for a given message. Messages are scanned by DLP in a top-down order, but exit that scanning on the first match. For example, suppose a configuration that applies both PCI-DSS and a PII policy, in that order. A message that contains both credit card information and U.S. SSNs will be flagged by the PCI policy and will not be examined by the PII policy, even if your action is set to Deliver.
In the category score ranges, you’ll see a category called Ignore that by default covers score ranges of 0–9. This isn’t really a severity category at all; messages that fall into this score range are not considered a match, do not have any action applied, and continue to the next DLP policy in the list.
Classifiers and Entities
It’s worth reviewing the concept of classifiers before we see examples on how to use them. Classifiers are the bits of logic that attempt to identify a specific piece of data. There are a large number of built-in classifiers supplied with the DLP engine, and you can create your own. The built-in classifiers are each given a fairly self-explanatory name and can be categorized by the methods they use:
• Numeric calculations: These classifiers recognize patterns of digits and can perform an arithmetic operation, like a checksum. The classifier may only define particular ranges of numbers as valid. Payment card numbers, some national identification numbers, health insurance numbers, and bank account numbers are defined in this way.
• Dictionaries: Lists of words, phrases, and regular expressions that define the entity in question. Predefined dictionaries include those for corporate financials, academic degrees, disease and injury terms, and drug and compound names. You can define custom dictionaries to be used exclusively for DLP policies.
• Proximity matches: Multiple simple terms can be considered a match if they occur “close” to each other in the message. For example, the word “expiration” might not trigger a match, but if it’s near the word “card,” the message may refer to the expiration date of a credit card.
• Weighting and scoring: Each individual term or classifier can have a numeric score associated with it, and a total score calculated from all of the terms encountered. The total score is compared to a threshold value to determine a match, in the same way that the ESA weighted dictionaries and thresholds work.
The predefined policies are built by combining one or more of the supplied classifiers, and you can see the classifiers in use by a particular policy in its customization page. For example, the policy for Sarbanes-Oxley (SOX) uses the classifier “Corporate Financials” and PCI-DSS uses “Credit Card Track Data” or “Credit Card Number” classifiers.
Custom Classifiers
You can only create and use your own classifiers by starting with a custom DLP policy. The Settings page for a custom policy allows you to select one or more classifiers to include in the policy. You have access to all the built-in classifiers that RSA provides. In the drop-down box, select either a built-in classifier or Create a Classifier and click the Add... button. Continue to select and add classifiers as needed.
When you add multiple classifiers, you combine them with Boolean operators AND (all classifiers must match) or OR (any classifier can match), with the Boolean NOT available to invert a given classifier. You can use the NOT rule to negate matches in order to reduce false positives.
If you choose the Create a Classifier option, the ESA displays the custom classifier page. To create a custom classifier, you need to give it a name and define the rules for the classifier. You can only use the custom classifier in the DLP policy where you created it. An example of a custom classifier is shown in Figure 15-3.
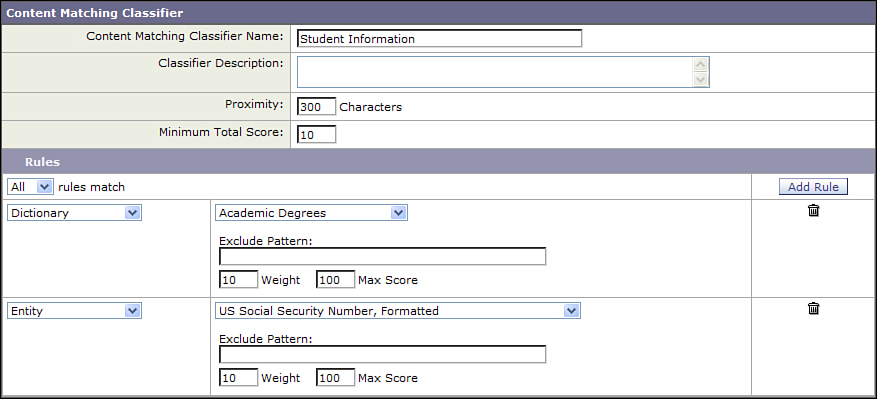
Figure 15-3. Custom Classifier Based on a Predefined Dictionary and Entity
To use a dictionary in a custom classifier, that dictionary needs to exist before you create the classifier. Local custom dictionaries are created in the main page of the DLP policy manager, and not in the ESA dictionaries page. These dictionaries are strictly for DLP use only and aren’t stored or managed like the ones used in content filters.
Let’s look at an example for an organization that needs to protect sensitive payment data when processing orders. We could use the PCI-DSS policy for detecting payment card information, but that policy can’t be customized with specific order-related terms. Starting with a custom policy, we can use the built-in credit card classifiers and combine them with a custom classifier for order information.
Let’s start with that custom classifier for order information. The organization uses a specific alphanumeric format for order numbers, with four digits for the year of the order, a two-letter code for the country the order was placed in, and a 6-digit ID number, all separated with dashes. As an example, the string “2010-AU-001454” might be an order number.
Creating classifiers to match specific data can be more art than science. A regular expression can easily match our order string format, and we can certainly create a classifier that matches just that regex. To avoid false positives, it makes sense to combine that regular expression with words or phrases that tie it to orders. Matching alphanumeric strings in a vacuum without other corroborating data often ends up with too many violations, forcing manual review of messages.
Here are a few recommendations when creating custom classifiers:
• Be as specific as possible: Regular expressions should include length and format qualifiers, if possible. Prefer phrases like “Purchase Order” or “Place an Order” over individual generic words like “order.”
• Don’t reinvent the wheel: Use the built-in classifiers and entities wherever possible. These are tuned from the factory to match without false positives.
• Don’t put too many rules in a single classifier: All the scores from all the rule matches add up to a single total score for the classifier. Lots of rules mean lots of matches, making it difficult to troubleshoot which rules are causing false positives.
In this case, we combine a few phrases with the regex for order numbers. Because the regex for order numbers is specific, it’s weighted at 10, while the phrases have a weight of just 2. We’ll leave the proximity settings to 300 characters.
The final custom classifier rules are shown in Figure 15-4.
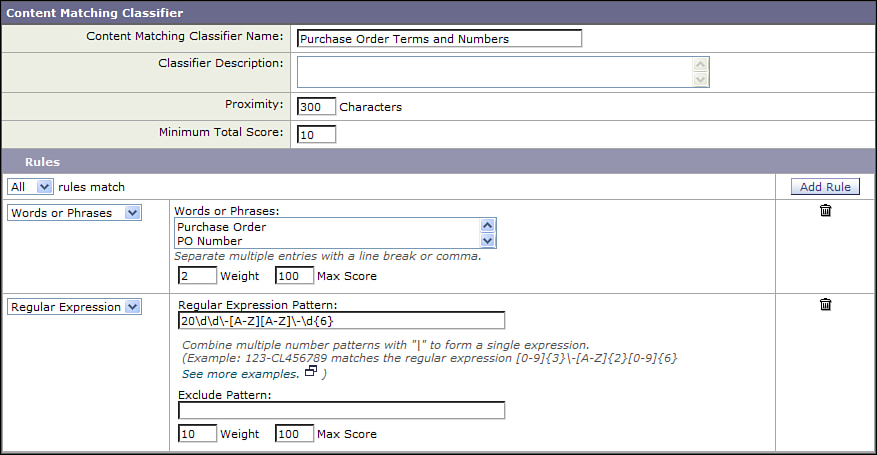
Figure 15-4. Custom Classifier for Order Information
Finally, we’ll add a built-in classifier for credit card numbers to the policy, and require that both match before considering the message to be a violation. Using the built-in classifier for credit cards is preferable because it matches the number pattern and the digit checksum that defines payment card numbers; using a custom regular expression will not compute the checksum.
The final classifier configuration for this policy is shown in Figure 15-5.
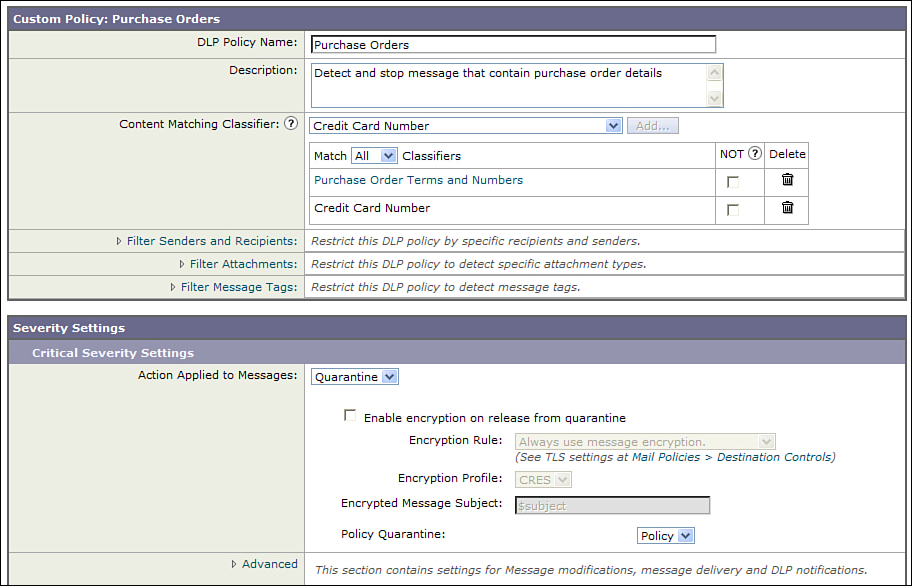
Figure 15-5. Custom Policy for Matching Order-Related Messages with Payment Card Information
The last step is to decide on the action to take for messages that violate the policy. In this case, I chose to quarantine the messages, but any of the actions previously described are available.
Customizing Policies
Some of the built-in policies recommend or require customization of matching rules before you use them, and are marked Customization Recommended. Truly custom policies have no content matching rules at all—you must define them and the combinatorial logic that contributes to a match.
Customizing Content Matching on Predefined Policies
The policies that require or recommend additional matching rules accept regular expression matches. The regular expressions define other identifiers that you want to consider part of a DLP match. For example, in healthcare environments covered by the HIPAA regulation, patients are often identified by a number or string that varies depending on the treatment facility or the patient’s insurer. Because such an identifier is specific to an organization but critical to accurate matches, you must define these or risk a very high number of false positives.
If you want to use your custom classifiers, you must start from a blank Custom Policy. You cannot add built-in or custom classifiers to any of the other standard predefined policies.
Customizing User and Attachment Rules
Every policy allows you to restrict which senders, recipients, and attachment types that it applies to. Sender and recipient restrictions are pretty straightforward: Just add the email addresses to the relevant text box and choose whether it’s an inclusion or exclusion.
For example, if you know that Alice and Bob in Human Resources are authorized to transmit PII outside of your organization, add their email addresses to the sender list and choose Is Not from the drop-down. You’re restricted to full or partial email addresses; LDAP lookups are not supported. Figure 15-6 shows an example.
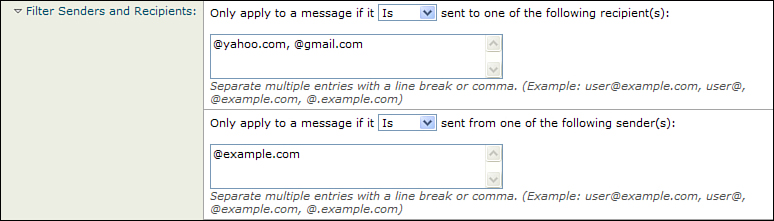
Figure 15-6. Exclusions Based on Sender or Recipient Address
Applying restrictions to senders or recipients in this way somewhat duplicates the capabilities of outgoing mail policies. Normally, if you have a need to apply DLP policies to particular groups of senders and recipients, you would do so by creating an outgoing mail policy with the appropriate membership, and then select the right DLP policies. I prefer this approach because it’s consistent with all the other policy configurations, and it’s easy to see everything in one place on the outgoing mail policies page.
Further, if your DLP policies are tied to LDAP group information, you must use outgoing mail policies to define your group because the DLP sender or recipient restrictions can’t use LDAP lookups.
So, why is this feature here? For cases where you need to apply or exclude a policy based on both sender and recipient. For example, suppose you need to examine all messages coming from your HR department for PII, except when being transmitted to your company’s health insurance provider. You can certainly create an outgoing mail policy for your HR department by tying it to LDAP group membership. To meet the second requirement, you need to use the DLP recipient exclusion for the health insurance company’s email domain.
For attachments, you can specify individual attachment types or categories from a built-in list in the drop-down box. These are file types covered by the ESA’s attachment fingerprinting and can be recognized even if the attachment extension is changed or the file is archived or compressed. For any file types that aren’t defined by fingerprint, you can enter additional file extensions.
The other two options aren’t often called for, but they can be useful in eliminating false positives if the DLP engine is incorrectly classifying some messages. Attachments that don’t meet the minimum size that you enter aren’t examined. The other option excludes encrypted or password protected attachment types.
Figure 15-7 shows an example of attachment exclusions using both built-in and custom defined types.
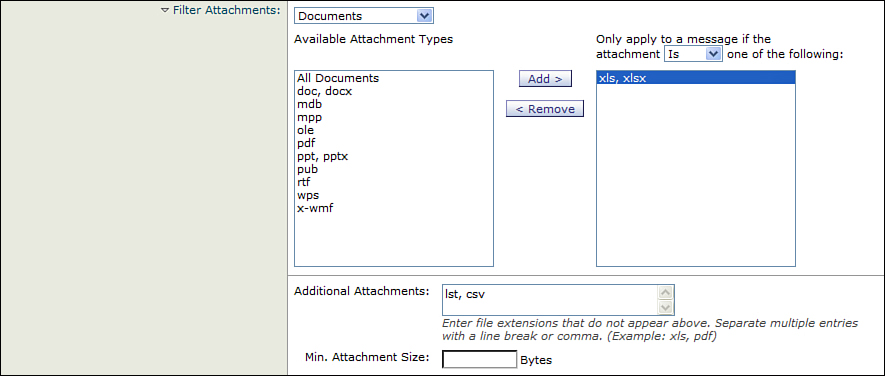
Figure 15-7. Exclusions Based on File Types and Extensions
You cannot restrict attachments by other conditions, like any of their text content, MIME type, or even by complete filenames. For more advanced attachment rules, you may need to use a content filter with your DLP policy, discussed in the next section.
Integration with Content Filters
If the built-in DLP policy restrictions don’t meet all of your filtering requirements on their own, you can use the results of content filters with message tags. A message tag is a markup on the message that can be acted on in DLP policies to include or exclude messages based on the result of a content filter. The markup is internal to the ESA and invisible to the end users; it’s just a variable added to the ESA data structure that stores the message.
Message tags are flexible because content filters are flexible and the Add Message Tag action can be added to any filter. The value for a message tag is an arbitrary string. Once added, you can configure the DLP policy to act on its presence or absence.
Some examples of requirements that can be met with message tags are
• Excluding particular filenames from DLP policies: If your policy is consistently flagging a spreadsheet named PriceQuote.xls or a document named PressRelease.pdf, but it’s clear they don’t violate policy, create a content filter to match the filename and add a message tag.
• Providing a means of bypassing DLP restrictions: If your organization’s rules allow it, a filter can be used to look for text in the message that triggers the bypass. For example, messages that include a text disclaimer from the sender, like “contains confidential account information,” might bypass your policy on disclosing account information.
• Multicondition bypass rules: Because content filters can combine multiple conditions, you can easily bypass DLP for messages with a particular subject and attachment, for example. For example, if your rules allow the message with “Account Statement” and attachment “statement.pdf” to be exempt from confidential information scanning, create a content filter to act on those two conditions and create a message tag.
• LDAP-based lookup: Content filters can use recipient and sender LDAP group checks that aren’t available in DLP. These results can be written into message tags for exclusions from DLP scanning.
• Include or exclude messages based on Subject or other header: If particular subject keywords should be used to force a scan, or skip the scan, you must create a content filter to add a message tag for this. The DLP engine does examine the Subject in making its determination, but only in the larger message context, not as a means of bypassing the policy.
Figure 15-8 shows an example of a content filter using the message tag action.
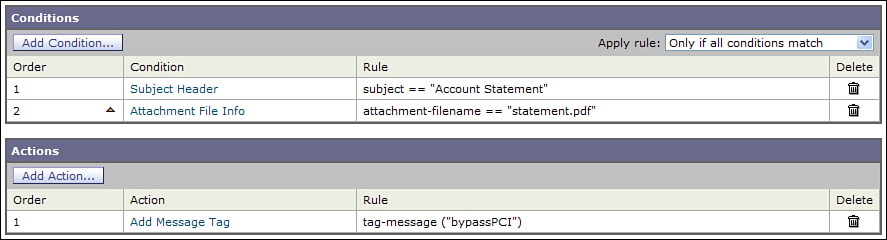
Figure 15-8. Content Filter with Message Tag Action
Summary
Email is one of the oldest protocols on the Internet, but being old doesn’t mean that it can’t learn new tricks. Because of its popularity as a communication medium, it’s popular for fraudulent abusers who stand to gain from exploiting individual’s trust of domains and websites they know. SMTP doesn’t specifically address the authenticity of senders, but recent proposals, like SPF and DKIM, attempt to rectify that. We discussed how SPF and DKIM works, what you need to do to use the standards, and how the ESA fits into an authentication strategy.
Another challenge with email that stems from its ease is that it’s easy to mistakenly or deliberately expose confidential information. Good business practice dictates keeping intellectual property and confidential data from being disclosed. Industry groups have created standards for handling financial information. Legislators and regulators in many jurisdictions have crafted laws to prevent the disclosure of private personal and financial data. This chapter showed how to configure DLP policies on the ESA to detect and act on potential regulatory and disclosure policy violations and how to enforce the use of encryption when sensitive information must be sent outside of your organization.