8. Using Transitions and Animations
Once you have created all the elements of your presentation, you can add motion and visual appeal to your slideshow with slide transitions and animations.
Slide transitions are animated effects that occur when you switch from one slide to another. An object build is an animation that occurs within the body of the slide. Some builds involve one or more elements of an object, and you can control how objects arrive on a slide and how they leave. For example, you can have the parts of a graph appear on the screen one at a time (called a chart build), or make text boxes or graphics fly on or off the screen. Text builds animate the way different lines of bulleted text appear on the slide. Table builds let you animate parts of a table onto the screen.
In this chapter, you’ll learn how to apply slide transitions and create the different types of object builds.
Applying Slide Transitions
Slide transitions are a good way to add visual interest when you change slides. They also serve as a cue for the audience to reinforce the fact that you’re changing slides; if someone isn’t paying particularly close attention, that flash of motion will often help them refocus on your slideshow.
All slide transitions involve an animated effect where the first, old slide is replaced by the second, new slide. Keynote provides 21 built-in transition styles, plus None.
You apply transitions using the Slide Navigator and the Transitions and Animations button in the toolbar. You can set a transition between any two contiguous slides. Many transitions have options that you can set to adjust the look of the effect. For example, you can set a page flip transition to move from left to right, right to left, top to bottom, or bottom to top. You can also control (to a point) the speed of a transition.
To apply a slide transition:
1. In the Slide Navigator, tap to select the slide you want to apply the transition to.
2. Tap the Transitions and Animation button in the toolbar ![]() .
.

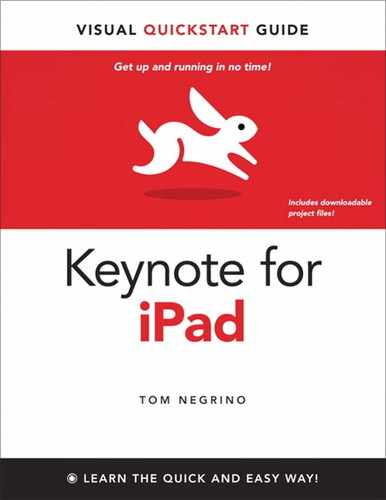
![]() Start applying a slide transition by tapping the Transitions and Animations button in the toolbar.
Start applying a slide transition by tapping the Transitions and Animations button in the toolbar.
Keynote switches to the Transitions and Animation mode, and a button appears next to the slide you selected, showing you the transition assigned to that slide. If no transition has been assigned, the button reads None ![]() .
.
![]() When you’re in Transitions and Animations mode, a button shows in the Slide Navigator telling you what, if any, transition is applied to the selected slide.
When you’re in Transitions and Animations mode, a button shows in the Slide Navigator telling you what, if any, transition is applied to the selected slide.
3. Tap the transitions button.
The Transitions popover appears ![]() .
.
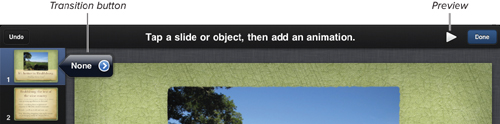
![]() Use the Transitions popover to set the transition effect you want.
Use the Transitions popover to set the transition effect you want.
4. Swipe up or down until you find the transition you want, and then tap it.
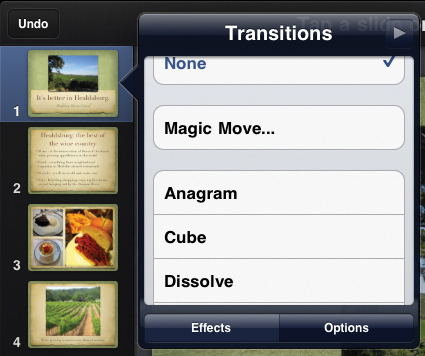
The popover disappears for a moment, Keynote shows a preview of the transition, and then the popover reappears. To see the preview again, tap the Preview button at the top right corner of the Transitions popover ![]() .
.
![]() In Transitions and Animations mode, a yellow triangle on a slide thumbnail indicates that you’ve applied a transition. To repeat the transition, tap the Preview button in the popover.
In Transitions and Animations mode, a yellow triangle on a slide thumbnail indicates that you’ve applied a transition. To repeat the transition, tap the Preview button in the popover.
5. Tap on the slide to make the Transitions popover disappear.
Slides with transitions appear in the Slide Navigator (when you’re in the Transitions and Animation mode) with a small yellow triangle in the lower-right corner, as in ![]() .
.
6. If you want to add more transitions, repeat the preceding steps. To preview the transition, tap the Preview button in the toolbar. To finish and leave the Transitions and Animation mode, tap Done in the upper right corner of the screen.
Tip
You can’t apply a transition to more than one slide in the Slide Navigator at a time. This is such an incredible drawback that I assume that a later version of Keynote will fix it, perhaps by the time you read this. In the meantime, here’s a workaround: you can apply a transition to a particular slide and then duplicate it as many times as you need. Of course, if you change slide layouts, you’ll have to apply the transition again.
Tip
You can use slide transitions to communicate different types of information or to denote sections in your presentation. For example, you can use a transition to signify that you’re moving to an entirely different topic in your presentation. Let’s say that you have a presentation with three distinct sections. You can use no transitions between the slides in each section, and use transitions only between slides at the end of one section and the beginning of the next.
To set a transition’s options:
1. While the Transitions popover is open, tap the Option button. The options for the currently applied transition appear ![]() . Different transitions have different options (for example, the transition shown in
. Different transitions have different options (for example, the transition shown in ![]() has a direction control), so these options will change. All transitions, however, share a set of options:
has a direction control), so these options will change. All transitions, however, share a set of options:
• Duration has a slider that allows you to change the length of the transition from the default one second to five seconds, in quarter-second increments.
• Start Transition has two values. On Tap requires a tap on the screen to trigger the transition, and After Previous Transition proceeds with the transition automatically.
• Delay is a slider that becomes active only when you choose After Previous Transition. It has a half-second default value, and can be increased up to 10 seconds.
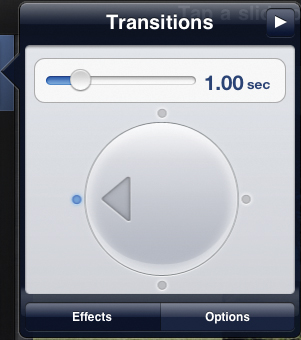
![]() The Options pane of the Transitions popover allows you to set a variety of options, such as the transition direction.
The Options pane of the Transitions popover allows you to set a variety of options, such as the transition direction.
2. When you’re done setting the transition’s options, tap elsewhere on the slide. To finish and leave the Transitions and Animation mode, tap Done in the upper right corner of the screen.
Creating Magic Moves
A Magic Move is a kind of transition that takes one or more common objects from one slide and animates changes to those objects in different sizes, positions, or effects on the next slide. For example, if you have the same image in different positions on adjacent slides, applying a Magic Move transition creates the animation effect of the image moving from its original position to its new position on the second slide.
Begin by preparing a slide with objects you want to move. As part of the transition, you’ll duplicate the slide and then apply the Magic Move transition. Then you can resize, move, or add effects to objects on the original or duplicated slide. When you play the presentation, Keynote creates the required animation.
To create a Magic Move:
1. In the Slide Navigator, tap to select the slide you want to use for the Magic Move.
2. Tap the Transitions and Animation button in the toolbar.
Keynote switches to the Transitions and Animation mode, and the transitions button appears next to the selected slide.
3. Tap the transitions button and then tap Magic Move from the Transitions popover.
Keynote asks you if you want to duplicate the slide ![]() .
.
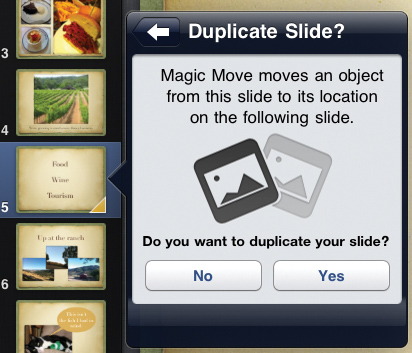
![]() Keynote begins the Magic Move by asking if you want to duplicate the current slide.
Keynote begins the Magic Move by asking if you want to duplicate the current slide.
4. Tap Yes.
Keynote creates the duplicated slide, and switches you to it. Each of the objects on the slide is marked with a star icon, to indicate that it is part of a Magic Move ![]() .
.

![]() Each of the objects (in this case three different text boxes) shows a star icon, indicating that it is part of a Magic Move.
Each of the objects (in this case three different text boxes) shows a star icon, indicating that it is part of a Magic Move.
5. Arrange the objects on the duplicated slide however you’d like them to appear ![]() .
.

![]() During the Magic Move, the text boxes moved into place, and the three pictures flew in from off the slide.
During the Magic Move, the text boxes moved into place, and the three pictures flew in from off the slide.
6. To see the Magic Move in action, tap the Preview button in the toolbar. To finish and leave the Transitions and Animation mode, tap Done in the upper right corner of the screen.
Tip
You can start objects off the screen by pinching in the Slide Canvas to zoom out to 50% view and then move the objects off the slide and onto the Slide Canvas ![]() . When the Magic Move occurs, the objects rush onto the slide.
. When the Magic Move occurs, the objects rush onto the slide.

![]() In this 50% view, you can see how the pictures were positioned off the slide area on the original slide.
In this 50% view, you can see how the pictures were positioned off the slide area on the original slide.
Animating Bulleted Text
Object builds, as noted earlier, animate one or more objects on the slide. When you create a build, you can set the way the object “builds in” (appears on the slide) and “builds out” (leaves the slide).
Probably the most common sort of build you will be doing is with bulleted text, to make each bullet and its associated text appear when you tap the iPad during the presentation. These text builds have a number of options so that you can control how the text appears on the slide. If you want to animate free text boxes, see “Creating Object Builds” later in this chapter.
To apply bulleted text builds:
1. Switch to a slide with bulleted text.
2. Tap the Transitions and Animation button in the toolbar.
Keynote switches to the Transitions and Animation mode.
3. Tap to select the box containing the bulleted text.
Buttons appear next to the object, showing any build effect that’s already been applied to it. Of course, if the text has no build the Build In and Build Out buttons show None ![]() .
.

![]() I haven’t applied any builds yet, so the Build In and Build Out buttons show None.
I haven’t applied any builds yet, so the Build In and Build Out buttons show None.
4. Tap either the Build In or Build Out button.
A popover appears showing the available effects ![]() .
.
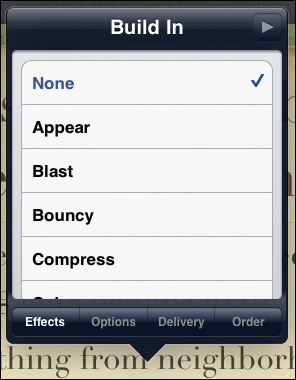
![]() Choose the build effect you want from the popover.
Choose the build effect you want from the popover.
5. Tap the effect that you want.
Keynote shows you a preview of the effect.
6. (Optional) Tap the Options button at the bottom of the popover to adjust the build duration, when the build should start, and the delay (if the build begins automatically).
7. (Optional) Tap the Delivery button at the bottom of the popover to adjust how the build delivers the effect (for bulleted text, typically all at once or one bullet point at a time) ![]() .
.
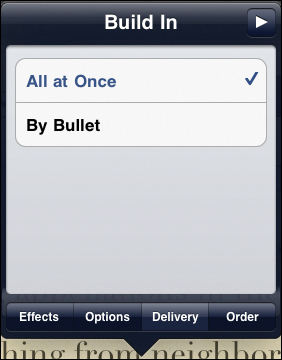
![]() The Delivery pane changes, depending on what sort of object you are building. This is the Delivery pane for a bulleted text box.
The Delivery pane changes, depending on what sort of object you are building. This is the Delivery pane for a bulleted text box.
8. (Optional) Tap the Order button to control the order of multiple object builds. See “Ordering Object Builds” later in this chapter for more information.
Animating Charts and Tables
You can animate Keynote tables and charts so that the parts of the element appear on the screen in sequence. This adds some visual flair to the item, and can even add a touch of drama. Chart builds rank just behind bulleted text builds in usefulness. You can get some dramatic effects when you make the parts of a chart appear sequentially on the screen.
To add a build to a table or chart:
1. Switch to a slide with the table or chart you want to animate.
2. Tap the Transitions and Animation button in the toolbar.
Keynote switches to the Transitions and Animation mode.
3. Tap to select the table or chart.
Buttons appear next to the object, showing any build effect that’s already been applied to it. If the text has no build, the Build In and Build Out buttons show None.
4. Tap either the Build In or Build Out button.
A popover appears showing the available effects ![]() .
.
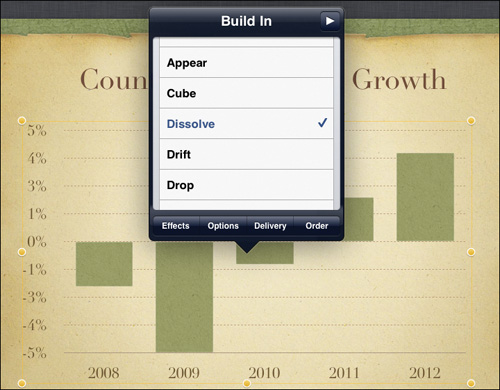
![]() Choose the build effect you want.
Choose the build effect you want.
5. Tap the effect that you want.
Keynote shows you a preview of the effect.
6. (Optional) Tap the Options button at the bottom of the popover to adjust the build duration, when the build should start, and the delay (if the build begins automatically).
7. (Optional) Tap the Delivery button at the bottom of the popover to adjust how the build delivers the effect ![]() .
.
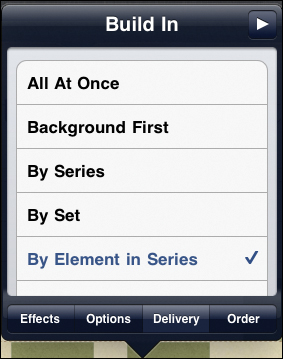
![]() The Delivery pane for chart objects.
The Delivery pane for chart objects.
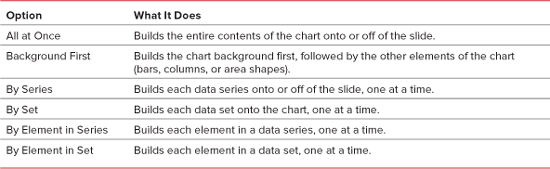
Tables and charts have different delivery options, as described in Table 8.1 and Table 8.2, respectively.
Table 8.1 Table Delivery Options
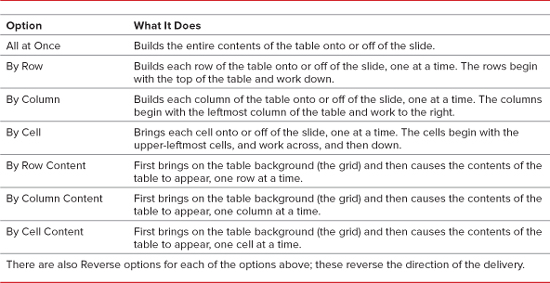
Table 8.2 Chart Delivery Options
8. (Optional) Tap the Order button to control the order of multiple object builds. See “Ordering Object Builds” later in this chapter for more information.
Creating Object Builds
General object builds work much the same way as the previous builds in this chapter. The only difference is that you will be working with any element that you can place on the Slide Canvas, including text boxes, shapes, graphics, or movies. Actually, to Keynote, everything on the Slide Canvas is an object, including bulleted text boxes, tables, and charts, so you can animate almost everything.
When you are animating multiple objects, you can control the order in which those objects appear, and each object can have its own build style, direction, and delivery options. So you can, for example, have a slide with bulleted text that moves in from the left side, a graphic that slides in on the right side, and a title box that drops in from the top ![]() . You can set the order in which objects appear on the screen, and for each object, you can choose to have it appear after you tap the slide, with the prior object, or after the prior object.
. You can set the order in which objects appear on the screen, and for each object, you can choose to have it appear after you tap the slide, with the prior object, or after the prior object.

![]() This slide has multiple object builds. The title box animates in from the top of the slide, and the bulleted text box and the picture move in from the left and right side of the slide, respectively. Yes, that would be tasteless in a real presentation; it’s only an example.
This slide has multiple object builds. The title box animates in from the top of the slide, and the bulleted text box and the picture move in from the left and right side of the slide, respectively. Yes, that would be tasteless in a real presentation; it’s only an example.
1. Switch to a slide you want to animate.
2. Tap the Transitions and Animation button in the toolbar.
Keynote switches to the Transitions and Animation mode.
3. Tap to select the first object you want to animate.
Build In and Build Out buttons appear next to the object.
4. Tap the Build In button, and then, from the Effect pane of the popover, choose the type of animation you want.
5. (Optional) Tap the Options button at the bottom of the popover to adjust the build duration, direction, when the build should start, and the delay (if the build begins automatically).
6. (Optional) Tap the Delivery button at the bottom of the popover to adjust how the build delivers the effect.
7. Select the next object you want to animate, and repeat steps 4 through 6.
8. If you want to create a Build Out, tap the Build Out button and then repeat steps 4 through 7.
Ordering Object Builds
You can control the order in which objects build on or off the slide by selecting each object in Transitions and Animations mode and then working with the Options and Order panes in the Build In and Build Out popovers. Every time you create a different object build, Keynote assigns a number to the object ![]() . Keynote automatically prevents two objects from having the same order number.
. Keynote automatically prevents two objects from having the same order number.
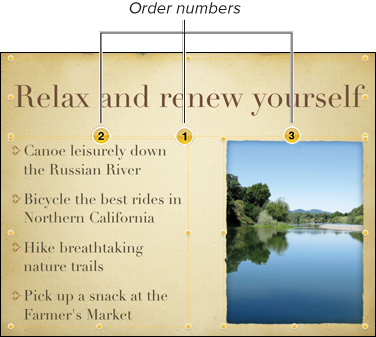
![]() You can tell which order objects will build by their order numbers.
You can tell which order objects will build by their order numbers.
You can see the order list in the Order pane of the Build In and Build Out popovers. You can use this list to reorder the build order for objects. Using the Options pane, you can change when a build triggers, and the length of time between automatic builds.
To reorder object builds:
1. In the Slide Navigator, switch to a slide that has multiple object builds.
2. Tap the Transitions and Animation button in the toolbar.
3. Tap one of the objects on the slide that has a build ![]() and then tap either the Build In or Build Out button (depending on which you want to reorder).
and then tap either the Build In or Build Out button (depending on which you want to reorder).
The Build In or Build Out popover appears.
4. Tap the Order button.
The Build Order pane appears ![]() . Each object with a build shows in the list, with its order number.
. Each object with a build shows in the list, with its order number.

![]() Drag a Move button to move a build up or down in the list.
Drag a Move button to move a build up or down in the list.
5. Touch and drag the Move button for the objects you want to reorder.
Changing an object’s order automatically changes its number.
To control when an object animates:
1. In the Build In or Build Out popover, tap the Option button.
The Options pane appears ![]() .
.
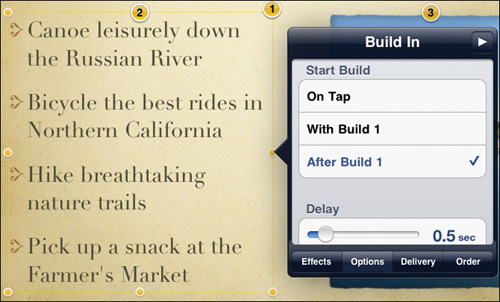
![]() You can use the Start Build section to decide when a build triggers.
You can use the Start Build section to decide when a build triggers.
2. In the Start Build section, choose one of the following:
• On Tap begins the build when you tap on the slide.
• After Transition only appears on the first item in the build order. It triggers the build after a slide appears, and after the amount of time in the Delay field at the bottom of the Options pane.
• With Build n starts the build at the same time as the previous build in the list, and after the amount of time in the Delay field.
• After Build n starts the build after the previous build, which is denoted by n, and after the amount of time in the Delay field.
To control the length of time between builds:
In the Options pane of the Build In or Build Out popover, drag the slider in the Delay section ![]() .
.