An Introduction to iCloud
At the same time Apple released its iOS 5 operating system for the iPhone, iPad, and iPod touch, it also released a new online-based file-sharing service called iCloud that was designed to be fully integrated with all iOS devices as well as Mac computers and even Windows-based PCs to some extent.
iCloud replaces Apple’s MobileMe service. In addition to offering a cloud-based file-sharing system for your iPhone, it offers a wide range of additional features and functions.
When you upgrade to iOS 5 or purchase a new iPhone with iOS 5 (or later) already installed, you are invited to create a free iCloud account using your existing Apple ID and another email address.
The free iCloud account you create includes 5GB of online storage space, plus enough additional online storage space to store all your iTunes Store, App Store, iBookstore, and Newsstand purchases (including all content you’ve purchased in the past, including music, apps, TV show episodes, movies, music videos, eBooks, audiobooks, ringtones, and so on).
Your iCloud account also includes its own email address and offers a wide range of functionality that works seamlessly with your iPhone.
Apple has gone to great lengths to offer complete integration between your iPhone and iCloud to make the iCloud service highly functional but easy to use. In fact, after you initially set up the various features and functions of iCloud to work with your iPhone, much of the functionality happens automatically in the background. Thus, you do not need to remember to manually upload or transfer files from your iPhone to iCloud or download needed data, files, documents, or content from iCloud. What you need becomes automatically available to you on your iPhone as well as your computer(s) and other iOS device(s).
Plus, the majority of iCloud services are offered free. That being said, you do have other options when it comes to using cloud-based file-sharing services. There are also other online-based music stores and bookstores, for example, from which you can purchase or acquire content for your iPhone.
 TELL ME MORE Media 4.1—Using Dropbox Instead of iCloud
Access this audio file through your registered Web edition at my.safaribooksonline.com/9780132954310/media.
Discover What Apple’s iCloud Service Is All About
Apple’s iCloud is first and foremost a free, online-based file-sharing service that allows you to link (via the Internet) your desktop computer, laptop computer, iPhone, iPad, iPod touch, and/or Apple TV so that you can share files, documents, data, and content easily, and in many cases automatically, between computers and iOS devices linked to the same iCloud account.
When you first set up a new iPhone or upgrade to iOS 5, you have the opportunity to create a free iCloud account using your Apple ID and password (or any other pre-existing email address you provide).
At any time, you can set up a free iCloud account by launching the Settings app and tapping the iCloud option. When the iCloud menu screen appears within Settings, tap the Account option displayed at the top of the screen. The process for setting up an iCloud account takes about one minute.
Beyond just being a file-sharing service, iCloud was designed with specialized functionality for iPhones and other Apple computers and iOS devices. This section outlines many of the features iCloud offers to iPhone users.
Sharing Purchased Content
Any content you purchase from the iTunes Store, App Store, iBookstore, or Newsstand (which are all services also owned and operated by Apple) now automatically gets saved to your iCloud account, in addition to being downloaded to the computer or device that the content was purchased using. This also includes all past purchases.
In this case, “content” refers to music, TV show episodes, movies, music videos, apps, eBooks, audiobooks, and so on, that are purchased and/or acquired from Apple’s iTunes Store, App Store, iBookstore, or Newsstand, not from competing online-based services, or that you rip from your own CDs or DVDs.
As soon as you purchase a new song from the iTunes Store, for example, because it gets stored within your iCloud account, it immediately becomes accessible to all your computers and iOS devices linked to your iCloud account.
As a result, the new music purchase you acquired on your iPhone is available for you to enjoy on your iPad, iPod touch, Apple TV, desktop computer(s), and laptop computer(s) without your having to repurchase that song.
The ability to share content between computers and devices via iCloud works with any type of content purchased from the iTunes Store, App Store, iBookstore, or Newsstand. Plus, the online storage space within your iCloud account that’s needed for this content is provided free. It does not tap into your allocated 5GB of online storage space that initially comes with each iCloud account.
Apps for your iPhone purchased from the App Store can be shared with your iPad or iPod touch via iCloud without your having to purchase multiple copies of the same app.
Sharing works between an iPhone and iPad, however, only if you purchase iPhone-specific or Hybrid apps. Remember, an iPad-specific app does not work on an iPhone.
Sharing Photos Using iCloud’s Photo Stream
Another feature of iCloud is that you can create a Photo Stream, which allows you to automatically share up to 1,000 digital photos between your iPhone and all your other computers and iOS devices linked to your iCloud account.
This number includes photos you take using your iPhone’s built-in cameras, as well as digital images acquired from other sources or imported into your iPhone from a digital camera, for example.
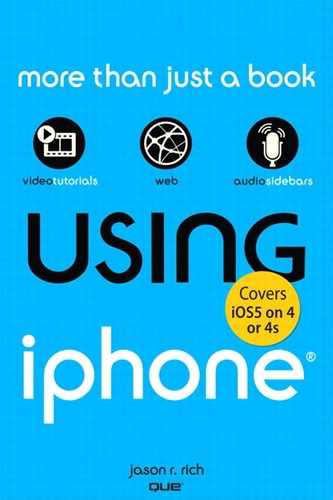
When Photo Stream is active on your iPhone, within the Photos app, you see an Album labeled Photo Stream (as shown in Figure 4.1) listed on the Albums screen.
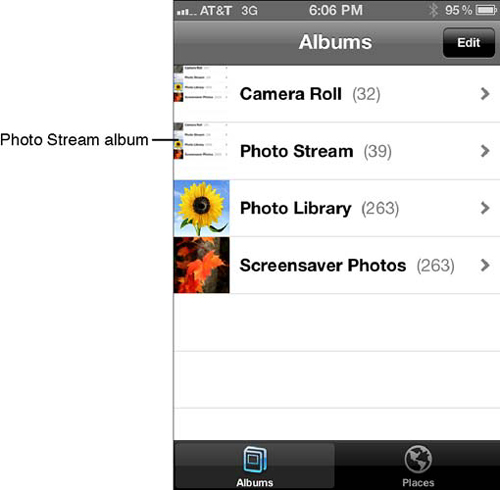
Figure 4.1 When Photo Stream is active on your iPhone, you can access up to 1,000 images. This number includes images taken using your iPhone as well as images from your other computer(s) and iOS devices.
To use the Photo Stream feature, your iPhone must have access to a Wi-Fi Internet connection. It does not work with a 3G connection.
The images stored in your Photo Stream include the most recently shot or acquired images, which are stored for up to 30 days on the iCloud service.
All digital images that become part of your Photo Stream are automatically uploaded to iCloud and then downloaded and permanently saved on your desktop computer (using the iTunes software). Plus, you have the option to pick and choose your favorite shots from your Photo Stream and also save them to your iPhone (or other iOS device, where they will remain until you manually delete them).
On a Mac, you can manage your digital photo library, as well as edit, print and share photos, using the iPhoto ’11 (or later) software, which is part of Apple’s iLife suite. iPhoto ’11 (version 9.2.1 or later) offers iCloud Photo Stream compatibility when used with Mac OS X Lion.
After saving an image to your Photos app within your iPhone, you can edit, enhance, view, print, and share it within the newly enhanced iOS 5 version of the Photos app. For example, you can email a photo, include it in a text message, or tweet a photo within the Photos app.
![]() To learn more about the iOS 5 edition of the Photos app, see “Taking and Viewing Photos and Videos,” (Chapter 13).
To learn more about the iOS 5 edition of the Photos app, see “Taking and Viewing Photos and Videos,” (Chapter 13).
Either through iCloud or by connecting your iPhone via Wi-Fi to a wireless home network and using iOS 5’s AirPlay feature, you can instantly share digital photos and videos stored on your iPhone with your Apple TV. Then you can view those images on your high-definition television (HDTV) or home entertainment system. Photos can be viewed individually or as part of an animated slide-show you create.
![]() LET ME TRY IT
LET ME TRY IT
Activating the Photo Stream Feature on Your iPhone
To begin using the iCloud Photo Stream feature on your iPhone, after you set up a free iCloud account, follow these steps:
1. Launch the Settings app from the Home screen.
2. From the main Settings menu, tap the iCloud option.
3. Make sure the email address (or Apple ID) listed at the top of the iCloud screen within the Settings app is the correct one used to establish your iCloud account.
4. Scroll down to the Photo Stream option and tap it.
5. When the Photos menu appears within Settings, turn the virtual switch associated with Photo Stream to the on position.
After this setting is turned on, Photo Stream automatically uploads all new photos taken or stored on your iPhone to the iCloud service. From the iCloud service, they automatically get downloaded to all your computers and iOS devices linked to that iCloud account.
Likewise, any images added to your Photo Stream from other computers or iOS devices are automatically displayed within the Photo Stream folder of the Photos app on your iPhone. This process happens in the background and is fully automated as long as your iPhone has access to a Wi-Fi Internet connection.
Saving Photo Stream Images on Your iPhone
As you’re looking at images from your Photo Stream on your iPhone using the Photos app (shown in Figure 4.2), you can store any of them on your iPhone within whichever Album you want. To do this, view your Photo Stream images. As you’re looking at image thumbnails from the Photo Stream screen, tap the Share icon that’s displayed in the upper-right corner of the iPhone’s screen.
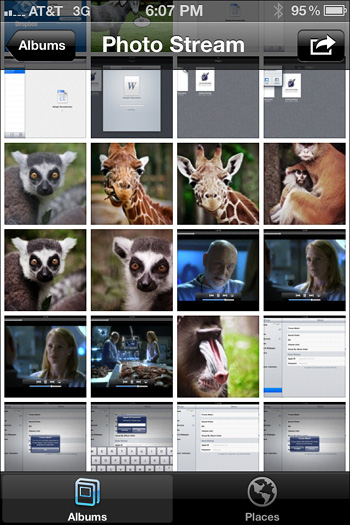
Figure 4.2 Within the Photos app on your iPhone, you can view and save images from your iCloud Photo Stream.
Using your finger, tap the image thumbnails you want to store on your iPhone within the Photos app. A red-and-white check mark appears in the lower-right corner of each image thumbnail you select.
When image thumbnails are selected, at the bottom of the Photo Stream screen within the Photos app, four icons become active (shown in Figure 4.3). They are labeled Share, Copy, Add To, and Save. To save the selected photos on your iPhone, tap the Add To option and choose in which Album within the Photos app you want to store the images. Alternatively, tap Save to store the selected images within the Camera Roll album.

Figure 4.3 Images saved from Photo Stream on your iPhone remain there until you manually delete them. Images within your Photo Stream stay there for up to 30 days and are always stored permanently on your primary computer.
The Share command is used to email, text message, or print the selected images from your Photo Stream, and the Copy command is used to create a duplicate copy of the image (which also gets stored on your iPhone).
Transferring and Syncing Documents and Files
iCloud allows you to easily (often automatically) share documents and files between your iPhone and your other computers and devices. In fact, all the iWork for iOS apps (including Pages, Numbers, and Keynote, which you learn more about in Chapter 15) are now fully integrated with iCloud, so as you create a new document or file, it automatically gets sent to your iCloud account on the Web and is instantly made available to your other computers or devices.
You can begin creating a document using Microsoft Word on your primary computer, upload it to your iCloud account, and then access it using Pages on your iPhone. Or you can create and edit a Numbers spreadsheet file on your iPhone and have it automatically saved to iCloud, where you can access it from your iPad and continue working on it, or upload it to your primary computer, where it can be imported into Microsoft Excel.
There are some compatibility issues between the Microsoft Office software and the iWork for iOS apps. They typically deal with incompatible fonts and formatting. In the case of PowerPoint versus Keynote presentations, slide animations and transitions may have compatibility issues as well. When you transfer documents or files, the iWork for iOS apps will automatically compensate for these issues, but a warning message will be displayed.
If you receive a warning message relating to document or file incompatibility, proofread the document or file carefully, and then manually change the font, formatting, slide animation or slide transition as needed.
You’ll discover that many apps, beyond just the iWork for iOS apps, are or will soon be fully iCloud-compatible, allowing you to easily share data, documents, and files between your iPhone and other computers or iOS devices, as long as they’re connected to the Web.
When an iPhone app such as Pages, Numbers, or Keynote is compatible with iCloud, files are automatically uploaded and downloaded between your phone and iCloud using a 3G or Wi-Fi Internet connection.
 SHOW ME Media 4.2—Customize iCloud from the Settings App
Access this video file through your registered Web edition at my.safaribooksonline.com/9780132954310/media.
![]() LET ME TRY IT
LET ME TRY IT
Turning on App-Specific iCloud Functionality
If you’re using an iPhone app that is iCloud compatible, such as Pages, Numbers, or Keynote, after you initially set up your iCloud account, you need to configure that app to utilize the iCloud service. To do this, follow these steps:
1. Launch the Settings app from the iPhone’s Home screen.
2. From the main Settings menu, scroll down toward the bottom of the screen until you see the section that lists all third-party apps that are installed on your iPhone and have user-adjustable settings.
3. One at a time, tap the listings for iCloud-compatible apps, such as Pages, Numbers, or Keynote (shown in Figure 4.4).
Figure 4.4 From the main Settings menu, choose the apps, such as Pages, that you want to activate the iCloud feature to work with.
4. At the top of the Pages screen within Settings, for example, you see a virtual switch that’s associated with the Use iCloud option. Tap this switch to turn it on (shown in Figure 4.5).
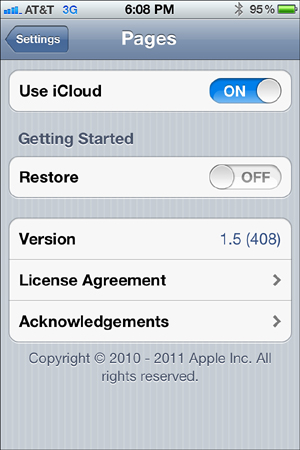
Figure 4.5 Within Settings, you need to turn on the iCloud feature for each compatible app with which you want to use the online service. Shown here is the Pages menu screen within the Settings app.
5. In the upper-left corner of the screen, tap the arrow-shaped Settings icon to return to the main Settings menu.
6. Repeat steps 3, 4, and 5 for each iCloud-compatible app that you want to grant automatic access to the iCloud service.
7. After you turn on iCloud functionality within each app you plan to use with iCloud to automatically share files, documents, and/or data with other computers or iOS devices, return to the main Settings menu and tap the iCloud option.
8. Scroll down on the iCloud screen within Settings to the Documents & Data option. Make sure this feature is turned on. Tap this menu option to reveal the Documents & Data menu within Settings.
9. The Documents & Data menu has two options, each associated with a virtual on/off switch. First, turn on the Documents & Data option. This allows you to transmit app-specific documents and data to iCloud.
10. Next, if you want to be able to use a 3G connection to upload and download documents, files, and data (in addition to a Wi-Fi connection, when available), also turn on the Use Cellular option. Using a 3G connection to upload and download documents, data, and files utilizes some of your monthly wireless data allocation provided by your wireless service provider.
11. Press the Home button to return to the Home screen. You can now launch and use any iCloud-compatible apps, and they are able to upload and download documents, data, and files as needed. After it is initially set up, this becomes a fully automated process that happens in the background.
Synchronizing Purchased Content
Remember, as soon as you set up your iCloud account, all previous and current purchases made using the iTunes Store, App Store, iBookstore, and Newsstand automatically get stored within your iCloud account and become accessible from any computer or device linked to your iCloud account.
Access All Your Music Using iTunes Match
By default, all music you’ve ever purchased from the iTunes Store becomes accessible on all your computers and iOS devices via iCloud. This music can be downloaded from iCloud and saved on your computer or device (so it’s accessible when you are not connected to the Internet).
However, your free iCloud account does not make music from your personal digital music collection available to you via iCloud unless you upgrade to the iTunes Match service for $24.99 per year.
When you upgrade to the premium iTunes Match service from your primary computer that’s running the iTunes software, your entire digital music collection, including songs you’ve recorded yourself, purchased from another online music store (such as the Amazon MP3 Store), or “ripped” from your own audio CDs, also becomes available through your iCloud account and accessible on all your computers and iOS devices.
To learn more about the premium iTunes Match feature, visit www.apple.com/icloud/features. To subscribe to and begin using this feature, you need to purchase and activate it from your primary computer that’s running the latest version of the iTunes software.
![]() LET ME TRY IT
LET ME TRY IT
Turning On iTunes Match Within Your iPhone
After you set up your iCloud account and upgrade to the iTunes Match service from your primary computer, you need to turn on this feature within your iPhone. To do this, follow these steps:
1. Launch the Settings app from the iPhone’s Home screen.
2. From the main Settings menu, tap the Music option.
3. When the Music menu appears within Settings, two menu options, labeled iTunes Match and Show All Music, appear at the top of the screen (shown in Figure 4.6). Tap the virtual on/off switch associated with iTunes Match option and turn it on.
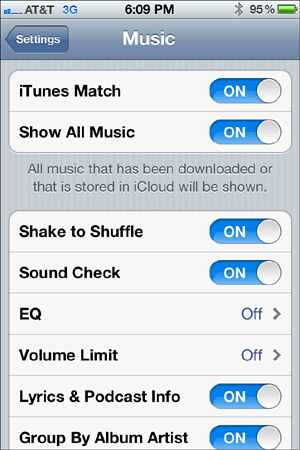
Figure 4.6 After you subscribe to the iTunes Match service, you need to turn on this feature on your iPhone and any other iOS devices you plan to use it with. You do this in the Music menu screen of the Settings app.
4. Tap the virtual switch associated with the Show All Music option and switch it to the on position also. From your iPhone, turning on this option allows you to see all the music stored on your iPhone as well as music accessible from iCloud (that can be streamed or downloaded to your phone).
5. Press the Home button to return to the Home screen.
Create a Backup of Your iPhone Using iCloud Backup
Before iOS 5 was released, if you wanted to maintain a backup of your iPhone, you needed to use the iTunes Sync process. This required you to connect your iPhone to your primary computer using the supplied USB cable and then run the iTunes software on your computer.
Your iPhone’s backup files were stored on your primary computer’s hard drive. Thus, if you ever needed to restore data from the backup files to your iPhone, you had to reconnect the iPhone to your primary computer.
Although the iTunes Sync process is still a viable option for maintaining a backup of your iPhone (which is something I can’t recommend strongly enough), you can now use the iCloud Backup feature.
You might opt to create an iCloud Backup to backup your iPhone wirelessly, and have the backup files stored online, but also maintain a backup on your primary computer. When the iCloud Backup feature is turned on, however, it must be turned off from within the Settings app if you want to create a backup on your primary computer using iTunes Sync or Wireless iTunes Sync.
iCloud Backup allows you to wirelessly create and maintain a complete backup of your iPhone via the Internet. Your iPhone’s backup files get stored on the online-based iCloud server. Thus, you can create, and if necessary, later restore your iPhone from anywhere there’s a Wi-Fi Internet connection.
When you activate the iCloud Backup feature, your iPhone automatically backs itself up once per day. However, you also have the option to manually initiate an iCloud backup anytime.
For the iCloud Backup (or Restore) process to work, however, your iPhone must have access to a Wi-Fi Internet connection and also be plugged into an external power source.
![]() LET ME TRY IT
LET ME TRY IT
Activating the iCloud Backup Feature on Your iPhone
To set up the iCloud Backup feature to automatically work on your iPhone, follow these steps:
1. Launch the Settings app from the iPhone’s Home screen.
2. From the main Settings menu, select the iCloud option.
3. Scroll down toward the bottom of the iCloud menu screen within Settings, and tap the Storage & Backup option (shown in Figure 4.7).
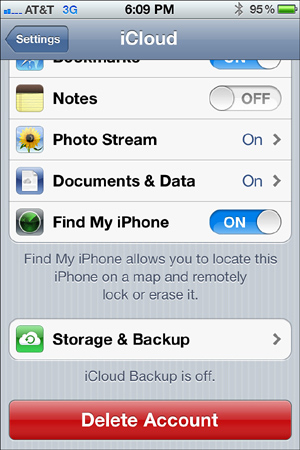
Figure 4.7 To activate iCloud Backup, tap the Storage & Backup option after tapping the iCloud option within the Settings app.
4. When the Storage & Backup menu screen appears, you can see how much of your available 5GB of free online storage space is currently available and how much is being utilized. Near the bottom of this screen, tap the iCloud Backup option, and turn the virtual on/off switch associated with this option to the on position (shown in Figure 4.8).
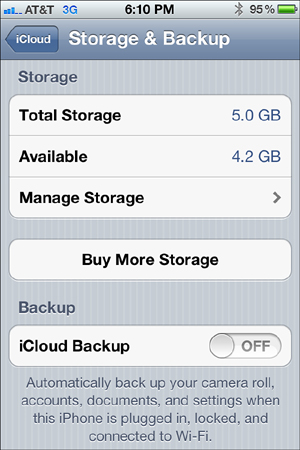
Figure 4.8 From the Storage & Backup screen within Settings, scroll down to the iCloud Backup option and turn it on.
5. As soon as you turn on iCloud Backup, you see this message: Start iCloud Backup: Your iPhone Will No Longer Back Up to Your Computer Automatically When You Sync with iTunes. Tap the OK icon to continue.
6. From this point forward, your iPhone will automatically back itself up to the iCloud service daily, as long as it has access to the Internet via Wi-Fi and is also plugged in to an external power source.
7. Now, at the bottom of the Storage & Backup screen within Settings, you see a new option, labeled Back Up Now. At any time, you can manually create a backup of your iPhone using this feature by tapping this icon. How long the backup process takes depends on how much of your iPhone’s internal storage is being utilized and the speed of your Wi-Fi Internet connection.
8. For your reference, just below the Back Up Now icon, you can see details relating to when the last iCloud Backup process was completed.
The first time you create a backup of your iPhone using the iCloud Backup feature, the process could take an hour or longer. However, when subsequent daily or manual backups are created, the process is much shorter because only new or changed information is backed up.
TELL ME MORE Media 4.3—Using the iCloud Backup Feature
Access this audio file through your registered Web edition at my.safaribooksonline.com/9780132954310/media.
When the iCloud Backup feature is turned on, if you connect your iPhone to your primary computer and attempt an iTunes Sync, this process does not work. If you want to create a backup of your iPhone to be stored on your primary computer using the iTunes Sync or Wireless iTunes Sync process, you must first turn off the iCloud Backup feature within the Settings app on your iPhone.
Whether you use the traditional iTunes Sync process, the new Wireless iTunes Sync process, or the iCloud Backup process, it is extremely important to maintain a current, secure, and reliable backup of your iPhone. Should something go wrong, you can easily restore your iPhone’s content without having to manually reenter any data.
If something goes wrong with your iPhone that requires you to restore data from your backup, you can restore easily using the iCloud Backup feature. When you activate a new iPhone or an iPhone that has been erased, as part of the initial setup procedure (which is outlined in Chapter 1, “What’s New with iOS 5”), you are given the option to restore from an iCloud Backup.
You can restore your existing iPhone or a replacement iPhone. For example, if you lose your iPhone, or it gets stolen, you can purchase a new or used replacement phone and then restore the backup from the previous phone so that the contents and settings of the replacement iPhone become identical to the original.
If you need to replace your iPhone and you’re still within your initial two-year service agreement with your wireless data provider and don’t qualify for a reduced price replacement iPhone, you can purchase a used or refurbished iPhone from a variety of sources, often for much less than the price of a brand-new phone.
Some sources for buying a used or refurbished iPhone include eBay.com, Craigslist.com, UsediPhones.net, Amazon.com, and MacBooty.com. When buying a used iPhone, beware of online scams.
However, if you purchase third-party insurance for your iPhone, from a company such as Worth Ave. Group (www.worthavegroup.com), Square Trade (www.squaretrade.com), or your wireless service provider, you can typically get a replacement phone for a $50 (or less) deductible.
Likewise, if you upgrade your iPhone 4 (running iOS 5) to an iPhone 4S, for example, you can use the Restore from iCloud feature on the new iPhone 4S using your iPhone 4 backup. This way, the new phone gets loaded with all your apps, data, documents, content, and personalized settings right from the start.
Syncing App-Specific Data
From your iPhone, iCloud can also be used to automatically sync contacts, calendar, email, eBook bookmarks and Safari bookmarks, for example, with your primary computer and other iOS devices also linked to your iCloud account.
When this feature is turned on, if you add a new contact entry to the Contacts app (or modify or delete an entry), that update automatically synchronizes with your Contacts database utilized by your primary computer (such as Address Book on a Mac), as well as with the Contacts app running on your iPad or iPod touch, for example.
Likewise, if you update, delete, or add a new contact entry to Address Book on your Mac (or the Contacts app running on your iPad or iPod touch), those changes are automatically and immediately uploaded to iCloud and then downloaded to your iPhone.
As a result, your Contacts database is always up-to-date, regardless of which computer or device you access it from. This feature also works with scheduling data related to the Calendar app.
In addition, you can configure your iPhone to automatically sync your iCloud-specific email account with your other computers and devices as well as your eBook and Safari bookmarks (and Bookmarks Bar).
To configure your iPhone to automatically sync data related to the Mail, Contacts, Calendars, Reminders, Safari (Bookmarks), and Notes apps, turn on these individual features within the iCloud menu screen, within the Settings app (shown in Figure 4.9).
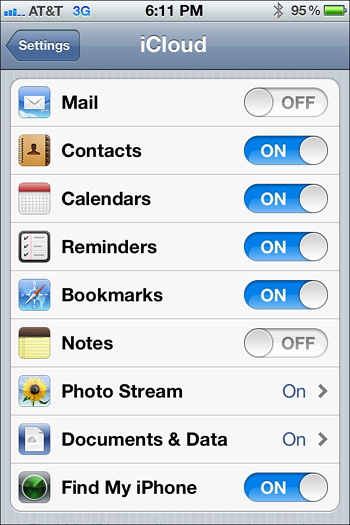
Figure 4.9 Within Settings, tap the iCloud option to reveal this iCloud menu screen. You can now decide which apps you want to keep synchronized via iCloud.
You also need to turn on this feature on your computer(s) and other iOS devices that are linked to your iCloud account and with which you want to sync app-related data.
Using iCloud’s Find My iPhone Feature
The Find My iPhone feature was first introduced in conjunction with Apple’s now-defunct MobileMe online service. It’s now fully integrated with the iCloud service and is free.
If you’re already a member of Apple’s now-defunct MobileMe service, you can transfer your account at no charge and create an iCloud account. You must do this before June 30, 2012, when the MobileMe service will be taken offline forever, and all content, data, photos, and files stored on this service will be deleted.
When your iPhone is turned on and connected to the Internet via a 3G or Wi-Fi connection, the Find My iPhone feature allows you to pinpoint its exact location on a detailed map. You can then have the iPhone emit an audible tone, send a message to your iPhone’s screen, password-protect and lock down your iPhone, or remotely delete all content from your iPhone and erase the device.
Find My iPhone is a useful feature if your iPhone gets lost or stolen. The feature does not work if the phone is turned off or in Airplane mode, and to work, the Find My iPhone feature must be turned on and configured in advance.
Similar functionality is also available using iCloud’s Find My iPad feature. Or if you download the free Find My Friends app, you can track the whereabouts of your friends and family members as well (who also have an iPhone, iPad, or iPod touch).
If you upgrade your iPhone from iOS 4.3.4 (or earlier) to iOS 5, during this upgrade process, you are prompted to set up the Find My iPhone service. However, you can activate it at any time within the Settings app.
To pinpoint the location of your iPhone when it’s turned on and has access to the Internet, using any computer or device that can access the Internet, visit www.iCloud.com/find, and enter your Apple ID and password. The location of your iPhone will be displayed on a detailed map. You can also use the free Find My iPhone app on any iOS device.
The Find My iPhone service works in conjunction with your iCloud account, which is password protected. However, if someone were to obtain your iCloud password, that person could easily access the iCloud website, sign into the service as you, and then track your exact location at any time. If you activate this feature, be extra careful about keeping your iCloud password a secret and consider changing it periodically.
![]() LET ME TRY IT
LET ME TRY IT
Activating the Find My iPhone Feature
Before you can use the Find My iPhone feature to locate the exact location of your iPhone if it gets lost or stolen, you must first activate this feature from your iPhone after you set up an iCloud account.
To set up the Find My iPhone feature, follow these steps:
1. From the Home screen, launch the Settings app.
2. When the main Settings menu appears, tap the iCloud option.
3. From the iCloud menu within Settings, scroll down to the Find My iPhone feature, and tap the virtual on/off switch associated with it. To activate the feature, you should turn on the switch.
![]() LET ME TRY IT
LET ME TRY IT
Using the Find My iPhone Feature to Locate Your iPhone
When the Find My iPhone feature is active, as long as the iPhone is turned on and can connect to the Internet via a 3G or Wi-Fi connection, you can pinpoint its exact location using any computer or device connected to the Internet.
To pinpoint the exact location of your iPhone, follow these steps:
1. From your primary computer, laptop computer, iPad, or any other device that connects to the Internet, point your web browser to www.iCloud.com/find.
2. Log in to your iCloud account, using the Apple ID or email address you associated with the account when you first created it, and then enter your account password.
3. The iCloud website then displays a full-color Google Map and automatically pinpoints the exact location of your iPhone on that map.
4. Click on the blue-and-white “i” icon associated with the location of your iPhone on the map. This reveals a pop-up window, labeled Info, that offers you several options.
5. From the Info pop-up window that appears (shown in Figure 4.10), click the Play Sound or Send Message icon to either have your iPhone emit an audible sound to help you find it or display a text message on the screen that you compose.
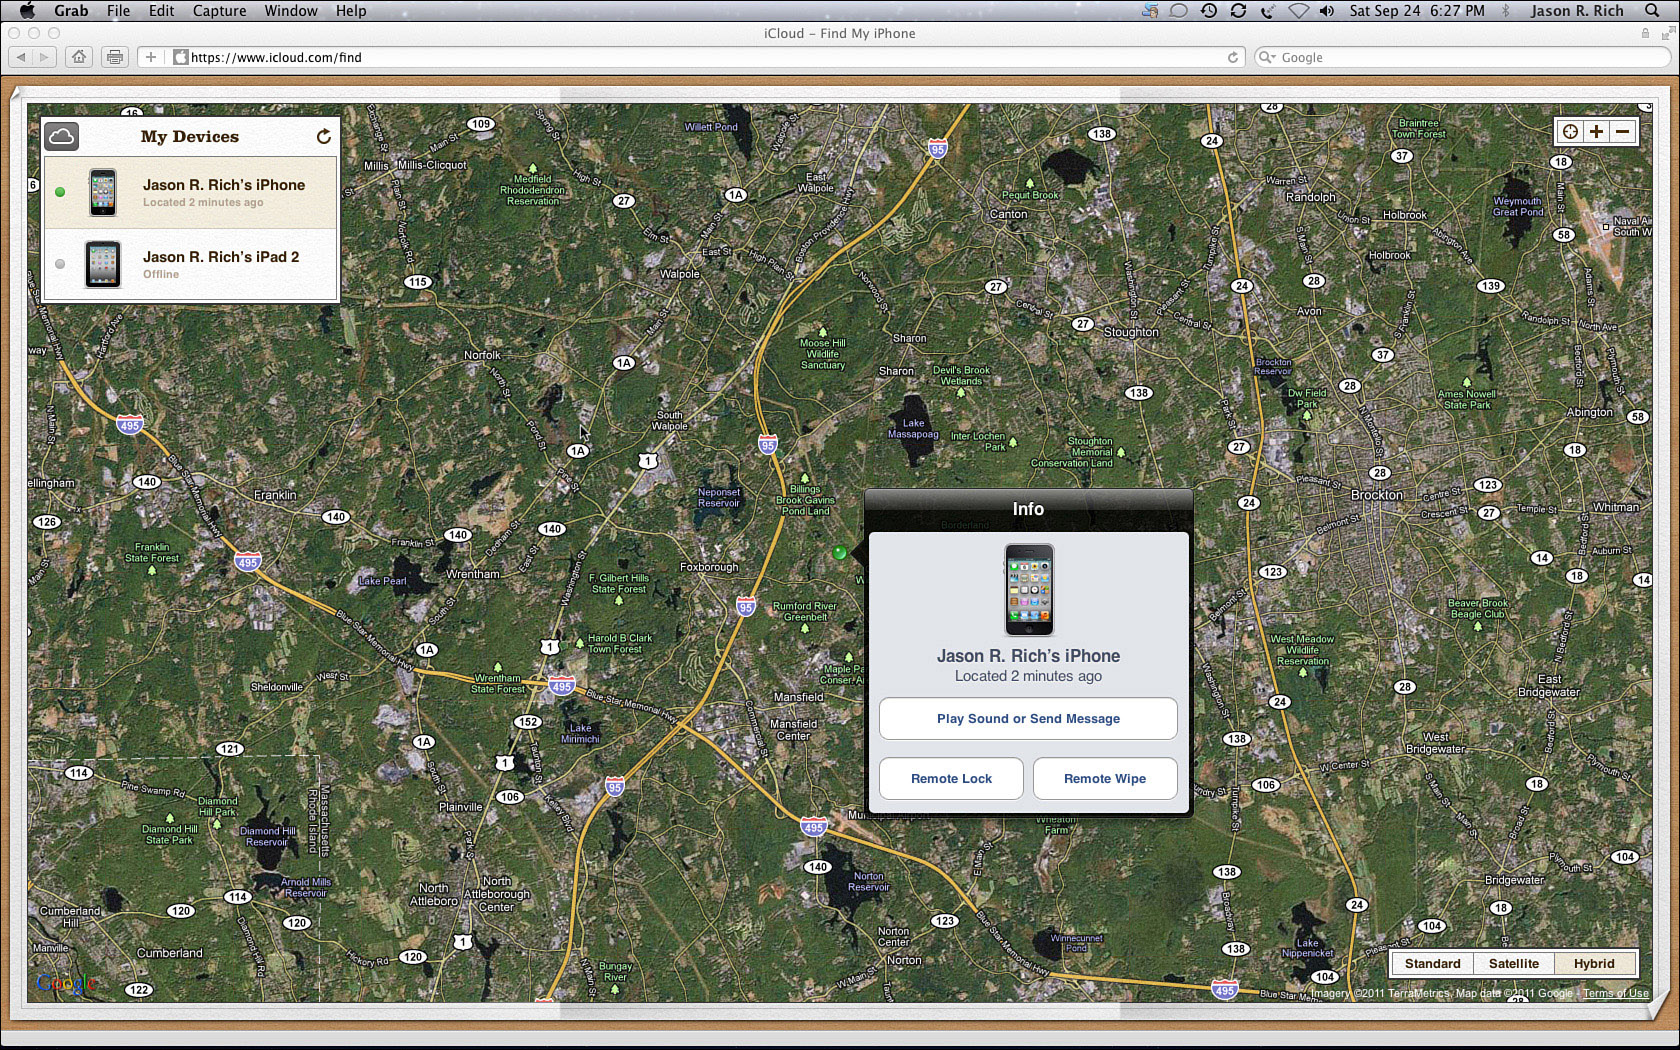
Figure 4.10 After you locate your phone using the Find My iPhone service, you have several options in regard to retrieving or protecting it.
6. Click on the Remote Lock icon to lock down your iPhone using a password that you create and activate remotely to keep your iPhone from being accessed by authorized people.
7. Click on the Remote Wipe icon to remotely erase your entire iPhone. You can later restore your iPhone from a backup after you retrieve it.
Setting Up Your iCloud-Related Email Account
Every iCloud account comes with a free email account, which you can utilize for any purpose. The benefit to using your iCloud email account is that it automatically gets synced with the iCloud service, so you can manage your iCloud-related email account from any computer or iOS device, and it is always up-to-date. If you get a new email message, for example, it shows up on all your computers and iOS devices linked to your iCloud account simultaneously.
Ultimately, from your iPhone, you can manage your iCloud-related email account within the Mail app, just as you would any other pre-existing email account.
The free iCloud-related email account you’re given utilizes the me.com extension. However, you can choose your own custom and unique username, so your email address is [username]@me.com.
If you already have a MobileMe email account from Apple, you can transfer and use it with your iCloud account.
![]() To learn more about using your iCloud-related email account with the Mail app, see “Sending and Receiving Email Messages,” (Chapter 8).
To learn more about using your iCloud-related email account with the Mail app, see “Sending and Receiving Email Messages,” (Chapter 8).
Obtaining Additional Online Storage Space
Every iCloud account comes with 5GB of online storage space, plus all the additional storage space needed to store iTunes Store, App Store, iBookstore, and Newsstand purchases.
If, however, you use iCloud to back up your iPhone; maintain a Photo Stream with 1,000 digital images; and also use it to store, transfer, and synchronize documents, data, and files, that 5GB of online storage could easily get used up. Even more space is needed if you own both an iPhone and an iPad or iPod touch, and also use iCloud with these other devices.
From your iPhone, you can instantly purchase additional online storage space for your iCloud account and begin using it. The annual fee for additional online storage space (above and beyond the initial 5GB) is as follows:
• 10GB: $20 per year (This gives you 15GB of online storage.)
• 20GB: $40 per year (This gives you 25GB of online storage.)
• 50GB: $100 per year (This gives you 55GB of online storage.)
When you purchase additional online storage, the fee automatically gets charged to the credit card you have on file in conjunction with your Apple ID. This becomes an auto-renewing subscription fee that must be canceled manually.
SHOW ME Media 4.4—Upgrading your iCloud Account’s Online Storage Capacity
Access this video file through your registered Web edition at my.safaribooksonline.com/9780132954310/media.
![]() LET ME TRY IT
LET ME TRY IT
Purchasing Additional iCloud Online Storage Space
To purchase and immediately begin using additional iCloud online storage space above and beyond the initial 5GB provided free and the additional free storage space for your iTunes Store, App Store, iBookstore, and Newsstand purchases, follow these steps:
1. Launch the Settings app from the iPhone’s Home screen.
2. From the main Settings menu, tap the iCloud option.
3. When the iCloud menu screen appears within Settings, scroll down and then tap the Storage & Backup option.
4. Displayed in the middle of the Storage & Backup menu screen within Settings is the Buy More Storage option. Tap it.
5. When the Buy More Storage menu screen appears (shown in Figure 4.11), tap the amount of additional online storage space you want to acquire (10GB, 20GB, or 50GB).
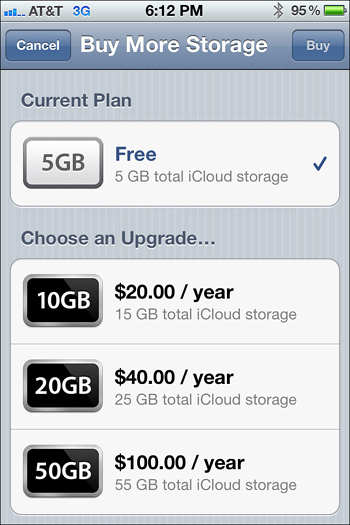
Figure 4.11 From your iPhone, you can decide how much additional online storage space you need and then purchase it instantly.
6. Tap the Buy icon displayed in the upper-right corner of the screen.
7. Just as when making any iTunes Store, App Store, iBookstore, or Newsstand purchase, you are asked to confirm your purchase decision by entering your Apple ID password.
8. When the transaction is approved, your credit card is charged, and the additional online storage space becomes available almost immediately.
9. Press the Home button to return to the iPhone’s Home Screen.
iCloud Continues to Evolve
Apple’s iCloud service is still relatively new and is constantly evolving. As a result, new features and functionality are regularly being added to the service. At the same time, many third-party app developers are hard at work updating their apps to work with iCloud or create new apps that broaden iCloud’s functionality when used with an iPhone.
Before you can begin using iCloud functionality with your favorite apps that didn’t come pre-installed on your iPhone (including third-party apps), you might need to update certain apps so you’re using the latest version that includes iCloud functionality. This is the case with the iWork for iOS apps, for example.
To make sure you’re running the latest versions of your favorite apps (that now offer iCloud integration or compatibility) access the App Store, and tap the Updates icon displayed at the bottom of the screen.
![]() To learn more about updating your iPhone’s apps, see “The App Store, iBookstore, and Newsstand,” (Chapter 15).
To learn more about updating your iPhone’s apps, see “The App Store, iBookstore, and Newsstand,” (Chapter 15).