What’s New with iOS 5
Since it was first introduced in 2007, the iPhone has evolved a lot. The latest iOS 5 operating system for the iPhone 3Gs, iPhone 4, and iPhone 4S offers the most significant advancements yet. This chapter provides an overview of what’s new in iOS 5, plus previews the advancements made to the iPhone 4S.
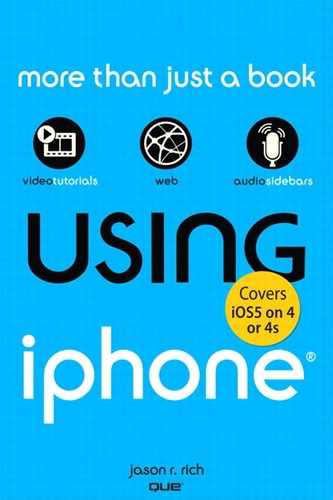
If you’re already an iPhone user who is upgrading your iPhone 3Gs or iPhone 4 to the iOS 5 operating system, you’re in for some pleasant surprises. However, if you’ve opted to upgrade your phone to the iPhone 4S (shown in Figure 1.1), you’re about to discover even more technological advancements and cutting-edge features that are exclusive to this smartphone model.
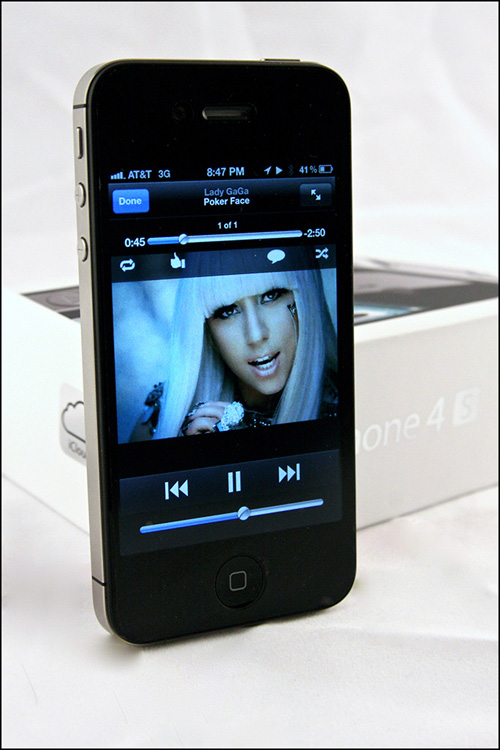
Figure 1.1 The iPhone 4S is the most advanced iPhone yet. It’s faster, more powerful, and more feature-packed than the iPhone 3Gs or iPhone 4.
The iPhone 4S and all new iPhone 3Gs and iPhone 4 phones sold after October 14, 2011, come with iOS 5 pre-installed. When you begin using your new phone, however, you may be prompted to update the operating system on your phone to the latest edition of iOS 5.
iOS 5 Offers New Features, Functions, and Additional Pre-Installed Apps
When you start using iOS 5 on your iPhone, among your immediate discoveries will be a handful of new pre-installed apps, such as Notification Center, Reminders, and Newsstand, plus more than 200 dramatic improvements to the other pre-installed apps you may already be familiar with, such as Phone, Mail, Safari, Contacts, Calendars, Music, Photos, Camera, Maps, iTunes, and Videos.
From the App Store, you also have access to more than 500,000 third-party apps that allow you to fully customize your iPhone’s functionality; plus, you can further personalize your iOS device’s functionality within the Settings app (which you will learn more about shortly).
![]() To learn how to use the new Notification Center app, see “Using Notification Center,” (Chapter 5). To learn more about the Reminders app, see “Using Reminders with iCloud,” (Chapter 11).
To learn how to use the new Notification Center app, see “Using Notification Center,” (Chapter 5). To learn more about the Reminders app, see “Using Reminders with iCloud,” (Chapter 11).
The iPod app that allowed your iPhone to transform itself into a full-featured iPod digital music player in older versions of the iOS has been overhauled. It’s now called Music. As with the other pre-installed apps, you can launch it from your iPhone’s Home screen.
As you begin using iOS 5 on your iPhone, one thing you’ll notice is that many of the pre-installed apps are more fully integrated with each other, making it easier for them to share data. Plus, a growing number of apps are iCloud-compatible, and they integrate with Apple’s new cloud-based file-sharing service.
The iPhone 4S is chock full of useful apps that come pre-installed, including Phone, Mail, Safari, Music, Videos, Photos, Camera, FaceTime, iMessage, Reminders, App Store, iTunes, Compass, Calendar, Game Center, Contacts, Newsstand, Stocks, Weather, Notes, YouTube, Calculator, Notification Center, and Voice Memos.
One key feature that sets the iPhone 4S apart from older iPhone models is that it also offers Siri, which allows you to control the phone and many of its features, functions, and apps using your voice.
Other highly recommended apps that integrate with iOS 5, and that you learn more about shortly, include iBooks, Cards, the official Twitter app, Pages, Numbers, and Keynote.
Thanks to iCloud, it’s never been easier for your iPhone to wirelessly share data, documents, files, apps, and content with other computers and iOS devices linked to the same iCloud account via the Internet.
In many cases, iCloud can be configured to work in the background, so your latest documents, files, and data are available whenever and wherever they’re needed, on whichever computer or device you happen to be using.
iCloud also offers the Find My iPhone and new Find My Friends features. Plus, it allows you to download your iTunes music purchases, regardless of which computer or iOS device you used to purchase that music.
![]() To get the most out of using iCloud, you need to configure its features and functions to work with your iPhone. To learn what iCloud offers and discover how to utilize it, see “An Introduction to iCloud,” (Chapter 4).
To get the most out of using iCloud, you need to configure its features and functions to work with your iPhone. To learn what iCloud offers and discover how to utilize it, see “An Introduction to iCloud,” (Chapter 4).
Discover the New iOS 5 Pre-Installed Apps
Keeping track of vast amounts of information—from phone calls, contacts, and scheduling data to word processing documents, emails, text messages, and spreadsheets—is one of the tasks that your iPhone can do best.
To help you juggle multiple tasks simultaneously, while you’re dealing with deadlines, obligations, to-do lists, and a hectic schedule, many of the apps you’ll soon be using are capable of generating alarms, alerts, or notifications to keep you informed of what requires your immediate attention.
The new Notification Center app that’s fully integrated with iOS 5 is designed to help you manage these alerts, alarms, and notifications in one place. Notification Center runs in the background and continuously monitors all the compatible apps installed on your iOS device. It then displays what’s important to you within the Notification Center window (shown in Figure 1.2).

Figure 1.2 The Notification Center window displays all alerts, alarms, and notifications generated by your various apps in one convenient place.
To access the Notification Center window at any time, regardless of what app or apps are currently running, swipe your finger from the top of the iPhone’s screen in a downward direction. The listings within this window each represent a separate app-specific alarm, alert, or notification. Tap any listing to open the related app and view, utilize, and/or respond to the relevant information.
 SHOW ME Media 1.1—Introduction to Notification Center
Access this video file through your registered Web edition at my.safaribooksonline.com/9780132954310/media.
Meanwhile, the new Reminders app that also comes pre-installed on your iPhone allows you to manage multiple to-do lists simultaneously. You not only can maintain multiple to-do lists using Reminders, but it’s possible to also assign specific alerts and alarms to individual items on each to-do list.
When you have the Location Services feature of your iPhone turned on, you’re able to assign location-based alarms to your to-do list items. This way, when you arrive at a specific location, or you’re about to leave it, alarms can be generated to remind you of tasks associated with to-do list items related to that location. Of course, alarms within Reminders can also be set based on a specific time and date.
Throughout this book, you learn all about the apps that come pre-installed on your iPhone and learn how to use the Multitasking capabilities built into iOS 5 so that you can quickly switch between apps, copy content from one app to another, or perform multiple tasks at once.
Thanks to the new Newsstand app, you can subscribe to and read the digital editions of popular newspapers and magazines right on your iPhone’s screen. You learn more about the Newsstand app (and how it differs from iTunes or the App Store app) in Chapter 15, “The App Store, iBookstore, and Newsstand.”
Getting Started with a New iPhone
As you’re purchasing a new iPhone 3Gs, iPhone 4, or iPhone 4S, you need to choose a wireless service provider and have a phone number assigned to your new phone. You then need to activate the new phone before you can begin using it. Part of this activation process involves setting up a free iCloud account, as well as an Apple ID account (if you don’t already have one). You do not have to set up a free iCloud account; however, iOS 5 offers integrated iCloud functionality, which you’ll probably find very useful.
When you purchase a new iPhone, you can transfer your current cell phone number to the new phone or have your selected wireless service provider assign a new phone number to the phone. Phone numbers can be transferred from one service provider to another, regardless of what cell phone make or model the number was previously assigned to.
If you’re a first-time iPhone user and are not transferring data, apps, and personal settings from an older iPhone model, the activation process can be done wirelessly, as long as you’re within a Wi-Fi hotspot. Otherwise, you need to connect your iPhone to your primary computer using the supplied USB cable and make sure that computer is running the latest version of the iTunes software.
If you’ve purchased other Apple computers or iOS devices in the past, you probably already have an Apple ID set up. This Apple ID is used for a variety of purposes, including to make purchases from the iTunes Store, iBookstore, and Newsstand. It’s also used when setting up a free iCloud, FaceTime, or iMessage account.
If you already have an Apple ID set up, make sure you know the email address and password associated with it.
If you don’t yet have a free Apple ID, you are prompted to create one during the iPhone activation process. You need to link a credit or debit card to your Apple ID account so that online purchases can be paid instantly as you use your iPhone.
If you’re upgrading your existing iPhone 3Gs or iPhone 4 to iOS 5, you need to connect your iPhone to your primary computer via the supplied USB cable and then use the iTunes Sync process to perform the operating system upgrade. Your existing iPhone phone number and service plan stay the same.
If you’re upgrading your iPhone’s hardware from an iPhone 3Gs to iPhone 4, or from an iPhone 4 to an iPhone 4S, for example, use the iTunes sync procedure to first create a backup of your current iPhone before starting the new phone activation process.
To activate a new iPhone and transfer data from an old iPhone to it, or to upgrade your existing phone to iOS 5, you must have the latest version of iTunes (version 10.5 or later) running on your primary computer, and your phone should be connected to your computer via the USB cable that came with your phone.
If you’re using an optional iPhone dock, insert your iPhone into the dock and connect the dock to your primary computer (or a USB hub connected to your primary computer) via the supplied USB cable.
Upgrading Your Existing iPhone to iOS 5
To upgrade an iPhone from an older version of the iOS to iOS 5, you must have your phone connected to your primary computer (via the supplied USB cable) and your computer must have access to the Internet.
After completing the iTunes Sync backup process, click the Summary tab for your iPhone displayed at the top of the iTunes screen (on your primary computer). In the Version box that’s displayed about halfway down the screen, click on the Check for Update icon (shown in Figure 1.3).
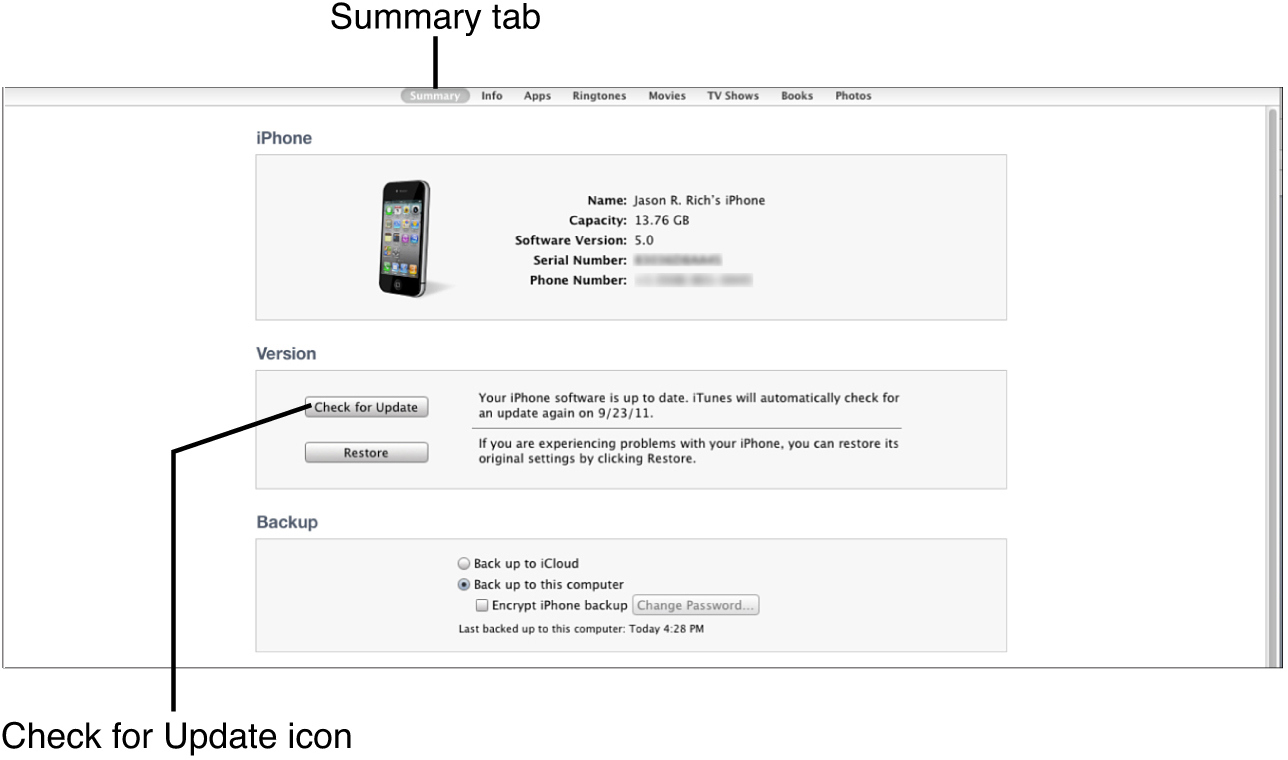
Figure 1.3 Click on the Check for Update icon within iTunes that’s running on your primary computer (while your iPhone is connected to that computer via a USB cable).
On your computer that’s running iTunes, click the Check for Update icon to have iTunes determine whether a newer, more up-to-date version of iOS is available for download and installation on your iPhone.
If your iOS device is running an older version of the operating system, a message appears, stating that you should download and install the latest version of the iOS operating system, which is iOS 5.0 or later.
Follow the onscreen prompts on your primary computer to begin downloading iOS 5. During this procedure, do not touch your iPhone; simply leave it connected to your primary computer. Depending on the speed of your Internet connection, the iOS 5 download process could take awhile, so be patient.
After iOS 5 is downloaded, it is automatically transferred to your iPhone and installed. Again, this process could take up to 30 minutes, so be patient and do not disconnect your phone from the primary computer during this process or attempt to use it.
After iOS 5 is installed, your iPhone resets. At this point, you need to configure iOS 5 on your device. After that, you can restore your saved apps and data.
Configuring iOS 5 on Your iPhone
With iOS 5 installed on your iPhone, you will see the new Welcome screen (shown in Figure 1.4) when the device is turned on for the first time. Plan on spending about 15 minutes configuring the new operating system and then, if applicable, restoring your previously backed-up data, personal settings, and apps.
Figure 1.4 After iOS 5 is installed on your iPhone, and you turn it on for the first time, this Welcome screen appears. You now need to go through the activation procedure.
This part of the process can be done with your device connected to your primary computer using the iTunes sync process, or it can be done wirelessly. Configuring iOS 5 wirelessly on your iPhone requires that the device have access to the Web via a Wi-Fi connection.
From the initial iOS 5 setup screen, move the slider from left to right to proceed to the next Welcome screen, which is animated. From this screen, select a language. English is the default, but Spanish and 19 other options are available.
Tap your selection so that a check mark appears on the screen next to it. Then tap the blue-and-white Next icon displayed in the upper-right corner of the screen.
Next, from the Country or Region screen, select where you’ll be primarily using your iOS device. As shown in Figure 1.5, the default option is United States, but the Show More menu lists virtually every other country on the planet. Tap your selection so that a check mark appears next to it and then tap the Next icon.
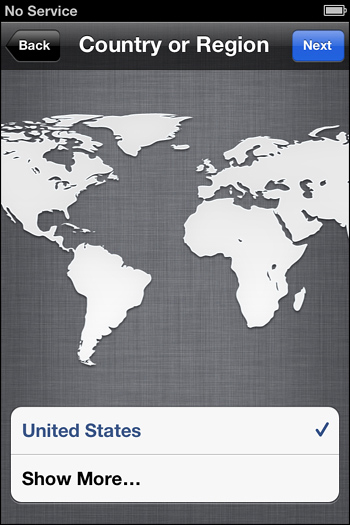
Figure 1.5 Part of the iOS 5 activation process involves selecting your home country.
The Location Services screen appears next. Your iPhone has the capability to pinpoint and track its exact location using GPS, crowd-sourced Wi-Fi hotspots, and cell-tower locations. From this screen, you can turn on this feature or disable it. However, after iOS 5 is operational, you can customize this feature from the Settings app.
For now, tap either the Enable Location Services or Disable Location Services option displayed near the bottom center of the screen. When a check mark appears next to your selection, tap the Next icon.
When the Wi-Fi Networks screen appears (shown in Figure 1.6), under the Choose a Network heading, any available Wi-Fi hotspots are listed.
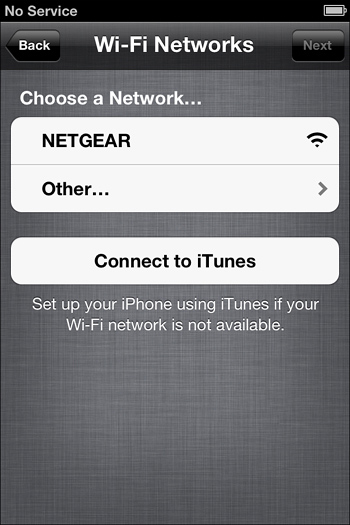
Figure 1.6 If you’re activating a new iPhone that won’t be restored using data from the iTunes Sync backup related to an older phone, you can activate iOS 5 wirelessly if you’re within a Wi-Fi hotspot.
If no Wi-Fi hotspots appear, your device is not able to connect to a Wi-Fi hotspot. To continue, you need to keep your iPhone connected to your primary computer via the supplied USB cable and select the Connect to iTunes option by tapping it.
After selecting an Internet connection method, tap the Next icon. You see the Set Up iPhone screen displayed next. From this screen, choose one of the three options:
• Set Up as New iPhone
• Restore from iCloud Backup
• Restore from iTunes
If you’re setting up a brand-new iPhone, tap the Set Up as New iPhone option. However, if you’re upgrading your existing iPhone, tap and select the Restore from iTunes option to continue. This allows you to restore your data, personalized preferences, cellular phone number, and your apps from a previously created backup.
When you install iOS 5 onto your iPhone, all its current contents are deleted. Unless you have a backup created prior to the install process, your data, files, and content are lost.
In the future, after you set up iOS 5 and an iCloud account, you can restore your device wirelessly from backup data stored on iCloud by selecting the Restore from iCloud Backup option. Or if your backup data is stored on your primary computer, you can restore data wirelessly (or using the supplied USB cable) from your primary computer using iTunes Sync. For now, however, depending on your situation, tap the Set Up as New iPhone or Restore from iTunes option; then tap the Next icon to continue.
Setting Up as New iPhone
If you opted to continue the iOS 5 setup procedure by selecting the Set Up as New iPhone option, the next screen enables you to create an Apple ID account and continue the process using your existing Apple ID and password.
From the Apple ID screen (shown in Figure 1.7), tap either the Sign In with an Apple ID or Create a Free Apple ID option. Or you can tap the Skip This Step option and complete this step later.
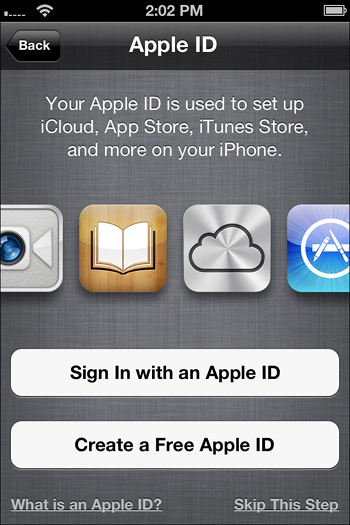
Figure 1.7 When you sign in using your Apple ID, you can then set up or access an iCloud, FaceTime, and/or iMessage account, plus make online purchases from the iTunes Store, App Store, or Newsstand.
Assuming that you have an Apple ID account and password, select the Sign In with an Apple ID option by tapping it. When prompted, enter your Apple ID and corresponding password. Tap the Next icon to continue.
When the Terms and Conditions screen appears, tap the Agree icon displayed in the bottom-right corner of the screen to continue. You are prompted to confirm this decision when a pop-up Terms and Conditions window appears. Once again, tap the Agree icon.
You are now given the opportunity to set up an iCloud account using your Apple ID and password. Near the bottom center of the Set Up iCloud screen (shown in Figure 1.8), you see two options, allowing you to turn on or off iCloud functionality within your iPhone. If you select Use iCloud, your free iCloud account is set up, and your device configures itself to begin using the iCloud service. You can fully customize how your iPhone interacts with iCloud later.
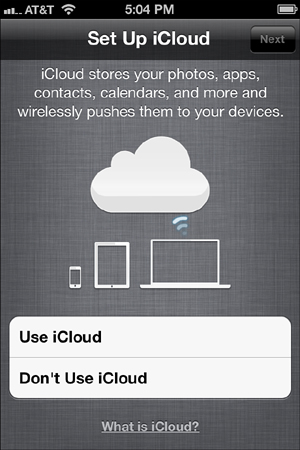
Figure 1.8 You are able to set up the Find My iPhone feature when you first activate iOS 5 and your iCloud account.
If you already have an iCloud account set up, enter the Apple ID and password associated with that iCloud account to link your iPhone to it. For iCloud to sync data and transfer files between your iOS device(s) and computer(s), they all need to be linked to the same iCloud account.
Use iCloud to Create a Remote Back-Up of Your iPhone
Assuming that you have access to a Wi-Fi connection on an ongoing basis, you can configure your iPhone to automatically and wirelessly back itself up once per day and store the backup data on iCloud. During this setup procedure, when the iCloud Backup screen appears, choose to maintain a wireless backup of your mobile device using iCloud, or choose to maintain a backup of your device on your primary computer (using the iTunes sync process).
Again, tap the Next icon when you see the Diagnostics screen. This is the final step in the initial iOS 5 setup process. The Thank You screen appears next. To begin using your iPhone, simply tap the Start Using iPhone icon that appears near the bottom center of this screen.
The default Home screen is now displayed on your iPhone (shown in Figure 1.9). It operates using iOS 5 and is ready for you to use. Notice the app icons for all the new iOS 5 apps, such as Reminders and Newsstand, plus a new look for the Music app. Use your finger to scroll to the secondary Home Screen to view all the pre-installed apps.

Figure 1.9 The default Home screen on your iPhone looks like this when you first start using iOS 5.
![]() To learn how to customize the appearance of your iPhone’s Home screen, see “Customizing Your iPhone,” (Chapter 5).
To learn how to customize the appearance of your iPhone’s Home screen, see “Customizing Your iPhone,” (Chapter 5).
At this point, iOS 5 is running on your iPhone, but your data, apps, and settings have not yet been restored to the device from a previously created backup, if applicable.
How to Restore from iTunes
If you’re upgrading your iPhone from iOS 4.3.4 (or earlier) to iOS 5, and previously created a backup with your device before starting the iOS 5 installation procedure, you can continue the iOS 5 installation process and restore all your data, personal settings, cell phone number/Internet account information, and apps by selecting the Restore from iTunes option during this part of the iOS 5 setup procedure.
This capability also applies when you’re upgrading your iPhone hardware, if you want to install your iPhone 3Gs or iPhone 4’s data, personalized settings, content, and apps onto your new iPhone 4S, for example.
If you previously selected the Restore from iTunes option, with your iPhone still connected to your primary computer via the USB cable, after iOS 5 is installed and activated, your backup data, apps, and preferences are restored. When the process is complete, you are ready to use your iPhone, which then runs iOS 5.
Depending on how much data, how many apps, and what content need to be restored to your iPhone from a previously created backup, the process of finalizing the iOS 5 install and then restoring your content could take up to 30 minutes, so be patient.
Choosing the Right Service Plan
Before you begin using your new iPhone, you need to activate a wireless service plan from a wireless service provider that supports the iPhone in your home country. Unless you’ve purchased an unlocked and contract-free version of the iPhone, this typically requires you to sign a two-year service agreement.
If you’re upgrading to a new iPhone model, you have the option to keep your old service plan or modify the plan, based on your needs. However, if you’re simply upgrading your existing iPhone to iOS 5, no changes need to be made to your wireless service account.
Every iPhone service plan has three components: voice, data, and text messaging. Each wireless service provider offers several different service plans to choose from. So, first you need to choose a wireless service provider and then select a service plan that best fits your needs and budget.
 TELL ME MORE Media 1.2—Choosing a Wireless Service Provider
Access this audio file through your registered Web edition at my.safaribooksonline.com/9780132954310/media.
After you sign a contract with a wireless service provider, you need to keep your iPhone activated with that company for two years; otherwise, you must pay an early-termination fee of up to $350. However, during that two-year period, you can change your service plan as your needs change.
Understand Your Voice Plan
The voice aspect of your plan relates to making and receiving calls. Unless the voice aspect of your plan offers unlimited calling, it includes a predetermined number of calling minutes per month. No long-distance calling charges are applied to calls, as long as calls are made from and stay within your home country.
Depending on your wireless service provider, you may be offered unlimited night and weekend minutes, which means that after a specific time each night (usually 7:00 p.m. or 9:00 p.m.), calls made or received do not count against your monthly minute allocation. Likewise, you may be given the opportunity to roll over your unused minutes to the next month, or you may be allowed to call any other cell phone users who subscribe to the same cellular network without your monthly minute allocation being reduced.
If you use up your monthly minute allocation for calls, you are charged a per-minute fee for each additional minute used to both make and receive calls.
![]() To learn how to make and receive calls using your iPhone, see “Placing and Receiving Calls,” (Chapter 6).
To learn how to make and receive calls using your iPhone, see “Placing and Receiving Calls,” (Chapter 6).
The Wireless Data Aspect of Your Wireless Service Plan
The second component of your wireless service plan relates to wireless data usage. Again, some wireless service providers offer unlimited 3G network usage, but most offer a predetermined monthly wireless data allocation, such as 2GB per month. If you go beyond that predetermined wireless data allocation, you are billed a hefty premium for each additional megabyte of data you send or receive.
Your wireless data allocation is utilized whenever you access the Internet using a 3G wireless connection to surf the Web (using Safari), stream content from the Internet, send or receive emails (using the Mail app), or utilize any apps that tap the Web to access data or information.
The Text Messaging Aspect of Your Wireless Service Plan
Not to be confused with Apple’s Internet-based iMessage service, which is free of charge to use and has no monthly messaging limits, the Messages app that comes pre-installed on your iPhone is also used to send and receive text messages via your wireless service provider’s network.
A text message can include a text-based message, but you can also add a photo, short video, or website URL to the message.
iMessage text messages can be sent only to other iOS device users who set up a free iMessage account, whereas traditional text messages can be sent to or received from any other cell phone users, regardless of which wireless service network they subscribe to or what make and model cell phone (or smartphone) they use.
When selecting your wireless service plan, you can typically opt for a pay-peruse text messaging plan, which is fine if you’ll seldom use this feature. Most plans include a predetermined number of incoming and/or outgoing text messages or allow for unlimited text messaging throughout the month.
![]() To learn more about text messaging, iMessage, and the Messages app, see “Instant Messaging and Text Messaging from Your iPhone,” (Chapter 16).
To learn more about text messaging, iMessage, and the Messages app, see “Instant Messaging and Text Messaging from Your iPhone,” (Chapter 16).
Protecting Your New iPhone
If you purchased a new iPhone, Apple offers its optional AppleCare+ program ($99 for two years), which includes unlimited technical support plus repairs if something goes wrong with your phone during the coverage period. (If major repair work needs to be done, you may be required to pay a deductible.)
Instead of purchasing AppleCare+ for your iPhone, you have the option to acquire third-party insurance for about the same price. This insurance does not include any technical support, but it does cover your iPhone from loss, damage, or theft during the coverage period. (Loss and theft are not covered by Apple-Care+.)
Independent insurance companies, including Worth Ave. Group (www.worthavegroup.com) and Square Trade (www.squaretrade.com), are among the companies that offer optional iPhone insurance. Your wireless service provider may also offer an optional insurance plan, but this plan is typically more expensive yet offers less coverage than other options.
TELL ME MORE Media 1.3—Protecting Your iPhone: AppleCare and Third-Party Insurance
Access this audio file through your registered Web edition at my.safaribooksonline.com/9780132954310/media.
Whether you opt to purchase AppleCare+ or third-party insurance for your phone, you can also protect your phone investment in two ways. First, apply a thin, clear protective film over the iPhone’s touch screen, or the entire phone, to protect it from scratches. Zagg, Inc. (www.zagg.com) is one of many companies that offer an ultra-thin, clear protective film, priced under $25, to protect all iPhone models.
Second, invest in a good-quality (durable) case that will protect the phone when its being transported or not in use.
Accidentally dropping an iPhone and exposing it to liquid are the two most common types of damage you’re likely to encounter. Unless you have AppleCare+ or other insurance coverage, the repair cost could be substantial, or you may need to replace the phone altogether.
If the iPhone needs to be replaced, but you don’t qualify for a discounted phone upgrade from your wireless service provider, the replace cost for a new iPhone is between $500 and $700, depending on the model, although you may find less expensive, used, or refurbished iPhones on eBay.com, for example.
TELL ME MORE Media 1.4—Investing in a Screen Protector and Case for Your iPhone
Access this audio file through your registered Web edition at my.safaribooksonline.com/9780132954310/media.
Introducing iPhone 4S: The Fastest, Most Feature-Packed iPhone Yet
The iPhone 4S is the most powerful and advanced iPhone released to date. In fact, when Apple began taking pre-orders for the new phone on October 7, 2011, in less than 24 hours, more than one million units were presold, making it the fastest-selling Smartphone in history.
Although the iPhone 4S isn’t bigger in size than previous iPhone models, it is significantly faster and more powerful. And, although it runs iOS 5 (just like the iPhone 3Gs and iPhone 4), it offers features and functionality that the older iPhone models do not, including Siri (shown in Figure 1.10).
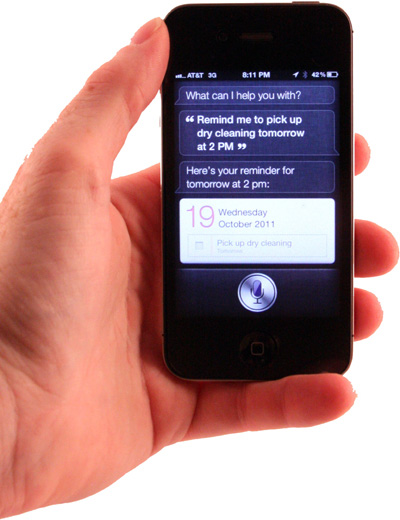
Figure 1.10 On an iPhone 4S, hold down the Home button for two to three seconds. When the Siri icon appears, you can control your iPhone using your voice.
Siri allows you to control many features and functions of your iPhone 4S using your voice. It does not currently work on any other iPhone or iPad models. You can actually speak to your iPhone 4S using complete sentences, and it responds to your inquiries and commands without your having to touch the screen. As you’ll discover, Siri works really well with a wireless Bluetooth headset linked to your iPhone 4S, such as the optional Jawbone Era or Jawbone Icon headset (www.jawbone.com).
![]() To learn more about using Siri on an iPhone 4S, see “Overview of Some Additional Pre-Installed iPhone Apps,” (Chapter 14).
To learn more about using Siri on an iPhone 4S, see “Overview of Some Additional Pre-Installed iPhone Apps,” (Chapter 14).
Apple’s proprietary dual-core A5 chip is what powers the iPhone 4S, making it significantly faster than the iPhone 4. In fact, when you compare the iPhone 4S with the older model, you’ll discover that the iPhone 4S features a longer battery life, an improved touch-screen display, and a higher-resolution (8MP) digital camera. Plus, it has two antennas (which allow for clearer voice communication and significantly faster Web access).
The iPhone 4S is also a world phone, meaning that it’s compatible with both GSM and CDMA cellular networks. Thus, you can use it virtually anywhere in the world. (Although international roaming fees apply unless you install a prepaid SIM card into your iPhone 4S when traveling abroad.)
iPhone 4S and many of the apps you’ll be using with it are fully iCloud-compatible, allowing you to wirelessly maintain a backup of your phone, plus easily share data, documents, and files with your computer(s) and other iOS devices.
iPhone 4S: 3G Versus 4G Wireless Connectivity
The iPhone 4S allows you to connect to the Web using a Wi-Fi or 3G connection. However, on October 4, 2011, when the iPhone 4S was announced, Apple disclosed that this latest iPhone model utilizes two antennas to transmit and receive data, which vastly increases possible data speeds to 14.4Mbps (double that of the iPhone 4).
“If you follow the phone industry, these numbers might sound familiar.... This is what the majority of our competitors claim when they talk about 4G performance.... We’re not going to get into a debate in the industry about what’s 4G and what isn’t.... What’s most important, when it comes to real-world performance, the iPhone 4S is just as fast as all these phones [the Motorola Atrix 4G, LG Thrill 4G, and HTC Inspire 4G]. In fact, we think with all of our [iOS 5] software enhancements, it’s even faster in real-world use,” stated Bill Schiller, Apple’s senior vice president of Worldwide Product Marketing, at the iPhone 4S product launch press conference.
So, depending on whom you ask, some refer to the iPhone 4S as having 4G web-surfing capabilities. In fact, in the upper-left corner of the screen, your mobile device may show that you’re connected to a 4G wireless network (which is significantly faster than a 3G network) when you’re connected to your wireless service provider’s network.
Make Sure Your Apps Are Up to Date
After you upgrade to iOS 5, you’ll probably discover that the developers of your favorite apps have also released updated versions. You can check wirelessly whether you’re running the most current versions of the apps already installed on your iPhone by using a 3G or Wi-Fi connection.
SHOW ME Media 1.5—Update Your Existing Apps, If Necessary
Access this video file through your registered Web edition at my.safaribooksonline.com/9780132954310/media.
From the Home screen, tap the App Store app and then tap the Updates icon, which is displayed near the bottom right of the screen. If you see the message All Apps Are Up to Date, you’re in good shape; otherwise, you are given the option to upgrade any out-of-date apps.
After you initially acquire an app from the App Store, all subsequent updates to that app are free of charge. Plus, now that you’re running iOS 5 on your device, you are able to easily share your app purchases among multiple iOS devices that you own.
A hybrid app is one that is designed for use on both an iPhone and iPad. Some apps are iPad-specific, for example, and run only on the iPad or iPad 2. Meanwhile, apps designed specifically for the iPhone run on iPads, but these apps do not take advantage of the tablet’s larger display or advanced capabilities.
Although it’s often easier to update apps directly from the phone itself, you can also download app updates using your primary computer and iTunes, and then use the iTunes sync process to transfer the updated app(s) to your iPhone.
When you create an iCloud account and begin using iCloud with your iPhone, all of your app purchases (and free app downloads) are automatically stored on iCloud. If you delete an app from your phone, you can reinstall it anytime, for free, from iCloud.
To do this, when you return to the App Store, tap the Purchased icon displayed at the bottom of the screen. All the apps you’ve purchased (and the free apps you’ve downloaded) are displayed. Tap the Cloud icon displayed with each app’s description to reinstall it on your phone.
Keeping the iOS Up to Date Wirelessly
For the initial upgrade from iOS 4.3.4 (or earlier) to iOS 5, you needed to connect your phone to your primary computer using the supplied USB cable and use the iTunes sync process. Now that iOS 5 is installed on your phone, you can opt to upgrade the iOS wirelessly in the future if you have access to a Wi-Fi Internet connection (a 3G Internet connection does not work for this purpose). To use this wireless iOS upgrade feature the phone also needs to be plugged into an external power source.
Periodically, Apple releases upgrades to the iOS operating system that need to be downloaded and installed on your phone.
![]() LET ME TRY IT
LET ME TRY IT
Updating Your iPhone’s iOS
To wirelessly check for iOS upgrades and then download and install these upgrades as they become available, follow these steps:
1. From the Home screen, tap the Settings app.
2. Tap the General option under the Settings heading.
3. Under the General heading, tap the Software Update option. Your device automatically accesses the Web and determines whether an updated version of the iOS is available.
4. During this process, the message Checking for Updates is displayed. If an update is available, you can now download and install it via the Web, without having to connect your iPhone to your primary computer.