Sending and Receiving Email
In addition to being able to surf the Web using the Safari app, your iPhone can help you manage one or more email accounts, plus send and receive email messages when you use the Mail app that also comes pre-installed with iOS 5 on all iPhone models.
The iPhone’s Mail app works with your existing email account(s), as well as the free email account provided to you by Apple when you establish an iCloud account.
You can also establish a free email account with Yahoo! Mail (http://mail.yahoo.com), Google Gmail (http://mail.google.com), or Microsoft Hotmail (www.hotmail.com), for example.
Using Mail, you are able to receive email attachments from others and then open those attachments within other iPhone apps, such as Photos (for photos), Pages (for Word or Pages documents), Keynote (for PowerPoint or Keynote presentations), or Numbers (for Excel or Numbers spreadsheet files). You also can use iBooks or another third-party PDF reader app to read PDF files received as email attachments. In all, your iPhone is capable of opening more than 15 different file types as attachments.
![]() To learn more about using Microsoft Office files, including Word, Excel, and PowerPoint files with your iPhone, see “The App Store, iBookstore, and Newsstand,” (Chapter 15).
To learn more about using Microsoft Office files, including Word, Excel, and PowerPoint files with your iPhone, see “The App Store, iBookstore, and Newsstand,” (Chapter 15).
If you want to send an email that contains an attachment, you use the Share command within the app that relates to the type of attachment it is, not from the Mail app. For example, to email someone between one and five photos that are stored on your iPhone, you tap the Share icon within the Photos app and then choose the Email Photo option.
Setting Up Your Existing Email Accounts to Work with the Mail App
Before you can begin using the Mail app to manage your existing email accounts and to send or receive email, you must first set up each account once within your iPhone. You do this within the Settings app.
If you’re upgrading your iPhone to iOS 5, or restoring a replacement iPhone with data from your previous iPhone, your email account settings automatically transfer when you perform a restore from a backup.
![]() LET ME TRY IT
LET ME TRY IT
Setting Up an Existing Email Account to Work with Your iPhone
To set up an existing email account to work with your iPhone, follow these steps:
1. Launch the Settings app from the iPhone’s Home screen.
2. From the main Settings menu, select the Mail, Contacts, Calendars option.
3. Under the Accounts heading on the Mail, Contacts, Calendars menu screen within Settings, tap the Add Account option.
4. When the Add Account menu screen appears, select the type of email account you are adding. Your options include iCloud, Microsoft Exchange, Gmail, Yahoo!, AOL, Hotmail, and MobileMe. (If you have an email account that does not fit into one of these email account categories, select Other.)
5. Based on the email account type you selected, you are prompted for specific information pertaining to that pre-existing account. For example, if you select Yahoo! Mail or Google Gmail, you are prompted to supply your name, email address, password, and description.
6. Within the Name field, use the virtual keyboard to enter your full name. This name will be displayed in the From field of your outgoing email messages.
7. Tap the Address field and enter your existing Yahoo! Mail or Google Gmail address ([email protected] or [email protected]).
8. Tap the Password field and enter your account password.
9. Tap the Description field and enter a short description for this email account, such as Personal Yahoo Mail. This description is used to distinguish it from the other email accounts you may be managing from your iPhone.
10. Tap the Next icon displayed in the upper-right corner of the screen. Your iPhone connects to the Internet and verifies the account.
11. You are promoted with a series of virtual on/off switches that allow you to link Mail, Contacts, Calendars, Reminders, and Notes to this account. Tap the Save icon to continue.
12. The email account is now set up on your iPhone and appears under the Accounts heading in the Mail, Contacts, Calendars screen within Settings. You can now scroll down on this screen to customize the various settings associated with the Mail app or launch the Mail app to being sending and receiving emails.
13. Repeat this process for each email account you’d like to manage from your iPhone.
Depending on the type of email address you’re setting up on your iPhone, you may be required to enter additional information, such as your Incoming Mail Server and Outgoing Mail Server host name. This information is provided by your email service provider.
When you purchase a new iPhone, it comes with 90 days of free technical support from Apple. You can set up an in-person appointment at any Apple Store and have an Apple Genius set up your email account(s) for you, or call the AppleCare phone number (800-APL-CARE), and have a technical support specialist walk you through this process.
Managing Your Email Accounts from the iPhone
The iOS 5 edition of the Mail app allows you to manage one or more email accounts simultaneously. Although incoming messages, for example, can be displayed within a single Inbox screen, in reality, the data from each email account is always kept separate.
When you launch the Mail app, the Inbox for whatever email account is selected is displayed. However, you can select All Inboxes to view a single list of all incoming emails from all accounts within a single list. Doing this saves time because you don’t have to switch between accounts.
From the Inbox screen (shown in Figure 8.1), tap the Mailboxes icon displayed in the upper-left corner to select either the All Inboxes display option, or if you’re managing more than one email account from your iPhone, select which individual account’s Inbox you want to view separately.
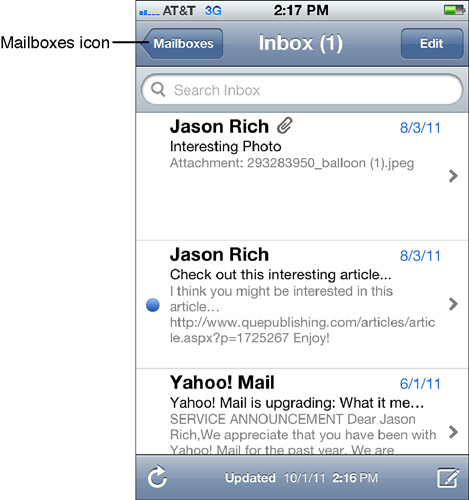
Figure 8.1 When you launch the Mail app, the Inbox screen automatically appears, and your iPhone checks for new, incoming emails from the server (assuming it can connect to the Internet using a 3G or Wi-Fi connection).
Access Separate Mailboxes from the Mailboxes Screen
After you tap the Mailboxes icon from the main Inbox screen of the Mail app, the Mailboxes screen (shown in Figure 8.2) is displayed. From here, you can scroll down to the Accounts heading and then view individual folders for any of your email accounts, such as the Inbox, Drafts, Sent, Trash, Spam, or Saved folders. You also have the option to create additional folders for sorting and storing incoming emails for later reference.
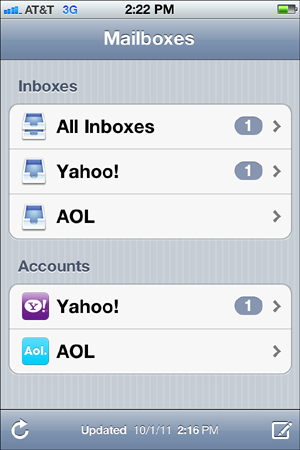
Figure 8.2 From the Mailboxes screen, you can access the Inbox of any email account being managed from your iPhone or access any Folder (Mailbox) related to an email account.
Any custom folders previously created for an email account are automatically transferred to your iPhone when you set up that account to work with the iPhone using the Settings app.
Whether you’re looking at your email account listings under the Inboxes or Accounts heading within the Mailboxes screen, the gray oval that contains a number within it indicates how many email messages are currently stored within that account or folder.
To access an Inbox for a specific account, tap the account name under the In-boxes heading. Or to view a single listing of all incoming emails from all accounts, tap the All Inboxes option.
At the bottom of the Mailboxes screen, a Refresh icon is displayed near the lower-left corner, and a Compose Message icon is displayed near the lower-right corner.
To view the folders associated with an email account, scroll down to the Accounts heading and tap one email account listing. (Refer back to Figure 8.2.)
Creating Folders to Organize Emails Within an Account
If the email account set up to work with your iPhone allows you to create new folders (also sometimes referred to as Mailboxes), from the Mailboxes screen, tap the email account to which you want to add a folder from the listing under the Accounts heading.
When the Mailboxes screen for that account is displayed (shown in Figure 8.3), you see a listing of folders already available, such as Inbox, Drafts, Sent, Trash, and so on. Tap the Edit icon displayed in the upper-right corner of the screen. Then, in the lower-right corner of the screen, tap the New Mailbox icon that appears.
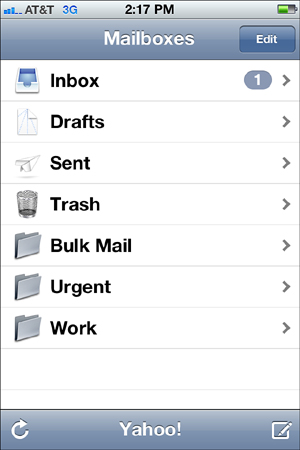
Figure 8.3 You can view multiple folders for any email account and then move emails into those folders to better sort or organize them.
From the Edit Mailbox screen, type the name of the new folder that you want to create, such as Urgent, Personal, or Work, and then tap the Save icon displayed in the upper-right corner of the screen. The new folder (mailbox) is created.
To delete a folder, tap the Edit icon displayed when viewing a list of folders for that email account. Next, tap an existing folder’s listing. From the Edit Mailbox screen that appears, tap the Delete Mailbox icon. (You also have the option to rename a folder from this screen.)
Viewing Your Inbox
When you launch the Mail app, the Inbox screen is the first thing you see, and your iPhone automatically connects to the Web to check for new incoming emails. (Refer to Figure 8.1.)
Displayed on this screen are listings for each individual email message within your Inbox. Depending on how you set up the Preview feature within Settings, for each listing you see the email’s Subject, Date, and Sender, along with between zero and five lines of the email message’s body.
A paperclip icon displayed next to the Sender information (shown in Figure 8.4) indicates the email message contains an attachment.
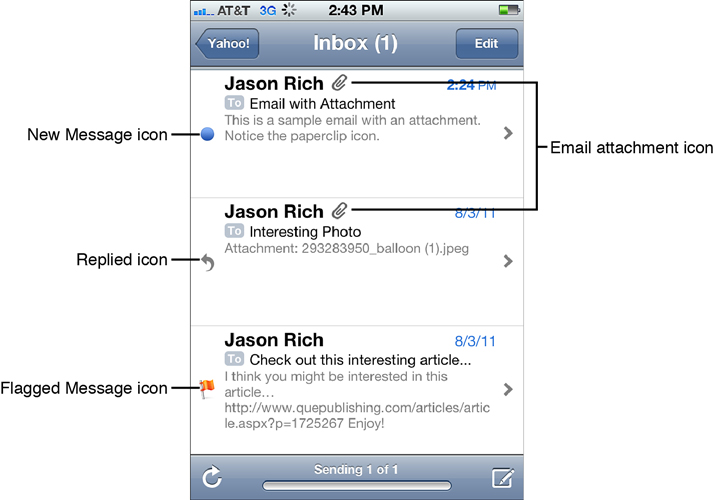
Figure 8.4 Based on the symbols displayed within an Inbox listing, you can tell whether a message is new (unread), has been replied to, or has an attachment associated with it. You also can see whether you’ve flagged the message as urgent.
As you’re viewing your Inbox, when a message has a blue dot displayed on the left side of the screen, this indicates it’s a new email that has not yet been opened and read.
If a left-pointing arrow icon appears on the left side of the listing, this means the message has already been replied to. Or if you have flagged the message as important, a flag icon appears to the left of that message listing. Figure 8.4 shows samples of these email message-related icons you can view from the Inbox screen.
As you’re viewing each email listing within your Inbox, to open and read the email, tap its listing. Or to delete the email without opening it, swipe your finger from left to right across the listing and then tap the red-and-white Delete icon that appears. Use your finger to scroll up or down within your Inbox.
To the right of each listing is a > icon, which indicates you can open the message by tapping it to read it in its entirety. To the immediate left of the > icon, a number displayed within a gray box means the message is part of a message thread.
A message thread is an ongoing email conversation which begins with one email that the recipient replies to. This response starts the message thread. It continues when the original sender then replies to that reply, and so on. The number displayed to the right of the listing (within a gray box) indicates how many levels (or back-and-forth replies) the message thread contains.
When you delete an email on your iPhone, it is deleted from the iPhone itself, not from your email server. Thus, if you access the account from another computer or device, the message is still displayed. You can change this by adjusting the main settings of your email account via its server, but not from your iPhone.
Also from the Inbox screen, if you tap the Edit icon displayed in the upper-right corner of the screen, an empty circular icon appears to the left of each email listing. When you tap the listing, a check mark appears within the circular icon, meaning that the message has been selected.
After you select one or more email message listings, tap the Delete, Move, or Mark icons displayed at the bottom of the screen (shown in Figure 8.5). This way, you can delete multiple messages at once without opening them first, move the messages from your Inbox to another folder, or either mark the messages with a flag (meaning they’re important) or mark them as unread (new).
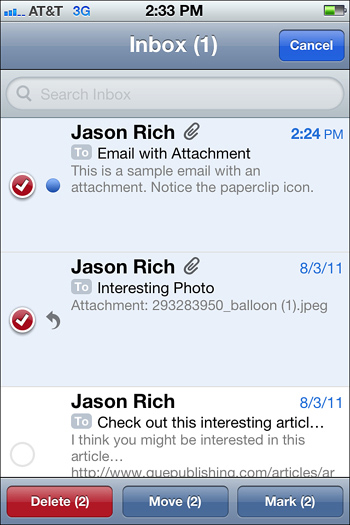
Figure 8.5 After tapping Edit while viewing your Inbox, you can move messages to other folders (mailboxes) or delete them.
 TELL ME MORE Media 8.1—Creating Email Folders
Access this audio file through your registered Web edition at my.safaribooksonline.com/9780132954310/media.
Displayed near the bottom-left corner of the Inbox screen is the Refresh icon. Tap this icon to manually check for new incoming emails whenever you like. Near the bottom center of the screen, a message labeled Updated, along with a Date and Time, tells you when your iPhone last connected to the email server(s) to update your Inbox with new messages.
As you’re looking at your Inbox, you can compose a new email message from scratch (as opposed to replying to an incoming email) by tapping the Compose Email icon displayed near the lower-right corner of the screen. When you tap this icon, a New Message screen appears.
 SHOW ME Media 8.2—Composing an Email
Access this video file through your registered Web edition at my.safaribooksonline.com/9780132954310/media.
Performing a Search Within Your Emails
At the top of the Inbox screen is an empty Search field. Enter any keyword associated with an email to quickly find what you’re looking for within your Inbox. You can use the recipient’s name, a date, or any keyword that appears within a message.
To use this Search feature, tap the empty Search field and type your keyword(s) using the virtual keyboard. Then tap the From, To, Subject, or All tab to determine what fields you want to search. To initiate the search, tap the Search button that appears in the lower-right corner of the keyboard (next to the spacebar). When the Search results are displayed, tap any listing to open and view it.
To perform a global search of your iPhone for specific information, use the Spotlight Search feature. Tap the Home button to return to the Home screen and then swipe your finger from left to right to access the Spotlight Search screen.
Reading and Managing an Individual Email
From your Inbox, if you tap any message listing, that email opens within a new screen, allowing you to read it in its entirety (shown in Figure 8.6). When you do this, near the top of the screen, the From field is displayed, with the To field appearing below it. By scrolling downward, you can see the message’s subject and date, followed by the body of the email.

Figure 8.6 You can view one email message at a time and then use the command icons at the bottom of the screen to manage that email.
If the email contains an attachment, an icon for the attachment is displayed at the bottom of the email. You can tap the attachment to download it to your iPhone and then hold your finger on it to save and open the attachment for use with a compatible app.
If the email attachment is not compatible with any apps installed on your iPhone, you are not able to save or download it using your iPhone, but you are able to see that an attachment is present.
To the right of the Date field when you’re reading an email message, an option labeled Mark is displayed in blue. When you tap it, two command icons, labeled Flag and Mark As Unread, appear.
Tap the Flag icon to add a graphic of a flag to the email, indicating it’s important. This is a new feature added to the iOS 5 edition of the Mail app. Or after you read the email, tap Mark As Unread to keep the message in your Inbox as an unread message (with a blue dot to the left of its listing).
As you’re reading an email, a selection of command icons is displayed at the bottom of the iPhone’s screen. These icons are described next.
Refresh
Tap the Refresh command to manually check for new, incoming messages and reload the message you’re currently viewing.
File
Tap the File icon to move the message from your Inbox to another folder that’s associated with the email account, all of which are displayed on the screen when you tap the File icon. Tap your folder selection, and the message is moved to that folder.
Trash
Tap the Trash Can icon (displayed at the bottom center of the screen) to delete the message you’re currently viewing. Confirm your deletion decision by tapping the red-and-white Delete Message icon.
Reply/Forward/Print
When you tap the left-pointing arrow icon displayed at the bottom of the screen as you’re reading an email, a menu appears, giving you the option to reply to the email message you’re viewing, forward the message to another email address, or print the message to a printer using the AirPrint feature of iOS 5.
To reply to the message, tap the Reply icon that appears after tapping the left-pointing arrow icon. A Compose Message screen appears with the To and Subject fields already filled in. The body of the message you’re replying to is attached to the email. Simply add whatever additional text you want as your reply and then tap the Send icon displayed in the upper-right corner of the screen.
To forward the message you’re reading to another email address, tap the left-pointing arrow icon and then tap the Forward command icon. Using the virtual keyboard, fill in the To field for the recipient(s). You can also add additional text to the body of the message before sending it. Finish by tapping the Send icon displayed in the upper-right corner of the screen.
Compose
Tap the Compose icon, displayed near the bottom-right corner of the screen, to compose an outgoing email from scratch. See the “Composing an Email” section later in this chapter.
As you’re reading an email, tap the left-pointing arrow icon labeled “All Inboxes” or the name of your email account within it to return to the Inbox display. This icon is located in the upper-left corner of the screen.
Alternatively, to view the previous or next email message within your Inbox without returning to the Inbox screen, tap the up-or down-pointing arrow icon displayed near the upper-right corner of the screen.
Incoming Emails Can Be Sorted and Displayed by Thread
Within the Settings app, you have the option to display your incoming emails by thread or by the date received. To sort your Inboxes by message thread, launch Settings and select the Mail, Contacts and Calendar option from the main Settings menu. From the Mail, Contacts and Calendar menu screen, scroll down to the Organize By Thread option under the Mail heading. Tap the virtual switch associated with the Organize By Thread option and turn it on.
Now, from your Inbox, when you tap a new incoming message that’s part of a thread, a new listing of the messages related to that thread appears, with the most recent message displayed first. Tap any of the messages in the thread to refresh your memory about the ongoing email conversation or tap the top-listed email in the thread to read the latest message in its entirety.
Mail Is Compatible with Notification Center
Another way to quickly access new, incoming emails is via the Notification Center window, if you have set up the Notification Center app to continuously monitor the Mail app.
To access an email from the Notification Center window, first slide your finger from the top of the screen downward to make the Notification Center window appear. This technique works while using any app on your iPhone or from the Home screen.
While viewing the Notification Center window, look under the Mail heading and then tap any listing for an incoming email message. The Mail app launches, and that email message is displayed.
![]() To learn more about using the Notification Center app, see “Using Notification Center,” (Chapter 5).
To learn more about using the Notification Center app, see “Using Notification Center,” (Chapter 5).
Setting Up Your iPhone to Check for New Emails Automatically
When it comes to checking your emails using your iPhone, you can do this manually, or set up the Mail app to automatically check for new incoming emails. This is done from within the Settings app. You can do this using one of three methods:
1. Turn on the iPhone’s Push feature, which automatically downloads new information from the server as it becomes available. This option is the most convenient but also quickly uses up your monthly wireless data allocation from your wireless service provider, unless you’re connected to the Internet using a Wi-Fi connection. This feature also drains the iPhone’s battery faster.
2. Set the Fetch setting to check for new incoming emails every 15 minutes, 30 minutes, or hourly. This option, too, uses up your monthly wireless data allocation from your service provider (unless you’re using Wi-Fi) and drains the iPhone’s battery faster, but the extent it does so depends on how often you set the iPhone to check automatically for incoming emails.
3. Check for new incoming emails manually by tapping the Refresh icon displayed near the bottom-left corner of several screens within the Mail app. You have to wait 15 to 30 seconds for the new messages to load into your iPhone, but using this feature utilizes less of your monthly wireless data usage allocation and helps preserve the iPhone’s battery life.
![]() LET ME TRY IT
LET ME TRY IT
Selecting How Your iPhone Will Retrieve New Emails
To choose which method your iPhone will use to retrieve emails (and whether this process will be done automatically), follow these steps:
1. Launch the Settings app from the Home screen.
2. From the main Settings menu, select the Mail, Contacts, Calendars option.
3. Scroll down on the Mail, Contacts, Calendars menu screen to the Fetch New Data option and tap it.
4. When the Fetch New Data screen appears within Settings (shown in Figure 8.7), tap the virtual on/off switch associated with the Push feature to turn on this feature. Or if you leave it off, scroll down to the Fetch feature and select how often you want the iPhone to check for new emails. Tap the Every 15 Minutes, Every 30 Minutes, Hourly, or Manually option.

Figure 8.7 From the Fetch New Data screen within Settings, you decide how often, if ever, your iPhone will automatically check for new emails by connecting to the Internet.
5. You can choose a different setting for each email account you’re managing from your iPhone. To do this, tap the Advanced icon displayed below the Fetch heading (at the bottom of the Fetch New Data screen).
Composing an Email
From the Mail app, you can easily compose a new message to one or more recipients by tapping the Compose Mail icon displayed near the lower-right corner of many screens within the Mail app.
When the New Message screen appears (shown in Figure 8.8), you see a blank template for composing and sending an outgoing email message. Begin by filling in the To field with one or more email addresses for the recipient(s).
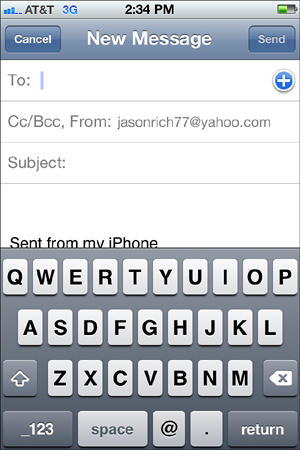
Figure 8.8 Use the New Message screen to compose and send a new email message to one or more recipients.
If you’re manually entering email addresses in the To field, separate multiple addresses with a comma. Or you can tap the plus sign icon displayed to the right of the To field and select email addresses from contact entries stored within the Contacts app.
The From field of the outgoing email is already filled in. However, if you tap the From field, you can add email addresses to the Cc: or Bcc: fields. Or if you’re managing multiple email accounts from your iPhone, you can change which account the email you’re composing will be sent from.
Next, tap the Subject field and type the email’s subject using the virtual keyboard. You have the option to leave this field blank if you desire.
Tap anywhere within the email message’s body field to begin writing your email message using the virtual keyboard. The message can be as long as you’d like.
Using Bold, Italic, or Underlined Text
One new feature of Mail for iOS 5 is that you can include bold, italic, and/or underlined text within the body of your emails. To use these features, start typing a word and then double-tap it. Above that word, tabs for Cut, Copy, Suggestions, BIU, and Quote Level are displayed.
When a word is highlighted in blue, you can extend the highlighted text to include multiple words, a complete sentence, or a paragraph, for example, by placing your finger on one of the blue selection dots and moving it around accordingly.
Tap BIU. New tabs, labeled Bold, Italics, and Underline, appear above the selected and highlighted word or text. Tap one or more of these options. For example, you can use Bold-Italic text or Italic-Underlined text or any combination you desire.
The Select, Cut, and Copy commands also work within the Mail app. Tap the Suggestion tab to see a listing of suggested words if what you’ve typed is misspelled. Adjusting the Quote Level allows you to indent the selected text.
![]() To learn more about using iOS 5’s Select, Copy, Cut and Paste commands, see “Using the Select, Select All, Copy, Cut, and Paste Commands” (Chapter 3).
To learn more about using iOS 5’s Select, Copy, Cut and Paste commands, see “Using the Select, Select All, Copy, Cut, and Paste Commands” (Chapter 3).
Using Email Signatures
By default, at the bottom of every email you compose, Signature text is displayed. The default Signature is “Sent from my iPhone.” However, within the Settings app, you can add or change the Signature or opt to forgo displaying a Signature altogether.
Some people create a Signature that contains their name, address, email, phone number, website URL, Twitter username, and/or other contact information. Others use it to conclude their emails with an inspirational quote. What you include within an email Signature is up to you.
![]() LET ME TRY IT
LET ME TRY IT
Creating an Email Signature
To create an email Signature that will appear at the end of your emails, follow these steps:
1. Launch the Settings app from the Home screen.
2. From the main Settings menu, select the Mail, Contacts, Calendars option.
3. Scroll down on the Mail, Contacts, Calendars menu screen to the Signature option under the Mail heading and tap it.
4. When the Signature screen appears, using the virtual keyboard, enter the text you want to include at the end of your email messages.
5. After composing the Signature, tap the left-pointing arrow icon labeled Mail in the upper-left corner of the screen.
6. While viewing the Mail, Contacts, Calendar menu screen within Settings, you can also adjust other customizable options relating to the Mail app. For example, the Show option allows you to determine how many emails your iPhone will load from the mail server at any given time. Your options include 50, 100, 200, 500, or 1,000 recent messages. The Preview option allows you to determine how many lines of an email’s body will be displayed within your Inbox screen, as well as within the Notification Center window.
7. When you’re done adjusting the Mail-related settings, press the Home button to save your changes and return to the iPhone’s Home screen.
TELL ME MORE Media 8.3—Customizing Mail Settings
Access this audio file through your registered Web edition at my.safaribooksonline.com/9780132954310/media.
Composing Emails Within Other Apps
Many apps allow you to compose and send email messages within them without first launching the Mail app. By doing this, you can include app-specific attachments in outgoing emails.
If an app allows you to compose and send an email within it, this feature is accessible from the Share icon within that app. Just some of the popular apps that allow you to send email messages within them (and include app-specific attachments) include Contacts, Photos, Camera, Safari, Maps, Pages, Numbers, and Keynote.
SHOW ME Media 8.4—Sending an Email Within Another App (Aside from Mail)
Access this video file through your registered Web edition at my.safaribooksonline.com/9780132954310/media.