Managing Music on Your iPhone
With each new app you use on your iPhone, you can transform your device into something totally different. The Music app allows you to use any model iPhone as a feature-packed iPod digital music player that can store thousands of songs, allow you to enjoy personalized music Playlists, plus grant you access to your own digital music library stored on iCloud.
When you combine the Music app with the iTunes app, which you use to purchase music and other content from the iTunes Store directly from your iPhone, you have the ability to purchase and download music from an ever-growing collection of more than 20 million songs, not to mention other audio content, including audiobooks (which can also be played using the Music app).
The speaker built into your iPhone is surprisingly powerful and clear, but to truly appreciate your music, you’ll probably want to utilize wired stereo headphones or ear buds that connect to the Headphones jack on the top of your iPhone. Alternatively, you can use wireless Bluetooth headphones to immerse yourself in the music without cables.
If you often listen to music while in a loud area, such as aboard an airplane or while walking down a city street, consider investing in headphones with noise-reduction technology, from a company like Bose or Shure.
However, if you want to share your music with those around you, a vast selection of external speakers is available to connect to your iPhone using the Dock Connector port or a wireless Bluetooth connection. You can even connect your iPhone directly to your car’s stereo system or your home theater system to enjoy your favorite music on high-quality speakers.
Loading Music into Your iPhone
In the past, there were two methods of loading music into your iPhone. First, you could download it directly to your phone using the iTunes app. Or you could transfer music from your primary computer using the iTunes Sync process.
Although these two options are still viable, you can now store your personal digital music collection on iCloud, and then download songs to your iPhone from iCloud, via the Internet (using a 3G or Wi-Fi connection).
All your iTunes music purchases (past and present) become available to all your computers and iOS devices as soon as you create a free iCloud account and then link your computers and iOS devices to the same account.
![]() To learn more about using iCloud with your iPhone, see “An Introduction to iCloud,” (Chapter 4).
To learn more about using iCloud with your iPhone, see “An Introduction to iCloud,” (Chapter 4).
If you upgrade to the premium iTunes Match service ($24.99 per year), your entire digital music collection, including music not purchased from iTunes, becomes accessible to you via Apple’s cloud-based file-sharing service.
 TELL ME MORE Media 9.1—Introduction to iTunes Match
Access this audio file through your registered Web edition at my.safaribooksonline.com/9780132954310/media.
When music is stored on iCloud, and if your iPhone has access to the Internet, you can download any music from iCloud to your iPhone. When you do this, the music gets stored on your iPhone and can then be played back anytime, whether or not an Internet connection is present.
 SHOW ME Media 9.2—Accessing Past iTunes Music Purchases via iCloud
Access this video file through your registered Web edition at my.safaribooksonline.com/9780132954310/media.
The number of songs your iPhone can store simultaneously is in the thousands but depends on the memory capacity of your phone, as well as what other content, apps, and data are currently being stored on it.
Using the Music App
In conjunction with iOS 5, the now-outdated iPod app received a major overhaul and a new name. Now, the Music app is used to listen to music (and other audio) that’s stored on your iPhone. This includes iTunes music purchases or music acquired from other sources, such as by “ripping” your own audio CDs to create digital music files compatible with your iPhone, or through other online services, such as Amazon MP3 Store.
TELL ME MORE Media 9.3—Other Sources for Music Besides iTunes
Access this audio file through your registered Web edition at my.safaribooksonline.com/9780132954310/media.
The Music app allows you to play back songs and create and enjoy personal Playlists. Before using the Music app, however, you must populate it with music, which can be done directly from your iPhone using the iTunes app. The Music app comes pre-installed on your iPhone that’s running iOS 5. How to add music to your iPhone is explained shortly.
The Music App’s Command Icons
After you launch the Music app, five command icons are displayed at the bottom of the screen (shown in Figure 9.1). As you’re about to discover, they’re used to manage your music library, create Playlists, and listen to your music.
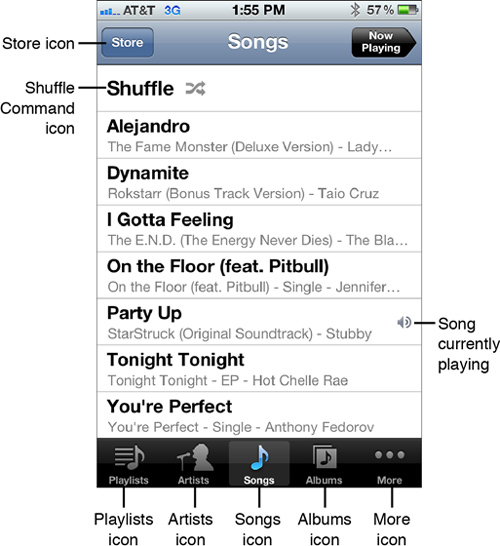
Figure 9.1 You can manage the music collection stored on your iPhone (or on iCloud) using the five command icons displayed at the bottom of the Music app’s screen.
On almost every screen within the Music app, displayed in the upper-left corner is a Store icon. Tap it to launch the iTunes app and shop for music from the iTunes Store. (Again, refer to Figure 9.1.)
Playlists
Playlists are personalized collections of songs that you can group together and then play back at any time. Each Playlist is given its own title and can include as many songs from your personal music collection as you like.
You can create separate Playlists for working out, to enjoy while you drive, to listen to when you’re depressed, or to dance to when you feel like cutting loose. There is no limit to the number of separate Playlists you can create and store on your iPhone. Playlists can also be created on your primary computer (or another iOS device) and then synced or transferred to your iPhone using iTunes Sync or iCloud.
When listening to any Playlist, you can play back the songs in order or have the Music app randomize the song order (using the Shuffle command). A Playlist can also be put into an infinite loop so it continuously plays until you press Pause.
The Music app automatically creates a handful of Playlists for you, composed of your top rated songs, recently added songs, Top 25 most-played songs, or songs from a specific music genre, such as Classical, Rock, or ‘90s. However, by tapping the Add Playlist option (shown in Figure 9.2), you can create your own Playlists from scratch.
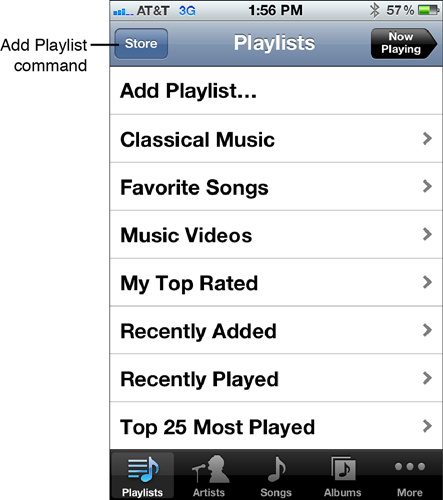
Figure 9.2 Create customized Playlists from the songs stored on your iPhone. Tap the Playlists command icon when you launch the Music app.
Your personal Playlists can be synced to your primary computer using iTunes Sync, or stored on iCloud and then made accessible to your other computers and iOS devices.
SHOW ME Media 9.4—Creating Custom Playlists
Access this video file through your registered Web edition at my.safaribooksonline.com/9780132954310/media.
![]() LET ME TRY IT
LET ME TRY IT
Creating a Personalized Playlist
To create and then enjoy your own personal Playlist using the Music app, follow these steps:
1. Launch the Music app from the Home screen.
2. Tap the Playlists command icon displayed near the bottom-left corner of the screen.
3. When the Playlists screen appears, tap the Add Playlist option.
4. Within the New Playlist pop-up window, use the virtual keyboard to enter the name for the Playlist you’re creating. You can enter a name like Work-out Music, Favorite Songs, Meditation Music, or Dance Music, for example. Tap the Save icon to continue.
5. Next, the Songs list is displayed on your iPhone’s screen. This is a complete listing of songs currently stored on your iPhone (shown in Figure 9.3). At the top of the listing is an Add All Songs option. Tap it to create a Playlist using all the music stored on your iPhone. Or one at a time, tap the plus sign icon associated with each song you want to add to this particular Playlist.
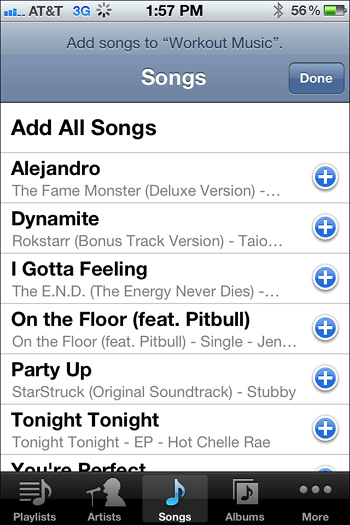
Figure 9.3 From the list of songs stored on your iPhone, select which ones you want to add to the Playlist you’re creating.
6. As you select one song at a time, its listing turns gray, indicating the song has been added to your Playlist. When you finish adding songs, tap the Done icon displayed in the upper-right corner of the screen.
7. A special screen for the Playlist you just created is displayed next (shown in Figure 9.4). At the top center of the screen, the name of the Playlist is shown. Below it are three command icons, labeled Edit, Clear, and Delete. The Edit command allows you to edit your Playlist and add additional songs, for example. The Clear command removes all songs from the list but does not delete the Playlist itself. You can then add new songs to the Playlist. The Delete icon deletes the Playlist altogether.
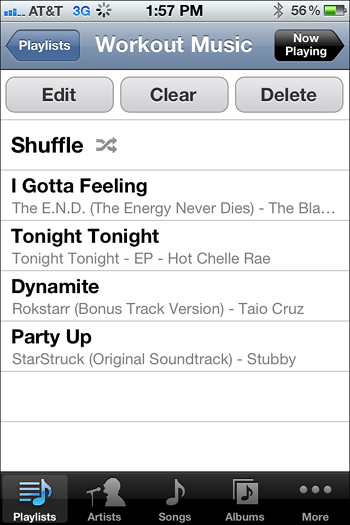
Figure 9.4 After it is created, you can edit a Playlist or begin playing music from it.
The Shuffle icon enables you to play back the Playlist using a random song order. Below the Shuffle icon is the listing of songs included in the custom Playlist (shown in the order they’ll be played).
To begin playing the Playlist, tap any song you want to start with or tap the Shuffle icon. The Play screen appears, and the music starts playing.
8. To exit the Playlist screen, tap the left-pointing arrow-shaped icon with the word Playlists within it that you see displayed in the upper-left corner of the screen. This returns you to the main Playlists menu. Alternatively, tap any of the command icons displayed near the bottom of the screen.
Artists
Whenever you store digital music on your iPhone, part of that digital music file contains details about the song, such as the artist, genre, composer, length of the song, and what album the song came from.
Tap the Artists command icon displayed at the bottom of the Music app’s screen to see a list of artists responsible for the music currently stored on your iPhone.
When you tap an artist’s name, the individual songs or albums from that artist stored on your iPhone (or available via iCloud) are displayed.
If you have iCloud turned on, songs that are available to you but not stored on your iPhone are listed with an iCloud icon associated with them. Tap the iCloud icon to download the song to your iPhone.
Song
Tap the Songs command icon displayed at the bottom center of the Music app’s screen to see a complete listing of song titles currently stored on your iPhone and available via iCloud (if the iCloud feature is turned on). Refer back to Figure 9.1; there, you can see the iCloud feature was turned off.
When you tap a song listing, the Music app’s Play screen appears, and the song begins playing.
If you have iCloud turned on, songs that are available to you but not stored on your iPhone, are displayed with an iCloud icon associated with them (as shown in Figure 9.5). Tap the iCloud icon to download the song to your iPhone.
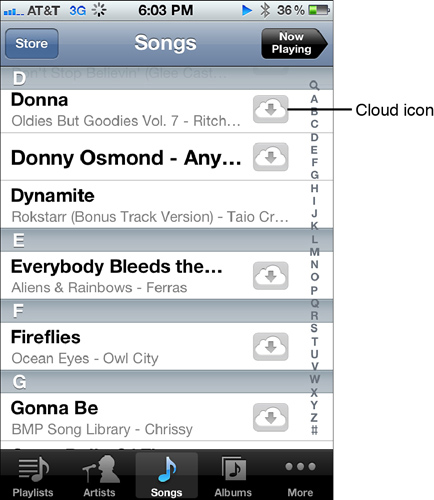
Figure 9.5 Songs displaying an iCloud icon can be streamed from the Internet or downloaded to your iPhone. They are not currently stored on the phone.
Albums
Just about every individual song stored on your iPhone was originally released as part of a full-length album. Tap the Albums command icon that’s also displayed at the bottom of the Music app’s screen to see a listing of album titles from which the songs currently stored on your iPhone (or available to you from iCloud) came.
When you tap any album title listing, a separate screen appears displaying the songs you own from that album and stored on your iPhone or available via iCloud.
If you have iCloud turned on, songs from Albums that are available to you but not stored on your iPhone, are displayed with an iCloud icon associated with them. Tap the iCloud icon to download the music to your iPhone.
More
When you tap the More command icon, the More menu screen appears. This menu gives you access to other sorting methods you can use to find and play the music stored on your iPhone or available via iCloud.
The options offered from the More menu include
• Audiobooks—View a listing of audiobooks and then begin playing an audiobook from that collection.
If you acquire audio books from Audible.com (as opposed to iTunes), be sure to use the free Audible app to listen to that content. The Audible app gives you additional controls that are useful for listening to audiobooks, as opposed to music. For example, you can add bookmarks or timers as you’re listening to an audiobook, or quickly jump between chapters.
• Compilations—View a listing of compilation albums and then begin playing that music.
• Composers—View a listing of the music composers and songwriters responsible for the music stored on your iPhone (or iCloud account) and then choose which music you want to play based on a composer or songwriter.
• Genres—View your digital music collection sorted by the music genre each song falls into, such as pop, classical, rock, jazz, and so on.
• iTunes U—Access and play back iTunes U content by tapping this menu option. iTunes provides thousands of free audio courses taught by professors and other experts from hundreds of world-renowned learning institutions, colleges, and universities throughout the world.
• Podcasts—Select this menu option to play back podcasts you have stored on your iPhone or iCloud account. iTunes provides thousands of free podcasts that you can download and listen to at your leisure. Podcasts are like on-demand radio shows, but anyone has the ability to record and publish podcasts through iTunes.
The Music App’s Play Screen
Whenever a song is playing on your iPhone, the Music app’s Play screen initially appears (shown in Figure 9.6). However, when music or audio is playing, you can use iOS 5’s Multitasking mode and begin using other apps. The music or audio continues playing in the background.

Figure 9.6 Control the music that’s playing from the Music app’s Play screen.
Near the bottom of the Play screen are basic music control icons, including Track Back, Play/Pause, and Track Forward. Below these icons is a Volume slider, which you can adjust using your finger. Slide the dot within the Volume slider to the right to increase the audio playback volume or to the left to lower it.
As music or audio is playing, you also can adjust the volume using the Volume Up (+) and Volume Down (–) buttons on the side of your iPhone and/or using the volume controls located on the cable of some stereo headsets.
Displayed in the center of the Music app’s Play screen is the Album artwork for the music you’re currently listening to.
Near the top center of the screen, the title of the song currently playing is displayed. To the left of the title is a left-pointing arrow icon that allows you to switch back to the previous Music app screen you were viewing, such as the Playlists screen.
When music is playing on your iPhone, you can use iOS 5’s multitasking capabilities to leave the Music app and do something else, but the music will continue playing, unless you manually pause it.
Displayed to the right of the song title, near the top-right corner of the Music app’s Play screen, is an Album icon. Tap this icon to display a list of all songs from the Album that the currently playing song came from and that are also stored on your iPhone.
Directly below the song title displayed near the top-center of the screen is a timer slider. To the left of this slider is a timer that shows how much of the song has already played. To the right of the slider is a timer that simultaneously shows how much of the song is remaining. The dot displayed within the slider shows graphically how far into the song you are as it’s playing. Using your finger, you can fast forward within the song by dragging this dot to the right. Or you can rewind within the song by moving the dot to the left.
To place a song in continuous repeat mode as you’re playing it and also viewing the Music app’s Play screen, tap the circular icon under the timer slider (on the left side of the screen). It looks like two arrows chasing each other. (Refer to Figure 9.6.)
To add a song to your Favorites list, from the Play screen, tap the thumbs-up icon displayed below the timer slider, near the top of the screen. The icon turns blue after you add the song to your Favorites list.
To access Apple’s Ping online, a music-oriented social networking service, and post a comment (Ping Post) about the song you’re listening to, tap the cartoon-like bubble icon displayed under the timer slider. Your iPhone connects to the Internet, and a Ping Post message screen appears. Type your comment and then tap the Post icon to share your thoughts about the song on the Ping online service. You can opt to turn off the Ping service altogether on your iPhone if you have no interest in participating on this online social networking site.
To activate the Shuffle command as you’re listening to a song within a Playlist, tap the Shuffle icon (displayed below the timer slider, to the extreme-right side of the screen). This allows songs to be played from the current Playlist in a random order.
Want to sing along with your favorite songs, but don’t know the lyrics? No problem! Purchase and download the Lyrics ID app ($0.99) from the app store. It displays the song lyrics to the songs currently stored on your iPhone as the music is playing. Another app that offers song lyrics and other useful features is Sound-Hound ($0.99). There are also a handful of karaoke apps available from the App Store. Use the App Store’s Search feature (in conjunction with the keyword Karaoke) to find third-party apps, like The Singing Machine ($0.99) and Karaoke Party ($5.99).
Accessing Music Controls from the Multitasking Bar
In addition to using the Music app to control your music, you can gain access to the Music app’s Track Back, Play/Pause, and Track Forward icons, as well as a shortcut for launching the Music app within the Multitasking bar.
To access these Music controls, double-tap the Home button. When the Multitasking bar appears (showing all the apps currently running on your iPhone), swipe your finger from left to right across the icon bar. The Music Controls appear (as shown in Figure 9.7).
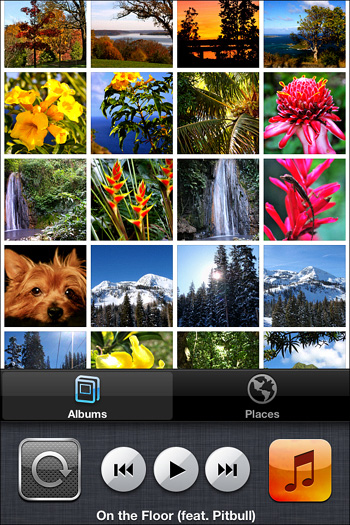
Figure 9.7 Control music from the Multitasking toolbar as well as from the Music app. Here, the Photos app is the primary app running, with the Music Controls displayed at the bottom of the screen.
![]() To learn more about using the iPhone’s Multitasking mode, see “Switching Between Apps Using Multitasking Mode,” (Chapter 3).
To learn more about using the iPhone’s Multitasking mode, see “Switching Between Apps Using Multitasking Mode,” (Chapter 3).
Using the iTunes App to Download Music
The iTunes Store is an online music and video content store owned and operated by Apple. To shop for music, audiobooks, podcasts, and other audio content that can be enjoyed using the Music app, you have a few options.
Every week, iTunes offers a different selection of free music from up-and-coming and/or featured artists. When downloaded, this music becomes part of your digital music collection and is available via your iCloud account.
You can use the iTunes app on your iPhone to shop for and download music and audio content directly to the phone. The iTunes app is separate from the Music app, but they work in conjunction with each other. Alternatively, you can use the iTunes software on your primary computer to access the iTunes Store.
Thanks to iCloud, you also can access any iTunes purchases from any of your computers or iOS devices linked to the same iCloud account and download (or stream) that audio content from the Internet.
From the iTunes Store, you can purchase TV show episodes and music videos and/or purchase (or rent) movies to watch on your iPhone’s screen using the Videos app, which is covered in Chapter 14, “Overview of Some Additional Pre-installed iPhone Apps.”
Although the Music, Videos, and iTunes app are integrated with each other, they are separate apps. The iTunes app is used to acquire (or purchase) music, audio, and video content from the iTunes Store. To begin using this app, launch it from the iPhone’s Home screen.
The iTunes App’s Command Icons
When you launch the iTunes app on your iPhone, at the bottom of the screen, you see five command icons that are used to navigate your way around the iTunes Store (shown in Figure 9.8).
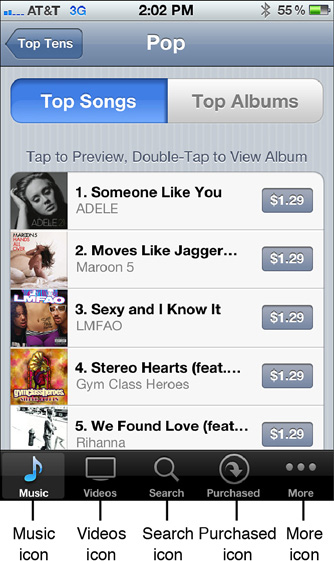
Figure 9.8 The iTunes app command icons.
Music
To acquire and purchase music from the iTunes Store, tap the Music icon displayed near the bottom-left corner of the screen. Then, at the top of the screen, tap the New Releases, Top Tens, or Genres tab, based on what you’re looking for.
When you tap the New Releases tab, you see a listing of newly released, full-length albums. Scroll down on this screen to see a listing of newly released singles. Interspersed among these listings are banner ads for albums or songs that the iTunes Store is featuring.
At the bottom of the New Releases screen (viewable after tapping the Music command icon within the iTunes app), you see three additional command options, labeled Complete My Album, Redeem, and Apple ID.
After you purchase one or more singles from a particular album from the iTunes Store, you can later tap the Complete My Album feature and purchase the rest of the songs from that full-length album at a discounted priced (based on how many songs from the album you already own).
Use the Redeem command if you have an iTunes Gift Card that you want to use to make iTunes Store purchases from your iPhone. After tapping this command, you are asked to enter the iTunes Gift Card Code displayed on the back of the gift card.
iTunes Gift Cards are available from Apple Stores, convenience stores, supermarkets, pharmacies, gas stations, and wherever gift cards are sold. They come in predefined denominations ($15, $25, $50, or $100) and are used to make online-based iTunes Store purchases.
If you don’t have a credit or debit card to link to your Apple ID account to make purchases from the iTunes Store, you can prepur-chase iTunes Gift Cards instead. Of course, you can give or receive them as gifts as well.
As you’re using the iTunes app, to manage your Apple ID account (and update your credit card information, for example), tap the Apple ID option that’s displayed at the bottom of the New Releases screen. From Safari (or any web browser) you can also visit https://appleid.apple.com to manage your Apple ID account and recover or change your password, for example.
As you’re searching for music, tap the Top Tens tab to view a listing of top-10 songs broken down by music category or genre. When you tap the Top Tens tab after tapping the Music icon, you see more than 20 different music genres to choose from.
Tap a music genre and then view a list of either Top Songs or Top Albums that fall within that genre. As you view any listing for a song or album, tap the price icon to purchase and download it. Or tap the song title (or album artwork) to listen to a free preview.
Aside from viewing top-10 lists of popular music by category, after tapping the Music icon, you can tap the Genres tab to view all music within the vast iTunes collection that falls into that category or genre. Again, more than 20 different genres are available to choose from.
If you’re shopping for eBooks to use with the iBooks app, you need to access iBookstore within the iBooks app on your iPhone (or use the iTunes software on your computer). Likewise, if you’re looking for digital editions of newspapers or magazines, use the Newsstand app, not the iTunes app on your iPhone.
Videos
Tap the Videos command icon within the iTunes app to shop for TV show episodes, movies, and music videos from the iTunes Store. To play back this content, you use the Videos app, not the Music app.
![]() To learn more about using the Videos app to watch TV shows, music videos, and movies you download from iTunes, see “Overview of Some Additional Pre-Installed iPhone Apps,” (Chapter 14).
To learn more about using the Videos app to watch TV shows, music videos, and movies you download from iTunes, see “Overview of Some Additional Pre-Installed iPhone Apps,” (Chapter 14).
Search
If you’re looking for a particular song, album, or artist, tap the Search icon displayed at the bottom center of the iTunes app’s screen. The iTunes Store has an ever-growing collection of songs, so chances are, you can find what you’re looking for using this Search feature.
![]() LET ME TRY IT
LET ME TRY IT
Using the Search Command in iTunes to Find Music (or Other Audio or Video Content) You’re Looking For
When using the iTunes app to shop for music, you can quickly find exactly what you’re looking for using the Search command. To do this, follow these steps:
1. Launch the iTunes app from the iPhone’s Home screen (or within the Music app).
2. Tap the Search icon displayed near the bottom center of the iTunes app’s screen.
3. Within the empty Search field that appears, using the virtual keyboard, enter a song title, album title, artist name, or any keyword that will help you find the music you’re looking for.
4. Tap the Search key (in the lower-right corner of the virtual keyboard) to initiate your search.
5. Listings for your search results are displayed. As with any music listing, tap its price icon to purchase and download the music or tap the song title (or album artwork) to hear a free preview of the music.
Your search results are divided into categories, such as Top Results, Albums, Songs, Podcasts, TV Seasons, TV Episodes, Ringtones, Audiobooks, and Music Videos, so you can easily find what you’re looking for.
Have you ever been listening to the radio, watching TV, or riding in an elevator and want to know the name of a song that’s playing so you can purchase it? Well, there’s an app for that. Download the free Shazam app from the App Store. When you hear a song you want to identify, launch the app. It “listens” to what’s playing and then identifies the song for you, complete with its title and artist. It then launches iTunes, giving you the option to purchase the song. This is one of the most popular, free iPhone apps of all time.
Purchased
You already know that all your iTunes purchases—past and present—are always accessible from iTunes and are now also stored online within your iCloud account. Thus, you can purchase iTunes music or content on one computer or iOS device but enjoy it on all your computers and iOS devices (including your iPhone) linked to the same iCloud account.
From your iPhone, to access your iTunes music purchases (whether or not they were purchased from your iPhone), tap the Purchased icon displayed at the bottom of the iTunes app’s screen.
Next, choose whether you want to view past Music, TV Show, Music Video, or Movie purchases from the Purchased screen. Because this chapter is focused on music, tap the Music option.
The Purchased screen within the iTunes app now displays all music purchases you’ve made from iTunes. This includes free music you’ve downloaded from iTunes. From this screen, tap the All Songs listing to view all your music purchases or tap the Recent Purchases option to view only the most recent music purchases.
Under the Artists heading, you can easily find iTunes music purchases sorted by artist name.
Use the Search field at the top of the Purchased screen to help you find what you’re looking for by typing a song title, album title, artist name, or any keyword.
Below the Purchased heading displayed near the top of the screen, you see two command tabs, labeled All and Not on This iPhone. The All tab lists all music you’ve purchased, including songs currently stored on your iPhone. The Not on This iPhone tab displays a list of songs you can download from your iCloud account that were purchased (and later deleted) from your iPhone, or that were purchased using your Apple ID account but from another computer or device.
When you download music from the Purchased screen within the iTunes app, you again are asked for your Apple ID. However, you are not charged again to download the already-purchased music. Instead of a price icon being associated with each song or album listing, you see an iCloud icon. Tap on it to download that music.
More
By tapping the More icon displayed at the bottom of the iTunes app’s screen, you gain access to a menu that offers seven additional options, including
• Genius—Use the iTunes Genius feature to automatically analyze your past music purchases and then offer suggestions for additional music you might enjoy.
• Ping—Access the free Ping service, which is an online social networking site operated by Apple that’s exclusively focused on music.
• Ringtones—Access a special area of the iTunes Store where you can shop for iPhone Ringtones.
• Podcasts—Access a special area of the iTunes Store where you can browse and download free audio podcasts.
• Audiobooks—Tap this option to access a special area of the iTunes Store where you can browse and shop for audiobooks. In addition to being able to purchase and read eBooks using the iBooks app, from the iTunes app, you can purchase and download audiobooks that you can listen to using the Music app.
• iTunes U—Search through the thousands of classes, lectures, and audio-based courses you can experience free from the iTunes Store.
• Downloads—View a list of pending or in-progress downloads originating from the iTunes Store or iCloud.
Customizing the Music App
To customize the Music app, launch the Settings app and then select the Music option from the main Settings menu. From the Music menu screen within
Settings, you can turn on/off the iTunes Match service (if you’ve subscribed to it), plus adjust other options that determine how the Music app will respond to your actions.
From the Music menu screen within Settings, you also can enter your Apple ID and password under the Home Sharing heading, which allows you to wirelessly stream content from your iPhone to your Apple TV or primary computer, assuming they’re connected to the same wireless home network (via a Wi-Fi connection) as your iPhone.
While you’re accessing the Settings app, also select the Store option from the main Settings menu to adjust several iTunes Store and iTunes Match-related options. For example, you can determine whether or not iTunes Match will work on your iPhone when using a 3G Internet connection (as opposed to a Wi-Fi connection).