Managing Appointments, Events, and To-Do Lists
Thanks to the Calendar app that comes pre-installed on your iPhone, you can take control over your busy schedule and manage your time more efficiently. Plus, the schedule data you maintain on your iPhone can easily be synced with other computers and devices, using the same techniques you use to synchronize your Contacts data (which was explained in the preceding chapter).
In addition to the Calendar app, iOS 5 also now features the Reminders app, which is a powerful to-do list manager. Both of these apps are useful organizational and time management tools, and both work seamlessly with Notification Center.
![]() To learn more about using Notification Center to monitor the Calendar and Reminders apps, see “Using Notification Center,” (Chapter 5).
To learn more about using Notification Center to monitor the Calendar and Reminders apps, see “Using Notification Center,” (Chapter 5).
Managing Your Time with the Calendar App
With its multiple viewing options for keeping track of the scheduling information stored within it, the iOS 5 version of the Calendar app for the iPhone is a highly customizable scheduling tool that enables you to easily sync your scheduling data with your primary computer’s scheduling software (such as Microsoft Outlook on a PC or iCal on a Mac). Like many other apps, Calendar works seamlessly with Apple’s iCloud service.
![]() To learn more about using iCloud to back up and sync Calendar and Reminders data, see “An Introduction to iCloud,” (Chapter 4).
To learn more about using iCloud to back up and sync Calendar and Reminders data, see “An Introduction to iCloud,” (Chapter 4).
The Calendar app works with your iPhone held in either landscape or portrait mode, so which you choose is a matter of personal preference.
Using Calendar, you can share some or all of your schedule information with colleagues and maintain several separate, color-coded calendars to keep personal and work-related responsibilities as well as individual projects listed separately while still being able to view them on the same screen.
The Calendar and Reminders apps work with Siri on the iPhone 4S. To discover how to use your voice to interact with these and other apps, see Chapter 14, “Overview of Some Additional Pre-Installed iPhone Apps.”
Controlling the Calendar View
Launch Calendar from your iPhone’s Home screen, and then choose which viewing perspective you’d like to see your schedule data in.
The Day View
The Day view displays your appointments and scheduled events individually, based on the time each item is scheduled for (shown in Figure 11.1). This view displays the date on the top of the screen and then provides an item-by-item listing of your scheduled appointments.
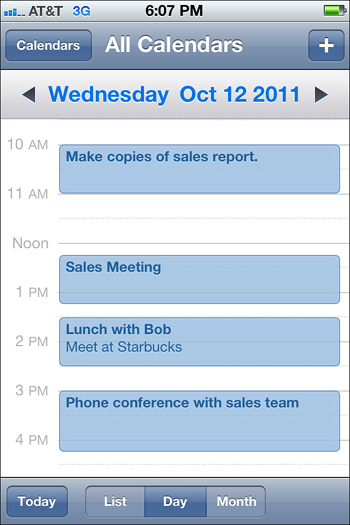
Figure 11.1 The Calendar app’s Day view. If you have the Invitations feature turned on, a special Invitations icon will appear in the lower-right corner of the screen.
The Week View
The Week view uses a grid format to display the days of the week along the top of the screen and time intervals along the left side of the screen (shown in Figure 11.2). With it, you have an overview of all appointments and events scheduled within a particular week (Sunday through Saturday).
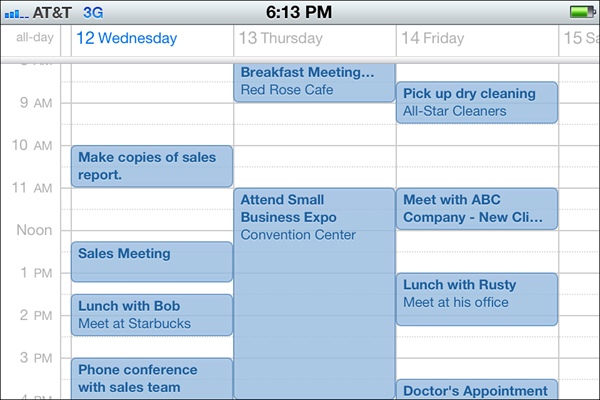
Figure 11.2 The Calendar app’s Week view. You must hold the iPhone in landscape mode to access this view.
To see the Week view, first tap either the List, Day, or Month view tab at the bottom of the screen. Then rotate your iPhone from portrait mode to landscape mode to automatically switch to the Week view.
The Month View
The Month view (shown in Figure 11.3) enables you to see a month’s worth of appointments and events at a time. Tap any single day to see that day’s appointment listings at the bottom of the screen. Then tap an individual listing to see it in detail.
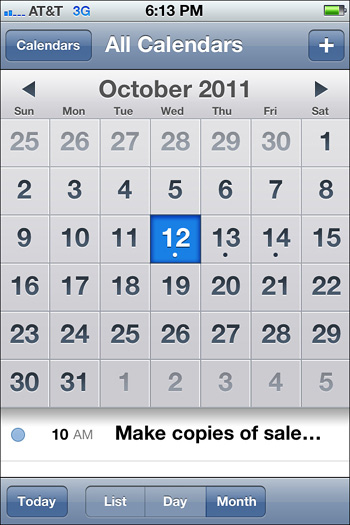
Figure 11.3 The Calendar app’s Month view.
Use the left and right arrows, displayed to the right and left of the Month and Year, to quickly jump between months as you view the calendar in Month view.
The List View
See a complete summary listing of all appointments and events stored within the Calendar app using the List view (shown in Figure 11.4). You can tap an individual listing to see its complete details.

Figure 11.4 The Calendar app’s List view.
Regardless of which view you select, at any time, you can view the current day’s schedule by tapping the Today icon located in the lower-left corner of the screen. On the calendar itself, the current date is always highlighted in blue.
Creating a New Appointment or Event
You can easily enter a new appointment or event from whichever calendar view you happen to be using.
![]() LET ME TRY IT
LET ME TRY IT
Creating a New Appointment or Event
When using the Calendar app, appointments, meetings, and other items you enter are referred to as “events.” To create a new event within your schedule, follow these steps:
1. Launch the Calendar app and tap the plus sign icon displayed in the upper-right corner of the screen on the iPhone. This causes an Add Event screen to be displayed.
2. The first field within the Add Event screen is labeled Title. Using the virtual keyboard, enter a heading for the appointment or event, such as Lunch with Rusty, Ryan’s Soccer Practice, Call Emily, or Mandatory Sales Meeting at Work. Refer to Figure 11.5.
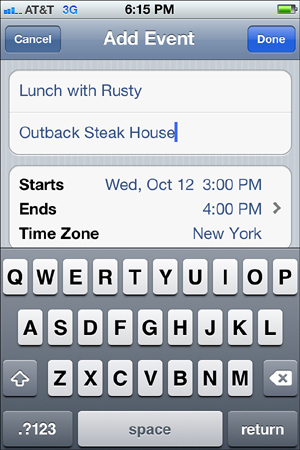
Figure 11.5 Add appointments to the Calendar app from the Add Event screen.
3. If a location is associated with the event, tap the Location field located below the Title field and then use the virtual keyboard to enter an address or location. Entering information into the Location field is optional. You can be as detailed as you want when entering information into this field.
4. To set the time and date for the new appointment to begin and end, tap the Starts and Ends field. A new Start & End screen is displayed, temporarily replacing the Add Event window (shown in Figure 11.6).
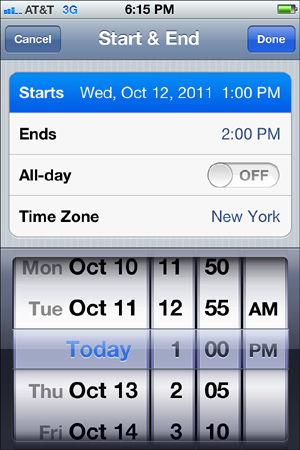
Figure 11.6 Set the Time and Date for each event you add to the Calendar app.
5. When viewing the Start & End screen, tap the Starts option so that it becomes highlighted in blue, and then use the scrolling Date, Hour, Minute, and AM/PM dials to select the Start Time for your appointment.
6. After entering the Start Time, tap the Ends option and again use the scrolling Date, Hour, Minute, and AM/PM dials to select the End Time for your appointment. Or if the appointment lasts the entire day, tap the All-Day virtual switch, moving it from the off to on position.
7. After you enter the Start Time and End Time for the appointment, you must tap the blue-and-white Done button to save this information and return to the Add Event screen.
8. If the appointment you’re entering repeats every day, every week, every two weeks, every month, or every year, tap the Repeat option, and choose the appropriate time interval. The default for this option is Never, meaning that it is a nonrepeating, one-time only appointment.
9. To set an audible alarm for the event, tap the Alert option displayed below the Repeat option within the Add Event screen. The Event Alert screen temporarily replaces the Add Event screen.
10. On the Event Alert screen, tap to specify when you want the audible alarm to sound to remind you of the appointment. Your options are None (which is the default), At Time of Event, 5 Minutes Before, 15 Minutes Before, 30 Minutes Before, One Hour Before, Two Hours Before, One Day Before, or Two Days Before. When you tap your selection, a check mark that corresponds with that selection is displayed on the right side of the screen.
11. Tap the blue-and-white Done button displayed in the upper-right corner of the Event Alert screen to save the information and return to the Add Event screen. For every event, you can activate up to two separate alerts.
12. When you return to the Add Event screen, if you’re maintaining several separate calendars within the Calendar app, choose in which calendar you want to list the appointment or event by tapping the Calendar option.
It is essential that you tap the blue-and-white Done icon to save the new event information and have it displayed within your calendar. The alternative is to tap the Cancel icon (displayed in the upper-left corner of the Add Event, Start & End, Repeat, or Event Alert screens), which is used to exit that screen without saving any new information.
 SHOW ME Media 11.1—Adding an Alarm to an Appointment
Access this video file through your registered Web edition at my.safaribooksonline.com/9780132954310/media.
After you add an alert, a Second Alert option is displayed within the Add Event screen. If you want to add a secondary alarm to this appointment, tap the Second Alert option, and when the Event Alert screen reappears, tap when you want the second alarm to sound. Again, don’t forget to tap the Done button. The correct time for the location of the meeting and the iPhone or iPad will adjust accordingly when you travel.
SHOW ME Media 11.2—Creating a Recurring Appointment
Access this video file through your registered Web edition at my.safaribooksonline.com/9780132954310/media.
Two other options available from the Add Event screen include Invitees and Availability. Tap Invitees to compose and send an invitation email to others within the Calendar app and invite other people to a meeting or appointment. Those people will be able to RSVP, and their invitation response will then appear along with the event listing. Availability allows you to display blocks of time as either “Busy” or “Free” on your calendar.
As you scroll down within the Add Event screen, you see an optional URL and Notes field. Using the virtual keyboard, you can manually enter a website URL that somehow corresponds to the event. Alternatively, you can tap the Notes field and manually type notes pertaining to the appointment (or paste data from other apps within this field).
The alternative to manually entering appointment information into the Calendar app on your iPhone is to enter your scheduling information within a scheduling program on your primary computer, such as Microsoft Outlook (PC), iCal (Mac), or Microsoft Entourage (Mac), and then sync this data with your iOS device using the iTunes sync process, the Wireless iTunes Sync process, or iCloud.
You also can sync scheduling data with other online or network-based scheduling applications offered by Yahoo! and Google, for example. This is set up within the Settings app. Just select the Mail, Contacts, Calendars option and then edit the preferences associated with your Yahoo! or Google account.
Viewing Individual Appointment Details
From any Calendar view within the Calendar app, tap an individual event (appointment, meeting, and so on), to view all the details related to that item.
When you tap a single event listing, a new screen appears (shown in Figure 11.7). In the upper-right corner of the screen is an Edit icon. Tap it to modify any aspect of the event listing, such as the title, location, start time, end time, alert, or notes.
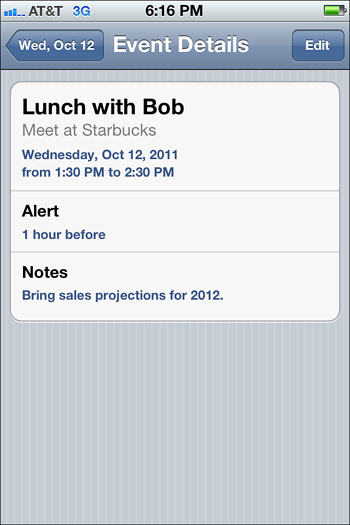
Figure 11.7 View the details about each Calendar event or appointment.
To delete an event entry entirely, tap the red-and-white Delete Event icon displayed at the bottom of the Edit screen. Or when you’re done making changes to an Event entry, tap the blue-and-white Done button displayed in the upper-right corner of the window.
The Calendar app works in conjunction with several other apps, including Contacts and Notification Center. For example, within Contacts, you can enter someone’s birthday within a record, and that information can automatically be displayed within the Calendar app.
To display birthday listings, for example, within Calendar, tap the Calendars button, which is displayed in the upper-left corner of the screen, and then tap the Birthdays option to add a check mark to that selection. All recurring birthdays stored within your Contacts app then appear within Calendar.
 TELL ME MORE Media 11.3—Linking Birthdays from Contacts into Calendar
Access this audio file through your registered Web edition at my.safaribooksonline.com/9780132954310/media.
Quickly Finding Appointment or Event Details
In addition to viewing the various calendar views offered within the Calendar app, to find individual appointments, use the Search field. The in-app Search field is located at the top of the screen when you tap the List option (displayed at the bottom of the screen for viewing events).
Tap the Search field and then use the virtual keyboard to enter any keyword or phrase associated with the appointment you’re looking for.
Alternatively, from the iPhone’s Home screen, swipe your finger from left to right to access the Spotlight Search screen. Within the Search field that appears, enter a keyword, search phrase, or date associated with an appointment. When a list of relevant items is displayed, tap the appointment you want to view. This launches the Calendar app and displays that specific appointment.
Viewing One or More Color-Coded Calendars
One of the handy features of the Calendar app is that you can view and manage multiple, color-coded calendars at one time on the same screen, or you can easily switch between calendars.
To decide which calendar information you want to view, tap the Calendars icon displayed in the upper-left corner of the screen. When the Show Calendars window appears, select which calendar or calendars you want to view on your device’s screen by tapping their listings.
You can view one or more calendars at a time, or you can select to view data from all your calendars on one screen simultaneously. Each calendar is color-coded, so you can tell entries apart when looking at multiple calendars on the screen at one time.
Customizing the Calendar App
As you begin using the Calendar app, you’ll discover there are many ways to customize it beyond choosing between the various calendar views. For example, within the Calendar app, you can set audible alerts to remind you of appointments, meetings, and events.
To customize the audio alert generated by the Calendar app, launch the Settings app and then select the General option. Next, tap the Sounds option.
Make sure the Calendar Alerts option, displayed within the Sounds screen of Settings, is turned on. If this option is turned off, a text-based message displays on the iPhone’s screen as an event reminder instead of an audible alarm sounding.
If you want the ability to receive meeting or event invites from others, from the Settings app, tap the Mail, Contacts, Calendars option. Then scroll down to the Calendars heading and make sure the New Invitations Alerts option is turned on. This enables you to hear an audible alarm when you receive a new invitation.
Also from this screen within Settings, under the Calendars heading, determine how far back in your schedule you want to sync appointment data between your primary computer and iOS device. Your options include Events 2 Weeks Back, Events 1 Month Back, Events 3 Months Back, Events 6 Months Back, or All Events.
Adjusting Time Zone Support
When the Time Zone Support option within Settings is turned on, and you’ve selected the major city that you’re in or near, all alarms are activated based on that city’s time zone. However, when you travel, be sure to turn off this option. With Time Zone Support turned off, the iPhone determines the current date and time based on the location and time zone you’re in (when it’s connected to a cell network or the Internet) and adjusts all your alarms to go off at the appropriate time for that time zone.
![]() LET ME TRY IT
LET ME TRY IT
Adjusting the Time Zone Support Feature
To access the Time Zone Support feature, follow these steps:
1. Launch the Settings app from the Home screen.
2. Select the Mail, Contacts, Calendars option.
3. Scroll down to the options listed under Calendars and then tap Time Zone Support.
4. When the Time Zone Support screen appears, you see a virtual switch for turning this feature on or off. When it’s turned on, below the switch is a Time Zone option. Tap it and then choose your home city (or a city within the time zone you’re in).
When turned off, Time Zone Support displays event times within your Calendar, and also activates alarms, based on the time zone selected. So, if New York City (Eastern Time Zone) is selected, for example, and you have an appointment set for 2:00 p.m. with an accompanying alarm, you see that appointment listed at 2:00 p.m. and hear the alarm at 2:00 p.m. Eastern Time, regardless of where or in what time zone you’re actually physically located.
Using the Reminders App to Manage Your To-Do Lists
One thing that sets Reminders apart from other to-do list management apps available from the App Store is that you can utilize location-based alarms (which take advantage of your device’s GPS capabilities).
And, like many other apps, Reminders works seamlessly with Notification Center and iCloud. Thus, you can access and update your to-do lists from your iPhone or iPad (when either device is connected to the Web) and always be looking at the latest version of each list.
When you begin using the Reminders app, it has two precreated lists that are empty. They’re labeled Reminders and Completed. Begin building a to-do list using the default Reminders list or create a new list (with a unique name) from scratch.
Although you can easily maintain one master to-do list that contains individual items for everything you want or need to accomplish, you’ll probably find it easier to create separate lists for specific projects or tasks.
Every to-do list you create within Reminders can contain its own items or entries. Each item, in turn, can have a separate deadline and alarm associated with it, as well as its own priority, and it can have text-based notes associated with it. Plus, on the iPhone, you can associate a location-based alert with each item on a list.
Creating Your First To-Do List
The process for creating a to-do list is relatively straightforward. Yet, you can add as much detail to the list as you need to enhance your productivity and ensure the information you need is always at your fingertips.
![]() LET ME TRY IT
LET ME TRY IT
Creating a To-Do List
Let’s begin using Reminders by creating a sample grocery list. To create a to-do list, follow these steps:
1. Launch the Reminders app.
2. To access the Lists screen, tap the Menu icon (which looks like three horizontal lines). It’s displayed in the upper-left corner of the screen.
3. From the Lists screen, tap the Edit icon displayed in the upper-right corner of the screen.
4. Tap the Create New List option.
5. When the virtual keyboard appears, enter the title of your list, such as Grocery List, and tap the Done icon.
6. A listing for your Grocery List to-do list is now displayed on the Lists screen. Tap the Done icon displayed in the upper-right corner of the screen to exit list editing mode.
7. With the List screen still displayed, tap the Grocery List listing you just created (shown in Figure 11.8).
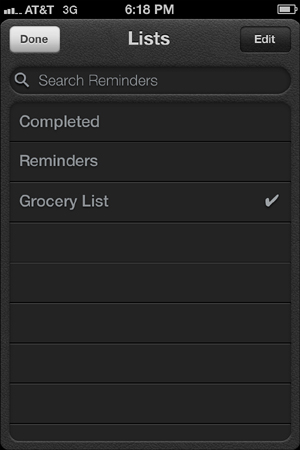
Figure 11.8 Manage your to-do lists from the Lists screen of Reminders.
8. The to-do list screen for Grocery List is displayed (shown in Figure 11.9). At the top of the list is the Grocery List heading, however, the rest of the virtual page is empty.

Figure 11.9 After creating the Grocery List, you now need to populate it with individual to-do items.
9. You’re now ready to populate the to-do list with individual entries, each of which can have an alarm associated with it.
Populating Your To-Do List with Items
The blank list within Reminders has the Grocery List heading you created shown at the top. Tap the plus sign icon displayed in the upper-right corner to add each new list entry.
For this example, tap the plus sign icon, and when the virtual keyboard appears, type Milk (shown in Figure 11.10). Tap the Return key on the keyboard to continue.
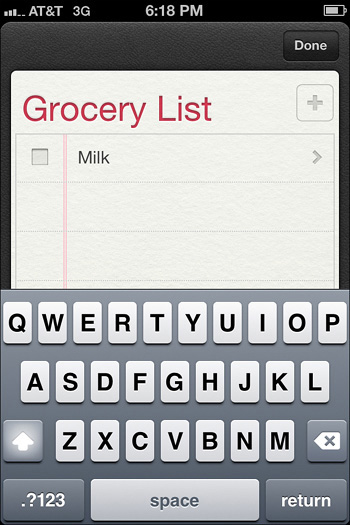
Figure 11.10 Add one to-do item to your list at a time.
Notice that the to-do list item, labeled Milk, is now displayed as part of the Grocery List. Next to it is a check box you can tap when that item or task is completed, or in this case, you’ve added milk to your shopping cart at the supermarket.
When you tap the check box associated with a to-do list item, a check mark appears within the check box, indicating that the item is completed. That item is also automatically added to your master Completed list.
As you’re first entering each to-do list item (in this case, Milk), you can add a custom alarm, priority, and/or notes to it. To do this, tap the Milk listing (not the check box associated with it). A separate Details screen relating to that to-do list item is displayed.
Adjusting the Details Screen for Each To-Do List Item
The top field of the Details screen (shown in Figure 11.11) contains the to-do item heading you just created (in this case, Milk). Tap this field to edit the listing. For example, you could change it from “Milk” to “Low Fat Milk.”
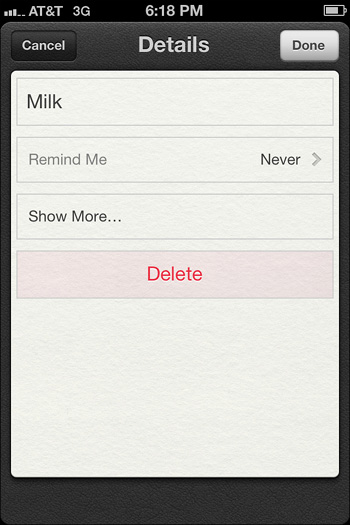
Figure 11.11 Every to-do item has a separate Details screen.
Alternatively, tap the second field, labeled Remind Me. A new Remind Me window appears with two options, labeled On a Day and At a Location.
Tap the virtual on/off switch associated with the On A Day option to turn it on. Then, when the current date and time are displayed below the On a Day option, tap it. You can now use the onscreen menu wheels (shown in Figure 11.12) to select the specific date and time you want to associate with the to-do item and set an alarm for it. After you select the appropriate date and time, tap the Done icon to continue.
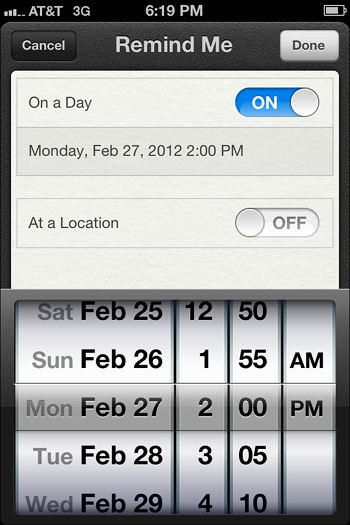
Figure 11.12 You can set alarms based on a time/date or location.
You return to the Details screen for that to-do list item. A new field labeled Repeat is now displayed. Tap this field to repeat the alarm at the same time everyday, every week, every two weeks, every month, or every year. The default for the Repeat option, however, is None. This means it’s a one-time event or item. Tap the Done icon to continue.
Next, tap the Show More field. On the Details screen, additional fields, labeled Priority, List, and Notes are displayed. Tap one option at a time to further customize each to-do list entry.
Tap Priority to choose between none, low, medium, or high priority. Tap the List option to transfer the to-do item from the Grocery List to another list. Or tap the Notes option to use the virtual keyboard to enter text-based notes related to the specific entry.
At the bottom of the Details screen, you’ll discover the Delete icon. Tap it to delete this particular to-do item from your list. Or tap the Done icon to save the changes or customizations to the Milk entry and return to the master Grocery List. Tap the plus sign icon again to add another item to your list, such as Eggs, and repeat the same process just described.
Using Location-Based Alerts
When you tap the Remind Me option, on the Remind Me screen for an item, an At A Location field is displayed under the On A Day field. When you tap this option to turn on the virtual switch associated with it, a pop-up window appears stating, Reminders Would Like to Use Your Current Location. Tap the OK icon to continue and allow the app to use your iPhone’s GPS capabilities to pinpoint your location.
Below the At a Location option, several additional options now appear. Tap the Location option you want to associate with this item. You can use your Current Location or Home Address, or you can select the Choose Location option and add any address listed within your Contacts database that’s associated with the Contacts app.
Prior to setting up a grocery list, you can use the Maps app to pinpoint the exact location of your favorite grocery store and then save that location as a listing within your Contacts database. In the Search field of the Maps app, for example, enter Stop & Shop, Mansfield, MA.
When the Maps app finds this supermarket and displays it on the map, tap the listing to reveal the Info screen. Scroll down the Info screen and tap Add to Contacts. Now, the address for the local Stop & Shop in Mansfield, Massachusetts, for example, is stored in your Contacts database and is accessible within Reminders.
After associating an address from your Contacts database to the At a Location option within Reminders, tap either the When I Leave or When I Arrive option displayed on the Remind Me screen.
If you tap When I Arrive, your Grocery List, along with the Milk item, appears on your iPhone’s screen, and your iPhone generates an audible alert when you arrive at the supermarket. For now, tap the Done icon to save this information.
Likewise, you can set a location-based alert and list to activate and be displayed every morning when you arrive at work, or every afternoon as soon as you return from lunch, for example.
Managing Entire Lists Within Reminders
In addition to managing the to-do items stored within each of your lists, you can manage the lists themselves from the Reminders Lists screen. From here, use the Search field to find items on any list based on a keyword search, or add new lists or delete existing lists from the Reminders app, as well as rearrange the order that your lists are displayed.
Accessing Your Completed List
As soon as you tap the check box associated with any to-do list item, within any of your lists, that item is copied to the Reminder app’s master Completed list. When you view the Completed list, the date and time each item was completed are displayed. Tap the listing for any completed to-do list entry to display all the details related to it.
Reviewing Your To-Do List Items by Date
Whenever you assign a Remind Me date to a particular To-Do item, you also are able to view it by date. As you’re looking at the Reminders’ List screen, tap the Date tab to reveal a comprehensive listing of all to-do items, from all your lists, sorted by date.
Using Reminders with iCloud
Reminders is one of several pre-installed iOS 5 apps that work seamlessly with iCloud. However, after setting up a free iCloud account, you need to turn on iCloud functionality for the Reminders app on your iPhone. To do this, launch the Settings app and tap the iCloud option from the main Settings menu.
Next, from the iCloud menu screen within Settings, tap the virtual switch associated with Reminders. Now, on the iPhone, your Reminders to-do lists are automatically uploaded to your iCloud account. If you also turn on iCloud functionality on another iOS device that’s linked to the same iCloud account, all your Reminders to-do lists automatically remain synchronized on each device.
Getting into the Habit of Using Reminders
Because Reminders offers a different set of tools for keeping your to-do lists organized than you may be used to, especially if your lists were previously maintained on scraps of paper or sticky notes, when you decide to begin using Reminders, it’s important to stick to it and begin to manage all your to-do lists and items from this one app.
Using just one app may take some getting used to and require a slight change to your daily work habits, but the benefit should become evident relatively quickly when you discover you can more efficiently juggle multiple projects, tasks, and deadlines, as well as personal and work-related responsibilities that you track using the Reminders app.
Remember, as you create each to-do list and then add individual entries to each list, you can include as much or as little detail as you want to each entry. However, you can easily create separate lists to differentiate between personal and work-related responsibilities, for example.
Using the iPhone’s Clock App as an Alarm Clock
In addition to using the Calendars or Reminders app to remind you of important appointments or deadlines, you also can set alarms for yourself using the Clock app that comes pre-installed on your iPhone.
This feature is extremely useful when you’re traveling because the wakeup call service offered by many hotels is extremely unreliable.
![]() LET ME TRY IT
LET ME TRY IT
Setting an Alarm Using the iPhone’s Clock App
To set an alarm within the Clock app, follow these steps:
1. Launch the Clock app from the Home screen, and then tap the Alarm icon displayed near the bottom of the screen.
2. Tap the plus sign icon displayed in the upper-right corner of the screen to add a new alarm.
3. When the Add Alarm screen appears (shown in Figure 11.13), adjust the Repeat, Sound, Snooze, and Label options as needed and then select the alarm time. (Be sure to set an Alarm sound that will get your attention or wake you up and that the volume on your iPhone is turned up.)
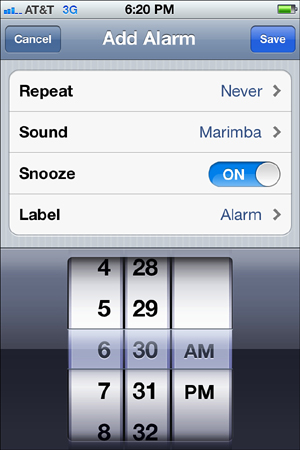
Figure 11.13 Use the Clock app as a programmable alarm clock. You can set as many separate alarms as you need.
4. When the Alarm is set, tap the Save icon in the upper-right corner of the screen. This is important!
5. A tiny Clock icon appears near the top-right corner of the screen. From the Alarm screen, make sure the virtual on/off switch associated with the alarm you just created is set to the on position.
6. Repeat these steps to add additional alarms.
7. You can now exit the app. As long as your iPhone is not turned off entirely, the alarm will sound at the designated time. (Your iPhone can, however, be in Sleep mode.)