
7. Working with Audio
Lesson overview
• Understand the difference between audio clip editing and audio track editing
• Keyframe the relative loudness of an audio clip in Adobe Premiere Pro
• Send audio clips between Adobe Premiere Pro and Adobe Audition
• Apply noise reduction to audio clips in Audition
• Create and export a final audio mixdown in Audition
• Add a final audio mixdown to a sequence in Adobe Premiere Pro
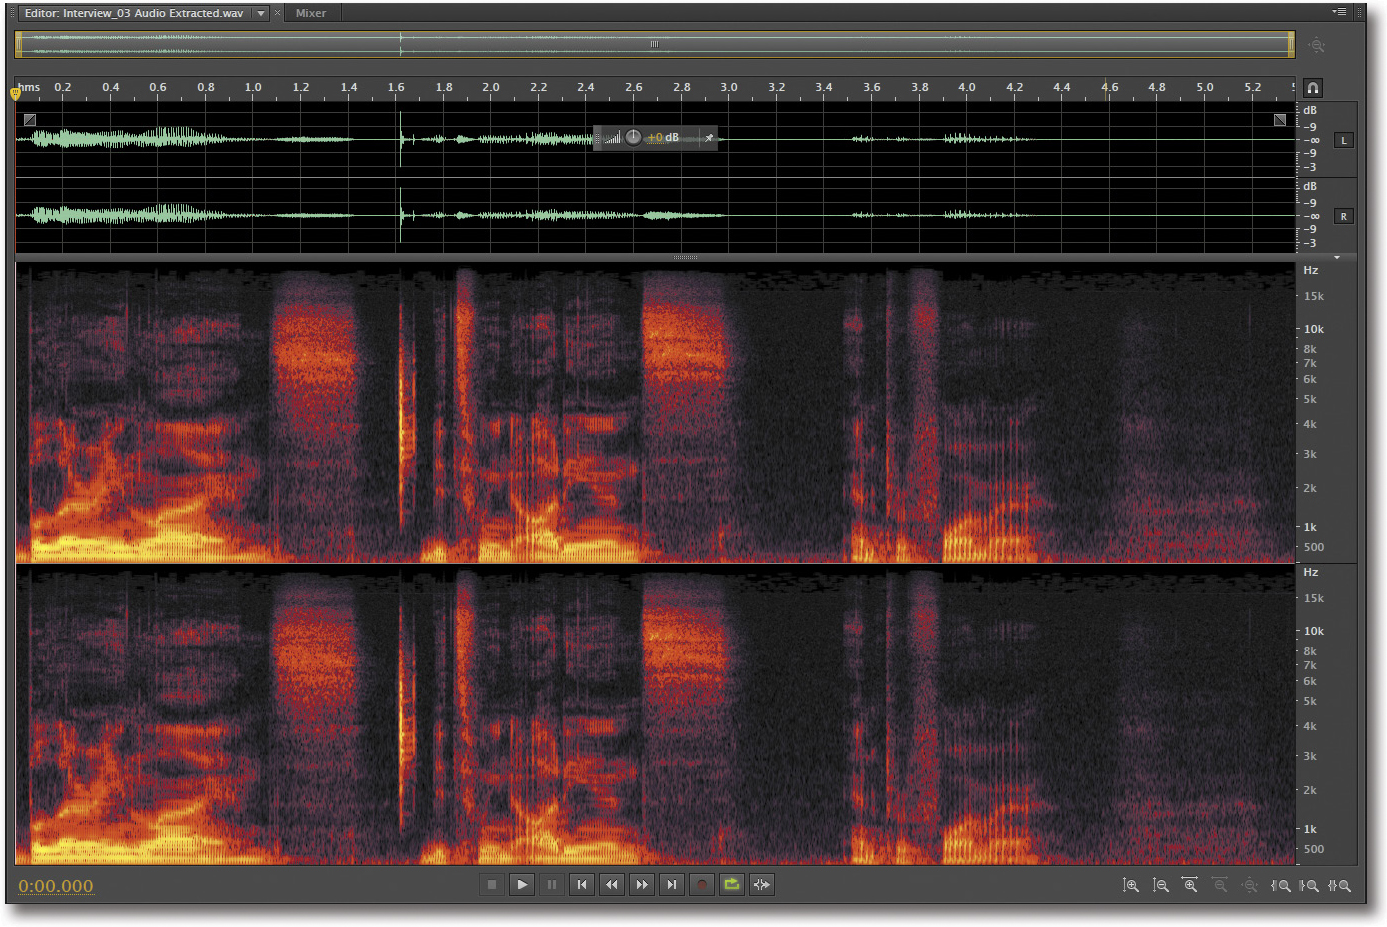
Spectral Frequency Display in Adobe Audition CS6.
Making your final edit sequence in Premiere Pro
If you are continuing from the previous lesson, feel free to continue with the Adobe Premiere Pro project you already have open. If you are starting at this lesson, navigate to the Lesson 07 folder on your hard drive and open the Adobe Premiere Pro project Lesson_07 Start.prproj. Save your Adobe Premiere Pro project file in the Lesson 07 folder as Afrolicious Promo.prproj.
Because you are continuing with a previous version of this edit, you’ll first save a new version of your sequence. This allows you to go back to the previous version if need be and is a recommended best practice in the video editing workflow.
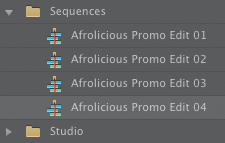
1. In the Project panel, twirl open the Sequences bin.
2. Click on the Afrolicious Promo Edit 03 sequence to select it. Choose Edit > Copy to copy it to your clipboard. Then choose Edit > Paste.
This will make a duplicate of this sequence outside of the Sequences folder.
3. To modify the name of the sequence, click on the name of the sequence to select it.
4. Change the name of the sequence to Afrolicious Promo Edit 04, press Return (Enter), and drag it into the Sequences folder.
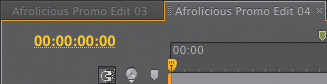
5. Double-click the Afrolicious Promo Edit 04 sequence to load it in your Timeline.
Note that the sequence appears in a new tabbed Timeline panel in front of your original sequence.
Having multiple Timeline panels open simultaneously can be useful in certain situations, but it can also be confusing. For the time being, you’ll close the first Timeline to eliminate the possibility of accidentally modifying the wrong sequence.
6. In the Timeline panel, click the Afrolicious Promo Edit 03 tab to select it.
7. Press Command+W (Ctrl+W) to close this sequence.
The new sequence is now the only one visible in the Timeline, which will ensure that you are working on the most recent iteration.
8. Press Command+S (Ctrl+S) to save your Adobe Premiere Pro project.
Monitoring audio
If you’re editing audio with the Adobe Creative suite of applications, it’s important to use recommended methods and quality equipment. You should make sure that the audio in your Timeline is not too loud or too soft, and that there isn’t any unwanted noise. A simple way to determine if your Timeline audio is too soft is to listen to your playback and compare it to another mastered audio source, for example, a video playing on a website or music playing in an MP3 application. If, by comparison, your Timeline audio is too soft, consider adjusting your Timeline audio settings to a higher level. To determine if your Timeline audio is too loud, play your Timeline while listening closely with headphones on and pay close attention to your Audio Meters panel (covered in the next section of this lesson). If you hear distortion or if your Audio Meters peak continually into the red indicators, your audio is too loud. If this is the case, adjust your Timeline audio settings to a higher level.
You also want to ensure that what you are hearing in your Timeline is what end users will experience when they hear the finished content. To do this, you must work with quality studio monitors (or speakers) and studio headphones to guarantee that your audio sounds the way you want it to under optimal conditions.
Bear in mind that end users may not be using the best equipment, so you should also listen to your audio using equipment that is not of the highest quality. For example, monitor your audio with inexpensive earbuds that come with an MP3 player, or perhaps use the internal speakers of a laptop. Consider who your listeners are and anticipate their listening environment.
Above all, trust your ears! If you’re hearing anomalies or artifacts, such as distortion or unwanted noise, end users will probably hear them, too. Consider making the appropriate adjustments.
Understanding the Audio Tools in Adobe Premiere Pro and Audition
Adobe Premiere Pro CS6 and Adobe Audition CS6 offer optimal tools for editing audio, including:
• A redesigned Audio Mixer in Adobe Premiere Pro that gets its new look and functionality from Adobe Audition
• An enhanced Audio Meters panel in Adobe Premiere Pro
• Easy transfer of audio clips between Adobe Premiere Pro and Audition
• Noise-removal effects in Audition
Before you do anything in Adobe Premiere Pro, you need to change your workspace, set your preferences, and open the Audio Mixer.
Changing your workspace in Adobe Premiere Pro
Your workspace is an assortment of panels that displays a graphical representation of your controls. Adobe Premiere Pro CS6 comes with a set of preset workspaces that were designed to maximize productivity based on certain tasks.
Up until now you’ve been using the workspace for editing. Because you’ll be working with audio in this lesson, it’s best to change your workspace in Adobe Premiere Pro to help streamline your work. To change your workspace, follow these steps.
1. Choose Window > Workspace > Audio.
2. Choose Window > Workspace > Reset Current Workspace. Click Yes in the window that appears.
Notice that by doing this your user interface has changed slightly. Most notably, the Audio Mixer panel is now prominent. You’ll explore the Audio Mixer later in this lesson.
Let’s add another panel to your workspace.
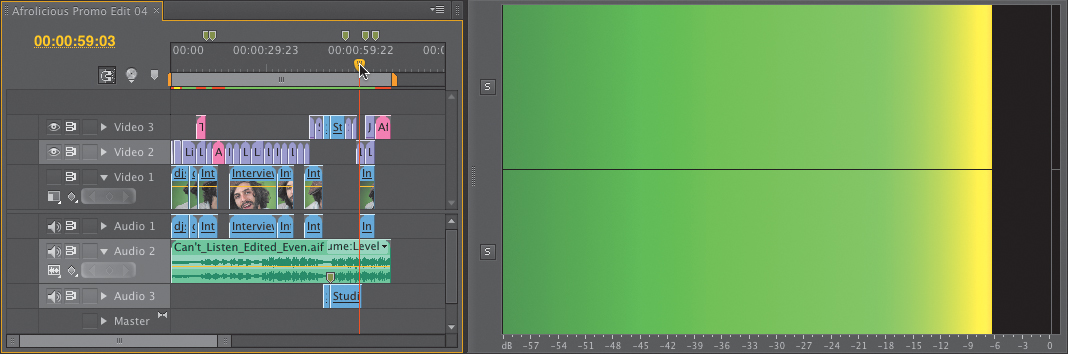
3. Choose Window > Audio Meters. The Audio Meters panel appears in the workspace.
4. Hover your cursor between the Timeline panel and the Audio Meters panel until the cursor changes shape. Drag to the left to stretch the Audio Meters panel horizontally.
5. Now scrub your current time indicator (CTI) across the Timeline. Notice that if the Audio Meters panel is stretched wider than its height, the green meters bounce horizontally, whereas if the height of the Audio Meters panel is longer than its width, the meters bounce vertically. This feature allows for very precise readings on audio levels.
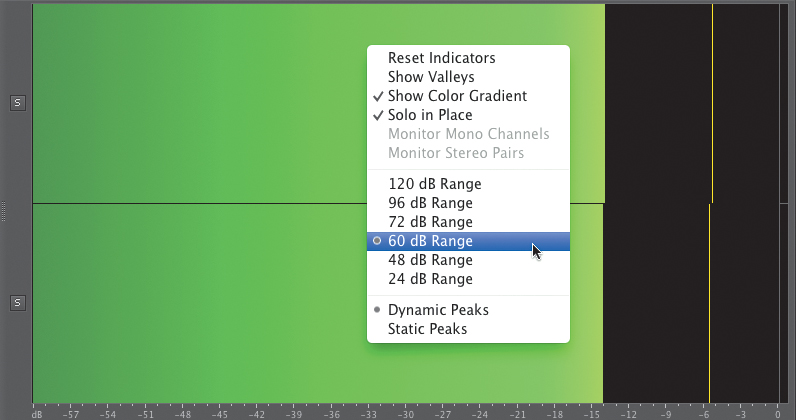
If you want to adjust the scale of units to yield even more precise measurement of volume, right-click on the Auto Meters panel to select from a list of options.
6. Stretch your Audio Meters panel so its height is longer than its width.
Verifying your preferences
Your audio monitoring may already be configured properly. However, you should verify your preferences to make sure you can hear your audio output from Premiere Pro.
Regardless of whether you’re listening to your computer’s sound through studio monitors or headphones (or earbuds!), set a preference in Adobe Premiere Pro that will use your operating system audio output setting.
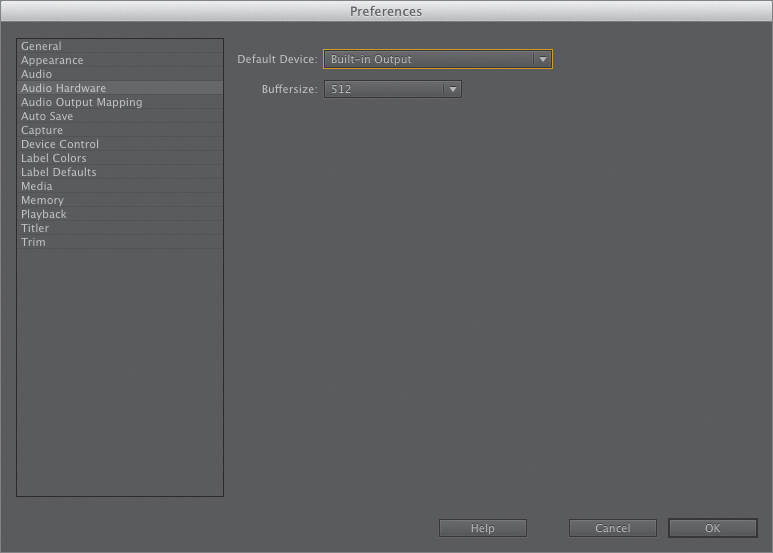
1. Choose Premiere Pro > Preferences > Audio Hardware to select your audio monitoring device.
2. Choose your Default Device and click OK.
Viewing audio waveforms
An audio waveform is a graphical representation of the frequency and volume of an audio clip. Generally, where the graphic is thin, the volume is low, and when the graphic is thick, the volume is high. If you play your movie and listen carefully as you watch your CTI move across the audio waveform, you can get an idea of when sounds occur just by looking at the waveform.
1. In the Timeline, click the disclosure triangle next to Audio 1 and Audio 2 to twirl them open and see the audio waveforms.
2. Zoom in by pressing the equal (=) key on your keyboard (not the numeric keypad).
You can zoom in on your Timeline pressing the equal (=) key. Zoom out by pressing the minus (–) key.
3. Play the sequence by pressing the spacebar.
This blocky graphic becomes a line that moves up and down over time. This is a visual representation of the vibration on the capsule of a microphone when recording audio, as well as the vibration of a speaker when playing back audio.
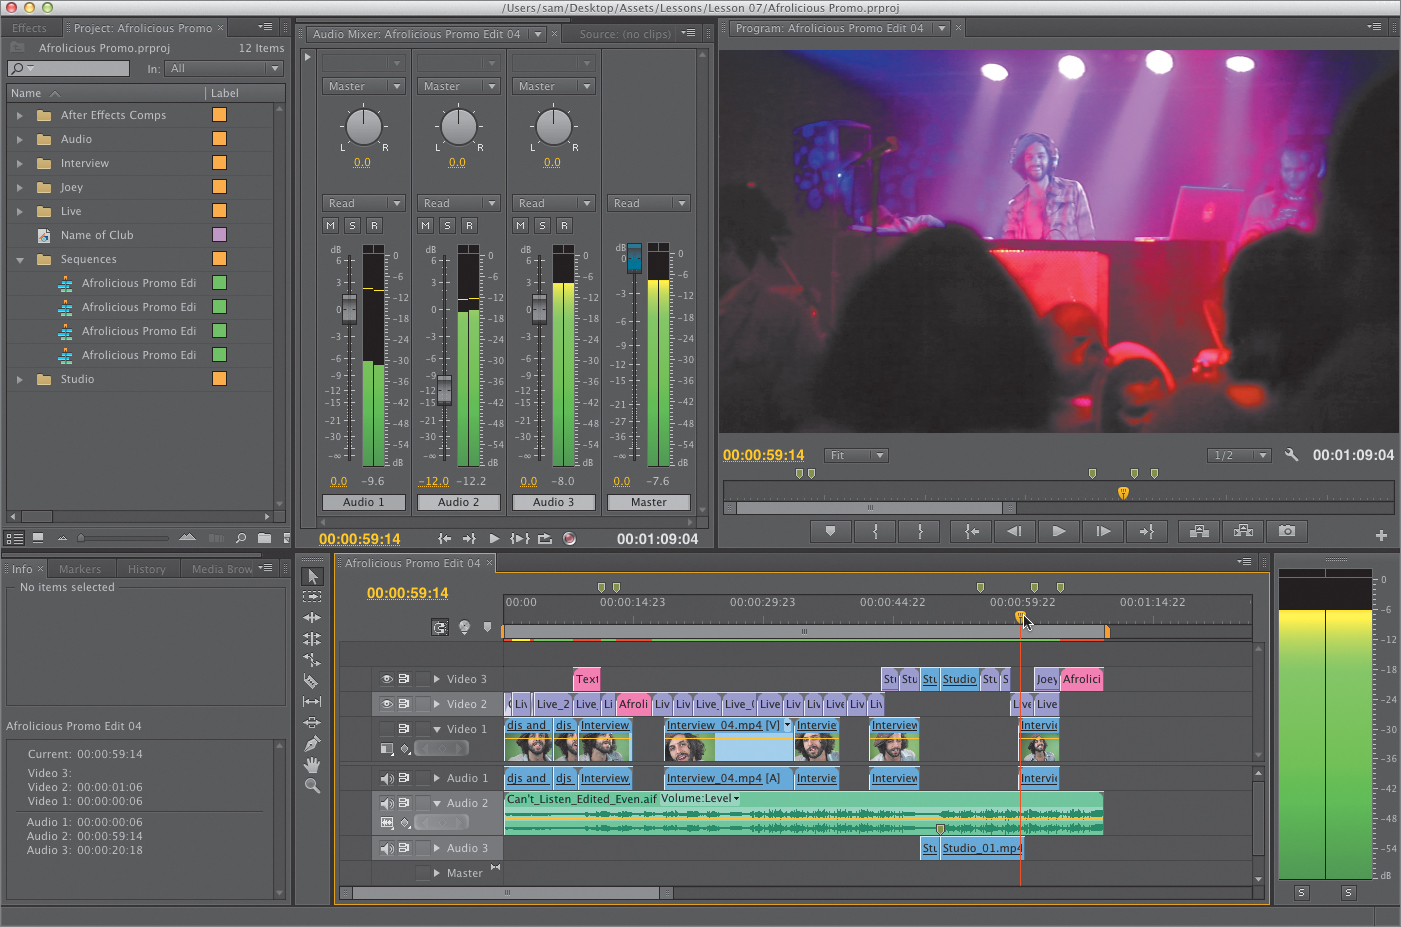
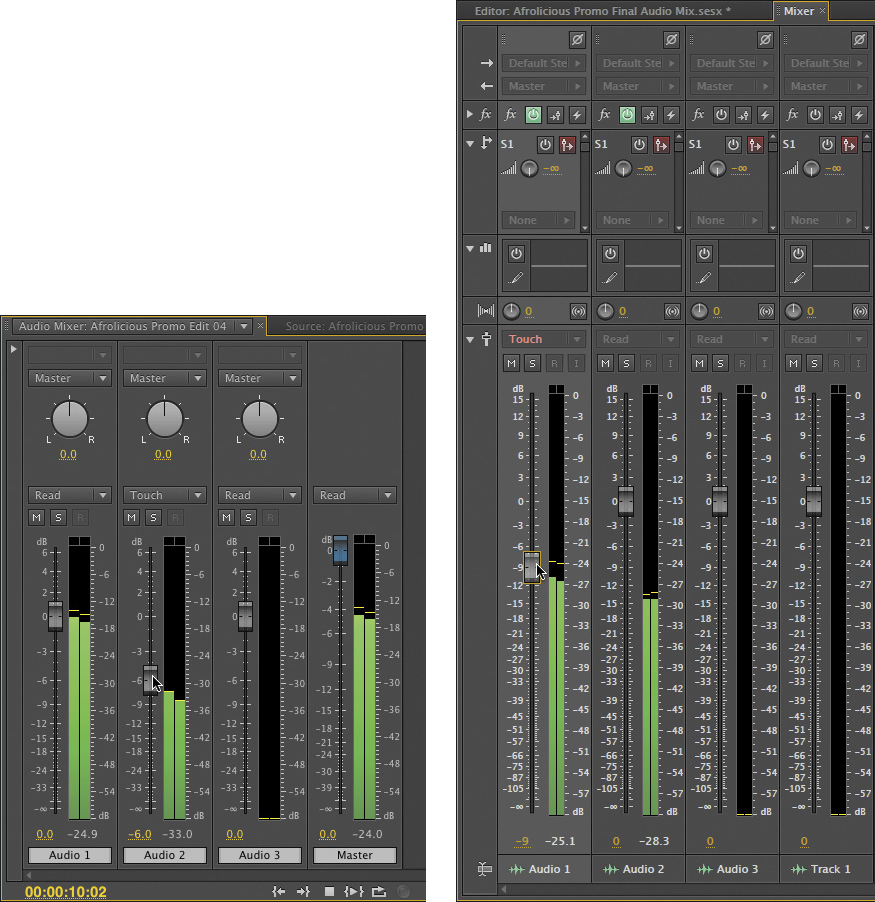
Opening the Audio Mixer
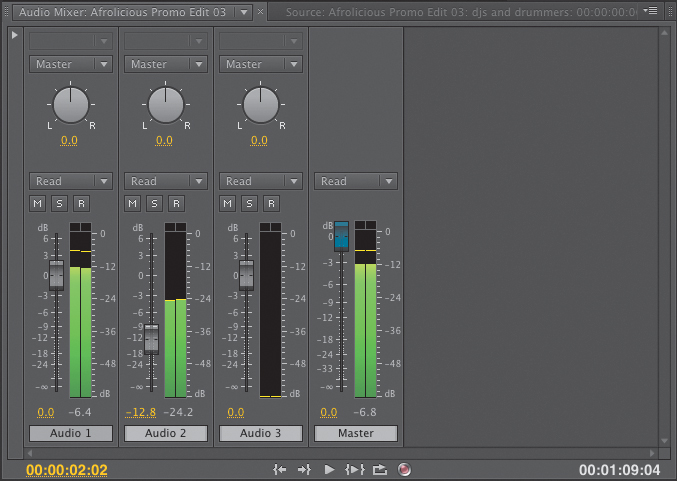
The Audio Mixer panel in Adobe Premiere Pro CS6 has a sleek new look that provides fast, accurate visual feedback about your audio signal levels and includes revamped Mute, Solo, and Record buttons and pan controls, as well as an improved channel strip layout. Now, double-clicking a fader returns it to 0dB, and the Mixer includes separate decibel level scales for the meters and faders. In addition, right-clicking on the Audio Mixer reveals context menus that provide a number of options, including the ability to reset the peak level indicators, show valleys at low amplitude points, change the displayed decibel range, and choose between dynamic peak indicators that update every three seconds or static peak indicators that hold the loudest peak until reset or playback is restarted. And—when signal is present—peak levels are displayed numerically below each meter, giving you precise visual feedback about your audio signal levels. Let’s open the Audio Mixer.
1. Press Shift+6 to show your Audio Mixer panel.
2. In your Timeline, click on the CTI and drag it to the right to scrub through your sequence.
You’ll see a green line in the audio meters moving up and down at varying degrees based on the level of the audio on a given track.
Reset your fader
In a previous lesson, you adjusted the Audio Mixer to temporarily compensate for the music audio levels. Later in this lesson, in the section “Audio Clip Editing in Premiere Pro,” you’ll perform audio editing operations on track Audio 2 in your Timeline
1. Press Shift+6 to show your Audio Mixer panel.
2. Option-click (Alt-click) on the fader icon for Audio 2 to reset it to 0.
Adobe Premiere Pro effects
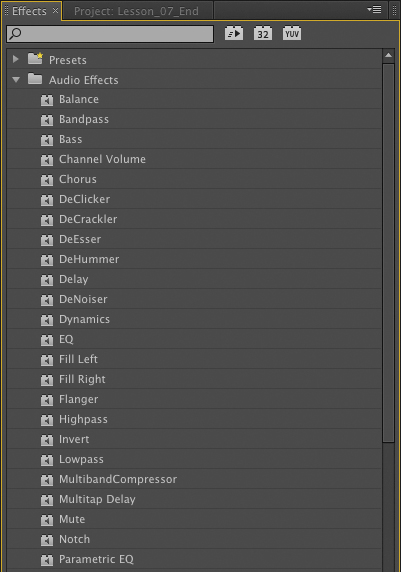
Just as Adobe Premiere Pro offers many effects for video, it also offers many effects for audio. Audio effects can be applied to audio clips in the same way that video effects can be applied to video clips in your Timeline, as demonstrated in Lesson 4. You can apply the following effects and more:
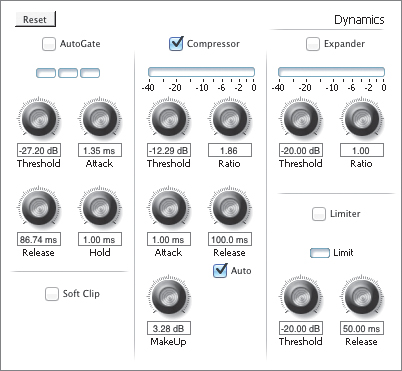
• Dynamics effect. Provides a set of controls that allow you to adjust audio, including Limiter, Compressor, and Expander settings. The dynamics effect is a good way to fix problems with audio levels that vary too much.
• Parametric Equalization effect. Allows you to adjust frequencies in relation to a Center frequency. This can be used to simulate a more expensive microphone or reduce an unwanted hiss from a high frequency.
• Reverb effect. Can apply a simulation of the acoustics of audio playing in a room.
• Delay effect. Creates an echo of an audio clip’s sound. This can be useful to simulate the sound of an audio clip as if it were played in a cavernous space.
These audio effects, and others, are located in the Effects panel within the Audio Effects category.
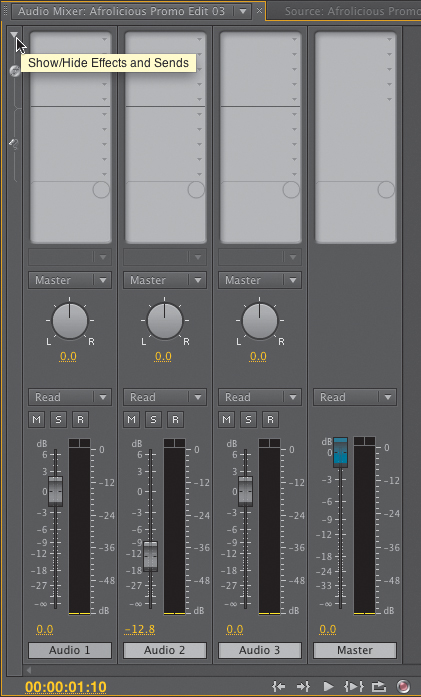
Track-based effects when applied affect entire tracks and are accessed via the Effects and Sends menu in the upper region of the Audio Mixer panel.
Audio clip editing in Adobe Premiere Pro
Editing audio clips in Adobe Premiere Pro CS6 is just as simple and intuitive as editing video. Clip volume and duration can be adjusted in the Source Monitor as well as in the Timeline.
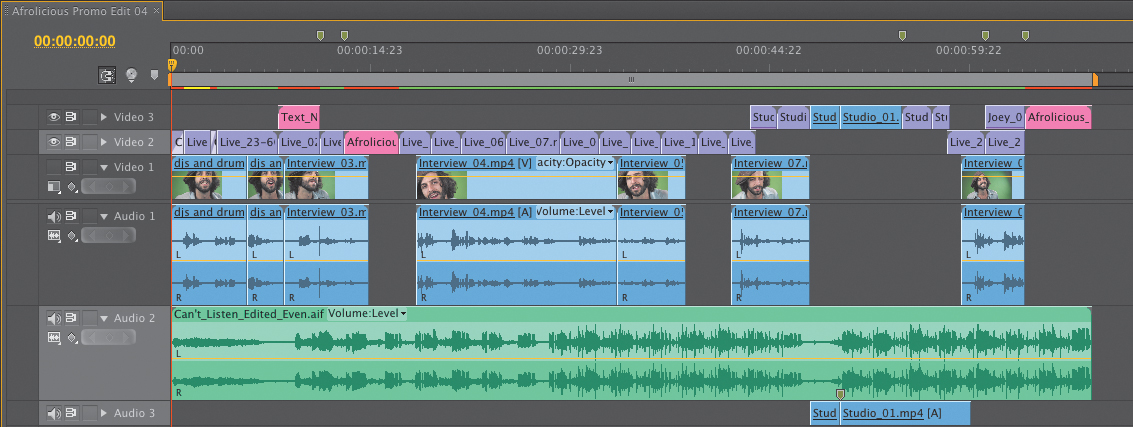
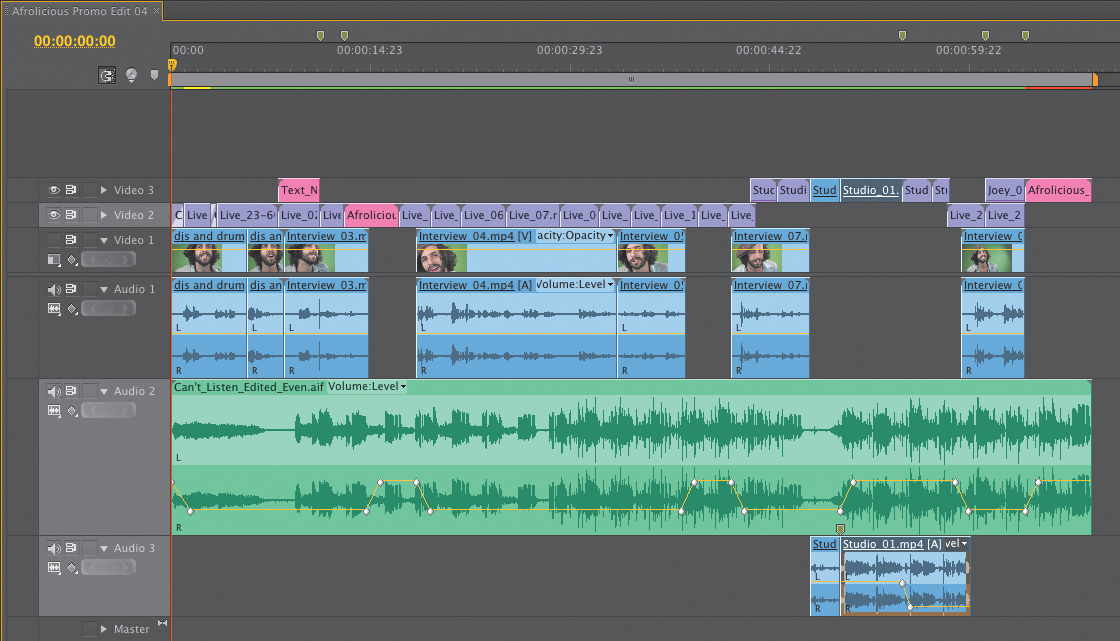
Now let’s dive into clip editing. You’ll be automating the volume of the music clip so that as Joey—the interview subject—speaks, the music volume is reduced but is raised when he is not speaking.
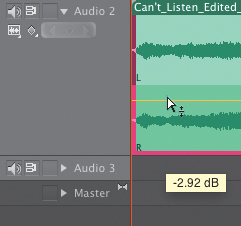
In your Afrolicious Promo Edit 04 Timeline, look closely at the Audio 1 track. All of the clips in that track have a yellow horizontal line, which indicates a clip’s current volume level.
1. Press the Home key to set your CTI to the beginning of your edit.
2. With the Selection tool, click on the yellow line for the music clip in Audio 2, and drag downward until your tool tip reads between –3 and –4dB. Notice that it’s challenging to achieve a precise result making this adjustment on the Timeline.
3. With the music clip in Audio 2 selected, press Shift+5 to open the Effect Controls panel and notice the corresponding volume adjustment for the Level property. Here you can set precise values for your volume adjustments. Change the Volume Level to –3.0dB. By making this adjustment in the Effect Controls panel, Adobe Premiere Pro makes a new keyframe at the current time.
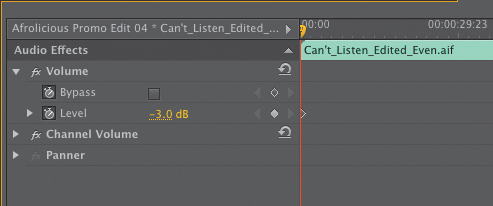
Notice the stopwatch icon next to Level. This is activated by default. If you deactivated it, Adobe Premiere Pro would not automatically create new keyframes.
You’ll continue to add keyframes to the Volume Level of the music clip on Audio 2 in this fashion. By automating the music clip, you can set different adjustments at different points in time so the music doesn’t overpower the interview and the music is prominent when there is no interview audio.
4. Advance your CTI to approximately 00:00:01:12. Adjust the Volume Level in the Effect Controls panel to –12dB.
5. Play your Timeline from the beginning, listening carefully and noticing that the music level is louder at the beginning than it is for the remainder of the clip. Also, listen to the interview audio. Stop right after you hear Joey say, “blurring lines between audience and performer.”
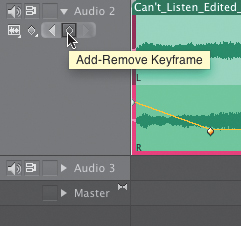
6. Keep the music clip selected. Go to the Effect Controls panel and set a value of –12 for Level by clicking the Add/Remove Keyframe icon.
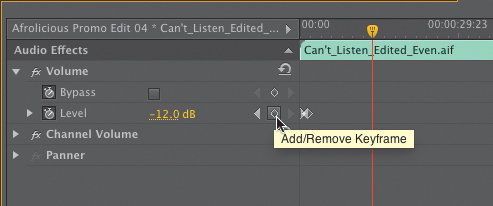
You could also click the corresponding Add/Remove Keyframe icon in the Timeline.
7. Adjust your CTI one second ahead when there is no interview audio and only music. Adjust the Level to –3dB. This will make another keyframe at the current time.
Press Shift+right arrow to adjust your CTI forward five frames. Press Shift+left arrow to adjust your CTI backward five frames.
8. Play back your sequence from the beginning. The music gets louder as Joey finishes saying, “audience and performer.”
9. Scrub your CTI to the right until it snaps to the head of the next interview audio clip in which Joey says, “Afrolicious began five years ago.” Adjust your CTI backward 12 frames.
Let’s make the music softer as Joey begins speaking again.
10. With the music clip selected, click the Add/Remove Keyframe icon next to the Level value. Again, this makes a new keyframe using the current value, which should be –3dB.
11. Move your CTI forward one second. Adjust the Level to –12, making another keyframe with this value.
12. Play back the sequence to hear the music get louder and then softer again. As you work through making these volume adjustments, be sure to play back your audio and make any adjustments needed to create a seamless audio edit. This could mean overlapping volume changes to the music track during the beginning and end of the interview segments.
13. Do the next edit on your own so that the music gets louder during the next break in the interview audio. Keyframe your music Level between –12dB and –3dB over one second to make it louder and then between –3dB and –12dB over one second to make it softer.
14. Find the point in your Timeline when the singer at the studio microphone sings the line “I can’t listen.” From here, keyframe your music Level from –12 to –3 over a span of one second.
15. Advance your CTI forward. Right before Joey says, “My confidence comes from the music,” keyframe the music Level over one second between –3dB and –12dB. Then as Joey finishes saying, “with that music behind us,” keyframe the music Level over one second between –12dB and –3db.
16. Twirl open Audio 3, and select Studio_01.mp4. Move your CTI back to when the singer finishes singing “when they tell me.” Go to the Effect Controls panel and set a Volume Level keyframe for 0dB at this frame. Advance your CTI forward to right before he sings “I can’t make it....” Adjust the Volume Level to the lowest possible value, making a keyframe with this value, so that the audio for this clip dips down as the music gets louder, thus blending with the music track.
17. Press Home to jump to the beginning of your sequence. Press Shift+6 to show the Audio Mixer so that you can see the meters. Press the spacebar to play your sequence. Notice that the green meters for Audio 2 get higher and lower as the Level keyframes for this clip automate upward and downward.
18. Press Command+S (Ctrl+S) to save your project.
Audio clip editing in Adobe Audition
Adobe Audition is a cross-platform, high-performance multitrack audio editor with a versatile arsenal of sound-restoration and editing tools, strong integration with Adobe Premiere Pro, and dozens of new features, such as real-time clip stretching, parameter automation, and automatic speech alignment, that increase your efficiency and control.
Although you can use Adobe Premiere Pro in the clip editing and finishing stages of audio production, you’ll be using Adobe Audition for its more robust and efficient tools to resolve issues such as clicks and background noise.
Examining clips for distractions
Let’s closely examine the interview and natural audio track to determine what needs to be fixed in the sequence Afrolicious Promo Edit 04.
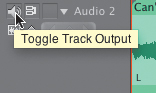
1. In your Adobe Premiere Pro Timeline, mute Audio 2 by clicking its Toggle Track Output switch, so that you can listen closely to the interview audio in Audio 1 and the natural audio in Audio 3. Click Play.
2. Listen closely to when Joey says, “blurring lines.” Immediately after he says that is an audible click sound. This is distracting and should be removed.
3. Toward the end of the video is a clip of Joey and the singer sitting in the studio (Studio_07-Dialogue.mp4). As Joey says, “We should lay down that vocal,” notice that there is an audible low-frequency hum produced by a poorly grounded microphone or cable. This noise should also be removed.
For this lesson, you’ll use Adobe Audition to remove the click sound from Interview_03.mp4 and the low-frequency hum from Studio_07-Dialogue.mp4.
Sending audio clips from Adobe Premiere Pro to Audition for cleanup
Adobe Premiere Pro allows you to easily send an audio clip to Adobe Audition.
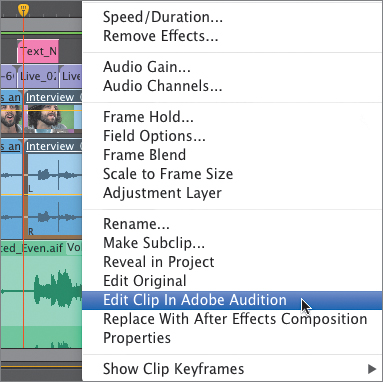
Let’s first work with the Interview_03.mp4 clip. Select that audio clip in your Timeline. Right-click on it, and then choose Edit Clip In Adobe Audition.
Adobe Premiere Pro automatically renders this as a .wav file and replaces the original audio clip within the Timeline. This new .wav file, Interview_03 Audio Extracted.wav, will open in Adobe Audition.
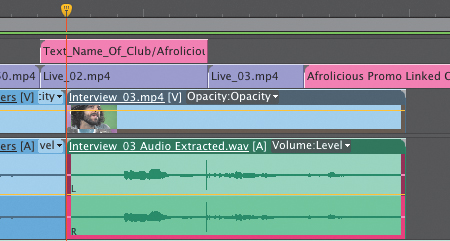
Any changes applied to Interview_03 Audio Extracted.wav in Audition will automatically update in your Adobe Premiere Pro sequence.
Understanding the Spectral Frequency Display
In Adobe Audition, Interview_03 Audio Extracted.wav will appear in the Editor panel. At the top of the Editor panel you’ll see a stereo waveform. Below the waveform is the Spectral Frequency Display. It offers a different way of visualizing frequencies and volume in the left and right channels of the clip.
If you are seeing the waveform but not the Spectral Frequency Display, click the small triangle icon at the bottom right of the Editor panel, just above the zoom tools, to reveal the horizontal interface divider, which you can then drag upward.
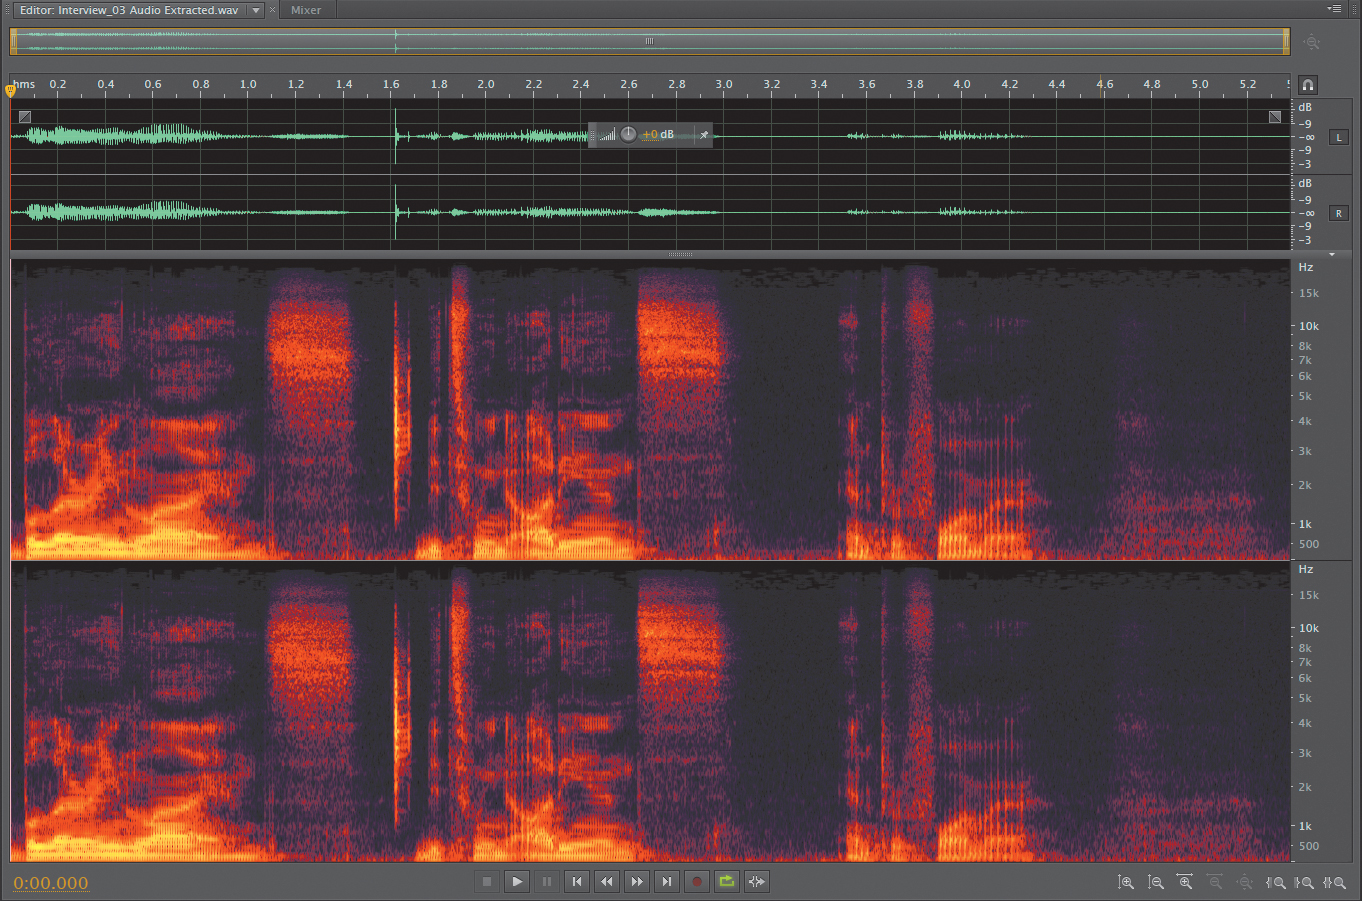
Play the clip and pay close attention to the Spectral Frequency Display. There are separate (but in this case, largely identical) spectra for the left and right audio channels. Frequency is represented on the vertical axis, whereas amplitude is represented by a range of colors and brightness. Notice the range of frequencies displayed on the right side of the Spectral Frequency Display. Also, notice that louder sounds are represented by yellow and orange areas, whereas softer sounds appear red and purple.
As you play the clip a few times, watch the CTI and pay close attention to which areas of the spectrum correspond to the sounds you hear. Try to visually isolate where the click sound is in the spectrum.
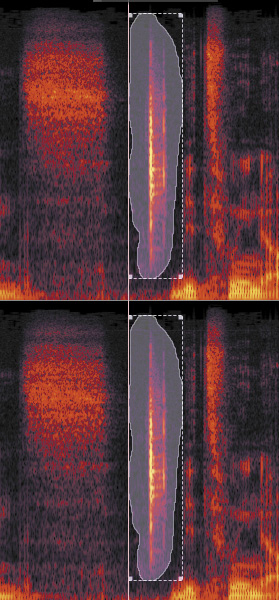
Removing transient sounds using the Spectral Frequency Display
The click noise that should be removed from Interview_03.mp4 is visible in the Spectral Frequency Display as a narrow vertical orange area. You’ll remove it using the Lasso tool.
1. From the Tools panel at the top, select the Lasso tool.

2. Adjust your CTI to just before the click sound. Zoom in to the spectrum by pressing the equal (=) key several times.
3. Using the Lasso tool, draw around the click sound in the spectrum. Try to isolate it without selecting any spectrum of the audio of Joey speaking.
4. Press the Delete key.
Play back the clip from the beginning and verify that the click sound is gone and the audible voice frequencies or natural noise floor is still intact.
5. Save your .wav file in Audition by pressing Command+S (Ctrl+S). Then switch back to Adobe Premiere Pro.
6. Play your sequence and notice that the changes you saved in Audition are indeed applied, and that the click sound has been removed.

Removing background noise from your audio
You need to edit one more audio clip in Adobe Audition. Studio_07-Dialogue.mp4 has a low-frequency hum. This time you can’t simply select and delete an unwanted bit of audio. The low-frequency hum is audible throughout and is interlaced with frequencies that are essential to keeping the quality of dialogue. To remove it, you must select a region of the audio spectrum that represents the room tone, or the background noise only, which captures a snapshot of these unwanted frequencies. Then you’ll use a noise-removal effect in Adobe Audition. The background noise will be removed from the whole clip, leaving the dialogue audio intact.
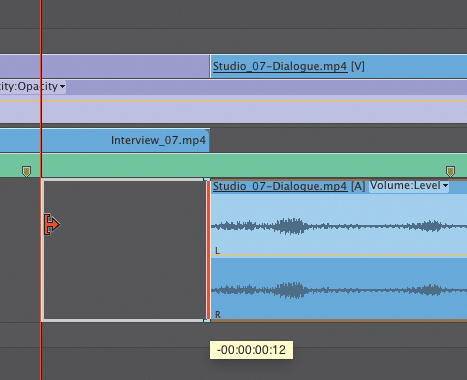
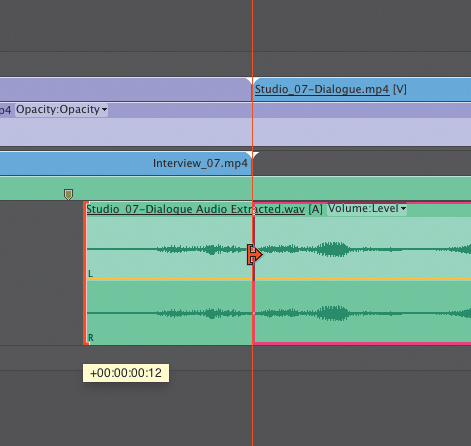
Based on the edit you currently have in the Timeline, Studio_07-Dialogue.mp4 has been tightly trimmed to Joey saying, “Let’s lay down that vocal.” To sample some room tone from this clip, you need to temporarily extend the In point of this audio clip.
1. In the Adobe Premiere Pro Timeline, you need to extend the head of the audio but not the video of Studio_07-Dialogue.mp4. To do this, hold down the Option (Alt) key, and with the Selection tool, click and drag the head of this clip in Audio 3 to the left 12 frames.
2. Now select that audio clip. Right-click on it, and then choose Edit Clip In Adobe Audition. Again, you should see its replacement audio clip, Studio_07-Dialogue Audio Extracted.wav, open in Adobe Audition.
3. Listen to the audio and find a region of time at the beginning of the clip that is only room tone and nobody speaking.
4. You can define your region of selection by setting In and Out points. Adjust your CTI to 0.082 seconds and press I to set the In point. Adjust your CTI to 0.191 seconds and press O to set the Out point.
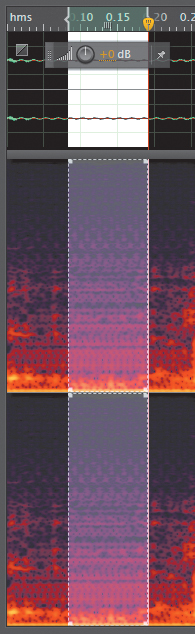
5. Choose Effect - Noise Reduction Process > Noise Reduction / Restoration > Noise Reduction Process.
6. In the Noise Reduction Process window, click the Capture Noise Print button to sample the room tone.
7. Now click the Select Entire File button so that any changes you make with the sampled room tone will apply to the entire file.
8. Click the Play button at the bottom of the Effect - Noise Reduction window to hear the audio with the noise removed.
The Noise Reduction slider controls the percentage of noise reduction in the output signal. Fine-tune this setting while previewing audio to achieve maximum noise reduction with minimum artifacts. Reduce By determines the amplitude reduction of detected noise.
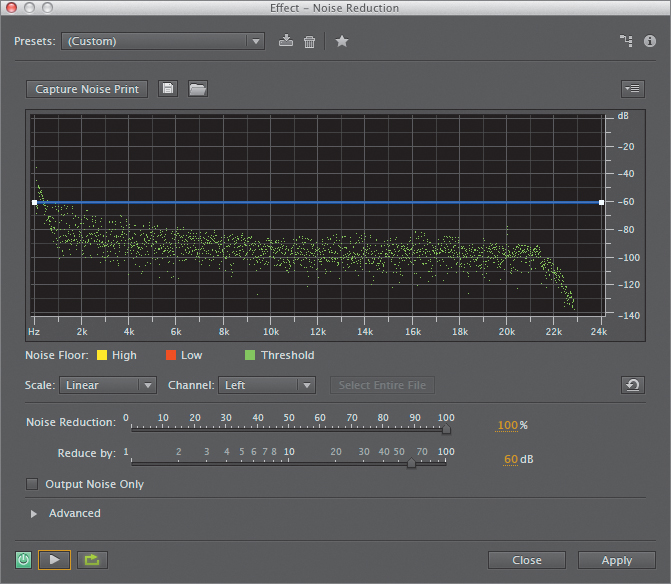
Noise Reduction is a frequency value, whereas Reduce By is a decibel value. Basically, you want to capture the frequencies you want to remove while maintaining integrity of the frequencies that are integral to the sounds you’d like to preserve. It helps to try increasing the Noise Reduction value to the point at which the sound degrades. Listen for destructive qualities to the sound you’re trying to preserve, and then ease back the value to a nominal threshold that sounds good to your ears. Use the Reduce By value to reduce the selected frequencies more or less. It is recommended to use the Noise Reduction and Reduce By values in an inverse fashion.
Remember that the goal here is not to reduce noise completely, but to reduce it so that the speaker is clearer and still sounds natural. There is a balance between clarity and overprocessed audio.
9. Once the noise reduction sounds satisfactory, click Apply.
The Noise Reduction effect offers many capabilities to refine your noise reduction, but in most cases you’ll only need to slightly adjust the Noise Reduction and Reduce By properties. Again, trust your ears as you identify the optimal balance between destructive and effective changes.
10. Press Command+S (Ctrl+S) to save your .wav file, and then switch back to Adobe Premiere Pro.
11. Now you need to re-trim this audio clip in your Timeline. Hold down the Option (Alt) key, and click and drag the In point forward 12 frames, back to its original state.
12. Press Command+S (Ctrl+S) to save your Adobe Premiere Pro project.
Multitrack mixing and finishing in Adobe Audition
At the point in postproduction when your picture is locked—that is, when the edit is complete and no further adjustments to timing will be made—it is standard procedure to finish the audio mix by balancing levels between tracks and maximizing overall amplitude without introducing distortion.
You’ll finish the audio mix in Adobe Audition using its multitrack mixing features. You’ll also add a sound effect to the final mix. Then you’ll export a final stereo mixdown from Audition and replace the original clip audio with the final stereo mixdown in the current Adobe Premiere Pro Timeline.
Let’s send the entire sequence into Audition.
1. In your Adobe Premiere Pro sequence, make sure that all of your audio tracks are turned on.
2. In the Project panel, in the Sequences folder, select Afrolicious Promo Edit 04.
3. Choose Edit > Edit in Adobe Audition > Sequence.

4. In the window that appears, select the Export Preview Video check box and match the rest of the settings in the following figure. Click OK.
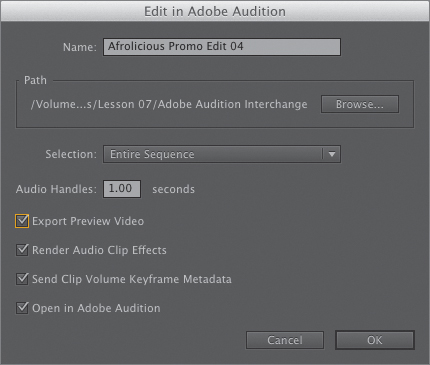
You are exporting preview video with your audio mix so that in Audition you’ll have a visual cue for when to insert a sound effect.
Adobe Premiere Pro exports the video and Audition opens showing all of your tracks and clips from your Timeline.
Note that a few operations happened automatically. The video track is exported as a single video clip that is only for reference in Audition. All audio clips are exported as .wav files. These are then brought into an Audition multitrack project with all automation keyframes intact and all effects rendered in the copied audio clips. All original media remains on your computer and will not be affected.
Exporting preview video when sending a sequence to Adobe Audition may result in a long render time.
5. Change your Audition workspace to show the video preview. Choose Window > Workspace > Edit Audio to Video. Then reset the workspace by choosing Window > Workspace > Reset “Edit Audio to Video.” Click Yes.
You’ll first add a sound effect to the final audio mix in Adobe Audition. Then you’ll add the sound of a crowd cheering toward the end of the video.
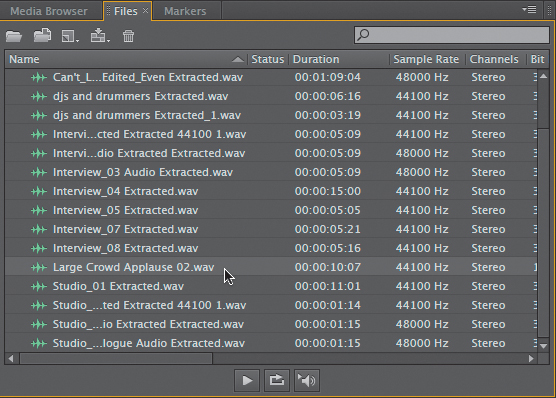
6. Choose File > Import > File. Navigate to the Audio folder in the Adobe CS6 Project Assets folder. Select Large Crowd Applause 02.wav and click Open. You’ll see this clip in your Files panel.
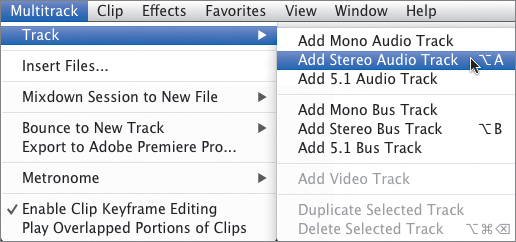
7. You need to add a new track for the sound effect, so click Multitrack > Track > Add New Stereo Audio Track. This new track appears in the Editor panel below Audio 3.
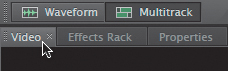
8. Click the Video tab near the top left of the interface. This allows you to see the edit of the video so that you can synch sounds with visual cues.
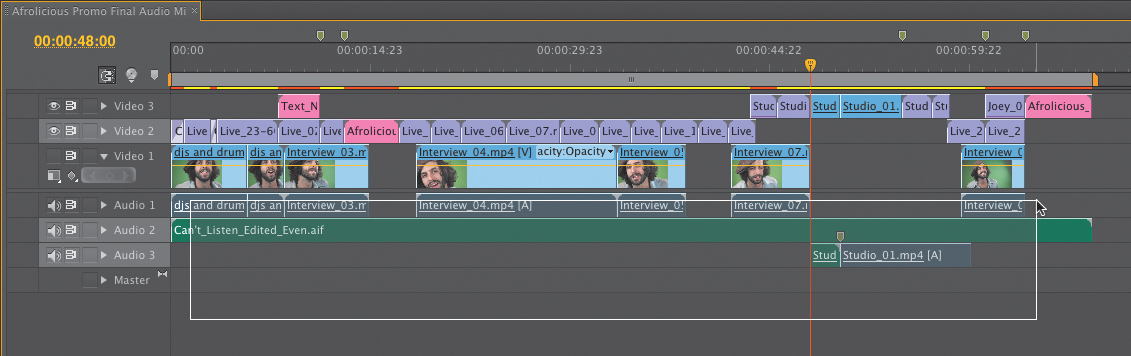
9. Adjust the CTI to 00:00:58:13 to when you see Joey on stage smiling at the crowd. This moment would be good for the crowd applause to be heard.
10. Drag the file Large Crowd Applause 02.wav into the Editor panel in the new audio track. Press V to activate the Move tool. Click on the Large Crowd Applause 02 clip in the Editor panel so that its head snaps to the CTI.
11. Now you’ll need to trim the tail of the sound effect clip. Adjust your CTI to 00:01:07:15, right before the last four bass notes in the music. With the Move tool, click and drag the bottom-right corner of the Large Crowd Applause 02 clip until the tail of the clip snaps to the CTI.
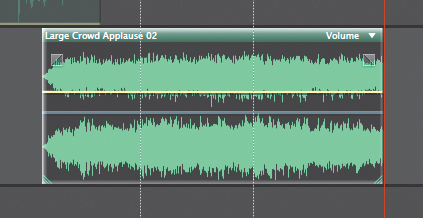
12. A yellow horizontal line indicates this clip’s volume. With the Move tool, click and drag this yellow line to –12dB.

The Zoom tools at the bottom of the Editor panel can be used to expand the tracks horizontally or vertically, making it easier to adjust volume or make time-based edits.
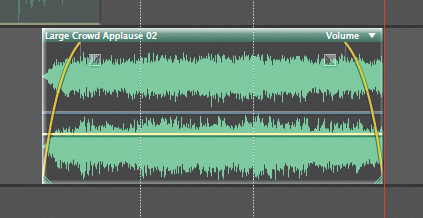
13. Now let’s fade the clip in and out. Select the clip and choose Clip > Fade In > Fade In. Choose Clip > Fade Out > Fade Out.
14. Press Command+S (Ctrl+S) to save your Audition session. Name your file Afrolicious Promo Final Audio Mix.sesx and save it in the default location. Click OK.
Audio track editing in Adobe Audition
Now it’s time to do the final multitrack mix. To reiterate, applying changes to a track affects the entire audio output of that track. You’ll apply an effect to the music track as well as to the interview track. Then you’ll apply an effect to the Master track, which will affect the output of all tracks.
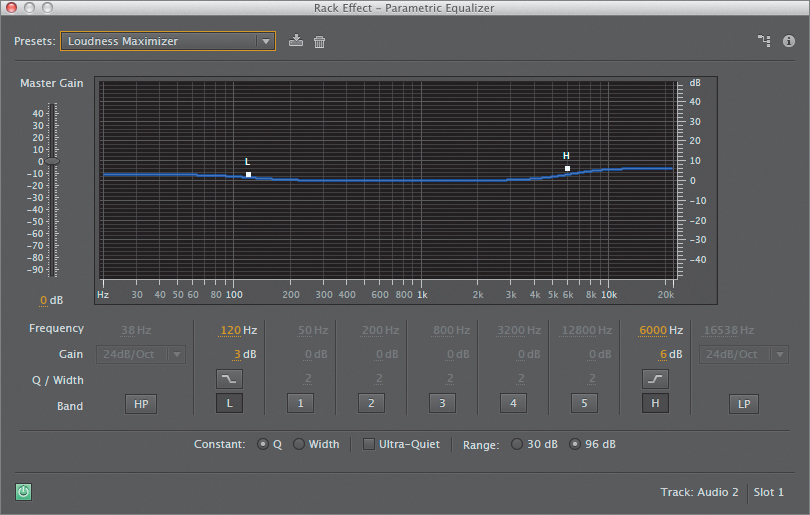
1. Select track Audio 2. Choose Effects > Filter and EQ > Parametric Equalizer to open the Rack Effect window. Set Presets to Loudness Maximizer. This preset will boost the low and high frequencies, leaving the midrange frequencies between 100 Hz and 4 kHz (the frequency range of the human voice) unchanged.
2. Close the Parametric Equalizer window.
3. Select track Audio 1. Rather than use the menu, this time click the Effects Rack panel tab to access it.

You’ll see several empty rows with a number on the left and triangle icons on the right. These rows represent slots where audio effects would appear as a list.
4. Click the first triangle icon and a menu will appear. From the menu choose Filter and EQ > Parametric Equalizer. It will show as the first effect in the rack.
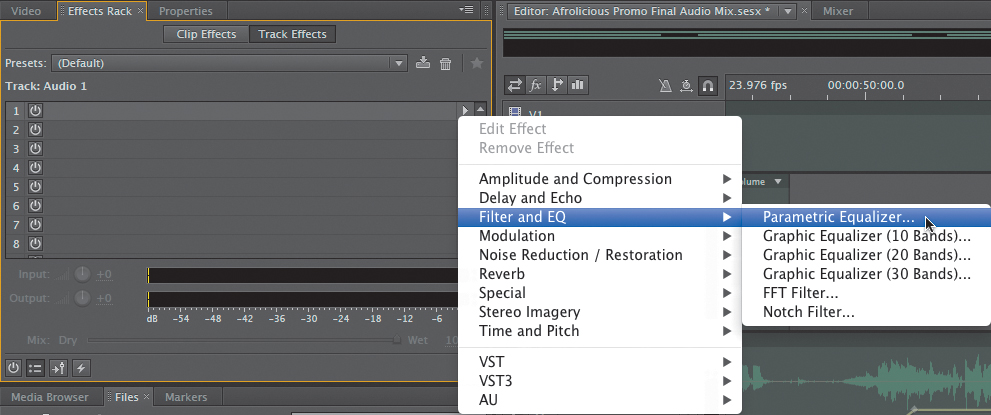
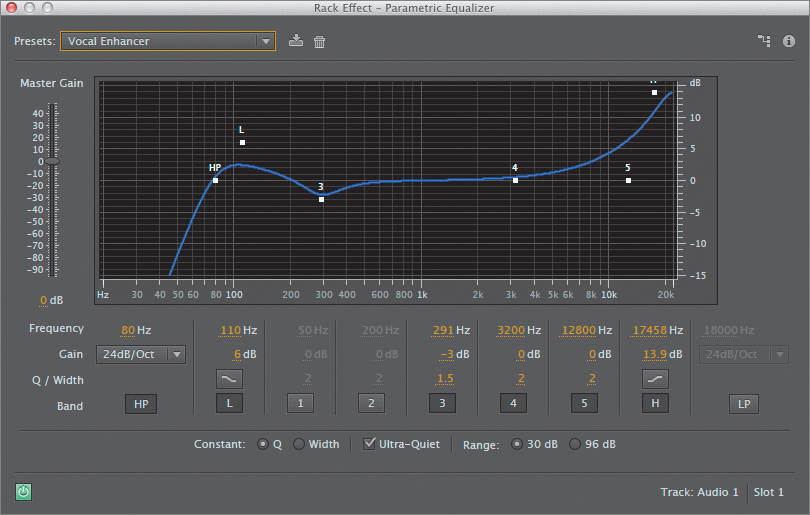
5. In the Rack Effect – Parametric Equalizer window that appears, set the Preset to Vocal Enhancer. This preset enhances the vocal range of audio frequencies by making a subtle increase to frequencies associated with the human voice while reducing unwanted frequencies so that the resulting vocal sounds are audible and clear. Close the Parametric Equalizer window.
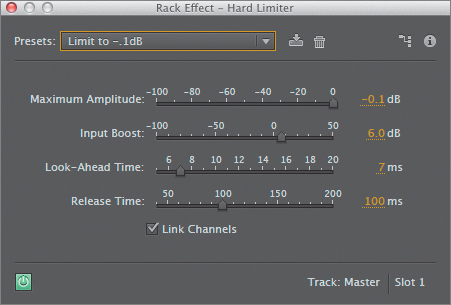
6. Select the Master track in the Editor panel. Choose Effects > Amplitude and Compression > Hard Limiter. In the Rack Effect window, set the Preset to Limit to –.1dB to ensure that audio in the entire mix is at maximum loudness without clipping or distortion. Close this window.
Limiting refers to setting a maximum audio output threshold. With limiting applied, no clip in a track can be louder than this set volume.
7. Press Command+S (Ctrl+S) to save your Audition session.
Creating the final audio mix
The final task you want to do in Audition is export the final audio mix.
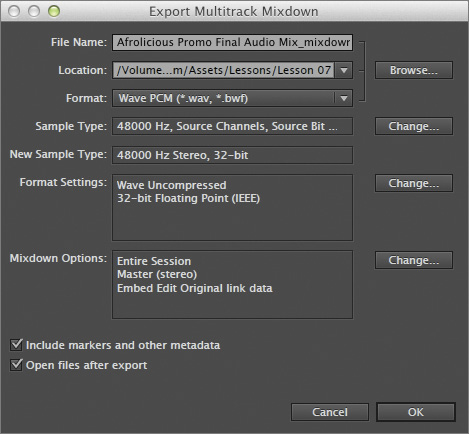
1. Choose File > Export > Multitrack Mixdown > Entire Session.
2. In the Export Multitrack Mixdown window, name your file name Afrolicious Promo Final Audio Mix_mixdown.wav. Set Location to the Lesson 07 folder.
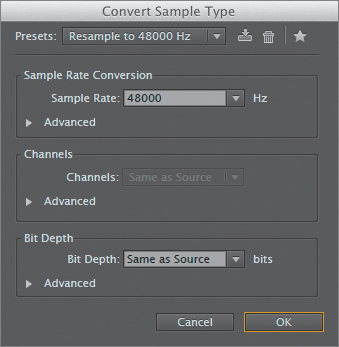
3. You’ll need to change the Sample Type so that your sample rate is 48 kHz, the standard for audio and video production. Click the Change button to the right of the Sample Type values.
4. In the Convert Sample Type window, click the Presets menu and choose Resample to 48000 Hz.
5. Click OK to close the Convert Sample Type window. Click OK again to close the Export Multitrack Mixdown window.
6. Switch back to Adobe Premiere Pro. In the Project panel, in the Sequences folder, select Afrolicious Promo Edit 04. Choose Edit > Duplicate. Select the resulting Afrolicious Promo Edit 04 Copy, click on it once to make its name editable, and then change it to Afrolicious Promo Final Audio Mix. Double-click on this to open it. Close the tab for Afrolicious Promo Edit 04 in the Timeline panel to avoid confusion.
Now import the final audio mix that you made in Audition.
7. Choose File > Import. Navigate to your Lesson 07 folder and select Afrolicious Promo Final Audio Mix_mixdown.wav. Click Import and drag the file into the Audio folder.
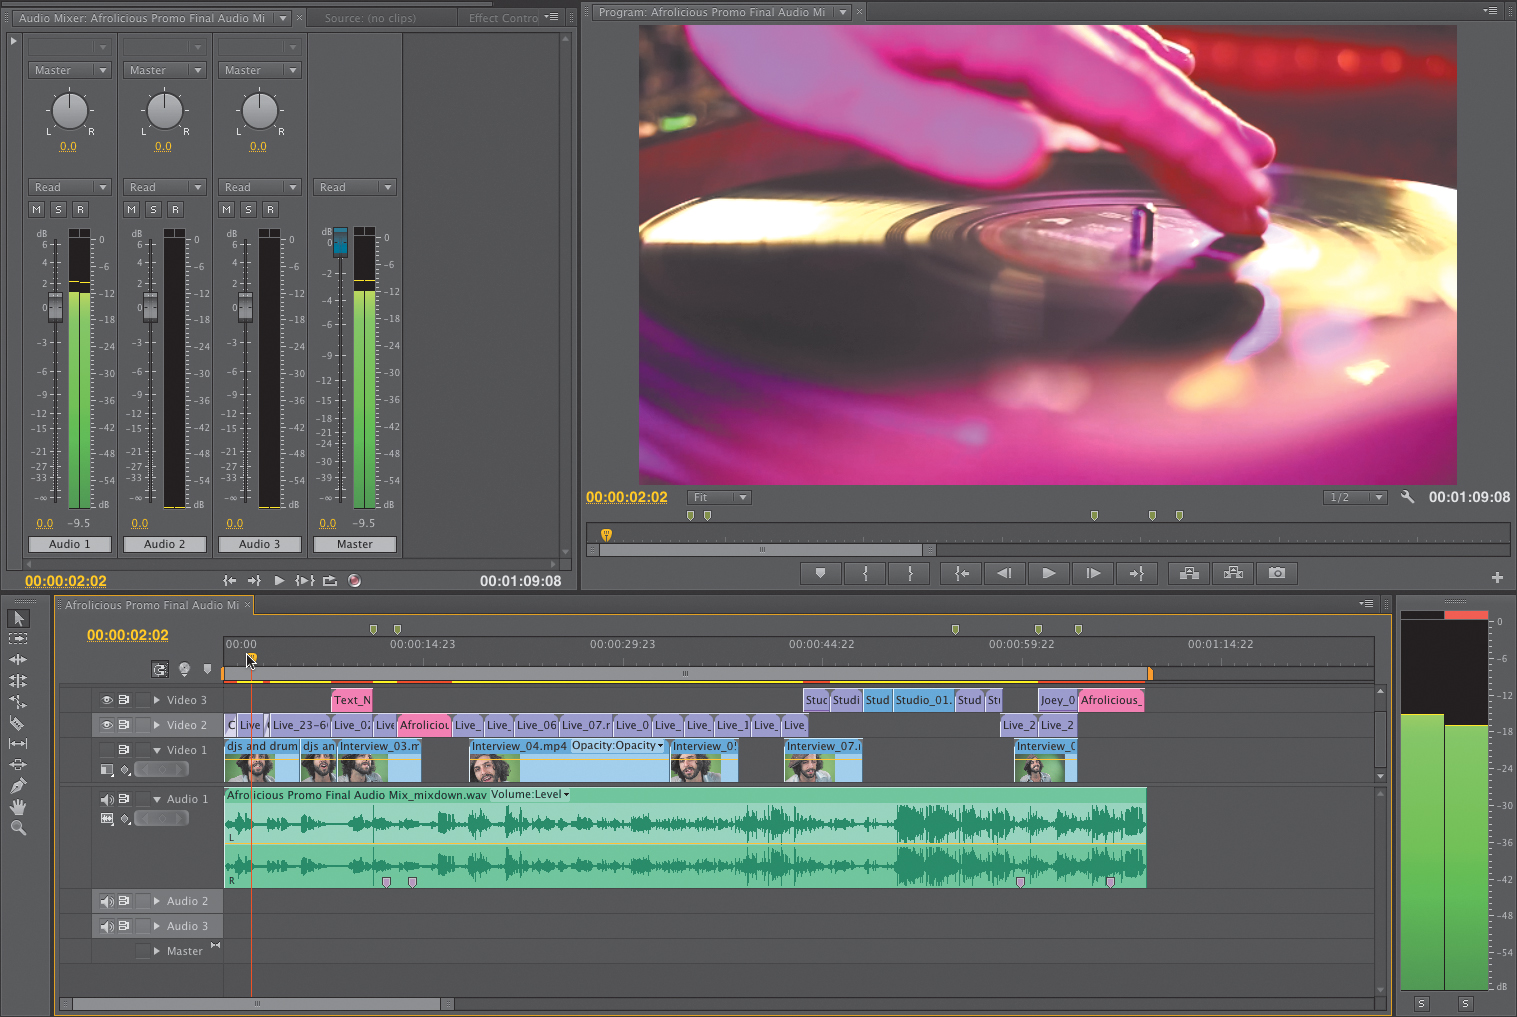
8. In the Timeline for Afrolicious Promo Final Audio Mix, hold down the Option (Alt) key as you draw a marquee around all of the audio clips in Audio 1, Audio 2, and Audio 3 to select them. Once they are selected, press Delete.
9. Drag Afrolicious Promo Final Audio Mix_mixdown.wav from the Audio folder in the Project panel into the now-empty track Audio 1. Make sure that its In point is at the very beginning of the sequence.
10. Play back your entire sequence and monitor the audio. Pay close attention to ensure that the audio is still synched properly with the video. You should now have a finished audio mix with optimum amplitude and balancing between tracks.
11. Press Command+S (Ctrl+S) to save your Adobe Premiere Pro project.
Review questions
1. What is the difference between clip editing and track editing?
2. How do you make the volume of an audio clip change over time in a sequence?
3. What new feature in Adobe Premiere Pro CS6 allows for precise readout of sequence volume viewable as both horizontal and vertical meters?
4. How do you send a clip from a sequence in Adobe Premiere Pro CS6 to Audition CS6?
5. What is the name of the user interface feature in Audition that shows an audio clip represented by a range of colors and brightness, and simplifies selection and removal of unwanted noise?
6. What audio effect in Audition allows for capturing a sample of background noise that can then be removed from an entire clip?
Review answers
1. Clip editing entails making changes to the audio of a specific clip by adjusting its volume, adding an effect, or performing some other operation. Track editing entails making changes to an entire track.
2. You make the volume of an audio clip change over time in a sequence by applying Volume Level keyframes to the clip in the Effect Controls panel.
3. The Audio Meters panel to the right of the Timeline panel can show volume readout both horizontally and vertically.
4. Select the audio clip in the Adobe Premiere Pro Timeline, right-click on it, and choose Edit Clip In Audition.
5. The user interface feature is the Spectral Frequency Display.
6. The audio effect is the Noise Reduction Process effect.