
9. Organizing Your Photos: Places
In this chapter, you learn how to navigate the Places map, which helps you easily track your travels, whether global or in your own small corner of the world.
→ Navigating the Places map
→ Viewing photos by location
→ Manually adding locations to photos
→ Managing your Places library
Places is probably my favorite feature of iPhoto. If you’re a travel buff like me, you can see just how cool a feature it is. With Places, you can easily track all the locations where you took your photos on a large, interactive map. Simply select any pin on the map to view all the photos you took in that location and relive your travels.
From automatic geolocation lookup to easy smart album creation to incredible ways to navigate your photos on a global scale, Places is one of the features of iPhoto that quickly becomes most people’s favorite. Together with the Events and Faces features, Places completes the trifecta of the novel ways iPhoto enables you to organize and navigate your photos.
What Is Location Data?
Before we get in to exploring the Places map, let’s talk about how Places can automatically “know” where your photos were taken by using location data.
Location data consists of bits of information encoded into the photographs you take that help your camera or photo software accurately pinpoint the location of the photo you have taken. When you take a picture, there are two ways your photos can be automatically tagged with location data. The first is by Global Positioning System (GPS), and the second is by using a known Wi-Fi location.
Your camera might have one of these technologies built in to the hardware. For example, most smartphones, like the iPhone, have built-in GPS chips that tag your photos with their location. Some newer standalone digital cameras also have GPS chips built in.
GPS is a way for the device you are using, such as a phone or computer, to know where it is at any given moment. It does this via a built-in chip that receives coded transmissions from a number of satellites high above the Earth. The built-in chip knows where each satellite should be at any particular point in time and can use that data to interpret and calculate its own location with great accuracy. In a camera with GPS capabilities, these coordinates are encoded in the Exif information, or metadata, of each photograph you take. That Exif information is then extracted by iPhoto, which uses it to display your photos’ locations on a map.
A second way the device you are using to take pictures can encode location data is by using Wi-Fi location services. If your camera or media player (like an iPod touch) has a Wi-Fi chip built in to it, it might be able to encode approximate location data into your photo’s Exif information that can then be used to “guesstimate” the approximate location your photos were taken in. (This capability is available only in some devices.) It does this by using the location of known Wi-Fi hot spots to pinpoint the place your photo was taken. Wi-Fi location services aren’t as accurate as dedicated built-in GPS chips, but at least they put your photos in the right ballpark. Keep in mind, however, that Wi-Fi location services are essentially worthless when your device is out of the range of known Wi-Fi hot spots.
If you have an older camera without location data capabilities, you aren’t barred from using Places in iPhoto. iPhoto enables you to manually enter locations for your photos so they appear on the Places map.
Set Up iPhoto to Use Your Location Data
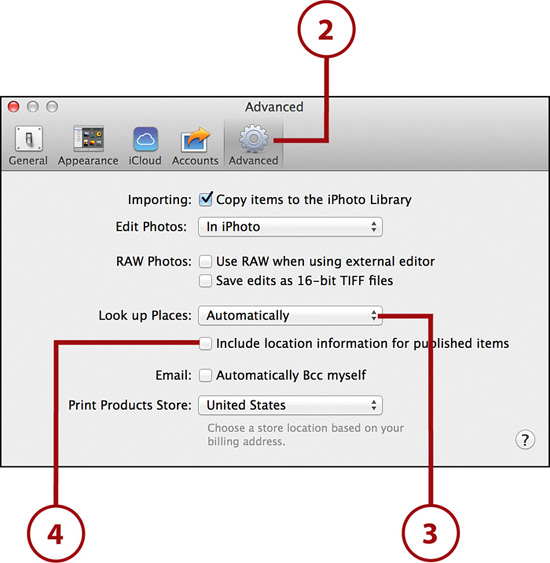
Just because your camera tags your photos with location data doesn’t mean iPhoto automatically displays your photos on the Places map. You must first make sure you allow iPhoto to access the location data for your photographs.
1. Choose iPhoto, Preferences from iPhoto’s menu bar.
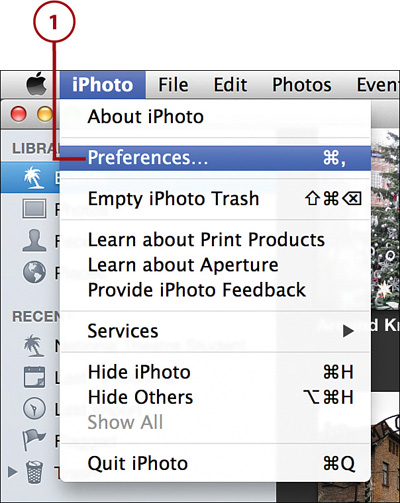
2. Click the Advanced tab.
3. Make sure Look Up Places is set to Automatically. If it is set to Never, iPhoto will not read the location data from the Exif information in your photos.
4. Select the Include Location Information for Published Items check box if you want your photo’s location published when you share the photo on iCloud, Facebook, or Flickr.
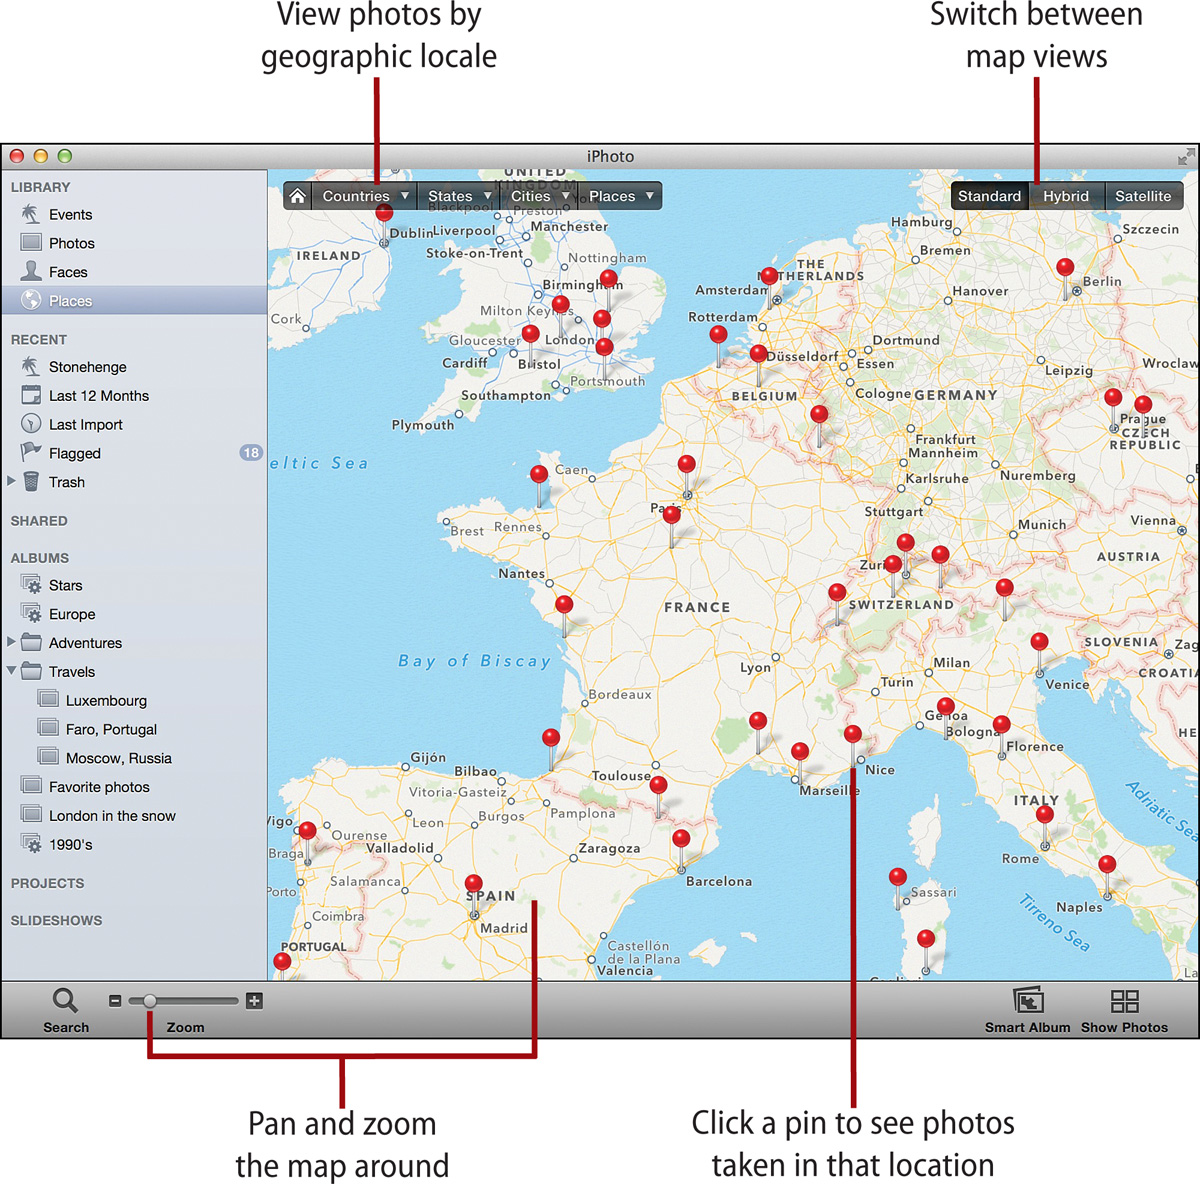
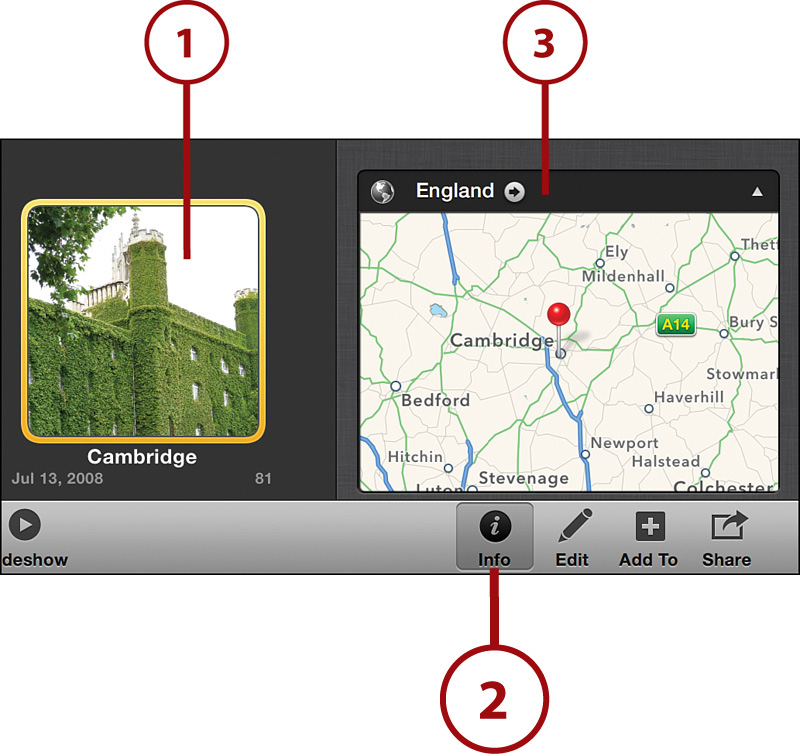
The Places Map
When you select Places from iPhoto’s source list, you are presented with a map that shows a series of red pins on it. Each red pin represents a location where your photos were taken.

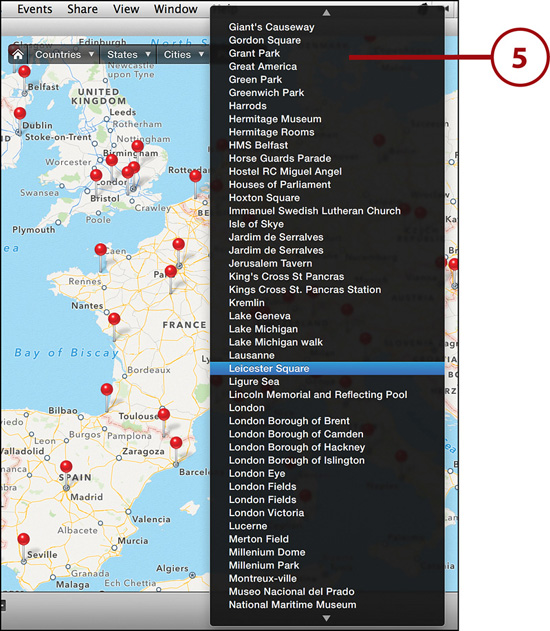
• Location menu: Located at the upper left of the map, this menu enables you to jump to specific regions on your map, including Countries, States, Cities, or Places (which means specific locations, such as the Eiffel Tower).
• Location pin: Each red pin on the map represents a location where a photo was taken.
• Name of selected location: The name of a location pin displays when you select it. By default, it is named after the location it is in.
• Maps Style menu: This menu is used to switch between three map views: Standard, Satellite, and Hybrid.
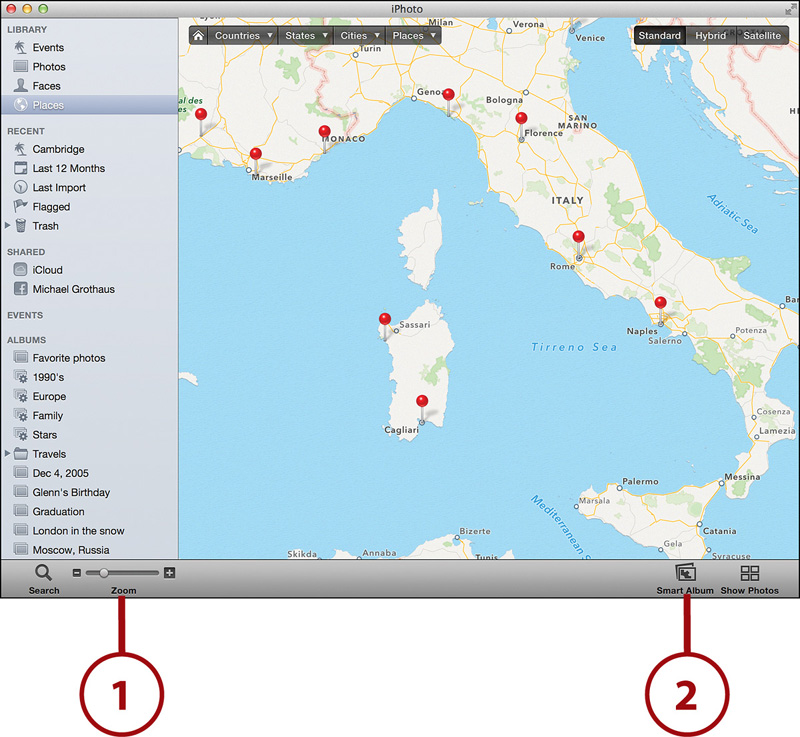
• Map Zoom slider: This slider, located below the map, works for the map just the same as it does for zooming in on your photos. Move the slider left or right to zoom out or zoom in on the map.
• Smart Album button: This button enables you to create a smart album of the photos from the currently showing pins on the map.
• Show Photos button: When clicked, this button displays a contact sheet of all the photos of the current pins in view.
Why Can’t I Edit This Map?
Note that the map in Places view is read-only. That means you cannot edit or change locations of photos by dragging the pins around. Everything on the main, large Places map is stationary and fixed. However, the mini-map in the Information Pane of a photo or event is where you edit locations and make changes to your photos. Read more about this mini-map later in the chapter.
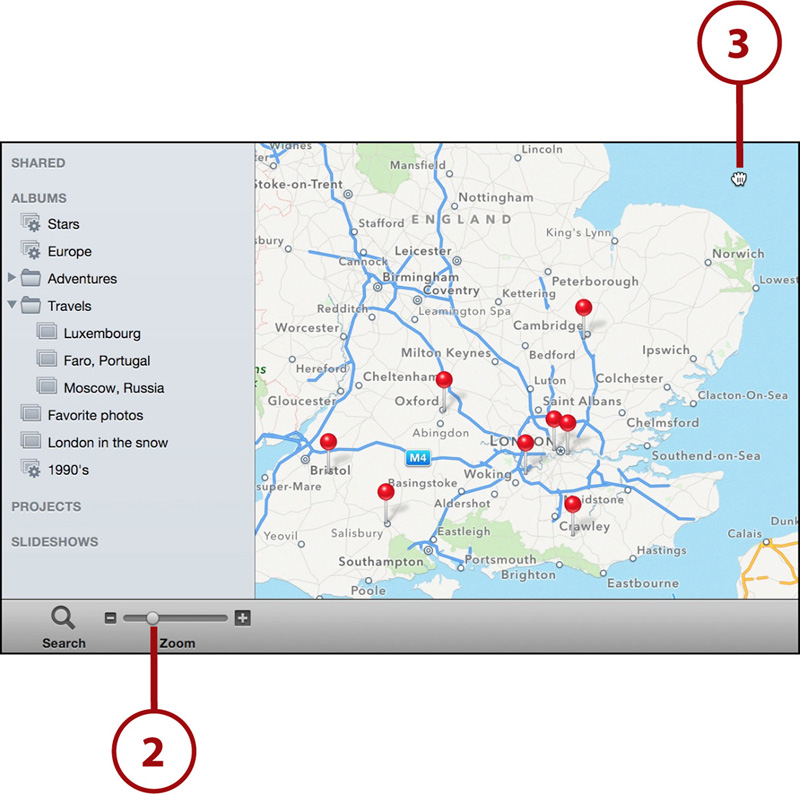
Navigating the Places Map Manually
You can manually interact with the Places map in two primary ways: by using the Zoom slider or by using your trackpad or mouse.
1. Use the Zoom slider by moving its tiny ball left or right; as you do so, the map zooms out or in. You can also use the scroll wheel on your mouse to zoom in or out on the map.
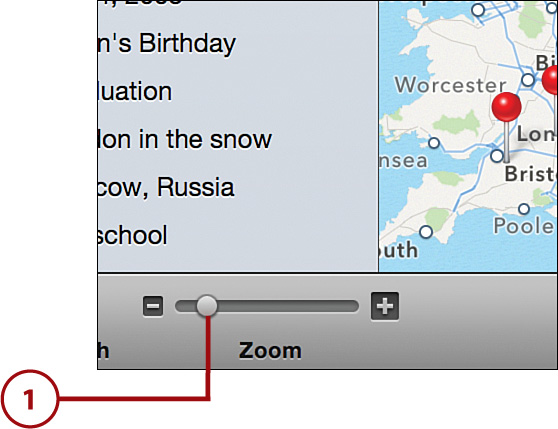
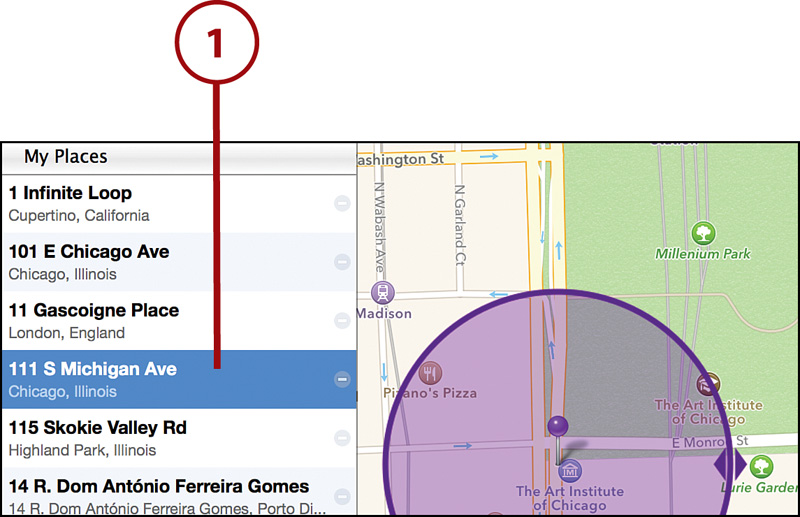
2. As you zoom into a location, you may notice more pins appear. This signifies different locations for photos in a more defined area. For example, in the image in step 1 there are five pins representing photo locations in the United Kingdom, but when you zoom in to the UK in the image in step 2, eight pins appear.
Zooming for More Detail
iPhoto limits the number of pins you see when viewing the map in its entirety in order to not clutter the map with thousands of pins. The more you zoom in to one location, the more pins you are likely to see, provided you have photos in multiple locations.
3. After you have zoomed in on a location, you can click and hold your mouse to drag the map around. When you click and hold the mouse button on the map, your cursor icon turns into a hand.
Navigating the Places Map Using the Location Menu
In addition to using the Zoom slider in iPhoto’s toolbar, or your mouse or trackpad to navigate the map, you can also use the Location menu to instantly jump to a specific location on the map. The Location menu is the semitransparent bar at the upper left of the map. It consists of a Home button, followed by buttons for Countries, States, Cities, and Places.
1. Click the Home button to view all of your locations on the map. If you’ve traveled a lot, this might be a very zoomed-out view of the whole planet.
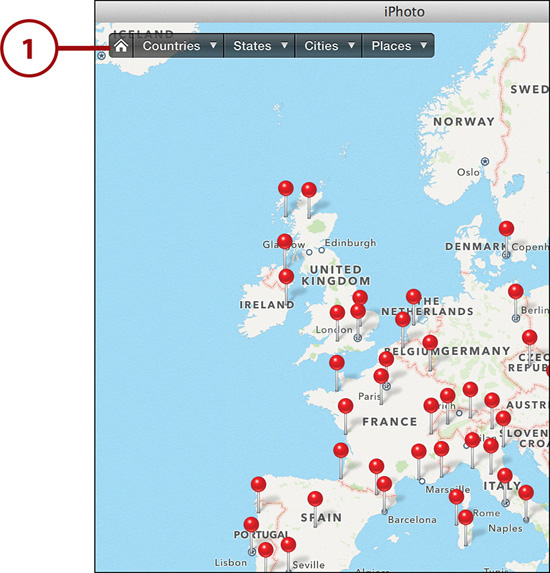
2. Click the Countries button to see a list of all the countries that contain photos taken there. Countries where no photos were taken are not listed. You can click any country in the list to be taken to its location on the map.

Cropped Countries
When selecting a location from the Location menu—a country, for instance—you do not see the entire country on the screen; you see a zoomed-in portion of the country where you have taken photos.
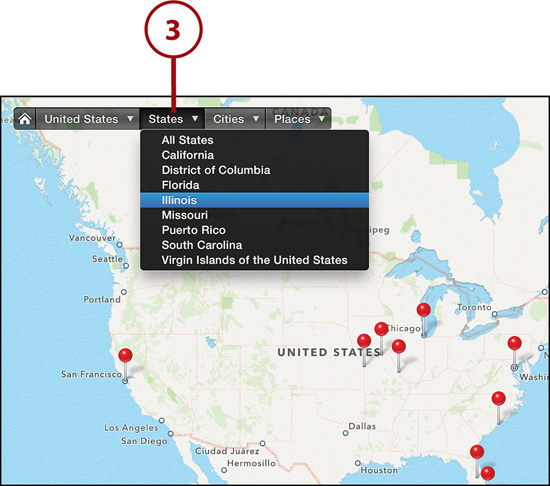
3. Click the States button to see all the states or provinces you’ve taken photos in. You can click any state or province in the list to be taken to its location on the map.
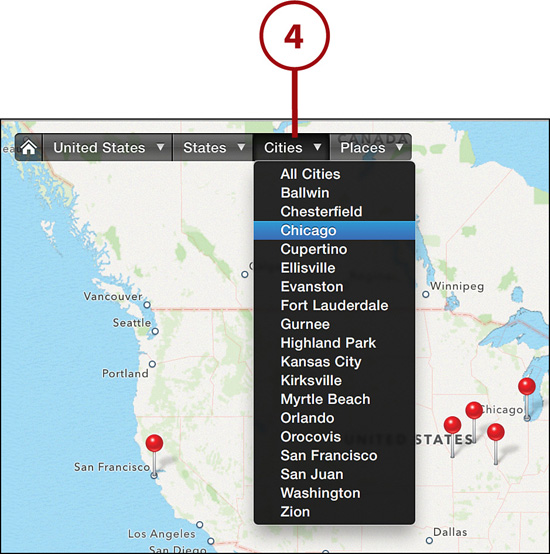
4. Click the Cities button to see all the cities you’ve taken photos in. You can click any city in the list to be taken to its location on the map.
5. Click the Places button to see all the places you’ve taken photos in. A “place” in the context of the Places menu is a specific individual location your photos were taken in, including specific addresses, such as your home address, or points of interest, such as the Eiffel Tower. You can click any place in the list to be taken to its location on the map.
Switching Between Map Views
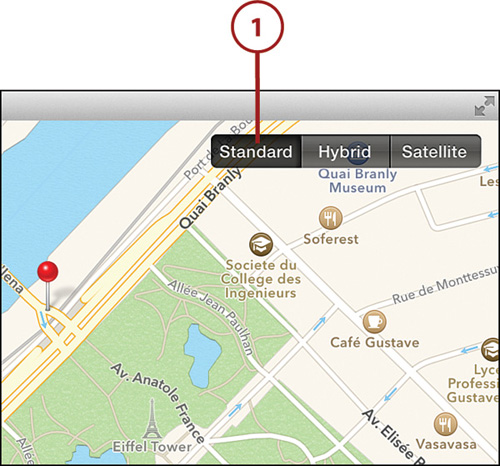
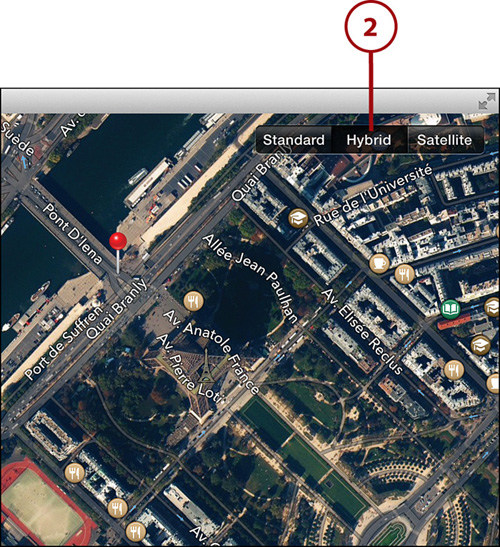
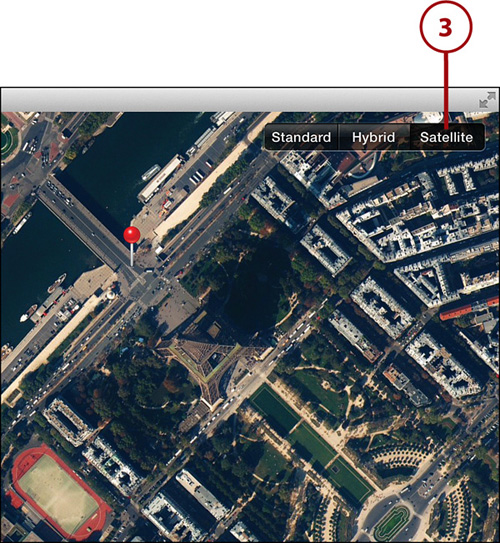
iPhoto gives you three options of how to view the map that your photos are presented on in Places. You can switch between these map views using the Map Style menu in the upper-right corner of the map.
1. Click the Standard button. This view shows you the topography of the given map. This view lets you see relief maps of an area’s terrain. The Standard view also overlays roads, borders, and labels.
2. Click the Hybrid button. This view combines Standard and Satellite views. You see the map in satellite imagery, but it has labels, roads, and borders overlaid on it.
3. Click the Satellite button. This view shows you the map using satellite imagery. It’s perhaps the coolest view because you can zoom in on streets and see little blips of people who were walking on the day the satellite imagery (not your photos) was taken. No labels appear in Satellite view.
Viewing Your Photos in Places
Places isn’t just about viewing pins on a map, of course. Places enables you to easily see all the photos you have taken in a given area. It does this in one of two ways: via its red location pins and via the Show Photos button.
View Photos by Pin
You can easily view all the photos you’ve taken in a location by using Places’ location pins.
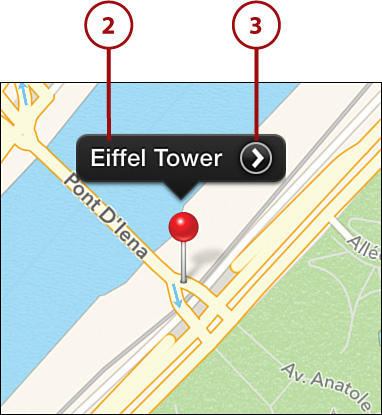
1. Click a red pinhead.

2. A black label with the name of the location appears over the pin with an arrow (>) icon on it.
Branching Pins
If you are zoomed out relatively far on the map, a pin may actually contain multiple locations within it. For example, you might see one pin for London at a high zoomed-out level, but the more you zoom in, you might see additional pins branch off from the main London pin. These pins could display hyperlocal areas within London.
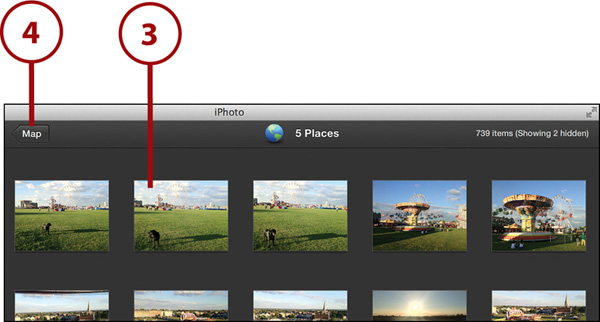
3. Click a label’s arrow (>) icon to view all the photos taken in that location. An album that displays all the photos taken within that location opens.
4. Note that if the location is rather broad (for example, London) and in fact contains multiple locations, you see a message at the top of the album that shows how many locations the album contains. For example, in the image for this step, you can see all the photos that are contained in the London pin. Inside that pin are actually 61 locations, which you would see as individual pins if you zoomed in enough on the main map. However, at the location I chose to display the London pin’s photos, it contained 61 separate locations in London.

5. Click the Map button to exit the album and return to the Places map.

View Photos Using the Show Photos Button
A second way to view photos on the map is by clicking the Show Photos button below the map in iPhoto’s toolbar. The Show Photos button works a little differently when displaying photos than selecting an individual pin does. If you click the Show Photos button, every photo for every pin viewable on the map is displayed in an album. This is handy when you want to view photos from multiple locations that cannot be combined into one pin by zooming out on the map.
1. Zoom into an area of the map where you want to see all the photos. This area can be as small (a single city) or as large (multiple countries) as you want.
2. Click the Show Photos button in iPhoto’s toolbar.

3. You see an album that dislays all the photos taken within the location of the borders of the map you selected.
4. Click the Map button to exit the album and return to the Places map.
Search Photos Based on Location
Besides viewing location photos on a map, you can search for photos taken in a particular location using the Search tool in iPhoto’s toolbar.
1. Click the Search button.

2. In the Search field, enter the name of a location (for example, Paris) or a place (for example, Eiffel Tower).
3. The results display in iPhoto’s window.

Searching in Predefined Locations
If you’ve selected a location from the Countries, States, Cities, or Places menus, you can quickly find photos taken in only those locations by clicking the Show Photos button in iPhoto’s toolbar.
Getting Familiar with the Places Mini-Maps
Don’t worry if you don’t have a camera with location data capabilities. With iPhoto, you can manually add location data to your photos quickly and easily. Additionally, you can change the location of a photograph that is already assigned a specific place. You make these changes through the Places mini-map.
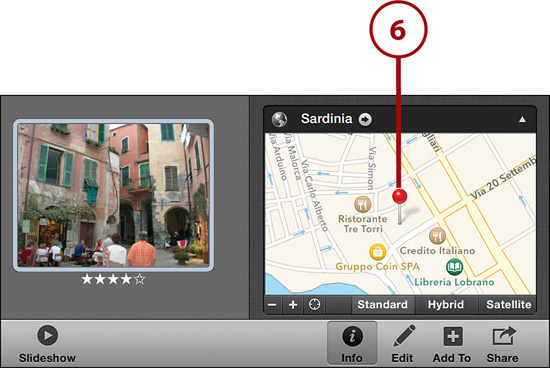
The Places mini-map is inside the Information Pane. The mini-map is located under the Places header, and it shows the location of the selected photo or the locations of all the photos in a selected event.

Just as with the large Places map, you can switch between Standard, Satellite, and Hybrid views of the mini-map in the Information Pane, zoom in or out of the map, or click the Center button—the one that looks like crosshairs—to center the pins on the map.
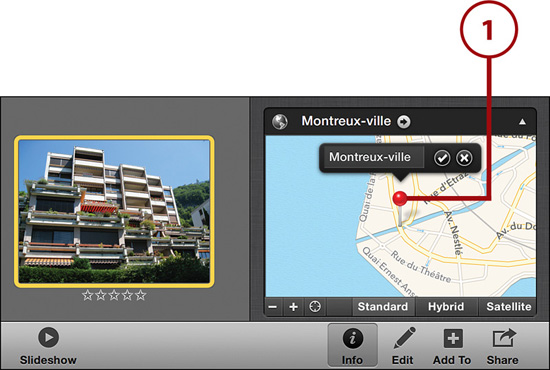
Manually Add Locations to Photos
The mini-map is where you can manually add a location to a photo.
1. Select a photo in your library that does not have a location assigned to it. The mini-map in the Information Pane is blank.
2. Click Assign a Place.

3. Start typing the name of the locaton where you know the photo was taken.
4. As you begin to type, iPhoto automatically cross-checks to see whether any other photos in your library have matching locations. iPhoto also displays major locations around the world, such as cities, and points of interest, such as the Eiffel Tower, as location suggestions. Press Return to enter your location.

Latitude Before Longitude
You can also enter the exact address—or even the exact coordinates—of a location if you know it. Just be sure to enter latitude before longitude.
5. Optionally, you can select one of the auto-suggested locations iPhoto makes. iPhoto makes these auto-suggestions by searching the Internet to see whether what you are typing matches any major points of interest. If iPhoto finds a matching place, click it to set it as the location.

6. iPhoto displays a map with a pin representing the photo’s newly set location.
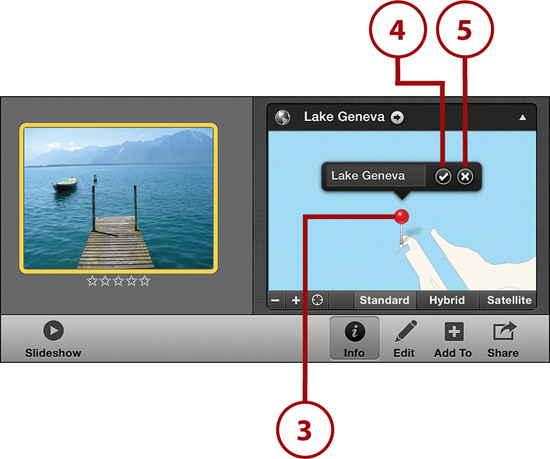
Manually Move a Pin
Sometimes when you manually set a fairly wide-ranging area as a location, such as “Lake Geneva,” you might want to hone in on the exact location you took the photograph, such as a specific cove on the edge of the lake. In this case, your only option is to manually move the photo’s location pin to the exact spot you want.
1. Select the pin on the mini-map. The pin jumps in the air, signifying it’s ready to be moved.
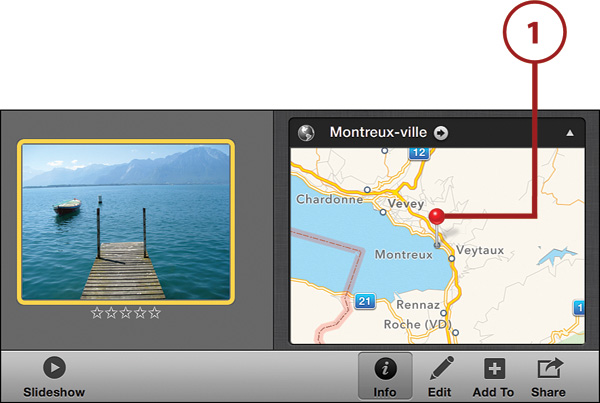
2. Drag the pin to its proper location. If you need a more detailed view of the map, you can use the plus and minus buttons on the map to zoom in or out to find your new location.

3. Drop the pin in its new location.
4. In the pin’s label, click the check mark button to accept the name for the given location.
5. Click the X button to reject the pin’s new location. The pin moves to its old location.
Add Personalized Names to Your Locations
iPhoto lets you add personalized names to locations. So, instead of marking a location as “123 Main Street,” you can call it “Mom’s House.” When you add a personalized name to a location, all photos with that location are updated to reflect the new name.
1. Select the pin on the mini-map that has the location you want to personalize.
2. Enter a nickname for the location.
3. Click the check mark to change the current name to the new one you entered, or click the X to revert to the original name.

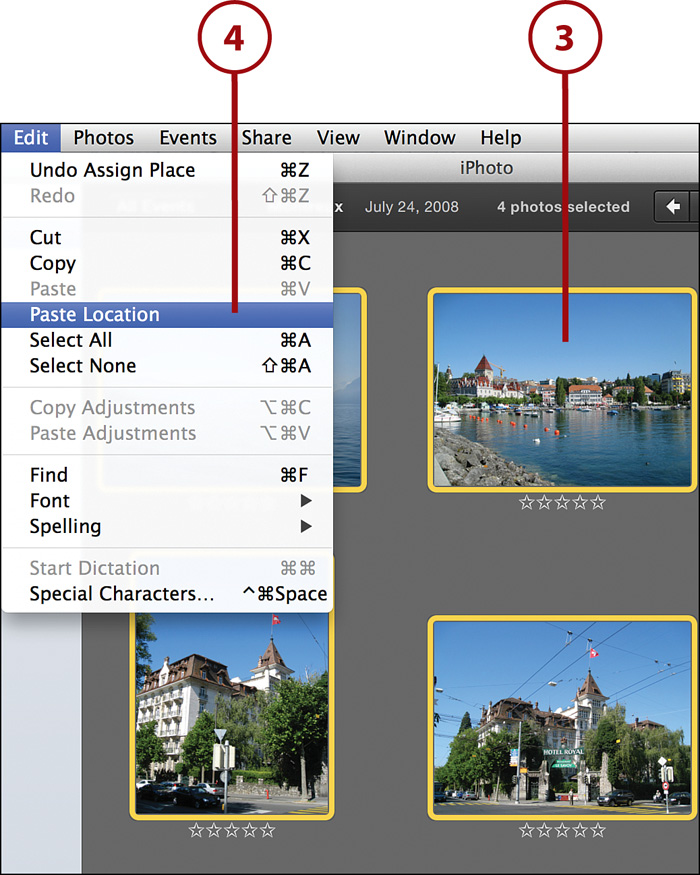
Copy and Paste Location Information
If you’ve already set an exact location of a photo that you want to use as the exact location of other photos, iPhoto lets you easily copy and paste location information without using Places or Maps at all.
1. Select a photo that already has the desired location information.
2. Select Edit, Copy.
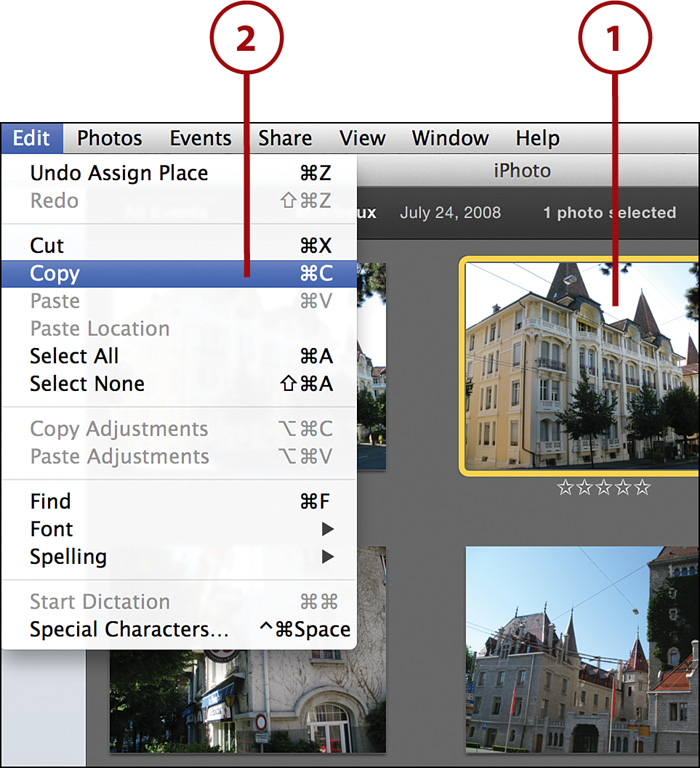
3. Select the photo or photos that you want to apply the previous location to.
4. Select Edit, Paste Location. The location is added to the selected photos.
Removing and Restoring a Photo’s Location
You can remove locations from the Places map. Keep in mind that removing a location does not delete the original location data from the photo’s Exif information. The photo’s location data will always be encoded in its Exif data. Removing a location in iPhoto simply removes it from the Places map.
Remove a Location
1. Select the photos or events that include location information.
2. Click the Info button.
3. Click the Places header in the Information Pane.
4. Select the location’s name. If there’s more than one location, such as for an entire event, the name says “Multiple Locations.”
5. Click the X to the right of the name. The location name disappears, and the location is removed from the photo or event.

Restore a Location
You can always restore the location to your photos. This is possible because, as mentioned, iPhoto always keeps the photo’s original location data intact in its Exif information.
1. Select the photo to which you want to restore the location.
2. Select Photos, Rescan for Location. The original location is added back to the photo, which is now viewable in iPhoto again.

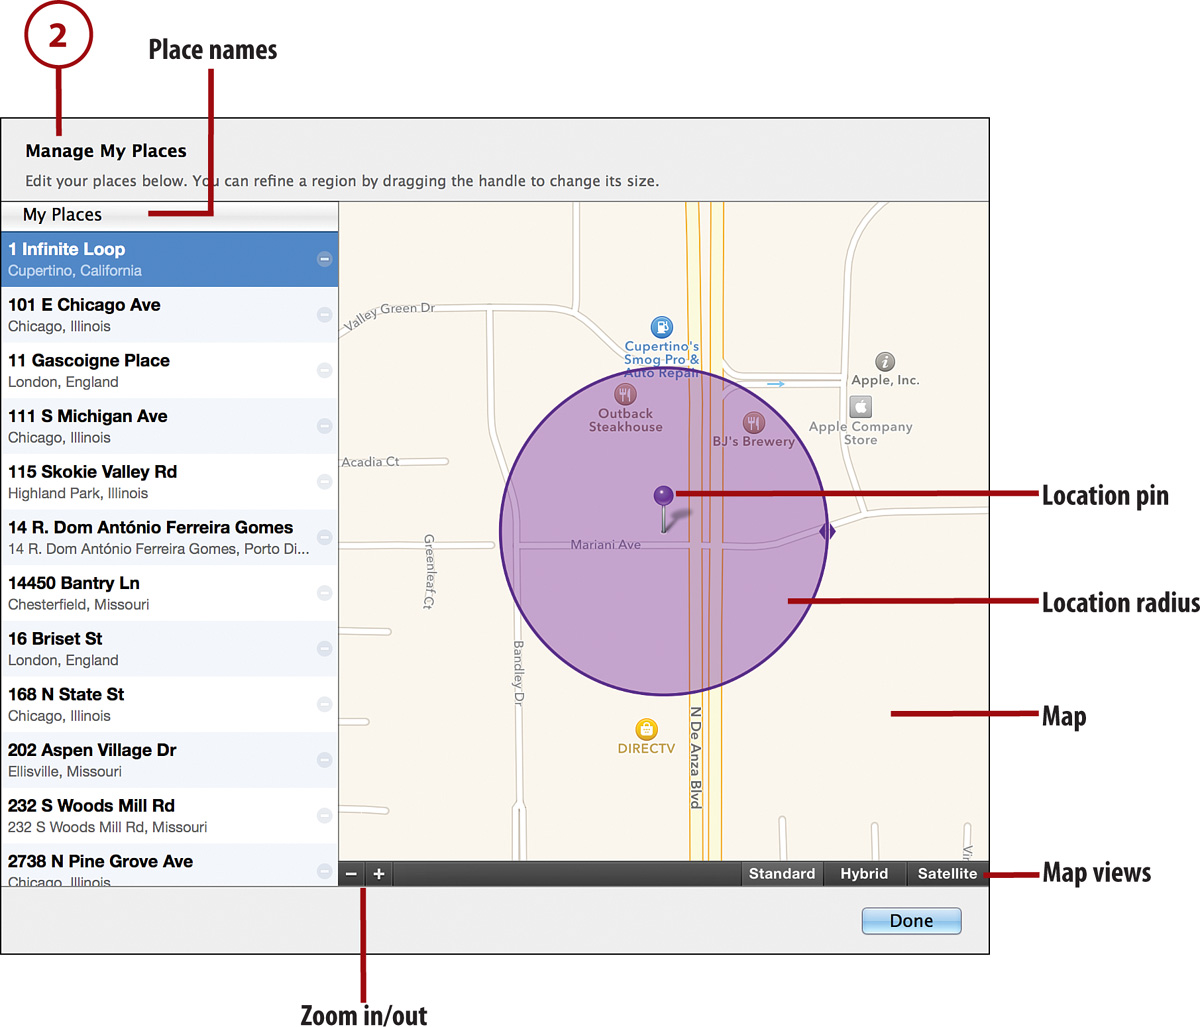
Managing Places
iPhoto gives you an easy way to manage all your Places locations in, well, one location. You do this through the Manage My Places window. Using Manage My Places, you can quickly see all the personalized places you’ve added to your photos, rename or delete them, and even fine-tune your locations.
Open Manage My Places
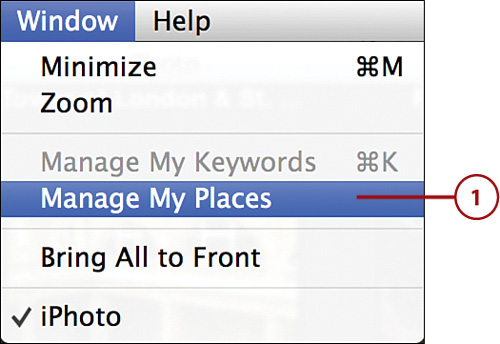
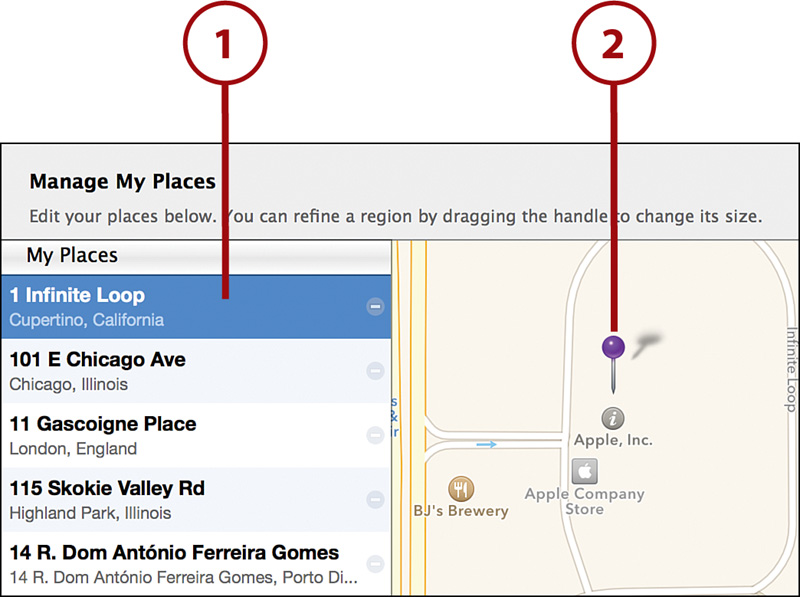
1. Select Window, Manage My Places.
2. The Manage My Places window appears.
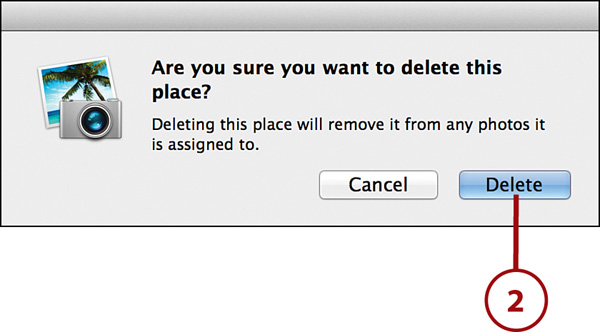
Delete a Location
1. Click the minus button in the circle next to the location you want to delete.
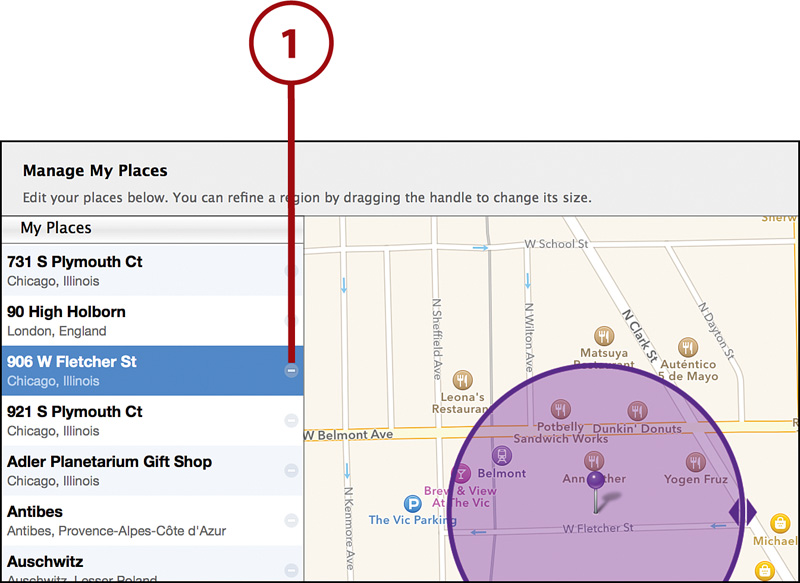
2. Click Delete to confirm that you want to delete the location. The location is removed from the Places map and any photo that contains the location. Your photos will not be deleted.
Change a Location’s Name
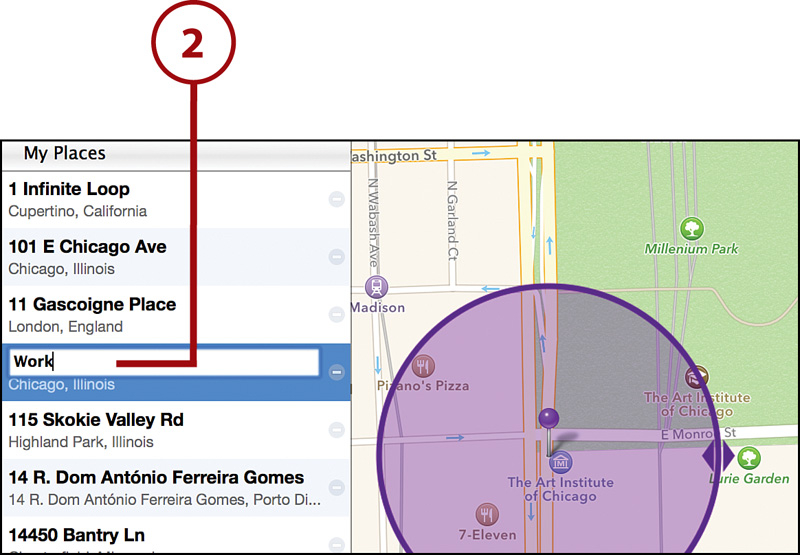
1. Select a place from the list.
2. Double-click its name, and enter a new one. The location’s changed name appears in the pop-up list when you are assigning a location to a photo. The changed name only affects the label of the location (for example, “111 S Michigan Ave” becomes “Work”) and does not affect the location itself.
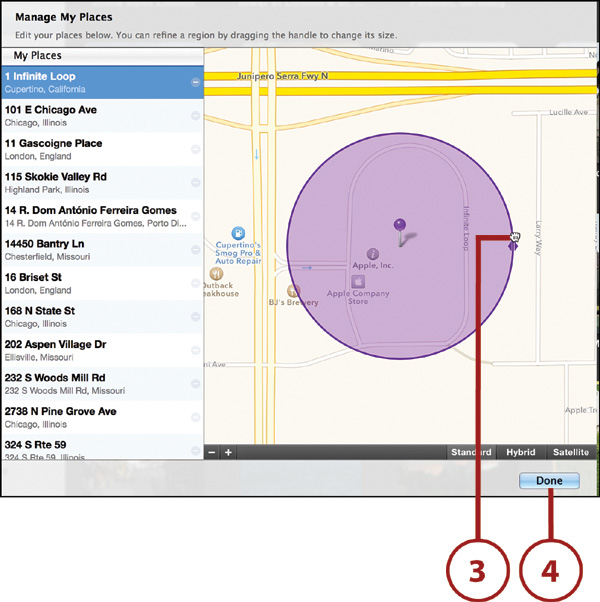
Adjust a Location’s Area
You can adjust the location and area of a specific place. This is helpful when you want to fine-tune a pin’s exact location, or increase or decrease the overall area of a location.
1. Select the place whose location area you want to change.
2. Click and drag the location pin to your desired location. You can use the map’s Zoom button and different views to hone in on an exact location.
3. (Optional) You can click and hold the edges of the purple vicinity circle to signify that a particular location encompasses a given area. This is handy when labeling certain areas, such as parks or large city blocks.
4. Click the Done button to hide the Manage My Places window.
Using Places to Create Smart Albums
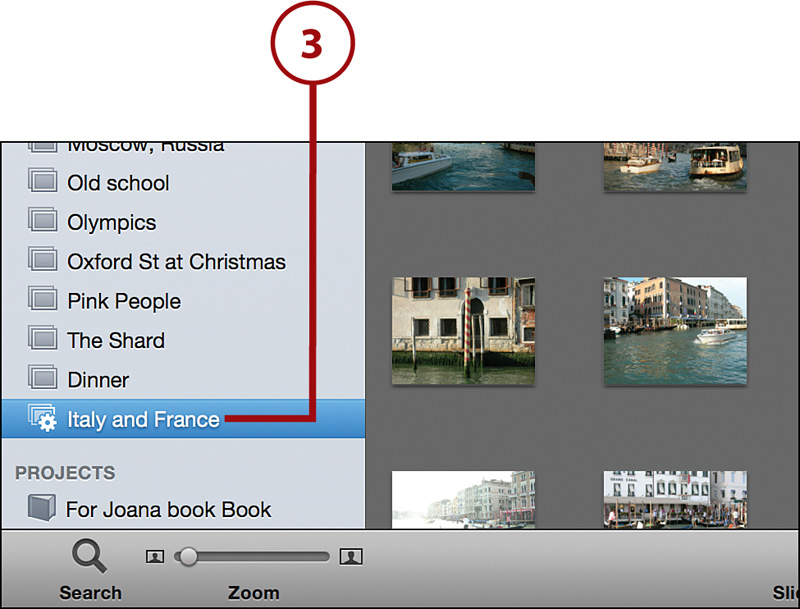
Apple has added a handy shortcut button to the bottom of the Places window that enables you to quickly create smart albums based on the locations you are currently viewing in Places. This is advantageous if you want to create a smart album based on a place or places but don’t want to go through the manual steps of creating a location-based smart album.
1. Zoom into the region of the map that contains pins for the locations you want to include in the smart album. (Or alternatively use the Countries, States, Cities, or Places menus to limit pins to a certain area.)
2. Click the Smart Album button.
3. A new smart album is created in your Albums list. It’s named for the regions it encompasses.
4. Rename the smart album by double-clicking the name and entering a new one.
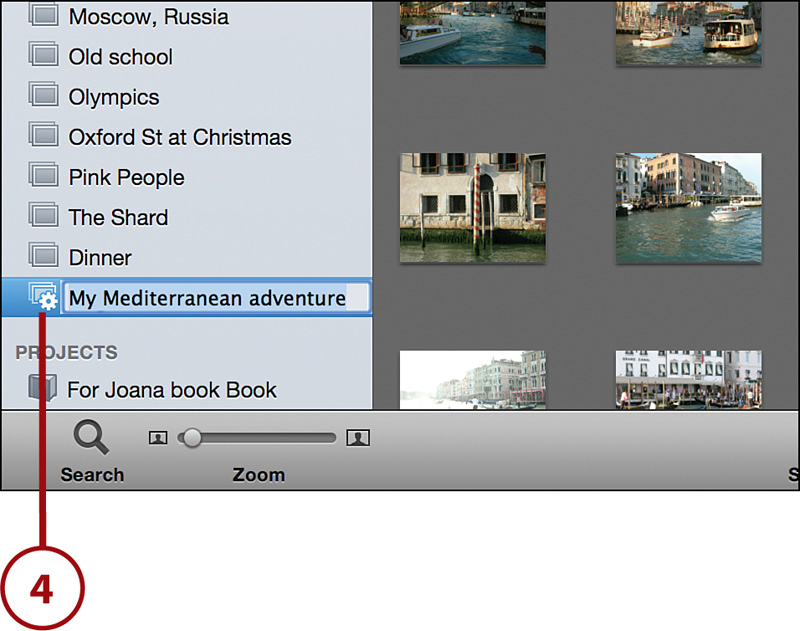
Future Photos Are Automatically Added by Location
After you have created a smart album for a particular region or location, any photos that you add to your photo library from that point on that match that region’s or location’s latitude-longitude or location data are automatically added to the smart album.