2. Basic Word Operations
Before you jump in and start whipping up documents willy-nilly, taking some time to familiarize yourself with the basic methods Word offers to access tools, commands, and features is a good idea. Learning how to find your way to the commonly used commands and features now can help you speed up your work later. Microsoft Word presents commands, settings, and options through dialog boxes, context menus, toolbars, and the Ribbon. In many cases, you can access the same tools and features through several different avenues. For example, don’t be surprised to find an Italics button on the Ribbon, in the Font dialog box, and on a mini toolbar that pops up from time to time. Although this might seem rather redundant at first, offering you several ways to accomplish the same task or action is simply a brilliant way to accommodate all kinds of users, including some who like making selections from a dialog box and others who like clicking things on a pop-up toolbar.
Another basic part of operating within Word is learning how to adjust your view of the document you are working on. You can switch view modes to change how a page is displayed onscreen, or use the zoom tools to change the level of magnification for viewing a document. Word’s view modes and zoom tools are an essential part of helping you see what you’re doing onscreen.
Working with the Ribbon
Introduced back in Word 2007, the Ribbon organizes commands and features into tabs listed across the top of the program window. Today’s Ribbon is better than ever. If you haven’t worked with the latest versions of Word in the past few years, you might be interested to know the Ribbon replaces the menus and toolbars of old. With the Ribbon format, related command buttons and features are organized into groups found within each tab. For example, if you display the Home tab, shown in Figure 2.1, you can find most of Word’s formatting commands, such as font and size, alignment buttons, and styles. The Insert tab offers a plethora of items you can insert into a document, such as pictures, links, text boxes, and so forth. The various buttons, drop-down menus, and galleries found on the Ribbon tabs are grouped under labeled headings, such as Font or Paragraph, along the Ribbon’s expanse.
FIGURE 2.1 The Home tab on the Ribbon displays various formatting tools and features.
![]() Note
Note
In regard to software lingo, lots of terms are interchangeable. For example, commands, features, settings, and options are all basically the same thing—selections you make in the program to perform a computer task. Sometimes this involves clicking an actual command button, such as OK or Cancel; other times this involves choosing from a variety of options to apply, such as clicking check boxes or radio buttons (the tiny circles with bullets) to turn items on or off. At the heart of it, all software programs are basically about taking your input, whether it’s clicking buttons or typing in text, and turning it into something, such as a Word document.
Using Ribbon Elements
Using the Ribbon is a fairly straightforward procedure. All you have to do is click a tab name to view its contents. To activate a command or feature on the Ribbon, click on it. Let’s say you type in a title at the top of your document and want to make it bold so it stands out from the rest of the page. To apply bold formatting to selected title text, you can click the Bold button (the button with a little bold B on it) found on the Ribbon’s Home tab.
![]() Note
Note
The Ribbon appears throughout the Microsoft Office suite of programs, such as Excel and PowerPoint, and it also appears in other programs as well. After you learn your way around the Ribbon in Word, you’ll easily traverse the Ribbon format in other programs.
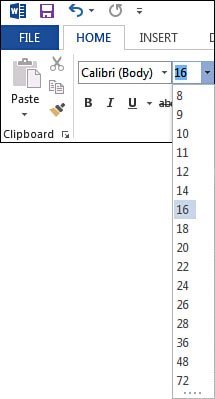
If you see a drop-down arrow—which is simply a downward pointing arrow icon—next to any Ribbon feature, you can click it to display a menu of additional choices or options. Figure 2.2 shows an example of a drop-down menu. After the menu drops, you can click a selection from the menu to apply it to your document.
FIGURE 2.2 Drop-down menus offer a variety of selections you can make.
With some commands, such as font color, the command button shows the previously selected option, such as red. If you click the button instead of the dropdown arrow icon, you can apply the previously selected color to another area of your document without having to go through the process of selecting the color all over again. In other words, buttons like these retain the last selection until you designate another selection.
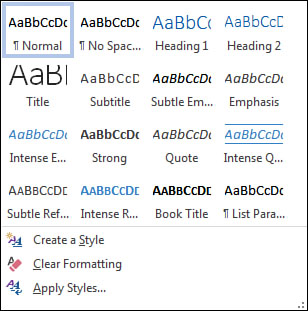
The Ribbon also features list boxes, called galleries, as shown in Figure 2.3. You can scroll through the gallery to view selections and click the one you want to apply.
FIGURE 2.3 Galleries list a variety of selections, such as styles you can apply.
You can also expand the gallery to view all the settings at one time, as shown in Figure 2.4.
FIGURE 2.4 You can also open the gallery to view its contents.
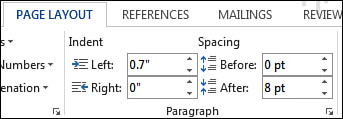
Spinner arrows are also found on the Ribbon. For example, on the Page Layout tab, shown in Figure 2.5, you can click up and down arrow buttons to change the numeric settings for indents and spacing.
FIGURE 2.5 Use spinner arrows to adjust values.
Check boxes are also found on the Ribbon, specifically on the View tab. Simply check or uncheck a box to turn the feature on or off.
![]() Note
Note
The Ribbon got its name from its earliest concept of combining commands onto an area of the screen resembling a paper scroll-like strip. Although the Ribbon doesn’t really work quite like a paper scroll today, it still offers easy, intuitive access to commands and features.
![]() Tip
Tip
You might notice some groups of commands on a tab have a tiny icon in the bottom-right corner of the group. When clicked, this icon opens a dialog box where you can find additional and advanced commands. For example, if you click the Paragraph group’s icon, the Paragraph dialog box opens with more spacing, indent, and line break settings. You can learn more about dialog boxes later in this chapter.
Here’s a rundown of the main tabs found on the Ribbon:
• File—This tab opens a new screen of various file-related commands, such as Open, Save, and Print. Learn more about opening and saving files in Part II.
• Home—This tab organizes all the basic formatting commands for creating a document, including font, size, and alignment commands. Learn more about formatting in Part III.
• Insert—Use the commands on this tab to add elements to your document, such as clip art, text boxes, pictures, drawn shapes, video clips, and more. Learn more about adding graphic elements in Part IV.
• Design—Add flare to your document using Word’s document formatting tools, including themes, watermarks, and page borders. Learn more about advanced formatting in Parts III and IV.
• Page Layout—Find all kinds of page layout controls on this tab, including margin settings, columns, page orientation, paragraph spacing, and other placement tools. Learn more about formatting pages in Part III.
• References—The tools on this tab help you to add footnotes, endnotes, citations and bibliography elements, table of contents, captions, index elements, and more. Learn more about building longer documents in Part V.
• Mailings—Use the tools on this tab to help generate mail merge documents and their various fields for customizing mass mailing materials. To learn more about mail merging, check out the additional online content for this book located at http://www.quepublishing.com/title/9780789750907.
• Review—Find Word’s many proofing tools on this tab, including spell-checking options, grammar checking, and tools for collaborating on documents with reviewing and tracking marks. To learn more about sharing documents with other users, visit http://www.quepublishing.com/title/9780789750907 and find steps and techniques for using Word’s reviewing features.
• View—You can find all the various ways to change your view of a document on this tab, including zoom tools, view modes, and window arrangement options for viewing more than one document at a time. Learn more about view modes later in this chapter.
• Add-Ins—If you install extra third-party add-in programs, such as specialized toolbars or features, you can find them listed in this tab. Learn more about add-ins and apps in Chapter 3, “Setting Up Accounts and Services.”
In addition to these, task-specific tabs might also appear when you are working on an item such as a picture or drawn shape.
Hiding and Displaying the Ribbon
A lot of commands are available in Word, and placing them on various tabs on the Ribbon helps keep them organized. However, it also makes the Ribbon appear a bit intrusive at times because it holds so many things. You can easily hide the Ribbon and get it out of the way when you’re working on documents. You can summon it back again with a click.
To hide the Ribbon, just double-click any tab name on the Ribbon. Word immediately hides the entire thing except for the tab names, shown in Figure 2.6. To display the Ribbon again, double-click a tab name.
FIGURE 2.6 You can hide the Ribbon to free up screen space.
If you want the Ribbon to always appear locked in place, click the pushpin icon located at the far-right end, as shown in Figure 2.7. Click the same area to unlock the Ribbon again.
FIGURE 2.7 Look for the pushpin icon to pin the Ribbon in place.
Want to customize the Ribbon? You can add and subtract commands to suit the way you work. To find customizing options, right-click an empty area of the Ribbon or on a tab name and click Customize the Ribbon. This opens the Word Options dialog box to the Customize Ribbon tab where you can add and subtract commands, create new tabs, rename tabs, or reset to the default settings.
Working with the Quick Access Toolbar
Located in the top-left corner of the Word program window resides a small grouping of icon buttons called the Quick Access toolbar. These buttons give you quick access to common actions. By default, the Quick Access toolbar displays the Save, Undo, and Redo buttons, as shown in Figure 2.8. You can use these shortcut icons to quickly save a file, or undo or redo an action.
FIGURE 2.8 Tucked away in the corner lurks the Quick Access toolbar.
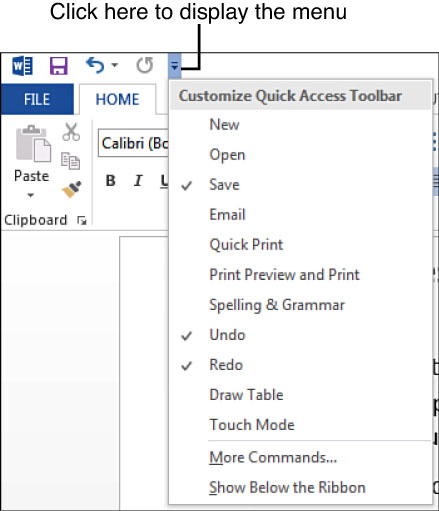
You can also choose to display more or less shortcuts on the toolbar. Click the arrow icon at the end of the bar to display a drop-down menu (see Figure 2.9). Check marks next to the command names indicate the icons that appear on the toolbar. To add an icon, click the command name. To remove an icon, click it to uncheck it and delete it from the toolbar.
FIGURE 2.9 Use the drop-down menu at the end of the toolbar to specify which shortcut icons appear.
As you can imagine, placing shortcuts up at the top of your program window can be a timesaver if you find yourself performing the same tasks over and over again, such as printing files, and tire of looking through the Ribbon or other dialog boxes to find a command.
![]() Tip
Tip
Want to customize the Quick Access toolbar? You can add an icon for a command you use the most. Click the arrow icon at the end of the Quick Access toolbar and choose More Commands. This opens the Word Options dialog box to the Quick Access Toolbar tab where you can add and subtract commands.
Using Context Menus and Toolbars
Microsoft Word offers several ways to apply commands related to the task at hand. Called context menus and toolbars, these features pop up and display shortcut commands pertaining to the item you are working with in a document.
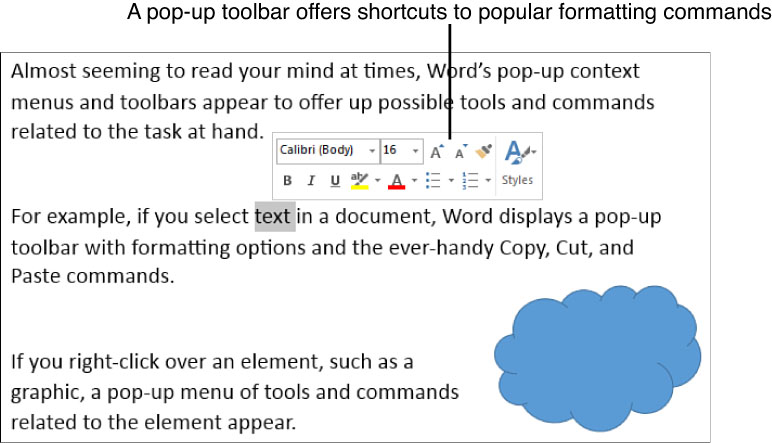
For example, as soon as you select text in a document, a mini toolbar appears near the cursor. You can use this toolbar, shown in Figure 2.10, to quickly apply basic formatting commands. If you ignore the mini toolbar and keep working, it eventually disappears. To activate a command from the toolbar, simply click the button.
FIGURE 2.10 The mini toolbar offers shortcuts to common formatting commands, like Bold and Italics.
You can turn off the automatic mini toolbar display if you do not find it helpful. To do so, click the File tab on the Ribbon, then click Options. The Word Options dialog box opens. Click the General category, then deselect the Show Mini Toolbar on selection check box and click OK. This turns the feature off. To turn it on again, revisit this dialog box and check the box again.
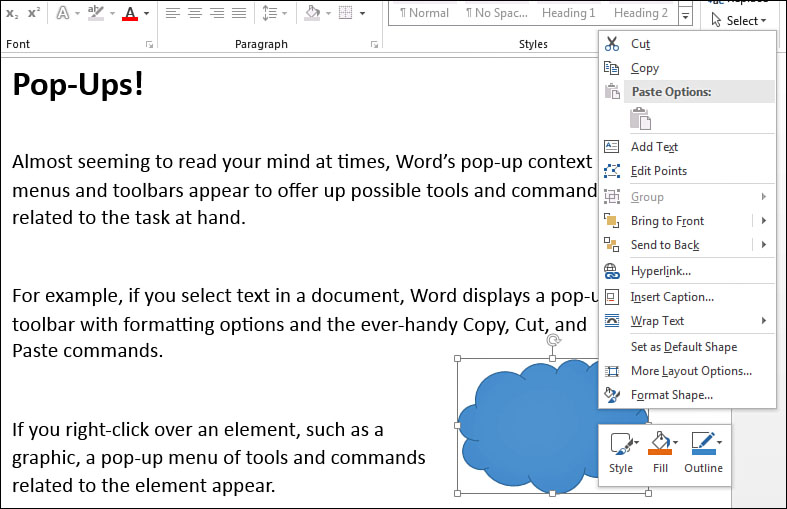
If you right-click while performing a task, such as entering text or editing a table, a context menu pops up listing commands related to what you’re doing. For example, if you right-click a drawn shape (see Figure 2.11), the context menu includes commands for formatting the shape, adjusting its positioning, inserting a caption, and more. To make a selection from the context menu, click the command.
FIGURE 2.11 Context menus appear when you right-click in a document.
Dealing with Dialog Boxes
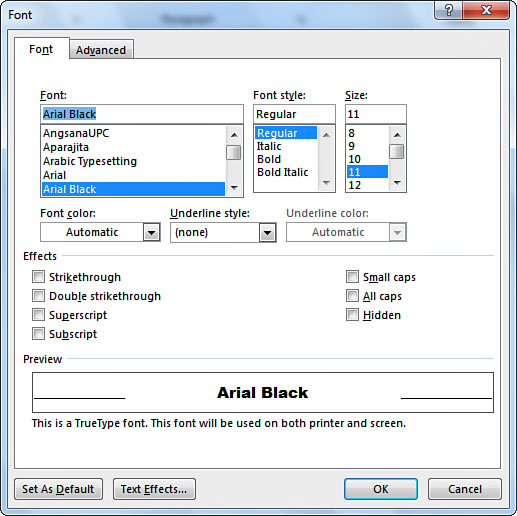
Dialog boxes are a basic part of just about every software program. Dialog boxes allow users to specify more input. Many of Word’s dialog boxes offer more options for you to choose from before applying a feature, or present a variety of related settings all in one convenient spot. Figure 2.12 shows a typical dialog box. As you can see, it looks a lot like a form you might fill out.
FIGURE 2.12 Dialog boxes require additional input from a user before implementing a feature or action.
Dialog boxes display many of the same tools found in the Ribbon, including buttons, list boxes, drop-down menus, spinner arrows, check boxes, and text boxes or fields in which you enter data. You can also find slider controls, tabs, and radio buttons among the many dialog boxes in Word.
The bottom of a dialog box typically has command buttons to execute the changes or to exit the box without changing anything. Click OK to execute the settings you specified, or click Cancel to forego the changes.
Some dialog boxes might include buttons that open additional dialog boxes. Tools and settings you find on Word’s Ribbon might open dialog boxes as well. You are sure to encounter lots of dialog boxes as you work, but after you know what to expect from them and how to enter your input, you can handle them with ease.
![]() Tip
Tip
You can move a dialog box around onscreen by clicking and dragging its title bar.
From time to time, Word also presents another type of box to you, called a prompt box. It looks like a dialog box in appearance, but generally it cautions you about a task or program need and offers some command buttons to choose from. For example, if you attempt to close a file you have not saved, Word prompts you to save your work. You can choose Save, Don’t Save, or Cancel in the prompt box. Other prompt boxes just require an OK to confirm an action.
Working with Word View Modes and Zoom Tools
You can use Word’s view modes to change the way you look at a document onscreen. You can also adjust the zoom level, or magnification, of your document to view more or less of your document on the screen. View modes and document zooming are handy features when you want to get a different view of your document pages, such as zooming in to make the text easier to read onscreen or switching to Read More mode to focus only on the text in a column format, much like reading a book. You can find all of Word’s viewing tools conveniently located on the Ribbon’s View tab.
Changing View Modes
A view mode refers to a screen display for viewing a document. By default, Word starts you out in Print Layout view. This mode is just one of five different view modes available in Word.
• Read mode Use this mode to hide all the tools and menus and focus on reading the document much like a book, with pages of text displayed as columns.
• Print Layout This mode displays your document in the middle of the screen surrounded by the Ribbon at the top, and scroll bars around the right and bottom edge. Basically, you can view all the elements in your document just as they appear in printed form.
• Web Layout If you are working with web pages in Word, this mode lets you see everything on the page just as it would appear in a browser.
• Outline If you are working with a large document, this view lets you see headings and subheadings in an outline format, with bullets and indents denoting levels in the document.
• Draft Use this view to see just the text in your document, minus all the graphic elements, and page layout elements such as headers and footers.
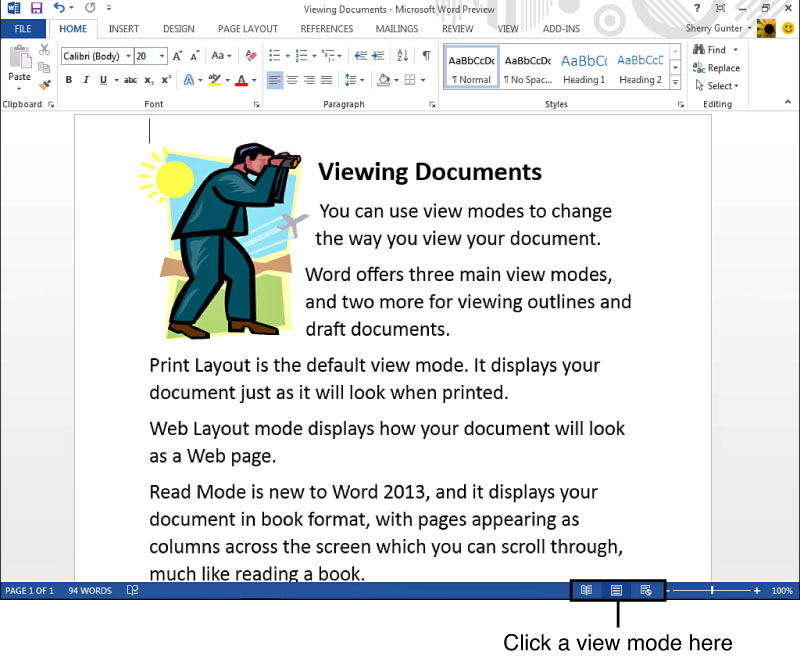
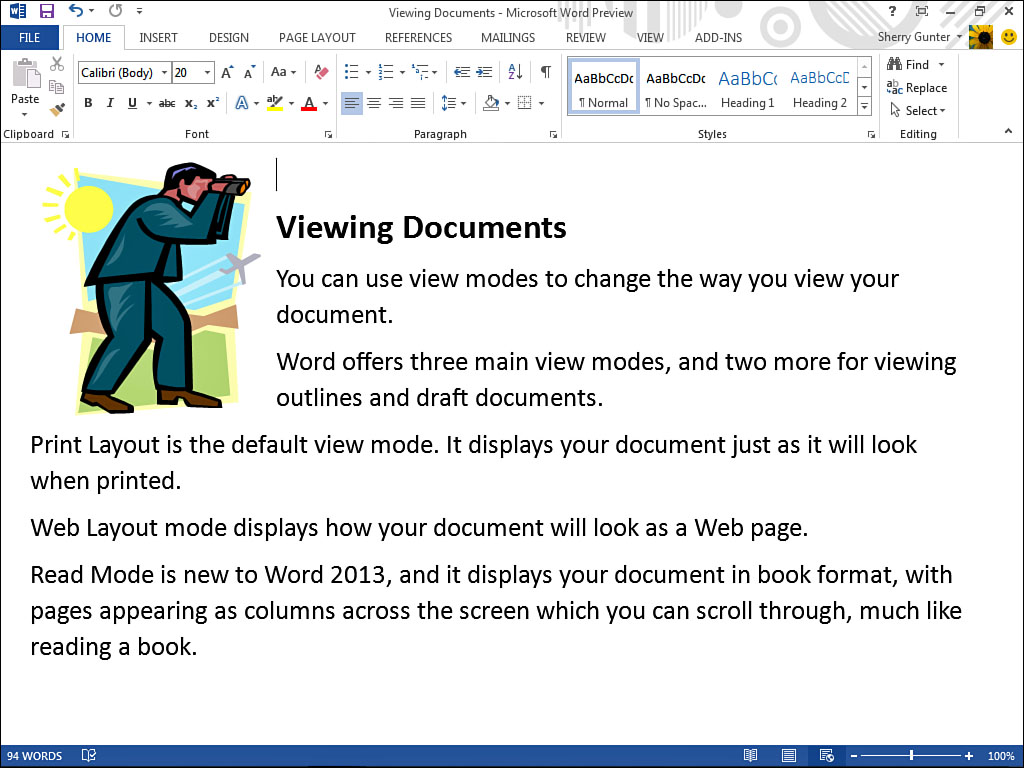
You can access Word’s view modes several ways. If you simply want to choose between Print Layout, Web Layout, or Read mode, click the associated icon from the program window’s status bar, as shown in Figure 2.13. This figure also shows the default Print Layout view.
FIGURE 2.13 You can quickly choose a view mode from the status bar. This screen shows Print Layout mode.
![]() Tip
Tip
You can quickly find out the name of any Word button or icon by hovering the mouse pointer over it. This applies to the view icons on the status bar, too.
Figure 2.14 shows the same document using Web Layout view. Notice how the page content sprawls out without margin areas normally associated with documents.
FIGURE 2.14 Here’s the same document shown in Web Layout view mode.
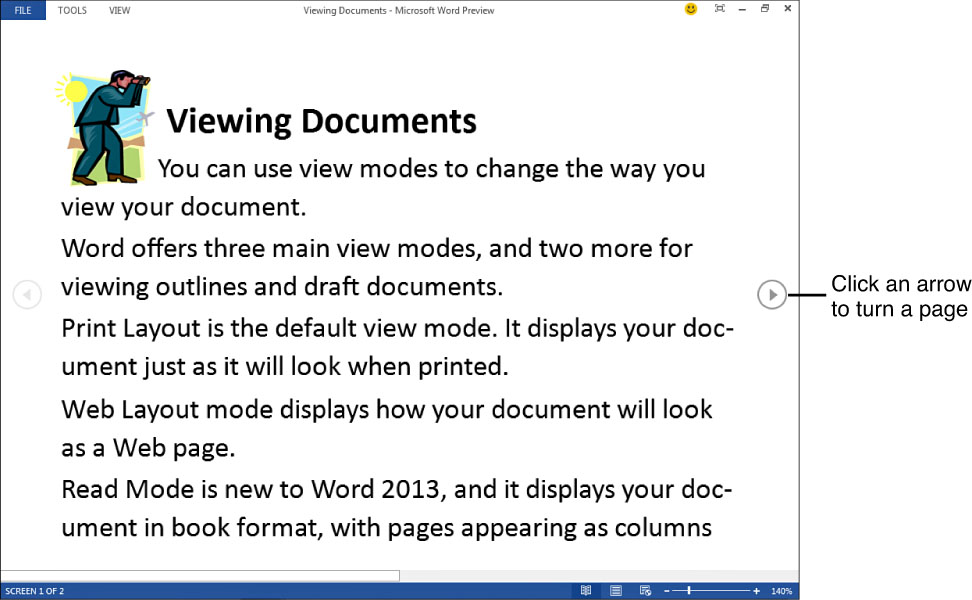
Figure 2.15 shows the same document using Read mode. The Ribbon is no longer displayed, and the Tools and View tabs display menus when clicked. In this viewing mode, you can use the arrow icons on the left and right side of the page to move forward and backward a page, like turning pages in a book.
FIGURE 2.15 Here’s the same document shown in Read mode.
In addition to the view modes found on the status bar, you can also click the View tab on the Ribbon, as shown in Figure 2.16, and then click a view mode. In addition to the three main view modes, the View tab also features the Outline and Draft views.
FIGURE 2.16 Use the View tab on the Ribbon as another route to switching views.
Zooming Your View
Magnifying tools have long been a staple of word-processing programs, allowing users to zoom in for a closer look at text and other document items, or zooming out for a bird’s-eye view of a page. To make zooming easier than ever, you can drag the Zoom slider on the status bar (see Figure 2.17). Drag it left to zoom out or drag it right to zoom in. You can also click on the slider to adjust the zoom level. To return to 100%, click the middle of the Zoom bar.
FIGURE 2.17 Drag the Zoom slider to zoom in or out.
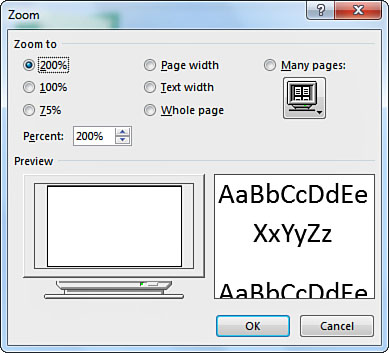
You can also find Zoom controls on the View tab, as shown in Figure 2.18. Any time you want to return a page to 100% size, click the 100% button. The View tab also lists options for viewing a single page, multiple pages, or full page width. To specify a specific zoom percentage, click the Zoom button to open the Zoom dialog box, shown in Figure 2.19.
FIGURE 2.18 The Ribbon’s View tab offers more zoom options.
FIGURE 2.19 Use the Zoom dialog box to set a specific percentage for zooming a document, or choose from several presets, such as 200% or 75%.
From the Zoom dialog box, you can choose a percentage or type a number in the text box. Click OK to apply the new setting to the document.


