
Hour 8. Activities and Fragments
What You’ll Learn in This Hour
![]() How to create and display fragments
How to create and display fragments
![]() How to navigate with fragments
How to navigate with fragments
![]() How fragments and activities interact
How fragments and activities interact
In this hour, you will learn what fragments are and how to incorporate them into Android apps. Fragments make creating sophisticated user interfaces easier. In this hour, you learn how to display fragments, how fragments interact with an action bar, and how fragments interact with activities.
Using Fragments Across UIs
Fragments are sections of full user interface (UI) functionality on a device’s screen. They were introduced in Android 3.0 Honeycomb, which was created to run on Android tablets. Before fragments, the user interface for an Android app was made up of activities, layouts, and controls such as buttons.
One reason fragments were introduced was to make an easier task of creating apps that worked well on small devices such as phones as well as on larger devices such as tablets and televisions. On a phone, you might use one fragment in an activity. On a tablet, you might combine several fragments in one layout to take advantage of the larger display area. You can use the same fragment on both a phone and a tablet. That same fragment can be displayed on its own in one user interface and with other fragments in another user interface.
Like activities, fragments have a lifecycle. They are started, paused, and destroyed. Fragments always live within an activity and whatever happens in the activity happens in the fragment. If an activity is destroyed, all the fragments within the activity are also destroyed.
As you saw in Hour 4, “Not Just Smartphones: Supporting Tablets, TVs, and More,” the support package for Android provides backward compatibility of many new Android features to older versions of Android. Using the support package, fragments are available for commonly used Android platforms starting with API level 4 (Android 1.6).
The four projects in the source code that accompany this hour are the following:
![]() Hour8App.Intro
Hour8App.Intro
![]() Hour8App.Flip
Hour8App.Flip
![]() Hour8App.Tab
Hour8App.Tab
![]() Hour8App.Callback
Hour8App.Callback
Creating and Displaying Fragments
Like with an activity, you can create a fragment by using a layout file and a single class that defines the fragment and inflates the layout. You can use two techniques to display this fragment in an activity: either embed the fragment in an XML layout file or add it dynamically.
Using a Layout for Fragment Display
You can embed fragments directly into an XML layout for an activity. Using this approach, the fragment acts as a container for multiple controls. You use the fragment class name to identify the fragment. When the layout is inflated, the fragment class runs and the user interface displays.
Listing 8.1 defines a simple layout file for a fragment. On line 4 of Listing 8.1, a TextView is defined. Line 8 shows that the text in this TextView is set to "Layout for fragment A". This example is contained in the project Hour8.intro.
LISTING 8.1 Layout for a Fragment (fragment_a.xml)
1: <RelativeLayout xmlns:android="http://schemas.android.com/apk/res/android"
2: android:layout_width="match_parent"
3: android:layout_height="match_parent" >
4: <TextView
5: android:id="@+id/textView1"
6: android:layout_width="wrap_content"
7: android:layout_height="wrap_content"
8: android:text="Layout for fragment A"
9: android:textAppearance="?android:attr/textAppearanceLarge" >
10: </TextView>
11: </RelativeLayout>
The class that uses fragment_a.xml extends the Fragment class and implements one method called onCreateView(). FragmentA defined in Listing 8.2 inflates the layout and returns the resulting view.
LISTING 8.2 Creating a View for FragmentA (FragmentA.java)
1:import android.app.Fragment;
2:import android.os.Bundle;
3:import android.view.LayoutInflater;
4:import android.view.View;
5:import android.view.ViewGroup;
6:public class FragmentA extends Fragment {
7: @Override
8: public View onCreateView(LayoutInflater
9: inflater, ViewGroup container, Bundle savedInstanceState) {
10: View v = inflater.inflate(R.layout.fragment_a, container, false);
11: return v;
12: }
13:}
Listing 8.1 defines the layout for a simple fragment. Listing 8.2 shows the fragment class that inflates that view. In Listing 8.3, the fragment is added to the activity_main.xml layout. The result in this case is trivial. You’ve simply embedded a TextView in a fragment and displayed the fragment, but the process is the same for even complex fragments.
Line 6 defines the fragment using the class name. Line 7 gives the fragment an id.
LISTING 8.3 Activity Layout with Embedded Fragment
1:<RelativeLayout xmlns:android="http://schemas.android.com/apk/res/android"
2: xmlns:tools="http://schemas.android.com/tools"
3: android:layout_width="match_parent"
4: android:layout_height="match_parent"
5: tools:context=".MainActivity" >
6:<fragment android:name="com.bffmedia.hour8app.intro.FragmentA"
7: android:id="@+id/fragment_a"
8: android:layout_width="match_parent"
9: android:layout_height="match_parent" />
10:</RelativeLayout>
Displaying Fragments Dynamically
You can add fragments to an activity dynamically. The idea is to have a layout, such as a LinearLayout, within the activity layout to hold the fragment.
In Listing 8.4, lines 6–10 define a LinearLayout and give it the id layout_container. You use that LinearLayout as the container for a fragment that is defined dynamically in code. That is, the dynamically created fragment will display within the LinearLayout with id layout_container. For this simple example, the LinearLayout is defined as the only element within the RelativeLayout; in practice, other controls or fragments could be defined in the RelativeLayout.
LISTING 8.4 Activity Layout with LinearLayout to Hold Fragments
1:<RelativeLayout xmlns:android="http://schemas.android.com/apk/res/android"
2: xmlns:tools="http://schemas.android.com/tools"
3: android:layout_width="match_parent"
4: android:layout_height="match_parent"
5: tools:context=".MainActivity" >
6:<LinearLayout
7: android:id="@+id/layout_container"
8: android:layout_width="wrap_content"
9: android:layout_height="wrap_content">
10:</LinearLayout>
11:</RelativeLayout>
To tie the fragment to an activity’s layout, you use a FragmentTransaction object, as shown in Listing 8.5.
In the onCreate() method of this activity, you create a new FragmentA object and a FragmentTransaction object. In line 3, you tie FragmentA to the layout using the FragmentTransaction replace() method. The contents of the LinearLayout associated with R.id.layout_container are replaced with the fragment that you created.
LISTING 8.5 Dynamically Adding a Fragment
1:FragmentA fragmentA = new FragmentA();
2:FragmentTransaction ft = getFragmentManager().beginTransaction();
3:ft.replace(R.id.layout_container, fragmentA);
4:ft.addToBackStack("example");
5:ft.setTransition(FragmentTransaction.TRANSIT_FRAGMENT_FADE);
6:ft.commit();
A FragmentTransaction object uses the following methods to manage fragments in a layout:
![]()
Add(): Adds a fragment to a layout.
![]()
Replace(): Replaces a fragment within a layout.
![]()
Remove(): Removes a fragment from a layout.
![]()
AddToBackStack(): Adds the set of commands in the transaction to the back stack. The fragment will not be destroyed when it is removed or replaced—it will be stopped. If the user navigates using the Back button, the fragment on the stack will redisplay.
![]()
SetTransition(): Sets an animation for the FragmentTransaction.
![]()
Commit(): Commits the transaction. This causes the transaction to take effect. The AddToBackStack() method is associated with all the commands that are committed.
Fragments and the Support Package
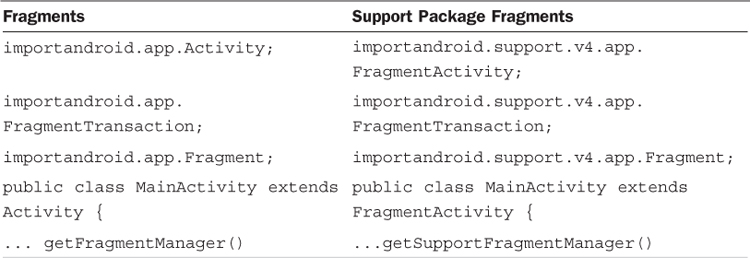
Fragments are available in all current versions of Android via the support package (which is also known as the compatibility library). Table 8.1 shows a comparison of the key differences between using fragments and the support package fragments. As you can see, the imports are different. Instead of an activity, you use a FragmentActivity, and instead of calling the getFragmentManager() method, you use getSupportFragmentManager().
If you use the support package, you will use the support package imports and methods. If your app targets Honeycomb and above, you can use the Android imports and methods.
Note: Using Fragments for Phones and Tablets
Fragments make leveraging the same code in both tablet and phone apps easy. In a phone app, you might have two activities such as a list and a details page. Selecting from the list shows the entire details page. On a tablet, you can design the same app with the list and detail page side by side. In both cases, you should use the same fragment class for the list and for the detail page. For a detailed example of this method, see http://developer.android.com/guide/practices/tablets-and-handsets.html.
Using Fragments for Navigation
In this section, you learn two ways to navigate using fragments. In the first case, you use fragments that navigate to each other. When the user clicks a button on FragmentA, FragmentB appears and vice versa. Implementing that navigation technique shows how to navigate within a set of fragments. The back stack is supported in this case. To make this technique work efficiently and consistently, the methods used to show individual fragments are defined in the activity.
In the second way to navigate using fragments, you use an action bar to show a fragment when a tab is selected from the action bar. Each fragment that you want to display has a corresponding tab in the action bar. When the tab is selected, the fragment displays.
Navigating Between Fragments
Using one activity and two fragments, you can see how one fragment can navigate to another. Though you use two fragments in this example, you can implement a more complex navigation scheme with many fragments using the same method. Rather than having multiple activities to manage, you can work with just one activity and multiple fragments.
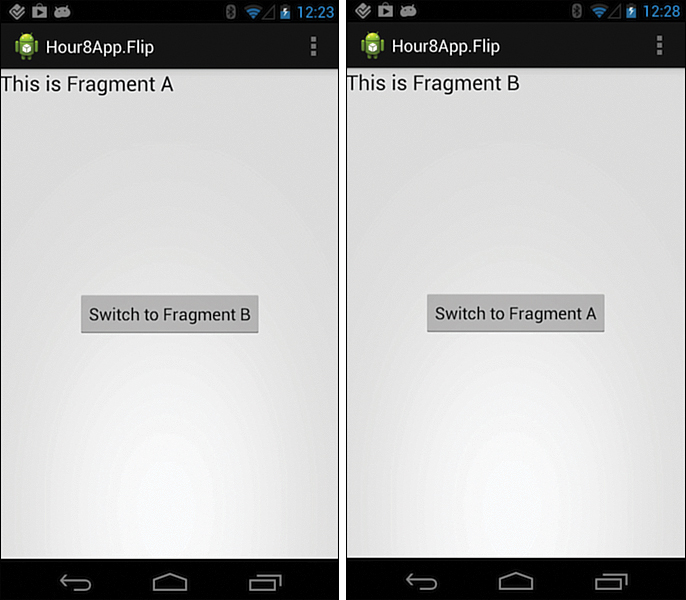
You need to define FragmentA and FragmentB. In each activity, a button is used to initiate navigation. The navigation always switches between fragments. Figure 8.1 shows the app with FragmentA displayed on the left and FragmentB displayed on the right. This example is contained in the project Hour8.Flip.
The project contains three XML layout files and three java files. There is one layout for the activity and one for each fragment, so you have the following files:
![]()
MainActivity.java
![]()
FragmentA.java
![]()
FragmentB.java
![]()
activity_main.xml
![]()
fragment_a.xml
![]()
Fragment_b.xml
In MainActivity.java, you define two methods, showFragmentA() and showFragmentB(), to show each fragment. Listing 8.6 shows the complete code for the showFragmentA() method.
LISTING 8.6 Showing a Fragment with showFragmentA()
1:public void showFragmentA(){
2:FragmentA fragmentA = new FragmentA();
3:FragmentTransaction ft = getFragmentManager().beginTransaction();
4:ft.replace(R.id.layout_container, fragmentA);
5:ft.addToBackStack("fragment a");
6:ft.setTransition(FragmentTransaction.TRANSIT_FRAGMENT_FADE);
7:ft.commit();
8: }
The showFragmentA() method defined in Listing 8.6 is called in the onCreate() method of the MainActivity class, because you want to show FragmentA when the activity starts.
It is also called when the button in FragmentB is clicked. Fragments always live within an activity, and that activity is visible to the fragments. That means that a fragment can call a method defined in the activity. Listing 8.7 shows a snippet of FragmentB code that calls the showFragmentA() method.
On line 4 of Listing 8.7, the current activity is retrieved using the method getActivity(). The activity returned is cast to MainActivity, and the method showFragmentA() is called in line 5.
This example shows that the activity associated with the fragment is available via the getActivity() method. Getting the activity this way gives you access to methods within the activity. For simple examples like this one, calling methods that are defined in the activity can be handy.
LISTING 8.7 Calling showFragmentA() from FragmentB
1:Button button = (Button) v.findViewById(R.id.button1);
2: button.setOnClickListener(new OnClickListener() {
3: public void onClick(View v) {
4: MainActivity currentActivity = (MainActivity) getActivity();
5: currentActivity.showFragmentA();
6: }
7: });
Using Fragments with an ActionBar
In Hour 7, “ActionBar and Menu Navigation,” you created an action bar with two tabs and learned how to respond to the tab being selected by creating a class that implemented an ActionBar.TabListener. In this section, you use an action bar with tabs to display different fragments. The project that accompanies this example is Hour8.Tab.
Switching Between Fragments with Tabs
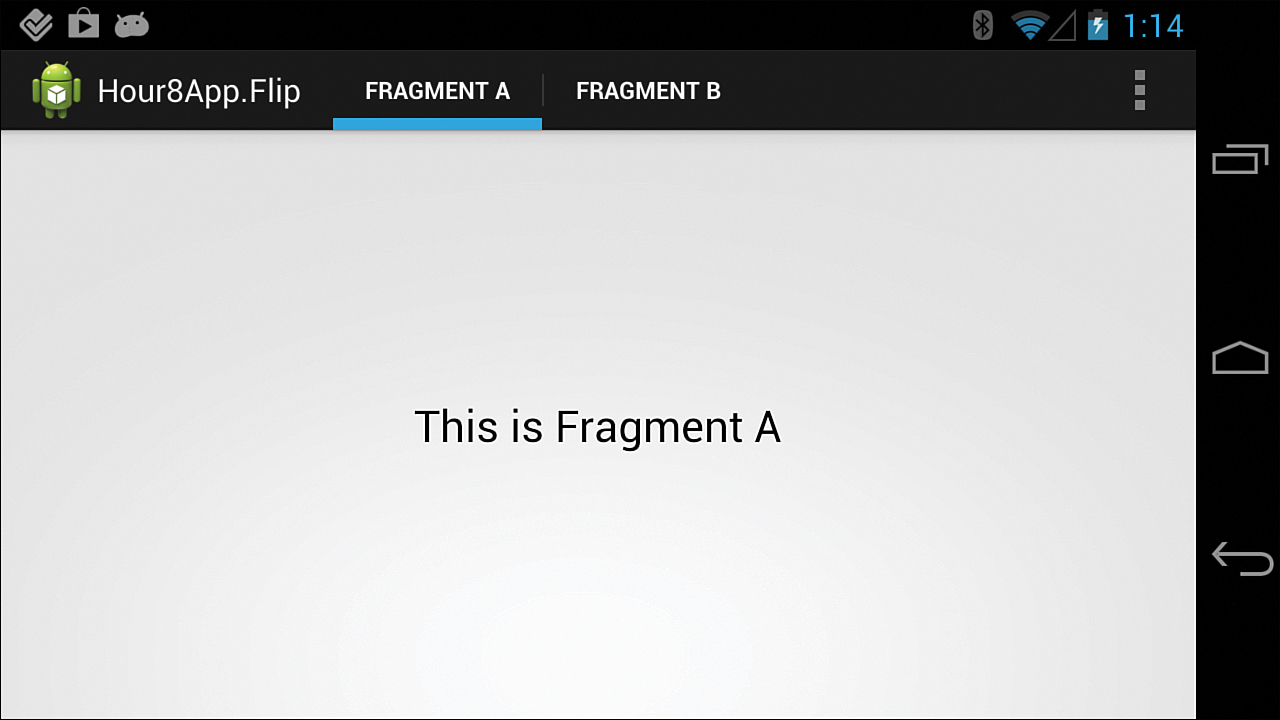
Listing 8.6 shows a method to display a fragment in a layout. You can call that method from within a tab listener to add tabs that can be used to navigate between fragments. The result is shown in Figure 8.2.
To implement the interaction between fragments and the action bar, you create and display tabs as illustrated in Hour 7 in Listing 7.3. You implement a different tab listener, as shown in Listing 8.8.
LISTING 8.8 Implementing a Tab Listener
1: private class NavTabListener implements ActionBar.TabListener {
2: public NavTabListener() {}
3: @Override
4: public void onTabReselected(Tab tab, FragmentTransaction ft) {}
5: @Override
6: public void onTabSelected(Tab tab, FragmentTransaction ft) {
7: if (tab.equals(mTab1)){
8: showFragmentA();
9: }else{
10: showFragmentB();
11: }
12: }
13: @Override
14: public void onTabUnselected(Tab tab, FragmentTransaction ft) {}
15: }
16: }
When a tab is selected, the activity’s showFragmentA() or showFragmentB() method will be called. The code is similar to Listing 7.4, but rather than show a message, you switch fragments.
Adding MenuItems from a Fragment
Adding items to the action bar when a particular fragment is displayed often makes sense. These menu items would only display when the particular fragment is showing. Android provides a concise mechanism for doing this. Fragments implement an onCreateOptionsMenu() method to append items to the action bar.
To add items to the action bar, the fragment must
![]() Call
Call setHasOptionsMenu() during the onCreate() method. This is an indicator that the fragment has menu options.
![]() Implement an
Implement an onCreateOptionsMenu() method.
![]() Handle the item being selected. This can be done in the activity’s
Handle the item being selected. This can be done in the activity’s onOptionsItemSelected() method. The activity method can handle responses to all cases, even if the fragment added the menu item.
Fragment and Activity Interaction
You have seen that a fragment can call a method that is defined within an activity, as shown in Listings 8.6 and 8.7. In that case, you knew that the methods existed within the activity. You can take a further step when you create a fragment and require that a particular method be implemented in the calling activity. To do that, the fragment implements an interface for the activity to implement. The fragment enforces this requirement by checking on the existence of the implemented interface.
To see how a fragment can require an interface to be implemented within an activity, you will create FragmentYesNo.java. This fragment has two buttons: one for “yes” and one for “no.” The fragment includes a TextView that you can populate with a question. Visually, this fragment can display a question and accept “yes” or “no” as possible responses. You define an interface within the fragment called onAnswerSelectedListener(). In order to be notified when a selection is made in FragmentYesNo, the activity must implement this method. The Hour 8. Callback project contains this example.
The following snippet shows a portion of the onCreateView() method for the fragment. A button is created. When the button is clicked, the fragment’s onAnswerSelectedListener() method is passed “yes.”
View v = inflater.inflate(R.layout.fragment_yes_no, container, false);
Button buttonYes = (Button) v.findViewById(R.id.buttonYes);
buttonYes.setOnClickListener(new OnClickListener() {
public void onClick(View v) {
mListener.OnAnswerSelected("yes");
}
});
The code for the “no” button is identical except it passes “no” in the response.
The listener interface is defined as follows:
public interface OnAnswerSelectedListener {
public void OnAnswerSelected(String answer);
}
OnAnswerSelectedListener mListener;
The onAnswerSelectedListener interface is defined in the FragmentYesNo class and the member field mListener is defined.
You make it a requirement that the activity that uses FragmentYesNo must implement this callback listener. You do that in the fragment’s onAttach() method. The onAttach() method is called when the fragment is attached to the activity. It is also there that the listener that will be called in the fragment is assigned. Listing 8.9 shows the onAttach() method.
LISTING 8.9 The Fragment’s onAttach() Method
1: @Override
2: public void onAttach(Activity activity) {
3: super.onAttach(activity);
4: try {
5: mListener = (OnAnswerSelectedListener) activity;
6: } catch (ClassCastException e) {
7: throw new ClassCastException(activity.toString()
8: + " must implement OnAnswerSelectedListener");
9: }
10: }
The onAttach() method is passed the activity. On line 5 of Listing 8.9, the fragment’s mListener is assigned to the activity cast as an OnAnswerSelectedListener. You are trying to get an OnAnswerSelectedListener from the activity. If the activity has not implemented the OnAnswerSelectedListener interface, this will fail. If the activity does not implement the interface, a ClassCastException is thrown. This forces any activity that wants to use this fragment to implement the callback.
On the activity side, the activity must implement the interface as follows:
public class MainActivity extends Activity
implements FragmentYesNo.OnAnswerSelectedListener {
...
@Override
public void OnAnswerSelected(String answer) {
Toast.makeText(getApplicationContext(), answer, Toast.LENGTH_SHORT).show();
}
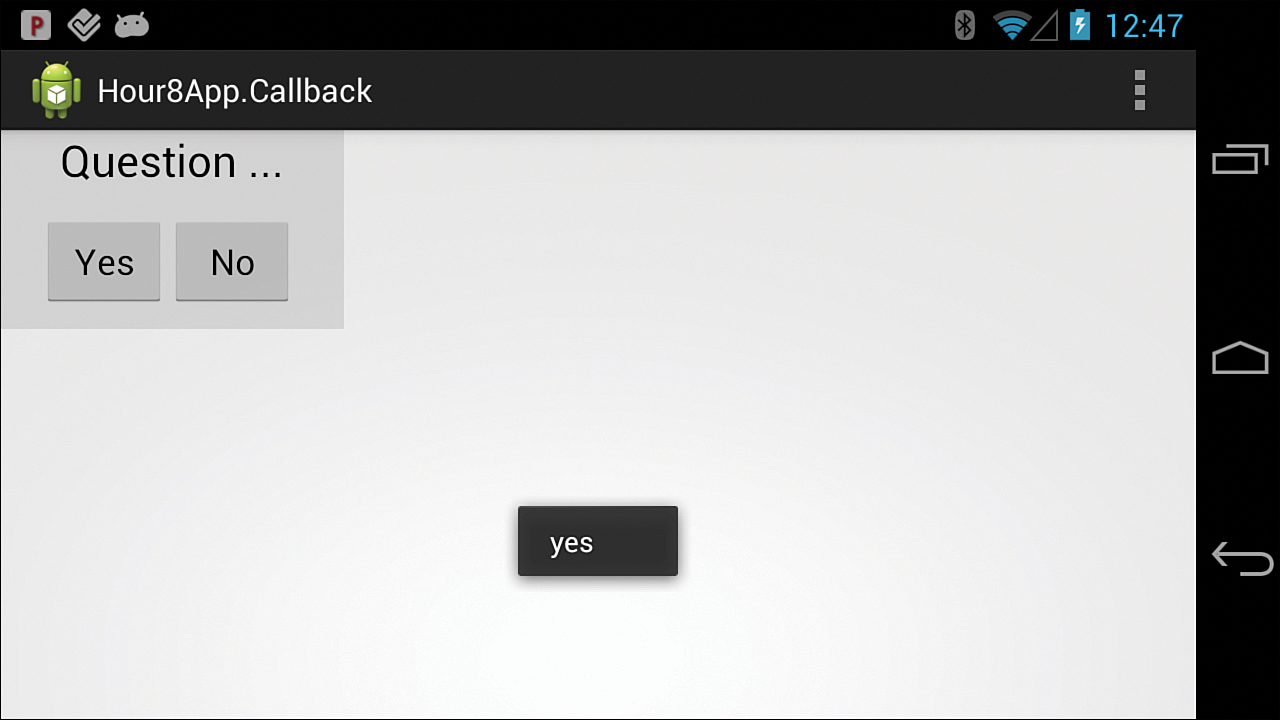
In this case, the onAnswerSelected() method just shows a toast message with the selected answer. Figure 8.3 shows the fragment and toast message.
You can pass data to the fragment using a bundle as you did with an activity, as follows:
Bundle args = new Bundle();
args.putString("question", "Do you like fragments?");
FragmentYesNo yesNoFragment = new FragmentYesNo();
yesNoFragment.setArguments(args);
This data is read in the fragment by calling the fragment’s getArguments() method.
Summary
This hour introduced fragments and demonstrated how you can display them dynamically or define them within the layout resource file of an activity. Fragments provide a convenient way to create and work with complex user interfaces. You saw several ways that an action bar can be used to work with fragments. Specifically, you implemented an action bar with two tabs to switch between fragments. You saw the ties between the activity that creates a fragment and the fragment itself. The fragment can call methods from that activity and can also require the activity to define specific methods.
Q&A
Q. What is the relationship between an activity and a fragment?
A. A fragment is always associated with an activity. An activity can include one or more fragments, so a fragment can be considered as a component within an activity.
Q. What are some advantages of using fragments?
A. Fragments make creating complex user interfaces easier and also make creating apps for tablets and phones that leverage the same code easier. Fragments allow you to design apps into visual and functional components and then implement these components as standalone units.
Workshop
Quiz
1. What is the onAttach() method?
2. What two techniques are used to display fragments?
3. What method is used to add items to the ActionBar from a fragment?
Answers
1. The onAttach() method is called when a fragment is attached to an activity. The activity is passed as a parameter. In this hour, you used the onAttach() method to ensure that the activity implemented a required callback.
2. Fragments can be created and displayed by using the XML layout for an activity or they can be dynamically created using FragmentTransactions.
3. Like an activity, the fragment has an onCreateOptionsMenu() method to add items to the ActionBar.
Exercises
1. Expand the FragmentYesNo example by implementing a dynamic display of questions. When the fragment is defined, a bundle should be passed with the question to display.
2. Expand the FragmentYesNo example by implementing navigation within the onAnswerSelected() callback. Implement two simple fragments. Navigate to one when “yes” is selected and to the other when “no” is selected.
3. Activities and fragments both go through a lifecycle. Using code such as the following snippet, log the methods for an activity and a fragment. The code uses the Log class to log the name of the method called. For the fragment, add a log statement for onAttach(), onCreate(), onCreateView(), and onActivityCreated():
import android.util.Log;
public class MainActivity extends Activity {
private static final String TAG = MainActivity.class.getName();
@Override
8protected void onCreate(Bundle savedInstanceState) {
Log.d(TAG, "onCreate");
super.onCreate(savedInstanceState);
setContentView(R.layout.activity_main);
}