
Hour 9. Scripting Part 2
What You’ll Learn in This Hour:
• How to write methods
• How to capture user input
• How to work with local components
• How to work game objects
Last Hour you learned about the basics of scripting in Unity. This hour you will be taking what you have learned and using it to complete more meaningful tasks. You will begin by examining methods. You will learn what they are, how they work, and how to write them. Then you will get hands on with user input. After that, you will examine how to access components from scripts. You will wrap the Hour up by learning how to access other game objects and their components with code.
Tip: Sample Scripts
Several of the scripts and coding structures mentioned in this hour are available in the book assets for Hour 9. Be sure to check them out for additional learning.
Methods
Methods, often called functions, are modules of code that can be called and used independently of each other. Each method generally represents a single task or purpose, and often many methods can work together to achieve complex goals. Consider the two methods you have seen so far: Start and Update. Each of them represents a single and concise purpose. The Start method contains all of the code that is run for an object when the scene first begins. The Update method contains the code that is run every frame of the scene.
Note: Method Shorthand
You have seen so far that whenever the Start method is mentioned, the word “method” has followed it. It can become cumbersome to always have to specify that a word used is a method. You can’t write just “Start” however, as people wouldn’t know if you meant the word or a method. A shorter way of handling this is to use parenthesis with the word. So the method Start can be rewritten as just Start(). If you ever see something written like SomeWords(), you can know instantly that the writer is talking about a method named “SomeWords”.
Anatomy of a Method
Before working with methods, you should look at the different parts that compose them. Below is the general format of a method.
<return type> <name>(<parameters>){
<Inside the method's block>
}
Method Name
Every method must have a unique name. Though the exact names that you are allowed to give a method are determined by the language used, some good general guidelines for method names are:
• Make a method name descriptive. It should be an action and preferably a verb.
• Avoid spaces in method names. Spaces are not allowed.
• Avoid special characters (!@*%$, etc.) in method names. Different languages allow different characters. By not using any, you don’t run the risk of there being a problem.
Method names are very important because that is both how you identify them and also how you use them.
Return Type
Every method has the ability to return a variable back to whatever code called it. The type of this variable is called the return type. If a method returns an integer, then the return type would be “int”. Likewise, if the method returned a true or false then the return type would be “bool”. If a method doesn’t return any value, it still has a return type. In that instance, the return type is “void” meaning “nothing”. Any method that returns a value will do some with the keyword “return”.
Parameter List
Just as methods can pass a variable back to whatever code called it, the calling code can pass variables in. These variables are called “parameters”. The variables sent into the method are identified in the parameter list section of the method. An example of a method named “Attack” that takes an integer called “enemyID” would look like this:
void Attack(int enemyID)
{}
As you can see, when specifying a parameter, you must provide both the variable type as well as the name. Multiple parameters are separated with a comma.
Method Block
This is where the code of the method actually goes. Every time a method is used, the code inside the method block will run in its entirety.
Tip: Methods as Factories
The concept of methods can be confusing for someone who is new to programming. Often times, mistakes will be made regarding the parameters and return of methods. A good way to keep it straight is to think of a method as a factory. Factories receive raw materials and use that to make products. Methods are the same way. The parameters are the materials you are passing in to the “factory” and the return is the final product of that factory. Just think of methods that don’t take parameters as factories that don’t require raw goods. Likewise, think of methods that don’t return anything as factories which don’t produce final products. By imagining method as little factories, you can work to keep the flow of logic straight in your head.
Writing Methods
Now that you have an understanding the components of a method, writing them is easy. Before you begin writing your methods take a moment ask yourself three main questions:
1. What specific task will the method achieve?
2. Does the method need any outside data to achieve it?
3. Does the method need to give any data back?
Answering these questions will help you determine the method’s name, parameters, and return data.
Consider this example: A player has been hit with a fireball. You need to write a method to simulate this by removing 5 health points. You know what the specific task of this method is. You also know that the task doesn’t need any data (since you know it takes 5 points) and should probably give the new health value back. You could write the method like this:
int TakeDamageFromFireball()
{
int playerHealth = 100 ;
return playerHealth – 5 ;
}
As you can see in the above method, the player’s health is 100 and 5 is taken away from it. The result (which is 95) is passed back. Obviously, this can be improved upon. For starters, it is said above that the fireball does 5 points of damage, but what if you wanted it to be able to do more? You would then need to know exactly how much damage a fireball was supposed to do at any given time. You would need a variable, or in this case a parameter. Your new method could be written as:
int TakeDamageFromFireball(int damage)
{
int playerHealth = 100 ;
return playerHealth – damage ;
}
Now you can see that the damage is read in from the method and applied to the health. Another place where this can be improved is with the health itself. Currently, the player can never lose as their health will always refresh back to 100 before having damage taken out. It would be better to store the player’s health elsewhere so its value was persistent. You could then read it in and remove the damage appropriately. Your method would then look like:
int TakeDamageFromFireball(int damage, int playerHealth)
{
return playerHealth – damage ;
}
By examining your needs, you can build better, more robust methods for your game.
Note: Simplification
In the above example, the resulting method simply performs basic subtraction. This is over simplified for instruction’s sake. In a more realistic environment there are many ways to handle this task. A player’s health could be stored in a variable belonging to a script. Doing so would mean that it did not need to be read in. Another possibility would be a complex algorithm in the “TakeDamageFromFireball” method where the incoming damage was reduced by some armor value, a player’s dodging ability, or a magical shield. If the examples here seem silly, just bear in mind that they are that was to demonstrate various elements of the topic.
Using Methods
Once a method is written, all that is left is to use it. Using a method is often referred to as “calling” or “invoking” the method. To call a method, you simply need to write the method’s name following by parenthesis and any parameters. So if you were trying to use a method that was named “SomeMethod” you would write:
SomeMethod();
If SomeMethod() required a integer parameter, you would call it like this:
//method call with a value of 5
SomeMethod(5);
//method call passing in a variable
int x = 5;
SomeMethod(x); //do not write "int x" here.
Note that when you call a method, you do not need to supply the variable type with the variable you are passing in. If SomeMethod() returned a value, you would want to “catch” it in a variable. The code could look something like this (a Boolean return type is assuming, in reality it could be anything):
bool result = SomeMethod();
Using this basic syntax is all there is to writing methods.
Input
Without player input, “video games” would just be “video”. Player input can come in many different varieties. Inputs can be physical like gamepads, joysticks, keyboards, and mice. There are capacitive controllers such as the relatively new touch screens which are found in modern mobile devices. There are also motion devices like the Wii Remote, the Playstation Move, and the Microsoft Kinect. Rarer is the audio input that uses microphones and a player’s voice to control a game. In this section, you will learn all about writing code to allow the player to interact with your game with physical devices.
Input Basics
With Unity (like most game engines), you have the ability to detect specific keypresses in code to make it interactive. It is a good idea, however, to avoid doing that. Doing so makes it difficult to allow the player to remap the controls to their preference. Thankfully, Unity has a simple system for generically mapping controls. With Unity, you look for a specific “axis” to know if a player intends for a certain action. Then, when the player runs the game, they can choose to make different controls mean different axes.
You can view, edit, and add different axes using the Input Manager. To access the Input Manager, click “Edit->Project Settings->Input”. In the Input Manager you can see the various axes associated with different input actions. By default there are 15 input axes, but you can add your own if you would like. Figure 9.1 shows the default Input Manager with the “Horizontal” axis expanded.
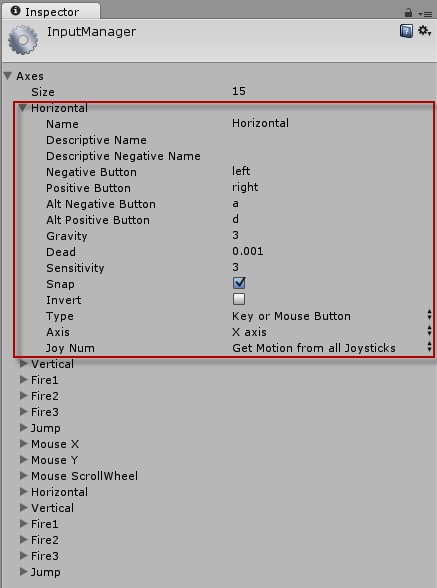
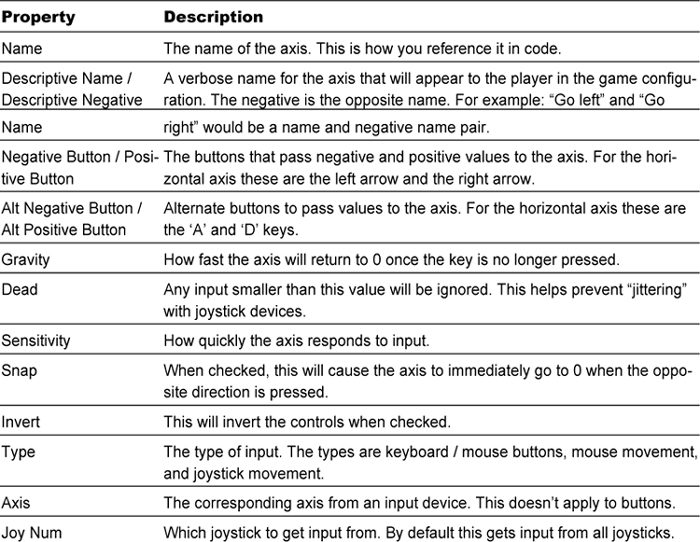
While the horizontal axis doesn’t directly control anything (we will write scripts to do that later) it represents that player going sideways. Table 9.1 contains the properties of an axis and their description.
Input Scripting
Once your axes are set up in the Input Manager working with them in code is very simple. To access any of the player’s input, you will be using the “Input” object. More specifically, you will be using the “GetAxis” method of the input object. GetAxis() reads the name of the axis in as a string and returns back the value of that axis. So if you wanted to get the value of the horizontal axis, you would type:
float hVal = Input.GetAxis("Horizontal");
In the case of the horizontal axis, if the player is pressing the left arrow (or the ‘A’ key) then GetAxis() will return back a negative number. If the player is pressing the right arrow (or ‘D’ key) the method will return a positive value.
Specific Key Input
While you generally want to deal with the generic axes for input, sometimes you do want to determine if a specific key has been pressed. To do so, you will again be using this input object. This time, however, you will be using the “GetKey” method. This method reads in a special code that corresponds to a specific key. It then returns back a true of the key is currently down and a false if the key is not currently down. To determine if the ‘K’ key is currently pressed, you would type:
bool isKeyDown = Input.GetKey(KeyCode.K);
Tip: Finding Key Codes
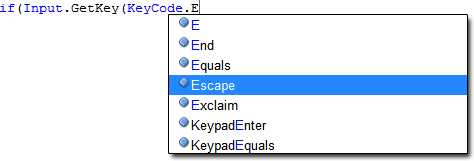
Each key has a specific key code. You can determine the key code of the specific key you want by reading the Unity documentation. Alternatively, you can use the built in tools of MonoDevelop to find it. Whenever you are working on a script in MonoDevelop, you can always type in the name of an object followed by a period. Doing so will result in a menu popping up with all of the possible options. Likewise, if you type an open parenthesis after typing a method name, the same menu will popup showing you the various options. Figure 9.2 illustrates using the auto menu to find the key code for the “Esc” key.
Figure 9.2. The automatic popup in MonoDevelop
Mouse Input
Besides keypresses, you will want to capture mouse input from the user. There are two components to mouse input: mouse buttons and mouse movement. Determining if mouse buttons are pressed is much like keypresses covered above. Again you will be using the input object. This time you will use the GetMouseButtonDown method. This method takes an integer between 1 and 3 to dictate which mouse button you are asking about. The method returns a Boolean value indicating if the button is pressed or not. The code to get the mouse button presses looks like this:
bool isButtonDown;
isButtonDown = Input.GetMouseButtonDown(0); //left mouse button
isButtonDown = Input.GetMouseButtonDown(1); //right mouse button
isButtonDown = Input.GetMouseButtonDown(3); //center mouse button
Mouse movement is only along two axis: x and y. To get the mouse movement you will use the GetAxis method of the input object. You can use the names “Mouse X” and “Mouse Y” to get the movement along the x and y axis respectively. The code to read in the mouse would look like:
float value;
value = Input.GetAxis("Mouse X"); //x axis movement
value = Input.GetAxis("Mouse Y"); //y axis movement
Unlike button presses, the mouse movement is measured by the amount the mouse has moved since the last frame only. Basically, holding a key will cause a value to increase until it maxes out at -1 or 1 (depending on whether is it positive or negative). The mouse movement, however, will generally have smaller numbers as it is measured and reset every frame.
Accessing Local Components
As you have seen numerous times in the inspector view, objects are composed of various components. You can interact with these components at run time through scripts. Every component is a little different, but the general syntax for editing components is to type the components name followed by a period and ending with the name of the property you wish to change. For instance, if you wanted to change the type of a point light component, you could write:
light.type = LightType.Directional;
This will change the “type” property of the light component to be “directional”. Notice how the light component and type property are capitalized in the inspector but lower case in code. Just remember that when you are attempting to access a specific thing (“this light” for example) you will use lower case letters.
The most common component you will work with is the transform component. By editing this, you can make objects move around the screen. Remember that an object’s transform is made up of its translation (or position), its rotation, and its scale. While you can modify those directly, it is easier to use some built in options called the Translate method, the Rotate method, and the localScale variable.
//moves the object along the positive x axis.
//The '0F' means 0 as a float. It is the way Unity reads floats
transform.Translate(.05f, 0f, 0f);
//rotates the object along the z axis
transform.Rotate(0f, 0f, 1f);
//scales the object to double its size in all directions
transform.localScale = new Vector3(1.5f, 1.5f, 1.5f);
Since Translate() and Rotate() are methods, if the above code where to be put in Update() the object would continually move along the positive x axis while being rotated along the y axis.
Accessing Other Objects
Many times you will want a script to be able to find and manipulate other objects and their components. Doing so is simply a matter of finding the object you want and calling upon the appropriate component. There are a few basic ways to find objects that aren’t local to the script, or the object the script is attached to.
Finding Other Objects
The first and easiest way to find other objects to work with is to use the editor. By creating a public variable on the class level of type GameObject, you can simply drag the object you want onto the script component in the inspector view. The code to set this up would look like this:
//This is here for reference
public class SomeClassScript : MonoBehaviour {
//this is the game object you want to access
public GameObject objectYouWant;
//this is here for reference
Void Start() {
}
}
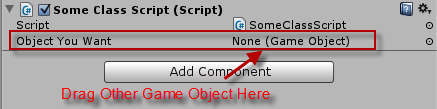
Once you have attached the script to a game object, you will see a property in the inspector called “Object You Want” (see Figure 9.2). Simply drag any game object you want onto this property to have access to it in the script.
Figure 9.3. The new “Object You Want” property in the inspector.
Another way to find a game object is by using the Find method. In order to find it this way you will need to know the object’s name. The object’s name is what it is called inside the hierarchy view. Assuming you are looking for an object named “Cube” the code would look like this:
//This is here for reference
public class SomeClassScript : MonoBehaviour {
//this is the game object you want to access
public GameObject target;
//this is here for reference
void Start() {
target = GameObject.Find("Cube");
}
}
The shortcoming of this method is that it just returns the first item it finds with the given name. If you have multiple “Cube” objects, you won’t know which one you are getting.
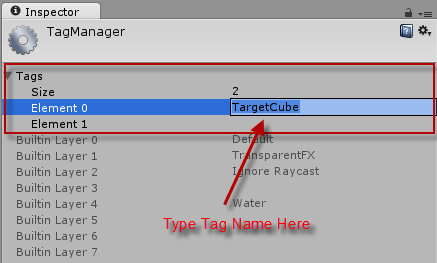
The final way to find an object is by its tag. An object’s tag is much like its layer (which was covered previously). The only different is semantics. The layer is used for broad categories of interaction while the tag is used for basic identification. You create tags using the Tag Manager (click “Edit->Project Settings->Tags”). Figure 9.4 shows how to add a new tag to the Tag Manager.
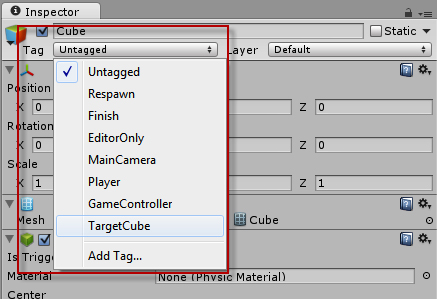
Once a tag is created, simply apply it to an object using the Tag dropdown list in the inspector view (see Figure 9.5).
Now that a tag is added to an object, you can find it using the FindWithTag method:
//This is here for reference
public class SomeClassScript : MonoBehaviour {
//this is the game object you want to access
public GameObject target;
//this is here for reference
void Start() {
target = GameObject.FindWithTag("TargetCube");
}
}
Tip: Finding Efficiency
In the above examples, the target game object has been stored in a class variable (often called a member). The code to find the target object has then been placed in the Start method. You could always simply create the variable and find the target audience in the Update method (or wherever else you need it). You should avoid doing that. Finding an object over and over is very inefficient and can slow down a game’s performance. Remember, performance is good! Doing the same thing over and over is bad!
Modifying Object Components
Once you have a reference to another object, working with the components of that object is almost 100% the exact same. The only difference is that now, instead of simply writing the component name, you need to write the object variable and a period in from of it:
//This accesses the local component, not what you want
transform.Translate(0, 0, 0);
//This accesses the target object, what you want
targetObject.transform.Translate(0, 0, 0);
Summary
This hour you explored more scripting in Unity. You learned all about methods and looked at some ways to write your own. Then, you worked with player inputs from the keyboard and mouse. After that you learned about modifying object components with code. Lastly, you discovered how to find and interact with other game objects via scripts.
Q&A
Q. How many methods should I write?
A. A method should be a single concise function. You don’t want to have too few methods as that would cause each method to do more than one thing. You also don’t want to have too many small methods as that defeats the purpose. As long as each process has its own specific method, you have enough.
Q. Why don’t we learn more about gamepads?
A. The problem with gamepads is that they are all different. On top of that, different operating systems treat them differently. The reason they weren’t covered in detail this hour is because they are too varied and wouldn’t allow for a consistent reader experience (plus not everyone has gamepads).
Q. Is every component editable by script?
A. Yes. All of the built in ones are at least.
Workshop
Take some time to work through the questions here to ensure you have a firm grasp on the material.
Quiz
1. True or False: Methods can also be referred to as functions.
2. True or False: Not every method has a return type.
3. Why is it a bad thing to map player interactions to specific buttons?
4. In the “Try-It-Yourself” exercises in the sections on local and target components, the cube was translated along the positive x axis and rotated along the z axis. This caused the cube to move around in a big circle. Why?
Answers
1. True.
2. False. Every method has a return type. If the method returns nothing, the type is void.
3. The players will have a much harder time remapping the controls to meet their preferences. By mapping your controls to generic axes, the player can change which buttons map to those axes easily.
4. Transformations happen on the local coordinate system (remember Hour 2). Therefore, the cube did move along the positive x axis. The direction that axis was facing relative to the camera, however, kept changing.
Exercise
It is a good idea to combine each Hour’s lessons together to see them interact is a more realistic way. In this exercise, you will be writing scripts to allow the player direction control over a game object. The solution to this exercise can be found in the book assets for Hour 9 if needed.
1. Create a new project or scene. Add a cube to the scene and position it at (0, 0, -5). Add a direction light to your scene.
2. Create a new folder called “Scripts” and create a new script called “CubeControlScript”. Attach the script to the cube.
Try to add the following functionality to the script. If you get lost, check the book assets for Hour 9 for help:
• Whenever the player presses the left or right arrow, move the cube along the x axis negatively or positively respectively. Whenever the player presses the down or up arrow move, the cube along the y axis negatively or positively respectively.
• When the player moves the mouse along the y axis, rotate the cube about the x axis. When the player moves the mouse along the x axis, rotate the cube about the y axis.
• When the player presses the ‘M’ key, scale the cube up. When the player presses the ‘N’ key, scale the cube down.