
Hour 11. Game 2: Chaos Ball
What You’ll Learn in This Hour:
• How to design the game Chaos Ball
• How to build the ChaosBall arena
• How to build the ChaosBall entities
• How to build the ChaosBall control objects
• How to further improve ChaosBall
It is time once again to take what you have learned and make another game. This hour you will be making the game Chaos Ball, which is a faster paced arcade style game. You will start by covering the basic design elements of the game. From there, you will build arena and game objects. Each object type will be made unique and given special collision properties. From there you will add interactivity to make the game playable. You will finish by playing the game and making any necessary tweaks to improve the experience.
Tip: Completed Project
Be sure to follow along in this hour to build the complete game project. If you get stuck, however, a completed copy of the game can be found in the book assets for Hour 11. Take a look at it if you need help or inspiration!
Design
You have already learned what the design elements are in Hour 7. This time you will get right into them.
The Concept
This is a game slightly akin to Pinball or Breakout. The player will be in an arena. Each of the four corners will have a color and four balls with corresponding colors will be floating around. Amidst the four colored balls, there will be several yellow balls, called Chaos Balls. Chaos Balls exist solely to get in your way and make the game challenging. They are smaller than the four colored balls but they also move faster. The player will have a flat surface with which they will attempt to knock the colored balls into the correct corners.
The Rules
The rules for this game will state how to play, but will also allude to some of the properties of the objects. The rules for Chaos Ball are as follows:
• The player wins when all four balls are in the correct corners. There is no loss condition.
• Hitting the correct corner will cause a ball to become inert.
• All objects in the game will be super bouncy (they will lose no momentum on impact).
• No ball (or player) will be able to leave the arena.
• Ball speeds and chaos ball speeds will be randomized.
The Requirements
The requirements for this game are very simple. This is not a graphically intense game and instead relies on scripting and interaction for its entertainment. The requirements for Chaos Ball are:
• A walled piece of terrain to act as the arena.
• Textures for the terrain and game objects. These are provided in the Unity standard assets.
• Several colored balls and chaos balls. These will be generated in Unity.
• A character controller. This is provided by the Unity standard assets.
• A game controller. This will be created in Unity.
• A bouncy physics material. This will be created in Unity.
• Colored corner indicators. These will be generated in Unity.
• Interactive scripts. These will be written in MonoDevelop.
The Arena
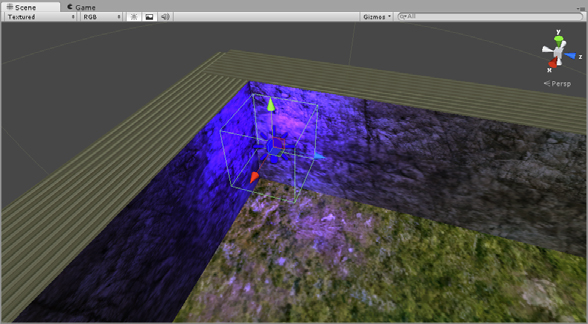
The very first thing you will want to create is an area for the action to take part in. The term “arena” is chosen to give the idea that the terrain is quite small and also walled in. The player, nor any balls, should be able to leave the arena. Otherwise, the arena is quite simple (see Figure 11.1).

Creating the Arena
As mentioned above, this is going to be a simple process due to the simplicity of a basic arena map. To create the arena:
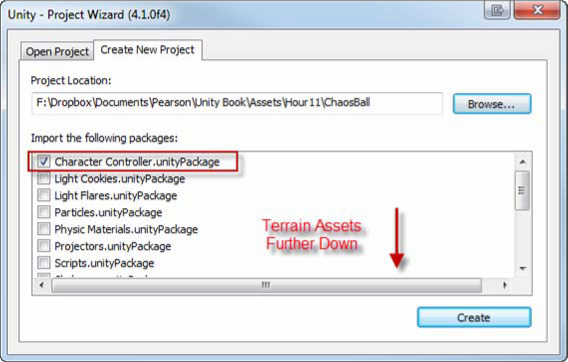
1. Create a new project in a folder called “ChaosBall”. This time at the “Create New Project” dialog, check the boxes next to “Character Controller.unityPackage” and “Terrain Assets.unityPackage” (see Figure 11.2). Add a terrain to the project.
Figure 11.2. The “Create New Project” dialog.
2. Set the resolution of the terrain to 50 by 50. Add a directional light to the scene. Delete the “Main Camera”.
3. Add a cube to your scene. Place the cube at (0, 1.5, 25) and scale it to (1.5, 3, 51). Notice how it becomes a side wall for the arena. Rename the cube to “Wall”.
4. Save the scene as “Main” in a “Scenes” folder.
Tip: Consolidating Objects
You may be wondering to yourself why you only created a single wall when the arena will obviously need four. The idea is that you want to do as little redundant, tedious work as possible. Often, if you require several objects that are very similar, you can create the object one and then duplicate it multiple times. In this instance, you will setup a single wall with its materials and properties and then simply copy it three times. You will repeat the same process for the corner nodes, the chaos balls, and the colored balls. Hopefully you can see how a little planning can save you a fair bit of time.
Texturing
Right about now the arena is looking pretty pitiful and bland. Everything is white and there is only a single wall. The next step is to add some textures to liven the place up. There are two objects specifically you will need to texture: the wall and the ground.
1. Create a new folder called “Materials” under “Assets” in the project view. Add a material to the folder (right click the folder and select “Create->Material”). Name the material “WallMaterial”.
2. Set the x axis tiling to 10 (see Figure 11.3).
Figure 11.3. Adding cliff texture to material.
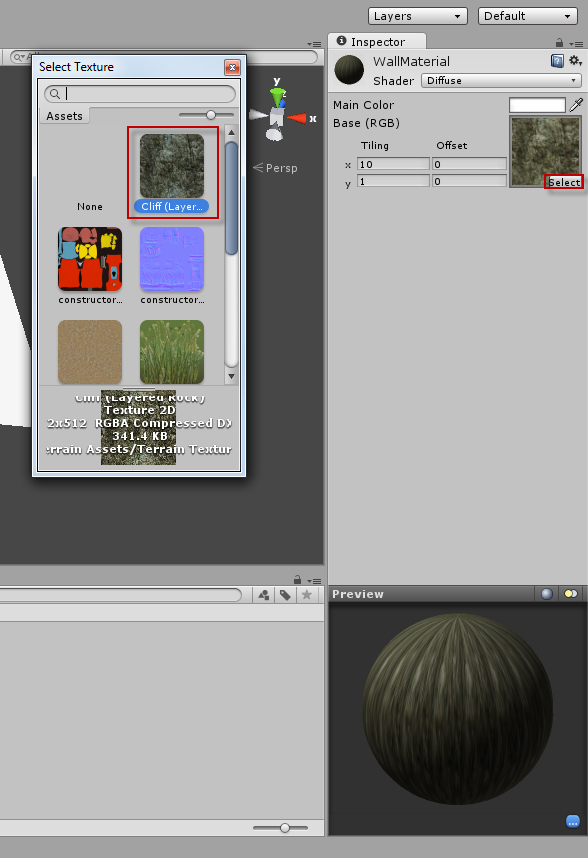
3. Apply the “Cliff” texture to the wall material in the inspector view (see Figure 11.3).
4. Click and drag the wall material onto the wall object in the scene view.
Next you will need to texture the ground. Recall that since the ground is a terrain, it is textured a little differently:
1. With the terrain selected, choose the terrain texturing tool in the inspector (see Figure 11.4).
Figure 11.4. Adding terrain texture.
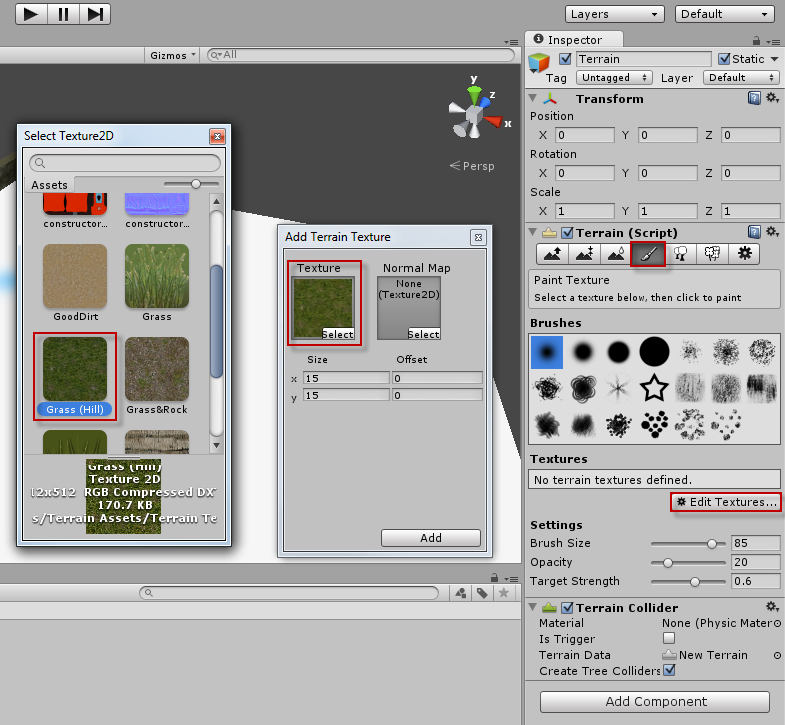
2. Click “Edit Textures->Add Texture”. In the “Add Terrain Texture” dialog, select the “Grass (Hill)” texture and click “Add”.
3. Your terrain will now be textured with grass.
Super Bouncy Material
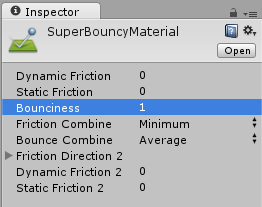
You will want objects to bounce off of the walls without losing any momentum. What you need is a super bouncy material. If you recall, Unity has a set of physics materials available. The bouncy material they provide, however, is not quite bouncy enough for your needs. Therefore, a new material needs to be created:
1. Right click the “Materials” folder and select “Create->Physic Material”. Name the material “SuperBouncyMaterial”.
2. Set the properties for the super bouncy material as they appear in Figure 11.5. Basically, you will want everything that reduces energy to be minimized.
Figure 11.5. SuperBouncyMaterial settings
3. Click and drag the super bouncy material onto the wall object in the scene. It will automatically get applied as the physics material for the collider.
Finish the Arena
Now that the wall and ground is complete, you can finish the arena. The hard work has been done and now all you need to do is duplicate the walls (right click in the hierarchy view and select “Duplicate”). The exact steps are as follows:
• Duplicate the wall once. Place the new instance at (50, 1.5, 25).
• Duplicate the wall again. Place it at (25, 1.5, 0) with a rotation of (0, 90, 0).
• Duplicate the wall created in the previous step (the one that’s “turned”) and place it at (25, 1.5, 50).
Your arena should now have four walls without any gaps or seams.
Game Entities
In this section you will be creating the various game objects required for playing the game. Just like with the arena wall, it will be easier for you to create one instance of each entity and then duplicate it.
The Player
The player in this game will be a modified first person character controller. When you created this project, you should have selected to import that character controller’s package. Go ahead and click and drag a first person character controller into the scene. Place the controller at (46, 1, 4) with a rotation of (0, 315, 0).
The first thing you are going to want to do is to move the camera up and away from the controller. This will allow the player a greater field of vision while playing the game. To do this:
1. Expand the “First Person Controller” in the hierarchy view (click the arrow next to its name) and locate the “Main Camera”. You will know you have the correct one because it will be blue.
2. After selecting the controller’s camera, position it at (0, 5, -3.5) with a rotation of (43, 0, 0). The camera should now be above, behind, and slightly looking down on the controller.
The next thing to do is to add a bumper to the controller. The bumper will be the flat surface the player will bounce balls off of. To do this:
1. Add a cube to the scene. Rename the cube “Bumper”. Scale the bumper (3.5, 3, 1).
2. Click and drag your super bouncy material onto the bumper.
3. In the hierarchy view, click and drag the bumper onto the “First Person Controller”. This will nest the bumper onto the controller. After doing that, change the position of the bumper to (0, 0, .1) with a rotation of (0, 0, 0). The bumper will now be slightly in front of the controller.
The last thing to do is to speed the player up a bit. Select the “First Person Controller” and in the inspector view expand the “Movement” property of the “Character Motor (Script)” component. Change the “Max Forward Speed” to 11 and the “Max Sideways Speed” to 10.
Chaos Balls
The chaos balls will be the fast and wild balls flying around the arena and disrupting the player. In many ways they are similar to the colored balls, so you will be working to give them universally applicable assets. To create the first chaos ball:
1. Add a sphere to the scene. Rename the sphere “Chaos” and position it at (15, 2, 25) with a scale of (.5, .5, .5).
2. Click and drag the super bouncy material onto the sphere.
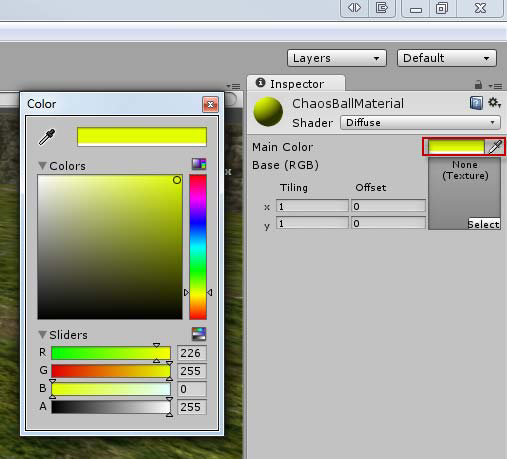
3. Create a new material for the chaos ball called “ChaosBallMaterial”. In the color selector for the material, select a bright yellow color (see Figure 11.6). Click and drag the material onto the sphere.
Figure 11.6. The ChaosBallMaterial settings
4. Add a rigidbody to the sphere. Change the “Angular Drag” to 0 and uncheck “Use Gravity”. Change the “Collision Detection” property to “Continuous”. Under the “Constraints” property, freeze the y position. We don’t want the balls to be able to go up or down.
5. Open the Tag Manager (click “Edit->Project Settings->Tags”), expand the “Tags” section by clicking the arrow next to “Tags”, and add the tag “Chaos” at “Element 0”. While you’re here, go ahead and add the tags “Green”, “Orange”, “Red”, and “Blue”. These will be used later.
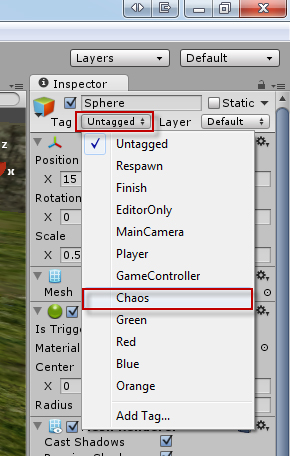
6. Select the chaos sphere and change its tag to be “Chaos” in the inspector view (see Figure 11.7).
Figure 11.7. Choosing the Chaos tag.
The ball is now complete, but it still doesn’t do anything. You will need to create a script to move the ball all around the arena. You will need to create a script called “VelocityScript” and attach it to the chaos ball. The full code for the velocity script can be found in Listing 11.1.
Listing 11.1. VelocityScript.cs
using UnityEngine;
using System.Collections;
public class VelocityScript : MonoBehaviour {
public float max = 50;
// Use this for initialization
void Start () {
rigidbody.velocity = new Vector3(Random.Range(0, max), 0, Random.Range(0, max));
}
// Update is called once per frame
void Update () {
}
}
As you can see in the listing above, the Random.Range() method is used to give the ball an initial velocity between 0 and 50 along the x and z axis. Random.Range() takes two numbers as parameters and returns a random number in between them.
Run your scene and watch the ball begin to fly around the arena. At this point, the chaos ball is finished. In the hierarchy view, duplicate the chaos ball four times. Scatter each ball around the arena and give each of them a random y axis rotation. Remember that movement along the y axis is locked, so make sure each ball stays at a y position of 2.
The Colored Balls
While the chaos balls are yellow, and that is a color, the colored balls are the four specific balls needed to win the game. They will be red, orange, blue, and green. Like the chaos balls, you will be able to make a single ball and then duplicate it to make the creation easier.
To create the first ball:
1. Add a sphere to the scene. Rename the sphere “Blue”. Position the sphere somewhere near the middle of the arena, and make sure the y position is 2.
2. Create a new material called “BlueMaterial” and set its color to blue the same way you did for the chaos balls (Figure 11.6 above). While you’re at it, go ahead and create “RedMaterial”, “GreenMaterial”, and “OrangeMaterial” and set them to the appropriate color. Click and drag the “BlueMaterial” onto the sphere.
3. Click and drag the super bouncy material onto the ball.
4. Add a rigidbody to the sphere. Change its “Angular Drag” to 0, uncheck “Use Gravity”, and freeze the y position under “Constraints”.
5. Previously you created the “Blue” tag. Now, change the sphere’s tag to “Blue” just like you did for the chaos ball (see Figure 11.7 above).
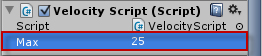
6. Attach the velocity script to the sphere. In the inspector locate “Velocity Script (Script)” component and change the property “Max” to 25 (see Figure 11.8). This will cause the sphere to move slower than the chaos balls initially.
Figure 11.8. Changing the max property.
If you run the scene now, you should see the blue ball moving rapidly around the arena. Now you need to create the other three balls. Each one will be a duplicate of the blue ball. The steps to create the other balls are:
1. Duplicate the blue ball. Rename the new ball to its color: Red, Orange, and Green.
2. Give the new ball the tag corresponding to its name. It is important for the name and the tag to be the same thing.
3. Drag the appropriate color material onto the new ball. It is important for the ball to be the same color as its name.
4. Give the ball a random location and rotation in the arena, but ensure that its y position is 2.
At this point, the game entities are complete. If you run the scene you will see all of the balls bouncing around the arena.
The Control Objects
Now that you have all of the pieces in place, it is time to “Gamify” them. That is, it is time to turn these into a playable game. To do that, you will need to create the four corner goals, the goal scripts, and the game controller. Once done, you will have yourself a game.
The Goals
Each of the four corners has a specific colored goal which corresponds to a colored ball. The idea behind the goal is that when a ball enters, the goal will check its tag. If the tag matches the color of the goal, then there is a match. When a match is found, the ball is set to kinematic (remember that makes it inert) and the goal is set to “solved”. As with the ball objects above, you can configure a single goal and then duplicate it to match your needs.
To set up the initial goal:
1. Create an empty game object (click “GameObject->Create Empty”). Rename the game object “BlueGoal” and assign the tag “Blue” to it. Position the game object at (1.6, 2, 1.6).
2. Attach a box collider to the goal and check the “Is Trigger” property. Change the size of the box collider to be (1.5, 1.5, 1.5).
3. Attach a light to the goal (click “Component->Rendering->Light”). Make it a point light and make it the corresponding color of the goal (see Figure 11.9). Change the intensity of the light to 3.
Next you will need to create a script called “GoalScript” and attach it to the blue goal. The content of the script are listed in Listing 11.2 below.
using UnityEngine;
using System.Collections;
public class GoalScript : MonoBehaviour {
private bool solved = false;
// Use this for initialization
void Start () {
}
// Update is called once per frame
void Update () {
}
void OnTriggerEnter(Collider other)
{
if(other.tag == tag)
{
solved = true;
other.rigidbody.isKinematic = true;
}
}
public bool IsSolved()
{
return solved;
}
}
As you can see in the script, the OnTriggerEnter() method will check the tag of every object that contacts it against its own tag. If they match, the object is made inert and that goal gets flagged as “solved”.
Note: Private Variable
You may notice that the GoalScript has a private “solved” variable and a public IsSolved() method. The method simply returns the variable. You may be wondering to yourself why that extra work was done when the variable could have simply been made public. The reason things were structured this way was to prevent any other objects or scripts from accidently setting the goal to be solved. Since nothing has access to that variable besides the goal, nothing can mess it up. The method exists solely to tell the game control when if the goal is complete.
Once the script is complete and attached to the goal, it is time to duplicate it. The steps to create the other goals are as follows:
1. Duplicate the BlueGoal. Name the new goal corresponding to its color: RedGoal, GreenGoal, and OrangeGoal.
2. Change the tag of the goal to its corresponding color.
3. Change the color of the point light to the goal’s corresponding color.
4. Position the goal. The colors can go in any corner as long as each goal gets its own corner. The three other corner positions are (1.6, 2, 48.4), (48.4, 2, 1.6), and (48.4, 2, 48.4).
All of the goals should now be set up and operational.
The Game Controller
The last element needed to finish the game is the game controller. This controller will be responsible for checking each goal every frame and determining when all four are solved. For this particular game, the game controller is very simple. To create the game controller:
1. Add an empty game object to the scene. Move it someplace out of the way. Rename it “GameController”.
2. Create a script called “GameControlScript” and add the code from Listing 11.3 to it. Attach the script to the game controller.
3. With the game controller selected, click and drag each goal to their corresponding property on the “Game Control Script” component (see Figure 11.10).
Listing 11.3. HTML Tags and Attributes Covered in Hour 5
using UnityEngine;
using System.Collections;
public class GameControlScript : MonoBehaviour {
public GoalScript red;
public GoalScript blue;
public GoalScript orange;
public GoalScript green;
private bool isGameOver = false;
// Use this for initialization
void Start () {
}
// Update is called once per frame
void Update () {
if(red.IsSolved() && blue.IsSolved() && orange.IsSolved() && green.IsSolved())
{
}
}
void OnGUI()
{
if(isGameOver)
{
GUI.Box(new Rect(Screen.width / 2 - 100,
Screen.height / 2 - 50, 200, 75), "Game Over");
GUI.Label(new Rect(Screen.width / 2 - 30,
Screen.height / 2 - 25, 60, 50), "Good Job!");
}
}
}
Figure 11.10. Adding the goals to the game controller.
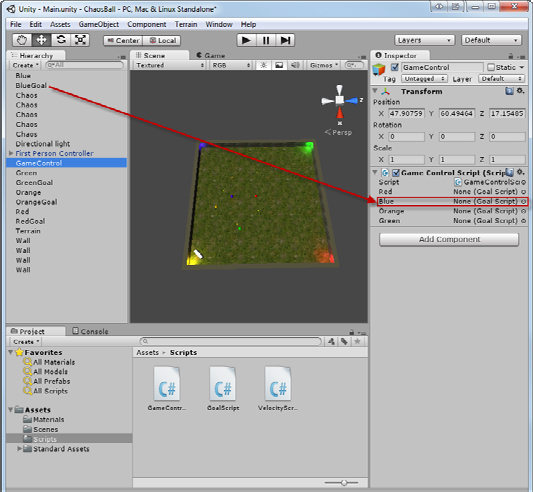
As you can see in the above script, the game controller has a reference to each of the four goals. Every frame, the controller checks the goals to see if they are complete. If they are, the controller sets the variable “isGameOver” to true and displays the game over message on the screen.
Congratulations. Chaos Ball is now complete!
Improving the Game
Even though Chaos Ball is a complete game, it is hardly as good as it could be. Several features that would greatly improve game play have been omitted. They were left out so that you could experiment with the game and make it better. In a way, you could say that Chaos Ball is now a complete prototype. It is a playable example of the game, but it lacks polish. You are encourage to go back through this chapter and look for ways you can make the game better. Think to yourself as you play it:
• Is the game too easy or hard?
• What would make it easier or harder?
• What would give it that “wow” factor?
• What parts of the game are fun? What parts of the game are tedious?
In the exercise below, you will have an opportunity to improve the game and add some of those features.
Summary
This hour you made the game Chaos Ball. You started by designing the game. You determined the concept, the rules, and the requirements. From there, you sculpted the arena and learned that sometimes you can make a single object and duplicate it to save time. From there you created the player, the chaos balls, the colored balls, the goals, and the game controller. You finished by playing the game and thinking of ways to improve it.
Q&A
Q. Why do we use continuous collision detection on the chaos balls? I thought that reduced performance.
A. Continuous collision detection can, in fact, reduce performance. In this instance it is needed, however. The chaos balls are small and fast enough that sometimes they can pass right through the walls.
Q. The goals determined if the correct ball entered based on its tag. Could the same thing have been accomplished with just its name?
A. Absolutely! The reason tags were used was for simplicity. Using tags and the editors, the scripts could be written generically. This allowed you to make it once and use it four times.
Workshop
Take some time to work through the questions here to ensure you have a firm grasp on the material.
Quiz
1. True or False: Unity’s bouncy physics material was used for this game.
2. How does the player lose the game?
3. What positional axis where all of the ball objects frozen on?
4. True or False: The goals utilized the method OnTriggerEnter() to determine if an object was the correct ball.
5. Why were some basic features omitted.
Answers
1. False. You created your own super bouncy physics material.
2. Trick question. The player cannot lose the game.
3. The y axis.
4. True.
5. To give the reader a chance to add them in.
Exercise
The best part about making games is that you can get to make them the way you want. Following a guide can be a good learning experience, but you don’t get the satisfaction of making a custom game. In this exercise, you will have an opportunity to modify the game a little to make something more unique. Exactly how you want to change the game is up to you. Some suggestions are listed below:
• Try adding a button that allows the player to play again whenever the game is completed (GUI elements haven’t been covered yet, but this feature existed in the last game; see if you can figure it out).
• Try adding a timer so that the player knows how long it took to win.
• Try adding variances of the chaos balls.
• Try adding a chaos goal that requires all of the chaos balls to be complete.
• Try changing the size or shape of the player’s bumper. Try making a complex bumper out of many shapes.