Chapter 1. Video Crash Course

On most video productions, a lot happens before footage is recorded. Cameras are placed, shots are lined up, lighting is set, and subjects are positioned. The reality of shooting video with your iPad, iPhone, or iPod touch is probably the opposite: many spontaneous moments are captured because your device is easily at hand. What both situations share is a foundation of technical ability and purpose. Just because you’re grabbing an unexpected event doesn’t mean it has to be captured haphazardly.
Over years of watching movies, television, and online clips, we’ve all developed a visual language of photography in motion that separates careless shooting from purposeful capture. A steady frame, composition that features subjects with intent and balance, good audio, variety of shots (such as close-ups and establishing shots)—these characteristics separate footage that people want to see from video that’s painful to watch. Once you have these foundations of video in your blood, even the most spontaneous captures you make will look better than careless ones. (And you’ll also have a better sense of when to break those rules.)
Intent
I know this is a fuzzy concept to start off with, but let me encourage you to start with an idea of what the result of your video will be. Even if it’s a nebulous idea, embarking on a video shoot helps you determine the best way to record it.
For example, let’s say you want to preserve the look and feel of a day on vacation. You could make a mental checklist (or create a literal one if that helps) of landmarks and events scheduled for the day. Expanding beyond that, think about recording what surrounds a landmark. Is it crowded, serene, bright, dark, colorful? Is the landmark the only interesting item in the area to focus on? Perhaps the road to reach it was more of an adventure than the destination was. What does the area sound like? What aspects of the place do you want to convey to someone who isn’t there?
With those questions in mind, we can break out a theoretical list of video clips to capture:
• Footage of the journey to reach the landmark.
• An establishing shot of the landmark and its immediate surroundings. (I’ll talk more about shot types shortly.)
• Clips that focus on specific items in close-up shots, such as foliage or animals nearby, people who work or live near the landmark, or detailed elements of the landmark or event itself.
• Video of the area in general, often referred to as B-roll footage, that records the area’s sound and gets a feel for the environment.
Now, before you start to feel overwhelmed with an abundance of planning, let’s turn to something more spontaneous. A friend is doing something amusing that you want to capture on video. Even as you’re pulling an iPhone from your pocket, you can be thinking of where to position your friend within the frame and where you should stand to capture the moment. Maybe she’s telling a joke and you need to step back a bit to get her arm and hand gestures in the shot. Maybe she’s about to jump on top of a table and belt out a song, in which case you want to include both the table and her in the frame.
The point is, with a small arsenal of video knowledge you can capture higher-quality footage, regardless of how planned or impromptu the situation is. Because here’s the thing about photography, and especially video: you often can’t go back and get the shot. Your friend could re-enact the joke, but it might not be as good as the first telling. You may not return to the landmark on this trip. And so, whenever possible, you want to capture the best footage you can in the moment.
Video Format
Okay, let’s jump back to more practical considerations, such as what format the iOS devices record in. Apple has made this part of the video process easy by limiting what its cameras capture. You don’t need to worry about multiple file formats the way you do with camcorders and professional equipment.
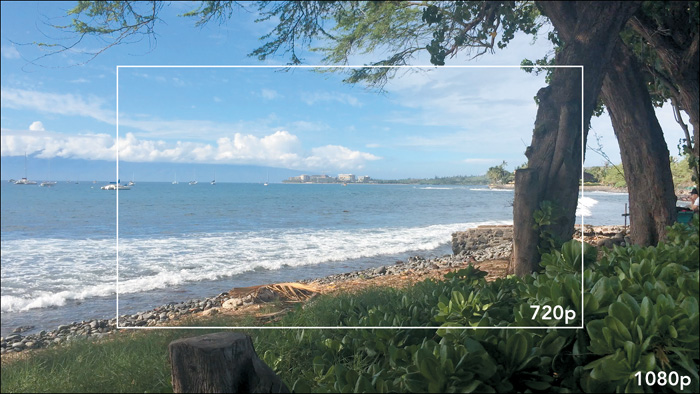
All iPads since the iPad 2, iPhones since the iPhone 4, and iPod touch models starting with the fifth-generation capture high-definition (HD) video at either 720p (1280 by 720 pixels) or 1080p (1920 by 1080 pixels) (1.1). The “p” in the name stands for “progressive,” which means every horizontal line for each frame is recorded; some non-Apple video devices record in 1080i, where “i” stands for “interlaced” and every other line in a frame is recorded.
![]() Note
Note
Although the camera captures every pixel for each frame, not every pixel is saved to memory. To prevent HD video from quickly overwhelming the storage on your device, the video is compressed. For example, pixels that remain the same between frames 1 and 2 are discarded in frame 2. However, the compression algorithms are good enough that you wouldn’t know the difference.
The cameras record video at 30 frames per second (fps), although some software can adjust that to 24 fps, the rate at which most theatrical movies are shot. The iPhone 5s is also capable of capturing 120 fps in its Slow-Mo mode. (When played back at regular 30 fps speed, the 120 fps footage appears in slow motion; I cover that in Chapter 2.)
![]() Note
Note
When I talk about cameras, I’m almost always referring to the rear camera, not the front-facing camera above the screen. The rear camera contains a better image sensor and optics; the front camera is designed for FaceTime video calls, which don’t need the high resolution.
Composition
I’d argue that one of the biggest advantages to shooting video with an iPhone or iPad is the ability to view the scene using a larger screen, compared to a viewfinder or a camera’s LCD screen. You can see clearly which objects appear in the frame and where they’re positioned, and then adjust for better composition if needed.
You can find counterexamples to everything I mention here, so keep in mind that none of these suggestions are set in stone. But use them as a guide when framing your shots.
The Rule of Thirds
If every scene you record features a person in the middle of the frame, not only will all your shots become repetitive, but you’ll also miss out on the possibilities of using the left and right areas to create more visually interesting compositions.
The “rule of thirds” imagines the frame split into three vertical and three horizontal areas (1.2). Some apps (though not Apple’s Camera app) include the option to display a grid that helps you line up elements. Move the camera so the subject of your shot falls into one of the “thirds.” If you’re shooting a landscape, position the horizon line roughly a third of the distance from the top of the screen (to emphasize the ground) or a third from the bottom of the screen (to emphasize the sky) instead of bisecting the frame.

Mind the Background
The traditional reason for making note of what else is in the frame is to avoid tree branches that might look like they’re growing out of someone’s head. However, I think people are more forgiving about discerning faces from foliage, especially when shooting video. Instead, keep an eye out for other distractions, such as tourists wandering into the frame, signs or graffiti, or items such as litter that may escape someone’s eye when they’re on location but will draw the viewer’s attention when viewed within the frame.
Sometimes, such distractions can be minimized in editing—for instance, you could cut to another view of a monument during the seconds that a tourist inadvertently walked across the front of the camera. More often the better solution is as simple as walking a few steps to reframe the shot.
Lead into the Frame
Taking the rule of thirds one step further, when someone or something is moving across the frame, give them room to move by showing the viewer where they’re headed (1.3, on the next page). Use the “empty” two-thirds of the frame to help the viewer anticipate the direction or destination. (The flipside is to put someone at the edge of the frame facing out. Horror movies use techniques like this all the time to make viewers feel uneasy.)

Shot Variety
No matter what type of movie you’re shooting, it’s important to vary the composition of shots. Everything centered all the time is uninteresting. The type of shot can also affect the mood of the scene; an extreme close-up that includes a person’s eyes and perspiring forehead evokes a different feeling than a wider shot where you see a person sitting at a desk. Here’s a selection of shot types; the next time you’re watching a movie or TV show, try to spot the shots and how often they’re used.
• Establishing shot. This shot, usually framed wide enough to include many elements, is used to establish the geography or context of a scene (1.4). A few seconds of footage that includes the exterior of a mountaintop hotel tells the viewer where the next scenes occur (even if, as in most fictional shows, all of the interiors are shot on sound stages or at distant locations).

• Medium shot. Typically framed to include two or three people’s torsos, medium shots, and variations thereof, are most common.
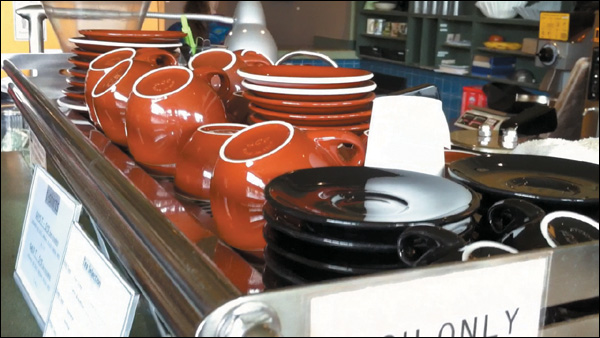
• Close-up shot. As its name suggests, the close-up shot involves positioning the camera so that most of the frame is filled by the subject (1.5). That can be a head-and-shoulders clip of someone being interviewed or a shot of a memorial plaque.
• Cutaway/B-roll. This type of footage can be a lifesaver during the editing process. It’s anything in the surrounding area that is not the subject. When you’re shooting, don’t stop recording immediately when the action ends. Instead, linger on the scene, capture the sky, flowers, sculpture, hallways, desk clutter...anything that draws your eye and can be used later to better evoke the environment in which you were filming.
I want to emphasize that you don’t need to plan a bunch of specific shot types for every project. What’s important is that you’re thinking of other variations while you’re shooting so that you don’t miss something that could be used later.
Audio
Have you ever attended a pre-release screening of a movie-in-progress? It makes you realize just how much polish is applied to a finished film. For example, nearly everything you hear has been re-recorded or processed. In one screening I viewed, the on-set audio was still present, and the actors’ dialogue was much less distinct from the surrounding noise. Also, sounds such as footsteps, explosions, and even birds in the sky are all created and added later.
Audio is important, and professionals use many techniques to capture better audio than what’s available from the camera’s built-in microphone. But what about shooting with an iOS device? An iPhone has a decent microphone, but it’s limited to objects that are fairly close to it. And the iPhone doesn’t include a handy hotshoe on top on which to attach a microphone, as many video cameras and DSLRs do.
It is possible to record good audio with an iPhone or iPad—it just depends on what measures you’re willing to take to do it. I think that’s based largely on the type of video you’re shooting: a travelogue of your vacation is much different than an interview with someone.
![]() Note
Note
I’m realistic enough to understand that you’re not going to reach for a microphone at every opportunity. (Well, I’m not going to anyway.) I don’t carry a mic with me everywhere, nor do I leave it connected to my iPhone. But for those times when you can be more deliberate about recording, the improved sound will be worth it.
Microphones
The first step is to record with something other than the iPhone’s or iPad’s built-in microphone. Three types of mics can help.
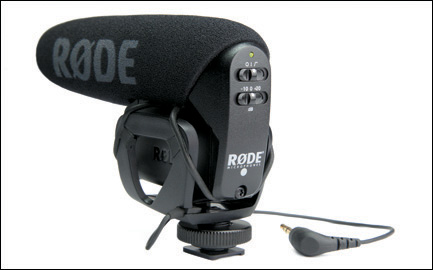
• If you’re shooting a short distance from your subject, a shotgun or directional microphone captures audio from a narrow cone in front of the mic, minimizing the noise coming from the sides or from behind it.
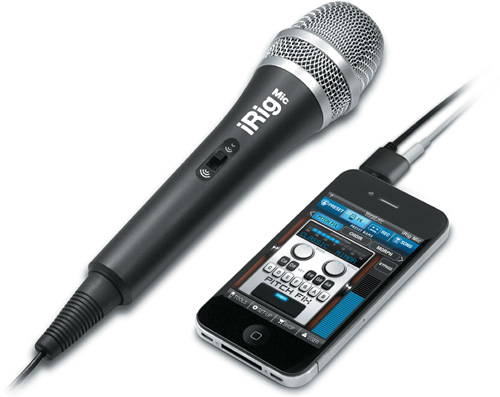
• A handheld microphone such as the iRig Mic is great for doing interviews, recording a performance, or capturing other audio to which you can get close enough to position the microphone.
• For interviews in which your focus is on the audio of the person being interviewed, or if you’re the one doing the talking and you want an unobtrusive microphone, buy a lavalier mic such as the Røde SmartLav. A lavalier clips onto a shirt, so it’s hands-free and out of the way.
Some of the microphones, such as the iRig Mic, are designed to plug directly into the iOS device’s headphone port (1.6). If you already own a microphone with an XLR-style plug, you can use an adapter such as the iRig Pre to bridge the gap between the mic and the iOS device. Also check out the online store KV Connection for inexpensive cable adapters.

Another option, for iPad owners, is to use USB microphones, like those used for podcasting on your computer. With the addition of the Apple Lightning to USB Camera Adapter or the iPad Camera Connection Kit (for older models with 30-pin ports), you can plug a USB microphone into the iPad. (Some microphones require more power than the iPad is able to provide, so search the Web for your mic model before buying the adapter for this purpose.)
![]() Tip
Tip
Don’t forget about the earbuds that come with the iPhone. When you connect them to the headphone jack on the iPhone or iPad, the microphone included on the cable becomes the audio input for your movie. If you’re looking to narrate what you’re shooting as you film, this is a good way to do it. (Remember that you can add narration later while editing, which is a better idea to keep the scene’s audio separate from the narration.)
External Recording
There’s another way to tackle the audio issue, and that’s to not worry about the audio the camera is recording. Instead, record audio separately to another iPhone, iPad, or iPod touch. This approach is practically required if you’re shooting from a distance that’s beyond what the camera can pick up.
For an interview, if you don’t have a lavalier or handheld microphone, set an iPhone to record audio and place it just out of the frame, or put it in a shirt pocket. Even if you do have a microphone, connecting it to an external recording device avoids tangled cables and, more importantly, gives you a second copy of the audio.
If you’re shooting something that involves more deliberate recording, like an interview or something scripted, it’s helpful to use some sort of clapper or slate when you start. It doesn’t have to be a real slate (the type you see in behind-the-scenes moviemaking footage), but something that introduces a sharp, loud sound that’s easy to synchronize when you’re editing.
![]() Tip
Tip
Okay, this is seriously overkill for casual shooters, but if you want a great virtual slate, check out MovieSlate. Yes, you get the sound, but it also records timecode, shot information, sound information, and more. For our purposes, timecode—the movie industry standard for measuring recorded video and film—doesn’t come into play when editing in iMovie on the iPad or iPhone. (But it is represented in Pinnacle Studio; see Chapter 3.)
Improve the Camera
In Seattle, the Fremont Solstice Parade is a photographer’s dream. Fremont is a wildly eclectic neighborhood, so a parade that celebrates the changing of the season is full of color and character. Oh, and hundreds of naked bicyclists decorated in body paint.
One year my wife and I were finishing breakfast at a favorite diner when the procession of cyclists started streaming past the windows. I thought the parade was the following day, so I was without a camera—or was I? In the spirit of “the best camera is the one with you,” I quickly grabbed my Palm Treo smartphone and started snapping photos.
Technically, I did capture pictures of the parade. Realistically, they were low resolution, poorly colored, and terrible.
If I were in the same position today using my iPhone 5s, the quality of the photos would be quite good. (I don’t remember if I even bothered trying to shoot video with the Treo.) The technology in the current generations of iPhones and iPads is remarkable, both optically and in the image processing software that drives the lens.
Still, there are limitations. The camera is just one function out of many, and its size is severely restricted by the pocketable nature of the case design. There’s no optical zoom—if you want something to be larger in the frame, you need to move closer (the digital zoom is decent in a pinch, but not nearly as good as optical). And you have no choice in the size or capability of the lens; it’s designed to work well for all types of scenes, which means it doesn’t excel in specific situations, like wide-angle views or close-up macro shots. Don’t worry, though, because plenty of companies want to sell you add-ons that help overcome many of those limitations.
Shoot Steady
The number one way to set your video apart from most everything that’s recorded with a smartphone or tablet? Steady, smooth motion. Yes, shaky footage has its uses, but steady motion is more polished and professional. Does that mean you need to haul a big tripod everywhere? Nope, alternatives abound. Here are a few of my favorites:
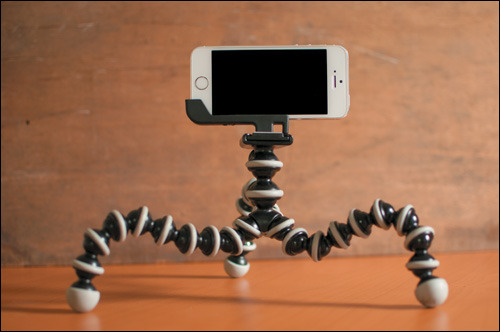
GorillaPod adjustable tripods
I own a few tripods, but often they’re overkill for mounting an iPhone. Joby’s GorillaPod models feature articulating legs that can be positioned on nearly any surface or wrapped around railings, tree branches, and other objects (1.8). If you’re shooting handheld, extend the legs and use the GorillaPod as a handle. Some models offer a standard screw for connecting any camera, while others come with a bracket that fits over the iPhone.
The Glif
Studio Neat’s Glif is a combination tripod mount (for attaching the iPhone to a tripod) and a stand that can hold the iPhone at an angle when you’re editing or watching movies.
![]() Tip
Tip
A quick search on Amazon or Google will reveal many methods of mounting an iOS device to a tripod. If you’re looking for something light and portable that can be easily carried in a bag, Square Jellyfish makes Jelly Legs tripods, the Spring Tripod Mount, and the Micro Ball Head, which work well together. The company also makes versions that fit the iPad mini.
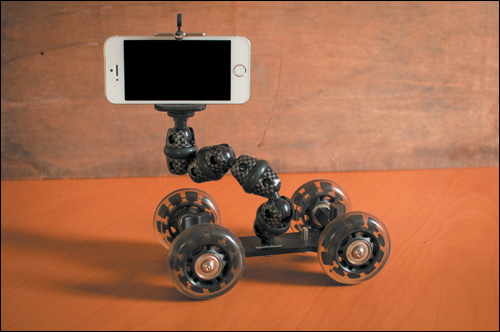
iStabilizer Dolly
A tripod is great for photographs, because it keeps the camera still. But video is motion, and sometimes moving the camera can be an effective way to tell a story (think of how many movies slowly push in on a character when they’re seeing something unbelievable).
The iStabilizer Dolly is a small platform built on four wheels, with an articulating arm that holds the iPhone in place (1.9 on the next page). You can make smooth dolly moves (where the camera is doing the moving, versus zooming the lens) without introducing the jostle of walking. The platform can also be adjusted to make the wheels turn, enabling creative elliptical movements.
Mobislyder
Another option for smooth motion is the Mobislyder. It’s a 12-inch track with a mount that slides horizontally or at an incline. And because it doesn’t have wheels, like the iStabilizer Dolly, it’s not subject to the smoothness of the surface it’s rolling across.
Padcaster and Padcaster mini
You’ll notice that the options thus far are made for the iPhone, since the device’s size is much more amenable to shooting video (and the camera is still better than the iPad’s). If you’re shooting with an iPad, however, you’re not limited to holding it in front of you like a dinner plate.
The Padcaster and the Padcaster mini are both fairly big steps up, but they’re good steps. They feature tripod mounts for stability, but also include hotshoe mounts to add things like portable lights and microphones (1.10). The best part is the ability to add a high-quality lens in front of the iPad’s camera.

1.10 The Padcaster with a shotgun microphone, audio adapter, LED light source, and lens (and, presumably, an iPad on the other side)
mCAMLITE and Phocus Accent
Another step up, the mCAMLITE case for the iPhone is made of aluminum and includes a tripod mount, shoe mount, microphone, and a combination wide-angle/macro lens. The Phocus Accent is a similar, less expensive model with many lenses and other accessories available.
Lenses
As I mentioned earlier, the cameras in the iPhone and iPad are quite good, but limited in range. Several companies sell add-on lenses that fit in front of the camera to change your perspective.
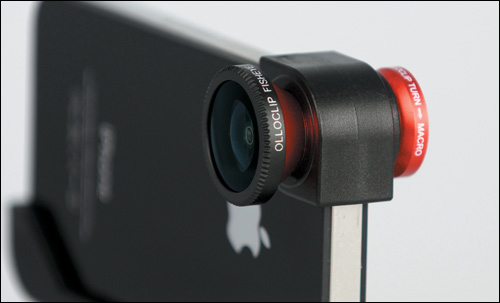
Olloclip
For ease of use, the Olloclip is my choice for extra lenses. Its clever design includes two lenses that fit over the corner of an iPhone or iPad (1.11, on the next page). Don’t want to use the wide-angle lens? Flip it around and use the fisheye. Or, unscrew one of those to reveal a macro lens. It doesn’t require a special case (though Olloclip does sell one that offers a tripod mount) and doesn’t take up much room. The company also offers a 2x telephoto lens with a polarizer and additional macro lenses for iPhone and iPad models.
iPro Lens System
The iPro Lens System offers better glass than the Olloclip (at a higher price) and requires a case to affix the lenses onto. For the iPad, the lenses attach to a clip that covers the iPad’s camera. You can buy a wide-angle, super wide-angle, fisheye, macro, or 2x telephoto lens (or combinations).
PhotoProX
One challenge of the iPhone is that it doesn’t cater well to bad weather or being underwater. The Optrix PhotoProX is a waterproof case that includes four interchangeable lenses. Although the first time you dunk your phone into water is nerve-racking, the case is well sealed (down to 33 feet). Even if you’re not shooting an underwater documentary (or Bond film), the PhotoProX is nice to have in messy, muddy, or sandy conditions that threaten your iPhone.
Extra Power
Don’t forget that shooting and editing video is demanding on your device’s battery. If you expect to do a lot of recording, consider picking up an external power source such as a Mophie Juice Pack or external battery chargers.
![]() Tip
Tip
Many companies offer external batteries, so let me save you some trouble. Visit the Web site The Wirecutter to learn what the editors there have (extensively) tested and recommend. That advice applies to all sorts of products, not just mobile accessories.