
Chapter Seven. Shooting Landscapes & Nature Like a Pro
Recipes for Making the Great Outdoors Look Great
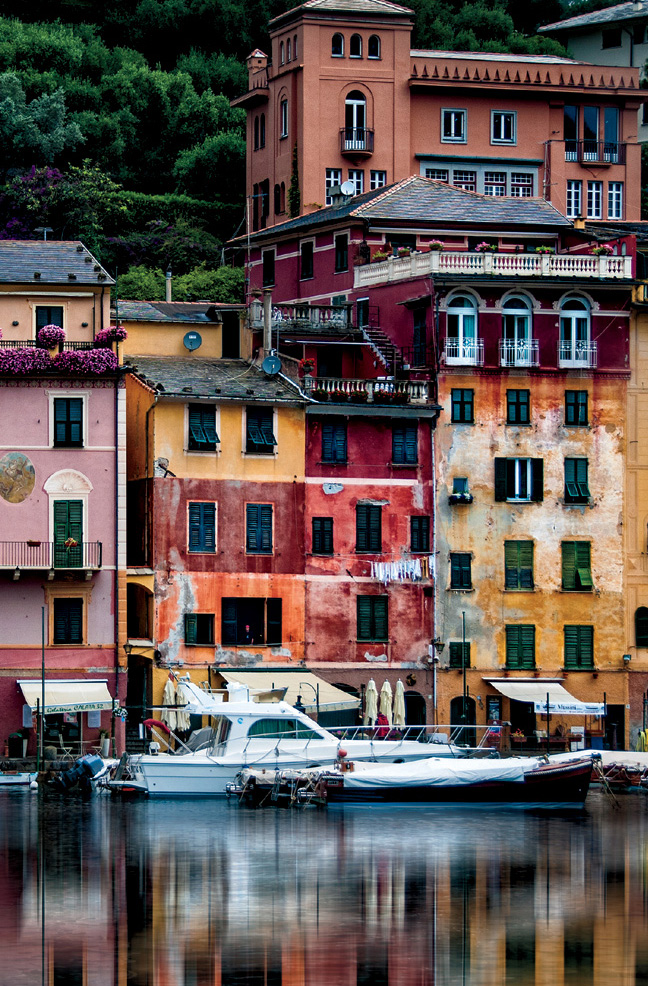
SHUTTER SPEED: 1/640 SEC F-STOP: F/8 ISO: 200 FOCAL LENGTH: 56MM | PHOTOGRAPHER: SCOTT KELBY
Wait a minute, this is some kind of scam because nature and landscapes are the same thing! Au contraire (said the guy who doesn’t actually speak French, though I do adore french fries, or pommes de terre frites, as my non-French friends who want to sound French say when ordering fries at McDonald’s), when it comes to photography, nature and landscape are actually two very distinct things. For example, landscape shots are photos of your yard right after you’ve cut the grass and your hedges have been neatly trimmed, whereas nature shots are usually photos of bees. I am not making this up. Well, maybe the first part, but if you were to Google the term “nature,” you know what would come up in the search results? Me neither. So, I’m going to go to Google myself right now and type in “nature,” and then when the results appear, I’m going to click on the Images link, and I’ll bet I get a bunch of close-up of photos of bees. Here we go (heading to Google.com now. Typing. [insert typing on keyboard sound effect here]). Ah ha! I mean... uh oh. It’s not bees. It’s a tiger, then a bunch of landscape shots (and not of your yard, probably because you haven’t trimmed your hedges). Wait! Wait! I scrolled down on the results page and found a ladybug and some butterflies. Does that count? No? Really? Well, crud, I guess this is a scam after all. Well, if I were you, I’d still read this chapter since you’ve already paid for the book, unless of course you shoplifted this book, in which case you can pretend this chapter is called “Booked and Fingerprinted.”
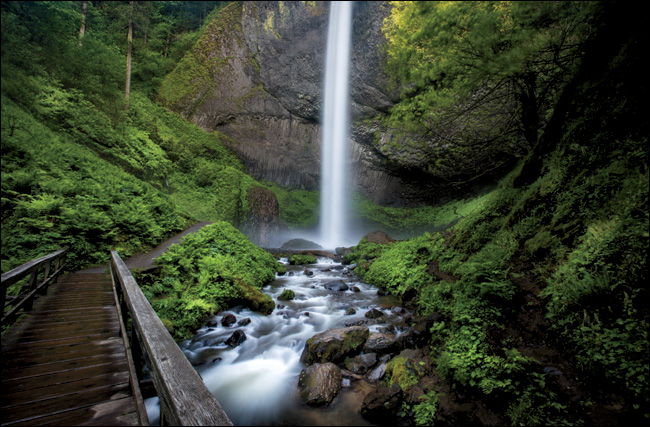
Shooting Streams
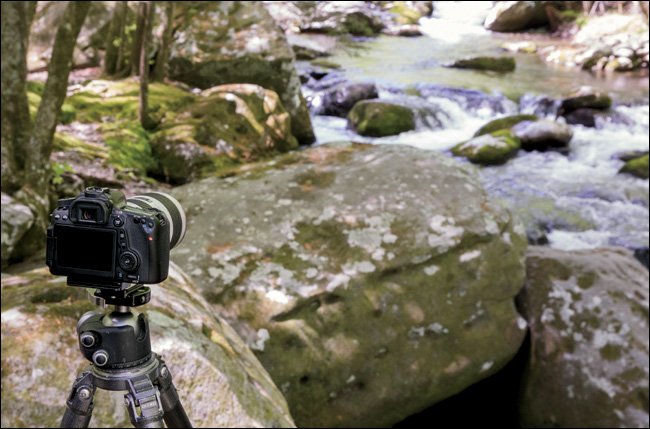
BEHIND THE SCENES: We’re in the Great Smoky Mountains National Park and we’re set up on a rock that sticks out into a stream, with our camera mounted on a tripod.
CAMERA SETTINGS: I’m using a 70–200mm f/2.8 lens, zoomed in to 110mm. My f-stop is f/32 and that puts my shutter speed at 1.3 seconds. Now, f/32 probably isn’t the sharpest f-stop on my camera (and that’s being kind—some of the f-stops at the far end of the range experience a thing called “lens diffraction,” so they aren’t generally as sharp as f-stops like f/8 or f/11), but in this case I was happy to trade a little sharpness to get a longer shutter speed (more on that in a moment).
Final Image
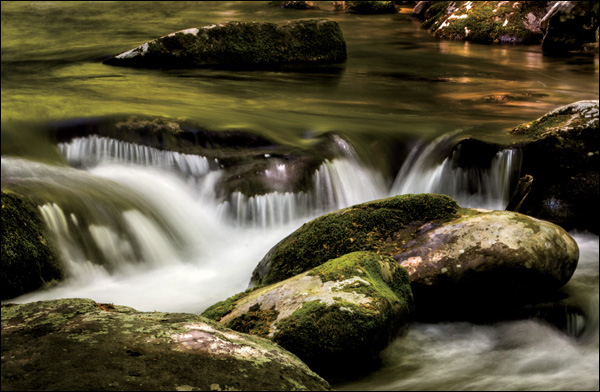
THOUGHT PROCESS: When we’re shooting a stream like this, our goal is to keep our shutter open long enough for the water to become smooth and silky, like you see here (water that’s frozen in mid-air by a high-shutter speed is one of the Seven Deadly Sins of Landscape Photography). So, how do we keep our shutter open long enough to get this silky water effect? First, look for parts of the stream that aren’t out in direct sunlight. I look for parts where there are clouds overhead blocking the direct sun. That was the case here: this part of the stream was under cloud cover most of the time, but the sun did peek out a few times so I had to take a break from shooting until it tucked back behind a cloud. Secondly, set your f-stop to the highest number your lens will allow—on the lens I was using, it was f/32 which, along with the clouds, helped me keep the shutter open 1.3 seconds for the shot you see above. The water is pretty silky, but the longer you can keep it open, the smoother and silkier it will get. If you wanted to keep it open even longer, you could add a polarizing filter (see page 152). It darkens the scene, usually by a stop or two, and that keeps your shutter open longer, so using one will get you even silkier water than you see here. If you need silkier water yet, then you can go all the way to a neutral density filter (called an ND filter, for short). We’ll talk about them next, in "Shooting Waterfalls," but just know that you can use them here, as well.
POST-PROCESSING: I added contrast in Lightroom’s Develop module (or Camera Raw) and darkened the edges all the way around by going to the Effects panel and, in the Post Crop Vignetting section, dragging the Amount slider to the left to –9. Lastly, I applied the Nik Color Efex Pro plug-in’s Tonal Contrast filter using the default settings.
Shooting Waterfalls
NICOLE S. YOUNG
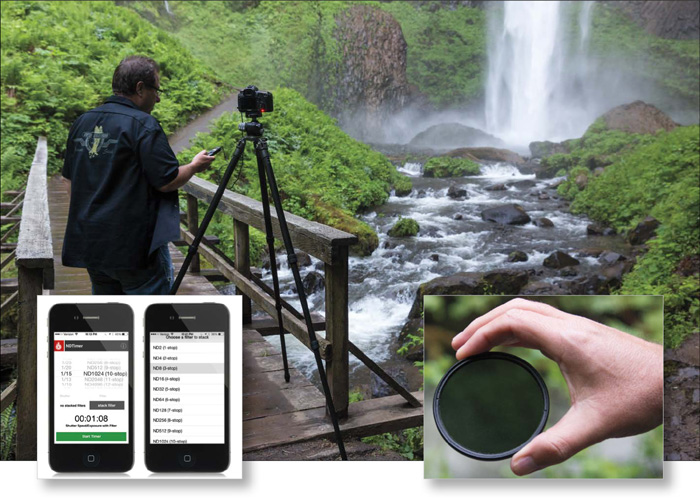
BEHIND THE SCENES: I’m making a long exposure here (to create that silky water), so even though it’s during the day, I’m on a tripod and using a cable release to fire my shutter button. The red light on the back of the camera is on because this behind-the-scenes shot was taken during the time the shutter was open.
CAMERA SETTINGS: The final image was taken with a 16–35mm f/2.8 lens zoomed all the way out at 16mm. My f-stop was f/22 so I could keep the shutter open as long as possible, but I added a 3-stop ND (neutral density) filter to my lens (seen in the inset on the right above) to keep my shutter open even longer (more on this on the facing page). In this case, the sun was behind the waterfall (just lucky), so I was able to get a pretty decent, silky water effect just setting my f-stop to f/22 without any filter at all because it made my shutter speed 2.5 seconds long, which isn’t bad. But, once I added the 3-stop ND filter to my lens, it increased my shutter speed to 15 seconds, which made the water much silkier and smoother, so it was totally worth doing. My ISO was 100 (I used the lowest possible ISO not only because I was on a tripod, but because it was my least-sensitive-to-light ISO, so it also forced the shutter to stay open longer).
Final Image
THOUGHT PROCESS: Our goal here is pretty much the same as when shooting streams: keep the shutter open long enough for the water to flow, giving us that really silky water look. Usually, if we shoot in direct daylight, just using a high f-stop (anywhere from f/22 to f/32) alone won’t keep the shutter open long enough. Instead, we use an ND filter to darken the scene, so our shutter can stay open longer and still make a proper exposure. ND filters come in different darkness amounts, ranging from 2 stops to 10 stops, but if you need the scene even darker, you can “stack” a second filter on top of the first one (you might use a 10-stop filter, and then a 2-stop on top. You’ll be surprised at how much that second 2- or 3-stop filter adds to your shutter speed length). How do you know how long to keep your shutter open? You use an app. I use ND Timer (by Three60, available for IOS; shown in the inset on the left on the facing page). It tells you exactly how long to leave your shutter open (even if you stack filters), plus it has a built-in timer, and it’s just 99¢. Although my camera was able to autofocus with the 3-stop ND filter on, if you use an 8-stop or 10-stop (or you stack), it’s so dark, your camera won’t be able to auto-focus. So, focus first with autofocus turned on (before you put the filter on), then switch your focus to manual (right on the lens), and put the filter(s) on.
POST-PROCESSING: I did four things in Lightroom or Camera Raw (I created a video of it all for you, which you’ll find on the book’s companion webpage, mentioned in the book’s introduction): (1) increased the Contrast amount, (2) added Post Crop Vignetting, (3) increased the Clarity amount to bring out the detail, and (4) used the Adjustment Brush to brighten some of the highlight areas in the grass and bushes.
Photographing Animals
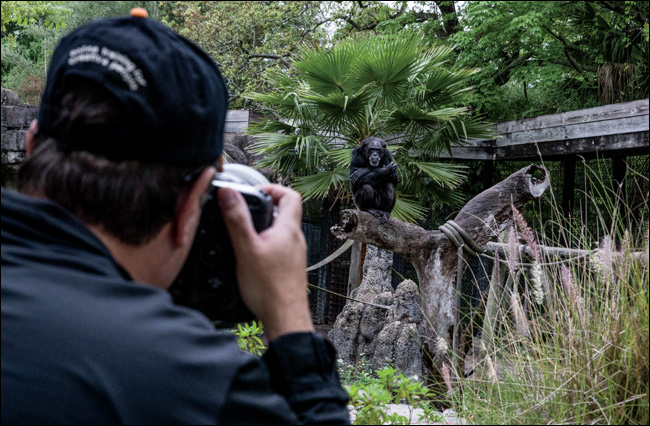
BEHIND THE SCENES: I’m shooting outdoors here in a local zoo using a long lens (this is becoming really popular with wildlife photographers, and most zoos allow you to bring in a long lens and, in many cases, even tripods).
CAMERA SETTINGS: The final image on the facing page was taken with a 200–400mm f/4 lens with a 1.4 tele-extender to get in even closer. With that, I’m zoomed in to 506mm on a full-frame camera body. I’m using a monopod to help steady my lens. My f-stop is f/5.6 (the lowest f-stop I can choose with a tele-extender added to my f/4 lens—with the tele-extender, you lose 1 stop of light). My shutter speed is 1/400 of a second at 1250 ISO (I could have lowered my ISO down to 200 or even lower and still probably had enough shutter speed to have the shot be really sharp, especially since my lens was held up with a monopod). If you don’t have this long a lens, you can rent some really long lenses from LensProToGo (www.lensprotogo.com) or BorrowLenses (www.borrowlenses.com). I’ve used both in the past—they’re great, and have an incredible selection of long lenses to rent.
Final Image
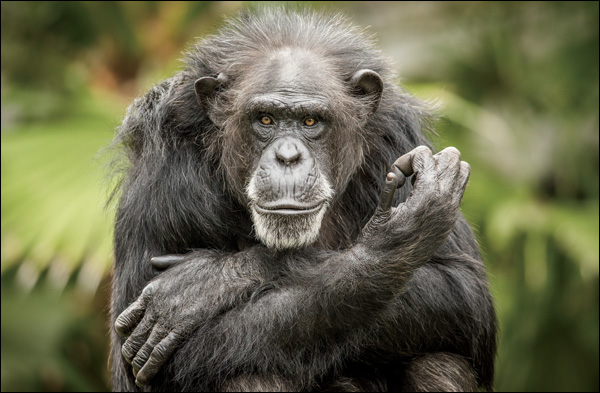
THOUGHT PROCESS: The goal when you’re shooting in a zoo is, of course, to frame the image so you can’t actually tell it was shot in a zoo. This is often more challenging than it sounds because, while you may have an unobstructed view of the animal (like I do on the facing page), the background behind the animal is usually either an ugly fence or an obviously man-made enclosure, or it just looks very different from their actual natural habitat. One way around this is just to be very aware of the background as you’re composing your shot. This can get really frustrating because, of course, the animal won’t always be in a location within their environment that lets you get the shot with a decent background behind him. It requires a lot of patience, and you might have to walk away without getting a shot you’d show anyone, because the animal just stays in one location, or is too far away, or stays in an area with an ugly background. You can try shooting from a different angle, which might improve the background, but at the same time the animal might never look in your direction. The patience part of this is really key. Another way around this is to zoom in tight and shoot wide open (using the lowest f-stop your lens will allow), which puts the background out of focus, like you see above.
POST-PROCESSING: I increased the contrast a bit in Lightroom’s Develop module (or Camera Raw; pretty standard for me). Then, in the Effects panel, under Post Crop Vignetting, I dragged the Amount slider to –11 to darken the edges of the image just a tiny bit. Lastly, like every image, I sharpened it using Photoshop’s Unsharp Mask filter.
Shooting in Daylight

BEHIND THE SCENES: Here you’re seeing a before/after of a shot taken during the day (I usually don’t shoot landscapes in the middle of the day—only around dawn or dusk—but since you get the most impact from a circular polarizer during the day, I shot these at around 5:40 p.m., when sunset was just after 8:00 p.m.). This before/after is actually a side-by-side of two images (the shot taken without the circular polarizer on the left, and the one with it on the right), both open in Photoshop at the same time (if you have two images open in Photoshop, and you go under the Window menu, under Arrange, and choose 2-up Vertical, it gives you this side-by-side layout onscreen).
CAMERA SETTINGS: This was taken using a 16–35mm f/2.8 lens, zoomed in to 30mm. I’m at f/22 (a popular f-stop to choose for landscapes where you want everything in focus from front to back). My ISO is 100 and my shutter speed was just 1/10 of a second, so I’m on a tripod, using a cable release, to keep my camera as still as possible for the sharpest possible image. One reason my shutter speed is so slow is that it’s late in the day, and you lose around a stop-and-a-half to two stops of light by adding a polarizing filter in front of your lens.
Final Image
THOUGHT PROCESS: Although we usually think of using a circular polarizer to get better, more colorful, more saturated skies when we’re shooting during the day, a polarizer does more than just help the sky (take a look at the after shot on the facing page, and you can see the effect the polarizer has on the entire image). Adding a polarizer is kind of like adding a pair of polarized sunglasses in front of your lens: it makes almost everything look better in bright daylight. The thing that trips up a lot of folks using a polarizing filter is that the amount of the effect changes pretty dramatically depending on your position in relation to the sun itself. It can either have a huge effect (which mostly happens when you’re at a 90° angle to the sun), or little to no effect if you’re aiming anywhere else, especially if you’re aiming at the setting sun. Also, once the polarizer is on your lens, you’ll need to slowly rotate the front of the filter to control the strength and position of it, so make sure you rotate as you’re looking through the viewfinder (you’ll see how it affects the scene as you rotate it). One thing to keep an eye out for: if you use a polarizer on a wide-angle lens, like I did here, be careful when positioning the darkening in the sky (while rotating the front of the filter) because you can wind up with an uneven effect, with part of the sky being darkened and part of it not being darkened nearly as much.
POST-PROCESSING: Nothing much. Just added some contrast in Lightroom’s Develop module (or Camera Raw), and of course sharpening (every image gets sharpened).
Starbright Sun Effect
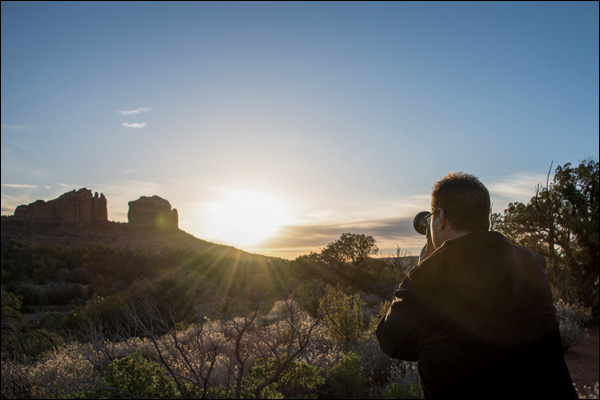
BEHIND THE SCENES: Shooting landscape shots where you see the sun in the image is getting more and more popular, and that’s exactly what you’re seeing in the shot above: me aiming at those huge rock-like boulder thingies (that’s their official technical name) with the sun clearly in the shot.
CAMERA SETTINGS: For the final image (on the facing page), I’m using a 16–35mm lens at 16mm, so I’m as wide out as it will go. I’m at f/22, which is a particularly popular f-stop for landscape photography, but we’re using it for a different reason here (more on that on the next page). Although I’m hand-holding here, in most cases when shooting landscape images, I’d be on a tripod because I’d normally be shooting in lower light (around dawn or sunset). Since the sun was still bright in the sky, I figured I could hand-hold this one and get away with it, but at 100 ISO and at f/22. Without raising my ISO, I was only at 1/60 of a second, so that was as slow a shutter speed as I could actually get away with and still get a steady shot. About five minutes later, it probably would have been too late and my shutter speed would have fallen to 1/30 and my shot probably would have been a little soft.
Final Image

THOUGHT PROCESS: If I was on the edge of having too slow a shutter speed, why didn’t I just lower my f-stop, which would have raised my shutter speed? It’s because f/22 is a magic number when it comes to creating those starbright beams of light coming off the sun (you still get them to some extent at f/18, but not like you do at f/22). Take a look at the sun over in the behind-the-scenes shot on the facing page. That’s how the sun would normally appear in photos where it’s right there in the shot. That was taken at f/8 and the sun’s beams really have no definition—it’s just a big, fuzzy ball of light. Now look at the 14 well-defined starbrights (one common name for them) coming off the sun in this photo above (the fact that you can count 14 starbrights just shows how well defined they are). Of course, you can buy screw-on filters that will help with this effect, but if all you have to do is dial in f/22 before you take the shot, why not try that instead?
POST-PROCESSING: The rocks are backlit, so in Lightroom’s Develop module (or Camera Raw), I dragged the Shadows slider to the right to bring out details in those rocks. I also lowered the Highlights amount quite a bit (to –68) to help lower the brightness of the sun and make those starbrights stand out even more. I increased the Clarity amount to bring out more texture in the rocks, and lastly, I dragged the Vibrance slider to the right quite a bit (to +73) to make the sky richer and more blue.
Zoo Photography, Part 2
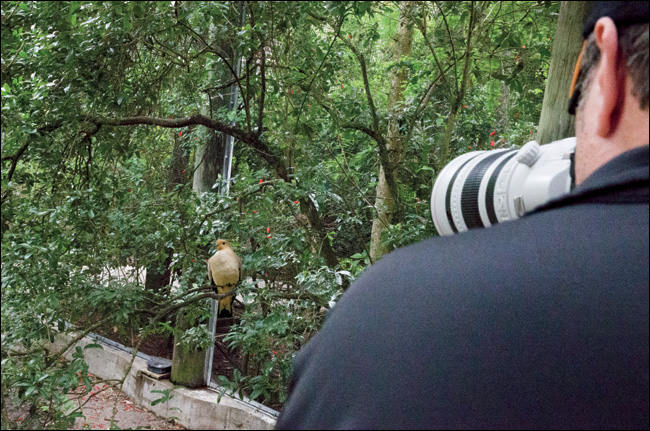
BEHIND THE SCENES: Our subject is perched on a branch inside an enclosed aviary at a local zoo. I’m up high in a stand that gives you a “bird’s-eye view” (sorry, couldn’t help myself) of the area.
CAMERA SETTINGS: The final image on the facing page was taken with a 200–400mm f/4 lens at f/5.6 on a full-frame camera, but I’m zoomed in to just 280mm (the bird just isn’t that far away). If you use a cropped-sensor camera, you wouldn’t need nearly as long a lens since that crop factor works in your favor, bringing you at least 40% to 60% closer (depending on your make and model, a 70–200mm lens would get you just as close if not closer). My shutter speed is 1/640 of a second at 1250 ISO (I could have lowered my ISO down to 400 and still probably had enough shutter speed to have the shot be really sharp).
Final Image
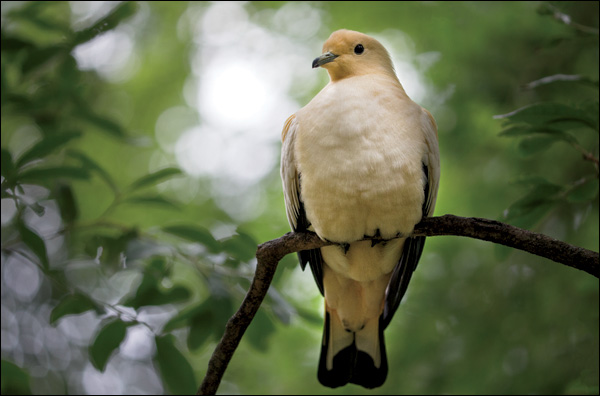
THOUGHT PROCESS: With any wildlife photo, it’s essential to get the eye sharp and in focus, and that was fairly darn easy with the bird just perched there on a branch not far from me. I’d prefer not to be shooting up or down at a bird, if possible, so I got down as low as I could to get the shot you see above. I was only shooting up a tiny bit (I’m standing in the shot you see to the left, but to get this image I did wind up kneeling and resting my lens on the railing in front of me). The challenge, once again, was hiding the fence that surrounded the aviary so you couldn’t tell it was taken inside one, and by zooming in tight and using a wide-open f-stop (like f/5.6, in this case), I was able to blur the background enough so you can’t see the fence or the unappealing area surrounding the bird. Also, make sure you take a look at everything in the frame before you take the shot—there were lots of little distracting branches and twigs that were sticking into the shot when I first framed it up, so I tried moving a foot or so in either direction until I could find an angle where I could get this fairly clean view.
POST-PROCESSING: In Lightroom’s Develop module (or Camera Raw), I dragged the Contrast slider to the right. Then, I went to the Effects panel, under Post Crop Vignetting, and dragged the Amount slider to –11 to darken the edges of the image just a tiny bit. Lastly, like every image, I sharpened it using Photoshop’s Unsharp Mask filter (I used quite a heavy amount of sharpening here: Amount 90, Radius 1.5, Threshold 0).
Photographing in an Aquarium
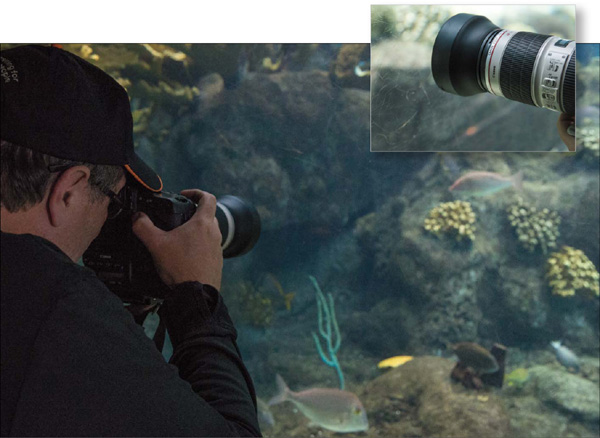
BEHIND THE SCENES: I’m in an aquarium, shooting down low with my lens pressed directly against the glass.
CAMERA SETTINGS: I’m using my 70–200mm f/2.8 lens again (zoomed all the way out to 75mm), and I’m at f/2.8 because the light in most aquariums is really low, so I need as much light coming in as possible to get my shutter speed high enough to freeze the moving fish. Unfortunately, in most cases, that won’t be enough alone to freeze their movement and get a really sharp shot. To freeze a moving object, ideally you’d have your shutter speed at 1/1000 of a second or faster. If it’s a slow-moving object (like this fairly slow-moving fish), it’s not a problem, but if you can get to 1/1000 of a second or faster, then the blurring problem from the movement of the fish goes away completely. In this case, by raising my ISO to 1600, I got my shutter speed all the way up to 1/1250 of a second so I could freeze even a fast-moving fish.
Final Image
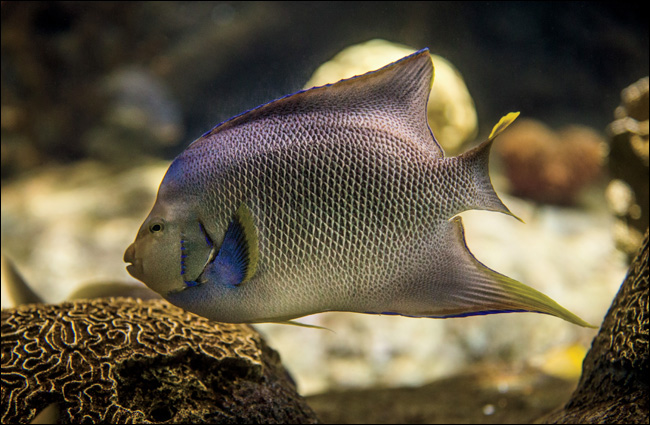
THOUGHT PROCESS: Outside of adjusting your shutter speed to freeze the movement of the fish, the big thing you have to work at avoiding are the reflections in the glass. The best way I’ve found to do this is to go online and buy a rubber lens hood for your lens (B&H Photo has a rubber lens hood that fits my 70–200mm lens starting at around $15). That way, you can put your lens right against the glass itself and that rubber lens hood blocks out any reflections. If you look at the image at the top right of the facing page, you can see my lens hood is right up against the glass (and with the rubber lens hood, you don’t have to worry about scratching your lens or the glass in the aquarium, which is helpful to show if/when the aquarium security guard comes by).
POST-PROCESSING: Shots taken through thick glass or Plexiglas like this are almost always going to look a bit flat, so you’re usually going to have to add a lot of contrast to combat that. I really cranked the contrast for this shot, and I also used the Lightroom Develop module’s (or Camera Raw’s) Adjustment Brush to brighten the fish itself, since he was so close to the glass he was kind of backlit. Also, you’re going to have to adjust the white balance for most underwater shots—I used the White Balance Selector tool (in Lightroom; or White Balance tool in Camera Raw) and clicked it on rocks that I could tell should be a neutral color. Of course, you could click it on a nearby shark (snicker). You might have to click around the image a few times to find a white balance you like, but you will find one.
Shooting Individual Flowers
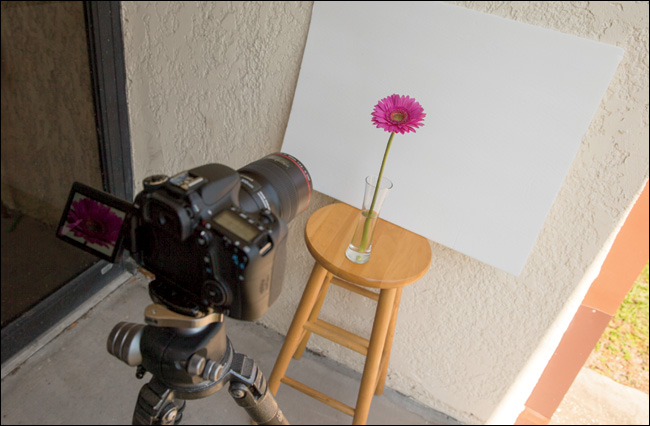
BEHIND THE SCENES: Here, we’re shooting with natural light, but we’re under the edge of a roof so we’re in the shade. Our flower (a Gerbera daisy) is positioned with a piece of white poster board behind it (we eventually had to use gaffer’s tape to tape the poster board to the wall, because even the tiniest bit of wind would blow it over right on the flower). The camera is set at the same height as the flower (which isn’t very high). To make framing the shot easier, I used the pop-out LCD screen and Live View mode on this Canon 70D so I could use the screen to frame up the shot without having to get down on my knees.
CAMERA SETTINGS: I’m using a 100mm macro lens for this shoot, my go-to lens for shooting flowers up close, and we’re really close in on the final shot. I’m shooting in aperture priority mode at f/22 because the depth of field is so incredibly shallow that, if you shoot at a wider open aperture, it’ll be hard to make anything but a little sliver of the flower look in focus. My shutter speed was 1/15 of a second and I’m at 400 ISO, but no worries because when I’m shooting a macro lens, I’m always shooting on a tripod. To minimize camera movement, I’m using the camera’s built-in self-timer (my backup plan when I forget to bring my cable release—it fires the shutter for me 10 seconds after I press the button, so there’s no movement from me pressing the shutter button after 10 seconds have passed).
Final Image
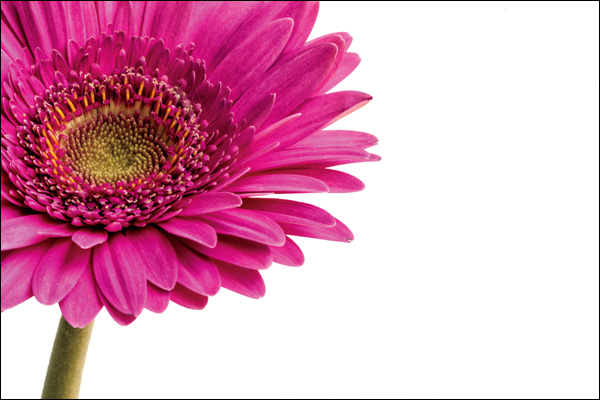
THOUGHT PROCESS: First, you need a great flower to shoot, and that means being picky about which one you choose to shoot. In the same garden, you’ll find individual flowers that look ratty, with brown spots and missing petals, and you’ll find some that are almost perfect. Be picky about which one you choose to shoot. In my case, we simply went to a local florist and bought three “cash-and-carry” daises for literally just a couple of bucks, but even then, we had to look at a lot before we found this decent one (we couldn’t find a near-perfect one in the entire batch). The white poster board you can get from Walgreens. What’s nice is that you can use that poster board on-location in a garden: just position it about 6 or 8 inches behind the flower you’re trying to photograph (this actually works better than it sounds, so give it a try). We already covered shooting on a tripod for close-up macro shots, and using something to trigger the shutter to minimize movement, and we’re shooting at f/22 to increase our depth of field since macro lenses have such a shallow depth of field. However, you can extend that depth of field a bit more if you keep the sensor pretty much flat, so you’re aiming directly at the flower at the same height, not aiming down at it. This extends that depth of field and lets you have more of the flower in focus, like you see here.
POST-PROCESSING: I added contrast in Lightroom’s Develop module (or Camera Raw), then used Photoshop’s Clone Stamp tool to remove little specks and anything else that looked yucky on the petals.
Adding Water Drops to Flowers
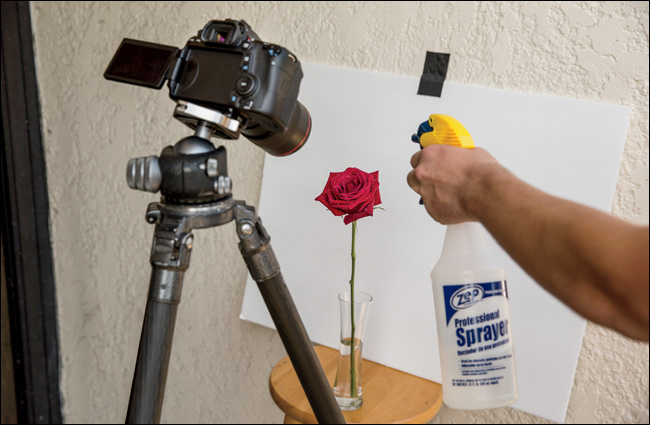
BEHIND THE SCENES: To get water on the petals, we’re simply using a spray bottle with water. There are all sorts of mixtures you can concoct to make the water bead up and have bigger drops (like using glycerine, water and milk, sugar, etc.), but I just use regular ol’ water. You don’t want big sprays of water, just squeeze the trigger a little bit and, of course, the more drops you want, the more times you pull the trigger.
CAMERA SETTINGS: Once again, I’m using a 100mm macro lens with my f-stop at f/22, so I could keep as much depth of field as possible. My shutter speed is 1/15 of a second, which is why I’m on a tripod (but I’m always on a tripod when I shoot a macro lens because any tiny, little movement will create a really blurry image).
Final Image

THOUGHT PROCESS: If you look at the production photo on the facing page, you can see that I’m shooting down on the flower, rather than shooting it straight on. This means that even at an f-stop like f/16 or higher (again, I’m at f/22), my depth of field (the area in focus) will be very shallow—shallower than if I had kept the camera’s plane of focus straight, so it was aiming right at the flower (as seen in the previous flower recipe). Keeping it straight like that gives you a greater depth of field (more of the flower will be in focus), but I was able to get away with aiming down here because the part of the flower that I was shooting is pretty flat to begin with. If I needed more of the flower in focus, I could have bent the stem of the flower, so rather than facing upward, it would be facing straight forward. Then, I could’ve lowered my tripod until the camera was aiming straight at the flower, keeping the camera’s sensor parallel to the flower, which creates a wider depth of field.
POST-PROCESSING: I increased the contrast a bit in Lightroom’s Develop module (or Camera Raw; pretty standard for me). Then, in the Effects panel, under Post Crop Vignetting, I dragged the Amount slider to –9 to darken the edges of the image just a tiny bit all the way around.
Shooting the Moon
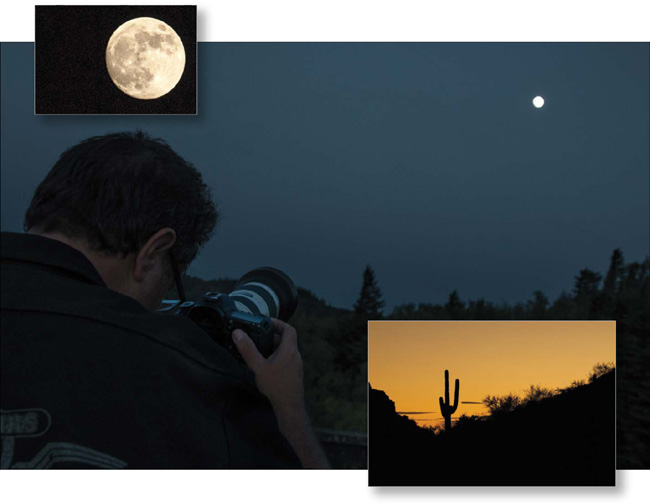
BEHIND THE SCENES: Since taking a shot of the moon is going to require shooting in really low light, we’re on a tripod and we’re using a cable release to minimize any camera movement while the shutter is open.
CAMERA SETTINGS: For the shot of the moon, I’m using my 70–200mm f/2.8 lens, zoomed all the way in to 200mm. Switch your camera to shoot in manual mode and dial in f/11 as your f-stop and 1/250 of a second as your shutter speed (even though you could “technically” hand-hold the shot, at that fast a shutter speed you’re going to get a sharper result on a tripod, so I would definitely go that route). By the way, you want to get the moon as large as possible in your frame, so the longer the lens you can use for this, the better. As I said, I used a 70–200mm for this shot of the moon on a full moon night (check http://stardate.org/nightsky/moon to find out when the next full moon will be), but if you have a tele-extender or a longer lens, use that to get a larger-size moon in your frame. You want it to fill as much of your frame as possible—you can always shrink it down later if you want, but you don’t want to have to make it larger or you’ll lose quality. Also, zoom in tight, so you just see the moon in your frame and nothing else—you want a clear moon on a black background, that’s it.
Final Image

THOUGHT PROCESS: The whole “shoot in manual mode at f/11 at 1/250 of a second” is actually a recipe that seems to work about every time. I wish I had invented it, but it has been around for a while and that’s simply because it works. However, because of the brightness of the moon, it’s really hard to create one single image where you have a cityscape or landscape where both the moon and the landscape are properly exposed (normally, the moon will appear as a white glowing ball without any detail, so if you see a shot where the moon has detail, you know they pulled off some type of camera or Photoshop trick to make that happen). Back in the traditional film days, to get the moon properly exposed in a photo, you’d have to do a double-exposure—combining two different images into one frame (you’d literally take one shot, rewind the film one frame, and shoot another shot onto that same frame). Some of today’s digital cameras have the ability to do double-exposures, so you’d take the landscape shot (for this landscape, it was f/10 and 1/90 of a second shutter speed at 400 ISO), then you’d turn on the double-exposure feature and change your settings to f/11 at 1/250 of a second, and then shoot the moon on the same frame. Or, you can do what I did: shoot the landscape, then take a second shot of the moon using the settings I mentioned, and use Photoshop to quickly combine the two (believe it or not, this is easier).
POST-PROCESSING: I made the sky a little more yellow, and then I added the moon. Don’t worry, I made a video tutorial for you showing you the process (it’s simple). You can find it on the book’s companion webpage (mentioned in the book’s introduction).