
Chapter One. Shooting Natural Light Portraits Like a Pro
Recipes for Making People Look Their Best
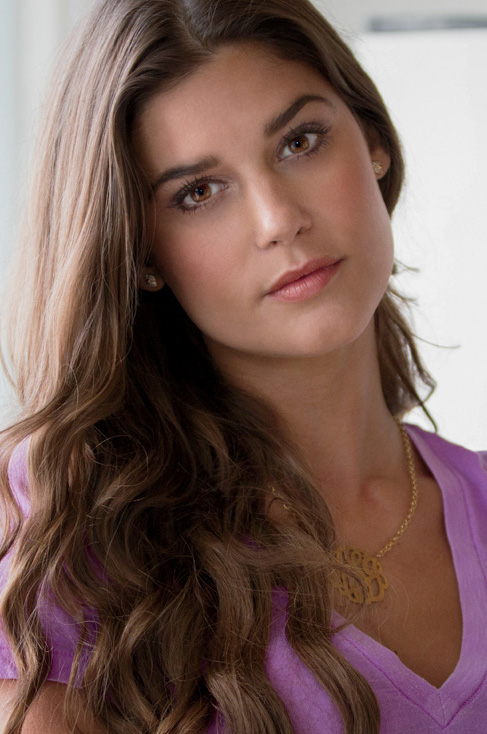
SHUTTER SPEED: 1/125 SEC F-STOP: F/2.8 ISO: 400 FOCAL LENGTH: 70MM | PHOTOGRAPHER: SCOTT KELBY
I don’t know if you’ve ever walked outside and taken a good long look at the sun, but if you did, you were probably on drugs (at least that’s what it said in that instructional film I watched back in 8th grade health class. Frankly, that scared the living daylights out of me, which is an odd phrase to use since we’re talking about daylight from the sun, but the whole thing is a bit of a blur to me because I was probably on drugs). Anyway, even if you just take a quick glance at the sun, you’ll probably start squinting, then sweating, then eventually your retinas will burst into flames and they’ll rush you to the hospital where they’ll try to ease your pain by giving you (wait for it... wait for it...)—that’s right—drugs. (See? They were right in that film after all.) Anyway, that tiny, harsh ball of light in the sky is what creates “natural light,” but that natural light is usually the harshest, most unflattering darn light ever created, and if you want to get even with someone for some injustice or parking space they stole from you at the mall, just take a portrait of them standing outside in this direct sunlight right around 2:00 p.m. and you’ll have instantly settled the score. It’s because sunlight, by itself, is actually harsh and unflattering, so it’s our job (and the focus of this chapter) as photographers (and part-time drug abuse counselors) to take the light from that harsh little circle of hydrogen and helium up in the sky and somehow make it look soft and beautiful. If we can do that, the people we photograph will look soft and beautiful, too, unless of course they didn’t actually look soft or beautiful to begin with, which is precisely why God invented Photoshop back during The War of the Spanish Succession in 1701. Now, if you’re wondering if the rest of these chapter intros are going to be anything along these lines, the answer is, sadly, “Yes. Most definitely.” Don’t say I didn’t warn you.
Seven Things You’ll Wish You Had Known...
(1) Here’s how this book works: Basically, it’s you and me together at a shoot, and I’m giving you the same tips, the same advice, and sharing the same techniques I’ve learned over the years from some of the top working pros. When I’m with a friend, I skip all the technical stuff. So, for example, if you turned to me and said, “Hey Scott, I want the light to look really soft and flattering. How far back should I put this softbox?” I wouldn’t give you a lecture about lighting ratios or flash modifiers. In real life, I’d just turn to you and say, “Move it in as close as you can to your subject without it actually showing up in the shot. The closer you get, the softer and more wrapping the light gets.” I’d tell you short and right to the point. Like that. So that’s what I do here.
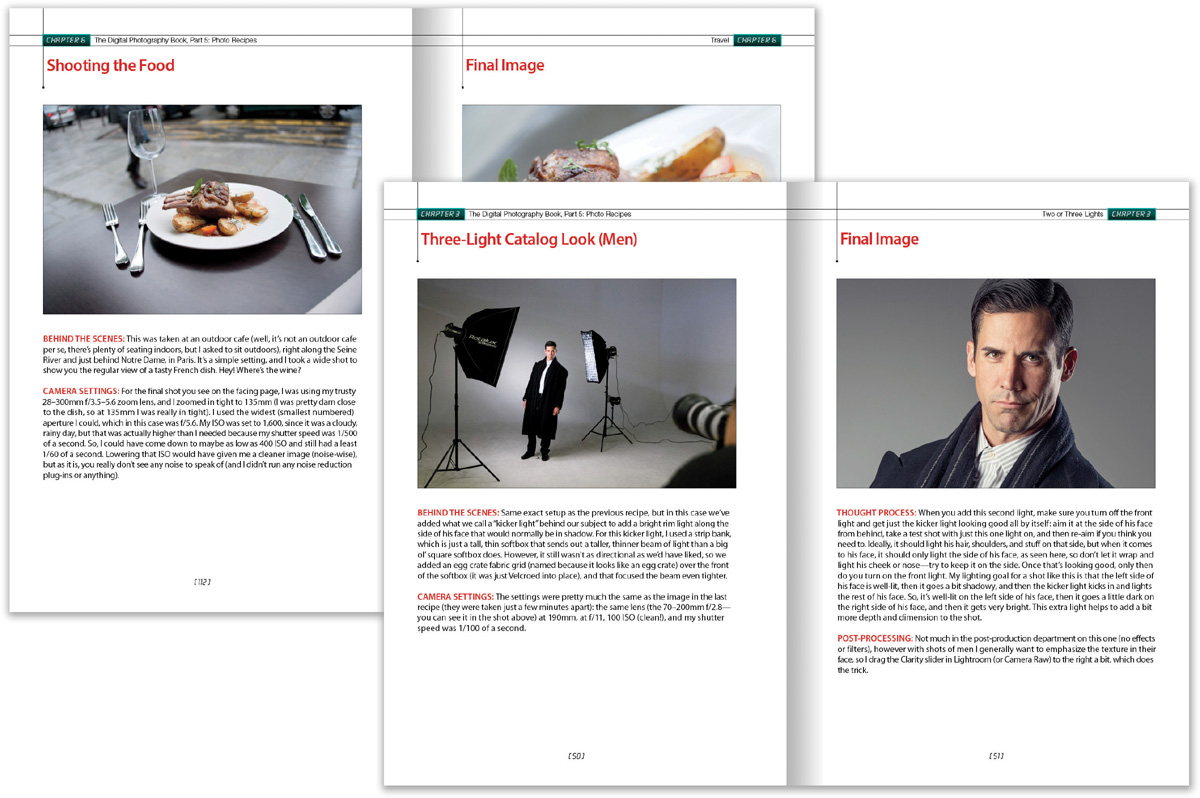
(2) This is a recipe book. It’s based on the most popular chapter in parts 1 through 4 of this book series, which is the last chapter—called “Photo Recipes”—where I show a final image and then explain how to get that kind of shot. Here, I took things up a big notch by adding another page (so now each recipe is a two-page spread) with a behind-the-scenes production shot, so you can see the exact setup that was used to make the shot. Plus, for each recipe I give you four important segments: (1) A detailed explanation of what you’re seeing in the production shot. (2) All my camera settings for the shot. (3) The thought process of why we do this a particular way (this part is really important). And, (4) I tell you exactly what I did to the photo after the shoot in Lightroom or Photoshop, or using a plug-in, to get the final look you see on the second page.
...Before Reading This Book!

(3) Sometimes you have to buy stuff. This is not a book to sell you stuff, but before you move forward, understand that to get pro results, sometimes you have to use some accessories that the pros use. I don’t get a kickback or promo fee from any companies whose products I recommend (rats!). I’m just giving you the exact same advice I’d give a friend.
(4) I wound up making you a bunch of video tutorials. Some of the post-processing stuff is kind of hard to explain with just text, so I made a number (a bunch) of videos for you that show exactly what was done to certain photos in the book. Some stuff was just “standard portrait retouching” and I did a video for you on what that means to me (so you can do the exact same retouches). For some photos, however, I needed to do more, but luckily none of it is hard—you’ll be able to do every single thing I teach you because the videos are all simple, clear, and step by step. I use Lightroom a lot (it’s my main tool), but sometimes I have to use Photoshop (nearly everything I show in a video can also be done in Photoshop Elements, so if you’re an Elements user you won’t get left behind). Also, if you use Photoshop’s Camera Raw plug-in (instead of Lightroom), that’s okay because Lightroom has Camera Raw built right in (it has the same sliders, in the same order, that do the same exact things). I put up a webpage with all the videos and links to any gear I mentioned, and this was all created expressly for this book, and exclusively for you my awesome, awesome reader and new best friend in the whole wide world. Here’s the link: www.kelbyone.com/books/digphotogv5 (but turn the page, you’ve still got three more important things to go!).
Two More of Those Things
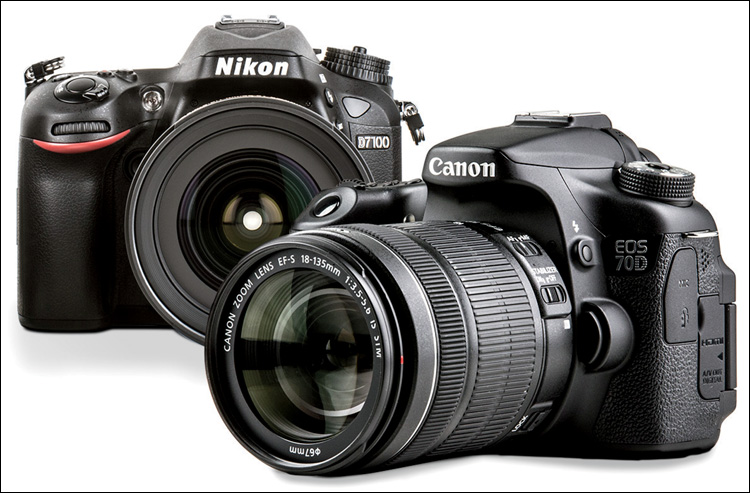
(5) If you’re shooting with a Sony, Olympus, or Fuji digital camera, don’t let it throw you that a Canon or Nikon camera is pictured. Since most people are shooting with a Canon or Nikon, you’ll see both (although I shoot primarily Canon cameras and lenses these days), but either way, don’t sweat it—most of the techniques in this book apply to any digital SLR camera, and even many of the point-and-shoot digital cameras, as well.
(6) WARNING: The intro page at the beginning of each chapter is just designed to give you a quick mental break, and honestly, they have little to do with the chapter. In fact, they have little to do with anything, but writing these quirky, off-the-wall chapter intros is kind of a tradition of mine (I do this in all my books), but if you’re one of those really “serious” types, I’m begging you: skip them because they’ll just get on your nerves. By the way, if you somehow are into these quirky chapter intros, I made an entire eBook of nothing but my favorites compiled from all my books, and it’s called Buy This Book of Chapter Intros Even Though You Won’t Learn Anything. 100% of the profits from the sale of the eBook goes to support the Springs of Hope Orphanage in Kenya, which is an orphanage built from the ground up with the gracious support of people who read my daily blog and take part in my annual Worldwide Photo Walk. You can find it for the Kindle at Amazon, or in Apple’s iBooks Store. You’ll really dig it (or hate it with the passion of a thousand burning suns), but either way, you’re helping some orphans so you still get lots of good Karma and, in the end, everybody makes out (stop snickering—you know what I meant).
One Last Thing
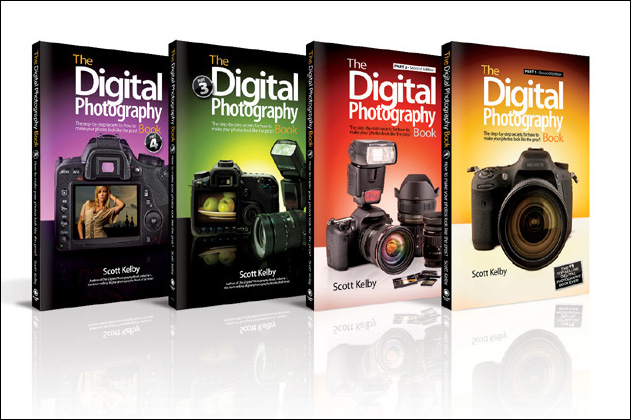
(7) Keep this in mind: this is a “show me how to do it” book. Again, I’m telling you these tips just like I’d tell a shooting buddy, and that means, oftentimes, it’s just which button to push, which setting to change, where to put the light, without all the technical explanations. I figure that once you start getting amazing results from your camera, you’ll go out and buy one of those “tell me all about it” camera or lighting books that goes into all that technical stuff and you’ll learn terms like “chromatic aberration” and “lens diffraction” and “hyperfocal distance.” Also, this is the fifth book in this series. All the books have completely different content, and were designed to pick up where the last book left off, so if this is your first book in this series, you’re still okay because of how this one was designed. But, if you like the series (and, of course, I’m hoping you super-dig it), I would recommend starting with part 1, and then going in order. This would be the ideal situation (for us both—sorry, couldn’t help myself), and honestly, that’s how the series was designed. Well, it wasn’t designed that way from the start. When I wrote the first one, it wasn’t called part 1, because I never imagined it would become the best-selling book in the history of digital photography. Once it did, I wrote a part 2, then 3, then 4, and this new turn in the series, part 5 (Photo Recipes), which I truly hope ignites your passion for photography by helping you get the kind of results you always hoped you’d get from your photography. Now, pack up your gear, it’s time to head out for our first shoot.
For Better Light Outdoors, Shoot in Shade
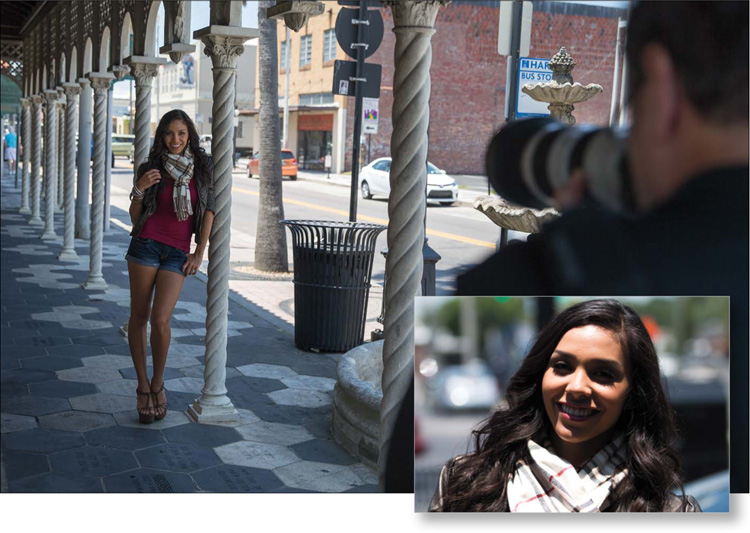
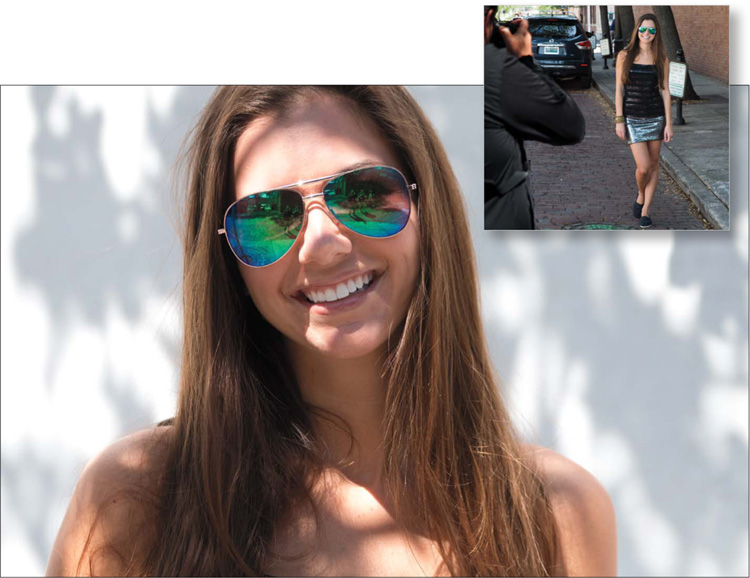
BEHIND THE SCENES: First, look at the small photo in the bottom right here. That’s how the light looks on our subject when she’s standing just a few feet to the right, out in direct sunlight. Note the harsh shadows, shiny skin and hot spots, and shadows filling her eye sockets. It’s just not flattering light at all. In the larger shot here, I’ve moved her a few feet to her left so now she’s standing under a roof awning that blocks all the harsh sun.
CAMERA SETTINGS: For natural light shots, I generally want the background out of focus (to help separate the subject from the background), so I try to shoot at the lowest-numbered f-stop my lens will allow—in this case, it was f/2.8. But, just f-stop alone won’t get you that really out-of-focus background; you’ll also need to zoom in tight. So, I moved back from my subject (with a 70–200mm f/2.8 lens on my camera) and zoomed in to 130mm. These two things together (f-stop and zooming in) give us that separation and nice soft background you see in the final image. With my f-stop at f/2.8 (which lets in the most light), I was able to use my cleanest, lowest ISO (100 ISO) and still get a shutter speed of 1/320 of a second. So, hand-holding the shot and still having it nice and sharp was not a problem.
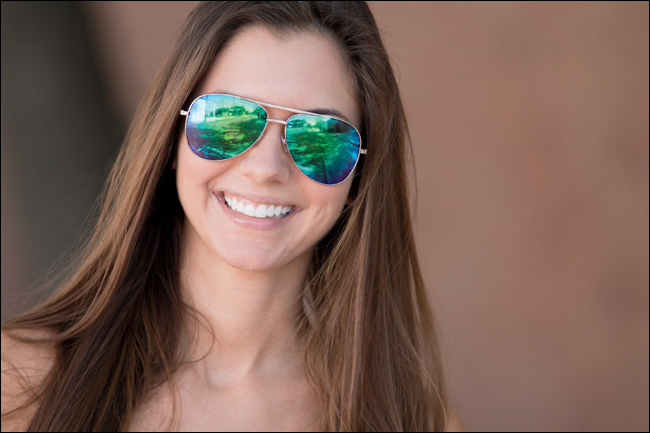
Final Image
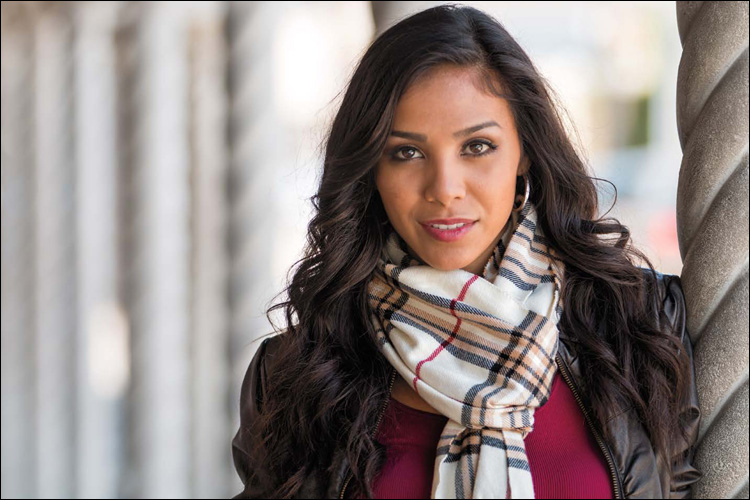
THOUGHT PROCESS: I think a lot of photographers confuse “natural light” with beautiful light, but they are two different things. Natural light usually refers to light coming from the sun, which is the harshest light source in the universe most times of the day because of its brightness, small size, and position in the sky. What makes sunlight beautiful is when something is spreading and diffusing (softening) that natural light, like a frosted window, or a window that’s really dirty (those make gorgeous light), or something that blocks most of the light (like a roof or thick tree branches). Our job is to find that diffused, non-direct sunlight. Having the subject stand in the shade, rather than in direct sunlight, is a quick and easy way to use natural light, and since they’re in the shade, the light’s not harsh—it’s soft and flattering. Once you’ve found some shade, the ideal place to put your subject is near the edge of it. That’s where the light will generally be its softest and prettiest (under the shaded area, get as close as you can to the direct sun without any of it actually hitting your subject). So, why didn’t I position her to the right more to get her closer to the edge of the shade? Because I wanted that row of columns to appear behind her.
POST-PROCESSING: Nothing much to do here beyond the standard portrait retouching stuff (removing minor blemishes, softening her skin a tiny bit, brightening her eyes a tiny bit, etc.).
Diffusing Harsh Sunlight
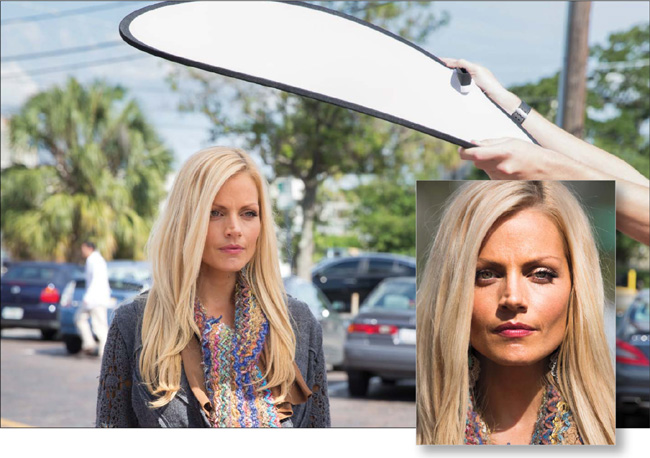
BEHIND THE SCENES: We’re in a parking lot here (the light doesn’t get much yuckier than this, right?), but to soften and diffuse the harsh, direct sun (you can see what the direct sun shot looks like in the small shot at the bottom right, here) we put a diffuser over our subject’s head (as seen above in the large shot). This diffuser is part of the F.J. Westcott 30" 5-in-1 Reflector kit (if you look at the reflector we’re using on page 12, that zips open, and inside is this awesome 1-stop diffuser, which is worth the price of the kit alone. I use it 10x more than I do the reflector. It sells for around $39 at B&H Photo).
CAMERA SETTINGS: The final image was taken with my 70–200mm f/2.8 lens at f/2.8, which (when you zoom in tight) puts the background way out of focus (like you see on the facing page). I’m zoomed in tight to 160mm. My ISO is set at 100 and my shutter speed is 1/1000 of a second (I’m shooting in aperture priority mode, so I choose the f-stop and then the camera automatically chooses the shutter speed it needs to make a proper exposure).
Final Image
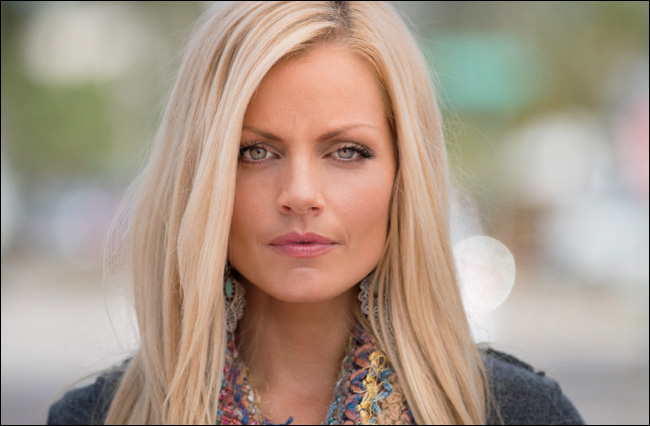
THOUGHT PROCESS: Let’s talk about the lighting first. A diffuser is my go-to accessory for shooting outdoors for a number of reasons: (1) you can’t always count on there being shade around for soft light, (2) I can use it pretty much anywhere outdoors, (3) it’s super- lightweight and collapses into a small flat circle, (4) it’s very inexpensive, and (5) it makes people look great! To use one, you literally just have a friend hold it up between the sun and your subject—that’s it. If I were to add one tip it would be this: the closer you can get that diffuser to your subject (without actually seeing it in the picture), the softer and more flattering the light becomes. So, I’ll have my friend keep lowering and lowering it, bringing it down closer to my subject, until I actually see the edge of it in my view-finder. Then, I have them raise it back up just a couple of inches. Super-simple and you get great results every time. Now, why did I shoot this in an awful-looking parking lot? I thought it would make a great example for how the combination of shooting at a low-numbered f-stop and zooming in tight can be used to blur the background so much you really can’t tell what’s behind your subject. Can you imagine how handy this is? Now you can make a beautiful portrait anywhere using one lens and a cheap diffuser (if you just want the diffuser, and you don’t need the whole 5-in-1 kit, you can get the diffuser alone for around $20 at B&H Photo).
POST-PROCESSING: Just the standard portrait retouching stuff.
Diffusing a Larger Area
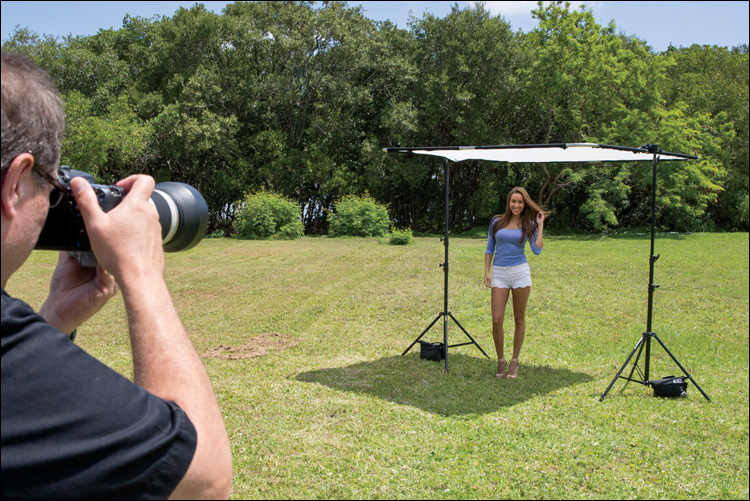
BEHIND THE SCENES: Here, we’re in a big empty lot, and we’ve put up a large diffuser to soften and spread the harsh “high noon” sunlight overhead. This is a 6.6x6.6’ Lastolite Large Standard Skylite Rapid Kit, which comes with a 1.25-stop diffusion panel (it’s around $399). Plus, you’ll need two light stands to support it, and two Lastolite swivel grip heads to angle the diffuser toward the sun. Those swivels run around $54 each. Also note the two sandbags—one on each light stand. Those are very important. Without them, the whole thing can crash over with a small gust of wind. Now, if you’re thinking this is getting kinda expensive (you’re into about $500 or so at this point), just remember that this rig is less expensive than nearly any lens you might want to buy, and will probably have a bigger impact on how your outdoor portraits look than any $500 lens, so it’s worth considering.
CAMERA SETTINGS: This was taken with a 70–200mm f/2.8 lens zoomed in to 135mm. My f-stop is f/2.8 and my shutter speed is 1/1250 of a second at 160 ISO (obviously, I could have lowered my ISO down to 100 and still have had plenty of shutter speed to hand-hold a shot and have it really sharp).
Final Image
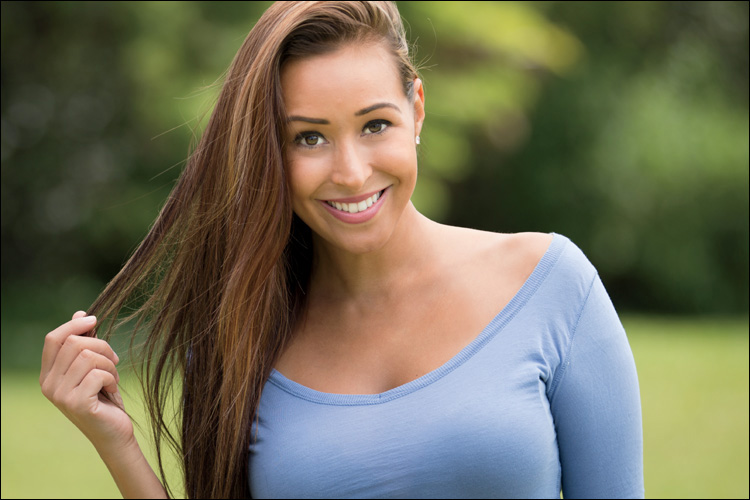
THOUGHT PROCESS: The hand-held Westcott diffuser we used earlier is great for head -shots, but if you need to cover more of your subject (or if you have a couple or a small group), then you’d go to a bigger diffusion panel like this (this larger diffusion panel is sometimes referred to as a “scrim”). With something this big, you could easily do a 2/3-length shot or even full-length—look at the shot on the facing page and you’ll see the shadow created by the diffuser covers enough of our subject to do a full-length shot if you wanted to, no problem. Notice the quality of the light here—we’re in the middle of a vacant lot, at literally high noon, and the quality of light underneath this diffuser is just beautiful. The diffuser itself is very lightweight, and the frame is made of lightweight aluminum (kind of like those folding lawn chairs). It all fits in a small travel case (it’s made for location shoots) and just takes a few minutes to put together. Every time I use this, I think to myself, “I’ve gotta start using this more.” The light is just that gorgeous.
POST-PROCESSING: Nothing much, once again. Standard portrait retouching stuff and darkening the edges all the way around using the Lightroom Develop module’s (or Camera Raw’s) Post Crop Vignetting Amount slider in the Effects panel. Just drag it to –11 and you’re done.
Positioning a Reflector Outdoors
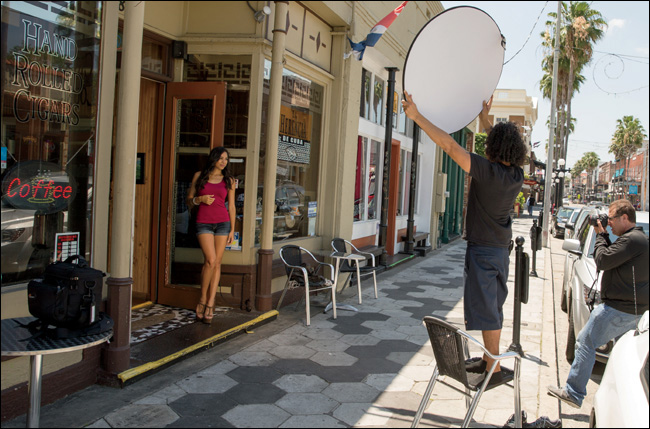
BEHIND THE SCENES: I’m shooting our subject in the doorway of a small cigar bar and, once I took the initial photo, I could see that her face appeared too dark. So, I had my assistant hold a small collapsible reflector (this is the F.J. Westcott 30" 5-in-1 Reflector kit I talked about earlier) up high to bounce some of the sunlight back onto our subject’s face. Since we’re outdoors, I had him use the gold side of the reflector, so it reflected a warm-colored light onto her, rather than silver (which we use in the studio) or white (which is just too subtle in this case). The reason my assistant is standing on a chair is that: (1) the subject is standing up on a step, (2) the subject is tall, and (3) my assistant John, here...um...isn’t.
CAMERA SETTINGS: For this shot, I wanted to put the background behind her really, really out of focus, so I went with an 85mm f/1.8 lens (a fixed-length lens, not a zoom), and, of course, I shot at f/1.8 (if you bought a low-f-stop lens like this, you bought it to shoot at f/1.8, right? If you’re not always shooting at that low an f-stop with this lens, you wasted your money). We had been shooting inside the cigar bar, and inside I had set my ISO at 800 so I would have enough shutter speed to hand-hold my shots. When we walked out the front door, I turned back and saw that the entryway looked pretty cool, so I had our subject stand there to catch a few frames, but I forgot to change my ISO back to 100 (for shooting outside). There’s a lesson in there somewhere (for me, at least). Anyway, at 800 ISO, my shutter speed was way up there—1/5000 of a second.
Final Image
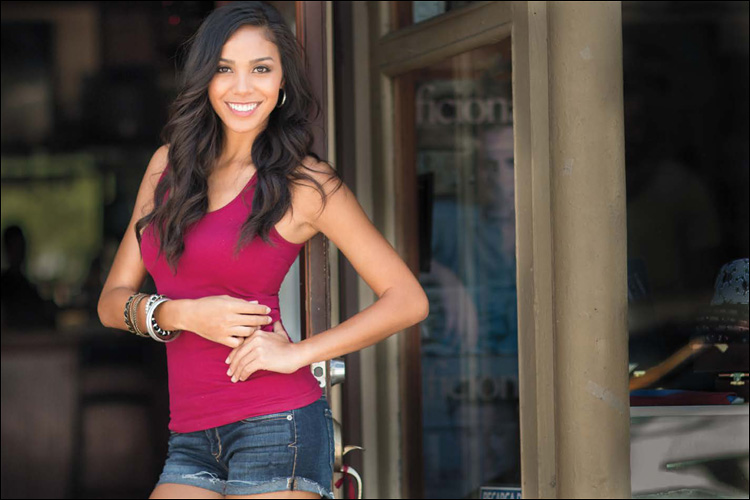
THOUGHT PROCESS: The key here (and why I included this shot in the book) is to talk about the reflector position. When we light a subject, we’re trying to mimic the position of the sun (it’s up high, aiming down at us) because that’s how we’re lit with natural light—from above (heck, that’s how we’re usually lit with artificial light in our homes and offices—from above, aiming down at us). So, when you use a reflector, don’t place it down low to bounce the light up into your subject’s face. That’s called “up-lighting,” and it’s used for lighting monsters or linebackers to make them look scary. Mimic the sun. Hold the reflector way up high, so the bounced light comes from up high and reflects down on your subject. That way, it winds up being flattering (instead of scary). As for using the reflector itself, I used it because when I took a test shot, I could see that her face was just too dark. Our eyes are drawn to the brightest thing in the image, so I directed my assistant to angle the reflector so it would mostly brighten her face. You do that by literally tilting the reflector slowly back and forth (toward the subject and away from them), until you can see a large pool of reflected light hit them. Once you see that, then it’s easy to position the reflector to move that pool of light where you want it (if you’ve ever seen sunlight strike the face of your wristwatch and create a bright light on the ceiling, you know what I mean).
POST-PROCESSING: I did standard portrait retouching, but I also had to clone away some stickers on the window to her right (from the camera position). I also used Light-room’s Adjustment Brush to darken the mirror to her left and the windows to her right, so they didn’t draw the eye (since our eyes are dawn to the brightest things in the image).
Fix Dappled Light
BEHIND THE SCENES: What you’re seeing above is a nightmare. You see all those big bright spots of light hitting our subject in different areas (like on the bridge of her nose, her forehead, her upper chest, and her arms)? Those harsh beams of light coming through the tree she’s standing under are called “dappled light” and, for the most part, we want to avoid it like the plague (I say “for the most part” because you could possibly make a case for using dappled light in some fine-art piece, but generally, we do our best to avoid it). You see how you can also see individual tree branches (like the one on the left side of her forehead)? Yeah, that’s all bad, bad stuff.
CAMERA SETTINGS: For the final image (on the facing page), I’m using a 70–200mm lens zoomed in to 182mm, so I’m pretty tight. I’m at f/2.8 (if your lens doesn’t go that low, you can use either f/4 or f/5.6—as long as you’re zoomed in tight using the lowest-number f-stop your lens will allow, the background will still be soft). I’m at 400 ISO at a shutter speed of 1/1000 of a second.
Final Image
THOUGHT PROCESS: If dappled light is so bad, what is it exactly that we want? We want nice, even shade like you see in the shot above, which was taken literally just a few feet from where the first shot was taken. The next tree on the street had a lot more leaves on it, so there wasn’t nearly as much dappled light. There was some at the edges of the shade, so I looked through the viewfinder and had our subject keep taking a step backward, until I could see through the viewfinder that no annoying streams of light were showing through the leaves, and it was just nice, even shade (if you look at the small photo in the top right on the facing page, you can see the behind-the-scenes shot after I moved our subject away from the evil dappled-light tree and over to the more solidly shady tree). Doing this also created a happy accident, in that the background looked more interesting in the second shot than the dull white wall in the dappled light shot.
POST-PROCESSING: Just two things: (1) standard ol’ portrait retouching, and (2) in Light room’s Develop module (or Camera Raw), I dragged the Post Crop Vignetting Amount slider, in the Effects panel, to –11 to darken the edges of the image just a tiny bit (I do this quite a bit for natural light images. It helps draw the eye to your subject by darkening the edges all the way around).
Direct, Contrasty Window Light
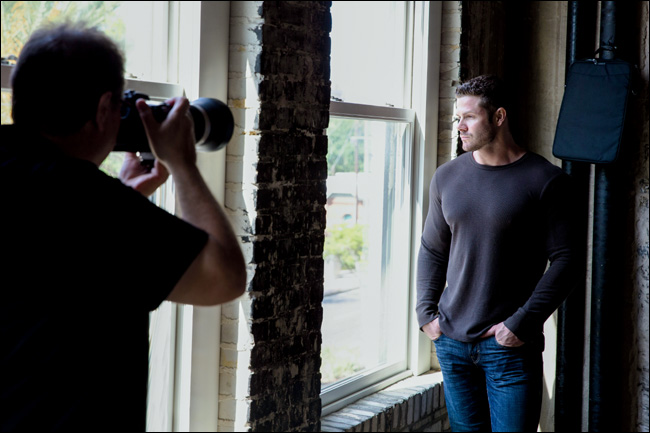
BEHIND THE SCENES: Our subject is standing directly in front of a large glass window, so there’s nothing there to soften or diffuse the light. The sun is pretty high in the sky (it’s around 4:00 p.m.) and the bright sunlight is coming through the window at an angle. I had my subject stand very close to the window because, for this look (which I would generally use with men), I want very sharp, contrasty light (putting him right near the window is the opposite of what I would do if I was shooting a woman and wanted soft, diffused light). So, that’s it: direct light streaming in from a tall window. No diffusion—no nuthin’—just direct light. If you look directly behind our subject, you’ll see my black lap top bag taped up to the wall with gaffer’s tape. We taped it up there because there’s a gap between the two black tubes on the wall, and I could see the lighter beige wall area in the shot. I needed something to hide that lighter area, and we didn’t have a black cloth or a black shirt, so we kinda had to make do using my laptop bag. It’s not pretty, but it worked. Also, having your subject wear a dark-colored shirt makes this look easier.
CAMERA SETTINGS: I’m using a 70–200mm f/2.8 lens and I’m zoomed in to 95mm, with my f-stop at f/4.5. There is plenty of light in the room, so to create this dark, dramatic look, I shot in aperture priority mode (which I always do for natural light portraits), but the trick is to use exposure compensation to darken the scene by around two stops or so (in this case, I darkened it by 1.7 stops). Even though you’re darkening the room around him, his face will still be brightly lit by the direct sunlight.
Final Image
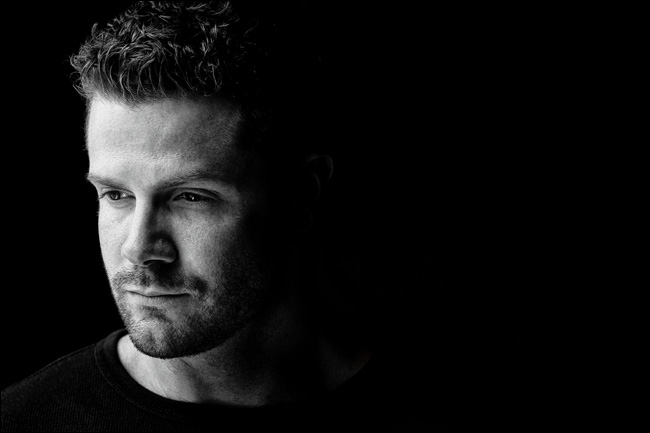
THOUGHT PROCESS: I am really drawn to color (it’s my “thing”), so I don’t shoot a lot of black and white. But, I knew before I pressed the shutter button on this one that I was going to convert it to black and white for the added drama. You might be wondering how I got away with using just harsh, direct sunlight. It’s because I wasn’t trying to make a soft, beautiful shot. I was intentionally going for a really contrasty look, so this hard light works. This contrasty light (and the post-processing) accentuates his skin texture and facial hair, and brings out detail. For men, that usually looks terrific.
POST-PROCESSING: In Lightroom’s Develop module (or Camera Raw), I increased the contrast a lot by dragging the Contrast slider to the right quite a ways. Once the image looked really contrasty, I used a plug-in for Lightroom (or Photoshop, Elements, or Apple Aperture) called Silver Efex Pro, which is part of the Google Nik Collection. Nearly every pro I know uses this plug-in for converting to black and white (yes, it’s that good), and I use it in a very simple way: When you open your image in it, on the left, it shows you a bunch of large thumbnail views of your image with different types of black-and-white processing. I just click on the one that looks best to me, and then I click OK. (By the way, the preset that usually looks the best is High Structure [Harsh], as it adds midtone contrast and really brings out the detail, which is what I’m usually after in a black-and-white photo.) The final step was to add a lot of sharpening, using Photoshop’s Unsharp Mask filter with these settings: Amount 90, Radius 1.5, Threshold 0.
Softening Window Light
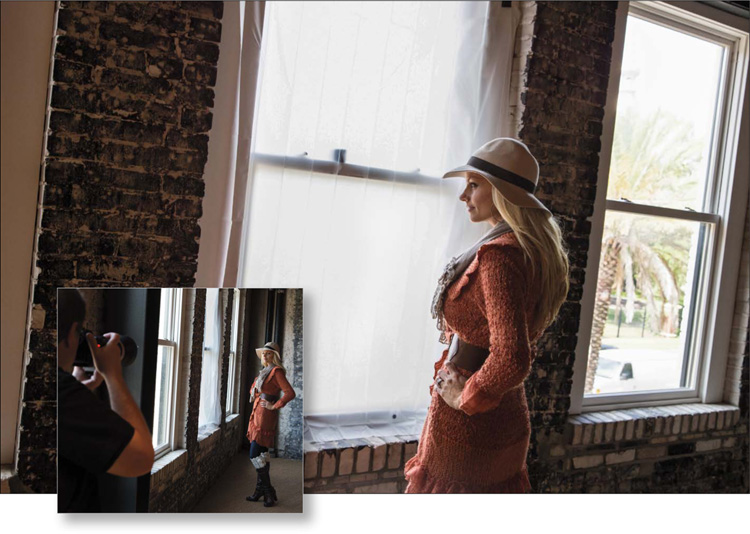
BEHIND THE SCENES: Here, our subject is standing directly in front of a large window, which technically should make a beautiful shot, except for one thing: window light, by nature, is not soft and beautiful. Sometimes it is, but it really depends on the window’s location, the time of day, and the angle and position of the sun, because window light can be some of the harshest, nastiest light you’ve ever seen. That’s why we keep a frosted vinyl shower curtain liner with us (literally, just $1.99 at Walmart) to tape up over a window (using gaffer’s tape we bought from B&H Photo—gaffer’s tape comes off surfaces without leaving any sticky residue, or peeling off paint or finishes, or doing any harm whatsoever. It’s amazing stuff. Around $6 a roll). My shooting position is directly to her left along the wall.
CAMERA SETTINGS: I’m using my 70–200mm f/2.8 lens again, and I’m at f/2.8 so I can put the background out of focus, but as you can see on the facing page, it’s only a little bit out of focus. Why only a little bit? Wouldn’t f/2.8 make it really out of focus? Well, it would if I could zoom in tighter, but to get more of her in the frame than just her head and shoulders, I had to zoom out to 70mm. I couldn’t move farther back (to zoom in tighter, but get the same composition with a blurrier background) because the room wasn’t that deep. By the way, when you add this frosty diffuser in front of the window, it softens the light big time, but it also cuts the amount of light. So, I had to increase my ISO to 800 to get my shutter speed above my 1/60-of-a-second-minimum hand-holding rule (it actually got it up to 1/320 of a second, so I was in good shape to hand-hold. I actually could have lowered it down to at least 400 ISO and still had a decent shutter speed).
Final Image
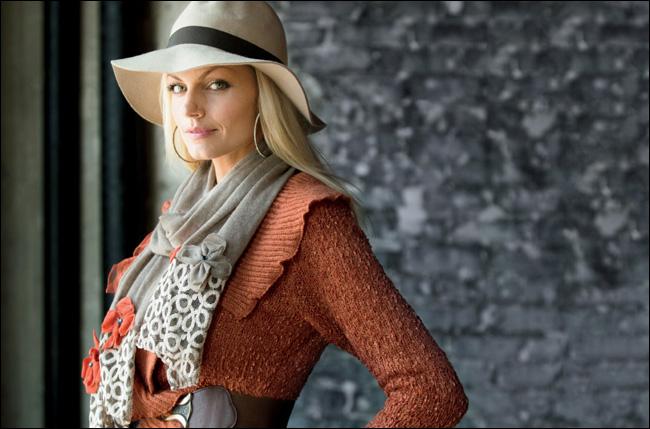
THOUGHT PROCESS: If you want just really soft, wonderful, wrapping light from a window, this trick turns that window into a giant softbox, and the diffused light that comes through now is just absolutely gorgeous (as seen above). By the way, you could get a little softer light by having her take a few steps back from the window. Just know that will lower the amount of light (the farther away you move the light, the darker it gets, right?), so you’d probably have to bump up the ISO a bit more then, because you’re already at your lowest possible f-stop (well, I was anyway at f/2.8).
POST-PROCESSING: Not much to do here, just the standard retouching stuff. Also, I used Photoshop’s Content-Aware Fill feature to get rid of the edges of two framed pictures you could see on the wall behind her to the far right. I made a short video for you on how Content-Aware Fill works. You can find it on the book’s companion webpage (mentioned in the book’s introduction).
Shooting in Direct Sun

BEHIND THE SCENES: We’re shooting in pretty much the harshest sunlight you can imagine—it’s nearly “high noon,” and we’re standing in the middle of a street along some trolley tracks (don’t worry, the trolley hadn’t started its daily runs yet). I’m not using the tracks as any kind of background element—I’m just trying to avoid seeing parked cars in the background. Not much else going on here, just bright, nasty sunlight, so I positioned my subject with her back to the sun, which almost creates a silhouette of her. But, we’re going to address that part with our camera settings.
CAMERA SETTINGS: I’m shooting in aperture priority mode (more on this on the next page), and my f-stop is my standard natural light f-stop of f/2.8. That, coupled with zooming in fairly tight with my 70–200mm f/2.8 lens (I zoomed in all the way to 200mm), created the out-of-focus background behind her. My shutter speed is 1/1000 of a second, and I’m at 400 ISO (I could have shot this at 100 ISO, but I forgot to change the ISO from a previous shot in the shade. Doh! No harm done, but if it’s daylight, I generally choose 100 ISO for the cleanest possible results).
Final Image
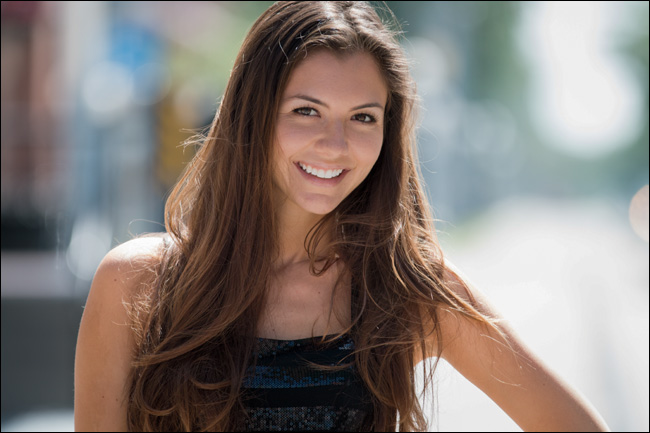
THOUGHT PROCESS: This is a really handy technique to know because there’s not always shade around, and you don’t always have a way to soften and diffuse the light. Using this technique (which I learned from renowned wedding photographer Cliff Mautner), you can shoot right out in direct sunlight and still have soft, beautiful light on your subject. You start by putting your subject’s back to the sun, which creates a nice rim light coming through their hair and along the edges of their shoulders, arms, etc. With the sun now behind your subject, the side of their face facing the camera is dark because it’s essentially in the shade. So, the trick is to overexpose (make the entire image intentionally brighter than it should be) by around one full f-stop. So, now they’re not in the shadows anymore (compare the light on her face here vs. the behind-the-scenes shot on the previous page). If you shoot natural light portraits in aperture priority mode, like I do (A on the top dial of Nikon or Sony DSLRs, or Av on Canon cameras), then you can use the exposure compensation feature to overexpose the image beyond what the camera thought was the proper exposure. Generally (depending on your camera’s make and model), you press a button and then turn a dial or knob to make the exposure the camera took brighter or darker (you can see this in your viewfinder, usually with a + or –sign showing if you made it darker or brighter). If you shoot in manual mode instead, you’d just set your proper exposure, then choose the next brightest full f-stop.
POST-PROCESSING: Just standard portrait retouching stuff—removing blemishes, smoothing skin, brightening eyes, etc.
Better Window Light
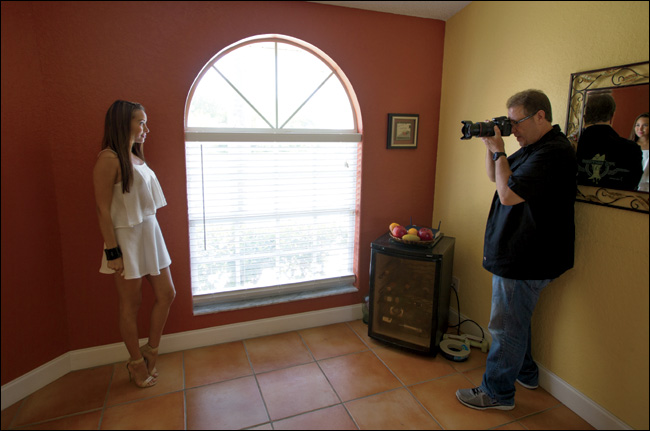
BEHIND THE SCENES: Here, we have our subject in place for a window shot, where she’s standing just behind the window. I’m shooting back at an angle toward her (if there had been more room, I probably would have been just to the right of the window—closer to the window itself—so this is also a great tip for making the most of a small space).
CAMERA SETTINGS: In such tight quarters, I’m using a 24–70mm f/2.8 lens at 70mm (certainly not my go-to lens for portraits because it’s not tremendously flattering. The 70–200mm f/2.8 zoomed in to around 120mm or more would be a much more flattering choice, but I just didn’t have the room). Now, if you look at the image above, you’ll see our subject isn’t standing directly in front of the window, she’s standing behind it, and she’s kind of on the edge of the light (no light is hitting her directly). So, I had to crank up the ISO a bit (to 400 ISO) to get my shutter speed up over 1/60 of a second (to 1/100 of a second—enough speed to hand-hold and still get a sharp shot).
Final Image

THOUGHT PROCESS: So, why are we placing her behind the window and not in front of it? It’s because we don’t have any way to diffuse the light (no shower curtain, etc.). So, by putting her just behind the window, she gets the edge of the light, where it’s really soft and beautiful, instead of the harsh, direct light. Ideally, to make it even softer, I would have moved her a few feet away from the wall (5 to 6 feet), which helps the light become even softer (again, it’s less direct). But, when I tried that, we couldn’t make the behind-the-scenes shot you see on the facing page, so I shot it like you see it.
POST-PROCESSING: Just the standard portrait retouching stuff. By the way, if you’re wondering, “What’s the standard portrait retouching stuff?” I made a video tutorial for you showing what the standard portrait retouching stuff actually is (and how to do it yourself). You’ll find it on the book’s companion webpage mentioned in “Seven Things You’ll Wish You Had Known Before Reading This Book!” at the beginning of this chapter.
Window Light Without Diffusion 2
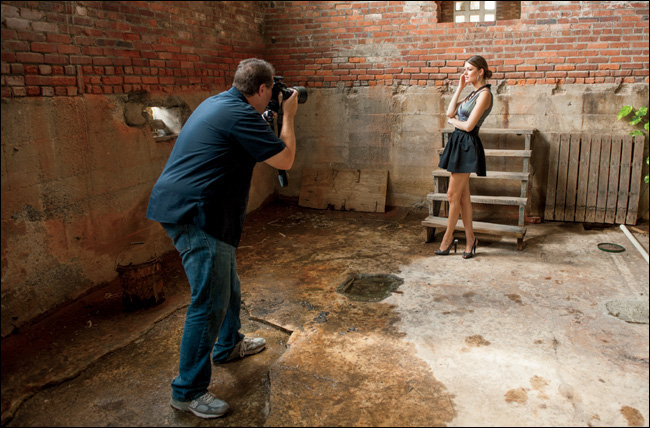
BEHIND THE SCENES: Here, our subject is in an old, abandoned warehouse, and the light is streaming in from the windows up above. Nothing else at work here, but that natural light from the windows.
CAMERA SETTINGS: For the final image on the facing page: to put the background way out of focus, I actually used an 85mm f/1.4 lens for this shot, taken at f/1.4, and that created a very shallow depth of field. My ISO was a bit higher than it needed to be at 800 ISO because that created a shutter speed of 1/500 of a second (way faster than I needed to get above my 1/60-of-a-second rule for hand-held shots), so I probably could have lowered that to at least 200 ISO and still been okay. Maybe even 100 ISO.
Final Image
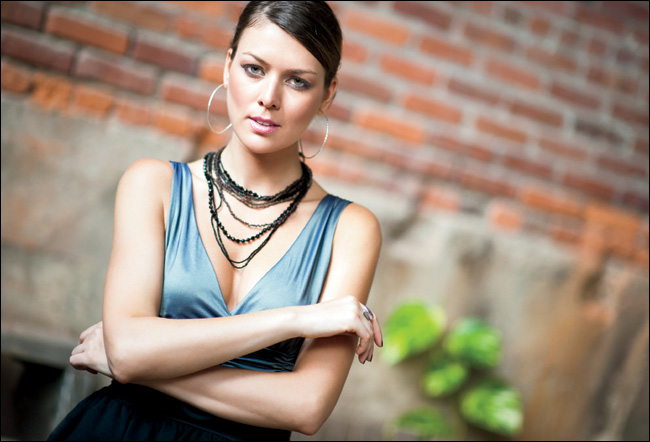
THOUGHT PROCESS: Another way to get softer window light is to move your subject away from the window, so they’re not getting a direct beam. Here, I have our subject 8 to 10 feet away from the window, and the light there is much softer and very flattering. You have to move your subject far away enough that the direct beam isn’t falling anywhere on them. Once you have them positioned to get that beautiful light, then the rest of the look comes from the extremely shallow depth of field from shooting at f/1.4. One thing to keep in mind about shooting with either an f/1.2, f/1.4, or f/1.8 lens: the focusing technique is a bit different for these lenses than it is with most other lenses. With other lenses, we’d normally aim our camera so the center focus point (inside our viewfinder) is right over our subject’s eye, then we’d press-and-hold our shutter button halfway down to lock focus on their eye, then lastly, we’d move the camera however we wanted to compose our shot, and then fire. That doesn’t work well with these faster lenses (the f/1.2s, f/1.4s, and f/1.8s) because you’re dealing with such a narrow plane of focus. Recomposing after you’ve focused can get your camera out of the focus plane. So, with these fast lenses, we do just the opposite. We compose the shot first, trying to keep the camera parallel to the subject (not tilted up or down). Then, once your shot is composed the way you want it, use the dial on the back of your camera to manually move the center focus point right over your subject’s eye, and now you can take the shot.
POST-PROCESSING: Just the regular portrait retouching stuff and darkening the outside edges using the Lightroom Develop module’s (or Camera Raw’s) Post Crop Vignetting Amount slider in the Effects panel.