9. 10 Strategies for Taking Professional-Quality Digital Pictures
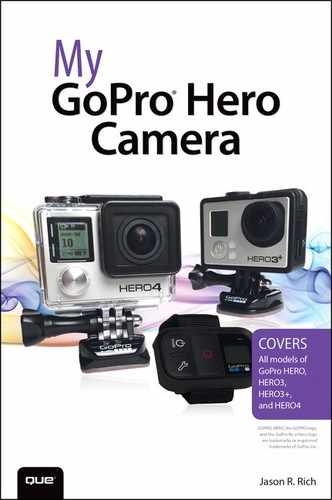
In this chapter, you discover 10 strategies for taking better digital pictures (as opposed to shooting video) using your GoPro camera. Topics include the following:
![]() Selecting the best approach to take with your GoPro camera when taking pictures
Selecting the best approach to take with your GoPro camera when taking pictures
![]() How to best utilize light in your images
How to best utilize light in your images
![]() Using the Rule of Thirds to help frame your shots
Using the Rule of Thirds to help frame your shots
![]() Choosing the best shooting perspective to capture your subject
Choosing the best shooting perspective to capture your subject
You already know that your GoPro camera can shoot high-resolution photos. Actually, the Hero3+ and Hero4 can shoot digital images at up to 12MP resolution using a Wide Field of View.
In this chapter, you discover how to incorporate the technical knowledge you obtained from the previous chapter related to using the various Photo-related shooting modes, and combine it with your own creativity to consistently capture more visually interesting digital images.
Enhance Your Images with Software
Don’t forget, using optional photo editing software on your computer or mobile device, you can quickly crop, edit, or enhance an image after it’s been shot. Within just a few minutes, sometimes less, you can dramatically improve or alter the appearance of an image.
You can also apply many shooting strategies outlined in this chapter for taking digital pictures when using your GoPro camera to shoot HD video.
Preparation Is Essential
If you take pictures away from your home, such as when you’re on vacation, or participate in a once-in-a-lifetime event, remember to bring along at least one or two extra fully charged batteries, plus an extra microSD memory card for your camera.
Without battery power, your camera is useless. In addition, if you fill your memory card to capacity, while awesome or once-in-a-lifetime photo opportunities still exist, you either need to erase content that’s already stored on your camera’s memory card or forego taking additional pictures while you’re out and about.
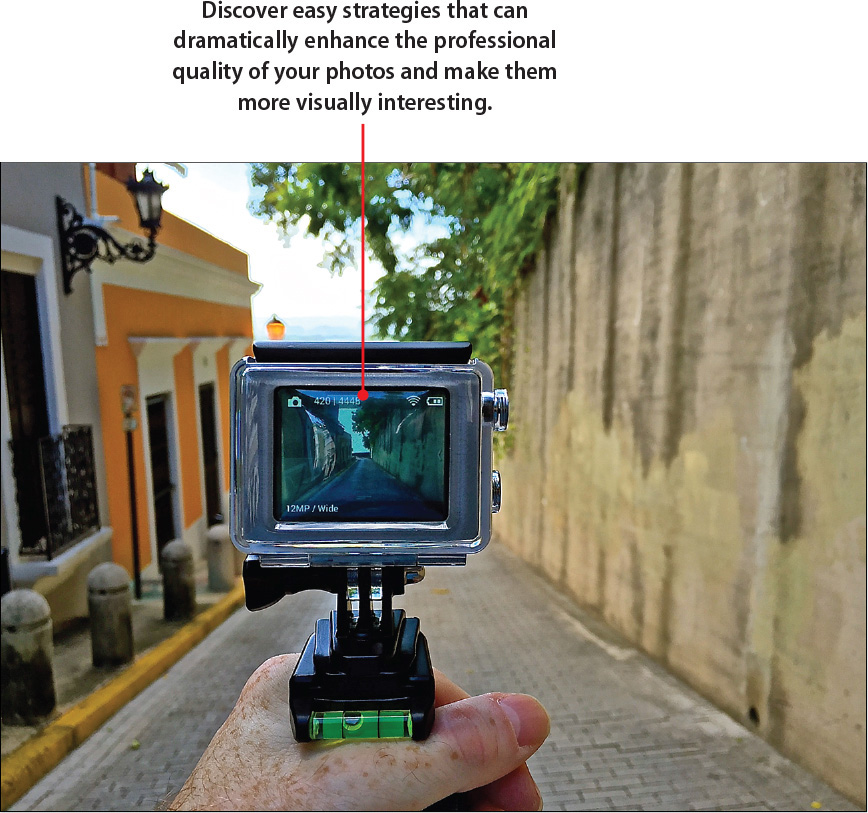
Another important step that many people forego is to make sure the camera’s lens is clean prior to shooting. This is particularly important if you shoot in or around water, snow, dust, or dirt.
Everyone has taken photos and gotten a finger in front of the lens. But even something as small as water drops or sand can get on your lens (or on the camera’s housing in front of the lens) and ruin your photos. The easiest way to avoid this is to use some type of optional handle or grip with your camera.
You should also remember, when set to Wide Field of View, the camera’s lens captures everything in front of the lens within a 170-degree radius. Thus, even if your fingers are positioned to the sides of the lens, they could appear in your images.
Avoid Excessive Shaking
Regardless of what you take pictures of with your GoPro camera, always be sure you hold the camera steady, and avoid excessive shaking when you press the Shutter button. This is particularly important when shooting photos or video in low-light situations.
The following 10 strategies can help you properly set up your camera and take advantage of its built-in features, as well as optional housings and accessories, to help you achieve the best possible results.
Choosing an Interesting Subject
As a photographer, your first big picture-taking decision involves deciding what or who your subject will be, and how you want to showcase that subject in your photos. When shooting with a GoPro camera, your subject can be yourself, or you can just as easily point the camera away from yourself and shoot subjects positioned in front of the camera.
In addition to people, however, a photo’s subject can be an animal, object, popular tourist attraction, or a piece of architecture. Your goal as the photographer is to take people or objects that you encounter and capture those subjects within a digital image so that it’s visually interesting.
When shooting people, for example, a variety of factors contribute to how your photos look, including
• The subjects’ facial expression
• What they communicate through their eyes
• Their pose and body language
• Their outfit and general appearance
• What they’re doing in the photo
• What’s in the foreground, background, and to the sides of your subject within the frame
• As the photographer, your chosen shooting angle and perspective
• Whether you, as the photographer, opt to take a posed or candid shot of your subject (the difference will be explained shortly)
However, when your subject is an inanimate object and cannot showcase emotion, for example, then it’s your responsibility as the photographer to capture that subject in creative ways.
This might mean shooting from an unusual angle or perspective, framing your subject in the shot using what’s in the foreground, background, or to the sides of the subject, taking advantage of natural or artificial lighting, and utilizing some type of reflection in water, a window, or a mirror.
Break Your Existing Habits When Framing Your Shots
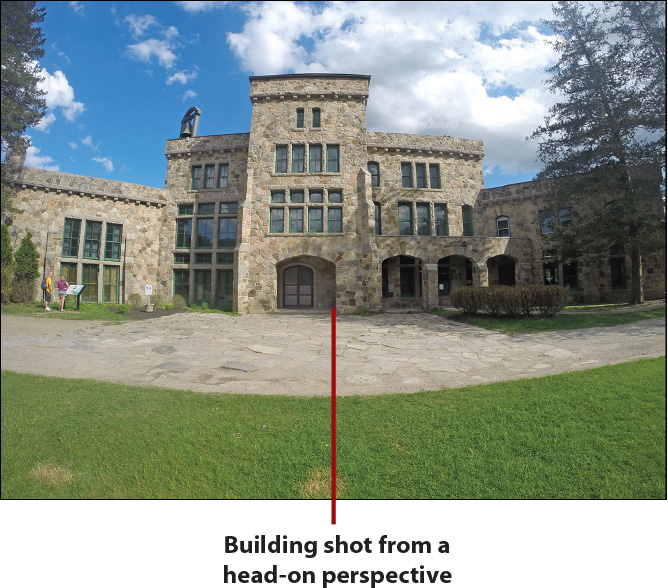
Most amateur photographers are indiscriminate when choosing their subject and then simply point the camera at their intended subject, center the subject within the viewfinder, and take a picture from a head-on perspective. These photos are boring to look at, and all the photographer’s shots look basically the same even when the subjects are different.
Depending on your subject, you may discover that timing is essential to capture the perfect shot. So, when you know what you want to shoot, make sure that you’re in the right place, at exactly the right time, with your camera set up to take pictures in that particular shooting situation.
Knowing what you want to accomplish in advance and then preplanning your shots as much as possible can help to ensure that you properly set up your GoPro camera and have the right housing, mount, and accessories on hand.
Following are picture-taking strategies that you can use to make your intended subjects appear in focus, vibrant, and visually interesting. Of course, these are only suggestions.
After you become better acquainted with your camera’s various photo-related features and functions, use your own creativity when selecting your shooting strategies to acquire the best shots.
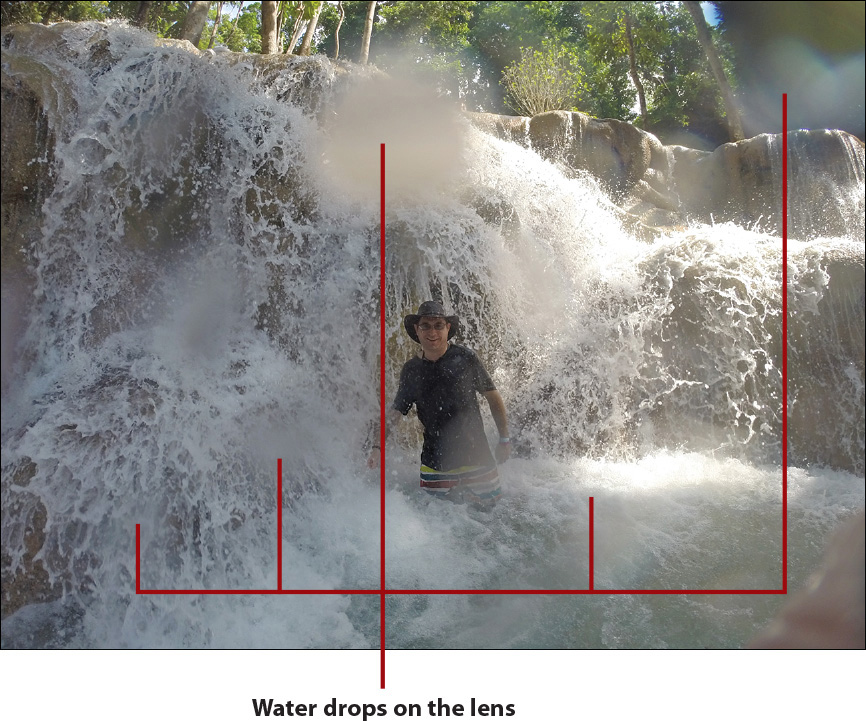
Shoot Action from a First- or Third-Person Perspective
One of the best uses of a GoPro camera, compared to a traditional point-and-shoot camera, is the ability to attach the camera directly to yourself or your equipment, so you can capture photos or videos of yourself engaged in an activity and shoot from a first- or third-person perspective.
First-person perspective means you mount the camera to yourself or your equipment and point it forward or backward. Thus, what’s captured in photos is exactly what you see. However, you do not appear in the actual photos.
Using an optional extension pole, for example, or depending on how you mount your camera on your equipment, you can position the camera to capture yourself in the shots as you engage in an activity. This enables you to shoot from a third-person perspective.
If you opt to use your camera for this purpose, to achieve the best results, consider these strategies:
• Choose the best shooting perspective. If you mount the camera on your chest or head, for example, this slight height difference can impact how your photos ultimately look.
• Make sure you can control your camera. If you mount the camera on yourself and you plan to engage in an activity, you must be able to press the camera’s Shutter button easily. Consider using the Smart Remote and wearing it on your wrist, for example. Another option is to have someone remotely control the camera that’s mounted to you or your equipment. This is easily done using the GoPro mobile app (via a smartphone or tablet) or the optional Smart Remote.
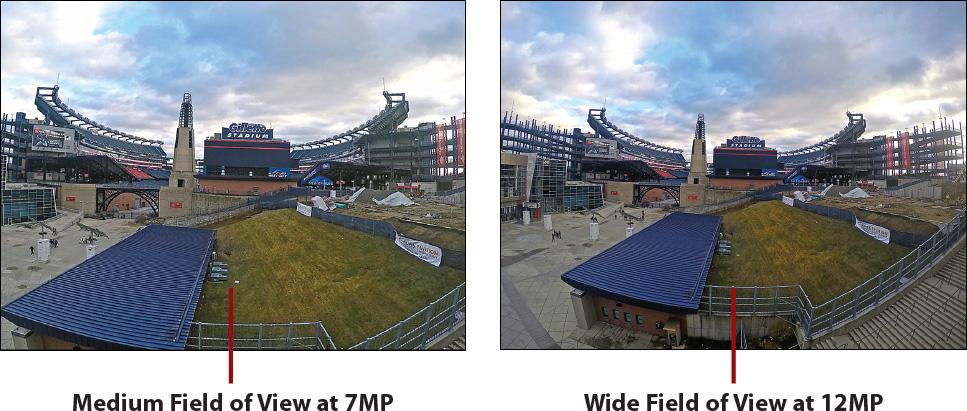
• Frame your shots. Based on how you mount the camera, this determines what appears in your photos. Changing the shooting resolution and switching between the Wide and Medium Field of View can impact how much of what’s to the sides (and in the foreground) of your subject appears within your shots, and whether the fisheye effect impacts your shots.
Take Interesting Pictures of People
Because your camera has a Wide Field of View, if you move in too close to your subject, the fisheye effect typically appears in your photos. Thus, if you want to capture a close-up of your subject, you need to stand at least a few feet away, shooting at the highest resolution possible (12MP Wide if using a Hero4), and then cropping the image after the fact. Shooting at 7MP Medium reduces the fisheye effect but also results in a lower resolution image that showcases less detail.
Meanwhile, if you position the camera in landscape mode (horizontally), you can capture your intended subject in the shot but also capture a lot of background (what’s behind and to the sides of your subject). This allows you to better showcase where the photo was taken.
However, if you want the main focus of your shot to be your subject and the background is less important, consider shooting with the camera positioned in portrait orientation (vertically), so less emphasis is put on what’s in the background.
In general, when taking pictures of people, the primary focal point of the image, or what people viewing the image will pay the most attention to, is probably your subject’s face.
If the subject is not looking directly into the camera, however, the focal point of the image becomes more about what the subject is doing in the photo.
Assuming you’re not going for something more candid, which is more difficult but can capture more genuine emotions and natural actions, you can tell people where to look, how to pose, and what they should be doing when you press the Shutter button to snap a photo.
Capture the Perfect Selfie
Using a GoPro camera, the easiest way to take a selfie (taking a photo of yourself) is to use an optional extension pole.
1. Attach the camera to the pole mount.
2. Position the camera toward yourself and smile.
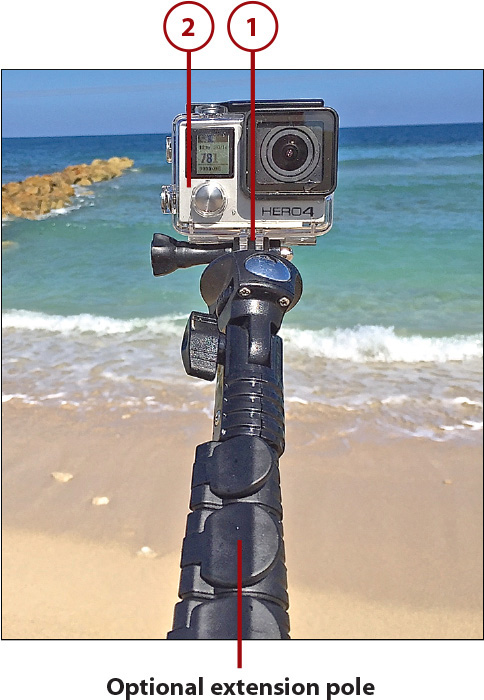
3. Snap a photo by pressing the camera’s Shutter button, the Shutter button on the Smart Remote, or the Shutter icon within the GoPro App. When using a pole mount, controlling the camera with the Smart Remote is usually easiest.
Shooting Angle Matters
If you hold the camera facing toward you at about eye level, whatever is directly behind you will appear in your photo. If you hold the camera at a height above your head and shoot at a downward angle, the background in your image will be more of what’s on the ground behind you. Likewise, if you hold the camera at waist level and shoot in an upward direction, your background will showcase more of what’s above you.
Photographing Animals and Pets
When taking photos of animals that are not in motion, you can typically achieve the most visually interesting results if the animal is looking directly into the camera as you snap the photo. In these situations, try to focus on, or frame your shots around, the animals’ eyes because it’s through their eyes that animals showcase emotion.
To capture an animal in motion, position yourself as the photographer so that the animal is moving into your shot or moving toward the camera. Taking photos of animals from unusual perspectives or while the animal is engaged in a funny or unusual activity often results in a visually interesting photo.
Capture a Fast-Moving Subject
If you use your GoPro like a traditional camera and take photographs of a subject that’s in front of you (the photographer), there are a few tricks to getting great shots when your subject is in motion but you’re not.
• Anticipate the movement of your subject, and plan accordingly for your shots. Ideally, you want to capture your subjects as they enter the frame of your shot, not exiting from it.
• If your subject isn’t moving from right to left (or left to right) across the frame, try to capture the subject moving directly toward the camera, instead of away from it.
• Utilize the Burst mode that’s built in to the camera if you need to capture a particular moment as your subject is moving. For example, as a basketball player is about to shoot a basket. Using the Burst mode, you can capture multiple shots in quick succession and capture the exact moment you need or want. You can always delete the extra shots later.
• Follow the moving subject by moving the camera at the same speed, and in the same direction, if possible. The subject will appear in focus, but the background will blur, which showcases motion.
Take Great Pictures of Your Child’s Event
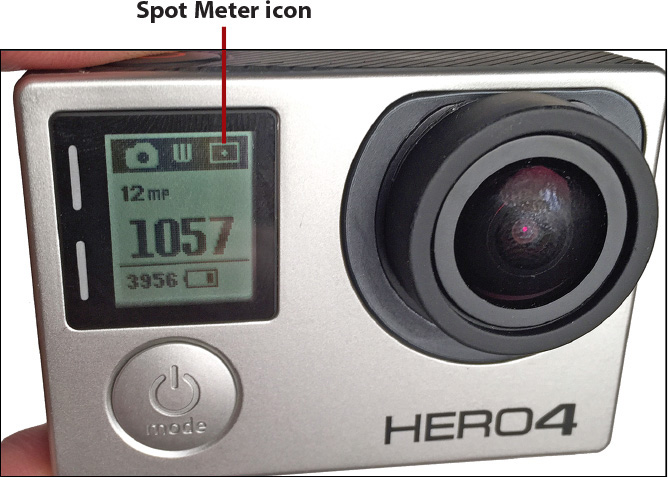
When you encounter a situation in which you, as the photographer, are in a low-light or a dark area but your subject is in front of you and well lit, be sure to turn on the camera’s Spot Meter option prior to taking a photo.
Spot Meter works well if you’re in the audience of a show or concert, for example, where the stage and the performers, which in this case are your subjects, are well lit.
When the Spot Meter feature is turned on, the Spot Meter icon appears on the camera and Smart Remote’s Status Screen. A similar icon also displays within the GoPro App.
Shoot Visually Interesting Objects
The Wide Field of View offered by the GoPro cameras can capture massive buildings or large structures, which is relatively simple. However, instead of shooting a building, landmark, or piece of architecture from a head-on perspective, your photos can often look more interesting if you shoot them from an angle.
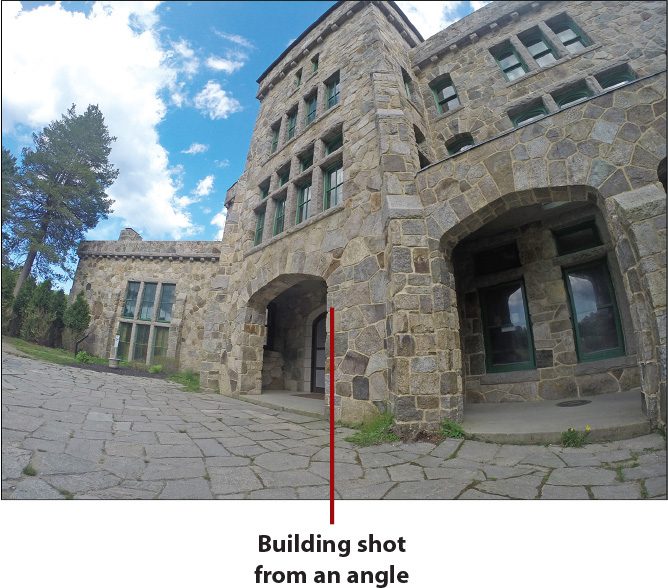
If your photos show a fisheye effect due to the camera’s wide lens, move farther away from your subject, or fix this effect after you take the photo by using the GoFix or Lens Corrector app on your mobile device or the appropriate tool offered by your photo editing software.
More About the Fisheye Effect
You can find more information about the optional GoFix and Lens Corrector apps for the iPhone and iPad in Chapter 15, “Using the GoPro Mobile App.”
Take Vivid Underwater Photos
Taking underwater photos with a GoPro camera is one of the situations for which this camera was specifically designed. However, before exposing your camera to water, make sure it’s properly enclosed within either a Standard Housing (with a Standard Backdoor) or a Dive Housing (with a Standard Backdoor).
When snorkeling or swimming, your camera uses the ambient light from the sun that comes from the surface. If you take pictures of fish or coral, try to position yourself above your subject so that the sunlight from the surface shines from behind the camera and shines evenly onto your underwater subject.
If you try shooting from below your subject toward the surface, the light from the surface typically generates a silhouette effect around your subject, which greatly reduces the amount of detail you’ll see.
When scuba diving or taking pictures at depths of more than a few feet underwater, consider using an optional colored filter over your camera’s built-in lens. GoPro, as well as several other companies, offers red or magenta filters for color correction when shooting in the ocean or at depths of more than a few feet underwater. The optional filter you should use depends on the depth you shoot at and the water’s natural color.
Choose the Right Underwater Lens Filter
GoPro’s Red Dive Filter ($69.99) works best underwater when filming in blue salt water or clear fresh water, at a depth between 15 and 70 feet. GoPro’s Magenta Dive Filter ($69.99) works better in greenish colored water, at a depth between 15 and 70 feet.
Polar Pro Filters (http://polarprofilters.com) offers a selection of optional lens filters designed for underwater photography. These filters work with GoPro’s Dive Housing and are priced starting at $29.99.
Setting Your Camera to the Best Mode for Your Shooting Situation
To shoot digital images (instead of video), you can set your GoPro camera to Single, Continuous, Night, Burst, Time Lapse, or Night Lapse shooting mode when using a Hero4. You can also turn on or off the Spot Meter and Protune features, as well as adjust the Megapixel Resolution of your shots.
Based on the Resolution you select, you can sometimes choose between a Medium or Wide Field of View. Using these various photo-related settings and options, choose what’s best for each particular shooting situation, based on what your subject is doing, the available light, and various other factors (including your own creativity).
Sometimes, Several Different Setting Configurations Work Equally Well
As the photographer, you’ll often be confronted with shooting situations in which two or more different camera configurations will work fine. In these cases, it is a matter of making a creative decision to determine how you want your photos to ultimately look.
Take Advantage of Burst shooting mode
Burst shooting mode is best used when you shoot a fast-moving subject. Based on how you set up this feature, when you press and hold down the Shutter button, you can take 3, 5, or 10 photos per second. Using the Hero4 (with the February 2015 Camera Software update), it’s also possible to shoot 30 frames in 6 seconds.
When using this Burst shooting mode feature, you can adjust the Megapixel Resolution, and if you use a Hero4, for example, also select between a Medium and Wide Field of View when shooting at 7MP resolution.
Why Burst Shooting Mode Is Ideal for Fast Action
If you know an action is about to happen, preset the camera to Burst mode, and then press the Shutter button 1 or 2 seconds before the wanted action starts, and hold it down until the action finishes.
Then, choose the single photo that best showcases the exact moment or action you want to depict. Photos taken even a fraction of a second apart often look noticeably different.
With the Burst shooting mode, you also have the option of turning on or off the Spot Meter and Protune feature.
Don’t Forget About Your Hero4’s Multi-Shot Options
The Multi-Shot options enable you to set up your camera to automatically snap photos at a particular time interval and determine how long the camera’s lens shutter stays open for each shot. From the Settings menu, you can adjust the Megapixel Resolution, as well as turn on or off the Spot Meter and Protune feature.
When you tap on the Shutter option from the Settings menu, you can determine how long the camera’s lens shutter remains open for each shot. This, in turn, determines how much light the camera can capture with your shot.
Your options include Auto, 2, 5, 10, 15, 20, or 30 seconds. The longer the camera’s shutter remains open, the more susceptible the camera becomes to your subject’s movement or camera movement. Even the slightest movement of the camera or your subject can potentially result in a blur appearing within your images.
Tips for Setting the Shutter Option
When using the Night or Night Lapse shooting modes, adjust the Shutter option to Auto to capture things such as sunrises or sunsets, or when taking photos outside at dawn or dusk.
When you shoot in low light but take pictures of things such as cars with their lights on, fireworks, or a neon sign, for example, try adjusting the Shutter to 2, 5, or 10 seconds, while holding the camera still by mounting it on a tripod.
Use a longer exposure, between 20 and 30 seconds, to take photos of the night sky, the moon, and stars, for example, where there is little light and motion. Again, a tripod or mount is required to hold the camera still.
By tapping the Interval option that displays on the Settings menu, under the Multi-Shot heading, you can adjust the time interval your camera automatically snaps a photo until you turn off this feature. For example, if you choose the 15 second option, your camera will snap one photo every 15 seconds, starting when you press the Shutter button and continuing until you press the Shutter button a second time.
Your available options from the Interval submenu include Continuous, 4, 5, 10, 15, 20, or 30 seconds, as well as 1, 2, 5, 30, or 60 minutes.
When Turning On Protune Can Benefit You
For taking digital photos with your Hero4 (or another GoPro camera that offers a Protune feature for taking digital photos), the Protune feature offers a handful of additional options that enable you to have more manual control over your camera’s settings.
When you turn on the Protune feature that’s related to Photo or Multi-Shot options, the Settings menu expands and offers a White Balance, Color, ISO Limit, Sharpness, and EV Comp option, each of which has a submenu associated with it.
You can set up separate Protune-related settings for the Video, Photo, and Multi-Shot modes. Unless you need to customize Protune-related settings to capture the perfect shot, and you fully understand how adjusting one or more of these options can impact your shots, you should leave the Protune feature turned off and rely on your camera to automatically make adjustments as needed on your behalf.
Shooting Resolution Considerations
Your Hero4 camera can shoot at 5MP, 7MP, or 12MP resolution. A shot taken at 5MP resolution uses 5 million individual pixels within each digital image. This shooting resolution uses a preset Medium Field of View.
Shots taken at 5MP resolution also use the smallest file sizes but capture less detail, depth, and color vibrancy in your photos. Depending on what you shoot, if you compare the same subject shot at 5MP and 12MP resolution, you’ll probably see a difference in the subtle detail captured within your image.
Resolution Matters When Editing Photos
By shooting at a higher resolution, you can make better use of your photo editing software to edit and enhance your images after they’re shot. For example, if you opt to use the Crop tool to zoom in on a small subject within a photo, the cropped area you select will stay clear, detailed, and in focus. But at lower resolutions, the cropped portion of an image could become pixelated.
When using the Hero4, shooting at 7MP resolution offers decent detail, color vibrancy, and depth, plus enables you to choose between a Medium or Wide Field of View.
Shooting at 12MP resolution, using the default Wide Field of View, you can capture the highest quality digital images possible using your camera. Each digital photo requires significantly more storage space within your camera’s memory card, and later on your computer’s hard drive, or the internal storage of your mobile device.
Reducing Resolution After the Fact Is Easy
When you shoot at 12MP (Wide) resolution using the Hero4, when later using the photo editing software on your computer or mobile device, it’s easy to reduce the image’s resolution (and image quality).
However, you cannot easily increase the resolution of a shot after the fact. Thus, you can’t shoot at 5MP resolution and then easily increase that photo’s resolution to 12MP without using costly and typically difficult-to-use, professional-caliber photo editing software.
In general, always take photos at the highest resolution your camera offers, unless you have a specific reason to shoot at a lower resolution, and know you do not need the image quality of shooting at a higher resolution.
Using a Viewfinder with Your Camera When Taking Photos
As a photographer, framing your shots within a viewfinder enables you to see exactly what you’re shooting in real time. Because your GoPro camera does not have a built-in viewfinder, you can either forgo planning and framing your shots altogether, or use one of the camera’s viewfinder options.
For example, invest in the optional LCD Touch BacPac display to use this accessory’s full-color viewfinder that fits onto the back of the camera. Yes; this does increase the thickness of the camera and drain the camera’s battery life faster, but it also enables you to see exactly what you’re shooting.
Another alternative is to use the GoPro App that runs on your smartphone or tablet as your viewfinder. This method works best if you have the camera attached to yourself or your equipment, and the back of the camera is otherwise blocked or inaccessible.
Using the GoPro App, you can frame your shot and then either control the camera’s Shutter button from the camera or from the app, depending on your shooting situation. Even if you don’t use a viewfinder while you shoot, having a viewfinder can help you initially position your camera when using a mount to ensure it’s angled correctly based on the shooting situation and the results you want to achieve.
A Viewfinder Is Not Always Needed
If you have the GoPro mounted on your body or vehicle, for example, and the camera faces forward, what it captures when you press the Shutter button is whatever is in front of you. In this case, having access to a viewfinder isn’t necessary.
Based on a particular shooting situation, choose which viewfinder option will work best, and which will allow you to frame your shots based on the situation.
Tilting the camera at a slight angle can impact the appearance of your image dramatically. Thus, it’s often better to see a preview of exactly what you’ll be shooting, instead of guessing, and then see what the camera actually captured within the frame after the fact, when it may be too late to do a reshoot.
Selecting the Most Appropriate Housing and Mount
To choose the best camera housing, follow these basic guidelines:
• If you shoot in or around water, encase your camera within a Standard or Dive Housing to ensure that it’s waterproof and resistant to extreme temperatures.
• If you shoot in a clean, dry, and calm area, consider using the optional Frame Housing. This enables you to keep the camera’s lens totally uncovered. However, this housing does come with a Protective Lens Filter to place directly over the lens for added protection against physical damage. Remember, the Frame Housing offers no waterproof protection whatsoever.
• If you want to make your camera as inconspicuous as possible, especially when shooting in low-light situations, consider using the Blackout Housing, instead of the Standard Housing.
Learn More About Housings and Mounts
Refer to Chapter 3, “Overview of GoPro Camera Housings,” and Chapter 4, “Overview of GoPro Camera Mounts,” respectively, for more information about the various optional camera housings and mounts available for your GoPro camera.
Paying Attention to Your Primary Light Source
As the photographer, you must always pay attention to your primary light source. When shooting outside, your light source is typically the sun. Inside, your primary light source might be a floor lamp, overhead lighting, candles, or flames from a fire in a fireplace.
Ideally, you want to position your primary light source behind you, the photographer, so that it’s shining as evenly as possible onto your subject.
If the light is positioned in front of the camera, you have glare and possibly an overexposed image, and your subject may appear as a silhouette. Thus, the detail you see in your photos will be compromised.
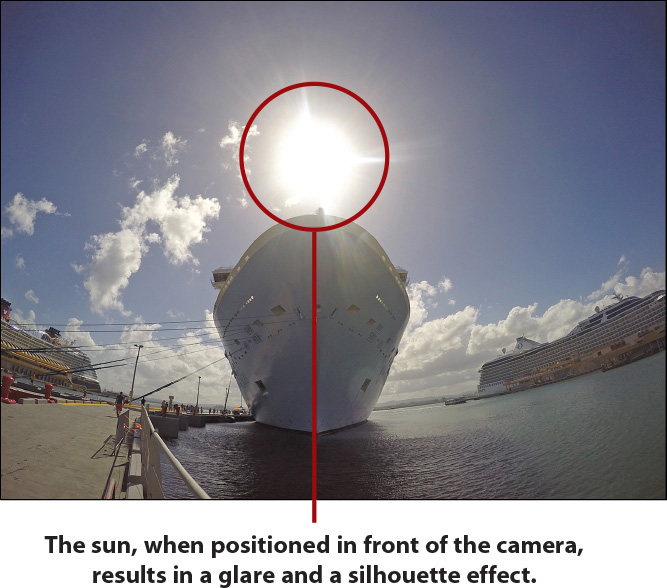
Meanwhile, if the primary light source shines unevenly on your subject, this can cause unwanted shadows on or around your intended subject. Shadows that appear in your photo can be annoying to look at and make your photos appear unprofessional.
Pay attention to how the primary light source casts light upon your subject, and if you notice unwanted shadows, reposition yourself (the photographer) and/or your subject to better use the light.
Using the Rule of Thirds When Framing Your Shots
Most amateur photographers tend to center their subject in the viewfinder and then shoot that subject from a head-on perspective. The Rule of Thirds is a basic photography strategy that encourages you, the photographer, to move your intended subject away from the center of the frame.
To use the Rule of Thirds, you need access to a viewfinder to frame your shots, which means using either the LCD Touch BacPac or the GoPro mobile app.
As you look at your viewfinder and frame your shot, imagine that a tic-tac-toe style grid is superimposed over your viewfinder. This grid shows nine boxes. The center box represents the center of the frame where you’d typically position your intended subject.
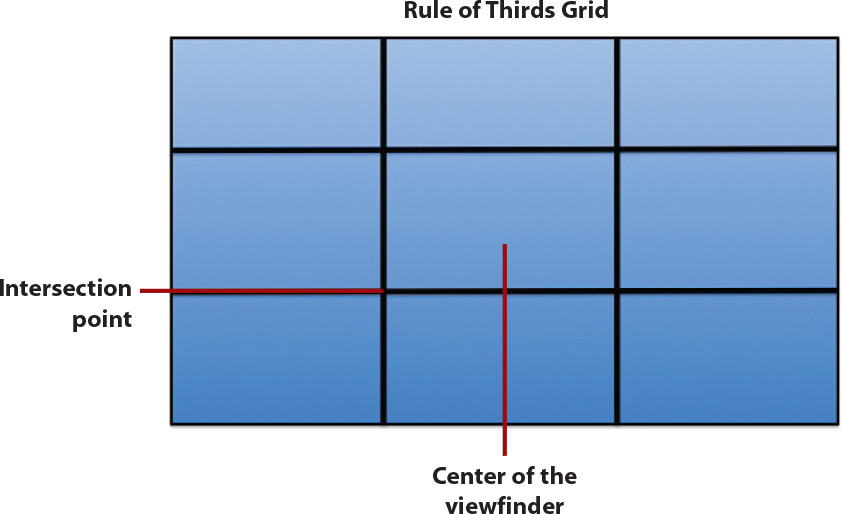
Reposition the camera so that your subject is lined up along one of the grid’s horizontal or vertical lines, or the focal point of your subject is positioned over one of the intersection points of the grid. In other words, move your subject away from that center square, as shown in the following examples.
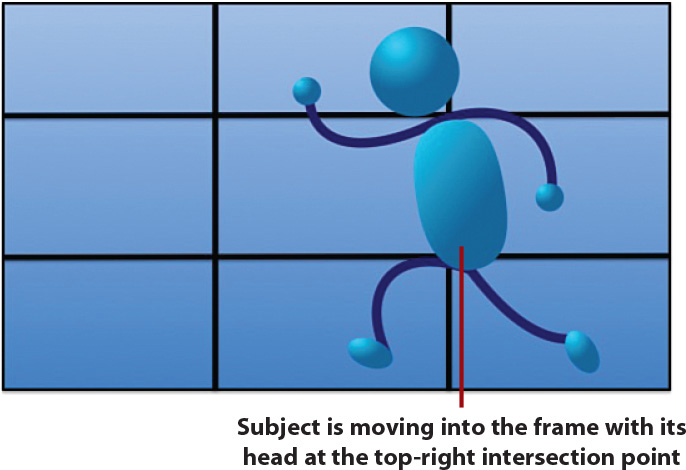
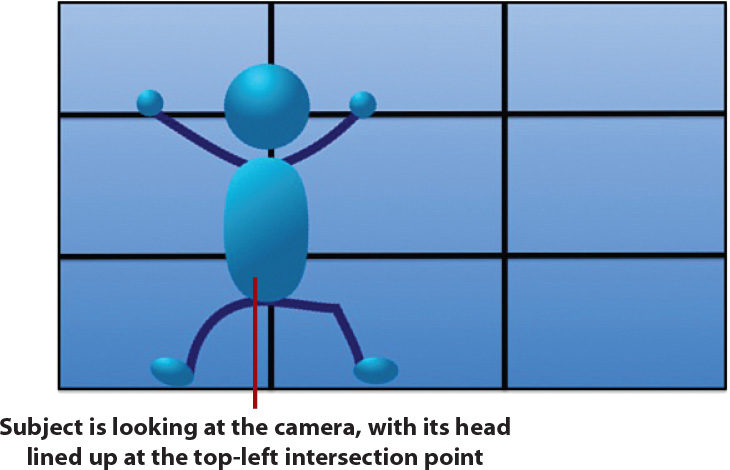
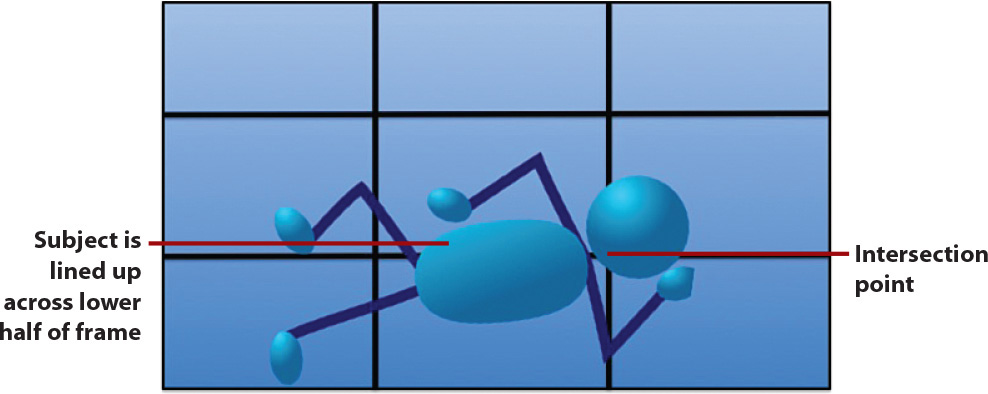
When taking a picture of a person, center the subject’s face at one of the intersection points of the grid. If you shoot a large object, you can line up the subject along one of the grid’s horizontal or vertical lines.
Ultimately, you can capture more visually interesting photos if you position or mount the camera at an angle, from above, below, or to the side of your subject. Also consider shooting from a diagonal perspective. Keep the Rule of Thirds, the shooting perspective, and the position of your primary light source in mind as you frame your shots. Also use your creativity to choose an interesting shooting angle.
Choosing a Visually Interesting Shooting Perspective
If you will be mounting the camera to yourself or your equipment while taking pictures at the same time you’re engaged in some type of activity, you can choose between shooting from a first- or third-person perspective. Alternatively, you can position the camera on a tripod or have someone else serve as the photographer and then use the camera just as you would any point-and-shoot camera.
Imagine you’re on a bicycle. Using GoPro’s optional Handlebar/Seatpost/Pole Mount ($19.99), you can easily and securely attach the camera to the handlebar of your bike. Then, if you position the camera facing forward, you can shoot from a first-person perspective. What you see in front of you will be in your shot, but you, as the photographer and bike rider, will not appear in the photos.
However, if you position the camera facing backward from the handlebars, you appear in your own photos, and what’s in the background will be what’s behind you as you’re riding. Both are valid perspectives depending on the visual story you want to tell.
Yet another option is to mount the camera on the back or side of the bike, facing forward, so that it captures some of you (the rider), as well as what’s ahead of you.
Properly Handling Low-Light Situations
The latest GoPro camera models, especially the GoPro Hero4, offer shooting modes that enable you to capture clear images, even in low-light situations. However, when shooting in low light, be sure to incorporate these shooting strategies:
• Turn on Night shooting mode. This enhances the clarity of photos by allowing more ambient light to be captured within each shot.
• Hold the camera still when pressing the Shutter button. (Consider using a tripod or mount. Even the slightest movement can cause blurs in low-light situations.)
Editing Your Digital Photos After They’ve Been Shot
After your images are shot using a GoPro camera and they’re stored within the camera’s microSD memory card, you can then transfer those images to your primary computer or mobile device. At this point, use photo editing software on your computer or a photo editing app on your mobile device to crop, rotate, edit, or enhance an image using editing tools and special effect filters.
Using the Crop tool, it’s easy to reframe an image by getting rid of unwanted background, or by selecting your intended subject and using the Crop tool to simulate a camera’s zoom feature.
You can also add one or more special effect filters to images to subtly or dramatically alter their appearance. Or you can use a series of individual editing tools to adjust specific aspects of a photo, such as its lighting, color, contrast, or saturation.
If you hold the camera at a weird angle while taking a photo, many photo editing applications enable you to easily straighten an image or rotate it clockwise or counterclockwise at a particular angle.
Photo editing software comes bundled with all Mac and Windows-based computers. However, there are many optional photo editing software packages available, such as Photoshop Elements (www.adobe.com/products/elements-family.html), Google Picasa (http://picasa.google.com), Corel Paint Shop Pro (www.corel.com), and Pixelmator (www.pixelmator.com).
There are also literally hundreds of photo editing applications available for the Apple iPhone and iPad, as well as all Android and Windows Mobile smartphones and tablets. Each of these photo editing software packages or mobile apps offer a different selection of photo editing and enhancement tools and features, so choose one that offers the toolset most useful based on your needs.