2. Getting Started with Your GoPro Camera
In this chapter, you learn all about the GoPro camera. Topics include the following:
![]() An overview of the camera’s buttons, ports, and Status Screen
An overview of the camera’s buttons, ports, and Status Screen
![]() How to set up the camera to shoot photos or video for the first time
How to set up the camera to shoot photos or video for the first time
![]() More information about controlling the camera remotely
More information about controlling the camera remotely
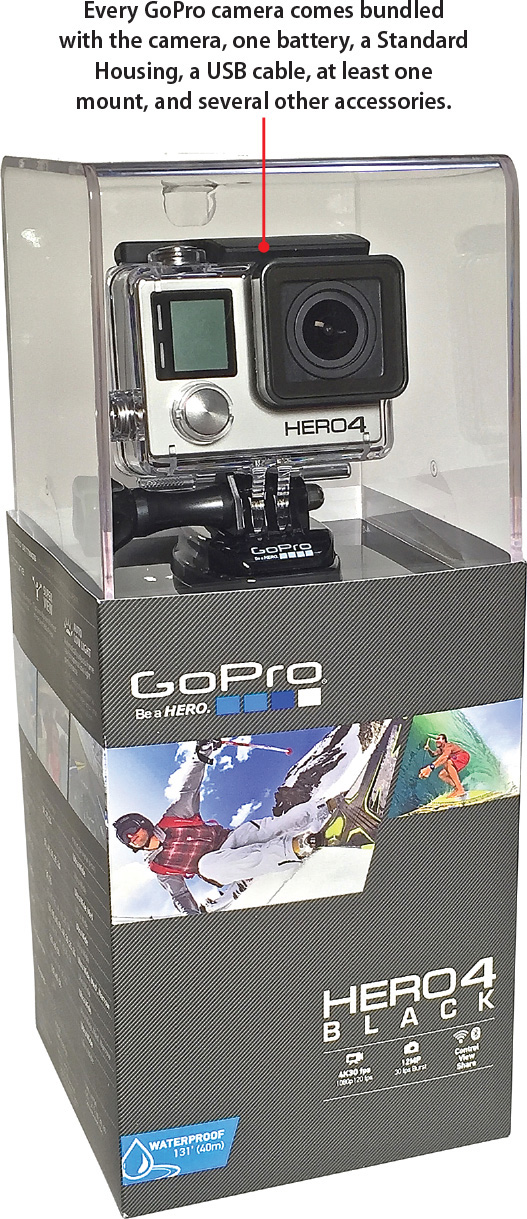
Your GoPro camera comes packaged with almost everything you need to start shooting photos or videos. However, depending on which camera model and bundle configuration you select, the contents in the box vary, and additional equipment and accessories are required.
The GoPro Hero4 Black, for example, comes with the camera, a Standard Housing, one rechargeable battery, two basic mounts, a three-way pivot arm (which works with a mount), two Quick Release Buckles (one for each mount), a USB cable, and a Skeleton Backdoor for the housing.
Other Hero4 bundles, such as the Hero4 Black/Surf and Hero4 Black/Music, are available from GoPro and include different mounts and accessories.

Memory Card Not Included
What’s not included with the camera is the required microSD Memory Card. You learn more about microSD Memory Cards in Chapter 6, “Choosing the Best Memory Cards for Your GoPro Camera.”
Overviewing the GoPro Camera’s Body
The GoPro camera is tiny and lightweight. The Hero4 weighs just 3.1 ounces. (Other models weigh less.) However, it’s packed with technology and comes preinstalled with a robust operating system.
Before you begin taking photos or shooting video, you must become acquainted with the camera so that you know how to prepare it to get the best possible results.
The Front of the Camera
The front of most GoPro camera models, including the Hero4 (shown here without a housing) contains four important components: the lens, the LCD Status Screen, the camera’s Power/Mode button, and two Status Lights.
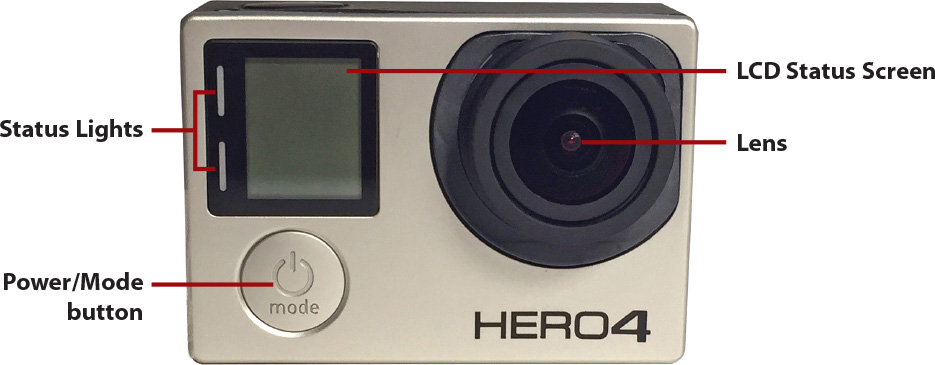
• Lens: All models of GoPro are equipped with a fixed, ultra-wide lens. The lens is designed to capture photos or videos with an extremely wide field of view; although, some of its shooting modes enable you to switch from ultra-wide to a medium or narrow field of view. There is no zoom feature built into the lens.
• Power/Mode button: Use the circular silver button on the front of the camera to turn on the camera’s power and to manually switch between the main shooting modes and options, such as Video, Photo, Multi-Shot, Playback, and Settings.
• LCD Status Screen: Using text, numbers, and tiny graphic symbols, this display showcases information related to what your camera is currently set to do.
• Status Lights: There are two small, colored LED lights on the front of the camera. The blue light is the Wireless Status (if applicable). The red light indicates the Camera Status. Depending on your camera model, the appearance of these lights varies slightly. The camera often generates audible beeps in addition to using these Status Lights.
The Back of the Camera
On the back of some GoPro camera models is a door to the battery compartment, as well as the camera’s proprietary Hero Port, which allows you to connect either the optional LCD Touch BacPac or Battery BacPac accessory. For example, the Hero3+ model has this configuration. You can also find another red LED Status Light.
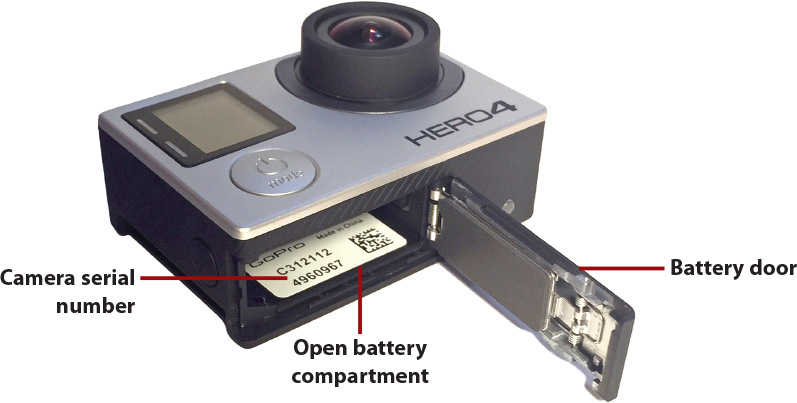
Bottom Battery Access
The battery compartment access for the Hero4 is on the bottom of the camera.
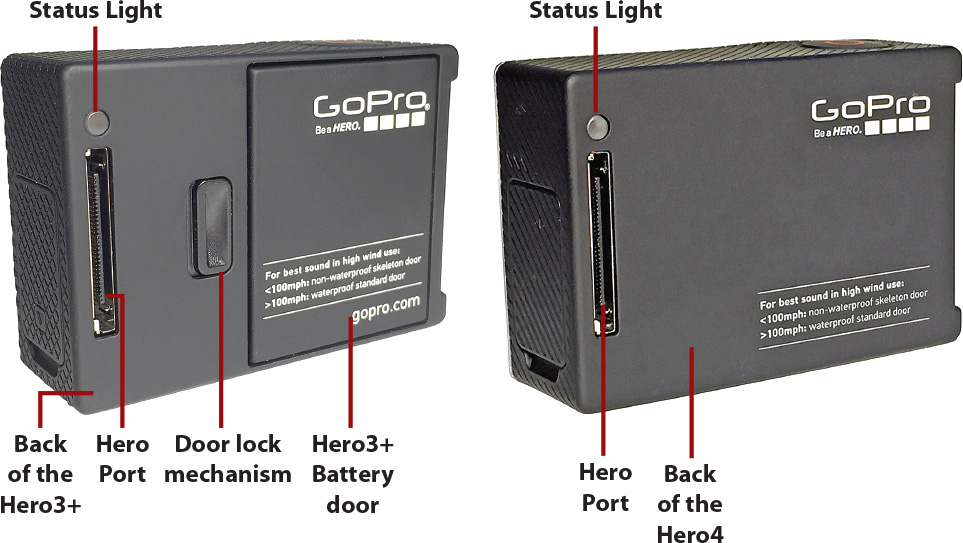
• Battery compartment: Most of the GoPro cameras are powered using small interchangeable and rechargeable batteries. On some camera models, including the Hero3+, access to the battery compartment is located on the back of the camera. Use your finger to move the lock mechanism from right to left, and then remove the battery door to access the battery compartment.
• Status Light: This is one of four red camera Status Lights located on the camera’s body. All the red camera Status Lights indicate the same information but are visible from different angles while you use the camera.
• Hero Port and corresponding latch: Connect the GoPro LCD Touch BacPac or Battery BacPac to the back of your camera by first lining up either accessory’s latch with the camera’s port latch and then inserting the accessory’s port connector into the camera’s Hero Port.
One Battery Isn’t Always Enough
The GoPro camera comes with one battery. Due to the relatively short battery life each offers, you should consider investing in at least one or two additional batteries to extend your available shooting time. Be sure to purchase the appropriate batteries for your specific camera model.
You can find more information about using the GoPro camera with its rechargeable batteries, and where to acquire additional batteries that are compatible with your camera in Chapter 7, “Keeping Your Batteries Charged.”
The Right Side of the Camera
With the front of the GoPro camera facing toward you as you hold it, on the right side of the camera’s body is the port door. Remove this door to reveal several of the camera’s ports, as well as the microSD Memory Card slot.
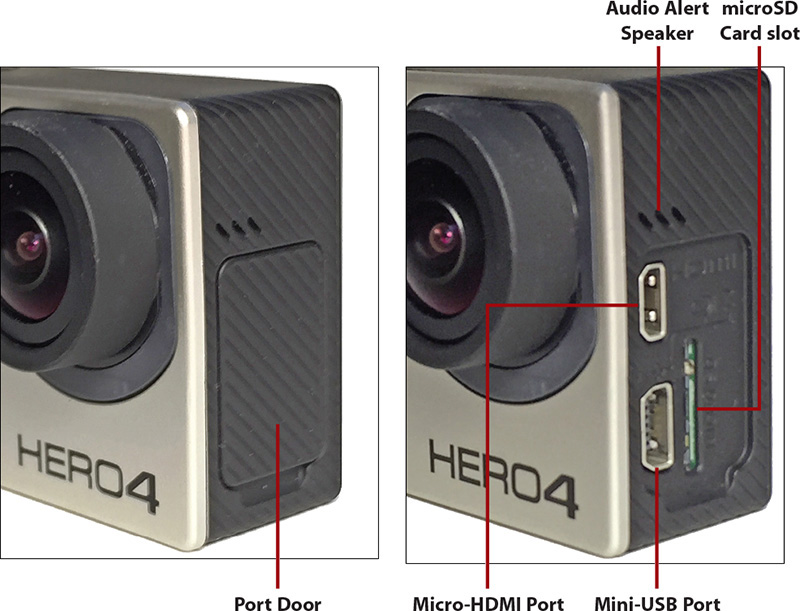
• Micro-HDMI Port: Using an optional cable (sold separately), you can connect your camera directly to an HD television to view the digital photos and video files that are stored on your camera’s memory card while the card is still in the camera.
• Mini-USB Port: The USB cable that came with your GoPro camera works with this port. After you use this cable to connect your camera directly to your computer, you can recharge your camera’s battery or transfer photos or video stored within the camera’s memory card without first removing the card from the camera.
• microSD Memory Card slot: Before you begin shooting, a microSD Memory Card (sold separately) must be inserted into the camera. This is where your digital photos and video are stored until you transfer them to your computer or mobile device where you can view, edit, and permanently store them. After a memory card is full, you can insert another card and continue shooting or transfer the content from the existing memory card to your computer or mobile device, reformat that card (to delete its contents), and then continue shooting on that same card.
Between the camera and a computer, the content transfer process requires the supplied USB cable. To transfer content between the memory card (that’s installed within the camera) and a smartphone or tablet, this process is done wirelessly via a Wi-Fi/Bluetooth connection and the GoPro App.
About microSD Memory Cards
As you’ll discover shortly, the microSD Memory Card to be used with your GoPro camera must have a Class 10 or UHS-1 rating and can have a capacity up to 64GB.
In addition to the card’s storage capacity, you also should consider its read/write speed. Be sure to read Chapter 6 before investing in memory cards.
The Left Side of the Camera
What’s on the left side of the camera varies slightly between camera models. On the Hero3+, for example, you can find the Wi-Fi On/Off button and a tiny Audio Alert speaker. On the Hero4, you can find the Settings/Tag button, as well as the latch to access the battery door (located on the bottom of the camera). Also on the Hero4, you can use the Settings/Tag button while you film video to manually mark key moments so that you can easily find them later when editing the content.
The Top of the Camera
Located on the top of the GoPro camera is the Shutter/Select button, another red Status Light, and a built-in microphone.
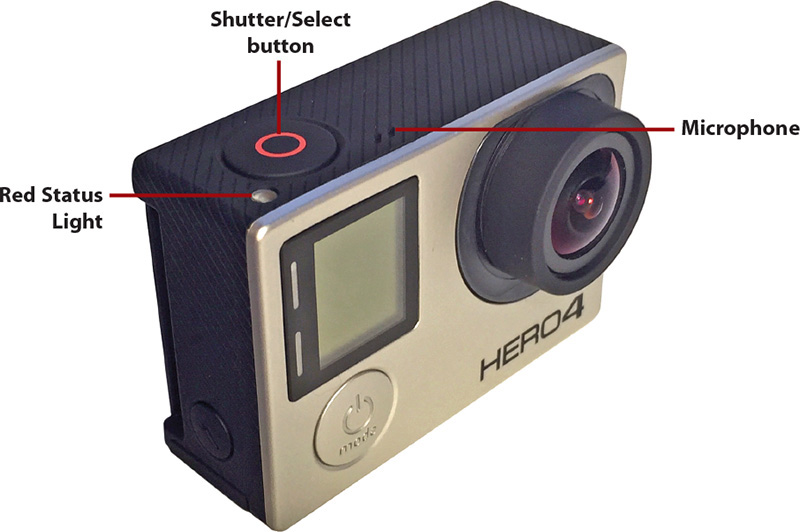
• Shutter/Select button: Use the Shutter/Select Button to snap each photo when the camera is in Photo mode (unless you’re remotely controlling the GoPro camera using the Smart Remote or GoPro mobile app). When the camera is in Video mode, the Shutter/Select Button starts and stops the recording process. When navigating through the menu options displayed on the Status Screen, use the Shutter/Select button to select and set a displayed menu option.
• Status Light: This is another of the four red Camera Status Lights located on the camera’s body. All the red Camera Status Lights indicate the same information but are visible from different angles.
• Microphone: When shooting video, your GoPro camera is designed to simultaneously record audio. You can use the camera’s built-in microphone for this purpose. To record audio with better quality, connect an external microphone to your camera via the camera’s Mini-USB port. However, to do this, in addition to an external microphone (sold separately), you need the optional 3.5mm Mic Adapter. You’ll learn more about this in Chapter 11, “Capturing Sound and Using Artificial Light While Shooting Video.”
The Bottom of the Camera
On the majority of the GoPro camera models, nothing is located on the bottom of the camera body. However, on the bottom of the GoPro Hero4 (shown here), you can find the door for the camera’s battery compartment.
To recharge your camera’s battery, you have several options. The USB cable is inserted into the camera’s Mini-USB port and can be connected to your computer (via its USB port), or to an optional wall charger ($39.99). An optional auto charger ($29.99) is also available for charging on the go.
An easier option is to purchase an external battery charger, such as GoPro’s Dual Battery Charger for Hero3+/3 ($29.99) or the Dual Battery Charger + Battery for Hero4 ($49.99). These chargers, which are available from the GoPro website (or authorized GoPro dealers), enable you to recharge two batteries simultaneously using a standard electrical outlet. The camera is not needed to charge the batteries when using an optional battery charger.
Thus, you can use one charged battery within the camera while you’re shooting and have two spare batteries charging simultaneously in the charger.
Many other, less expensive, single and dual battery chargers are available from third parties.
Battery Life
Depending on the GoPro model and specific camera features you use, the average battery life per charge will vary greatly. For example, the Hero4 can shoot 4K video at 30fps for approximately 1 hour per battery charge with the Wi-Fi/Bluetooth feature turned off. However, if you use the LCD Touch BacPac with the Hero4 camera, and Wi-Fi, the battery life is considerably shorter because these options require additional power to function.
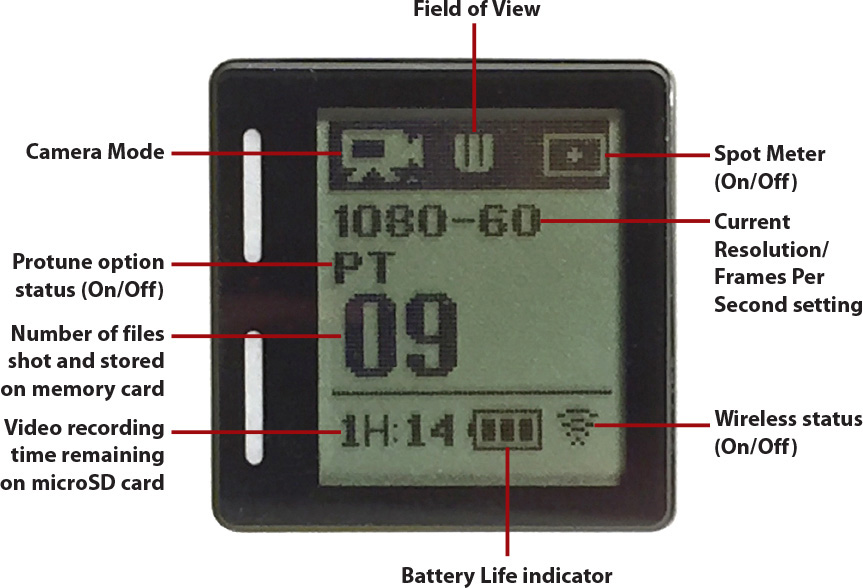
Exploring the LCD Status Screen
Whether you’re preparing your camera to shoot photos or video, or you’re actually engaged in the shooting process, the information that displays on the LCD Status Screen is important.
Status Varies Among Camera Models
The location and appearance of options displayed on the Status Screen, as well as what options are available from the various menus, vary based on the GoPro camera model you use, as well as which version of the Camera Software is installed. Menu options are also impacted by what optional equipment is connected to the camera. What you see here is meant to give a general overview. You’ll see more details in forthcoming chapters.
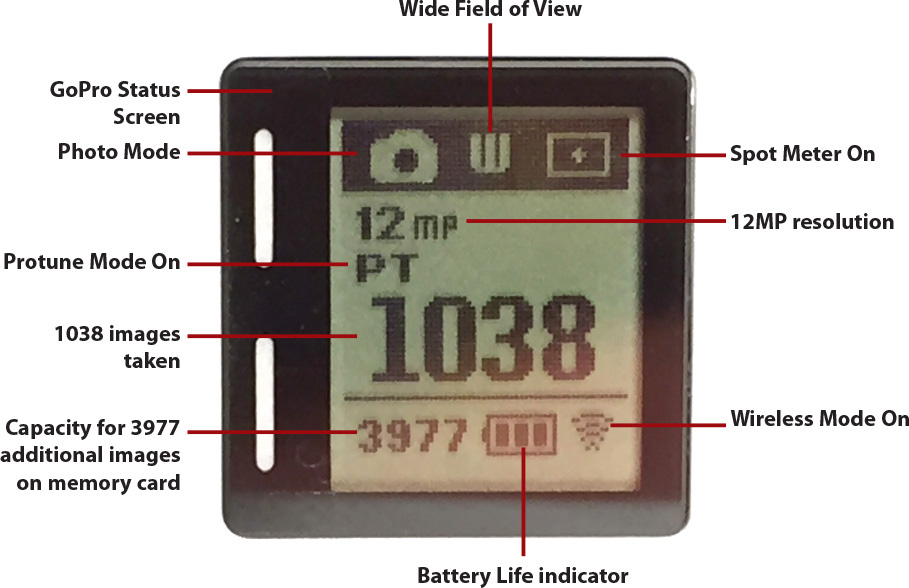
Depending on what you’re doing at any given moment with the camera, the Status Screen displays multiple pieces of information at once. The information can be in the form of text, numbers, and symbols. The figure included here shows an overview of the basic information and where it appears.
When you turn on the camera, its currently selected Shooting Mode displays, followed by details pertaining to that shooting mode. Press the Power/Mode button on the front of the camera to toggle between the Shooting Mode options, which include
• Video: Select this option to begin shooting HD video using the default video shooting options or options you previously set from the Settings menu.
• Photo: Select this option to begin shooting high-resolution digital photos using the default Photo options or options you previously set from the Settings menu.
• Shooting/Multi-Shot Mode: When shooting still images, the Power/Mode button switches between the Burst and Time Lapse shooting modes. You can customize these shooting options from the Settings menu.
• Playback: This main menu option is displayed only when your camera is connected directly to a television set or monitor (using an optional cable), or the LCD Touch BacPac is connected to the camera.
• Settings: From this menu, you can customize dozens of camera-related settings, as well as many options related to specific shooting modes and shooting resolutions. After you customize any of these settings, they’ll remain saved and active until you manually change them. For example, if you set up the camera’s default shooting mode to be Photo, anytime you turn on the camera, it will automatically be set to shoot still digital images in the resolution you’ve previously set.
When the wanted option or shooting mode displays on the Status Screen, press the Shutter/Select button to select and activate it.
Your GoPro camera utilizes a rather complex menu hierarchy, which gives you manual access to a wide range of camera features and functions directly from the camera. To make this a bit easier to understand, you learn about specific camera and shooting-related features and functions throughout this book, and how to adjust related menu options and settings in the context of their use.
The exact same information can be displayed on the Status Screen, Touch BacPac display, and within the GoPro App. However, it is much easier to customize the menu options and adjust camera settings using the LCD Touch BacPac display or the GoPro App from your smartphone or tablet.
When you use either of these alternate displays, the user interface showcases more information in an easier-to-understand format.
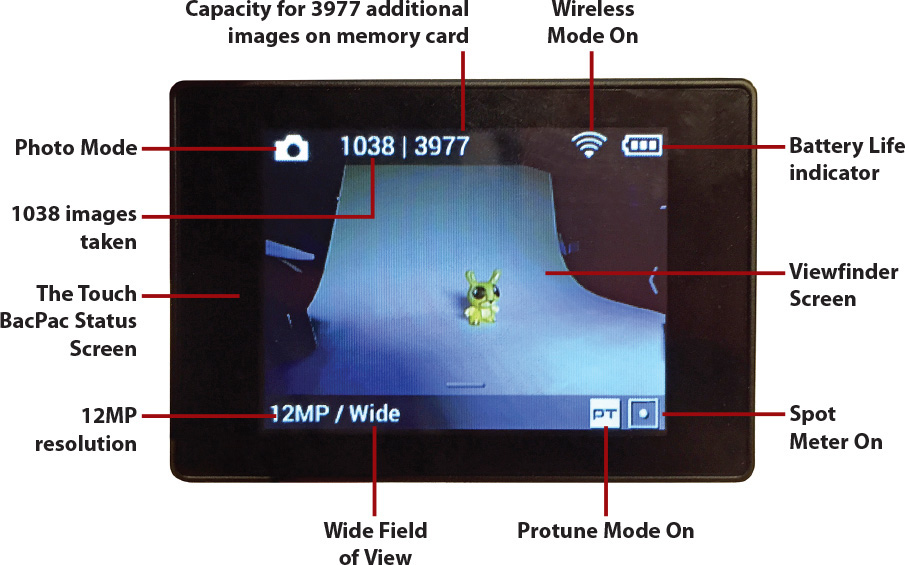
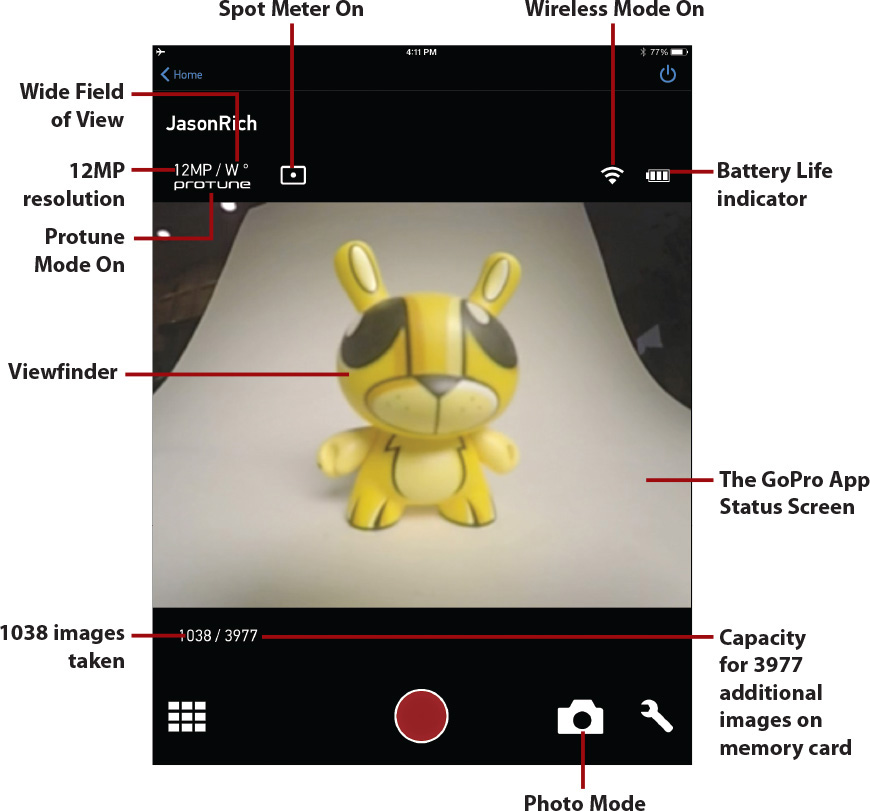
Shown in these three examples, the GoPro Hero4 camera is set to Photo shooting mode, at 12MP resolution, with a Wide Field of View. Wireless, Protune, and Spot Meter features are turned on for demonstration purposes to showcase these icons.
There are currently 1,038 images stored on the camera’s memory card, which has a current capacity of 3,977 images. (This changes if HD video is also stored within this memory card.) The battery level displays as a graphic.
The Status Screen that’s located on the front of the camera, as well as on the Smart Remote (which has an identical Status Screen), displays detailed information but typically uses confusing abbreviations and icons to best utilize the limited space on the screen.
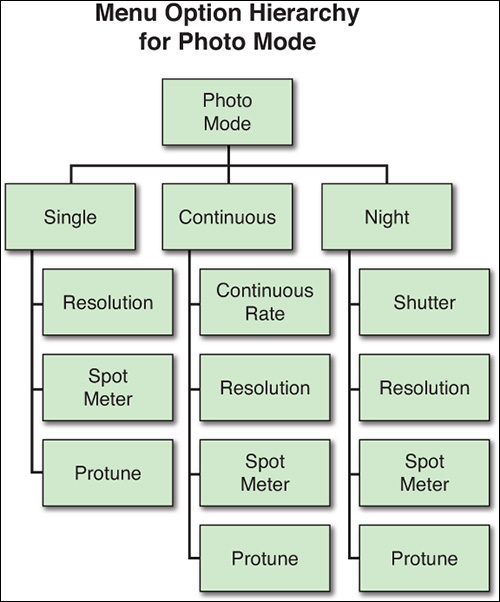
Your GoPro Camera’s Menu Hierarchy
The Hero4’s main menu has five options: Video, Photo, Multi-Shot, Playback, and Settings. These options each have submenus.
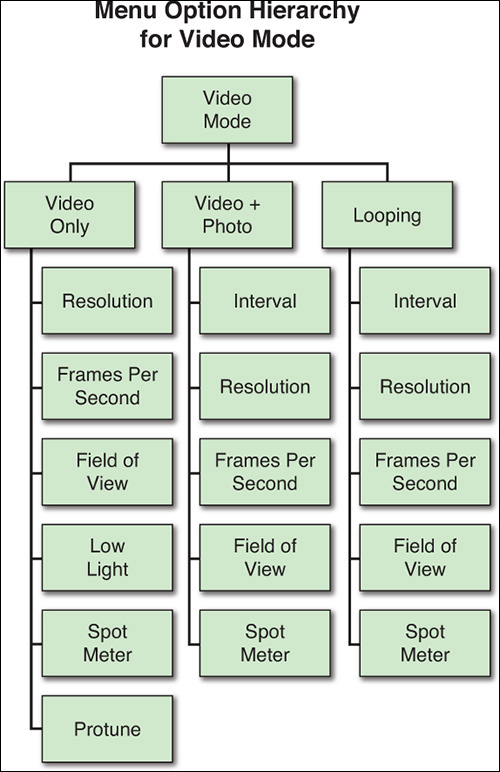
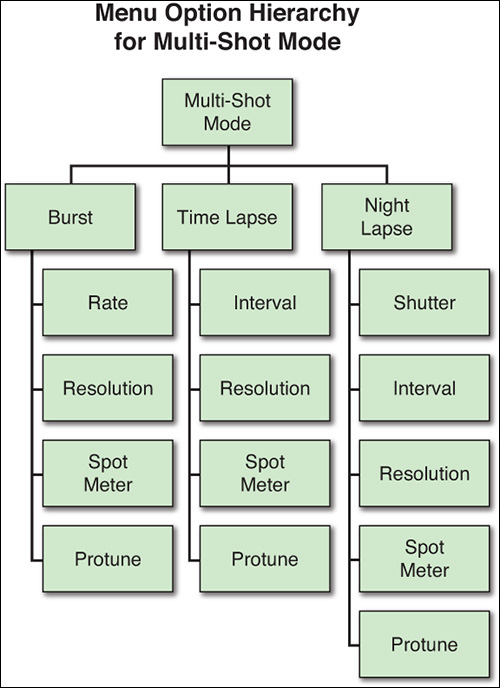
The following charts offer an at-a-glance summary that shows which features and functions can be selected, accessed, or modified from the Video, Photo, and Multi-Shot submenu options.
The Playback option has no submenus, and it only appears when the camera is connected to the LCD Touch BacPac display or a TV set. You can find more information about the Settings submenu options in Chapter 12, “Adjusting the Camera’s Setup Menu Options.”
Protune Has Its Own Submenu Options
For each shooting mode that Protune offers (which varies by camera model), you can adjust individual Protune-related settings, including White Balance, Color, ISO Limit, Sharpness, and EV Comp. These Protune-related settings can be set differently and saved separately for each shooting mode.
Keep in mind, the available menu options vary based on camera model and which version of the Camera Software is installed.
Status Lights Provide Useful Information About Your Camera
Your GoPro camera is equipped with four separate red LED Status Lights (located on different sides of the camera, including the front, back, top, and bottom), and depending on the model, one separate blue LED Status Light.
The Status Lights on the top and bottom of the camera can switch between red or blue, based on how the camera is being used. These red Status Lights visually indicate a variety of things, so you can see what your camera is doing from almost any angle.
For example, when you turn the camera on or off, the red Status Lights flash several times, and the camera simultaneously generates a few beeps. Then, if you start recording video, the red Status Lights flash continuously to indicate you’re currently filming.
Alternatively, when you snap a single digital image, the red Status Lights blink once, offering a visual indicator that the Shutter button has been pressed (either manually or remotely) and that one image has been captured and saved.
If the camera is set to Burst or Time Lapse shooting mode, for example, the red Status Lights blink each time a photo is taken. Then, when you turn off Time Lapse mode and stop shooting, the red Status Light flashes three times.
When a battery is in the camera, and the camera is connected to an external power source and is charging, the red Status Lights remain on. When the battery is fully charged, the red Status Lights turn off.
Not All Status Lights Are Always Illuminated
Depending on what information the Status Lights are being used to convey, sometimes only the front light is active. For example, when your camera’s Wireless option is turned on, but the camera’s power is off, only the front blue Status Light flashes. This indicates that a wireless connection can be established with the GoPro App or Smart Remote, and you can remotely power on and take control of the camera.
Meanwhile, the blue Wi-Fi/Bluetooth Status Light can be seen from the front of the camera, and indicates when the wireless feature of the camera is turned on and active. For example, even if the camera is turned off, the blue Status Light continues to flash if the camera’s wireless option is turned on. In this case, you can remotely turn on and start using the camera via the Smart Remote or GoPro App from up to several hundred feet away from the camera, without ever physically touching the camera.
Turn Off Indicators
From within Settings, you can turn off the Status Lights and the Sound Indicator audio alerts, so they do not function at all. These features use up little battery power, so keeping them on is typically beneficial.
Setting Up the Camera for the First Time
Each time you begin using your GoPro, regardless of the shooting situation, you need to properly prepare the camera. However, the first time you turn on the camera to begin using it, a few extra steps are required to properly set up the camera.
Insert Battery and SD Card
To initially set up the camera for the first time, follow these steps:
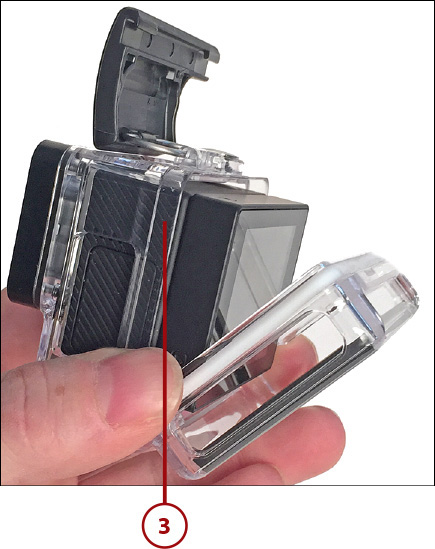
1. Take the camera out of its housing, by lifting up the black plastic latch found on the top of the housing.
2. Open the housing by separating the top of the housing’s front and back.

3. Open the side door of the camera to insert a microSD memory card. Refer to Chapter 6 for instructions on how to do this (not pictured).
4. Open the Battery door on the side or bottom of the camera (depending on your camera model).
5. Replace the spent battery with one that is fully charged. Although you can simply charge a spent battery by connecting the GoPro to the supplied USB cable and power source, you can save time using an optional GoPro battery charger and instead insert a second, fully charged battery into the camera.
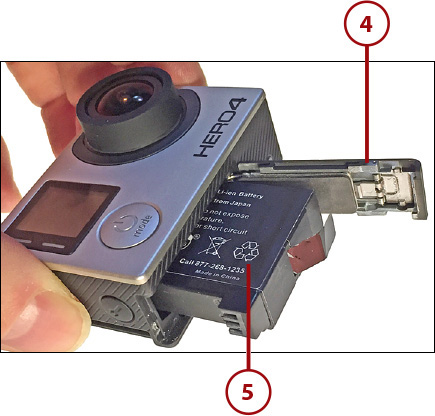
Battery Status
While the camera is plugged into an external power source, if a battery within the camera is charging, the red Status Lights on the camera remain turned on. When the battery is fully charged, the Status Lights automatically turn off.
Prepare the Camera
With the battery and SD card installed, you can now continue setting up your camera:
1. Check to see if your camera’s operating system software is up to date (not pictured). (See, “Updating Your Camera’s Operating System,” later in this chapter.)
2. If applicable, connect the optional LCD Touch BacPac or Battery BacPac accessory to the camera’s body.

3. Insert the camera into an appropriate housing based on your intended shooting situation. You should choose the best housing based on where you’ll be shooting to achieve the best results and provide the maximum level of protection for the camera. (Refer to Chapter 3, “Overview of GoPro Camera Housings.”)
4. Connect the housing to an appropriate mount based on your intended shooting situation. Make sure you securely connect the camera to whatever equipment you’ll be using it with. (Refer to Chapter 4, “Overview of GoPro Camera Mounts.”)

5. Depending on how you’ll be using the camera, establish a wireless connection between the camera and the Smart Remote or the GoPro mobile app. This requires you to complete the pairing process (not pictured).
Using the Smart Remote
See Chapter 5, “Must Have GoPro Camera Accessories,” to learn how this is done when using the Smart Remote. If you’ll be using the camera with the GoPro mobile app that’s running on your smartphone or tablet, see Chapter 15, “Using the GoPro Mobile App,” to learn how this pairing process works.
Customize Settings
The camera comes with each of the Shooting Modes set to default settings. To alter any of the default settings, access the camera’s menu and follow these steps:
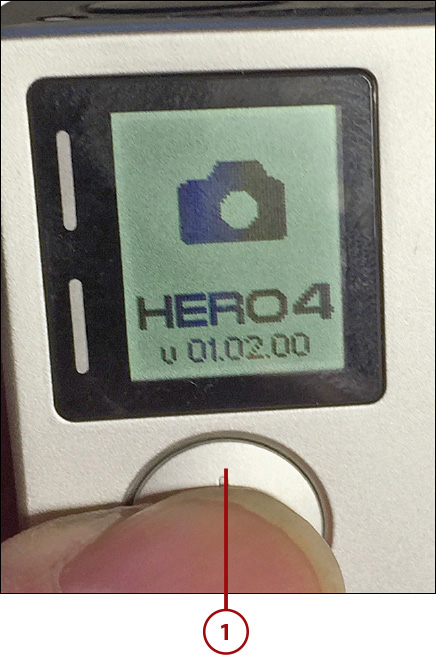
1. Turn on the camera by pressing the Power/Mode button for 2 to 3 seconds until the Status Lights blink and the camera beeps.
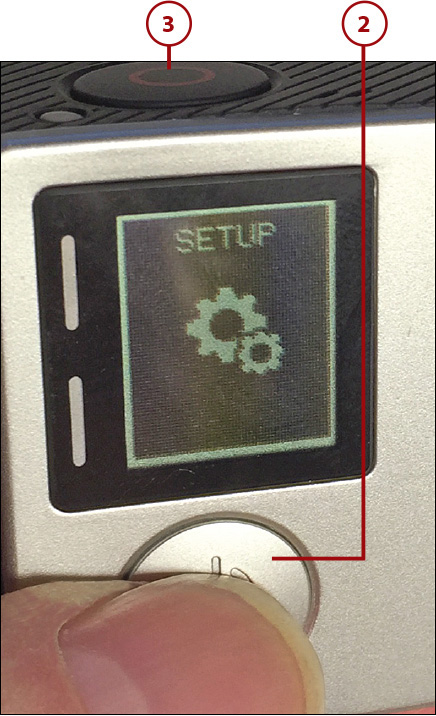
2. Press the Power/Mode button on the camera to toggle through the main menu options. At this point, choose a shooting mode and start taking pictures or shooting video, or select the Settings menu to adjust camera settings.
3. Press the Shutter/Select button to access the Settings menu when the wrench-shaped icon appears on the Status Screen. Do the same to select the Setup menu. From this Setup menu, you can manually adjust options relating to more than a dozen camera-related options and features, plus set the Time/Date within the camera.
Default Settings
The default GoPro Hero 4 Settings are
• Video: 1080p, 30fps, SuperView
• Photo: 12MP, Wide FOV
• Multi-Shot: Burst Option (set up to shoot 30 images per second)
• QuickCapture: Off
• Wireless: Off
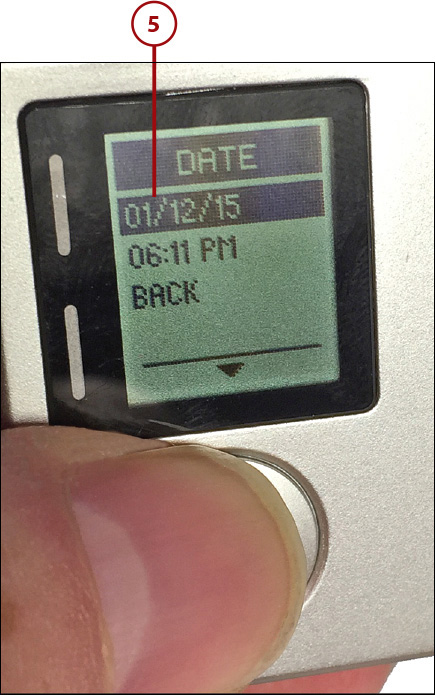
4. Select the Time/Date option (its icon looks like a calendar) to set or adjust this information.
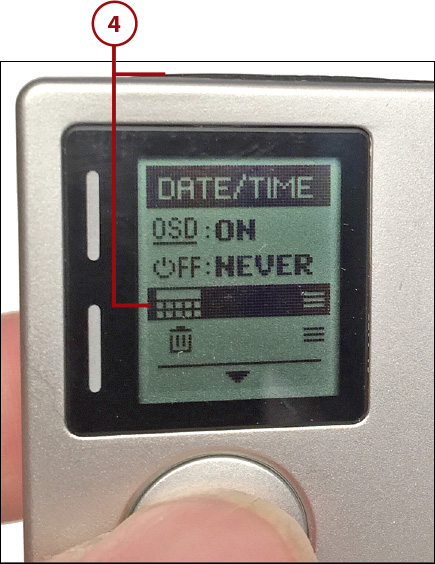
5. Ultimately, anytime you take photos or shoot video, the time and date it was shot are recorded automatically as part of that content’s digital file information (metadata).
6. To exit out of the Settings menu, press and hold the Shutter/Select button for 2 seconds. You’re now ready to start taking pictures or shooting video.
Updating Your Camera’s Operating System
When you purchase a new GoPro camera, the operating system (OS) that controls the camera and its operation comes preinstalled on the camera. However, GoPro periodically updates the OS to fine-tune the features and functions your camera offers.
In early-2015, GoPro released a software update that introduced new features to the GoPro Hero4 Silver and Hero4 Black cameras. These new software-driven features include a Time Lapse video mode, a 30/6 Burst shooting mode (allowing for 30 still digital images to be shot in six seconds), and an Auto Rotate feature (that automatically adjusts video content shot when the camera is mounted upside down). The Hero4 Black was also granted the ability to shoot video at 720p resolution at 240 fps (which is ideal for capturing HD-quality slow motion footage), as well as 2.7K resolution at 60 fps.
Software versus Software
GoPro refers to the OS software as the Camera Software. It should not be confused with the GoPro Studio software for the PC or Mac, or the GoPro App for your smartphone or tablet.
You can update your camera’s software using one of three methods, as shown in the tasks in this section. The best method to use depends on which camera model you use. If you use the Hero4, any of these Camera Software update methods work.
When applicable, using the GoPro mobile app (that’s running on your smartphone or tablet) offers the easiest way to update the Camera Software when this becomes necessary.
Using the GoPro Mobile App on an Android or Windows Mobile Device
Throughout this book, details about using the iPhone and iPad version of the GoPro mobile app are showcased. Although the features and functions offered by the Android and Windows Mobile versions of the mobile app are the same, the appearance of the command icons and the location of various app-related functions or menu options will vary. For more information about using the GoPro mobile app on an Android or Windows Mobile device, visit https://gopro.com/support/articles/getting-started-with-gopro-app.
Update Using the GoPro Mobile App
The easiest option (for camera models that support it, including the Hero3+ and Hero4) is to update the camera’s software via the GoPro App that’s running on your smartphone or tablet. Shown here is how the software update process works on an iPad. It’s very similar if done using the GoPro App running on an iPhone, Android, or Windows mobile device. To do this, follow these steps:
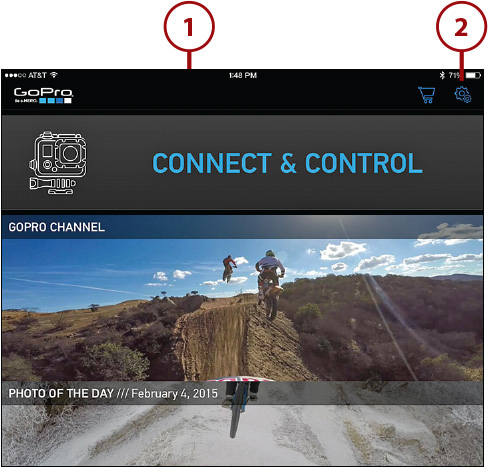
1. Launch the GoPro App on your mobile device, and establish a wireless connection between the camera and your smartphone or tablet.
Pairing a Device
This requires a Wi-Fi or Bluetooth connection (depending on the camera model) that your camera creates through a process called pairing. You can learn more about this pairing process in Chapter 15.
2. From the app’s main menu screen, click the Settings icon.
3. From the App Settings menu on your iOS mobile device, turn on the virtual switch associated with the Auto Download option. If an update is available, the app automatically downloads it and then transfers the software to your camera’s memory card when a wireless connection is established. The camera software update then installs itself onto the camera automatically.
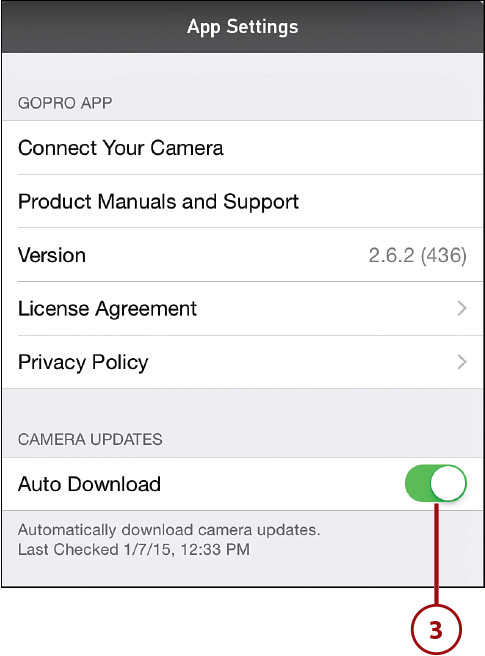
Check for Internet
Your mobile device requires an Internet connection, and then a wireless connection with your camera, for this process to work.
Update the Hero4 Using GoPro Studio Software
The following steps show you how to update the Camera Software on a Hero4 using the GoPro Studio software on your computer:
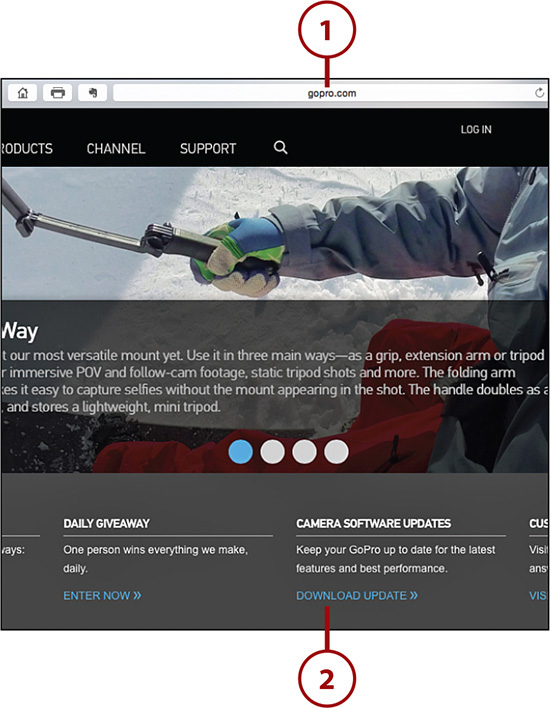
1. Download and install the GoPro Studio software onto your Windows or Mac computer. To do this from your computer, access the GoPro website (www.gopro.com), and then scroll down to the bottom of the website’s home page (not pictured).
2. Click the Download Update option listed under the Camera Software Updates heading.
3. If you’re not using the Hero4 camera, from the update page select your camera model from the Select Other Camera menu that’s displayed near the top-right corner of the screen.
4. Click the Download GoPro Studio button. Follow the on-screen prompts, based on whether you’re using a PC or Mac, to download and install the GoPro Studio software onto your computer. Later, this software will also be used to edit the video you shoot with your camera.

5. Launch the software on your computer (not pictured).
6. Make sure a microSD Memory Card is inserted into your camera.

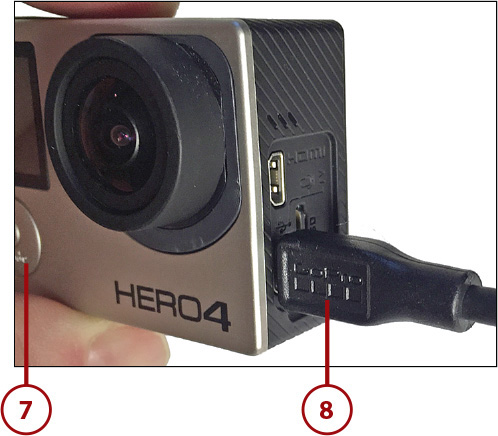
7. Turn on the camera.
8. Connect the camera to your computer via the supplied USB cable. The computer automatically identifies the camera. If an update is available, the Camera Software Update window displays. Follow the onscreen prompts and then wait until the entire installation process is complete before attempting to disconnect the camera from the computer or use the camera.
Camera Resets
The camera operating system software is first downloaded to your computer from GoPro’s website and then transferred to the camera, where it is automatically installed. During this process, the camera resets itself multiple times.
Updating the Operating System Manually
There is also a method for updating the camera’s software without using the GoPro Studio software. This method, which requires a microSD Memory Card reader that you can connect to your computer, is what you need to use with the lower-end GoPro Hero camera, but it also works with other camera models, including the Hero3+ and Hero4. Follow these steps to use this manual method for updating the Camera Software:
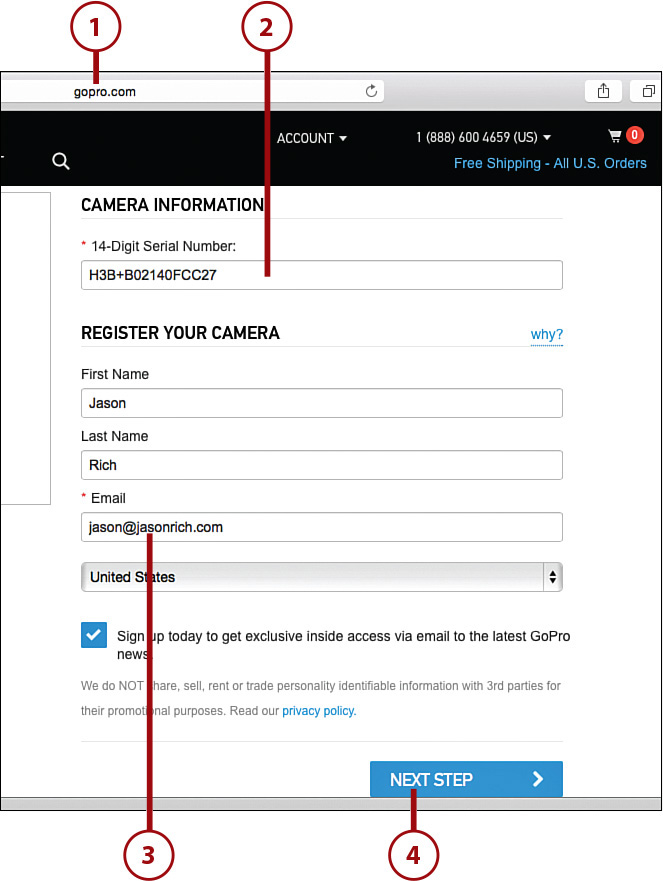
1. From your computer, go to http://gopro.com/support/product-update/register-camera.
2. Scroll down and click on the Update Your Camera Manually option. When prompted, enter your camera’s 14-Digit Serial Number. This number can be found on the camera’s packaging or by removing the battery from the battery compartment.
3. Enter your first name, last name, and email address within the appropriate fields of the website.
4. Click on Next Step to continue.
5. From the Update Your GoPro web page screen, click the Download Update button (not pictured).
6. Select between Wi-Fi & Firmware Update, Wi-Fi Update Only, or Firmware Update Only if given these options by the website. (The Wi-Fi Update refers to the wireless connection that can be established between your camera and the Smart Remote or the GoPro App.)

7. Create a name for your camera, as well as a password. You’ll be prompted to confirm this password. Do so and click the Next Step button to continue.

8. Click on the Download Update button found on the left side of the web page. The necessary update will be downloaded to your computer.
9. Click the Next Step button to continue.

10. With the camera turned off, remove the microSD Memory Card from your camera, and insert it into an optional microSD Card Reader. Connect the Card Reader to your computer via its USB port. Click the Next Step button to continue (not pictured).
11. Locate the UPDATE.zip file that was downloaded to your computer from the GoPro website, and double-click it. On a Mac, by default, the file is saved to your Downloads folder (not pictured).
12. Drag the newly created UPDATE folder to the GoPro Camera’s memory card device listing. On the Mac, this is on the left side of the Finder window. Click the Next Step button to continue.

13. With the camera turned off, re-insert the memory card into the camera (not pictured) and turn it on. The system updates automatically.
Expect Resets
Expect the camera to reset multiple times. Watch the LCD Status Screen for messages relating to the progress. When the installation process finishes, click the Finish button on the website. Your camera has now been updated and is ready to use.