15. Using the GoPro Mobile App
In this chapter, you discover how to use the GoPro App with your camera. Topics include the following:
![]() How to pair your camera with a mobile device that runs the GoPro mobile app
How to pair your camera with a mobile device that runs the GoPro mobile app
![]() Remotely control your camera via the GoPro mobile app instead of using the Smart Remote
Remotely control your camera via the GoPro mobile app instead of using the Smart Remote
![]() Wirelessly transfer photos or video from your camera’s memory card to your mobile device to view, edit, and share that content
Wirelessly transfer photos or video from your camera’s memory card to your mobile device to view, edit, and share that content
Thanks to the built-in wireless capabilities of your GoPro camera (most models), as well as the Wi-Fi and Bluetooth functionality built into your smartphone or tablet, you can run the optional (and free) GoPro mobile app from your mobile device, which enables you to accomplish a variety of tasks.
• Remotely controlling the camera from your mobile device. You can adjust the camera’s Settings and quickly switch between shooting modes without physically touching your camera.
• Using the screen on your mobile device as your camera’s real-time and full-color viewfinder. Thus, whatever you see within this viewfinder is what ultimately appears in your photos and video.
• Transferring photos or video from the memory card within your camera wirelessly to your mobile device, where you can view, edit, and then share that content without using a computer or any cables.
The GoPro mobile app is designed to work with the Apple iPhone or iPad and is available for free from the App Store. An Android version of the GoPro App is available from Google Play, and the Windows Mobile edition of the app is available from the Windows Store. These three versions of the app function similarly.
Getting Started with the App
After you install the app onto your smartphone or tablet, to establish a wireless connection between your mobile device and the camera, you need to initially pair the two devices.
This pairing process needs to be done only once. After that, anytime you turn on the Wireless mode of your GoPro camera, launch the GoPro mobile app on your mobile device, and then connect the mobile device to the camera’s Wi-Fi/Bluetooth signal, you can use the app to communicate directly with your camera.
Your mobile device determines how far away you can be from the GoPro camera to remotely control it. This varies based on the smartphone or tablet model you use.
The basic GoPro Hero camera does not have a Wireless mode. Therefore, it is not compatible with the GoPro App. The Hero3 and Hero3+ can connect to your mobile device via Wi-Fi, whereas the Hero4 can establish a connection using Wi-Fi and Bluetooth.
Install the GoPro App
To initially find and install the official GoPro App onto your iPhone or iPad (shown), follow these steps:
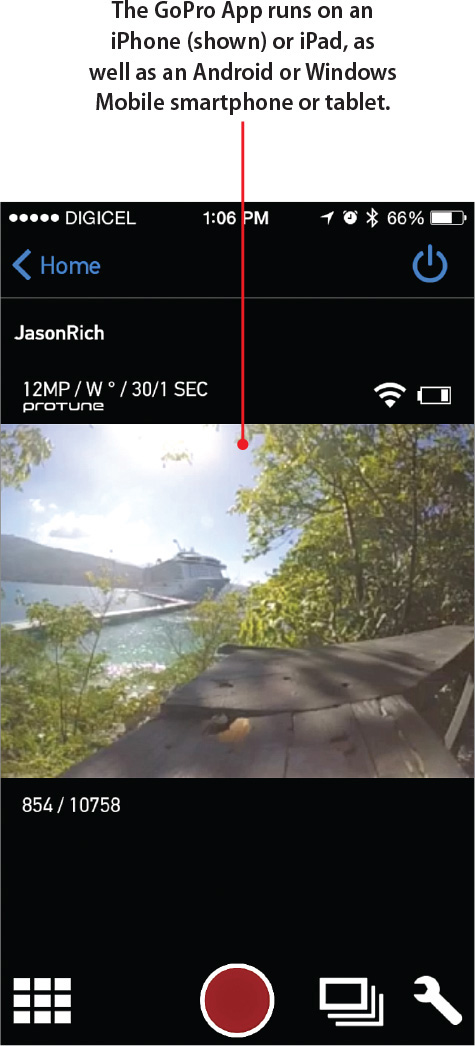
1. From the Home screen, launch the App Store app. (Make sure you’re connected to the Internet.)
2. Within the App Store app’s Search field, enter the search word GoPro, and tap the Search key.

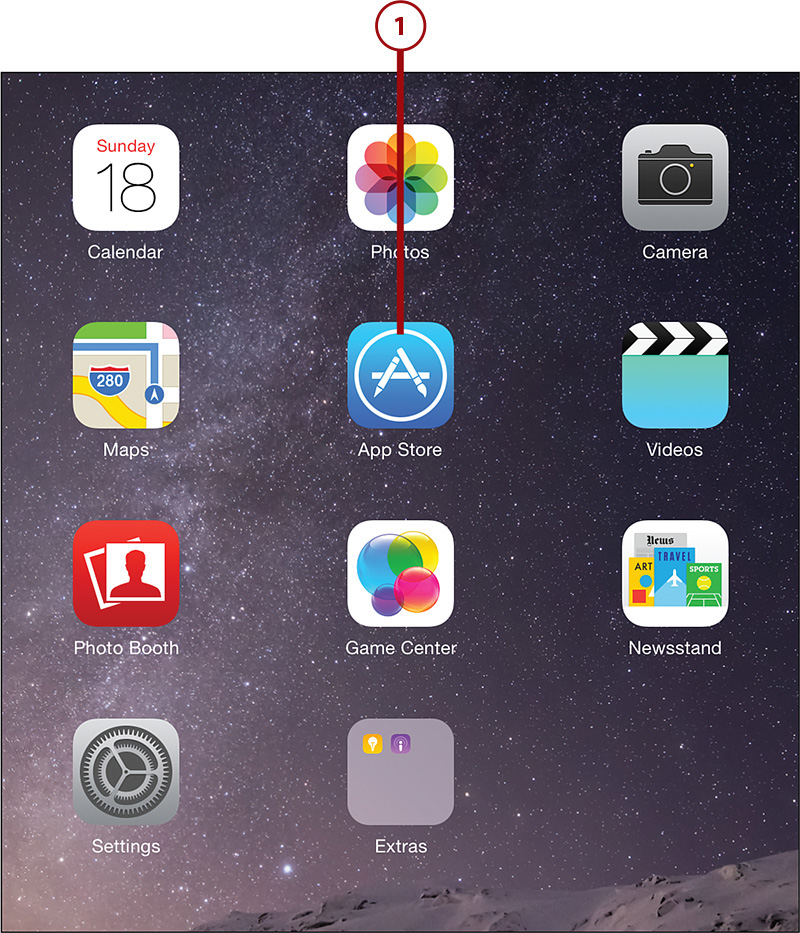
3. From the Search Results, select the GoPro App option by tapping the Get button.

4. When the Install button appears, tap it.
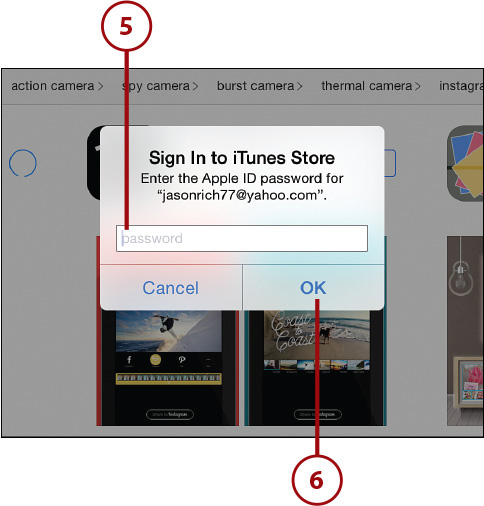
5. If prompted to do so, enter your Apple ID password, or use the Touch ID sensor that’s built in to your mobile device to confirm your account information and identity.
6. Tap OK. The GoPro App automatically downloads and installs onto your iPhone or iPad.
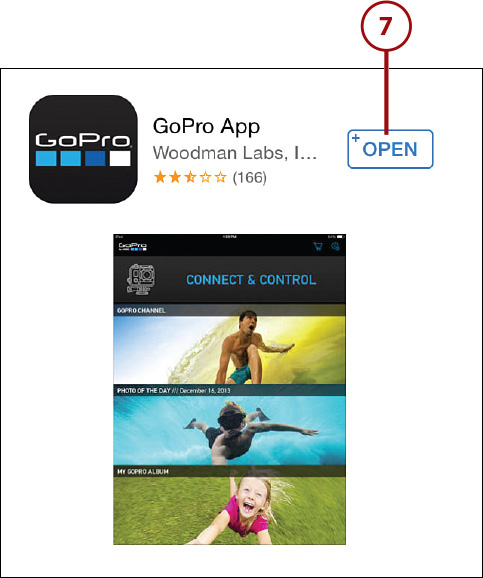
7. When the process is done, tap the Open button to launch the app.
Launch the App from the Home Screen
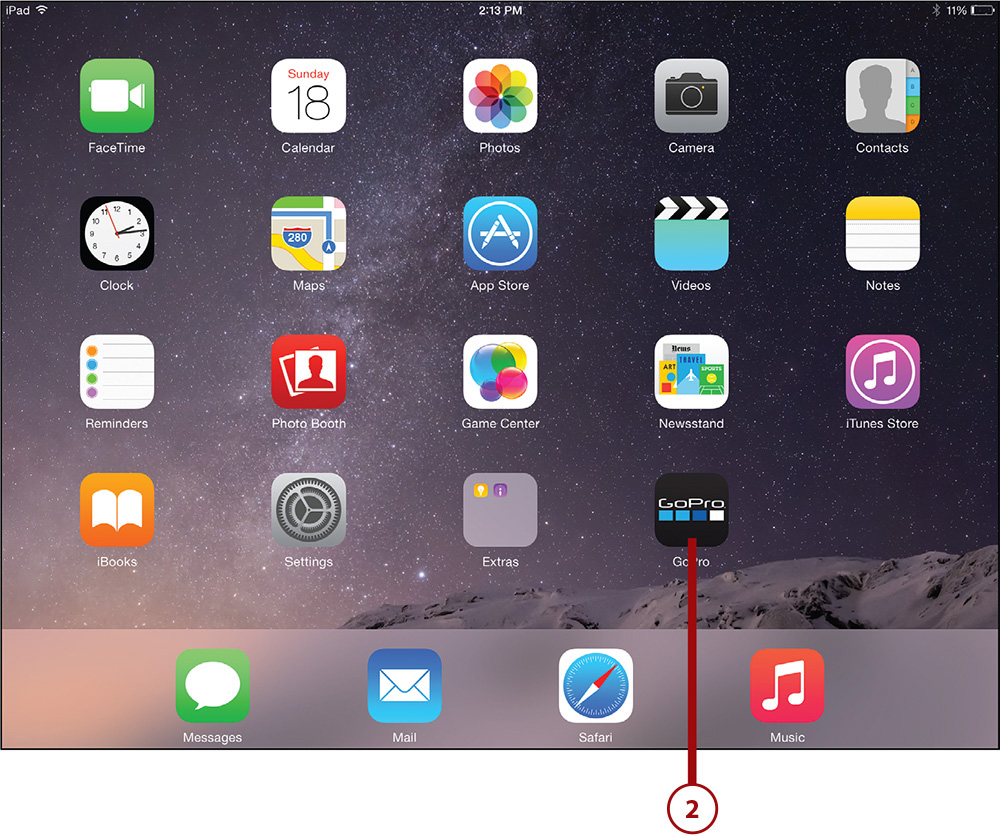
Subsequently, after the app is installed, you can launch it from the Home screen by tapping the GoPro App icon that appears there.
Pair the GoPro App with Your GoPro Hero4
The first time you use the GoPro App that runs on your mobile device with your compatible GoPro camera, you need to pair these two devices. Follow these steps for pairing your iOS mobile device with a Hero4 camera:
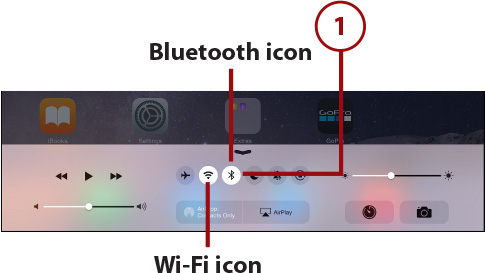
1. Turn on the Wi-Fi and Bluetooth features of your smartphone or tablet. You can do this from the Control Center (shown), or from within Settings on the iPhone or iPad.
The GoPro mobile app will still launch on your smartphone or tablet, without establishing a link with the camera. However, you will not be able to remotely control the camera via the app, or use the app as a real-time viewfinder.
2. Locate the installed GoPro App on your mobile device and tap its icon.
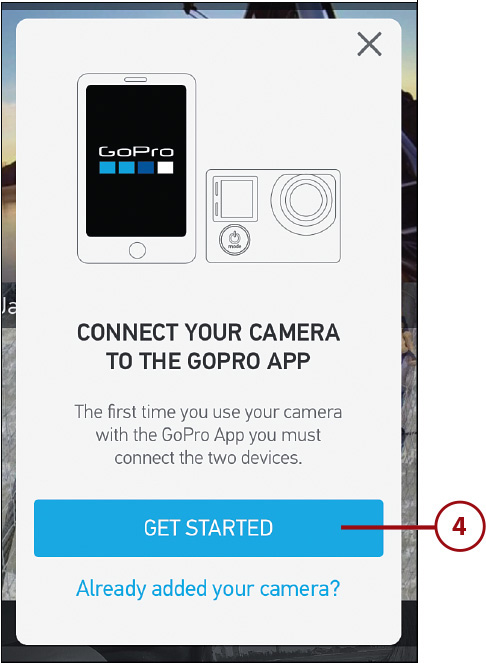
3. From the mobile app’s main screen, tap the Connect Your Camera option (after it replaces the initial Searching for a GoPro message).

4. Tap the Get Started button in the menu that appears.
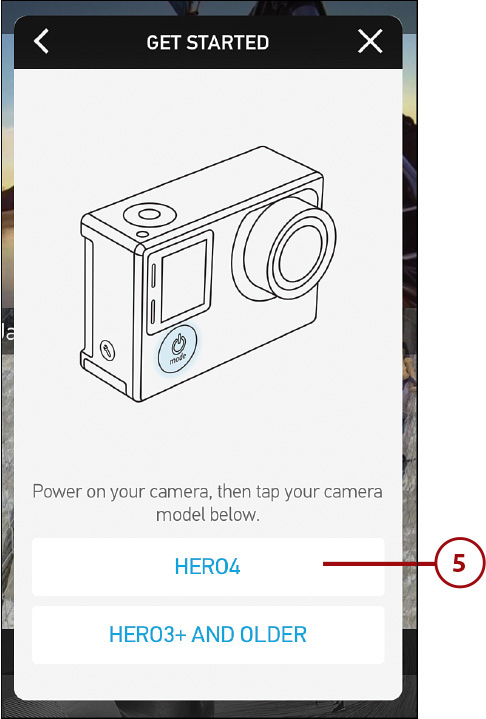
5. Select your camera model from the app’s menu.
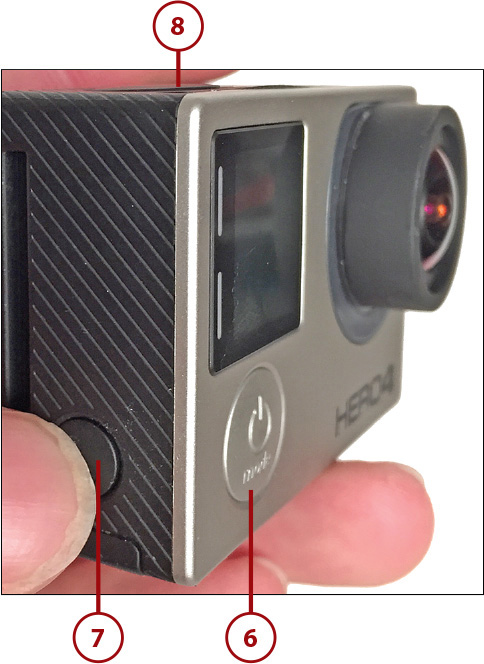
6. Turn on your GoPro Hero4 by pressing and holding the Power/Mode button for approximately 2 seconds (not pictured).
The LCD Touch BacPac Makes the Pairing Process Easier
If you have the LCD Touch BacPac accessory connected to your GoPro camera, you’ll have an easier time navigating through its menu options using the interactive and easy-to-view touch screen display.
7. Press and hold the Settings/Tag button on the side of your camera’s body until the Wireless menu appears on the display.
8. Press the Shutter button to select the GoPro App option from the camera’s Wireless menu. The camera enters into Pairing mode. From the app, tap the Continue option.
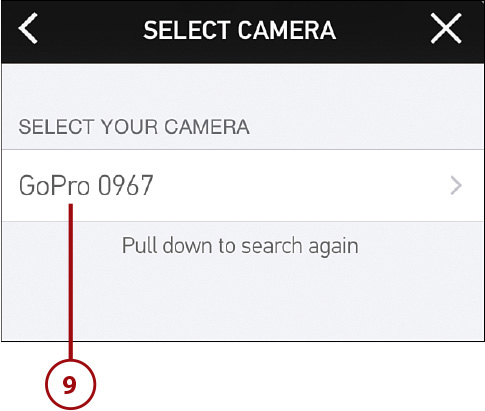
9. From the Select Camera screen, tap the displayed GoPro camera listing.
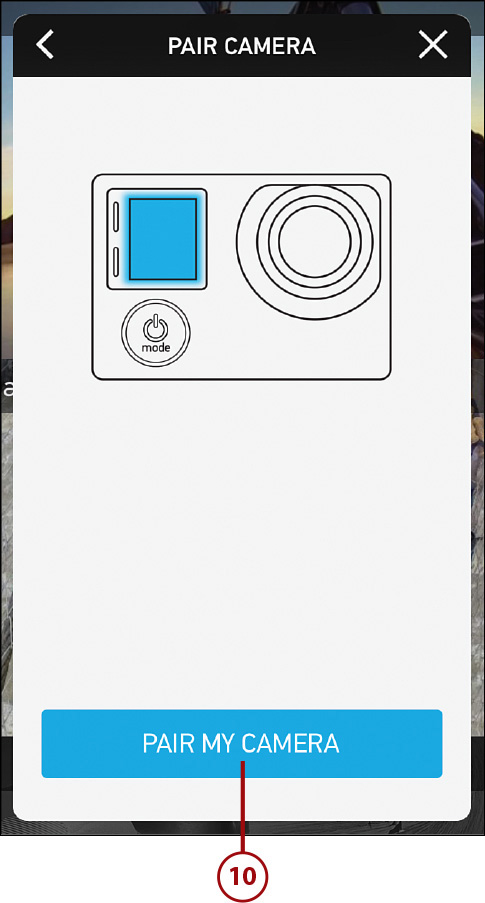
10. From the app’s Pair Camera screen, tap the Pair My Camera button.
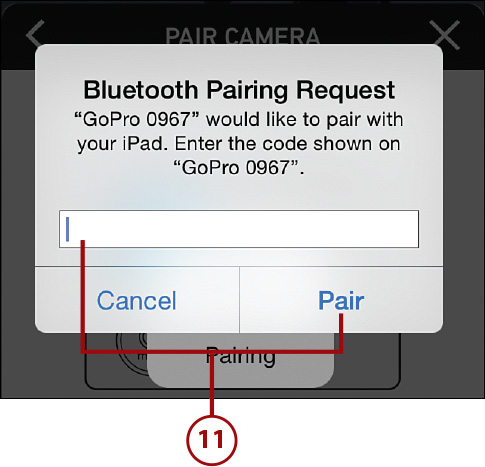
11. When the Bluetooth Pairing Request window appears on the app’s screen, enter the numeric code that displays on the GoPro camera’s Status screen, and tap the Pair button.
12. After the Paired message appears, create a name and password for your camera (not pictured). The name you select doubles as the name your camera uses when creating its own wireless network.
13. Tap the Continue button (not pictured).
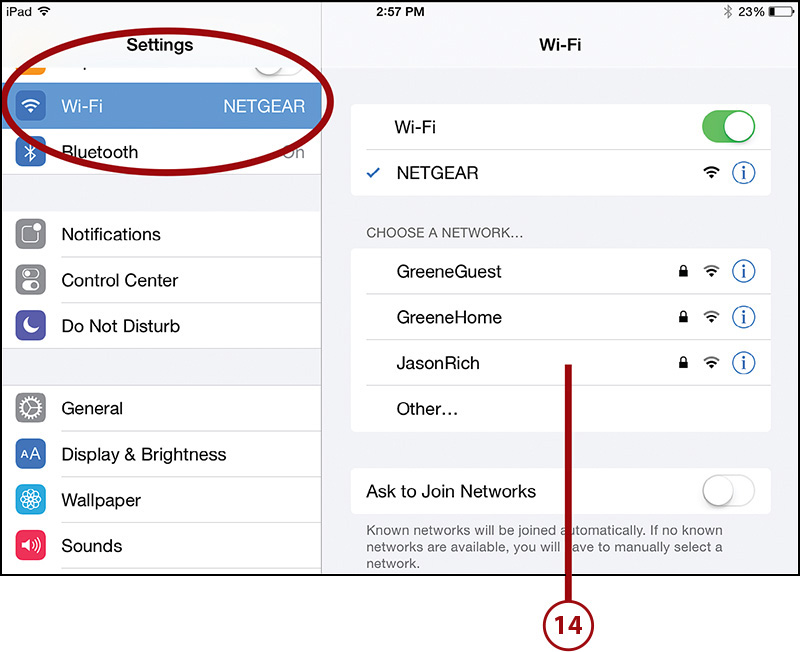
14. From your mobile device, connect to the Wi-Fi wireless network that’s now created by your camera. To do this, go to the Wi-Fi page for your device’s settings and tap your camera’s name under the listed networks.
Enabling GoPro Wireless
To turn on or off the GoPro camera’s wireless feature on the Hero3 or Hero3+, press the Wi-Fi button on the side of the camera. On the Hero4, this button is the Settings/Tag button.
15. When prompted, enter your camera’s password (not pictured).
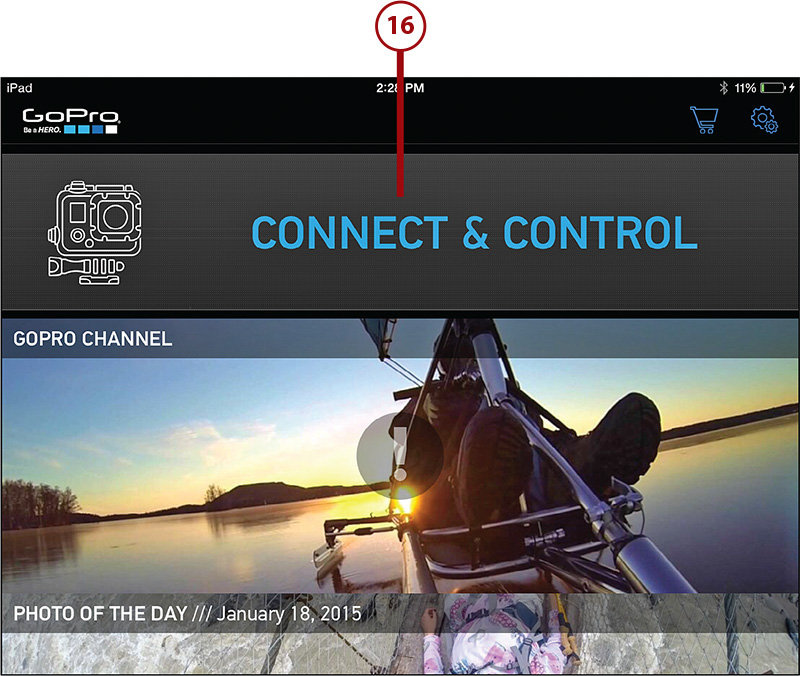
16. Relaunch the GoPro App. From the app, tap on the Connect & Control option when it appears. Your camera and the GoPro App (via your mobile device) will now be connected, and the Wireless mode of your camera will be turned on. The camera’s blue Status Light should be flashing.
One and Done
From this point forward, when you turn on the GoPro camera’s Wireless feature and select the GoPro App option, and then you launch the GoPro App on your mobile device (assuming it’s connected to your camera’s wireless network), the two devices automatically establish their connection when you tap the app’s Connect & Control option.
Taking Control of Your Camera Using the GoPro App
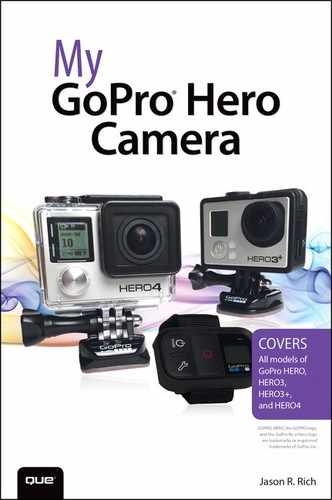
The main menu screen of the mobile app displays when you launch the GoPro App. From the app, tap the Connect & Control option. Your camera beeps three times when the remote connection is established. The camera remote control screen then appears on your smartphone or tablet.
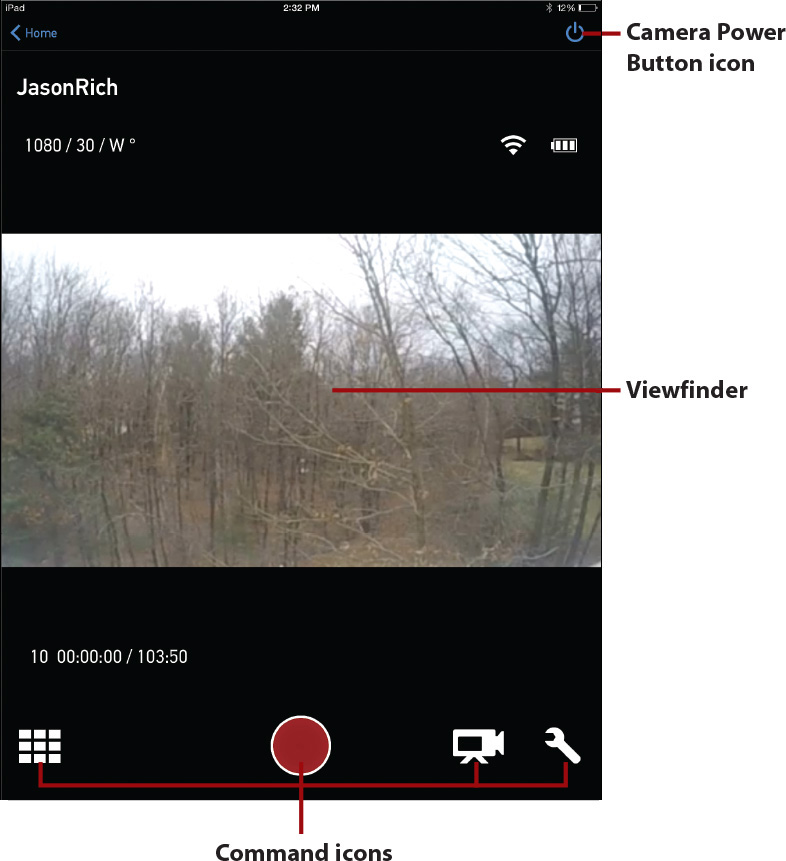
With the connection established, the camera’s remote viewfinder is in the center of the app screen. Along the bottom of the screen are various command icons for controlling the camera remotely.
The camera’s power button displays in the top-right corner of the app screen, which enables you to power on or off the camera directly from the app (assuming the camera is in Wireless mode). Tap the Home button to return to the app’s main menu.
Navigating the App Settings Menu
From the GoPro App’s main menu, tap the gear-shaped Settings menu icon to access the app’s App Settings menu.

Following are the menu options:
• Connect Your Camera: Tap this to initially pair your GoPro App with your GoPro camera.
• Product Manuals and Support: Tap this command to launch your smartphone or tablet’s web browser to visit the GoPro website, and then access the online editions of the user manuals for the various GoPro cameras and accessories.
• Version: Displayed here is the version number of the GoPro App that’s currently running on your mobile device. GoPro periodically updates the app with new features and functions.
• License Agreement: Tap here to read GoPro’s License Agreement. This is a text-based screen that’s chock full of legal information.
• Privacy Policy: Tap here to read GoPro’s Privacy Policy. This is a text-based screen that’s also loaded with legal information.
• Auto Download: Turn on the virtual switch that’s associated with this option if you want the camera to automatically (and wirelessly) transfer any new photos or video you’ve shot on your GoPro camera directly to your mobile device whenever a connection between the camera and mobile device is established (via the GoPro App).
• Use Cellular Data: Instead of using Wi-Fi (which is free), this option enables your smartphone or tablet to use its 4G (LTE) cellular data connection to establish a link between your camera and the app. If you have a monthly cellular data allocation, turning on the virtual switch for this option results in you using up this monthly allocation quickly because the file sizes associated with your photos and video are rather large. It’s best to turn on this option only if you have an unlimited cellular data plan with your wireless service provider. Otherwise, rely on the Wi-Fi connection.
• Camera Models: Turn on the virtual switch associated with this option to allow the GoPro App to download and install any Camera Software updates to your GoPro cameras as they’re made available. This is the easiest way to update the Camera Software that runs on your GoPro camera.
Accessing Your My GoPro Album
From the GoPro App’s main menu, you can access the My GoPro Album option by tapping the photo that displays below this heading. Then, from the Albums screen, access any photos already stored within your mobile device, including those stored within the My GoPro Album, which is reserved for photos taken with your GoPro camera that have been transferred to your mobile device.
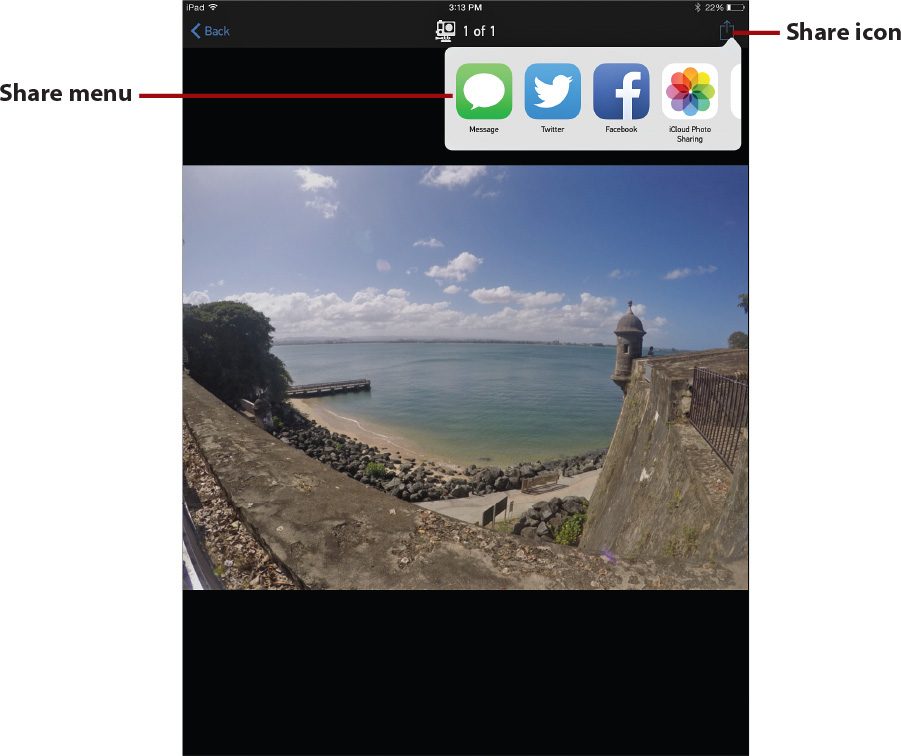
When viewing a photo, tap on the image to make the menu options and icons appear, then tap the Share icon to share that image via text message, Twitter, Facebook, iCloud Photo Library, or another compatible third-party app.
Transfer Photos or Video from the Memory Card to the GoPro App
After establishing a wireless connection between your camera and the GoPro App, you can transfer photos or video from the memory card within your camera to your mobile device to view, edit, and share them. To transfer selected content, follow these steps:
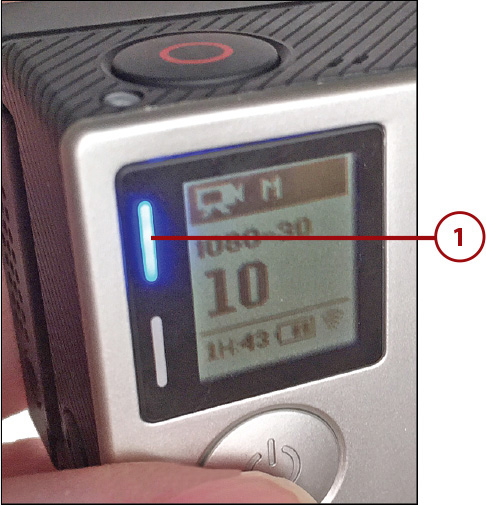
1. Turn on your GoPro camera and make sure it’s in Wireless mode. The blue Status light should flash on the camera.
2. Launch the GoPro App on your mobile device, and establish a connection with the camera by tapping the Connect & Control option (not pictured).
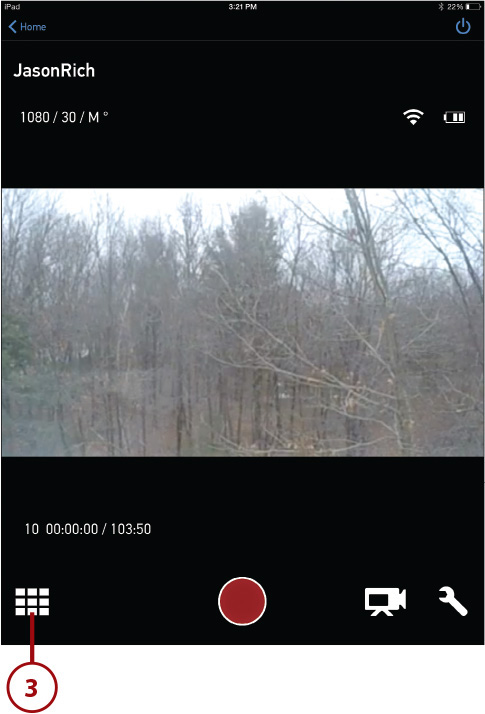
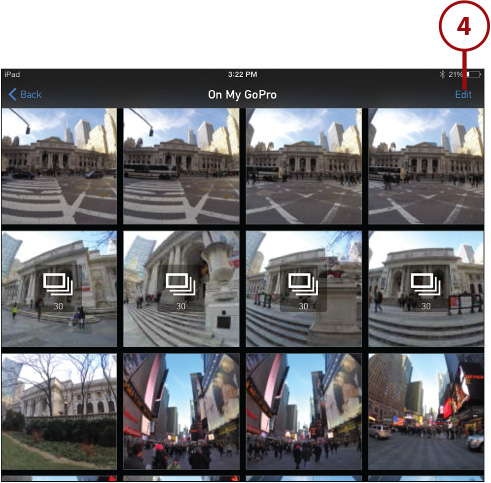
3. Tap the Image Preview icon that displays near the bottom-left corner of the screen. When the On My GoPro screen displays, you see thumbnails representing each photo and video stored on the memory card of your camera.
4. Tap the Edit option to select images and videos you want to import from your camera’s memory card to your mobile device.
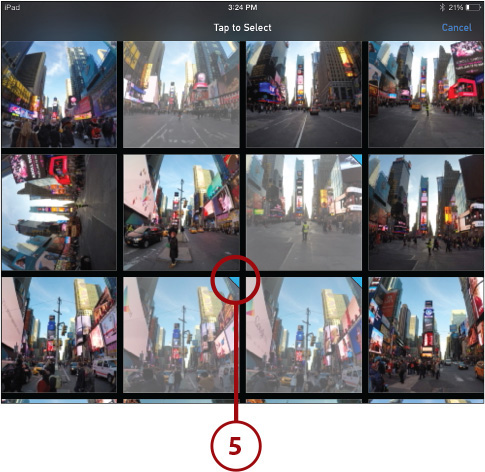
5. One at a time, tap each image thumbnail that represents the image or video you want to transfer. Select any number of images or videos to transfer. As you select each thumbnail, the top-right corner of the image thumbnail turns blue.
Select All
To transfer all the content currently stored on your camera’s memory card, tap the Select All option that displays at the bottom center of the GoPro App’s Tap to Select screen.
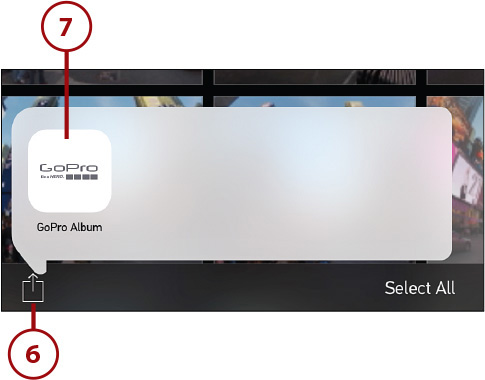
6. Tap the Share icon after selecting all the images you want to transfer.
7. Tap the GoPro Album icon to transfer the selected images and videos to the GoPro Album on your mobile device.
8. When transferring digital images (instead of video), choose between high and low resolution. One at a time, the images and videos wirelessly transfer from your camera’s memory card (that’s installed within your camera) to your mobile device.

Choosing a Resolution
Choosing High Resolution keeps the resolution of your images intact at the resolution each was shot it. This results in larger file sizes that take up more internal storage space within your mobile device.
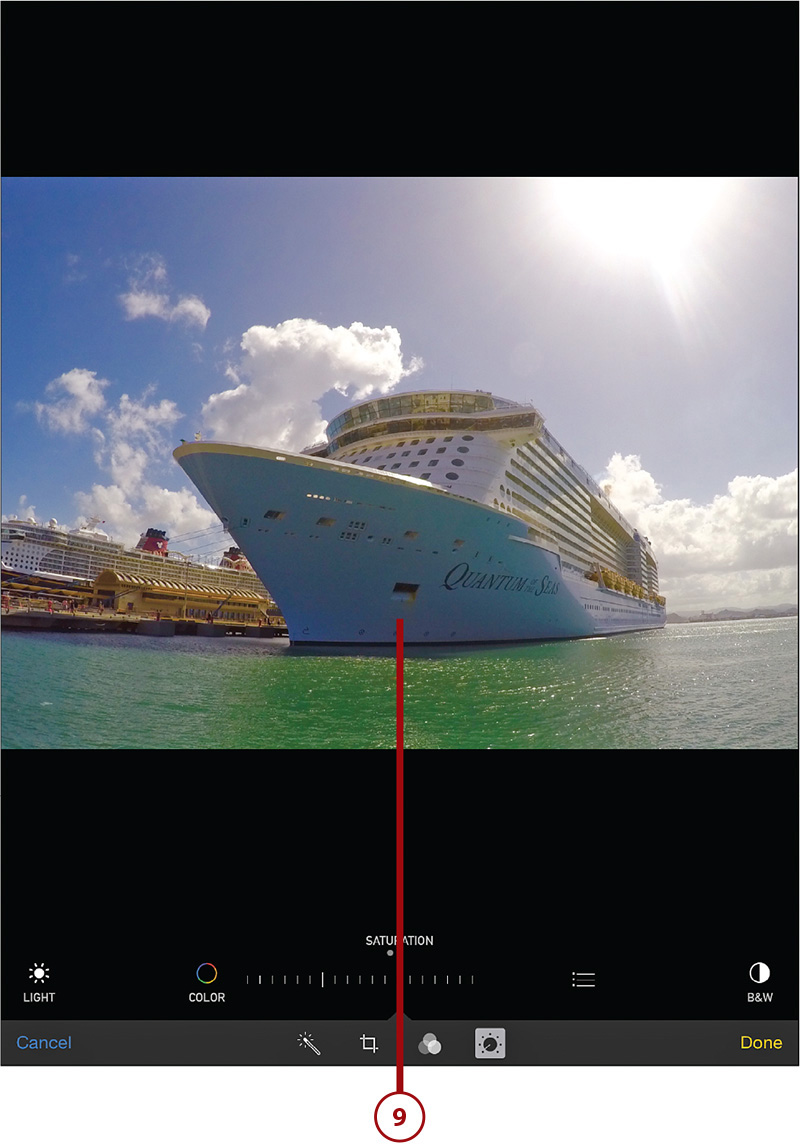
9. When the transfer process is complete, you can exit the GoPro App and launch the Photos app (shown here on the iPad) to edit, share, and organize the images. You can also launch a video editing app, such as iMovie, to edit your videos. If you want to share your photos or videos, use a specialized app for accessing Facebook, Twitter, Instagram, SnapChat, or YouTube, for example.
Controlling Your Camera from the GoPro App
Using the GoPro App, remotely controlling your camera is a rather straightforward process because more information displays on the smartphone or tablet’s screen than can display on the camera or Smart Remote’s Status Screen.
To remotely power on the camera, when it’s in Wireless mode, tap the Power icon that displays in the top-right corner of the app screen. Then, within the center area of the screen, you see your real-time viewfinder.
Just below the viewfinder you can see information about the capacity of your memory card, and how many photos or how much additional video the memory card can hold, assuming you do not change any camera settings.
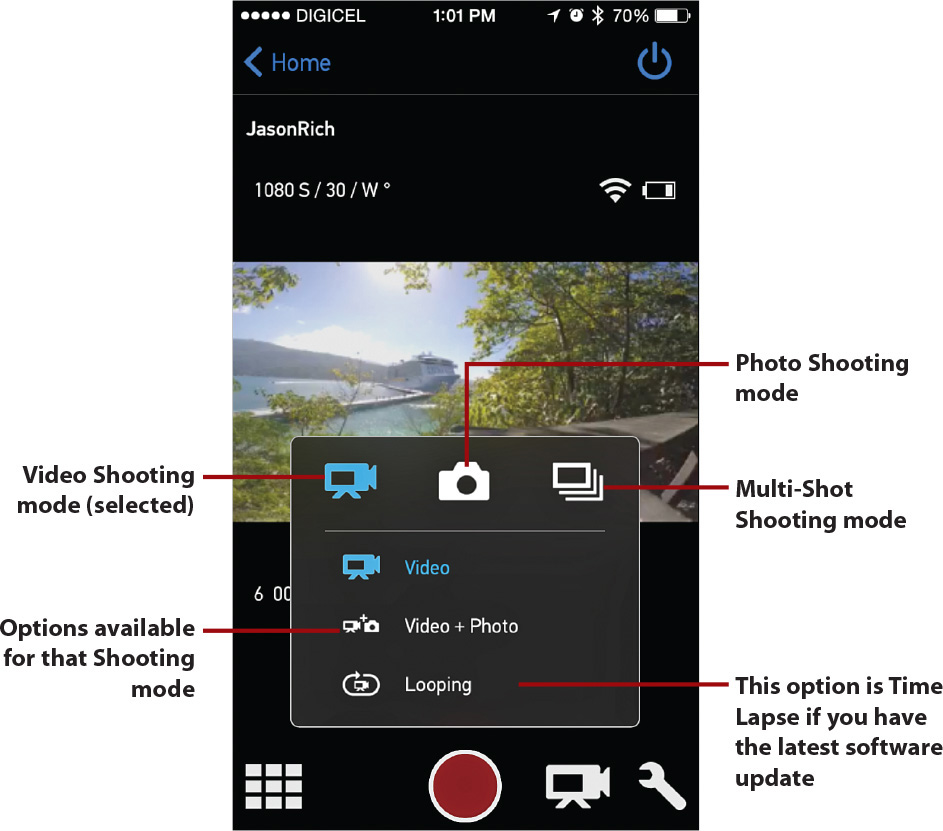
The Shutter button displays using a red circular icon. Depending on which shooting mode the camera is in, to the right of the Shutter button you see an icon representing the selected and active shooting mode.
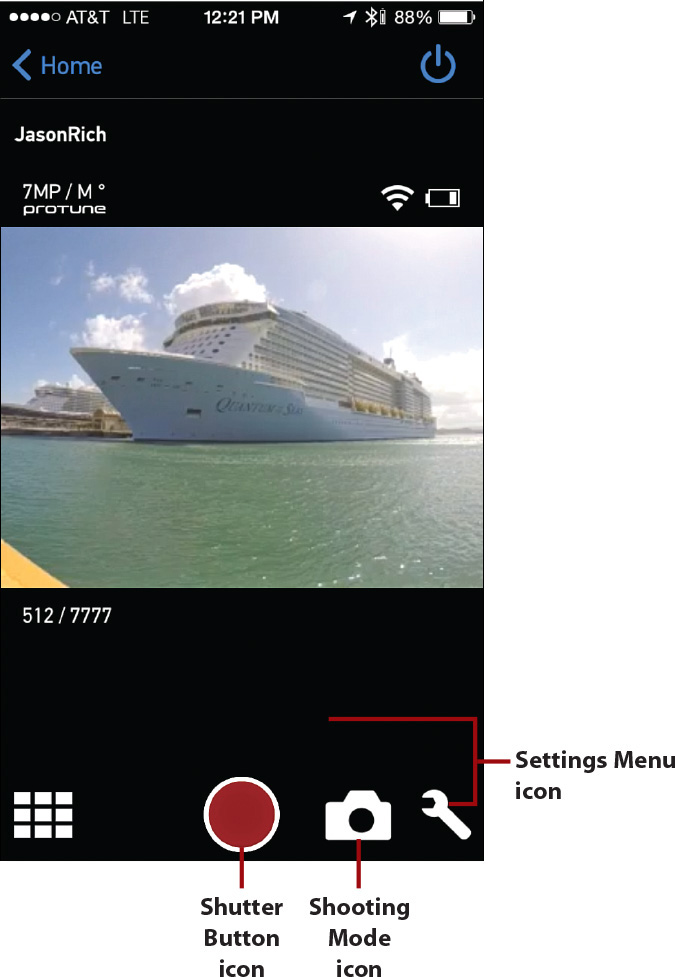
Quickly change the shooting mode by tapping an icon that represents the currently active camera mode. This reveals an icon-based menu.
You can learn more about your camera’s shooting modes for photos and video in Chapter 8, “Shooting High-Resolution Photos,” and Chapter 10, “Shooting HD Video.”
Adjusting the Hero4’s Settings from the App
In addition to selecting the camera’s shooting mode from the GoPro App, when you tap the wrench-shaped Settings icon that displays in the bottom-right corner of the app, you can adjust specific settings and options related to each shooting mode.
Under each menu heading, the following is a summary of what you can adjust remotely on your Hero4. If you use the Hero3, Hero3+, or another compatible camera model, your options will vary.
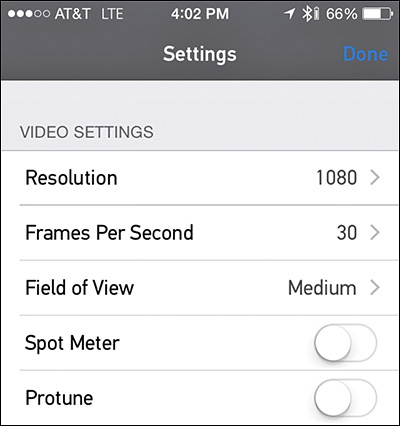
• Video Settings: These options enable you to customize Video mode-related settings, such as resolution and frames per second. After tapping the Video icon to select it (so it displays in blue), tap the wrench-shaped Settings icon to adjust Video-related settings.
• Photo Settings: These options enable you to customize Photo mode-related settings, such as Spot Meter, continuous shooting rate, and Protune settings.
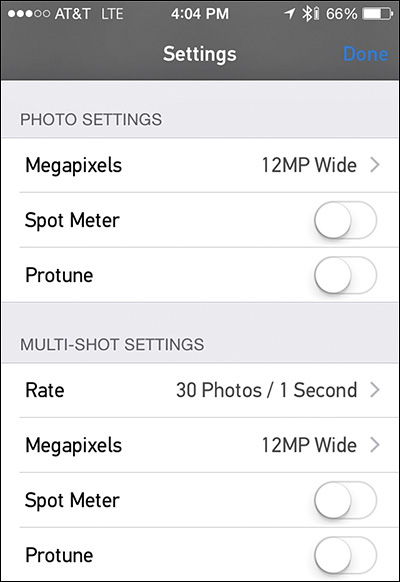
• Multi-Shot Settings: These options enable you to customize settings, such as burst mode shooting rate and time lapse interval, when using the camera’s Multi-Shot options.
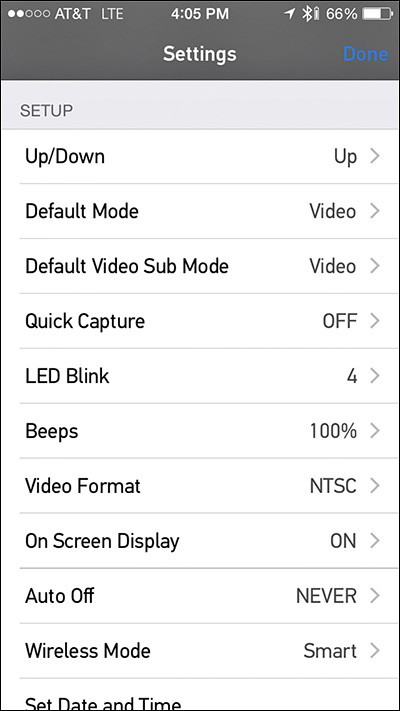
• Setup Settings: Adjust any of the options available from the GoPro camera’s main Settings menu, but do it remotely from the GoPro App. From the Settings menu, you can customize more than 10 camera-related features and functions. For example, tap the Default mode option to determine which shooting mode will automatically become active each time you turn on the camera.
Learn More About the Settings Menu
For complete details on how to utilize all the options available from the Settings menu, see Chapter 12, “Adjusting the Camera’s Setup Menu Options.”
• Delete Settings: Use one of these two commands to delete content from your camera’s memory card. The Delete Last File option enables you to delete from the camera’s memory card just the last photo or video you’ve shot, whereas the Delete All Files from SD Card option erases the entire memory card. Do not use this option unless you are 100 percent sure that your content has already been transferred to your computer or mobile device, or you can potentially lose it forever.
• Camera Info Settings: When you first paired your camera with your Smart Remote or the GoPro App, you were asked to give your camera a name. Tap the Name option to edit the Name and Password related to your camera and the wireless network it creates.
Locate Your Camera
By turning on the virtual switch associated with Locate Camera, you can remotely instruct the camera to start beeping and flashing its Status Lights. This makes it easier to find when it’s in relatively close proximity, but due to its small size, can’t be found for whatever reason.
• Wireless Control Settings: Use the options offered under this heading to activate either the GoPro Wi-Fi Remote or GoPro Smart Remote. When you do this, however, it deactivates the wireless connection that currently exists between your camera and the GoPro App that runs on your mobile device. Remember, you can have either the GoPro App or the Smart Remote set up to wirelessly control your camera at any given time.
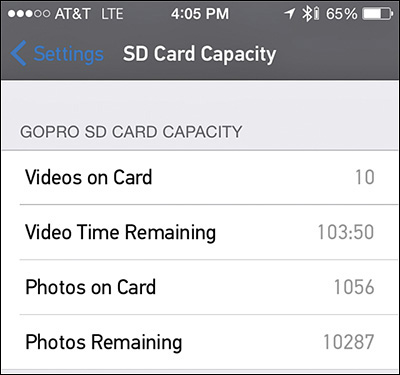
• Camera Status Settings: The options offered under this heading display information only. The battery level option displays your camera’s current battery life from within the app, whereas tapping the SD Card Capacity option tells you, based on the camera’s current settings, how much more video or how many more photos you can store on the camera’s memory card. You also see how many photos and videos are currently stored on the card.
Optional GoPro Mobile Apps
Available from the App Store, or wherever you acquire mobile apps for your smartphone or tablet, you can discover additional third-party apps designed to work with your GoPro camera. To find these apps, enter the search phrase GoPro within the App Store’s Search field.
This section offers details about three additional GoPro-related apps. These apps are available for the iPhone and iPad. Versions of some of them, as well as other apps, are also available for Android and Windows Mobile smartphones and tablets.
10 – Fast GoPro & DJI Phantom Video Sharing with Music
This optional app enables you to shoot video with your GoPro camera, wirelessly transfer the content to your iPhone or iPad, and then quickly edit the video using simple tools. The app makes it quick and easy to select your favorite shots or scenes and then add special effects, titles, and music to your video. For example, you can speed up or slow down playback with a few on-screen taps.
You can then share your edited video via Facebook, Instagram, Tumblr, YouTube, or Vine from directly within the app; email or message the video to others (via the Mail or Messages app); or upload the video to a cloud-based service, such as Dropbox.
Prizmia for GoPro
You can use this app, which is priced at $9.99, instead of the official GoPro mobile app to remotely control your camera, and then edit and share photos or video from your mobile device. The official GoPro mobile app does not have built-in photo or video editing capabilities.
When using the app as a remote viewfinder when shooting, for example, Prizmia offers a full-screen viewfinder view, regardless of what resolution you shoot in.
What’s also unique about this app is that it includes more than 90 special effect filters that can be added to photos or videos, either in real time while the content is shot or after the fact during the editing process. You can also manually control contrast, saturation, gamma, and brightness. In addition, you can use app-specific features, such as video stabilization and Auto-Lock Focus & Exposure when shooting.
The Prizmia app offers the toolset that you need to take full control over your GoPro camera (remotely) while shooting, but then edit and share your content—all from within a single, well-designed app that integrates nicely with several online social networking services, including Facebook and YouTube. In other words, you won’t need to transfer your content to a computer to edit and share it, which means you can handle these tasks from virtually anywhere.
Beyond purchasing the app, several additional special effect filter sets, including Bleach Bypass Filter Effects, Dusk Filter Effects, Colors Filter Effects, B&W Filter Effects, and Vintage Filter Effects, are sold separately as in-app purchases for $0.99 per set, so to unlock all that this Prizmia app has to offer, plan on spending approximately $15.00.
Lab for GoPro
The free Lab for GoPro App is designed to help you quickly edit and share digital photos taken with a GoPro camera that you’ve wirelessly transferred to your mobile device.
This app includes 16 special effect filters. In addition you can make manual adjustments to a photo’s brightness, saturation, contrast, blur, focus, tone curves, and exposure.
Then you can overlay text and supplied digital clip art (stickers) over your image before sharing it from within the app via Facebook, Twitter, Instagram, WhatsApp, iPhoto, Dropbox, Pintrest, or Tumblr.
Other Choices
After you transfer your photo or video content from your GoPro camera to your mobile device, you can use any photo or video editing app on your smartphone or tablet to edit that content.
On the iPhone or iPad, for example, you can use the Photos app for editing digital images or clipping video content, whereas you can use Apple’s iMovie app for video editing while on the go.
For third-party apps, the Replay app is a powerful, but easy-to-use video editor, whereas apps such as Pixelmator, SnapSeed, Photogene 4, Adobe Photoshop Express, Adobe Photoshop Touch, Afterlight, and Pinnacle Studio offer powerful photo editing tools.