12. Adjusting the Camera’s Setup Menu Options
In this chapter, you learn about the options available from your camera’s Setup menu. Topics include the following:
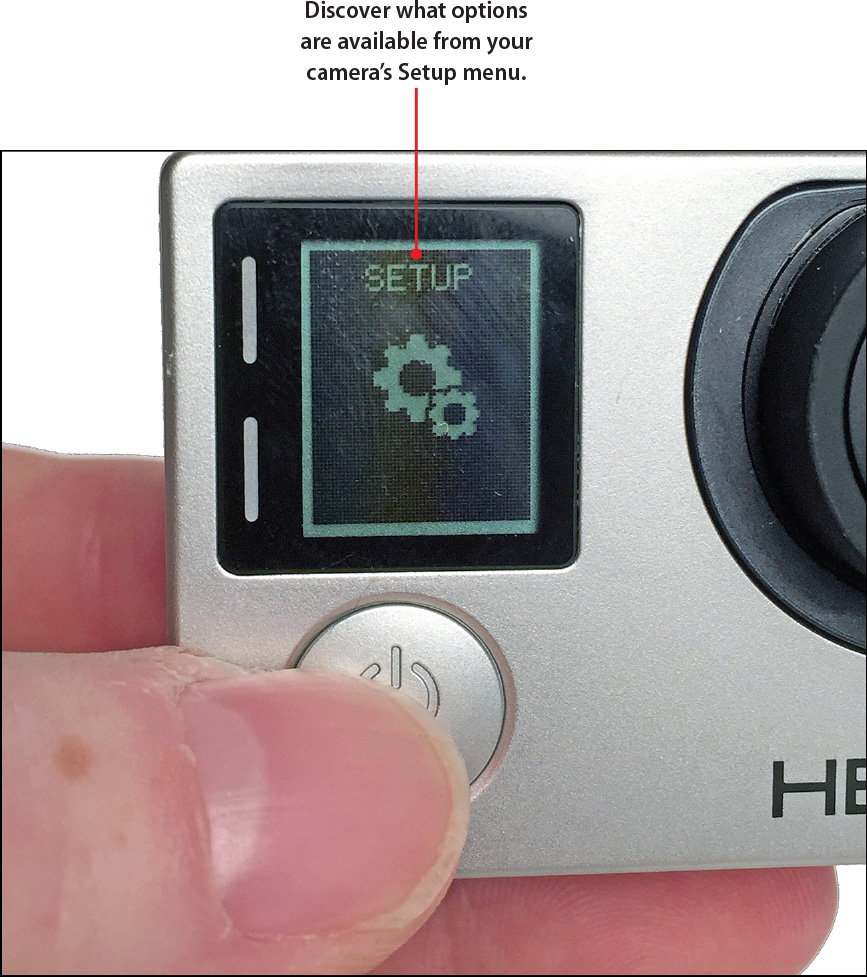
![]() Learn which specific Setup menu options to change to meet your needs
Learn which specific Setup menu options to change to meet your needs
![]() How to navigate your way around the Setup menu
How to navigate your way around the Setup menu
![]() How to set the Default shooting mode for your camera
How to set the Default shooting mode for your camera
You already know that each shooting mode that your camera offers has its own Settings options that enable you to customize that mode to best accommodate each shooting situation you encounter. However, your camera also has a main Setup menu, from which you can adjust options that relate to the overall operation of the camera. Each of these Setup options relate to all shooting modes.
Factory Defaults
Each Setup menu option has a default factory setting. After you adjust a Setup option, that change remains active until you manually alter it again or use the Reset command on your camera to return all Setup options to their factory default settings.
In this chapter you learn how to adjust each Setup-related setting directly from the camera, using the Smart Remote, using the LCD Touch BacPac display, or using the GoPro App with your smartphone or tablet.
Getting Acquainted with the Setup Menu Options
The following options are available from the Hero4’s Setup menu:
Menu Options Vary
The available Setup menu options will vary based on which GoPro camera model you use and which version of the Camera Software is installed on your camera.
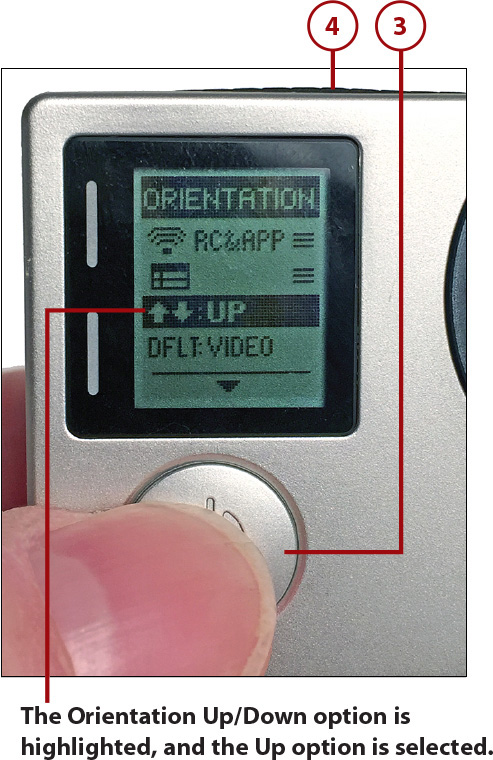
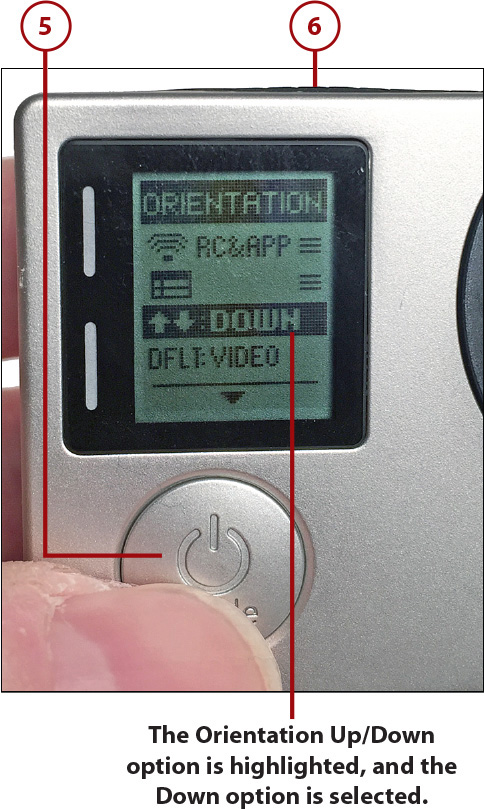
• Orientation Up/Down If you opt to mount the camera sideways or upside down while shooting, you must rotate your images or video footage during the editing process unless you first adjust this Orientation setting. When the Up option is selected, the camera assumes all filming will be done with the camera positioned right side up. When the Down option is selected, the camera assumes it will be mounted upside down when filming and will automatically rotate the image(s) and video on your behalf. This saves you a step during the editing process. If you’re using the Hero4 with the February 2015 Camera Software update, the orientation is now automatically adjusted by the camera, so this feature is not needed.
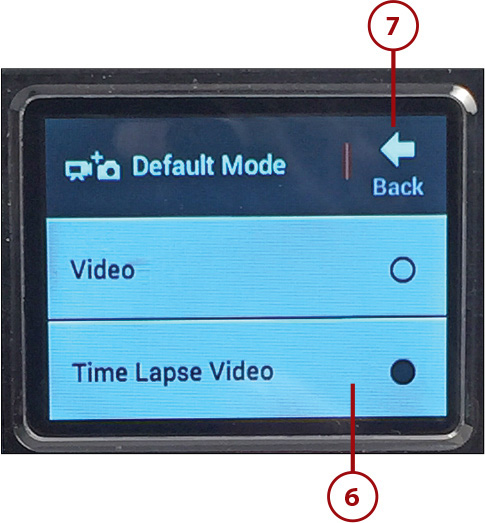
• Default Mode: Select which shooting mode is automatically active each time you turn on the camera. Shooting options include Video, Video+Photo, or Video Looping. If you’re using a Hero4 with the February 2915 Camera Software update, instead of Video Looping, a Time Lapse Video option is available. Options related to shooting digital images include Single, Continuous, Night, Burst, Time Lapse, or Night Lapse. In addition to choosing a shooting mode, you can then customize the Settings options for that mode, which will also become active each time you turn on the camera. For the Default mode, choose the shooting mode and related options that you will use most frequently.
Change Shooting Modes After You Turn on the Camera
Regardless of how you set the Default mode, when the camera is turned on, you always have the option to change the shooting mode before you begin shooting. Directly from the camera, repeatedly press the Power/Mode button to toggle between shooting modes.
• QuikCapture: When you turn on this feature, each time you power on your camera, it immediately begins shooting video or taking Time Lapse photos based on how you set up this feature. After you set up your camera, to use this feature, start with the camera turned off. Then, instead of turning it on by pressing and holding the Power/Mode button for 2 seconds, press and hold the Shutter/Select button for 2 seconds. The camera then starts filming video or taking Time Lapse photos immediately and keeps doing this until you press the Shutter/Select button again. (When you control the camera with the Smart Remote or GoPro App, QuikCapture is automatically disabled.)
• LED Blink: Your GoPro camera has four red LED Status Lights (located on the top, bottom, front, and back of the camera’s body) and uses all of them by default, so you can see them from any angle while the camera is in use. This Setup option enables you to instruct the camera to use all four lights, just two lights (the ones on the top and bottom of the camera), or none of the Status Lights as you use the camera.
Reasons to Turn Off the LED Status Lights
The LED Blink option you select is a matter of personal preference. If you can’t see the camera while filming, or you want to keep the camera as inconspicuous as possible, turn off all LED Status Lights. These lights use very little battery power, so turning them off does not significantly extend your battery life.
• Beeps: With the Status Lights, your camera beeps when it’s turned on or off, or when certain functions are used. This option enables you to adjust the volume of these beeps. The default option is 100% (the loudest possible). Other options include 70% or Off. When turned off, the camera won’t make sounds with its normal operation.
• Video Format: This option enables you to control frame rates when playing back video on a television set or monitor. Use the NTSC setting if you’re within North America or the PAL settings if you’re outside of North America.
• On Screen Display (OSD): This option has an on or off setting. When turned on, related icons and filenames appear on the screen as you play back video or view photos. When turned off, only the content displays. This option applies only when you view content on the LCD Touch BacPac display or when your camera is connected directly to a television set or monitor as you use the Playback feature.
• Auto Off: Determine if and when your camera will automatically turn itself off (to conserve battery life) after a predefined period of inactivity. Your submenu options include Never, 1, 2, 3, or 5 minutes. If you select Never, the camera remains on until the battery dies or you manually turn it off. When you select one of the other options, the camera powers itself off if that length of time goes without any buttons on the camera being pressed, or without the camera recording or shooting.
• Set Date and Time: Anytime you wirelessly connect your camera to the GoPro App or connect your camera to the GoPro Studio software running on your computer (using the supplied USB cable), the date and time within the camera will automatically be set or adjusted. Using this option, however, you can manually set the date and time.
Make Sure the Date and Time Are Correctly Set
Each time you take a photo or shoot video using your camera, the time and date that content was created is automatically recorded and saved. Thus, it’s important that you have the correct time and date set within your camera. If you travel between time zones, and don’t connect your camera to the GoPro App or GoPro Studio software, be sure to manually adjust the date and time as needed.
• Delete Last File: This command is used to manage content stored within your camera’s microSD memory card and does not relate directly to the camera’s operation. When you select and activate this option, the last photo or video you shot with your camera will be deleted from the SD memory card.
• Delete All Files From SD Card: This command is also used to manage content stored within your camera’s microSD memory card and does not relate directly to the camera’s operation. By selecting this option, all the content currently stored within your camera’s SD memory card will be deleted.
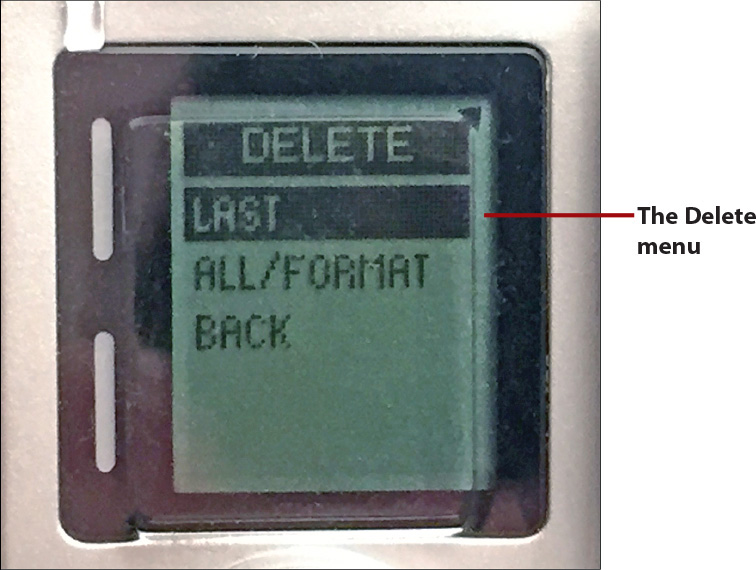
Delete Confirmation
Upon confirming the All/Format option, this reformats your camera’s memory card. Do not use this feature unless you’re 100 percent sure you’ve transferred to your computer or mobile device the photos and video files that you want to keep. When the content is deleted from the memory card, it is gone forever.
In some cases, you can hire a data recovery service to retrieve accidentally deleted files from the camera’s memory card, but this typically costs at least several hundred dollars and is not always successful.
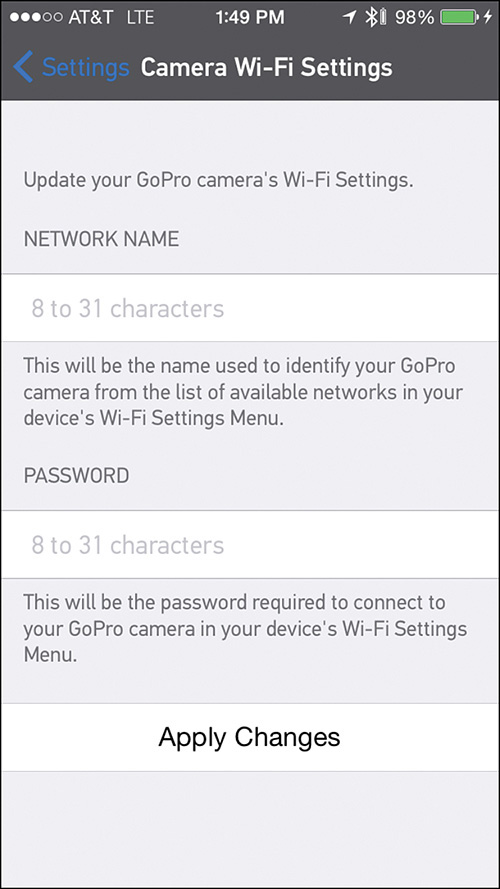
• Name: When you first set up the Smart Remote or GoPro App with your camera, you are asked to name your camera and create a password for it. The name given to your camera is also used as the Network Name your camera creates when establishing a wireless connection, and the password is used, so only you can access this network using the GoPro App (running on your smartphone or tablet). To change the Camera/Network Name and related password, select this Setup menu option, and then tap on the Apply Changes button after you update the Camera/Network Name and Password.
• Version: This is a non-interactive option that simply displays which version of the GoPro Camera Software is currently running on your camera.
• Locate Camera: This option has an on/off option and is used with the Smart Remote or GoPro App. When turned on, it activates the camera’s LCD Status Lights and Beeping feature, which enables you to easily locate the camera (assuming it’s turned on). This feature can be used to help locate your camera if you’re within relatively close proximity to it.
• Use with Current Wi-Fi Remote/Use with Smart Remote: When the camera’s Wireless feature is turned on, the camera can be set up to establish a wireless connection with a Smart Remote and the GoPro App (running on your smartphone or tablet), but only one of these options can be used at any given time. If the camera has already been set up to work with your Smart Remote, select the default Use with Current Wi-Fi Remote option. However, if you want to set up the camera to work with a different Wi-Fi Remote (or Smart Remote) select this Setup menu option, and then follow the directions in Chapter 5, “Must Have GoPro Camera Accessories,” to pair the camera with the new remote control accessory.
• Battery Level: This feature simply displays the camera’s current battery level.
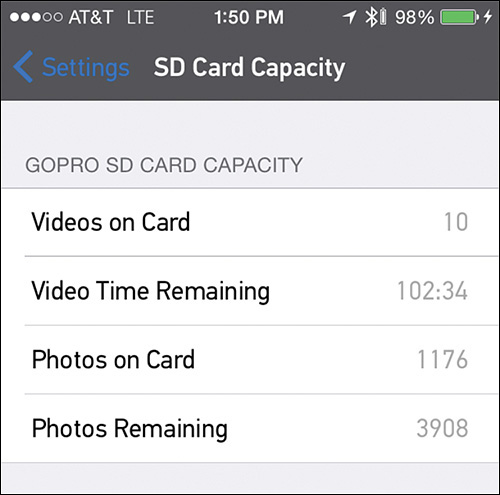
• SD Card Capacity: Select this option to review details about your camera’s SD memory card. Information that displays includes the number of videos currently stored on the camera, the amount of additional video that can be shot and stored on the memory card (based on its available capacity and the camera’s current shooting mode and settings), the number of digital photos stored on the current memory card, and the number of additional photos the memory card can hold (based on its available capacity and the camera’s shooting mode and settings).
Resetting Your Camera
Your camera has a built-in Reset command. When you execute this option, all Setup options are returned to their default factory settings. However, the date and time as well as the name and password you assigned to the camera when setting up the Wireless mode remain intact.
The Camera Reset command is not currently available via the GoPro App. To access it, you need to access the Setup menu directly from the camera, via the Smart Remote, or using the LCD Touch BacPac display.
If for some reason your camera becomes unresponsive, one option to try before using the Reset command is to press and hold the Power/Mode button for 8 seconds. Using this option, your camera’s personalized Setup settings remain intact.

Accessing the Setup Menu
You can access your GoPro camera’s Setup menu in four possible ways. You can do this from the camera directly, using the LCD Touch BacPac display, using the Smart Remote, or using the GoPro App (that runs on your smartphone or tablet).
Access the Setup Menu Directly from the Camera
To access and adjust the Setup menu directly from the camera, follow these steps:
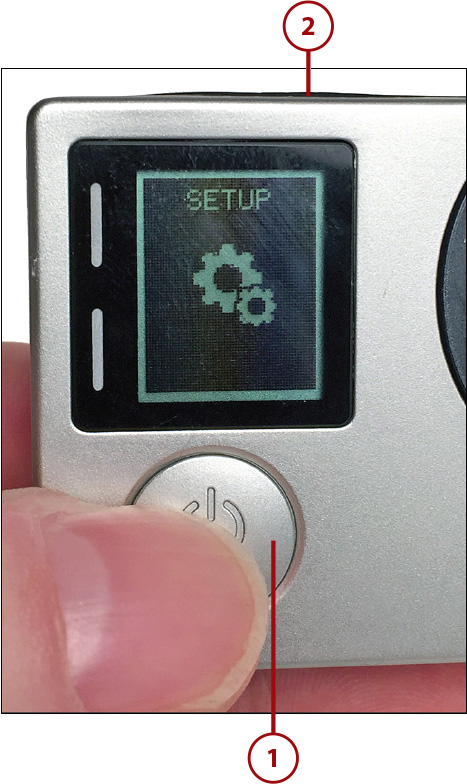
1. When the camera is turned on, while looking at the Status Screen, repeatedly press the Power/Mode button until the gear-shaped Setup menu icon displays.
2. Press the Shutter/Select button to access the Setup menu.
3. When the Setup menu displays within the Status Screen, repeatedly press the Power/Mode button to scroll down within the menu and highlight each feature.
4. When the feature you want to adjust is highlighted, press the Shutter/Select button.
5. Press the Power/Mode button to toggle through the submenu options.
6. Press the Shutter/Select button to activate a highlighted and selected option.
7. To exit out of the Setup menu, scroll down to the bottom of the menu, and select the Exit option.

Access the Setup Menu Using the LCD Touch BacPac Display
To access and adjust the Setup menu using the LCD Touch BacPac display using a Hero4 with the BacPac attached and powered on, follow these steps:
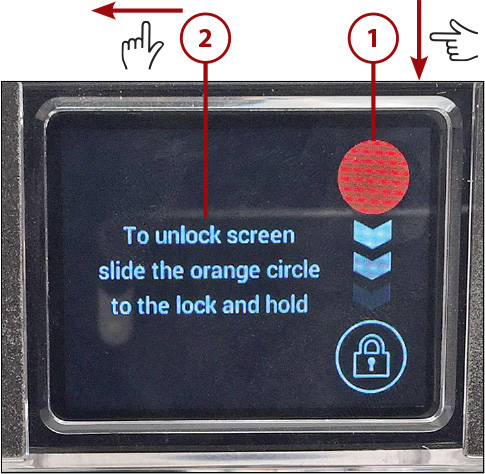
1. Unlock the screen by placing your finger on the red dot and dragging it downward until it covers the lock icon. Hold your finger in place until the screen unlocks.
Swiping
The LCD Touch BacPac for the Hero3 or Hero3+ is not compatible with finger swipes on the display. Instead, use the buttons on the camera to access menus, and then tap the screen to select menu options.
2. Place your finger at the right-edge of the display and swipe to the left. This opens the menu screen.
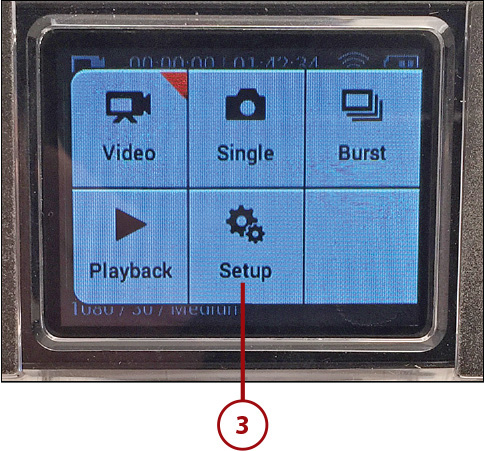
3. Tap on the Setup option.
4. Swipe up to scroll downward to see options not visible on the screen.
5. Tap on the Setup menu option you want to adjust.

6. When the selected option’s submenu appears, tap on the wanted setting.
7. Tap on the Back icon (displayed in the top-right corner of the screen) to return to the main Setup menu. Repeat steps 4 through 7 for each Setup option you want to adjust.
8. To exit out of the Setup menu, tap on the Exit X icon that displays in the top-right corner of the screen (not pictured).
Access the Setup Menu Using the Smart Remote
As you know from previous chapters, the information displayed on the Smart Remote’s Status Screen is identical to what’s displayed on the camera’s own Status Screen.
To use the Smart Remote to access the Setup menu, first establish a wireless connection between the camera and the Smart Remote. To do this, refer to Chapter 5.
While controlling the camera via the Smart Remote, press the Power/Mode button on the remote to toggle between the various shooting modes until the gear-shaped Setup icon displays. Then, follow the directions offered within the previous section (titled “Access the Setup Menu Directly from the Camera”); however, instead of pressing buttons on the camera, press the buttons on the Smart Remote.
Access the Setup Menu Using the GoPro App
To access and adjust the Setup menu using the GoPro App that’s running on your smartphone or tablet and paired with your camera, follow these steps:
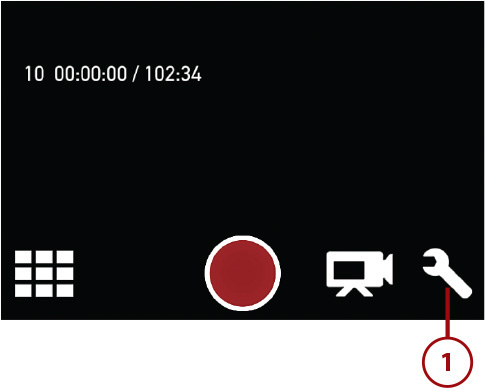
1. With the app open, tap the wrench-shaped Settings icon that displays in the lower-right corner.
Pairing Your Camera
Establish a connection between your GoPro camera and the GoPro App. (Refer to Chapter 15 for information on how to pair these devices and establish the wireless connection.)
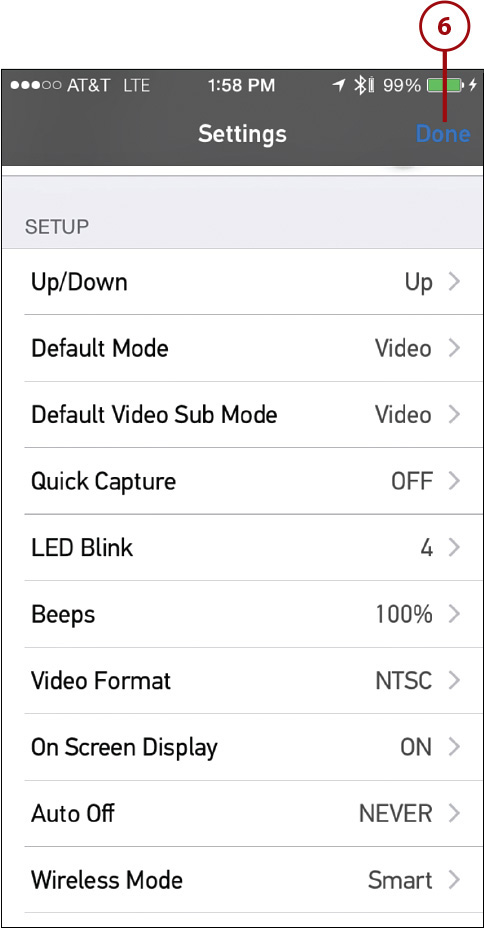
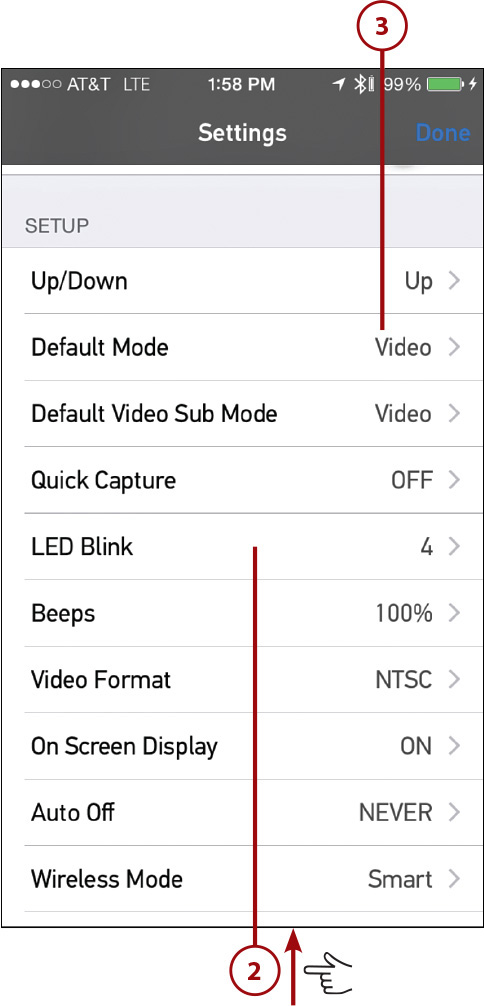
2. From the Settings menu, scroll downward. The options listed under the Setup heading all correspond to the options available from the camera’s Setup menu.
3. Tap on the Settings menu option you want to adjust to access its submenu.
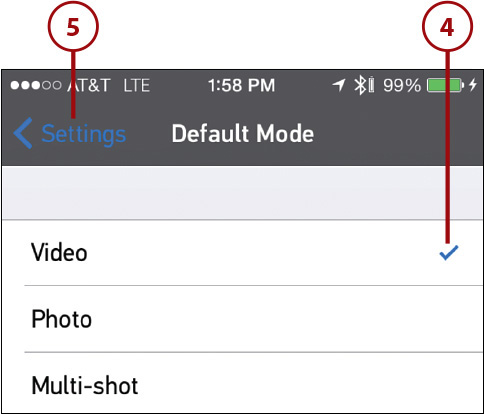
4. Tap on the new setting you want to use.
5. If you’re not automatically returned to the Setup menu, tap the Settings option in the top-left corner of the screen. Repeat Steps 2 through 5 to adjust other Setup menu options, one at a time.
6. Tap the Done option in the top-right corner of the Setup menu screen to return to the viewfinder screen and save your changes.