5. Must-Have GoPro Camera Accessories
In this chapter, you learn about some of the extremely useful and popular accessories for use with the GoPro cameras. Topics include the following:
![]() Remotely controlling your GoPro camera with a Smart Remote
Remotely controlling your GoPro camera with a Smart Remote
![]() Using the LCD Touch BacPac display
Using the LCD Touch BacPac display
![]() Giving your camera a power boost with the Battery BacPac
Giving your camera a power boost with the Battery BacPac
In addition to using your GoPro camera with a housing and mount that’s best suited to your shooting situation, GoPro offers several other extremely useful accessories that make the camera easier to use, give it added functionality, and enable you to capture better photos or videos.
Three of GoPro’s most useful accessories, which fall into the “must have” category for many GoPro camera users, are the Smart Remote, the LCD Touch BacPac display, and the Battery BacPac.
Remotely Control Your Camera with the Smart Remote
The GoPro Hero3+ offers Wi-Fi capabilities, whereas the Hero4 can use Wi-Fi and Bluetooth to establish a wireless connection between the camera and certain accessories, including GoPro’s handheld remote control for the camera, which comes bundled with certain camera configurations or is also sold separately ($79.99).
Additional Smart Remote Features
Originally, the wireless remote for the GoPro cameras was called the Wi-Fi Remote. However, with the release of the Hero4 camera, this useful remote control accessory was updated with enhanced capabilities and renamed. It’s now called the Smart Remote.
Using the battery-powered Smart Remote, you can remotely control all the camera’s options and adjust its settings from up to 600 feet. Like the camera, the Smart Remote is waterproof (but only to a depth of 33 feet), and it’s designed to be used in a wide range of shooting situations. For more serious photographers or videographers, another useful feature of the Smart Remote is that this one remote control unit can be programmed to wirelessly control up to 50 different GoPro cameras, either separately or simultaneously.
The GoPro Smart Remote that’s shown on the left (which works with the Hero3+ or Hero4) has a slightly different design than the original Wi-Fi Remote for the Hero3+ (shown on the right).

In addition to the large Power/Mode, Shutter/Select, and Settings/Tag buttons, which work exactly the same way as their counterparts that are built in to the GoPro camera body, the Smart Remote’s built-in LCD Status Screen mirrors exactly what displays on the camera’s Status Screen. The remote also has a Status Light built in that mirrors in real time what the Status Lights built into the camera display.
After you establish a wireless connection between the camera and the Smart Remote, you can
• Remotely turn on or off the camera.
• Adjust the camera’s shooting mode and settings.
• Control the camera wirelessly when shooting photos or video.
• Use the Hero4’s Tag feature to mark important moments as you shoot video, so you can find them faster during the editing process.
The Wi-Fi Remote Lacks the Settings/Tag Button
The older Wi-Fi Remote does not have a Settings/Tag button but functions similarly to the Smart Remote.
Charge the Smart Remote’s Battery
The Smart Remote (and older Wi-Fi Remote) has a built-in rechargeable battery that powers the device. Prior to using the remote, you need to charge it:
1. Remove the Attachment Key from the remote, if applicable. To do this, move the release switch on the back of the remote from right to left, and then pull out the Attachment Key.

2. Plug the larger end of the supplied Smart Remote USB Charging Cable into the bottom of the Smart Remote.

3. Plug the USB plug end of the cable into your computer’s USB port, or plug the USB plug into an optional Wall Charger or Auto Charger.

The Smart Remote Has Its Own Rechargeable Battery
When the Smart Remote’s battery is fully charged, a graphic of a fully charged battery displays on the remote’s Status Screen.
4. The Status Screen displays a battery-level graphic to indicate that it’s charging. Allow the Smart Remote’s battery to charge for at least 1 hour prior to initially using it.
5. Remove the USB Charging Cable from the Smart Remote, and if you choose, replace it with the Attachment Key.

Pair the Smart Remote with Your Hero4 Camera
Prior to using the Smart Remote for the first time, you need to pair this accessory with your camera. This process needs to be done only once. After this, it works automatically from up to 600 feet away. Follow these steps to initially pair your Hero4 with a Smart Remote:
1. Turn on the GoPro camera by pressing the Power/Mode button.
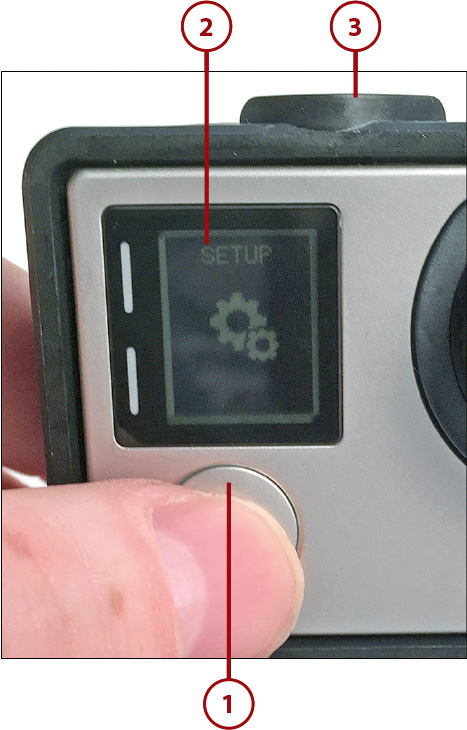
2. Press the Power/Mode button repeatedly to cycle through the menu options until the Setup option displays on the Status Screen.
The Touch BacPac Displays Easier-to-Understand Camera Menus
When accessing any GoPro Camera menus or adjusting its settings is required, this is easier to accomplish using the optional LCD Touch BacPac display—more information will be displayed on this touch screen, and you can navigate through the camera’s menus faster using your finger.
3. Press the Shutter/Select button to choose the Setup option.
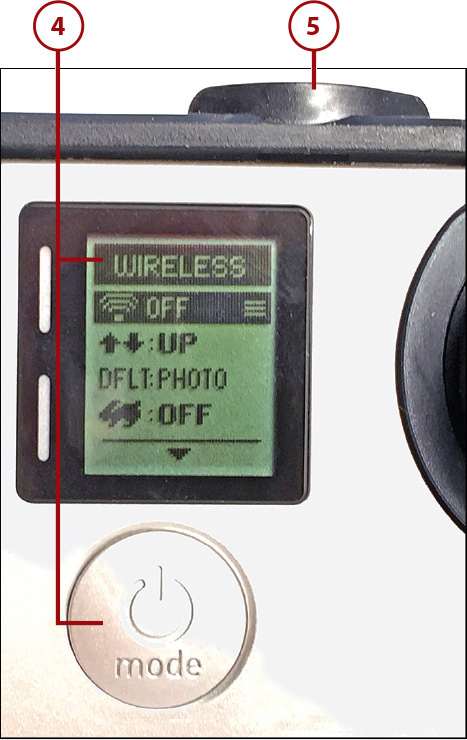
4. When the Setup menu displays, press the Power/Mode button repeatedly to cycle through the menu options until the Wireless option displays on the Status Screen.
5. Press the Shutter/Select button to choose the Wireless option.
6. When the Wireless menu displays, press the Power/Mode button repeatedly to cycle through the menu options until the WiFi RC (or RC & App) option displays on the Status Screen.
7. Press the Shutter/Select button to choose this option.

8. If the camera does not automatically enter into pairing mode in search of the Smart Remote device, cycle to the New (or New RC) option, and select it to place the camera into pairing mode.

9. On the Smart Remote, press the Power/Mode button to turn it on. Assuming it has never been paired with a GoPro camera, the remote unit will enter into pairing mode.
10. If the Smart Remote has been paired with other GoPro cameras previously, press and hold down the Settings/Tag button for approximately 4 seconds to initiate the pairing process.
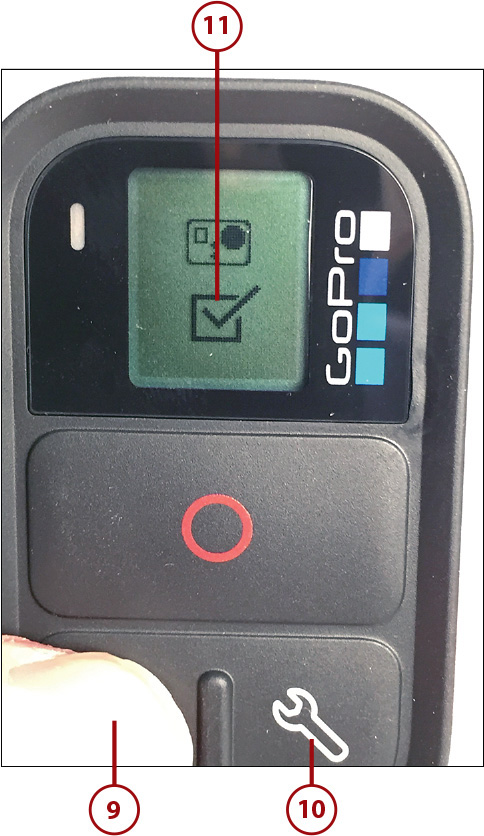
11. After the Smart Remote and Hero4 establish a wireless connection, a check mark graphic appears on both Status Screens. The Smart Remote now functions with the GoPro camera it’s paired with.
Directions for Hero3+ Users
You can find directions for how to pair the Hero3+ camera with the original Wi-Fi Remote or the Smart Remote on GoPro’s website at http://gopro.com/support/articles/how-to-pair-your-hero3-wi-fi-remote.
Using the Smart Remote with Your Camera
After pairing your camera with the Smart Remote, turn on the Wireless option that’s built in to the camera. At this point, you can operate the camera by pressing the buttons on the camera, or you can use the Smart Remote to handle any camera-related function remotely using the three buttons on the Smart Remote.
How to Turn on the Camera’s Wireless Mode
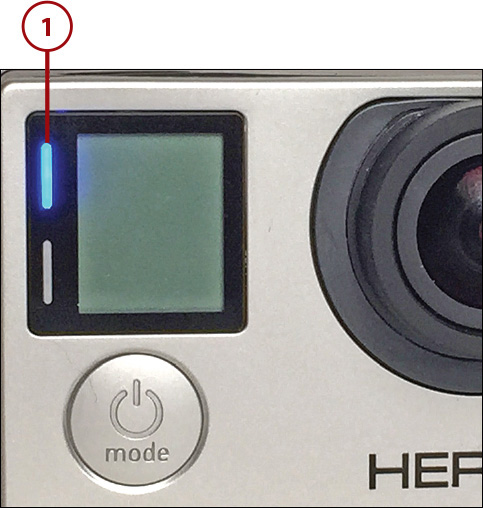
To turn on the camera’s Wireless function, turn on the camera, access the Setup menu, and from the Setup menu, select the Wireless option. From the Wireless menu, select the WiFi RC or RC & App option. When Wireless mode is turned on and active, the camera’s blue Status Light flashes, even when the camera is turned off.
If you plan to mount your camera on equipment where it won’t be easily accessible while you engage in a particular activity—or if you want to set up the camera on a tripod or mount but be standing away from the camera while you take pictures or film video—using the Smart Remote is a convenient and viable option.
Alternatively, if you’re a smartphone or tablet user, you can install the free GoPro App onto your mobile device, pair your device with your camera, and then control the camera remotely via the GoPro App from your mobile device. Chapter 15, “Using the GoPro Mobile App,” explains how to do this.
Control Your Camera with the Smart Remote
The Smart Remote buttons work just like the corresponding buttons on the camera’s body. You can turn on the camera remotely and begin taking digital photos using the Photo-related settings you previously selected (or the default Photo-related settings) by following these steps:
1. Make sure the camera’s Wireless mode is turned on. The blue Status Light should be flashing, even if the camera is turned off.
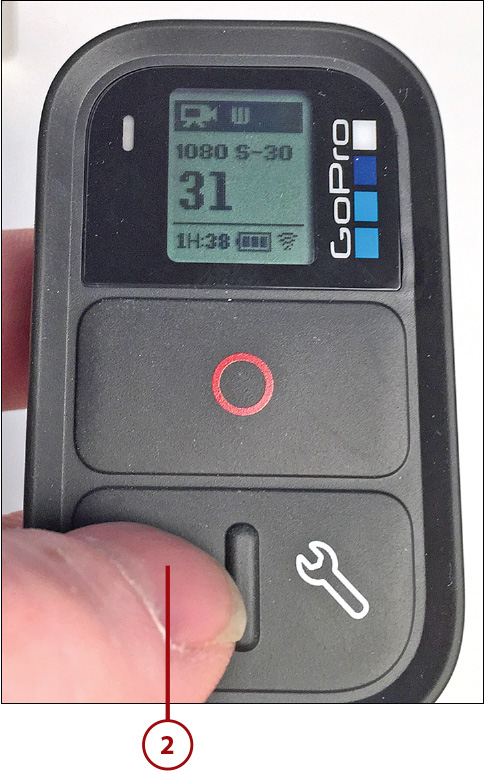
2. From the Smart Remote, press the Power/Mode button for 2 seconds to remotely turn on the camera. The Status Screen on the remote displays the camera’s main menu.
3. Press the Power/Mode button on the Smart Remote repeatedly to cycle through the menu options until the Photo option appears.
4. Press the Shutter/Select button on the remote to choose this option.

5. Set up the camera using a housing and mount, and frame your shot. Your GoPro camera is now turned on in Photo mode and ready to take pictures (not pictured).
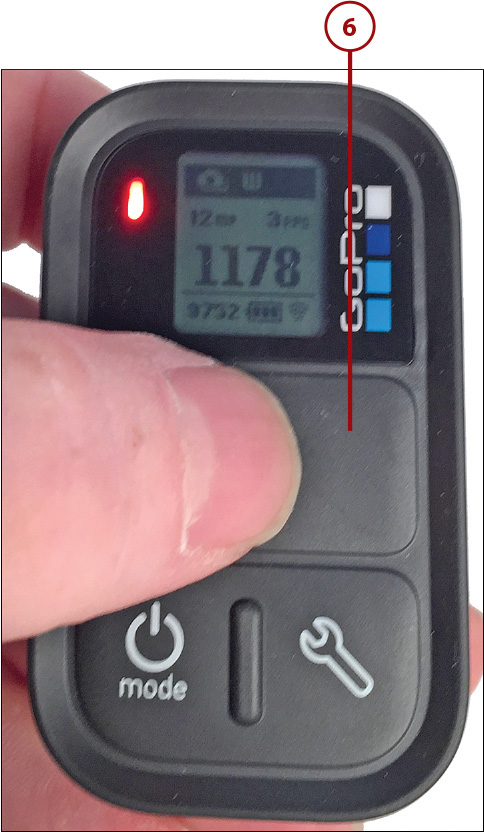
6. Using the Smart Remote, press the Shutter/Select button to take individual photos. Or use the Smart Remote to adjust the Photo mode’s settings before taking pictures.
More About Adjusting the Camera’s Settings
Chapter 8, “Shooting High-Resolution Photos,” includes information on how to adjust the camera’s photo-related settings and take pictures using your camera with or without the Smart Remote.
Chapter 10, “Shooting HD Video,” covers how to adjust your camera’s video-related settings, including its resolution and then shoot video using your camera with or without the Smart Remote.
Adjusting Settings with the Touch BacPac
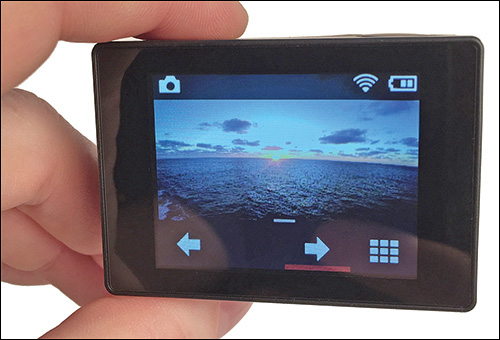
A viewfinder is one of the features that virtually all point-and-shoot and digital SLR cameras offer. The GoPro cameras, however, do not have a built-in viewfinder. If you want to see what you’re shooting in real time, you need to either invest in the optional LCD Touch BacPac display ($79.99), or use the GoPro mobile app with your smartphone or tablet.
See the World Through the Lens of Your Camera
It’s a camera’s viewfinder that shows you exactly what you’re about to shoot and what your camera’s lens has been set up and positioned to capture within your shots. Hence, if you’re using your GoPro like a traditional camera, where you hold it in your hands, point it outward, and shoot a subject, the viewfinder is an essential tool for properly framing your shots, whether you are shooting photos or video.
The LCD Touch BacPac is a small, optional add-on accessory for the GoPro cameras that attaches to the back of the camera’s body. It is powered by the camera’s rechargeable battery. Thus, when you use this convenient accessory, your camera’s battery life will be somewhat shorter.
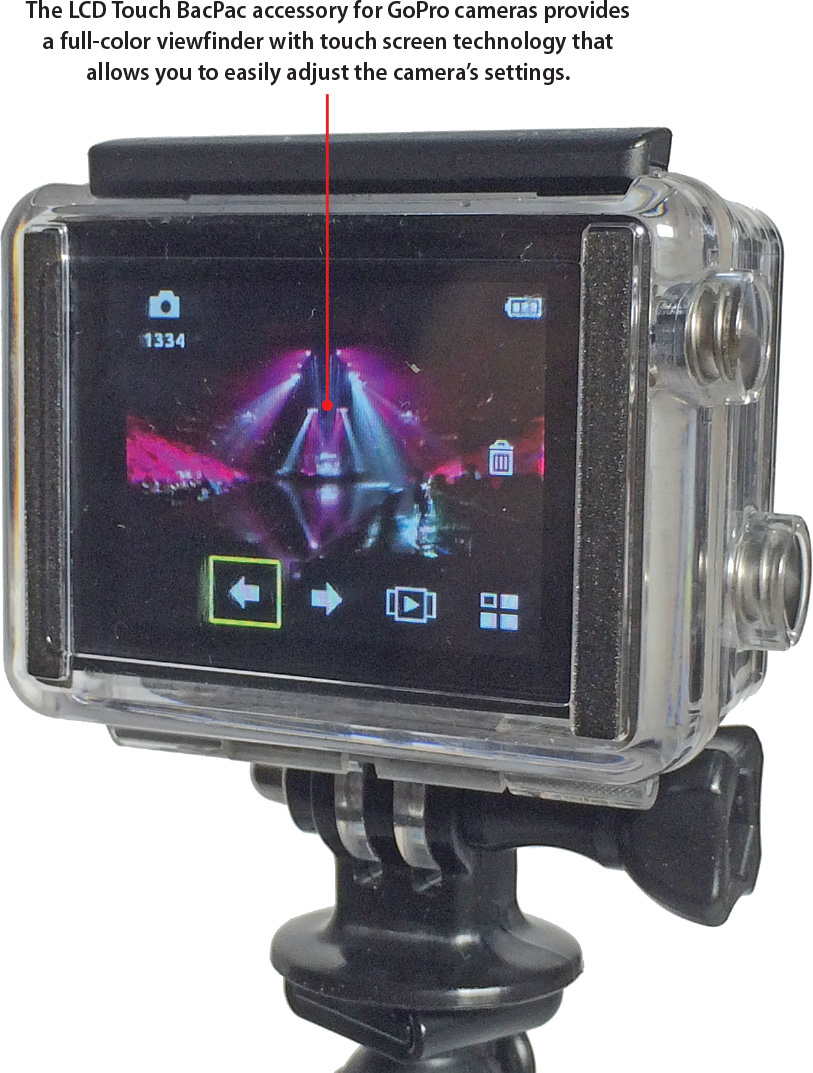
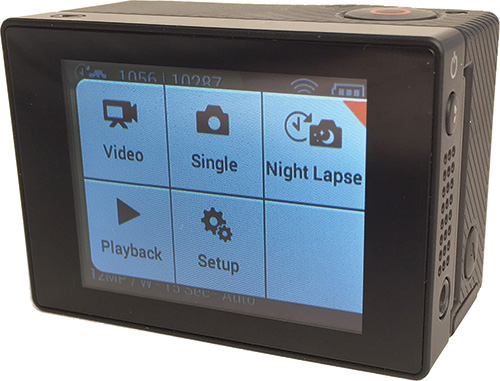
In addition to serving as a full-color viewfinder while shooting, the LCD Touch BacPac has touch screen capabilities that enable you to view and navigate through all the camera’s menus in a faster, straightforward, and efficient way. This method of adjusting the camera’s settings can replace your need to use the camera’s built-in Power/Mode and Shutter/Select buttons, as well as the camera’s Status Screen.
After you shoot photos or video, you can use the LCD Touch BacPac to play back your content without having to transfer your photos or videos from the camera’s memory card to your computer or mobile device.
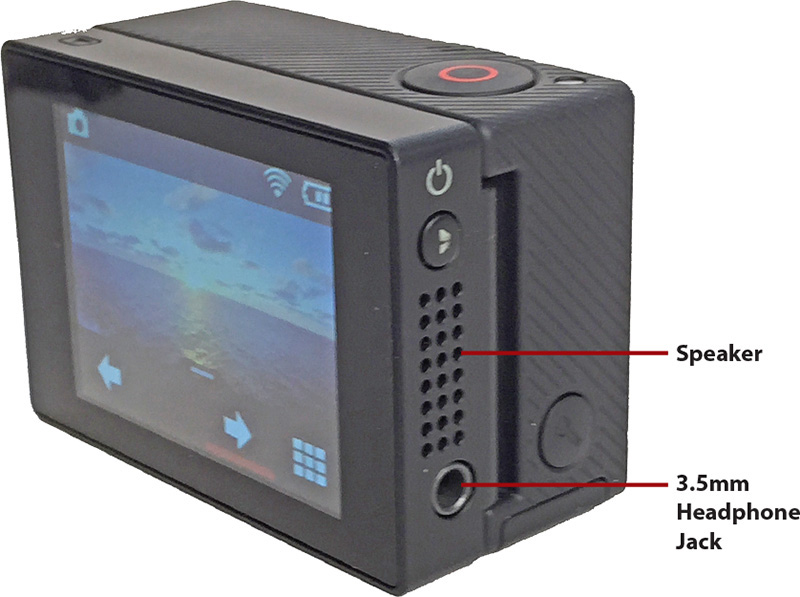
As you play back your video content on the LCD screen, you can hear the recorded audio either through the accessory’s tiny built-in speaker, or you can plug standard headphones into the built-in 3.5mm headphone jack.
To attach the LCD Touch BacPac to the camera, turn off the camera and point it so that the camera’s back faces you. Line up the hooked end of the accessory to the groove on the right side of the camera’s back.

Gently press the BacPac connector on the accessory into the camera’s Hero Port.
Hero4 Users Can Use Finger Swipes on the LCD Touch BacPac Display
In addition to allowing users to touch the screen to navigate through the menus and adjust camera settings, Hero4 users can also use finger swipe movements to perform certain tasks.
After the LCD Touch BacPac is connected to the camera, it automatically turns on whenever the camera is powered on. However, you can manually turn on or off this accessory by pressing its Playback button. If you’re not using any of the functions offered by this accessory, turn it off to conserve battery power.
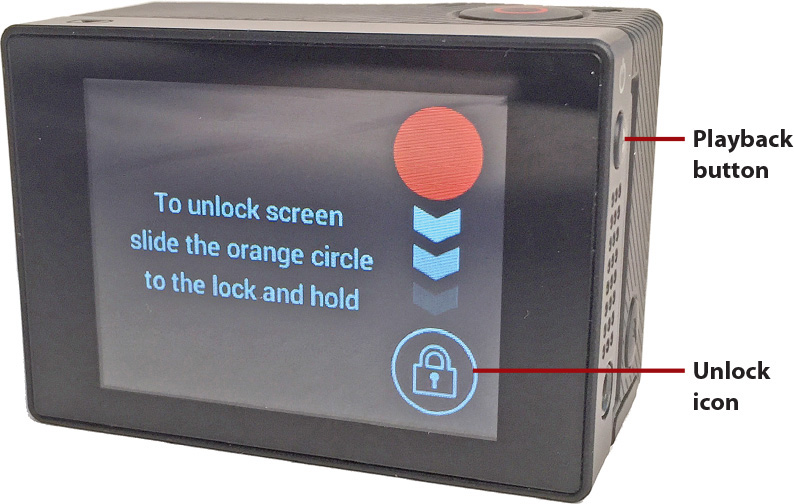
To unlock the touch screen, press your finger on the red dot and swipe downward to move the red dot over the lock icon. Hold your finger in place for several seconds after the red dot is dragged over the lock icon. An unlock animation displays, after which time the touch screen can then be used. Then, use finger taps or finger swipes on the touch screen to navigate through the camera’s menu options and to adjust camera settings.
Although you can preview and play back photos or videos on the LCD screen that’s built into the LCD Touch BacPac, the photos and video display at a much lower resolution than the content was actually shot in.
After content has been shot, press the Playback button to view your photos or videos on the LCD screen. You can then scroll through image thumbnails. To play a video, tap its thumbnail or press the Playback button. Tap the Thumbnail icon to return to the thumbnail screen and preview your content, or tap the “X” icon to exit out of the Playback menu.
When using the LCD Touch BacPac with your camera and a Standard Housing or Dive Housing, you need to replace the backdoor of the housing and use a supplied Touch BacPac backdoor if you want to use the touch screen while the camera is encased within a housing. However, this Touch BacPac backdoor is only waterproof to a depth of 10 feet.
If you want to use the LCD Touch BacPac as just a viewfinder (with no access to the touch screen) while providing full waterproof protection to the camera and the display, use it with a Standard Housing or Dive Housing, and use a BacPac backdoor (which offers waterproof protection to a depth of 131 feet).
When filming video in a calm and dry environment, attach a Skeleton BacPac backdoor to most of the GoPro’s housings to protect the camera, lens, and display from dirt or physical damage, plus record higher quality audio. No waterproof protection is offered with this option.
Use Your GoPro Like a Traditional Point-and-Shoot Camera
The LCD Touch BacPac is an extremely useful accessory if you want to use your GoPro camera more like a traditional point-and-shoot camera. However, if you plan to mount the camera on yourself or your equipment and then control it remotely using the Smart Remote or GoPro mobile app, the LCD Touch BacPac is unnecessary.
Give Your Camera a Power Boost with the Battery BacPac
Depending on which camera features and functions you use, in the best-case scenario, a fully charged GoPro battery will last only for 90 minutes of actual filming (often much less). Then, you need to either swap out the battery with a fully charged one, or stop using the camera to plug it in so that the battery that’s within it can recharge.
If you work on projects that require a lot of continuous filming, or you take the camera on a vacation and want to shoot photos and videos throughout the day without needing to change batteries often, consider investing in the optional Battery BacPac ($49.99). Designed to be the same thickness as the LCD Touch BacPac, this is an external battery pack that attaches to the back of the camera. It greatly extends the overall battery life of the camera per charge.
The Battery BacPac comes with a USB charging cable that plugs into the USB port of a computer, or you can use an optional Wall Charger or Auto Charger. You can remove the Battery BacPac from the camera when it’s charging, so you can continue shooting using either a second Battery BacPac or regular GoPro camera batteries.
When this accessory is connected to the camera, you must use a supplied BacPac backdoor with any of the GoPro housings because this battery pack increases the thickness of the camera body.
Learn to Extend the Battery Life of Your GoPro Camera
More information about using the GoPro’s rechargeable batteries, how to extend the life of the batteries per charge, and how to save money on replacement GoPro-compatible batteries is covered in Chapter 7, “Keeping Your Batteries Charged.”