10. Shooting HD Video
In this chapter, you learn about your GoPro camera’s video shooting modes, resolutions, features, and functions. Topics include the following:
![]() How and when to use each Video, Video+Photo, or Looping-related feature built in to your GoPro model
How and when to use each Video, Video+Photo, or Looping-related feature built in to your GoPro model
![]() Determine the best video resolution to shoot in based on your situation or needs
Determine the best video resolution to shoot in based on your situation or needs
![]() Navigating through the video-related menus using the camera, LCD Touch BacPac, Smart Remote, or GoPro App
Navigating through the video-related menus using the camera, LCD Touch BacPac, Smart Remote, or GoPro App
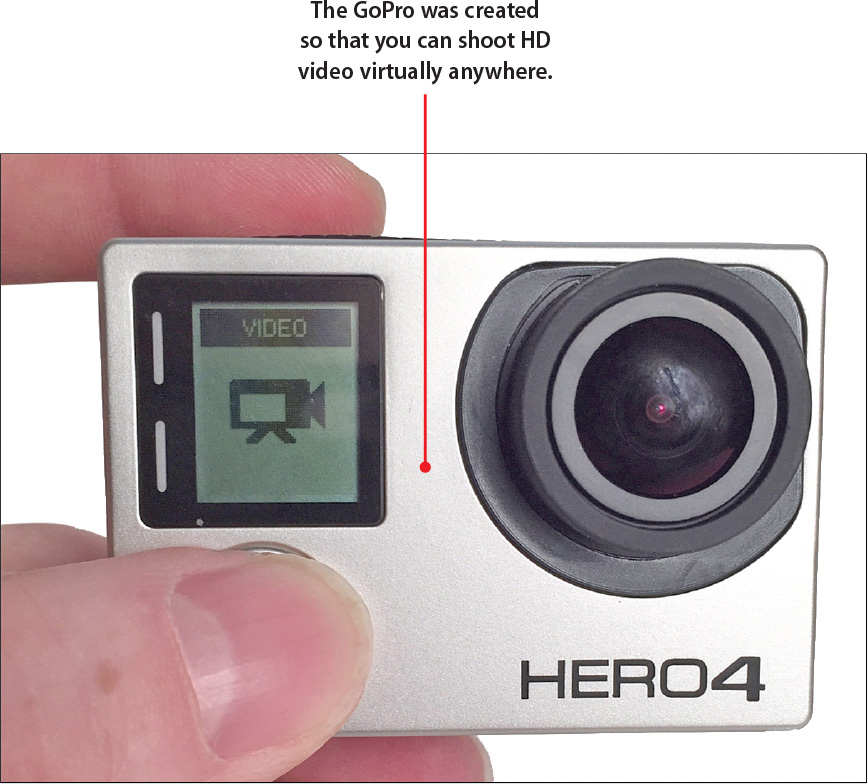
If you want to shoot HD video in traditional shooting situations, you can choose from thousands of video cameras. Your smartphone or tablet probably has a decent quality HD video camera built in.
However, if you want to capture stunning, clear, and high-quality video in and around water, snow, or other harsh conditions; capture first-person shots by mounting the camera onto yourself or your equipment; or mount the camera in a tight space and at a specific angle to capture the perfect shot—your GoPro camera is designed to excel in these situations.
Especially when shooting with the Hero3+ or Hero4, your camera is chock full of video-related features and functions, and it gives you plenty of options for shooting resolution, frames per second, and field of view.
When you encase the camera within an appropriate housing and use a mount that’s best suited for your shooting situation, you can quickly discover that when using your GoPro camera you are limited only by your imagination and not by the technology built in to the camera or its design.
Using Available HD Video Options
The GoPro Hero3+ and Hero4 cameras offer three main video-related shooting modes: Video, Video+Photo, and Looping. Each of these main options offers a variety of adjustable settings that enable you to customize that shooting mode to best meet your needs.
Thanks to GoPro’s February 2015 Camera Software update, the GoPro Hero4 has a new shooting mode called Time Lapse Video. See the later section “Shooting Time Lapse Video” to discover how to use this new shooting mode.
Use video for shooting HD video in your choice of resolutions. Video+Photo enables you to shoot video and simultaneously take high-resolution digital photos with your camera. The Looping mode enables you to capture only highlights in a particular shooting situation, at an interval you preselect. Use this option to save storage space on your camera’s microSD memory card because storing HD video files requires a significant amount of storage space.
After you capture your raw video footage, you need to edit it. You can do this using the free GoPro Studio software for the PC or Mac. (See Chapter 16, “Using the GoPro Studio Software,” or you can use any third-party video editing software on your computer or mobile device.)
As you’ll discover, the GoPro Studio software is fully compatible with some of your GoPro camera’s unique features and functions. For example, you can easily remove the fisheye effect your camera captures, or you can import video shot at different resolutions or settings so that all footage looks consistent in your final video production.
In addition, during this editing process, you can do the following:
• Pick and choose the shots or scenes you want to incorporate into your video production.
• Edit or trim shots or scenes to showcase the best visuals and highlights.
• Rearrange the order of shots and scenes.
• Digitally enhance the footage with special effects.
• Incorporate animated transitions between shots or scenes.
• Add music and sound effects to your production.
• Record and add voice overs to your production.
• Edit and enhance the audio that was recorded with the video.
• Export and share your edited video with others in a variety of ways, such as creating DVDs or uploading the video to YouTube.
As you plan your video shots and the ultimate shooting video, you will most likely edit the raw footage before you show it to other people.
Don’t worry; many powerful video editing programs and mobile apps are extremely easy to use and offer professional-quality features. As a result, you can often transform your raw video footage into an eye-popping visual experience for your viewers in a short amount of time.
Understand Your Goals When Shooting Video
Your goals when shooting video need to be capturing your subjects in the best way possible and using the most appropriate camera features, functions, and settings so that you have an overabundance of the best quality content possible when you begin the video editing process.
Shooting Video with Your GoPro
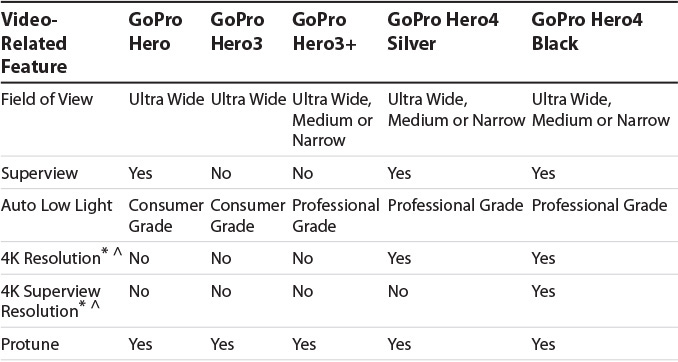
Each GoPro camera model offers a different selection of video-related features and functions and can shoot at a variety of different resolutions.
Because the top-of-the-line Hero4 Black includes all the video-related features and functions covered in this chapter, this is the camera model that is primarily discussed. However, Table 10.1 indicates which other GoPro camera models offer specific video-related features and functions.
Some GoPro Camera Models Offer Superview Resolutions
When you select a shooting resolution that includes Superview, this fully utilizes the built-in wide angle lens of your camera and enables you to capture a truly immersive field of view. More content can be captured around the edges of the frame, which enables you to showcase more detail when playing back video on a high definition, widescreen television or monitor.
Superview is ideal for capturing first-person perspective shots, but you can achieve better results when the camera is mounted to yourself or your equipment, or you use a tripod, because the camera becomes more sensitive to subtle shaking, vibration, or movement.

The GoPro cameras offer three main video-related shooting modes, each of which is useful for specific types of shooting situations. You will find, however, that you’ll be using the Video shooting mode the majority of the time.
After you select a shooting mode, access the Settings menu for that shooting mode to adjust shooting mode-specific settings based on your intended shooting situation and what you plan to do with your video footage after it’s been shot.
You need to choose the most appropriate shooting Resolution, Frames per Second rate, and Field of View when adjusting video mode-specific settings. These are three of the more important decisions you need to make based on your shooting situation, your creativity, and what you want to achieve.
Regardless of which shooting mode you select, you also can turn on or off the Spot Meter function, as well as turn on and adjust Protune-related settings.
To select the appropriate Resolution, FPS, and FOV, you can learn more about how to best make these decisions from Chapter 13, which covers the impact these settings have on your raw video, and how these settings impact your ability to edit and later showcase what you’ve shot.
More information about the camera’s Protune functions as they relate to shooting HD video is covered later in the section “Enhancing Video Quality with Protune.”
All Video-Related Functions Offer the Spot Meter and Protune Functions
After you select a Video shooting mode for your camera, you can adjust options related specifically to that shooting mode via the Settings menu.
At this point, you can also turn on or off the camera’s Spot Meter and Protune functions, which are explained in greater detail in the later section “Video Shooting Mode.” If you turn on the Protune function, a submenu of adjustable Protune-related functions will also be offered.
After you select a Video shooting mode and adjust its options, these selections remain active until you manually change them or until you turn off the GoPro camera. Then, when you turn the camera on again, its Default shooting mode and related settings are automatically activated.
You can select the Default shooting mode from the camera’s main Settings menu. See Chapter 12, “Adjusting the Camera’s Setup Menu Options,” for more information on how to set or change this option.
Video Shooting Mode
The Video shooting mode enables you to capture HD video, complete with audio. Whether you hold the camera, have it mounted on yourself or your equipment, or position it on a mount or tripod, when you press the Shutter button, the camera begins recording and continues recording until you press the Shutter button a second time.
As you record, the red Status Lights on the camera flash, indicating that the recording process is underway. When you begin the video recording process, the camera also beeps once and then beeps three times when you stop recording.
After selecting the Video shooting mode, but prior to pressing the Shutter button to begin recording, you have the option of accessing the Video shooting mode’s Settings menu, from which the following options are available:
• Resolution: Depending on which Hero camera you use, your choice of available resolution options will vary. The most comprehensive selection of resolution options is offered by the Hero4, which offers the following resolutions: WVGA, 720p Superview, 720p, 960p, 1080p, 1080p Superview, 1440p, 2.7K, 2.7K 4:3, 2.7K Superview, 3K, and 4K Superview.
• Frames Per Second (FPS): Based on which Resolution option you select, a different assortment of corresponding Frames Per Second options become available. For example, on the Hero4, if you select 1080p Superview, you can then choose between shooting at 24, 30, 48, 60, or 80 Frames Per Second.
• Field of View (FOV): Also based on which Resolution option you select, a different assortment of corresponding Field of View options become available. This helps to determine how much you’ll take advantage of the camera’s wide angle lens, and how much of what’s in front of and to the sides of the camera’s lens will be caught in the frame and recorded. Although some resolutions, such as 4K on the Hero4, offer only a Wide FOV option, the more common resolutions, such as 1080p on the Hero4, enable you to choose between a Narrow, Medium, or Wide Field of View.
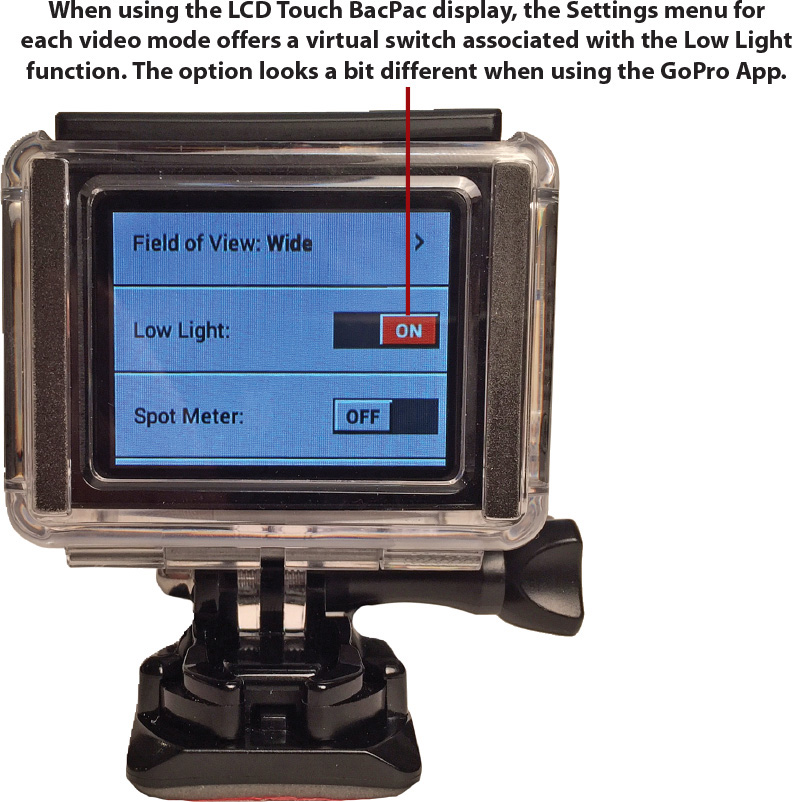
• Low Light: When turned on using the virtual switch displayed with this option within the Settings menu, the camera automatically compensates for low light or changing light as you shoot video. This is a useful feature to use when shooting in the evening or at night, as well as indoors when minimal lighting is available. This option is only available when certain Resolution options are selected.
• Spot Meter: When turned on, this feature enables you to capture clearer and more in focus shots when the camera is positioned in a dark or low-light area, but the subject is in front of the camera in a well-lit area. For example, use this feature if you sit in the audience at a show or concert and film the performers on the stage, or if the camera is positioned inside of a vehicle, but you shoot a subject that’s located outside of the vehicle in the sunlight.
• Protune: When turned on, this option enables you to manually adjust or fine-tune specific camera settings that are otherwise controlled automatically by the camera. Protune-related options include White Balance, Color, ISO Limit, Sharpness, and EV Comp.
Table 10.2 offers an overview of the Hero4’s available shooting resolutions, as well as the corresponding Frames Per Second and Field of View options available. Again, the Resolution options available, as well as their related FPS and FOV options vary, based on which GoPro camera model you use.

Video+Photo Shooting Mode
This shooting mode enables you to shoot HD video and simultaneously take digital images at a predetermined resolution and time interval. After you select the Video+Photo shooting mode, from the Settings menu, choose your video Resolution, FPS and FOV settings, and turn on/off the Spot Meter function. Protune is not available from this shooting mode.
In addition to the video-related settings, you need to select an Interval, which determines how frequently the camera takes a digital photo during the video filming process. Options include every 5, 10, 30, or 60 seconds.
Adjust the Photo Settings to select the wanted Resolution and corresponding Field of View for the digital images.
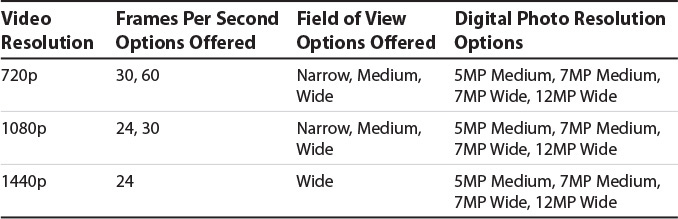
When you select Video+Photo, the Hero4’s Video Resolution options are limited to 720p, 1080p, and 1440p. Based on which of these resolutions you select, more limited FPS and FOV options are available (compared to when using the Video shooting mode).
Table 10.3 showcases what Video Resolutions, FPS and FOV options, as well as what Digital Photo Resolution options are available when the Video+Photo Shooting mode is selected on the Hero4.
After choosing the Video+Photo shooting mode and then adjusting its settings, press the Shutter button to begin filming HD video and capturing digital photos. The filming process continues until you press the Shutter button again.
Looping Video Mode
This video option enables you to preselect a time interval, such as 5, 20, 60, or 120 minutes, and then have the camera capture and record video during that time period. When the selected time period ends, if you press the Shutter/Select button, the video recording is saved onto the microSD memory card and a new recording begins.
However, if you fail to press the Shutter/Select button at the end of the predetermined time period, the recording is not saved. The camera, however, begins the recording process again.
From the Interval submenu related to this Looping Video feature, in addition to the predetermined time periods (5, 20, 60, or 120 minutes), there’s also an option called Max. When you select this Max option, the camera keeps recording HD video (using the settings you choose) until the microSD memory card reaches capacity. At this point, you can either save the footage or allow the camera to automatically erase the previously recorded footage and begin recording again until the camera’s memory card is filled.
The Camera Records Separate Video Files
As the 5-, 20-, 60-, or 120-minute video files are recorded and saved to your camera’s memory card, each time segment recording is saved as a separate file. This makes it easier to find and edit specific files. Or using photo editing software, such as GoPro Studio, multiple time segment recordings can be edited together into a longer video.
All the video resolution, FPS options, and FOV options available from your camera’s Video shooting mode are also offered when you select the Video Looping mode on your compatible GoPro camera model (refer to Table 10.2).
Taking Advantage of Hero4’s Hilight Tagging
One of the skills you need to fine-tune as you become a videographer using your GoPro camera is keeping track of what raw footage you might want to use later during the editing process. In many situations, you might shoot 5, 10, or even 20 times more video footage than you’ll actually feature within your final video project.
As you’re filming, one feature that can help you keep track of awesome scenes or shots is GoPro’s Hilight Tagging feature. It’s available exclusively on the Hero4 cameras.
When filming HD video, if you want to mark a specific moment or shot, so you can quickly find it later when editing, simply press the Settings/Tag button that’s located on the side of the Hero4.
Later, you can view these tags as you play back video using the GoPro App on your mobile device or the GoPro Studio software on your computer. The tags, however, do not become part of your final video production that your audience sees.
Create a Tag from the Smart Remote
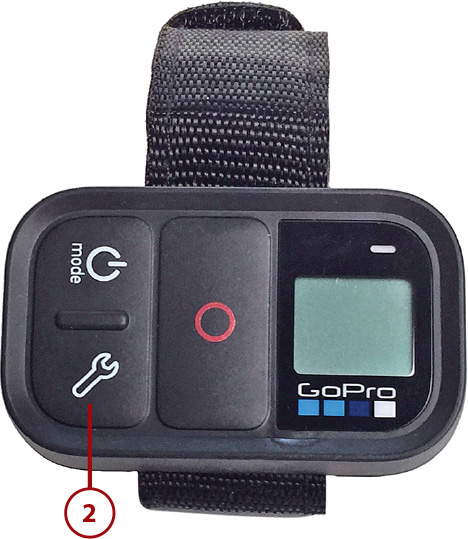
Instead of pressing the Setting/Tag button on the side of the camera while filming, you can also create tags directly from the Smart Remote:
1. Start a recording with your GoPro camera (not pictured).
2. Press the Settings/Tag button on the remote control unit to add a tag to the video file as it’s being recorded.
Create a Tag from the GoPro App
You can also create tags directly from the GoPro App:
1. Start a recording with your GoPro camera (not pictured).
2. Open the GoPro App.
3. Press the bright yellow Tag button (displayed on the app screen to the right of the Shutter button).

Shooting Time Lapse Video
One of the new features added to the GoPro Hero4’s Camera Software update in February 2015 is a new shooting mode called Time Lapse Video. This video mode allows the camera to start and stop shooting video in short bursts, and at a pre-set time interval. This enables you to later edit and view the footage as a cohesive and seamless time lapse video clip, without having to stitch together a group of digital images.
After selecting the Time Lapse Video mode, access the mode’s Settings menu to adjust the Interval, Resolution, FPS, FOV, and Spot Meter (On/Off) options. The Interval options available include every 5 seconds, 10 seconds, 30 seconds, or 60 seconds. The Auto Low Light option is not offered when shooting Time Lapse Video.

Capture Time Lapse Video
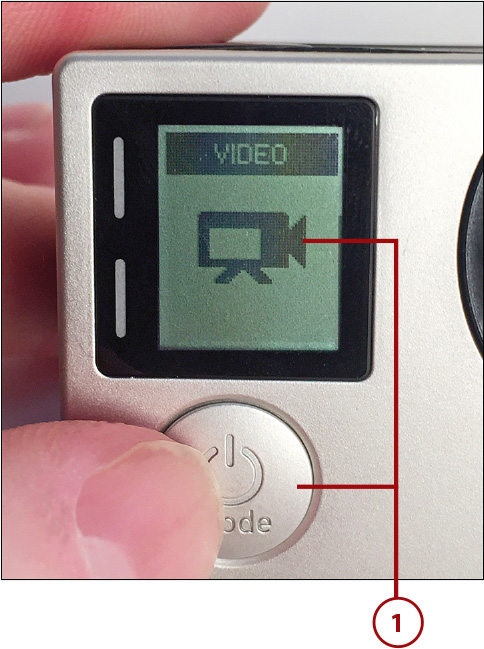
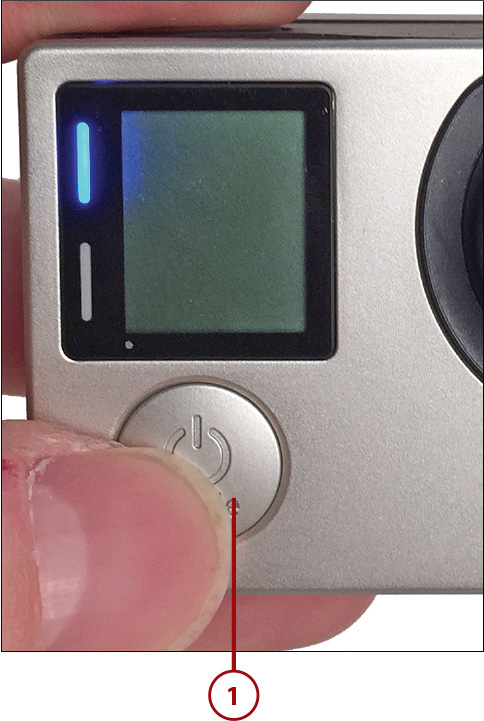
To set up and begin shooting in Time Lapse Video mode directly from the camera, turn it on and follow these steps:
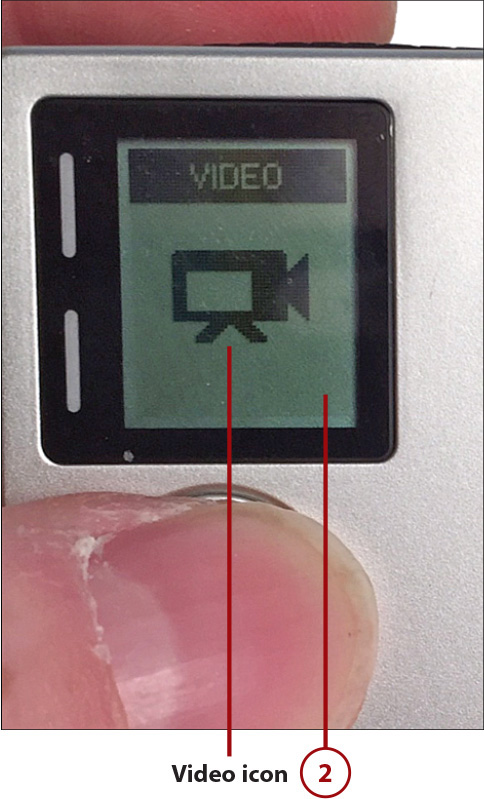
1. Press the Power/Mode button repeatedly until the Video mode icon appears on the Status Screen.
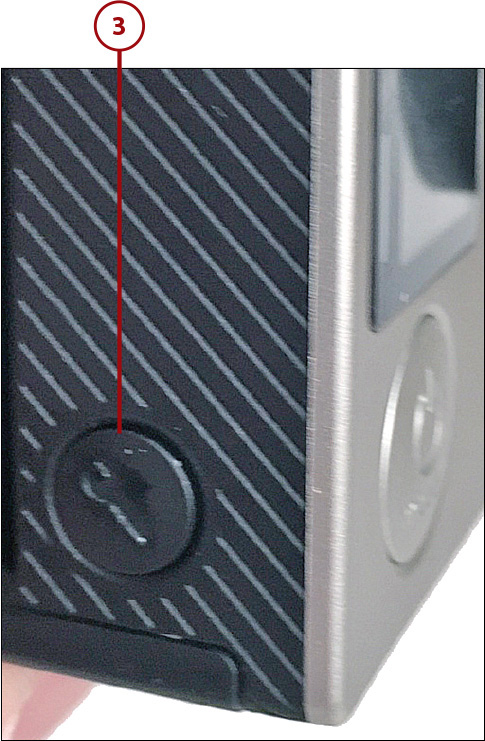
2. Press the Settings/Tag button to access the Video mode’s Settings menu (not pictured).
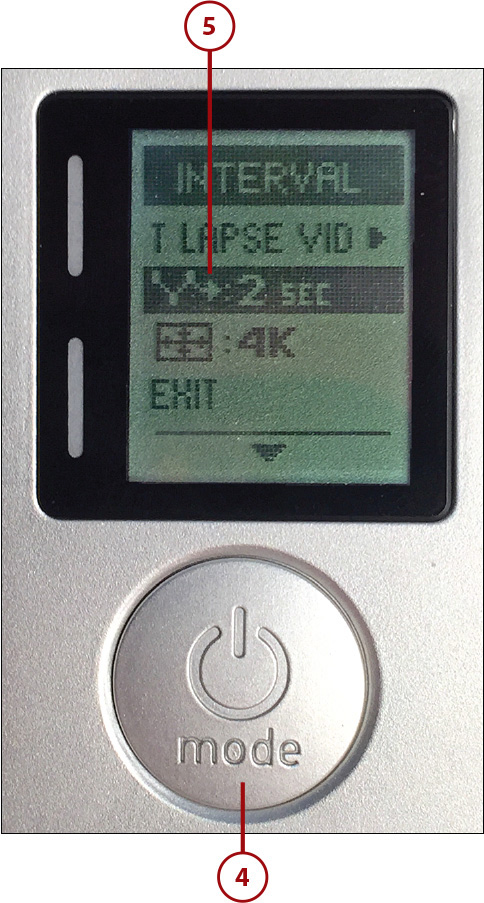
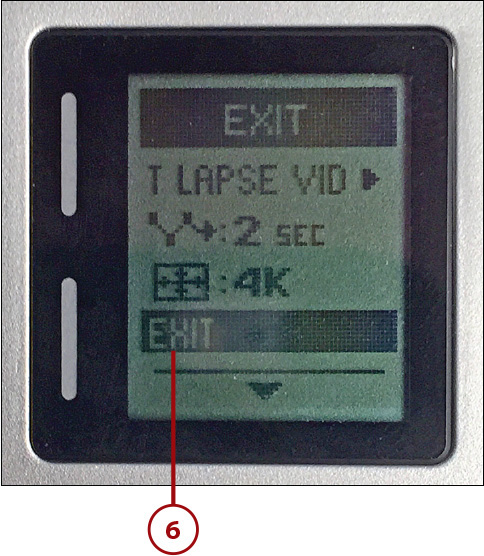
3. Press the Shutter/Select button to toggle through the options, until the T Lapse Vid (Time Lapse Video) option is displayed.

4. Press the Power/Mode button to scroll down within the Setup menu and adjust each Time Lapse Video-related option, one at a time. Options include Interval, Resolution, FPS, FOV, and Spot Meter (On/Off).
5. Once an option is highlighted, press the Shutter/Select button to toggle through the options, and then press the Power/Mode button to select the displayed setting and move to the next option within the menu.
6. When you’re done adjusting the Time Lapse Video-related options, scroll down to the Exit option and select it. You’re now ready to begin shooting Time Lapse Video using your GoPro Hero4.
Using the App
Of course, you can also adjust the camera’s shooting mode via the Smart Remote or GoPro App.
Time Lapse Video Shooting Strategies
When you’re ready to start shooting Time Lapse Video, set up your camera using a tripod or stand so that it will remain very stable. There should be no camera movement whatsoever.
Press the Shutter button once to begin recording. The camera will begin shooting one video frame at a time at the pre-set time interval and continue doing this until you press the Shutter button again to stop recording.
The Time Lapse video is stored as a single video clip on your camera’s microSD memory card. If you want access to individual Time Lapse images, use the Time Lapse mode in Photo mode, not the Time Lapse Video mode.
Keep in mind that when you play back the Time Lapse Video footage, the sequence is very short, even if you filmed over a several hour period. Thus, to give you the most flexibility when editing, allow the camera to shoot more additional time lapse sequences than you think you’ll actually need. You can always delete the unwanted footage later.
Enhancing Video Quality with Protune
The Protune (PT) feature is designed for more advanced GoPro users. It enables you to have greater manual control over specific camera settings related to shooting video.
Using Protune, you can capture higher-quality results because the camera utilizes less data compression on your raw video footage, plus better captures natural colors within your shots. The raw digital video footage is then more compatible with higher-end and professional-level video editing software packages, which means you can take full advantage of the more advanced editing tools built in to that software.
Regardless of which video-related shooting mode you select, from that mode’s Settings menu, you can turn on or off the Protune feature via a virtual on/off switch in the GoPro app.

When turned on, five additional menu options become available, and each can be adjusted for that particular Video shooting mode. You can set the Protune-related settings differently for each video and photo-related shooting mode.
The adjustable Protune options include
• White Balance
• Color
• ISO Limit
• Sharpness
• EV Comp (Exposure Value Compensation)
When Protune is turned off, the camera automatically adjusts each of these settings on your behalf. This requires less decision making and tinkering with camera settings on your part prior to shooting.
Adjusting White Balance
The White Balance setting allows the camera to adjust all the colors and tones displayed within each video frame, based on what the camera perceives to be the color white in each frame.
When this option is set to Auto (which is the default), the camera automatically analyzes each video frame as it’s being shot and adjusts the color tone based on the conditions it senses.
• If you shoot video in an area with natural, warm light, such as incandescent lighting (indoors), or during a sunrise or sunset, consider selecting the 3000K White Balance option to capture more authentic colors.
• If you shoot in areas lit by fluorescent lighting or in average daylight, select the 5500K White Balance option.
• When shooting in cool lighting (such as when outside in overcast conditions), use the 6500K White Balance option.
• If you plan to use higher-end video editing software that offers White Balance controls to later edit or enhance your raw footage, select the camera’s Native White Balance option when actually shooting video.
Adjusting Color
The Adjusting Color option enables you to manually select the color profile used by the camera when shooting video. The default GoPro Color option uses the same color profile as when the Protune feature is turned off. When you select the Flat option, this enables you to easily edit the color in your video later, using video editing software, to showcase truly natural or authentic looking colors within an image.
Adjusting ISO Limit
Use the ISO Limit setting to manage the camera’s sensitivity to light, especially when shooting in low-light situations. Based on which option you select, you can manage the brightness of your video footage and somewhat control the unwanted graininess (or noise) captured within the footage by the camera due to poor lighting.
To achieve brighter footage when shooting in low light, select the default 800 ISO Limit option. The video, however, showcases more noise, which takes away from the detail, image sharpness, and vibrancy of color that’s depicted.
The 400 ISO Limit option results in slightly darker footage (when shooting in low light), but the video contains less noise than with the 800 ISO Limit option selected. As a result, your video showcases a bit more detail and sharpness.
If you shoot indoors with decent (but not bright) lighting, choose the 200 ISO Limit option. When shooting outdoors in daylight, the 100 ISO Limit option generates the least amount of noise, resulting in a sharper, brighter, and more vibrant footage.
Adjusting Sharpness
To manually adjust Sharpness while shooting video, the Protune option offers three options: High (which is the default setting), Medium, and Low.
Choose the High setting to achieve ultra-sharp image quality in your videos. Choose the Medium setting to capture what GoPro calls “moderately sharp” video footage, or use the Low option to capture softer video footage that showcases a bit less detail.
Adjusting EV Comp
EV Comp, which stands for Exposure Value Compensation, also impacts the brightness of video as it’s being taken. If you shoot in areas with contrasting lighting conditions, adjusting this setting can help you capture better quality video overall. The available EV Comp options range from –2.0 to 2.0, with the default option being 0.0.
Reset the Protune Options
By selecting the Reset option related to a specific Protune menu, you can reset all the related options to their default settings. However, the changes to their default settings will apply only to the Protune options for that specific shooting mode.
Switching Between Video-Related Shooting Modes
When the camera is turned on, you can switch between Video shooting modes in four ways and then adjust shooting mode-specific settings, including
• From the camera directly
• Using the LCD Touch BacPac display
• Using the Smart Remote
• Using the GoPro App that’s running on your smartphone or tablet
After selecting a Video shooting mode and adjusting the mode-specific Settings, you might also want to access the camera’s Setup menu and adjust the Orientation Up/Down feature if you plan to hold or mount the camera sideways or upside down.
If you know the camera will be mounted upside down while shooting, turning on the Orientation Up/Down feature allows the camera to automatically rotate the video you shoot, which can save you a step during the editing process.
Thanks to the February 2015 Camera Software update, the Hero4 will automatically rotate your video footage as needed during the shooting process, so you don’t need to worry about this Orientation Up/Down option. It still applies to other Hero camera models, however.
For directions on how to turn on/off this Orientation Up/Down feature, see Chapter 12.
Switch Video-Related Shooting Modes Directly from the Camera
To switch between video-related shooting modes and then adjust shooting mode-specific settings before taking pictures using the Hero4, follow these steps:
1. Turn on the camera by pressing and holding the Power/Mode button for approximately 2 seconds.
2. While looking at the camera’s Status Screen, repeatedly press the Power/Mode button until the icon for either Video mode displays. Stop pressing the Power/Mode button when the Video icon is visible to turn on the Video mode.
3. When the camera is in Video mode, to select between the Video, Time Lapse Video (Hero4 only), Video+Photo, or Looping Video mode, press the Settings/Tag button on the side of the camera to access the Video’s Mode submenu.
4. The first option listed within the Mode submenu that displays on the Status Screen enables you to toggle between shooting modes. Repeatedly press the Shutter/Select button to switch between Video, Video+Photo, or Looping Video mode until your wanted option displays. When using the Hero4 with the February 2015 Camera Software update, the Time Lapse Video option will also be listed here.
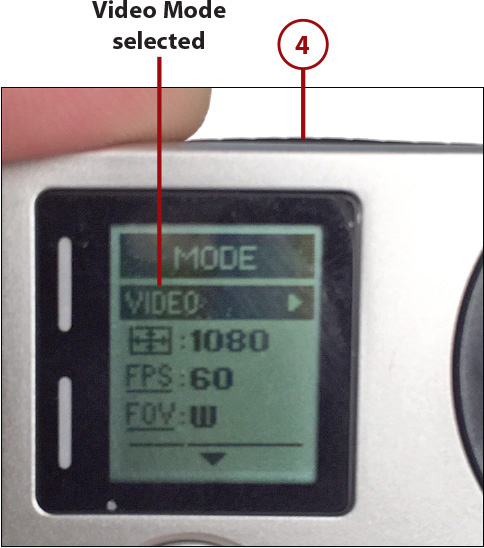
5. The shooting mode that’s highlighted and displayed near the top of the Mode menu is the one that’s selected and currently active. Below this menu option are the currently selected Settings-related options for that shooting mode.
6. Press the Power/Mode button to highlight, select, and then adjust one or more shooting mode-specific settings (one at a time).
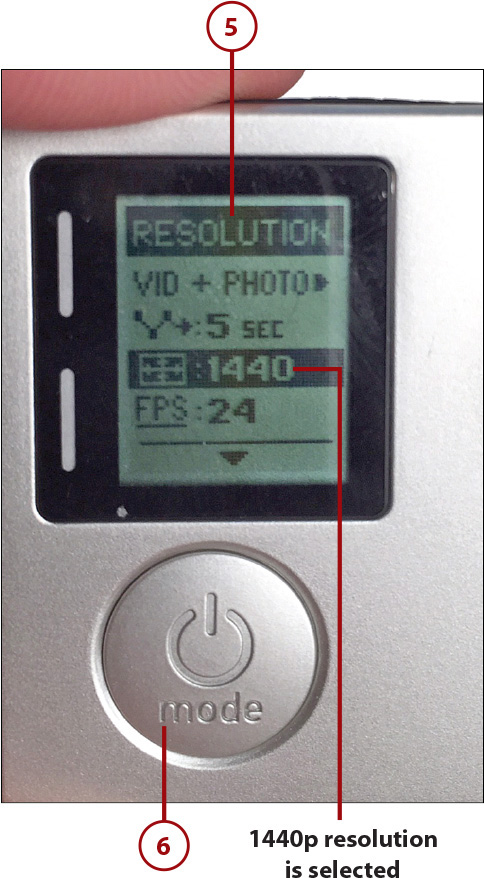
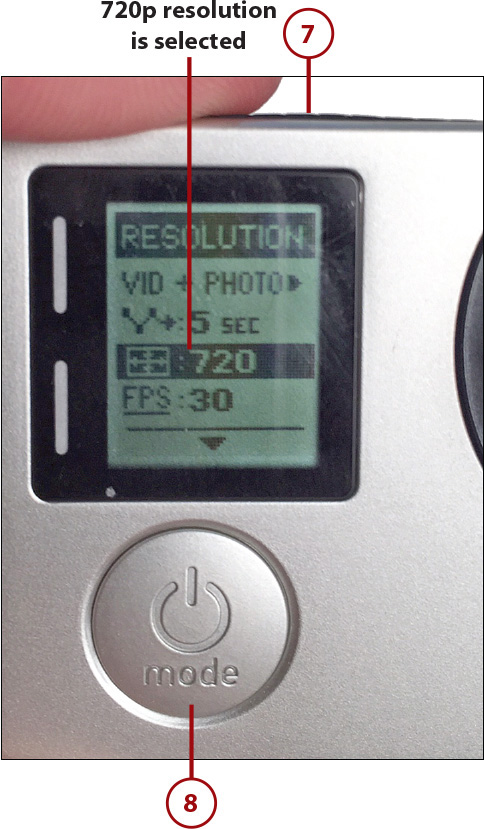
7. After a submenu option is highlighted (by pressing the Power/Mode button), press the Shutter/Select button to select the highlighted option’s submenu or toggle between available options.
8. After the desired settings-related option displays, press the Power/Mode button to select it. Repeat Steps 5 through 7 for each shooting mode-specific setting you want to alter prior to shooting.
Switch Video Shooting Modes Using the LCD Touch BacPac Display
To select a specific Video shooting mode and adjust that shooting mode’s settings using the LCD Touch BacPac, attach the BacPac to the camera and, with the camera turned on, follow these steps:
1. Tap the BacPac display and unlock it by swiping down.

2. When using the Hero4, place your finger on the right side of the display and swipe to the left to access the camera’s main menu. (Alternatively, or when using a different GoPro camera model, press the Settings/Tab button or the Wi-Fi button on the side of the camera to access the menu.)
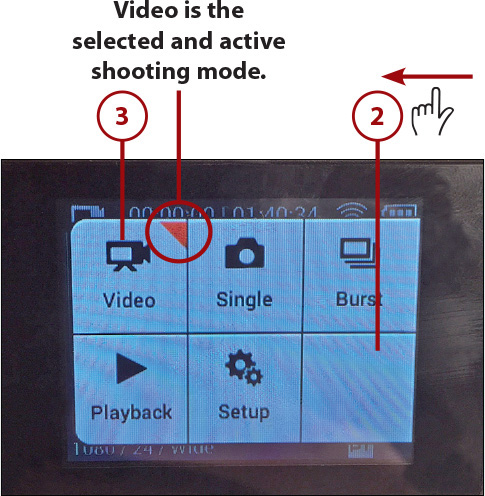
3. Tap the Video mode option displayed in the top-left corner of the menu. The currently selected and active shooting mode displays a red triangle in the top-right corner of the icon. You will automatically return to the main viewfinder screen.
4. After you select the main Video mode option, to switch between Video shooting modes, place your finger at the bottom center of the touch display, and this time swipe upward. Using the Hero4 this displays the Settings menu specifically for the active shooting mode.
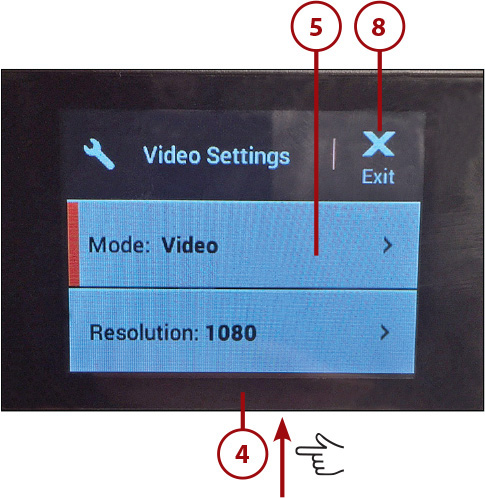
5. Tap the Mode option to select a specific Video shooting mode (Video, Video+Photo, or Looping Video).
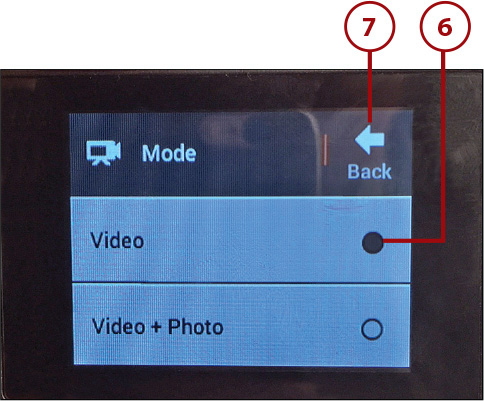
6. When the Mode submenu displays, tap your wanted shooting mode. You may need to swipe your finger upward on the screen to first scroll through the menu options.
7. Tap Back to return to the Settings menu. Repeat Steps 5 through 7 until all the settings related to the selected shooting mode are adjusted to meet your needs.
8. From the Video Settings menu, tap the Exit (X) icon that’s displayed in the top-right corner of the display to save your changes and return to the viewfinder screen. You’re now ready to begin shooting.
You can adjust the following options from the Settings menu: Resolution, Frames Per Second, Field of View, Low Light, Spot Meter, and Protune.
Submenus and Controls
Upon tapping many options available in the Settings menu, you may see another submenu, where options specific to that feature or function display. In some cases, a virtual on/off switch is an option instead of a submenu. Regardless, tap the option you want to select it.
Switch Between Video Shooting Modes Using the GoPro Smart Remote
The information displayed on the Status Screen of the Smart Remote (or Wi-Fi Remote) is identical to what’s displayed on the Status Screen of the camera. If you want to use the Smart Remote to remotely control your camera, first follow the directions offered within Chapter 5, “Must Have GoPro Camera Accessories,” for pairing and activating the Smart Remote.
Then, refer to the “Switch Video-Related Shooting Modes Directly from the Camera” section earlier in this chapter to determine which buttons to press on the Smart Remote (instead of on the camera).
Switch Shooting Modes Using the GoPro App
To select and activate a specific Video shooting mode using the GoPro App, and then adjust the settings related to the selected shooting mode, follow these steps.
1. From your smartphone or tablet, access the Wi-Fi feature and connect to the wireless network that your camera has created. On the iPhone or iPad, for example, this is done from within Settings (accessible from the Home screen), not from within the GoPro App.

To follow these steps, your camera and app must already be paired. Follow the directions in Chapter 15, “Using the GoPro Mobile App,” to initially pair your smartphone or tablet with your camera.
2. Launch the GoPro App on your mobile device, and tap the Connect & Control option.

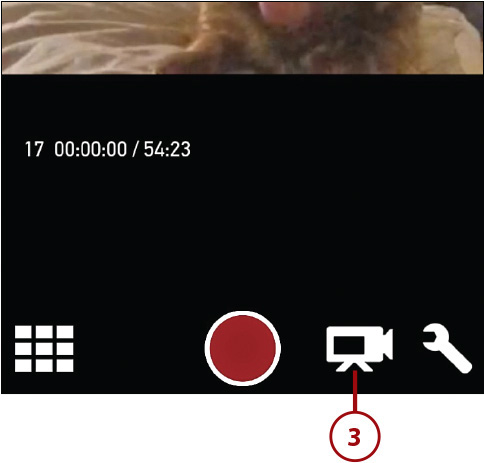
3. To select the main Video shooting mode, tap the shooting mode icon that displays to the right of the red Shutter button on the app’s Viewfinder screen.
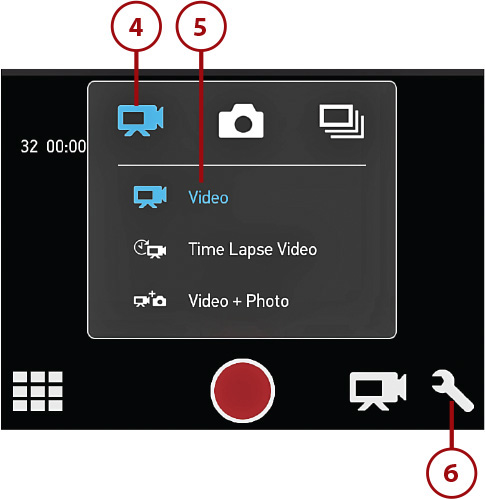
4. Tap the video camera-shaped icon so that it becomes highlighted in blue.
5. Tap the Video, Video+Photo, or Time Lapse Video option to select the desired video-related shooting mode. Your selected option also is highlighted in blue.
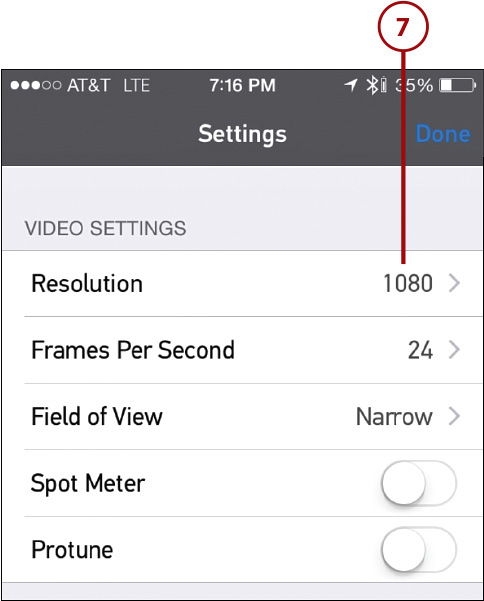
6. Tap on the wrench-shaped Settings icon to adjust the available settings for the specific shooting mode you’ve just selected. Displayed near the top of the Settings menu is the Video Settings heading. Below it are the options you can adjust for the selected Video shooting mode.
7. Tap the Resolution setting.
8. Select a resolution. Repeat this process until you’ve adjusted all the wanted Video shooting mode-specific settings.
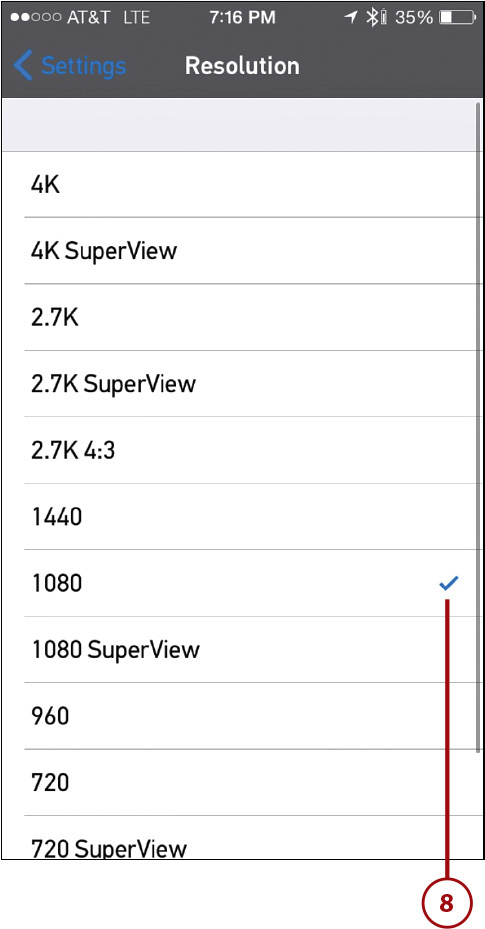
Changing Other Settings
One at a time, tap an option listed within the Settings menu to adjust that particular feature. In some cases, such as with resolution, there is a submenu from which you can select an option. In other cases, you can adjust a virtual switch to turn on or off a setting.