
Appendix B. Common Task Reference
While working on Android apps, you are likely to learn certain tasks well. You will know the Activity and Fragment lifecycles without needing a reference. You will know how to execute code on a background thread. You will know how to do many tasks because you will have to do them all the time; however, some tasks you only need to do every now and then. You need to do them just often enough that you wish you could easily remember how to accomplish them, but not often enough to necessarily memorize them. Appendix B is meant to show you how to do some of these tasks and serve as a future reference.
Dismissing the Software Keyboard
Generally, Android does a good job of showing and hiding the Android keyboard as needed, but there are times when you need to dismiss the software keyboard manually. Perhaps you’ve made your own custom view that needs to dismiss the keyboard at certain times, or maybe the user has entered enough text into an EditText that you’re able to show results but the keyboard would otherwise obscure them. Whatever the reason, dismissing the software keyboard is actually very easy to do. You just need to get a window token (IBinder) from an onscreen view such as your custom view or the EditText that the user was typing into and use the InputMethodManager’s hideSoftInputFromWindow method. See Listing B.1 for a simple example.
Listing B.1 Using the InputMethodManager to Dismiss the Software Keyboard
InputMethodManager imm = (InputMethodManager) getSystemService(Context.INPUT_METHOD_SERVICE);imm.hideSoftInputFromWindow(view.getWindowToken(), 0);
Using Full Screen Mode
Most apps should not use full screen mode. Generally users are jumping into and out of apps in seconds or minutes and are not engrossed enough in an app to warrant hiding the status bar at the top of the screen. There are a few exceptions, such as for a noncasual game (most casual games, such as Solitaire, do not have a need to take the full screen) and temporary full screen use for video playback, for example. When in doubt, don’t make your app full screen.
If your activity should always be full screen, such as for a game, then it should specify a theme in the AndroidManifest.xml file that extends from one of the existing full screen themes. As of Android 4.0, device manufacturers are required to include the device default theme and the Holo themes as part of the compatibility test suite (any manufacturer that wants to include Google’s apps such as the Play Store must ensure their devices pass the compatibility suite, which ensures platform consistency across devices). This means that the easiest way to have an Activity appear full screen is to include android:theme="@android:style/Theme.DeviceDefault.NoActionBar.Fullscreen" in the activity tag of the manifest (if your app extends Holo, then replace DeviceDefault with Holo). The theme prior to Holo that was full screen was Theme.NoTitleBar.Fullscreen, so apps that support older versions of Android can use that. If you are implementing a custom theme and cannot extend those or if you are using one of the AppCompat themes, you can specify android:windowFullscreen as true and android:windowContentOverlay as @null. Listing B.2 shows an example theme.
Listing B.2 A Custom Full Screen Theme
<style name="FullScreen" parent="Theme.AppCompat.Light.NoActionBar">
<item name="android:windowFullscreen">true</item>
<item name="android:windowContentOverlay">@null</item>
</style>
Back in Honeycomb (API level 11), Android added support for software system buttons (that is, the back, home, and recents/overview buttons could be shown on the screen). This means that the concept of “full screen” changed slightly because being truly full screen on a device with software buttons prevents the user from pressing any of those buttons. To handle that issue, the View class was given a method called setSystemUiVisibility(int) that allows you to hide that system navigation or to dim it. For example, if the user taps a view that is displaying a video to play it full screen, the view can call setSystemUiVisibility(View.SYSTEM_UI_FLAG_HIDE_NAVIGATION) to become full screen. For situations where you don’t want to hide the system navigation because the user still needs it, you can instead dim the navigation (making the buttons appear like faint dots) by passing View.SYSTEM_UI_FLAG_LOW_PROFILE int instead.
Keeping the Screen On
Sometimes you need to keep the screen on while your app is in the foreground. For instance, you might be showing a video and you don’t expect the user to interact with the device for a few minutes. Because the user isn’t interacting with the device, it may time out and turn off the screen. Many developers mistakenly use the WakeLock class for this simple task. Not only does WakeLock require an extra permission, it has to be manually released to avoid excessive battery drain.
The easy way to accomplish this is to get a reference to the Window and set the FLAG_KEEP_SCREEN_ON flag. The call looks like this: getWindow().addFlags(WindowManager.LayoutParams.FLAG_KEEP_SCREEN_ON). The nice thing about using this method is that it doesn’t require a special permission. It will also only be enabled while your app is in the foreground. This means that you don’t have to worry about your app keeping the system on even after the user has pressed the home button and moved on to something else. When you no longer need to keep the screen on, you call getWindow().clearFlags(WindowManager.LayoutParams.FLAG_KEEP_SCREEN_ON). Although this method of keeping the screen on when you need it is much better than using a WakeLock, keep in mind that the screen is typically a device’s biggest battery drain, so keeping the screen on more than necessary will adversely affect battery life no matter which method you use. The vast majority of apps do not need to keep the screen on artificially since the user’s interactions will keep the screen on, so consider heavily whether keeping the screen on is beneficial to the user experience.
Determining the Device’s Physical Screen Size
In the past, devices were broken up into broad size categories of small, normal, large, and extra large. Although the recommendation now is to use density-independent pixels and the various resource qualifiers covered in Chapter 4, “Adding App Graphics and Resources,” there are still times when you need to know which size “bucket” the app falls into at runtime. You do this by getting the Configuration object from Resources and checking the screenLayout field. The screenLayout contains more information about the display, such as when it’s “long” and in which direction the text is laid out, so you need to use the SCREENLAYOUT_SIZE_MASK to pull out the specific int you’re looking for. See Listing B.3 for an example.
Listing B.3 Determining a Device’s Size at Runtime
switch (getResources().getConfiguration().screenLayout & Configuration.SCREENLAYOUT_SIZE_MASK) {
case Configuration.SCREENLAYOUT_SIZE_XLARGE:
// Extra large (most 10″ tablets)
break;
case Configuration.SCREENLAYOUT_SIZE_LARGE:
// Large (most 7″ tablets)
break;
case Configuration.SCREENLAYOUT_SIZE_NORMAL:
// Normal (most phones)
break;
case Configuration.SCREENLAYOUT_SIZE_SMALL:
// Small (very uncommon)
break;
}
Determining the Device’s Screen Size in Pixels
Sometimes you simply need to know how many pixels wide or high the display is. You can do this by getting a reference to the WindowManager to get a reference to the Display and then get the size from it. Prior to Android 3.0 (API level 13), you would use the getWidth and getHeight methods; since then, the getSize method has been available. If you’re in an activity, you can get the WindowManager by simply calling getWindowManager. If not, you can get it as a system service as shown in Listing B.4.
Listing B.4 Getting the Screen Width and Height
WindowManager wm = (WindowManager) context.getSystemService(Context.WINDOW_SERVICE);
Display display = wm.getDefaultDisplay();
Point size = new Point();
display.getSize(size);
int screenWidth = size.x;
int screenHeight = size.y;
Determining the Device DPI
For the most part, you never have to directly consider converting to/from pixels and density-independent pixels. When you get dimensions from Resources, the work is done for you. When you specify sizes in your layouts, the conversion happens automatically. However, sometimes you do need to know the device DPI, such as when implementing a custom view that handles density-specific drawing. You know that one pixel on an MDPI device is two pixels on an XHDPI device, but how do you know the density of a given device? From the DisplayMetrics object, you can see the density, which will be an int that represents the dots per inch (dpi). Listing B.5 shows how you can use this, but you should note that there are additional possible values. For instance, a device can be 560 dpi, which has a constant of DENSITY_560. You should use the density for comparison in most cases rather than looking for exact values.
Listing B.5 Determining a Device’s Density at Runtime
final int density = getResources().getDisplayMetrics().densityDpi;
if (density > DisplayMetrics.DENSITY_XXXHIGH) {
// Display is more than 560 dots per inch
} else if (density > DisplayMetrics.DENSITY_XXHIGH) {
// Display is more than 480 dots per inch
} else if (density > DisplayMetrics.DENSITY_XHIGH) {
// Density is more than 320 dots per inch
} else if (density > DisplayMetrics.DENSITY_HIGH) {
// Density is more than 240 dots per inch
} else if (density > DisplayMetrics.DENSITY_MEDIUM) {
// Density is more than 160 dots per inch
} else if (density > DisplayMetrics.DENSITY_LOW) {
// Density is more than 120 dots per inch
}
If you instead have a pixel value for MDPI and need to scale it for the current screen density, you can use the density property of DisplayMetrics (as opposed to the densityDpi property). This will be a float that you can multiply the MDPI value by to scale it properly. For instance, on an XXXHDPI device, the density property will be 4.0.
Checking for a Network Connection
The majority of apps use a network connection, so checking whether there is a connection or not can be very useful. If your app needs some assets on startup or fetches new data, you should check if there is a network connection to notify the user when one is not available. Being proactive gives a much better user experience than just waiting for a failed network attempt and showing an error. By actually telling the user that the device does not have a network connection (preferably in an unobtrusive inline UI element), you enable the user to possibly fix the problem (e.g., if the user has accidently left the device in airplane mode or has not yet connected to an available Wi-Fi network) and you also take some of the blame off your app. Instead of your app showing failed connection errors or having unexplained missing assets everywhere, you inform the user right away that something is wrong. See Listing B.6 for an example of a static method you might want to put in a utility class (keep in mind that this just determines if there is an active network connection, not if the device is connected to the Internet).
Listing B.6 A Static Method for Determining if a Device Has a Connection
/**
* Returns true if the device has a network connection
*
* @param context Context to access the ConnectivityManager
* @return true if the device has a network connection
*/
public static boolean isConnectedToNetwork(Context context) {
boolean connected = false;
ConnectivityManager cm = (ConnectivityManager) context.getSystemService(Context.CONNECTIVITY_SERVICE);
if (cm != null) {
NetworkInfo ni = cm.getActiveNetworkInfo();
if (ni != null) {
connected = ni.isConnected();
}
}
return connected;
}
Checking if the Current Thread Is the UI Thread
You should never modify views from a background thread, but there are times when a piece of code can run on the main (UI) thread or a background thread, so it’s necessary to determine whether or not it’s the UI thread. Fortunately, this is really easy. The Looper class has a static method called myLooper() that returns the Looper for the current thread. It also has a getMainLooper() method that returns the Looper for the UI thread. If these objects are the same, your code is running on the UI thread. See Listing B.7 for an example.
Listing B.7 How to Check if the Current Thread Is the UI Thread
if (Looper.myLooper() == Looper.getMainLooper()) {
// UI Thread
} else {
// Other Thread
}
Custom View Attributes
Although custom view attributes were partly covered in the chapters of this book, some additional attributes are available. Unfortunately, the Android site does not currently provide a list of these, and it can be tough to interpret them when reading through the ones in the Android source.
By convention, custom attributes go in an attrs.xml file in res/values. This file will specify which XML attributes are available for the view. For a complete example, see Listing B.8.
Listing B.8 A Sample attrs.xml File That Specifies Many Custom Attributes
<?xml version="1.0" encoding="utf-8"?>
<resources>
<declare-styleable name="CustomAttributesView">
<!-- boolean -->
<attr name="booleanExample" format="boolean" />
<!-- integer -->
<attr name="integerExample" format="integer" />
<!-- float -->
<attr name="floatExample" format="float" />
<!-- fraction (actually a percentage like "50%") -->
<attr name="fractionExample" format="fraction" />
<!-- string -->
<attr name="stringExample" format="string" />
<!-- dimension -->
<attr name="colorExample" format="color" />
<!-- dimension -->
<attr name="dimensionExample" format="dimension" />
<!-- reference -->
<attr name="referenceExample" format="reference" />
<!-- enum -->
<attr name="enumExample">
<enum name="zero_enum" value="0"/>
<enum name="one_enum" value="1"/>
</attr>
<!-- flag - the user can use multiple flags -->
<attr name="flagExample">
<flag name="oneFlag" value="1"/>
<flag name="twoFlag" value="2"/>
<flag name="fourFlag" value="4"/>
</attr>
<!-- reference OR color -->
<attr name="referenceOrColorExample" format="reference|color" />
<!-- existing attribute -->
<attr name="android:textColor" />
</declare-styleable>
</resources>
To use these values, the layout file they’ll be used in needs to specify the namespace for the app’s package and then each attribute needs the namespace prefix. Typically, you’ll specify the namespace as “app,” but that’s a convention. In most cases you will use this: xmlns:app="http://schemas.android.com/apk/res-auto". See Listing B.9 for a simple layout that specifies each of the custom values.
Listing B.9 Simple Layout Using a Custom View with Custom Attributes
<RelativeLayout
xmlns:android="http://schemas.android.com/apk/res/android"
xmlns:app="http://schemas.android.com/apk/res-auto"
xmlns:tools="http://schemas.android.com/tools"
android:layout_width="match_parent"
android:layout_height="match_parent"
tools:context=".MainActivity" >
<com.auidbook.appendixb.MyCustomView
android:layout_width="match_parent"
android:layout_height="match_parent"
android:textColor="#FFFF0000"
app:booleanExample="true"
app:colorExample="#FFFF0000"
app:dimensionExample="100dp"
app:enumExample="one_enum"
app:flagExample="oneFlag|fourFlag"
app:floatExample="5.5"
app:fractionExample="10%"
app:integerExample="42"
app:referenceExample="@string/app_name"
app:referenceOrColorExample="#FF00FF00"
app:stringExample="My String" />
</RelativeLayout>
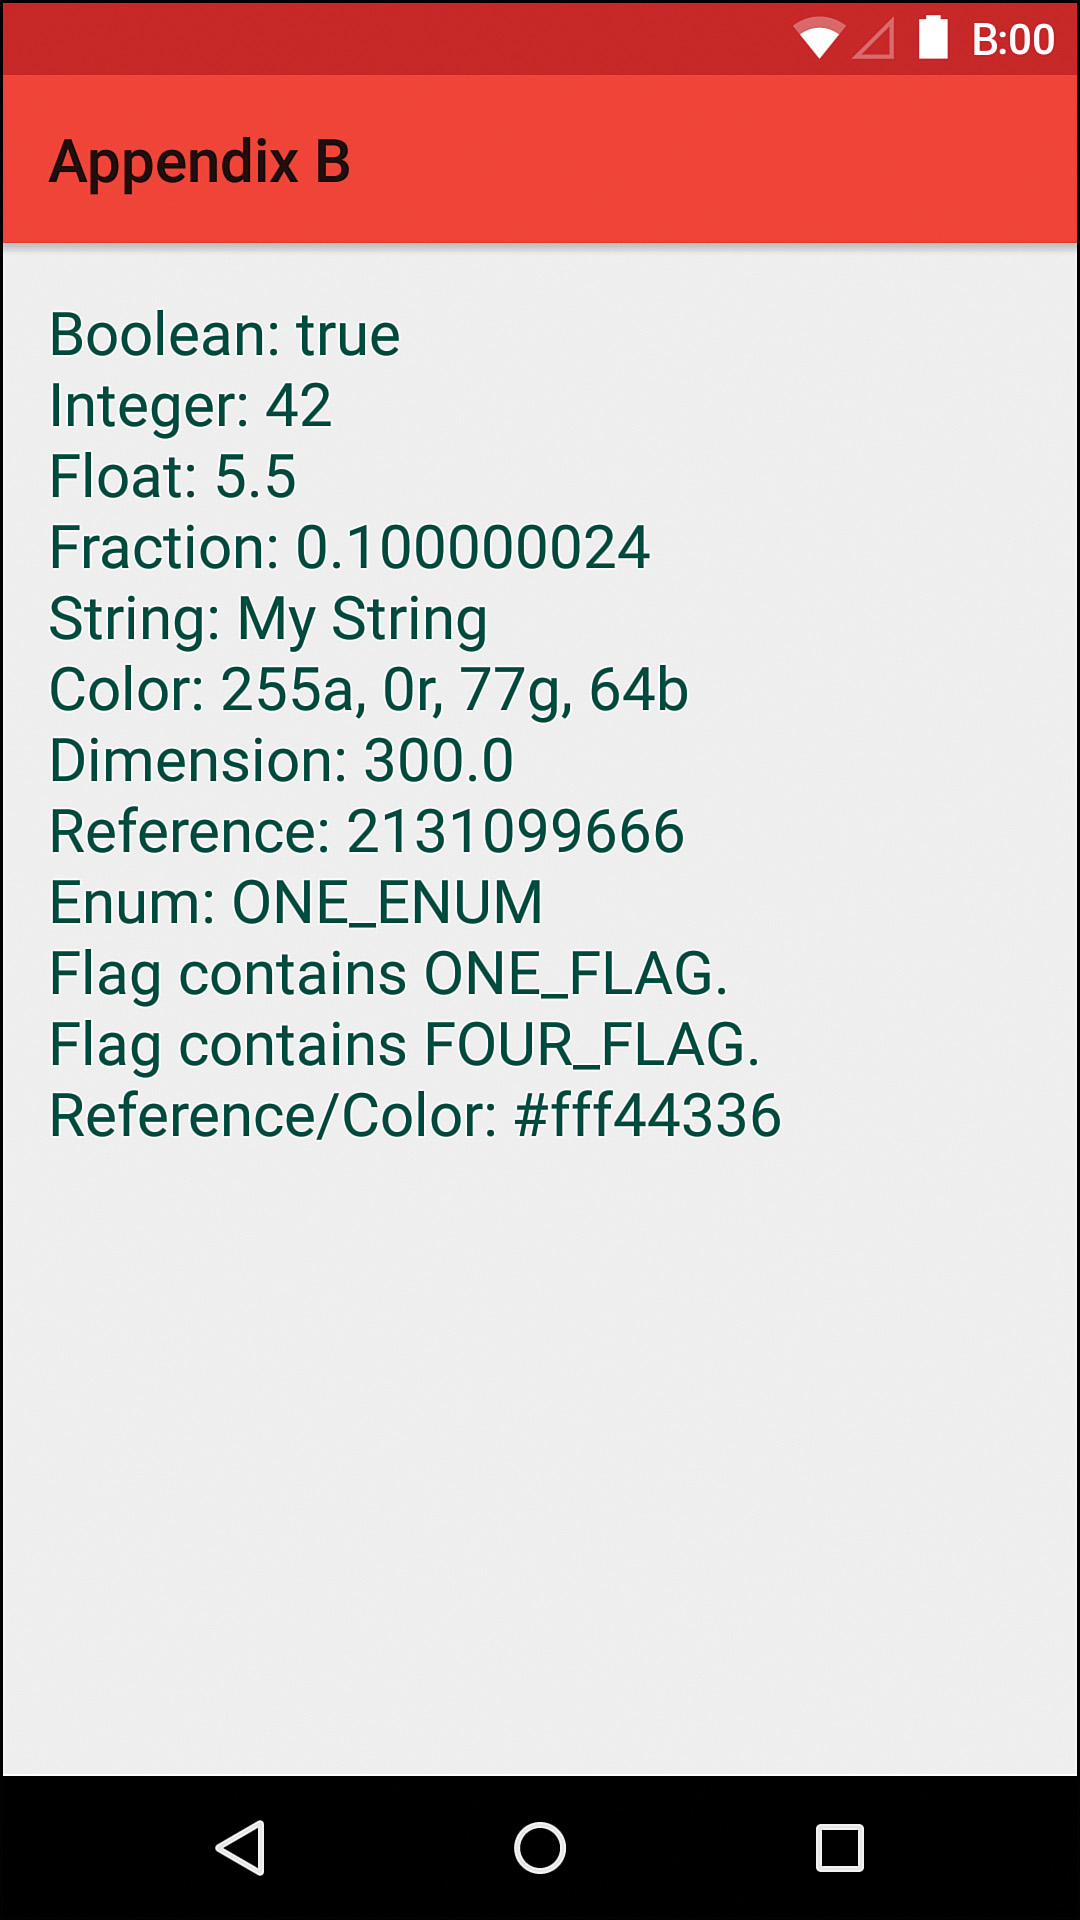
The custom view needs to use Context’s obtainStyledAttributes method to retrieve a TypedArray of the attributes that were specified in the XML layout. The various attributes are available from that TypedArray. Most of these are pretty simple, but a few need a little bit of explanation. The enum type does not return an actual enum; it just ensures that only one of the possible choices is selected. It’s up to you to make use of the int to decide what to do. The flag type needs to use “bitwise and” operations to determine which values are set. The reference in this example isn’t actually used to do anything other than print its int, but you can get the value the reference points to with the Resources object. When a value can be multiple types, and those types are different (e.g., color or reference), you can use the peekValue method to get a TypedValue object and determine the type from there. See Listing B.10 for a simple custom view that reads all these attributes and then creates a string to display that shows which ones were passed. Figure B.1 shows what this view can look like on a device. This complete example is available in the appendixb folder of the book’s source code.
Listing B.10 A Custom View that Utilizes a Variety of Custom Attributes
public class CustomAttributesView extends View {
// Enum values
private static final int ZERO_ENUM = 0;
private static final int ONE_ENUM = 1;
// Flag values
private static final int ONE_FLAG = 1;
private static final int TWO_FLAG = 2;
private static final int FOUR_FLAG = 4;
private String mDisplayString;
private final Paint mPaint = new Paint(Paint.ANTI_ALIAS_FLAG);
private StaticLayout mLayout;
private TextPaint mTextPaint;
public CustomAttributesView(Context context) {
super(context);
mDisplayString = "No custom attributes";
mPaint.setColor(Color.BLACK);
mTextPaint = new TextPaint(mPaint);
mTextPaint.setTextSize(context.getResources().getDimension(R.dimen.customViewTextSize));
}
public CustomAttributesView(Context context, AttributeSet attrs) {
super(context, attrs);
init(context, attrs);
}
public CustomAttributesView(Context context, AttributeSet attrs, int defStyleAttr) {
super(context, attrs, defStyleAttr);
init(context, attrs);
}
@TargetApi(Build.VERSION_CODES.LOLLIPOP)
public CustomAttributesView(Context context, AttributeSet attrs, int defStyleAttr, int defStyleRes) {
super(context, attrs, defStyleAttr, defStyleRes);
init(context, attrs);
}
@Override
public void onDraw(Canvas canvas) {
canvas.save();
canvas.clipRect(getPaddingLeft(), getPaddingTop(), getWidth() - getPaddingRight(), getHeight() - getPaddingBottom());
canvas.translate(getPaddingLeft(), getPaddingTop());
mLayout.draw(canvas);
canvas.restore();
}
@Override
protected void onLayout(boolean changed, int left, int top, int right, int bottom) {
super.onLayout(changed, left, top, right, bottom);
if (mLayout == null || changed) {
mLayout = new StaticLayout(mDisplayString, mTextPaint, right - left, Layout.Alignment.ALIGN_NORMAL, 1, 0, true);
}
}
private void init(Context context, AttributeSet attrs) {
final TypedArray customAttrs = context.obtainStyledAttributes(attrs, R.styleable.CustomAttributesView);
final StringBuilder sb = new StringBuilder();
int currentAttribute;
// boolean
currentAttribute = R.styleable.CustomAttributesView_booleanExample;
boolean booleanExample = customAttrs.getBoolean(currentAttribute, false);
sb.append("Boolean:").append(booleanExample).append('
');
// integer
currentAttribute = R.styleable.CustomAttributesView_integerExample;
int integerExample = customAttrs.getInt(currentAttribute, 0);
sb.append("Integer:").append(integerExample).append('
');
// float
currentAttribute = R.styleable.CustomAttributesView_floatExample;
float floatExample = customAttrs.getFloat(currentAttribute, 0f);
sb.append("Float:").append(floatExample).append('
');
// fraction
currentAttribute = R.styleable.CustomAttributesView_fractionExample;
float fractionExample = customAttrs.getFraction(currentAttribute, 1, 1, -1);
sb.append("Fraction:").append(fractionExample).append('
');
// string
currentAttribute = R.styleable.CustomAttributesView_stringExample;
String stringExample = customAttrs.getString(currentAttribute);
sb.append("String:").append(stringExample).append('
');
// color
currentAttribute = R.styleable.CustomAttributesView_colorExample;
int colorExample = customAttrs.getColor(currentAttribute, Color.BLACK);
sb.append("Color:")
.append(Color.alpha(colorExample))
.append("a,")
.append(Color.red(colorExample))
.append("r,")
.append(Color.green(colorExample))
.append("g,")
.append(Color.blue(colorExample))
.append("b")
.append('
');
// dimension
currentAttribute = R.styleable.CustomAttributesView_dimensionExample;
float dimensionExample = customAttrs.getDimension(currentAttribute, 0);
sb.append("Dimension:").append(dimensionExample).append('
');
// reference
currentAttribute = R.styleable.CustomAttributesView_referenceExample;
int referenceExample = customAttrs.getResourceId(currentAttribute, 0);
sb.append("Reference:").append(referenceExample).append('
');
// enum
currentAttribute = R.styleable.CustomAttributesView_enumExample;
int enumExample = customAttrs.getInt(currentAttribute, -1);
if (enumExample == ZERO_ENUM) {
sb.append("Enum: ZERO_ENUM
");
} else if (enumExample == ONE_ENUM) {
sb.append("Enum: ONE_ENUM
");
} else {
sb.append("Enum not specified.
");
}
// flag
currentAttribute = R.styleable.CustomAttributesView_flagExample;
int flagExample = customAttrs.getInt(currentAttribute, -1);
if (flagExample == -1) {
sb.append("Flag not specified.
");
} else {
if ((flagExample & ONE_FLAG) != 0) {
sb.append("Flag contains ONE_FLAG.
");
}
if ((flagExample & TWO_FLAG) != 0) {
sb.append("Flag contains TWO_FLAG.
");
}
if ((flagExample & FOUR_FLAG) != 0) {
sb.append("Flag contains FOUR_FLAG.
");
}
}
// reference OR color
currentAttribute = R.styleable.CustomAttributesView_referenceOrColorExample;
TypedValue tv = customAttrs.peekValue(currentAttribute);
if (tv == null) {
sb.append("Did not contain reference or color.
");
} else {
sb.append("Reference/Color:").append(tv.coerceToString()).append('
');
}
// android:textColor
currentAttribute = R.styleable.CustomAttributesView_android_textColor;
tv = customAttrs.peekValue(currentAttribute);
if (tv == null) {
mPaint.setColor(Color.BLACK);
} else {
mPaint.setColor(tv.data);
}
customAttrs.recycle();
mDisplayString = sb.toString();
mTextPaint = new TextPaint(mPaint);
mTextPaint.setTextSize(context.getResources().getDimension(R.dimen.customViewTextSize));
}
}
Note
Although you may have read straight through this appendix to see what it offers, it’s largely intended to be a reference. There are those times when you can’t quite remember things such as how to specify a custom attribute that is an enum, and trying to figure it out by racking your brain, looking at the source, or even browsing the Web can be a slow process. That’s when this appendix is meant to be helpful. Hopefully you will reference it when needed, so you can focus on the important parts of your code.