
8. Working with Templates
Lesson overview
In this lesson, you’ll learn how to work faster, make updating easier, and be more productive. You’ll learn how to do the following:
• Create a Dreamweaver template
• Insert editable regions
• Produce child pages
• Update templates and child pages
This lesson will take about 1 hour to complete. If you have not already done so, download the project files for this lesson from the Lesson & Update Files tab on your Account page at www.peachpit.com, store them on your computer in a convenient location, and define a new site based on the lesson08 folder as described in the “Getting Started” section of this book. Your Account page is also where you’ll find any updates to the lessons or to the lesson files. Look in the Lesson & Update Files tab to access the most current content.
Dreamweaver’s productivity tools and site-management capabilities are among its most useful features for a busy designer.
Creating a template from an existing layout
A template is a type of master page from which you can create related child pages. Templates are useful for setting up and maintaining the overall look and feel of a website while providing a means for quickly and easily producing site content. A template is different from your completed pages; it contains areas that are editable and other areas that are not. Templates enable a workgroup environment in which page content is created and edited by several team members while the web designer controls the page design and the specific elements that must remain unchanged.
![]() Note
Note
Create a new site based on the lesson08 folder before beginning the lesson.
Although you can create a template from a blank page, converting an existing page into a template is far more practical and also far more common. In this exercise, you’ll create a template from your existing layout.
1. Launch Dreamweaver CC (2015.1 release) or later.
2. Open mylayout.html from the lesson08 folder. Switch to Design view.
The first step in converting an existing page to a template is to save the page as a template. Most of the work creating a template must be completed in Design or Code view. The template options will not be accessible within Live view.
![]() Note
Note
Design view will often not display the layout accurately in the document window, and some of the responsive styling may not work as expected.
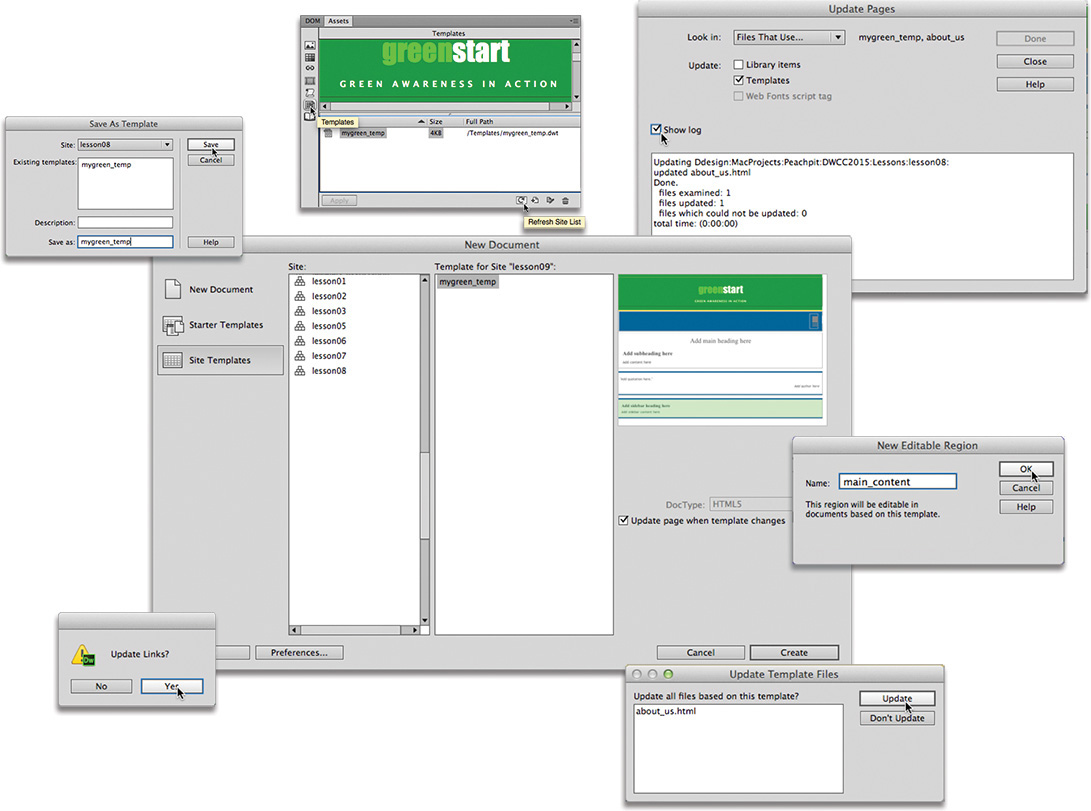
3. Choose File > Save as Template.
The Save As Template dialog appears.
4. If necessary, choose lesson08 from the Site pop-up menu. Leave the Description field empty. Type mygreen_temp in the Save As field. Click Save.

![]() Tip
Tip
Adding the suffix “temp” to the filename helps to visually distinguish this file from others in the site folder display, but it’s not a requirement.
![]() Note
Note
A dialog may appear, asking about saving the file without defining editable regions; just click Yes to save anyway. You’ll create editable regions in the next exercise.
An untitled dialog appears, asking whether you want to update links.
Templates are stored in their own folder, Templates, which Dreamweaver automatically creates at the site root level.
5. Click Yes to update the links.

Since the template is saved in a subfolder, updating the links in the code is necessary so that they will continue to work properly when you create child pages later. Dreamweaver automatically resolves and rewrites links as necessary when you save files anywhere in the site.
Although the page still looks exactly the same, you can identify that it’s a template by the file extension .dwt displayed in the document tab, which stands for Dreamweaver template.
A Dreamweaver template is dynamic, meaning that the program maintains a connection to all pages within the site that are derived from the template. Whenever you add or change content within the dynamic regions of the template and save it, Dreamweaver passes those changes to all the child pages automatically, keeping them up-to-date. But a template shouldn’t be completely dynamic. Some sections of the page should contain areas where you can insert unique content. Dreamweaver allows you to designate these areas of the page as editable.
Inserting editable regions
When you create a template, Dreamweaver treats all the existing content as part of the master design. Child pages created from the template would be exact duplicates, and all the content would be locked and uneditable. This setup is great for repetitive features of the design, such as the navigation components, logos, copyright, contact information, and so on, but the downside is that it stops you from adding unique content to each child page. You get around this barrier by defining editable regions in the template. Dreamweaver creates two editable regions automatically, one for the <title> element and another for metadata or scripts that need to be loaded in the <head> section of the page; you have to create the rest.
First, give some thought to which areas of the page should be part of the template and which should be open for editing. At the moment, three sections of your current layout need to be editable: both <aside> elements and the main content area.
1. Open mygreen_temp.dwt from the lesson08 templates folder in Design view, if necessary. Maximize the program window to fill the entire screen.
2. Insert the cursor in the heading text Insert main heading here. Click the section tag selector.
![]() Note
Note
The template workflow currently works only in Design and Code views. You will not be able to perform any of these tasks in Live view.
Dreamweaver selects the entire <section> element.
3. Choose Insert > Template > Editable Region.

4. In the New Editable Region dialog, type main_content in the Name field. Click OK.

Each editable region must have a unique name, but no other special conventions apply. However, keeping the name short and descriptive is a good practice. The name is used solely within Dreamweaver and has no other bearing on the HTML code. In Design view, you will see the new region name in a blue tab above the designated area identifying it as an editable region. In Live view, the tabs are orange.
You also need to add an editable region to Sidebar 1 and Sidebar 2. Each of these sidebar regions contains text placeholders that you can customize on each page.
5. Insert the cursor in the left column. Click the aside tag selector.
6. Choose Insert > Template > Editable Region.
7. In the New Editable Region dialog, type side_region1 in the Name field. Click OK.

8. Insert the cursor in the right column.
Click the aside tag selector.
9. Choose Insert > Template > Editable Region.
10. In the New Editable Region dialog, type side_region2 in the Name field.
Click OK.
11. Save the file.
Once you have set up the visible components of the template, you should turn your attention to areas that are hidden from most visitors.
Inserting metadata
A well-designed webpage includes several important components that users may never see. One such item is the metadata that is often added to the <head> section of each page. Metadata is descriptive information about your webpage or the contents it contains that is often used by other applications, like the browser or a search engine.
Adding metadata—for instance, a piece of data such as title—is not only a good practice, it’s vital to your ranking and presence in the various search engines. Each title should reflect the specific content or purpose of the page. But many designers also append the name of the company or organization to help build more corporate or organizational awareness. By adding a title placeholder with the company name in the template, you will save time typing it in each child page later.
1. If necessary, open mygreen_temp.dwt in Design view.
2. In the Document Title field of the Property inspector, select the placeholder text Untitled Document.
Many search engines use the page title in the listings of a search result. If you don’t supply one, the search engine will pick one of its own. Let’s replace the generic placeholder with one geared for this website.
![]() Tip
Tip
The Document Title field is available in the Property inspector only when you are in Design or Code views.
3. Type Meridien GreenStart Association - Add Title Here to replace the text.
Press Enter/Return to complete the title.

![]() Tip
Tip
If the Property inspector is not visible, you can display it by selecting Window > Properties.
Along with the title, the other piece of metadata that usually appears in these search results is the page description. A description is a type of summary of a page that succinctly describes the contents in 25 words or less. Over the years, web developers have tried to drive more traffic to their sites by writing misleading titles and descriptions or outright lies. But be forewarned—most search engines have become wise to such tricks and will actually demote sites that use these tactics.
To achieve the highest ranking with the search engines, make the description of the page as accurate as possible. In many cases, the contents of the title and the description metadata will appear verbatim in the results page of a search.
4. Choose Insert > HTML > Description.
An empty Description dialog appears.
5. Type Meridien GreenStart Association - add description here. Click OK.

Dreamweaver has added the two metadata elements to the page. Unfortunately, only one of them was implemented properly in the template.
6. Switch to Code view. Locate and examine the <title> tag in the code and the surrounding markup.

In most cases, the <title> will appear around line 8. Notice how the title appears between two comments that delineate an “editable” portion of the template named "doctitle".
7. Locate and examine the <meta> tag containing the "description" and the surrounding markup.

You should find the description near the end of the <head> section, around line 23. This element is not contained in an editable section of the template. This means that this metadata will be locked on all child pages, and you will not be able to customize it for that page.
Luckily, Dreamweaver comes to the rescue by providing an editable section designed for metadata just like this. In this case, it can’t even get any more convenient—you’ll find it just above the description delineated by the HTML comment markup <!-- TemplateBeginEditable name="head" -->. To make the description metadata editable, you’ll need to move it into this section.
8. Click the line number containing the entire description, or select the entire <meta> element using the cursor.
The <meta> tag and its contents should occupy a single line of the markup.
9. Press Ctrl+X/Cmd+X to cut this code into memory.
10. Insert the cursor at the end of the comment <!--TemplateBeginEditable name="head"--> (around line 21).
![]() Note
Note
The new line is simply intended to make the markup easier to read. It’s otherwise unnecessary.
11. Press Enter/Return to insert a new line.
12. Click the line number of the new blank line.
Press Ctrl+V/Cmd+V to paste the description <meta> element.

The description is now contained within the editable template region named "head".
13. Choose File > Save.
You now have three editable regions—plus editable metadata for title and description—that you can change as needed when you create new child pages using this template.
14. Choose File > Close All.
Now it’s time to learn how to use your new template.
Producing child pages
Child pages are the raison d’être for Dreamweaver templates. Once a child page has been created from a template, only the content within the editable regions can be modified in the child page. The rest of the page remains locked within Dreamweaver. It’s important to remember that this behavior is supported only within Dreamweaver and a few other HTML editors. Be aware: If you open the page in a text editor, like Notepad or TextEdit, the code is fully editable.
Creating a new page
The decision to use Dreamweaver templates for a site should be made at the beginning of the design process so that all the pages in the site can be made as child pages of the template. In fact, that was the purpose of the layout you’ve built up to this point: to create the basic structure of your site template.
1. Launch Dreamweaver CC (2015.1 release) or later, if necessary.
The template workflow functions only in Design and Code views. You can also access site templates from the New Document dialog.
2. Choose File > New, or press Ctrl+N/Cmd+N.
The New Document dialog appears.
3. In the New Document dialog, select the Site Templates option.
Select lesson08 in the Site list, if necessary.
Select mygreen_temp in the Template For Site “lesson08” list.

4. Select the Update Page When Template Changes option, if necessary.
Click Create.
Dreamweaver creates a new page based on the template.
5. If necessary, switch to Design view.

Typically, Dreamweaver defaults to the last document view (Code, Design, or Live) you were using for the new document. In Design view, you will see the name of the template file displayed in the upper-right corner of the document window. Before modifying the page, you should save it.
6. Choose File > Save.
The Save As dialog appears.
7. In the Save As dialog, navigate to the site root folder.
Name the file about_us.html, and click Save.
![]() Tip
Tip
The Save As dialog provides a handy button to take you to the site root with a single click. Feel free to use it in any exercise, as needed.
The child page has been created. When you save the document in the site root folder, Dreamweaver updates all links and references to external files. The template makes it easy to add new content.

Adding content to child pages
When you create a page from a template, only the editable regions can be modified.
1. Open about_us.html in Design view, if necessary.
You’ll find that many of the features and functionality of templates work properly only in Design view, although you should be able to add or edit content in the editable regions from Live view.
2. Position the cursor over each area of the page.

![]() Warning
Warning
If you open a template in a text editor, all the code is editable, including the code for the non-editable regions of the page.
When the cursor moves over certain areas of the page, such as the header, horizontal menu, and footer, the Locked icon ![]() appears. These areas are uneditable regions that are locked and cannot be modified within the child page inside Dreamweaver. Other areas, like side_region1 and the main content section, can be changed.
appears. These areas are uneditable regions that are locked and cannot be modified within the child page inside Dreamweaver. Other areas, like side_region1 and the main content section, can be changed.
3. Open the Property inspector, if necessary.
In the Title field, select the placeholder text Add Title Here.
Type About Meridien GreenStart and press Enter/Return.
4. In the main_content region, select the placeholder text Insert main heading here. Type About Meridien GreenStart to replace the text.

5. Select the placeholder text Insert subheading here.
Type GreenStart - green awareness in action! to replace the text.
6. In the Files panel, double-click aboutus-text.rtf in the lesson08 resources folder to open the file.
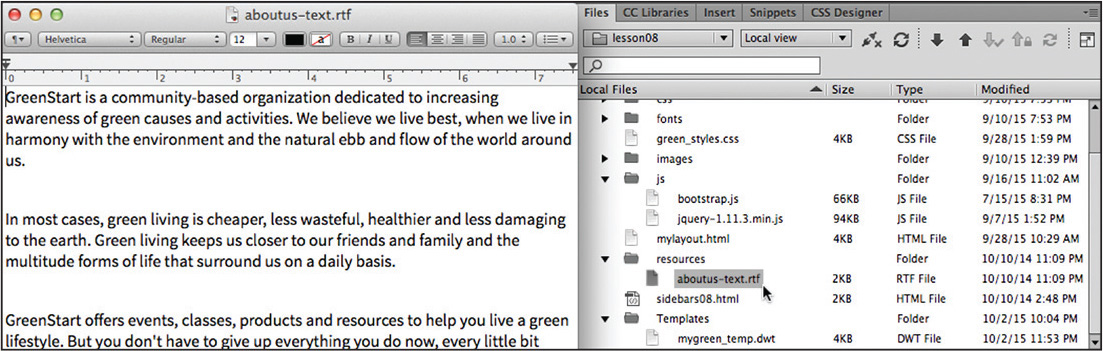
Dreamweaver opens only simple, text-based file formats, such as .html, .css, .txt, .xml, .xslt, and a few others. When Dreamweaver can’t open the file, it passes the file to a compatible program, such as Word, Excel, WordPad, TextEdit, and so on. The file contains content for the main content section.
![]() Tip
Tip
To add a little editorial flair, use the command Insert >HTML >Character > Em Dash to replace the hyphen in the heading with a long dash.
7. Press Ctrl+A/Cmd+A to select all the text. Press Ctrl+C/Cmd+C to copy the text.
8. Switch back to Dreamweaver.
9. Insert the cursor in the placeholder text Insert content here.
Select the p tag selector.
10. Press Ctrl+V/Cmd+V to paste the text.

The placeholder text is replaced by the new content. You can also add content to the sidebar elements.
11. Open sidebars08.html in Design view from the site root folder.

The file contains content for each sidebar. The top half is composed of three environmentally themed quotations and the bottom half of environmental tips and news.
12. Insert the cursor in the first paragraph, and examine the tag selectors.
The tag selectors indicate a structure identical to what you created for the quotations column in Lesson 6, “Working with a Web Framework,” but unformatted by the CSS. Let’s use this content to replace the existing sidebar.
13. Click the aside tag selector.

The tag selector shows the same Bootstrap class structure used in the template.
14. Press Ctrl+X/Cmd+X to cut the entire element into memory.
15. Select the about_us.html document tab.

The child page appears in the document window again.
16. Insert the cursor into the first column.
Select the aside tag selector.
17. Press Ctrl+V/Cmd+V to replace the sidebar placeholder.

The replacement content appears, formatted somewhat by the external CSS file.
![]() Tip
Tip
You may find it difficult to identify and select Sidebar 2 because of the inaccurate way Design view renders the page. To achieve success, be sure to use the correct tag selectors.
18. Select the sidebars08.html document tab.
19. Repeat steps 12–17 to replace the Sidebar 2 placeholder.
All three editable regions have now been populated with content.
20. Close sidebars08.html.
Do not save the changes.
By not saving the changes, you preserve the content in the file if you want to repeat the exercise later.
21. Switch to Live view to preview the page.

The CSS styling kicks in again and the page design and columns now render properly. Although you can’t see the template name in the upper-right corner any more, the names of the editable regions now display in orange tabs above their corresponding element.
22. Save the file.
You have populated the editable regions with text and pictures, but they can hold any type of web-compatible content, including tables, video, banner ads, and more. From time to time, content inserted into a template will require some additional styling via CSS.
For example, notice that the images and text in the right column are touching the left and right edges of the column. If the element had no background color, this would not be an issue. But normally you would want the text and other content to be moved slightly off these edges.
Formatting content in editable regions
Often content inserted into the editable regions will need to have custom styling created for it to help it adapt to the layout itself or to various screen sizes that may be encountered. In this exercise, you will create some new rules to format the picture and text in Sidebar 2.
1. Open about_us.html in Live view, if necessary. Maximize the program window to the full size of the computer display. Ensure that the document window and Scrubber show the page at least 1024 pixels in width.
Before you create any CSS rules, you should examine the structure of the element you want to style.
2. Select the first image in Sidebar 2.

The HUD appears focused on the img tag. The image appears in a semantic structure using the <section> and <figure> elements.
3. In the CSS Designer, select the All button.
Select green_styles.css > GLOBAL.
Click the Add Selector icon ![]() .
.
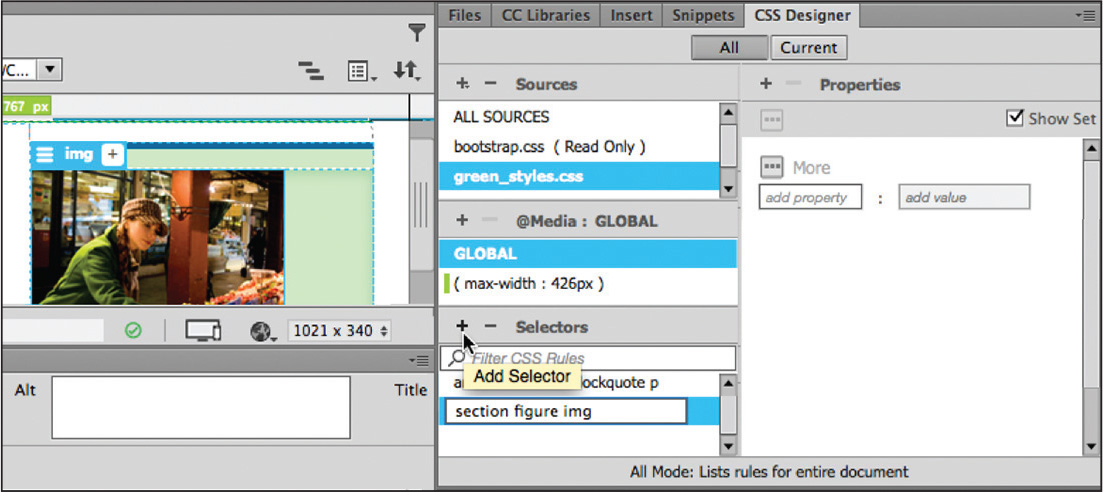
The selector section figure img appears in the Selectors window. This selector would format the image, but you’ll want to limit the effect to Sidebar 2 to prevent unintended consequences.
4. Edit the selector name to say:
.sidebar2 section figure img
By adding the class sidebar2 to the selector name, only images appearing in this specific structure will be targeted.
5. Create the following properties in the new rule:
margin: 0px auto
display: block

The images in Sidebar 2 align to the center of the column. Setting auto margins on the left and right forces elements toward the center. But this alone will not achieve the desired result. Images are considered inline elements, which ignore margin settings. Setting display: block allows images to honor the specifications.
6. Select the caption below the first image in Sidebar 2.
The HUD appears focused on the figcaption element.
7. Select green_styles.css > GLOBAL.
Click the Add Selector icon ![]() .
.
The selector section figure figcaption appears in the Selectors window. Let’s limit this selector as you did the previous one.
8. Edit the selector name to say:
.sidebar2 section figure figcaption
9. Create the following property:
margin: 5px 10px 15px 10px

The captions are now indented on the left and right and exhibit more space at the top and bottom. Other custom styling may be needed as you create more pages, but for now you’re finished.
10. Save all files.
11. Choose File > Close All.
Once you have created child pages and added content, there will come a time when you need to add or change a menu item, update the header or footer, or otherwise modify the content in the base template.
Updating a template
Templates can automatically update any child pages made from that template. But only areas outside the editable regions will be updated. Let’s make some changes in the template to learn how templates work.
1. Choose Window > Assets.
The Assets panel appears. If it appears floating freely in the document window, you can dock it with the CSS Designer panel. The Assets panel gives you immediate access to a variety of components and content available to your website.
![]() Tip
Tip
The Template category in the Assets panel does not appear when a document is open in Live view. Switch to Design or Code view, if necessary, to access this category.
2. In the Assets panel, click the Templates category icon ![]() .
.
If no templates appear in the list, click the refresh icon ![]() .
.
The panel displays a list of site templates and a preview window. The name of your template appears in the list.
3. Right-click mygreen_temp and choose Edit from the context menu.

The template opens.
4. In the navbar, select the text Home.
Type Green Home to replace the text.

5. In the vertical menu, select the text Green News. Type Headlines to replace the text.
6. Select and replace the text Insert with the word Add wherever it appears in the main_content, side_region1, and side_region2 editable regions.

You can now clearly see the changes to the menu and content areas. In the template, the entire page is editable.
8. Save the file.
The Update Template Files dialog appears. The filename about_us.html appears in the update list.
9. Click Update.

The Update Pages dialog appears.
10. Select the Show Log option.

The window displays a report detailing which pages were successfully updated and which ones were not.
11. Close the Update Pages dialog.
12. Choose File > Open Recent > about_us.html. Observe the page, and note any changes.
![]() Tip
Tip
If an open page has been changed during the update, it will be updated by Dreamweaver and show an asterisk in the document tab by its name.

The changes made to the horizontal menu in the template are reflected in this file, but the changes to the sidebars and main content areas were ignored, and the content you added to both areas earlier remains unaltered.
As you can see, you can safely make changes and add content to the editable regions without worrying that the template will delete all your hard work. At the same time, the boilerplate elements of the header, footer, and horizontal menu all remain consistently formatted and up-to-date, based on the status of the template.
13. Click the document tab for mygreen_temp.dwt to switch to the template file.
14. Switch to Design view.
15. Delete the word Green from the Green Home link in the horizontal menu. Change the word Headlines in the vertical menu back to Green News.
16. Save the template and update related files.
17. Click the document tab for about_us.html. Observe the page and note any changes.

The horizontal menu has been updated. Dreamweaver even updates linked documents that are open at the time. The only concern is that the changes have not been saved; the document tab shows an asterisk, which means the file has been changed but not saved.
If Dreamweaver or your computer were to crash at this moment, the changes would be lost; you would have to update the page manually or wait until the next time you make changes to the template to take advantage of the automatic update feature.
18. Save and close all files.
Dreamweaver’s templates help you build and automatically update pages quickly and easily. In the upcoming lessons, you will use the newly completed template to create files for the project site. Although choosing to use templates is a decision you should make when first creating a new site, it’s never too late to use them to speed up your workflow and make site maintenance faster and easier.
![]() Tip
Tip
Always use the Save All command whenever you have multiple files open that have been updated by a template. In most cases, it’s better to update when your files are closed so that they are saved automatically.
Review questions
1. How do you create a template from an existing page?
2. Why is a template “dynamic”?
3. What must you add to a template to make it useful in a workflow?
4. How do you create a child page from a template?
5. Can templates update pages that are open?
Review answers
1. Choose File > Save as Template, and enter the name of the template in the dialog to create a .dwt file.
2. A template is dynamic because Dreamweaver maintains a connection to all pages created from it within a site. When the template is updated, it passes any changes to the locked areas of the child pages and leaves the editable regions unaltered.
3. You must add editable regions to the template; otherwise, unique content can’t be added to the child pages.
4. Choose File > New, and in the New Document dialog, select Site Templates. Locate the desired template, and click Create. Or right-click the template name in the Assets > Template category, and choose New From Template.
5. Yes. Open pages based on the template are updated along with files that are closed. The only difference is that files that are open are not automatically saved after being updated.