
Hour 20. Interacting with Other iOS Services
What You’ll Learn in This Hour:
![]() How to compose and post updates to social networking sites
How to compose and post updates to social networking sites
![]() Ways to create and send email with the Mail application
Ways to create and send email with the Mail application
![]() How to access contacts
How to access contacts
![]() Methods of displaying and manipulating map views
Methods of displaying and manipulating map views
![]() How to forward and reverse geocode
How to forward and reverse geocode
![]() How to open URLs in Safari view controllers
How to open URLs in Safari view controllers
In previous hours, you learned how your applications can interact with various parts of an iDevice’s hardware and software. In the preceding hour, for example, you accessed the music library. In Hour 18, “Sensing Orientation and Motion,” you used the accelerometer and gyroscope. It is typical of a full-featured application to leverage these unique capabilities of a device’s hardware and software that Apple has made accessible through iOS. Beyond what you have learned already, the iOS applications you develop can take advantage of some additional built-in services.
Extending iOS Service Integration
In the previous hours, you’ve learned how to display photos that are stored on your device, take camera pictures, play iPod music, and even add web views (essentially mini Safari windows) to your apps. In this hour, you take your apps to the next level of integration by adding access to contacts, email, social networking sites Twitter and Facebook, Safari, and mapping capabilities.
Contacts
Contacts are a contained shared database of contact information that is available to any iOS application. Having a common, shared set of contact information provides a better experience for the user than if every application manages its own separate list of contacts. With shared contacts, there is no need to add contacts multiple times for different applications, and updating an individual in one application makes the update available instantly in all the other applications.
iOS provides comprehensive access to the Contacts database through two frameworks: the Contacts and the Contacts UI frameworks.
The Contacts UI Framework
The Contacts UI framework is a set of user interface classes that wrap around the Contacts framework and provide a standard way for users to work with their contacts, as shown in Figure 20.1.

You can use the Contacts UI framework’s interfaces to allow users to browse, search, and select contacts, display and edit a selected contact’s information, and create new contacts. On the iPhone, the Contacts interface is displayed over top of your existing views in a modal view. You can choose to do the same on the iPad, or you can code it into a popover if you want.
To use the Contacts UI framework, you add it to your project by way of a module import:
import ContactsUI
To display the UI for choosing a person from the Contacts database, we must declare, initialize, and allocate an instance of the class CNContactPickerViewController. This class gives us a new view controller that displays our Contacts UI and enables us to “pick people.” We must also set a delegate that will handle dealing with the person who is returned (if any).
From our main application’s view controller, we display the people picker with presentViewController:animated:completion, like this:
let picker: CNContactPickerViewController =
CNContactPickerViewController()
picker.delegate = self
presentViewController(picker, animated: true, completion: nil)
Once the people picker is displayed, our application simply waits until the user does something. The people picker handles the UI and user interactions within the Contacts interface on its own. When the user does choose something, however, we must deal with it by way of the CN contact picker delegate.
CN Contact Picker Delegate
The contact picker delegate determines what happens when a user selects a person from the displayed contacts by implementing up to three methods. The class that is implementing these methods (such as your application’s view controller class) must conform to the CNContactPickerDelegate protocol.
The first delegate method that you can implement (but may not need) is contactPickerDidCancel. This is called if the user cancels his interactions with the people picker, and is shown in Listing 20.1. If you don’t care what happens when the user cancels, you can leave this method out—no worries.
LISTING 20.1 Handling a Cancel Action in the People Picker
func contactPickerDidCancel(picker:
CNContactPickerViewController) {
// The user didn't pick anyone. Uh oh!
}
We can implement two other methods as part of the picker delegate, but we only have to choose one. The first, contactPicker:didSelectContact, provides us with a reference to the contact that the user touched. We can then use the Contacts framework (remember, this is all in the Contacts UI framework) to work with the contact information.
For example, consider Listing 20.2.
LISTING 20.2 Handling the Selection of a Person in the Contacts Database
func contactPicker(picker: CNContactPickerViewController,
didSelectContact contact: CNContact) {
// The user picked a contact. We should do something with it!
}
So, this seems straightforward enough, right? What could we possibly need another people picker controller delegate method for?
For when we don’t want our users selecting people, of course! If you’ve used other applications that let you select individuals from your contacts, you’ll notice that sometimes they let you drill down to choose a contact’s phone number, address, email, and so on. In these cases, they’re not just choosing a person, they’re choosing properties that describe a person. For cases where you want this level of granularity, you don’t implement contactPicker:didSelectContact, instead, you implement contactPicker:didSelectContactProperty, as shown in Listing 20.3.
LISTING 20.3 Handling Drilling Down to Individual Properties
func contactPicker(picker: CNContactPickerViewController,
didSelectContactProperty contactProperty: CNContactProperty) {
// Let's work with a person, and a specific property
// within their contact details.
}
These methods provide the basis for interacting with the Contacts UI, but it provides no facility for working with the actual data that is returned. To do that, we must turn to the Contacts framework.
The Contacts Framework
With the Contacts framework, your application can access the Contacts database to retrieve and update contact data and create new contacts. You’ll need it (obviously) to manage the data returned by the Contacts UI framework. Both of these frameworks are new, as of iOS 9, and replace older Address Book frameworks that were difficult to work with and required far more code to extract information from a contact’s record.
To use the Contacts framework, import the corresponding module:
import Contacts
Imagine that we’re implementing the contactPicker:didSelectContact method and have just received a variable, contact (of the type CNContact), from the method. From this reference, we can access all of the contact’s data just by using the variable properties (read-only) defined within the CNContact class. There are many, so we’re not going to cover all of them here; that’s what documentation is for.
For example, to get the contact’s first name from the variable property givenName, the code would look like the following:
let firstname: String = contact.givenName
Some properties might contact multiple values—such as email addresses. (I have dozens.) These are returned as an Array of CNLabeledValue objects. These are nothing more than a value property and a label property associated with it. My email address for day job might have the label “work,” for example.
To work with CNLabeledValue arrays, we first index into the array to get the particular entry we want (or loop through the array to work with all of them), and then cast the value of that entry as whatever type of data we are expecting. For example, an email address is a String, whereas postal addresses are yet another object type called CNPostalAddress.
Let’s see what some real world code might look like for checking how many email addresses a contact object has:
let emailCount: Int = contact.emailAddresses.count
The emailAddresses variable property gives us an Array of CNLabeledValues containing email strings and labels for them. Accessing the count property on any Array provides us with the total number of elements in that array (in this case, the total number of email addresses).
To grab the first (index 0) email address listed for the contact, we can either index into the array (emailAddresses[0]) or use the first property of the Array which acts as a shortcut for accessing index 0:
let emailAddress: String? =
contact.emailAddresses.first!.value as? String
You get quite a bit of practice interacting with contacts in the tutorial in this hour. For a full list of all the properties that can be stored for a person (including whether they are multivalue properties), review the CNContact reference for iOS in the developer documentation. You may also wish to review the class reference for CNPostalAddress to understand how contact mailing addresses are stored.
If you’ve made it this far in the book and you’re still wondering what requires ! versus ?, you’re not alone. As mentioned early in the book, Swift is still being developed. Some values that were optional in the last edition are now required, and vice versa. Xcode does an excellent job of telling you when you should be unwrapping, when forced downcasts are required, and so on—without having to read every single piece of API docs.
In a production application, you should be checking to see whether key optional values are nil rather than just assuming they hold something. For our purposes (demonstrating core concepts), we unwrap and use the values as needed.
Email Messages
In the preceding hour, you learned how to enable a user to use Apple’s image picker interfaces to select a photo for your application. Showing a system-supplied view controller is a common pattern in iOS, and the same approach is used in the Message UI framework to provide an interface for sending email, as demonstrated in Figure 20.2.

Your application provides the initial values for the email and then acts as a delegate while temporarily stepping out of the way and letting the user interact with the system-supplied interface for sending email. This is the same interface users use in the Mail application to send email, so they will find it familiar.
Note
Similar to how the previous hour’s app did not include any of the details of working with the iOS database of photos or music, you do not need to include any of the details about the email server your user is using or how to interact with it to send an email. iOS takes care of the details of sending email at the expense of some lower-level control of the process. The trade-off makes it very easy to send email from your application.
To use the Message UI framework, import the MessageUI module:
import MessageUI
To display a Mail compose window, you must create a MFMailComposeViewController object. This handles the display of the email message. Next, you need to create an array of email addresses that will be used as recipients and use the setToRecipients method to configure the Mail compose view controller with the addresses. Finally, a delegate for handling completion of sending the message is assigned, and the compose view controller is presented with presentViewController:animated:completion. Listing 20.4 shows a simple implementation of this process.
LISTING 20.4 Preparing and Showing the Compose Dialog
1: let mailComposer:MFMailComposeViewController =
2: MFMailComposeViewController()
3: let emailAddresses:[String]=["[email protected]"]
4:
5: mailComposer.mailComposeDelegate=self
6: mailComposer.setToRecipients(emailAddresses)
7:
8: presentViewController(mailComposer, animated: true, completion: nil)
In lines 1–2, the Mail compose view controller is initialized.
Line 3 initializes the array of addresses with a single address: "[email protected]".
Line 5 sets the delegate for the Mail compose view controller. The delegate is responsible for handling any tasks that need to happen after the message is sent or canceled.
Line 6 assigns the recipients to the Mail compose view controller, and line 8 displays the compose window.
The Mail Compose View Controller Delegate
Like the Contacts people picker, the Mail compose view controller requires that we conform to a protocol (MFMailComposeViewControllerDelegate) that implements a cleanup method that is called when the user finishes using the compose window. This method is mailComposeController:didFinishWithResult:error. In most cases, this method needs only to dismiss the Mail Compose view controller, as shown in Listing 20.5.
LISTING 20.5 Handling the Composition Completion
func mailComposeController(controller: MFMailComposeViewController,
didFinishWithResult result: MFMailComposeResult, error: NSError?) {
dismissViewControllerAnimated(true, completion: nil)
}
If you’re interested in what happened that resulted in the message composition view going away, however, you can look at the MFMailComposeResult result value, which may be one of these (self-explanatory) constants: MFMailComposeResultCancelled, MFMailComposeResultSaved, MFMailComposeResultSent, MFMailComposeResultFailed. If an error occurred when trying to display the composition window (maybe a mail account hasn’t been configured?), it will be returned in the error object. We’ll look a bit at some similar error-handling cases in the next hour.
Posting to Social Networking Sites
Very similar to preparing email messages with iOS is the process of posting to social networking sites. Just include the Social framework, create a compose view controller for the service you want to use, and then display it modally. Figure 20.3 shows the iOS tweet compose view in action.

Unlike Mail, however, after you’ve presented the compose view, you don’t need to deal with any cleanup. You simply display the view and you’re done. Let’s take a quick look at what this might look like in code.
Like all the other frameworks, you use the Social framework by importing its module:
import Social
After that, you must create an instance of the SLComposeViewController using the class method composeViewControllerForServiceType. This specialized view controller provides the user interface and can currently target three social networking websites: Twitter, Facebook, and Sina Weibo/Tencent Weibo (Chinese) using the constants SLServiceTypeTwitter, SLServiceTypeFacebook, SLServiceTypeSinaWeibo, and SLServiceTypeTencentWeibo, respectively.
Before composing a post, it is important to use the SLComposeViewController class method isAvailableForServiceType to ensure that users have an active account configured for the service they’re trying to use. Then, we can set the default text for the post, an image, and even a URL with the class methods setInitialText, addImage, and addURL. Finally, the controller is presented onscreen. Listing 20.6 shows an implementation example for Facebook.
LISTING 20.6 Preparing to Post to Facebook
let messageComposer: SLComposeViewController =
SLComposeViewController(forServiceType: SLServiceTypeFacebook)
if SLComposeViewController.isAvailableForServiceType(SLServiceTypeFacebook) {
messageComposer.setInitialText("Hello Facebook frenemies!")
presentViewController(messageComposer, animated: true, completion: nil)
}
After presenting the view controller, there’s nothing else to do. The user can use the interface to change the initial text, add personal images/locations/URLs, and, of course, post the message.
This is just a simple example. Other methods are available to add additional functionality with multiple Twitter accounts, locations, and so on. You can also add a callback function if you want to be notified when the user is done posting. If you need more advanced social networking features, start with the Social Framework Reference in the Xcode documentation.
Accessing the Safari Web Browser
Early in the book, we used web views to display HTML content from remote websites. I even gave you a few ideas on how you could build your own web browser using UIWebView.
I’d like to apologize for that. With the new SFSafariViewController in iOS 9, you’d be silly to write your own browser.
iOS has, for many years, had the ability to launch other applications, including Safari, by using the UIApplication class’s openURL method:
let webURL = NSURL(string: "https://www.apple.com")!
UIApplication.sharedApplication().openURL(webURL)
Unfortunately, openURL takes the user out of the current application and drops them into Safari. With the new SFSafariViewController, you can embed Safari directly in your application, and keep your users at the URL you define. Best of all, it’s crazy easy to do.
To use the SFSafariViewController, first import the SafariServices framework:
import SafariServices
Then, initialize and present the controller:
let safariController = SFSafariViewController(URL:NSURL(string:
"https://www.apple.com")!)
self.presentViewController(safariController, animated: true, completion: nil)
The result is a modal Safari browser window, with access to plug-ins and share extensions, that appears directly in your app, as demonstrated in Figure 20.4.

FIGURE 20.4 The Safari View Controller provides a simple way of adding Safari’s capabilities to your application.
Mapping
The iOS implementation of Apple Maps puts a responsive and fun-to-use mapping application in your palm. Yes, the original launch brought some controversy with the switch away from Google Maps, but Apple has been making rapid updates, and there is no denying that the new maps are beautiful. You can bring the Apple Maps experience to your apps using Map Kit.
Map Kit enables you to embed a map into a view and provides logic needed to display the map. It handles the scrolling, zooming, and loading of new map data as needed. Applications can use Map Kit to annotate locations on the map. Map Kit can also do reverse geocoding, which means getting place information (country, state, city, address) from coordinates.
You can start using Map Kit with no code at all, just by adding the Map Kit framework to your project and an MKMapView instance to one of your views in Interface Builder (IB). After adding a map view, you can set several properties within the Attributes Inspector to further customize the view (see Figure 20.5). You can select between map, satellite, and hybrid modes, you can determine whether the map should use Core Location (which you learn more about in the next hour) to center on the user’s location, and you can control whether the user should be allowed to interact with the map through swipes and pinches for scrolling and zooming.

If you want to control your map object (MKMapView) programmatically, you can do so through a variety of methods. Moving and sizing the map, for example, are common activities that you may want to do programmatically. First, however, you must import the Map Kit framework module:
import MapKit
In most cases where you manipulate a map, you also need to include the Core Location framework:
import CoreLocation
We manage our map’s view by defining a map “region” and then using the setRegion:animated method. A region is a simple structure (not an object) called a MKCoordinateRegion. It has members called center, which is another structure called a CLLocationCoordinate2D (coming from Core Location and containing latitude and longitude); and span (an MKCoordinateSpan structure), which denotes how many degrees to the east, west, north, and south of the center are displayed. A degree of latitude is 69 miles. A degree of longitude, at the equator, is 69 miles. By choosing small values for the span within the region (like 0.5), we narrow our display down to just a few miles around the center point. For example, if we want to define a region centered at 60.0 degrees latitude and 60.0 degrees longitude with a span of 0.5 degrees in each direction, we can write the following:
let centerRegion: CLLocationCoordinate2D =
CLLocationCoordinate2D(latitude: 60.0, longitude: 60.0)
let spanRegion:MKCoordinateSpan =
MKCoordinateSpan(latitudeDelta: 0.5, longitudeDelta: 0.5)
let mapRegion: MKCoordinateRegion =
MKCoordinateRegion(center: centerRegion, span: spanRegion)
To center and zoom in on this region in a map object called map, we use the following:
map.setRegion(mapRegion, animated: true)
Another common map activity is the addition of annotations. Annotations enable us to display important points on top of the map.
Annotations
You can add annotations to maps within your applications—just like they can in online mapping services. Using annotations usually involves implementing a new subclass of MKAnnotationView that describes how the annotation should appear and what information should be displayed.
For each annotation that we add to a map, we first need a “place mark” object, MKPlaceMark, that describes its location. For the tutorial in this hour, we need just one—to show a chosen address.
To understand how these objects come together, let’s work through a quick example. To add an annotation to a map called map, we must initialize and position an MKPlacemark object. Initializing the place mark requires an address dictionary and a structure called CLLocationCoordinate2D that contains the latitude and longitude where the marker should be placed. Once initialized, the place mark is added to the map with the MKMapView method addAnnotation, as shown in the code fragment in Listing 20.7.
LISTING 20.7 Placing an Annotation
1: let myCoordinate: CLLocationCoordinate2D =
2: CLLocationCoordinate2D (latitude: 20.0, longitude: 20.0)
3: let myMarker: MKPlacemark =
4: MKPlacemark(coordinate: myCoordinate, addressDictionary: fullAddress)
5: map.addAnnotation(myMarker)
In this example, lines 1–2 initialize a CLLocationCoordinate2D structure (myCoordinate) that holds a latitude of 20.0 and a longitude of 20.0.
Lines 3–4 initialize a new MKPlacemark (myMarker) using myCoordinate and fullAddress, which we must create by hand using the definition of an Address structure in the ABPerson reference documentation.
Finally, line 5 adds the annotation to the map.
Caution: Catch Up, MapKit Engineers!
Address dictionaries are a remnant of deprecated iOS contact management frameworks called Address Book and Address Book UI. Hopefully, MapKit will be updated in the near future to be easier to work with when using the modern Contacts and Contacts UI frameworks.
To remove an existing annotation from a map view, just use removeAnnotation in place of addAnnotation; the parameters are the same.
When we add the annotation, iOS is (behind the scenes) being nice. Apple provides a subclass of the MKAnnotationView called MKPinAnnotationView. When you call addAnnotation on the map view object, iOS is automatically creating an instance of the MKPinAnnotationView for you (a pin that is placed on the map). In many cases, this is all we need. To customize the pin drop, however, we must implement the map view’s delegate method mapView:viewForAnnotation.
Annotations and the Map View Delegate Protocol
To customize an annotation view further, we must implement the mapView:viewForAnnotation delegate method, and state that we are conforming the map view delegate protocol. Let’s start with the easy part first. To state that we’re conforming to the protocol, we will add MKMapViewDelegate to the class line of the class implementing the annotation view method, and then set the map object’s delegate variable property to that same class. If we’re implementing this in our view controller, we’ll probably just be adding the line:
map.delegate = self
This can also be handled by control-dragging from the map’s delegate connection to the appropriate class in Interface Builder.
After we’ve finished that setup, we can implement mapView:viewForAnnotation to return a customized marker for the map. For example, consider this implementation (see Listing 20.8), which initializes a custom instance of MKPinAnnotationView.
LISTING 20.8 Customizing the Annotation View
1: func mapView(aMapView: MKMapView,
2: viewForAnnotation annotation: MKAnnotation) -> MKAnnotationView? {
3: let pinDrop:MKPinAnnotationView =
4: MKPinAnnotationView(annotation: annotation, reuseIdentifier: "myspot")
5: pinDrop.animatesDrop=true
6: pinDrop.canShowCallout=true
7: pinDrop.pinTintColor=UIColor.blueColor()
8: return pinDrop
9: }
Line 3–4 declares and initializes an instance of MKPinAnnotationView using the annotation parameter that iOS sends to the mapView:viewForAnnotation method (we don’t touch this), along with a reuseIdentifier string. This reuse identifier is a unique identifying string that allows an allocated annotation to be reused in other places. For our purposes, this could be any string you want.
The new pin annotation view, pinDrop, is configured through three variable properties in lines 5–8. The animatesDrop Boolean variable property, when true, animates the pin dropping onto the map. The canShowCallout variable property sets the pin so that it displays additional information in a callout when touched, and pinTintColor sets the color of the onscreen pin graphic.
Once properly configured, the new pin annotation view is returned to the map view in line 8.
Adding this method (and the proper delegate/protocol lines) into your code creates purple pins with callouts that are animated when added to a map. Your applications, however, can create entirely new annotation view types that don’t necessary look like pins. We’re just reusing Apple’s MKPinAnnotationView and adjusting the attributes only slightly beyond what we would get if this method were not included at all.
Geocoding
A cool feature of iOS—often used in conjunction with maps—is geocoding. Geocoding works in two “directions”: forward and reverse. Forward geocoding takes an address and turns it into latitude and longitude. Reverse geocoding returns a location name for a given latitude and longitude. To geocode in iOS, you make use of the CLGeocoder and CLPlacemark classes. The CLGeocoder class does the hard work of translating coordinates and addresses, and the CLPlacemark stores the results—latitude, longitude, address, locality, and so on. What’s more, you can easily turn a CLPlacement into an MKPlacemark.
So, what does all of that mean?
It means that by using a CLGeocoder object, you can use just an address to set a placemark on a map. iOS automatically takes care of looking up where the address actually is! For example, consider Listing 20.9.
LISTING 20.9 Forward Geocoding
1: let geocoder: CLGeocoder = CLGeocoder()
2: geocoder.geocodeAddressString(addressString, completionHandler:
3: {(placemarks: [CLPlacemark]?, error: NSError?) -> Void in
4: let firstPlacemark:CLPlacemark = placemarks!.first!
5: let mapPlacemark: MKPlacemark = MKPlacemark(placemark: firstPlacemark)
6: self.map.addAnnotation(mapPlacemark)
7: })
Lines 1 sets up a new instance of a CLGeocoder object. Lines 3–7 define a handler closure that is executed after the geocodeAddressString:completionHandler method is executed.
This method takes an address string and returns an array of CLPlacemark objects for each match it finds by forward geocoding the address. Because we’re really only interested in one address, line 4 stores a reference to that CLPlacemark object in firstPlacemark.
Line 5 uses an MKPlacemark method, initWithPlacemark, to convert the CLPlacemark firstPlacemark object into an MKPlacemark named mapPlacemark.
Finally, Line 6 adds mapPlacemark to the map.
Geocoding uses your network connection to operate, so lines 3–7 might take a second or two to execute. Subsequent code (lines 8+) may execute before the code in the closure finishes, so plan accordingly. If an error occurs, the object error will be defined—so you’ll want to implement error checking if getting a result is critical to your application.
Reverse geocoding works similarly to forward geocoding. The difference is that instead of providing an address to a method, you provide a CLLocation object, which contains a latitude and longitude. What you get back is another CLPlacemark, but one that is populated with address information automatically.
For example, take a look at Listing 20.10.
LISTING 20.10 Reverse Geocoding
1: let geocoder: CLGeocoder = CLGeocoder()
2: let theLocation: CLLocation = CLLocation(latitude: 37.7833,
3: longitude: 122.4167)
4: geocoder.reverseGeocodeLocation(theLocation, completionHandler:
5: {(placemarks: [CLPlacemark]?, error: NSError?) -> Void in
6:
7: let myPlacemark: CLPlacemark = placemarks!.first!
8: // Do something useful with the placemark data!
9: })
Line 1 again creates a CLGeocoder object named geocoder. Lines 2-3 creates a new CLLocation (theLocation) using the CLLocation method initWithLatitude:longitude. (I’m using the latitude and longitude for San Francisco here, for no reason in particular.)
Lines 4–9 define the reverse geocoding closure using the GLGeocoder method reverseGeocodeLocation:completionHandler. The closure is passed the theLocation parameter, and returns a list of matching placemarks in the array placemark. Again, I’m really only interested in one of the placemarks, so I assign myPlacemark to placemarks!.first! for easy referencing in my code.
Line 8 (and subsequent lines in the closure) would do something meaningful with myPlacemark. To give you an idea of what that might look like, here are a few of the variable properties that will be available in myPlacemark after the reverse geocoding takes place:
locality—The city name of the location
ocean—The name of the ocean (if the location is in an ocean!)
postalCode—The ZIP code of the location
thoroughfare—The street name of the location
country—The country that contains the location
areasOfInterest—An array of the names of points of interest in the immediate vicinity
addressDictionary—A Dictionary containing all the address information
As you can see, that’s quite a bit of data that we get for “free” just by providing a latitude and longitude. We’ll implement some very simple geocoding with our maps in this hour’s project.
Note
In the next hour, we take a closer look at Core Location in Hour 21, “Implementing Location Services.” Core Location gives you direct access to the GPS and compass capabilities of your device.
Maps, Locations, and Permissions
In earlier editions of the book, I often mentioned during the hour’s project a teensy tweak that would be needed when working with a map view—no biggie. Starting in iOS 8, Apple has umm... “refined” things enough that I need a few more words to get my point across. Previously, when you wanted to use a MKMapView and show a user’s location, you’d check a box in Interface Builder. That’s it. No code required. Now, two additional steps are needed before using location data.
You must make sure that your code creates a CLLocationManager object and calls either requestWhenInUseAuthorization or requestAlwaysAuthorization before attempting to use the location—even if the location is just the built-in “blip” on a map view. The former authorizes your app to use the location only when it is in the foreground and active, and the latter asks for location information to be available all the time.
In many projects (such as this hour’s example), this comes down to creating a location manager constant in the class handling the map:
let locMan:CLLocationManager=CLLocationManager()
And a line of code in ViewDidLoad (or a method of your choice) that looks like this:
locMan.requestWhenInUseAuthorization()
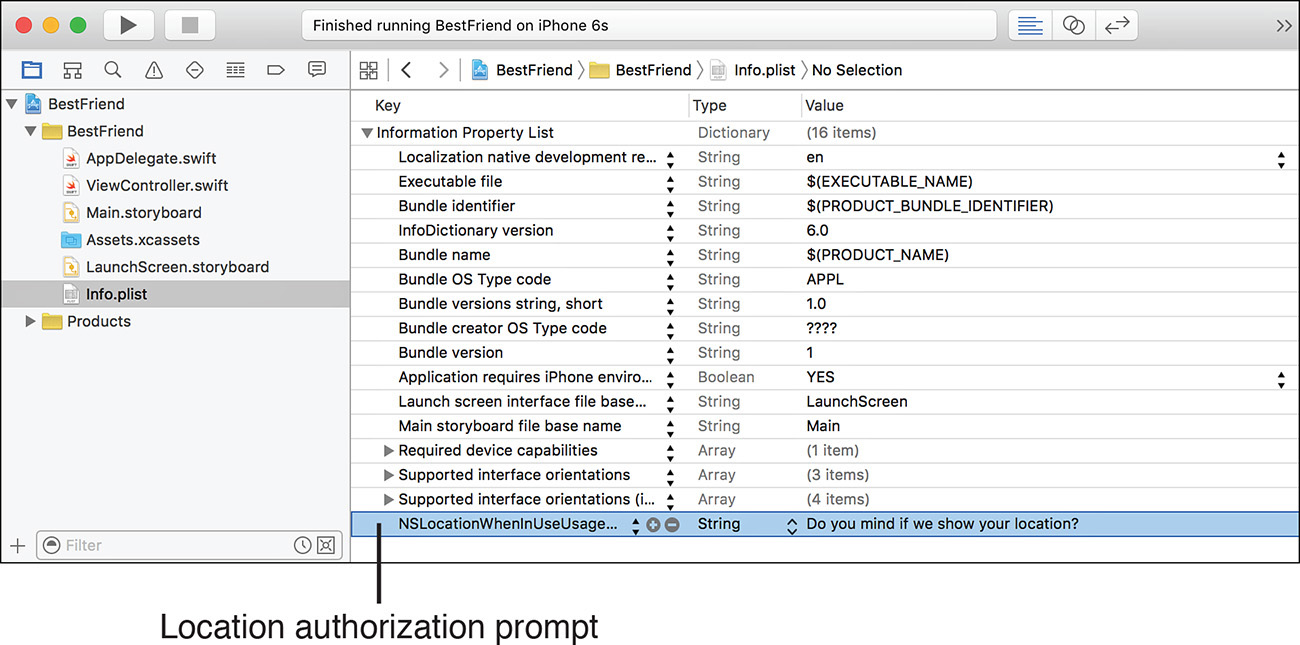
Once these lines are in place, you still aren’t good to go. You must also add one of two keys to your application’s Info.plist file (in the “Supporting Files” group): NSLocationWhenInUseUsageDescription or NSLocationAlwaysUsageDescription. These keys should be set with a string value with a message you’d like displayed to the user when asking for permission to use their location, as demonstrated in Figure 20.6.
What happens if you don’t complete these steps? The answer is absolutely nothing. The location will not be returned, and the user will never be prompted.
Using Contacts, Email, Social Networking, Safari, and Maps
In this hour’s example, we enable users to pick a contact as their best friend from their Contacts. After they have picked their best friend, we retrieve information from the Contacts database about that friend and display it nicely on the screen—including their name, photo, email address, and website. We enable users to show their friend’s address in an interactive map, send that friend an email, post a tweet, or open the friend’s website (all within a single app screen).
Implementation Overview
This project covers quite a bit of area, but you don’t have to enter an extensive amount of code. We start by creating the interface, and then add Contacts, map, email, Twitter, and finally Safari features. Each of these requires frameworks to be included in our view controller’s interface file. In other words, if something doesn’t seem to be working, make sure that you didn’t skip any steps on importing the framework modules.
Setting Up the Project
Start Xcode and create a new single-view iOS application called BestFriend. This tutorial has a high level of functionality, but most of the action happens in methods behind the scenes. We need to add several frameworks to accommodate this functionality, and we must add a handful of connections that we know we’ll need from the start.
Adding the Frameworks
Start by adding the frameworks, by modifying ViewController.swift so that these lines are included after the existing import statement:
import MapKit
import CoreLocation
import MessageUI
import Social
import Contacts
import ContactsUI
import SafariServices
Planning the Variables and Connections
Within our application, we allow users to select a contact, and we display a name, email address, photo, and website for the person they choose. We show the name and email strings through two labels (UILabel) named name and email, and the image by way of a UIImageView named photo. For the website, we use a button named web and modify its title to show the URL. This, incidentally, gives us a convenient way of opening a Safari view when the URL is touched.
Finally, we have an onscreen map (MKMapView) referenced through an outlet we name map, and an instance of the Core Location Location Manager (CLLocationManager) to ask our users to use location services. We’ll call this locMan.
The application also implements four actions: newBFF, which is called to enable the user to choose a new friend from Contacts; sendEmail, to send an email to your buddy; sendTweet, to post a tweet to your Twitter timeline; and openWeb to open the friend’s website.
Designing the Interface
Now, open the Main.storyboard interface file, switch to a manageable simulated screen size, and build the application UI. The BestFriend app is a sandbox of features. Instead of me trying to describe where everything goes, take a look at Figure 20.7 to see my approach to an interface.
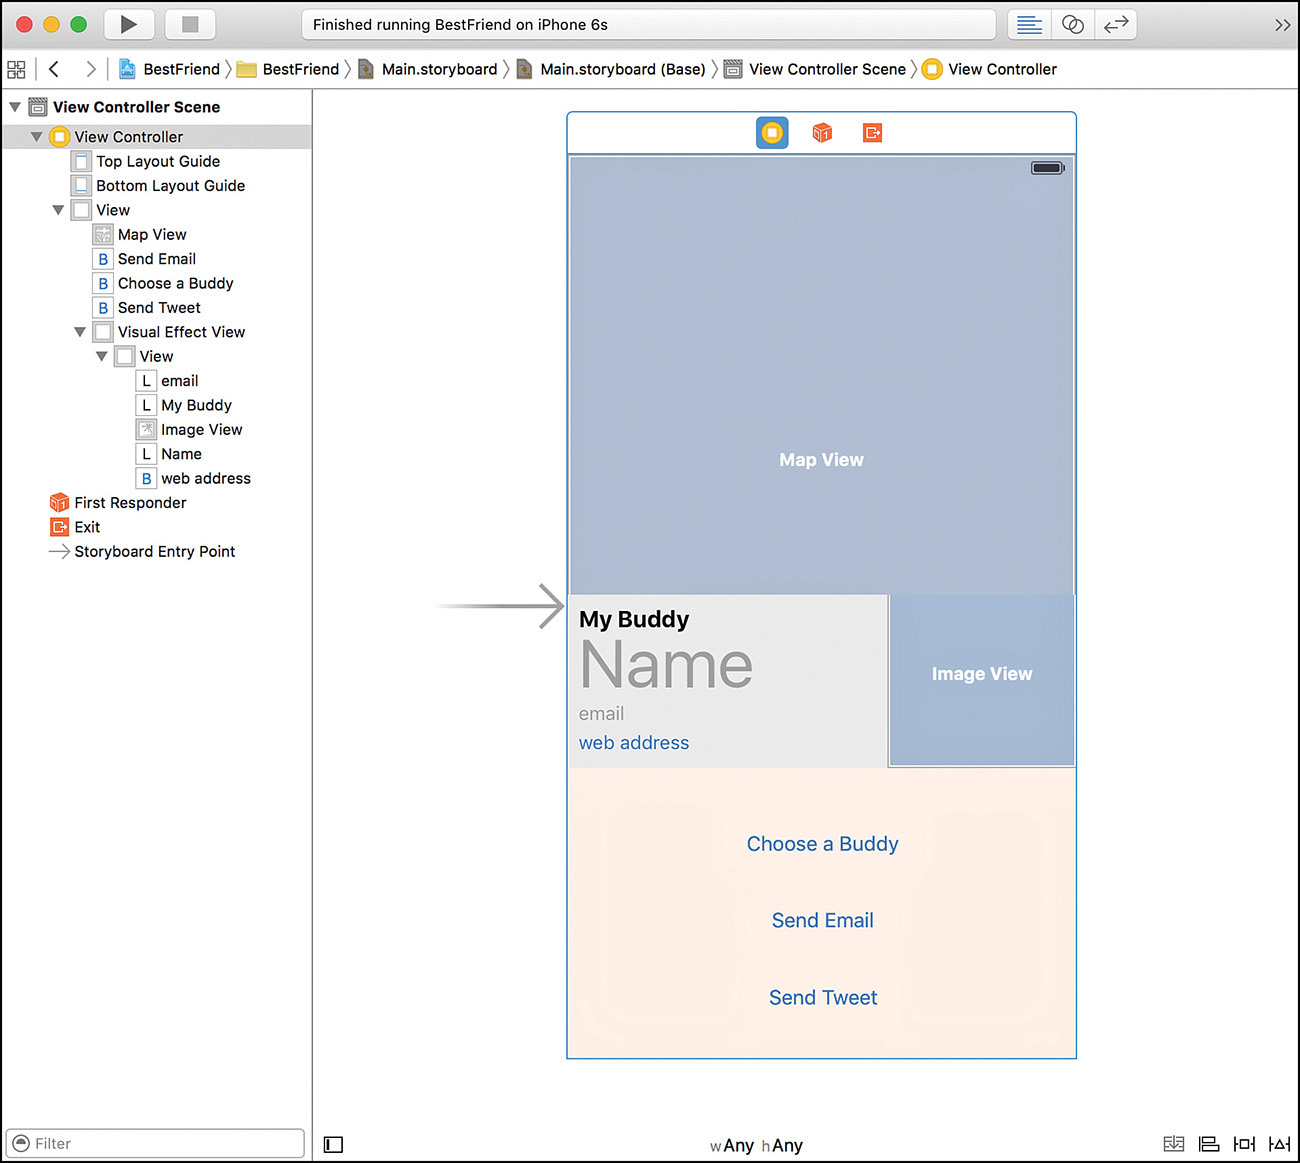
Drag a new instance of a map view (MKMapView) into the interface. This is the map view that ultimately displays your location and the city your buddy is in. Use the Attributes Inspector (Option-Command-4) to set the map to show the user location. This adds an animated annotation that shows the user’s location.
I’ve sized my map to cover a little over half of the screen with the idea that my friend’s photo and details will be superimposed over top of the map.
Add three labels (UILabel): one (bold) that acts as a title (My Buddy), another for your friend’s name, and the third for his or her email address. Below the labels, add a UIButton and set the Control alignment to left justified and the font size to match the font of the labels (System 14.0). We’ll use the button like a label, but it will also be able to respond to touch.
Add an image view (UIImageView) that will hold your buddy’s photograph from the Contacts. Use the Attributes Inspector to change the image scaling to Aspect Fit. I’ve positioned mine to the right of the labels and button.
In my UI, I’ve placed all of these elements inside a UIVisualEffectView, but you can use a UIView with a translucent white background or whatever you want. This view is positioned overlapping the bottom 25% or so of the map.
Finally, add three buttons (UIButton): one to choose a buddy (titled Choose a Buddy), another to email your buddy (titled Send Email), and the last to post a tweet (Send Tweet) to your Twitter account.
Configuring the Map View
After adding the map view, select it and open the Attributes Inspector (Option-Command-4). Use the Type drop-down menu to pick which type of map to display (satellite, hybrid, or standard), and then activate all the interaction options. This makes the map show the user’s current location and enables the user to pan and zoom within the map view (just like in the iOS Maps application).
Creating and Connecting the Outlets and Actions
You’ve done this a thousand times (okay, maybe a few dozen), so this should be pretty familiar. You need to define a total of five outlets and three actions:
![]() The label that will contain the contact’s name (UILabel):
The label that will contain the contact’s name (UILabel): name
![]() The email address label (UILabel):
The email address label (UILabel): email
![]() The button that will show and launch the contact’s website (UIButton):
The button that will show and launch the contact’s website (UIButton): web
![]() The image view for showing the contact’s photo (UIImageView):
The image view for showing the contact’s photo (UIImageView): photo
![]() The map view (MKMapView):
The map view (MKMapView): map
And four actions:
![]() The Choose Buddy button (UIButton):
The Choose Buddy button (UIButton): newBFF
![]() The Send Email button (UIButton):
The Send Email button (UIButton): sendEmail
![]() The Send Tweet button (UIButton):
The Send Tweet button (UIButton): sendTweet
![]() The Web Address button (UIButton):
The Web Address button (UIButton): openWeb
Switch to the assistant editor with Main.storyboard and the ViewController.swift file open to begin making connections.
Adding the Outlets
Control-drag from the label that will display our chosen contact’s name to just below the class line at the top of ViewController.swift. When prompted, name the new outlet name. Repeat this for the email address label, connecting it to an outlet named email and the web address button, connecting it to (guess what) web. Do the same for the image view, connecting to an outlet named photo. Finally, Control-drag from the map view to ViewController.swift, creating a new outlet named map.
Adding the Actions
Next, create the new actions. Control-drag from the Choose Buddy button to below the variable properties you’ve just created. When prompted, create a new action called newBFF. Following the same process, connect the Send Email button to an action named sendEmail, and the Send Tweet button to sendTweet. Lastly, connect the web address button to a new action named openWeb.
As mentioned earlier, our map view implementation can include a delegate method (mapView:viewForAnnotation) for customizing the display of annotations. To set the map view’s delegate to our view controller, we can write map.delegate=self in code, or we can connect the map view’s delegate outlet to the view controller line in our IB document outline.
Select the map view and open the Connections Inspector (Option-Command-6). Drag from the delegate outlet to the view controller line in the document outline area, as shown in Figure 20.8.

With those connections, you’re done with the interface and its connections. Even though we will be presenting interfaces for email, Twitter, Safari and Contacts, these elements are going to be generated entirely in code.
Implementing the Contacts Logic
There are two parts to accessing the Contacts database: displaying a view that allows the user to choose a contact (an instance of the class ABPeoplePickerNavigationController) and reading the data that corresponds to that contact. Two steps... two frameworks that we need to use.
Conforming to the People Picker Delegate Protocol
Before we access either the Contacts UI or the internal data, we must indicate that we intend to implement the CNContactPickerViewController protocol.
Modify the ViewController.swift file and update the class line, adding CNContactPickerDelegate to show that we are conforming to the Contact Picker Delegate protocol:
class ViewController: UIViewController, CNContactPickerDelegate {
Displaying the Contacts Picker View
When the user presses the button to choose a buddy, we want to show the Contacts picker view controller, which will provide the user with the familiar interface from the Contacts application.
Update the newBFF method in ViewController.swift to initialize and present a picker, setting the picker’s delegate to the view controller (self). The code, shown in Listing 20.11, should be very similar to what you saw earlier in this hour.
LISTING 20.11 Implementing the newBFF Method
1: @IBAction func newBFF(sender: AnyObject) {
2: let picker: CNContactPickerViewController =
3: CNContactPickerViewController()
4: picker.delegate = self
5: presentViewController(picker, animated: true, completion: nil)
6: }
In lines 2–3, we declare picker as an instance of CNContactPickerViewController—a graphical user interface (GUI) object that displays the system’s Contacts database. Line 4 sets its delegate to our ViewController (self).
Line 5 displays the people picker as a view over top of our existing user interface.
Choosing, Accessing, and Displaying Contact Information
For the BestFriend application, we want to know only the friend the user has selected; we don’t want the user to go on and select or edit the contact’s properties. This means we should implement the contactPicker:didSelectContact delegate method; this will be our workhorse for the project. We don’t really care if the user cancels while selecting a user, so no other delegate methods are required.
The contactPicker:didSelectContact delegate method is called automatically when a user touches a contact’s name, and with it we are passed the selected person as an CNContact (part of the Contacts framework that we imported earlier).
For this example, we read five things: the person’s name, picture, email address, web address, and postal address. We also check whether the contact record has a picture before attempting to read it.
Unfortunately, we need to manipulate a bit of the contact data before we can display it. For example, with the contact image, we only have access to the image data, so we’ll need the imageWithData initialization method of UIImage.
For the email address, web address, and postal address, we must deal with the possibility of multiple values being returned in an Array. For these pieces of data, we access the first value that we find, convert them to Strings or, in the case of postal address, an object of the type CNPostalAddress.
Sounds complicated? It’s not the prettiest code, but it’s not difficult to understand. Add the delegate method contactPicker:didSelectContact to the ViewController.swift file, as shown in Listing 20.12.
LISTING 20.12 Handling the Selection of a Contact
1: func contactPicker(picker: CNContactPickerViewController,
2: didSelectContact contact: CNContact) {
3: name.text = "(contact.givenName) (contact.familyName)"
4: email.text = contact.emailAddresses.first!.value as? String
5: web.setTitle(contact.urlAddresses.first!.value as? String,
6: forState: UIControlState.Normal)
7: if contact.imageDataAvailable {
8: photo.image = UIImage(data: contact.imageData!)
9: }
10: showAddress(contact.postalAddresses.first!.value
11: as! CNPostalAddress)
12: }
Let’s walk through the logic we’ve implemented here. First, note that when the method is called, it is passed a contact variable of the type CNContact. This is a reference to the person who was chosen and is used throughout the method.
Line 3 sets the name label to the contact’s first and last names (givenName and familyName, respectively) using String interpolation.
Line 4 grabs the first email address stored for the contact (emailAddresses.first), casts it as a String and set the email label to the result.
Lines 5–6 use get the first web address stored for the contact (urlAddresses.first), casts it as a String, and sets the title of the web button to the result.
Line 6 checks the property imageDataAvailable. If it is true, line 8 is executed, loading the photo imageview with the image stored for the contact (imageData).
Lines 10–11 pass the first address for the contact (postAddresses.first) to a method showAddress that we’ll write next. This method will display the address on a map. Addresses are managed using objects of the type CNPostalAddress, so that is what we pass to the method.
Implementing the Map Logic
Earlier in the hour, we added two frameworks to the project: Core Location, which deals with locations; and Map Kit, which displays the embedded Apple Maps. We’re going to do three things with the map:
![]() First, we’ll show our current location.
First, we’ll show our current location.
![]() Second, we’re going to center and zoom it around the address the user has chosen.
Second, we’re going to center and zoom it around the address the user has chosen.
![]() Third, we’ll add an annotation (a pushpin marker) at the address, making it easy to pick out.
Third, we’ll add an annotation (a pushpin marker) at the address, making it easy to pick out.
Requesting Permission to Use the User’s Location
Even though we check a little box on the map settings to show a user’s location, it isn’t going to work unless we explicitly ask for permissions. To do this, we need to create an instance of the CLLocationManager object, and then use the requestWhenInUseAuthorization. We’ll also need to add a new key to the project’s plist file. Hooray.
Add a new constant, locMan, to the end of list of IBOutlets that you’ve defined at the top of the ViewController.swift file:
let locMan:CLLocationManager=CLLocationManager()
Next, update the viewDidLoad method to include a call to the authorization method, as shown in Listing 20.13.
LISTING 20.13 Update the viewDidLoad Method to Ask for Location Authorization
override func viewDidLoad() {
super.viewDidLoad()
locMan.requestWhenInUseAuthorization()
}
Finish off the authorization process by updating the project’s plist file. Use the Project Navigator to open the Supporting Files group and click the Info.plist file.
Expand the Information Property List entry, and position your cursor over its name. A plus button appears to the right of the name. Click that button. Within the Key field, type NSLocationWhenInUseUsageDescription. Make sure that the Type column is set to string, and then type a message in the Value field, such as Do you mind if we show your location?. Figure 20.9 shows the setting within my version of the project.

Controlling the Map Display
We’ve got the display of the map and the user’s current location with the MKMapView, so the only other map tasks we need to handle are geocoding and annotation. To keep things nice and neat in our application, we implement all this functionality in a new method called showAddress. showAddress takes one input: a CNPostalAddress (the address object pulled from Contacts). The CLGeocoder class does all the heavy lifting of looking up the address and finding its latitude and longitude, but is written to work with an older style of address structures—not CNPostalAddress objects. For that reason, we’ll need to take the components of the address (street, state, and so on) and put them into a string for processing.
Open ViewController.swift and enter the new showAddress method shown in Listing 20.14.
LISTING 20.14 Centering the Map and Adding an Annotation
1: func showAddress(f:CNPostalAddress) {
2: let addressString: String =
3: "(f.street),(f.city),(f.state),(f.postalCode)"
4: let geocoder: CLGeocoder = CLGeocoder()
5: geocoder.geocodeAddressString(addressString, completionHandler:
6: {(placemarks: [CLPlacemark]?, error: NSError?) -> Void in
7: let friendPlacemark:CLPlacemark = placemarks!.first!
8: let mapRegion:MKCoordinateRegion =
9: MKCoordinateRegion(
10: center: friendPlacemark.location!.coordinate,
11: span: MKCoordinateSpanMake(0.2, 0.2))
12: self.map.setRegion(mapRegion, animated: true)
13: let mapPlacemark: MKPlacemark =
14: MKPlacemark(placemark: friendPlacemark)
15: self.map.addAnnotation(mapPlacemark)
16: })
17: }
Let’s explore how this works. The CNPostalAddress is passed into the method in the variable f. Why did I use f? Because the original name, fullAddress, caused the subsequent lines to wrap without there being anywhere I could break the line and still have it be valid code. Thanks Swift!
I digress. Lines 2–3 take the variable properties of the address object (street, city, state, postalCode) and combine them into a single string (addressString) that will be processed by the geocoder.
Line 4 by declares a new instance of a Core Location geocoder object: geocoder. As you may recall from earlier in this hour’s lesson, the geocoder function geocoder.geocodeAddressString method takes an address string and creates a CLPlacemark object with its location, which can then be accessed by a closure. This is precisely what happens in lines 5–17.
Line 5 performs forward geocoding on the addressString. When the geocoding completes, lines 7–15 are executed.
Line 7 stores the first CLPlacemark returned by the geocoding in the object friendPlacemark. This object contains a variable property, location, which, in turn, contains another variable, coordinate that holds latitude and longitude values. We can use this coordinate value directly when creating out map region.
Lines 8–11 use the coordinate value and a calculated span to define the region of the map to display and then use setRegion:animated (line 12) to redraw the map accordingly. This is identical to the map-centering approach we explored earlier this hour. Review the earlier code if you have any concerns about the logic.
Finally, lines 13–14 handle the annotation. In lines 13–14, we create a new map placemark (MKPlacemark), mapPlacemark, using the Core Location placemark (CLPlacemark) friendPlacemark.
With the friendPlacemark defined, we can add it to the map using the addAnnotation method in line 15.
Customizing the Pin Annotation View
Earlier in the hour, you learned that if you want to customize your annotation view, you can conform to MKMapViewDelegate protocol and implement the mapView:viewForAnnotation map view delegate method. Update the ViewController.swift file now to include the MKMapViewDelegate protocol:
class ViewController: UIViewController,
CNContactPickerDelegate, MKMapViewDelegate {
To implement the custom annotation view, we’ll use exactly the same code as in Listing 20.8. The code is included again here (Listing 20.15) for your reference.
LISTING 20.15 Customizing the Annotation View
1: func mapView(aMapView: MKMapView,
2: viewForAnnotation annotation: MKAnnotation) -> MKAnnotationView? {
3: let pinDrop:MKPinAnnotationView =
4: MKPinAnnotationView(annotation: annotation,
5: reuseIdentifier: "myspot")
6: pinDrop.animatesDrop=true
7: pinDrop.canShowCallout=true
8: pinDrop.pinTintColor=UIColor.blueColor()
9: return pinDrop
10: }
Implementing the Email Logic
In this example of using the Message UI framework, we want to allow users to email a buddy by pressing the Send Mail button. We populate the To field of the email with the address that we located in the Contacts database. The user can then use the interface provided by the MFMailCompose ViewController to edit the email and send it.
Conforming to the Mail Compose Delegate Protocol
The class implementing the Message UI framework (in this case, ViewController) must also conform to the MFMailComposeViewControllerDelegate, which includes a method mailComposeController:didFinishWithResult that is called after the user is finished sending a message. Update the class line in ViewController.swift to include this protocol:
class ViewController: UIViewController,
CNContactPickerDelegate, MKMapViewDelegate,
MFMailComposeViewControllerDelegate {
Displaying the Mail Compose View
To compose a message, we need to initialize an instance of MFMailComposeViewController. The recipients are configured with the MFMailComposeViewController method setToRecipients. One item of interest is that the method expects an array, so we need to take the email address for our buddy and create an array with a single element in it so that we can use the method. Once configured, the message composition view is displayed with presentViewController:animated:completion.
Speaking of the email address, where will we access it? Glad you asked. Earlier we set the email UILabel to the address, so we just use email.text to get the address of our buddy.
Create the sendEmail method using Listing 20.16 as your guide.
LISTING 20.16 Configuring and Displaying the Mail Compose View
1: @IBAction func sendEmail(sender: AnyObject) {
2: let emailAddresses:[String]=[self.email.text!]
3: let mailComposer:MFMailComposeViewController =
4: MFMailComposeViewController()
5: mailComposer.mailComposeDelegate=self;
6: mailComposer.setToRecipients(emailAddresses)
7: presentViewController(mailComposer, animated: true, completion: nil)
8: }
There are few surprises here. Line 2 defines an array, emailAddresses, that contains a single element grabbed from the email UILabel.
Lines 3–4 declare mailComposer as an instance of the MFMailComposeViewController—the object that displays and handles message composition. Lines 5–6 configure the MFMailCompose ViewController object, setting its delegate to self (ViewController) and the recipient list to the emailAddresses array. Line 7 presents the Mail compose window onscreen.
Handling Mail Completion
When a user is finished composing/sending a message, the composition window should be dismissed. To do this, we need to implement the mailComposeController:didFinishWith Result method defined in the MFMailComposeViewControllerDelegate protocol—exactly as demonstrated in Listing 20.5, re-created here for your reference (see Listing 20.17).
Add this to your ViewController.swift file. Note that Apple says that this method is expected but optional. If you leave it out, the application works, but if it’s expected, we’d better include it!
LISTING 20.17 Dismissing the Mail Compose View
func mailComposeController(controller: MFMailComposeViewController,
didFinishWithResult result: MFMailComposeResult, error: NSError?) {
dismissViewControllerAnimated(true, completion: nil)
}
A single line to dismiss the view controller, and we’re good to go.
Implementing the Social Networking Logic
The next piece of the BestFriend application is adding the logic behind the sendTweet method. When a user presses the Send Tweet button, we want to display a tweet compose window with the default text “Hello all - I’m currently in <somewhere>!”. Huh? Where’s <somewhere>? Well, it’s going to depend on where you’re standing. We’re going to have our tweet automatically filled in with the reverse geocoded name of our current location.
Using the basic social networking features doesn’t require any delegate methods or protocols to be added, so importing the framework, as we did at the start of the project, is all we need to start tweeting.
Displaying the Compose View
To display a tweet compose window, we complete four tasks:
1. Declare, allocate, and initialize an instance of the SLComposeViewController.
2. Use the compose view controller class method isAvailableForServiceType to verify that we’re even allowed to use Twitter.
3. Create a default message to be displayed by calling the compose view controller instance method setInitialText. Obviously, if you don’t want to create a default message, this is optional.
4. Display the view with our old standby, presentViewController:animated: completion.
So, where is the reverse geocoding going to fit in this process? The geocoding closure is going to wrap around it. We’ll use our map object to access map.userLocation.location—a structure containing the user’s latitude and longitude. This will be passed to the geocoder, which will figure out where we are. After it has made the determination, and then we complete the four steps required to display a tweet composition window with a default tweet.
Open ViewController.swift and implement our last method, sendTweet, as shown in Listing 20.18.
LISTING 20.18 Implementing a Simple Tweet Compose View
1: @IBAction func sendTweet(sender: AnyObject) {
2: let geocoder: CLGeocoder = CLGeocoder()
3: geocoder.reverseGeocodeLocation(map.userLocation.location!,
4: completionHandler:
5: {(placemarks: [CLPlacemark]?, error: NSError?) -> Void in
6: let myPlacemark:CLPlacemark = placemarks!.first!
7: let tweetText:String =
8: "Hello all - I'm currently in (myPlacemark.locality!)!"
9:
10: let tweetComposer: SLComposeViewController =
11: SLComposeViewController(forServiceType: SLServiceTypeTwitter)
12:
13: if SLComposeViewController.isAvailableForServiceType(
14: SLServiceTypeTwitter) {
15: tweetComposer.setInitialText(tweetText)
16: self.presentViewController(tweetComposer,
17: animated: true, completion: nil)
18: }
19: })
20: }
Line 2 initializes a new Core Location geocoder object (CLGeocoder): geocode. Lines 3–5 begin the closure that is executed when geocoding is completed. Here we use reverseGeocodeLocation:completionHandler, with map.userLocation.location as the argument. This takes the current location of the user—as provided by our map object—and figures out where the person is (city, address, and so on).
Line 6 grabs the first location returned by the geocoder and stores it in a Core Location placemark (CLPlacemark) named myPlacemark. This object contains all the information returned by the geocoder.
In lines 7–8, we use myPlacemark.locality (the name of the user’s city) to create a string, tweetText, that will be displayed as a default tweet in the tweet composition window.
Lines 10–11 declare tweetComposer, an instance of the social networking compose view controller of the type SLServiceTypeTwitter. Lines 13-14 check to make sure we are allowed to send tweets for that same service type. If we can, Line 15 sets the initial tweet to tweetText, and Lines 16-17 display tweetComposer.
One more little method and we’re all done.
Implementing the Safari View Controller
The final piece of our application is implementing the method openWeb. Recall that this action is called when the user touches the button whose title is set to the friend’s web address. It should open a Safari view controller containing the website.
Implement openWeb as shown in Listing 20.19
LISTING 20.19 Open a URL Using Safari Web Views
@IBAction func openWeb(sender: AnyObject) {
let safariController = SFSafariViewController(URL: NSURL(string:
web.titleForState(UIControlState.Normal)!)!)
presentViewController(safariController, animated: true, completion: nil)
}
Only two lines of code in this method (broken across three lines, but still...). The first initializes the Safari View Controller (safariController) using the title of the web button as the URL.
The second line presents safariController onscreen.
Find a mirror, look around nervously, and now take a bow. You’ve finished the BestFriend app.
Setting the Status Bar to White (Optional)
Depending on how you positioned the map in your interface, you might want to switch the iOS status bar to a light color, rather than the default black. To lighten the status bar, add the method in Listing 20.20 to your ViewController.swift file
LISTING 20.20 Setting the Status Bar Appearance in preferredStatusBarStyle
override func preferredStatusBarStyle() -> UIStatusBarStyle {
return UIStatusBarStyle.LightContent
}
Building the Application

Further Exploration
Over the past few hours, you’ve learned much of what there is to know about accessing images, music, and sending email, but we haven’t even scratched the surface of the Contact and Contact UI frameworks. In fact, the Contact UI framework contains three additional modal view controllers. You can use the framework to create new contacts, set properties, and edit and delete contacts. Anything the Contacts application can do, you can do with the framework. For more detailed information about the use of these APIs, refer to the excellent framework guides in the iOS Help. Beware of a guide called the Address Book Programming Guide for iOS – this is still included in the documentation, but refers to an old method for working with contact data. It’s ugly.
In addition, review the Apple guide for Map Kit and complete the Core Location exercises in the next hour. Using these two frameworks, you can create complex map annotation views (MKAnnotationView) well beyond the simple pushpin annotations presented here. You can deploy these features in nearly any application that works with addresses or locations.
If your application presents a social networking opportunity, implementing Twitter and Facebook support is both fast and straightforward. What is shown here, however, only scratches the surface of what the Social framework can do. Refer to Apple’s Social framework reference for more examples of this exciting new tool.
Once you’ve mastered these integration topics, check out the Calendar and Reminders Programming Guide, which introduces you to Event Kit and Event Kit UI frameworks. Similar in design and function to the Contacts frameworks, these provide access to the iOS Calendar and Reminder information, including the ability to create new events and reminders directly in your application.
Summary
In this hour, you learned how to allow the user to interact with contacts from the Contact database, how to send email messages, open Safari views, tweet, and how to interact with the Map Kit and Core Location frameworks. Although there are some challenges to working with Contact data (lots of embedded data structures), after you’ve established the patterns to follow, it becomes much easier. The same goes for the Map Kit and Core Location features. The more you experiment with the coordinates and mapping functions, the more intuitive it will be to integrate them into your own applications. As for email and Safari, there’s not much to say: They’re easy to implement anywhere.
Q&A
Q. Can I use the MKMapView when my device is offline?
A. No, the map view requires an Internet connection to fetch its data.
Q. Is there a way to differentiate between address (mailing or email) types in the Contact data?
A. Yes. Although we did not use these features in our code, you can identify specific types (home, work, and so on) of addresses when reading Contact data by examining the label properties (we only used the value).
a. UIMapView
b. MKMapView
c. MapView
d. CLMapView
2. The framework responsible for providing social networking interaction is known simply as what?
a. Core Data
b. Social
c. SNetworking
d. Twitbook
3. The CNContactPickerDelegate protocol requires that a minimum of how many methods be implemented?
a. 1
b. 2
c. 3
d. 4
4. The people picker, mail interface, safari view, and twitter composer views are all displayed using which method?
a. displayViewController:animated:completion
b. presentViewController:completion
c. displayViewController:completion
d. presentViewController:animated:completion
5. Forward geocoding takes which of the following as input?
a. Latitude and longitude
b. An address
c. An address book
d. A person
6. Accessing data for an individual contact requires us to use what class?
a. ABContact
b. ABContactData
c. CNContactData
d. CNContact
7. Contact addresses are returned as an Array of this object?
a. ABPostalAddress
b. CNPostalAddress
c. ABAddressList
d. CNAddressList
8. To zoom in on a portion of a map, which of the following methods should you use?
a. setRegion:animated
b. setRegion
c. getRegion:animated
d. zoomRegion:animated
9. Geocoding will only work in the iOS Playground if you set the playground to do what?
a. Run in the iOS Simulator
b. Show invisibles
c. Run outside of the iOS Simulator
d. Run in the foreground
10. A location on a map is known as a what?
a. Pin
b. Location mark
c. Placemark
d. Mark
Answers
1. B. Maps are displayed via the MKMapView object.
2. B. The Social framework provides all the social networking features in iOS.
3. A. The CNContactPickerDelegate protocol requires just a single method be implemented in order to function.
4. D. The views within this hour’s exercises make heavy use of the presentViewController:animated:completion method.
5. B. An address is all that forward geocoding requires as input.
6. D. We use the CNContact object to access attributes of an individual contact.
7. B. The Contacts framework gives us access to an individual’s addresses as an Array of CNPostalAddress objects.
8. A. To zoom in on a portion of an MKMapView, you should use the setRegion:animated method.
9. A. Geocoding in the iOS Playground will result in an error unless you’ve set it to run in the iOS Simulator.
10. C. A location on a map (in iOS land) is known as a place mark.
Activities
1. Apply what you learned in Hour 15, “Reading and Writing Application Data,” and make the BestFriend application persist the name and photo of the selected friend so that the user doesn’t need to repeat the selection each time the application is run.
2. Enhance the BestFriend application to include, by default, your current location (city and street) in the email message composition window.
3. Update the iPad version of the project so that the Person Picker is displayed in a popover rather than taking over the entire screen.
4. Add error checking throughout the application so that picking a contact that doesn’t include all the accessed attributes does not crash the application.