Chapter 2. Installing and Configuring Configuration Manager Reporting
In This Chapter
![]() Creating the Reporting Services Point
Creating the Reporting Services Point
![]() Using ConfigMgr Security Reporting Roles
Using ConfigMgr Security Reporting Roles
![]() Changing the ConfigMgr Report Logo
Changing the ConfigMgr Report Logo
![]() Demonstrating Creating and Assigning ConfigMgr Security Roles
Demonstrating Creating and Assigning ConfigMgr Security Roles
System Center Configuration Manager (ConfigMgr) uses a reporting services point to host its reports, apply permissions to access reports, and check the health of SQL Server Reporting Services (SSRS). While the reporting services point is technically an optional role for ConfigMgr, not adding this role to your environment would leave you unable to leverage ConfigMgr’s reporting capabilities, which would seriously affect your ability to manage your ConfigMgr environment.
By leveraging the reporting services point and SSRS to utilize built-in and custom reports, you can get a better understanding of your environment and measure key performance indicators (KPIs). When you couple reporting with creating custom dashboards and using built-in SSRS features such as report subscriptions, your entire business organization can make informed decisions based on ConfigMgr information.
This chapter shows you how to install the reporting services point. It discusses using security roles to allow non-ConfigMgr administrators to access information within ConfigMgr without the need for the console; this is referred to as role-based administration (RBA). It also introduces a utility you can use to change the default report logo used by ConfigMgr.
![]() You use it to create the data source and upload the default ConfigMgr reports.
You use it to create the data source and upload the default ConfigMgr reports.
![]() It checks for new reports added directly to SSRS and applies the appropriate permissions on all folders and reports. This check occurs every 10 minutes, and this default cannot be modified.
It checks for new reports added directly to SSRS and applies the appropriate permissions on all folders and reports. This check occurs every 10 minutes, and this default cannot be modified.
Adding the reporting services point is similar to adding any other role in ConfigMgr. A key point to remember when installing the RP is that when SSRS is installed remotely to the ConfigMgr site server, you should install this role on your SSRS server and not your ConfigMgr server.
Tip: Prerequsities for Installing the Reporting Services Point
Prior to installing the RP, the authors recommend that you apply the latest software updates to your SQL Server instance. In addition, confirm that you and the ConfigMgr site server have full administrative privileges on both the Windows Server and the SQL Server instance where you will be installing SSRS.
As a general rule, you should install SSRS on the same server as your ConfigMgr database. This is for performance reasons: When you execute an SSRS report, the SSRS report needs to access the ConfigMgr database. If the SQL SSRS instance is remote to ConfigMgr, report execution time increases, as does network traffic to access the ConfigMgr database.
The exception to installing SSRS on the same server as your ConfigMgr database is when you are using SQL clustering for the ConfigMgr database. Because Microsoft does not support SSRS on a SQL cluster, SSRS needs to be installed on another server.
Tip: System Center Operations Manager and SSRS Security
Microsoft does not support an installation with ConfigMgr and Operations Manager sharing the same SQL SSRS instance. This is due to the fact that Operations Manager changes the way security permissions are handled within an SSRS instance. You need to create a separate SSRS instance for each System Center component.
Before you begin the installation process, create an Active Directory (AD) security user account and give it a name such as CM16SSRS. This user account is a low-rights security account, requiring no special permissions within AD. The account will be used by ConfigMgr to access reports and the SQL Server database, and it will be used when SSRS subscriptions are executed. During the RP installation, this account is granted the appropriate permissions within both ConfigMgr and SSRS.
Follow these steps to create the reporting services point on the default SQL instance for SSRS on your Windows server:
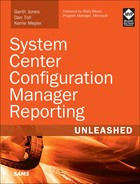
1. Open the ConfigMgr console and navigate to Administration -> Site Configuration. Select Servers and Site System Roles, as shown in Figure 2.1.
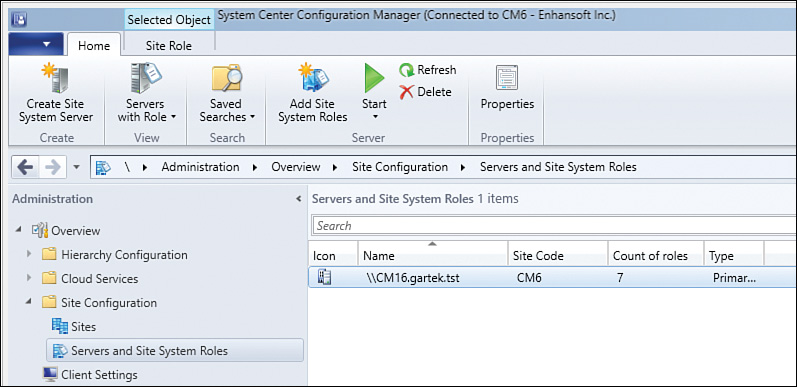
2. Right-click the server name and then select Add Site System Roles (see Figure 2.2).
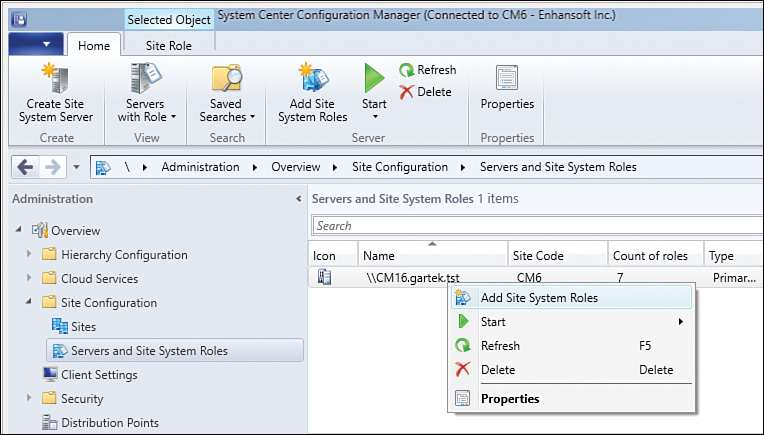
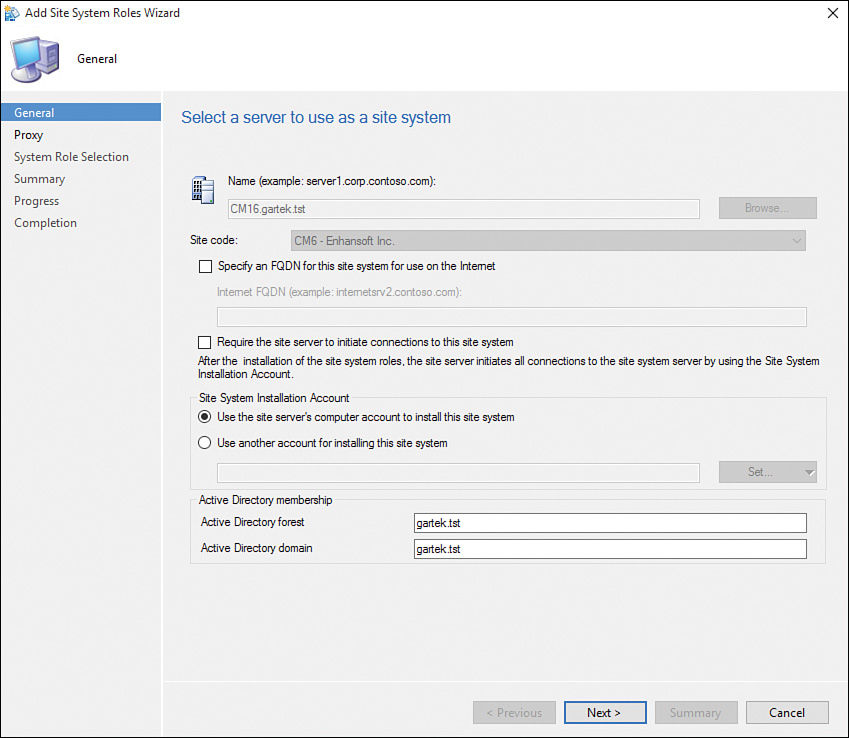
3. On the General page of the Add Site System Roles Wizard (see Figure 2.3), click Next.
4. On the Proxy page, accept the default proxy setting (displayed in Figure 2.4) by clicking Next.
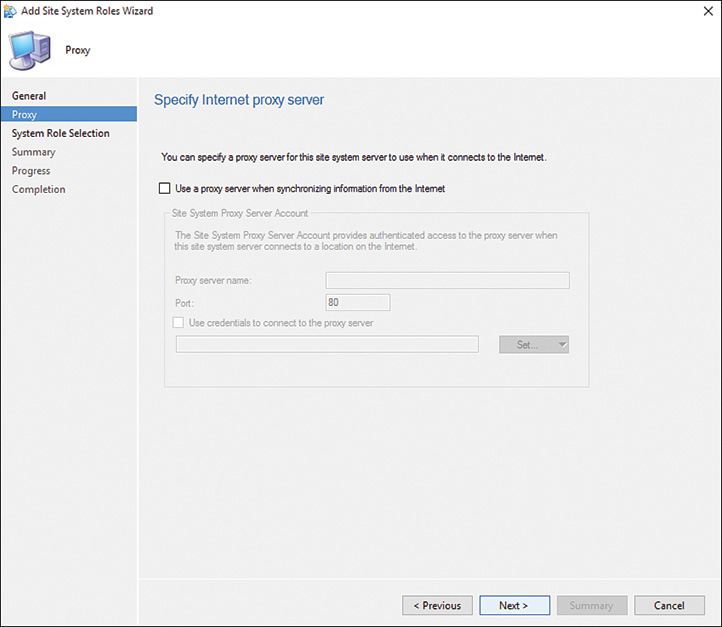
Real World: About the Proxy Settings
In most cases, proxy settings should not be set. The only time proxy settings need to be configured is when the SQL Server is also hosting roles requiring Internet access, such as the software update point or asset intelligence synchronization point roles.
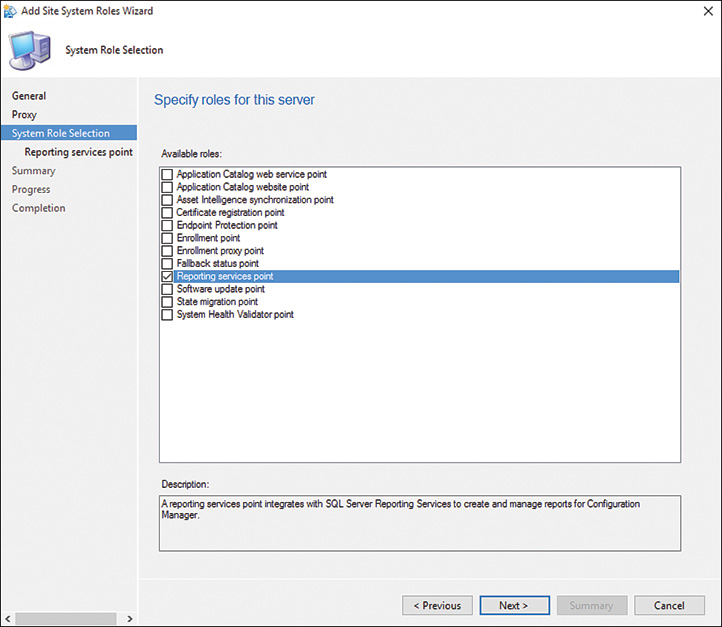
5. On the System Role Selection page, check Reporting services point as the role for this server, as shown in Figure 2.5. Click Next.
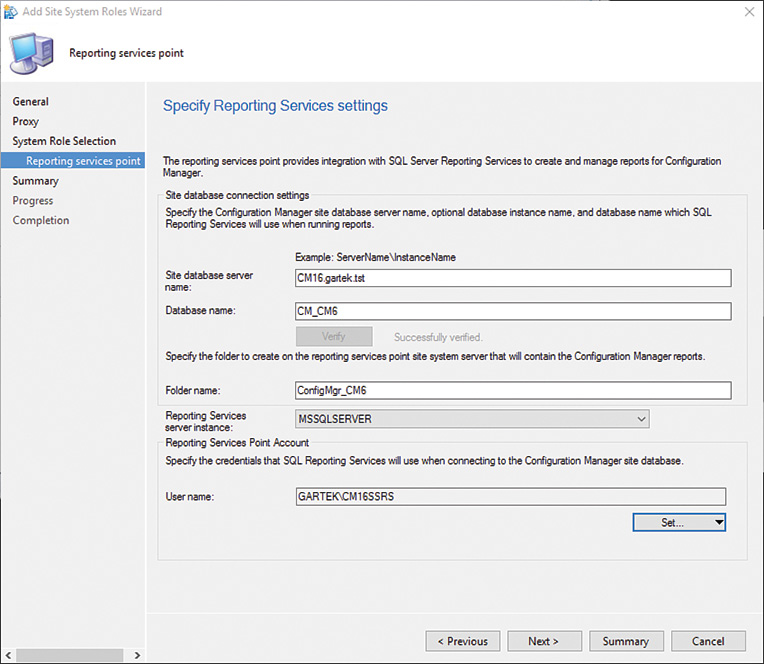
6. Click the Verify button, shown in Figure 2.6. The warning icon shown in this figure disappears when the site server database and database name are verified.
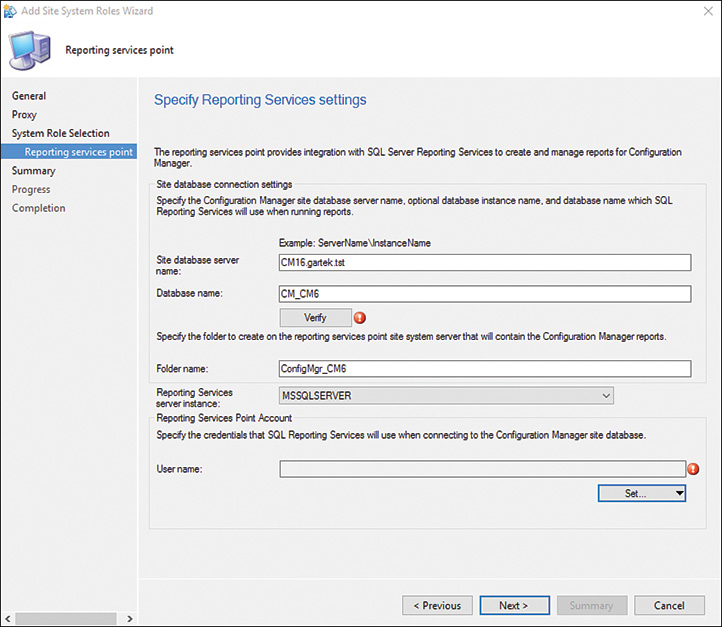
FIGURE 2.6 Verifying the site database server and site database name and specifying the credentials for SSRS to use.
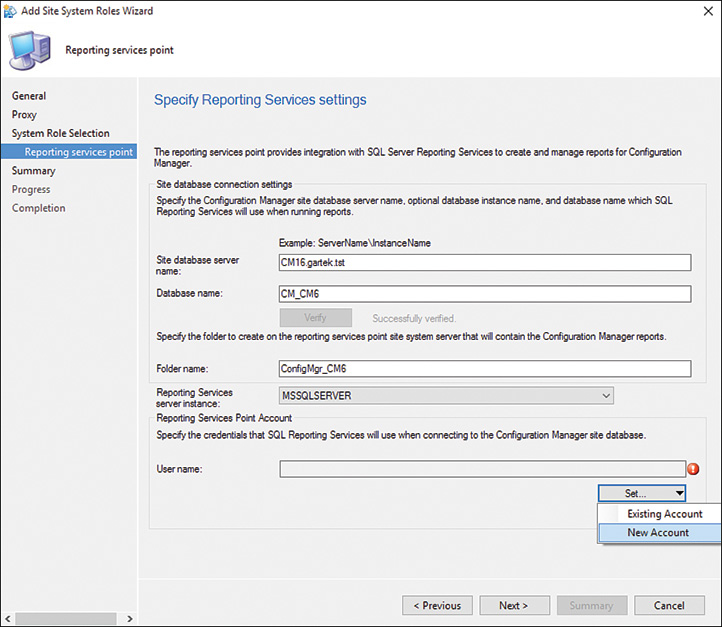
7. Click the Set button and select New Account, shown in Figure 2.7, to set the user account used to connect to the site database.
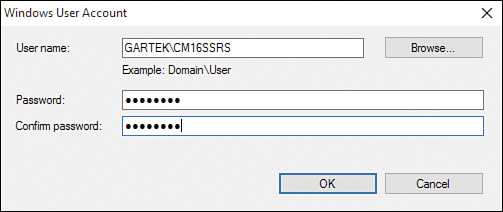
8. In the Windows User Account window (see Figure 2.8), type in the user account name or browse to select it. Enter the associated password and click OK.
9. Back on the Reporting services point page of the wizard, notice that the User name field is now populated, as shown in Figure 2.9. Click Next to continue.
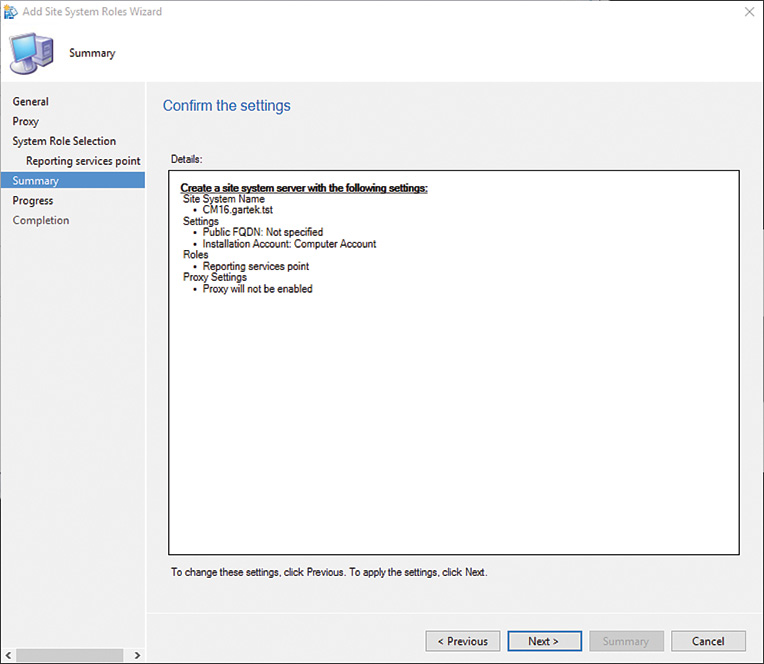
10. Verify the settings on the Summary page (displayed in Figure 2.10) and click Next to add the reporting services point role.
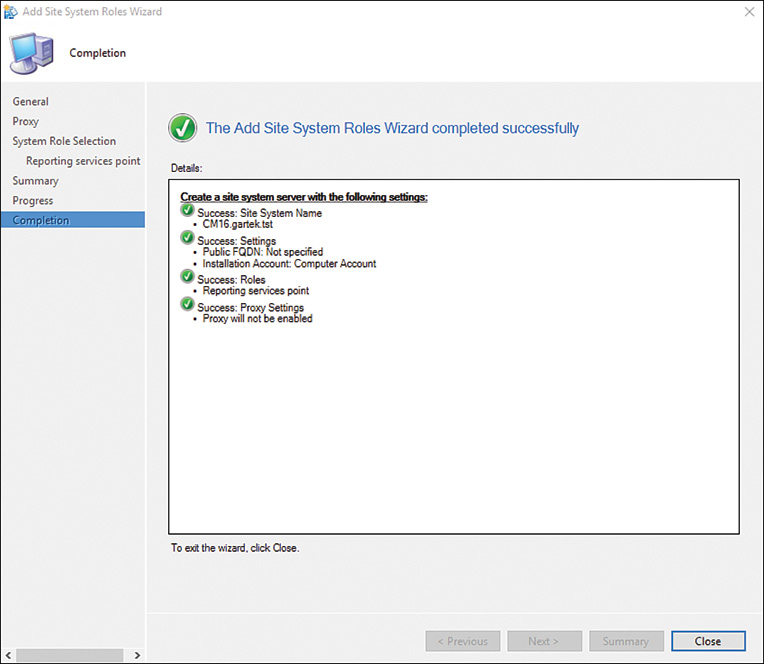
11. The Completion page, shown in Figure 2.11, appears after the site system role is successfully added. Click Close to exit the wizard.
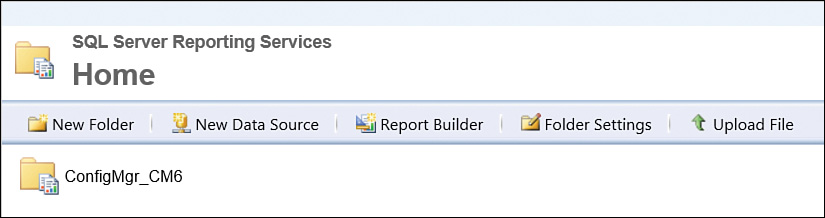
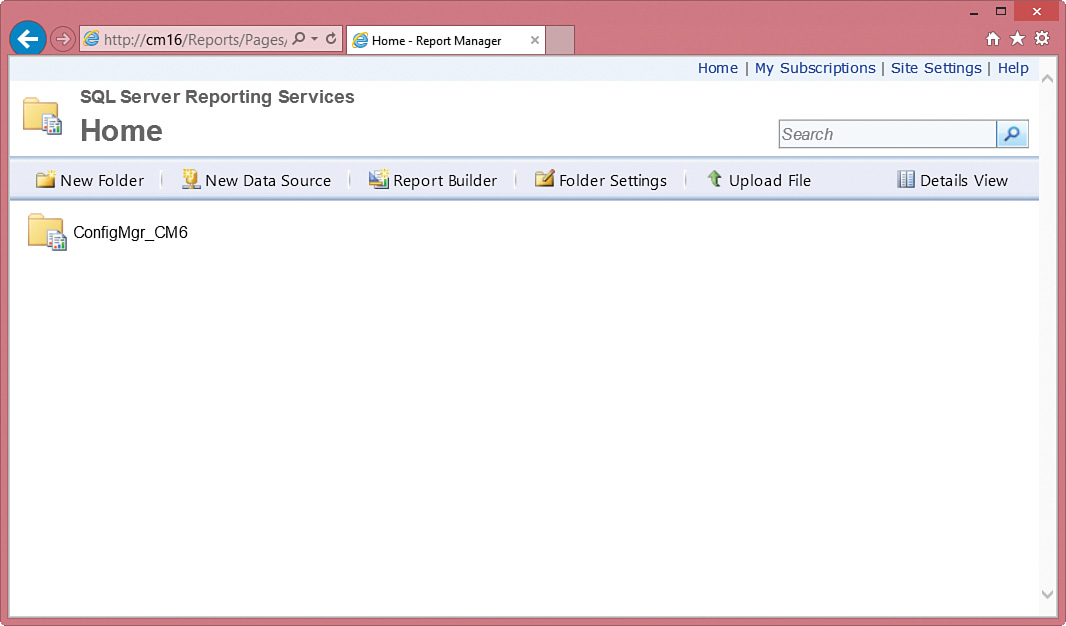
The simplest way to validate that the ConfigMgr reporting services point was installed correctly is to use Internet Explorer to browse to http://<SSRS servername>/reports. When the RP is successfully installed, you see a folder named ConfigMgr_<SiteCode>, as shown in Figure 2.12.
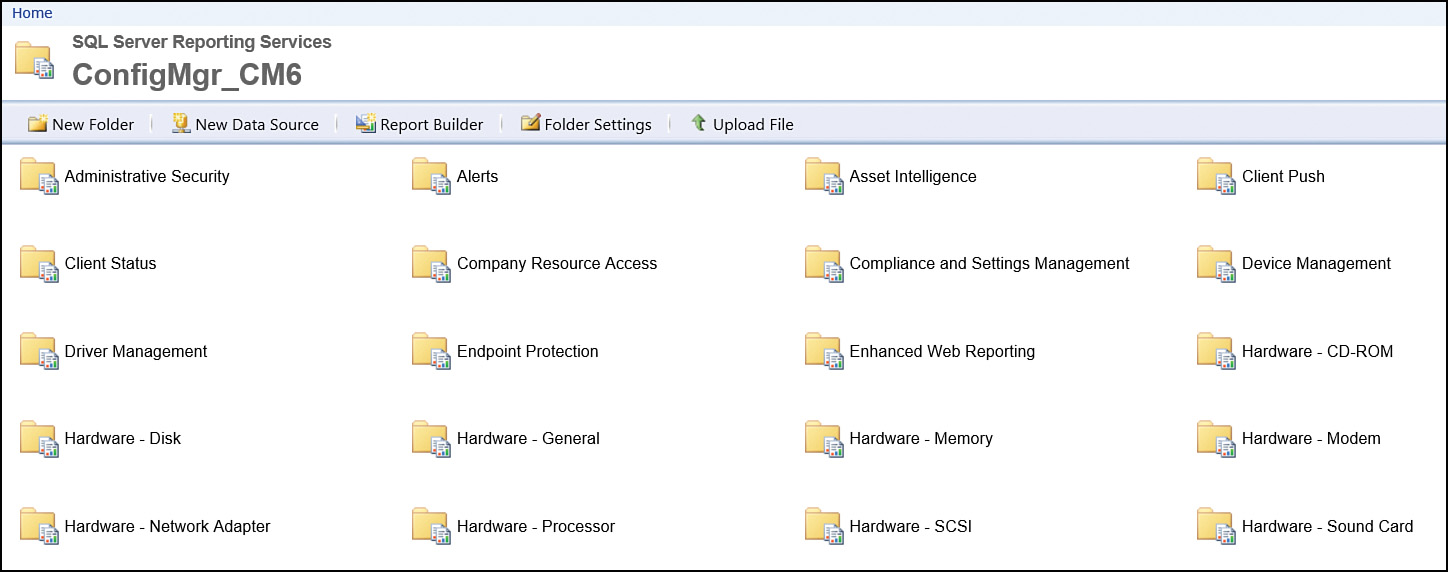
Drill down through the folder, and you should see a number of folders listed, as shown in Figure 2.13. Keep in mind that it will take several minutes for all the SSRS reports and folders to become populated.
You can review two sets of logs to check the health of your RP:
![]() The first set of log files (srsrpMSI.log and srsrpsetup.log) records the installation of the reporting services point.
The first set of log files (srsrpMSI.log and srsrpsetup.log) records the installation of the reporting services point.
![]() srsrp.log checks the ongoing status of the RP. Captured within this log file are permissions changes on the RP and when the RP sees new folders and reports. The reporting services point check occurs every 10 to 15 minutes.
srsrp.log checks the ongoing status of the RP. Captured within this log file are permissions changes on the RP and when the RP sees new folders and reports. The reporting services point check occurs every 10 to 15 minutes.
This section has discussed how to add the reporting services point role to ConfigMgr. The next section discusses creating security roles to allow users to access the SSRS reports without accessing the ConfigMgr console.
Using ConfigMgr Security Reporting Roles
As soon as you have installed ConfigMgr, someone, typically a manager, will ask you for information stored by ConfigMgr. As with any other enterprise application, it is best to reduce the number of people who can access the console, but this creates a conundrum: How can you grant access to information such as software update status, and hardware inventory without giving users access to the console? Luckily, ConfigMgr with SSRS allows you to provide information to end users without the need for any console; only an Internet browser is required. Security reporting roles, which are discussed in the following sections, make this possible.
Creating a Security Reporting Role
It’s important to follow the principle of least privileges needed when creating security reporting roles. This book uses ConfigMgr’s RBA feature to enable users to view SSRS reports. You can view the security roles RBA uses at Administration -> Security -> Security Roles in the ConfigMgr console. This section walks through the steps involved in creating a security role that allows users to access reports without accessing the ConfigMgr console. Creating a new security role is most easily accomplished by copying an existing role and removing unnecessary permissions.
Real World: Copying an Existing Security Role for Report Access
When creating a new security role to access reports, the authors recommend that you copy from the read-only auditor security role. Here’s why:
![]() Using the read-only auditor role requires fewer changes than if you use another role for your base.
Using the read-only auditor role requires fewer changes than if you use another role for your base.
![]() Using this role follows the best practice of least privileges as the read-only auditor security role cannot make any changes to ConfigMgr. Therefore, if any mistakes are made when using this role as your model, the worst that might occur is someone using the new security role could be able to view more information than was intended. However, that user would not be able to change or cause any damage to your ConfigMgr environment.
Using this role follows the best practice of least privileges as the read-only auditor security role cannot make any changes to ConfigMgr. Therefore, if any mistakes are made when using this role as your model, the worst that might occur is someone using the new security role could be able to view more information than was intended. However, that user would not be able to change or cause any damage to your ConfigMgr environment.
Follow these steps to create a security reporting role:
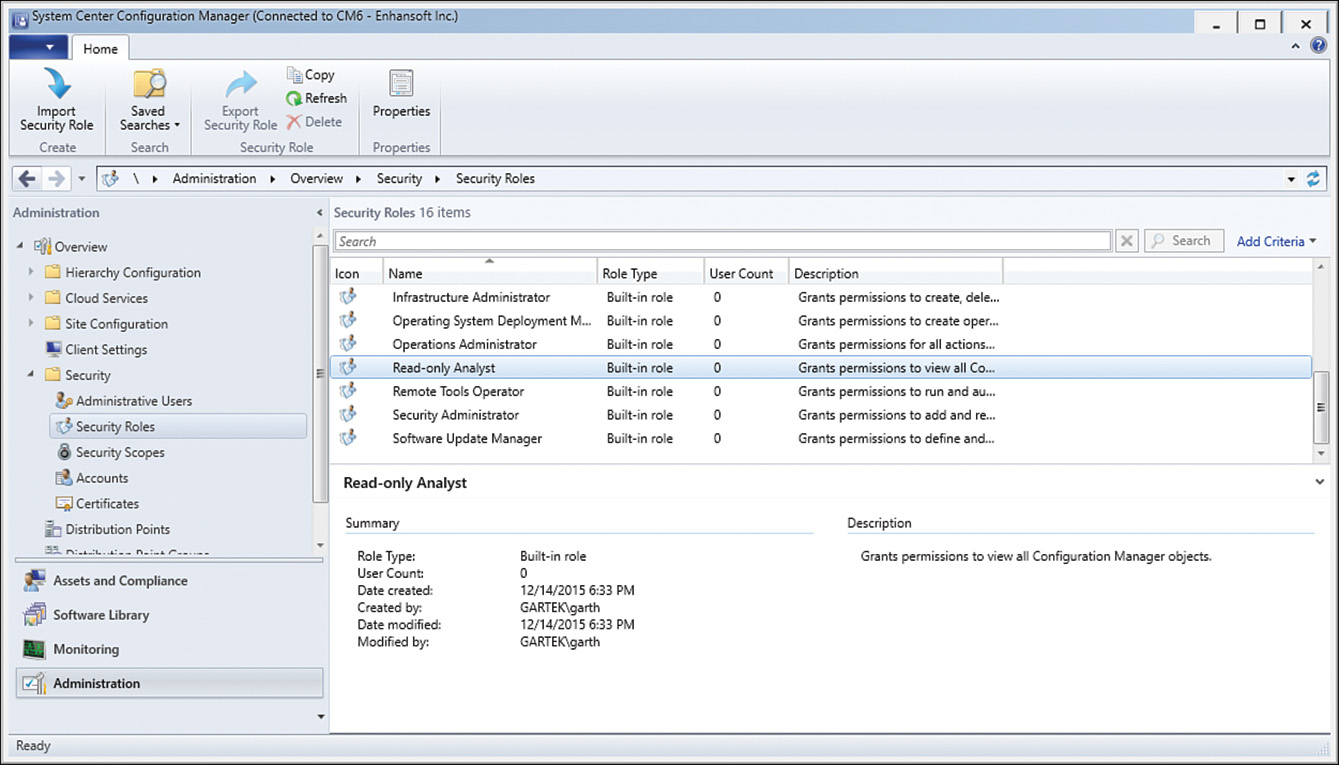
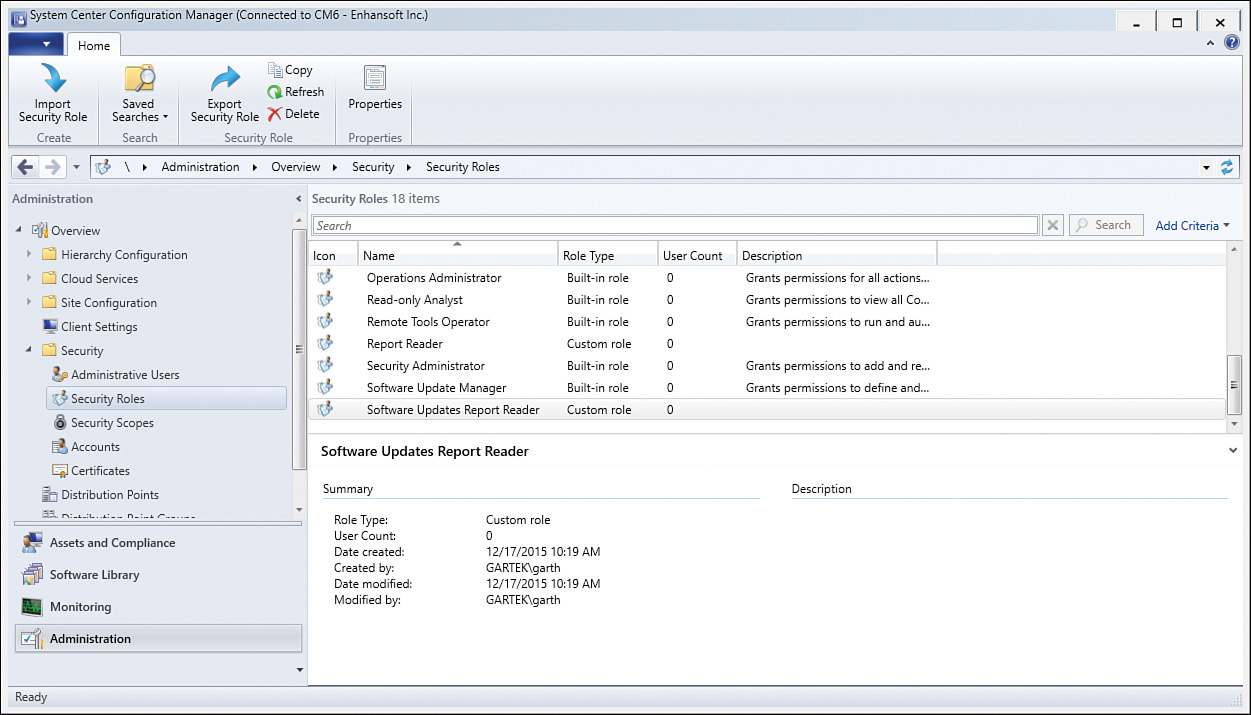
1. In the ConfigMgr console, navigate to Administration -> Security -> Security Roles to open the Security Roles node, as shown in Figure 2.14.
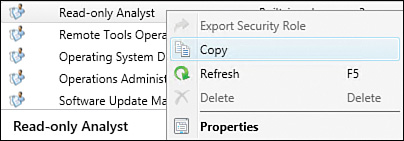
2. Right-click the Read-only Analyst role and select Copy, as shown in Figure 2.15.
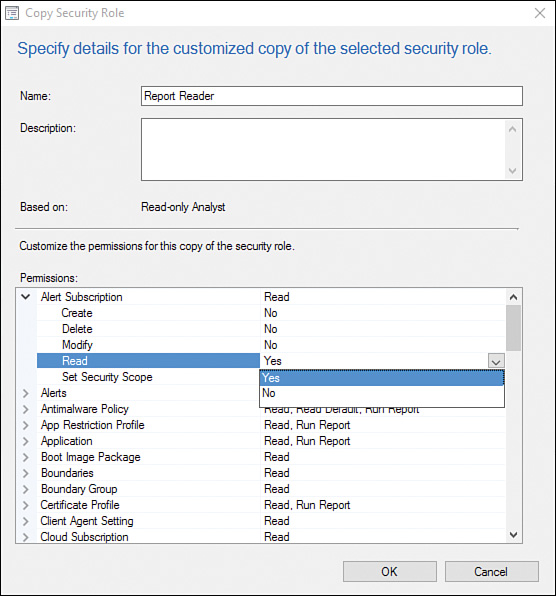
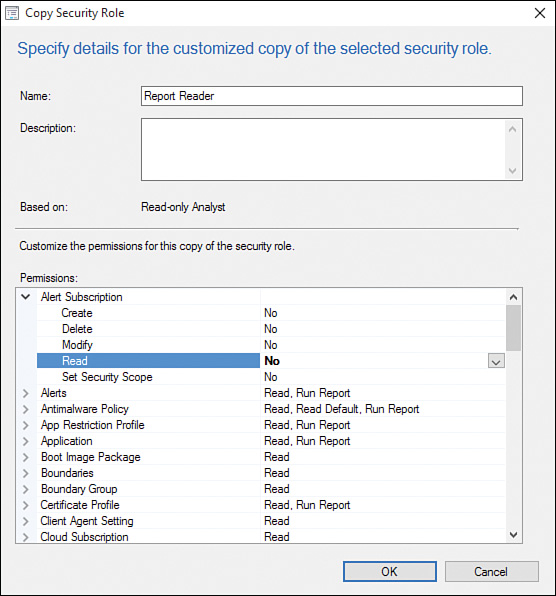
3. In the Copy Security Role window displayed in Figure 2.16, enter Report Reader in the Name field.
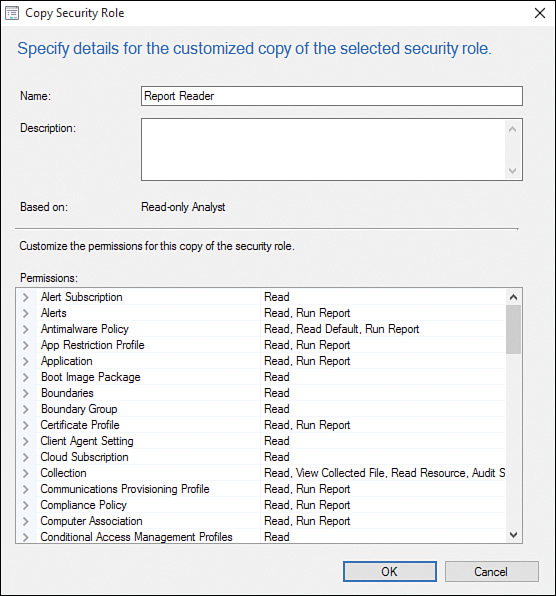
4. Remove the unneeded permissions by expanding the various nodes within the Permissions section. Table 2.1 lists the desired nodes and permissions.
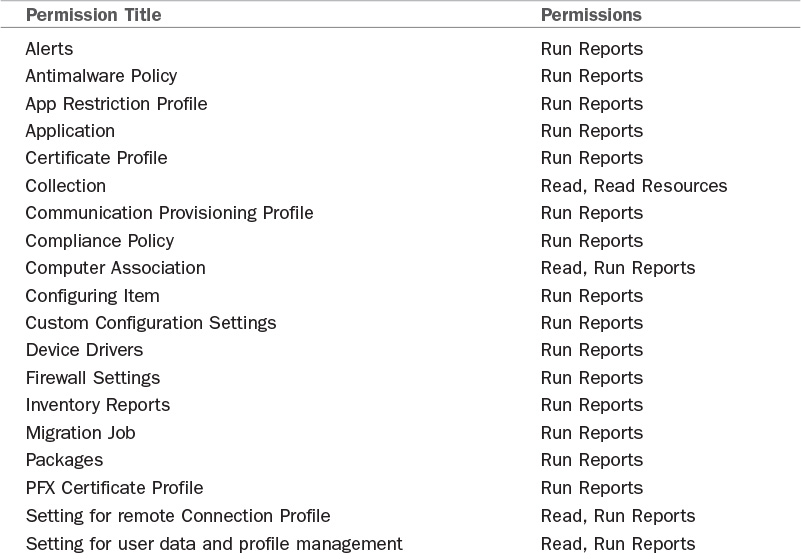
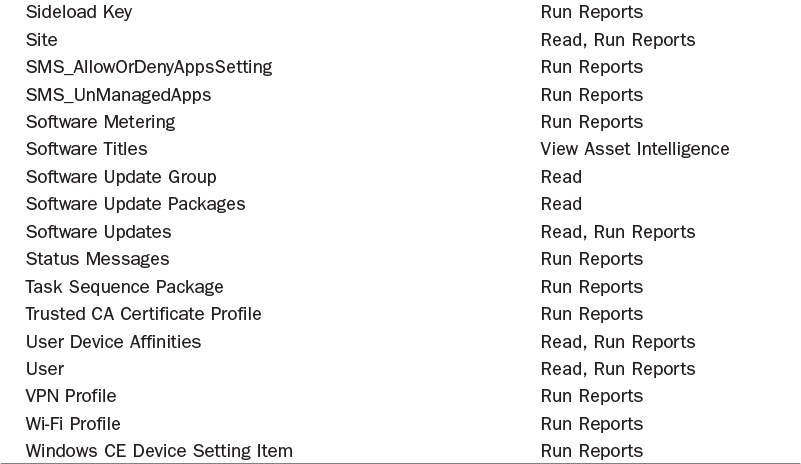
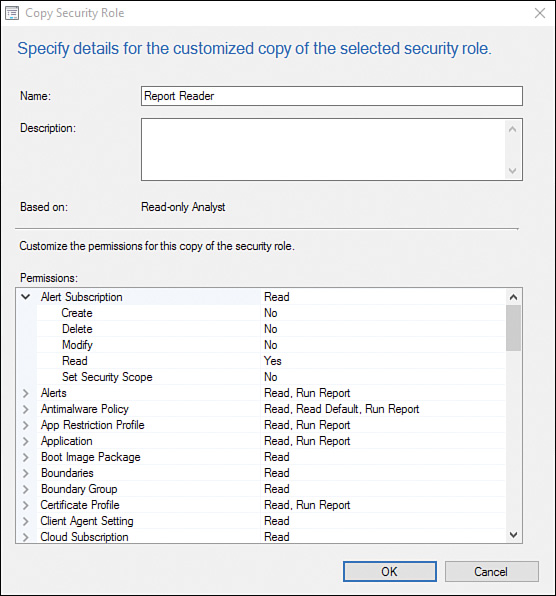
5. Starting with the Alert Subscription permission, expand Alert Subscription (displayed in Figure 2.17) and change the Read permission from Yes to No, as shown in Figure 2.18 and Figure 2.19. Repeat this process for each node until the results match Table 2.1.
Tip: Import the Security Role
To reduce the work required to change the security role, the authors have provided the Report Reader.xml file, to which this security role has been exported. You can import this role as value-added content for this book. See Appendix C, “Available Online,” for further information.
Restricting Access to Reports
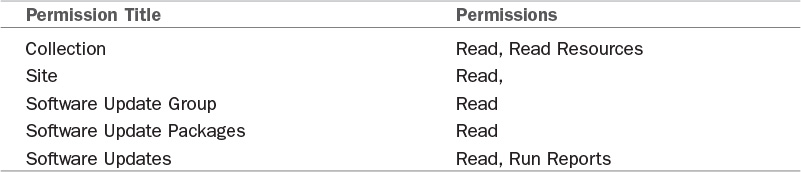
The previous section discussed creating a security role to grant all reports to a security group or user. Let’s say you want to grant selected reports, such as the software update reports, to certain groups, such as your server and workstation security teams. Accomplishing this would require adjusting the permissions within the Report Reader security role to include only the items shown in Table 2.2 and Figure 2.20, which would limit access to just the software update reports.
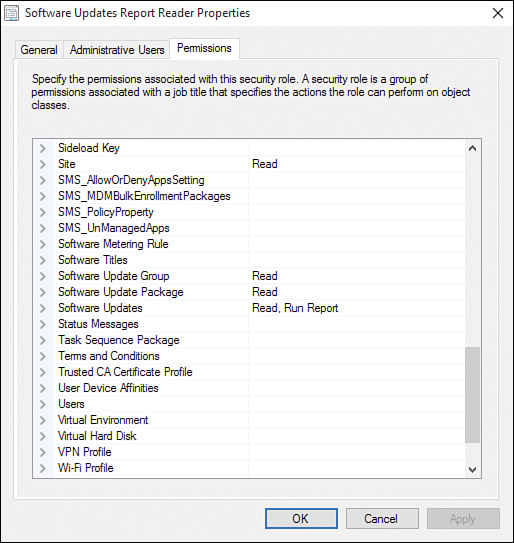
After the security role is created, it is displayed within the ConfigMgr console as shown in Figure 2.21.
Tip: Import the Security Role
The Software Updates Report Reader.xml file contains an XML export for the Software Updates Report Reader security role. This file is provided as additional content for this book (see Appendix C).
Removing a Security Role
You cannot remove a security role that has members assigned to it. Be sure to first remove all AD users and security groups assigned to a security role before you try to remove it.
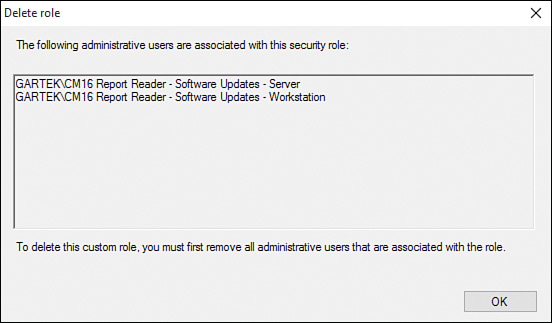
Note: Warning When Trying to Delete a Security Role
If you receive the warning message shown in Figure 2.22, the security role still has users associated with it. Ensure that no users or security groups are assigned to the security role before trying to remove it.
To remove a security role, perform the following steps:
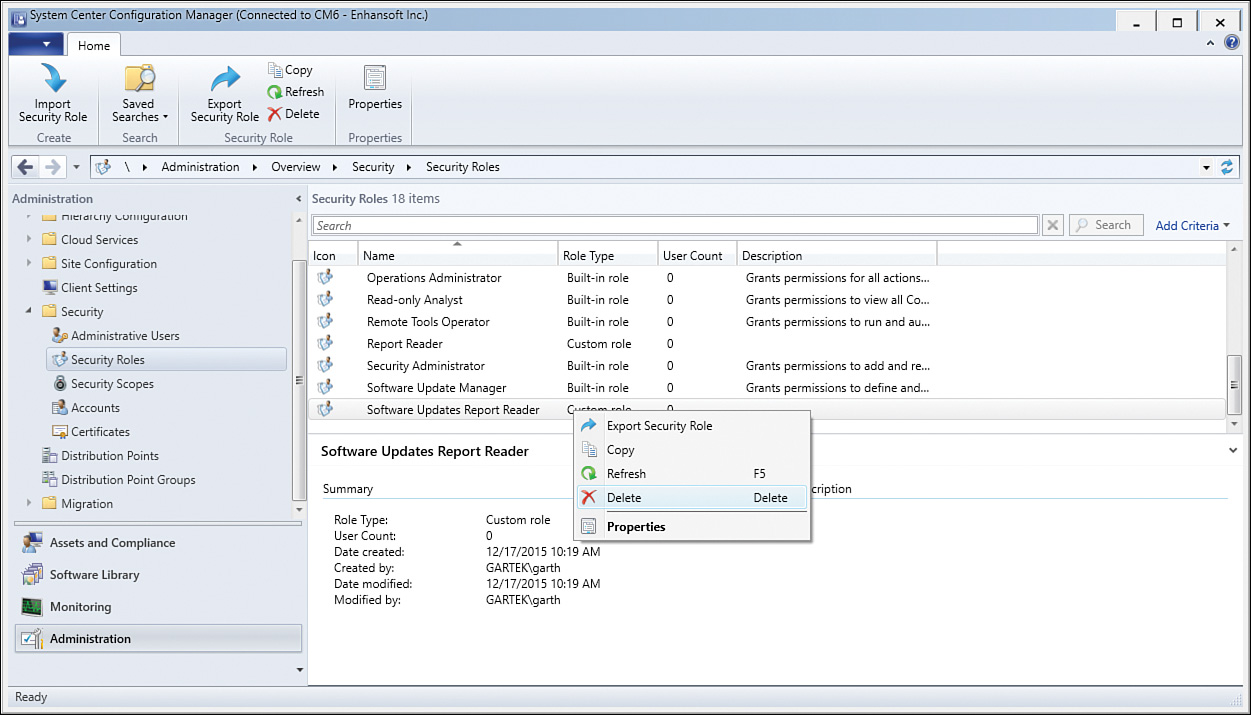
1. In the ConfigMgr console, navigate to Administration -> Security -> Security Roles. Right-click the role and select Delete, as shown in Figure 2.23.
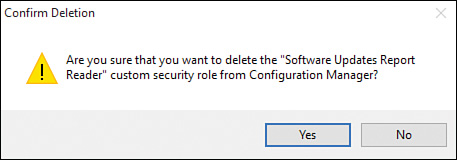
2. Click Yes to confirm deletion of the security role (see Figure 2.24).
Exporting and Importing Security Roles
Best practices call for a development environment maintained separately from your production environment. When following best practices, the security role previously created in the “Creating a ConfigMgr Security Reporting Role” section of this chapter would have been created within a development environment.
To ensure that exactly the same role is implemented within your production environment, export the security role from your development environment and import it into the production environment. To do so, perform the following steps:
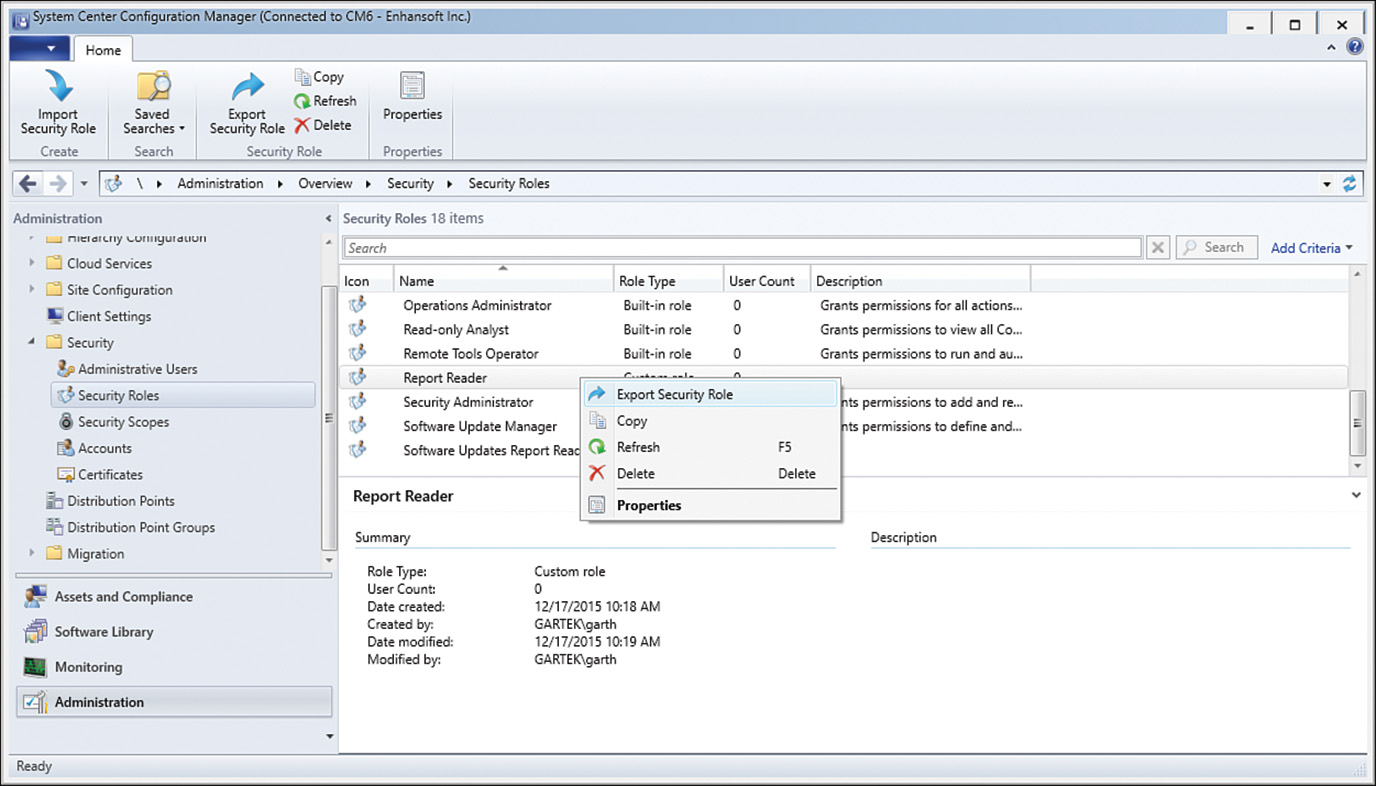
1. In the ConfigMgr console, navigate to Administration -> Security -> Security Roles. Right-click the security role you would like to export and select Export Security Role, as shown in Figure 2.25.
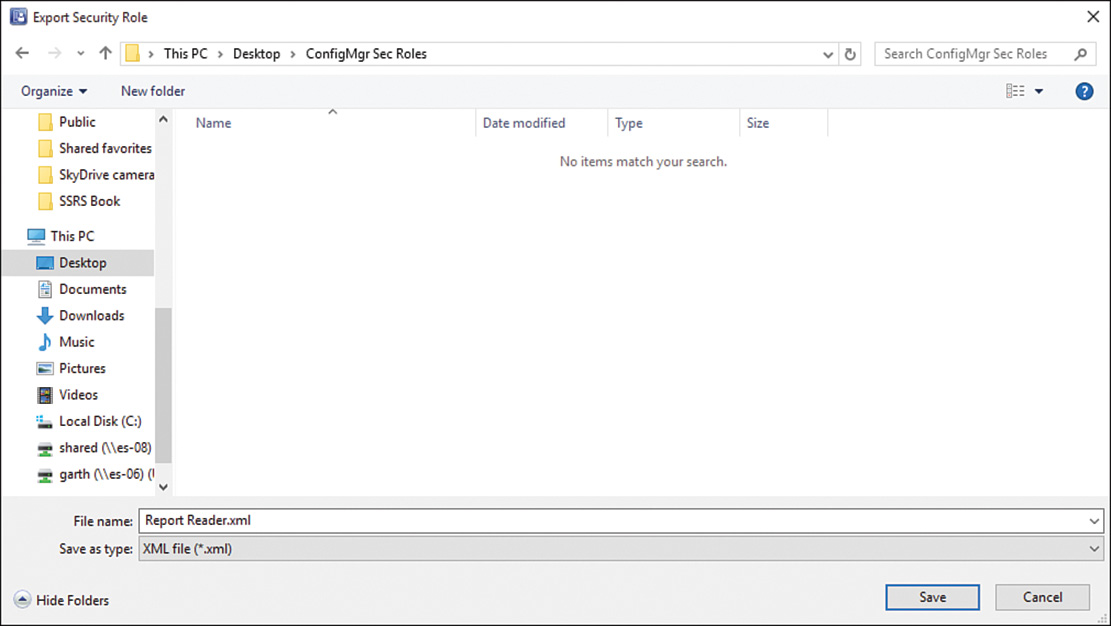
2. Select the location to which to save the exported security role and click Save, as shown in Figure 2.26.
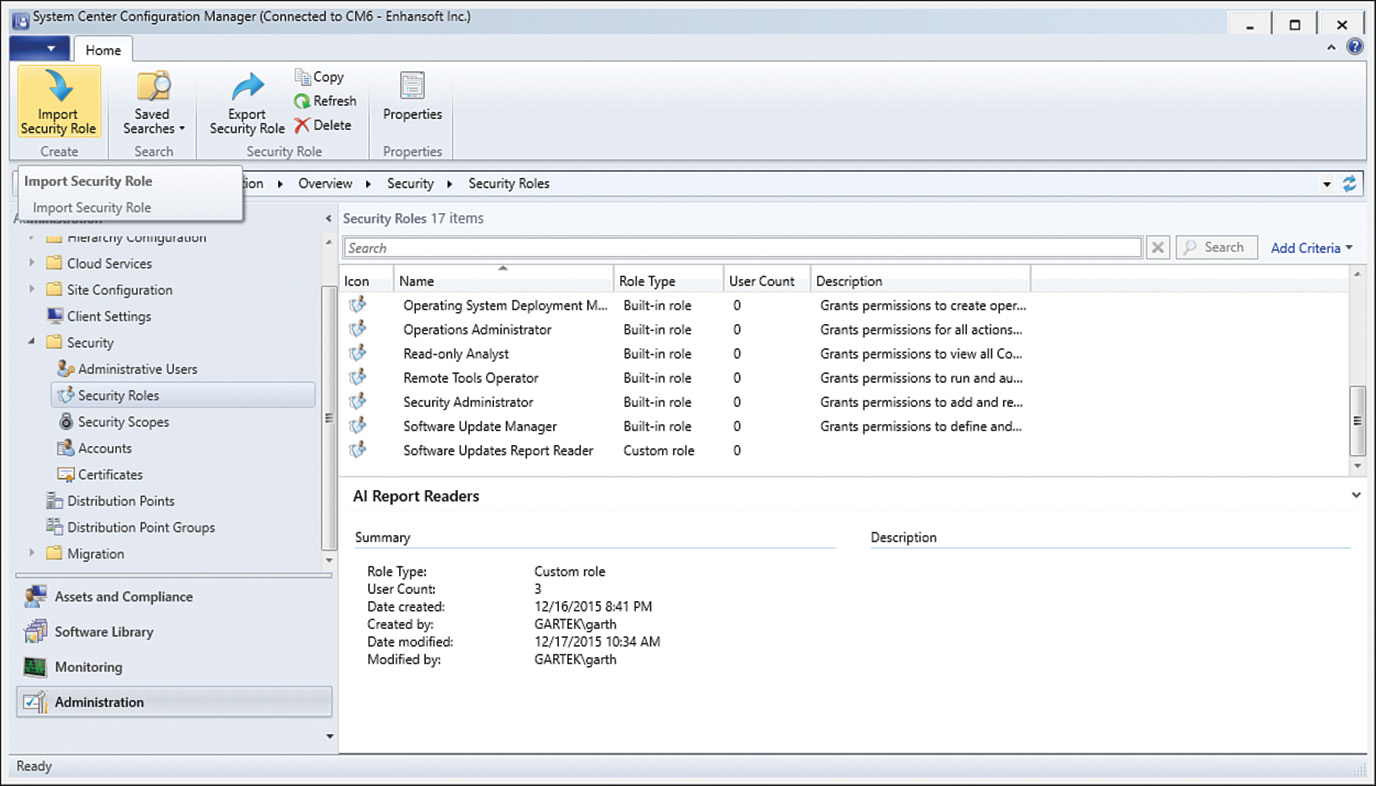
3. To import the security role, in the ConfigMgr console in your production environment, navigate to Administration -> Security -> Security Roles. Select Import Security Role on the ribbon bar, as shown in Figure 2.27.
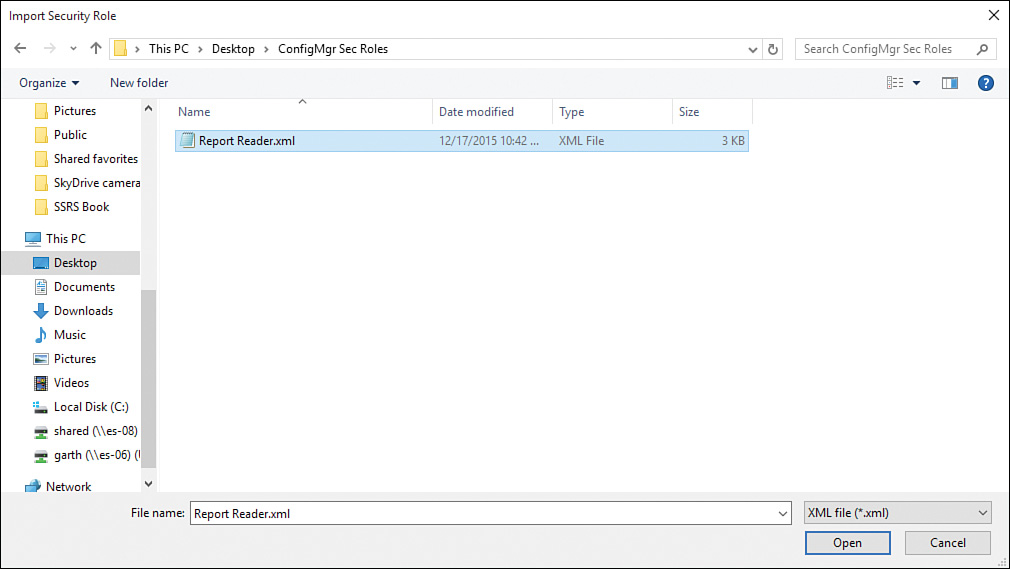
4. Locate and select the security role XML file exported from your development environment to the file system and click Open, as shown in Figure 2.28. The security role is imported into your production ConfigMgr environment.
This section has discussed how to create the Report Reader and Software Updates Report Reader security roles to grant access to ConfigMgr reports. In addition, it has discussed how to remove security roles and how to export and import security roles. The next section discusses applying a security role to an AD security group to allow users to access SSRS reports without accessing the ConfigMgr console.
Working with Security Roles
Security is an important part of any enterprise application, and System Center Configuration Manager is no exception. Following the principle of granting least privilege, you should assign ConfigMgr console users only rights that are necessary. As with any other enterprise application, the authors recommend that you not assign permissions directly to an individual administrator or user; rather, you should assign the permissions to an AD security group. This way you have the flexibility to add and remove users quickly, and you also have an audit trail via a service desk ticketing system or AD status messages. In addition, the authors recommend not assigning your day-to-day user accounts access to the ConfigMgr console where any changes to ConfigMgr can be made. If a user needs to access read-only information only within the reports, you can grant rights to access to the SSRS reports only, since the reports provide read-only data. The following sections discuss how to apply a security role to a security group and how to remove permissions.
Applying a Security Role to a Security Group
This section discusses the process of granting permissions to the ConfigMgr reports using an AD security group. Begin by creating an AD security group called CM16 Report Reader; this group will be used to grant access to all ConfigMgr reports. Then perform the following steps:
1. In the ConfigMgr console, navigate to Administration -> Security -> Administrative Users.
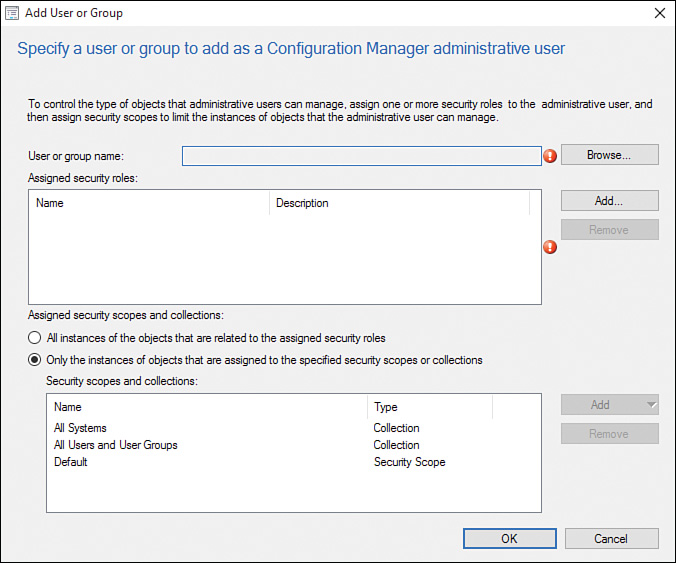
2. Click Add User or Group in the ribbon bar. When the Add User or Group window opens, click Browse (see Figure 2.29).
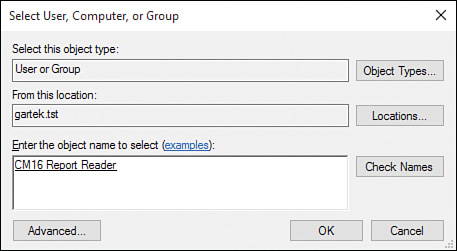
3. Select the CM16 Report Reader security group, as shown in Figure 2.30, and click OK.
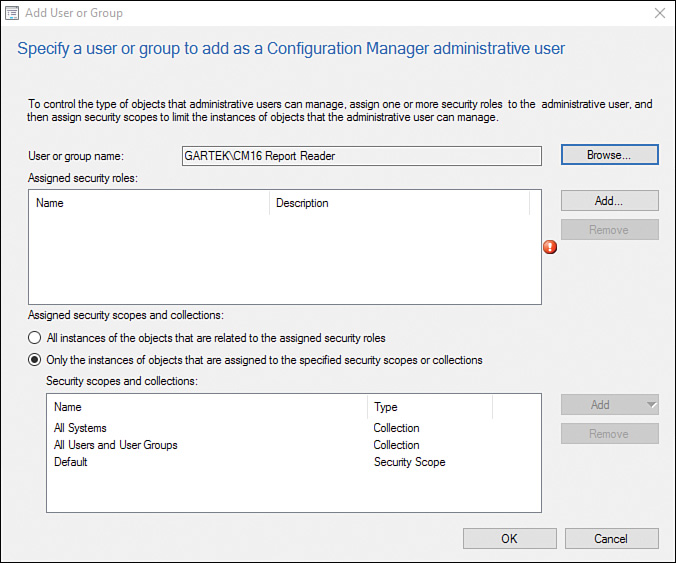
4. In the Add User or Group window, click Add next to the Assigned security roles text box (see Figure 2.31).
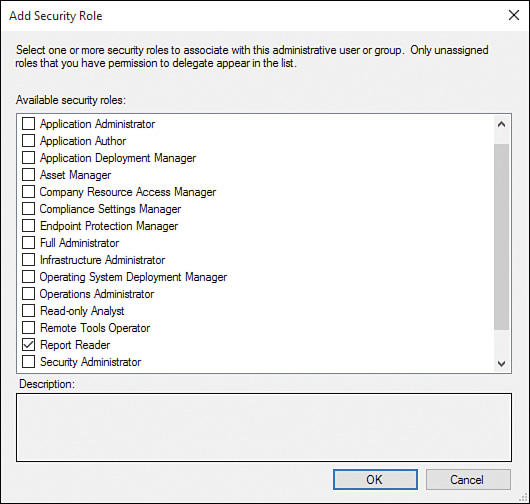
5. Select the Report Reader check box in the Add Security Role window and click OK (see Figure 2.32).
6. In the Add User or Group window, shown in Figure 2.33, click OK to complete this task.
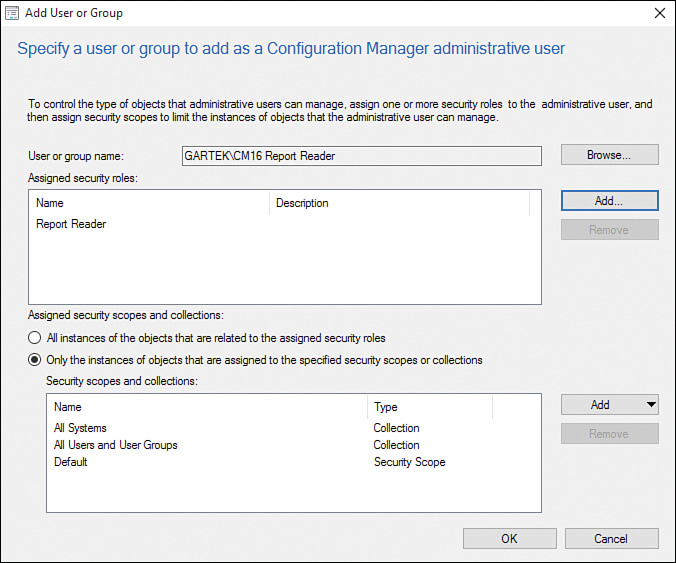
In the ConfigMgr console, navigate to Administration -> Security -> Administrative Users to view the permissions assigned to the CM16 Report Reader AD security group, as shown in Figure 2.34.

According to the principle of least privilege for providing access to software update reports to only the server and workstation security teams, you would create two AD security groups:
![]() CM16 Report Reader - Software Updates - Server
CM16 Report Reader - Software Updates - Server
![]() CM16 Report Reader - Software Updates - Workstation
CM16 Report Reader - Software Updates - Workstation
Follow these steps to create these security groups:
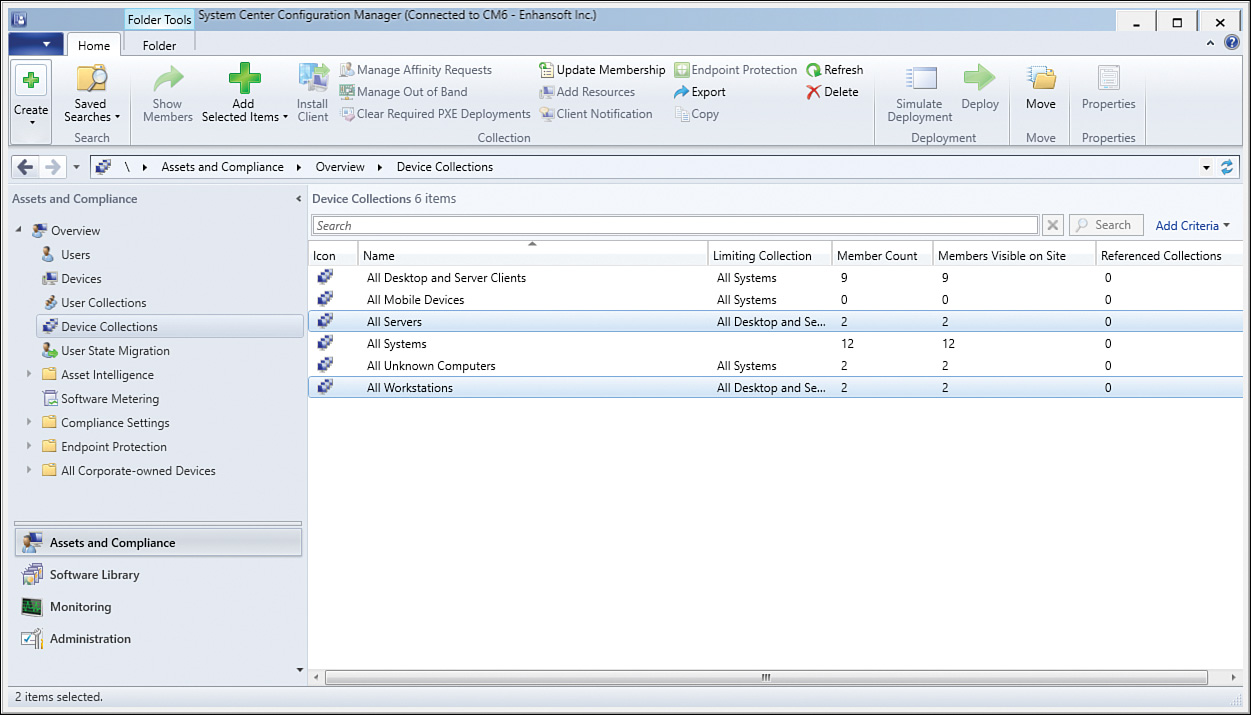
1. In the ConfigMgr console, navigate to Device Collections. Figure 2.35 shows the two collections that currently exist: All Servers and All Workstations.
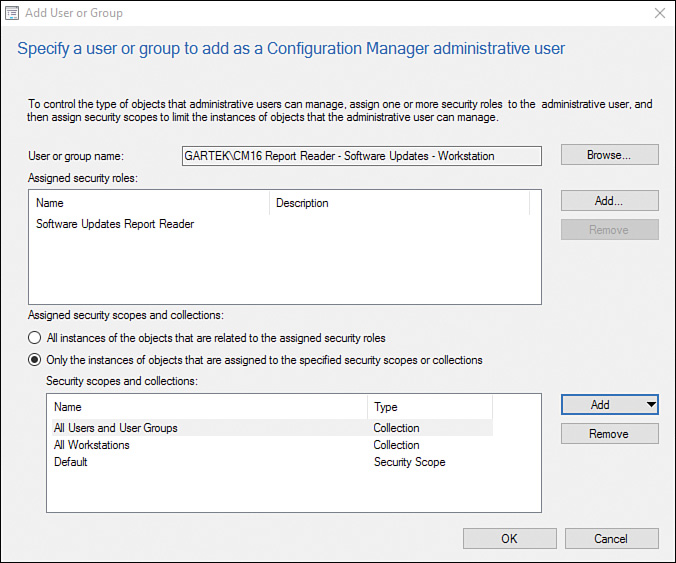
2. Add the AD security group and assign the Software Updates Report Reader security role. At this point, the wizard would look as shown in Figure 2.36.
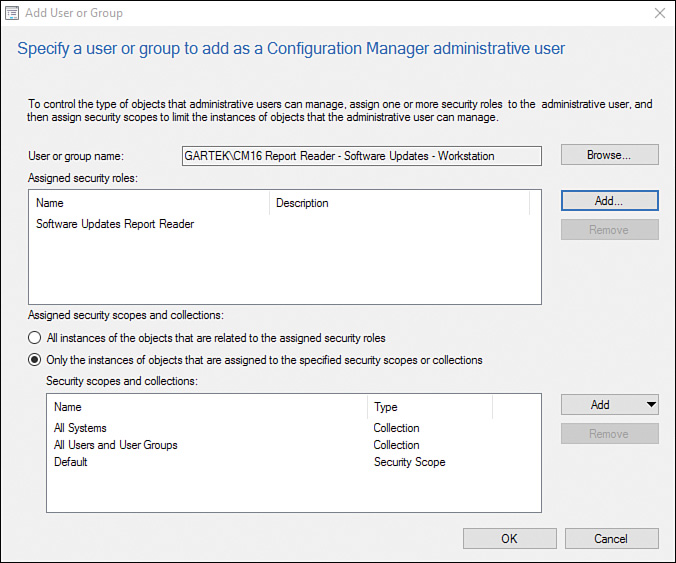
FIGURE 2.36 Assigning the Software Updates Report Reader security role to CM16 Report Reader - Software Updates - Workstation.
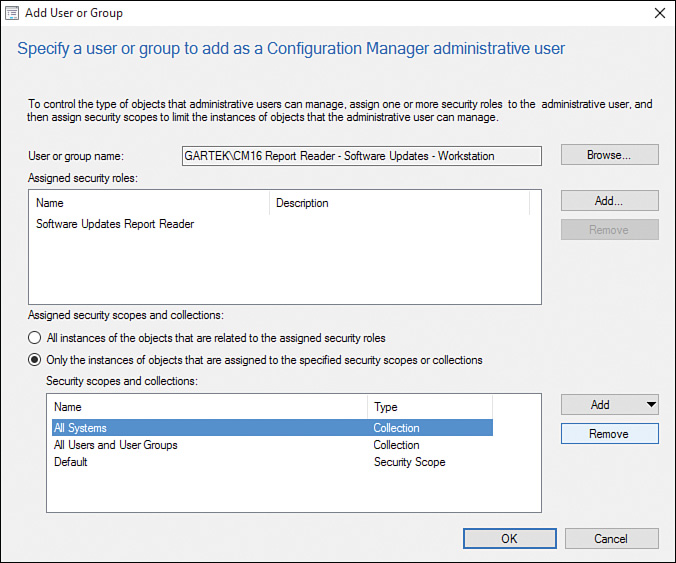
3. Select the All Systems collection (see Figure 2.37) and click Remove.
4. Click Add and then select Collection from the dropdown (see Figure 2.38).

5. In the top-left section of the window, click the User Collections dropdown menu and select Device Collections as shown in Figure 2.39.
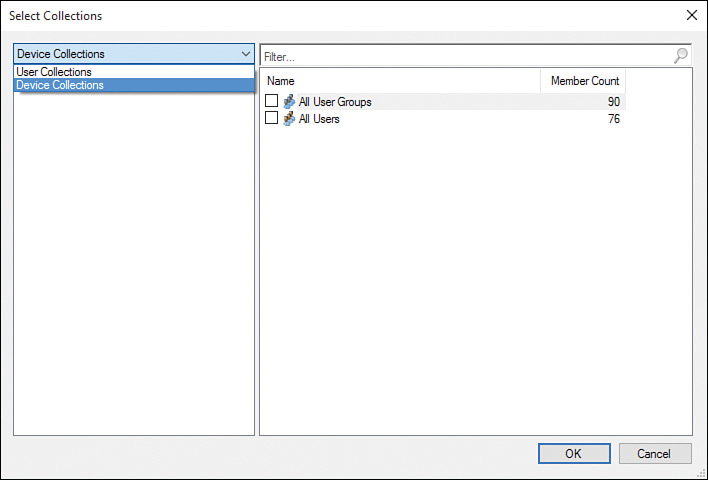
Note: Navigating to Device Collections
It would seem intuitive to select Device Collections and then select Device Collections again, but here you actually select the User Collections dropdown menu and then select Device Collections.
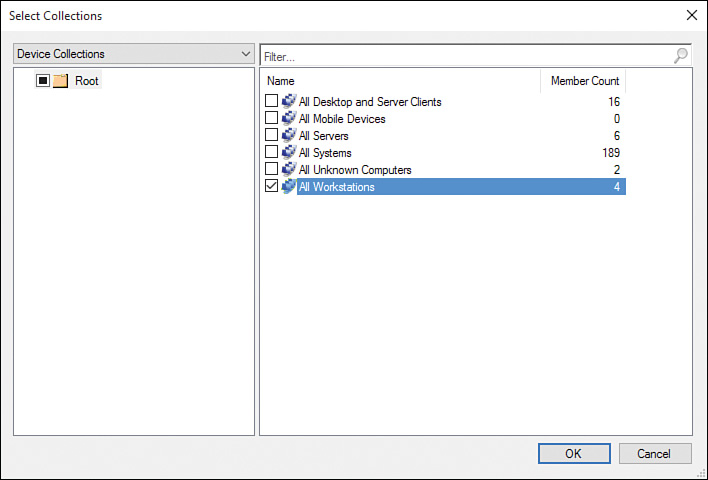
6. Select the All Workstations collection (see Figure 2.40) and click OK.
7. Click OK again to apply the permissions (see Figure 2.41).
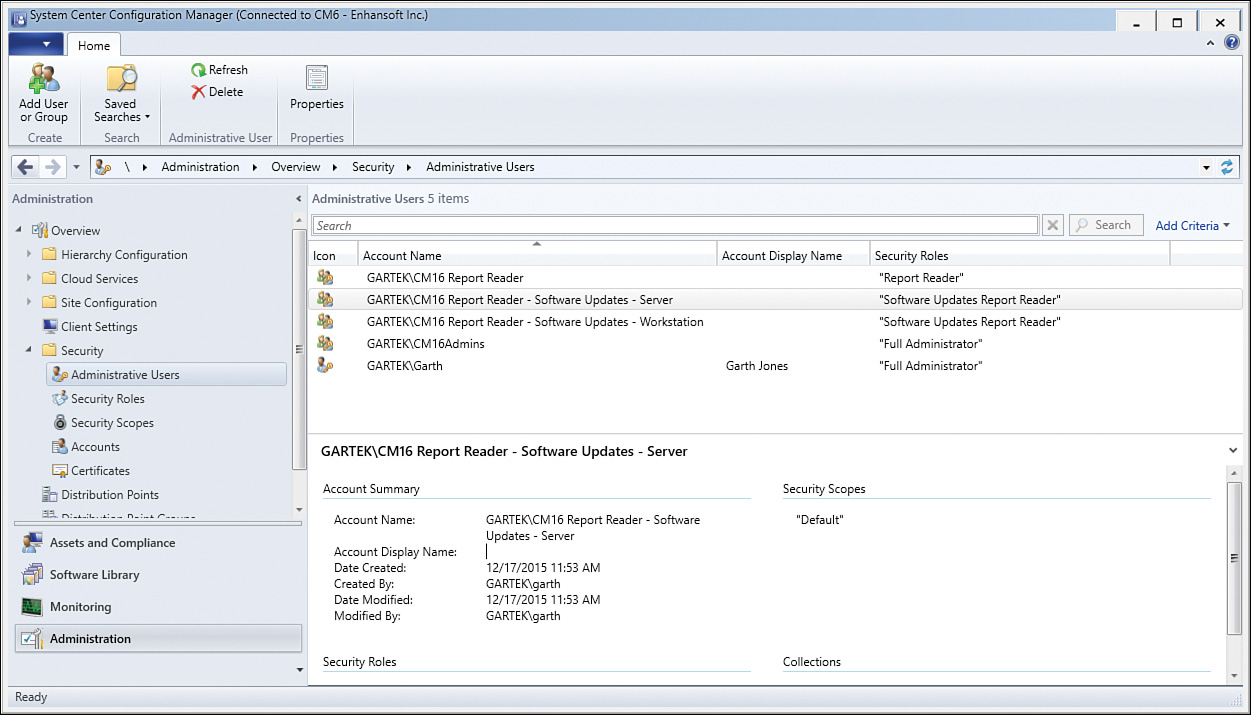
8. Repeat the process to apply permissions to the CM16 Report Reader - Software Updates - Server AD users group, as shown in Figure 2.42.
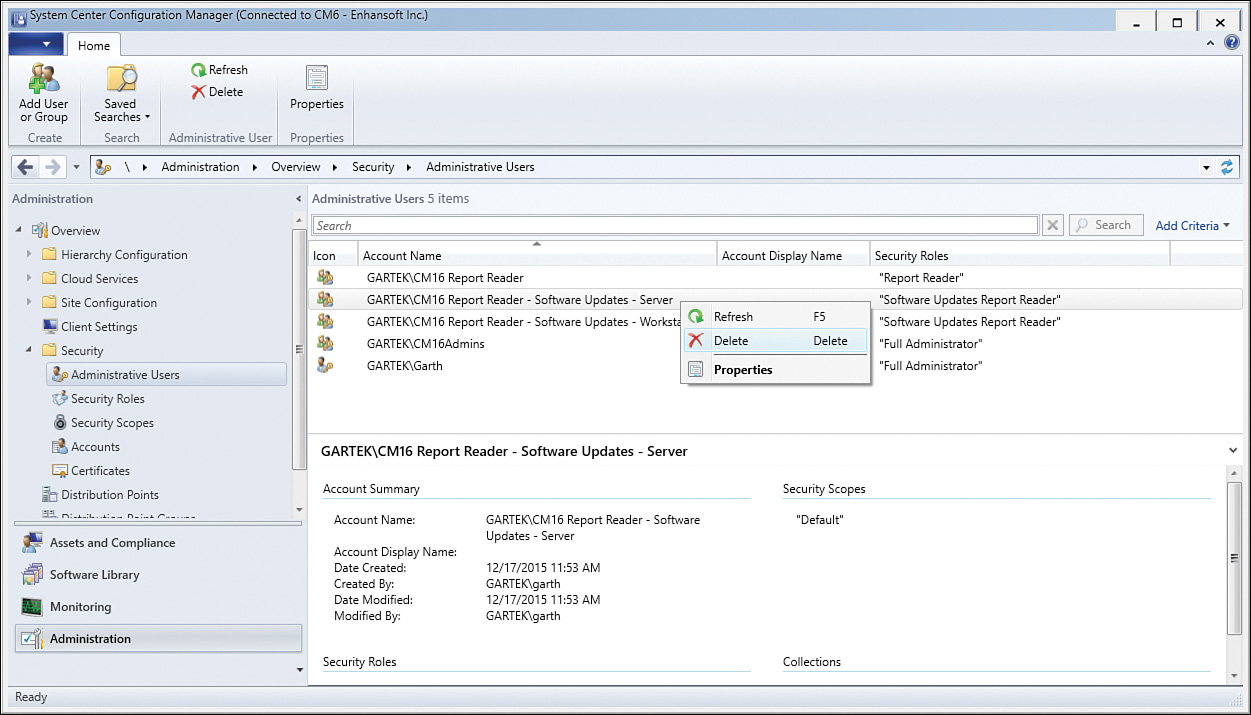
Removing Permissions
To completely remove permissions from an AD security group or user, right-click the group (in this case CM16 Report Reader - Software Updates - Server) and select Delete, as shown in Figure 2.43.
You have now applied the custom Report Reader and Software Updates Report Reader security roles to AD groups and the appropriate collections. A user can now view ConfigMgr reports without accessing the ConfigMgr console. The next section discusses how a user can access SSRS reports without using the ConfigMgr console.
Accessing ConfigMgr Reports
Providing users a simple way to access ConfigMgr reports is important to ensure that they can access the information in a timely and efficient manner.
To access ConfigMgr reports from a workstation, open Internet Explorer (IE) and enter the URL to your SSRS site, which is typically http://<SSRS servername>/reports (see Figure 2.44).
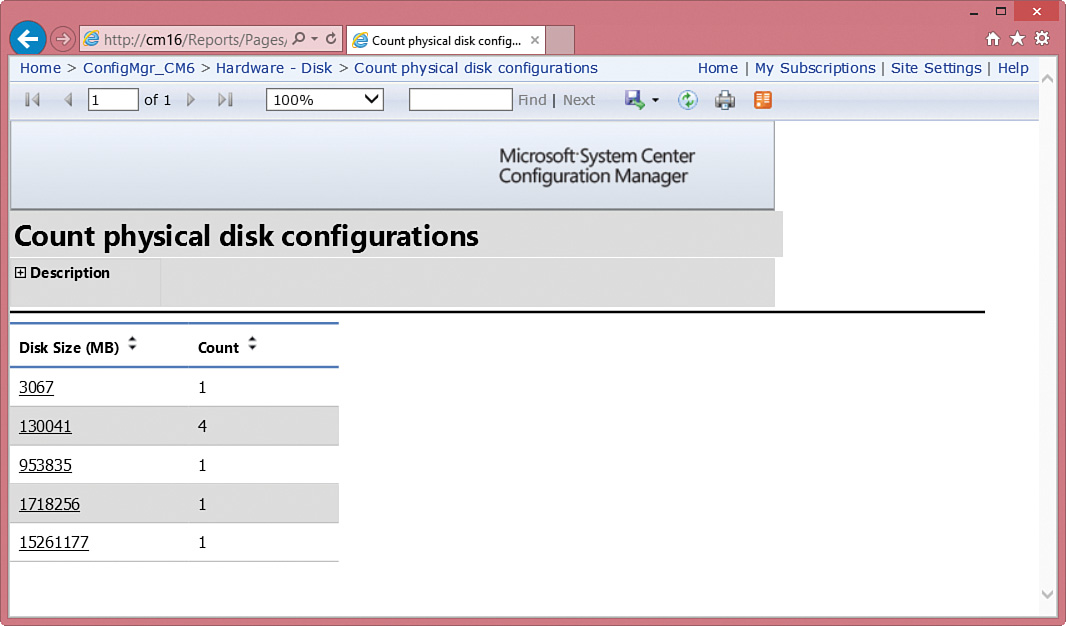
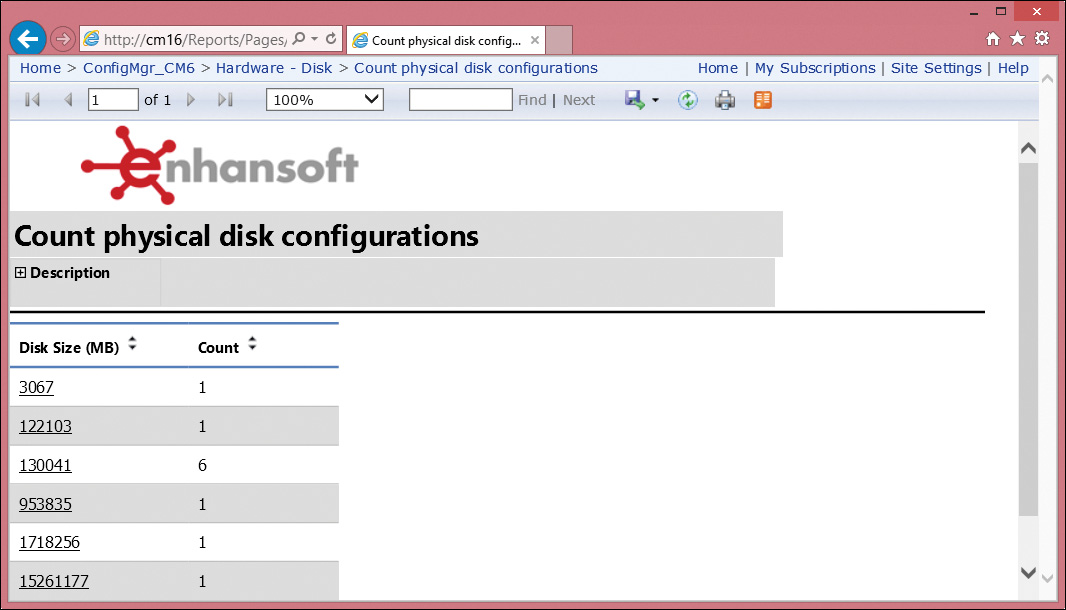
At the main SSRS site, click ConfigMgr_<SiteCode> to expose the ConfigMgr report categories. View the report titled Count physical disk configurations, found under the Hardware - Disk category and shown in Figure 2.45.
Tip: Accessing ConfigMgr Reports from your Site Server
To avoid any User Account Control (UAC) issues, launch Internet Explorer in an elevated mode. This ensures that your account can access ConfigMgr reports. Note that this issue does not occur on remote computers.
This section has shown how to access the ConfigMgr reports from a remote computer through a browser, thereby allowing for easy and efficient access to the ConfigMgr data without the user needing to access the ConfigMgr console.
Changing the ConfigMgr Report Logo
Once the reporting services point is installed in your environment, you can execute the default reports. However, as Figure 2.45 illustrates, the reports do not show your company’s logo and are branded with the default System Center Configuration Manager logo. You can easily change this by using Enhansoft’s Logo Changer, a utility provided by the authors. This free tool allows you to change the default reports to use logos that you specify.
Before learning how to use the tool, you first need to understand these technical details:
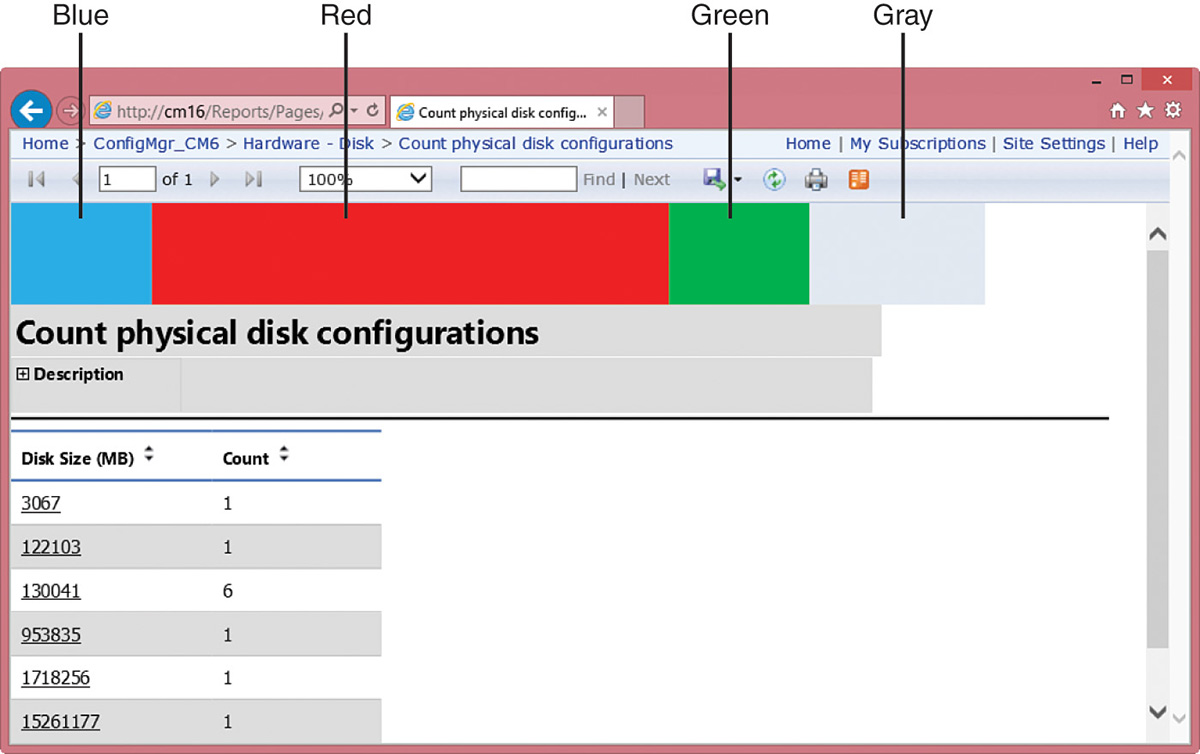
![]() The report header is broken into three sections, as shown in Figure 2.46, with the default sizes listed in Table 2.3.
The report header is broken into three sections, as shown in Figure 2.46, with the default sizes listed in Table 2.3.

![]() All image files must be PNG files.
All image files must be PNG files.
![]() Both the Left and Right image locations automatically adjust their sizes to match the image size. The Center image location does not adjust its size; it stretches or compresses the image to fit the 367×72-pixel space.
Both the Left and Right image locations automatically adjust their sizes to match the image size. The Center image location does not adjust its size; it stretches or compresses the image to fit the 367×72-pixel space.
Tip: ConfigMgr Reports Default Image Sizes
For best results, the authors recommend that all images files be 72 pixels high. Otherwise, a gray background fills the extra pixel area.
Table 2.4 and Figure 2.46 demonstrate the three image file locations, the significance of image sizes, and how those locations adjust their sizes based on the file image size:
![]() Table 2.4 shows that the image files are solid blue, red, and green, with each image file having a size of 100×72 pixels.
Table 2.4 shows that the image files are solid blue, red, and green, with each image file having a size of 100×72 pixels.
![]() Notice in Figure 2.46 that the blue image extends the left image area by 80 pixels and that the center image expands to fill the 367×72-pixel area. The right image fills only 100 pixels of the 225-pixel area; the remaining area is filled with the default gray color.
Notice in Figure 2.46 that the blue image extends the left image area by 80 pixels and that the center image expands to fill the 367×72-pixel area. The right image fills only 100 pixels of the 225-pixel area; the remaining area is filled with the default gray color.
Once the images are uploaded to your SSRS site, compare Figure 2.47 and Figure 2.48 and notice the following items:
![]() The blue image has expanded the left image area to become 100×72 pixels.
The blue image has expanded the left image area to become 100×72 pixels.
![]() The red image has stretched to fill the 367×72-pixel area.
The red image has stretched to fill the 367×72-pixel area.
![]() The green image uses only the 100×72-pixel area or the 225×72-pixel area. Gray color fills in the remaining area at the end of the header.
The green image uses only the 100×72-pixel area or the 225×72-pixel area. Gray color fills in the remaining area at the end of the header.

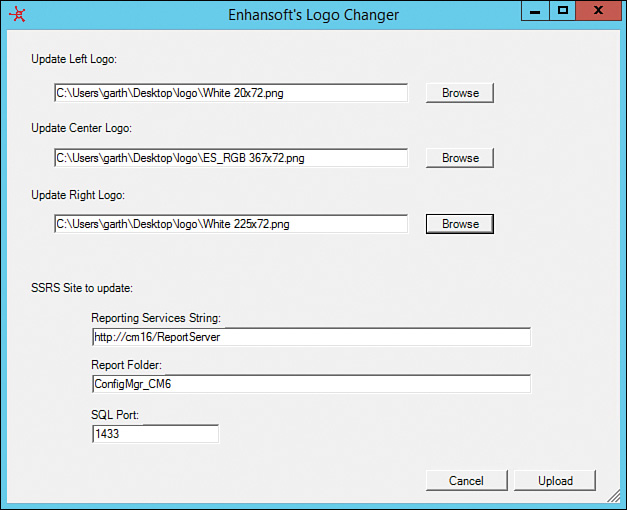
With the background information addressed, you can now quickly customize the default ConfigMgr reports to be more to your liking. To change the default logo in your ConfigMgr reports using Enhansoft’s Logo Changer, follow these steps:
1. Log on to the Enhansoft site and download the Logo Changer from http://www.enhansoft.com/customer-area. If you don’t have an account, you need to create one.
2. To avoid UAC issues, execute Logo Changer in elevated mode on your ConfigMgr site server.
3. Browse for your image (PNG) files for each location—left, center, and right—as shown in Figure 2.47. Click Upload.
Tip: SSRS Server Details
When executed on your ConfigMgr site server, Enhansoft’s Logo Changer automatically detects your SSRS Reporting Services String, ConfigMgr Report Folder, and SQL Port. If any of these details are incorrect, adjust them before clicking the Upload button.
4. Click OK to acknowledge that the image files have been uploaded to your SSRS site. The Logo Changer closes automatically.
5. Browse to your SSRS site and execute one of the default reports to confirm that the image files are uploaded correctly and look as expected. Figure 2.48 shows an example.
If you need to restore the default Microsoft ConfigMgr image files, you can find those files stored on your SSRS site server, in the SMS_SRSRPstyle folder.
Repeat the process of running the Enhansoft Logo Changer, this time selecting the original image files.
Demonstrating Creating and Assigning ConfigMgr Security Roles
The purpose of this part of the chapter is to help you become familiar with creating and assigning ConfigMgr security roles. In each of the following sections, you will create and assign an AD security group to the ConfigMgr security role. Use the information explained throughout this chapter to perform these tasks.
Working with the Report Reader Security Role
After creating the AD security group in step 1, access the ConfigMgr console to create and assign the ConfigMgr Report Reader security role. Follow these steps:
1. Create an AD security group called ConfigMgr Report Reader and assign a test user account to this group.
2. Copy the Read-only Analyst security role and name the new security role Report Reader.
3. Adjust the permissions for the role to match those in Table 2.1, earlier in this chapter.
4. Assign the AD security group called ConfigMgr Report Reader to the Report Reader ConfigMgr security role, with access to All Systems collection.
Working with the Software Updates Report Reader Security Role
After creating the two AD security groups in step 1, access the ConfigMgr console to create and assign the ConfigMgr Software Updates Report Reader security role to the appropriate AD security groups. Follow these steps:
1. Create two AD security groups called ConfigMgr Report Reader - Software Updates - Server and ConfigMgr Report Reader - Software Updates - Workstation. Create two different test user accounts and assign one to each of these new security groups.
2. Create two collections, one called All Servers for servers and one called All Workstations.
3. Import the Software Updates Report Reader.xml file. See Appendix C for details regarding this file.
4. Assign the ConfigMgr Report Reader - Software Updates - Server AD Security group to the Software Updates Report Reader ConfigMgr security role, with access to the All Servers collection.
5. Assign the ConfigMgr Report Reader - Software Updates - Workstation AD security group to the Software Updates Report Reader ConfigMgr security role, with access to the All Workstations collection.
Working with the Inventory Report Reader Security Role
Once the AD security group is created in step 1, access the ConfigMgr console to create and assign the ConfigMgr Inventory Report Reader security role to the AD security group. Follow these steps:
1. Create an AD security group called ConfigMgr Inventory Report Reader and assign a test user account to this AD security group.
2. Copy the Software Update Report Reader security role and call the new security role Inventory Report Reader.
3. Adjust the permissions for this ConfigMgr security role to match the permissions listed in Table 2.5.

4. Assign the ConfigMgr Inventory Report Reader AD security group to the Inventory Report Reader ConfigMgr security role with access to the All Systems collection.
Summary
This chapter has shown how to install the ConfigMgr reporting services point. It has discussed the importance of security and how to leverage ConfigMgr security roles and AD groups to adhere to the principle of least privilege required. You saw an example of this in the creation of the Software Updates Report Reader role to show only the computers in the All Workstation collection to the service desk team.
Keeping with the best practice of testing in a development environment, the chapter has discussed how you can leverage ConfigMgr’s export and import feature. As discussed in this chapter, there is no need to deploy a ConfigMgr console to everyone who needs to view reports; instead, you can allow access to reports without the console. This chapter has also shown how you can replace the logo that comes with the default ConfigMgr reports with your own company’s logo.
The next chapter reviews the most common and important data ConfigMgr classes as well as their corresponding SQL data views. It also discusses how to launch and connect to the ConfigMgr site database, as well as how to execute some sample queries using the SQL Server Management Studio tool.