
4. Enhancing PDF Documents
Lesson overview
In this lesson, you’ll do the following:
• Rearrange pages in a PDF document.
• Rotate and delete pages.
• Insert pages into a PDF document.
• Edit links and bookmarks.
• Renumber pages in a PDF document.
• Learn how to insert video and other multimedia files.
• Set document properties and add metadata to a PDF.

This lesson will take approximately 45 minutes to complete. Copy the Lesson04 folder onto your hard drive if you haven’t already done so.

You can modify PDF documents by rearranging, cropping, deleting, or inserting pages; editing text or images; or adding multimedia files. You can also add navigational aids such as bookmarks and links.
Examining the work file
You’ll work with conference materials for the fictitious Meridien Conference. The presentation has been designed both for print and for online viewing. Because this online presentation is in the developmental phase, it contains a number of mistakes. You’ll use Acrobat to correct the problems in this PDF document.
1 Start Acrobat.
2 Choose File > Open. Navigate to the Lesson04/Assets folder, select Conference Guide.pdf, and click Open. Then choose File > Save As, click Choose A Different Folder, navigate to the Lesson04 folder, rename the file Conference Guide_revised.pdf, and click Save.
3 Click the small arrow on the left side of the window to open the navigation pane, if it’s not already open. Then click the Bookmarks button (![]() ) in the navigation pane.
) in the navigation pane.

The Bookmarks panel opens, revealing several bookmarks that have already been created. Bookmarks are links to specific points in the document. They can be generated automatically from the table-of-contents entries of documents created by most desktop publishing programs or from formatted headings in applications such as Microsoft Word. You can also create bookmarks in Acrobat. You can specify the appearance of bookmarks and add actions to them.
4 Click along the edge of the Table of Contents page (away from the text), and then press the Down Arrow key on your keyboard to page through the document.
![]() Tip
Tip
Which cursor you see depends on where you move it over the page. Near editable text, it becomes an I-beam; over linked text, it becomes a pointing finger. At the edge of the page, it’s an arrow with a box.
Notice that the bookmark icon corresponding to the page that you are viewing is highlighted as you move through the pages. (There are a couple of bookmark errors that you’ll correct later.)
5 Click the Table of contents bookmark to return to the first page of the presentation.
6 In the document pane, move the pointer over the items listed in the table of contents. Notice that the hand changes to a pointing finger, indicating that items in the list are links.
7 Click the Meridien Wi-fi entry in the document pane to follow its link. (Be sure to click the entry in the table of contents, not the bookmark in the Bookmarks panel.)

Notice that the page number on the page displayed in the document pane is 2, though the page number in the table of contents showed the page as being page 4. The page is out of order.
8 Choose View > Page Navigation > Previous View to return to the table of contents.
Moving pages with page thumbnails
Page thumbnails offer a convenient way to preview pages. In previous lessons, you used page thumbnails to navigate a document. Now you’ll use them to quickly rearrange pages in a document.
1 Click the Page Thumbnails button (![]() ) in the navigation pane.
) in the navigation pane.
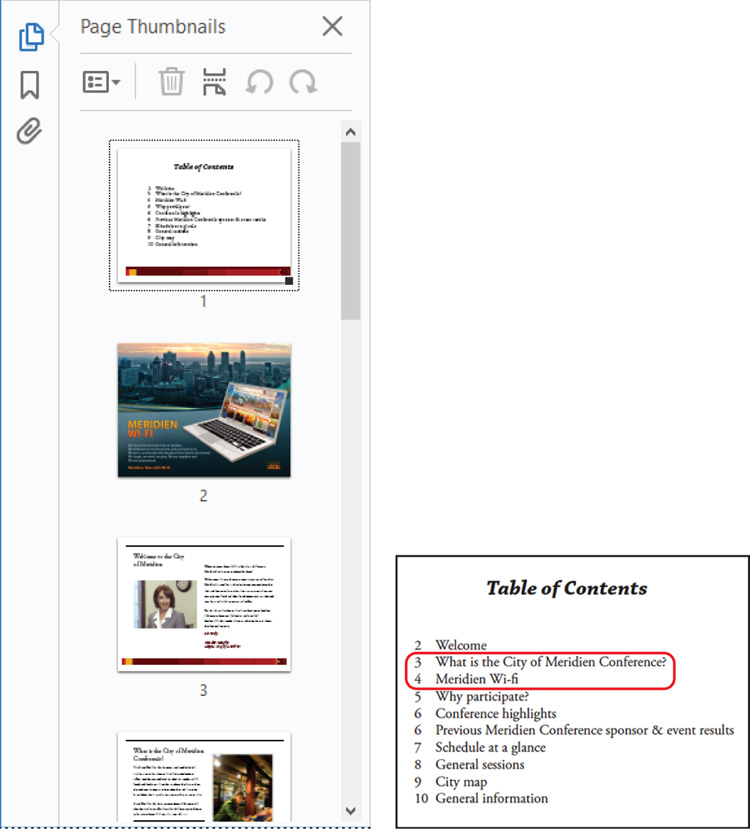
The Meridien Wi-fi page is out of place. According to the table of contents, it should follow the page titled “What is the City of Meridien Conference?”
2 Click the page 2 thumbnail to select it.
3 Drag the selected thumbnail image down until the insertion bar appears between the thumbnails of pages 4 and 5.
4 Release the mouse button to insert the page at its new position.

The Meridien Wi-fi page now follows the “What is the City of Meridien Conference?” page and precedes the “Why participate?” page.
5 To check the sequence of pages, choose View > Page Navigation > First Page to go to the first page of the document (if you’re not already there), and then use the Next Page button (![]() ) to page through the presentation.
) to page through the presentation.
6 When you’re satisfied that the pages are in the correct order, click the Page Thumbnails button again to close its panel. Then choose File > Save to save your work so far.
Manipulating pages
The first page of the presentation (page 1 of 13) is the Table of Contents page, and it’s rather plain. To make the presentation more attractive, you’ll add a cover page, which you’ll then rotate to match the other pages in the presentation.
Inserting a page from another file
You’ll start by inserting the cover page.
![]() Tip
Tip
If you insert a page that is larger than the other pages in a document, you can crop out unnecessary areas of the page. Right-click the page, and choose Crop Pages.
1 Click Organize Pages in the Tools pane.
2 Click Insert in the Organize Pages toolbar, and then choose From File.
3 Navigate to the Lesson04/Assets folder, and select Conference Guide Cover.pdf. Click Open or Select.
4 In the Insert Pages dialog box, choose Before from the Location menu, and select First in the Page area. Then click OK. You want to insert this PDF file before any of the pages in your document.
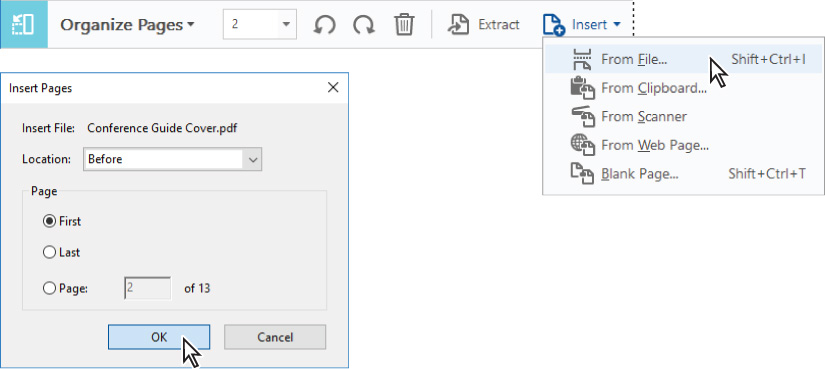
The cover document appears as page 1 in the Conference Guide_revised.pdf document.

5 Choose File > Save to save your work.
Rotating a page
The cover page is now in the conference document, but it has the wrong orientation. You’ll rotate the new page to match the rest of the document.
![]() Tip
Tip
If you have an Acrobat or Creative Cloud subscription, you can rotate and rearrange pages on a tablet or phone using the Acrobat DC mobile app. See “Going mobile” on page 6 to learn more.
1 Select the thumbnail for the cover. Two rotation icons and a delete icon appear superimposed on the thumbnail.
2 Click the Rotate Counterclockwise icon.

Acrobat rotates the page so that it matches the rest of the document. Only the selected page is rotated.
Deleting a page
The last page in the document doesn’t quite fit with the others, and the conference committee has decided to distribute it separately. You’ll delete it from the document.
1 Select the thumbnail for the last page in the document (page 14).
2 Click the delete icon.
3 Click OK to confirm that you want to delete the page.

The page is deleted from the Conference Guide_revised.pdf file.
4 Close the Organize Pages toolbar to return to the main document view.

5 Choose File > Save to save your work.
Renumbering pages
You may have noticed that the page numbers on the document pages do not always match the page numbers that appear below the page thumbnails and on the toolbar. Acrobat automatically numbers pages with Arabic numerals, starting with page 1 for the first page in the document, and so on. However, you can change the way Acrobat numbers pages. You’ll give the cover page a roman numeral, so that the contents page is page 1.
1 Click the Page Thumbnails button (![]() ) in the navigation pane to display the page thumbnails.
) in the navigation pane to display the page thumbnails.
2 Click the page 1 thumbnail to go to the cover page.
You’ll renumber the first page of the document—the cover page—using lowercase roman numerals.
3 Click the options menu button at the top of the Page Thumbnails panel, and choose Page Labels. The Page Numbering dialog box opens.

4 For Pages, select From, and enter from 1 to 1 of 13. For Numbering, select Begin New Section, choose “i, ii, iii” from the Style menu, and enter 1 in the Start text box. Click OK.

5 Choose View > Page Navigation > Go To Page. Enter 1, and click OK.

Acrobat displays the table of contents page. Because you renumbered the cover page, the number 1 in the page number text box is now assigned to the contents page of the document.
![]() Tip
Tip
You can manually add page numbers to the pages of your Adobe PDF document using headers or footers. (Select the Edit PDF tool, and choose Header & Footer > Add.)
6 Close the Page Thumbnails panel.
7 Choose File > Save to save your changes.


![]() Tip
Tip
To quickly return to your previous view, choose View > Page Navigation > Previous View, or press Ctrl or Command and the Left Arrow key.
1 Go to page 1, the table of contents page, if you’re not there already.
2 Click the links for each of the table of contents entries to identify problems.
The link for page 3 and the second link for page 6 go to the wrong pages. There is no link for the last entry. First, you’ll correct the links that go to the wrong pages.
3 Click Edit PDF in the Tools pane, and then choose Link > Add/Edit Web Or Document Link. Acrobat outlines the links on the page.
4 Double-click the link for page 3, “What is the City of Meridien Conference?”

5 In the Link Properties dialog box, click the Actions tab. The action associated with this link is to go to page 3. Click Edit.

6 In the Go To A Page In This Document dialog box, select Use Page Number, and enter 3 in the Page box. Click OK.

The listed action now goes to page 4. Remember that you renumbered the pages, so page 3 is actually the 4th page in the PDF file.
7 Click OK.

8 In the toolbar, select the Selection tool. Then click the link for page 3. It goes to the appropriate page now. Return to the table of contents page.

9 Follow steps 3–7 to make the same change for the link to the previous event results, changing the linked page number to page 6.
Now you’ll create a link for the last entry.
10 Go to page 1 (the Table of Contents page), if you’re not there already. If links aren’t outlined, choose Link > Add/Edit Web Or Document Link.
11 Drag a link box around the final contents entry, “10 General information.”
12 In the Create Link dialog box, choose Invisible Rectangle for the Link Type, and select Go To A Page View in the Link Action area. Then click Next.

The Create Go To View dialog box appears. Don’t click anything until you’re on the page that should be linked.
13 Scroll to page 10. When the General Information page is on the screen, click Set Link. Acrobat returns you to the contents page.

14 Select the Selection tool, and then click the link you just created to test it.
15 Close the Edit PDF panel.
16 Choose File > Save to save your work.
Working with bookmarks
A bookmark is simply a link represented by text in the Bookmarks panel. While bookmarks that are created automatically by many authoring programs are generally linked to headings in the text or to figure captions, you can also add your own bookmarks in Acrobat to create a custom outline of a document or to open other documents.
Additionally, you can use electronic bookmarks as you would paper bookmarks—to mark a place in a document that you want to highlight or return to later.
Adding a bookmark
First, you’ll add a bookmark for the second topic on page 6, the section titled “Previous Meridien Conference sponsor and event results.”
1 Go to page 6 in the document, so that you can see the event results.
2 Open the Bookmarks panel, and then click the Conference highlights bookmark. Your new bookmark will be added directly below the selected bookmark.
3 Click the New Bookmark button (![]() ) at the top of the Bookmarks panel. A new, untitled bookmark appears.
) at the top of the Bookmarks panel. A new, untitled bookmark appears.
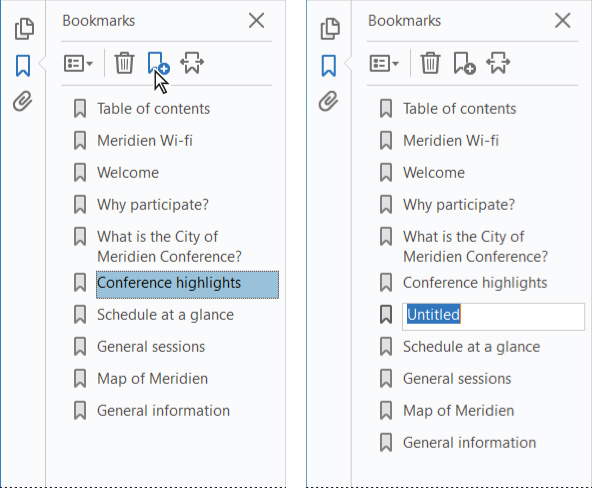
4 In the text box of the new bookmark, type Previous conference results. Press Enter or Return to accept the name.

Naming bookmarks automatically
1 Navigate to the page you want to link, and set the magnification to the optimal level. The current magnification will be inherited by the bookmark.
2 Drag the I-beam to highlight the text that you want to use as your bookmark.
3 Click the New Bookmark button at the top of the Bookmarks panel. A new bookmark is created in the bookmarks list, and the highlighted text from the document pane is used as the bookmark name. By default, the new bookmark links to the current page view displayed in the document window.

Changing a bookmark destination
A couple of bookmarks link to the wrong pages. You’ll change those now.
1 In the Bookmarks panel, click the Why participate? bookmark. The document pane displays the “What is the City of Meridien Conference?” page.

2 Click the Next Page button (![]() ) twice to go to page 5 (6 of 13) of the document, which is the page you want the bookmark to link to.
) twice to go to page 5 (6 of 13) of the document, which is the page you want the bookmark to link to.
3 From the options menu at the top of the Bookmarks panel, choose Set Bookmark Destination. Click Yes in the confirmation message to update the bookmark destination.

4 Repeat the process to correct the destination of the “What is the City of Meridien Conference?” bookmark, which should be linked to page 3 (4 of 13).
5 Choose File > Save to save the Conference Guide_revised.pdf file.
Moving bookmarks
After creating a bookmark, you can easily drag it to its proper place in the Bookmarks panel. You can move individual bookmarks or groups of bookmarks up and down in the Bookmarks panel, and you can nest bookmarks.
Some of the bookmarks are out of order in the current document. You’ll rearrange them now.
1 In the Bookmarks panel, drag the icon for the Welcome bookmark directly below the icon for the Table of contents bookmark.
2 Drag the other bookmarks so that they appear in the same order as the entries in the table of contents.

3 Close the Bookmarks panel, and then choose File > Save to save your work.
Setting document properties and metadata
You’re nearly done with this conference guide. To finish it off, you’ll set the initial view, which determines what people see when they first open the file, and add metadata to the document.
1 Choose File > Properties.
2 In the Document Properties dialog box, click the Initial View tab.
3 From the Navigation Tab menu, choose Bookmarks Panel And Page.

When the viewer opens the file, both the page and the bookmarks will be visible.
4 In the Window Options area, choose Document Title from the Show menu.
With this option selected, the document title, rather than the filename, will appear in the document’s title bar.
5 Select the Description tab.
The document’s author has already entered some metadata for the file, including some keywords. Metadata is information about the document itself, and you can use it to search for documents. You’ll add some more keywords.
6 In the Keywords field, after the existing keywords, type ; map; vendors. Keywords must be separated by commas or semicolons.

7 Click OK to accept changes in the Document Properties dialog box.
8 Choose File > Save to save your work, and then close all open files and quit Acrobat.
Review questions
1 How can you change the order of pages in a PDF document?
2 How do you insert an entire PDF file into another PDF file?
3 How can you correct a link’s destination?
4 What is a bookmark?
Review answers
1 You can change the page order by dragging the page thumbnails corresponding to the pages you want to move to their new locations in the Page Thumbnails panel.
2 To insert all the pages from a PDF file before or after any page in another PDF file, select the Organize Pages tool, choose Insert > From File, and then select the file you want to insert. Specify where in the document the pages should be inserted.
3 To correct a link’s destination, select the Edit PDF tool, and then choose Link > Add/Edit Web Or Document Link. Next, double-click the incorrect link. Then click the Actions tab in the Link Properties dialog box, click Edit, and type the correct page number in the Page box in the Go To A Page In This Document dialog box. Click OK to close each dialog box.
4 A bookmark is simply a link represented by text in the Bookmarks panel.