Chapter 7. Automation with Playbooks
Security Orchestration, Automation and Response (SOAR) is defined as a solution stack of compatible software programs that allows an organization to collect data about security threats from multiple sources and respond to low-level security events without human assistance.
In Azure Sentinel, you can leverage Playbooks, which is a direct integration with Logic Apps, to perform SOAR for Incidents that are created in your environment. Playbooks provides the ability to build flows that can automate your investigations and respond to security alerts. Playbooks has hundreds of built-in connectors making it easy to connect to systems, data, and apps making it easy to integrate and orchestrate for security response. If a connector doesn’t exist, you can even create a custom connector.
Tip
This chapter will not concentrate on understanding Logic Apps. For more information on Logic Apps, see https://aka.ms/ASB/LogicApps.
Azure Sentinel provides two ways to leverage Logic Apps. Real-time automation can be configured as part of the analytic to call a Playbook when the analytics are triggered. This will call the Playbook automatically when the incident is created. The second option allows you to call a Playbook from the incident on-demand.
The Importance of SOAR
In today’s cyber landscape, the number of threats is increasing, which leads to an increasing number of alerts security teams need to respond to. SOAR can be used to enrich alerts with data from other sources, investigate entities for more context, orchestrate across the organization, and act on incidents. Using SOAR can reduce the time to resolution for security incidents and allow security teams to focus on the most important alerts. Security teams can automate the response actions for low-severity incidents, which can eliminate the security team’s need to even be involved. They can enrich and investigate a medium-severity incident, again reducing the time needed to understand what happened and decide on a response action. All this leaves more time to focus on high-severity incidents that have greater impact to the organization.
Real-time automation
When you create an analytic, you can define a Playbook to trigger as part of the analytics configuration. This is called real-time automation. The Playbook is automatically run when the analytic is triggered, and it follows the Playbooks’ steps as you have configured them. Use the following steps to create and configure a Playbook for real-time automation.
Open the Azure Portal and sign in as a user who has Azure Sentinel Contributor privileges.
In the search pane, type Azure Sentinel and click on the Sentinel icon when it appears.
Select the workspace on which Azure Sentinel has been enabled.
In the left navigation pane, click Playbooks.
Click the Add Playbook button, as shown in Figure 7-1.

FIGURE 7-1 The Add Playbook button The Logic App Create blade appears as shown in Figure 7-2. Enter Prompt-User in the Name field. Ensure that you have selected the correct subscription from the Subscription drop-down menu. Select Use Existing for the Resource Group. From the Location drop-down menu, select the region in which the Playbook will reside. The Log Analytics option has two choices: On or Off. This option chooses whether to save diagnostic logs for Logic App in Log Analytics. This can help by providing richer debugging details. Click the Create button to commit the changes.
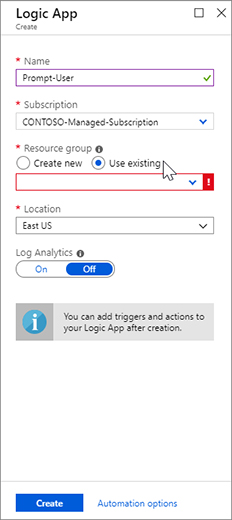
FIGURE 7-2 Logic App Create blade Once created, the Logic Apps Designer blade appears, as shown in Figure 7-3. Notice that there are many templates that you can use, but for this example, you will create one from scratch. Click Blank Logic App tile to create it.
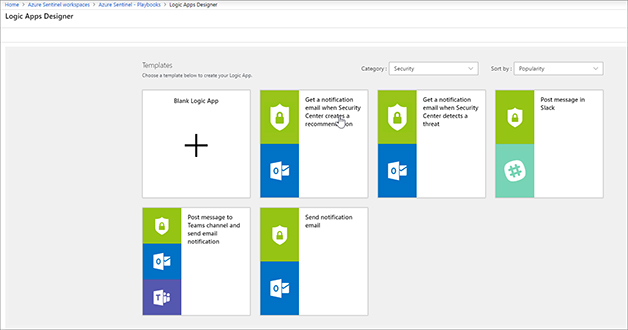
FIGURE 7-3 Logic App Designer blade Enter Azure Sentinel in the search box. Click When a response to Azure Sentinel alert is triggered, as shown in Figure 7-4.
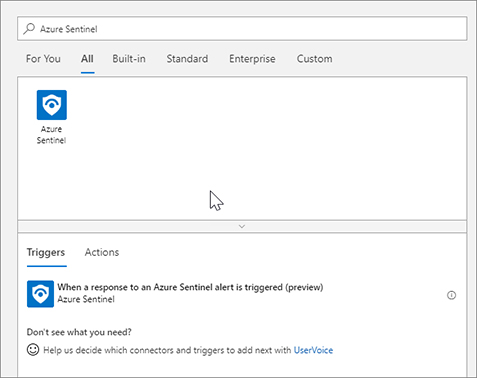
FIGURE 7-4 Add a trigger in the Logic App Designer blade Each Logic App connector requires an application program interface (API) connection resource. These API connections store the variables and tokens needed to access the API for the connection, like Office or Azure. Logic Apps make it easy by allowing you to sign in as you add new connectors and creating the API connection resource for you. Click Sign In to create the Azure Sentinel connection, as shown in Figure 7-5. A pop-up window appears for you to type your credentials; sign in to Azure with the account you have been using throughout this book.
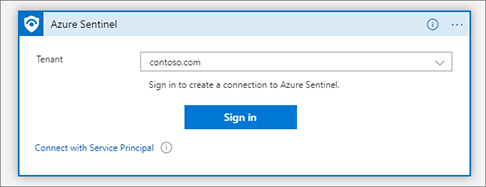
FIGURE 7-5 Signing in to create a connection for the Logic Apps connector Each Playbook must start with a trigger. This is the action that starts the Playbook run. Now that you have a trigger for the Playbook, you can start adding actions. Click the New Step button to add a step, as shown in Figure 7-6.

FIGURE 7-6 The New Step button in the Logic Apps Designer In this Playbook, you are going to prompt the user to see if they had indeed taken the action that was part of the Incident. The first thing you need to do is get the user entity from the property of the incident. Search for Azure Sentinel and select Alert – Get accounts, as shown in Figure 7-7.
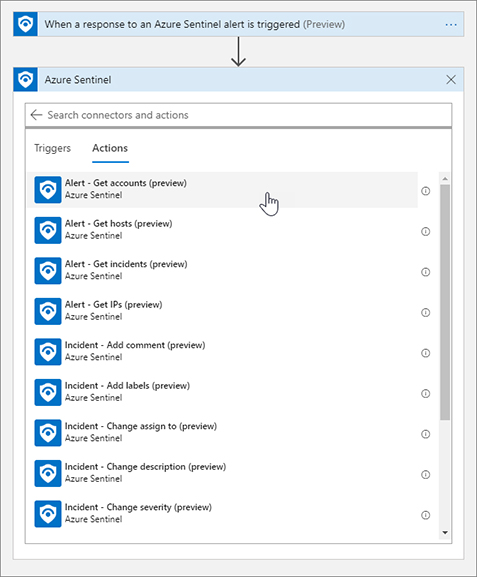
FIGURE 7-7 Adding an action to the Playbook For the Alert – Get accounts action, you are required to provide the list of entities from the Azure Sentinel alert. The great thing about Logic Apps is that each step has inputs and outputs. Those outputs become Dynamic Properties that can be used in later steps. The trigger named When a response to Azure Sentinel alert is triggered provides dynamic properties like Alert display name, Entities, Product name, and the like. Click the Entities List field, and the Dynamic content flyout menu will appear. Select Entities from the Dynamic content list, as shown in Figure 7-8.
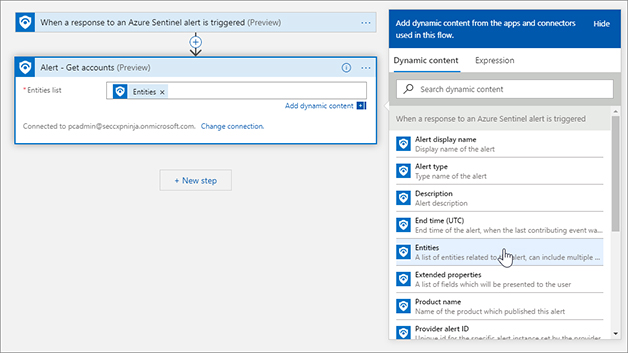
FIGURE 7-8 Adding Dynamic content to the action Click the New Step button and type Azure Sentinel. Click Azure Sentinel and select Get incidents. Use the Dynamic Properties to add System alert ID, Subscription ID, Resource group, and Workspace ID, as shown in Figure 7-9.
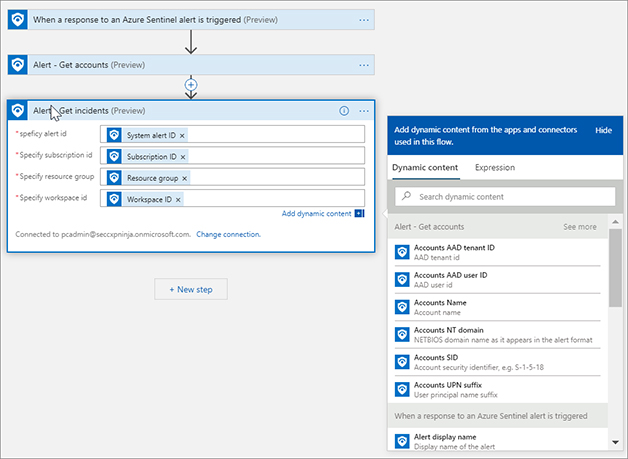
FIGURE 7-9 Alert – Get incidents dialog box Click New Step and type Azure AD. Click Azure AD and select Get user, as shown in Figure 7-10.
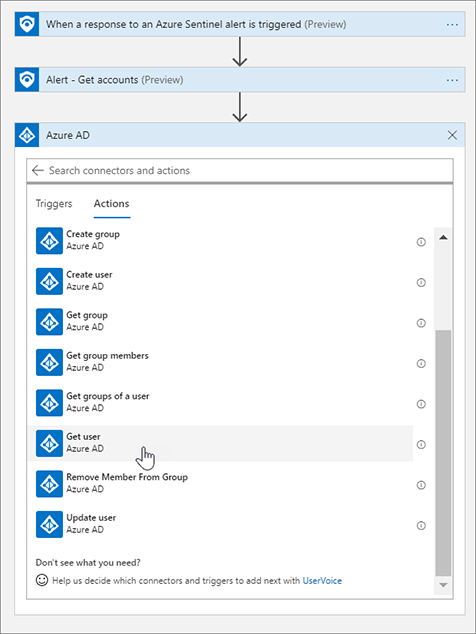
FIGURE 7-10 Adding another action to get the AAD user in Logic Apps Click the User ID Or Principal Name text box. Select Accounts AAD User ID from the Dynamic Content flyout menu, as show in Figure 7-11. Notice that once you click the Accounts AAD User ID, Logic Apps adds a For each loop action. This is because the Accounts returned from the Alert - Get Accounts action is an array and could contain multiple accounts.
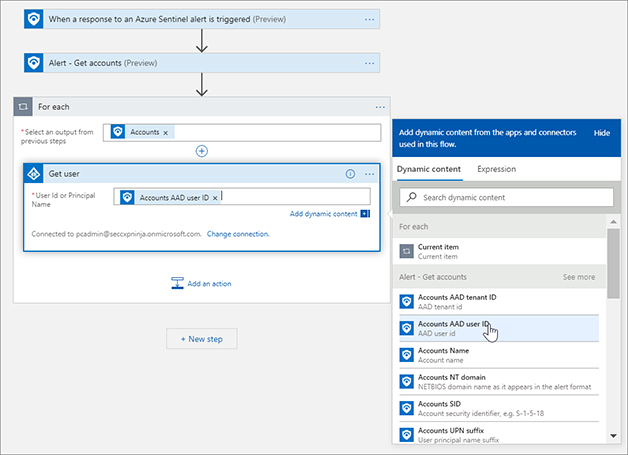
FIGURE 7-11 Adding the dynamic property to the AAD action In the For each dialog box, click Add An Action and type Office 365. Select Office 365 Outlook, scroll down, and select Send approval email, as shown in Figure 7-12.
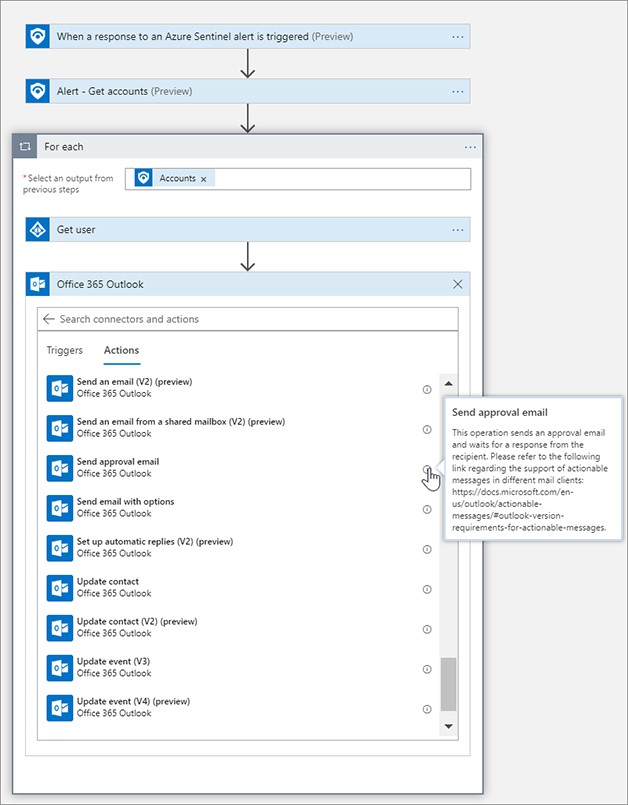
FIGURE 7-12 Adding an Office 365 action to send an email Tip
You can click the Information buttons next to actions and triggers to see what they do.
Click the To box. Select Mail from the Get User step in the Dynamic Content flyout menu.
Change the Subject text box to Security Alert and add the Alert Display Name.
In the User Options box, change the text to something like This was me, This was not me. Change Importance to High.
Click Add new parameter and select Body. Click outside the drop-down menu to make it disappear.
For the Body, enter New alert from Azure Sentinel. Please respond ASAP.
In the Dynamic Content menu, under Get Incident, choose Severity.
In the Dynamic Content menu, under Get Incident, choose Alert Display Name.
In the Dynamic Content menu, under Get Incident, choose Description. The text is using text plus dynamic content from previous actions. Figure 7-13 shows the example.
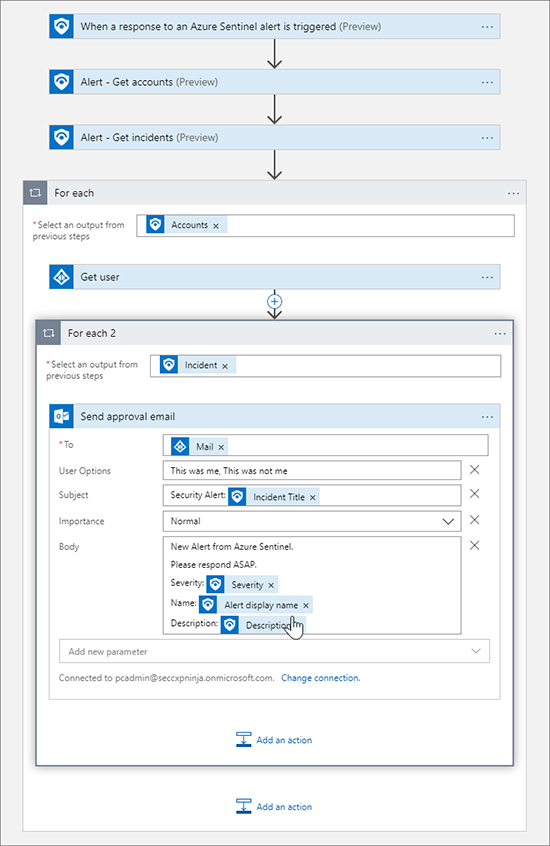
FIGURE 7-13 Setting the properties of the Send approval email action Click Add An Action, type Control, and Select Control. Select Condition. Condition is an If operator, so we can use this to determine the action to take based on the response. In the Condition menu, select Selected Option, and for the value enter something like This was me. See Figure 7-14 for an example.
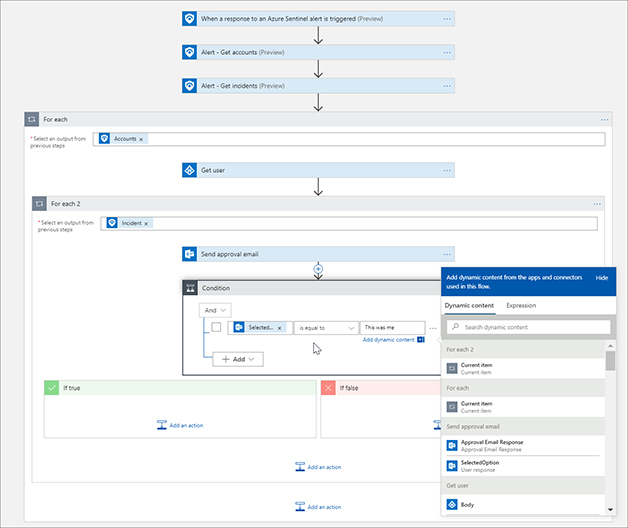
FIGURE 7-14 Adding a condition to evaluate In the if True condition, click Add An Action and click Azure Sentinel and then select Incident - Add A Comment. Enter the Subscription ID, Resource Group, Workspace ID, and Incident ID using the dynamic properties. Type User confirms they completed the action that triggered the alert. Closing the incident in the Incident Comment box. See Figure 7-15 for the completed action.
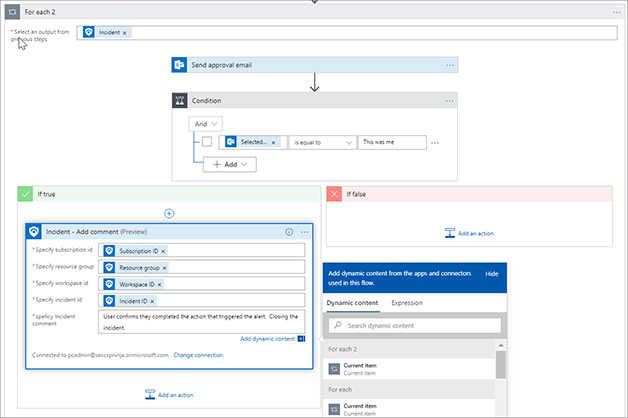
FIGURE 7-15 Adding steps in the If True action area In the If True condition box, click Add An Action and click Azure Sentinel. Then select Incident - Change Status. Enter the Subscription ID, Resource Group, Workspace ID, and Incident ID using the dynamic properties. Select Closed in the Specify Status menu and select Resolved in the Close Reason menu. See Figure 7-16 for the action.
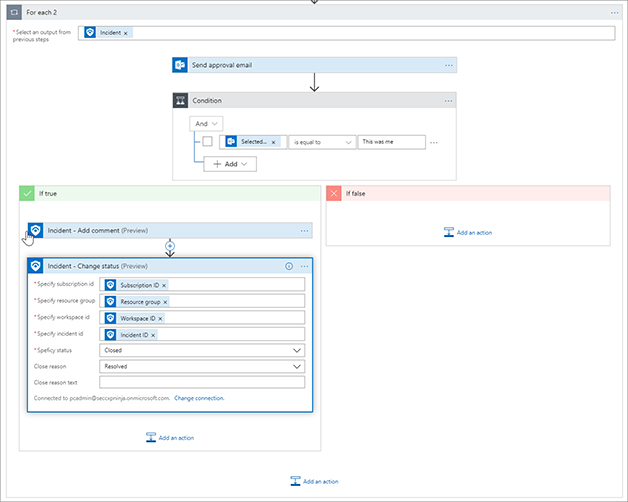
FIGURE 7-16 Adding another action to close the incident in Azure Sentinel We have now configured the true side of the condition. We are checking with the user to see if they performed the action from the Azure Sentinel incident and if so, we are closing the case as resolved. This means the security analyst does not need to go investigate the incident further.
In the If False condition box, click Add An Action and click Azure Sentinel. Then select Incident – Add comment. Enter the Subscription ID, Resource Group, Workspace ID, and Incident ID using the dynamic content from the trigger. Type User confirms they did not complete the action. Further investigation is needed in the Incident Comment box. See Figure 7-17 for the completed action.
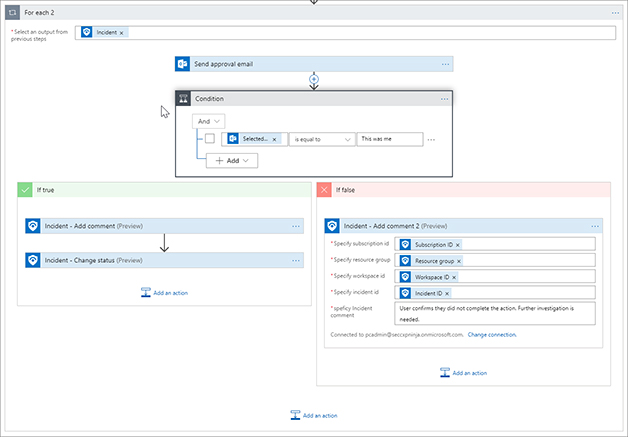
FIGURE 7-17 Adding an action to the If False side of the condition In the If False condition, click Add An Action and type Microsoft Teams. Click Microsoft Teams and select Post A Message. Click Sign In and use the pop-up menu to sign in.
Select your Team from the drop-down menu. Select your Channel from the drop-down menu.
In the Message body, enter New alert from Azure Sentinel. Please investigate ASAP.
In the Dynamic Content menu, under Get Incident, choose Severity.
In the Dynamic Content menu, under Get Incident, choose Alert Display Name.
In the Dynamic Content menu, under Get Incident, choose Description.
Click Add Parameter, select Subject, and click outside the drop-down menu to make it disappear.
In the Subject box, enter Security Alert: Incident Title. See Figure 7-18 for the completed action.
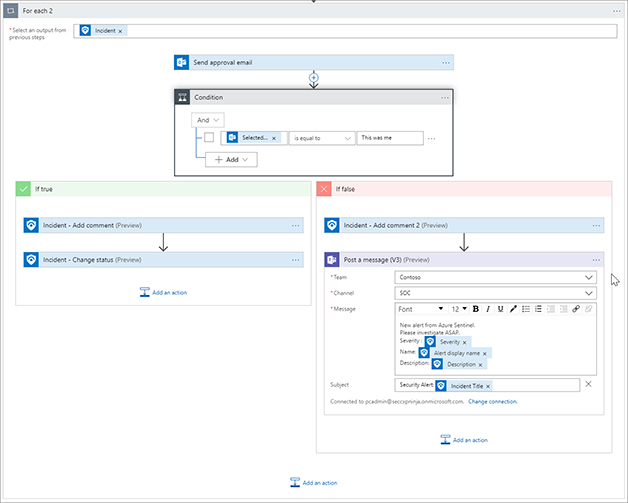
FIGURE 7-18 Adding a Microsoft Teams action to post a message Click the Save button for the Logic App, as shown in Figure 7-19. Figure 7-20 shows the completed Playbook.

FIGURE 7-19 The Save button for Logic Apps 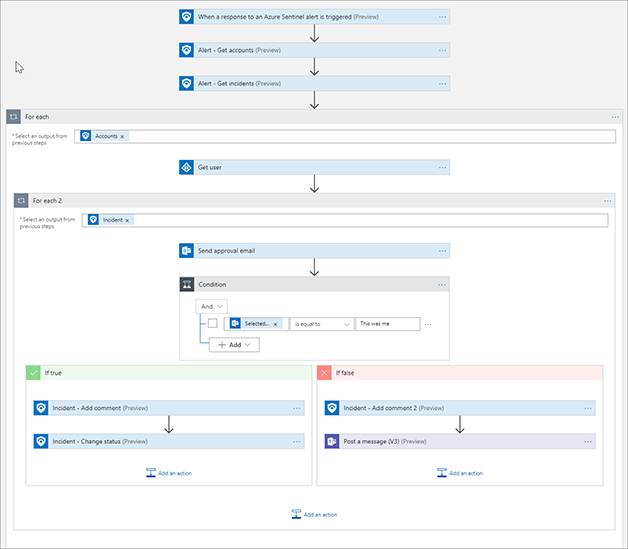
FIGURE 7-20 The completed Playbook In the Azure navigation bar, click Azure Sentinel Playbooks to go back to the Playbooks blade.
Click Analytics in Azure Sentinel. Select the VM Deletion analytic created in Chapter 2. As shown in Figure 7-21, set the Real-time automation drop-down menu to Prompt User. Click Save.
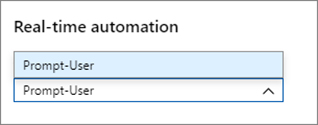
FIGURE 7-21 Setting the Real-time automation for the analytic
Perform the following tasks to create a new VM to test the real-time automation:
Create a new Virtual Machine with the following specifications:
Operating system: Windows Server 2016.
Resource group: Use the same resource group that you created for the workspace earlier in this chapter.
Once the VM is created, go to the resource group. Select the virtual machine and click Delete. It will take a few minutes for the activity logs to populate and for the analytic to trigger. Figure 7-22 shows the deletion logs in Azure Activity.
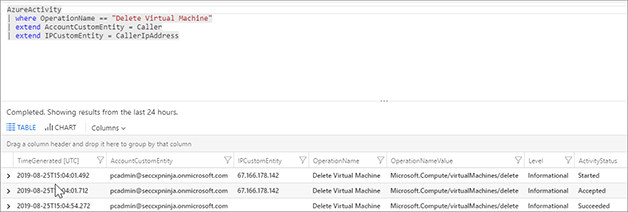
FIGURE 7-22 View of the Azure Activity Logs for deleting a virtual machine Now that the incident has been created, we can see in Figure 7-23 that the Playbook has a run waiting for the user input.
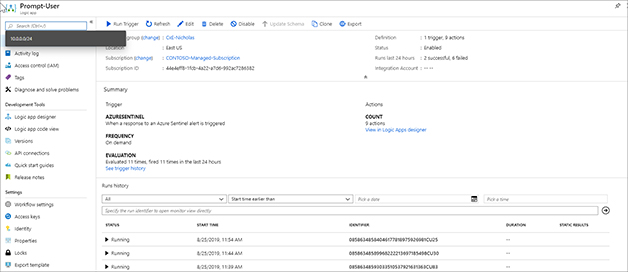
FIGURE 7-23 Logic App Playbook blade showing the run history If we look in the user mailbox, we can see the email from our Playbook. Figure 7-24 shows the email. Click This was not me for the email.
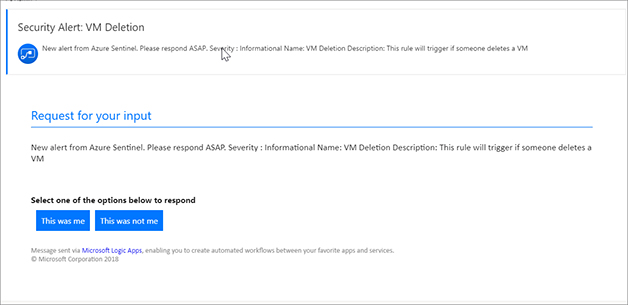
FIGURE 7-24 Send Approval Email Go to Azure Sentinel, and in the Azure Portal, click Incidents and select the incident. After a few moments, you should see the comment that was added (see Figure 7-25).
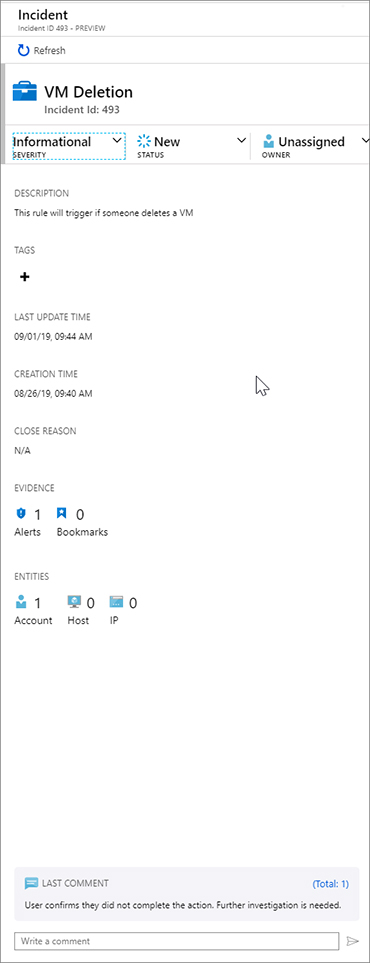
FIGURE 7-25 The Incident with automated comment Figure 7-26 shows the Microsoft Teams message that was posted to the SOC Channel.
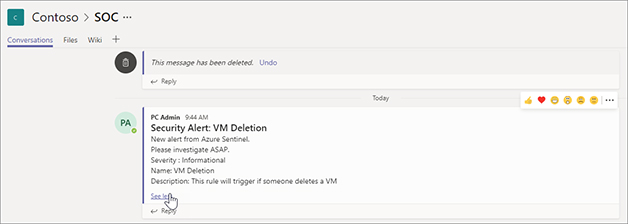
FIGURE 7-26 The message that was posted to Microsoft Teams
As you can see in this section, you can create some simple but powerful Playbooks to help reduce the work on security analysts so they can focus on creating new detections, improving existing detections, and investigating higher-severity alerts.
Post-incident automation
Not every incident can be automatically remediated using real-time automation as part of the analytic. This is because your SOC processes may not have a process defined or the incident needs more investigation before executing the Playbook. In this section, we will cover the capability to run Playbooks on demand from the incident details. You may want to use this to trigger steps as part of the investigation, like isolating a VM in the cloud. Or you could use it to conduct some remediation action once you have completed your investigation, so that you can clean up the incident.
Open the Azure Portal and sign in as a user who has Azure Sentinel Contributor privileges.
In the search pane, type Deploy a custom template and click the selection from the returned results.
Click Build Your Own Template In The Editor.
Open a new browser tab and go to https://aka.ms/ASB/GeoIp.
Copy the contents of the page. This is an ARM template to deploy the Logic App and connection we will use in this section.
Go back to the Azure Portal browser tab and paste the contents in the Edit Template blade, as shown in Figure 7-27. Click Save.
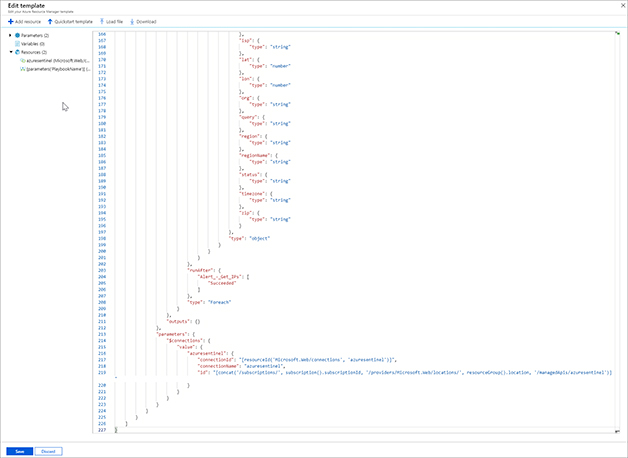
FIGURE 7-27 The Edit Template blade Select your Subscription and Resource Group from their drop-down menus. Enter your username. Check I Agree and click Purchase. Figure 7-28 shows the Custom Deployment blade.
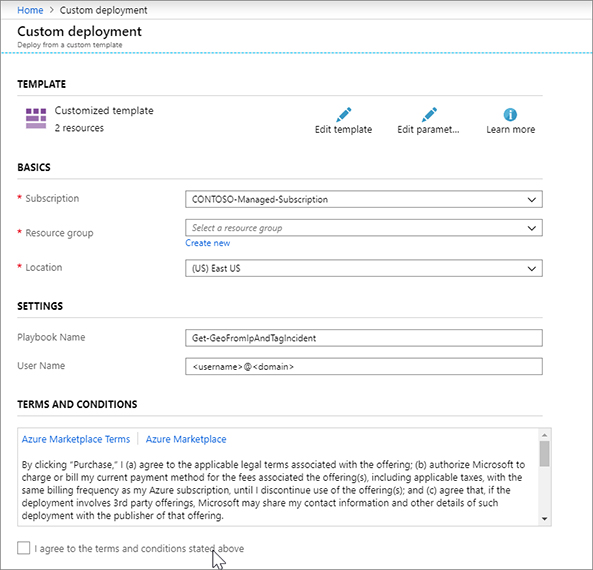
FIGURE 7-28 The Custom Deployment blade After the deployment completes, click Resource Groups in the left navigation pane.
Click the AzureSentinel API connection resource.
In Figure 7-29, you can see the connection is not authenticated.
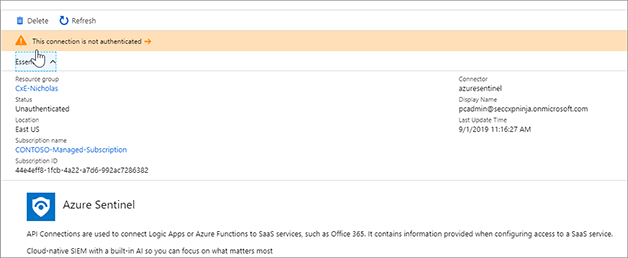
FIGURE 7-29 The message that was posted to Microsoft Teams Click Edit API Connection in the left menu. Click Authorize, as shown in Figure 7-30.
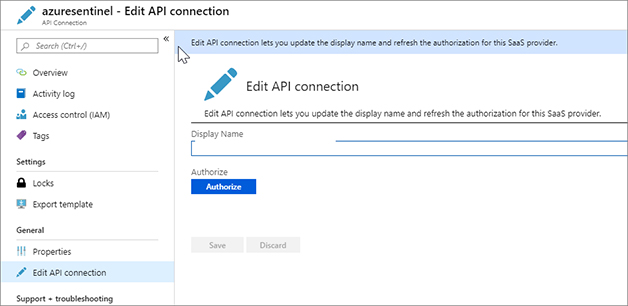
FIGURE 7-30 The Edit API Connection blade A pop-up window will appear. Sign in to Azure. Figure 7-31 shows that the authentication was successful.
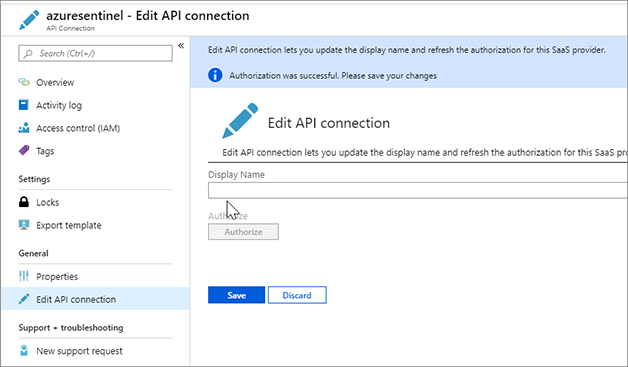
FIGURE 7-31 Successful authentication In the search pane, type Azure Sentinel and click on the Azure Sentinel item when it appears.
Select the workspace on which Azure Sentinel is enabled.
In the left navigation pane, click Playbooks.
Click the Get-GeoFromIpAndTagIncident Playbook.
Click Edit in the top bar. Figure 7-32 shows the complete Playbook. As you can see, the Playbook is similar to the one you created in the previous section. It is triggered by the Azure Sentinel Alert trigger. It then gets the incident and IP entities. Next, it uses the HTTP action to call out to a free API (see http://ip-api.com/json/<ip>). This returns a JSON response with various properties. The Parse JSON step takes the response and makes each property a Dynamic Property in the Playbook. The last step writes the City and Country from the IP query as Tags for the Incident. You can expand each step to see the details.
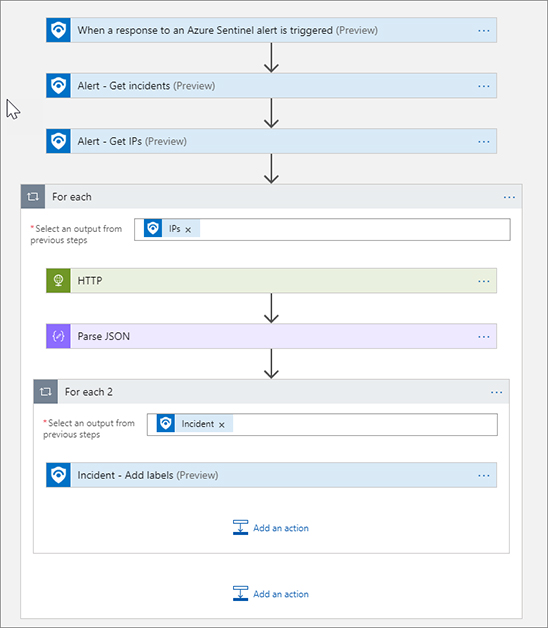
FIGURE 7-32 The complete Playbook Click Azure Sentinel – Playbooks in the Azure navigation bar.
Click Incidents.
Click the VM Deletion incident we have been using.
Click View Full Details.
We can see our comment from the previous Logic App. Imagine you are an SOC Analyst who needs to further investigate this and that you would like to query the IP and get its Geolocation information.
In the Alerts area, click View Playbooks, as shown in Figure 7-33.
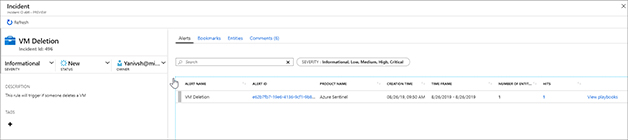
FIGURE 7-33 The Alerts area of the Incident blade Click Run next to the Get-GeoFromIpAndTagIncident Playbook, which will trigger the Playbook.
Click the Runs tab as shown in Figure 7-34. Here, you can see the previous runs for this alert. We can see our run was successful.
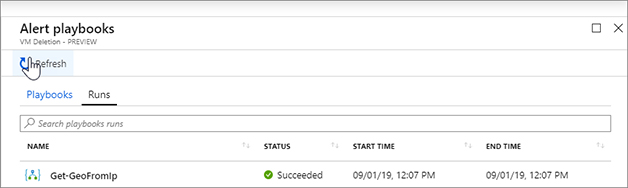
FIGURE 7-34 The list of previous runs Close the Alert Playbooks blade.
Click Refresh on the incident. Figure 7-35 shows the incident now has tags from the city and country of the IP address.
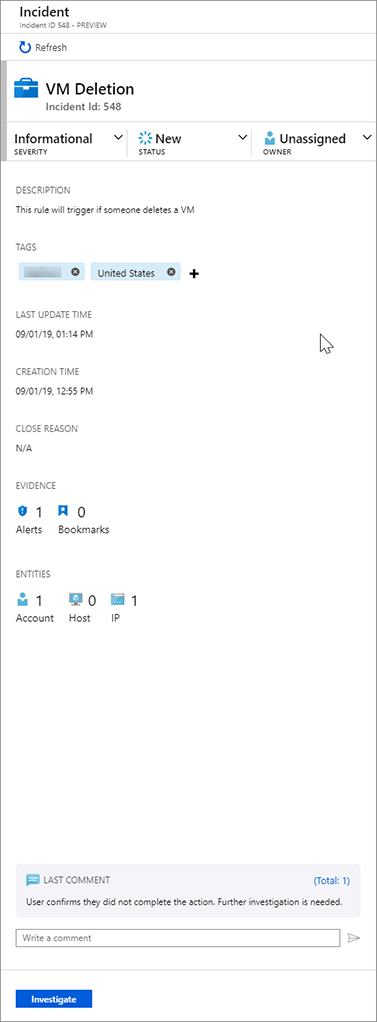
FIGURE 7-35 Tags are now added to the incident
In this chapter, we showed you how to create a Playbook from scratch, configure your analytic to use this as a real-time automation, and how to run Playbooks on-demand as part of your investigation. You can use these techniques to automate response actions and help speed investigation and triage of incidents in Azure Sentinel.