Appendix A Setting up the Data Sample
This appendix is all about getting the database set up and working correctly. It is assumed that you have WebSphere Application Server up and running and have even built some simple projects with Rational Application Developer or the latest version of Eclipse. This book doesn't cover these applications, but you need some basic knowledge of them to follow and build the examples.
Many of the examples focus on a specific set of data provided by eclipse.org. Because it has been adapted for the purposes of this book it is necessary to explain how to set up the database and create a usable datasource. This exercise will lay the groundwork for building your own sample applications.
Getting Started
This exercise makes use of an existing database provided by Eclipse.org. The BIRT (Business Intelligence and Reporting Tools) sample database provides a simple set of tables and example data that form the basis for BIRT sample reports. The examples are based around a company called Classic Models (see Figure A.1), which is a retailer of scale-model classic cars and other vehicles.

Figure A.1 Classic Models logo
The database is typical of what you might find in a small business, with data such as customers, orders, order detail items, products, and so on. It was designed to illustrate many of the features of the BIRT report designer, but it also happens to be perfect for building many of the examples presented within this book.
The sample database is open source; you are free to use it for your own experiments with other tools or projects, to create samples for other tools, and so on. It is provided under the terms of Eclipse.org, located with the sample downloads provided with this book or available at www.eclipse.org/legal/epl/notice.php.
IBM has done substantial research in the area of common scenarios that customers need to solve. One common use case is for setting up a new account for customers. Additional use cases include order entry, order status, and payment history. This book cannot present all these use cases. It instead focuses on different approaches to integrating a breadth of tools, rather than building out a single application that illustrates one business scenario. This book shows you some of them, and the general guidelines for building these types of applications.
Database and Schema
The Classic Models database consists of seven tables completely populated with sample data. Figure A.2 illustrates the data model associated with those tables. The tables are
• Offices: Sales offices and locations
• Employees: All employees, including sales reps who work with customers
• Customers: Customers of Classic Models
• Orders: Orders placed by customers
• Order Details: Line items that are contained within a single order
• Payments: Payments made by customers against their account
• Products: The list of scale model cars
• Product Line: Types of products offered by Classic Models
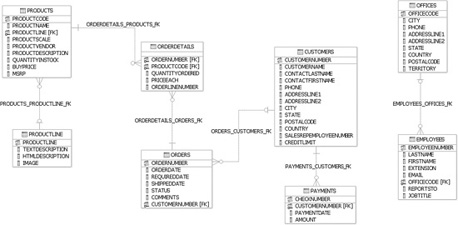
Figure A.2 Classic Models database schema
Using this schema with the prepopulated data makes available a large set of sample data and use cases to build upon: Everything from simple lookup tables to complete business transactions can be explored within this environment.
Setting Up Your Data Environment
The classic models database is available from eclipse.org at www.eclipse.org/birt/ phoenix/db/. It is provided in a variety of formats except for the main one that we need, which is DB2. Because this appendix works with WebSphere and focuses on IBM software you want to have this database available in DB2. In some cases you might consider Oracle, or even Derby for development purposes.
Fortunately, after much trial and error a script has been developed that will simplify the steps to create and load the Classic Models database in DB2. The download site that hosts the code samples for this book provides the data sources DB2 setup script along with any changes to the latest instructions for creating the database.
The setup process consists of three main steps:
1. Creating a CMODELS database
2. Running the CMODELS data script
3. .Creating a WAS data source
If you don't have access to a DB2 workgroup or enterprise edition then I recommend you download and use IBM DB2 Express-C for these examples. All the examples are tested with this platform. You can download and install this version, shown in Figure A.3, from the IBM website at www-306.ibm.com/software/data/db2/express/.
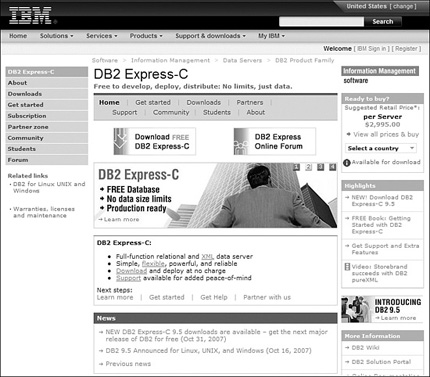
Figure A.3 DB2 Express-C downloadable edition
![]()
IBM DB2 Express-C is a no-charge community edition of the DB2 database server. It is designed for small businesses, developers, and business partners who serve small business clients. DB2 Express-C can be set up quickly, is easy to use, and includes self-managing capabilities.
Creating the DB2 Database
After you have DB2 installed and running, the next step is to create the Classic Models database. After you have created the database you can then run the CreateCMDB2.sql script, which creates the required tables and populates them with sample data.
When setting up the database keep in mind the following points:
• The DB2 admin used in these examples is db2admin. This is also the schema name for the tables that is hard coded in the load script. If your admin name is different you will have to modify the load script.
• In this example the database is loaded on the same machine as WAS. If you are creating a remote database you will need to load the local drivers on your WebSphere instance and change any reference to localhost in this example to the correct host name.
• Versions used in this set of examples are DB2 Express-C version 9.5 and WebSphere Application Server version 6.1. Some of these steps or screenshots may differ slightly from what is shown.
After you install DB2, the First Steps screen appears (see Figure A.4).
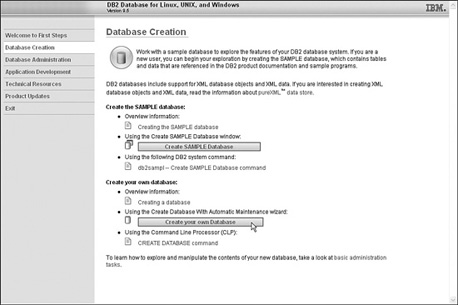
Figure A.4 Start the database creation wizard
Follow these steps to create the database:
1. Choose the Create your own Database option to launch the database creation wizard. This wizard allows you to quickly create the Classic Models database (see Figure A.5).
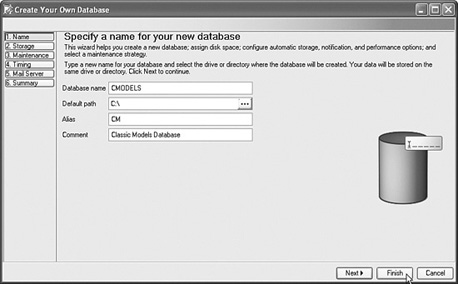
Figure A.5 Create the Classic Models DB

After you have the setting configured click Finish.
A window appears that shows the database being created. Allow it to finish and then close the First Steps window. At this point the database is created and you can now create the tables and load the sample data.
Load the Classic Models Data
I have provided a load script that you can use to create the tables and load the sample data. Figure A.6 shows the command line steps that should be followed. Just follow these steps:
1. To load the data, use the DB2 command-line processor to connect to the database.
C:>db2 connect to CMODELS
   Database Connection Information

   Database server         = DB2/NT 9.5.0
   SQL authorization ID    = ADMIN
   Local database alias    = CMODELS
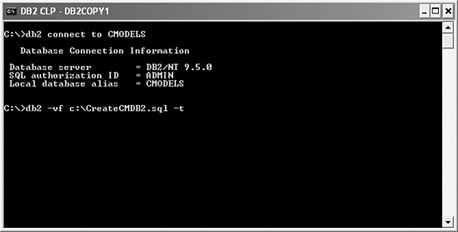
Figure A.6 Load sample data
2. Enter the following command to run the script:
C:>db2 –vf <your path>CreateCMDB2.sql –t
The “v” is the verbose flag, which is not required, but it does provide detailed output so it is recommended. Check the output in the command window to ensure that there were no errors during the load process.
3. Copy the script to your local machine then open the command window and enter the following commands.
…
GRANT SELECT, INSERT, UPDATE, DELETE, INDEX, ALTER, REFERENCES ON TABLE
   DB2ADMIN.PRODUCTLINE TO USER DB2ADMIN WITH GRANT OPTION
DB200001 The SQL command completed successfully.

GRANT CONTROL ON TABLE DB2ADMIN.PRODUCTS TO USER DB2ADMIN
DB200001 The SQL command completed successfully.

GRANT SELECT, INSERT, UPDATE, DELETE, INDEX, ALTER, REFERENCES ON TABLE
   DB2ADMIN.PRODUCTS TO USER DB2ADMIN WITH GRANT OPTION
DB200001 The SQL command completed successfully.

C:>
Now the database is fully populated with sample data that you can start to use. The next step is to create a WebSphere data source so that your applications can properly connect to the data source.
Creating a WebSphere Data Source
WebSphere data sources provide an approach for managing connections to databases and other back-end systems. Not using a WAS data source can be the source of many headaches within an application design. Using a proven data connection manager to handle things such as database connection pools, monitoring capability, and transaction management just makes good sense for any application or environment. You can set up data source providers and data sources through the WebSphere administration console.
Access the WAS console using the username and password you used when you installed your server. After you enter your username and password, click Log in.
Create the JDBC Provider
A JDBC provider is really the driver that you will be using to connect to your data source. You may, in fact, have one provider for each type of data source that you will be using. For example, you may have one provider for DB2 databases and one for Oracle databases. The granularity or number of JDBC providers can vary depending upon a number of factors. In this case it is a one-for-one match of provider to data source.
1. From the opening screen in the admin console, click on JDBC Providers to access the JDBC Providers screen (see Figure A.7). From it you can set up the scope of your provider. WebSphere provides several different levels at which to scope your resources, which allows increased security and better management of them.
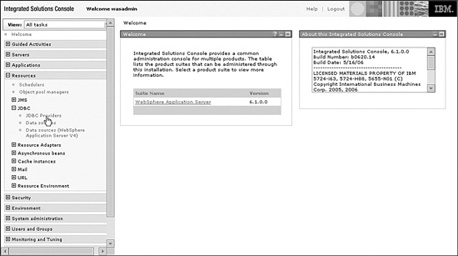
Figure A.7 Navigate to JDBC providers
2. The scope of a datasource is used to determine which servers, clusters, or cells can access that datasource. Figure A.9 shows the page where the scope can be changed. Click on the drop-down menu and select ‘Cell' scope
(see Figure A.8) for the scope options that should be available.

Figure A.8 Change to Cell level scope
3. Click the New button as shown in Figure A.9, to continue.

Figure A.9 Create a new JDBC provider
4. For Step 1: Create new JDBC provider (see Figure A.10), enter the following settings:
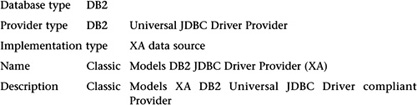
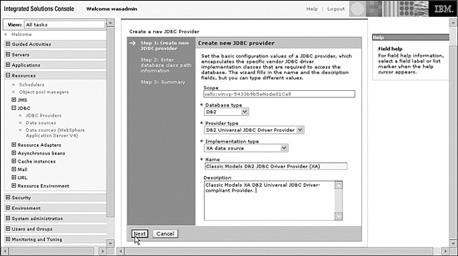
Figure A.10 New JDBC provider settings
5. Click Next to continue.
6. For Step 2: Enter database class path information (see Figure A.11), enter the following values:
      DB2_UNIVERSAL_JDBC_DRIVER_PATH   <your path>SQLLIBjava
     Native library path              Leave blank
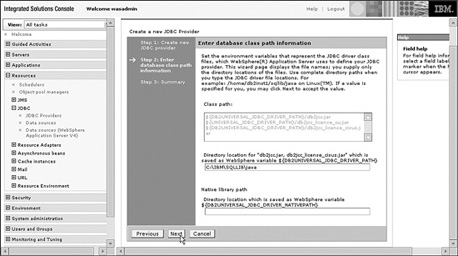
Figure A.11 Driver class path information
7. Click Next to continue. On the summary screen, validate the settings and then click Finish.
8. After your provider is created be sure to click Save in the messages area at the top of the screen (see Figure A.12).
Doing so ensures that your changes are saved to the WebSphere master configuration. Additional steps such as
creating and testing data sources will not be possible until you save the JDBC provider configuration.
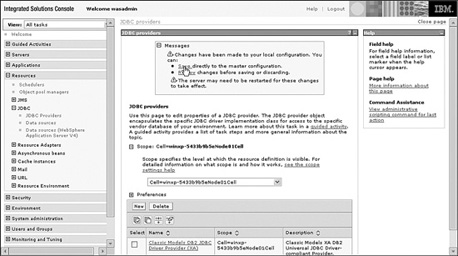
Figure A.12 Save changes
Create an Authentication Alias
Before you can create an actual data source you need to set up an authentication alias for your database. Doing so allows you to connect to the database without providing a username and password within your actual application code. Generally this alias allows the DBA to manage the username/password for the database separately from any code that is developed. Using this feature may not always be the best practice, depending upon your security requirements.
1. To start, click on the Classic Models JDBC Provider (see Figure A.13) that you just created.
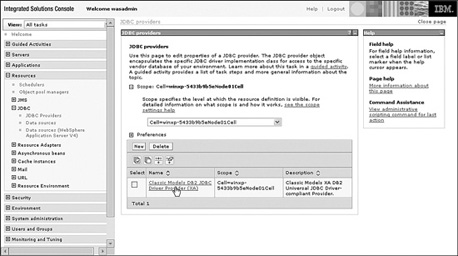
Figure A.13 The Classic Models data source
2. Click the Data sources link (see Figure A.14). Currently you can see that no data sources are defined within this provider.
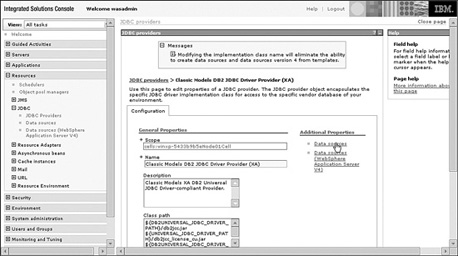
Figure A.14 Create a new data source
3. On the Data Sources page click the New button. At this point you could start to create a data source; however, without an authentication alias you would not be able to finish this process. If you are using a different version of WebSphere you may not have this option at this step. In this case it may be better to back up and create an authentication alias separately before creating the data source.
4. Click on the create a new J2C authentication alias link (see Figure A.15). In the JASS – J2C authentication data screen that appears, click the New button. A form appears that allows you to create the authentication alias.

Figure A.15 Accessing the Authentication Alias screen
On the JASS-J2C authentication data screen (see Figure A.16), enter the following values:
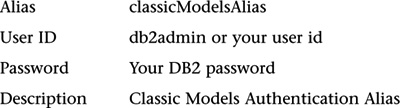
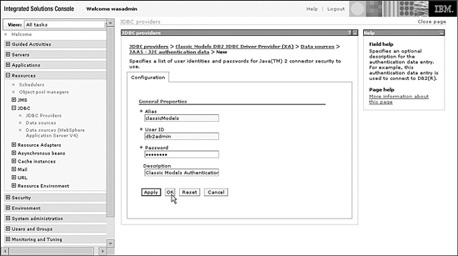
Figure A.16 Enter Authentication Alias data
5. Click OK to continue; in the Messages section click Save to make sure the alias is properly stored to the WAS configuration.
Create the Data Source
Now you can go back and actually create the data source. After you save the authentication alias it is time to create an actual data source that references our classic models database. Follow these steps:
1. Click on the Data sources link in the breadcrumb navigation trail at the top of the screen. This will return you to the data source setup screen. Figure A.17 demonstrates how to use this breadcrumb trail.
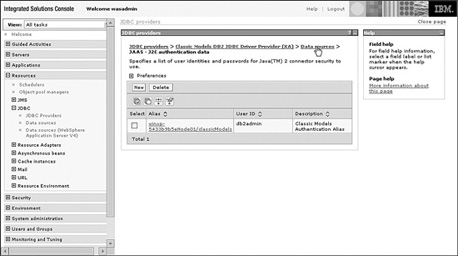
Figure A.17 Return to create data source
2. Click the New button. You are now back to the original data source screen; however, this time you have an authentication alias to use in the setup. Figure A.18 shows how to setup the basic datasource information.
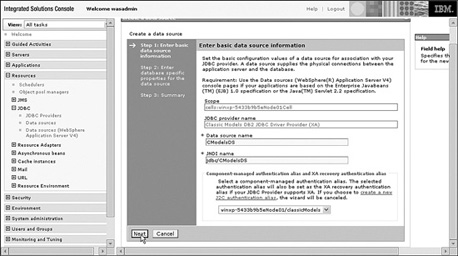
Figure A.18 Enter data source information
3. For Step 1: Enter basic data source information, enter the following values:
Data source name classicModelsDS
JNDI name jdbc/classicModelsDS
Component-managed authentication alias <your newly created alias>
Note that in this example, I have picked my newly created authentication alias in the drop-down at the bottom of the screen. Click Next to continue. Figure A.19 shows how you should setup the database properties.
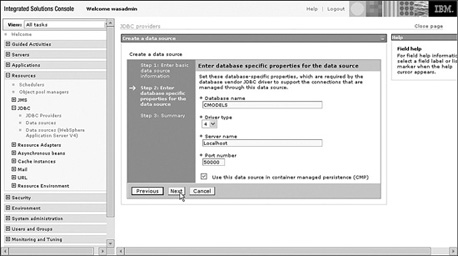
Figure A.19 Database setup parameters
4. For Step 2: Enter database specific properties for the data source, enter the following values:
5. Click Next to continue. On the summary screen, review the data source setup parameters and click Finish. Again, save the data source once it has been created by clicking Save.
Test the Connection
After you have saved your newly created data source navigate back to it to test that it was set up correctly as shown in Figure A.20.
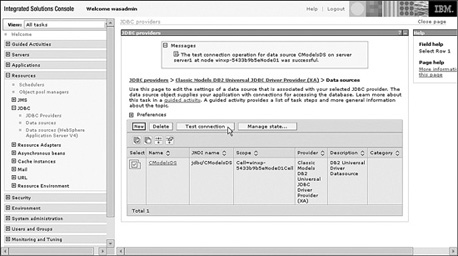
Figure A.20 Testing the data source
You can test the configuration in several ways; however, the simplest is to check the Select box next to your data source and click the Test connection button. The system will return a message at the top of the screen indicating success or telling you about any errors in the setup.
Conclusion
If you were able to set up your environment as outlined in this chapter then you should be ready to go for most of the examples in the book.
 Links to developerWorks Articles
AA.1 developerWorks Information Management Zone: http://www.ibm.com/developerworks/db2/