Chapter 3 Persistence Matters
The Persistence layer is covered early in this book for two reasons:
• Persistence, data storage, and Object/Relational (O/R) mapping components can provide a base for many applications. In a traditional bottom-up design, this area may be designed first within the architecture.
• Persistence is where many applications go wrong and where you might first look when they start to have trouble. That trouble could be performance, security, or functionality related. Data drives many applications, so you might focus on this particular aspect of the application.
I mentioned in earlier chapters that organizations expect the development team to be experts on new technology even as they continue to add new requirements for the system and new frameworks become available to the development community. Make no mistake, however; application architecture is hard. As we look at different layers of the architecture we need to understand several different technologies. We are really just scratching the surface of what you will have to do in a real enterprise application. I hope, however, you can extrapolate much of what I discuss to your own environment and application architecture.
Types of Persistence Frameworks
![]()
Thankfully, several popular persistence frameworks are available to developers today. This is a huge leap from just a few years ago when developers were still struggling with custom JDBC code. However, even with using a framework much potential still exists for things to go wrong. Overloading a database with queries is still very possible, and some thought is required in the database design.
I want to warn against picking a framework because you think it is popular or because you want to learn it. In many cases the framework you choose probably won't be a problem, if you choose a proven framework with a solid community or vendor behind it. Think about the reasons for your choice and the amount of effort it might take to make a framework viable for your project or organization. Choosing a framework just because you think it is cool is not a good use of business dollars. Some diligence is necessary to ensure it is the right framework for the job and that it will serve the needs of the business without undue modification or too many complications. Essentially, two types of popular frameworks are available today, object/relational mapping and SQL based, although these could be broken down into more fine-grained categories.
Object/Relational Mapping
Object/relational mapping is the ability to persist Java objects to a relational database or set of tables. The idea is to actually transform data into the two different formats. Relational tables and object-oriented classes each use a different structure so the ability for a developer to “think” in terms of objects and not be concerned with how the relational tables are designed is considered a huge advantage.
In the O/R mapping category, Hibernate is arguably one of the most popular persistence frameworks available today. The growth has been pretty steady over the last several years as more projects try to leverage industry experience rather than try to build their own framework. Other products in this category include Oracle's TopLink and the Java Persistence API, which are discussed later in this chapter.
SQL-Based Frameworks
SQL-based frameworks seek to provide a robust JDBC type of framework where your domain objects or Java beans are mapped to specific SQL statements. This approach can be simpler and more familiar to many programmers, yet still reduce many of the issues that you would face by creating your own persistence framework. The difference is the ability and flexibility in which you can use custom SQL statements in your application. I'm not claiming that the decision between roll your own and an available framework is that cut-and-dried, but you get the general idea. In this category are frameworks like iBATIS and Spring JDBC. We could probably add plain JDBC to this category as well.
Why Not Roll Your Own Framework?
One could very easily make a case for a roll-your-own framework; however, at this point in time doing so does not seem reasonable except for very simple cases, and even then it is a stretch. With all the robust and popular frameworks readily available, building your own is hardly necessary, if not another bad use of project dollars. You can hardly build a framework that is as robust or complete as many of the currently available frameworks. In the case you are looking at a custom approach, an argument could be made that the ramp-up time for the team to learn a new framework would work against them; that is, the “not invented here” syndrome. Although this may be partly true, using a good layered approach can help isolate much of the team from having to learn the custom framework right away, instead depending on one small subteam to provide them with the DAO layer and Entity objects required by the application.
WebSphere Data Source Resource Reference
I will make a quick point upfront about resource references within WebSphere for data source access. While a data source provides the access point to a specific database, there is another level of abstraction that is recommended to acquire and use a data source.
Resource manager connection factories are actually defined by the J2EE specification, and are used to create resource connections. In this case the resource manager connection factory would be the javax.sql.DataSource interface.
In Appendix A, “Setting Up the Data Sample,” I provide an example of setting up a data source for the Classic Models database. Throughout this book the data source name will be something like jdbc/CModelsDS or jdbc/cmDS. This name identifies it as a JDBC data source when performing the datasource lookup. One school of thought considers this name to be not enough redirection when performing a data source lookup. The general thinking is that using this name in the lookup ties the server to providing this value to the data source. This could result in security or configuration problems because you are essentially hardcoding the data source name within your application. Accessing a data source using the provided DS name has been deprecated in WebSphere, and using this approach you are likely to see the following error in your SystemOut.log
 [12/1/07 16:27:27:234 EST] 0000002b ConnectionFac W J2CA0294W: Deprecated usage of
direct JNDI lookup of resource jdbc/CModelsDS. The following default values are
used: [Resource-ref settings]

   res-auth:                 1 (APPLICATION)
   res-isolation-level:      0 (TRANSACTION_NONE)
   res-sharing-scope:        true (SHAREABLE)
   loginConfigurationName:   null
   loginConfigProperties:    null
[Other attributes]

   res-resolution-control:   999 (undefined)
   res ref or CMP bean name: null
   Database pool properties: null
   primeID:                  0
isCMP1_x:                false (not CMP1.x)
isJMS:                false (not JMS)
The way to avoid this warning is to include a resource reference within your application that allows your application to use a specific value for the lookup, but also gives the WebSphere administrator or deployment manager the ability to change the data source name on the deployed server.
The main way to set up this reference is to use a ResourceRefBinding in the ibm-web-bnd.xmi file that is contained within the project WAR file. ResourceRefBindings can be used on JNDI resources such as JDBC or queue references that are set up by the WebSphere administrator. Actually, two files have to be modified. One is the ibm-web-bnd.xmi file that was mentioned earlier, and the second is the project web.xml file.
ibm-web.bnd.xmi
<resRefBindings xmi:id="ResourceRefBinding_1196545201031" jndiName="jdbc/CModelsDS">
  <bindingResourceRef href="WEB-INF/web.xml#ResourceRef_1196545201031"/>
 </resRefBindings>
Once the reference is complete you can set up a resource-ref element within the web.xml file of your application.
web.xml
<resource-ref id="ResourceRef_1196545201031">
   <description>Classic Models DS Reference</description>
   <res-ref-name>jdbc/CModelsDSRef</res-ref-name>
   <res-type>javax.sql.DataSource</res-type>
   <res-auth>Container</res-auth>
   <res-sharing-scope>Shareable</res-sharing-scope>
</resource-ref>
If you are new to WebSphere this may seem like over-abstraction, but the goal is to provide good flexibility and abstraction between roles within your organization. Removing this warning can reduce log bloat and make log files easier to read. It can also make your code more portable because not using this approach is deprecated and susceptible to being changed in future versions of WebSphere.
iBATIS Framework
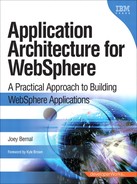
The iBATIS framework is designed to provide a simple approach to providing database access to your application (see Figure3.1). Simple is a relative term; every new technology requires some knowledge building, but aside from very simple custom JDBC frameworks iBATIS is one of the simplest and more robust I have found. iBATIS has actually been around for about five years now; you can find the code at http://ibatis.apache.org. As of this writing some discussion is going on for starting work on version 3 of the iBATIS framework.

Figure 3.1 iBATIS data mapper framework
iBATIS uses a full SQL approach and works by mapping complete SQL to the classes that compose your domain model. The key word here is SQL, which you can generate or modify to allow for custom mapping specific to your application.
iBATIS comes with different features; the Data Mapping, or SQL Mapping Framework, is one part. A DAO framework included with iBATIS has been deprecated in favor of using the Spring DAO framework. Spring has full support for iBATIS built into the latest versions. Even though I emphasized the word simple when speaking about iBATIS, the entire package is very full featured and more than can be discussed in a single chapter.
Figure.3.2 illustrates a layered example of how everything fits together. This example does not use a business logic layer, but you can easily see how the business logic layer can fit into the overall architecture.
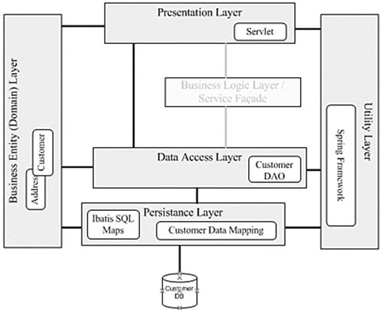
Figure 3.2 Layered iBATIS-Spring architecture
You can see a variety of classes within this diagram. Several seem to make sense, but a couple of them are new. It is not a stretch to imagine that you could custom code some of the new objects to provide similar functionality; however, your goal is to leverage best practices and frameworks where possible, without trying to squeeze in every feature known to man. This architecture strikes a nice balance for simple applications. Let's start with implementing iBATIS and look at the Spring components later on. To work with iBATIS, you need to create two key configuration files:
• SqlMapConfig.xml There is one main SqlMapConfig.xml for each application. This file contains information such as the data source that iBATIS should be using and a list of the SQL map resources (SqlMap.xml files) that need to be used to manage the database interaction.
• SqlMap.xml file(s). For each set of SQL queries there is generally a related SqlMap.xml file. Often it is broken down by domain objects. For example, you might have a CUSTOMER_SqlMap.xml and an ORDERS_Sql_Map.xml file. In some instances you could have many more of these files. SqlMap files contain the actual SQL and the mappings for managing your database interaction.
The mapping statements that are contained within each DOMAINOBJECT_SqlMap.xml file are used to perform the actual data interaction. Figure3.3 provides an overview of how these files fit together within the iBATIS framework. The input and outputs of each mapping statement are provided by the domain classes and the DAO classes that allow use of the specific mapping statements.

Figure 3.3 iBATIS mapping overview
iBATIS mapping statements work with a variety of data types such as classes, primitives, lists, and hash tables. You can call a mapping statement with a single parameter such as a key value and it can return a complete object populated with the data represented by that key value. Before getting too far along in this discussion, let's implement the model so you understand how the mapping will occur.
Implementing the Customer Class and Customer SQL Mapping
Probably the most important part of implementing any persistence architecture is the design of the domain model—that is, the classes that actually make up the objects within the provided domain. In this case those classes will map pretty closely to the tables that are provided within the sample database. We have very common objects such as customers, employees, orders, and products. Customer.java is a standard POJO (Plain Old Java Object) hat you would expect to see in any application. In fact, it is so standard that I have to make the additional point that nothing special is needed for using this class with iBATIS.
package com.ibmpress.cm.model;

public class Customer {

   private Short customernumber;
   private String customername;
   private String contactlastname;
   private String contactfirstname;
   private String phone;
   private String addressline1;
   private String addressline2;
   private String city;
   private String state;
   private String postalcode;
   private String country;
   private Short salesrepemployeenumber;
   private Double creditlimit;

   public Short getCustomernumber() {
      return customernumber;

   }

   public void setCustomernumber(Short customernumber) {
      this.customernumber = customernumber;

   }

   public String getCustomername() {
      return customername;

   }
…
I have left off some of the getters and setters for brevity, but the example provides everything else you would see in the rest of this class. Interestingly, this class would be very similar to the class we would use in the EJB3 example later in this chapter, except with the necessary annotations.
Mapping the Customer Model
The SqlMap.xml file consists of two main parts: a result map, which is used to map to the Customer.java file; and the mapping statements themselves, of which there can be many. Result maps can be simple or complicated, but they are mainly used to map the values of each field to a field in your class. The following is an example of the DB2Admin_Customer_SqlMap.xml file.
<?xml version="1.0" encoding="UTF-8"?>
<!DOCTYPE sqlMap PUBLIC "-//ibatis.apache.org//DTD SQL Map 2.0//EN"
"http://ibatis.apache.org/dtd/sql-map-2.dtd">
<sqlMap>

<resultMap class="com.ibmpress.cm.model.Customer" id="CustomerResult">

     <result column="CUSTOMERNUMBER" jdbcType="SMALLINT"
     property="customernumber"/>
     <result column="CUSTOMERNAME" jdbcType="VARCHAR" property="customername"/>
     <result column="CONTACTLASTNAME" jdbcType="VARCHAR"
     property="contactlastname"/>
     <result column="CONTACTFIRSTNAME" jdbcType="VARCHAR"
     property="contactfirstname"/>
     <result column="PHONE" jdbcType="VARCHAR" property="phone"/>
     <result column="ADDRESSLINE1" jdbcType="VARCHAR" property="addressline1"/>
     <result column="ADDRESSLINE2" jdbcType="VARCHAR" property="addressline2"/>
     <result column="CITY" jdbcType="VARCHAR" property="city"/>
     <result column="STATE" jdbcType="VARCHAR" property="state"/>
     <result column="POSTALCODE" jdbcType="VARCHAR"  property="postalcode"/>
     <result column="COUNTRY" jdbcType="VARCHAR" property="country"/>
     <result column="SALESREPEMPLOYEENUMBER" jdbcType="SMALLINT"
     property="salesrepemployeenumber"/>
     <result column="CREDITLIMIT" jdbcType="DOUBLE" property="creditlimit"/>

</resultMap>
The result map class contains the location of your result class and an id that will be used to reference this map in the mapping statements for each query. For each field in the table you identify that field name and map it to a property in the customer class along with the data type of that field. Having the result map in place now makes creating the mapping statements that do most of the work needed for the persistence model easy. The following selectCustomerByPrimaryKey is an example of a <select> mapping statement. There are about eight mapping statement types in all, including <select>, <insert>, <update>, <delete>, and others that allow you to perform more custom actions. The <select> mapping statement is probably the simplest and most used of all the mapping statements. The following is a select statement mapping from the DB2Admin_Customers_SqlMap.xml file.
<select id="DB2ADMIN_CUSTOMERS.selectCustomerByPrimaryKey"
parameterClass="com.ibmpress.cm.model.Customer" resultMap="CustomerResult">
select CUSTOMERNUMBER, CUSTOMERNAME, CONTACTLASTNAME, CONTACTFIRSTNAME, PHONE,
ADDRESSLINE1, ADDRESSLINE2, CITY, STATE, POSTALCODE, COUNTRY, SALESREPEMPLOYEENUMBER,
CREDITLIMIT from DB2ADMIN.CUSTOMERS where CUSTOMERNUMBER = #customernumber:SMALLINT#
</select>
The statement provides both an input set as a parameterClass and an output set in the form of a resultMap (defined earlier). The query is pretty close to what you might find in a standard JDBC call with the addition of an inline # (pound sign) parameter to provide the criteria you need for this selection. Calling this statement from the CustomerDAO.java class you could provide the following method.
public Customer selectCustomerByPrimaryKey(Short customernumber) {
     Customer key = new Customer();
     key.setCustomernumber(customernumber);
     Customer record = (Customer)
     getSqlMapClientTemplate().queryForObject      ("DB2ADMIN_CUSTOMERS.selectCustomerByPrimaryKey", key);
     return record;

}
Notice that you can use the Customer class as both the input and output for this statement; however, they are actually two different instances of the class. You could actually do away with the parameterClass in this instance and just pass in a primitive to complete the where clause; however, an example class often can be very useful if you want to create very dynamic queries.
Additionally, having a consistent approach can also be important for ensuring that your layer within the application is used consistently and for providing type safety within application usage. Another example of a mapping statement using the <update> command shows how consistent the statements can be within the DB2Admin.Customers.SqlMap. xml
<update id="DB2ADMIN_CUSTOMERS.updateCustomerByPrimaryKey"
parameterClass="com.ibmpress.cm.model.Customer">

     update DB2ADMIN.CUSTOMERS
     set CUSTOMERNAME = #customername: VARCHAR#,
     CONTACTLASTNAME = #contactlastname: VARCHAR#,
     CONTACTFIRSTNAME = #contactfirstname: VARCHAR#,
     PHONE = #phone: VARCHAR#,
     ADDRESSLINE1 = #addressline1: VARCHAR#,
     ADDRESSLINE2 = #addressline2: VARCHAR#,
     CITY = #city: VARCHAR#,
     STATE = #state: VARCHAR#,
     POSTALCODE = #postalcode: VARCHAR#,
     COUNTRY = #country: VARCHAR#,
     SALESREPEMPLOYEENUMBER = #salesrepemployeenumber: SMALLINT#,
     CREDITLIMIT = #creditlimit: DOUBLE#
     where CUSTOMERNUMBER = #customernumber: SMALLINT#
</update>
The <update> statement does not have a return result map; rather, it returns an integer representing the number of rows that have been updated.
Configurating iBATIS
After the sqlMap is complete you need to configure iBATIS to recognize the data source and the SQL maps that are required. The sqlMapConfig.xml file is used to identify this information. This section shows how you might configure this file if you were going to write your own DAO class around iBATIS; later you find out how to configure it with Spring.
The basic sqlMapConfig.xml is composed of several parts. The header identifies the start of the XML document and some of the initial settings that are possible within iBATIS.
<?xml version="1.0" encoding="UTF-8" ?>
<!DOCTYPE sqlMapConfig PUBLIC "-//iBATIS.com//DTD SQL Map Config 2.0//EN"
"http://www.ibatis.com/dtd/sql-map-config-2.dtd">

<sqlMapConfig>

<settings cacheModelsEnabled="true" enhancementEnabled="true" maxSessions="64" maxTransactions="8" maxRequests="128" />
The settings element allows specific settings to be enabled within your iBATIS models. You can configure several settings, but you need to take care to understand how they might impact your application. For example, the cacheModelsEnabled option allows iBATIS to use cache models within mapped statements; however, you must create those models before they are used in the application. You should also know where you want caching to occur—at this level or higher within the application layers. An architect should understand this level of detail to help make the best decisions. An architect not understanding something of this detail may lead to future problems, because the development team may not raise the issue until it is too late.
The transactionManager and the dataSource element allow you to configure the data source and type of transaction management you will use within your application. In this case I have configured the dataSource element to work directly with the database and provide all the necessary information to make a connection.
<!—transactionManager type="JDBC" —>
<!—dataSource type="SIMPLE" —>
<!—property value="COM.ibm.db2.jdbc.app.DB2Driver" name="JDBC.Driver" / —>
<!—property value="jdbc:db2:CMODELS" name="JDBC.ConnectionURL" / —>
<!—property value="db2admin" name="JDBC.Username" /—>
<!—property value="db2admin" name="JDBC.Password" / —>
<!—property value="15" name="Pool.MaximumActiveConnections" / —>
<!—property value="15" name="Pool.MaximumIdleConnections" / —>
<!—property value="1000" name="Pool.MaximumWait" / —>
<!—/dataSource —>
<!—/transactionManager —>
Notice, however, that those settings are commented out because I would rather use the WebSphere data source that is created in Appendix A:
<transactionManager type="JDBC">
        <dataSource type="JNDI">
               <property name="DataSource" value="jdbc/CModelsDS" />
        </dataSource>
</transactionManager>
Finally, the config file should identify all the sqlMap files that are needed for this application. In this simple example there is only one file; however, in more complex cases you could have several <sqlMap> elements within the config file.
<sqlMap resource="com/ibmpress/cm/sqlmap/DB2ADMIN_ORDERS_SqlMap.xml"/>

</sqlMapConfig>
Notice that you have actually written some SQL for use within the persistence framework. Using SQL provides great control over how the data is manipulated, yet removes much of the mundane JDBC programming from the application. You also continue to leverage WAS data sources and take advantage of shared data connection pools.
Adding the Spring DAO Framework
The best approach when exploring iBATIS within your environment is to understand how to use the iBATIS framework independently of other frameworks. In this chapter you have used the iBATIS SqlMaps to interact with a data source directly; however, the iBATIS project has deprecated the DAO framework component that comes packaged with the download and has recommended that developers use the Spring DAO framework instead. Luckily for us, it is a good match, and Spring comes with full iBATIS support built in.
Spring has become pretty popular over the last couple of years and we have to give credit to Rod Johnson and the Spring team for filling a much-needed hole around business object management. For the most part, Spring should be a framework that you need to consider in almost any application; however, I think that you need to impose limitations and areas exist where Spring may not be the best fit. You find out more about Spring in Chapter 4, “Designing the Middle Tiers,” in the context of the business logic layer. For now, you learn how to use it in this application.
In this example, you use Spring in the simplest sense of this application—to function as a factory for DAO beans that you need to create. For the most part, you simply extend some built-in Spring support for iBATIS to accomplish this goal.
The data access object needed for this application is a very simple case. First you create the CustomerDAO.java interface to define the method signatures needed:
package com.ibmpress.cm.dao;

import java.util.List;
import com.ibmpress.cm.model.Customer;

public interface CustomerDAO {

     void insertCustomer(Customer record);
     int updateCustomerByPrimaryKey(Customer record);
     List getCustomers();
     Customer selectCustomerByPrimaryKey(Short customernumber);
     int deleteCustomerByPrimaryKey(Short customernumber);
}
Five methods are defined within the interface. You can implement these methods in the CustomerDAOImpl class. This implementation class extends the Spring SqlMapClientDao Support class that is available as part of the iBATIS support within the Spring libraries. This support includes all the helper classes and methods that are needed to use the SQL maps that were created earlier. The entire CustomerDAOImpl.java class is here for your viewing. Going through the provided methods and seeing how they interact with the Spring-iBATIS framework should be educational.
package com.ibmpress.cm.dao;

import java.util.List;
import org.springframework.orm.ibatis.support.
SqlMapClientDaoSupport;
import com.ibmpress.cm.model.Customer;

public class CustomerDAOImpl extends SqlMapClientDaoSupport implements
CustomerDAO {

       public CustomerDAOImpl() {
       super();
    }

    public void insertCustomer(Customer record) {
        getSqlMapClientTemplate().insert("DB2ADMIN_CUSTOMERS.insertCustomer",
        record);
     }

     public int updateCustomerByPrimaryKey(Customer record) {
        int rows =
        getSqlMapClientTemplate().update("DB2ADMIN_CUSTOMERS.updateCustomerByPrimaryK
        ey", record);
        return rows;
     }

     public List getCustomers() {
         List list =
         getSqlMapClientTemplate().queryForList("DB2ADMIN_CUSTOMERS.getCustomerList");
         return list;
     }

        public Customer selectCustomerByPrimaryKey(Short customernumber) {
          Customer key = new Customer();
          key.setCustomernumber(customernumber);
                 Customer record = (Customer)
          getSqlMapClientTemplate().queryForObject("DB2ADMIN_CUSTOMERS.selectCustomerBy
          PrimaryKey", key);
          return record;

     }

       public int deleteCustomerByPrimaryKey(Short customernumber) {
         Customer key = new Customer();
         key.setCustomernumber(customernumber);
         int rows =
         getSqlMapClientTemplate().delete("DB2ADMIN_CUSTOMERS.deleteCustomerByPrimaryK
         ey", key);
         return rows;

     }

}
The class diagram for this application shows a different view of how the pieces fit together (see Figure 3.4). The client application will initiate the web context and get an instance of the CustomerDAO.java file.

Figure 3.4 iBATIS-Spring class diagram
By default Spring provides objects as singletons unless you configure it to provide objects in one of the other modes that have recently become available. You could have created a custom DAO as a singleton and used it directly. In fact, in my previous book, Programming Portlets Second Edition, I do just this and provide an iBATIS DAO framework as an independent singleton. Managing objects is one of the strengths of Spring, and using a factory to look up objects simplifies some of the development interdependencies. Try using the introspection available within some tooling on a singleton to get an idea of what I am talking about. Being able to look up the DAO through the Spring context and using the dependency injection function to set up the SQL map configuration are very useful.
The final step is to wire up the Spring components so everything can work together. You use the applicationContext.xml file to pull all the dependencies together.
<?xml version="1.0" encoding="UTF-8"?>
<!DOCTYPE beans PUBLIC "-//SPRING//DTD BEAN//EN"
"http://www.springframework.org/dtd/spring-beans.dtd">
<beans>
<!—Data source bean —>
<bean id="testDataSource" class="org.apache.commons.dbcp.BasicDataSource" destroy-
method="close">
        <property name="driverClassName">
               <value>COM.ibm.db2.jdbc.app.DB2Driver</value>
        </property>
        <property name="url">
                <value>jdbc:db2:CMODELS</value>
        </property>
        <property name="username">

                <value>db2admin</value>
        </property>
        <property name="password">
                <value>db2admin</value>
        </property>
</bean>
Note two data sources are configured within this file: the testDataSource and the prodDataSource. This configuration provides an easy way to switch between the two and allow persistence functionality testing both inside and outside the WebSphere container. The prodDataSource uses the WebSphere data source that has been set up within the application server while the testDataSource uses a direct connection to the database.
     <bean id="prodDataSource"
class="org.springframework.jndi.JndiObjectFactoryBean">
     <property name="jndiName"
           value="java:comp/env/jdbc/CModelsDSRef"/>
     <property name="lookupOnStartup"
           value="false"/>
     <property name="cache"
           value="true"/>
     <property name="proxyInterface"
             value="javax.sql.DataSource"/>

     </bean>
Next are some setup prerequisites for using iBATIS. You use SqlMapClientFactoryBean to loadloadsqlMapConfig.xml and all the SQL maps so they can be provided to the DAO class via dependency injection. Don't worry if you don't understand dependency injection just yet; Chapter 4 goes into more detail about it.
<!—Web SqlMap setup for iBATIS Database Layer —>
<bean id="customerSqlMapConfig"
class="org.springframework.orm.ibatis.SqlMapClientFactoryBean">
        <property name="configLocation">
             <value>/WEB-INF/sqlMapConfig.xml</value>
        </property>
</bean>
Finally, the DAO bean is configured with the correct data source and the SQL map configuration bean. These properties are injected into the DAO bean or provided upon initialization.
<!—Customer DAO Bean —>
<bean id="customerDAO" class="com.ibmpress.cm.dao.CustomerDAOImpl">
       <property name="dataSource">
              <ref local="prodDataSource"/>
       </property>
       <property name="sqlMapClient">
              <ref local="customerSqlMapConfig"/>
       </property>
</bean>

</beans>
The bean id is important because that is what the client will use to look up the DAO at runtime. Because you have moved the data source information to Spring you can remove it from the iBATIS configuration file. The sqlMapConfig.xml file is now reduced to effectively one line at this point as shown here:
<?xml version="1.0" encoding="UTF-8" ?>
<!DOCTYPE sqlMapConfig PUBLIC "-//iBATIS.com//DTD SQL Map Config 2.0//EN"
"http://www.ibatis.com/dtd/sql-map-config-2.dtd">

<sqlMapConfig>
<sqlMap
resource=”com/ibmpress/cm/sqlmap/DB2ADMIN_CUSTOMERS_
SqlMap.xml" />
</sqlMapConfig>
That's pretty much it for building a complete, robust, albeit simple, persistence framework for your application.
Running a Test
I will not go into too much detail on testing your framework. The provided sample code has examples that can be run both outside and inside the WebSphere application server container. The main difference between the two is the data source and the Spring application context that is used. The IbatisSpringDAOTestServlet walks through some of the methods and simply outputs the values to the browser.
package com.ibmpress.cm.web.ibatisdao;

imports …

import org.springframework.web.context.WebApplicationContext;
import org.springframework.web.context.support.
WebApplicationContextUtils;

import com.ibmpress.cm.dao.CustomerDAO;
import com.ibmpress.cm.model.Customer;

public class IbatisSpringDAOTestServlet extends HttpServlet {

        CustomerDAO customerDAO;
The servlet defines an instance variable of type CustomerDAO. Generally instance variables are not considered good programming practice, so its use should definitely raise some flags during a code review. A good discussion of why it is being used should occur and be internally documented with a comment for future reference.
In the servlet init() method you can get a handle to the DAO and then store it locally for reference throughout the lifecycle of the servlet. The Spring WebApplicationContext is used to look up the DAO using the getBean() method.
  public void init(ServletConfig config ) throws ServletException {

super.init();

// Load Spring framework Web context

WebApplicationContext wac =
WebApplicationContextUtils.getRequiredWebApplicationContext(
config.getServletContext() );

//get customer data access object
customerDAO = (CustomerDAO)wac.getBean("customerDAO");

}
In the doGet() method of the servlet is where all the action happens. This method exercises many of the methods contained within the DAO. In the first part a new Customer object is created and then inserted into the database. I have removed some of the print writer statements for clarity.
protected void doGet(HttpServletRequest request, HttpServletResponse
response) throws ServletException, IOException {

            PrintWriter writer =response.getWriter();

            short custNum = 9999;
            Customer myCustomer = new Customer();
            myCustomer.setCustomernumber(custNum);
            myCustomer.setCustomername("mynew customer");
            myCustomer.setContactfirstname("Bernal");
            myCustomer.setContactlastname("Joey");
            myCustomer.setCountry("US");
            myCustomer.setPhone("123-456-7890");
            myCustomer.setCreditlimit(999999.99);

            customerDAO.insertCustomer(myCustomer);
Another section in the method is a lookup on all Customer objects in the table. This section gets a complete list of customers and then iterates through the data, outputting some basic information about each customer.
         List custList = customerDAO.getCustomers();
         Customer cust;
         Iterator
         it = custList.iterator();
         while (it.hasNext()) {

                 cust = (Customer) it.next();

                 writer.println(cust.getCustomernumber() + " " +
                 cust.getCustomername() + "<br>");
         }
This complete example is about as simple as I could make it while still providing a reference to how you might approach a persistence layer within your application. Keep in mind that even though it is a fairly simple example, there is still a lot to do; many decisions need to be made and many things considered before it can be called a production-ready application. The next section describes another approach using the EJB V3 specification and the Java Persistence API.
Transactional Thinking
For many applications built for WebSphere today, the impact of transactional interactions is not at the top of the list. Many applications are read only, or have light traffic and updates, and simply don't require robust transactional capability. However, other applications do require this capability but it is not taken into consideration during the design phase of the project. The ACID (Atomicity, Consistency, Isolation, and Durability) test is not designed simply for computer science students to learn and then forget! It is designed to provide a simple way to determine whether your data interaction requires transactional consideration.
You can find many references on ACID and how to manage and use transactions within your application, but you can keep a couple of key questions in mind to determine whether this capability is necessary within your application:
• A transaction is some amount of work that often consists of several discrete operations or steps. Do you have scenarios where multiple tables need to be updated, or several queries need to be run in succession? Are the events dependent upon one another—that is, if one fails, should they all roll back to the initial state?
• Transactions usually need to be isolated from each other. Do you have situations where multiple users are dependent upon or are updating the same set of data—for example, account information?
• Completed transactions should be in a state where they cannot be undone. If the user is notified that a transaction is complete, the system should guarantee it has completed successfully.
Keep in mind that adding transaction capability also adds complexity to your application, resulting in possible longer development and additional testing. These are not bad things, but they should be accounted for in your project estimates and not taken for granted as just part of the development routine.
For iBATIS some transactional support is already provided. Each single SQL statement is run within its own transaction; no demarcation is required. But many times you want to run local transactions that consist of two or more statements. iBATIS provides the ability natively to start and stop transactions, but unfortunately, it is difficult to use now that the DAO is wrapped with Spring. Spring assumes that you want to take advantage of its capabilities such as data source management and transaction support. You can wire up a transaction manager in Spring such as the org.springframework.transaction. interceptor.TransactionProxyFactoryBean and manage transactions at the Spring level.
If you do need to worry about transactions within your application then look closely at the technologies you are choosing and understand how mixing technologies can impact your choices. Traditionally EJB technology has been the choice for heavy transactional applications; the latest release of EJB specification 3 has become easier to use and more flexible by incorporating some of the best features of newer persistence frameworks. The discussion now moves to helping you understand how to use EJB3 within your application framework.
EJB 3 and the Java Persistence API
![]()
Many years ago during the dot-com boom I was involved in a major real estate portal project. We used the term portal more generically back then as portal application software was not widely available, but the architecture was a standard three-tier approach using EJBs, servlets, and JSPs. Using this approach was the hot trend during those times and technically the fit was correct for this particular application. The results, however, were a little less than stellar. Take 40 hot young programmers who could barely spell Java, mix in several complex new technologies and a list of requirements gathered from weeks of user sessions, and you can imagine the results. In the years since then I have worked on several projects using different versions of the EJB spec, but I always seemed to encounter the same complexity problems.
EJBs have gotten a mixed response across the industry over the years. For a long time no real alternative existed although development teams made do by simplifying their applications—even to the point of people trying to retrieve data directly from within their JSPs, which continues to amaze me. The fact that libraries like the Java Standard Tag Library include this capability is quite confusing, but fortunately, JSTL is complex enough to learn that it hasn't appeared to exacerbate the problem.
More recently alternatives to EJBs for building service and persistence layers have become more readily available. Persistence frameworks like iBATIS and Hibernate, and lightweight containers like Spring, have been able to fill the gap and allow development teams to build robust, layered applications without EJBs. I would have predicted a few years ago that this was going to be the death knell for EJBs, although I might have been a bit hesitant to say so publicly. But the EJB gods fought back and performed powerful magic. EJB3 and the Java Persistence API draw upon the best ideas from persistence technologies such as Hibernate, TopLink, and JDO as well as a light framework, POJO development, and dependency injection. Customers now no longer face the choice between incompatible non-standard persistence models for object/relational mapping. In addition, the Java Persistence API (JPA) is usable both within Java SE environments as well as within Java EE, allowing many more developers to take advantage of a standard persistence API.
EJB 3 offers so many new and exciting features that I don't even know where to start. Dependency injection with POJO development, annotations, JPA, and the fact that it is a Java EE standard technology all combine to make it a serious option for application development. Two key points to keep in mind within this example are the greatly simplified programming model for creating session EJBs, and creating a persistence layer with annotated POJOs.
One thing to remember about JPA is that it is a standards-based persistence framework, as opposed to many of the other approaches that have been discussed in this chapter. iBATIS, while heavily adopted by development teams in many organizations, is not a Java standard. Adopting a standards-based approach at all layers can be an important part of your architecture strategy if you choose to go that route.
Understanding the Approach
With the iBATIS example discussed earlier you saw how the code fit within a layered architecture. This example follows a very similar approach that can be layered in several ways. Figure 3.5 shows the class diagram for the example in this section. As usual the sample code will be downloadable for examination. Download information and complete descriptions of the examples are available in Appendix B, "Running the Examples."
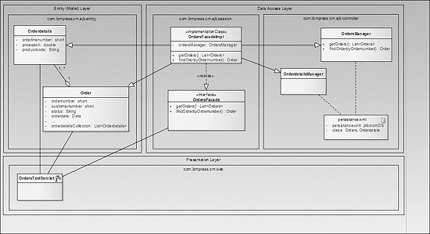
Figure 3.5 JPA layered approach
The entity layer contains the domain model that emulates the objects within our business domain. In this case are the Order object and the Orderdetails object. Notice that they are related in a one-to-many relationship; that is, one or more Orderdetails for every Order object. In the data access layer are two sets of components. One set is the session bean façade that is used by clients to access and use the persistence layer. The other set of components are the OrderManager components that actually perform the persistence interaction necessary for the entities involved.
Depending on where the functionality that is embedded within the session façade, one could classify the façade as the DAO layer or a business logic layer. My inclination in a simple project is to embed business logic within that façade; however, in this example there is not real logic so I have to classify it as a DAO layer that can be accessed by both local and remote application clients.
Entities with POJOs and Annotations
Annotations were introduced in Java 5 as part of the metadata spec, which was defined within JSR 175 in 2004. It is from this spec that the awesome power of annotations within EJB 3 and JPA has evolved. Honestly I wasn't that impressed with the idea of annotations until I started using them and realized how much code they could actually save. With your entity beans, annotations offer two powerful advantages:
• The ability to use these beans outside of this application as pure POJOs because the annotations will simply be ignored
• They save you a lot of code and deployment descriptor configurations that you would normally have to do to configure this EJB-based application
The best way to understand how annotations work is to walk through an example, as follows. The Orders.java entity starts as any other class; however, after the import statements you include the @Entity annotation.
package com.ibmpress.cm.ejb.entities;

import static javax.persistence.FetchType.EAGER;
import static javax.persistence.TemporalType.TIMESTAMP;
import …

@Entity
This annotation identifies the class as a persistent domain object. When the class is deployed the container will recognize it and will expect additional annotations within the entity.
JPA uses a variation of SQL called the Java Programming Query Language (JPQL) to manage interaction with the database. JPQL looks very similar to SQL; however, you need to understand the syntax and context to create the right queries. Static queries are usually defined within a @NamedQuery or @NamedQueries block, and the queries are executed by the EntityManager. You find out how to use the Entity Manager later in this section.
@NamedQueries({

        @NamedQuery(name="getOrders", query="SELECT o FROM Orders o"),

        @NamedQuery(name="getOrdersByOrderdate", query = "SELECT o FROM Orders o
WHERE o.orderdate = :orderdate"),

        @NamedQuery(name="getOrdersByShippeddate", query = "SELECT o FROM Orders o
WHERE o.shippeddate = :shippeddate"),

        @NamedQuery(name="getOrdersByCustomernumber", query = "SELECT o FROM Orders o
WHERE o.customernumber = :customernumber"),

        @NamedQuery(name="getOrdersByRequireddate", query = "SELECT o FROM Orders o
WHERE o.requireddate = :requireddate"),

        @NamedQuery(name="getOrdersByStatus", query = "SELECT o FROM Orders o WHERE o.status = :status")

})
This example has five named queries that are statically defined. All are SELECT queries that work with different query parameters so that you can query an entity in different ways. JPQL actually supports <SELECT>, <UPDATE>, and <DELETE> statements even though I have only used the <SELECT> statement within this example. Also note that all the query names have to be unique within this deployment module.
The next part of the class is the same as any other bean with several additional annotations embedded within the code. The @Id annotation identifies this instance variable as the identity for this entity. This normally equates to the primary key that is in the matching table for this entity. The @Lob annotation is used for large fields within the database such as CLOBs, BLOBs, or large character fields. Additionally you use the @Temporal annotation to identify how you want to map Date or Calendar types to the database.
public class Orders implements Serializable {

        @Id
        private short ordernumber;

        @Lob
        private String comments;

        private short customernumber;
        private String status;

        @Temporal(TIMESTAMP)
        private Date orderdate;

        @Temporal(TIMESTAMP)
        private Date shippeddate;

        @Temporal(TIMESTAMP)
        private Date requireddate;

        @OneToMany(mappedBy="ordernumber",fetch=EAGER)
        private List<Orderdetails> orderdetailsCollection;
Because Orderdetails are a related entity you can prefetch all the detail of your order when you load an order. With the @OneToMany annotation you can define a parameterized list of Orderdetails entity objects within the Order. Using the mappedBy attribute you can define the relationship column of the Order entity with the @Id of the Orderdetails entity. Also note that I used EAGER as the fetch attribute to define how this list is loaded. The @OnetoMany annotation actually defaults to LAZY loading; however, in this case I believe that an Order without the details is of little use except in a few cases. By contrast the @ManytoOne annotation actually defaults to EAGER fetch so it is important to understand the impact of these annotations and perhaps even comment on the results within your source files.
The rest of the class is pretty standard with getters and setters for all the private variables that represent class attributes.
          public Orders() {
                  super();
          }

          public short getOrdernumber() {
                  return this.ordernumber;
          }

          public void setOrderdate(Date orderdate) {
                  this.orderdate = orderdate;
          }

          …

          public void setOrderdetailsCollection(
                          List<Orderdetails> orderdetailsCollection) {
                  this.orderdetailsCollection = orderdetailsCollection;
          }

}
Overall you can see this is not a complicated setup. It can, however, quickly become complicated to the novice trying to build complex functionality within a new framework. A quick look at the Orderdetails class shows that it is very similar in design:
@Entity
@NamedQueries({

        @NamedQuery(name="getOrderdetails", query="SELECT o FROM
Orderdetails o"),

        @NamedQuery(name="getOrderdetailsOrdered", query = "SELECT o FROM
Orderdetails o ORDER BY o.orderlinenumber"),

        @NamedQuery(name="getOrderdetailsByProductcode", query = "SELECT o
FROM Orderdetails o WHERE o.productcode = :productcode")})

public class Orderdetails implements Serializable {

        @Id
        private short orderlinenumber;

        private double priceeach;

        private short quantityordered;

        private String productcode;

        @ManyToOne
        @JoinColumn(name="ORDERNUMBER")
        private Orders ordernumber;
I have to admit this is what might be called an anemic domain model. It is called that because it maps nearly directly to the data tables where the database field equals an attribute within the class. A richer domain model would likely include some behavior within the objects themselves. The beauty of a POJO-based entity model is that you have that flexibility within your application to add more functionality with very little effort.
Entity Managers
The entities are now in place but you need a way to manage them in a consistent manner. The Entity Manager is what controls the persistence of the entities that you have defined. The entities would really be of little use without the Entity Manager to control the CRUD (Create, Read, Update, Delete) functionality of the entity data. The OrdersManager uses the EntityManager API to perform the required persistence functionality. The class is a standard class that takes advantage of the API and exposes a set of methods to interact with the Orders data.
Before you get into the EntityManager let's spend a moment on the persistence.xml file that is necessary to tie in the persistence metadata. The persistence.xml file defines the persistence-unit that you can use. The name of the persistence unit is a reference to when an entity manager instance is created. The persistence unit also defines the data source that is being used and a list of the entity classes that are needed with this application.
<?xml version="1.0" encoding="UTF-8"?>
<persistence version="1.0"
xmlns="http://java.sun.com/xml/ns/persistence" xmlns:xsi="http://www.w3.org/2001/XMLSchema-instance" xsi:schemaLocation="http://java.sun.com/xml/ns/persistence http://java.sun.com/xml/ns/persistence/persistence_1_0.xsd">
        <persistence-unit name="ClassicModelsDataEJB">
                <jta-data-source>jdbc/cmDS</jta-data-source>
        <class>com.ibmpress.cm.ejb.entities.Orders</class>
        <class>com.ibmpress.cm.ejb.entities.Orderdetails</class>
        </persistence-unit>
</persistence>
Two main annotations are used in this class that assist with its identity. The @JPAManager annotation identifies the target entity for this manager class, and the @SupressWarnings annotation removes any complier warnings for unchecked exceptions that may occur in this class. This is a convenience annotation that you should use with care and carefully document.
package com.ibmpress.cm.ejb.controller;
import javax.persistence.EntityManager;
import javax.persistence.EntityManagerFactory;
import javax.persistence.Persistence;
import javax.persistence.Query;
import javax.persistence.TemporalType;
import com.ibm.jpa.web.Action;
import com.ibm.jpa.web.JPAManager;
import com.ibm.jpa.web.NamedQueryTarget;
import com.ibmpress.cm.ejb.entities.Orders;

…
@JPAManager(targetEntity=com.ibmpress.cm.ejb.entities.Orders.class)
@SuppressWarnings("unchecked")
public class OrdersManager {

        public OrdersManager() {}
        private EntityManager getEntityManager() {
                EntityManagerFactory emf = Persistence
                .createEntityManagerFactory("ClassicModelsDataEJB");
                return emf.createEntityManager();
}
The getEntityManager() method returns an instance of the EntityManager to other methods within the OrdersManager class. This method references thepersistence.xml file located within the project, or more specifically the persistence-unit that is defined within the persistence.xml file. In addition to the persistence context the EntityMan-ager provides some transactional context for the entity components and exposes the lifecycle methods for each entity. I show a few examples of the OrderManager class to help illustrate how this occurs.
The createOrders() method provides the ability to create a new order within the database. Reviewing the code you can see how the interaction is wrapped heavily within the transaction methods .begin and .commit of the EntityManager API. This provides a clean way to ensure transaction stability within your persistence architecture, although you do have to code the methods, or rely on wizards to provide the proper context. The single method em.persist is used to create a new record in the database. My one concern here is that from the developer's perspective, we haven't reduced the complexity completely. One must still take care to ensure that coding errors do not occur within the application.
         @Action(Action.ACTION_TYPE.CREATE)
         public String createOrders(Orders orders) throws Exception {
                 EntityManager em = getEntityManager();
                 try {

                         em.getTransaction().begin();
                         em.persist(orders);
                         em.getTransaction().commit();
                 } catch (Exception ex) {
                         try {
                                if (em.getTransaction().isActive()) {
                                        em.getTransaction().rollback();
                                }
                         } catch (Exception e) {
                                ex.printStackTrace();
                                throw e;
                         }

                                throw ex;
                 } finally {
                                em.close();
                 }
                 return "";
         }
The deleteOrders method is very similar to the createOrders method; however, it does contain a few subtle differences. For example, you call the em.merge method with the provided Orders object. This is because you have no idea where the Orders object that is passed into the method came from. It is the job of the EntityManager to manage entities, so a merge ensures that this bean data is synchronized with any other entity that might have been created. After that you can call the remove method and know you are removing the correct record in the database.
         @Action(Action.ACTION_TYPE.DELETE)
         public String deleteOrders(Orders orders) throws Exception {
                  EntityManager em = getEntityManager();
                  try {
                           em.getTransaction().begin();
                           orders = em.merge(orders);
                           em.remove(orders);
                           em.getTransaction().commit();
         } catch (Exception ex) {
                  try {
                           if (em.getTransaction().isActive()) {
                                    em.getTransaction().rollback();
                           }
                  } catch (Exception e) {
                           ex.printStackTrace();
                           throw e;
                  }
                  throw ex;
         } finally {
                  em.close();
         }
         return "";
}
Notice two items of interest here. First in the preceding methods I am catching the generic Exception, a practice I spoke negatively about in Chapter 2, “Setting a Standard.” Much of this code was generated by a wizard within Rational Application Developer version 7.5. This example illustrates nicely how you should always review generated code for correctness and for adherence to your organizational or team standards.
The other type of query that you can do with the OrdersManager class is a named query. This is accomplished via the createNamedQuery method.
The other type of query that you can do with the OrdersManager class is a named query. This is accomplished via the createNamedQuery method.
         @NamedQueryTarget("getOrders")
         public List<Orders> getOrders() {

                           EntityManager em = getEntityManager();
                  List<Orders> results = null;
                  try {
                           Query query = em.createNamedQuery("getOrders");
                           results = (List<Orders>) query.getResultList();
                  } finally {
                           em.close();
                  }
                  return results;

}
Before we get too far in the development let's take a look at how all this fits together as a set of projects. For this initial example I show how to package everything together as a single EAR file deployment package. This is typical of many applications that are locally hosted in a single application server instance.
Figure 3.6 shows a screenshot of my RAD 7.5 workspace for this example. You can see the final result actually contains four separate projects. Up to now you have only identified one of them. In reality it is not the focus of the book to work at this detailed level, but I think understanding how this example fits together in the project space helps you to visualize how the layers map to actual code. The entity beans and entity manager classes reside in the ClassicModelsDataEJB project in Figure 3.6, as well as the persistence.xml discussed earlier.

Figure 3.6 Project layout
Now the goal is to build out the rest of the application. The next step is to create the session façade, which will eventually provide both a local and remote interface for your applications. The ClassicModelsSessionEJBClient will contain the session façade interfaces, while the ClassicModelsSessionEJB will contain the implementation for the interfaces. Notice that there is only one implementation for both the local and the remove interface. Finally, the ClassicModelsWeb project will contain the servlet application for testing the entire application. You then break up different components of the application into different projects to remove any circular references that may occur when trying to include some of the components in other projects. For example, the web application requires a reference to both the session interfaces and the entity objects. Additionally, the session implementation requires a reference to the session bean interfaces and the entity objects. It can be confusing, but this is the best way to provide good encapsulation and reuse of the components.
The session interface for the persistence layer is actually quite simple. It is a standard interface with one annotation; the @Local annotation tells the container that this is a local interface for a session or message bean.
package com.ibmpress.cm.ejb.session;

import java.util.List;
import javax.ejb.Local;

import com.ibmpress.cm.ejb.entities.Orders;

@Local
public interface OrdersFacade {

         public List<Orders> getOrders();
         public Orders findOrdersByOrdernumber(short ordernumber);

}
In all other ways this interface is unremarkable. In fact this is another example of the beauty of the EJB 3 spec—that one simple annotation can turn the file into a local interface for an EJB. The implementation of this interface also contains only a single annotation, that being the @Stateless command. This command identifies in lieu of a deployment descriptor that this is, in fact, a stateless session bean.
package com.ibmpress.cm.ejb.session;

import java.util.List;
import javax.ejb.Stateless;
import com.ibmpress.cm.ejb.controller.OrdersManager;
import com.ibmpress.cm.ejb.entities.Orders;


@Stateless
public class OrdersFacadeImpl implements OrdersFacade {

         OrdersManager orderManager = new OrdersManager();


         public List<Orders> getOrders() {

                  List<Orders> list = orderManager.getOrders();
                  if (list == null) {
                           {System.out.println("list is null");
                  }
                  return list;
         }


         public Orders findOrdersByOrdernumber(short ordernumber) {
                  return orderManager.findOrdersByOrdernumber(ordernumber);
         }
}
That's it! The EJB section of the application is complete. It may look like a lot of code, but if you have done EJBs in the past you know this is not a lot of work. For your initial applications you can simplify everything a bit by reducing the number of methods and the amount of functionality you are providing.
Testing the Application
None of this effort is worthwhile unless it does something useful for your business. For this you need some kind of client interface, which allows useful work to be done. In this case you won't be doing any useful work for a while, but you can pretend. A separate web application can be built to test how this interaction will occur. You have the privilege of being able to take advantage of several new features and capabilities in the WebSphere EJB 3 Feature Pack. The first is that local references to EJBs happen automatically within the container. WebSphere recognizes the EJB you are referencing and can inject that EJB into your application on demand. The OrdersTestServlet contains a single annotation, @EJB, in the header. You define the instance variable within the servlet and preface it with the @EJB annotation to signify that this object is an EJB that lives somewhere within the container.
public class OrdersTestServlet extends HttpServlet {
@EJB
private OrdersFacade ordersFacade;

…

protected void doGet(HttpServletRequest request, HttpServletResponse response) throws ServletException, IOException {

PrintWriter writer = response.getWriter();
response.setContentType(“text/html”);

Short orderid = 10100;

writer.println(“OrderTestServlet using OrderFacade(Local) <br><br>”);

Orders myOrder = ordersFacade.findOrdersByOrdernumber(orderid);

…
Later in the doGet method when you reference the orderFacade variable, it is simply there, having been injected into your class as a dependency that you defined earlier in the class. Chapter 4 discusses dependency injection in more detail. Running the example you can see that it pulls back the order number that you defined in the class and lists the order details information for that order (see Figure 3.7).
Figure 3.7 Test servlet using local interface
For good layer separation, however, everything in one EAR file is not good enough. You have to at least understand how persistence can be encapsulated into a separate deployable component and still be used by other developers working on their own areas.
Remote Clients
Figure 3.8 provides a view of the application similar to Figure 3.5. Most of the classes you will recognize as ones that you just defined and created encapsulated within different projects, but still deployed within the same EAR file. There is the possibility, however, that remote clients may want to use this persistence layer, so you should make some provisions for this approach.
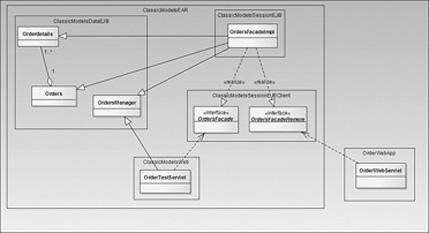
Figure 3.8 Local and remote deployment
You can accomplish this task quite easily after all the heavy lifting done earlier in this section. You just need to add a remote interface to the application and provide an implementation. OrdersFacadeRemote provides the remote interface via the @Remote annotation.
package com.ibmpress.cm.ejb.session;

import java.util.List;
import javax.ejb.Remote;

import com.ibmpress.cm.ejb.entities.Orders;

@Remote
public interface OrdersFacadeRemote {

         public List<Orders> getOrders();
         public Orders findOrdersByOrdernumber(short ordernumber);

}
An additional change that you need to make to the session bean implementation is to include the additional remote interface so that your remote client can access the same information.
@Stateless
public class OrdersFacadeImpl implementsOrdersFacade,
                                            OrdersFacadeRemote {
Note that for this approach you have to deploy two separate applications to the container—one being the original EAR that was created earlier, and the second being a standalone WAR file containing this new “remote” OrderWebServlet. This servlet starts out similar to the local servlet example; however, because you are accessing it remotely you need to provide some additional lookup information to the container.
public class OrderWebServlet extends HttpServlet {

@EJB
private OrdersFacadeRemote ordersFacade;


protected void doGet(HttpServletRequest request, HttpServletResponse response)
throws ServletException, IOException {

         PrintWriter writer = response.getWriter();
         response.setContentType(“text/html”);

         try {

                  InitialContext ic = new InitialContext();

                  OrdersFacadeRemote ordersFacade = (OrdersFacadeRemote)
                  ic.lookup(“com.ibmpress.cm.ejb.session.
OrdersFacadeRemote”);

         Short orderid = 10100;

         …
The javax.naming.InitialContext has to be created to pass the JNDI name of the EJB that is required. The EJB container will provide JNDI binding for the EJBs that are deployed. Both a long and short binding are provided depending upon your need for strong type safety within the server. Here is an example for the two interfaces, both remote and local:
00000014 EJBContainerI I CNTR0167I: The server is binding the
OrdersFacadeRemote interface of the OrdersFacadeImpl enterprise bean in the
ClassicModelsSessionEJB.jar module of the ClassicModelsDataEAR application.
00000014 EJBContainerI I CNTR0167I: The server is binding the
OrdersFacadeRemote interface of the OrdersFacadeImpl enterprise bean in the
ClassicModelsSessionEJB.jar module of the ClassicModelsDataEAR
application.
The binding location is: ejb/ClassicModelsDataEAR/ClassicModelsSessionEJB.jar
/OrdersFacadeImpl#com.ibmpress.cm.ejb.session.OrdersFacadeRemote
00000014 EJBContainerI I CNTR0167I: The server is binding the
OrdersFacadeRemote interface of the OrdersFacadeImpl enterprise bean in the
ClassicModelsSessionEJB.jar module of the
ClassicModelsDataEAR application.
 The binding location is:
ejblocal:ClassicModelsDataEAR/ClassicModelsSessionEJB.jar
/OrdersFacadeImpl
#com.ibmpress.cm.ejb.session.OrdersFacade
00000014 EJBContainerI I CNTR0167I: The server is binding the
OrdersFacade interface of the OrdersFacadeImpl enterprise bean in
the ClassicModelsSessionEJB.jar module of the
ClassicModelsDataEAR application.
The binding location is:
ejblocal:com.ibmpress.cm.ejb.session.OrdersFacade
Remember that for the local interface you didn't need to use this binding; the server was able to identify the correct EJB and inject it for us. After you have the correct binding you can run the test servlet as shown in Figure 3.9.
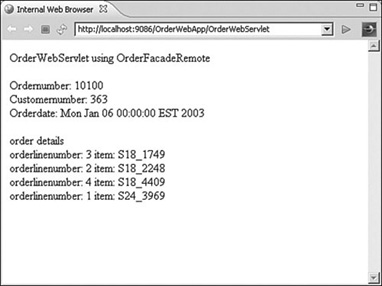
Figure 3.9 Test servlet using remote interface
Conclusion
Whew! This chapter covered a lot of material. Hopefully, it has provided the basis upon which you can start to define your own persistence strategy and how that fits into your overall architecture. Know that there is no rights or wrongs—well, actually, there are a lot of wrongs, but usually not until you get to implementation. At this point the fact that you are defining an approach that will get shared within your development team and across your organization is a big step in the right direction.
 Links to developerWorks Articles
A3.1 DeveloperWorks Technical Journal Tired of Hand Coding JDBC by Roland Barciahttp://www.ibm.com/developerworks/websphere/techjournal/0510_col_barcia
/0510_col_barcia.html
A3.2 Building EJB 3.0 Applications with WebSphere Application Server Roland Barcia, Jeffrey Sampson http://www.ibm.com/developerworks/websphere/techjournal/
0712_barcia/0712_barcia.html