
Chapter 2 Setting a Standard
Standards are an important concept, but achieving them is probably one of the most overlooked opportunities to improve the quality of software applications. On the surface, standards may seem like a trivial concept, but good application architecture starts with them. You often hear sports analogies about getting back to the basics; in software development these standards are the basics. This chapter covers standards and how to set the right ones for your organization or project and offers some recommendations and ideas for you to build upon with your own standards documentation.
Organizational Standards and Conventions
![]()
I have noticed over the last few years that some topics come in cycles. This may be a result of an ever-changing industry but standards are one of those topic areas that seem to come around every few years for a new set of discussions. Why do we need them? To quote myself in an article that was published in IBM developerWorks in 2007:
“Basically, things that are shared require that everyone who uses them gets along and plays nicely. Convincing organizations that this is a good idea seems to be a constant struggle. We are all bounded by the daily responsibilities of our jobs and the goal of getting projects finished, but it is everyone's responsibility to promote the idea that rules are a good thing. Rules help to promote cooperation, prevent mishaps and misunderstandings, enhance accountability, and enable recovery. That is, assuming we get things right in the first place.…”
The industry recognizes that for any development effort, standards are very important, but achieving them is something we rarely do well. Following well-designed programming standards can result in greater consistency within the delivered code, better quality code, and code that is easier for other developers to understand and maintain. Additional benefits of well-designed and -documented code include a reduced cost of long-term maintenance and the ability to transition artifacts to another team member or team. Before we get too deep in the weeds here, let me define a couple of terms:
• A standard is a minimum set of rules for the way something has to be done.
• A convention is a suggestion for how you might do something. It is the way things are usually done, but it is not necessarily set in stone.
Be careful how you define these terms to your development team. Often we use terms like naming conventions within a set of standards. Obviously you cannot put together a list for naming components that may be developed over the foreseeable future; however, this does not mean that the suggestions you put in place are optional, either. Sometimes these terms are used interchangeably and mean the same thing to the team. This is fine as long as everyone understands the meaning.
Everyone agrees that standards are important, but why devote an entire chapter to them? Because many organizations struggle with coming up with a comprehensive set of standards that can be implemented and, more importantly, enforced by the development side of the organization. If you don't write them down, then standards do not really exist, and you can't realistically expect developers to follow them. You also cannot expect to write them after the fact and have developers change their code to match what you have decided, especially if they are in the middle of a coding cycle. Doing so is not fair to anyone and is definitely not a good use of allocated company funds.
Putting the “Engineering” in Software Engineering
Sometime last year, I heard a well-respected colleague, Tom Alcott, use the phrase, “the use of rigorous software engineering principles” during a presentation of his I was attending. This struck a chord with me because it succinctly described a concept that I had been struggling with for a long time. It seems that day after day, I and others keep chanting this mantra of, “rigorous software engineering principles,” looking for the nirvana of software engineering, when the reality is that reaching perfection in application development is as hard as it is in the metaphysical world.
So how do you reach it? You reach it the same way that other engineering disciplines ensure that things are built and perform correctly—by putting in place standards, codes, and conventions and ensuring that people follow those rules and guidelines as much as possible. Then you physically inspect to be sure things are done right, making changes in the standards as necessary.
You might assume that the recommendation is for architects to actually look at the code that the development team has delivered. If you are thinking this then you are absolutely right. Later in this chapter I talk about the code review process; however, for now understand that this process is not as intimidating as you might expect, but it is something that is non-negotiable. Think of it this way: You wouldn't buy a house without an inspection would you? Then why accept mission-critical software without an inspection?
More often than not, the software you are building costs more than your house, or at least more than mine cost, yet it is almost always accepted on faith that it will run reliably. Maybe it's because the developer's own money isn't the money being spent. I often think that if they did consider it as their own money, IT shops would run quite differently.
Many reasons exist for promoting this type of standardization within your development team. Working on large or even small project teams, we've all been in situations where looking over or even modifying the code of another team member has been necessary. Testing, reviewing, and debugging code that doesn't follow any standards (or your standards) can be a daunting task, even for the best of programmers. How many times has a piece of code been scrapped and rewritten for lack of understanding? I have to admit that I have done this more often than not on projects or with particularity complex APIs.
Because each project is different with widely varying requirements, separating standards from environmental factors and creating a separate document for the development environment setup and configuration is necessary. The types of documents of the most interest are
• Coding standards and conventions: This is the core of the discussion within this chapter—to list out organizational standards and guidelines that can be followed across multiple projects.
• Development environment and setup: Setting up the developer's desktop is usually separate from the initial standards. Each project may have its own set of rules so this document may be specialized for larger projects. Usually there will be a standard set of processes for the setup and use of things like version control.
• Component completion and review process: This area may be part of the initial standards document; however, there is a lot of room here for customization on some projects. Review processes may be more rigorous on those projects that have higher visibility or that have more riding on their success. The team may make a conscious decision to reduce or increase flexibility within the review process.
• Specialized documents: Specialized documents may be created by different teams within the organization. For example, the security team should create a set of documents that outlines good and bad security programming practices. They may want you to test and review for cross-side scripting attacks within your web pages. Accessibility and usability standards may be put into place by HR or UI teams. Ensuring that all web-based applications are useable by screen readers and other tools is important in today's working environment.
Many organizations will have additional documentation standards for their projects. These additional requirements usually revolve around how the project fits within the physical environment, so they are beyond the scope of this book; however, you should make an attempt to fit these recommendations into your own environmental standards.
Standards Documentation
Standards documentation should consist of enough information that developers don't have to struggle to understand how to use the standard; however, the documentation cannot be so rigid that it tries to encompass every possible situation. Although there is much that can be included, a simple list should include the following topics:
• Naming standards and conventions
• Internal documentation
• Logging and tracing
• Exception and error handling
• Project and packaging file structure
• Use of external libraries
• General design guidelines
• Unit testing requirements
• Code completion and review process requirements
This chapter focuses on these topics and provides some guidance on how to handle them. Notice that this list should be geared toward your specific project or organization. Many industry- and language-specific standards should be incorporated into your projects. These can be listed or referenced into your standards whenever necessary, but you don't need to reinvent the wheel. Basic Java best practices and conventions such as the use of string concatenation, or putting more than one command on a single line, are tasks that should be handled during the code review process. They can be documented in an extension document or better yet on a Wiki so that they can continue to evolve with your organization. Take care however, this area could potentially grow to be unwieldy if not managed appropriately and any documented standards then lose their potential do to good.
Naming Standards and Conventions
I don't like to go overboard on any standards, but naming standards are something that can be well defined across an entire organization. For the most part these standards follow the Java standards issued by Sun for Java development. Many of the examples in this book follow the usual Java standard conventions. Common Java naming standards should be followed wherever possible. Of all these types of standards, I think that package names are the most important and will have the most impact on your development effort later in the project. Naming standards are an example of a convention, where some guidance is given, but flexibility is also required in how the convention is put into use within the project.
Packages
Package naming is something that should be well defined across your entire organization. If you have never seen a project where no standards were put in place, then you are lucky. Usually you will just end up with naming structures all over the place, with many developers using the defaults that were provided by the tooling or whatever code they copied their initial program from. When naming a package for classes within your application you might begin with the following structure:
Model: com.<domain>.<department | team>.<appname>.model
Data Access: com.<domain>.<department | team>.<appname>.dao
Business Function: com.<domain>.<department|team>.<appname>.<function area>
Servlets: com. <domain>.<department | team>.<appname>.servlets
Portlets:com. <domain>.<department | team>.<appname>.portlets
Test Classes: com. <domain>.<department | team>.<appname>.test
You can really use whatever structure makes sense for your app. Additional objects may follow a similar naming structure when necessary:
com. <domain>.<department | team>.<appname>.beans
com. <domain>.<department | team>.<appname>.util
com. <domain>.<department | team>.<appname>.objectmanager
JSPs should also follow a package or folder structure within the Web Archive file. This structure would usually be something similar to
com. <domain>.<department | team>.<appname>.jsp
I think it is easy to go either too short or too long on package names, so keep your eye on what developers are trying to do within their structure. You can also add subpackages as you deem necessary. For example, in some of my code I may add a subpackage to determine what type of presentation this object is representing, such as
com. <domain>.<department | team>.<web | portal | mobile><appname>
The main point here is to put some guidelines in place before any code starts to be developed. After a package structure is laid down it is very difficult to refactor your code libraries to adhere to a new structure. A well defined package naming structure also helps in monitoring and trace components at runtime.
Many of these standards are a mixture of what I have found works in projects and the classic Sun Java standards available at http://java.sun.com/docs/codeconv/. Most standards do not go into this level of detail with identifying package names, but specifically for your organizational standards you should for the sake of consistency across teams and projects.
Classes and Interfaces
Class and interface names should be nouns, in mixed case with the first letter of each word capitalized. For example
class MyUniqueClass
Some general guidelines for class naming include the following:
• Keep class names simple and descriptive.
• Use whole words.
• Avoid acronyms and abbreviations (unless the abbreviation is much more widely used than the long form, such as URL or HTML).
Functions and Methods
Methods names usually describe some action taking place. As such they should be written as verbs describing what action they are going to perform. Methods are written in mixed case with the first letter of the first word in lowercase and the first letter of each additional word capitalized.
calculateInterest();
registerAccount();
getCustomerList();
Variables and Constants
Like methods, all variables should be in mixed case with a lowercase first letter.
int startPosition;
char middleInitial;
String accountNumber;
Variable names should not start with underscore or dollar sign characters in most cases. Sometimes underscores are allowed for internal uses, or if a code generator is used, such as the JET engine (sometimes known as JET2), within the eclipse framework.
Constants should be written as all uppercase with the words separated by an underscore.
static final String LDAP_HOST_NAME = “myldap.ibm.com;”
static final String LDAP_HOST_PORT = 389;
Variable names should be as short as possible yet still be meaningful to the use of the variable. One character variables, except for simple counters or very temporary variables, may be considered, but even then a more descriptive name of what the counter is for may be necessary.
Java Server Pages
JSP page names should follow the same standard as class names using a mixed-case approach with the first letter of each word capitalized.
ViewCustomerList.jsp
UpdateCustomer.jsp
TransferAccountBalance.jsp
You should adapt a strategy for the initial JSP for any particular application if it is necessary. For example, if your application has a specific JSP that is always shown first, then that JSP should be named Main.jsp or Index.jsp, or something equally descriptive to assist with identification. JSP names should be kept as simple as possible, but again keeping the description to something that is recognizable to the casual observer.
Internal Documentation
Internal documentation refers to comments that are actually embedded within your code. This type of documentation serves several purposes. It typifies good programming practices. Being forced to write comments means you have to think about what your code is doing and how to describe it to your fellow programmers or consumers of your code components. It also helps in code reviews or when others have to make a change to code that you originally developed.
Internal documentation is almost always an afterthought, right alongside removing all the System.out lines from your code. Often what comes to mind toward the end of the project is to add comments for the generation of Javadoc for your application or system layer. But internal documentation is way more than just an abstract set of HTML documentation files. Many of the tools available today can leverage these comments within the environment to assist other developers who may be using your components or middleware libraries Figure 2.1 shows how your documentation can be displayed within Rational Application Developer.
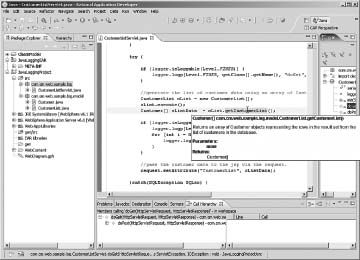
Figure 2.1 Internal documentation
You can imagine the benefit this could bring to a layered architecture where the upper layers are fully dependent upon lower layers to access data and systems. Being able to access the API documentation would be of great benefit.
The information published by Sun about using Javadoc can be extensive, outlining how to place your comments within the code. There may be a need to ensure that some development teams go to an extreme especially when a team is creating an API that will be used by other projects and teams. Many tools are available that can do an analysis on comments and recommend changes; as programmers are forced to redo some of their comments they will become more experienced in inserting documentation on the fly. For example, class specifications should include an executive summary, state information, OS hardware dependencies, allowed implementation variances, and security constraints.
Other sections may also be useful to users of this class. For example, when a method can accept null values, it should be explicitly documented so that others understand how to use it effectively. This level of detail would definitely be useful to any teams using this class.
For our purposes we are sticking to some of the basics. Rigid software engineering standards aside, I think honestly if we can get this level of detail we should consider ourselves lucky.
Class Header Information
Class headers are at the beginning of your class file. They should also include any include sections listed within your class. The comments should outline the use of the class without being too verbose.
/**
* Servlet implementation class for Servlet: JavaLogging
*
* @web.servlet
* name=“JavaLogging”
* display-name=“JavaLogging”
* description=“This servlet displays some sample data and
* illustrates the Java Logging API use within WebSphere”
* <p>
* @web.servlet-mapping
* url-pattern=“/JavaLogging”
* <p>
* @author Joey Bernal
* @version 1.0
**/
Including the @author directive can allow some static analysis tools to break down the errors that are found down by author, but it may also tell people new to the project who to ask if they have questions about some piece of code. Many frameworks need to provide information on how to instantiate a class within the framework. For example, through the use of some factory method that is provided which manages class instances. This seemingly trivial piece of information can make or break how others use your library classes or if they avoid them all together.
Class Methods
For methods, a minimum set of information should be included in the documentation. This includes
• A description of the method
• What parameters the method takes
• Any exceptions that are thrown
• What the method returns
  /**
  * Returns an array of Customer objects representing the rows in the
  * result set from the list of customers in the database.
  * <p>
  * @param                   none
  * @return                  Customer[]
*/
public Customer[] getCustomerList() {
You might also include additional information like known bugs, or any pre- or post-conditions that may be necessary for this method.
Getters and Setters
Getters and setters are specific, single-use functions that allow you to store and access data within your value objects or domain classes. As such they require similar documentation to what you would provide for functions and methods.
  /**
* Returns the value of column CUSTOMERS_CONTACTLASTNAME.
  * in the row represented by this object.
  *
  * @return       Object
  * @throws       SQLException
  */
public Object getCUSTOMERS_CONTACTLASTNAME() throws SQLException {
 return select.getCacheValueAt(rowNumber, 3);
}
Inline Comments
The mention of inline comments probably brings to mind commenting all the constants and variables within the class file, which is correct. Every variable declaration within your code should have a comment.
Guidelines are available for using inline comments (//) as opposed to using C-style comments.
/*
 * This is what I mean by C style comments
 *
 */
You should research these guidelines and determine how important keeping to them is to your effort and how much detail is necessary.
You can use inline comments to document the why as well as the how certain things are done a specific way. In development you can make an infinite number of choices. Understanding why a specific choice is made is very important in understanding the whole component or application. Of particular importance are areas that would be tricky for another reader to understand. This scenario is often difficult for the developer to judge, but think about times you have gone back to your own code and tried to understand what you were trying to do. Anytime you use a control structure such as a loop, if, or try statement is a good time to consider putting in a comment about that structure and its use.
Remember that for commenting to work you have to remove some ego from the situation. During a code review, discussion may occur about a particular approach. This should be an honest discussion with possible debate, but developers should not feel that their every move is being questioned. This will cause more problems later in the project as developers become more resistant to the code review process.
Another school of thought proposes that when inline comments are used to explain some tricky piece of code, that the code itself should be simplified or refactored in some way. This is a valid concern during code review, especially when a particularly nasty set of code is uncovered and becomes indecipherable, even with embedded comments. Decisions have to be made regarding the manageability of that section of code versus the delivery of the overall project.
Logging and Tracing
Logging and tracing is an area of great debate in today's applications. Many different approaches and flavors of logging are available and even more opinions exist as to which approach is the best. Again you should take a one-size-does-not-fit-all approach and understand that different projects require different approaches.
I believe that simpler is better; here are a few key items to look for in a logging approach:
• The approach should be as easy as possible. Developers need to be as verbose as possible with their trace messages, so ease of use is of primary importance.
• You need a good set of different logging levels. Twenty different levels aren't needed; a half dozen will probably do. Again, the goal is to minimize confusion or indecision with any of the developers.
• There needs to be an easy way to change logging levels at runtime. This factor is important because in case of a problem you don't want to have to restart the server, which may make the problem go away.
Wrappers have always been the popular approach when putting together a logging strategy, even to the extent that development teams try and wrapper industry standard logging packages to simplify the approach for their team. I haven't understood this logic completely; our developers are expected to understand complex libraries, such as Spring, Hibernate, JavaServer Faces, and so on, yet people think they might struggle with log4J? I make light of the situation but you can see how misguided the effort can become.
I have to admit that I have changed approaches over the years and have looked at the pros and cons of log4J, WebSphere's JRAS, Apache Commons Logging, and others. Logging in the WebSphere environment can get complicated, with class loading conflicts being at the fore-front of problems that people encounter. Luckily logging can be simplified to a short set of guidelines that can be distributed and enforced across all your WebSphere projects. Starting with WebSphere version 6, the JDK 1.4 version of the logging API is being used within the environment. This approach makes use of the java.util.logging package, which allows consistency and, of course, simplicity in your applications. Another benefit is that there are no additional jar files that are usually sprinkled throughout your packages. Interestingly enough, I sometimes review code that has not one, but two different logging libraries sitting in the lib directory. Often neither is used very effectively.
System.out
I cannot stress enough that System.out messages are not to be tolerated within any code deployed to WebSphere Application server. I would like to be more open minded about its use, but have found that there is no good place to draw the line as to when it would be appropriate or not to use. Developers will always use the System.out log just to get some quick information about a running application; however, the logging approach recommended here is just as quick and can help avoid many of the problems that sometimes creep into production.
I have to admit that as a developer I am guilty of using and leaving System.out messages within my code. When I put on my administrator hat, however, I am merciless about making developers remove any last vestige of this type of logging and instead opt for clean logs that are more easily read by operations. System.out logs are not easy to manage. You can't remove items from the log to make them easier to read, without just turning off the entire log. Also, the System.out log may not be buffered, which could impact performance if you are doing a lot of logging within your application.
Using the Logger
Accessing the logger within your class is simple. Importing the java.util.logging packages provides the access you need to create and use a logger within your class.
…

import java.util.logging.Level;
import java.util.logging.Logger;

…

public class CustomerListServlet extends javax.servlet.http.HttpServlet {

…
private Logger logger =
Logger.getLogger(“com.cm.web.sample.logging.CustomerListServlet”);

…
In this case I use the package and class name of the class where I am using the logger. I prefer this approach across my entire application. The reason behind using this approach will become apparent later when I talk about the admin console and show how to turn on logging.
You can log using the logp method. Multiple ways exist to log messages, including several convenience methods; however, logp is the approach recommended by WebSphere.
public void logp( Level level,

String sourceClass,
String sourceMethod,
String msg,

Object param1)
Log a message, specifying source class and method, with a single object parameter to the log message. If the logger is currently enabled for the given message level then a corresponding LogRecord s created and forwarded to all the registered output Handler bjects.
The parameters are as follow:
level One of the message-level identifiers; for example, SEVERE
sourceClass Name of class that issued the logging request
sourceMethod Name of method that issued the logging request
msg The string message (or a key in the message catalog)
param1 Parameter to the log message
The primary advantage of using logp is that it allows the use of WSLevel logging levels within your application. It also allows message substitution parameters, and class and method names in the log entry, which are important for knowing where the problems may be occurring within your code. You can actually log a message with the following:
if (logger.isLoggable(Level.SEVERE)) {
 String str = “This is a SERVRE message”;
logger.logp(Level.SEVERE, getClass().getName(), “doGet”, str);

}
Performing a check to see whether the logging level is enabled using the isLoggable method is also recommended. Doing so helps to avoid generating logging data that will not be used. In this case you avoid generating a String object that will never be used, but that will have to be garbage collected, possibly degrading system performance.
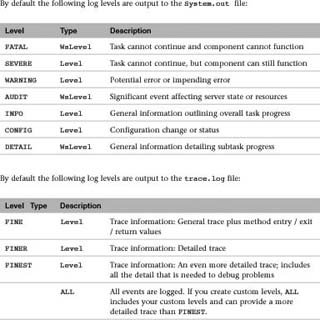
Logging Levels
The Java Logging API provides several levels for outputting different types of information to your logs. WebSphere Application Server provides a couple of additional levels on top of these levels. In total there are 10 logging levels in addition to the management levels OFF and ALL. These management levels would not normally be levels that the development team would have to worry about. The WebSphere InfoCenter gives some definitions for each of these levels and what they would be used for:
OFF No events are logged.
You can decide for yourself which levels make the most sense for your team or project. The preceding list may include too many levels for most developers to follow appropriately without either their having a lot of experience, or having several examples of different logging levels available so they can choose the right level to use. I suggest narrowing down the levels to something more reasonable. The following list defines a reasonable set of logging levels that can be described with concrete examples:
   Level.SEVERE
   Level.WARNING
   Level.INFO
   Level.CONFIG
   Level.FINE
   Level.FINER
   Level.FINEST
By default WebSphere usually sets all loggers to the INFO setting. Because any level includes messages that are at a higher level this will also include messages of type WARNING and SEVERE. Generally you want this type of information to display anyway so you can be informed of something bad happening within your system.
Logging of type SEVERE is reserved for big problems within the application. These would generally be exceptions that are thrown within the application. Exception handling is covered in the next section, but the actual logging of exceptions is one of the most common uses of a logging framework.
}catch(SQLException SQLex) {

if(logger.isLoggable(Level.SEVERE)) {

logger.logp(Level.SEVERE, getClass().getName(), “doGet”, “Servlet failed: “ +
SQLex.getMessage());
logger.logp(Level.SEVERE, getClass().getName(), “doGet”,
SQLex.getStackTrace().toString());

}

//something bad happened, so display error jsp.
nextJSP = “WEB-INF/com.cm.web.sample.log.jsp/Error.jsp”;

}
The preceding example not only logs the exception but also provides the end user with an error page that allows the user to continue with the application or try again later.
Logging of type INFO is generally simple. As an example it can be used to tell you that an object has been instantiated or initialized. The INFO level could also be used to show progress on long-running tasks or processes. This level does not generally need to be a type of problem, but can track progress within the application or system.
if (logger.isLoggable(Level.INFO)) {
logger.logp(Level.INFO, getClass().getName(), “init”, “initalized”);

}
You can specifically set the CONFIG logging level to see whether any parameters are set incorrectly within your application. Usually external systems such as databases or data sources, LDAP, or web services are different for each environment. It is not unheard of for parameters to not be changed as an application is moved through the deployment chain from development to QA to Stage and finally to production.
if (logger.isLoggable(Level.CONFIG)) {

logger.logp(Level.CONFIG, getClass().getName(), “initializer”, “DataSource Name”,
dsName);

}
Providing specific logging for these parameters can be very useful in situations where you are not sure that something is set correctly.
Method-Level Timers
Trace-level logging should include some level of timing data, at least at the method level. Complex parsing or calls to remote or external data sources should also include their own timing data. Is this extra work? You bet! Is it worth it in the long run? Absolutely! I can't count the number of times I wish I had this type of data. Take a little care to ensure that this data is only calculated when a very detailed level of tracing is turned on, otherwise you are building slow production performance into your system.
Generally you should use a tracing level of FINE for this level of logging. You can make good use of the tracing levels FINE, FINER, and FINEST, depending on the problem that you are facing. Timing traces are an example of FINE level tracing. Timing traces are used to see how fast requests are processing through the application. At the start of each method you can initiate some values and output the fact that the process has entered the method.
long start = 0;
if (logger.isLoggable(Level.FINE)) {

start= java.lang.System.currentTimeMillis();
logger.logp(Level.FINE, getClass().getName(), “init”, “Entering: “ +
NumberFormat.getNumberInstance().format( start ));

}
This trace would be output to the trace.log and would look something like the following:
[12/16/07         15:16:39:515         EST]        0000002b        CustomerListS        1
com.cm.web.sample.log.CustomerListServlet doGet Entering: 1,197,836,199,515
At the end of each method a follow-up entry would calculate and display the result of timing data.
if (logger.isLoggable(Level.FINE)) {

 long finish = java.lang.System.currentTimeMillis();
 long total = finish - start;
 logger.logp(Level.FINE, getClass().getName(), “init”, “Exited: “ +
 NumberFormat.getNumberInstance().format( finish ));
 logger.logp(Level.FINE, getClass().getName(), “init”, “Time spent: “ +
 NumberFormat.getNumberInstance().format( total ) + “milliseconds”);

}
This code would display data in the trace.log similar to the following:
[12/16/07 15:16:39:750 EST] 0000002b CustomerListS 1
com.cm.web.sample.log.CustomerListServlet doGet Exited:1,197,836,199,750
[12/16/0715:16:39:750 EST] 0000002b CustomerListS 1
com.cm.web.sample.log.CustomerListServlet doGet Time spent: 235 milliseconds
You have lots of opportunities to improve the set of standards your organization requires. For example, you may want to build auditing functionality into your applications. This feature may provide for an AUDIT level message to output to the logs whenever a process or method takes longer than some set threshold. This is especially important when you are dependent on a back-end system such as a database or web service. You can log the event along with the query itself to understand when and where some problem took place. I don't recommend using this approach everywhere because just generating the time values and performing the comparisons could become expensive if used too extensively. However, this approach may be good for potential hot-spots within the application where you may expect some performance issues, and will certainly help when your project moves into performance testing.
Working with Logging and Tracing
This type of logging offers several benefits, one of which is the ability to configure logging from within the admin console. Loggers are automatically displayed within the admin console Diagnostic Trace Service (see Figure 2.2) settings area. Using a package name approach can greatly increase the ability to turn on and off loggers at the right scope.
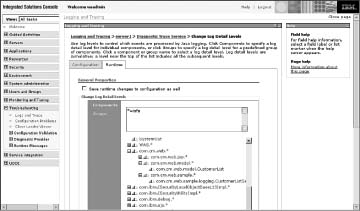
Figure 2.2 Admin console trace services
Turning on too much logging (see Figure 2.3) can cause an avalanche of information into the logs that will quickly overwhelm anyone trying to get usable information about a problem. The better approach is to selectively turn on logging for the potential problem area or to turn it on more generally at higher levels until you narrow down the problem area and can turn on full tracing to a deep analysis.
You can change logging levels on the fly using the admin screen. Click on the package you want to examine to set the appropriate levels. This approach is invaluable when diagnosing a problem in a running environment where you suspect that a restart would mask the problem, or make it go away for a while.
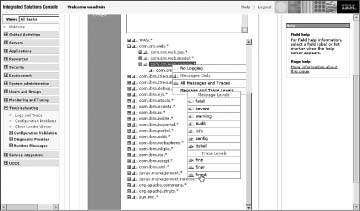
Figure 2.3 Setting log levels
Too Much Logging?
One issue with logging is that sometimes it can be too much—or can it? In the simple samples of code in this section, the logging actually takes more effort than the code doing actual business logic. But this probably won't ever be the case in real life, unless all you are doing is displaying table data and nothing else. But the reality is being verbose with your code should be a good thing. If the code is well formatted and the internal documentation is verbose enough, then code becomes more readable and maintainable, both during development and at runtime.
Good logging standards should be one of the basic building blocks in the framework of your architecture. Imagine if you were building a house and instead of putting a stud up every 12 or 16 inches, the builder decided to only put them up every once in a while? Luckily, people build houses better than we build software, because otherwise your house would never pass inspection and never be allowed to go beyond the framing stage. Some developers are naturally more verbose than others, but there has to be some minimum standards, or building codes if you will, to ensure your application can withstand the high winds and rain that we have to plan for.
Why Not Use Aspects?
Aspect-oriented programming is a development approach that attempts to separate many of the routing and repeating parts of development into their own set of objects. AOP specifically focuses on topics of a cross-cutting concern, or those items that cut across the entire development effort. Logging is one of those cross-cutting concerns. It is something that we do everywhere and not specific to any one part of the code. Whenever the discussion starts to focus on aspects the discussion always turns to logging, mainly because it is the most obvious example of a cross-cutting concern with any application. While this is interesting I don't believe I can get the same type of detail needed by relegating logging to a different set of layers. I believe that logging and tracing have to be built into the system to get the maximum detail.
Unless you have been at the back end of a project that is having trouble in production, understanding how important this standard really is may be difficult. Aspects can play another role in instrumentation of code that can be very powerful.
Exception and Error Handling
Exception handling is a topic that is probably even more controversial than some of the other topics discussed in this chapter. I don't have any silver bullet solutions regarding this topic, but I can offer guidance for some decisions for this part of your project. Much of the debate and discussion around exception handling revolves around two specific areas—handling exceptions where they occur, or throwing them up through the call stack.
Checked Versus Unchecked Exceptions
More often than not I agree with the idea that unchecked or runtime exceptions should never be caught. If you are not sure of the difference between checked and unchecked exceptions then you need to open a programming book and dig in. The general idea is that unchecked exceptions are things you should be looking for in your code anyway, such as a null pointer or an array out of bounds. Checked exceptions are things you can't really do anything about, such as an out-of-memory error
So with these basic definitions in mind, you should only throw checked exceptions within your code, and only those things that you can reasonably expect the calling code to handle—Of couse any errors that the calling method might expect from your code should be documented.
I do not like the idea of building large custom exception libraries within your application. This technique has always seemed counterintuitive to me when trying to reduce the bulk and complexity of an application. Each layer should only worry about the calling layer and what it might be able to do with a thrown exception. Letting upper layers determine whether the calling layer can reasonably handle an exception or will need to re-throw it is beyond the scope of the lower layer designers. From there is the calling layer's responsibility to determine whether it can actually handle the exception or needs to throw it higher up the stack.
Think about what the calling method may be looking for. If a method passes a null parameter and gets back a null result then it should be expecting to handle that exception and do some internal value checking. If you are within a middle layer it might be your responsibility to notify the calling program that it has passed you a null when you know that will cause problems.
You have probably heard it before but it is worth saying again, because I see it time and again when I do code reviews for customers:
Never hide an exception!
Hiding exceptions is asking for trouble, and then not wanting to know about it. If you do not know what I mean by exception hiding take a look at the following code example:
} catch (SQLException SQLex) {
  //Do nothing here.

}
In this case I caught the exception, a SQLException, and then did nothing, just kept running my program. Undoubtedly something is going to crash during this request and more than likely it will end with an ugly-looking error message to the end user requesting this data. Don't catch java.lang.Exception except in the presentation layer of the application.
} catch (Exception ex) {
Many people will disagree and say not to catch general exceptions at all, but I think that in the presentation layer you have a responsibility to ensure that your end users receive generic error messages, rather than a stack trace on their screens, even if the prettier message is fairly useless.
The next point about handling exceptions, especially in the upper layers of your code, is to do something responsible with them.
}catch(SQLException SQLex) {
if (logger.isLoggable(Level.SEVERE)) {

logger.logp(Level.SEVERE, getClass().getName(), “doGet”, “Servlet failed: “+
SQLex.getMessage());
logger.logp(Level.SEVERE, getClass().getName(), “doGet”,
SQLex.getStackTrace().toString());
}

//something bad happened, so display error jsp.
nextJSP = “WEB-INF/com.cm.web.sample.log.jsp/Error.jsp”;

}
Notice in the preceding code snippet the catch block changes the display JSP to provide an error message to the end user. More than likely when something bad happens we don't get any returned data and the JSP would end up with an empty data set for display. An alternative approach is to add some handling code in the display JSP to handle an empty data set.
The possibility exists that the logging code itself may throw an exception. Additional wrapping of a try/catch may be necessary to avoid this problem.
}catch(SQLException SQLex) {

try{
if (logger.isLoggable(Level.SEVERE)) {

ogger.logp(Level.SEVERE, getClass().getName(), “doGet”, “Servlet failed: “ +
SQLex.getMessage());
logger.logp(Level.SEVERE, getClass().getName(), “doGet”,
SQLex.getStackTrace().toString());
}

//something bad happened, so display error jsp.
nextJSP = “WEB-INF/com.cm.web.sample.log.jsp/Error.jsp”;

}catch(…) {

}
This is especially true when you are trying to close resources such as a data connection. This may seem like overkill, but it has happened time and again. The approach you use depends upon your level of comfort, your timeline, and the skill of your development team.
Project and Packaging File Structure
Some basic guidelines for packaging structure are necessary for ensuring consistency across multiple applications and projects within the organization. Without these initial guidelines, everyone will do his or her own thing. Deployment teams within large organizations indicate that often every single application has its own deployment quirks because the teams all took different approaches to packaging.
Actually listing out the directory structure for how applications will be packaged within your environments might be useful. This list would include JAR, WAR, and EAR files to ensure a standard for everyone to follow. In addition, be sure to document specific requirements; for example, the location of JSP files within the Web Archive. The following are some guidelines for project packaging:
• JSP files should reside in a folder that maintains the package naming structure of the application.
• JSP folders should reside within the WEB-INF folder in the WAR file for security purposes.
• The EJB JAR modules and Web WAR modules comprising an application should be packaged together in the same EAR module.
• Utility classes used by a single Web module should be placed within its WEB-INF/lib folder.
• Utility classes used by multiple modules within an application should be placed at the root of the EAR file.
• Utility classes used by multiple applications can be placed on a directory referenced via a shared library definition.
Many teams are looking for additional guidance in how to design applications for proper packaging. I recommend looking to the development team to see how they are doing things now, and how they can be changed for the better. The more you involve the people who actually perform this function the better off your projects will be.
Using External Libraries
The use of third-party and open source libraries must be handled a little differently from other standards within your organization. The main challenge is that trying to guess at all the requirements your development teams may encounter is simply too hard. As such listing all the libraries they may need is difficult. The two schools of thought on the matter are as follow:
• Option 1: Let the application developers package their third-party libraries within the archive file for deployment.
• Option 2: Try to build out shared libraries that everyone can use and depend on.
The reality is probably somewhere in the middle, but personally I like to know what the developers are using and why, even if it does end up packaged in a WAR or EAR file. Logging APIs is a perfect example. Without a little oversight more logging libraries and copies of the same set of libraries will sneak into your system, causing you to lose the control you so nicely put in place earlier in this chapter and possibly causing unexpected class loading conflicts.
One cause of this proliferation of libraries may be the developers' lack of knowledge or misunderstanding of what features are already available either through WebSphere itself or currently deployed shared libraries within the system. WebSphere shared libraries (see Figure 2.4) help reduce the number of libraries within a system by allowing multiple applications to use them.
Versions of specific libraries should be standardized once they are used within the system. You don't need every team using a different version of some function. Occasionally, a team may need to use a specific version of an API, but it is probably not the case for all your teams. Special approval can be made on a case-by-case basis to package a particular version with the application if necessary. The key point is to be aware of what libraries are being used by your applications. Understand and document what is being used and why, so you are not surprised when problems occur.
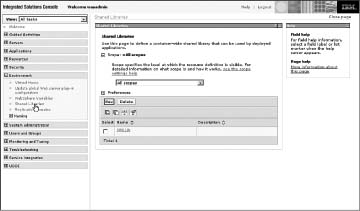
Figure 2.4 WebSphere shared libraries
When a team makes a request to use a library, the architecture or governance team should be ready to respond quickly. Development teams do not have time to waste—time is of the essence. Remember you are there to serve the development team, not the other way around, so a quick response, discussion, or approval will ensure that the next request follows the same channels and the development team does not try and circumvent the system.
Unit Testing Requirements
![]()
Unit tests are one of those line items I see on every project plan, but that rarely get performed, mostly because they are ill defined by the industry as a whole. We like to talk about unit testing. Often unit testing is described as that magical thing that developers do right before the code moves to another stage in the project, like Q/A or UAT. Because we continue to discuss unit tests (real or imagined) in our projects, it must mean that we think it is an important topic, an important line item that we can use to improve the quality and reliability of our code. If only we knew the half of it!
Most people who are involved with software projects of any type understand the need for good testing at all levels. Heck, for that matter, any user who has ever had to deal with a buggy piece of software can understand the need. Testing is designed to catch problems before software ships or a system goes live. In some cases releasing buggy software can annoy the user and may result in your being labeled a bad programmer or your company identified as one who produces bad software. In more extreme cases, a buggy piece of code can result in lost revenue to a company, or may even be life threatening.
You need to understand what unit testing is used for—to remove bugs. What is a bug? Sometimes this definition is difficult to pin down. In general, any function that returns incorrect results could be considered a bug. But in most software products, this definition includes any action or inaction that does not comply with known requirements. Rarely are the product requirements written to incorporate every possible input and output combination, so in many cases developers have to make do. Some obvious and not-so-obvious cases that developers try to handle when building a part of the application can include
• Not returning incorrect results that could be interpreted as correct when input parameters are not entered correctly.
• Null or blank entries in a form.
• Incorrect entries in a form.
• Handling purposeful, malicious entries in a form. This form of security testing will not specifically be discussed here.
• Testing a piece of functionality many times with similar input data to ensure that results are consistent.
• Entering invalid input and data to ensure that errors and exceptions are handled gracefully and explanations are useful to the user.
Many of these types of tests are not enumerated within the requirements or test scenarios and are often something that the developer just assumes he or she must do. In addition, nonfunctional tests must often be performed, which includes making sure the results of a test are not only accurate for one user, but returns consistently accurate results as many users access the same code, or that the results displayed to each user of the system are correct for that user only. Developing an application that works correctly at this level can be a difficult task. For example, consider the following:
In order to improve performance of an application the team decides it will cache the data being used as much as possible, which results in the ability of the application to handle more users as load and scalability tests are performed. However, some users get the wrong results on their screen. Perhaps they are seeing the results from the user before them. This may be disastrous, for example, in the case of payroll forms or personal information.
You see from this simple example that a balance needs to be achieved between performance and functional correctness; however, without testing this balance can never happen.
Many types of testing can be performed within software development. Figure 2.5 illustrates a realistic view of the types of testing generally defined as necessary on a development project.
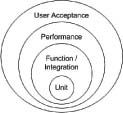
Figure 2.5 Levels of development testing
Different project teams often put a different emphasis on some areas. Many projects focus more on performance while others may not give performance a second thought, at least not until the site is live. Chapter 8, “Catching and Performance,” focuses on performance testing. Most of the layers you should readily understand, but for clarity's sake I enumerate them here:
• Unit testing: You can think of a unit as the most basic structural element of a system. This general definition is the one mostly followed in this book. In many languages a unit could be defined as a function or a method, but it also may be thought of as a bit broader, such as a unit of functionality or behavior.
• Function/integration testing: Functional testing, sometimes called black-box or closed-box testing, evaluates the results or data derived by a system without regard to how the system is built. For most web-based applications, functional testing assumes that a user enters data into a page and evaluates the returned results. While on the surface this testing is similar to unit testing, the scope is normally set at a business function level. Integration testing means testing combined components in a single environment, such as hardware and software components, including different pieces of an application that are designed to work together. These two types of testing often work hand in hand and so are together in this circle.
• Performance testing: Performance testing is not so much about a single user's results as the ability to provide the correct results to many users within a given time period. Ensuring speed and minimizing system overhead leads directly to the ability of a system to handle a large number of users. This characteristic is commonly known as system scalability. Performance testing and tuning is a fine and sometimes dark art and requires skills both in development and infrastructure to achieve good results.
• User acceptance testing: User acceptance testing means ensuring that the system meets or exceeds end user expectations. Even the most finely tuned or best-working system is worthless if it doesn't do what the user expects or is too hard to use. Ideally, test scripts are built based on the original requirements of the system to see whether the end product matches what was originally defined.
Whether you perform all of these types of tests, or even add more testing layers, it is important to know what you are expecting to gain from a testing cycle. Without this end result in mind you are wasting time and money and possibly jeopardizing the success of the product.
What Is a Unit?
You can typically consider a unit as the first link in the chain consisting of several types of tests. This testing provides a way for developers, within the comfort of their own world, to assure themselves that the smallest unit or component of a system functions as expected. This assurance also provides the base for additional higher-level testing as the system moves away from the center circle in Figure 2.5 to a broader, more aggregate view of the system.
A simple definition of unit testing is the ability to test the smallest unit or component of code as possible. While it is the essence of what you want to accomplish, it can be a little misleading. Most of the testing that occurs within a project, if testing occurs at all, happens in large chunks at the functional or user acceptance level. Looking behind the glass one can rationalize using more fine-grained ways to validate the behavior of code. If assurance can be gotten that the behavior of individual components is correct, then it stands to reason that as those components are brought together, or integrated, then they will function correctly at the higher level.
So unit testing can actually make code better and ensure that a component behaves as expected. But there is more to it than that. A pleasant side-effect of creating and running unit tests on a continuous basis is that it can help ensure that ongoing changes made to code don't have the unexpected effect of breaking earlier working pieces.
On some projects I have developers write out manually the list of tests that their code should be tested with, before they start coding. This step is the minimum developers should do for any piece of functionality they are coding. It also helps ensure that the developer understands the requirements correctly, and the list can feed into later QA or UAT type test scenarios.
Realistically, our components are too modular to be considered a single unit. However, going to the other extreme and testing at the method level may be too fine grained. The approach walks a fine line in trying to determine what to test, and how to get valid results.
The Trouble with Web Testing
Before the web and server-side programming, the definition of unit testing was not as difficult to pin down. Most applications had a main() method of some type that could be run on the command line. Building unit tests that had knowledge of what the application was trying to do was a simple matter of building test classes that ran the program, with the distinct advantage of being able to see inside the code. With the advent of the web and J2EE programming, components now run inside a container that creates or instantiates classes and then calls specific methods as required. In addition the container provides objects of its own as parameters to methods that contain the input and output values for processing.
Writing tests for web application code from within a main() method is often worthwhile. Much of the business logic within a web application can still be called from outside the web container. Much time can be saved by testing as much as possible outside the container or using a mock framework of some sort to test these components. You can also leverage in-container testing frameworks like Cactus to help you accomplish your goals.
Agile Approaches
Agile developers are some of the biggest proponents of unit testing and as such many support the idea of test-first development. Test-first development is a great way to ensure that a developer fully understands what he or she is creating before actually coding it. Generally, this testing process can be automated using a testing framework such as JUnit. Of course, all this testing can come at a price.
Not all testing frameworks are created alike, so developer training or some system configuration may be necessary before test-first development becomes seamless within your environment. Also, if the development effort is taking advantage of an application framework such as a portal or e-commerce server, the testing framework may not integrate well within the environment. Finally, to effectively conduct test-based development the entire team needs to be skilled enough to design and code appropriately.
Many developers or architects when initially confronted with the idea of unit testing and JUnit are convinced that it is the way to go. I know that I have spent many hours looking for the right approach to unit and in-container testing. While these strategies are valid, one person learning a new approach versus trying to get an entire team to adopt a strategy and perform it correctly are two different things. Be cautious in this area and be sure that what you propose is doable and will add value to the project.
Code Completion and Review Process Requirements
The best way to ensure that quality components are being created is to perform a peer review on the code. This is also a time and place for your manager or team lead to understand the work and be confident that this code is ready to deploy. The steps involved in declaring code complete is brief: Before a developer declares code complete, usually he or she checks the code in and tells the project manager or team lead that the code is finished. The PM then checks that component as complete on his or her list and the developer moves on to another function.
What is interesting to me is that we wonder why we have problems. Really, in what other job can we get away with declaring the job finished without someone checking our work or questioning how we might have performed some actions? This chapter provides some guidelines for setting up standards and rules for development, but more important is checking that these standards are being followed.
I personally am not a big fan of checklists. You may not believe me because of my focus on standards, but documentation for documentation's sake is never fun or productive. Rather than checklists I suggest guidelines. These are things that a developer can do a follow-up check with to ensure that they won't get flagged during a code review. Performing a code review, by the way, is the first thing the PM or team lead should ask to do on the completed code. Here is a list of potential guidelines:
• The code is really complete. No stubs, No partial have-to-do's like removing System.out lines or adding comments.
• Some initial static analysis has been done, obvious things are taken care of such as hard-coded properties, and exceptions are handled appropriately.
• Third-party and open source libraries have been disclosed and approved for use within your application.
• The code has been compiled, unit tested, and deployed to a test server for some basic and documented functional tests, depending upon your team approach.
Your team should feel free to come up with a more robust set of completion requirements that outline in detail the tasks that should be accomplished; however, the actual code review process will flag most of those items. Having a documented list of requirements could potentially save time during the review process if the code that is presented has a lot of problems. You will have to weigh the effort involved in enforcing a set of requirements against the skill-level of your development team.
Code Reviews
Code review is a dirty word for many of today's development teams. I'm sure it has to do with the word review. Being reviewed and having others point out your shortcomings is never a pleasant experience. We should change this name to something that is more acceptable to people. Or maybe we should just get over it and embrace the idea that reviews are about the quality of the product, not the quality of the developer.
Many engineering roles have different levels of experience, usually an apprentice and a journeyman or licensed status. The same is true of software engineers: Some developers are more experienced or more productive than others. Code reviews help with the process of becoming a better developer, not only in the standards category, but through discussion about different approaches within the code. Developers should look at the code review process as a learning process, not a judgment on his or her ability. It is a chance for more experienced members of the team to pass on their experience or suggestions and a chance for everyone to learn from the group experience and build their skills.
Ideally code reviews are scheduled throughout the development cycle. Early code reviews should be scheduled after a developer has a working model of the code, and then, of course, a final review should be scheduled before the code is signed off on. This initial early feedback enables good communication between team members and enables the team lead or architect to understand how architectural decisions are being implemented. It also enables some feedback for previously made architectural decisions as well as clarifications if something is not well understood.
I often leave it to the developers to schedule code reviews during the development cycle. I will suggest that they should schedule a review in the next week or so to make sure their approach is fully understood. PMs can shoulder this burden to ensure it gets built into the project plan. The one deadly sin is blowing off the reviews because of lack of time. Any time spent now will multiply the time saved later. This concept has been proven again and again and so should not be a topic for debate. Developers are notorious for putting off code reviews as long as possible, asking for a little more time to just finish this one section.
The Danger of Putting Off a Review
On a previous project I took over as technical lead during the switch from the design to the development phase. One particular individual on the team was very difficult to get along with. As lead it was within my rights to remove this person and find a replacement, but I was young and thought that action would be extreme. I had been a team and squad leader in the army so I figured I could handle my share of problem team members. My solution was to give this person a small but important piece of the application where he could work in some isolation without bothering the rest of the team.
From time to time I would check on how things were going, always getting back the right response that everything was moving along nicely. Close to the end of this phase I started to dig a little deeper and some warning flags started going off that all was not as it should be. I suggested we do a code review, which was received very negatively. After a bit of a struggle I was able to force a code review with this individual and some of the leads of the team to discover disastrous results.
The majority of the reviews agreed that the code was nowhere ready to run and some parts had to be completely redesigned. I was forced to take a senior programmer off another piece of functionality and have him work with this person to rewrite the code. This example actually illustrates two wrong moves:
• Moving a problem developer out to a side feature without facing the problem head on
• Not reviewing everyone's progress
Like I said, I was young! I personally prefer the brown bag approach where a scheduled lunch hour is used to perform the review. The truth is one hour is never long enough, so schedule several hours and let people leave early if necessary rather than try to extend a meeting that is going long. Providing food such as pizza or takeout is usually enough of an incentive to get everyone who is required to attend to show up on time.
You Don't Have to Know Java for a Code Review
Okay, so the preceding statement is only slightly true—but you don't have to be an expert. Undoubtedly, you have Java experts on your team who can provide the expertise to uncover any problems. However, everyone learns a little something at group code reviews. Embarrassment should never be the focus of a review for anyone; that is, if you ever expect to have more than one review for that developer.
The idea of a code review is to let the specific developer walk you through the code process step by step. Start with gaining an understanding of what he is trying to accomplish, then look at code files to understand how he has implemented this functionality. You might make several passes through the application, first for general understanding and then to review more mundane items like adherence to standards, handling of exceptions, logging, and so on.
One item to determine is who should actually attend the code reviews. My approach is that this is part of the technical team's development process, not a step-out review. Management should not generally attend unless they are involved at that level. Having them there only puts pressure on the person who is being reviewed and side-tracks the conversation to other topics. PMs might attend for some of the review but not generally be involved in the technical part of the discussion. Business analysts might also be involved in some part of the review to ensure that the initial requirements were understood and followed within the application.
Communicating the Vision the Wiki Way
Coming up with a reasonable way to socialize, communicate, educate, maintain, and enforce the standards you define within your organization is not usually a problem for small teams. However, within the context of a large organization these tasks can be difficult. Socializing the message to development teams is just the first step. The next part of the process is project enforcement and incorporating a feedback loop to incorporate improvements and additions.
One way to accomplish all these goals are through wikis. They are becoming increasingly popular to accomplish the goal of creating a community around standards. This approach enables you to publish and then maintain standards in a readily consumable manner. PortalPatterns.org (see Figure 2.6) is publicly available and can be used as an example site.
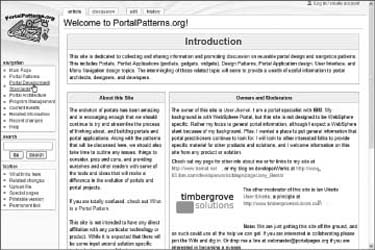
Figure 2.6 PortalPatterns.org
This site's goal is to build community and agreement on standards as well as provide examples for organizations looking to build their own set of standards.
Conclusion
This chapter outlined the importance of setting standards within your organization or project. I am not able to provide complete answers to every nuance of what you might need, but the general flavor and type of standards that you need to be successful have been outlined in this chapter. This book just scratches the surface of what you need for many projects within your organization.
If you are asked to put together standards for your organization, I believe it would take a small team of three or four people several weeks of part-time work to come up with a solid, comprehensive set of standards. This is a minimum effort; a comprehensive set will take longer.
As for any of the discussion within this chapter if you disagree with any of my advice, then feel free to call me an idiot and do your own thing. I have always made the point
I would rather you have any standard, maybe even bad ones, then no standards at all. I still believe this today, although more and more I am learning to commit to recommendations based on my experiences with many development teams working on the WebSphere platform.
 Links to developerWorks Articles
A2.1 WebSphere Developer Technical Journal: Comment Lines, With Great Power comes Great Responsibility:http://www.ibm.com/developerworks/websphere/techjournal/
0712_col_bernal/0712_col_bernal.html
A2.2 Getting Started with Unit and Component testing using IBM Rational Tools:http://www.ibm.com/developerworks/edu/ws-dw-ws-testing.html
Reference
WebSphere Application Server InfoCenter: http://www-306.ibm.com/software/webservers/ appserv/was/library/
Portal Patterns: http://www.portalpatterns.org