
You can use the methods of the Graphics class to create simple drawings. Those methods are sufficient for simple applets and applications, but they fall short when you create complex shapes or when you require complete control over the appearance of the graphics. The Java 2D API is a more sophisticated class library that you can use to produce high-quality drawings. In this chapter, we give you an overview of that API.
We then turn to the topic of printing and show how you can implement printing capabilities into your programs.
Finally, we cover two techniques for transferring data between programs: the system clipboard and the drag-and-drop mechanism. You can use these techniques to transfer data between two Java applications or between a Java application and a native program.
The original JDK 1.0 had a very simple mechanism for drawing shapes. You selected color and paint mode, and called methods of the Graphics class such as drawRect or fillOval. The Java 2D API supports many more options.
You can easily produce a wide variety of shapes.
You have control over the stroke, the pen that traces shape boundaries.
You can fill shapes with solid colors, varying hues, and repeating patterns.
You can use transformations to move, scale, rotate, or stretch shapes.
You can clip shapes to restrict them to arbitrary areas.
You can select composition rules to describe how to combine the pixels of a new shape with existing pixels.
You can give rendering hints to make trade-offs between speed and drawing quality.
To draw a shape, you go through the following steps:
Obtain an object of the
Graphics2Dclass. This class is a subclass of theGraphicsclass. Ever since Java SE 1.2, methods such aspaintandpaintComponentautomatically receive an object of theGraphics2Dclass. Simply use a cast, as follows:public void paintComponent(Graphics g) { Graphics2D g2 = (Graphics2D) g; . . . }Use the
setRenderingHintsmethod to set rendering hints: trade-offs between speed and drawing quality.RenderingHints hints = . . .; g2.setRenderingHints(hints);
Use the
setStrokemethod to set the stroke. The stroke draws the outline of the shape. You can select the thickness and choose among solid and dotted lines.Stroke stroke = . . .; g2.setStroke(stroke);
Use the
setPaintmethod to set the paint. The paint fills areas such as the stroke path or the interior of a shape. You can create solid color paint, paint with changing hues, or tiled fill patterns.Paint paint = . . .; g2.setPaint(paint);
Use the
clipmethod to set the clipping region.Shape clip = . . .; g2.clip(clip);
Use the
transformmethod to set a transformation from user space to device space. You use transformations if it is easier for you to define your shapes in a custom coordinate system than by using pixel coordinates.AffineTransform transform = . . .; g2.transform(transform);
Use the
setCompositemethod to set a composition rule that describes how to combine the new pixels with the existing pixels.Composite composite = . . .; g2.setComposite(composite);
Create a shape. The Java 2D API supplies many shape objects and methods to combine shapes.
Shape shape = . . .;
Draw or fill the shape. If you draw the shape, its outline is stroked. If you fill the shape, the interior is painted.
g2.draw(shape);
g2.fill(shape);
Of course, in many practical circumstances, you don’t need all these steps. There are reasonable defaults for the settings of the 2D graphics context. You would change the settings only if you want to change the defaults.
In the following sections, you will see how to describe shapes, strokes, paints, transformations, and composition rules.
The various set methods simply set the state of the 2D graphics context. They don’t cause any drawing. Similarly, when you construct Shape objects, no drawing takes place. A shape is only rendered when you call draw or fill. At that time, the new shape is computed in a rendering pipeline (see Figure 7-1).
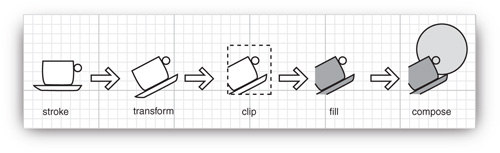
In the rendering pipeline, the following steps take place to render a shape:
The path of the shape is stroked.
The shape is transformed.
The shape is clipped. If there is no intersection between the shape and the clipping area, then the process stops.
The remainder of the shape after clipping is filled.
The pixels of the filled shape are composed with the existing pixels. (In Figure 7-1, the circle is part of the existing pixels, and the cup shape is superimposed over it.)
In the next section, you will see how to define shapes. Then, we turn to the 2D graphics context settings.
Here are some of the methods in the Graphics class to draw shapes:
drawLine
drawRectangle
drawRoundRect
draw3DRect
drawPolygon
drawPolyline
drawOval
drawArc
There are also corresponding fill methods. These methods have been in the Graphics class ever since JDK 1.0. The Java 2D API uses a completely different, object-oriented approach. Instead of methods, there are classes:
Line2D
Rectangle2D
RoundRectangle2D
Ellipse2D
Arc2D
QuadCurve2D
CubicCurve2D
GeneralPath
These classes all implement the Shape interface.
Finally, the Point2D class describes a point with an x- and a y- coordinate. Points are useful to define shapes, but they aren’t themselves shapes.
To draw a shape, you first create an object of a class that implements the Shape interface and then call the draw method of the Graphics2D class.
The Line2D, Rectangle2D, RoundRectangle2D, Ellipse2D, and Arc2D classes correspond to the drawLine, drawRectangle, drawRoundRect, drawOval, and drawArc methods. (The concept of a “3D rectangle” has died the death that it so richly deserved—there is no analog to the draw3DRect method.) The Java 2D API supplies two additional classes: quadratic and cubic curves. We discuss these shapes later in this section. There is no Polygon2D class. Instead, the GeneralPath class describes paths that are made up from lines, quadratic and cubic curves. You can use a GeneralPath to describe a polygon; we show you how later in this section.
The classes
Rectangle2D
RoundRectangle2D
Ellipse2D
Arc2D
all inherit from a common superclass RectangularShape. Admittedly, ellipses and arcs are not rectangular, but they have a bounding rectangle (see Figure 7-2).
Each of the classes with a name ending in “2D” has two subclasses for specifying coordinates as float or double quantities. In Volume I, you already encountered Rectangle2D.Float and Rectangle2D.Double.
The same scheme is used for the other classes, such as Arc2D.Float and Arc2D.Double.
Internally, all graphics classes use float coordinates because float numbers use less storage space and they have sufficient precision for geometric computations. However, the Java programming language makes it a bit more tedious to manipulate float numbers. For that reason, most methods of the graphics classes use double parameters and return values. Only when constructing a 2D object must you choose between a constructor with float or double coordinates. For example,
Rectangle2D floatRect = new Rectangle2D.Float(5F, 10F, 7.5F, 15F);
Rectangle2D doubleRect = new Rectangle2D.Double(5, 10, 7.5, 15);
The Xxx2D.Float and Xxx2D.Double classes are subclasses of the Xxx2D classes. After object construction, essentially no benefit accrues from remembering the subclass, and you can just store the constructed object in a superclass variable, just as in the code example.
As you can see from the curious names, the Xxx2D.Float and Xxx2D.Double classes are also inner classes of the Xxx2D classes. That is just a minor syntactical convenience, to avoid an inflation of outer class names.
Figure 7-3 shows the relationships between the shape classes. However, the Double and Float subclasses are omitted. Legacy classes from the pre-2D library are marked with a gray fill.
You already saw how to use the Rectangle2D, Ellipse2D, and Line2D classes in Volume I, Chapter 7. In this section, you will learn how to work with the remaining 2D shapes.
For the RoundRectangle2D shape, you specify the top-left corner, width and height, and the x- and y-dimension of the corner area that should be rounded (see Figure 7-4). For example, the call
RoundRectangle2D r = new RoundRectangle2D.Double(150, 200, 100, 50, 20, 20);
produces a rounded rectangle with circles of radius 20 at each of the corners.
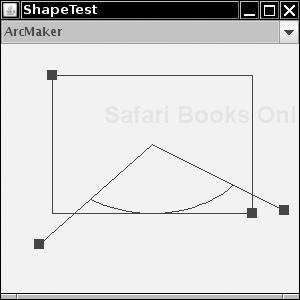
To construct an arc, you specify the bounding box, the start angle, the angle swept out by the arc (see Figure 7-5), and the closure type, one of Arc2D.OPEN, Arc2D.PIE, or Arc2D.CHORD.
Arc2D a = new Arc2D(x, y, width, height, startAngle, arcAngle, closureType);
Figure 7-6 illustrates the arc types.
Caution
If the arc is elliptical, the computation of the arc angles is not at all straightforward. The API documentation states: “The angles are specified relative to the non-square framing rectangle such that 45 degrees always falls on the line from the center of the ellipse to the upper right corner of the framing rectangle. As a result, if the framing rectangle is noticeably longer along one axis than the other, the angles to the start and end of the arc segment will be skewed farther along the longer axis of the frame.” Unfortunately, the documentation is silent on how to compute this “skew.” Here are the details:
Suppose the center of the arc is the origin and the point (x, y) lies on the arc. You get a skewed angle with the following formula:
skewedAngle = Math.toDegrees(Math.atan2(-y * height, x * width));
The result is a value between –180 and 180. Compute the skewed start and end angles in this way. Then, compute the difference between the two skewed angles. If the start angle or the angle difference is negative, add 360. Then, supply the start angle and the angle difference to the arc constructor.
If you run the example program at the end of this section, then you can visually check that this calculation yields the correct values for the arc constructor (see Figure 7-9 on page 531).
The Java 2D API supports quadratic and cubic curves. In this chapter, we do not get into the mathematics of these curves. We suggest you get a feel for how the curves look by running the program in Listing 7-1. As you can see in Figures 7-7 and 7-8, quadratic and cubic curves are specified by two end points and one or two control points. Moving the control points changes the shape of the curves.
To construct quadratic and cubic curves, you give the coordinates of the end points and the control points. For example,
QuadCurve2D q = new QuadCurve2D.Double(startX, startY, controlX, controlY, endX, endY);
CubicCurve2D c = new CubicCurve2D.Double(startX, startY, control1X, control1Y,
   control2X, control2Y, endX, endY);
Quadratic curves are not very flexible, and they are not commonly used in practice. Cubic curves (such as the Bezier curves drawn by the CubicCurve2D class) are, however, very common. By combining many cubic curves so that the slopes at the connection points match, you can create complex, smooth-looking curved shapes. For more information, we refer you to Computer Graphics: Principles and Practice, Second Edition in C by James D. Foley, Andries van Dam, Steven K. Feiner, et al. (Addison-Wesley 1995).
You can build arbitrary sequences of line segments, quadratic curves, and cubic curves, and store them in a GeneralPath object. You specify the first coordinate of the path with the moveTo method. For example,
GeneralPath path = new GeneralPath();
path.moveTo(10, 20);
You then extend the path by calling one of the methods lineTo, quadTo, or curveTo. These methods extend the path by a line, a quadratic curve, or a cubic curve. To call lineTo, supply the end point. For the two curve methods, supply the control points, then the end point. For example,
path.lineTo(20, 30);
path.curveTo(control1X, control1Y, control2X, control2Y, endX, endY);
You close the path by calling the closePath method. It draws a line back to the starting point of the path.
To make a polygon, simply call moveTo to go to the first corner point, followed by repeated calls to lineTo to visit the other corner points. Finally, call closePath to close the polygon. The program in Listing 7-1 shows this in more detail.
A general path does not have to be connected. You can call moveTo at any time to start a new path segment.
Finally, you can use the append method to add arbitrary Shape objects to a general path. The outline of the shape is added to the end to the path. The second parameter of the append method is true if the new shape should be connected to the last point on the path, false if it should not be connected. For example, the call
Rectangle2D r = . . .;
path.append(r, false);
appends the outline of a rectangle to the path without connecting it to the existing path. But
path.append(r, true);
adds a straight line from the end point of the path to the starting point of the rectangle, and then adds the rectangle outline to the path.
The program in Listing 7-1 lets you create sample paths. Figures 7-7 and 7-8 show sample runs of the program. You pick a shape maker from the combo box. The program contains shape makers for
Use the mouse to adjust the control points. As you move them, the shape continuously repaints itself.
The program is a bit complex because it handles a multiplicity of shapes and supports dragging of the control points.
An abstract superclass ShapeMaker encapsulates the commonality of the shape maker classes. Each shape has a fixed number of control points that the user can move around. The getPointCount method returns that value. The abstract method
Shape makeShape(Point2D[] points)
computes the actual shape, given the current positions of the control points. The toString method returns the class name so that the ShapeMaker objects can simply be dumped into a JComboBox.
To enable dragging of the control points, the ShapePanel class handles both mouse and mouse motion events. If the mouse is pressed on top of a rectangle, subsequent mouse drags move the rectangle.
The majority of the shape maker classes are simple—their makeShape methods just construct and return the requested shape. However, the ArcMaker class needs to compute the distorted start and end angles. Furthermore, to demonstrate that the computation is indeed correct, the returned shape is a GeneralPath containing the arc itself, the bounding rectangle, and the lines from the center of the arc to the angle control points (see Figure 7-9).
Example 7-1. ShapeTest.java
  1. import java.awt.*;
  2. import java.awt.event.*;
  3. import java.awt.geom.*;
  4. import java.util.*;
  5. import javax.swing.*;
  6.
  7. /**
  8.  * This program demonstrates the various 2D shapes.
  9.  * @version 1.02 2007-08-16
 10.  * @author Cay Horstmann
 11.  */
 12. public class ShapeTest
 13. {
 14.    public static void main(String[] args)
 15.    {
 16.       EventQueue.invokeLater(new Runnable()
 17.          {
 18.             public void run()
 19.             {
 20.                JFrame frame = new ShapeTestFrame();
 21.                frame.setDefaultCloseOperation(JFrame.EXIT_ON_CLOSE);
 22.                frame.setVisible(true);
 23.             }
 24.          });
 25.    }
 26. }
 27.
 28. /**
 29.  * This frame contains a combo box to select a shape and a component to draw it.
 30.  */
 31. class ShapeTestFrame extends JFrame
 32. {
 33.    public ShapeTestFrame()
 34.    {
 35.       setTitle("ShapeTest");
 36.       setSize(DEFAULT_WIDTH, DEFAULT_HEIGHT);
 37.
 38.       final ShapeComponent comp = new ShapeComponent();
 39.       add(comp, BorderLayout.CENTER);
 40.       final JComboBox comboBox = new JComboBox();
 41.       comboBox.addItem(new LineMaker());
 42.       comboBox.addItem(new RectangleMaker());
 43.       comboBox.addItem(new RoundRectangleMaker());
 44.       comboBox.addItem(new EllipseMaker());
 45.       comboBox.addItem(new ArcMaker());
 46.       comboBox.addItem(new PolygonMaker());
 47.       comboBox.addItem(new QuadCurveMaker());
 48.       comboBox.addItem(new CubicCurveMaker());
 49.       comboBox.addActionListener(new ActionListener()
 50.          {
 51.             public void actionPerformed(ActionEvent event)
 52.             {
 53.                ShapeMaker shapeMaker = (ShapeMaker) comboBox.getSelectedItem();
 54.                comp.setShapeMaker(shapeMaker);
 55.             }
 56.          });
 57.       add(comboBox, BorderLayout.NORTH);
 58.       comp.setShapeMaker((ShapeMaker) comboBox.getItemAt(0));
 59.    }
 60.
 61.    private static final int DEFAULT_WIDTH = 300;
 62.    private static final int DEFAULT_HEIGHT = 300;
 63. }
 64.
 65. /**
 66.  * This component draws a shape and allows the user to move the points that define it.
 67.  */
 68. class ShapeComponent extends JComponent
 69. {
 70.    public ShapeComponent()
 71.    {
 72.       addMouseListener(new MouseAdapter()
 73.          {
 74.             public void mousePressed(MouseEvent event)
 75.             {
 76.                Point p = event.getPoint();
 77.                for (int i = 0; i < points.length; i++)
 78.                {
 79.                   double x = points[i].getX() - SIZE / 2;
 80.                   double y = points[i].getY() - SIZE / 2;
 81.                   Rectangle2D r = new Rectangle2D.Double(x, y, SIZE, SIZE);
 82.                   if (r.contains(p))
 83.                   {
 84.                      current = i;
 85.                      return;
 86.                   }
 87.                }
 88.             }
 89.
 90.             public void mouseReleased(MouseEvent event)
 91.             {
 92.                current = -1;
 93.             }
 94.          });
 95.       addMouseMotionListener(new MouseMotionAdapter()
 96.          {
 97.             public void mouseDragged(MouseEvent event)
 98.             {
 99.                if (current == -1) return;
100.                points[current] = event.getPoint();
101.                repaint();
102.             }
103.          });
104.       current = -1;
105.    }
106.
107.    /**
108.     * Set a shape maker and initialize it with a random point set.
109.     * @param aShapeMaker a shape maker that defines a shape from a point set
110.     */
111.    public void setShapeMaker(ShapeMaker aShapeMaker)
112.    {
113.       shapeMaker = aShapeMaker;
114.       int n = shapeMaker.getPointCount();
115.       points = new Point2D[n];
116.       for (int i = 0; i < n; i++)
117.       {
118.          double x = generator.nextDouble() * getWidth();
119.          double y = generator.nextDouble() * getHeight();
120.          points[i] = new Point2D.Double(x, y);
121.       }
122.       repaint();
123.    }
124.
125.    public void paintComponent(Graphics g)
126.    {
127.       if (points == null) return;
128.       Graphics2D g2 = (Graphics2D) g;
129.       for (int i = 0; i < points.length; i++)
130.       {
131.          double x = points[i].getX() - SIZE / 2;
132.          double y = points[i].getY() - SIZE / 2;
133.          g2.fill(new Rectangle2D.Double(x, y, SIZE, SIZE));
134.       }
135.
136.       g2.draw(shapeMaker.makeShape(points));
137.    }
138.
139.    private Point2D[] points;
140.    private static Random generator = new Random();
141.    private static int SIZE = 10;
142.    private int current;
143.    private ShapeMaker shapeMaker;
144. }
145.
146. /**
147.  * A shape maker can make a shape from a point set. Concrete subclasses must return a shape
148.  *  in the makeShape method.
149.  */
150. abstract class ShapeMaker
151. {
152.    /**
153.     * Constructs a shape maker.
154.     * @param aPointCount the number of points needed to define this shape.
155.     */
156.    public ShapeMaker(int aPointCount)
157.    {
158.       pointCount = aPointCount;
159.    }
160.
161.    /**
162.     * Gets the number of points needed to define this shape.
163.     * @return the point count
164.     */
165.    public int getPointCount()
166.    {
167.       return pointCount;
168.    }
169.
170.    /**
171.     * Makes a shape out of the given point set.
172.     * @param p the points that define the shape
173.     * @return the shape defined by the points
174.     */
175.    public abstract Shape makeShape(Point2D[] p);
176.
177.    public String toString()
178.    {
179.       return getClass().getName();
180.    }
181.
182.    private int pointCount;
183. }
184.
185. /**
186.  * Makes a line that joins two given points.
187.  */
188. class LineMaker extends ShapeMaker
189. {
190.    public LineMaker()
191.    {
192.       super(2);
193.    }
194.
195.    public Shape makeShape(Point2D[] p)
196.    {
197.       return new Line2D.Double(p[0], p[1]);
198.    }
199. }
200.
201. /**
202.  * Makes a rectangle that joins two given corner points.
203.  */
204. class RectangleMaker extends ShapeMaker
205. {
206.    public RectangleMaker()
207.    {
208.       super(2);
209.    }
210.
211.    public Shape makeShape(Point2D[] p)
212.    {
213.       Rectangle2D s = new Rectangle2D.Double();
214.       s.setFrameFromDiagonal(p[0], p[1]);
215.       return s;
216.    }
217. }
218.
219. /**
220.  * Makes a round rectangle that joins two given corner points.
221.  */
222. class RoundRectangleMaker extends ShapeMaker
223. {
224.    public RoundRectangleMaker()
225.    {
226.       super(2);
227.    }
228.
229.    public Shape makeShape(Point2D[] p)
230.    {
231.       RoundRectangle2D s = new RoundRectangle2D.Double(0, 0, 0, 0, 20, 20);
232.       s.setFrameFromDiagonal(p[0], p[1]);
233.       return s;
234.    }
235. }
236.
237. /**
238.  * Makes an ellipse contained in a bounding box with two given corner points.
239.  */
240. class EllipseMaker extends ShapeMaker
241. {
242.    public EllipseMaker()
243.    {
244.       super(2);
245.    }
246.
247.    public Shape makeShape(Point2D[] p)
248.    {
249.       Ellipse2D s = new Ellipse2D.Double();
250.       s.setFrameFromDiagonal(p[0], p[1]);
251.       return s;
252.    }
253. }
254.
255. /**
256.  * Makes an arc contained in a bounding box with two given corner points, and with starting
257.  * and ending angles given by lines emanating from the center of the bounding box and ending
258.  *  in two given points. To show the correctness of the angle computation, the returned shape
259.  * contains the arc, the bounding box, and the lines.
260.  */
261. class ArcMaker extends ShapeMaker
262. {
263.    public ArcMaker()
264.    {
265.       super(4);
266.    }
267.
268.    public Shape makeShape(Point2D[] p)
269.    {
270.       double centerX = (p[0].getX() + p[1].getX()) / 2;
271.       double centerY = (p[0].getY() + p[1].getY()) / 2;
272.       double width = Math.abs(p[1].getX() - p[0].getX());
273.       double height = Math.abs(p[1].getY() - p[0].getY());
274.
275.       double skewedStartAngle = Math.toDegrees(Math.atan2(-(p[2].getY() - centerY)
276.             * width, (p[2].getX() - centerX)
277.             * height));
278.       double skewedEndAngle = Math.toDegrees(Math.atan2(-(p[3].getY() - centerY)
279.             * width, (p[3].getX() - centerX)
280.             * height));
281.       double skewedAngleDifference = skewedEndAngle - skewedStartAngle;
282.       if (skewedStartAngle < 0) skewedStartAngle += 360;
283.       if (skewedAngleDifference < 0) skewedAngleDifference += 360;
284.
285.       Arc2D s = new Arc2D.Double(0, 0, 0, 0, skewedStartAngle, skewedAngleDifference,
286.                                  Arc2D.OPEN);
287.       s.setFrameFromDiagonal(p[0], p[1]);
288.
289.       GeneralPath g = new GeneralPath();
290.       g.append(s, false);
291.       Rectangle2D r = new Rectangle2D.Double();
292.       r.setFrameFromDiagonal(p[0], p[1]);
293.       g.append(r, false);
294.       Point2D center = new Point2D.Double(centerX, centerY);
295.       g.append(new Line2D.Double(center, p[2]), false);
296.       g.append(new Line2D.Double(center, p[3]), false);
297.       return g;
298.    }
299. }
300.
301. /**
302.  * Makes a polygon defined by six corner points.
303.  */
304. class PolygonMaker extends ShapeMaker
305. {
306.    public PolygonMaker()
307.    {
308.       super(6);
309.    }
310.
311.    public Shape makeShape(Point2D[] p)
312.    {
313.       GeneralPath s = new GeneralPath();
314.       s.moveTo((float) p[0].getX(), (float) p[0].getY());
315.       for (int i = 1; i < p.length; i++)
316.          s.lineTo((float) p[i].getX(), (float) p[i].getY());
317.       s.closePath();
318.       return s;
319.    }
320. }
321.
322. /**
323.  * Makes a quad curve defined by two end points and a control point.
324.  */
325. class QuadCurveMaker extends ShapeMaker
326. {
327.    public QuadCurveMaker()
328.    {
329.       super(3);
330.    }
331.
332.    public Shape makeShape(Point2D[] p)
333.    {
334.       return new QuadCurve2D.Double(p[0].getX(), p[0].getY(), p[1].getX(), p[1].getY(), p[2]
335.             .getX(), p[2].getY());
336.    }
337. }
338.
339. /**
340.  * Makes a cubic curve defined by two end points and two control points.
341.  */
342. class CubicCurveMaker extends ShapeMaker
343. {
344.    public CubicCurveMaker()
345.    {
346.       super(4);
347.    }
348.
349.    public Shape makeShape(Point2D[] p)
350.    {
351.       return new CubicCurve2D.Double(p[0].getX(), p[0].getY(), p[1].getX(), p[1].getY(), p[2]
352.             .getX(), p[2].getY(), p[3].getX(), p[3].getY());
353.    }
354. }
java.awt.geom.RoundRectangle2D.Double 1.2
RoundRectangle2D.Double(double x, double y, double width, double height, double arcWidth, double arcHeight)constructs a round rectangle with the given bounding rectangle and arc dimensions. See Figure 7-4 for an explanation of the
arcWidthandarcHeightparameters.
java.awt.geom.Arc2D.Double 1.2
Arc2D.Double(double x, double y, double w, double h, double startAngle, double arcAngle, int type)constructs an arc with the given bounding rectangle, start, and arc angle and arc type. The
startAngleandarcAngleare explained on page 528. The type is one ofArc2D.OPEN,Arc2D.PIE, andArc2D.CHORD.
java.awt.geom.QuadCurve2D.Double 1.2
QuadCurve2D.Double(double x1, double y1, double ctrlx, double ctrly, double x2, double y2)constructs a quadratic curve from a start point, a control point, and an end point.
java.awt.geom.CubicCurve2D.Double 1.2
CubicCurve2D.Double(double x1, double y1, double ctrlx1, double ctrly1, double ctrlx2, double ctrly2, double x2, double y2)constructs a cubic curve from a start point, two control points, and an end point.
java.awt.geom.Path2D.Float 6
void moveTo(float x, float y)makes (
x,y) the current point, that is, the starting point of the next segment.void lineTo(float x, float y)void quadTo(float ctrlx, float ctrly, float x, float y)void curveTo(float ctrl1x, float ctrl1y, float ctrl2x, float ctrl2y, float x, float y)draws a line, quadratic curve, or cubic curve from the current point to the end point (
x,y), and makes that end point the current point.
java.awt.geom.Path2D 6
void append(Shape s, boolean connect)adds the outline of the given shape to the general path. If
connectistrue, the current point of the general path is connected to the starting point of the added shape by a straight line.void closePath()closes the path by drawing a straight line from the current point to the first point in the path.
In the preceding section, you saw how you can specify complex shapes by constructing general paths that are composed of lines and curves. By using a sufficient number of lines and curves, you can draw essentially any shape. For example, the shapes of characters in the fonts that you see on the screen and on your printouts are all made up of lines and cubic curves.
Occasionally, it is easier to describe a shape by composing it from areas, such as rectangles, polygons, or ellipses. The Java 2D API supports four constructive area geometry operations that combine two areas into a new area:
add—. The combined area contains all points that are in the first or the second area.subtract—. The combined area contains all points that are in the first but not the second area.intersect—. The combined area contains all points that are in the first and the second area.exclusiveOr—. The combined area contains all points that are in either the first or the second area, but not in both.
Figure 7-10 shows these operations.
To construct a complex area, you start with a default area object.
Area a = new Area();
Then, you combine the area with any shape.
a.add(new Rectangle2D.Double(. . .));
a.subtract(path);
. . .
The Area class implements the Shape interface. You can stroke the boundary of the area with the draw method or paint the interior with the fill method of the Graphics2D class.
The draw operation of the Graphics2D class draws the boundary of a shape by using the currently selected stroke. By default, the stroke is a solid line that is 1 pixel wide. You can select a different stroke by calling the setStroke method. You supply an object of a class that implements the Stroke interface. The Java 2D API defines only one such class, called BasicStroke. In this section, we look at the capabilities of the BasicStroke class.
You can construct strokes of arbitrary thickness. For example, here is how you draw lines that are 10 pixels wide.
g2.setStroke(new BasicStroke(10.0F));
g2.draw(new Line2D.Double(. . .));
When a stroke is more than a pixel thick, then the end of the stroke can have different styles. Figure 7-11 shows these so-called end cap styles. You have three choices:
A butt cap simply ends the stroke at its end point.
A round cap adds a half-circle to the end of the stroke.
A square cap adds a half-square to the end of the stroke.
When two thick strokes meet, there are three choices for the join style (see Figure 7-12).
A bevel join joins the strokes with a straight line that is perpendicular to the bisector of the angle between the two strokes.
A round join extends each stroke to have a round cap.
A miter join extends both strokes by adding a “spike.”
The miter join is not suitable for lines that meet at small angles. If two lines join with an angle that is less than the miter limit, then a bevel join is used instead. That usage prevents extremely long spikes. By default, the miter limit is 10 degrees.
You specify these choices in the BasicStroke constructor, for example:
g2.setStroke(new BasicStroke(10.0F, BasicStroke.CAP_ROUND, BasicStroke.JOIN_ROUND));
g2.setStroke(new BasicStroke(10.0F, BasicStroke.CAP_BUTT, BasicStroke.JOIN_MITER,
   15.0F /* miter limit */));
Finally, you can specify dashed lines by setting a dash pattern. In the program in Listing 7-2, you can select a dash pattern that spells out SOS in Morse code. The dash pattern is a float[] array of numbers that contains the lengths of the “on” and “off” strokes (see Figure 7-13).
You specify the dash pattern and a dash phase when constructing the BasicStroke. The dash phase indicates where in the dash pattern each line should start. Normally, you set this value to 0.
float[] dashPattern = { 10, 10, 10, 10, 10, 10, 30, 10, 30, ... };
g2.setStroke(new BasicStroke(10.0F, BasicStroke.CAP_BUTT, BasicStroke.JOIN_MITER,
10.0F /* miter limit */, dashPattern, 0 /* dash phase */));The program in Listing 7-2 lets you specify end cap styles, join styles, and dashed lines (see Figure 7-14). You can move the ends of the line segments to test the miter limit: Select the miter join, then move the line segment to form a very acute angle. You will see the miter join turn into a bevel join.
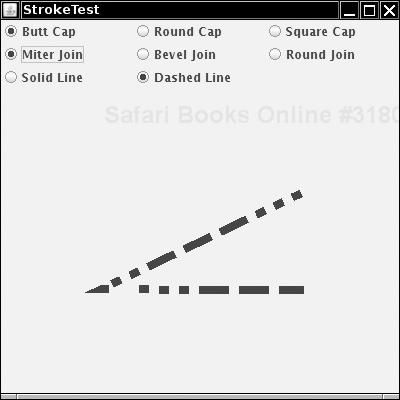
The program is similar to the program in Listing 7-1. The mouse listener remembers if you click on the end point of a line segment, and the mouse motion listener monitors the dragging of the end point. A set of radio buttons signal the user choices for the end cap style, join style, and solid or dashed line. The paintComponent method of the StrokePanel class constructs a GeneralPath consisting of the two line segments that join the three points that the user can move with the mouse. It then constructs a BasicStroke, according to the selections that the user made, and finally draws the path.
Example 7-2. StrokeTest.java
  1. import java.awt.*;
  2. import java.awt.event.*;
  3. import java.awt.geom.*;
  4. import javax.swing.*;
  5.
  6. /**
  7.  * This program demonstrates different stroke types.
  8.  * @version 1.03 2007-08-16
  9.  * @author Cay Horstmann
 10.  */
 11. public class StrokeTest
 12. {
 13.    public static void main(String[] args)
 14.    {
 15.       EventQueue.invokeLater(new Runnable()
 16.          {
 17.             public void run()
 18.             {
 19.                JFrame frame = new StrokeTestFrame();
 20.                frame.setDefaultCloseOperation(JFrame.EXIT_ON_CLOSE);
 21.                frame.setVisible(true);
 22.             }
 23.          });
 24.    }
 25. }
 26.
 27. /**
 28.  * This frame lets the user choose the cap, join, and line style, and shows the resulting
 29.  * stroke.
 30.  */
 31. class StrokeTestFrame extends JFrame
 32. {
 33.    public StrokeTestFrame()
 34.    {
 35.       setTitle("StrokeTest");
 36.       setSize(DEFAULT_WIDTH, DEFAULT_HEIGHT);
 37.
 38.       canvas = new StrokeComponent();
 39.       add(canvas, BorderLayout.CENTER);
 40.
 41.       buttonPanel = new JPanel();
 42.       buttonPanel.setLayout(new GridLayout(3, 3));
 43.       add(buttonPanel, BorderLayout.NORTH);
 44.
 45.       ButtonGroup group1 = new ButtonGroup();
 46.       makeCapButton("Butt Cap", BasicStroke.CAP_BUTT, group1);
 47.       makeCapButton("Round Cap", BasicStroke.CAP_ROUND, group1);
 48.       makeCapButton("Square Cap", BasicStroke.CAP_SQUARE, group1);
 49.
 50.       ButtonGroup group2 = new ButtonGroup();
 51.       makeJoinButton("Miter Join", BasicStroke.JOIN_MITER, group2);
 52.       makeJoinButton("Bevel Join", BasicStroke.JOIN_BEVEL, group2);
 53.       makeJoinButton("Round Join", BasicStroke.JOIN_ROUND, group2);
 54.
 55.       ButtonGroup group3 = new ButtonGroup();
 56.       makeDashButton("Solid Line", false, group3);
 57.       makeDashButton("Dashed Line", true, group3);
 58.    }
 59.
 60.    /**
 61.     * Makes a radio button to change the cap style.
 62.     * @param label the button label
 63.     * @param style the cap style
 64.     * @param group the radio button group
 65.     */
 66.    private void makeCapButton(String label, final int style, ButtonGroup group)
 67.    {
 68.       // select first button in group
 69.       boolean selected = group.getButtonCount() == 0;
 70.       JRadioButton button = new JRadioButton(label, selected);
 71.       buttonPanel.add(button);
 72.       group.add(button);
 73.       button.addActionListener(new ActionListener()
 74.          {
 75.             public void actionPerformed(ActionEvent event)
 76.             {
 77.                canvas.setCap(style);
 78.             }
 79.          });
 80.    }
 81.
 82.    /**
 83.     * Makes a radio button to change the join style.
 84.     * @param label the button label
 85.     * @param style the join style
 86.     * @param group the radio button group
 87.     */
 88.    private void makeJoinButton(String label, final int style, ButtonGroup group)
 89.    {
 90.       // select first button in group
 91.       boolean selected = group.getButtonCount() == 0;
 92.       JRadioButton button = new JRadioButton(label, selected);
 93.       buttonPanel.add(button);
 94.       group.add(button);
 95.       button.addActionListener(new ActionListener()
 96.          {
 97.             public void actionPerformed(ActionEvent event)
 98.             {
 99.                canvas.setJoin(style);
100.             }
101.          });
102.    }
103.
104.    /**
105.     * Makes a radio button to set solid or dashed lines
106.     * @param label the button label
107.     * @param style false for solid, true for dashed lines
108.     * @param group the radio button group
109.     */
110.    private void makeDashButton(String label, final boolean style, ButtonGroup group)
111.    {
112.       // select first button in group
113.       boolean selected = group.getButtonCount() == 0;
114.       JRadioButton button = new JRadioButton(label, selected);
115.       buttonPanel.add(button);
116.       group.add(button);
117.       button.addActionListener(new ActionListener()
118.          {
119.             public void actionPerformed(ActionEvent event)
120.             {
121.                canvas.setDash(style);
122.             }
123.          });
124.    }
125.
126.    private StrokeComponent canvas;
127.    private JPanel buttonPanel;
128.
129.    private static final int DEFAULT_WIDTH = 400;
130.    private static final int DEFAULT_HEIGHT = 400;
131. }
132.
133. /**
134.  * This component draws two joined lines, using different stroke objects, and allows the
135.  * user to drag the three points defining the lines.
136.  */
137. class StrokeComponent extends JComponent
138. {
139.    public StrokeComponent()
140.    {
141.       addMouseListener(new MouseAdapter()
142.          {
143.             public void mousePressed(MouseEvent event)
144.             {
145.                Point p = event.getPoint();
146.                for (int i = 0; i < points.length; i++)
147.                {
148.                   double x = points[i].getX() - SIZE / 2;
149.                   double y = points[i].getY() - SIZE / 2;
150.                   Rectangle2D r = new Rectangle2D.Double(x, y, SIZE, SIZE);
151.                   if (r.contains(p))
152.                   {
153.                      current = i;
154.                      return;
155.                   }
156.                }
157.             }
158.
159.             public void mouseReleased(MouseEvent event)
160.             {
161.                current = -1;
162.             }
163.          });
164.
165.       addMouseMotionListener(new MouseMotionAdapter()
166.          {
167.             public void mouseDragged(MouseEvent event)
168.             {
169.                if (current == -1) return;
170.                points[current] = event.getPoint();
171.                repaint();
172.             }
173.          });
174.
175.       points = new Point2D[3];
176.       points[0] = new Point2D.Double(200, 100);
177.       points[1] = new Point2D.Double(100, 200);
178.       points[2] = new Point2D.Double(200, 200);
179.       current = -1;
180.       width = 8.0F;
181.    }
182.
183.    public void paintComponent(Graphics g)
184.    {
185.       Graphics2D g2 = (Graphics2D) g;
186.       GeneralPath path = new GeneralPath();
187.       path.moveTo((float) points[0].getX(), (float) points[0].getY());
188.       for (int i = 1; i < points.length; i++)
189.          path.lineTo((float) points[i].getX(), (float) points[i].getY());
190.       BasicStroke stroke;
191.       if (dash)
192.       {
193.          float miterLimit = 10.0F;
194.          float[] dashPattern = { 10F, 10F, 10F, 10F, 10F, 10F, 30F, 10F, 30F, 10F, 30F, 10F,
195.                10F, 10F, 10F, 10F, 10F, 30F };
196.          float dashPhase = 0;
197.          stroke = new BasicStroke(width, cap, join, miterLimit, dashPattern, dashPhase);
198.       }
199.       else stroke = new BasicStroke(width, cap, join);
200.       g2.setStroke(stroke);
201.       g2.draw(path);
202.    }
203.
204.    /**
205.     * Sets the join style.
206.     * @param j the join style
207.     */
208.    public void setJoin(int j)
209.    {
210.       join = j;
211.       repaint();
212.    }
213.
214.    /**
215.     * Sets the cap style.
216.     * @param c the cap style
217.     */
218.    public void setCap(int c)
219.    {
220.       cap = c;
221.       repaint();
222.    }
223.
224.    /**
225.     * Sets solid or dashed lines
226.     * @param d false for solid, true for dashed lines
227.     */
228.    public void setDash(boolean d)
229.    {
230.       dash = d;
231.       repaint();
232.    }
233.
234.    private Point2D[] points;
235.    private static int SIZE = 10;
236.    private int current;
237.    private float width;
238.    private int cap;
239.    private int join;
240.    private boolean dash;
241. }
java.awt.BasicStroke 1.2
BasicStroke(float width)BasicStroke(float width, int cap, int join)BasicStroke(float width, int cap, int join, float miterlimit)BasicStroke(float width, int cap, int join, float miterlimit, float[] dash, float dashPhase)constructs a stroke object with the given attributes.
Parameters: |
| The width of the pen |
| The end cap style, one of | |
| The join style, one of | |
| The angle, in degrees, below which a miter join is rendered as a bevel join | |
| An array of the lengths of the alternating filled and blank portions of a dashed stroke | |
| The “phase” of the dash pattern; a segment of this length, preceding the starting point of the stroke, is assumed to have the dash pattern already applied |
When you fill a shape, its inside is covered with paint. You use the setPaint method to set the paint style to an object with a class that implements the Paint interface. The Java 2D API provides three such classes:
The
Colorclass implements thePaintinterface. To fill shapes with a solid color, simply callsetPaintwith aColorobject, such asg2.setPaint(Color.red);
The
GradientPaintclass varies colors by interpolating between two given color values (see Figure 7-15).The
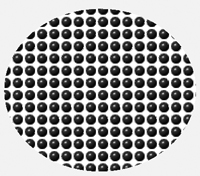
TexturePaintclass fills an area with repetitions of an image (see Figure 7-16).
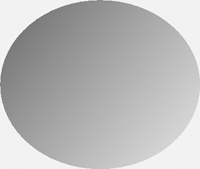
You construct a GradientPaint object by specifying two points and the colors that you want at these two points.
g2.setPaint(new GradientPaint(p1, Color.RED, p2, Color.YELLOW));
Colors are interpolated along the line joining the two points. Colors are constant along lines that are perpendicular to that joining line. Points beyond an end point of the line are given the color at the end point.
Alternatively, if you call the GradientPaint constructor with true for the cyclic parameter,
g2.setPaint(new GradientPaint(p1, Color.RED, p2, Color.YELLOW, true));
then the color variation cycles and keeps varying beyond the end points.
To construct a TexturePaint object, you specify a BufferedImage and an anchor rectangle.
g2.setPaint(new TexturePaint(bufferedImage, anchorRectangle));
We introduce the BufferedImage class later in this chapter when we discuss images in detail. The simplest way of obtaining a buffered image is to read an image file:
bufferedImage = ImageIO.read(new File("blue-ball.gif"));The anchor rectangle is extended indefinitely in x- and y-directions to tile the entire coordinate plane. The image is scaled to fit into the anchor and then replicated into each tile.
java.awt.GradientPaint 1.2
GradientPaint(float x1, float y1, Color color1, float x2, float y2, Color color2)GradientPaint(float x1, float y1, Color color1, float x2, float y2, Color color2, boolean cyclic)GradientPaint(Point2D p1, Color color1, Point2D p2, Color color2)GradientPaint(Point2D p1, Color color1, Point2D p2, Color color2, boolean cyclic)constructs a gradient paint object that fills shapes with color such that the start point is colored with
color1, the end point is colored withcolor2, and the colors in between are linearly interpolated. Colors are constant along lines that are perpendicular to the line joining the start and the end point. By default, the gradient paint is not cyclic; that is, points beyond the start and end points are colored with the same color as the start and end point. If the gradient paint is cyclic, then colors continue to be interpolated, first returning to the starting point color and then repeating indefinitely in both directions.
Suppose you need to draw an object such as an automobile. You know, from the manufacturer’s specifications, the height, wheelbase, and total length. You could, of course, figure out all pixel positions, assuming some number of pixels per meter. However, there is an easier way: You can ask the graphics context to carry out the conversion for you.
g2.scale(pixelsPerMeter, pixelsPerMeter);
g2.draw(new Line2D.Double(coordinates in meters)); // converts to pixels and draws scaled line
The scale method of the Graphics2D class sets the coordinate transformation of the graphics context to a scaling transformation. That transformation changes user coordinates (user-specified units) to device coordinates (pixels). Figure 7-17 shows how the transformation works.
Coordinate transformations are very useful in practice. They allow you to work with convenient coordinate values. The graphics context takes care of the dirty work of transforming them to pixels.
There are four fundamental transformations.
Scaling: blowing up, or shrinking, all distances from a fixed point.
Rotation: rotating all points around a fixed center.
Translation: moving all points by a fixed amount.
Shear: leaving one line fixed and “sliding” the lines parallel to it by an amount that is proportional to the distance from the fixed line.
Figure 7-18 shows how these four fundamental transformations act on a unit square.
The scale, rotate, translate, and shear methods of the Graphics2D class set the coordinate transformation of the graphics context to one of these fundamental transformations.
You can compose the transformations. For example, you might want to rotate shapes and double their size. Then, you supply both a rotation and a scaling transformation.
g2.rotate(angle);
g2.scale(2, 2);
g2.draw(. . .);
In this case, it does not matter in which order you supply the transformations. However, with most transformations, order does matter. For example, if you want to rotate and shear, then it makes a difference which of the transformations you supply first. You need to figure out what your intention is. The graphics context will apply the transformations in the opposite order in which you supplied them. That is, the last transformation that you supply is applied first.
You can supply as many transformations as you like. For example, consider the following sequence of transformations:
g2.translate(x, y);
g2.rotate(a);
g2.translate(-x, -y);
The last transformation (which is applied first) moves the point (x, y) to the origin. The second transformation rotates with an angle a around the origin. The final transformation moves the origin back to (x, y). The overall effect is a rotation with center point (x, y)—see Figure 7-19. Because rotating about a point other than the origin is such a common operation, there is a shortcut:
g2.rotate(a, x, y);
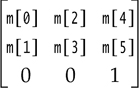
If you know some matrix theory, you are probably aware that all rotations, translations, scalings, shears, and their compositions can be expressed by matrix transformations of the form:
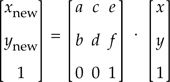
Such a transformation is called an affine transformation. In the Java 2D API, the AffineTransform class describes such a transformation. If you know the components of a particular transformation matrix, you can construct it directly as
AffineTransform t = new AffineTransform(a, b, c, d, e, f);
Additionally, the factory methods getRotateInstance, getScaleInstance, getTranslateInstance, and getShearInstance construct the matrices that represent these transformation types. For example, the call
t = AffineTransform.getScaleInstance(2.0F, 0.5F);
returns a transformation that corresponds to the matrix
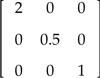
Finally, the instance methods setToRotation, setToScale, setToTranslation, and setToShear set a transformation object to a new type. Here is an example:
t.setToRotation(angle); // sets t to a rotation
You can set the coordinate transformation of the graphics context to an AffineTransform object.
g2.setTransform(t); // replaces current transformation
However, in practice, you shouldn’t call the setTransform operation, as it replaces any existing transformation that the graphics context may have. For example, a graphics context for printing in landscape mode already contains a 90-degree rotation transformation. If you call setTransform, you obliterate that rotation. Instead, call the transform method.
g2.transform(t); // composes current transformation with t
It composes the existing transformation with the new AffineTransform object.
If you just want to apply a transformation temporarily, then you first get the old transformation, compose with your new transformation, and finally restore the old transformation when you are done.
AffineTransform oldTransform = g2.getTransform(); // save old transform
g2.transform(t); // apply temporary transform // now draw on g2
g2.setTransform(oldTransform); // restore old transform
java.awt.geom.AffineTransform 1.2
AffineTransform(double a, double b, double c, double d, double e, double f)AffineTransform(float a, float b, float c, float d, float e, float f)constructs the affine transform with matrix

AffineTransform(double[] m)AffineTransform(float[] m)constructs the affine transform with matrix
static AffineTransform getRotateInstance(double a)creates a rotation around the origin by the angle
a(in radians). The transformation matrix is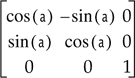
If
ais between 0 and π / 2, the rotation moves the positive x-axis toward the positive y-axis.static AffineTransform getRotateInstance(double a, double x, double y)creates a rotation around the point
(x,y)by the anglea(in radians).static AffineTransform getScaleInstance(double sx, double sy)creates a scaling transformation that scales the x-axis by
sxand the y-axis bysy. The transformation matrix is
static AffineTransform getShearInstance(double shx, double shy)creates a shear transformation that shears the x-axis by
shxand the y-axis byshy. The transformation matrix is
static AffineTransform getTranslateInstance(double tx, double ty)creates a translation that moves the x-axis by
txand the y-axis byty. The transformation matrix is
void setToRotation(double a)void setToRotation(double a, double x, double y)void setToScale(double sx, double sy)void setToShear(double sx, double sy)void setToTranslation(double tx, double ty)sets this affine transformation to a basic transformation with the given parameters. See the
getXxxInstancemethod for an explanation of the basic transformations and their parameters.
java.awt.Graphics2D 1.2
void setTransform(AffineTransform t)replaces the existing coordinate transformation of this graphics context with
t.void transform(AffineTransform t)composes the existing coordinate transformation of this graphics context with
t.void rotate(double a)void rotate(double a, double x, double y)void scale(double sx, double sy)void shear(double sx, double sy)void translate(double tx, double ty)composes the existing coordinate transformation of this graphics context with a basic transformation with the given parameters. See the
AffineTransform.getXxxInstancemethod for an explanation of the basic transformations and their parameters.
By setting a clipping shape in the graphics context, you constrain all drawing operations to the interior of that clipping shape.
g2.setClip(clipShape); // but see below
g2.draw(shape); // draws only the part that falls inside the clipping shape
However, in practice, you don’t want to call the setClip operation, because it replaces any existing clipping shape that the graphics context might have. For example, as you will see later in this chapter, a graphics context for printing comes with a clip rectangle that ensures that you don’t draw on the margins. Instead, call the clip method.
g2.clip(clipShape); // better
The clip method intersects the existing clipping shape with the new one that you supply.
If you just want to apply a clipping area temporarily, then you should first get the old clip, then add your new clip, and finally restore the old clip when you are done:
Shape oldClip = g2.getClip(); // save old clip
g2.clip(clipShape); // apply temporary clip
draw on g2
g2.setClip(oldClip); // restore old clip
In Figure 7-20, we show off the clipping capability with a rather dramatic drawing of a line pattern that is clipped by a complex shape, namely, the outline of a set of letters.

To obtain character outlines, you need a font render context. Use the getFontRenderContext method of the Graphics2D class.
FontRenderContext context = g2.getFontRenderContext();
Next, using a string, a font, and the font render context, create a TextLayout object:
TextLayout layout = new TextLayout("Hello", font, context);This text layout object describes the layout of a sequence of characters, as rendered by a particular font render context. The layout depends on the font render context—the same characters will look different on a screen or a printer.
More important for our application, the getOutline method returns a Shape object that describes the shape of the outline of the characters in the text layout. The outline shape starts at the origin (0, 0), which might not be what you want. In that case, supply an affine transform to the getOutline operation that specifies where you would like the outline to appear.
AffineTransform transform = AffineTransform.getTranslateInstance(0, 100);
Shape outline = layout.getOutline(transform);
Then, append the outline to the clipping shape.
GeneralPath clipShape = new GeneralPath();
clipShape.append(outline, false);
Finally, set the clipping shape and draw a set of lines. The lines appear only inside the character boundaries.
g2.setClip(clipShape);
Point2D p = new Point2D.Double(0, 0);
for (int i = 0; i < NLINES; i++)
{
   double x = . . .;
   double y = . . .;
   Point2D q = new Point2D.Double(x, y);
   g2.draw(new Line2D.Double(p, q)); // lines are clipped
}
You can see the complete code in Listing 7-8 on page 607.
java.awt.Graphics 1.0
void setClip(Shape s)1.2sets the current clipping shape to the shape
s.Shape getClip()1.2returns the current clipping shape.
java.awt.Graphics2D 1.2
void clip(Shape s)intersects the current clipping shape with the shape
s.FontRenderContext getFontRenderContext()returns a font render context that is necessary for constructing
TextLayoutobjects.
java.awt.font.TextLayout 1.2
TextLayout(String s, Font f, FontRenderContext context)constructs a text layout object from a given string and font, using the font render context to obtain font properties for a particular device.
float getAdvance()returns the width of this text layout.
float getAscent()float getDescent()returns the height of this text layout above and below the baseline.
float getLeading()returns the distance between successive lines in the font used by this text layout.
In the standard RGB color model, every color is described by its red, green, and blue components. However, it is also convenient to describe areas of an image that are transparent or partially transparent. When you superimpose an image onto an existing drawing, the transparent pixels do not obscure the pixels under them at all, whereas partially transparent pixels are mixed with the pixels under them. Figure 7-21 shows the effect of overlaying a partially transparent rectangle on an image. You can still see the details of the image shine through from under the rectangle.

In the Java 2D API, transparency is described by an alpha channel. Each pixel has, in addition to its red, green, and blue color components, an alpha value between 0 (fully transparent) and 1 (fully opaque). For example, the rectangle in Figure 7-21 was filled with a pale yellow color with 50% transparency:
new Color(0.7F, 0.7F, 0.0F, 0.5F);
Now let us look at what happens if you superimpose two shapes. You need to blend or compose the colors and alpha values of the source and destination pixels. Porter and Duff, two researchers in the field of computer graphics, have formulated 12 possible composition rules for this blending process. The Java 2D API implements all of these rules. Before we go any further, we want to point out that only two of these rules have practical significance. If you find the rules arcane or confusing, just use the SRC_OVER rule. It is the default rule for a Graphics2D object, and it gives the most intuitive results.
Here is the theory behind the rules. Suppose you have a source pixel with alpha value aS. In the image, there is already a destination pixel with alpha value aD. You want to compose the two. The diagram in Figure 7-22 shows how to design a composition rule.
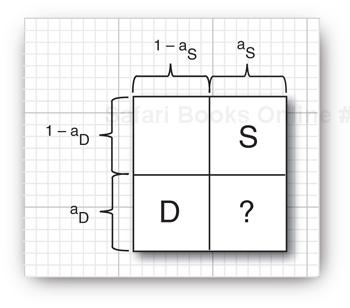
Porter and Duff consider the alpha value as the probability that the pixel color should be used. From the perspective of the source, there is a probability aS that it wants to use the source color and a probability of 1 − aS that it doesn’t care. The same holds for the destination. When composing the colors, let us assume that the probabilities are independent. Then there are four cases, as shown in Figure 7-22. If the source wants to use the source color and the destination doesn’t care, then it seems reasonable to let the source have its way. That’s why the upper-right corner of the diagram is labeled “S.” The probability for that event is aS·(1 − aD). Similarly, the lower-left corner is labeled “D.” What should one do if both destination and source would like to select their color? That’s where the Porter–Duff rules come in. If we decide that the source is more important, then we label the lower-right corner with an “S” as well. That rule is called SRC_OVER. In that rule, you combine the source colors with a weight of aS and the destination colors with a weight of (1 − aS)·aD.
The visual effect is a blending of the source and destination, with preference given to the source. In particular, if aS is 1, then the destination color is not taken into account at all. If aS is 0, then the source pixel is completely transparent and the destination color is unchanged.
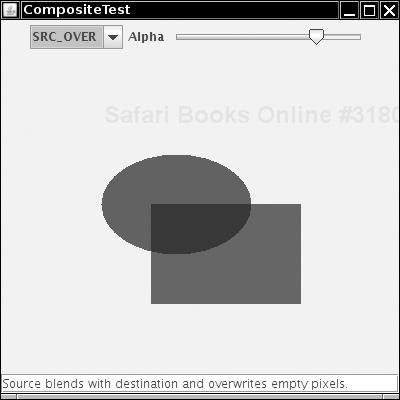
The other rules depend on what letters you put in the boxes of the probability diagram. Table 7-1 and Figure 7-23 show all rules that are supported by the Java 2D API. The images in the figure show the results of the rules when a rectangular source region with an alpha of 0.75 is combined with an elliptical destination region with an alpha of 1.0.
Table 7-1. The Porter–Duff Composition Rules
Rule | Explanation |
|---|---|
| Source clears destination. |
| Source overwrites destination and empty pixels. |
| Source does not affect destination. |
| Source blends with destination and overwrites empty pixels. |
| Source does not affect destination and overwrites empty pixels. |
| Source overwrites destination. |
| Source clears destination and overwrites empty pixels. |
| Source alpha modifies destination. |
| Source alpha complement modifies destination. |
| Source blends with destination. |
| Source alpha modifies destination. Source overwrites empty pixels. |
| Source alpha complement modifies destination. Source overwrites empty pixels. |
As you can see, most of the rules aren’t very useful. Consider, as an extreme case, the DST_IN rule. It doesn’t take the source color into account at all, but it uses the alpha of the source to affect the destination. The SRC rule is potentially useful—it forces the source color to be used, turning off blending with the destination.
For more information on the Porter–Duff rules, see, for example, Computer Graphics: Principles and Practice, Second Edition in C by James D. Foley, Andries van Dam, Steven K. Feiner, et al.
You use the setComposite method of the Graphics2D class to install an object of a class that implements the Composite interface. The Java 2D API supplies one such class, AlphaComposite, that implements all the Porter–Duff rules in Figure 7-23.
The factory method getInstance of the AlphaComposite class yields an AlphaComposite object. You supply the rule and the alpha value to be used for source pixels. For example, consider the following code:
int rule = AlphaComposite.SRC_OVER;
float alpha = 0.5f;
g2.setComposite(AlphaComposite.getInstance(rule, alpha));
g2.setPaint(Color.blue);
g2.fill(rectangle);
The rectangle is then painted with blue color and an alpha value of 0.5. Because the composition rule is SRC_OVER, it is transparently overlaid on the existing image.
The program in Listing 7-3 lets you explore these composition rules. Pick a rule from the combo box and use the slider to set the alpha value of the AlphaComposite object.
Furthermore, the program displays a verbal description of each rule. Note that the descriptions are computed from the composition rule diagrams. For example, a "DS" in the second row stands for “blends with destination.”
The program has one important twist. There is no guarantee that the graphics context that corresponds to the screen has an alpha channel. (In fact, it generally does not.) When pixels are deposited to a destination without an alpha channel, then the pixel colors are multiplied with the alpha value and the alpha value is discarded. Because several of the Porter–Duff rules use the alpha values of the destination, a destination alpha channel is important. For that reason, we use a buffered image with the ARGB color model to compose the shapes. After the images have been composed, we draw the resulting image to the screen.
BufferedImage image = new BufferedImage(getWidth(), getHeight(), BufferedImage.TYPE_INT_ARGB);
Graphics2D gImage = image.createGraphics();
// now draw to gImage
g2.drawImage(image, null, 0, 0);
The complete code for the program is shown in Listing 7-3. Figure 7-24 shows the screen display. As you run the program, move the alpha slider from left to right to see the effect on the composed shapes. In particular, note that the only difference between the DST_IN and DST_OUT rules is how the destination (!) color changes when you change the source alpha.
Example 7-3. CompositeTest.java
  1. import java.awt.*;
  2. import java.awt.event.*;
  3. import java.awt.image.*;
  4. import java.awt.geom.*;
  5. import javax.swing.*;
  6. import javax.swing.event.*;
  7.
  8. /**
  9.  * This program demonstrates the Porter-Duff composition rules.
 10.  * @version 1.03 2007-08-16
 11.  * @author Cay Horstmann
 12.  */
 13. public class CompositeTest
 14. {
 15.    public static void main(String[] args)
 16.    {
 17.       EventQueue.invokeLater(new Runnable()
 18.          {
 19.             public void run()
 20.             {
 21.                JFrame frame = new CompositeTestFrame();
 22.                frame.setDefaultCloseOperation(JFrame.EXIT_ON_CLOSE);
 23.                frame.setVisible(true);
 24.             }
 25.          });
 26.    }
 27. }
 28.
 29. /**
 30.  * This frame contains a combo box to choose a composition rule, a slider to change the
 31.  *  source alpha channel, and a component that shows the composition.
 32.  */
 33. class CompositeTestFrame extends JFrame
 34. {
 35.    public CompositeTestFrame()
 36.    {
 37.       setTitle("CompositeTest");
 38.       setSize(DEFAULT_WIDTH, DEFAULT_HEIGHT);
 39.
 40.       canvas = new CompositeComponent();
 41.       add(canvas, BorderLayout.CENTER);
 42.
 43.       ruleCombo = new JComboBox(new Object[] { new Rule("CLEAR", "  ", "  "),
 44.             new Rule("SRC", " S", " S"), new Rule("DST", "  ", "DD"),
 45.             new Rule("SRC_OVER", " S", "DS"), new Rule("DST_OVER", " S", "DD"),
 46.             new Rule("SRC_IN", "  ", " S"), new Rule("SRC_OUT", " S", "  "),
 47.             new Rule("DST_IN", "  ", " D"), new Rule("DST_OUT", "  ", "D "),
 48.             new Rule("SRC_ATOP", "  ", "DS"), new Rule("DST_ATOP", " S", " D"),
 49.             new Rule("XOR", " S", "D "), });
 50.       ruleCombo.addActionListener(new ActionListener()
 51.          {
 52.             public void actionPerformed(ActionEvent event)
 53.             {
 54.                Rule r = (Rule) ruleCombo.getSelectedItem();
 55.                canvas.setRule(r.getValue());
 56.                explanation.setText(r.getExplanation());
 57.             }
 58.          });
 59.
 60.       alphaSlider = new JSlider(0, 100, 75);
 61.       alphaSlider.addChangeListener(new ChangeListener()
 62.          {
 63.             public void stateChanged(ChangeEvent event)
 64.             {
 65.                canvas.setAlpha(alphaSlider.getValue());
 66.             }
 67.          });
 68.       JPanel panel = new JPanel();
 69.       panel.add(ruleCombo);
 70.       panel.add(new JLabel("Alpha"));
 71.       panel.add(alphaSlider);
 72.       add(panel, BorderLayout.NORTH);
 73.
 74.       explanation = new JTextField();
 75.       add(explanation, BorderLayout.SOUTH);
 76.
 77.       canvas.setAlpha(alphaSlider.getValue());
 78.       Rule r = (Rule) ruleCombo.getSelectedItem();
 79.       canvas.setRule(r.getValue());
 80.       explanation.setText(r.getExplanation());
 81.    }
 82.
 83.    private CompositeComponent canvas;
 84.    private JComboBox ruleCombo;
 85.    private JSlider alphaSlider;
 86.    private JTextField explanation;
 87.    private static final int DEFAULT_WIDTH = 400;
 88.    private static final int DEFAULT_HEIGHT = 400;
 89. }
 90.
 91. /**
 92.  * This class describes a Porter-Duff rule.
 93.  */
 94. class Rule
 95. {
 96.    /**
 97.     * Constructs a Porter-Duff rule
 98.     * @param n the rule name
 99.     * @param pd1 the first row of the Porter-Duff square
100.     * @param pd2 the second row of the Porter-Duff square
101.     */
102.    public Rule(String n, String pd1, String pd2)
103.    {
104.       name = n;
105.       porterDuff1 = pd1;
106.       porterDuff2 = pd2;
107.    }
108.
109.    /**
110.     * Gets an explanation of the behavior of this rule.
111.     * @return the explanation
112.     */
113.    public String getExplanation()
114.    {
115.       StringBuilder r = new StringBuilder("Source ");
116.       if (porterDuff2.equals("  ")) r.append("clears");
117.       if (porterDuff2.equals(" S")) r.append("overwrites");
118.       if (porterDuff2.equals("DS")) r.append("blends with");
119.       if (porterDuff2.equals(" D")) r.append("alpha modifies");
120.       if (porterDuff2.equals("D ")) r.append("alpha complement modifies");
121.       if (porterDuff2.equals("DD")) r.append("does not affect");
122.       r.append(" destination");
123.       if (porterDuff1.equals(" S")) r.append(" and overwrites empty pixels");
124.       r.append(".");
125.       return r.toString();
126.    }
127.
128.    public String toString()
129.    {
130.       return name;
131.    }
132.
133.    /**
134.     * Gets the value of this rule in the AlphaComposite class
135.     * @return the AlphaComposite constant value, or -1 if there is no matching constant.
136.     */
137.    public int getValue()
138.    {
139.       try
140.       {
141.          return (Integer) AlphaComposite.class.getField(name).get(null);
142.       }
143.       catch (Exception e)
144.       {
145.          return -1;
146.       }
147.    }
148.
149.    private String name;
150.    private String porterDuff1;
151.    private String porterDuff2;
152. }
153.
154. /**
155.  * This component draws two shapes, composed with a composition rule.
156.  */
157. class CompositeComponent extends JComponent
158. {
159.    public CompositeComponent()
160.    {
161.       shape1 = new Ellipse2D.Double(100, 100, 150, 100);
162.       shape2 = new Rectangle2D.Double(150, 150, 150, 100);
163.    }
164.
165.    public void paintComponent(Graphics g)
166.    {
167.       Graphics2D g2 = (Graphics2D) g;
168.
169.       BufferedImage image = new BufferedImage(getWidth(), getHeight(),
170.                                               BufferedImage.TYPE_INT_ARGB);
171.       Graphics2D gImage = image.createGraphics();
172.       gImage.setPaint(Color.red);
173.       gImage.fill(shape1);
174.       AlphaComposite composite = AlphaComposite.getInstance(rule, alpha);
175.       gImage.setComposite(composite);
176.       gImage.setPaint(Color.blue);
177.       gImage.fill(shape2);
178.       g2.drawImage(image, null, 0, 0);
179.    }
180.
181.    /**
182.     * Sets the composition rule.
183.     * @param r the rule (as an AlphaComposite constant)
184.     */
185.    public void setRule(int r)
186.    {
187.       rule = r;
188.       repaint();
189.    }
190.
191.    /**
192.     * Sets the alpha of the source
193.     * @param a the alpha value between 0 and 100
194.     */
195.    public void setAlpha(int a)
196.    {
197.       alpha = (float) a / 100.0F;
198.       repaint();
199.    }
200.
201.    private int rule;
202.    private Shape shape1;
203.    private Shape shape2;
204.    private float alpha;
205. }
In the preceding sections you have seen that the rendering process is quite complex. Although the Java 2D API is surprisingly fast in most cases, there are cases when you would like to have control over trade-offs between speed and quality. You achieve this by setting rendering hints. The setRenderingHint method of the Graphics2D class lets you set a single hint. The hint keys and values are declared in the RenderingHints class. Table 7-2 summarizes the choices. The values that end in _DEFAULT denote defaults that are chosen by a particular implementation as a good trade-off between performance and quality.
Table 7-2. Rendering Hints
Key | Value | Explanation |
|---|---|---|
| VALUE_ANTIALIAS_ON VALUE_ANTIALIAS_OFF VALUE_ANTIALIAS_DEFAULT | Turn antialiasing for shapes on or off. |
| VALUE_TEXT_ANTIALIAS_ON VALUE_TEXT_ANTIALIAS_OFF VALUE_TEXT_ANTIALIAS_DEFAULT VALUE_TEXT_ANTIALIAS_GASP 6 VALUE_TEXT_ANTIALIAS_LCD_HRGB 6 VALUE_TEXT_ANTIALIAS_LCD_HBGR 6 VALUE_TEXT_ANTIALIAS_LCD_VRGB 6 VALUE_TEXT_ANTIALIAS_LCD_VBGR 6 | Turn antialiasing for fonts on or off. When using the value |
| VALUE_FRACTIONALMETRICS_ON VALUE_FRACTIONALMETRICS_OFF VALUE_FRACTIONALMETRICS_DEFAULT | Turn the computation of fractional character dimensions on or off. Fractional character dimensions lead to better placement of characters. |
| VALUE_RENDER_QUALITY VALUE_RENDER_SPEED VALUE_RENDER_DEFAULT | When available, select rendering algorithms for greater quality or speed. |
| VALUE_STROKE_NORMALIZE VALUE_STROKE_PURE VALUE_STROKE_DEFAULT | Select whether the placement of strokes is controlled by the graphics accelerator (which may move it by up to half a pixel) or is computed by the “pure” rule that mandates that strokes run through the centers of pixels. |
| VALUE_DITHER_ENABLE VALUE_DITHER_DISABLE VALUE_DITHER_DEFAULT | Turn dithering for colors on or off. Dithering approximates color values by drawing groups of pixels of similar colors. (Note that antialiasing can interfere with dithering.) |
| VALUE_ALPHA_INTERPOLATION_QUALITY VALUE_ALPHA_INTERPOLATION_SPEED VALUE_ALPHA_INTERPOLATION_DEFAULT | Turn precise computation of alpha composites on or off. |
| VALUE_COLOR_RENDER_QUALITY VALUE_COLOR_RENDER_SPEED VALUE_COLOR_RENDER_DEFAULT | Select quality or speed for color rendering. This is only an issue when you use different color spaces. |
| VALUE_INTERPOLATION_NEAREST_NEIGHBOR VALUE_INTERPOLATION_BILINEAR VALUE_INTERPOLATION_BICUBIC | Select a rule for interpolating pixels when scaling or rotating images. |
The most useful of these settings involves antialiasing. This technique removes the “jaggies” from slanted lines and curves. As you can see in Figure 7-25, a slanted line must be drawn as a “staircase” of pixels. Especially on low-resolution screens, this line can look ugly. But if, rather than drawing each pixel completely on or off, you color in the pixels that are partially covered, with the color value proportional to the area of the pixel that the line covers, then the result looks much smoother. This technique is called antialiasing. Of course, antialiasing takes a bit longer because it takes time to compute all those color values.
For example, here is how you can request the use of antialiasing:
g2.setRenderingHint(RenderingHints.KEY_ANTIALIASING, RenderingHints.VALUE_ANTIALIAS_ON);
It also makes sense to use antialiasing for fonts.
g2.setRenderingHint(RenderingHints.KEY_TEXT_ANTIALIASING, Rendering-
Hints.VALUE_TEXT_ANTIALIAS_ON);
The other rendering hints are not as commonly used.
You can also put a bunch of key/value hint pairs into a map and set them all at once by calling the setRenderingHints method. Any collection class implementing the map interface will do, but you might as well use the RenderingHints class itself. It implements the Map interface and supplies a default map implementation if you pass null to the constructor. For example,
RenderingHints hints = new RenderingHints(null);
hints.put(RenderingHints.KEY_ANTIALIASING, RenderingHints.VALUE_ANTIALIAS_ON);
hints.put(RenderingHints.KEY_TEXT_ANTIALIASING, RenderingHints.VALUE_TEXT_ANTIALIAS_ON);
g2.setRenderingHints(hints);
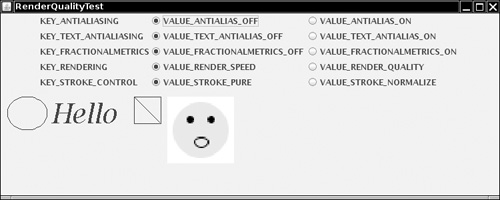
That is the technique we use in Listing 7-4. The program shows several rendering hints that we found beneficial. Note the following:
Antialiasing smooths the ellipse.
Text antialiasing smooths the text.
On some platforms, fractional text metrics move the letters a bit closer together.
Selecting
VALUE_RENDER_QUALITYsmooths the scaled image. (You would get the same effect by settingKEY_INTERPOLATIONtoVALUE_INTERPOLATION_BICUBIC).When antialiasing is turned off, selecting
VALUE_STROKE_NORMALIZEchanges the appearance of the ellipse and the placement of the diagonal line in the square.
Figure 7-26 shows a screen capture of the program.
Example 7-4. RenderQualityTest.java
  1. import java.awt.*;
  2. import java.awt.event.*;
  3. import java.awt.geom.*;
  4. import java.io.*;
  5. import javax.imageio.*;
  6. import javax.swing.*;
  7.
  8. /**
  9.  * This program demonstrates the effect of the various rendering hints.
 10.  * @version 1.10 2007-08-16
 11.  * @author Cay Horstmann
 12.  */
 13. public class RenderQualityTest
 14. {
 15.    public static void main(String[] args)
 16.    {
 17.       EventQueue.invokeLater(new Runnable()
 18.          {
 19.             public void run()
 20.             {
 21.                JFrame frame = new RenderQualityTestFrame();
 22.                frame.setDefaultCloseOperation(JFrame.EXIT_ON_CLOSE);
 23.                frame.setVisible(true);
 24.             }
 25.          });
 26.    }
 27. }
 28.
 29. /**
 30.  * This frame contains buttons to set rendering hints and an image that is drawn with
 31.  * the selected hints.
 32.  */
 33. class RenderQualityTestFrame extends JFrame
 34. {
 35.    public RenderQualityTestFrame()
 36.    {
 37.       setTitle("RenderQualityTest");
 38.       setSize(DEFAULT_WIDTH, DEFAULT_HEIGHT);
 39.
 40.       buttonBox = new JPanel();
 41.       buttonBox.setLayout(new GridBagLayout());
 42.       hints = new RenderingHints(null);
 43.
 44.       makeButtons("KEY_ANTIALIASING", "VALUE_ANTIALIAS_OFF", "VALUE_ANTIALIAS_ON");
 45.       makeButtons("KEY_TEXT_ANTIALIASING", "VALUE_TEXT_ANTIALIAS_OFF",
 46.                   "VALUE_TEXT_ANTIALIAS_ON");
 47.       makeButtons("KEY_FRACTIONALMETRICS", "VALUE_FRACTIONALMETRICS_OFF",
 48.             "VALUE_FRACTIONALMETRICS_ON");
 49.       makeButtons("KEY_RENDERING", "VALUE_RENDER_SPEED", "VALUE_RENDER_QUALITY");
 50.       makeButtons("KEY_STROKE_CONTROL", "VALUE_STROKE_PURE", "VALUE_STROKE_NORMALIZE");
 51.       canvas = new RenderQualityComponent();
 52.       canvas.setRenderingHints(hints);
 53.
 54.       add(canvas, BorderLayout.CENTER);
 55.       add(buttonBox, BorderLayout.NORTH);
 56.    }
 57.
 58.    /**
 59.     * Makes a set of buttons for a rendering hint key and values
 60.     * @param key the key name
 61.     * @param value1 the name of the first value for the key
 62.     * @param value2 the name of the second value for the key
 63.     */
 64.    void makeButtons(String key, String value1, String value2)
 65.    {
 66.       try
 67.       {
 68.          final RenderingHints.Key k =
 69.             (RenderingHints.Key) RenderingHints.class.getField(key).get(null);
 70.          final Object v1 = RenderingHints.class.getField(value1).get(null);
 71.          final Object v2 = RenderingHints.class.getField(value2).get(null);
 72.          JLabel label = new JLabel(key);
 73.
 74.          buttonBox.add(label, new GBC(0, r).setAnchor(GBC.WEST));
 75.          ButtonGroup group = new ButtonGroup();
 76.          JRadioButton b1 = new JRadioButton(value1, true);
 77.
 78.          buttonBox.add(b1, new GBC(1, r).setAnchor(GBC.WEST));
 79.          group.add(b1);
 80.          b1.addActionListener(new ActionListener()
 81.             {
 82.                public void actionPerformed(ActionEvent event)
 83.                {
 84.                   hints.put(k, v1);
 85.                   canvas.setRenderingHints(hints);
 86.                }
 87.             });
 88.          JRadioButton b2 = new JRadioButton(value2, false);
 89.
 90.          buttonBox.add(b2, new GBC(2, r).setAnchor(GBC.WEST));
 91.          group.add(b2);
 92.          b2.addActionListener(new ActionListener()
 93.             {
 94.                public void actionPerformed(ActionEvent event)
 95.                {
 96.                   hints.put(k, v2);
 97.                   canvas.setRenderingHints(hints);
 98.                }
 99.             });
100.          hints.put(k, v1);
101.          r++;
102.       }
103.       catch (Exception e)
104.       {
105.          e.printStackTrace();
106.       }
107.    }
108.
109.    private RenderQualityComponent canvas;
110.    private JPanel buttonBox;
111.    private RenderingHints hints;
112.    private int r;
113.    private static final int DEFAULT_WIDTH = 750;
114.    private static final int DEFAULT_HEIGHT = 300;
115. }
116.
117. /**
118.  * This component produces a drawing that shows the effect of rendering hints.
119.  */
120. class RenderQualityComponent extends JComponent
121. {
122.    public RenderQualityComponent()
123.    {
124.       try
125.       {
126.          image = ImageIO.read(new File("face.gif"));
127.       }
128.       catch (IOException e)
129.       {
130.          e.printStackTrace();
131.       }
132.    }
133.
134.    public void paintComponent(Graphics g)
135.    {
136.       Graphics2D g2 = (Graphics2D) g;
137.       g2.setRenderingHints(hints);
138.
139.       g2.draw(new Ellipse2D.Double(10, 10, 60, 50));
140.       g2.setFont(new Font("Serif", Font.ITALIC, 40));
141.       g2.drawString("Hello", 75, 50);
142.
143.       g2.draw(new Rectangle2D.Double(200, 10, 40, 40));
144.       g2.draw(new Line2D.Double(201, 11, 239, 49));
145.
146.       g2.drawImage(image, 250, 10, 100, 100, null);
147.    }
148.
149.    /**
150.     * Sets the hints and repaints.
151.     * @param h the rendering hints
152.     */
153.    public void setRenderingHints(RenderingHints h)
154.    {
155.       hints = h;
156.       repaint();
157.    }
158.
159.    private RenderingHints hints = new RenderingHints(null);
160.    private Image image;
161. }
Prior to version 1.4, Java SE had very limited capabilities for reading and writing image files. It was possible to read GIF and JPEG images, but there was no official support for writing images at all.
This situation is now much improved. Java SE 1.4 introduced the javax.imageio package that contains “out of the box” support for reading and writing several common file formats, as well as a framework that enables third parties to add readers and writers for other formats. As of Java SE 6, the GIF, JPEG, PNG, BMP (Windows bitmap), and WBMP (wireless bitmap) file formats are supported. In earlier versions, writing of GIF files was not supported because of patent issues.
The basics of the library are extremely straightforward. To load an image, use the static read method of the ImageIO class:
File f = . . .;
BufferedImage image = ImageIO.read(f);
The ImageIO class picks an appropriate reader, based on the file type. It may consult the file extension and the “magic number” at the beginning of the file for that purpose. If no suitable reader can be found or the reader can’t decode the file contents, then the read method returns null.
Writing an image to a file is just as simple:
File f = . . .;
String format = . . .;
ImageIO.write(image, format, f);
Here the format string is a string identifying the image format, such as "JPEG" or "PNG". The ImageIO class picks an appropriate writer and saves the file.
For more advanced image reading and writing operations that go beyond the static read and write methods of the ImageIO class, you first need to get the appropriate ImageReader and ImageWriter objects. The ImageIO class enumerates readers and writers that match one of the following:
An image format (such as “JPEG”)
A file suffix (such as “
jpg”)A MIME type (such as “image/jpeg”)
Note
MIME is the Multipurpose Internet Mail Extensions standard. The MIME standard defines common data formats such as “image/jpeg” and “application/pdf”. For an HTML version of the Request for Comments (RFC) that defines the MIME format, see http://www.oac.uci.edu/indiv/ehood/MIME.
For example, you can obtain a reader that reads JPEG files as follows:
ImageReader reader = null;
Iterator<ImageReader> iter = ImageIO.getImageReadersByFormatName("JPEG");
if (iter.hasNext()) reader = iter.next();
The getImageReadersBySuffix and getImageReadersByMIMEType method enumerate readers that match a file extension or MIME type.
It is possible that the ImageIO class can locate multiple readers that can all read a particular image type. In that case, you have to pick one of them, but it isn’t clear how you can decide which one is the best. To find out more information about a reader, obtain its service provider interface:
ImageReaderSpi spi = reader.getOriginatingProvider();
Then you can get the vendor name and version number:
String vendor = spi.getVendor();
String version = spi.getVersion();
Perhaps that information can help you decide among the choices, or you might just present a list of readers to your program users and let them choose. However, for now, we assume that the first enumerated reader is adequate.
In the sample program in Listing 7-5, we want to find all file suffixes of all available readers so that we can use them in a file filter. As of Java SE 6, we can use the static ImageIO.getReaderFileSuffixes method for this purpose:
String[] extensions = ImageIO.getWriterFileSuffixes();
chooser.setFileFilter(new FileNameExtensionFilter("Image files", extensions));
For saving files, we have to work harder. We’d like to present the user with a menu of all supported image types. Unfortunately, the getWriterFormatNames of the IOImage class returns a rather curious list with redundant names, such as
jpg, BMP, bmp, JPG, jpeg, wbmp, png, JPEG, PNG, WBMP, GIF, gif
That’s not something one would want to present in a menu. What is needed is a list of “preferred” format names. We supply a helper method getWriterFormats for this purpose (see Listing 7-5). We look up the first writer associated with each format name. Then we ask it what its format names are, in the hope that it will list the most popular one first. Indeed, for the JPEG writer, this works fine: It lists "JPEG" before the other options. (The PNG writer, on the other hand, lists "png" in lower case before "PNG". We hope this behavior will be addressed at some time in the future. In the meantime, we force all-lowercase names to upper case.) Once we pick a preferred name, we remove all alternate names from the original set. We keep going until all format names are handled.
Some files, in particular, animated GIF files, contain multiple images. The read method of the ImageIO class reads a single image. To read multiple images, turn the input source (for example, an input stream or file) into an ImageInputStream.
InputStream in = . . .;
ImageInputStream imageIn = ImageIO.createImageInputStream(in);
Then attach the image input stream to the reader:
reader.setInput(imageIn, true);
The second parameter indicates that the input is in “seek forward only” mode. Otherwise, random access is used, either by buffering stream input as it is read or by using random file access. Random access is required for certain operations. For example, to find out the number of images in a GIF file, you need to read the entire file. If you then want to fetch an image, the input must be read again.
This consideration is only important if you read from a stream, if the input contains multiple images, and if the image format doesn’t have the information that you request (such as the image count) in the header. If you read from a file, simply use
File f = . . .;
ImageInputStream imageIn = ImageIO.createImageInputStream(f);
reader.setInput(imageIn);
Once you have a reader, you can read the images in the input by calling
BufferedImage image = reader.read(index);
where index is the image index, starting with 0.
If the input is in “seek forward only” mode, you keep reading images until the read method throws an IndexOutOfBoundsException. Otherwise, you can call the getNumImages method:
int n = reader.getNumImages(true);
Here, the parameter indicates that you allow a search of the input to determine the number of images. That method throws an IllegalStateException if the input is in “seek forward only” mode. Alternatively, you can set the “allow search” parameter to false. Then the getNumImages method returns −1 if it can’t determine the number of images without a search. In that case, you’ll have to switch to Plan B and keep reading images until you get an IndexOutOfBoundsException.
Some files contain thumbnails, smaller versions of an image for preview purposes. You can get the number of thumbnails of an image with the call
int count = reader.getNumThumbnails(index);
Then you get a particular index as
BufferedImage thumbnail = reader.getThumbnail(index, thumbnailIndex);
Another consideration is that you sometimes want to get the image size before actually getting the image, in particular, if the image is huge or comes from a slow network connection. Use the calls
int width = reader.getWidth(index);
int height = reader.getHeight(index);
to get the dimensions of an image with a given index.
To write a file with multiple images, you first need an ImageWriter. The ImageIO class can enumerate the writers that are capable of writing a particular image format:
String format = . . .;
ImageWriter writer = null;
Iterator<ImageWriter> iter =  ImageIO.getImageWritersByFormatName( format );
if (iter.hasNext()) writer = iter.next();
Next, turn an output stream or file into an ImageOutputStream and attach it to the writer. For example,
File f = . . .;
ImageOutputStream imageOut = ImageIO.createImageOutputStream(f);
writer.setOutput(imageOut);
You must wrap each image into an IIOImage object. You can optionally supply a list of thumbnails and image metadata (such as compression algorithms and color information). In this example, we just use null for both; see the API documentation for additional information.
IIOImage iioImage = new IIOImage(images[i], null, null);
Write out the first image, using the write method:
writer.write(new IIOImage(images[0], null, null));
For subsequent images, use
if (writer.canInsertImage(i))
   writer.writeInsert(i, iioImage, null);
The third parameter can contain an ImageWriteParam object to set image writing details such as tiling and compression; use null for default values.
Not all file formats can handle multiple images. In that case, the canInsertImage method returns false for i > 0, and only a single image is saved.
The program in Listing 7-5 lets you load and save files in the formats for which the Java library supplies readers and writers. The program displays multiple images (see Figure 7-27), but not thumbnails.
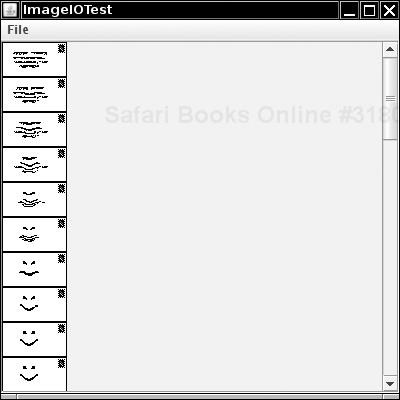
Example 7-5. ImageIOTest.java
  1. import java.awt.*;
  2. import java.awt.event.*;
  3. import java.awt.image.*;
  4. import java.io.*;
  5. import java.util.*;
  6. import javax.imageio.*;
  7. import javax.imageio.stream.*;
  8. import javax.swing.*;
  9. import javax.swing.filechooser.*;
 10.
 11. /**
 12.  * This program lets you read and write image files in the formats that the JDK supports.
 13.  * Multi-file images are supported.
 14.  * @version 1.02 2007-08-16
 15.  * @author Cay Horstmann
 16.  */
 17. public class ImageIOTest
 18. {
 19.    public static void main(String[] args)
 20.    {
 21.       EventQueue.invokeLater(new Runnable()
 22.          {
 23.             public void run()
 24.             {
 25.                JFrame frame = new ImageIOFrame();
 26.                frame.setDefaultCloseOperation(JFrame.EXIT_ON_CLOSE);
 27.                frame.setVisible(true);
 28.             }
 29.          });
 30.    }
 31. }
 32.
 33. /**
 34.  * This frame displays the loaded images. The menu has items for loading and saving files.
 35.  */
 36. class ImageIOFrame extends JFrame
 37. {
 38.    public ImageIOFrame()
 39.    {
 40.       setTitle("ImageIOTest");
 41.       setSize(DEFAULT_WIDTH, DEFAULT_HEIGHT);
 42.
 43.       JMenu fileMenu = new JMenu("File");
 44.       JMenuItem openItem = new JMenuItem("Open");
 45.       openItem.addActionListener(new ActionListener()
 46.          {
 47.             public void actionPerformed(ActionEvent event)
 48.             {
 49.                openFile();
 50.             }
 51.          });
 52.       fileMenu.add(openItem);
 53.
 54.       JMenu saveMenu = new JMenu("Save");
 55.       fileMenu.add(saveMenu);
 56.       Iterator<String> iter = writerFormats.iterator();
 57.       while (iter.hasNext())
 58.       {
 59.          final String formatName = iter.next();
 60.          JMenuItem formatItem = new JMenuItem(formatName);
 61.          saveMenu.add(formatItem);
 62.          formatItem.addActionListener(new ActionListener()
 63.             {
 64.                public void actionPerformed(ActionEvent event)
 65.                {
 66.                   saveFile(formatName);
 67.                }
 68.             });
 69.       }
 70.
 71.       JMenuItem exitItem = new JMenuItem("Exit");
 72.       exitItem.addActionListener(new ActionListener()
 73.          {
 74.             public void actionPerformed(ActionEvent event)
 75.             {
 76.                System.exit(0);
 77.             }
 78.          });
 79.       fileMenu.add(exitItem);
 80.
 81.       JMenuBar menuBar = new JMenuBar();
 82.       menuBar.add(fileMenu);
 83.       setJMenuBar(menuBar);
 84.    }
 85.
 86.    /**
 87.     * Open a file and load the images.
 88.     */
 89.    public void openFile()
 90.    {
 91.       JFileChooser chooser = new JFileChooser();
 92.       chooser.setCurrentDirectory(new File("."));
 93.       String[] extensions = ImageIO.getReaderFileSuffixes();
 94.       chooser.setFileFilter(new FileNameExtensionFilter("Image files", extensions));
 95.       int r = chooser.showOpenDialog(this);
 96.       if (r != JFileChooser.APPROVE_OPTION) return;
 97.       File f = chooser.getSelectedFile();
 98.       Box box = Box.createVerticalBox();
 99.       try
100.       {
101.          String name = f.getName();
102.          String suffix = name.substring(name.lastIndexOf('.') + 1);
103.          Iterator<ImageReader> iter = ImageIO.getImageReadersBySuffix(suffix);
104.          ImageReader reader = iter.next();
105.          ImageInputStream imageIn = ImageIO.createImageInputStream(f);
106.          reader.setInput(imageIn);
107.          int count = reader.getNumImages(true);
108.          images = new BufferedImage[count];
109.          for (int i = 0; i < count; i++)
110.          {
111.             images[i] = reader.read(i);
112.             box.add(new JLabel(new ImageIcon(images[i])));
113.          }
114.       }
115.       catch (IOException e)
116.       {
117.          JOptionPane.showMessageDialog(this, e);
118.       }
119.       setContentPane(new JScrollPane(box));
120.       validate();
121.    }
122.
123.    /**
124.     * Save the current image in a file
125.     * @param formatName the file format
126.     */
127.    public void saveFile(final String formatName)
128.    {
129.       if (images == null) return;
130.       Iterator<ImageWriter> iter = ImageIO.getImageWritersByFormatName(formatName);
131.       ImageWriter writer = iter.next();
132.       JFileChooser chooser = new JFileChooser();
133.       chooser.setCurrentDirectory(new File("."));
134.       String[] extensions = writer.getOriginatingProvider().getFileSuffixes();
135.       chooser.setFileFilter(new FileNameExtensionFilter("Image files", extensions));
136.
137.       int r = chooser.showSaveDialog(this);
138.       if (r != JFileChooser.APPROVE_OPTION) return;
139.       File f = chooser.getSelectedFile();
140.       try
141.       {
142.          ImageOutputStream imageOut = ImageIO.createImageOutputStream(f);
143.          writer.setOutput(imageOut);
144.
145.          writer.write(new IIOImage(images[0], null, null));
146.          for (int i = 1; i < images.length; i++)
147.          {
148.             IIOImage iioImage = new IIOImage(images[i], null, null);
149.             if (writer.canInsertImage(i)) writer.writeInsert(i, iioImage, null);
150.          }
151.       }
152.       catch (IOException e)
153.       {
154.          JOptionPane.showMessageDialog(this, e);
155.       }
156.    }
157.
158.    /**
159.     * Gets a set of "preferred" format names of all image writers. The preferred format name
160.     * is the first format name that a writer specifies.
161.     * @return the format name set
162.     */
163.    public static Set<String> getWriterFormats()
164.    {
165.       TreeSet<String> writerFormats = new TreeSet<String>();
166.       TreeSet<String> formatNames = new TreeSet<String>(Arrays.asList(ImageIO
167.             .getWriterFormatNames()));
168.       while (formatNames.size() > 0)
169.       {
170.          String name = formatNames.iterator().next();
171.          Iterator<ImageWriter> iter = ImageIO.getImageWritersByFormatName(name);
172.          ImageWriter writer = iter.next();
173.          String[] names = writer.getOriginatingProvider().getFormatNames();
174.          String format = names[0];
175.          if (format.equals(format.toLowerCase())) format = format.toUpperCase();
176.          writerFormats.add(format);
177.          formatNames.removeAll(Arrays.asList(names));
178.       }
179.       return writerFormats;
180.    }
181.
182.    private BufferedImage[] images;
183.    private static Set<String> writerFormats = getWriterFormats();
184.    private static final int DEFAULT_WIDTH = 400;
185.    private static final int DEFAULT_HEIGHT = 400;
186. }
javax.imageio.ImageIO 1.4
static BufferedImage read(InputStream input)static BufferedImage read(URL input)reads an image from
input.static boolean write(RenderedImage image, String formatName, File output)static boolean write(RenderedImage image, String formatName, OutputStream output)writes an image in the given format to
output. Returnsfalseif no appropriate writer was found.static Iterator<ImageReader> getImageReadersByFormatName(String formatName)static Iterator<ImageReader> getImageReadersBySuffix(String fileSuffix)static Iterator<ImageReader> getImageReadersByMIMEType(String mimeType)static Iterator<ImageWriter> getImageWritersByFormatName(String formatName)static Iterator<ImageWriter> getImageWritersBySuffix(String fileSuffix)static Iterator<ImageWriter> getImageWritersByMIMEType(String mimeType)gets all readers and writers that are able to handle the given format (e.g., “JPEG”), file suffix (e.g., “jpg”), or MIME type (e.g., “image/jpeg”).
static String[] getReaderFormatNames()static String[] getReaderMIMETypes()static String[] getWriterFormatNames()static String[] getWriterMIMETypes()static String[] getReaderFileSuffixes()6static String[] getWriterFileSuffixes()6gets all format names, MIME type names, and file suffixes supported by readers and writers.
ImageInputStream createImageInputStream(Object input)ImageOutputStream createImageOutputStream(Object output)creates an image input or image output stream from the given object. The object can be a file, a stream, a
RandomAccessFile, or another object for which a service provider exists. Returnsnullif no registered service provider can handle the object.
javax.imageio.ImageReader 1.4
void setInput(Object input)void setInput(Object input, boolean seekForwardOnly)sets the input source of the reader.
Parameters:
inputAn
ImageInputStreamobject or another object that this reader can accept.seekForwardOnlytrueif the reader should read forward only. By default, the reader uses random access and, if necessary, buffers image data.reads the image with the given image index (starting at 0). Throws an
IndexOutOfBoundsExceptionif no such image is available.int getNumImages(boolean allowSearch)gets the number of images in this reader. If
allowSearchisfalseand the number of images cannot be determined without reading forward, then −1is returned. IfallowSearchistrueand the reader is in “seek forward only” mode, then anIllegalStateExceptionis thrown.int getNumThumbnails(int index)gets the number of thumbnails of the image with the given index.
BufferedImage readThumbnail(int index, int thumbnailIndex)gets the thumbnail with index
thumbnailIndexof the image with the given index.int getWidth(int index)int getHeight(int index)gets the image width and height. Throw an
IndexOutOfBoundsExceptionif no such image is available.ImageReaderSpi getOriginatingProvider()gets the service provider that constructed this reader.
javax.imageio.spi.IIOServiceProvider 1.4
String getVendorName()String getVersion()gets the vendor name and version of this service provider.
javax.imageio.spi.ImageReaderWriterSpi 1.4
String[] getFormatNames()String[] getFileSuffixes()String[] getMIMETypes()gets the format names, file suffixes, and MIME types supported by the readers or writers that this service provider creates.
javax.imageio.ImageWriter 1.4
void setOutput(Object output)sets the output target of this writer.
Parameters:
outputAn
ImageOutputStreamobject or another object that this writer can acceptvoid write(IIOImage image)void write(RenderedImage image)writes a single image to the output.
void writeInsert(int index, IIOImage image, ImageWriteParam param)writes an image into a multi-image file.
boolean canInsertImage(int index)returns
trueif it is possible to insert an image at the given index.ImageWriterSpi getOriginatingProvider()gets the service provider that constructed this writer.
Suppose you have an image and you would like to improve its appearance. You then need to access the individual pixels of the image and replace them with other pixels. Or perhaps you want to compute the pixels of an image from scratch, for example, to show the result of physical measurements or a mathematical computation. The BufferedImage class gives you control over the pixels in an image, and classes that implement the BufferedImageOp interface let you transform images.
Note
JDK 1.0 had a completely different, and far more complex, imaging framework that was optimized for incremental rendering of images that are downloaded from the Web, a scan line at a time. However, it was difficult to manipulate those images. We do not discuss that framework in this book.
Most of the images that you manipulate are simply read in from an image file—they were either produced by a device such as a digital camera or scanner, or constructed by a drawing program. In this section, we show you a different technique for constructing an image, namely, to build up an image a pixel at a time.
To create an image, construct a BufferedImage object in the usual way.
image = new BufferedImage(width, height, BufferedImage.TYPE_INT_ARGB);
Now, call the getRaster method to obtain an object of type WritableRaster. You use this object to access and modify the pixels of the image.
WritableRaster raster = image.getRaster();
The setPixel method lets you set an individual pixel. The complexity here is that you can’t simply set the pixel to a Color value. You must know how the buffered image specifies color values. That depends on the type of the image. If your image has a type of TYPE_INT_ARGB, then each pixel is described by four values, for red, green, blue, and alpha, each of which is between 0 and 255. You supply them in an array of four integers.
int[] black = { 0, 0, 0, 255 };
raster.setPixel(i, j, black);
In the lingo of the Java 2D API, these values are called the sample values of the pixel.
Caution
There are also setPixel methods that take array parameters of types float[] and double[]. However, the values that you need to place into these arrays are not normalized color values between 0.0 and 1.0.
float[] red = { 1.0F, 0.0F, 0.0F, 1.0F };
raster.setPixel(i, j, red); // ERROR
You need to supply values between 0 and 255, no matter what the type of the array is.
You can supply batches of pixels with the setPixels method. Specify the starting pixel position and the width and height of the rectangle that you want to set. Then, supply an array that contains the sample values for all pixels. For example, if your buffered image has a type of TYPE_INT_ARGB, then you supply the red, green, blue, and alpha value of the first pixel, then the red, green, blue, and alpha value for the second pixel, and so on.
int[] pixels = new int[4 * width * height];
pixels[0] = . . . // red value for first pixel
pixels[1] = . . . // green value for first pixel
pixels[2] = . . . // blue value for first pixel
pixels[3] = . . . // alpha value for first pixel
. . .
raster.setPixels(x, y, width, height, pixels);
Conversely, to read a pixel, you use the getPixel method. Supply an array of four integers to hold the sample values.
int[] sample = new int[4];
raster.getPixel(x, y, sample);
Color c = new Color(sample[0], sample[1], sample[2], sample[3]);
You can read multiple pixels with the getPixels method.
raster.getPixels(x, y, width, height, samples);
If you use an image type other than TYPE_INT_ARGB and you know how that type represents pixel values, then you can still use the getPixel/setPixel methods. However, you have to know the encoding of the sample values in the particular image type.
If you need to manipulate an image with an arbitrary, unknown image type, then you have to work a bit harder. Every image type has a color model that can translate between sample value arrays and the standard RGB color model.
Note
The RGB color model isn’t as standard as you might think. The exact look of a color value depends on the characteristics of the imaging device. Digital cameras, scanners, monitors, and LCD displays all have their own idiosyncrasies. As a result, the same RGB value can look quite different on different devices. The International Color Consortium (http://www.color.org) recommends that all color data be accompanied by an ICC profile that specifies how the colors map to a standard form such as the 1931 CIE XYZ color specification. That specification was designed by the Commission Internationale de l’Eclairage or CIE (http://www.cie.co.at/cie), the international organization in charge of providing technical guidance in all matters of illumination and color. The specification is a standard method for representing all colors that the human eye can perceive as a triplet of coordinates called X, Y, Z. (See, for example, Computer Graphics: Principles and Practice, Second Edition in C by James D. Foley, Andries van Dam, Steven K. Feiner, et al., Chapter 13, for more information on the 1931 CIE XYZ specification.)
ICC profiles are complex, however. A simpler proposed standard, called sRGB (http://www.w3.org/Graphics/Color/sRGB.html), specifies an exact mapping between RGB values and the 1931 CIE XYZ values that was designed to work well with typical color monitors. The Java 2D API uses that mapping when converting between RGB and other color spaces.
The getColorModel method returns the color model:
ColorModel model = image.getColorModel();
To find the color value of a pixel, you call the getDataElements method of the Raster class. That call returns an Object that contains a color-model-specific description of the color value.
Object data = raster.getDataElements(x, y, null);
Note
The object that is returned by the getDataElements method is actually an array of sample values. You don’t need to know this to process the object, but it explains why the method is called getDataElements.
The color model can translate the object to standard ARGB values. The getRGB method returns an int value that has the alpha, red, green, and blue values packed in four blocks of 8 bits each. You can construct a Color value out of that integer with the Color(int argb, boolean hasAlpha) constructor.
int argb = model.getRGB(data);
Color color = new Color(argb, true);
To set a pixel to a particular color, you reverse these steps. The getRGB method of the Color class yields an int value with the alpha, red, green, and blue values. Supply that value to the getDataElements method of the ColorModel class. The return value is an Object that contains the color-model-specific description of the color value. Pass the object to the setDataElements method of the WritableRaster class.
int argb = color.getRGB();
Object data = model.getDataElements(argb, null);
raster.setDataElements(x, y, data);
To illustrate how to use these methods to build an image from individual pixels, we bow to tradition and draw a Mandelbrot set, as shown in Figure 7-28.
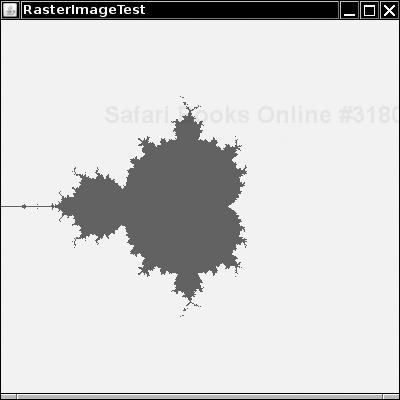
The idea of the Mandelbrot set is that you associate with each point in the plane a sequence of numbers. If that sequence stays bounded, you color the point. If it “escapes to infinity,” you leave it transparent.
Here is how you can construct the simplest Mandelbrot set. For each point (a, b), you look at sequences that start with (x, y) = (0, 0) and iterate:
xnew = x2 - y2 + a
ynew = 2 · x · y + b
It turns out that if x or y ever gets larger than 2, then the sequence escapes to infinity. Only the pixels that correspond to points (a, b) leading to a bounded sequence are colored. (The formulas for the number sequences come ultimately from the mathematics of complex numbers. We just take them for granted. For more on the mathematics of fractals, see, for example, http://classes.yale.edu/fractals/.)
Listing 7-6 shows the code. In this program, we demonstrate how to use the ColorModel class for translating Color values into pixel data. That process is independent of the image type. Just for fun, change the color type of the buffered image to TYPE_BYTE_GRAY. You don’t need to change any other code—the color model of the image automatically takes care of the conversion from colors to sample values.
Example 7-6. RasterImageTest.java
 1. import java.awt.*;
 2. import java.awt.image.*;
 3. import javax.swing.*;
 4.
 5. /**
 6.  * This program demonstrates how to build up an image from individual pixels.
 7.  * @version 1.13 2007-08-16
 8.  * @author Cay Horstmann
 9.  */
10. public class RasterImageTest
11. {
12.    public static void main(String[] args)
13.    {
14.       EventQueue.invokeLater(new Runnable()
15.          {
16.             public void run()
17.             {
18.                JFrame frame = new RasterImageFrame();
19.                frame.setDefaultCloseOperation(JFrame.EXIT_ON_CLOSE);
20.                frame.setVisible(true);
21.             }
22.          });
23.    }
24. }
25.
26. /**
27.  * This frame shows an image with a Mandelbrot set.
28.  */
29. class RasterImageFrame extends JFrame
30. {
31.    public RasterImageFrame()
32.    {
33.       setTitle("RasterImageTest");
34.       setSize(DEFAULT_WIDTH, DEFAULT_HEIGHT);
35.       BufferedImage image = makeMandelbrot(DEFAULT_WIDTH, DEFAULT_HEIGHT);
36.       add(new JLabel(new ImageIcon(image)));
37.    }
38.
39.    /**
40.     * Makes the Mandelbrot image.
41.     * @param width the width
42.     * @parah height the height
43.     * @return the image
44.     */
45.    public BufferedImage makeMandelbrot(int width, int height)
46.    {
47.       BufferedImage image = new BufferedImage(width, height, BufferedImage.TYPE_INT_ARGB);
48.       WritableRaster raster = image.getRaster();
49.       ColorModel model = image.getColorModel();
50.
51.       Color fractalColor = Color.red;
52.       int argb = fractalColor.getRGB();
53.       Object colorData = model.getDataElements(argb, null);
54.
55.       for (int i = 0; i < width; i++)
56.          for (int j = 0; j < height; j++)
57.          {
58.             double a = XMIN + i * (XMAX - XMIN) / width;
59.             double b = YMIN + j * (YMAX - YMIN) / height;
60.             if (!escapesToInfinity(a, b)) raster.setDataElements(i, j, colorData);
61.          }
62.       return image;
63.    }
64.
65.    private boolean escapesToInfinity(double a, double b)
66.    {
67.       double x = 0.0;
68.       double y = 0.0;
69.       int iterations = 0;
70.       while (x <= 2 && y <= 2 && iterations < MAX_ITERATIONS)
71.       {
72.          double xnew = x * x - y * y + a;
73.          double ynew = 2 * x * y + b;
74.          x = xnew;
75.          y = ynew;
76.          iterations++;
77.       }
78.       return x > 2 || y > 2;
79.    }
80.
81.    private static final double XMIN = -2;
82.    private static final double XMAX = 2;
83.    private static final double YMIN = -2;
84.    private static final double YMAX = 2;
85.    private static final int MAX_ITERATIONS = 16;
86.    private static final int DEFAULT_WIDTH = 400;
87.    private static final int DEFAULT_HEIGHT = 400;
88. }
java.awt.image.BufferedImage 1.2
BufferedImage(int width, int height, int imageType)constructs a buffered image object.
Parameters:
width, heightThe image dimensions
imageTypeThe image type. The most common types are
TYPE_INT_RGB,TYPE_INT_ARGB,TYPE_BYTE_GRAY, andTYPE_BYTE_INDEXEDreturns the color model of this buffered image.
WritableRaster getRaster()gets the raster for accessing and modifying pixels of this buffered image.
java.awt.image.Raster 1.2
Object getDataElements(int x, int y, Object data)returns the sample data for a raster point, in an array whose element type and length depend on the color model. If
datais notnull, it is assumed to be an array that is appropriate for holding sample data and it is filled. Ifdataisnull, a new array is allocated. Its element type and length depend on the color model.int[] getPixel(int x, int y, int[] sampleValues)float[] getPixel(int x, int y, float[] sampleValues)double[] getPixel(int x, int y, double[] sampleValues)int[] getPixels(int x, int y, int width, int height, int[] sampleValues)float[] getPixels(int x, int y, int width, int height, float[] sampleValues)double[] getPixels(int x, int y, int width, int height, double[] sampleValues)returns the sample values for a raster point, or a rectangle of raster points, in an array whose length depends on the color model. If
sampleValuesis notnull, it is assumed to be sufficiently long for holding the sample values and it is filled. IfsampleValuesisnull, a new array is allocated. These methods are only useful if you know the meaning of the sample values for a color model.
java.awt.image.WritableRaster 1.2
void setDataElements(int x, int y, Object data)sets the sample data for a raster point.
datais an array filled with the sample data for a pixel. Its element type and length depend on the color model.void setPixel(int x, int y, int[] sampleValues)void setPixel(int x, int y, float[] sampleValues)void setPixel(int x, int y, double[] sampleValues)void setPixels(int x, int y, int width, int height, int[] sampleValues)void setPixels(int x, int y, int width, int height, float[] sampleValues)void setPixels(int x, int y, int width, int height, double[] sampleValues)sets the sample values for a raster point or a rectangle of raster points. These methods are only useful if you know the encoding of the sample values for a color model.
java.awt.image.ColorModel 1.2
int getRGB(Object data)returns the ARGB value that corresponds to the sample data passed in the
dataarray. Its element type and length depend on the color model.Object getDataElements(int argb, Object data);returns the sample data for a color value. If
datais notnull, it is assumed to be an array that is appropriate for holding sample data and it is filled. Ifdataisnull, a new array is allocated.datais an array filled with the sample data for a pixel. Its element type and length depend on the color model.
In the preceding section, you saw how to build up an image from scratch. However, often you want to access image data for a different reason: You already have an image and you want to improve it in some way.
Of course, you can use the getPixel/getDataElements methods that you saw in the preceding section to read the image data, manipulate them, and then write them back. But fortunately, the Java 2D API already supplies a number of filters that carry out common image processing operations for you.
The image manipulations all implement the BufferedImageOp interface. After you construct the operation, you simply call the filter method to transform an image into another.
BufferedImageOp op = . . .;
BufferedImage filteredImage
   = new BufferedImage(image.getWidth(), image.getHeight(), image.getType());
op.filter(image, filteredImage);
Some operations can transform an image in place (op.filter(image, image)), but most can’t.
Five classes implement the BufferedImageOp interface:
AffineTransformOp
RescaleOp
LookupOp
ColorConvertOp
ConvolveOp
The AffineTransformOp carries out an affine transformation on the pixels. For example, here is how you can rotate an image about its center:
AffineTransform transform = AffineTransform.getRotateInstance(Math.toRadians(angle),
   image.getWidth() / 2, image.getHeight() / 2);
AffineTransformOp op = new AffineTransformOp(transform, interpolation);
op.filter(image, filteredImage);
The AffineTransformOp constructor requires an affine transform and an interpolation strategy. Interpolation is necessary to determine pixels in the target image if the source pixels are transformed somewhere between target pixels. For example, if you rotate source pixels, then they will generally not fall exactly onto target pixels. There are two interpolation strategies: AffineTransformOp.TYPE_BILINEAR and AffineTransformOp.TYPE_NEAREST_NEIGHBOR. Bilinear interpolation takes a bit longer but looks better.
The program in Listing 7-7 lets you rotate an image by 5 degrees (see Figure 7-29).

The RescaleOp carries out a rescaling operation
xnew = a · x + b
for each of the color components in the image. (Alpha components are not affected.) The effect of rescaling with a > 1 is to brighten the image. You construct the RescaleOp by specifying the scaling parameters and optional rendering hints. In Listing 7-7, we use:
float a = 1.1f;
float 20.0f;
RescaleOp op = new RescaleOp(a, b, null);
You can also supply separate scaling values for each color component—see the API notes.
The LookupOp operation lets you specify an arbitrary mapping of sample values. You supply a table that specifies how each value should be mapped. In the example program, we compute the negative of all colors, changing the color c to 255 − c.
The LookupOp constructor requires an object of type LookupTable and a map of optional hints. The LookupTable class is abstract, with two concrete subclasses: ByteLookupTable and ShortLookupTable. Because RGB color values are bytes, a ByteLookupTable should suffice. However, because of the bug described in http://bugs.sun.com/bugdatabase/view_bug.do?bug_id=6183251, we will use a ShortLookupTable instead. Here is how we construct the LookupOp for the example program:
short negative[] = new short[256];
for (int i = 0; i < 256; i++) negative[i] = (short) (255 - i);
ShortLookupTable table = new ShortLookupTable(0, negative);
LookupOp op = new LookupOp(table, null);
The lookup is applied to each color component separately, but not to the alpha component. You can also supply different lookup tables for each color component—see the API notes.
Note
You cannot apply a LookupOp to an image with an indexed color model. (In those images, each sample value is an offset into a color palette.)
The ColorConvertOp is useful for color space conversions. We do not discuss it here.
The most powerful of the transformations is the ConvolveOp, which carries out a mathematical convolution. We do not want to get too deeply into the mathematical details of convolution, but the basic idea is simple. Consider, for example, the blur filter (see Figure 7-30).

The blurring is achieved by replacement of each pixel with the average value from the pixel and its eight neighbors. Intuitively, it makes sense why this operation would blur out the picture. Mathematically, the averaging can be expressed as a convolution operation with the following kernel:
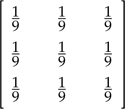
The kernel of a convolution is a matrix that tells what weights should be applied to the neighboring values. The kernel above leads to a blurred image. A different kernel carries out edge detection, locating areas of color changes:
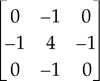
Edge detection is an important technique for analyzing photographic images (see Figure 7-31).

To construct a convolution operation, you first set up an array of the values for the kernel and construct a Kernel object. Then, construct a ConvolveOp object from the kernel and use it for filtering.
float[] elements =
   {
      0.0f, -1.0f, 0.0f,
      -1.0f,  4.f, -1.0f,
      0.0f, -1.0f, 0.0f
   };
Kernel kernel = new Kernel(3, 3, elements);
ConvolveOp op = new ConvolveOp(kernel);
op.filter(image, filteredImage);
The program in Listing 7-7 allows a user to load in a GIF or JPEG image and carry out the image manipulations that we discussed. Thanks to the power of the image operations that the Java 2D API provides, the program is very simple.
Example 7-7. ImageProcessingTest.java
  1. import java.awt.*;
  2. import java.awt.event.*;
  3. import java.awt.geom.*;
  4. import java.awt.image.*;
  5. import java.io.*;
  6. import javax.imageio.*;
  7. import javax.swing.*;
  8. import javax.swing.filechooser.*;
  9.
 10. /**
 11.  * This program demonstrates various image processing operations.
 12.  * @version 1.03 2007-08-16
 13.  * @author Cay Horstmann
 14.  */
 15. public class ImageProcessingTest
 16. {
 17.    public static void main(String[] args)
 18.    {
 19.       EventQueue.invokeLater(new Runnable()
 20.          {
 21.             public void run()
 22.             {
 23.                JFrame frame = new ImageProcessingFrame();
 24.                frame.setDefaultCloseOperation(JFrame.EXIT_ON_CLOSE);
 25.                frame.setVisible(true);
 26.             }
 27.          });
 28.    }
 29. }
 30.
 31. /**
 32.  * This frame has a menu to load an image and to specify various transformations, and
 33.  * a component to show the resulting image.
 34.  */
 35. class ImageProcessingFrame extends JFrame
 36. {
 37.    public ImageProcessingFrame()
 38.    {
 39.       setTitle("ImageProcessingTest");
 40.       setSize(DEFAULT_WIDTH, DEFAULT_HEIGHT);
 41.
 42.       add(new JComponent()
 43.          {
 44.             public void paintComponent(Graphics g)
 45.             {
 46.                if (image != null) g.drawImage(image, 0, 0, null);
 47.             }
 48.          });
 49.
 50.       JMenu fileMenu = new JMenu("File");
 51.       JMenuItem openItem = new JMenuItem("Open");
 52.       openItem.addActionListener(new ActionListener()
 53.          {
 54.             public void actionPerformed(ActionEvent event)
 55.             {
 56.                openFile();
 57.             }
 58.          });
 59.       fileMenu.add(openItem);
 60.
 61.       JMenuItem exitItem = new JMenuItem("Exit");
 62.       exitItem.addActionListener(new ActionListener()
 63.          {
 64.             public void actionPerformed(ActionEvent event)
 65.             {
 66.                System.exit(0);
 67.             }
 68.          });
 69.       fileMenu.add(exitItem);
 70.
 71.       JMenu editMenu = new JMenu("Edit");
 72.       JMenuItem blurItem = new JMenuItem("Blur");
 73.       blurItem.addActionListener(new ActionListener()
 74.          {
 75.             public void actionPerformed(ActionEvent event)
 76.             {
 77.                float weight = 1.0f / 9.0f;
 78.                float[] elements = new float[9];
 79.                for (int i = 0; i < 9; i++)
 80.                   elements[i] = weight;
 81.                convolve(elements);
 82.             }
 83.          });
 84.       editMenu.add(blurItem);
 85.
 86.       JMenuItem sharpenItem = new JMenuItem("Sharpen");
 87.       sharpenItem.addActionListener(new ActionListener()
 88.          {
 89.             public void actionPerformed(ActionEvent event)
 90.             {
 91.                float[] elements = { 0.0f, -1.0f, 0.0f, -1.0f, 5.f, -1.0f, 0.0f, -1.0f, 0.0f };
 92.                convolve(elements);
 93.             }
 94.          });
 95.       editMenu.add(sharpenItem);
 96.
 97.       JMenuItem brightenItem = new JMenuItem("Brighten");
 98.       brightenItem.addActionListener(new ActionListener()
 99.          {
100.             public void actionPerformed(ActionEvent event)
101.             {
102.                float a = 1.1f;
103.                // float b = 20.0f;
104.                float b = 0;
105.                RescaleOp op = new RescaleOp(a, b, null);
106.                filter(op);
107.             }
108.          });
109.       editMenu.add(brightenItem);
110.
111.       JMenuItem edgeDetectItem = new JMenuItem("Edge detect");
112.       edgeDetectItem.addActionListener(new ActionListener()
113.          {
114.             public void actionPerformed(ActionEvent event)
115.             {
116.                float[] elements = { 0.0f, -1.0f, 0.0f, -1.0f, 4.f, -1.0f, 0.0f, -1.0f, 0.0f };
117.                convolve(elements);
118.             }
119.          });
120.       editMenu.add(edgeDetectItem);
121.
122.       JMenuItem negativeItem = new JMenuItem("Negative");
123.       negativeItem.addActionListener(new ActionListener()
124.          {
125.             public void actionPerformed(ActionEvent event)
126.             {
127.                short[] negative = new short[256 * 1];
128.                for (int i = 0; i < 256; i++)
129.                   negative[i] = (short) (255 - i);
130.                ShortLookupTable table = new ShortLookupTable(0, negative);
131.                LookupOp op = new LookupOp(table, null);
132.                filter(op);
133.             }
134.          });
135.       editMenu.add(negativeItem);
136.
137.       JMenuItem rotateItem = new JMenuItem("Rotate");
138.       rotateItem.addActionListener(new ActionListener()
139.          {
140.             public void actionPerformed(ActionEvent event)
141.             {
142.                if (image == null) return;
143.                AffineTransform transform = AffineTransform.getRotateInstance(
144.                      Math.toRadians(5), image.getWidth() / 2, image.getHeight() / 2);
145.                AffineTransformOp op = new AffineTransformOp(transform,
146.                      AffineTransformOp.TYPE_BICUBIC);
147.                filter(op);
148.             }
149.          });
150.       editMenu.add(rotateItem);
151.
152.       JMenuBar menuBar = new JMenuBar();
153.       menuBar.add(fileMenu);
154.       menuBar.add(editMenu);
155.       setJMenuBar(menuBar);
156.    }
157.
158.    /**
159.     * Open a file and load the image.
160.     */
161.    public void openFile()
162.    {
163.       JFileChooser chooser = new JFileChooser();
164.       chooser.setCurrentDirectory(new File("."));
165.       String[] extensions = ImageIO.getReaderFileSuffixes();
166.       chooser.setFileFilter(new FileNameExtensionFilter("Image files", extensions));
167.       int r = chooser.showOpenDialog(this);
168.       if (r != JFileChooser.APPROVE_OPTION) return;
169.
170.       try
171.       {
172.          Image img = ImageIO.read(chooser.getSelectedFile());
173.          image = new BufferedImage(img.getWidth(null), img.getHeight(null),
174.                BufferedImage.TYPE_INT_RGB);
175.          image.getGraphics().drawImage(img, 0, 0, null);
176.       }
177.       catch (IOException e)
178.       {
179.          JOptionPane.showMessageDialog(this, e);
180.       }
181.       repaint();
182.    }
183.
184.    /**
185.     * Apply a filter and repaint.
186.     * @param op the image operation to apply
187.     */
188.    private void filter(BufferedImageOp op)
189.    {
190.       if (image == null) return;
191.       image = op.filter(image, null);
192.       repaint();
193.    }
194.
195.    /**
196.     * Apply a convolution and repaint.
197.     * @param elements the convolution kernel (an array of 9 matrix elements)
198.     */
199.    private void convolve(float[] elements)
200.    {
201.       Kernel kernel = new Kernel(3, 3, elements);
202.       ConvolveOp op = new ConvolveOp(kernel);
203.       filter(op);
204.    }
205.
206.    private BufferedImage image;
207.    private static final int DEFAULT_WIDTH = 400;
208.    private static final int DEFAULT_HEIGHT = 400;
209. }
java.awt.image.AffineTransformOp 1.2
AffineTransformOp(AffineTransform t, int interpolationType)constructs an affine transform operator. The interpolation type is one of
TYPE_BILINEAR,TYPE_BICUBIC, orTYPE_NEAREST_NEIGHBOR
java.awt.image.RescaleOp 1.2
RescaleOp(float a, float b, RenderingHints hints)RescaleOp(float[] as, float[] bs, RenderingHints hints)constructs a rescale operator that carries out the scaling operation xnew = a · x + b. When using the first constructor, all color components (but not the alpha component) are scaled with the same coefficients. When using the second constructor, you supply values for each color component, in which case the alpha component is unaffected, or values for both alpha and color components.
java.awt.image.ByteLookupTable 1.2
ByteLookupTable(int offset, byte[] data)ByteLookupTable(int offset, byte[][] data)constructs a lookup table for converting
bytevalues. The offset is subtracted from the input before the lookup. The values in the first constructor are applied to all color components but not the alpha component. When using the second constructor, you supply values for each color component, in which case the alpha component is unaffected, or values for both alpha and color components.
java.awt.image.ShortLookupTable 1.2
ShortLookupTable(int offset, short[] data)ShortLookupTable(int offset, short[][] data)constructs a lookup table for converting
shortvalues. The offset is subtracted from the input before the lookup. The values in the first constructor are applied to all color components but not the alpha component. When using the second constructor, you supply values for each color component, in which case the alpha component is unaffected, or values for both alpha and color components.
java.awt.image.ConvolveOp 1.2
ConvolveOp(Kernel kernel)ConvolveOp(Kernel kernel, int edgeCondition, RenderingHints hints)constructs a convolution operator. The edge condition specified is one of
EDGE_NO_OPandEDGE_ZERO_FILL. Edge values need to be treated specially because they don’t have sufficient neighboring values to compute the convolution. The default isEDGE_ZERO_FILL.
The original JDK had no support for printing at all. It was not possible to print from applets, and you had to get a third-party library if you wanted to print in an application. JDK 1.1 introduced very lightweight printing support, just enough to produce simple printouts, as long as you were not too particular about the print quality. The 1.1 printing model was designed to allow browser vendors to print the surface of an applet as it appears on a web page (which, however, the browser vendors have not embraced).
Java SE 1.2 introduced the beginnings of a robust printing model that is fully integrated with 2D graphics. Java SE 1.4 added important enhancements, such as discovery of printer features and streaming print jobs for server-side print management.
In this section, we show you how you can easily print a drawing on a single sheet of paper, how you can manage a multipage printout, and how you can benefit from the elegance of the Java 2D imaging model and easily generate a print preview dialog box.
Note
The Java platform also supports the printing of user interface components. We do not cover this topic because it is mostly of interest to implementors of browsers, screen grabbers, and so on. For more information on printing components, see http://java.sun.com/developer/onlineTraining/Programming/JDCBook/render.html.
In this section, we tackle what is probably the most common printing situation: printing a 2D graphic. Of course, the graphic can contain text in various fonts or even consist entirely of text.
To generate a printout, you take care of these two tasks:
Supply an object that implements the
Printableinterface.Start a print job.
The Printable interface has a single method:
int print(Graphics g, PageFormat format, int page)
That method is called whenever the print engine needs to have a page formatted for printing. Your code draws the text and image that are to be printed onto the graphics context. The page format tells you the paper size and the print margins. The page number tells you which page to render.
To start a print job, you use the PrinterJob class. First, you call the static getPrinterJob method to get a print job object. Then set the Printable object that you want to print.
Printable canvas = . . .;
PrinterJob job = PrinterJob.getPrinterJob();
job.setPrintable(canvas);
Caution
The class PrintJob handles JDK 1.1-style printing. That class is now obsolete. Do not confuse it with the PrinterJob class.
Before starting the print job, you should call the printDialog method to display a print dialog box (see Figure 7-32). That dialog box gives the user a chance to select the printer to be used (in case multiple printers are available), the page range that should be printed, and various printer settings.
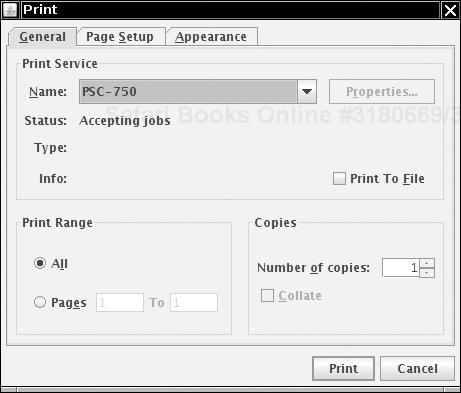
You collect printer settings in an object of a class that implements the PrintRequestAttributeSet interface, such as the HashPrintRequestAttributeSet class.
HashPrintRequestAttributeSet attributes = new HashPrintRequestAttributeSet();
Add attribute settings and pass the attributes object to the printDialog method.
The printDialog method returns true if the user clicked OK and false if the user canceled the dialog box. If the user accepted, call the print method of the PrinterJob class to start the printing process. The print method might throw a PrinterException. Here is the outline of the printing code:
if (job.printDialog(attributes))
{
   try
   {
      job.print(attributes);
   }
   catch (PrinterException exception)
   {
     . . .
   }
}
Note
Prior to JDK 1.4, the printing system used the native print and page setup dialog boxes of the host platform. To show a native print dialog box, call the printDialog method with no parameters. (There is no way to collect user settings in an attribute set.)
During printing, the print method of the PrinterJob class makes repeated calls to the print method of the Printable object associated with the job.
Because the job does not know how many pages you want to print, it simply keeps calling the print method. As long as the print method returns the value Printable.PAGE_EXISTS, the print job keeps producing pages. When the print method returns Printable.NO_SUCH_PAGE, the print job stops.
Therefore, the print job doesn’t have an accurate page count until after the printout is complete. For that reason, the print dialog box can’t display the correct page range and instead displays a page range of “Pages 1 to 1.” You will see in the next section how to avoid this blemish by supplying a Book object to the print job.
During the printing process, the print job repeatedly calls the print method of the Printable object. The print job is allowed to make multiple calls for the same page. You should therefore not count pages inside the print method but always rely on the page number parameter. There is a good reason why the print job might call the print method repeatedly for the same page. Some printers, in particular dot-matrix and inkjet printers, use banding. They print one band at a time, advance the paper, and then print the next band. The print job might use banding even for laser printers that print a full page at a time—it gives the print job a way of managing the size of the spool file.
If the print job needs the Printable object to print a band, then it sets the clip area of the graphics context to the requested band and calls the print method. Its drawing operations are clipped against the band rectangle, and only those drawing elements that show up in the band are rendered. Your print method need not be aware of that process, with one caveat: It should not interfere with the clip area.
Caution
The Graphics object that your print method gets is also clipped against the page margins. If you replace the clip area, you can draw outside the margins. Especially in a printer graphics context, the clipping area must be respected. Call clip, not setClip, to further restrict the clipping area. If you must remove a clip area, then make sure to call getClip at the beginning of your print method and restore that clip area.
The PageFormat parameter of the print method contains information about the printed page. The methods getWidth and getHeight return the paper size, measured in points. One point is 1/72 of an inch. (An inch equals 25.4 millimeters.) For example, A4 paper is approximately 595 × 842 points, and U.S. letter-size paper is 612 × 792 points.
Points are a common measurement in the printing trade in the United States. Much to the chagrin of the rest of the world, the printing package uses point units for two purposes. Paper sizes and paper margins are measured in points. And the default unit for all print graphics contexts is one point. You can verify that in the example program at the end of this section. The program prints two lines of text that are 72 units apart. Run the example program and measure the distance between the baselines. They are exactly 1 inch or 25.4 millimeters apart.
The getWidth and getHeight methods of the PageFormat class give you the complete paper size. Not all of the paper area is printable. Users typically select margins, and even if they don’t, printers need to somehow grip the sheets of paper on which they print and therefore have a small unprintable area around the edges.
The methods getImageableWidth and getImageableHeight tell you the dimensions of the area that you can actually fill. However, the margins need not be symmetrical, so you must also know the top-left corner of the imageable area (see Figure 7-33), which you obtain by the methods getImageableX and getImageableY.
Tip
The graphics context that you receive in the print method is clipped to exclude the margins, but the origin of the coordinate system is nevertheless the top-left corner of the paper. It makes sense to translate the coordinate system to start at the top-left corner of the imageable area. Simply start your print method with
g.translate(pageFormat.getImageableX(), pageFormat.getImageableY());
If you want your users to choose the settings for the page margins or to switch between portrait and landscape orientation without setting other printing attributes, you can call the pageDialog method of the PrinterJob class:
PageFormat format = job.pageDialog(attributes);
Note
One of the tabs of the print dialog box contains the page setup dialog box (see Figure 7-34). You might still want to give users an option to set the page format before printing, especially if your program presents a “what you see is what you get” display of the pages to be printed. The pageDialog method returns a PageFormat object with the user settings.
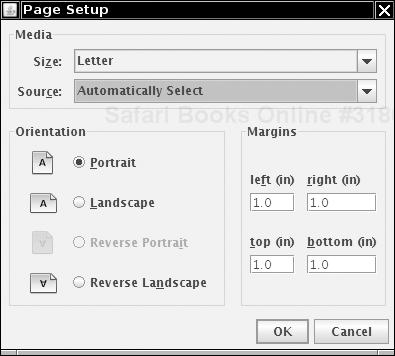
Listing 7-8 shows how to render the same set of shapes on the screen and on the printed page. A subclass of JPanel implements the Printable interface. Both the paintComponent and the print methods call the same method to carry out the actual drawing.
class PrintPanel extends JPanel implements Printable
{
   public void paintComponent(Graphics g)
   {
      super.paintComponent(g);
      Graphics2D g2 = (Graphics2D) g;
      drawPage(g2);
   }

   public int print(Graphics g, PageFormat pf, int page)
      throws PrinterException
   {
      if (page >= 1) return Printable.NO_SUCH_PAGE;
      Graphics2D g2 = (Graphics2D) g;
      g2.translate(pf.getImageableX(), pf.getImageableY());
      drawPage(g2);
      return Printable.PAGE_EXISTS;
   }

   public void drawPage(Graphics2D g2)
   {
      // shared drawing code goes here
      . . .
   }
   . . .
}
This example displays and prints the image shown in Figure 7-20 on page 558, namely, the outline of the message “Hello, World” that is used as a clipping area for a pattern of lines.
Click the Print button to start printing, or click the Page setup button to open the page setup dialog box. Listing 7-8 shows the code.
Note
To show a native page setup dialog box, you pass a default PageFormat object to the pageDialog method. The method clones that object, modifies it according to the user selections in the dialog box, and returns the cloned object.
PageFormat defaultFormat = printJob.defaultPage();
PageFormat selectedFormat = printJob.pageDialog(defaultFormat);
Example 7-8. PrintTest.java
  1. import java.awt.*;
  2. import java.awt.event.*;
  3. import java.awt.font.*;
  4. import java.awt.geom.*;
  5. import java.awt.print.*;
  6. import javax.print.attribute.*;
  7. import javax.swing.*;
  8.
  9. /**
 10.  * This program demonstrates how to print 2D graphics
 11.  * @version 1.12 2007-08-16
 12.  * @author Cay Horstmann
 13.  */
 14. public class PrintTest
 15. {
 16.    public static void main(String[] args)
 17.    {
 18.       EventQueue.invokeLater(new Runnable()
 19.          {
 20.             public void run()
 21.             {
 22.                JFrame frame = new PrintTestFrame();
 23.                frame.setDefaultCloseOperation(JFrame.EXIT_ON_CLOSE);
 24.                frame.setVisible(true);
 25.             }
 26.          });
 27.    }
 28. }
 29.
 30. /**
 31.  * This frame shows a panel with 2D graphics and buttons to print the graphics and to
 32.  * set up the page format.
 33.  */
 34. class PrintTestFrame extends JFrame
 35. {
 36.    public PrintTestFrame()
 37.    {
 38.       setTitle("PrintTest");
 39.       setSize(DEFAULT_WIDTH, DEFAULT_HEIGHT);
 40.
 41.       canvas = new PrintComponent();
 42.       add(canvas, BorderLayout.CENTER);
 43.
 44.       attributes = new HashPrintRequestAttributeSet();
 45.
 46.       JPanel buttonPanel = new JPanel();
 47.       JButton printButton = new JButton("Print");
 48.       buttonPanel.add(printButton);
 49.       printButton.addActionListener(new ActionListener()
 50.          {
 51.             public void actionPerformed(ActionEvent event)
 52.             {
 53.                try
 54.                {
 55.                   PrinterJob job = PrinterJob.getPrinterJob();
 56.                   job.setPrintable(canvas);
 57.                   if (job.printDialog(attributes)) job.print(attributes);
 58.                }
 59.                catch (PrinterException e)
 60.                {
 61.                   JOptionPane.showMessageDialog(PrintTestFrame.this, e);
 62.                }
 63.             }
 64.          });
 65.
 66.       JButton pageSetupButton = new JButton("Page setup");
 67.       buttonPanel.add(pageSetupButton);
 68.       pageSetupButton.addActionListener(new ActionListener()
 69.          {
 70.             public void actionPerformed(ActionEvent event)
 71.             {
 72.                PrinterJob job = PrinterJob.getPrinterJob();
 73.                job.pageDialog(attributes);
 74.             }
 75.          });
 76.
 77.       add(buttonPanel, BorderLayout.NORTH);
 78.    }
 79.
 80.    private PrintComponent canvas;
 81.    private PrintRequestAttributeSet attributes;
 82.
 83.    private static final int DEFAULT_WIDTH = 300;
 84.    private static final int DEFAULT_HEIGHT = 300;
 85. }
 86.
 87. /**
 88.  * This component generates a 2D graphics image for screen display and printing.
 89.  */
 90. class PrintComponent extends JComponent implements Printable
 91. {
 92.    public void paintComponent(Graphics g)
 93.    {
 94.       Graphics2D g2 = (Graphics2D) g;
 95.       drawPage(g2);
 96.    }
 97.
 98.    public int print(Graphics g, PageFormat pf, int page) throws PrinterException
 99.    {
100.       if (page >= 1) return Printable.NO_SUCH_PAGE;
101.       Graphics2D g2 = (Graphics2D) g;
102.       g2.translate(pf.getImageableX(), pf.getImageableY());
103.       g2.draw(new Rectangle2D.Double(0, 0, pf.getImageableWidth(), pf.getImageableHeight()));
104.
105.       drawPage(g2);
106.       return Printable.PAGE_EXISTS;
107.    }
108.
109.    /**
110.     * This method draws the page both on the screen and the printer graphics context.
111.     * @param g2 the graphics context
112.     */
113.    public void drawPage(Graphics2D g2)
114.    {
115.       FontRenderContext context = g2.getFontRenderContext();
116.       Font f = new Font("Serif", Font.PLAIN, 72);
117.       GeneralPath clipShape = new GeneralPath();
118.
119.       TextLayout layout = new TextLayout("Hello", f, context);
120.       AffineTransform transform = AffineTransform.getTranslateInstance(0, 72);
121.       Shape outline = layout.getOutline(transform);
122.       clipShape.append(outline, false);
123.
124.       layout = new TextLayout("World", f, context);
125.       transform = AffineTransform.getTranslateInstance(0, 144);
126.       outline = layout.getOutline(transform);
127.       clipShape.append(outline, false);
128.
129.       g2.draw(clipShape);
130.       g2.clip(clipShape);
131.
132.       final int NLINES = 50;
133.       Point2D p = new Point2D.Double(0, 0);
134.       for (int i = 0; i < NLINES; i++)
135.       {
136.          double x = (2 * getWidth() * i) / NLINES;
137.          double y = (2 * getHeight() * (NLINES - 1 - i)) / NLINES;
138.          Point2D q = new Point2D.Double(x, y);
139.          g2.draw(new Line2D.Double(p, q));
140.       }
141.    }
142. }
java.awt.print.PrinterJob 1.2
static PrinterJob getPrinterJob()returns a printer job object.
PageFormat defaultPage()returns the default page format for this printer.
boolean printDialog(PrintRequestAttributeSet attributes)boolean printDialog()opens a print dialog box to allow a user to select the pages to be printed and to change print settings. The first method displays a cross-platform dialog box, the second a native dialog box. The first method modifies the
attributesobject to reflect the user settings. Both methods returntrueif the user accepts the dialog box.PageFormat pageDialog(PrintRequestAttributeSet attributes)PageFormat pageDialog(PageFormat defaults)displays a page setup dialog box. The first method displays a cross-platform dialog box, the second a native dialog box. Both methods return a
PageFormatobject with the format that the user requested in the dialog box. The first method modifies theattributesobject to reflect the user settings. The second method does not modify thedefaultsobject.void setPrintable(Printable p, PageFormat format)sets the
Printableof this print job and an optional page format.void print()void print(PrintRequestAttributeSet attributes)prints the current
Printableby repeatedly calling itsprintmethod and sending the rendered pages to the printer, until no more pages are available.
java.awt.print.PageFormat 1.2
double getWidth()double getHeight()returns the width and height of the page.
double getImageableWidth()double getImageableHeight()returns the width and height of the imageable area of the page.
double getImageableX()double getImageableY()returns the position of the top-left corner of the imageable area.
int getOrientation()returns one of
PORTRAIT,LANDSCAPE, orREVERSE_LANDSCAPE. Page orientation is transparent to programmers because the page format and graphics context settings automatically reflect the page orientation.
In practice, you usually shouldn’t pass a raw Printable object to a print job. Instead, you should obtain an object of a class that implements the Pageable interface. The Java platform supplies one such class, called Book. A book is made up of sections, each of which is a Printable object. You make a book by adding Printable objects and their page counts.
Book book = new Book();
Printable coverPage = . . .;
Printable bodyPages = . . .;
book.append(coverPage, pageFormat); // append 1 page
book.append(bodyPages, pageFormat, pageCount);
Then, you use the setPageable method to pass the Book object to the print job.
printJob.setPageable(book);
Now the print job knows exactly how many pages to print. Then, the print dialog box displays an accurate page range, and the user can select the entire range or subranges.
Caution
When the print job calls the print methods of the Printable sections, it passes the current page number of the book, and not of each section, as the current page number. That is a huge pain—each section must know the page counts of the preceding sections to make sense of the page number parameter.
From your perspective as a programmer, the biggest challenge about using the Book class is that you must know how many pages each section will have when you print it. Your Printable class needs a layout algorithm that computes the layout of the material on the printed pages. Before printing starts, invoke that algorithm to compute the page breaks and the page count. You can retain the layout information so you have it handy during the printing process.
You must guard against the possibility that the user has changed the page format. If that happens, you must recompute the layout, even if the information that you want to print has not changed.
Listing 7-9 shows how to produce a multipage printout. This program prints a message in very large characters on a number of pages (see Figure 7-35). You can then trim the margins and tape the pages together to form a banner.
The layoutPages method of the Banner class computes the layout. We first lay out the message string in a 72-point font. We then compute the height of the resulting string and compare it with the imageable height of the page. We derive a scale factor from these two measurements. When printing the string, we magnify it by that scale factor.
Caution
To lay out your information precisely, you usually need access to the printer graphics context. Unfortunately, there is no way to obtain that graphics context until printing actually starts. In our example program, we make do with the screen graphics context and hope that the font metrics of the screen and printer match.
The getPageCount method of the Banner class first calls the layout method. Then it scales up the width of the string and divides it by the imageable width of each page. The quotient, rounded up to the next integer, is the page count.
It sounds like it might be difficult to print the banner because characters can be broken across multiple pages. However, thanks to the power of the Java 2D API, this turns out not to be a problem at all. When a particular page is requested, we simply use the translate method of the Graphics2D class to shift the top-left corner of the string to the left. Then, we set a clip rectangle that equals the current page (see Figure 7-36). Finally, we scale the graphics context with the scale factor that the layout method computed.
This example shows the power of transformations. The drawing code is kept simple, and the transformation does all the work of placing the drawing at the appropriate place. Finally, the clip cuts away the part of the image that falls outside the page. In the next section, you will see another compelling use of transformations, to display a print preview.
Most professional programs have a print preview mechanism that lets you look at your pages on the screen so that you won’t waste paper on a printout that you don’t like. The printing classes of the Java platform do not supply a standard “print preview” dialog box, but it is easy to design your own (see Figure 7-37). In this section, we show you how. The PrintPreviewDialog class in Listing 7-9 is completely generic—you can reuse it to preview any kind of printout.
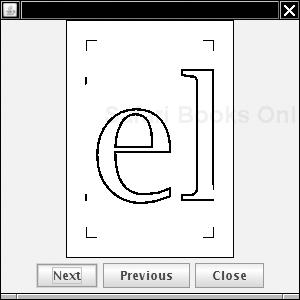
To construct a PrintPreviewDialog, you supply either a Printable or a Book, together with a PageFormat object. The surface of the dialog box contains a PrintPreviewCanvas. As you use the Next and Previous buttons to flip through the pages, the paintComponent method calls the print method of the Printable object for the requested page.
Normally, the print method draws the page context on a printer graphics context. However, we supply the screen graphics context, suitably scaled so that the entire printed page fits inside a small screen rectangle.
float xoff = . . .; // left of page
float yoff = . . .; // top of page
float scale = . . .; // to fit printed page onto screen
g2.translate(xoff, yoff);
g2.scale(scale, scale);
Printable printable = book.getPrintable(currentPage);
printable.print(g2, pageFormat, currentPage);
The print method never knows that it doesn’t actually produce printed pages. It simply draws onto the graphics context, thereby producing a microscopic print preview on the screen. This is a compelling demonstration of the power of the Java 2D imaging model.
Listing 7-9 contains the code for the banner printing program and the print preview dialog box. Type “Hello, World!” into the text field and look at the print preview, then print the banner.
Example 7-9. BookTest.java
  1. import java.awt.*;
  2. import java.awt.event.*;
  3. import java.awt.font.*;
  4. import java.awt.geom.*;
  5. import java.awt.print.*;
  6. import javax.print.attribute.*;
  7. import javax.swing.*;
  8.
  9. /**
 10.  * This program demonstrates the printing of a multipage book. It prints a "banner", by
 11.  * blowing up a text string to fill the entire page vertically. The program also contains a
 12.  * generic print preview dialog.
 13.  * @version 1.12 2007-08-16
 14.  * @author Cay Horstmann
 15.  */
 16. public class BookTest
 17. {
 18.    public static void main(String[] args)
 19.    {
 20.       EventQueue.invokeLater(new Runnable()
 21.          {
 22.             public void run()
 23.             {
 24.                JFrame frame = new BookTestFrame();
 25.                frame.setDefaultCloseOperation(JFrame.EXIT_ON_CLOSE);
 26.                frame.setVisible(true);
 27.             }
 28.          });
 29.    }
 30. }
 31.
 32. /**
 33.  * This frame has a text field for the banner text and buttons for printing, page setup,
 34.  * and print preview.
 35.  */
 36. class BookTestFrame extends JFrame
 37. {
 38.    public BookTestFrame()
 39.    {
 40.       setTitle("BookTest");
 41.
 42.       text = new JTextField();
 43.       add(text, BorderLayout.NORTH);
 44.
 45.       attributes = new HashPrintRequestAttributeSet();
 46.
 47.       JPanel buttonPanel = new JPanel();
 48.
 49.       JButton printButton = new JButton("Print");
 50.       buttonPanel.add(printButton);
 51.       printButton.addActionListener(new ActionListener()
 52.          {
 53.             public void actionPerformed(ActionEvent event)
 54.             {
 55.                try
 56.                {
 57.                   PrinterJob job = PrinterJob.getPrinterJob();
 58.                   job.setPageable(makeBook());
 59.                   if (job.printDialog(attributes))
 60.                   {
 61.                     job.print(attributes);
 62.                   }
 63.                }
 64.                catch (PrinterException e)
 65.                {
 66.                   JOptionPane.showMessageDialog(BookTestFrame.this, e);
 67.                }
 68.             }
 69.          });
 70.
 71.       JButton pageSetupButton = new JButton("Page setup");
 72.       buttonPanel.add(pageSetupButton);
 73.       pageSetupButton.addActionListener(new ActionListener()
 74.          {
 75.             public void actionPerformed(ActionEvent event)
 76.             {
 77.                PrinterJob job = PrinterJob.getPrinterJob();
 78.                pageFormat = job.pageDialog(attributes);
 79.             }
 80.          });
 81.
 82.       JButton printPreviewButton = new JButton("Print preview");
 83.       buttonPanel.add(printPreviewButton);
 84.       printPreviewButton.addActionListener(new ActionListener()
 85.          {
 86.             public void actionPerformed(ActionEvent event)
 87.             {
 88.                PrintPreviewDialog dialog = new PrintPreviewDialog(makeBook());
 89.                dialog.setVisible(true);
 90.             }
 91.          });
 92.
 93.       add(buttonPanel, BorderLayout.SOUTH);
 94.       pack();
 95.    }
 96.
 97.    /**
 98.     * Makes a book that contains a cover page and the pages for the banner.
 99.     */
100.    public Book makeBook()
101.    {
102.       if (pageFormat == null)
103.       {
104.          PrinterJob job = PrinterJob.getPrinterJob();
105.          pageFormat = job.defaultPage();
106.       }
107.       Book book = new Book();
108.       String message = text.getText();
109.       Banner banner = new Banner(message);
110.       int pageCount = banner.getPageCount((Graphics2D) getGraphics(), pageFormat);
111.       book.append(new CoverPage(message + " (" + pageCount + " pages)"), pageFormat);
112.       book.append(banner, pageFormat, pageCount);
113.       return book;
114.    }
115.
116.    private JTextField text;
117.    private PageFormat pageFormat;
118.    private PrintRequestAttributeSet attributes;
119. }
120.
121. /**
122.  * A banner that prints a text string on multiple pages.
123.  */
124. class Banner implements Printable
125. {
126.    /**
127.     * Constructs a banner
128.     * @param m the message string
129.     */
130.    public Banner(String m)
131.    {
132.       message = m;
133.    }
134.
135.    /**
136.     * Gets the page count of this section.
137.     * @param g2 the graphics context
138.     * @param pf the page format
139.     * @return the number of pages needed
140.     */
141.    public int getPageCount(Graphics2D g2, PageFormat pf)
142.    {
143.       if (message.equals("")) return 0;
144.       FontRenderContext context = g2.getFontRenderContext();
145.       Font f = new Font("Serif", Font.PLAIN, 72);
146.       Rectangle2D bounds = f.getStringBounds(message, context);
147.       scale = pf.getImageableHeight() / bounds.getHeight();
148.       double width = scale * bounds.getWidth();
149.       int pages = (int) Math.ceil(width / pf.getImageableWidth());
150.       return pages;
151.    }
152.
153.    public int print(Graphics g, PageFormat pf, int page) throws PrinterException
154.    {
155.       Graphics2D g2 = (Graphics2D) g;
156.       if (page > getPageCount(g2, pf)) return Printable.NO_SUCH_PAGE;
157.       g2.translate(pf.getImageableX(), pf.getImageableY());
158.
159.       drawPage(g2, pf, page);
160.       return Printable.PAGE_EXISTS;
161.    }
162.
163.    public void drawPage(Graphics2D g2, PageFormat pf, int page)
164.    {
165.       if (message.equals("")) return;
166.       page--; // account for cover page
167.
168.       drawCropMarks(g2, pf);
169.       g2.clip(new Rectangle2D.Double(0, 0, pf.getImageableWidth(), pf.getImageableHeight()));
170.       g2.translate(-page * pf.getImageableWidth(), 0);
171.       g2.scale(scale, scale);
172.       FontRenderContext context = g2.getFontRenderContext();
173.       Font f = new Font("Serif", Font.PLAIN, 72);
174.       TextLayout layout = new TextLayout(message, f, context);
175.       AffineTransform transform = AffineTransform.getTranslateInstance(0, layout.getAscent());
176.       Shape outline = layout.getOutline(transform);
177.       g2.draw(outline);
178.    }
179.
180.    /**
181.     * Draws 1/2" crop marks in the corners of the page.
182.     * @param g2 the graphics context
183.     * @param pf the page format
184.     */
185.    public void drawCropMarks(Graphics2D g2, PageFormat pf)
186.    {
187.       final double C = 36; // crop mark length = 1/2 inch
188.       double w = pf.getImageableWidth();
189.       double h = pf.getImageableHeight();
190.       g2.draw(new Line2D.Double(0, 0, 0, C));
191.       g2.draw(new Line2D.Double(0, 0, C, 0));
192.       g2.draw(new Line2D.Double(w, 0, w, C));
193.       g2.draw(new Line2D.Double(w, 0, w - C, 0));
194.       g2.draw(new Line2D.Double(0, h, 0, h - C));
195.       g2.draw(new Line2D.Double(0, h, C, h));
196.       g2.draw(new Line2D.Double(w, h, w, h - C));
197.       g2.draw(new Line2D.Double(w, h, w - C, h));
198.    }
199.
200.    private String message;
201.    private double scale;
202. }
203.
204. /**
205.  * This class prints a cover page with a title.
206.  */
207. class CoverPage implements Printable
208. {
209.    /**
210.     * Constructs a cover page.
211.     * @param t the title
212.     */
213.    public CoverPage(String t)
214.    {
215.       title = t;
216.    }
217.
218.    public int print(Graphics g, PageFormat pf, int page) throws PrinterException
219.    {
220.       if (page >= 1) return Printable.NO_SUCH_PAGE;
221.       Graphics2D g2 = (Graphics2D) g;
222.       g2.setPaint(Color.black);
223.       g2.translate(pf.getImageableX(), pf.getImageableY());
224.       FontRenderContext context = g2.getFontRenderContext();
225.       Font f = g2.getFont();
226.       TextLayout layout = new TextLayout(title, f, context);
227.       float ascent = layout.getAscent();
228.       g2.drawString(title, 0, ascent);
229.       return Printable.PAGE_EXISTS;
230.    }
231.
232.    private String title;
233. }
234.
235. /**
236.  * This class implements a generic print preview dialog.
237.  */
238. class PrintPreviewDialog extends JDialog
239. {
240.    /**
241.     * Constructs a print preview dialog.
242.     * @param p a Printable
243.     * @param pf the page format
244.     * @param pages the number of pages in p
245.     */
246.    public PrintPreviewDialog(Printable p, PageFormat pf, int pages)
247.    {
248.       Book book = new Book();
249.       book.append(p, pf, pages);
250.       layoutUI(book);
251.    }
252.
253.    /**
254.     * Constructs a print preview dialog.
255.     * @param b a Book
256.     */
257.    public PrintPreviewDialog(Book b)
258.    {
259.       layoutUI(b);
260.    }
261.
262.    /**
263.     * Lays out the UI of the dialog.
264.     * @param book the book to be previewed
265.     */
266.    public void layoutUI(Book book)
267.    {
268.       setSize(DEFAULT_WIDTH, DEFAULT_HEIGHT);
269.
270.       canvas = new PrintPreviewCanvas(book);
271.       add(canvas, BorderLayout.CENTER);
272.
273.       JPanel buttonPanel = new JPanel();
274.
275.       JButton nextButton = new JButton("Next");
276.       buttonPanel.add(nextButton);
277.       nextButton.addActionListener(new ActionListener()
278.          {
279.             public void actionPerformed(ActionEvent event)
280.             {
281.                canvas.flipPage(1);
282.             }
283.          });
284.
285.       JButton previousButton = new JButton("Previous");
286.       buttonPanel.add(previousButton);
287.       previousButton.addActionListener(new ActionListener()
288.          {
289.             public void actionPerformed(ActionEvent event)
290.             {
291.                canvas.flipPage(-1);
292.             }
293.          });
294.
295.       JButton closeButton = new JButton("Close");
296.       buttonPanel.add(closeButton);
297.       closeButton.addActionListener(new ActionListener()
298.          {
299.             public void actionPerformed(ActionEvent event)
300.             {
301.                setVisible(false);
302.             }
303.          });
304.
305.       add(buttonPanel, BorderLayout.SOUTH);
306.    }
307.
308.    private PrintPreviewCanvas canvas;
309.
310.    private static final int DEFAULT_WIDTH = 300;
311.    private static final int DEFAULT_HEIGHT = 300;
312. }
313.
314. /**
315.  * The canvas for displaying the print preview.
316.  */
317. class PrintPreviewCanvas extends JComponent
318. {
319.    /**
320.     * Constructs a print preview canvas.
321.     * @param b the book to be previewed
322.     */
323.    public PrintPreviewCanvas(Book b)
324.    {
325.       book = b;
326.       currentPage = 0;
327.    }
328.
329.    public void paintComponent(Graphics g)
330.    {
331.       Graphics2D g2 = (Graphics2D) g;
332.       PageFormat pageFormat = book.getPageFormat(currentPage);
333.
334.       double xoff; // x offset of page start in window
335.       double yoff; // y offset of page start in window
336.       double scale; // scale factor to fit page in window
337.       double px = pageFormat.getWidth();
338.       double py = pageFormat.getHeight();
339.       double sx = getWidth() - 1;
340.       double sy = getHeight() - 1;
341.       if (px / py < sx / sy) // center horizontally
342.       {
343.          scale = sy / py;
344.          xoff = 0.5 * (sx - scale * px);
345.          yoff = 0;
346.       }
347.       else
348.       // center vertically
349.       {
350.          scale = sx / px;
351.          xoff = 0;
352.          yoff = 0.5 * (sy - scale * py);
353.       }
354.       g2.translate((float) xoff, (float) yoff);
355.       g2.scale((float) scale, (float) scale);
356.
357.       // draw page outline (ignoring margins)
358.       Rectangle2D page = new Rectangle2D.Double(0, 0, px, py);
359.       g2.setPaint(Color.white);
360.       g2.fill(page);
361.       g2.setPaint(Color.black);
362.       g2.draw(page);
363.
364.       Printable printable = book.getPrintable(currentPage);
365.       try
366.       {
367.          printable.print(g2, pageFormat, currentPage);
368.       }
369.       catch (PrinterException e)
370.       {
371.          g2.draw(new Line2D.Double(0, 0, px, py));
372.          g2.draw(new Line2D.Double(px, 0, 0, py));
373.       }
374.    }
375.
376.    /**
377.     * Flip the book by the given number of pages.
378.     * @param by the number of pages to flip by. Negative values flip backwards.
379.     */
380.    public void flipPage(int by)
381.    {
382.       int newPage = currentPage + by;
383.       if (0 <= newPage && newPage < book.getNumberOfPages())
384.       {
385.          currentPage = newPage;
386.          repaint();
387.       }
388.    }
389.
390.    private Book book;
391.    private int currentPage;
392. }
So far, you have seen how to print 2D graphics. However, the printing API introduced in Java SE 1.4 affords far greater flexibility. The API defines a number of data types and lets you find print services that are able to print them. Among the data types:
Images in GIF, JPEG, or PNG format.
Documents in text, HTML, PostScript, or PDF format.
Raw printer code data.
Objects of a class that implements
Printable,Pageable, orRenderableImage.
The data themselves can be stored in a source of bytes or characters such as an input stream, a URL, or an array. A document flavor describes the combination of a data source and a data type. The DocFlavor class defines a number of inner classes for the various data sources. Each of the inner classes defines constants to specify the flavors. For example, the constant
DocFlavor.INPUT_STREAM.GIF
describes a GIF image that is read from an input stream. Table 7-3 lists the combinations.
Table 7-3. Document Flavors for Print Services
Data Source | Data Type | MIME Type |
|---|---|---|
|
|
|
|
|
|
|
|
|
|
| |
|
| |
|
| |
|
| |
|
| |
|
| |
|
| |
|
| |
|
| |
|
| |
|
| |
|
| |
|
| |
|
| |
|
| |
|
| |
|
|
|
|
|
|
| ||
|
| N/A |
| N/A | |
| N/A |
Suppose you want to print a GIF image that is located in a file. First find out whether there is a print service that is capable of handling the task. The static lookupPrintServices method of the PrintServiceLookup class returns an array of PrintService objects that can handle the given document flavor.
DocFlavor flavor = DocFlavor.INPUT_STREAM.GIF;
PrintService[] services
   = PrintServiceLookup.lookupPrintServices(flavor, null);
The second parameter of the lookupPrintServices method is null to indicate that we don’t want to constrain the search by specifying printer attributes. We cover attributes in the next section.
Note
Java SE 6 supplies print services for basic document flavors such as images and 2D graphics, but if you try to print text or HTML documents, the lookup will return an empty array.
If the lookup yields an array with more than one element, you select from the listed print services. You can call the getName method of the PrintService class to get the printer names, and then let the user choose.
Next, get a document print job from the service:
DocPrintJob job = services[i].createPrintJob();
For printing, you need an object that implements the Doc interface. The Java library supplies a class SimpleDoc for that purpose. The SimpleDoc constructor requires the data source object, the document flavor, and an optional attribute set. For example,
InputStream in = new FileInputStream(fileName);
Doc doc = new SimpleDoc(in, flavor, null);
Finally, you are ready to print:
job.print(doc, null);
As before, the null parameter can be replaced by an attribute set.
Note that this printing process is quite different from that of the preceding section. There is no user interaction through print dialog boxes. For example, you can implement a server-side printing mechanism in which users submit print jobs through a web form.
The program in Listing 7-10 demonstrates how to use a print service to print an image file.
Example 7-10. PrintServiceTest.java
 1. import java.io.*;
 2. import javax.print.*;
 3.
 4. /**
 5.  * This program demonstrates the use of print services. The program lets you print a GIF
 6.  * image to any of the print services that support the GIF document flavor.
 7.  * @version 1.10 2007-08-16
 8.  * @author Cay Horstmann
 9.  */
10. public class PrintServiceTest
11. {
12.    public static void main(String[] args)
13.    {
14.       DocFlavor flavor = DocFlavor.URL.GIF;
15.       PrintService[] services = PrintServiceLookup.lookupPrintServices(flavor, null);
16.       if (args.length == 0)
17.       {
18.          if (services.length == 0) System.out.println("No printer for flavor " + flavor);
19.          else
20.          {
21.             System.out.println("Specify a file of flavor " + flavor
22.                   + "
and optionally the number of the desired printer.");
23.             for (int i = 0; i < services.length; i++)
24.                System.out.println((i + 1) + ": " + services[i].getName());
25.          }
26.          System.exit(0);
27.       }
28.       String fileName = args[0];
29.       int p = 1;
30.       if (args.length > 1) p = Integer.parseInt(args[1]);
31.       try
32.       {
33.          if (fileName == null) return;
34.          FileInputStream in = new FileInputStream(fileName);
35.          Doc doc = new SimpleDoc(in, flavor, null);
36.          DocPrintJob job = services[p - 1].createPrintJob();
37.          job.print(doc, null);
38.       }
39.       catch (FileNotFoundException e)
40.       {
41.          e.printStackTrace();
42.       }
43.       catch (PrintException e)
44.       {
45.          e.printStackTrace();
46.       }
47.    }
48. }
javax.print.PrintService 1.4
DocPrintJob createPrintJob()creates a print job for printing an object of a class that implements the
Docinterface, such as aSimpleDoc.
javax.print.DocPrintJob 1.4
void print(Doc doc, PrintRequestAttributeSet attributes)prints the given document with the given attributes.
Parameters:
docThe
Docto be printedattributesThe required printing attributes, or
nullif no printing attributes are required
javax.print.SimpleDoc 1.4
SimpleDoc(Object data, DocFlavor flavor, DocAttributeSet attributes)constructs a
SimpleDocobject that can be printed with aDocPrintJob.Parameters:
dataThe object with the print data, such as an input stream or a
PrintableflavorThe document flavor of the print data
attributesDocument attributes, or
nullif attributes are not required
A print service sends print data to a printer. A stream print service generates the same print data but instead sends them to a stream, perhaps for delayed printing or because the print data format can be interpreted by other programs. In particular, if the print data format is PostScript, then it is useful to save the print data to a file because many programs can process PostScript files. The Java platform includes a stream print service that can produce PostScript output from images and 2D graphics. You can use that service on all systems, even if there are no local printers.
Enumerating stream print services is a bit more tedious than locating regular print services. You need both the DocFlavor of the object to be printed and the MIME type of the stream output. You then get a StreamPrintServiceFactory array of factories.
DocFlavor flavor = DocFlavor.SERVICE_FORMATTED.PRINTABLE;
String mimeType = "application/postscript";
StreamPrintServiceFactory[] factories
   = StreamPrintServiceFactory.lookupStreamPrintServiceFactories(flavor, mimeType);
The StreamPrintServiceFactory class has no methods that would help us distinguish any one factory from another, so we just take factories[0]. We call the getPrintService method with an output stream parameter to get a StreamPrintService object.
OutputStream out = new FileOutputStream(fileName);
StreamPrintService service = factories[0].getPrintService(out);
The StreamPrintService class is a subclass of PrintService. To produce a printout, simply follow the steps of the preceding section.
javax.print.StreamPrintServiceFactory 1.4
StreamPrintServiceFactory[] lookupStreamPrintServiceFactories(DocFlavor flavor, String mimeType)looks up the stream print service factories that can print the given document flavor and produces an output stream of the given MIME type.
StreamPrintService getPrintService(OutputStream out)gets a print service that sends the printing output to the given output stream.
The print service API contains a complex set of interfaces and classes to specify various kinds of attributes. There are four important groups of attributes. The first two specify requests to the printer.
Print request attributes request particular features for all
docobjects in a print job, such as two-sided printing or the paper size.Doc attributes are request attributes that apply only to a single
docobject.
The other two attributes contain information about the printer and job status.
Print service attributes give information about the print service, such as the printer make and model or whether the printer is currently accepting jobs.
Print job attributes give information about the status of a particular print job, such as whether the job is already completed.
To describe the various attributes there is an interface Attribute with subinterfaces:
PrintRequestAttribute
DocAttribute
PrintServiceAttribute
PrintJobAttribute
SupportedValuesAttribute
Individual attribute classes implement one or more of these interfaces. For example, objects of the Copies class describe the number of copies of a printout. That class implements both the PrintRequestAttribute and the PrintJobAttribute interfaces. Clearly, a print request can contain a request for multiple copies. Conversely, an attribute of the print job might be how many of these copies were actually printed. That number might be lower, perhaps because of printer limitations or because the printer ran out of paper.
The SupportedValuesAttribute interface indicates that an attribute value does not reflect actual request or status data but rather the capability of a service. For example, the CopiesSupported class implements the SupportedValuesAttribute interface. An object of that class might describe that a printer supports 1 through 99 copies of a printout.
Figure 7-38 shows a class diagram of the attribute hierarchy.
In addition to the interfaces and classes for individual attributes, the print service API defines interfaces and classes for attribute sets. A superinterface, AttributeSet, has four subinterfaces:
PrintRequestAttributeSet
DocAttributeSet
PrintServiceAttributeSet
PrintJobAttributeSet
Each of these interfaces has an implementing class, yielding the five classes:
HashAttributeSet
HashPrintRequestAttributeSet
HashDocAttributeSet
HashPrintServiceAttributeSet
HashPrintJobAttributeSet
Figure 7-39 shows a class diagram of the attribute set hierarchy.
For example, you construct a print request attribute set like this:
PrintRequestAttributeSet attributes = new HashPrintRequestAttributeSet();
After constructing the set, you are freed from worry about the Hash prefix.
Why have all these interfaces? They make it possible to check for correct attribute usage. For example, a DocAttributeSet accepts only objects that implement the DocAttribute interface. Any attempt to add another attribute results in a runtime error.
An attribute set is a specialized kind of map, where the keys are of type Class and the values belong to a class that implements the Attribute interface. For example, if you insert an object
new Copies(10)
into an attribute set, then its key is the Class object Copies.class. That key is called the category of the attribute. The Attribute interface declares a method
Class getCategory()
that returns the category of an attribute. The Copies class defines the method to return the object Copies.class, but it isn’t a requirement that the category be the same as the class of the attribute.
When an attribute is added to an attribute set, the category is extracted automatically. You just add the attribute value:
attributes.add(new Copies(10));
If you subsequently add another attribute with the same category, it overwrites the first one.
To retrieve an attribute, you need to use the category as the key, for example,
AttributeSet attributes = job.getAttributes();
Copies copies = (Copies) attribute.get(Copies.class);
Finally, attributes are organized by the values they can have. The Copies attribute can have any integer value. The Copies class extends the IntegerSyntax class that takes care of all integer-valued attributes. The getValue method returns the integer value of the attribute, for example,
int n = copies.getValue();
The classes
TextSyntax
DateTimeSyntax
URISyntax
encapsulate a string, date and time, or URI.
Finally, many attributes can take a finite number of values. For example, the PrintQuality attribute has three settings: draft, normal, and high. They are represented by three constants:
PrintQuality.DRAFT
PrintQuality.NORMAL
PrintQuality.HIGH
Attribute classes with a finite number of values extend the EnumSyntax class, which provides a number of convenience methods to set up these enumerations in a typesafe manner. You need not worry about the mechanism when using such an attribute. Simply add the named values to attribute sets:
attributes.add(PrintQuality.HIGH);
Here is how you check the value of an attribute:
if (attributes.get(PrintQuality.class) == PrintQuality.HIGH)
   . . .
Table 7-4 lists the printing attributes. The second column lists the superclass of the attribute class (for example, IntegerSyntax for the Copies attribute) or the set of enumeration values for the attributes with a finite set of values. The last four columns indicate whether the attribute class implements the DocAttribute (DA), PrintJobAttribute (PJA), PrintRequestAttribute (PRA), and PrintServiceAttribute (PSA) interfaces.
Table 7-4. Printing Attributes
Attribute | Superclass or Enumeration Constants | DA | PJA | PRA | PSA |
|---|---|---|---|---|---|
|
| ✓ | ✓ | ✓ | |
|
| ✓ | |||
|
| ✓ | |||
|
| ✓ | ✓ | ||
|
| ✓ | |||
|
| ✓ | |||
|
| ✓ | |||
|
| ✓ | ✓ | ||
|
| ✓ | |||
|
| ✓ | ✓ | ||
|
| ✓ | ✓ | ✓ | |
|
| ✓ | ✓ | ||
|
| ✓ | ✓ | ||
|
| ✓ | |||
|
| ✓ | ✓ | ||
|
| ✓ | |||
|
| ✓ | ✓ | ||
|
| ✓ | |||
|
| ✓ | |||
|
| ✓ | ✓ | ||
|
| ✓ | |||
|
| ✓ | ✓ | ||
|
| ✓ | ✓ | ||
|
| ✓ | |||
|
| ||||
|
| ✓ | |||
|
| ✓ | ✓ | ✓ | |
|
| ||||
|
| ✓ | ✓ | ✓ | |
|
| ✓ | ✓ | ✓ | |
|
| ✓ | ✓ | ||
|
| ✓ | |||
|
| ✓ | |||
|
| ✓ | ✓ | ✓ | |
|
| ✓ | ✓ | ✓ | |
|
| ✓ | |||
|
| ✓ | ✓ | ✓ | |
|
| ✓ | |||
|
| ✓ | |||
|
| ✓ | |||
|
| ✓ | ✓ | ||
|
| ✓ | |||
|
| ✓ | |||
|
| ✓ | |||
|
| ✓ | |||
|
| ✓ | |||
|
| ✓ | |||
|
| ✓ | |||
|
| ✓ | |||
|
| ✓ | ✓ | ✓ | |
|
| ✓ | |||
|
| ||||
|
| ||||
|
| ✓ | |||
|
| ✓ | ✓ | ✓ | |
|
| ✓ | |||
|
| ||||
|
| ✓ | |||
|
| ||||
|
| ✓ | ✓ | ✓ | |
|
| ✓ | ✓ | ✓ |
Note
As you can see, there are lots of attributes, many of which are quite specialized. The source for most of the attributes is the Internet Printing Protocol 1.1 (RFC 2911).
Note
An earlier version of the printing API introduced the JobAttributes and PageAttributes classes, the purpose of which is similar to the printing attributes covered in this section. These classes are now obsolete.
javax.print.attribute.AttributeSet 1.4
boolean add(Attribute attr)adds an attribute to this set. If the set has another attribute with the same category, that attribute is replaced by the given attribute. Returns
trueif the set changed as a result of this operation.Attribute get(Class category)retrieves the attribute with the given category key, or
nullif no such attribute exists.boolean remove(Attribute attr)boolean remove(Class category)removes the given attribute, or the attribute with the given category, from the set. Returns
trueif the set changed as a result of this operation.Attribute[] toArray()returns an array with all attributes in this set.
javax.print.PrintService 1.4
PrintServiceAttributeSet getAttributes()gets the attributes of this print service.
javax.print.DocPrintJob 1.4
PrintJobAttributeSet getAttributes()gets the attributes of this print job.
This concludes our discussion on printing. You now know how to print 2D graphics and other document types, how to enumerate printers and stream print services, and how to set and retrieve attributes. Next, we turn to two important user interface issues, the clipboard and support for the drag-and-drop mechanism.
One of the most useful and convenient user interface mechanisms of GUI environments (such as Windows and the X Window System) is cut and paste. You select some data in one program and cut or copy them to the clipboard. Then, you select another program and paste the clipboard contents into that application. Using the clipboard, you can transfer text, images, or other data from one document to another, or, of course, from one place in a document to another place in the same document. Cut and paste is so natural that most computer users never think about it.
Even though the clipboard is conceptually simple, implementing clipboard services is actually harder than you might think. Suppose you copy text from a word processor to the clipboard. If you paste that text into another word processor, then you expect that the fonts and formatting will stay intact. That is, the text in the clipboard needs to retain the formatting information. However, if you paste the text into a plain text field, then you expect that just the characters are pasted in, without additional formatting codes. To support this flexibility, the data provider can offer the clipboard data in multiple formats, and the data consumer can pick one of them.
The system clipboard implementations of Microsoft Windows and the Macintosh are similar, but, of course, there are slight differences. However, the X Window System clipboard mechanism is much more limited—cutting and pasting of anything but plain text is only sporadically supported. You should consider these limitations when trying out the programs in this section.
Note
Check out the file jre/lib/flavormap.properties on your platform to get an idea about what kinds of objects can be transferred between Java programs and the system clipboard.
Often, programs need to support cut and paste of data types that the system clipboard cannot handle. The data transfer API supports the transfer of arbitrary local object references in the same virtual machine. Between different virtual machines, you can transfer serialized objects and references to remote objects.
Table 7-5 summarizes the data transfer capabilities of the clipboard mechanism.
Data transfer in the Java technology is implemented in a package called java.awt.datatransfer. Here is an overview of the most important classes and interfaces of that package.
Objects that can be transferred via a clipboard must implement the
Transferableinterface.The
Clipboardclass describes a clipboard. Transferable objects are the only items that can be put on or taken off a clipboard. The system clipboard is a concrete example of aClipboard.The
DataFlavorclass describes data flavors that can be placed on the clipboard.The
StringSelectionclass is a concrete class that implements theTransferableinterface. It transfers text strings.A class must implement the
ClipboardOwnerinterface if it wants to be notified when the clipboard contents have been overwritten by somooeone else. Clipboard ownership enables “delayed formatting” of complex data. If a program transfers simple data (such as a string), then it simply sets the clipboard contents and moves on to do the next thing. However, if a program will place complex data that can be formatted in multiple flavors onto the clipboard, then it might not actually want to prepare all the flavors, because there is a good chance that most of them are never needed. However, then it needs to hang on to the clipboard data so that it can create the flavors later when they are requested. The clipboard owner is notified (by a call to itslostOwnershipmethod) when the contents of the clipboard change. That tells it that the information is no longer needed. In our sample programs, we don’t worry about clipboard ownership.
The best way to get comfortable with the data transfer classes is to start with the simplest situation: transferring text to and from the system clipboard. First, get a reference to the system clipboard.
Clipboard clipboard = Toolkit.getDefaultToolkit().getSystemClipboard();
For strings to be transferred to the clipboard, they must be wrapped into StringSelection objects.
String text = . . .
StringSelection selection = new StringSelection(text);
The actual transfer is done by a call to setContents, which takes a StringSelection object and a ClipBoardOwner as parameters. If you are not interested in designating a clipboard owner, set the second parameter to null.
clipboard.setContents(selection, null);
Here is the reverse operation, reading a string from the clipboard:
DataFlavor flavor = DataFlavor.stringFlavor;
if (clipboard.isDataFlavorAvailable(flavor)
   String text = (String) clipboard.getData(flavor);
The parameter of the getContents call is an Object reference of the requesting object, but because the current implementation of the Clipboard class ignores it, we just pass null.
The return value of getContents can be null. That indicates that the clipboard is either empty or that it has no data that the Java platform knows how to retrieve as text.
Listing 7-11 is a program that demonstrates cutting and pasting between a Java application and the system clipboard. If you select an area of text in the text area and click Copy, then the selected text is copied to the system clipboard. You can then paste it into any text editor (see Figure 7-40). Conversely, when you copy text from the text editor, you can paste it into our sample program.
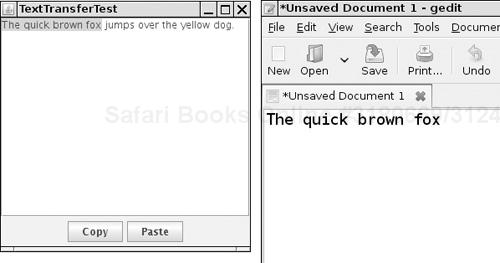
Example 7-11. TextTransferTest.java
  1. import java.awt.*;
  2. import java.awt.datatransfer.*;
  3. import java.awt.event.*;
  4. import java.io.*;
  5.
  6. import javax.swing.*;
  7.
  8. /**
  9.  * This program demonstrates the transfer of text between a Java application and the system
 10.  * clipboard.
 11.  * @version 1.13 2007-08-16
 12.  * @author Cay Horstmann
 13.  */
 14. public class TextTransferTest
 15. {
 16.    public static void main(String[] args)
 17.    {
 18.       EventQueue.invokeLater(new Runnable()
 19.          {
 20.             public void run()
 21.             {
 22.                JFrame frame = new TextTransferFrame();
 23.                frame.setDefaultCloseOperation(JFrame.EXIT_ON_CLOSE);
 24.                frame.setVisible(true);
 25.             }
 26.          });
 27.    }
 28. }
 29.
 30. /**
 31.  * This frame has a text area and buttons for copying and pasting text.
 32.  */
 33. class TextTransferFrame extends JFrame
 34. {
 35.    public TextTransferFrame()
 36.    {
 37.       setTitle("TextTransferTest");
 38.       setSize(DEFAULT_WIDTH, DEFAULT_HEIGHT);
 39.
 40.       textArea = new JTextArea();
 41.       add(new JScrollPane(textArea), BorderLayout.CENTER);
 42.       JPanel panel = new JPanel();
 43.
 44.       JButton copyButton = new JButton("Copy");
 45.       panel.add(copyButton);
 46.       copyButton.addActionListener(new ActionListener()
 47.          {
 48.             public void actionPerformed(ActionEvent event)
 49.             {
 50.                copy();
 51.             }
 52.          });
 53.
 54.       JButton pasteButton = new JButton("Paste");
 55.       panel.add(pasteButton);
 56.       pasteButton.addActionListener(new ActionListener()
 57.          {
 58.             public void actionPerformed(ActionEvent event)
 59.             {
 60.                paste();
 61.             }
 62.          });
 63.
 64.       add(panel, BorderLayout.SOUTH);
 65.    }
 66.
 67.    /**
 68.     * Copies the selected text to the system clipboard.
 69.     */
 70.    private void copy()
 71.    {
 72.       Clipboard clipboard = Toolkit.getDefaultToolkit().getSystemClipboard();
 73.       String text = textArea.getSelectedText();
 74.       if (text == null) text = textArea.getText();
 75.       StringSelection selection = new StringSelection(text);
 76.       clipboard.setContents(selection, null);
 77.    }
 78.
 79.    /**
 80.     * Pastes the text from the system clipboard into the text area.
 81.     */
 82.    private void paste()
 83.    {
 84.       Clipboard clipboard = Toolkit.getDefaultToolkit().getSystemClipboard();
 85.       DataFlavor flavor = DataFlavor.stringFlavor;
 86.       if (clipboard.isDataFlavorAvailable(flavor))
 87.       {
 88.          try
 89.          {
 90.             String text = (String) clipboard.getData(flavor);
 91.             textArea.replaceSelection(text);
 92.          }
 93.          catch (UnsupportedFlavorException e)
 94.          {
 95.             JOptionPane.showMessageDialog(this, e);
 96.          }
 97.          catch (IOException e)
 98.          {
 99.             JOptionPane.showMessageDialog(this, e);
100.          }
101.       }
102.    }
103.
104.    private JTextArea textArea;
105.
106.    private static final int DEFAULT_WIDTH = 300;
107.    private static final int DEFAULT_HEIGHT = 300;
108. }
java.awt.datatransfer.Clipboard 1.1
Transferable getContents(Object requester)gets the clipboard contents.
Parameters:
requesterThe object requesting the clipboard contents; this value is not actually used
void setContents(Transferable contents, ClipboardOwner owner)puts contents on the clipboard.
Parameters:
contentsThe
Transferableencapsulating the contentsownerThe object to be notified (via its
lostOwnershipmethod) when new information is placed on the clipboard, ornullif no notification is desiredboolean isDataFlavorAvailable(DataFlavor flavor)5.0returns
trueif the clipboard has data in the given flavor.Object getData(DataFlavor flavor)5.0gets the data in the given flavor, or throws an
UnsupportedFlavorExceptionif no data are available in the given flavor.
java.awt.datatransfer.ClipboardOwner 1.1
void lostOwnership(Clipboard clipboard, Transferable contents)notifies this object that it is no longer the owner of the contents of the clipboard.
Parameters:
clipboardThe clipboard onto which the contents were placed
contentsThe item that this owner had placed onto the clipboard
java.awt.datatransfer.Transferable 1.1
boolean isDataFlavorSupported(DataFlavor flavor)returns
trueif the specified flavor is one of the supported data flavors;falseotherwise.Object getTransferData(DataFlavor flavor)returns the data, formatted in the requested flavor. Throws an
UnsupportedFlavorExceptionif the flavor requested is not supported.
A DataFlavor is defined by two characteristics:
A MIME type name (such as
"image/gif").A representation class for accessing the data (such as
java.awt.Image).
In addition, every data flavor has a human-readable name (such as "GIF Image").
The representation class can be specified with a class parameter in the MIME type, for example,
image/gif;class=java.awt.Image
Note
This is just an example to show the syntax. There is no standard data flavor for transferring GIF image data.
If no class parameter is given, then the representation class is InputStream.
For transferring local, serialized, and remote Java objects, Sun Microsystems defines three MIME types:
application/x-java-jvm-local-objectref
application/x-java-serialized-object
application/x-java-remote-object
Note
The x- prefix indicates that this is an experimental name, not one that is sanctioned by IANA, the organization that assigns standard MIME type names.
For example, the standard stringFlavor data flavor is described by the MIME type
application/x-java-serialized-object;class=java.lang.String
You can ask the clipboard to list all available flavors:
DataFlavor[] flavors = clipboard.getAvailableDataFlavors()
You can also install a FlavorListener onto the clipboard. The listener is notified when the collection of data flavors on the clipboard changes. See the API notes for details.
java.awt.datatransfer.DataFlavor 1.1
DataFlavor(String mimeType, String humanPresentableName)creates a data flavor that describes stream data in a format described by a MIME type.
Parameters:
mimeTypeA MIME type string
humanPresentableNameA more readable version of the name
DataFlavor(Class class, String humanPresentableName)creates a data flavor that describes a Java platform class. Its MIME type is
application/x-java-serialized-object;class=className.Parameters:
classThe class that is retrieved from the
TransferablehumanPresentableNameA readable version of the name
String getMimeType()returns the MIME type string for this data flavor.
boolean isMimeTypeEqual(String mimeType)tests whether this data flavor has the given MIME type.
String getHumanPresentableName()returns the human-presentable name for the data format of this data flavor.
Class getRepresentationClass()returns a
Classobject that represents the class of the object that aTransferableobject will return when called with this data flavor. This is either theclassparameter of the MIME type orInputStream.
java.awt.datatransfer.Clipboard 1.1
DataFlavor[] getAvailableDataFlavors()5.0returns an array of the available flavors.
void addFlavorListener(FlavorListener listener)5.0adds a listener that is notified when the set of available flavors changes.
Objects that you want to transfer via the clipboard must implement the Transferable interface. The StringSelection class is currently the only public class in the Java standard library that implements the Transferable interface. In this section, you will see how to transfer images into the clipboard. Because Java does not supply a class for image transfer, you must implement it yourself.
The class is completely trivial. It simply reports that the only available data format is DataFlavor.imageFlavor, and it holds an image object.
class ImageTransferable implements Transferable
{
   public ImageTransferable(Image image)
   {
      theImage = image;
   }

   public DataFlavor[] getTransferDataFlavors()
   {
      return new DataFlavor[] { DataFlavor.imageFlavor };
   }

   public boolean isDataFlavorSupported(DataFlavor flavor)
   {
      return flavor.equals(DataFlavor.imageFlavor);
   }

   public Object getTransferData(DataFlavor flavor)
      throws UnsupportedFlavorException
   {
      if(flavor.equals(DataFlavor.imageFlavor))
      {
         return theImage;
      }
      else
      {
         throw new UnsupportedFlavorException(flavor);
      }
   }

   private Image theImage;
}
Note
Java SE supplies the DataFlavor.imageFlavor constant and does all the heavy lifting to convert between Java images and native clipboard images. But, curiously, it does not supply the wrapper class that is necessary to place images onto the clipboard.
The program of Listing 7-12 demonstrates the transfer of images between a Java application and the system clipboard. When the program starts, it generates an image containing a red circle. Click the Copy button to copy the image to the clipboard and then paste it into another application (see Figure 7-41). From another application, copy an image into the system clipboard. Then click the Paste button and see the image being pasted into the example program (see Figure 7-42).
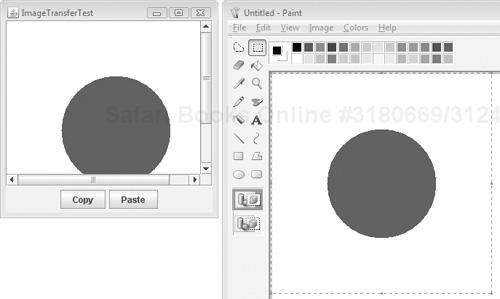
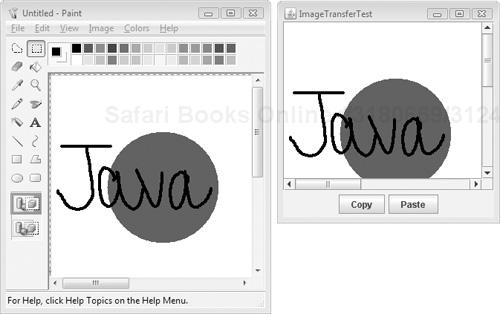
The program is a straightforward modification of the text transfer program. The data flavor is now DataFlavor.imageFlavor, and we use the ImageTransferable class to transfer an image to the system clipboard.
Example 7-12. ImageTransferTest.java
  1. import java.io.*;
  2. import java.awt.*;
  3. import java.awt.datatransfer.*;
  4. import java.awt.event.*;
  5. import java.awt.image.*;
  6. import javax.swing.*;
  7.
  8. /**
  9.  * This program demonstrates the transfer of images between a Java application and the system
 10.  * clipboard.
 11.  * @version 1.22 2007-08-16
 12.  * @author Cay Horstmann
 13.  */
 14. public class ImageTransferTest
 15. {
 16.    public static void main(String[] args)
 17.    {
 18.       EventQueue.invokeLater(new Runnable()
 19.          {
 20.             public void run()
 21.             {
 22.                JFrame frame = new ImageTransferFrame();
 23.                frame.setDefaultCloseOperation(JFrame.EXIT_ON_CLOSE);
 24.                frame.setVisible(true);
 25.             }
 26.          });
 27.    }
 28. }
 29.
 30. /**
 31.  * This frame has an image label and buttons for copying and pasting an image.
 32.  */
 33. class ImageTransferFrame extends JFrame
 34. {
 35.    public ImageTransferFrame()
 36.    {
 37.       setTitle("ImageTransferTest");
 38.       setSize(DEFAULT_WIDTH, DEFAULT_HEIGHT);
 39.
 40.       label = new JLabel();
 41.       image = new BufferedImage(DEFAULT_WIDTH, DEFAULT_HEIGHT, BufferedImage.TYPE_INT_ARGB);
 42.       Graphics g = image.getGraphics();
 43.       g.setColor(Color.WHITE);
 44.       g.fillRect(0, 0, DEFAULT_WIDTH, DEFAULT_HEIGHT);
 45.       g.setColor(Color.RED);
 46.       g.fillOval(DEFAULT_WIDTH / 4, DEFAULT_WIDTH / 4, DEFAULT_WIDTH / 2, DEFAULT_HEIGHT / 2);
 47.
 48.       label.setIcon(new ImageIcon(image));
 49.       add(new JScrollPane(label), BorderLayout.CENTER);
 50.       JPanel panel = new JPanel();
 51.
 52.       JButton copyButton = new JButton("Copy");
 53.       panel.add(copyButton);
 54.       copyButton.addActionListener(new ActionListener()
 55.          {
 56.             public void actionPerformed(ActionEvent event)
 57.             {
 58.                copy();
 59.             }
 60.          });
 61.
 62.       JButton pasteButton = new JButton("Paste");
 63.       panel.add(pasteButton);
 64.       pasteButton.addActionListener(new ActionListener()
 65.          {
 66.             public void actionPerformed(ActionEvent event)
 67.             {
 68.                paste();
 69.             }
 70.          });
 71.
 72.       add(panel, BorderLayout.SOUTH);
 73.    }
 74.
 75.    /**
 76.     * Copies the current image to the system clipboard.
 77.     */
 78.    private void copy()
 79.    {
 80.       Clipboard clipboard = Toolkit.getDefaultToolkit().getSystemClipboard();
 81.       ImageTransferable selection = new ImageTransferable(image);
 82.       clipboard.setContents(selection, null);
 83.    }
 84.
 85.    /**
 86.     * Pastes the image from the system clipboard into the image label.
 87.     */
 88.    private void paste()
 89.    {
 90.       Clipboard clipboard = Toolkit.getDefaultToolkit().getSystemClipboard();
 91.       DataFlavor flavor = DataFlavor.imageFlavor;
 92.       if (clipboard.isDataFlavorAvailable(flavor))
 93.       {
 94.          try
 95.          {
 96.             image = (Image) clipboard.getData(flavor);
 97.             label.setIcon(new ImageIcon(image));
 98.          }
 99.          catch (UnsupportedFlavorException exception)
100.          {
101.             JOptionPane.showMessageDialog(this, exception);
102.          }
103.          catch (IOException exception)
104.          {
105.             JOptionPane.showMessageDialog(this, exception);
106.          }
107.       }
108.    }
109.
110.    private JLabel label;
111.    private Image image;
112.
113.    private static final int DEFAULT_WIDTH = 300;
114.    private static final int DEFAULT_HEIGHT = 300;
115. }
116.
117. /**
118.  * This class is a wrapper for the data transfer of image objects.
119.  */
120. class ImageTransferable implements Transferable
121. {
122.    /**
123.     * Constructs the selection.
124.     * @param image an image
125.     */
126.    public ImageTransferable(Image image)
127.    {
128.       theImage = image;
129.    }
130.
131.    public DataFlavor[] getTransferDataFlavors()
132.    {
133.       return new DataFlavor[] { DataFlavor.imageFlavor };
134.    }
135.
136.    public boolean isDataFlavorSupported(DataFlavor flavor)
137.    {
138.       return flavor.equals(DataFlavor.imageFlavor);
139.    }
140.
141.    public Object getTransferData(DataFlavor flavor) throws UnsupportedFlavorException
142.    {
143.       if (flavor.equals(DataFlavor.imageFlavor))
144.       {
145.          return theImage;
146.       }
147.       else
148.       {
149.          throw new UnsupportedFlavorException(flavor);
150.       }
151.    }
152.
153.    private Image theImage;
154. }
Suppose you want to copy and paste objects from one Java application to another. In that case, you cannot use local clipboards. Fortunately, you can place serialized Java objects onto the system clipboard.
The program in Listing 7-13 demonstrates this capability. The program shows a color chooser. The Copy button copies the current color to the system clipboard as a serialized Color object. The Paste button checks whether the system clipboard contains a serialized Color object. If so, it fetches the color and sets it as the current choice of the color chooser.
You can transfer the serialized object between two Java applications (see Figure 7-43). Run two copies of the SerialTransferTest program. Click Copy in the first program, then click Paste in the second program. The Color object is transferred from one virtual machine to the other.
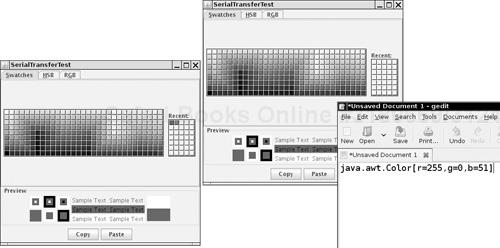
To enable the data transfer, the Java platform places binary data on the system clipboard that contains the serialized object. Another Java program—not necessarily of the same type as the one that generated the clipboard data—can retrieve the clipboard data and deserialize the object.
Of course, a non-Java application will not know what to do with the clipboard data. For that reason, the example program offers the clipboard data in a second flavor, as text. The text is simply the result of the toString method, applied to the transferred object. To see the second flavor, run the program, click on a color, and then select the Paste command in your text editor. A string such as
java.awt.Color[r=255,g=0,b=51]
will be inserted into your document.
Essentially no additional programming is required to transfer a serializable object. You use the MIME type
application/x-java-serialized-object;class=classNameAs before, you have to build your own transfer wrapper—see the example code for details.
Example 7-13. SerialTransferTest.java
  1. import java.io.*;
  2. import java.awt.*;
  3. import java.awt.datatransfer.*;
  4. import java.awt.event.*;
  5. import javax.swing.*;
  6.
  7. /**
  8.  * This program demonstrates the transfer of serialized objects between virtual machines.
  9.  * @version 1.02 2007-08-16
 10.  * @author Cay Horstmann
 11.  */
 12. public class SerialTransferTest
 13. {
 14.    public static void main(String[] args)
 15.    {
 16.       EventQueue.invokeLater(new Runnable()
 17.          {
 18.             public void run()
 19.             {
 20.                JFrame frame = new SerialTransferFrame();
 21.                frame.setDefaultCloseOperation(JFrame.EXIT_ON_CLOSE);
 22.                frame.setVisible(true);
 23.             }
 24.          });
 25.    }
 26. }
 27.
 28. /**
 29.  * This frame contains a color chooser, and copy and paste buttons.
 30.  */
 31. class SerialTransferFrame extends JFrame
 32. {
 33.    public SerialTransferFrame()
 34.    {
 35.       setTitle("SerialTransferTest");
 36.
 37.       chooser = new JColorChooser();
 38.       add(chooser, BorderLayout.CENTER);
 39.       JPanel panel = new JPanel();
 40.
 41.       JButton copyButton = new JButton("Copy");
 42.       panel.add(copyButton);
 43.       copyButton.addActionListener(new ActionListener()
 44.          {
 45.             public void actionPerformed(ActionEvent event)
 46.             {
 47.                copy();
 48.             }
 49.          });
 50.
 51.       JButton pasteButton = new JButton("Paste");
 52.       panel.add(pasteButton);
 53.       pasteButton.addActionListener(new ActionListener()
 54.          {
 55.              public void actionPerformed(ActionEvent event)
 56.              {
 57.                 paste();
 58.              }
 59.           });
 60.
 61.        add(panel, BorderLayout.SOUTH);
 62.        pack();
 63.    }
 64.
 65.    /**
 66.     * Copies the chooser's color into the system clipboard.
 67.     */
 68.    private void copy()
 69.    {
 70.       Clipboard clipboard = Toolkit.getDefaultToolkit().getSystemClipboard();
 71.       Color color = chooser.getColor();
 72.       SerialTransferable selection = new SerialTransferable(color);
 73.       clipboard.setContents(selection, null);
 74.    }
 75.
 76.    /**
 77.     * Pastes the color from the system clipboard into the chooser.
 78.     */
 79.    private void paste()
 80.    {
 81.       Clipboard clipboard = Toolkit.getDefaultToolkit().getSystemClipboard();
 82.       try
 83.       {
 84.          DataFlavor flavor = new DataFlavor(
 85.                "application/x-java-serialized-object;class=java.awt.Color");
 86.          if (clipboard.isDataFlavorAvailable(flavor))
 87.          {
 88.             Color color = (Color) clipboard.getData(flavor);
 89.             chooser.setColor(color);
 90.          }
 91.       }
 92.       catch (ClassNotFoundException e)
 93.       {
 94.          JOptionPane.showMessageDialog(this, e);
 95.       }
 96.       catch (UnsupportedFlavorException e)
 97.       {
 98.          JOptionPane.showMessageDialog(this, e);
 99.       }
100.       catch (IOException e)
101.       {
102.          JOptionPane.showMessageDialog(this, e);
103.       }
104.    }
105.
106.    private JColorChooser chooser;
107. }
108.
109. /**
110.  * This class is a wrapper for the data transfer of serialized objects.
111.  */
112. class SerialTransferable implements Transferable
113. {
114.    /**
115.     * Constructs the selection.
116.     * @param o any serializable object
117.     */
118.    SerialTransferable(Serializable o)
119.    {
120.       obj = o;
121.    }
122.
123.    public DataFlavor[] getTransferDataFlavors()
124.    {
125.       DataFlavor[] flavors = new DataFlavor[2];
126.       Class<?> type = obj.getClass();
127.       String mimeType = "application/x-java-serialized-object;class=" + type.getName();
128.       try
129.       {
130.          flavors[0] = new DataFlavor(mimeType);
131.          flavors[1] = DataFlavor.stringFlavor;
132.          return flavors;
133.       }
134.       catch (ClassNotFoundException e)
135.       {
136.          return new DataFlavor[0];
137.       }
138.    }
139.
140.    public boolean isDataFlavorSupported(DataFlavor flavor)
141.    {
142.       return DataFlavor.stringFlavor.equals(flavor)
143.             || "application".equals(flavor.getPrimaryType())
144.             && "x-java-serialized-object".equals(flavor.getSubType())
145.             && flavor.getRepresentationClass().isAssignableFrom(obj.getClass());
146.    }
147.
148.    public Object getTransferData(DataFlavor flavor) throws UnsupportedFlavorException
149.    {
150.       if (!isDataFlavorSupported(flavor)) throw new UnsupportedFlavorException(flavor);
151.
152.       if (DataFlavor.stringFlavor.equals(flavor)) return obj.toString();
153.
154.       return obj;
155.    }
156.
157.    private Serializable obj;
158. }
Occasionally, you might need to copy and paste a data type that isn’t one of the data types supported by the system clipboard, and that isn’t serializable. To transfer an arbitrary Java object reference within the same JVM, you use the MIME type
application/x-java-jvm-local-objectref;class=classNameYou need to define a Transferable wrapper for this type. The process is entirely analogous to the SerialTransferable wrapper of the preceding example.
An object reference is only meaningful within a single virtual machine. For that reason, you cannot copy the shape object to the system clipboard. Instead, use a local clipboard:
Clipboard clipboard = new Clipboard("local");The construction parameter is the clipboard name.
However, using a local clipboard has one major disadvantage. You need to synchronize the local and the system clipboard, so that users don’t confuse the two. Currently, the Java platform doesn’t do that synchronization for you.
When you use cut and paste to transmit information between two programs, the clipboard acts as an intermediary. The drag and drop metaphor cuts out the middleman and lets two programs communicate directly. The Java platform offers basic support for drag and drop. You can carry out drag and drop operations between Java applications and native applications. This section shows you how to write a Java application that is a drop target, and an application that is a drag source.
Before going deeper into the Java platform support for drag and drop, let us quickly look at the drag-and-drop user interface. We use the Windows Explorer and WordPad programs as examples—on another platform, you can experiment with locally available programs with drag-and-drop capabilities.
You initiate a drag operation with a gesture inside a drag source—by first selecting one or more elements and then dragging the selection away from its initial location. When you release the mouse button over a drop target that accepts the drop operation, the drop target queries the drag source for information about the dropped elements and carries out an appropriate operation. For example, if you drop a file icon from a file manager on top of a directory icon, then the file is moved into that directory. However, if you drag it to a text editor, then the text editor opens the file. (This requires, of course, that you use a file manager and text editor that are enabled for drag and drop, such as Explorer/WordPad in Windows or Nautilus/gedit in Gnome).
If you hold down the CTRL key while dragging, then the type of the drop action changes from a move action to a copy action, and a copy of the file is placed into the directory. If you hold down both SHIFT and CTRL keys, then a link to the file is placed into the directory. (Other platforms might use other keyboard combinations for these operations.)
Thus, there are three types of drop actions with different gestures:
Move
Copy
Link
The intention of the link action is to establish a reference to the dropped element. Such links typically require support from the host operating system (such as symbolic links for files, or object linking for document components) and don’t usually make a lot of sense in cross-platform programs. In this section, we focus on using drag and drop for copying and moving.
There is usually some visual feedback for the drag operation. Minimally, the cursor shape changes. As the cursor moves over possible drop targets, the cursor shape indicates whether the drop is possible or not. If a drop is possible, the cursor shape also indicates the type of the drop action. Table 7-6 shows several drop cursor shapes.
You can also drag other elements besides file icons. For example, you can select text in WordPad or gedit and drag it. Try dropping text fragments into willing drop targets and see how they react.
Note
This experiment shows a disadvantage of drag and drop as a user interface mechanism. It can be difficult for users to anticipate what they can drag, where they can drop it, and what happens when they do. Because the default “move” action can remove the original, many users are understandably cautious about experimenting with drag and drop.
Starting with Java SE 1.4, several Swing components have built-in support for drag and drop (see Table 7-7). You can drag selected text from a number of components, and you can drop text into text components. For backward compatibility, you must call the setDragEnabled method to activate dragging. Dropping is always enabled.
Table 7-7. Data Transfer Support in Swing Components
Component | Drag Source | Drop Target |
|---|---|---|
| Exports file list | N/A |
| Exports color object | Accepts color objects |
JTextField JFormattedTextField | Exports selected text | Accepts text |
| N/A (for security) | Accepts text |
JTextArea JTextPane JEditorPane | Exports selected text | Accepts text and file lists |
JList JTable JTree | Exports text description of selection (copy only) | N/A |
Note
The java.awt.dnd package provides a lower-level drag-and-drop API that forms the basis for the Swing drag and drop. We do not discuss that API in this book.
The program in Listing 7-14 demonstrates the behavior. As you run the program, note these points:
You can select multiple items in the list, table, or tree and drag them.
Dragging items from the table is a bit awkward. You first select with the mouse, then you let go of the mouse button, then click it again, and then you drag.
When you drop the items in the text area, you can see how the dragged information is formatted. Table cells are separated by tabs, and each selected row is on a separate line (see Figure 7-44).
You can only copy, not move, items, from the list, table, tree, file chooser, or color chooser. Removing items from a list, table, or tree is not possible with all data models. You will see in the next section how to implement this capability when the data model is editable.
You cannot drag into the list, table, tree, or file chooser.
If you run two copies of the program, you can drag a color from one color chooser to the other.
You cannot drag text out of the text area because we didn’t call
setDragEnabledon it.
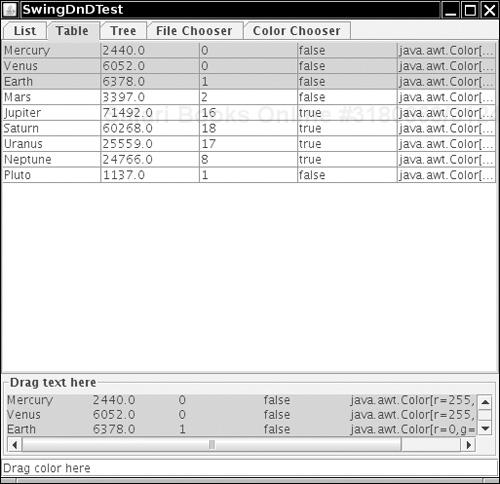
The Swing package provides a potentially useful mechanism to quickly turn a component into a drag source and drop target. You can install a transfer handler for a given property. For example, in our sample program, we call
textField.setTransferHandler(new TransferHandler("background"));You can now drag a color into the text field, and its background color changes.
When a drop occurs, then the transfer handler checks whether one of the data flavors has representation class Color. If so, it invokes the setBackground method.
By installing this transfer handler into the text field, you disable the standard transfer handler. You can no longer cut, copy, paste, drag, or drop text in the text field. However, you can now drag color out of this text field. You still need to select some text to initiate the drag gesture. When you drag the text, you will find that you can drop it into the color chooser and change its color value to the text field’s background color. However, you cannot drop the text into the text area.
Example 7-14. SwingDnDTest.java
 1. import java.awt.*;
 2.
 3. import javax.swing.*;
 4. import javax.swing.border.*;
 5. import javax.swing.event.*;
 6.
 7. /**
 8.  * This program demonstrates the basic Swing support for drag and drop.
 9.  * @version 1.10 2007-09-20
10.  * @author Cay Horstmann
11.  */
12. public class SwingDnDTest
13. {
14.    public static void main(String[] args)
15.    {
16.       EventQueue.invokeLater(new Runnable()
17.          {
18.             public void run()
19.             {
20.                JFrame frame = new SwingDnDFrame();
21.                frame.setDefaultCloseOperation(JFrame.EXIT_ON_CLOSE);
22.                frame.setVisible(true);
23.              }
24.          });
25.    }
26. }
27.
28. class SwingDnDFrame extends JFrame
29. {
30.    public SwingDnDFrame()
31.    {
32.       setTitle("SwingDnDTest");
33.       JTabbedPane tabbedPane = new JTabbedPane();
34.
35.       JList list = SampleComponents.list();
36.       tabbedPane.addTab("List", list);
37.       JTable table = SampleComponents.table();
38.       tabbedPane.addTab("Table", table);
39.       JTree tree = SampleComponents.tree();
40.       tabbedPane.addTab("Tree", tree);
41.       JFileChooser fileChooser = new JFileChooser();
42.       tabbedPane.addTab("File Chooser", fileChooser);
43.       JColorChooser colorChooser = new JColorChooser();
44.       tabbedPane.addTab("Color Chooser", colorChooser);
45.
46.       final JTextArea textArea = new JTextArea(4, 40);
47.       JScrollPane scrollPane = new JScrollPane(textArea);
48.       scrollPane.setBorder(new TitledBorder(new EtchedBorder(), "Drag text here"));
49.
50.       JTextField textField = new JTextField("Drag color here");
51.       textField.setTransferHandler(new TransferHandler("background"));
52.
53.       tabbedPane.addChangeListener(new ChangeListener()
54.          {
55.             public void stateChanged(ChangeEvent e)
56.             {
57.                textArea.setText("");
58.             }
59.          });
60.
61.       tree.setDragEnabled(true);
62.       table.setDragEnabled(true);
63.       list.setDragEnabled(true);
64.       fileChooser.setDragEnabled(true);
65.       colorChooser.setDragEnabled(true);
66.       textField.setDragEnabled(true);
67.
68.       add(tabbedPane, BorderLayout.NORTH);
69.       add(scrollPane, BorderLayout.CENTER);
70.       add(textField, BorderLayout.SOUTH);
71.       pack();
72.    }
73. }
In the previous section, you saw how to take advantage of the basic drag-and-drop support in Swing. In this section, we show you how to configure any component as a drag source. In the next section, we discuss drop targets and present a sample component that is both a source and a target for images.
To customize the drag-and-drop behavior of a Swing component, you subclass the TransferHandler class. First, override the getSourceActions method to indicate which actions (copy, move, link) your component supports. Next, override the getTransferable method that produces a Transferable object, following the same process that you use for copying to the clipboard.
In our sample program, we drag images out of a JList that is filled with image icons (see Figure 7-45). Here is the implementation of the createTransferable method. The selected image is simply placed into an ImageTransferable wrapper.
protected Transferable createTransferable(JComponent source)
{
   JList list = (JList) source;
   int index = list.getSelectedIndex();
   if (index < 0) return null;
   ImageIcon icon = (ImageIcon) list.getModel().getElementAt(index);
   return new ImageTransferable(icon.getImage());
}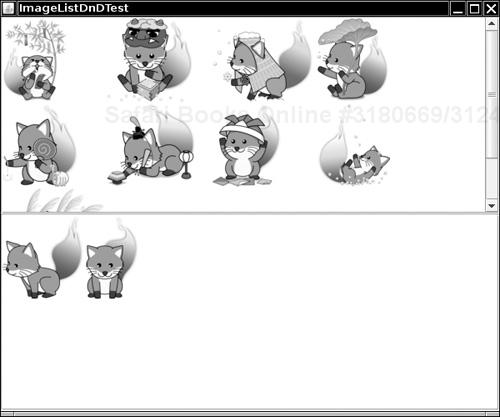
In our example, we are fortunate that a JList is already wired for initiating a drag gesture. You simply activate that mechanism by calling the setDragEnabled method. If you add drag support to a component that does not recognize a drag gesture, you need to initiate the transfer yourself. For example, here is how you can initiate dragging on a JLabel:
label.addMouseListener(new MouseAdapter()
{
   public void mousePressed(MouseEvent evt)
   {
      int mode;
      if ((evt.getModifiers() & (InputEvent.CTRL_MASK | InputEvent.SHIFT_MASK)) != 0)
                  mode = TransferHandler.COPY;
      else mode = TransferHandler.MOVE;
      JComponent comp = (JComponent) evt.getSource();
      TransferHandler th = comp.getTransferHandler();
      th.exportAsDrag(comp, evt, mode);
   }
});
Here, we simply start the transfer when the user clicks on the label. A more sophisticated implementation would watch for a mouse motion that drags the mouse by a small amount.
When the user completes the drop action, the exportDone method of the source transfer handler is invoked. In that method, you need to remove the transferred object if the user carried out a move action. Here is the implementation for the image list:
protected void exportDone(JComponent source, Transferable data, int action)
{
   if (action == MOVE)
   {
      JList list = (JList) source;
      int index = list.getSelectedIndex();
      if (index < 0) return;
      DefaultListModel model = (DefaultListModel) list.getModel();
      model.remove(index);
   }
}
To summarize, to turn a component into a drag source, you add a transfer handler that specifies the following:
Which actions are supported.
Which data is transferred.
And how the original data is removed after a move action.
In addition, if your drag source is a component other than those listed in Table 7-7 on page 654, you need to watch for a mouse gesture and initiate the transfer.
javax.swing.TransferHandler 1.4
int getSourceActions(JComponent c)override to return the allowable source actions (bitwise or combination of
COPY,MOVE, andLINK) when dragging from the given component.protected Transferable createTransferable(JComponent source)override to create the
Transferablefor the data that is to be dragged.void exportAsDrag(JComponent comp, InputEvent e, int action)starts a drag gesture from the given component. The action is
COPY,MOVE, orLINK.protected void exportDone(JComponent source, Transferable data, int action)override to adjust the drag source after a successful transfer.
In this section, we show you how to implement a drop target. Our example is again a JList with image icons. We add drop support so that users can drop images into the list.
To make a component into a drop target, you set a TransferHandler and implement the canImport and importData methods.
Note
As of Java SE 6, you can add a transfer handler to a JFrame. This is most commonly used for dropping files into an application. Valid drop locations include the frame decorations and the menu bar, but not components contained in the frame (which have their own transfer handlers).
The canImport method is called continuously as the user moves the mouse over the drop target component. Return true if a drop is allowed. This information affects the cursor icon that gives visual feedback whether the drop is allowed.
As of Java SE 6, the canImport method has a parameter of type TransferHandler.TransferSupport. Through this parameter, you can obtain the drop action chosen by the user, the drop location, and the data to be transferred. (Before Java SE 6, a different canImport method was called that only supplies a list of data flavors.)
In the canImport method, you can also override the user drop action. For example, if a user chose the move action but it would be inappropriate to remove the original, you can force the transfer handler to use a copy action instead.
Here is a typical example. The image list component is willing to accept drops of file lists and images. However, if a file list is dragged into the component, then a user-selected MOVE action is changed into a COPY action, so that the image files do not get deleted.
public boolean canImport(TransferSupport support)
{
   if (support.isDataFlavorSupported(DataFlavor.javaFileListFlavor))
   {
      if (support.getUserDropAction() == MOVE) support.setDropAction(COPY);
      return true;
   }
   else return support.isDataFlavorSupported(DataFlavor.imageFlavor);
}
A more sophisticated implementation could check that the files actually contain images.
The Swing components JList, JTable, JTree, and JTextComponent give visual feedback about insertion positions as the mouse is moved over the drop target. By default, the selection (for JList, JTable, and JTree) or the caret (for JTextComponent) is used to indicate the drop location. That approach is neither user-friendly nor flexible, and it is the default solely for backward compatibility. You should call the setDropMode method to choose a more appropriate visual feedback.
You can control whether the dropped data should overwrite existing items or be inserted between them. For example, in our sample program, we call
setDropMode(DropMode.ON_OR_INSERT);
to allow the user to drop onto an item (thereby replacing it), or to insert between two items (see Figure 7-46). Table 7-8 shows the drop modes supported by the Swing components.

Once the user completes the drop gesture, the importData method is invoked. You need to obtain the data from the drag source. Invoke the getTransferable method on the TransferSupport parameter to obtain a reference to a Transferable object. This is the same interface that is used for copy and paste.
One data type that is commonly used for drag and drop is the DataFlavor.javaFileListFlavor. A file list describes a set of files that is dropped onto the target. The transfer data is an object of type List<File>. Here is the code for retrieving the files:
DataFlavor[] flavors = transferable.getTransferDataFlavors();
if (Arrays.asList(flavors).contains(DataFlavor.javaFileListFlavor))
{
   List<File> fileList = (List<File>) transferable.getTransferData(DataFlavor.javaFileListFlavor);
   for (File f : fileList)
   {
      do something with f;
   }
}
When dropping into one of the components listed in Table 7-8, you need to know precisely where to drop the data. Invoke the getDropLocation method on the TransferSupport parameter to find where the drop occurred. This method returns an object of a subclass of TransferHandler.DropLocation. The JList, JTable, JTree, and JTextComponent classes define subclasses that specify location in the particular data model. For example, a location in a list is simply an integer index, but a location in a tree is a tree path. Here is how we obtain the drop location in our image list:
int index;
if (support.isDrop())
{
   JList.DropLocation location = (JList.DropLocation) support.getDropLocation();
   index = location.getIndex();
}
else index = model.size();
The JList.DropLocation subclass has a method getIndex that returns the index of the drop. (The JTree.DropLocation subclass has a method getPath instead.)
The importData method is also called when data is pasted into the component with the CTRL+V keystroke. In that case, the getDropLocation method would throw an IllegalStateException. Therefore, if the isDrop method returns false, we simply append the pasted data to the end of the list.
When inserting into a list, table, or tree, you also need to check whether the data is supposed to be inserted between items or whether it should replace the item at the drop location. For a list, invoke the isInsert method of the JList.DropLocation. For the other components, see the API notes for their drop location classes at the end of this section.
To summarize, to turn a component into a drop target, you add a transfer handler that specifies the following:
When a dragged item can be accepted.
How the dropped data is imported.
In addition, if you add drop support to a JList, JTable, JTree, or JTextComponent, you should set the drop mode.
Listing 7-15 shows the complete program. Note that the ImageList class is both a drag source and a drop target. Try dragging images between the two lists. You can also drag image files from a file chooser of another program into the lists.
Example 7-15. ImageListDragDrop.java
  1. import java.awt.*;
  2. import java.awt.datatransfer.*;
  3. import java.io.*;
  4. import java.util.*;
  5. import javax.imageio.*;
  6. import javax.swing.*;
  7. import java.util.List;
  8.
 9. /**
 10.  * This program demonstrates drag and drop in an image list.
 11.  * @version 1.00 2007-09-20
 12.  * @author Cay Horstmann
 13.  */
 14. public class ImageListDnDTest
 15. {
 16.    public static void main(String[] args)
 17.    {
 18.       EventQueue.invokeLater(new Runnable()
 19.          {
 20.             public void run()
 21.             {
 22.                JFrame frame = new ImageListDnDFrame();
 23.                frame.setDefaultCloseOperation(JFrame.EXIT_ON_CLOSE);
 24.                frame.setVisible(true);
 25.             }
 26.          });
 27.    }
 28. }
 29.
 30. class ImageListDnDFrame extends JFrame
 31. {
 32.    public ImageListDnDFrame()
 33.    {
 34.       setTitle("ImageListDnDTest");
 35.       setSize(DEFAULT_WIDTH, DEFAULT_HEIGHT);
 36.
 37.       list1 = new ImageList(new File("images1").listFiles());
 38.       list2 = new ImageList(new File("images2").listFiles());
 39.       setLayout(new GridLayout(2, 1));
 40.       add(new JScrollPane(list1));
 41.       add(new JScrollPane(list2));
 42.    }
 43.
 44.    private ImageList list1;
 45.    private ImageList list2;
 46.    private static final int DEFAULT_WIDTH = 600;
 47.    private static final int DEFAULT_HEIGHT = 500;
 48. }
 49.
 50. class ImageList extends JList
 51. {
 52.    public ImageList(File[] imageFiles)
 53.    {
 54.       DefaultListModel model = new DefaultListModel();
 55.       for (File f : imageFiles)
 56.          model.addElement(new ImageIcon(f.getPath()));
 57.
 58.       setModel(model);
 59.       setVisibleRowCount(0);
 60.       setLayoutOrientation(JList.HORIZONTAL_WRAP);
 61.       setDragEnabled(true);
 62.       setDropMode(DropMode.ON_OR_INSERT);
 63.       setTransferHandler(new ImageListTransferHandler());
 64.    }
 65. }
 66.
 67. class ImageListTransferHandler extends TransferHandler
 68. {
 69.    // Support for drag
 70.
 71.    public int getSourceActions(JComponent source)
 72.    {
 73.       return COPY_OR_MOVE;
 74.    }
 75.
 76.    protected Transferable createTransferable(JComponent source)
 77.    {
 78.       JList list = (JList) source;
 79.       int index = list.getSelectedIndex();
 80.       if (index < 0) return null;
 81.       ImageIcon icon = (ImageIcon) list.getModel().getElementAt(index);
 82.       return new ImageTransferable(icon.getImage());
 83.    }
 84.
 85.    protected void exportDone(JComponent source, Transferable data, int action)
 86.    {
 87.       if (action == MOVE)
 88.       {
 89.          JList list = (JList) source;
 90.          int index = list.getSelectedIndex();
 91.          if (index < 0) return;
 92.          DefaultListModel model = (DefaultListModel) list.getModel();
 93.          model.remove(index);
 94.       }
 95.    }
 96.
 97.    // Support for drop
 98.
 99.    public boolean canImport(TransferSupport support)
100.    {
101.       if (support.isDataFlavorSupported(DataFlavor.javaFileListFlavor))
102.       {
103.          if (support.getUserDropAction() == MOVE) support.setDropAction(COPY);
104.          return true;
105.       }
106.       else return support.isDataFlavorSupported(DataFlavor.imageFlavor);
107.    }
108.
109.    public boolean importData(TransferSupport support)
110.    {
111.       JList list = (JList) support.getComponent();
112.       DefaultListModel model = (DefaultListModel) list.getModel();
113.
114.       Transferable transferable = support.getTransferable();
115.       List<DataFlavor> flavors = Arrays.asList(transferable.getTransferDataFlavors());
116.
117.       List<Image> images = new ArrayList<Image>();
118.
119.       try
120.       {
121.          if (flavors.contains(DataFlavor.javaFileListFlavor))
122.          {
123.             List<File> fileList = (List<File>) transferable
124.                   .getTransferData(DataFlavor.javaFileListFlavor);
125.             for (File f : fileList)
126.             {
127.                try
128.                {
129.                   images.add(ImageIO.read(f));
130.                }
131.                catch (IOException ex)
132.                {
133.                   // couldn't read image--skip
134.                }
135.             }
136.          }
137.          else if (flavors.contains(DataFlavor.imageFlavor))
138.          {
139.             images.add((Image) transferable.getTransferData(DataFlavor.imageFlavor));
140.          }
141.
142.          int index;
143.          if (support.isDrop())
144.          {
145.             JList.DropLocation location = (JList.DropLocation) support.getDropLocation();
146.             index = location.getIndex();
147.             if (!location.isInsert()) model.remove(index); // replace location
148.          }
149.          else index = model.size();
150.          for (Image image : images)
151.          {
152.             model.add(index, new ImageIcon(image));
153.             index++;
154.          }
155.          return true;
156.       }
157.       catch (IOException ex)
158.       {
159.          return false;
160.       }
161.       catch (UnsupportedFlavorException ex)
162.       {
163.          return false;
164.       }
165.    }
166. }
javax.swing.TransferHandler 1.4
boolean canImport(TransferSupport support)6override to indicate whether the target component can accept the drag described by the
TransferSupportparameter.boolean importData(TransferSupport support)6override to carry out the drop or paste gesture described by the
TransferSupportparameter, and returntrueif the import was successful.
javax.swing.JFrame 1.2
void setTransferHandler(TransferHandler handler)6sets a transfer handler to handle drop and paste operations only
javax.swing.JList 1.2 javax.swing.JTable 1.2 javax.swing.JTree 1.2 javax.swing.JTextComponent 1.2
void setDropMode(DropMode mode)6set the drop mode of this component to one of the values specified in Table 7-8.
javax.swing.TransferHandler.TransferSupport 6
Component getComponent()gets the target component of this transfer.
DataFlavor[] getDataFlavors()gets the data flavors of the data to be transferred.
boolean isDrop()trueif this transfer is a drop,falseif it is a paste.int getUserDropAction()gets the drop action chosen by the user (
MOVE,COPY, orLINK).gets the drop actions that are allowed by the drag source.
getDropAction()setDropAction()gets or sets the drop action of this transfer. Initially, this is the user drop action, but it can be overridden by the transfer handler.
DropLocation getDropLocation()gets the location of the drop, or throws an
IllegalStateExceptionif this transfer is not a drop.
javax.swing.TransferHandler.DropLocation 6
Point getDropPoint()gets the mouse location of the drop in the target component.
javax.swing.JList.DropLocation 6
boolean isInsert()returns
trueif the data are to be inserted before a given location,falseif they are to replace existing data.int getIndex()gets the model index for the insertion or replacement.
javax.swing.JTable.DropLocation 6
boolean isInsertRow()boolean isInsertColumn()returns
trueif data are to be inserted before a row or column.int getRow()int getColumn()gets the model row or column index for the insertion or replacement, or −1 if the drop occurred in an empty area.
javax.swing.JTree.DropLocation 6
TreePath getPath()int getChildIndex()returns the tree path and child that, together with the drop mode of the target component, define the drop location, as described in Table 7-9.
We finish this chapter with several features that were added to Java SE 6 to make Java applications feel more like native applications. The splash screen feature allows your application to display a splash screen as the virtual machine starts up. The java.awt.Desktop class lets you launch native applications such as the default browser and e-mail program. Finally, you now have access to the system tray and can clutter it up with icons, just like so many native applications do.
A common complaint about Java applications is their long startup time. The Java virtual machine takes some time to load all required classes, particularly for a Swing application that needs to pull in large amounts of Swing and AWT library code. Users dislike applications that take a long time to bring up an initial screen, and they might even try launching the application multiple times if they don’t know whether the first launch was successful. The remedy is a splash screen, a small window that appears quickly, telling the user that the application has been launched successfully.
Traditionally, this has been difficult for Java applications. Of course, you can put up a window as soon as your main method starts. However, the main method is only launched after the class loader has loaded all dependent classes, which might take a while.
Java SE 6 solves this problem by enabling the virtual machine to show an image immediately on launch. There are two mechanisms for specifying that image. You can use the -splash command-line option:
java -splash:myimage.png MyApp
Alternatively, you can specify it in the manifest of a JAR file:
Main-Class: MyApp
SplashScreen-Image: myimage.gif
The image is displayed immediately and automatically disappears when the first AWT window is made visible. You can supply any GIF, JPEG, or PNG image. Animation (in GIF) and transparency (GIF and PNG) are supported.
If your application is ready to go as soon as it reaches main, you can skip the remainder of this section. However, many applications use a plug-in architecture in which a small core loads a set of plugins at startup. Eclipse and NetBeans are typical examples. In that case, you can indicate the loading progress on the splash screen.
There are two approaches. You can draw directly on the splash screen, or you can replace it with a borderless frame with identical contents, and then draw inside the frame. Our sample program shows both techniques.
To draw directly on the splash screen, get a reference to the splash screen and get its graphics context and dimensions:
SplashScreen splash = SplashScreen.getSplashScreen();
Graphics2D g2 = splash.createGraphics();
Rectangle bounds = splash.getBounds();
You can now draw in the usual way. When you are done, call update to ensure that the drawing is refreshed. Our sample program draws a simple progress bar, as seen in the left image in Figure 7-47.
g.fillRect(x, y, width * percent / 100, height);
splash.update();
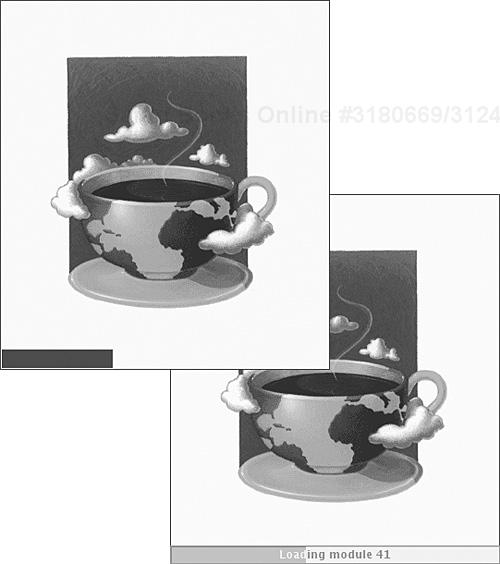
Note
The splash screen is a singleton object. You cannot construct your own. If no splash screen was set on the command line or in the manifest, the getSplashScreen method returns null.
Drawing directly on the splash screen has a drawback. It is tedious to compute all pixel positions, and your progress indicator won’t match the native progress bar. To avoid these problems, you can replace the initial splash screen with a follow-up window of the same size and content as soon as the main method starts. That window can contain arbitrary Swing components.
Our sample program in Listing 7-16 demonstrates this technique. The right image in Figure 7-47 shows a borderless frame with a panel that paints the splash screen and contains a JProgressBar. Now we have full access to the Swing API and can easily add message strings without having to fuss with pixel positions.
Note that we do not need to remove the initial splash screen. It is automatically removed as soon as the follow-up window is made visible.
Caution
Unfortunately, there is a noticeable flash when the splash screen is replaced by the follow-up window.
Example 7-16. SplashScreenTest.java
  1. import java.awt.*;
  2. import java.util.List;
  3. import javax.swing.*;
  4.
  5. /**
  6.  * This program demonstrates the splash screen API.
  7.  * @version 1.00 2007-09-21
  8.  * @author Cay Horstmann
  9.  */
 10. public class SplashScreenTest
 11. {
 12.    private static void drawOnSplash(int percent)
 13.    {
 14.       Rectangle bounds = splash.getBounds();
 15.       Graphics2D g = splash.createGraphics();
 16.       int height = 20;
 17.       int x = 2;
 18.       int y = bounds.height - height - 2;
 19.       int width = bounds.width - 4;
 20.       Color brightPurple = new Color(76, 36, 121);
 21.       g.setColor(brightPurple);
 22.       g.fillRect(x, y, width * percent / 100, height);
 23.       splash.update();
 24.    }
 25.
 26.    /**
 27.     * This method draws on the splash screen.
 28.     */
 29.    private static void init1()
 30.    {
 31.       splash = SplashScreen.getSplashScreen();
 32.       if (splash == null)
 33.       {
 34.          System.err.println("Did you specify a splash image with -splash or in the manifest?");
 35.          System.exit(1);
 36.       }
 37.
 38.       try
 39.       {
 40.          for (int i = 0; i <= 100; i++)
 41.          {
 42.             drawOnSplash(i);
 43.             Thread.sleep(100); // simulate startup work
 44.          }
 45.       }
 46.       catch (InterruptedException e)
 47.       {
 48.       }
 49.    }
 50.
 51.   /**
 52.    * This method displays a frame with the same image as the splash screen.
 53.    */
 54.   private static void init2()
 55.   {
 56.      final Image img = Toolkit.getDefaultToolkit().getImage(splash.getImageURL());
 57.
 58.      final JFrame splashFrame = new JFrame();
 59.      splashFrame.setUndecorated(true);
 60.
 61.      final JPanel splashPanel = new JPanel()
 62.         {
 63.            public void paintComponent(Graphics g)
 64.            {
 65.               g.drawImage(img, 0, 0, null);
 66.            }
 67.         };
 68.
 69.      final JProgressBar progressBar = new JProgressBar();
 70.      progressBar.setStringPainted(true);
 71.      splashPanel.setLayout(new BorderLayout());
 72.      splashPanel.add(progressBar, BorderLayout.SOUTH);
 73.
 74.      splashFrame.add(splashPanel);
 75.      splashFrame.setBounds(splash.getBounds());
 76.      splashFrame.setVisible(true);
 77.
 78.      new SwingWorker<Void, Integer>()
 79.      {
 80.         protected Void doInBackground() throws Exception
 81.         {
 82.            try
 83.            {
 84.               for (int i = 0; i <= 100; i++)
 85.               {
 86.                  publish(i);
 87.                  Thread.sleep(100);
 88.               }
 89.            }
 90.            catch (InterruptedException e)
 91.            {
 92.            }
 93.            return null;
 94.         }
 95.
 96.         protected void process(List<Integer> chunks)
 97.         {
 98.            for (Integer chunk : chunks)
 99.            {
100.               progressBar.setString("Loading module " + chunk);
101.               progressBar.setValue(chunk);
102.               splashPanel.repaint(); // because img is loaded asynchronously
103.            }
104.         }
105.
106.         protected void done()
107.         {
108.            splashFrame.setVisible(false);
109.
110.            JFrame frame = new JFrame();
111.            frame.setSize(DEFAULT_WIDTH, DEFAULT_HEIGHT);
112.            frame.setDefaultCloseOperation(JFrame.EXIT_ON_CLOSE);
113.            frame.setTitle("SplashScreenTest");
114.            frame.setVisible(true);
115.         }
116.      }.execute();
117.    }
118.
119.    public static void main(String args[])
120.    {
121.       init1();
122.
123.       EventQueue.invokeLater(new Runnable()
124.          {
125.             public void run()
126.             {
127.                init2();
128.             }
129.          });
130.    }
131.
132.    private static SplashScreen splash;
133.    private static final int DEFAULT_WIDTH = 300;
134.    private static final int DEFAULT_HEIGHT = 300;
135. }
java.awt.SplashScreen 6
static SplashScreen getSplashScreen()gets a reference to the splash screen, or
nullif no splash screen is present.URL getImageURL()void setImageURL(URL imageURL)gets or sets the URL of the splash screen image. Setting the image updates the splash screen.
Rectangle getBounds()gets the bounds of the splash screen.
Graphics2D createGraphics()gets a graphics context for drawing on the splash screen.
void update()updates the display of the splash screen.
void close()closes the splash screen. The splash screen is automatically closed when the first AWT window is made visible.
The java.awt.Desktop class lets you launch the default browser and e-mail program. You can also open, edit, and print files, using the applications that are registered for the file type.
The API is very straightforward. First, call the static isDesktopSupported method. If it returns true, the current platform supports the launching of desktop applications. Then call the static getDesktop method to obtain a Desktop instance.
Not all desktop environments support all API operations. For example, in the Gnome desktop on Linux, it is possible to open files, but you cannot print them. (There is no support for “verbs” in file associations.) To find out what is supported on your platform, call the isSupported method, passing a value in the Desktop.Action enumeration. Our sample program contains tests such as the following:
if (desktop.isSupported(Desktop.Action.PRINT)) printButton.setEnabled(true);
To open, edit, or print a file, first check that the action is supported, and then call the open, edit, or print method. To launch the browser, pass a URI. (See Chapter 3 for more information on URIs.) You can simply call the URI constructor with a string containing an http or https URL.
To launch the default e-mail program, you need to construct a URI of a particular format, namely
mailto:recipient?query
Here recipient is the e-mail address of the recipient, such as [email protected], and query contains &-separated name=value pairs, with percent-encoded values. (Percent encoding is essentially the same as the URL encoding algorithm described in Chapter 3, but a space is encoded as %20, not +). An example is subject=dinner%20RSVP&bcc=putin%40kremvax.ru. The format is documented in RFC 2368 (http://www.ietf.org/rfc/rfc2368.txt). Unfortunately, the URI class does not know anything about mailto URIs, so you have to assemble and encode your own. To make matters worse, at the time of this writing, there is no standard for dealing with non-ASCII characters. A common approach (which we take as well) is to convert each character to UTF-8 and percent-encode the resulting bytes.
Our sample program in Listing 7-17 lets you open, edit, or print a file of your choice, browse a URL, or launch your e-mail program (see Figure 7-48).
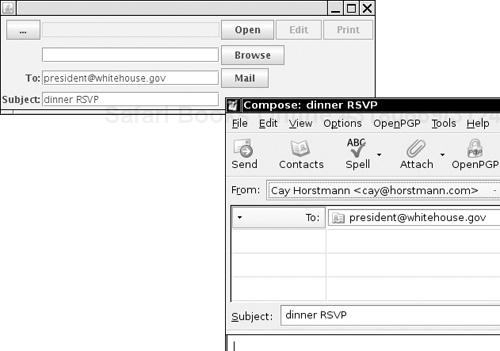
Example 7-17. DesktopAppTest.java
  1. import java.awt.*;
  2. import java.awt.event.*;
  3. import java.io.*;
  4. import java.net.*;
  5. import javax.swing.*;
  6.
  7. /**
  8.  * This program demonstrates the desktop app API.
  9.  * @version 1.00 2007-09-22
 10.  * @author Cay Horstmann
 11.  */
 12. public class DesktopAppTest
 13. {
 14.    public static void main(String[] args)
 15.    {
 16.       EventQueue.invokeLater(new Runnable()
 17.          {
 18.             public void run()
 19.             {
 20.                JFrame frame = new DesktopAppFrame();
 21.                frame.setDefaultCloseOperation(JFrame.EXIT_ON_CLOSE);
 22.                frame.setVisible(true);
 23.             }
 24.          });
 25.    }
 26. }
 27.
 28. class DesktopAppFrame extends JFrame
 29. {
 30.    public DesktopAppFrame()
 31.    {
 32.       setLayout(new GridBagLayout());
 33.       final JFileChooser chooser = new JFileChooser();
 34.       JButton fileChooserButton = new JButton("...");
 35.       final JTextField fileField = new JTextField(20);
 36.       fileField.setEditable(false);
 37.       JButton openButton = new JButton("Open");
 38.       JButton editButton = new JButton("Edit");
 39.       JButton printButton = new JButton("Print");
 40.       final JTextField browseField = new JTextField();
 41.       JButton browseButton = new JButton("Browse");
 42.       final JTextField toField = new JTextField();
 43.       final JTextField subjectField = new JTextField();
 44.       JButton mailButton = new JButton("Mail");
 45.
 46.       openButton.setEnabled(false);
 47.       editButton.setEnabled(false);
 48.       printButton.setEnabled(false);
 49.       browseButton.setEnabled(false);
 50.       mailButton.setEnabled(false);
 51.
 52.       if (Desktop.isDesktopSupported())
 53.       {
 54.          Desktop desktop = Desktop.getDesktop();
 55.          if (desktop.isSupported(Desktop.Action.OPEN)) openButton.setEnabled(true);
 56.          if (desktop.isSupported(Desktop.Action.EDIT)) editButton.setEnabled(true);
 57.          if (desktop.isSupported(Desktop.Action.PRINT)) printButton.setEnabled(true);
 58.          if (desktop.isSupported(Desktop.Action.BROWSE)) browseButton.setEnabled(true);
 59.          if (desktop.isSupported(Desktop.Action.MAIL)) mailButton.setEnabled(true);
 60.       }
 61.
 62.       fileChooserButton.addActionListener(new ActionListener()
 63.          {
 64.             public void actionPerformed(ActionEvent e)
 65.             {
 66.                if (chooser.showOpenDialog(DesktopAppFrame.this) ==
 67.                      JFileChooser.APPROVE_OPTION)
 68.                   fileField.setText(chooser.getSelectedFile().getAbsolutePath());
 69.             }
 70.          });
 71.
 72.       openButton.addActionListener(new ActionListener()
 73.          {
 74.             public void actionPerformed(ActionEvent e)
 75.             {
 76.                try
 77.                {
 78.                   Desktop.getDesktop().open(chooser.getSelectedFile());
 79.                }
 80.                catch (IOException ex)
 81.                {
 82.                   ex.printStackTrace();
 83.                }
 84.             }
 85.          });
 86.
 87.       editButton.addActionListener(new ActionListener()
 88.          {
 89.             public void actionPerformed(ActionEvent e)
 90.             {
 91.                try
 92.                {
 93.                   Desktop.getDesktop().edit(chooser.getSelectedFile());
 94.                }
 95.                catch (IOException ex)
 96.                {
 97.                   ex.printStackTrace();
 98.                }
 99.             }
100.          });
101.
102.       printButton.addActionListener(new ActionListener()
103.          {
104.             public void actionPerformed(ActionEvent e)
105.             {
106.                try
107.                {
108.                   Desktop.getDesktop().print(chooser.getSelectedFile());
109.                }
110.                catch (IOException ex)
111.                {
112.                   ex.printStackTrace();
113.                }
114.             }
115.          });
116.
117.       browseButton.addActionListener(new ActionListener()
118.          {
119.             public void actionPerformed(ActionEvent e)
120.             {
121.                try
122.                {
123.                   Desktop.getDesktop().browse(new URI(browseField.getText()));
124.                }
125.                catch (URISyntaxException ex)
126.                {
127.                   ex.printStackTrace();
128.                }
129.                catch (IOException ex)
130.                {
131.                   ex.printStackTrace();
132.                }
133.             }
134.          });
135.
136.       mailButton.addActionListener(new ActionListener()
137.          {
138.             public void actionPerformed(ActionEvent e)
139.             {
140.                try
141.                {
142.                   String subject = percentEncode(subjectField.getText());
143.                   URI uri = new URI("mailto:" + toField.getText() + "?subject=" + subject);
144.
145.                   System.out.println(uri);
146.                   Desktop.getDesktop().mail(uri);
147.                }
148.                catch (URISyntaxException ex)
149.                {
150.                   ex.printStackTrace();
151.                }
152.                catch (IOException ex)
153.                {
154.                   ex.printStackTrace();
155.                }
156.             }
157.          });
158.
159.       JPanel buttonPanel = new JPanel();
160.       ((FlowLayout) buttonPanel.getLayout()).setHgap(2);
161.       buttonPanel.add(openButton);
162.       buttonPanel.add(editButton);
163.       buttonPanel.add(printButton);
164.
165.       add(fileChooserButton, new GBC(0, 0).setAnchor(GBC.EAST).setInsets(2));
166.       add(fileField, new GBC(1, 0).setFill(GBC.HORIZONTAL));
167.       add(buttonPanel, new GBC(2, 0).setAnchor(GBC.WEST).setInsets(0));
168.       add(browseField, new GBC(1, 1).setFill(GBC.HORIZONTAL));
169.       add(browseButton, new GBC(2, 1).setAnchor(GBC.WEST).setInsets(2));
170.       add(new JLabel("To:"), new GBC(0, 2).setAnchor(GBC.EAST).setInsets(5, 2, 5, 2));
171.       add(toField, new GBC(1, 2).setFill(GBC.HORIZONTAL));
172.       add(mailButton, new GBC(2, 2).setAnchor(GBC.WEST).setInsets(2));
173.       add(new JLabel("Subject:"), new GBC(0, 3).setAnchor(GBC.EAST).setInsets(5, 2, 5, 2));
174.       add(subjectField, new GBC(1, 3).setFill(GBC.HORIZONTAL));
175.
176.       pack();
177.     }
178.
179.     private static String percentEncode(String s)
180.     {
181.        try
182.        {
183.           return URLEncoder.encode(s, "UTF-8").replaceAll("[+]", "%20");
184.        }
185.        catch (UnsupportedEncodingException ex)
186.        {
187.           return null; // UTF-8 is always supported
188.        }
189.     }
190. }
java.awt.Desktop 6
static boolean isDesktopSupported()returns
trueif launching of desktop applications is supported on this platform.static Desktop getDesktop()returns the
Desktopobject for launching desktop operations. Throws anUnsupportedOperationExceptionif this platform does not support launching of desktop operations.boolean isSupported(Desktop.Action action)returns
trueif the given action is supported.actionis one ofOPEN,EDIT,PRINT,BROWSE, orMAIL.void open(File file)launches the application that is registered for viewing the given file.
launches the application that is registered for editing the given file.
void print(File file)prints the given file.
void browse(URI uri)launches the default browser on the given URI.
void mail()void mail(URI uri)launches the default mailer. The second version can can be used to fill in parts of the e-mail message.
Many desktop environments have an area for icons of programs that run in the background and occasionally notify users of events. In Windows, this area is called the system tray, and the icons are called tray icons. The Java API adopts the same terminology. A typical example of such a program is a monitor that checks for software updates. If new software updates are available, the monitor program can change the appearance of the icon or display a message near the icon.
Frankly, the system tray is somewhat overused, and computer users are not usually filled with joy when they discover yet another tray icon. Our sample system tray application—a program that dispenses virtual fortune cookies—is no exception to that rule.
The java.awt.SystemTray class is the cross-platform conduit to the system tray. Similar to the Desktop class discussed in the preceding section, you first call the static isSupported method to check that the local Java platform supports the system tray. If so, you get a SystemTray singleton by calling the static getSystemTray method.
The most important method of the SystemTray class is the add method that lets you add a TrayIcon instance. A tray icon has three key properties:
The icon image.
The tooltip that is visible when the mouse hovers over the icon.
The pop-up menu that is displayed when the user clicks on the icon with the right mouse button.
The pop-up menu is an instance of the PopupMenu class of the AWT library, representing a native pop-up menu, not a Swing menu. You add AWT MenuItem instances, each of which has an action listener just like the Swing counterpart.
Finally, a tray icon can display notifications to the user (see Figure 7-49). Call the displayMessage method of the TrayIcon class and specify the caption, message, and message type.
trayIcon.displayMessage("Your Fortune", fortunes.get(index), TrayIcon.MessageType.INFO);
Listing 7-18 shows the application that places a fortune cookie icon into the system tray. The program reads a fortune cookie file (from the venerable UNIX fortune program) in which each fortune is terminated by a line containing a % character. It displays a message every ten seconds. Mercifully, there is a pop-up menu with an item to exit the application. If only all tray icons were so considerate!
Example 7-18. SystemTrayTest.java
  1. import java.awt.*;
  2. import java.util.*;
  3. import java.util.List;
  4. import java.awt.event.*;
  5. import java.io.*;
  6. import javax.swing.Timer;
  7.
  8. /**
  9.  * This program demonstrates the system tray API.
 10.  * @version 1.00 2007-09-22
 11.  * @author Cay Horstmann
 12.  */
 13. public class SystemTrayTest
 14. {
 15.    public static void main(String[] args)
 16.    {
 17.       final TrayIcon trayIcon;
 18.
 19.       if (!SystemTray.isSupported())
 20.       {
 21.          System.err.println("System tray is not supported.");
 22.          return;
 23.       }
 24.
 25.       SystemTray tray = SystemTray.getSystemTray();
 26.       Image image = Toolkit.getDefaultToolkit().getImage("cookie.png");
 27.
 28.       PopupMenu popup = new PopupMenu();
 29.       MenuItem exitItem = new MenuItem("Exit");
 30.       exitItem.addActionListener(new ActionListener()
 31.          {
 32.             public void actionPerformed(ActionEvent e)
 33.             {
 34.                System.exit(0);
 35.             }
 36.          });
 37.       popup.add(exitItem);
 38.
 39.       trayIcon = new TrayIcon(image, "Your Fortune", popup);
 40.
 41.       trayIcon.setImageAutoSize(true);
 42.       trayIcon.addActionListener(new ActionListener()
 43.          {
 44.             public void actionPerformed(ActionEvent e)
 45.             {
 46.                trayIcon.displayMessage("How do I turn this off?",
 47.                      "Right-click on the fortune cookie and select Exit.",
 48.                      TrayIcon.MessageType.INFO);
 49.             }
 50.          });
 51.
 52.       try
 53.       {
 54.          tray.add(trayIcon);
 55.       }
 56.       catch (AWTException e)
 57.       {
 58.          System.err.println("TrayIcon could not be added.");
 59.          return;
 60.       }
 61.
 62.       final List<String> fortunes = readFortunes();
 63.       Timer timer = new Timer(10000, new ActionListener()
 64.          {
 65.             public void actionPerformed(ActionEvent e)
 66.             {
 67.                int index = (int) (fortunes.size() * Math.random());
 68.                trayIcon.displayMessage("Your Fortune", fortunes.get(index),
 69.                      TrayIcon.MessageType.INFO);
 70.             }
 71.          });
 72.       timer.start();
 73.    }
 74.
 75.    private static List<String> readFortunes()
 76.    {
 77.       List<String> fortunes = new ArrayList<String>();
 78.       try
 79.       {
 80.          Scanner in = new Scanner(new File("fortunes"));
 81.          StringBuilder fortune = new StringBuilder();
 82.          while (in.hasNextLine())
 83.          {
 84.             String line = in.nextLine();
 85.             if (line.equals("%"))
 86.             {
 87.                fortunes.add(fortune.toString());
 88.                fortune = new StringBuilder();
 89.             }
 90.             else
 91.             {
 92.                fortune.append(line);
 93.                fortune.append(' '),
 94.             }
 95.          }
 96.       }
 97.       catch (IOException ex)
 98.       {
 99.         ex.printStackTrace();
100.       }
101.       return fortunes;
102.    }
103.
104. }
java.awt.SystemTray 6
returns
trueif system tray access is supported on this platform.static SystemTray getSystemTray()returns the
SystemTrayobject for accessing the system tray. Throws anUnsupportedOperationExceptionif this platform does not support system tray access.Dimension getTrayIconSize()gets the dimensions for an icon in the system tray.
void add(TrayIcon trayIcon)void remove(TrayIcon trayIcon)adds or removes a system tray icon.
java.awt.TrayIcon 6
TrayIcon(Image image, String tooltip)TrayIcon(Image image, String tooltip, PopupMenu popupMenu)constructs a tray icon with the given image, tooltip, and pop-up menu.
Image getImage()void setImage(Image image)String getTooltip()void setTooltip(String tooltip)PopupMenu getPopupMenu()void setPopupMenu(PopupMenu popupMenu)gets or sets the image, tooltip, or pop-up menu of this tooltip.
boolean isImageAutoSize()void setImageAutoSize(boolean autosize)gets or sets the
imageAutoSizeproperty. If set, the image is scaled to fit the tooltip icon area. If not (the default), it is cropped (if too large) or centered (if too small).void displayMessage(String caption, String text, TrayIcon.MessageType messageType)displays a message near the tray icon. The message type is one of
INFO,WARNING,ERROR, orNONE.public void addActionListener(ActionListener listener)public void removeActionListener(ActionListener listener)adds or removes an action listener when the listenercalled is platform-dependent. Typical cases are clicking on a notification or double-clicking on the tray icon.
You have now reached the end of this long chapter covering advanced AWT features. In the next chapter, we discuss the JavaBeans specification and its use for GUI builders.