
We begin this chapter by reviewing basic networking concepts. We then move on to writing Java programs that connect to network services. We show you how network clients and servers are implemented. Finally, you will see how to send e-mail from a Java program and how to harvest information from a web server.
Before writing our first network program, let’s learn about a great debugging tool for network programming that you already have, namely, telnet. Telnet is preinstalled on most systems. You should be able to launch it by typing telnet from a command shell.
Note
In Windows Vista, telnet is installed but deactivated by default. To activate it, go to the Control Panel, select Programs, click “Turn Windows Features On or Off”, and select the “Telnet client” checkbox. The Windows firewall also blocks quite a few network ports that we use in this chapter; you might need an administrator account to unblock them.
You may have used telnet to connect to a remote computer, but you can use it to communicate with other services provided by Internet hosts as well. Here is an example of what you can do. Type
telnet time-A.timefreq.bldrdoc.gov 13
As Figure 3-1 shows, you should get back a line like this:
54276 07-06-25 21:37:31 50 0 0 659.0 UTC(NIST) *

What is going on? You have connected to the “time of day” service that most UNIX machines constantly run. The particular server that you connected to is operated by the National Institute of Standards and Technology in Boulder, Colorado, and gives the measurement of a Cesium atomic clock. (Of course, the reported time is not completely accurate due to network delays.)
By convention, the “time of day” service is always attached to “port” number 13.
Note
In network parlance, a port is not a physical device, but an abstraction to facilitate communication between a server and a client (see Figure 3-2).
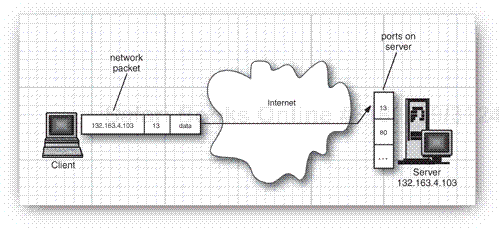
The server software is continuously running on the remote machine, waiting for any network traffic that wants to chat with port 13. When the operating system on the remote computer receives a network package that contains a request to connect to port number 13, it wakes up the listening server process and establishes the connection. The connection stays up until it is terminated by one of the parties.
When you began the telnet session with time-A.timefreq.bldrdoc.gov at port 13, a piece of network software knew enough to convert the string "time-A.timefreq.bldrdoc.gov" to its correct Internet Protocol (IP) address, 132.163.4.103. The telnet software then sent a connection request to that address, asking for a connection to port 13. Once the connection was established, the remote program sent back a line of data and then closed the connection. In general, of course, clients and servers engage in a more extensive dialog before one or the other closes the connection.
Here is another experiment, along the same lines, that is a bit more interesting. Do the following:
Figure 3-3 shows the response. It should look eerily familiar—you got a page of HTML-formatted text, namely, the main web page for Java technology.
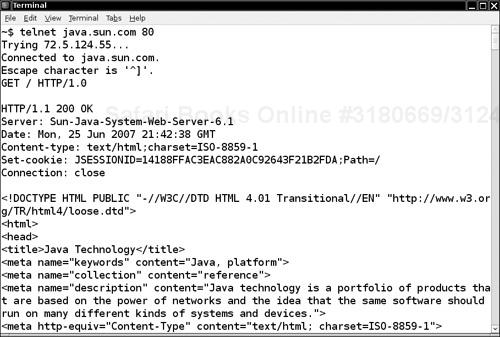
This is exactly the same process that your web browser goes through to get a web page. It uses HTTP to request web pages from servers. Of course, the browser displays the HTML code more nicely.
Note
If you try this procedure with a web server that hosts multiple domains with the same IP address, then you will not get the desired web page. (This is the case with smaller web sites that share a single server, such as horstmann.com.) When connecting to such a server, specify the desired host name, like this:
GET / HTTP/1.1
Host: horstmann.com
Then press the ENTER key two times. (Note that the HTTP version is 1.1.)
Our first network program in Listing 3-1 will do the same thing we did using telnet—connect to a port and print out what it finds.
Example 3-1. SocketTest.java
 1. import java.io.*;
 2. import java.net.*;
 3. import java.util.*;
 4.
 5. /**
 6.  * This program makes a socket connection to the atomic clock in Boulder, Colorado, and
 7.  * prints the time that the server sends.
 8.  * @version 1.20 2004-08-03
 9.  * @author Cay Horstmann
10.  */
11. public class SocketTest
12. {
13.    public static void main(String[] args)
14.    {
15.       try
16.       {
17.          Socket s = new Socket("time-A.timefreq.bldrdoc.gov", 13);
18.          try
19.          {
20.             InputStream inStream = s.getInputStream();
21.             Scanner in = new Scanner(inStream);
22.
23.             while (in.hasNextLine())
24.             {
25.                String line = in.nextLine();
26.                System.out.println(line);
27.             }
28.          }
29.          finally
30.          {
31.             s.close();
32.          }
33.       }
34.       catch (IOException e)
35.       {
36.          e.printStackTrace();
37.       }
38.    }
39. }
The key statements of this simple program are as follows:
Socket s = new Socket("time-A.timefreq.bldrdoc.gov", 13);
InputStream inStream = s.getInputStream();
The first line opens a socket, which is an abstraction for the network software that enables communication out of and into this program. We pass the remote address and the port number to the socket constructor. If the connection fails, then an UnknownHostException is thrown. If there is another problem, then an IOException occurs. Because UnknownHostException is a subclass of IOException and this is a sample program, we just catch the superclass.
Once the socket is open, the getInputStream method in java.net.Socket returns an InputStream object that you can use just like any other stream. Once you have grabbed the stream, this program simply prints each input line to standard output. This process continues until the stream is finished and the server disconnects.
This program works only with very simple servers, such as a “time of day” service. In more complex networking programs, the client sends request data to the server, and the server might not immediately disconnect at the end of a response. You will see how to implement that behavior in several examples throughout this chapter.
The Socket class is pleasant and easy to use because the Java library hides the complexities of establishing a networking connection and sending data across it. The java.net package essentially gives you the same programming interface you would use to work with a file.
Note
In this book, we cover only the Transmission Control Protocol (TCP). The Java platform also supports the User Datagram Protocol (UDP), which can be used to send packets (also called datagrams) with much less overhead than that for TCP. The drawback is that packets need not be delivered in sequential order to the receiving application and can even be dropped altogether. It is up to the recipient to put the packets in order and to request retransmission of missing packets. UDP is well suited for applications in which missing packets can be tolerated, for example, in audio or video streams, or for continuous measurements.
java.net.Socket 1.0
Socket(String host, int port)constructs a socket to connect to the given host and port.
InputStream getInputStream()OutputStream getOutputStream()gets streams to read data from the socket and write data to the socket.
Reading from a socket blocks until data are available. If the host is unreachable, your application waits for a long time and you are at the mercy of the underlying operating system to time out eventually.
You can decide what timeout value is reasonable for your particular application. Then, call the setSoTimeout method to set a timeout value (in milliseconds).
Socket s = new Socket(. . .);
s.setSoTimeout(10000); // time out after 10 seconds
If the timeout value has been set for a socket, then all subsequent read and write operations throw a SocketTimeoutException when the timeout has been reached before the operation has completed its work. You can catch that exception and react to the timeout.
try
{
   InputStream in = s.getInputStream(); // read from in
   . . .
}
catch (InterruptedIOException exception)
{
   react to timeout
}
There is one additional timeout issue that you need to address: The constructor
Socket(String host, int port)
can block indefinitely until an initial connection to the host is established.
You can overcome this problem by first constructing an unconnected socket and then connecting it with a timeout:
Socket s = new Socket();
s.connect(new InetSocketAddress(host, port), timeout);
See the “Interruptible Sockets” section beginning on page 184 if you want to allow users to interrupt the socket connection at any time.
java.net.Socket 1.0
Socket()1.1creates a socket that has not yet been connected.
void connect(SocketAddress address)1.4connects this socket to the given address.
void connect(SocketAddress address, int timeoutInMilliseconds)1.4connects this socket to the given address or returns if the time interval expired.
void setSoTimeout(int timeoutInMilliseconds)1.1sets the blocking time for read requests on this socket. If the timeout is reached, then an
InterruptedIOExceptionis raised.boolean isConnected()1.4returns
trueif the socket is connected.boolean isClosed()1.4returns
trueif the socket is closed.
Usually, you don’t have to worry too much about Internet addresses—the numerical host addresses that consist of four bytes (or, with IPv6, 16 bytes) such as 132.163.4.102. However, you can use the InetAddress class if you need to convert between host names and Internet addresses.
The java.net package supports IPv6 Internet addresses, provided the host operating system does.
The static getByName method returns an InetAddress object of a host. For example,
InetAddress address = InetAddress.getByName("time-A.timefreq.bldrdoc.gov");returns an InetAddress object that encapsulates the sequence of four bytes 132.163.4.104. You can access the bytes with the getAddress method.
byte[] addressBytes = address.getAddress();
Some host names with a lot of traffic correspond to multiple Internet addresses, to facilitate load balancing. For example, at the time of this writing, the host name java.sun.com corresponds to three different Internet addresses. One of them is picked at random when the host is accessed. You can get all hosts with the getAllByName method.
InetAddress[] addresses = InetAddress.getAllByName(host);
Finally, you sometimes need the address of the local host. If you simply ask for the address of localhost, you always get the local loopback address 127.0.0.1, which cannot be used by others to connect to your computer. Instead, use the static getLocalHost method to get the address of your local host.
InetAddress address = InetAddress.getLocalHost();
Listing 3-2 is a simple program that prints the Internet address of your local host if you do not specify any command-line parameters, or all Internet addresses of another host if you specify the host name on the command line, such as
java InetAddressTest java.sun.com
Example 3-2. InetAddressTest.java
 1. import java.net.*;
 2.
 3. /**
 4.  * This program demonstrates the InetAddress class. Supply a host name as command line
 5.  * argument, or run without command line arguments to see the address of the local host.
 6.  * @version 1.01 2001-06-26
 7.  * @author Cay Horstmann
 8.  */
 9. public class InetAddressTest
10. {
11.    public static void main(String[] args)
12.    {
13.       try
14.       {
15.          if (args.length > 0)
16.          {
17.             String host = args[0];
18.             InetAddress[] addresses = InetAddress.getAllByName(host);
19.             for (InetAddress a : addresses)
20.                System.out.println(a);
21.          }
22.          else
23.          {
24.             InetAddress localHostAddress = InetAddress.getLocalHost();
25.             System.out.println(localHostAddress);
26.          }
27.       }
28.       catch (Exception e)
29.       {
30.          e.printStackTrace();
31.       }
32.    }
33. }
java.net.InetAddress 1.0
static InetAddress[] getAllByName(String host)constructs an
InetAddress, or an array of all Internet addresses, for the given host name.static InetAddress getLocalHost()constructs an
InetAddressfor the local host.byte[] getAddress()returns an array of bytes that contains the numerical address.
String getHostAddress()returns a string with decimal numbers, separated by periods, for example,
"132.163.4.102".String getHostName()returns the host name.
Now that we have implemented a basic network client that receives data from the Internet, let’s implement a simple server that can send information to clients. Once you start the server program, it waits for some client to attach to its port. We chose port number 8189, which is not used by any of the standard services. The ServerSocket class establishes a socket. In our case, the command
ServerSocket s = new ServerSocket(8189);
establishes a server that monitors port 8189. The command
Socket incoming = s.accept();
tells the program to wait indefinitely until a client connects to that port. Once someone connects to this port by sending the correct request over the network, this method returns a Socket object that represents the connection that was made. You can use this object to get input and output streams, as is shown in the following code:
InputStream inStream = incoming.getInputStream();
OutputStream outStream = incoming.getOutputStream();
Everything that the server sends to the server output stream becomes the input of the client program, and all the output from the client program ends up in the server input stream.
In all the examples in this chapter, we transmit text through sockets. We therefore turn the streams into scanners and writers.
Scanner in = new Scanner(inStream);
PrintWriter out = new PrintWriter(outStream, true /* autoFlush */);
Let’s send the client a greeting:
out.println("Hello! Enter BYE to exit.");When you use telnet to connect to this server program at port 8189, you will see the preceding greeting on the terminal screen.
In this simple server, we just read the client input, a line at a time, and echo it. This demonstrates that the program receives the client’s input. An actual server would obviously compute and return an answer that depended on the input.
String line = in.nextLine();
out.println("Echo: " + line);
if (line.trim().equals("BYE")) done = true;
In the end, we close the incoming socket.
incoming.close();
That is all there is to it. Every server program, such as an HTTP web server, continues performing this loop:
It receives a command from the client (“get me this information”) through an incoming data stream.
It decodes the client command.
It gathers the information that the client requested.
It sends the information to the client through the outgoing data stream.
Listing 3-3 is the complete program.
Example 3-3. EchoServer.java
 1. import java.io.*;
 2. import java.net.*;
 3. import java.util.*;
 4.
 5. /**
 6.  * This program implements a simple server that listens to port 8189 and echoes back all
 7.  * client input.
 8.  * @version 1.20 2004-08-03
 9.  * @author Cay Horstmann
10.  */
11. public class EchoServer
12. {
13.    public static void main(String[] args)
14.    {
15.       try
16.       {
17.          // establish server socket
18.          ServerSocket s = new ServerSocket(8189);
19.
20.          // wait for client connection
21.          Socket incoming = s.accept();
22.          try
23.          {
24.             InputStream inStream = incoming.getInputStream();
25.             OutputStream outStream = incoming.getOutputStream();
26.
27.             Scanner in = new Scanner(inStream);
28.             PrintWriter out = new PrintWriter(outStream, true /* autoFlush */);
29.
30.             out.println("Hello! Enter BYE to exit.");
31.
32.             // echo client input
33.             boolean done = false;
34.             while (!done && in.hasNextLine())
35.             {
36.                String line = in.nextLine();
37.                out.println("Echo: " + line);
38.                if (line.trim().equals("BYE")) done = true;
39.             }
40.          }
41.          finally
42.          {
43.             incoming.close();
44.          }
45.       }
46.       catch (IOException e)
47.       {
48.          e.printStackTrace();
49.       }
50.    }
51. }
To try it out, compile and run the program. Then, use telnet to connect to the server localhost (or IP address 127.0.0.1) and port 8189.
If you are connected directly to the Internet, then anyone in the world can access your echo server, provided they know your IP address and the magic port number.
When you connect to the port, you will see the message shown in Figure 3-4:
Hello! Enter BYE to exit.
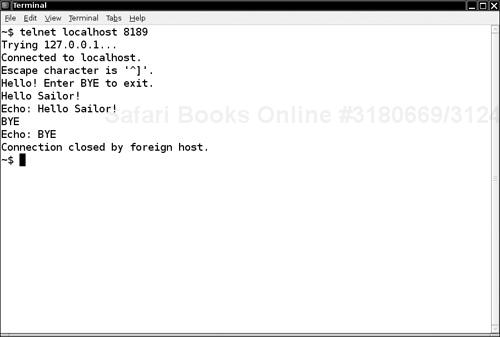
Type anything and watch the input echo on your screen. Type BYE (all uppercase letters) to disconnect. The server program will terminate as well.
java.net.ServerSocket 1.0
ServerSocket(int port)creates a server socket that monitors a port.
Socket accept()waits for a connection. This method blocks (i.e., idles) the current thread until the connection is made. The method returns a
Socketobject through which the program can communicate with the connecting client.void close()closes the server socket.
There is one problem with the simple server in the preceding example. Suppose we want to allow multiple clients to connect to our server at the same time. Typically, a server runs constantly on a server computer, and clients from all over the Internet might want to use the server at the same time. Rejecting multiple connections allows any one client to monopolize the service by connecting to it for a long time. We can do much better through the magic of threads.
Every time we know the program has established a new socket connection—that is, when the call to accept was successful—we will launch a new thread to take care of the connection between the server and that client. The main program will just go back and wait for the next connection. For this to happen, the main loop of the server should look like this:
while (true)
{
   Socket incoming = s.accept();
   Runnable r = new ThreadedEchoHandler(incoming);

   Thread t = new Thread(r);
   t.start();
}
The ThreadedEchoHandler class implements Runnable and contains the communication loop with the client in its run method.
class ThreadedEchoHandler implements Runnable
{ . . .
public void run()
{
try
{
InputStream inStream = incoming.getInputStream();
OutputStream outStream = incoming.getOutputStream();
process input and send response
incoming.close();
}
catch(IOException e)
{
handle exception
}
}
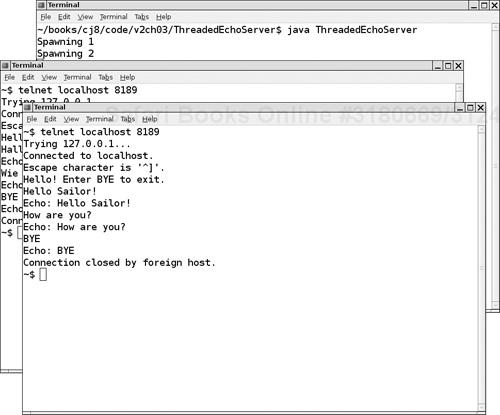
}Because each connection starts a new thread, multiple clients can connect to the server at the same time. You can easily check this out.
Compile and run the server program (Listing 3-4).
Open several telnet windows as we have in Figure 3-5.
Switch between windows and type commands. Note that you can communicate through all of them simultaneously.
When you are done, switch to the window from which you launched the server program and use CTRL+C to kill it.
Note
In this program, we spawn a separate thread for each connection. This approach is not satisfactory for high-performance servers. You can achieve greater server throughput by using features of the java.nio package. See http://www.ibm.com/developerworks/java/library/j-javaio for more information.
Example 3-4. ThreadedEchoServer.java
 1. import java.io.*;
 2. import java.net.*;
 3. import java.util.*;
 4.
 5. /**
 6.    This program implements a multithreaded server that listens to port 8189 and echoes back
 7.    all client input.
 8.    @author Cay Horstmann
 9.    @version 1.20 2004-08-03
10. */
11. public class ThreadedEchoServer
12. {
13.    public static void main(String[] args )
14.    {
15.       try
16.       {
17.          int i = 1;
18.          ServerSocket s = new ServerSocket(8189);
19.
20.          while (true)
21.          {
22.             Socket incoming = s.accept();
23.             System.out.println("Spawning " + i);
24.             Runnable r = new ThreadedEchoHandler(incoming);
25.             Thread t = new Thread(r);
26.             t.start();
27.             i++;
28.          }
29.       }
30.       catch (IOException e)
31.       {
32.          e.printStackTrace();
33.       }
34.    }
35. }
36.
37. /**
38.    This class handles the client input for one server socket connection.
39. */
40. class ThreadedEchoHandler implements Runnable
41. {
42.    /**
43.       Constructs a handler.
44.       @param i the incoming socket
45.       @param c the counter for the handlers (used in prompts)
46.    */
47.    public ThreadedEchoHandler(Socket i)
48.    {
49.       incoming = i;
50.    }
51.
52.    public void run()
53.    {
54.       try
55.       {
56.          try
57.          {
58.             InputStream inStream = incoming.getInputStream();
59.             OutputStream outStream = incoming.getOutputStream();
60.
61.             Scanner in = new Scanner(inStream);
62.             PrintWriter out = new PrintWriter(outStream, true /* autoFlush */);
63.
64.             out.println( "Hello! Enter BYE to exit." );
65.
66.             // echo client input
67.             boolean done = false;
68.             while (!done && in.hasNextLine())
69.             {
70.                String line = in.nextLine();
71.                out.println("Echo: " + line);
72.                if (line.trim().equals("BYE"))
73.                   done = true;
74.             }
75.          }
76.          finally
77.          {
78.             incoming.close();
79.          }
80.       }
81.       catch (IOException e)
82.       {
83.          e.printStackTrace();
84.       }
85.    }
86.
87.    private Socket incoming;
88. }
The half-close provides the ability for one end of a socket connection to terminate its output, while still receiving data from the other end.
Here is a typical situation. Suppose you transmit data to the server but you don’t know at the outset how much data you have. With a file, you’d just close the file at the end of the data. However, if you close a socket, then you immediately disconnect from the server, and you cannot read the response.
The half-close overcomes this problem. You can close the output stream of a socket, thereby indicating to the server the end of the requested data, but keep the input stream open.
The client side looks like this:
Socket socket = new Socket(host, port);
Scanner in = new Scanner(socket.getInputStream());
PrintWriter writer = new PrintWriter(socket.getOutputStream());
// send request data
writer.print(. . .);
writer.flush();
socket.shutdownOutput();
// now socket is half closed
// read response data
while (in.hasNextLine()) != null) { String line = in.nextLine(); . . . }
socket.close();
The server side simply reads input until the end of the input stream is reached. Then it sends the response.
Of course, this protocol is only useful for one-shot services such as HTTP where the client connects, issues a request, catches the response, and then disconnects.
When you connect to a socket, the current thread blocks until the connection has been established or a timeout has elapsed. Similarly, when you read or write data through a socket, the current thread blocks until the operation is successful or has timed out.
In interactive applications, you would like to give users an option to simply cancel a socket connection that does not appear to produce results. However, if a thread blocks on an unresponsive socket, you cannot unblock it by calling interrupt.
To interrupt a socket operation, you use a SocketChannel, a feature of the java.nio package. Open the SocketChannel like this:
SocketChannel channel = SocketChannel.open(new InetSocketAddress(host, port));
A channel does not have associated streams. Instead, it has read and write methods that make use of Buffer objects. (See Chapter 1 for more information about NIO buffers.) These methods are declared in interfaces ReadableByteChannel and WritableByteChannel.
If you don’t want to deal with buffers, you can use the Scanner class to read from a SocketChannel because Scanner has a constructor with a ReadableByteChannel parameter:
Scanner in = new Scanner(channel);
To turn a channel into an output stream, use the static Channels.newOutputStream method.
OutputStream outStream = Channels.newOutputStream(channel);
That’s all you need to do. Whenever a thread is interrupted during an open, read, or write operation, the operation does not block, but is terminated with an exception.
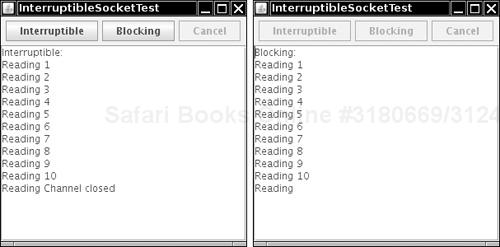
The program in Listing 3-5 contrasts interruptible and blocking sockets. A server sends numbers and pretends to be stuck after the tenth number. Click on either button, and a thread is started that connects to the server and prints the output. The first thread uses an interruptible socket; the second thread uses a blocking socket. If you click the Cancel button within the first ten numbers, you can interrupt either thread.
However, after the first ten numbers, you can only interrupt the first thread. The second thread keeps blocking until the server finally closes the connection (see Figure 3-6).
Example 3-5. InterruptibleSocketTest.java
  1. import java.awt.*;
  2. import java.awt.event.*;
  3. import java.util.*;
  4. import java.net.*;
  5. import java.io.*;
  6. import java.nio.channels.*;
  7. import javax.swing.*;
  8.
  9. /**
 10.  * This program shows how to interrupt a socket channel.
 11.  * @author Cay Horstmann
 12.  * @version 1.01 2007-06-25
 13.  */
 14. public class InterruptibleSocketTest
 15. {
 16.    public static void main(String[] args)
 17.    {
 18.       EventQueue.invokeLater(new Runnable()
 19.          {
 20.             public void run()
 21.             {
 22.                JFrame frame = new InterruptibleSocketFrame();
 23.                frame.setDefaultCloseOperation(JFrame.EXIT_ON_CLOSE);
 24.                frame.setVisible(true);
 25.             }
 26.          });
 27.    }
 28. }
 29.
 30. class InterruptibleSocketFrame extends JFrame
 31. {
 32.    public InterruptibleSocketFrame()
 33.    {
 34.       setSize(WIDTH, HEIGHT);
 35.       setTitle("InterruptibleSocketTest");
 36.
 37.       JPanel northPanel = new JPanel();
 38.       add(northPanel, BorderLayout.NORTH);
 39.
 40.       messages = new JTextArea();
 41.       add(new JScrollPane(messages));
 42.
 43.       interruptibleButton = new JButton("Interruptible");
 44.       blockingButton = new JButton("Blocking");
 45.
 46.       northPanel.add(interruptibleButton);
 47.       northPanel.add(blockingButton);
 48.
 49.       interruptibleButton.addActionListener(new ActionListener()
 50.          {
 51.             public void actionPerformed(ActionEvent event)
 52.             {
 53.                interruptibleButton.setEnabled(false);
 54.                blockingButton.setEnabled(false);
 55.                cancelButton.setEnabled(true);
 56.                connectThread = new Thread(new Runnable()
 57.                   {
 58.                      public void run()
 59.                      {
 60.                         try
 61.                         {
 62.                            connectInterruptibly();
 63.                         }
 64.                         catch (IOException e)
 65.                         {
 66.                            messages.append("
InterruptibleSocketTest.connectInterruptibly: "
 67.                                            + e);
 68.                         }
 69.                      }
 70.                   });
 71.                connectThread.start();
 72.             }
 73.          });
 74.
 75.       blockingButton.addActionListener(new ActionListener()
 76.          {
 77.             public void actionPerformed(ActionEvent event)
 78.             {
 79.                interruptibleButton.setEnabled(false);
 80.                blockingButton.setEnabled(false);
 81.                cancelButton.setEnabled(true);
 82.                connectThread = new Thread(new Runnable()
 83.                   {
 84.                      public void run()
 85.                      {
 86.                         try
 87.                         {
 88.                            connectBlocking();
 89.                         }
 90.                         catch (IOException e)
 91.                         {
 92.                           messages.append("
InterruptibleSocketTest.connectBlocking: " + e);
 93.                         }
 94.                      }
 95.                   });
 96.                connectThread.start();
 97.             }
 98.          });
 99.
100.       cancelButton = new JButton("Cancel");
101.       cancelButton.setEnabled(false);
102.       northPanel.add(cancelButton);
103.       cancelButton.addActionListener(new ActionListener()
104.          {
105.             public void actionPerformed(ActionEvent event)
106.             {
107.                connectThread.interrupt();
108.                cancelButton.setEnabled(false);
109.             }
110.          });
111.       server = new TestServer();
112.       new Thread(server).start();
113.    }
114.
115.    /**
116.     * Connects to the test server, using interruptible I/O
117.     */
118.    public void connectInterruptibly() throws IOException
119.    {
120.       messages.append("Interruptible:
");
121.       SocketChannel channel = SocketChannel.open(new InetSocketAddress("localhost", 8189));
122.       try
123.       {
124.          in = new Scanner(channel);
125.          while (!Thread.currentThread().isInterrupted())
126.          {
127.             messages.append("Reading ");
128.             if (in.hasNextLine())
129.             {
130.                String line = in.nextLine();
131.                messages.append(line);
132.                messages.append("
");
133.             }
134.          }
135.       }
136.       finally
137.       {
138.          channel.close();
139.          EventQueue.invokeLater(new Runnable()
140.          {
141.             public void run()
142.             {
143.                messages.append("Channel closed
");
144.                interruptibleButton.setEnabled(true);
145.                blockingButton.setEnabled(true);
146.             }
147.          });
148.       }
149.    }
150.
151.    /**
152.     * Connects to the test server, using blocking I/O
153.     */
154.    public void connectBlocking() throws IOException
155.    {
156.       messages.append("Blocking:
");
157.       Socket sock = new Socket("localhost", 8189);
158.       try
159.       {
160.          in = new Scanner(sock.getInputStream());
161.          while (!Thread.currentThread().isInterrupted())
162.          {
163.             messages.append("Reading ");
164.             if (in.hasNextLine())
165.             {
166.                String line = in.nextLine();
167.                messages.append(line);
168.                messages.append("
");
169.             }
170.          }
171.       }
172.       finally
173.       {
174.          sock.close();
175.          EventQueue.invokeLater(new Runnable()
176.          {
177.             public void run()
178.             {
179.                messages.append("Socket closed
");
180.                interruptibleButton.setEnabled(true);
181.                blockingButton.setEnabled(true);
182.             }
183.          });
184.       }
185.    }
186.
187.    /**
188.     * A multithreaded server that listens to port 8189 and sends numbers to the client,
189.     * simulating a hanging server after 10 numbers.
190.     */
191.    class TestServer implements Runnable
192.    {
193.       public void run()
194.       {
195.          try
196.          {
197.             ServerSocket s = new ServerSocket(8189);
198.
199.             while (true)
200.             {
201.                Socket incoming = s.accept();
202.                Runnable r = new TestServerHandler(incoming);
203.                Thread t = new Thread(r);
204.                t.start();
205.             }
206.          }
207.          catch (IOException e)
208.          {
209.             messages.append("
TestServer.run: " + e);
210.          }
211.       }
212.    }
213.
214.    /**
215.     * This class handles the client input for one server socket connection.
216.     */
217.    class TestServerHandler implements Runnable
218.    {
219.       /**
220.        * Constructs a handler.
221.        * @param i the incoming socket
222.        */
223.       public TestServerHandler(Socket i)
224.       {
225.          incoming = i;
226.       }
227.
228.       public void run()
229.       {
230.          try
231.          {
232.             OutputStream outStream = incoming.getOutputStream();
233.             PrintWriter out = new PrintWriter(outStream, true /* autoFlush */);
234.             while (counter < 100)
235.             {
236.                counter++;
237.                if (counter <= 10) out.println(counter);
238.                Thread.sleep(100);
239.             }
240.             incoming.close();
241.             messages.append("Closing server
");
242.          }
243.          catch (Exception e)
244.          {
245.             messages.append("
TestServerHandler.run: " + e);
246.          }
247.       }
248.
249.       private Socket incoming;
250.       private int counter;
251.    }
252.
253.    private Scanner in;
254.    private JButton interruptibleButton;
255.    private JButton blockingButton;
256.    private JButton cancelButton;
257.    private JTextArea messages;
258.    private TestServer server;
259.    private Thread connectThread;
260.
261.    public static final int WIDTH = 300;
262.    public static final int HEIGHT = 300;
263. }
java.net.InetSocketAddress 1.4
InetSocketAddress(String hostname, int port)constructs an address object with the given host and port, resolving the host name during construction. If the host name cannot be resolved, then the address object’s
unresolvedproperty is set totrue.boolean isUnresolved()returns
trueif this address object could not be resolved.
In this section, we show you a practical example of socket programming: a program that sends e-mail to a remote site.
To send e-mail, you make a socket connection to port 25, the SMTP port. The Simple Mail Transport Protocol (SMTP) describes the format for e-mail messages. You can connect to any server that runs an SMTP service. However, the server must be willing to accept your request. It used to be that SMTP servers were routinely willing to route e-mail from anyone, but in these days of spam floods, most servers now have built-in checks and accept requests only from users or IP address ranges that they trust.
Once you are connected to the server, send a mail header (in the SMTP format, which is easy to generate), followed by the mail message.
Here are the details:
Open a socket to your host.
Socket s = new Socket("mail.yourserver.com", 25); // 25 is SMTP
PrintWriter out = new PrintWriter(s.getOutputStream());
Send the following information to the print stream:
HELO sending host
MAIL FROM: <sender e-mail address>
RCPT TO: <recipient e-mail address>
DATA
mail message
(any number of lines)
.
QUIT
The SMTP specification (RFC 821) states that lines must be terminated with
followed by
.
Some SMTP servers do not check the veracity of the information—you might be able to supply any sender you like. (Keep this in mind the next time you get an e-mail message from [email protected] inviting you to a black-tie affair on the front lawn. It is fairly easy to find an SMTP server that will relay a fake message.)
The program in Listing 3-6 is a simple e-mail program. As you can see in Figure 3-7, you type in the sender, recipient, mail message, and SMTP server. Then, click the Send button, and your message is sent.
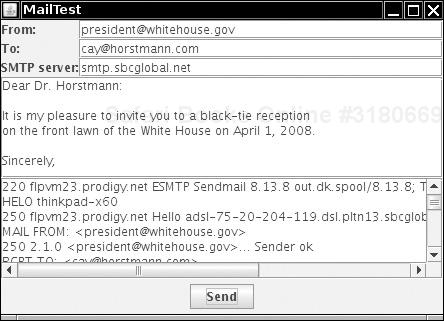
The program makes a socket connection to the SMTP server and sends the sequence of commands just discussed. It displays the commands and the responses that it receives.
Note
When this program appeared in the first edition of Core Java in 1996, most SMTP servers accepted connections from anywhere, without making any checks at all. Nowadays, most servers are less permissive, and you might find it more difficult to run this program. The mail server of your Internet service provider may be accessible when you connect from your home, from a trusted IP address. Other servers use the “POP before SMTP” rule, requiring that you first download your e-mail (which requires a password) before you send any messages. Try fetching your e-mail before you send mail with this program. An extension to SMTP that requires an encrypted password (http://tools.ietf.org/html/rfc2554) is becoming more common. Our simple program does not support that authentication mechanism.
In this last section, you saw how to use socket-level programming to connect to an SMTP server and send an e-mail message. It is nice to know that this can be done and to get a glimpse of what goes on “under the hood” of an Internet service such as e-mail. However, if you are planning an application that incorporates e-mail, you will probably want to work at a higher level and use a library that encapsulates the protocol details. For example, Sun Microsystems has developed the JavaMail API as a standard extension of the Java platform. In the JavaMail API, you simply issue a call such as
Transport.send(message);
to send a message. The library takes care of message protocols, authentication, handling attachments, and so on.
Example 3-6. MailTest.java
  1. import java.awt.*;
  2. import java.awt.event.*;
  3. import java.util.*;
  4. import java.net.*;
  5. import java.io.*;
  6. import javax.swing.*;
  7.
  8. /**
  9.  * This program shows how to use sockets to send plain text mail messages.
 10.  * @author Cay Horstmann
 11.  * @version 1.11 2007-06-25
 12.  */
 13. public class MailTest
 14. {
 15.    public static void main(String[] args)
 16.    {
 17.       EventQueue.invokeLater(new Runnable()
 18.          {
 19.             public void run()
 20.             {
 21.                JFrame frame = new MailTestFrame();
 22.                frame.setDefaultCloseOperation(JFrame.EXIT_ON_CLOSE);
 23.                frame.setVisible(true);
 24.             }
 25.          });
 26.    }
 27. }
 28.
 29. /**
 30.  * The frame for the mail GUI.
 31.  */
 32. class MailTestFrame extends JFrame
 33. {
 34.    public MailTestFrame()
 35.    {
 36.       setSize(DEFAULT_WIDTH, DEFAULT_HEIGHT);
 37.       setTitle("MailTest");
 38.
 39.       setLayout(new GridBagLayout());
 40.
 41.       // we use the GBC convenience class of Core Java Volume I, Chapter 9
 42.       add(new JLabel("From:"), new GBC(0, 0).setFill(GBC.HORIZONTAL));
 43.
 44.       from = new JTextField(20);
 45.       add(from, new GBC(1, 0).setFill(GBC.HORIZONTAL).setWeight(100, 0));
 46.
 47.       add(new JLabel("To:"), new GBC(0, 1).setFill(GBC.HORIZONTAL));
 48.
 49.       to = new JTextField(20);
 50.       add(to, new GBC(1, 1).setFill(GBC.HORIZONTAL).setWeight(100, 0));
 51.
 52.       add(new JLabel("SMTP server:"), new GBC(0, 2).setFill(GBC.HORIZONTAL));
 53.
 54.       smtpServer = new JTextField(20);
 55.       add(smtpServer, new GBC(1, 2).setFill(GBC.HORIZONTAL).setWeight(100, 0));
 56.
 57.       message = new JTextArea();
 58.       add(new JScrollPane(message), new GBC(0, 3, 2, 1).setFill(GBC.BOTH).setWeight(100, 100));
 59.
 60.       comm = new JTextArea();
 61.       add(new JScrollPane(comm), new GBC(0, 4, 2, 1).setFill(GBC.BOTH).setWeight(100, 100));
 62.
 63.       JPanel buttonPanel = new JPanel();
 64.       add(buttonPanel, new GBC(0, 5, 2, 1));
 65.
 66.       JButton sendButton = new JButton("Send");
 67.       buttonPanel.add(sendButton);
 68.       sendButton.addActionListener(new ActionListener()
 69.          {
 70.             public void actionPerformed(ActionEvent event)
 71.             {
 72.                new SwingWorker<Void, Void>()
 73.                {
 74.                   protected Void doInBackground() throws Exception
 75.                   {
 76.                      comm.setText("");
 77.                      sendMail();
 78.                      return null;
 79.                   }
 80.                }.execute();
 81.             }
 82.          });
 83.    }
 84.
 85.   /**
 86.    * Sends the mail message that has been authored in the GUI.
 87.    */
 88.   public void sendMail()
 89.   {
 90.      try
 91.      {
 92.         Socket s = new Socket(smtpServer.getText(), 25);
 93.
 94.         InputStream inStream = s.getInputStream();
 95.         OutputStream outStream = s.getOutputStream();
 96.
 97.         in = new Scanner(inStream);
 98.         out = new PrintWriter(outStream, true /* autoFlush */);
 99.
100.         String hostName = InetAddress.getLocalHost().getHostName();
101.
102.         receive();
103.         send("HELO " + hostName);
104.         receive();
105.         send("MAIL FROM: <" + from.getText() + ">");
106.         receive();
107.         send("RCPT TO: <" + to.getText() + ">");
108.         receive();
109.         send("DATA");
110.         receive();
111.         send(message.getText());
112.         send(".");
113.         receive();
114.         s.close();
115.       }
116.       catch (IOException e)
117.       {
118.          comm.append("Error: " + e);
119.       }
120.    }
121.
122.    /**
123.     * Sends a string to the socket and echoes it in the comm text area.
124.     * @param s the string to send.
125.     */
126.    public void send(String s) throws IOException
127.    {
128.       comm.append(s);
129.       comm.append("
");
130.       out.print(s.replaceAll("
", "
"));
131.       out.print("
");
132.       out.flush();
133.    }
134.
135.    /**
136.     * Receives a string from the socket and displays it in the comm text area.
137.     */
138.    public void receive() throws IOException
139.    {
140.       String line = in.nextLine();
141.       comm.append(line);
142.       comm.append("
");
143.    }
144.
145.    private Scanner in;
146.    private PrintWriter out;
147.    private JTextField from;
148.    private JTextField to;
149.    private JTextField smtpServer;
150.    private JTextArea message;
151.    private JTextArea comm;
152.
153.    public static final int DEFAULT_WIDTH = 300;
154.    public static final int DEFAULT_HEIGHT = 300;
155. }
To access web servers in a Java program, you will want to work on a higher level than making a socket connection and issuing HTTP requests. In the following sections, we discuss the classes that the Java library provides for this purpose.
The URL and URLConnection classes encapsulate much of the complexity of retrieving information from a remote site. You can construct a URL object from a string:
URL url = new URL(urlString);If you simply want to fetch the contents of the resource, then you can use the openStream method of the URL class. This method yields an InputStream object. Use it in the usual way, for example, to construct a Scanner:
InputStream inStream = url.openStream();
Scanner in = new Scanner(inStream);
The java.net package makes a useful distinction between URLs (uniform resource locators) and URIs (uniform resource identifiers).
A URI is a purely syntactical construct that contains the various parts of the string specifying a web resource. A URL is a special kind of URI, namely, one with sufficient information to locate a resource. Other URIs, such as
mailto:[email protected]
are not locators—there is no data to locate from this identifier. Such a URI is called a URN (uniform resource name).
In the Java library, the URI class has no methods for accessing the resource that the identifier specifies—its sole purpose is parsing. In contrast, the URL class can open a stream to the resource. For that reason, the URL class only works with schemes that the Java library knows how to handle, such as http:, https:, ftp:, the local file system (file:), and JAR files (jar:).
To see why parsing is not trivial, consider how complex URIs can be. For example,
http://maps.yahoo.com/py/maps.py?csz=Cupertino+CA
ftp://username:[email protected]/pub/file.txt
The URI specification gives rules for the makeup of these identifiers. A URI has the syntax
[scheme:]schemeSpecificPart[#fragment]
Here, the [ . . . ] denotes an optional part, and the : and # are included literally in the identifier.
If the scheme: part is present, the URI is called absolute. Otherwise, it is called relative.
An absolute URI is opaque if the schemeSpecificPart does not begin with a / such as
mailto:[email protected]
All absolute nonopaque URIs and all relative URIs are hierarchical. Examples are
http://java.sun.com/index.html
../../java/net/Socket.html#Socket()
The schemeSpecificPart of a hierarchical URI has the structure
[//authority][path][?query]
where again [ . . . ] denotes optional parts.
For server-based URIs, the authority part has the form
[user-info@]host[:port]
The port must be an integer.
RFC 2396, which standardizes URIs, also supports a registry-based mechanism by which the authority has a different format, but this is not in common use.
One of the purposes of the URI class is to parse an identifier and break it up into its various components. You can retrieve them with the methods
getScheme
getSchemeSpecificPart
getAuthority
getUserInfo
getHost
getPort
getPath
getQuery
getFragment
The other purpose of the URI class is the handling of absolute and relative identifiers. If you have an absolute URI such as
http://docs.mycompany.com/api/java/net/ServerSocket.html
and a relative URI such as
../../java/net/Socket.html#Socket()
then you can combine the two into an absolute URI.
http://docs.mycompany.com/api/java/net/Socket.html#Socket()
This process is called resolving a relative URL.
The opposite process is called relativization. For example, suppose you have a base URI
http://docs.mycompany.com/api
and a URI
http://docs.mycompany.com/api/java/lang/String.html
Then the relativized URI is
java/lang/String.html
The URI class supports both of these operations:
relative = base.relativize(combined);
combined = base.resolve(relative);
If you want additional information about a web resource, then you should use the URLConnection class, which gives you much more control than the basic URL class.
When working with a URLConnection object, you must carefully schedule your steps, as follows:
Call the
openConnectionmethod of theURLclass to obtain theURLConnectionobject:URLConnection connection = url.openConnection();Set any request properties, using the methods
setDoInput
setDoOutput
setIfModifiedSince
setUseCaches
setAllowUserInteraction
setRequestProperty
setConnectTimeout
setReadTimeout
We discuss these methods later in this section and in the API notes.
Connect to the remote resource by calling the
connectmethod.connection.connect();
Besides making a socket connection to the server, this method also queries the server for header information.
After connecting to the server, you can query the header information. Two methods,
getHeaderFieldKeyandgetHeaderField, enumerate all fields of the header. The methodgetHeaderFieldsgets a standardMapobject containing the header fields. For your convenience, the following methods query standard fields:getContentType getContentLength getContentEncoding getDate getExpiration getLastModified
Finally, you can access the resource data. Use the
getInputStreammethod to obtain an input stream for reading the information. (This is the same input stream that theopenStreammethod of theURLclass returns.) The other method,getContent, isn’t very useful in practice. The objects that are returned by standard content types such astext/plainandimage/gifrequire classes in thecom.sunhierarchy for processing. You could register your own content handlers, but we do not discuss that technique in this book.
Caution
Some programmers form the wrong mental image when using the URLConnection class, thinking that the getInputStream and getOutputStream methods are similar to those of the Socket class. But that isn’t quite true. The URLConnection class does quite a bit of magic behind the scenes, in particular the handling of request and response headers. For that reason, it is important that you follow the setup steps for the connection.
Let us now look at some of the URLConnection methods in detail. Several methods set properties of the connection before connecting to the server. The most important ones are setDoInput and setDoOutput. By default, the connection yields an input stream for reading from the server but no output stream for writing. If you want an output stream (for example, for posting data to a web server), then you need to call
connection.setDoOutput(true);
Next, you may want to set some of the request headers. The request headers are sent together with the request command to the server. Here is an example:
GET www.server.com/index.html HTTP/1.0
Referer: http://www.somewhere.com/links.html
Proxy-Connection: Keep-Alive
User-Agent: Mozilla/5.0 (X11; U; Linux i686; en-US; rv:1.8.1.4)
Host: www.server.com
Accept: text/html, image/gif, image/jpeg, image/png, */*
Accept-Language: en
Accept-Charset: iso-8859-1,*,utf-8
Cookie: orangemilano=192218887821987
The setIfModifiedSince method tells the connection that you are only interested in data that have been modified since a certain date.
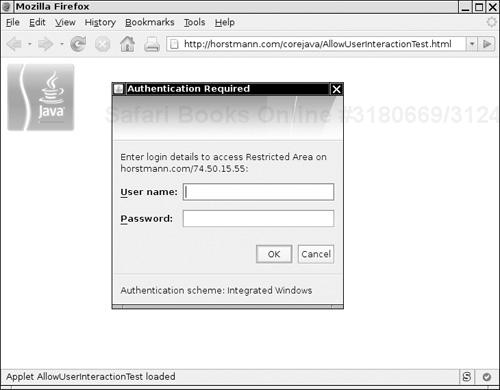
The setUseCaches and setAllowUserInteraction methods should only be called inside applets. The setUseCaches method directs the browser to first check the browser cache. The setAllowUserInteraction method allows an applet to pop up a dialog box for querying the user name and password for password-protected resources (see Figure 3-8).
Finally, you can use the catch-all setRequestProperty method to set any name/value pair that is meaningful for the particular protocol. For the format of the HTTP request headers, see RFC 2616. Some of these parameters are not well documented and are passed around by word of mouth from one programmer to the next. For example, if you want to access a password-protected web page, you must do the following:
Concatenate the user name, a colon, and the password.
String input = username + ":" + password;
Compute the base64 encoding of the resulting string. (The base64 encoding encodes a sequence of bytes into a sequence of printable ASCII characters.)
String encoding = base64Encode(input);
Call the
setRequestPropertymethod with a name of"Authorization"and value"Basic " + encoding:connection.setRequestProperty("Authorization", "Basic " + encoding);
Tip
You just saw how to access a password-protected web page. To access a password-protected file by FTP, you use an entirely different method. You simply construct a URL of the form
ftp://username:[email protected]/pub/file.txt
Once you call the connect method, you can query the response header information. First, let us see how to enumerate all response header fields. The implementors of this class felt a need to express their individuality by introducing yet another iteration protocol. The call
String key = connection.getHeaderFieldKey(n);
gets the nth key from the response header, where n starts from 1! It returns null if n is zero or larger than the total number of header fields. There is no method to return the number of fields; you simply keep calling getHeaderFieldKey until you get null. Similarly, the call
String value = connection.getHeaderField(n);
returns the nth value.
The method getHeaderFields returns a Map of response header fields that you can access as explained in Chapter 2.
Map<String,List<String>> headerFields = connection.getHeaderFields();
Here is a set of response header fields from a typical HTTP request.
Date: Wed, 27 Aug 2008 00:15:48 GMT
Server: Apache/2.2.2 (Unix)
Last-Modified: Sun, 22 Jun 2008 20:53:38 GMT
Accept-Ranges: bytes
Content-Length: 4813
Connection: close
Content-Type: text/html
As a convenience, six methods query the values of the most common header types and convert them to numeric types when appropriate. Table 3-1 shows these convenience methods. The methods with return type long return the number of seconds since January 1, 1970 GMT.
The program in Listing 3-7 lets you experiment with URL connections. Supply a URL and an optional user name and password on the command line when running the program, for example:
java URLConnectionTest http://www.yourserver.com user password
The program prints
All keys and values of the header.
The return values of the six convenience methods in Table 3-1.
The first ten lines of the requested resource.
The program is straightforward, except for the computation of the base64 encoding. There is an undocumented class, sun.misc.BASE64Encoder, that you can use instead of the one that we provide in the example program. Simply replace the call to base64Encode with
String encoding = new sun.misc.BASE64Encoder().encode(input.getBytes());
However, we supplied our own class because we do not like to rely on undocumented classes.
Note
The javax.mail.internet.MimeUtility class in the JavaMail standard extension package also has a method for Base64 encoding. The JDK has a class java.util.prefs.Base64 for the same purpose, but it is not public, so you cannot use it in your code.
Example 3-7. URLConnectionTest.java
  1. import java.io.*;
  2. import java.net.*;
  3. import java.util.*;
  4.
  5. /**
  6.  * This program connects to a URL and displays the response header data and the first 10
  7.  * lines of the requested data.
  8.  *
  9.  * Supply the URL and an optional username and password (for HTTP basic authentication) on
 10.  * the command line.
 11.  * @version 1.11 2007-06-26
 12.  * @author Cay Horstmann
 13.  */
 14. public class URLConnectionTest
 15. {
 16.    public static void main(String[] args)
 17.    {
 18.       try
 19.       {
 20.          String urlName;
 21.          if (args.length > 0) urlName = args[0];
 22.          else urlName = "http://java.sun.com";
 23.
 24.          URL url = new URL(urlName);
 25.          URLConnection connection = url.openConnection();
 26.
 27.          // set username, password if specified on command line
 28.
 29.          if (args.length > 2)
 30.          {
 31.             String username = args[1];
 32.             String password = args[2];
 33.             String input = username + ":" + password;
 34.             String encoding = base64Encode(input);
 35.             connection.setRequestProperty("Authorization", "Basic " + encoding);
 36.          }
 37.
 38.          connection.connect();
 39.
 40.          // print header fields
 41.
 42.          Map<String, List<String>> headers = connection.getHeaderFields();
 43.          for (Map.Entry<String, List<String>> entry : headers.entrySet())
 44.          {
 45.             String key = entry.getKey();
 46.             for (String value : entry.getValue())
 47.                System.out.println(key + ": " + value);
 48.          }
 49.
 50.          // print convenience functions
 51.
 52.          System.out.println("----------");
 53.          System.out.println("getContentType: " + connection.getContentType());
 54.          System.out.println("getContentLength: " + connection.getContentLength());
 55.          System.out.println("getContentEncoding: " + connection.getContentEncoding());
 56.          System.out.println("getDate: " + connection.getDate());
 57.          System.out.println("getExpiration: " + connection.getExpiration());
 58.          System.out.println("getLastModifed: " + connection.getLastModified());
 59.          System.out.println("----------");
 60.
 61.          Scanner in = new Scanner(connection.getInputStream());
 62.
 63.          // print first ten lines of contents
 64.
 65.          for (int n = 1; in.hasNextLine() && n <= 10; n++)
 66.             System.out.println(in.nextLine());
 67.          if (in.hasNextLine()) System.out.println(". . .");
 68.       }
 69.       catch (IOException e)
 70.       {
 71.          e.printStackTrace();
 72.       }
 73.    }
 74.    /**
 75.     * Computes the Base64 encoding of a string
 76.     * @param s a string
 77.     * @return the Base 64 encoding of s
 78.     */
 79.    public static String base64Encode(String s)
 80.    {
 81.       ByteArrayOutputStream bOut = new ByteArrayOutputStream();
 82.       Base64OutputStream out = new Base64OutputStream(bOut);
 83.       try
 84.       {
 85.          out.write(s.getBytes());
 86.          out.flush();
 87.       }
 88.       catch (IOException e)
 89.       {
 90.       }
 91.       return bOut.toString();
 92.    }
 93. }
 94.
 95. /**
 96.  * This stream filter converts a stream of bytes to their Base64 encoding.
 97.  *
 98.  * Base64 encoding encodes 3 bytes into 4 characters. |11111122|22223333|33444444| Each set
 99.  * of 6 bits is encoded according to the toBase64 map. If the number of input bytes is not a
100.  * multiple of 3, then the last group of 4 characters is padded with one or two = signs. Each
101.  * output line is at most 76 characters.
102.  */
103. class Base64OutputStream extends FilterOutputStream
104. {
105.    /**
106.     * Constructs the stream filter
107.     * @param out the stream to filter
108.     */
109.    public Base64OutputStream(OutputStream out)
110.    {
111.       super(out);
112.    }
113.
114.    public void write(int c) throws IOException
115.    {
116.       inbuf[i] = c;
117.       i++;
118.       if (i == 3)
119.       {
120.          super.write(toBase64[(inbuf[0] & 0xFC) >> 2]);
121.          super.write(toBase64[((inbuf[0] & 0×03) << 4) | ((inbuf[1] & 0xF0) >> 4)]);
122.          super.write(toBase64[((inbuf[1] & 0×0F) << 2) | ((inbuf[2] & 0xC0) >> 6)]);
123.          super.write(toBase64[inbuf[2] & 0×3F]);
124.          col += 4;
125.          i = 0;
126.          if (col >= 76)
127.          {
128.             super.write('
'),
129.             col = 0;
130.          }
131.       }
132.    }
133.
134.    public void flush() throws IOException
135.    {
136.       if (i == 1)
137.       {
138.          super.write(toBase64[(inbuf[0] & 0xFC) >> 2]);
139.          super.write(toBase64[(inbuf[0] & 0×03) << 4]);
140.          super.write('='),
141.          super.write('='),
142.       }
143.       else if (i == 2)
144.       {
145.          super.write(toBase64[(inbuf[0] & 0xFC) >> 2]);
146.          super.write(toBase64[((inbuf[0] & 0x03) << 4) | ((inbuf[1] & 0xF0) >> 4)]);
147.          super.write(toBase64[(inbuf[1] & 0x0F) << 2]);
148.          super.write('='),
149.       }
150.       if (col > 0)
151.       {
152.          super.write('
'),
153.          col = 0;
154.       }
155.    }
156.
157.    private static char[] toBase64 = { 'A', 'B', 'C', 'D', 'E', 'F', 'G', 'H', 'I', 'J', 'K',
158.          'L', 'M', 'N', 'O', 'P', 'Q', 'R', 'S', 'T', 'U', 'V', 'W', 'X', 'Y', 'Z', 'a', 'b',
159.          'c', 'd', 'e', 'f', 'g', 'h', 'i', 'j', 'k', 'l', 'm', 'n', 'o', 'p', 'q', 'r', 's',
160.          't', 'u', 'v', 'w', 'x', 'y', 'z', '0', '1', '2', '3', '4', '5', '6', '7', '8', '9',
161.          '+', '/' };
162.
163.    private int col = 0;
164.    private int i = 0;
165.    private int[] inbuf = new int[3];
166. }
Note
A commonly asked question is whether the Java platform supports access of secure web pages (https: URLs). As of Java SE 1.4, Secure Sockets Layer (SSL) support is a part of the standard library. Before Java SE 1.4, you were only able to make SSL connections from applets by taking advantage of the SSL implementation of the browser.
java.net.URL 1.0
InputStream openStream()opens an input stream for reading the resource data.
URLConnection openConnection();returns a
URLConnectionobject that manages the connection to the resource.
java.net.URLConnection 1.0
void setDoInput(boolean doInput)boolean getDoInput()If
doInputistrue, then the user can receive input from thisURLConnection.void setDoOutput(boolean doOutput)boolean getDoOutput()If
doOutputistrue, then the user can send output to thisURLConnection.void setIfModifiedSince(long time)long getIfModifiedSince()The
ifModifiedSinceproperty configures thisURLConnectionto fetch only data that have been modified since a given time. The time is given in seconds from midnight, GMT, January 1, 1970.void setUseCaches(boolean useCaches)boolean getUseCaches()If
useCachesistrue, then data can be retrieved from a local cache. Note that theURLConnectionitself does not maintain such a cache. The cache must be supplied by an external program such as a browser.void setAllowUserInteraction(boolean allowUserInteraction)boolean getAllowsUserInteraction()If
allowUserInteractionistrue, then the user can be queried for passwords. Note that theURLConnectionitself has no facilities for executing such a query. The query must be carried out by an external program such as a browser or browser plug-in.void setConnectTimeout(int timeout)5.0int getConnectTimeout()5.0sets or gets the timeout for the connection (in milliseconds). If the timeout has elapsed before a connection was established, the
connectmethod of the associated input stream throws aSocketTimeoutException.void setReadTimeout(int timeout)5.0int getReadTimeout()5.0sets the timeout for reading data (in milliseconds). If the timeout has elapsed before a read operation was successful, the
readmethod throws aSocketTimeoutException.void setRequestProperty(String key, String value)sets a request header field.
Map<String,List<String>> getRequestProperties()1.4returns a map of request properties. All values for the same key are placed in a list.
void connect()connects to the remote resource and retrieves response header information.
Map<String,List<String>> Map getHeaderFields()1.4returns a map of response headers. All values for the same key are placed in a map.
String getHeaderFieldKey(int n)gets the key for the
nth response header field, ornullifnis ≤ 0 or larger than the number of response header fields.String getHeaderField(int n)gets value of the
nth response header field, ornullifnis ≤ 0 or larger than the number of response header fields.int getContentLength()gets the content length if available, or -
1if unknown.String getContentTypegets the content type, such as
text/plainorimage/gif.String getContentEncoding()gets the content encoding, such as
gzip. This value is not commonly used, because the defaultidentityencoding is not supposed to be specified with aContent-Encodingheader.long getDate()long getExpiration()long getLastModifed()gets the date of creation, expiration, and last modification of the resource. The dates are specified as seconds from midnight, GMT, January 1, 1970.
InputStream getInputStream()OutputStream getOutputStream()returns a stream for reading from the resource or writing to the resource.
Object getContent()selects the appropriate content handler to read the resource data and convert it into an object. This method is not useful for reading standard types such as
text/plainorimage/gifunless you install your own content handler.
In the preceding section, you saw how to read data from a web server. Now we will show you how your programs can send data back to a web server and to programs that the web server invokes.
To send information from a web browser to the web server, a user fills out a form, like the one in Figure 3-9.
When the user clicks the Submit button, the text in the text fields and the settings of the checkboxes and radio buttons are sent back to the web server. The web server invokes a program that processes the user input.
Many technologies enable web servers to invoke programs. Among the best known ones are Java servlets, JavaServer Faces, Microsoft Active Server Pages (ASP), and Common Gateway Interface (CGI) scripts. For simplicity, we use the generic term script for a server-side program, no matter what technology is used.
The server-side script processes the form data and produces another HTML page that the web server sends back to the browser. This sequence is illustrated in Figure 3-10. The response page can contain new information (for example, in an information-search program) or just an acknowledgment. The web browser then displays the response page.
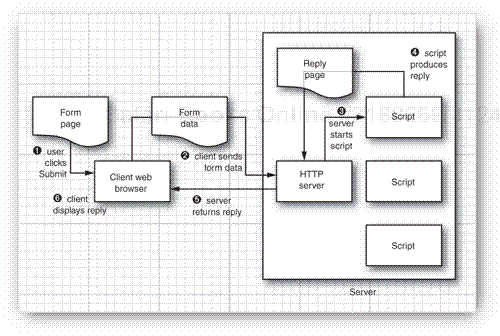
We do not discuss the implementation of server-side scripts in this book. Our interest is merely in writing client programs that interact with existing server-side scripts.
When form data are sent to a web server, it does not matter whether the data are interpreted by a servlet, a CGI script, or some other server-side technology. The client sends the data to the web server in a standard format, and the web server takes care of passing it on to the program that generates the response.
Two commands, called GET and POST, are commonly used to send information to a web server.
In the GET command, you simply attach parameters to the end of the URL. The URL has the form
http://host/script?parameters
Each parameter has the form name=value. Parameters are separated by & characters. Parameter values are encoded using the URL encoding scheme, following these rules:
Leave the characters
AthroughZ,athroughz,0through9, and . - * _ unchanged.Replace all spaces with
+characters.Encode all other characters into UTF-8 and encode each byte by a
%, followed by a two-digit hexadecimal number.
For example, to transmit the street name S. Main, you use S%2e+Main, as the hexadecimal number 2e (or decimal 46) is the ASCII code of the “.” character.
This encoding keeps any intermediate programs from messing with spaces and interpreting other special characters.
For example, at the time of this writing, the Yahoo! web site has a script, py/maps.py, at the host maps.yahoo.com. The script requires two parameters with names addr and csz. To get a map of 1 Infinite Loop, Cupertino, CA, you use the following URL:
http://maps.yahoo.com/py/maps.py?addr=1+Infinite+Loop&csz=Cupertino+CA
The GET command is simple, but it has a major limitation that makes it relatively unpopular: Most browsers have a limit on the number of characters that you can include in a GET request.
In the POST command, you do not attach parameters to a URL. Instead, you get an output stream from the URLConnection and write name/value pairs to the output stream. You still have to URL-encode the values and separate them with & characters.
Let us look at this process in more detail. To post data to a script, you first establish a URLConnection.
URL url = new URL("http://host/script");
URLConnection connection = url.openConnection();
Then, you call the setDoOutput method to set up the connection for output.
connection.setDoOutput(true);
Next, you call getOutputStream to get a stream through which you can send data to the server. If you are sending text to the server, it is convenient to wrap that stream into a PrintWriter.
PrintWriter out = new PrintWriter(connection.getOutputStream());
Now you are ready to send data to the server:
out.print(name1 + "=" + URLEncoder.encode(value1, "UTF-8") + "&");
out.print(name2 + "=" + URLEncoder.encode(value2, "UTF-8"));
Close the output stream.
out.close();
Finally, call getInputStream and read the server response.
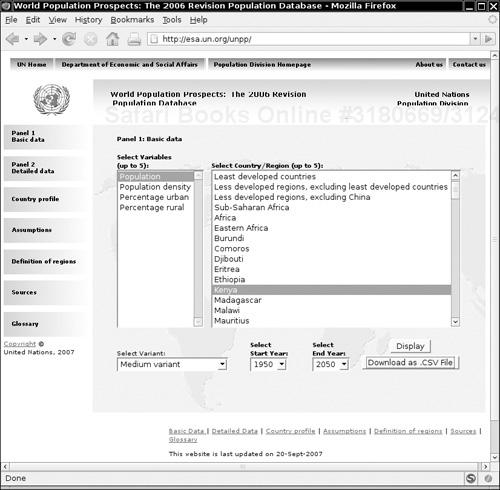
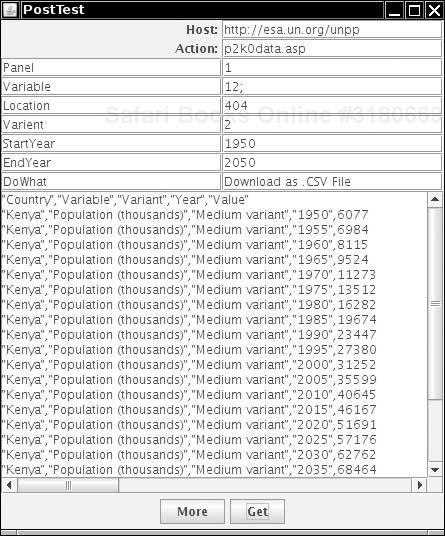
Let us run through a practical example. The web site at http://esa.un.org/unpp/ contains a form to request population data (see Figure 3-9 on page 208). If you look at the HTML source, you will see the following HTML tag:
<form action="p2k0data.asp" method="post">
This tag means that the name of the script executed when the user clicks the Submit button is p2k0data.asp and that you need to use the POST command to send data to the script.
Next, you need to find out the field names that the script expects. Look at the user interface components. Each of them has a name attribute, for example,
<select name="Variable">
<option value="12;">Population</option>
more options . . .
</select>
This tells you that the name of the field is Variable. This field specifies the population table type. If you specify the table type "12;", you will get a table of the total population estimates. If you look further, you will also find a field name Location with values such as 900 for the entire world and 404 for Kenya.
There are several other fields that need to be set. To get the population estimates of Kenya from 1950 to 2050, you construct this string:
Panel=1&Variable=12%3b&Location=404&Varient=2&StartYear=1950&EndYear=2050&
   DoWhat=Download+as+%2eCSV+File
Send the string to the URL
http://esa.un.org/unpp/p2k0data.asp
The script sends back the following reply:
"Country","Variable","Variant","Year","Value"
"Kenya","Population (thousands)","Medium variant","1950",6077
"Kenya","Population (thousands)","Medium variant","1955",6984
"Kenya","Population (thousands)","Medium variant","1960",8115
"Kenya","Population (thousands)","Medium variant","1965",9524
...
As you can see, this particular script sends back a comma-separated data file. That is the reason we picked it as an example—it is easy to see what happens with this script, whereas it can be confusing to decipher a complex set of HTML tags that other scripts produce.
The program in Listing 3-8 sends POST data to any script. We provide a simple GUI to set the form data and view the output (see Figure 3-11).
In the doPost method, we first open the connection, call setDoOutput(true), and open the output stream. We then enumerate the names and values in a Map object. For each of them, we send the name, = character, value, and & separator character:
out.print(name);
out.print('='),
out.print(URLEncoder.encode(value, "UTF-8"));
if (more pairs) out.print('&'),
Finally, we read the response from the server.
There is one twist with reading the response. If a script error occurs, then the call to connection.getInputStream() throws a FileNotFoundException. However, the server still sends an error page back to the browser (such as the ubiquitous “Error 404 - page not found”). To capture this error page, you cast the URLConnection object to the HttpURLConnection class and call its getErrorStream method:
InputStream err = ((HttpURLConnection) connection).getErrorStream();
More for curiosity’s sake than for practical use, you might like to know exactly what information the URLConnection sends to the server in addition to the data that you supply.
The URLConnection object first sends a request header to the server. When posting form data, the header includes
Content-Type: application/x-www-form-urlencoded
The header for a POST must also include the content length, for example,
Content-Length: 124
The end of the header is indicated by a blank line. Then, the data portion follows. The web server strips off the header and routes the data portion to the server-side script.
Note that the URLConnection object buffers all data that you send to the output stream because it must first determine the total content length.
The technique that this program displays is useful whenever you need to query information from an existing web site. Simply find out the parameters that you need to send (usually by inspecting the HTML source of a web page that carries out the same query), and then strip out the HTML tags and other unnecessary information from the reply.
Example 3-8. PostTest.java
  1. import java.awt.*;
  2. import java.awt.event.*;
  3. import java.io.*;
  4. import java.net.*;
  5. import java.util.*;
  6. import javax.swing.*;
  7.
  8. /**
  9.  * This program demonstrates how to use the URLConnection class for a POST request.
 10.  * @version 1.20 2007-06-25
 11.  * @author Cay Horstmann
 12.  */
 13. public class PostTest
 14. {
 15.    public static void main(String[] args)
 16.    {
 17.       EventQueue.invokeLater(new Runnable()
 18.          {
 19.             public void run()
 20.             {
 21.                JFrame frame = new PostTestFrame();
 22.                frame.setDefaultCloseOperation(JFrame.EXIT_ON_CLOSE);
 23.                frame.setVisible(true);
 24.             }
 25.          });
 26.    }
 27. }
 28.
 29. class PostTestFrame extends JFrame
 30. {
 31.    /**
 32.     * Makes a POST request and returns the server response.
 33.     * @param urlString the URL to post to
 34.     * @param nameValuePairs a map of name/value pairs to supply in the request.
 35.     * @return the server reply (either from the input stream or the error stream)
 36.     */
 37.    public static String doPost(String urlString, Map<String, String> nameValuePairs)
 38.          throws IOException
 39.    {
 40.       URL url = new URL(urlString);
 41.       URLConnection connection = url.openConnection();
 42.       connection.setDoOutput(true);
 43.
 44.       PrintWriter out = new PrintWriter(connection.getOutputStream());
 45.       boolean first = true;
 46.       for (Map.Entry<String, String> pair : nameValuePairs.entrySet())
 47.       {
 48.           if (first) first = false;
 49.           else out.print('&'),
 50.           String name = pair.getKey();
 51.           String value = pair.getValue();
 52.           out.print(name);
 53.           out.print('='),
 54.           out.print(URLEncoder.encode(value, "UTF-8"));
 55.       }
 56.
 57.       out.close();
 58.       Scanner in;
 59.       StringBuilder response = new StringBuilder();
 60.       try
 61.       {
 62.          in = new Scanner(connection.getInputStream());
 63.       }
 64.       catch (IOException e)
 65.       {
 66.          if (!(connection instanceof HttpURLConnection)) throw e;
 67.          InputStream err = ((HttpURLConnection) connection).getErrorStream();
 68.          if (err == null) throw e;
 69.          in = new Scanner(err);
 70.       }
 71.
 72.       while (in.hasNextLine())
 73.       {
 74.          response.append(in.nextLine());
 75.          response.append("
");
 76.       }
 77.
 78.       in.close();
 79.       return response.toString();
 80.    }
 81.
 82.    public PostTestFrame()
 83.    {
 84.       setTitle("PostTest");
 85.
 86.       northPanel = new JPanel();
 87.       add(northPanel, BorderLayout.NORTH);
 88.       northPanel.setLayout(new GridLayout(0, 2));
 89.       northPanel.add(new JLabel("Host: ", SwingConstants.TRAILING));
 90.       final JTextField hostField = new JTextField();
 91.       northPanel.add(hostField);
 92.       northPanel.add(new JLabel("Action: ", SwingConstants.TRAILING));
 93.       final JTextField actionField = new JTextField();
 94.       northPanel.add(actionField);
 95.       for (int i = 1; i <= 8; i++)
 96.          northPanel.add(new JTextField());
 97.
 98.       final JTextArea result = new JTextArea(20, 40);
 99.       add(new JScrollPane(result));
100.
101.       JPanel southPanel = new JPanel();
102.       add(southPanel, BorderLayout.SOUTH);
103.       JButton addButton = new JButton("More");
104.       southPanel.add(addButton);
105.       addButton.addActionListener(new ActionListener()
106.          {
107.             public void actionPerformed(ActionEvent event)
108.             {
109.                northPanel.add(new JTextField());
110.                northPanel.add(new JTextField());
111.                pack();
112.             }
113.          });
114.
115.       JButton getButton = new JButton("Get");
116.       southPanel.add(getButton);
117.       getButton.addActionListener(new ActionListener()
118.          {
119.             public void actionPerformed(ActionEvent event)
120.             {
121.                result.setText("");
122.                final Map<String, String> post = new HashMap<String, String>();
123.                for (int i = 4; i < northPanel.getComponentCount(); i += 2)
124.                {
125.                   String name = ((JTextField) northPanel.getComponent(i)).getText();
126.                   if (name.length() > 0)
127.                   {
128.                      String value = ((JTextField) northPanel.getComponent(i + 1)).getText();
129.                      post.put(name, value);
130.                   }
131.                }
132.                new SwingWorker<Void, Void>()
133.                   {
134.                      protected Void doInBackground() throws Exception
135.                      {
136.                         try
137.                         {
138.                            String urlString = hostField.getText() + "/" + actionField.getText();
139.                            result.setText(doPost(urlString, post));
140.                         }
141.                         catch (IOException e)
142.                         {
143.                            result.setText("" + e);
144.                         }
145.                         return null;
146.                      }
147.                   }.execute();
148.             }
149.          });
150.
151.       pack();
152.    }
153.
154.    private JPanel northPanel;
155. }
java.net.URLEncoder 1.0
static String encode(String s, String encoding)1.4returns the URL-encoded form of the string
s, using the given character encoding scheme. (The recommended scheme is"UTF-8".) In URL encoding, the characters ‘A’ - ‘Z’, ‘a’-‘z’, ‘0’-‘9’, ‘-’, ‘_’, ‘.’ and ‘*’ are left unchanged. Space is encoded into ‘+’, and all other characters are encoded into sequences of encoded bytes of the form"%XY", where0xXY is the hexadecimal value of the byte.
java.net.URLDecoder 1.2
static string decode(String s, String encoding)1.4returns the decoding of the URL encoded string
sunder the given character encoding scheme.
In this chapter, you have seen how to write network clients and servers in Java, and how to harvest information from web servers. The next chapter covers database connectivity. You will learn how to work with relational databases in Java, using the JDBC API. The chapter also has a brief introduction to hierarchical databases (such as LDAP directories) and the JNDI API.