
In this chapter, we continue our discussion of the Swing user interface toolkit from Volume I. Swing is a rich toolkit, and Volume I covered only basic and commonly used components. That leaves us with three significantly more complex components for lists, tables, and trees, the exploration of which occupies a large part of this chapter. We then turn to text components and go beyond the simple text fields and text areas that you have seen in Volume I. We show you how to add validations and spinners to text fields and how you can display structured text such as HTML. Next, you will see a number of components for displaying progress of a slow activity. We finish the chapter by covering component organizers such as tabbed panes and desktop panes with internal frames.
If you want to present a set of choices to a user, and a radio button or checkbox set consumes too much space, you can use a combo box or a list. Combo boxes were covered in Volume I because they are relatively simple. The JList component has many more features, and its design is similar to that of the tree and table components. For that reason, it is our starting point for the discussion of complex Swing components.
Of course, you can have lists of strings, but you can also have lists of arbitrary objects, with full control of how they appear. The internal architecture of the list component that makes this generality possible is rather elegant. Unfortunately, the designers at Sun felt that they needed to show off that elegance, rather than hiding it from the programmer who just wants to use the component. You will find that the list control is somewhat awkward to use for common cases because you need to manipulate some of the machinery that makes the general cases possible. We walk you through the simple and most common case, a list box of strings, and then give a more complex example that shows off the flexibility of the list component.
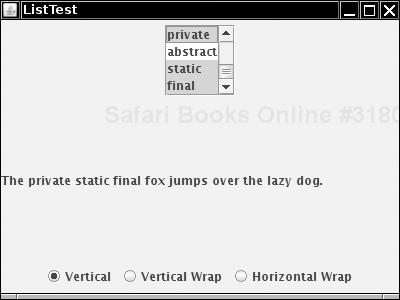
The JList component shows a number of items inside a single box. Figure 6-1 shows an admittedly silly example. The user can select the attributes for the fox, such as “quick,” “brown,” “hungry,” “wild,” and, because we ran out of attributes, “static,” “private,” and “final.” You can thus have the static final fox jump over the lazy dog.
To construct this list component, you first start out with an array of strings, then pass the array to the JList constructor:
String[] words= { "quick", "brown", "hungry", "wild", ... };
JList wordList = new JList(words);
Alternatively, you can use an anonymous array:
JList wordList = new JList(new String[] {"quick", "brown", "hungry", "wild", ... });List boxes do not scroll automatically. To make a list box scroll, you must insert it into a scroll pane:
JScrollPane scrollPane = new JScrollPane(wordList);
You then add the scroll pane, not the list, into the surrounding panel.
We must admit that the separation of the list display and the scrolling mechanism is elegant in theory, but it is a pain in practice. Essentially all lists that we ever encountered needed scrolling. It seems cruel to force programmers to go through hoops in the default case just so they can appreciate that elegance.
By default, the list component displays eight items; use the setVisibleRowCount method to change that value:
wordList.setVisibleRowCount(4); // display 4 items
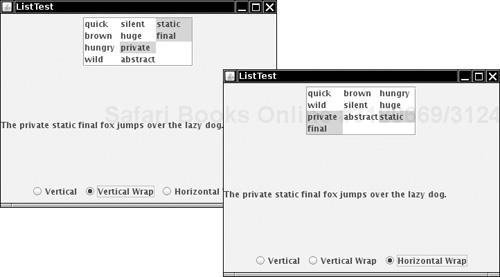
You can set the layout orientation to one of three values:
JList.VERTICAL(the default)—. Arrange all items vertically.JList.VERTICAL_WRAP—. Start new columns if there are more items than the visible row count (see Figure 6-2).JList.HORIZONTAL_WRAP—. Start new columns if there are more items than the visible row count, but fill them horizontally. Look at the placement of the words “quick,” “brown,” and “hungry” in Figure 6-2 to see the difference between vertical and horizontal wrap.
By default, a user can select multiple items. To add more items to a selection, press the CTRL key while clicking on each item. To select a contiguous range of items, click on the first one, then hold down the SHIFT key and click on the last one.
You can also restrict the user to a more limited selection mode with the setSelectionMode method:
wordList.setSelectionMode(ListSelectionModel.SINGLE_SELECTION);
   // select one item at a time
wordList.setSelectionMode(ListSelectionModel.SINGLE_INTERVAL_SELECTION);
   // select one item or one range of items
You might recall from Volume I that the basic user interface components send out action events when the user activates them. List boxes use a different notification mechanism. Rather than listening to action events, you need to listen to list selection events. Add a list selection listener to the list component, and implement the method
public void valueChanged(ListSelectionEvent evt)
in the listener.
When the user selects items, a flurry of list selection events is generated. For example, suppose the user clicks on a new item. When the mouse button goes down, an event reports a change in selection. This is a transitional event—the call
event.isAdjusting()
returns true if the selection is not yet final. Then, when the mouse button goes up, there is another event, this time with isAdjusting returning false. If you are not interested in the transitional events, then you can wait for the event for which isAdjusting is false. However, if you want to give the user instant feedback as soon as the mouse button is clicked, you need to process all events.
Once you are notified that an event has happened, you will want to find out what items are currently selected. The getSelectedValues method returns an array of objects containing all selected items. Cast each array element to a string.
Object[] values = list.getSelectedValues();
for (Object value : values)
   do something with (String) value;
Caution
You cannot cast the return value of getSelectedValues from an Object[] array to a String[] array. The return value was not created as an array of strings, but as an array of objects, each of which happens to be a string. To process the return value as an array of strings, use the following code:
int length = values.length;
String[] words = new String[length];
System.arrayCopy(values, 0, words, 0, length);
If your list does not allow multiple selections, you can call the convenience method getSelectedValue. It returns the first selected value (which you know to be the only value if multiple selections are disallowed).
String value = (String) list.getSelectedValue();
Note
List components do not react to double clicks from a mouse. As envisioned by the designers of Swing, you use a list to select an item, and then you click a button to make something happen. However, some user interfaces allow a user to double-click on a list item as a shortcut for item selection and acceptance of a default action. If you want to implement this behavior, you have to add a mouse listener to the list box, then trap the mouse event as follows:
public void mouseClicked(MouseEvent evt)
{
   if (evt.getClickCount() == 2)
   {
      JList source = (JList) evt.getSource();
      Object[] selection = source.getSelectedValues();
      doAction(selection);
   }
}
Listing 6-1 is the listing of the program that demonstrates a list box filled with strings. Notice how the valueChanged method builds up the message string from the selected items.
Example 6-1. ListTest.java
  1. import java.awt.*;
  2. import java.awt.event.*;
  3. import javax.swing.*;
  4. import javax.swing.event.*;
  5.
  6. /**
  7.  * This program demonstrates a simple fixed list of strings.
  8.  * @version 1.23 2007-08-01
  9.  * @author Cay Horstmann
 10.  */
 11. public class ListTest
 12. {
 13.    public static void main(String[] args)
 14.    {
 15.       EventQueue.invokeLater(new Runnable()
 16.          {
 17.             public void run()
 18.             {
 19.                JFrame frame = new ListFrame();
 20.                frame.setDefaultCloseOperation(JFrame.EXIT_ON_CLOSE);
 21.                frame.setVisible(true);
 22.             }
 23.          });
 24.    }
 25. }
 26.
 27. /**
 28.  * This frame contains a word list and a label that shows a sentence made up from the chosen
 29.  * words. Note that you can select multiple words with Ctrl+click and Shift+click.
 30.  */
 31. class ListFrame extends JFrame
 32. {
 33.    public ListFrame()
 34.    {
 35.       setTitle("ListTest");
 36.       setSize(DEFAULT_WIDTH, DEFAULT_HEIGHT);
 37.
 38.       String[] words = { "quick", "brown", "hungry", "wild", "silent", "huge", "private",
 39.             "abstract", "static", "final" };
 40.
 41.       wordList = new JList(words);
 42.       wordList.setVisibleRowCount(4);
 43.       JScrollPane scrollPane = new JScrollPane(wordList);
 44.
 45.       listPanel = new JPanel();
 46.       listPanel.add(scrollPane);
 47.       wordList.addListSelectionListener(new ListSelectionListener()
 48.          {
 49.             public void valueChanged(ListSelectionEvent event)
 50.             {
 51.                Object[] values = wordList.getSelectedValues();
 52.
 53.                StringBuilder text = new StringBuilder(prefix);
 54.                for (int i = 0; i < values.length; i++)
 55.                {
 56.                   String word = (String) values[i];
 57.                   text.append(word);
 58.                   text.append(" ");
 59.                }
 60.                text.append(suffix);
 61.
 62.                label.setText(text.toString());
 63.             }
 64.          });
 65.
 66.       buttonPanel = new JPanel();
 67.       group = new ButtonGroup();
 68.       makeButton("Vertical", JList.VERTICAL);
 69.       makeButton("Vertical Wrap", JList.VERTICAL_WRAP);
 70.       makeButton("Horizontal Wrap", JList.HORIZONTAL_WRAP);
 71.
 72.       add(listPanel, BorderLayout.NORTH);
 73.       label = new JLabel(prefix + suffix);
 74.       add(label, BorderLayout.CENTER);
 75.       add(buttonPanel, BorderLayout.SOUTH);
 76.    }
 77.
 78.    /**
 79.     * Makes a radio button to set the layout orientation.
 80.     * @param label the button label
 81.     * @param orientation the orientation for the list
 82.     */
 83.    private void makeButton(String label, final int orientation)
 84.    {
 85.       JRadioButton button = new JRadioButton(label);
 86.       buttonPanel.add(button);
 87.       if (group.getButtonCount() == 0) button.setSelected(true);
 88.       group.add(button);
 89.       button.addActionListener(new ActionListener()
 90.          {
 91.             public void actionPerformed(ActionEvent event)
 92.             {
 93.                wordList.setLayoutOrientation(orientation);
 94.                listPanel.revalidate();
 95.             }
 96.          });
 97.    }
 98.
 99.    private static final int DEFAULT_WIDTH = 400;
100.    private static final int DEFAULT_HEIGHT = 300;
101.    private JPanel listPanel;
102.    private JList wordList;
103.    private JLabel label;
104.    private JPanel buttonPanel;
105.    private ButtonGroup group;
106.    private String prefix = "The ";
107.    private String suffix = "fox jumps over the lazy dog.";
108. }
javax.swing.JList 1.2
constructs a list that displays these items.
int getVisibleRowCount()void setVisibleRowCount(int c)gets or sets the preferred number of rows in the list that can be displayed without a scroll bar.
int getLayoutOrientation()1.4void setLayoutOrientation(int orientation)1.4gets or sets the layout orientation
Parameters:
orientationOne of
VERTICAL, VERTICAL_WRAP, HORIZONTAL_WRAPvoid setSelectionMode(int mode)gets or sets the mode that determines whether single-item or multiple-item selections are allowed.
Parameters:
modeOne of
SINGLE_SELECTION, SINGLE_INTERVAL_SELECTION, MULTIPLE_INTERVAL_SELECTIONvoid addListSelectionListener(ListSelectionListener listener)adds to the list a listener that’s notified each time a change to the selection occurs.
Object[] getSelectedValues()returns the selected values or an empty array if the selection is empty.
Object getSelectedValue()returns the first selected value or
nullif the selection is empty.
In the preceding section, you saw the most common method for using a list component:
Specify a fixed set of strings for display in the list.
Place the list inside a scroll pane.
Trap the list selection events.
In the remainder of the section on lists, we cover more complex situations that require a bit more finesse:
Very long lists
Lists with changing contents
Lists that don’t contain strings
In the first example, we constructed a JList component that held a fixed collection of strings. However, the collection of choices in a list box is not always fixed. How do we add or remove items in the list box? Somewhat surprisingly, there are no methods in the JList class to achieve this. Instead, you have to understand a little more about the internal design of the list component. The list component uses the model-view-controller design pattern to separate the visual appearance (a column of items that are rendered in some way) from the underlying data (a collection of objects).
The JList class is responsible for the visual appearance of the data. It actually knows very little about how the data are stored—all it knows is that it can retrieve the data through some object that implements the ListModel interface:
public interface ListModel
{
   int getSize();
   Object getElementAt(int i);
   void addListDataListener(ListDataListener l);
   void removeListDataListener(ListDataListener l);
}
Through this interface, the JList can get a count of elements and retrieve each one of the elements. Also, the JList object can add itself as a ListDataListener. That way, if the collection of elements changes, the JList gets notified so that it can repaint itself.
Why is this generality useful? Why doesn’t the JList object simply store an array of objects?
Note that the interface doesn’t specify how the objects are stored. In particular, it doesn’t force them to be stored at all! The getElementAt method is free to recompute each value whenever it is called. This is potentially useful if you want to show a very large collection without having to store the values.
Here is a somewhat silly example: We let the user choose among all three-letter words in a list box (see Figure 6-3).
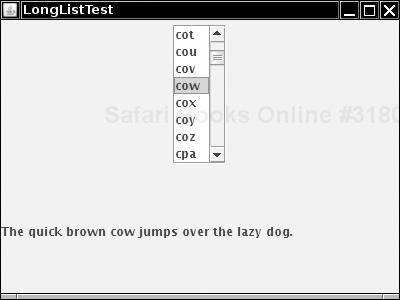
There are 26 × 26 × 26 = 17,576 three-letter combinations. Rather than storing all these combinations, we recompute them as requested when the user scrolls through them.
This turns out to be easy to implement. The tedious part, adding and removing listeners, has been done for us in the AbstractListModel class, which we extend. We only need to supply the getSize and getElementAt methods:
class WordListModel extends AbstractListModel
{
   public WordListModel(int n) { length = n; }
   public int getSize() { return (int) Math.pow(26, length); }
   public Object getElementAt(int n)
   {
      // compute nth string
      . . .
   }
   . . .
}
The computation of the nth string is a bit technical—you’ll find the details in Listing 6-2.
Now that we have supplied a model, we can simply build a list that lets the user scroll through the elements supplied by the model:
JList wordList = new JList(new WordListModel(3));
wordList.setSelectionMode(ListSelectionModel.SINGLE_SELECTION);
JScrollPane scrollPane = new JScrollPane(wordList);
The point is that the strings are never stored. Only those strings that the user actually requests to see are generated.
We must make one other setting. We must tell the list component that all items have a fixed width and height. The easiest way to set the cell dimensions is to specify a prototype cell value:
wordList.setPrototypeCellValue("www");The prototype cell value is used to determine the size for all cells. (We use the string “www” because “w” is the widest lowercase letter in most fonts.)
Alternatively, you can set a fixed cell size:
wordList.setFixedCellWidth(50);
wordList.setFixedCellHeight(15);
If you don’t set a prototype value or a fixed cell size, the list component computes the width and height of each item. That can take a long time.
As a practical matter, very long lists are rarely useful. It is extremely cumbersome for a user to scroll through a huge selection. For that reason, we believe that the list control has been completely overengineered. A selection that a user can comfortably manage on the screen is certainly small enough to be stored directly in the list component. That arrangement would have saved programmers from the pain of having to deal with the list model as a separate entity. On the other hand, the JList class is consistent with the JTree and JTable class where this generality is useful.
Example 6-2. LongListTest.java
  1. import java.awt.*;
  2.
  3. import javax.swing.*;
  4. import javax.swing.event.*;
  5.
  6. /**
  7.  * This program demonstrates a list that dynamically computes list entries.
  8.  * @version 1.23 2007-08-01
  9.  * @author Cay Horstmann
 10.  */
 11. public class LongListTest
 12. {
 13.    public static void main(String[] args)
 14.    {
 15.       EventQueue.invokeLater(new Runnable()
 16.          {
 17.             public void run()
 18.             {
 19.                JFrame frame = new LongListFrame();
 20.                frame.setDefaultCloseOperation(JFrame.EXIT_ON_CLOSE);
 21.                frame.setVisible(true);
 22.             }
 23.          });
 24.    }
 25. }
 26.
 27. /**
 28.  * This frame contains a long word list and a label that shows a sentence made up from
 29.  * the chosen word.
 30.  */
 31. class LongListFrame extends JFrame
 32. {
 33.    public LongListFrame()
 34.    {
 35.       setTitle("LongListTest");
 36.       setSize(DEFAULT_WIDTH, DEFAULT_HEIGHT);
 37.
 38.       wordList = new JList(new WordListModel(3));
 39.       wordList.setSelectionMode(ListSelectionModel.SINGLE_SELECTION);
 40.       wordList.setPrototypeCellValue("www");
 41.       JScrollPane scrollPane = new JScrollPane(wordList);
 42.
 43.       JPanel p = new JPanel();
 44.       p.add(scrollPane);
 45.       wordList.addListSelectionListener(new ListSelectionListener()
 46.          {
 47.             public void valueChanged(ListSelectionEvent evt)
 48.             {
 49.                StringBuilder word = (StringBuilder) wordList.getSelectedValue();
 50.                setSubject(word.toString());
 51.             }
 52.
 53.          });
 54.
 55.       Container contentPane = getContentPane();
 56.       contentPane.add(p, BorderLayout.NORTH);
 57.       label = new JLabel(prefix + suffix);
 58.       contentPane.add(label, BorderLayout.CENTER);
 59.       setSubject("fox");
 60.    }
 61.
 62.    /**
 63.     * Sets the subject in the label.
 64.     * @param word the new subject that jumps over the lazy dog
 65.     */
 66.    public void setSubject(String word)
 67.    {
 68.       StringBuilder text = new StringBuilder(prefix);
 69.       text.append(word);
 70.       text.append(suffix);
 71.       label.setText(text.toString());
 72.    }
 73.
 74.    private static final int DEFAULT_WIDTH = 400;
 75.    private static final int DEFAULT_HEIGHT = 300;
 76.    private JList wordList;
 77.    private JLabel label;
 78.    private String prefix = "The quick brown ";
 79.    private String suffix = " jumps over the lazy dog.";
 80. }
 81.
 82. /**
 83.  * A model that dynamically generates n-letter words.
 84.  */
 85. class WordListModel extends AbstractListModel
 86. {
 87.    /**
 88.     * Constructs the model.
 89.     * @param n the word length
 90.     */
 91.    public WordListModel(int n)
 92.    {
 93.       length = n;
 94.    }
 95.
 96.    public int getSize()
 97.    {
 98.       return (int) Math.pow(LAST - FIRST + 1, length);
 99.    }
100.
101.    public Object getElementAt(int n)
102.    {
103.       StringBuilder r = new StringBuilder();
104.       ;
105.       for (int i = 0; i < length; i++)
106.       {
107.          char c = (char) (FIRST + n % (LAST - FIRST + 1));
108.          r.insert(0, c);
109.          n = n / (LAST - FIRST + 1);
110.       }
111.       return r;
112.    }
113.
114.    private int length;
115.    public static final char FIRST = 'a';
116.    public static final char LAST = 'z';
117. }
javax.swing.JList 1.2
constructs a list that displays the elements in the specified model.
Object getPrototypeCellValue()void setPrototypeCellValue(Object newValue)gets or sets the prototype cell value that is used to determine the width and height of each cell in the list. The default is
null, which forces the size of each cell to be measured.void setFixedCellWidth(int width)if the width is greater than zero, specifies the width (in pixels) of every cell in the list. The default value is −1, which forces the size of each cell to be measured.
void setFixedCellHeight(int height)if the height is greater than zero, specifies the height (in pixels) of every cell in the list. The default value is −1, which forces the size of each cell to be measured.
You cannot directly edit the collection of list values. Instead, you must access the model and then add or remove elements. That, too, is easier said than done. Suppose you want to add more values to a list. You can obtain a reference to the model:
ListModel model = list.getModel();
But that does you no good—as you saw in the preceding section, the ListModel interface has no methods to insert or remove elements because, after all, the whole point of having a list model is that it need not store the elements.
Let’s try it the other way around. One of the constructors of JList takes a vector of objects:
Vector<String> values = new Vector<String>();
values.addElement("quick");
values.addElement("brown");
. . .
JList list = new JList(values);
You can now edit the vector and add or remove elements, but the list does not know that this is happening, so it cannot react to the changes. In particular, the list cannot update its view when you add the values. Therefore, this constructor is not very useful.
Instead, you should construct a DefaultListModel object, fill it with the initial values, and associate it with the list. The DefaultListModel class implements the ListModel interface and manages a collection of objects.
DefaultListModel model = new DefaultListModel();
model.addElement("quick");
model.addElement("brown");
. . .
JList list = new JList(model);
Now you can add or remove values from the model object. The model object then notifies the list of the changes, and the list repaints itself.
model.removeElement("quick");
model.addElement("slow");
For historical reasons, the DefaultListModel class doesn’t use the same method names as the collection classes.
The default list model uses a vector internally to store the values.
Caution
There are JList constructors that construct a list from an array or vector of objects or strings. You might think that these constructors use a DefaultListModel to store these values. That is not the case—the constructors build a trivial model that can access the values without any provisions for notification if the content changes. For example, here is the code for the constructor that constructs a JList from a Vector:
public JList(final Vector<?> listData)
{
   this (new AbstractListModel()
   {
      public int getSize() { return listData.size(); }
      public Object getElementAt(int i) { return listData.elementAt(i); }
   });
}
That means, if you change the contents of the vector after the list is constructed, then the list might show a confusing mix of old and new values until it is completely repainted. (The keyword final in the preceding constructor does not prevent you from changing the vector elsewhere—it only means that the constructor itself won’t modify the value of the listData reference; the keyword is required because the listData object is used in the inner class.)
So far, all lists that you have seen in this chapter contained strings. It is actually just as easy to show a list of icons—simply pass an array or vector filled with Icon objects. More interestingly, you can easily represent your list values with any drawing whatsoever.
Although the JList class can display strings and icons automatically, you need to install a list cell renderer into the JList object for all custom drawing. A list cell renderer is any class that implements the following interface:
interface ListCellRenderer
{
   Component getListCellRendererComponent(JList list, Object value, int index,
      boolean isSelected, boolean cellHasFocus);
}
This method is called for each cell. It returns a component that paints the cell contents. The component is placed at the appropriate location whenever a cell needs to be rendered.
One way to implement a cell renderer is to create a class that extends JComponent, like this:
class MyCellRenderer extends JComponent implements ListCellRenderer
{
public Component getListCellRendererComponent(JList list, Object value, int index,
boolean isSelected, boolean cellHasFocus)
{
// stash away information that is needed for painting and size measurement
return this;
}
public void paintComponent(Graphics g)
{
// paint code goes here
}
public Dimension getPreferredSize()
{
// size measurement code goes here
}
// instance fields
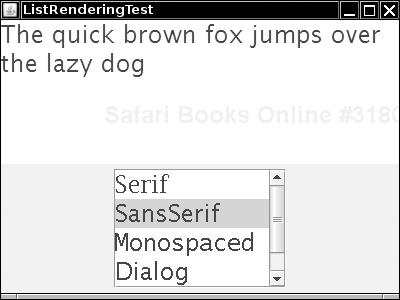
}In Listing 6-3, we display the font choices graphically by showing the actual appearance of each font (see Figure 6-4). In the paintComponent method, we display each name in its own font. We also need to make sure to match the usual colors of the look and feel of the JList class. We obtain these colors by calling the getForeground/getBackground and getSelectionForeground/getSelectionBackground methods of the JList class. In the getPreferredSize method, we need to measure the size of the string, using the techniques that you saw in Volume I, Chapter 7.
To install the cell renderer, simply call the setCellRenderer method:
fontList.setCellRenderer(new FontCellRenderer());
Now all list cells are drawn with the custom renderer.
Actually, a simpler method for writing custom renderers works in many cases. If the rendered image just contains text, an icon, and possibly a change of color, then you can get by with configuring a JLabel. For example, to show the font name in its own font, we can use the following renderer:
class FontCellRenderer extends JLabel implements ListCellRenderer
{
   public Component getListCellRendererComponent(JList list, Object value, int index,
      boolean isSelected, boolean cellHasFocus)
   {
      JLabel label = new JLabel();
      Font font = (Font) value;
      setText(font.getFamily());
      setFont(font);
      setOpaque(true);
      setBackground(isSelected ? list.getSelectionBackground() : list.getBackground());
      setForeground(isSelected ? list.getSelectionForeground() : list.getForeground());
      return this;
   }
}
Note that here we don’t write any paintComponent or getPreferredSize methods; the JLabel class already implements these methods to our satisfaction. All we do is configure the label appropriately by setting its text, font, and color.
This code is a convenient shortcut for those cases in which an existing component—in this case, JLabel—already provides all functionality needed to render a cell value.
We could have used a JLabel in our sample program, but we gave you the more general code so that you can modify it when you need to do arbitrary drawings in list cells.
Caution
It is not a good idea to construct a new component in each call to getListCellRendererComponent. If the user scrolls through many list entries, a new component would be constructed every time. Reconfiguring an existing component is safe and much more efficient.
Example 6-3. ListRenderingTest.java
  1. import java.util.*;
  2. import java.awt.*;
  3.
  4. import javax.swing.*;
  5. import javax.swing.event.*;
  6.
  7. /**
  8.  * This program demonstrates the use of cell renderers in a list box.
  9.  * @version 1.23 2007-08-01
 10.  * @author Cay Horstmann
 11.  */
 12. public class ListRenderingTest
 13. {
 14.    public static void main(String[] args)
 15.    {
 16.       EventQueue.invokeLater(new Runnable()
 17.          {
 18.             public void run()
 19.             {
 20.                JFrame frame = new ListRenderingFrame();
 21.                frame.setDefaultCloseOperation(JFrame.EXIT_ON_CLOSE);
 22.                frame.setVisible(true);
 23.             }
 24.          });
 25.    }
 26. }
 27.
 28. /**
 29.  * This frame contains a list with a set of fonts and a text area that is set to the
 30.  * selected font.
 31.  */
 32. class ListRenderingFrame extends JFrame
 33. {
 34.    public ListRenderingFrame()
 35.    {
 36.       setTitle("ListRenderingTest");
 37.       setSize(DEFAULT_WIDTH, DEFAULT_HEIGHT);
 38.
 39.       ArrayList<Font> fonts = new ArrayList<Font>();
 40.       final int SIZE = 24;
 41.       fonts.add(new Font("Serif", Font.PLAIN, SIZE));
 42.       fonts.add(new Font("SansSerif", Font.PLAIN, SIZE));
 43.       fonts.add(new Font("Monospaced", Font.PLAIN, SIZE));
 44.       fonts.add(new Font("Dialog", Font.PLAIN, SIZE));
 45.       fonts.add(new Font("DialogInput", Font.PLAIN, SIZE));
 46.       fontList = new JList(fonts.toArray());
 47.       fontList.setVisibleRowCount(4);
 48.       fontList.setSelectionMode(ListSelectionModel.SINGLE_SELECTION);
 49.       fontList.setCellRenderer(new FontCellRenderer());
 50.       JScrollPane scrollPane = new JScrollPane(fontList);
 51.
 52.       JPanel p = new JPanel();
 53.       p.add(scrollPane);
 54.       fontList.addListSelectionListener(new ListSelectionListener()
 55.          {
 56.             public void valueChanged(ListSelectionEvent evt)
 57.             {
 58.                Font font = (Font) fontList.getSelectedValue();
 59.                text.setFont(font);
 60.             }
 61.
 62.          });
 63.
 64.       Container contentPane = getContentPane();
 65.       contentPane.add(p, BorderLayout.SOUTH);
 66.       text = new JTextArea("The quick brown fox jumps over the lazy dog");
 67.       text.setFont((Font) fonts.get(0));
 68.       text.setLineWrap(true);
 69.       text.setWrapStyleWord(true);
 70.       contentPane.add(text, BorderLayout.CENTER);
 71.    }
 72.
 73.    private JTextArea text;
 74.    private JList fontList;
 75.    private static final int DEFAULT_WIDTH = 400;
 76.    private static final int DEFAULT_HEIGHT = 300;
 77. }
 78.
 79. /**
 80.  * A cell renderer for Font objects that renders the font name in its own font.
 81.  */
 82. class FontCellRenderer extends JComponent implements ListCellRenderer
 83. {
 84.    public Component getListCellRendererComponent(JList list, Object value, int index,
 85.          boolean isSelected, boolean cellHasFocus)
 86.    {
 87.       font = (Font) value;
 88.       background = isSelected ? list.getSelectionBackground() : list.getBackground();
 89.       foreground = isSelected ? list.getSelectionForeground() : list.getForeground();
 90.       return this;
 91.    }
 92.
 93.    public void paintComponent(Graphics g)
 94.    {
 95.       String text = font.getFamily();
 96.       FontMetrics fm = g.getFontMetrics(font);
 97.       g.setColor(background);
 98.       g.fillRect(0, 0, getWidth(), getHeight());
 99.       g.setColor(foreground);
100.       g.setFont(font);
101.       g.drawString(text, 0, fm.getAscent());
102.    }
103.
104.    public Dimension getPreferredSize()
105.    {
106.       String text = font.getFamily();
107.       Graphics g = getGraphics();
108.       FontMetrics fm = g.getFontMetrics(font);
109.       return new Dimension(fm.stringWidth(text), fm.getHeight());
110.    }
111.
112.    private Font font;
113.    private Color background;
114.    private Color foreground;
115. }
javax.swing.JList 1.2
returns the background color for unselected cells.
Color getSelectionBackground()returns the background color for selected cells.
Color getForeground()returns the foreground color for unselected cells.
Color getSelectionForeground()returns the foreground color for selected cells.
void setCellRenderer(ListCellRenderer cellRenderer)sets the renderer that paints the cells in the list.
javax.swing.ListCellRenderer 1.2
Component getListCellRendererComponent(JList list, Object item, int index, boolean isSelected, boolean hasFocus)returns a component whose
paintmethod draws the cell contents. If the list cells do not have fixed size, that component must also implementgetPreferredSize.Parameters:
listThe list whose cell is being drawn
itemThe item to be drawn
indexThe index where the item is stored in the model
isSelectedtrueif the specified cell was selectedhasFocustrueif the specified cell has the focus
The JTable component displays a two-dimensional grid of objects. Of course, tables are common in user interfaces. The Swing team has put a lot of effort into the table control. Tables are inherently complex, but—perhaps more successfully than with other Swing classes—the JTable component hides much of that complexity. You can produce fully functional tables with rich behavior by writing a few lines of code. Of course, you can write more code and customize the display and behavior for your specific applications.
In this section, we explain how to make simple tables, how the user interacts with them, and how to make some of the most common adjustments. As with the other complex Swing controls, it is impossible to cover all aspects in complete detail. For more information, look in Graphic Java 2: Mastering the JFC, Volume II: Swing, 3rd ed., by David M. Geary (Prentice Hall PTR 1999) or Core Java Foundation Classes by Kim Topley (Prentice Hall 1998).
Similar to the JList component, a JTable does not store its own data but obtains its data from a table model. The JTable class has a constructor that wraps a two-dimensional array of objects into a default model. That is the strategy that we use in our first example. Later in this chapter, we turn to table models.
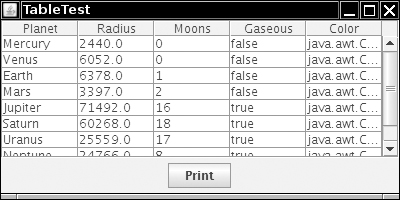
Figure 6-5 shows a typical table, describing properties of the planets of the solar system. (A planet is gaseous if it consists mostly of hydrogen and helium. You should take the “Color” entries with a grain of salt—that column was added because it will be useful in later code examples.)
As you can see from the code in Listing 6-4, the data of the table is stored as a two-dimensional array of Object values:
Object[][] cells =
{
   { "Mercury", 2440.0, 0, false, Color.YELLOW },
   { "Venus", 6052.0, 0, false, Color.YELLOW },
   . . .
}
Note
Here, we take advantage of autoboxing. The entries in the second, third, and fourth columns are automatically converted into objects of type Double, Integer, and Boolean.
The table simply invokes the toString method on each object to display it. That’s why the colors show up as java.awt.Color[r=...,g=...,b=...].
You supply the column names in a separate array of strings:
String[] columnNames = { "Planet", "Radius", "Moons", "Gaseous", "Color" };Then, you construct a table from the cell and column name arrays. Finally, add scroll bars in the usual way, by wrapping the table in a JScrollPane.
JTable table = new JTable(cells, columnNames);
JScrollPane pane = new JScrollPane(table);
The resulting table already has surprisingly rich behavior. Resize the table vertically until the scroll bar shows up. Then, scroll the table. Note that the column headers don’t scroll out of view!
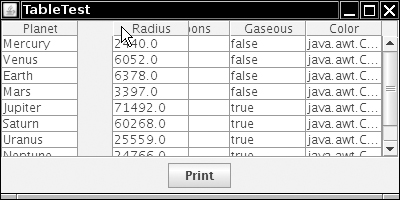
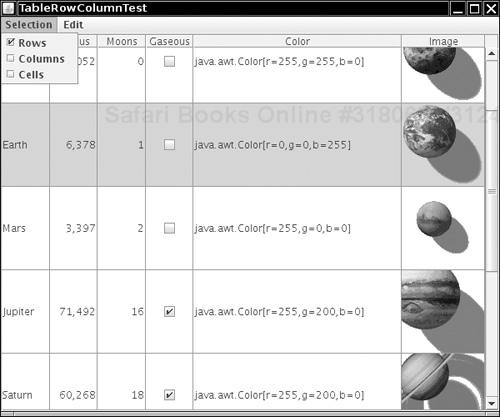
Next, click on one of the column headers and drag it to the left or right. See how the entire column becomes detached (see Figure 6-6). You can drop it to a different location. This rearranges the columns in the view only. The data model is not affected.
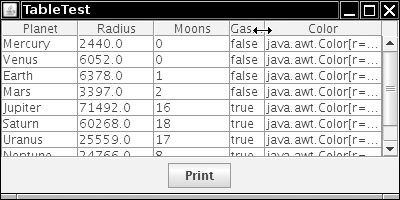
To resize columns, simply place the cursor between two columns until the cursor shape changes to an arrow. Then, drag the column boundary to the desired place (see Figure 6-7).
Users can select rows by clicking anywhere in a row. The selected rows are highlighted; you will see later how to get selection events. Users can also edit the table entries by clicking on a cell and typing into it. However, in this code example, the edits do not change the underlying data. In your programs, you should either make cells uneditable or handle cell editing events and update your model. We discuss those topics later in this section.
Finally, click on a column header. The rows are automatically sorted. Click again, and the sort order is reversed. This behavior is activated by the call
table.setAutoCreateRowSorter(true);
You can print a table with the call
table.print();
A print dialog box appears, and the table is sent to the printer. We discuss custom printing options in Chapter 7.
Note
If you resize the TableTest frame so that its height is taller than the table height, you will see a gray area below the table. Unlike JList and JTree components, the table does not fill the scroll pane’s viewport. This can be a problem if you want to support drag and drop. (For more information on drag and drop, see Chapter 7.) In that case, call
table.setFillsViewportHeight(true);
Example 6-4. PlanetTable.java
 1. import java.awt.*;
 2. import java.awt.event.*;
 3. import javax.swing.*;
 4.
 5. /**
 6.  * This program demonstrates how to show a simple table
 7.  * @version 1.11 2007-08-01
 8.  * @author Cay Horstmann
 9.  */
10. public class PlanetTable
11. {
12.    public static void main(String[] args)
13.    {
14.       EventQueue.invokeLater(new Runnable()
15.          {
16.             public void run()
17.             {
18.                JFrame frame = new PlanetTableFrame();
19.                frame.setDefaultCloseOperation(JFrame.EXIT_ON_CLOSE);
20.                frame.setVisible(true);
21.             }
22.          });
23.    }
24. }
25.
26. /**
27.  * This frame contains a table of planet data.
28.  */
29. class PlanetTableFrame extends JFrame
30. {
31.    public PlanetTableFrame()
32.    {
33.       setTitle("PlanetTable");
34.       setSize(DEFAULT_WIDTH, DEFAULT_HEIGHT);
35.       final JTable table = new JTable(cells, columnNames);
36.       table.setAutoCreateRowSorter(true);
37.       add(new JScrollPane(table), BorderLayout.CENTER);
38.       JButton printButton = new JButton("Print");
39.       printButton.addActionListener(new ActionListener()
40.          {
41.             public void actionPerformed(ActionEvent event)
42.             {
43.                try
44.                {
45.                   table.print();
46.                }
47.                catch (java.awt.print.PrinterException e)
48.                {
49.                   e.printStackTrace();
50.                }
51.             }
52.          });
53.       JPanel buttonPanel = new JPanel();
54.       buttonPanel.add(printButton);
55.       add(buttonPanel, BorderLayout.SOUTH);
56.    }
57.
58.    private Object[][] cells = { { "Mercury", 2440.0, 0, false, Color.yellow },
59.        { "Venus", 6052.0, 0, false, Color.yellow }, { "Earth", 6378.0, 1, false, Color.blue },
60.        { "Mars", 3397.0, 2, false, Color.red }, { "Jupiter", 71492.0, 16, true, Color.orange },
61.        { "Saturn", 60268.0, 18, true, Color.orange },
62.        { "Uranus", 25559.0, 17, true, Color.blue }, { "Neptune", 24766.0, 8, true, Color.blue },
63.        { "Pluto", 1137.0, 1, false, Color.black } };
64.
65.    private String[] columnNames = { "Planet", "Radius", "Moons", "Gaseous", "Color" };
66.
67.    private static final int DEFAULT_WIDTH = 400;
68.    private static final int DEFAULT_HEIGHT = 200;
69. }
javax.swing.JTable 1.2
JTable(Object[][] entries, Object[] columnNames)constructs a table with a default table model.
void print()5.0displays a print dialog box and prints the table.
boolean getAutoCreateRowSorter()6void setAutoCreateRowSorter(boolean newValue)6gets or sets the
autoCreateRowSorterproperty. The default isfalse. When set, a default row sorter is automatically set whenever the model changes.boolean getFillsViewportHeight()6void setFillsViewportHeight(boolean newValue)6gets or sets the
fillsViewportHeightproperty. The default isfalse. When set, the table always fills an enclosing viewport.
In the preceding example, the table data were stored in a two-dimensional array. However, you should generally not use that strategy in your own code. If you find yourself dumping data into an array to display it as a table, you should instead think about implementing your own table model.
Table models are particularly simple to implement because you can take advantage of the AbstractTableModel class that implements most of the required methods. You only need to supply three methods:
public int getRowCount();
public int getColumnCount();
public Object getValueAt(int row, int column);
There are many ways of implementing the getValueAt method. For example, if you want to display the contents of a RowSet that contains the result of a database query, you simply provide this method:
   public Object getValueAt(int r, int c)
   {
      try
      {
         rowSet.absolute(r + 1);
         return rowSet.getObject(c + 1);
      }
      catch (SQLException e)
      {
         e.printStackTrace();
         return null;
      }
   }
Our sample program is even simpler. We construct a table that shows some computed values, namely, the growth of an investment under different interest rate scenarios (see Figure 6-8).
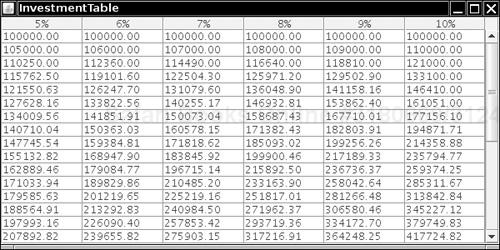
The getValueAt method computes the appropriate value and formats it:
public Object getValueAt(int r, int c)
{
   double rate = (c + minRate) / 100.0;
   int nperiods = r;
   double futureBalance = INITIAL_BALANCE * Math.pow(1 + rate, nperiods);
   return String.format("%.2f", futureBalance);
}
The getRowCount and getColumnCount methods simply return the number of rows and columns.
public int getRowCount() { return years; }
public int getColumnCount() {  return maxRate - minRate + 1; }
If you don’t supply column names, the getColumnName method of the AbstractTableModel names the columns A, B, C, and so on. To change column names, override the getColumnName method. You will usually want to override that default behavior. In this example, we simply label each column with the interest rate.
public String getColumnName(int c) { return (c + minRate) + "%"; }You can find the complete source code in Listing 6-5.
Example 6-5. InvestmentTable.java
 1. import java.awt.*;
 2.
 3. import javax.swing.*;
 4. import javax.swing.table.*;
 5.
 6. /**
 7.  * This program shows how to build a table from a table model.
 8.  * @version 1.02 2007-08-01
 9.  * @author Cay Horstmann
10.  */
11. public class InvestmentTable
12. {
13.    public static void main(String[] args)
14.    {
15.       EventQueue.invokeLater(new Runnable()
16.          {
17.             public void run()
18.             {
19.                JFrame frame = new InvestmentTableFrame();
20.                frame.setDefaultCloseOperation(JFrame.EXIT_ON_CLOSE);
21.                frame.setVisible(true);
22.             }
23.          });
24.    }
25. }
26.
27. /**
28.  * This frame contains the investment table.
29.  */
30. class InvestmentTableFrame extends JFrame
31. {
32.    public InvestmentTableFrame()
33.    {
34.       setTitle("InvestmentTable");
35.       setSize(DEFAULT_WIDTH, DEFAULT_HEIGHT);
36.
37.       TableModel model = new InvestmentTableModel(30, 5, 10);
38.       JTable table = new JTable(model);
39.       add(new JScrollPane(table));
40.    }
41.
42.    private static final int DEFAULT_WIDTH = 600;
43.    private static final int DEFAULT_HEIGHT = 300;
44. }
45.
46. /**
47.  * This table model computes the cell entries each time they are requested. The table contents
48.  * shows the growth of an investment for a number of years under different interest rates.
49.  */
50. class InvestmentTableModel extends AbstractTableModel
51. {
52.    /**
53.     * Constructs an investment table model.
54.     * @param y the number of years
55.     * @param r1 the lowest interest rate to tabulate
56.     * @param r2 the highest interest rate to tabulate
57.     */
58.    public InvestmentTableModel(int y, int r1, int r2)
59.    {
60.       years = y;
61.       minRate = r1;
62.       maxRate = r2;
63.    }
64.
65.    public int getRowCount()
66.    {
67.       return years;
68.    }
69.
70.    public int getColumnCount()
71.    {
72.       return maxRate - minRate + 1;
73.    }
74.
75.    public Object getValueAt(int r, int c)
76.    {
77.       double rate = (c + minRate) / 100.0;
78.       int nperiods = r;
79.       double futureBalance = INITIAL_BALANCE * Math.pow(1 + rate, nperiods);
80.       return String.format("%.2f", futureBalance);
81.    }
82.
83.    public String getColumnName(int c)
84.    {
85.       return (c + minRate) + "%";
86.    }
87.
88.    private int years;
89.    private int minRate;
90.    private int maxRate;
91.
92.    private static double INITIAL_BALANCE = 100000.0;
93. }
javax.swing.table.TableModel 1.2
int getColumnCount()gets the number of rows and columns in the table model.
Object getValueAt(int row, int column)gets the value at the given row and column.
void setValueAt(Object newValue, int row, int column)sets a new value at the given row and column.
boolean isCellEditable(int row, int column)returns
trueif the cell at the given row and column is editable.String getColumnName(int column)gets the column title.
In this subsection, you will see how to manipulate the rows and columns in a table. As you read through this material, keep in mind that a Swing table is quite asymmetric—there are different operations that you can carry out on rows and columns. The table component was optimized to display rows of information with the same structure, such as the result of a database query, not an arbitrary two-dimensional grid of objects. You will see this asymmetry throughout this subsection.
In the next example, we again display our planet data, but this time, we want to give the table more information about the column types. This is achieved by defining the method
Class<?> getColumnClass(int columnIndex)
of the table model to return the class that describes the column type.
The JTable class uses this information to pick an appropriate renderer for the class. Table 6-1 shows the default rendering actions.
You can see the checkboxes and images in Figure 6-9. (Thanks to Jim Evins, http://www.snaught.com/JimsCoolIcons/Planets, for providing the planet images!)
To render other types, you can install a custom renderer—see the “Cell Rendering and Editing” section beginning on page 392.
The JTable class stores information about table columns in objects of type TableColumn. A TableColumnModel object manages the columns. (Figure 6-10 shows the relationships among the most important table classes.) If you don’t want to insert or remove columns dynamically, you won’t use the column model much. The most common use for the column model is simply to get a TableColumn object:
int columnIndex = . . .;
TableColumn column = table.getColumnModel().getColumn(columnIndex);
The TableColumn class gives you control over the resizing behavior of columns. You can set the preferred, minimum, and maximum width with the methods
void setPreferredWidth(int width)
void setMinWidth(int width)
void setMaxWidth(int width)
This information is used by the table component to lay out the columns.
Use the method
void setResizable(boolean resizable)
to control whether the user is allowed to resize the column.
You can programmatically resize a column with the method
void setWidth(int width)
When a column is resized, the default is to leave the total size of the table unchanged. Of course, the width increase or decrease of the resized column must then be distributed over other columns. The default behavior is to change the size of all columns to the right of the resized column. That’s a good default because it allows a user to adjust all columns to a desired width, moving from left to right.
You can set another behavior from Table 6-2 by using the method
void setAutoResizeMode(int mode)
of the JTable class.
Table 6-2. Resize Modes
Behavior | |
|---|---|
| Don’t resize other columns; change the table size. |
| Resize the next column only. |
| Resize all subsequent columns equally; this is the default behavior. |
| Resize the last column only. |
| Resize all columns in the table; this is not a good choice because it prevents the user from adjusting multiple columns to a desired size. |
Row heights are managed directly by the JTable class. If your cells are taller than the default, you want to set the row height:
table.setRowHeight(height);
By default, all rows of the table have the same height. You can set the heights of individual rows with the call
table.setRowHeight(row, height);
The actual row height equals the row height that has been set with these methods, reduced by the row margin. The default row margin is 1 pixel, but you can change it with the call
table.setRowMargin(margin);
Depending on the selection mode, the user can select rows, columns, or individual cells in the table. By default, row selection is enabled. Clicking inside a cell selects the entire row (see Figure 6-9 on page 379). Call
table.setRowSelectionAllowed(false)
to disable row selection.
When row selection is enabled, you can control whether the user is allowed to select a single row, a contiguous set of rows, or any set of rows. You need to retrieve the selection model and use its setSelectionMode method:
table.getSelectionModel().setSelectionMode(mode);
Here, mode is one of the three values:
ListSelectionModel.SINGLE_SELECTION
ListSelectionModel.SINGLE_INTERVAL_SELECTION
ListSelectionModel.MULTIPLE_INTERVAL_SELECTION
Column selection is disabled by default. You turn it on with the call
table.setColumnSelectionAllowed(true)
Enabling both row and column selection is equivalent to enabling cell selection. The user then selects ranges of cells (see Figure 6-11). You can also enable that setting with the call
table.setCellSelectionEnabled(true)
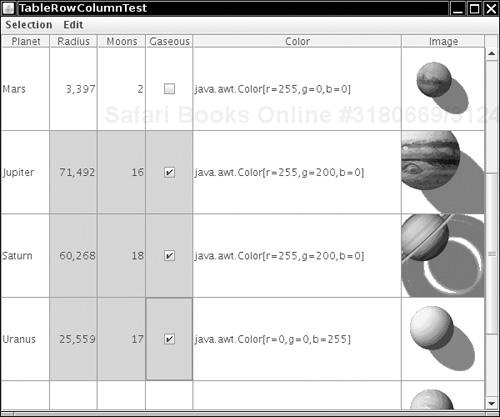
Run the program in Listing 6-6 to watch cell selection in action. Enable row, column, or cell selection in the Selection menu and watch how the selection behavior changes.
You can find out which rows and columns are selected by calling the getSelectedRows and getSelectedColumns methods. Both return an int[] array of the indexes of the selected items. Note that the index values are those of the table view, not the underlying table model. Try selecting rows and columns, then drag columns to different places and sort the rows by clicking on column headers. Use the Print Selection menu item to see which rows and columns are reported as selected.
If you need to translate table index values to table model index values, use the JTable methods convertRowIndexToModel and convertColumnIndexToModel.
As you have seen in our first table example, it is easy to add row sorting to a JTable, simply by calling the setAutoCreateRowSorter method. However, to have finer-grained control over the sorting behavior, you install a TableRowSorter<M> object into a JTable and customize it. The type parameter M denotes the table model; it needs to be a subtype of the TableModel interface.
TableRowSorter<TableModel> sorter = new TableRowSorter<TableModel>(model);
table.setRowSorter(sorter);
Some columns should not be sorted, such as the image column in our planet data. Turn sorting off by calling
sorter.setSortable(IMAGE_COLUMN, false);
You can install a custom comparator for each column. In our example, we will sort the colors in the Color column so that we prefer blue and green over red. When you click on the Color column, you will see that the blue planets go to the bottom of the table. This is achieved with the following call:
sorter.setComparator(COLOR_COLUMN, new Comparator<Color>()
   {
      public int compare(Color c1, Color c2)
      {
         int d = c1.getBlue() - c2.getBlue();
         if (d != 0) return d;
         d = c1.getGreen() - c2.getGreen();
         if (d != 0) return d;
         return c1.getRed() - c2.getRed();
      }
   });
If you do not specify a comparator for a column, the sort order is determined as follows:
If the column class is
String, use the default collator returned byCollator.getInstance(). It sorts strings in a way that is appropriate for the current locale. (See Chapter 5 for more information about locales and collators.)If the column class implements
Comparable, use itscompareTomethod.If a
TableStringConverterhas been set for the comparator, sort the strings returned by the converter’stoStringmethod with the default collator. If you want to use this approach, define a converter as follows:sorter.setStringConverter(new TableStringConverter() { public String toString(TableModel model, int row, int column) { Object value = model.getValueAt(row, column); convert value to a string and return it } });Otherwise, call the
toStringmethod on the cell values and sort them with the default collator.
In addition to sorting rows, the TableRowSorter can also selectively hide rows, a process called filtering. To activate filtering, set a RowFilter. For example, to include all rows that contain at least one moon, call
sorter.setRowFilter(RowFilter.numberFilter(ComparisonType.NOT_EQUAL, 0, MOONS_COLUMN));
Here, we use a predefined filter, the number filter. To construct a number filter, supply
The comparison type (one of
EQUAL,NOT_EQUAL,AFTER, orBEFORE).An object of a subclass of
Number(such as anIntegerorDouble). Only objects that have the same class as the givenNumberobject are considered.Zero or more column index values. If no index values are supplied, all columns are searched.
The static RowFilter.dateFilter method constructs a date filter in the same way. You supply a Date object instead of the Number object.
Finally, the static RowFilter.regexFilter method constructs a filter that looks for strings matching a regular expression. For example,
sorter.setRowFilter(RowFilter.regexFilter(".*[^s]$", PLANET_COLUMN));only displays those planets with a name that doesn’t end with an “s”. (See Chapter 1 for more information on regular expressions.)
You can also combine filters with the andFilter, orFilter, and notFilter methods. To filter for planets not ending in an “s” with at least one moon, you can use this filter combination:
sorter.setRowFilter(RowFilter.andFilter(Arrays.asList(
   RowFilter.regexFilter(".*[^s]$", PLANET_COLUMN),
   RowFilter.numberFilter(ComparisonType.NOT_EQUAL, 0, MOONS_COLUMN)));
Caution
Annoyingly, the andFilter and orFilter methods don’t use variable arguments but a single parameter of type Iterable.
To implement your own filter, you provide a subclass of RowFilter and implement an include method to indicate which rows should be displayed. This is easy to do, but the glorious generality of the RowFilter class makes it a bit scary.
The RowFilter<M, I> class has two type parameters: the types for the model and for the row identifier. When dealing with tables, the model is always a subtype of TableModel and the identifier type is Integer. (At some point in the future, other components might also support row filtering. For example, to filter rows in a JTree, one might use a RowFilter<TreeModel, TreePath>.)
A row filter must implement the method
public boolean include(RowFilter.Entry<? extends M, ? extends I> entry)
The RowFilter.Entry class supplies methods to obtain the model, the row identifier, and the value at a given index. Therefore, you can filter both by row identifier and by the contents of the row.
For example, this filter displays every other row:
RowFilter<TableModel, Integer> filter = new RowFilter<TableModel, Integer>()
   {
      public boolean include(Entry<? extends TableModel, ? extends Integer> entry)
      {
         return entry.getIdentifier() % 2 == 0;
      }
   };
If you wanted to include only those planets with an even number of moons, you would instead test for
((Integer) entry.getValue(MOONS_COLUMN)) % 2 == 0
In our sample program, we allow the user to hide arbitrary rows. We store the hidden row indexes in a set. The row filter includes all rows whose index is not in that set.
The filtering mechanism wasn’t designed for filters with criteria that change over time. In our sample program, we keep calling
sorter.setRowFilter(filter);
whenever the set of hidden rows changes. Setting a filter causes it to be applied immediately.
As you saw in the preceding section, you can filter table rows by either their contents or their row identifier. Hiding table columns uses a completely different mechanism.
The removeColumn method of the JTable class removes a column from the table view. The column data are not actually removed from the model—they are just hidden from view. The removeColumn method takes a TableColumn argument. If you have the column number (for example, from a call to getSelectedColumns), you need to ask the table model for the actual table column object:
TableColumnModel columnModel = table.getColumnModel();
TableColumn column = columnModel.getColumn(i);
table.removeColumn(column);
If you remember the column, you can later add it back in:
table.addColumn(column);
This method adds the column to the end. If you want it to appear elsewhere, you call the moveColumn method.
You can also add a new column that corresponds to a column index in the table model, by adding a new TableColumn object:
table.addColumn(new TableColumn(modelColumnIndex));
You can have multiple table columns that view the same column of the model.
The program in Listing 6-6 demonstrates selection and filtering of rows and columns.
Example 6-6. TableSelectionTest.java
  1. import java.awt.*;
  2. import java.awt.event.*;
  3. import java.util.*;
  4. import javax.swing.*;
  5. import javax.swing.table.*;
  6.
  7. /**
  8.  * This program demonstrates selection, addition, and removal of rows and columns.
  9.  * @version 1.03 2007-08-01
 10.  * @author Cay Horstmann
 11.  */
 12. public class TableSelectionTest
 13. {
 14.    public static void main(String[] args)
 15.    {
 16.       EventQueue.invokeLater(new Runnable()
 17.          {
 18.             public void run()
 19.             {
 20.                JFrame frame = new TableSelectionFrame();
 21.                frame.setDefaultCloseOperation(JFrame.EXIT_ON_CLOSE);
 22.                frame.setVisible(true);
 23.             }
 24.          });
 25.    }
 26. }
 27.
 28. /**
 29.  * This frame shows a multiplication table and has menus for setting the row/column/cell
 30.  * selection modes, and for adding and removing rows and columns.
 31.  */
 32. class TableSelectionFrame extends JFrame
 33. {
 34.    public TableSelectionFrame()
 35.    {
 36.       setTitle("TableSelectionTest");
 37.       setSize(DEFAULT_WIDTH, DEFAULT_HEIGHT);
 38.
 39.       // set up multiplication table
 40.
 41.       model = new DefaultTableModel(10, 10);
 42.
 43.       for (int i = 0; i < model.getRowCount(); i++)
 44.          for (int j = 0; j < model.getColumnCount(); j++)
 45.             model.setValueAt((i + 1) * (j + 1), i, j);
 46.
 47.       table = new JTable(model);
 48.
 49.       add(new JScrollPane(table), "Center");
 50.
 51.       removedColumns = new ArrayList<TableColumn>();
 52.
 53.       // create menu
 54.
 55.       JMenuBar menuBar = new JMenuBar();
 56.       setJMenuBar(menuBar);
 57.
 58.       JMenu selectionMenu = new JMenu("Selection");
 59.       menuBar.add(selectionMenu);
 60.
 61.       final JCheckBoxMenuItem rowsItem = new JCheckBoxMenuItem("Rows");
 62.       final JCheckBoxMenuItem columnsItem = new JCheckBoxMenuItem("Columns");
 63.       final JCheckBoxMenuItem cellsItem = new JCheckBoxMenuItem("Cells");
 64.
 65.       rowsItem.setSelected(table.getRowSelectionAllowed());
 66.       columnsItem.setSelected(table.getColumnSelectionAllowed());
 67.       cellsItem.setSelected(table.getCellSelectionEnabled());
 68.
 69.       rowsItem.addActionListener(new ActionListener()
 70.          {
 71.             public void actionPerformed(ActionEvent event)
 72.             {
 73.                table.clearSelection();
 74.                table.setRowSelectionAllowed(rowsItem.isSelected());
 75.                cellsItem.setSelected(table.getCellSelectionEnabled());
 76.             }
 77.          });
 78.       selectionMenu.add(rowsItem);
 79.
 80.       columnsItem.addActionListener(new ActionListener()
 81.          {
 82.             public void actionPerformed(ActionEvent event)
 83.             {
 84.                table.clearSelection();
 85.                table.setColumnSelectionAllowed(columnsItem.isSelected());
 86.                cellsItem.setSelected(table.getCellSelectionEnabled());
 87.             }
 88.          });
 89.       selectionMenu.add(columnsItem);
 90.
 91.       cellsItem.addActionListener(new ActionListener()
 92.          {
 93.             public void actionPerformed(ActionEvent event)
 94.             {
 95.                table.clearSelection();
 96.                table.setCellSelectionEnabled(cellsItem.isSelected());
 97.                rowsItem.setSelected(table.getRowSelectionAllowed());
 98.                columnsItem.setSelected(table.getColumnSelectionAllowed());
 99.             }
100.          });
101.       selectionMenu.add(cellsItem);
102.
103.       JMenu tableMenu = new JMenu("Edit");
104.       menuBar.add(tableMenu);
105.
106.       JMenuItem hideColumnsItem = new JMenuItem("Hide Columns");
107.       hideColumnsItem.addActionListener(new ActionListener()
108.          {
109.             public void actionPerformed(ActionEvent event)
110.             {
111.                int[] selected = table.getSelectedColumns();
112.                TableColumnModel columnModel = table.getColumnModel();
113.
114.                // remove columns from view, starting at the last
115.                // index so that column numbers aren't affected
116.
117.                for (int i = selected.length - 1; i >= 0; i--)
118.                {
119.                   TableColumn column = columnModel.getColumn(selected[i]);
120.                   table.removeColumn(column);
121.
122.                   // store removed columns for "show columns" command
123.
124.                   removedColumns.add(column);
125.                }
126.             }
127.          });
128.       tableMenu.add(hideColumnsItem);
129.
130.       JMenuItem showColumnsItem = new JMenuItem("Show Columns");
131.       showColumnsItem.addActionListener(new ActionListener()
132.          {
133.             public void actionPerformed(ActionEvent event)
134.             {
135.                // restore all removed columns
136.                for (TableColumn tc : removedColumns)
137.                   table.addColumn(tc);
138.                removedColumns.clear();
139.             }
140.          });
141.       tableMenu.add(showColumnsItem);
142.
143.       JMenuItem addRowItem = new JMenuItem("Add Row");
144.       addRowItem.addActionListener(new ActionListener()
145.          {
146.             public void actionPerformed(ActionEvent event)
147.             {
148.                // add a new row to the multiplication table in
149.                // the model
150.
151.                Integer[] newCells = new Integer[model.getColumnCount()];
152.                for (int i = 0; i < newCells.length; i++)
153.                   newCells[i] = (i + 1) * (model.getRowCount() + 1);
154.                model.addRow(newCells);
155.             }
156.          });
157.       tableMenu.add(addRowItem);
158.
159.       JMenuItem removeRowsItem = new JMenuItem("Remove Rows");
160.       removeRowsItem.addActionListener(new ActionListener()
161.          {
162.             public void actionPerformed(ActionEvent event)
163.             {
164.                int[] selected = table.getSelectedRows();
165.
166.                for (int i = selected.length - 1; i >= 0; i--)
167.                   model.removeRow(selected[i]);
168.             }
169.          });
170.       tableMenu.add(removeRowsItem);
171.
172.       JMenuItem clearCellsItem = new JMenuItem("Clear Cells");
173.       clearCellsItem.addActionListener(new ActionListener()
174.          {
175.             public void actionPerformed(ActionEvent event)
176.             {
177.                for (int i = 0; i < table.getRowCount(); i++)
178.                   for (int j = 0; j < table.getColumnCount(); j++)
179.                      if (table.isCellSelected(i, j)) table.setValueAt(0, i, j);
180.             }
181.          });
182.       tableMenu.add(clearCellsItem);
183.    }
184.
185.    private DefaultTableModel model;
186.    private JTable table;
187.    private ArrayList<TableColumn> removedColumns;
188.
189.    private static final int DEFAULT_WIDTH = 400;
190.    private static final int DEFAULT_HEIGHT = 300;
191. }
javax.swing.JTable 1.2
TableColumnModel getColumnModel()gets the “column model” that describes the arrangement of the table columns.
void setAutoResizeMode(int mode)sets the mode for automatic resizing of table columns.
Parameters:
modeOne of
AUTO_RESIZE_OFF,AUTO_RESIZE_NEXT_COLUMN,AUTO_RESIZE_SUBSEQUENT_COLUMNS,AUTO_RESIZE_LAST_COLUMN,AUTO_RESIZE_ALL_COLUMNSint getRowMargin()void setRowMargin(int margin)gets or sets the amount of empty space between cells in adjacent rows.
int getRowHeight()void setRowHeight(int height)gets or sets the default height of all rows of the table.
int getRowHeight(int row)void setRowHeight(int row, int height)gets or sets the height of the given row of the table.
ListSelectionModel getSelectionModel()returns the list selection model. You need that model to choose between row, column, and cell selection.
boolean getRowSelectionAllowed()void setRowSelectionAllowed(boolean b)gets or sets the
rowSelectionAllowedproperty. Iftrue, then rows are selected when the user clicks cells.boolean getColumnSelectionAllowed()void setColumnSelectionAllowed(boolean b)gets or sets the
columnSelectionAllowedproperty. Iftrue, then columns are selected when the user clicks on cells.boolean getCellSelectionEnabled()returns
trueif bothrowSelectionAllowedandcolumnSelectionAllowedaretrue.void setCellSelectionEnabled(boolean b)sets both
rowSelectionAllowedandcolumnSelectionAllowedtob.void addColumn(TableColumn column)adds a column as the last column of the table view.
void moveColumn(int from, int to)moves the column whose table index is
fromso that its index becomesto. Only the view is affected.void removeColumn(TableColumn column)removes the given column from the view.
int convertRowIndexToModel(int index)6int convertColumnIndexToModel(int index)returns the model index of the row or column with the given index. This value is different from
indexwhen rows are sorted or filtered, or when columns are moved or removed.void setRowSorter(RowSorter<? extends TableModel> sorter)sets the row sorter.
javax.swing.table.TableColumn 1.2
TableColumn(int modelColumnIndex)constructs a table column for viewing the model column with the given index.
void setPreferredWidth(int width)void setMinWidth(int width)void setMaxWidth(int width)sets the preferred, minimum, and maximum width of this table column to
width.void setWidth(int width)sets the actual width of this column to
width.void setResizable(boolean b)If
bistrue, this column is resizable.
javax.swing.ListSelectionModel 1.2
void setSelectionMode(int mode)Parameters:
modeOne of
SINGLE_SELECTION,SINGLE_INTERVAL_SELECTION, andMULTIPLE_INTERVAL_SELECTION
javax.swing.DefaultRowSorter<M, I> 6
void setComparator(int column, Comparator<?> comparator)sets the comparator to be used with the given column.
void setSortable(int column, boolean enabled)enables or disables sorting for the given column.
void setRowFilter(RowFilter<? super M,? super I> filter)sets the row filter.
javax.swing.table.TableRowSorter<M extends TableModel> 6
void setStringConverter(TableStringConverter stringConverter)sets the string converter that is used for sorting and filtering.
javax.swing.table.TableStringConverter<M extends TableModel> 6
abstract String toString(TableModel model, int row, int column)override this method to convert the model value at the given location to a string.
javax.swing.RowFilter<M, I> 6
boolean include(RowFilter.Entry<? extends M,? extends I> entry)override this method to specify the rows that are retained.
static <M,I> RowFilter<M,I> numberFilter(RowFilter.ComparisonType type, Number number, int... indices)static <M,I> RowFilter<M,I> dateFilter(RowFilter.ComparisonType type, Date date, int... indices)returns a filter that includes rows containing values that match the given comparison to the given number or date. The comparison type is one of
EQUAL,NOT_EQUAL,AFTER, orBEFORE. If any column model indexes are given, then only those columns are searched. Otherwise, all columns are searched. For the number filter, the class of the cell value must match the class ofnumber.static <M,I> RowFilter<M,I> regexFilter(String regex, int... indices)returns a filter that includes rows that have a string value matching the given regular expression. If any column model indexes are given, then only those columns are searched. Otherwise, all columns are searched. Note that the string returned by the
getStringValuemethod ofRowFilter.Entryis matched.static <M,I> RowFilter<M,I> andFilter(Iterable<? extends RowFilter<? super M,? super I>> filters)static <M,I> RowFilter<M,I> orFilter(Iterable<? extends RowFilter<? super M,? super I>> filters)returns a filter that includes the entries that are included by all filters or at least one of the filters.
static <M,I> RowFilter<M,I> notFilter(RowFilter<M,I> filter)returns a filter that includes the entries that are not included by the given filter.
javax.swing.RowFilter.Entry<M, I> 6
I getIdentifier()returns the identifier of this row entry.
M getModel()returns the model of this row entry.
Object getValue(int index)returns the value stored at the given index of this row.
int getValueCount()returns the number of values stored in this row.
String getStringValue()returns the value stored at the given index of this row, converted to a string. The
TableRowSorterproduces entries whosegetStringValuecalls the sorter’s string converter.
As you saw in the “Accessing Table Columns” section beginning on page 379, the column type determines how the cells are rendered. There are default renderers for the types Boolean and Icon that render a checkbox or icon. For all other types, you need to install a custom renderer.
Table cell renderers are similar to the list cell renderers that you saw earlier. They implement the TableCellRenderer interface, which has a single method:
Component getTableCellRendererComponent(JTable table, Object value, boolean isSelected,
   boolean hasFocus, int row, int column)
That method is called when the table needs to draw a cell. You return a component whose paint method is then invoked to fill the cell area.
The table in Figure 6-12 contains cells of type Color. The renderer simply returns a panel with a background color that is the color object stored in the cell. The color is passed as the value parameter.
class ColorTableCellRenderer extends JPanel implements TableCellRenderer
{
   public Component getTableCellRendererComponent(JTable table, Object value,
                                                  boolean isSelected,
      boolean hasFocus, int row, int column)
   {
      setBackground((Color) value);
      if (hasFocus)
         setBorder(UIManager.getBorder("Table.focusCellHighlightBorder"));
      else
         setBorder(null);
   }
   return this;
}
As you can see, the renderer installs a border when the cell has focus. (We ask the UIManager for the correct border. To find the lookup key, we peeked into the source code of the DefaultTableCellRenderer class.)
Generally, you will also want to set the background color of the cell to indicate whether it is currently selected. We skip this step because it would interfere with the displayed color. The ListRenderingTest example in Listing 6-3 shows how to indicate the selection status in a renderer.
Tip
If your renderer simply draws a text string or an icon, you can extend the DefaultTableCellRenderer class. It takes care of rendering the focus and selection status for you.
You need to tell the table to use this renderer with all objects of type Color. The setDefaultRenderer method of the JTable class lets you establish this association. You supply a Class object and the renderer:
table.setDefaultRenderer(Color.class, new ColorTableCellRenderer());
That renderer is now used for all objects of the given type in this table.
If you want to select a renderer based on some other criterion, you need to subclass the JTable class and override the getCellRenderer method.
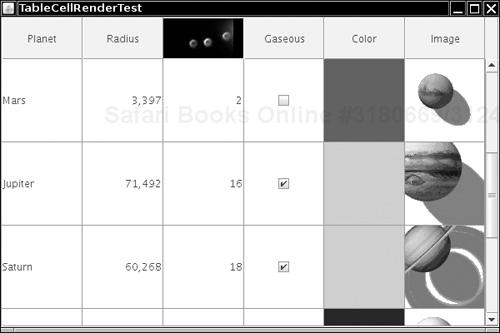
To display an icon in the header, set the header value:
moonColumn.setHeaderValue(new ImageIcon("Moons.gif"));However, the table header isn’t smart enough to choose an appropriate renderer for the header value. You have to install the renderer manually. For example, to show an image icon in a column header, call
moonColumn.setHeaderRenderer(table.getDefaultRenderer(ImageIcon.class));
To enable cell editing, the table model must indicate which cells are editable by defining the isCellEditable method. Most commonly, you will want to make certain columns editable. In the example program, we allow editing in four columns.
public boolean isCellEditable(int r, int c)
{
   return c == PLANET_COLUMN || c == MOONS_COLUMN || c == GASEOUS_COLUMN || c == COLOR_COLUMN;
}
Note
The AbstractTableModel defines the isCellEditable method to always return false. The DefaultTableModel overrides the method to always return true.
If you run the program in Listing 6-7, note that you can click the checkboxes in the Gaseous column and turn the check marks on and off. If you click a cell in the Moons column, a combo box appears (see Figure 6-13). You will shortly see how to install such a combo box as a cell editor.

Finally, click a cell in the first column. The cell gains focus. You can start typing and the cell contents change.
What you just saw in action are the three variations of the DefaultCellEditor class. A DefaultCellEditor can be constructed with a JTextField, a JCheckBox, or a JComboBox. The JTable class automatically installs a checkbox editor for Boolean cells and a text field editor for all editable cells that don’t supply their own renderer. The text fields let the user edit the strings that result from applying toString to the return value of the getValueAt method of the table model.
When the edit is complete, the edited value is retrieved by calling the getCellEditorValue method of your editor. That method should return a value of the correct type (that is, the type returned by the getColumnType method of the model).
To get a combo box editor, you set a cell editor manually—the JTable component has no idea what values might be appropriate for a particular type. For the Moons column, we wanted to enable the user to pick any value between 0 and 20. Here is the code for initializing the combo box:
JComboBox moonCombo = new JComboBox();
for (int i = 0; i <= 20; i++)
   moonCombo.addItem(i);
To construct a DefaultCellEditor, supply the combo box in the constructor:
TableCellEditor moonEditor = new DefaultCellEditor(moonCombo);
Next, we need to install the editor. Unlike the color cell renderer, this editor does not depend on the object type—we don’t necessarily want to use it for all objects of type Integer. Instead, we need to install it into a particular column:
moonColumn.setCellEditor(moonEditor);
Run the example program again and click a color. A color chooser pops up to let you pick a new color for the planet. Select a color and click OK. The cell color is updated (see Figure 6-14).
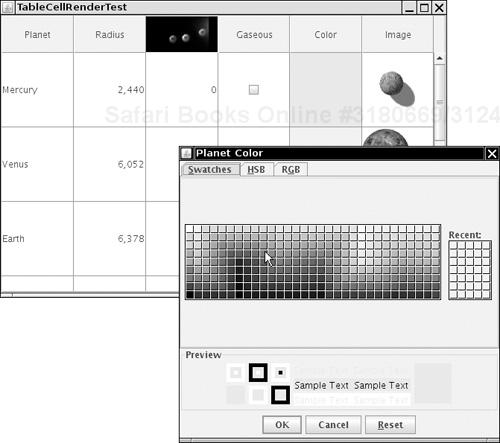
The color cell editor is not a standard table cell editor but a custom implementation. To create a custom cell editor, you implement the TableCellEditor interface. That interface is a bit tedious, and as of Java SE 1.3, an AbstractCellEditor class is provided to take care of the event handling details.
The getTableCellEditorComponent method of the TableCellEditor interface requests a component to render the cell. It is exactly the same as the getTableCellRendererComponent method of the TableCellRenderer interface, except that there is no focus parameter. Because the cell is being edited, it is presumed to have focus. The editor component temporarily replaces the renderer when the editing is in progress. In our example, we return a blank panel that is not colored. This is an indication to the user that the cell is currently being edited.
Next, you want to have your editor pop up when the user clicks on the cell.
The JTable class calls your editor with an event (such as a mouse click) to find out if that event is acceptable to initiate the editing process. The AbstractCellEditor class defines the method to accept all events.
public boolean isCellEditable(EventObject anEvent)
{
   return true;
}
However, if you override this method to false, then the table would not go through the trouble of inserting the editor component.
Once the editor component is installed, the shouldSelectCell method is called, presumably with the same event. You should initiate editing in this method, for example, by popping up an external edit dialog box.
public boolean shouldSelectCell(EventObject anEvent)
{
   colorDialog.setVisible(true);
   return true;
}
If the user cancels the edit, the table calls the cancelCellEditing method. If the user has clicked on another table cell, the table calls the stopCellEditing method. In both cases, you should hide the dialog box. When your stopCellEditing method is called, the table would like to use the partially edited value. You should return true if the current value is valid. In the color chooser, any value is valid. But if you edit other data, you can ensure that only valid data is retrieved from the editor.
Also, you should call the superclass methods that take care of event firing—otherwise, the editing won’t be properly canceled.
public void cancelCellEditing()
{
   colorDialog.setVisible(false);
   super.cancelCellEditing();
}
Finally, you need to supply a method that yields the value that the user supplied in the editing process:
public Object getCellEditorValue()
{
   return colorChooser.getColor();
}
To summarize, your custom editor should do the following:
Extend the
AbstractCellEditorclass and implement theTableCellEditorinterface.Define the
getTableCellEditorComponentmethod to supply a component. This can either be a dummy component (if you pop up a dialog box) or a component for in-place editing such as a combo box or text field.Define the
shouldSelectCell,stopCellEditing, andcancelCellEditingmethods to handle the start, completion, and cancellation of the editing process. ThestopCellEditingandcancelCellEditingmethods should call the superclass methods to ensure that listeners are notified.Define the
getCellEditorValuemethod to return the value that is the result of the editing process.
Finally, you indicate when the user is finished editing by calling the stopCellEditing and cancelCellEditing methods. When constructing the color dialog box, we install accept and cancel callbacks that fire these events.
colorDialog = JColorChooser.createDialog(null, "Planet Color", false, colorChooser,
   new
      ActionListener() // OK button listener
      {
         public void actionPerformed(ActionEvent event)
         {
            stopCellEditing();
         }
      },
   new
      ActionListener() // Cancel button listener
      {
         public void actionPerformed(ActionEvent event)
         {
            cancelCellEditing();
         }
      });
Also, when the user closes the dialog box, editing should be canceled. This is achieved by installation of a window listener:
colorDialog.addWindowListener(new
   WindowAdapter()
   {
      public void windowClosing(WindowEvent event)
      {
         cancelCellEditing();
      }
   });
This completes the implementation of the custom editor.
You now know how to make a cell editable and how to install an editor. There is one remaining issue—how to update the model with the value that the user edited. When editing is complete, the JTable class calls the following method of the table model:
void setValueAt(Object value, int r, int c)
You need to override the method to store the new value. The value parameter is the object that was returned by the cell editor. If you implemented the cell editor, then you know the type of the object that you return from the getCellEditorValue method. In the case of the DefaultCellEditor, there are three possibilities for that value. It is a Boolean if the cell editor is a checkbox, a string if it is a text field. If the value comes from a combo box, then it is the object that the user selected.
If the value object does not have the appropriate type, you need to convert it. That happens most commonly when a number is edited in a text field. In our example, we populated the combo box with Integer objects so that no conversion is necessary.
Example 6-7. TableCellRenderTest.java
  1. import java.awt.*;
  2. import java.awt.event.*;
  3. import java.util.*;
  4. import javax.swing.*;
  5. import javax.swing.table.*;
  6.
  7. /**
  8.  * This program demonstrates cell rendering and editing in a table.
  9.  * @version 1.02 2007-08-01
 10.  * @author Cay Horstmann
 11.  */
 12. public class TableCellRenderTest
 13. {
 14.    public static void main(String[] args)
 15.    {
 16.       EventQueue.invokeLater(new Runnable()
 17.          {
 18.             public void run()
 19.             {
 20.
 21.                JFrame frame = new TableCellRenderFrame();
 22.                frame.setDefaultCloseOperation(JFrame.EXIT_ON_CLOSE);
 23.                frame.setVisible(true);
 24.             }
 25.          });
 26.    }
 27. }
 28.
 29. /**
 30.  * This frame contains a table of planet data.
 31.  */
 32. class TableCellRenderFrame extends JFrame
 33. {
 34.    public TableCellRenderFrame()
 35.    {
 36.       setTitle("TableCellRenderTest");
 37.       setSize(DEFAULT_WIDTH, DEFAULT_HEIGHT);
 38.
 39.       TableModel model = new PlanetTableModel();
 40.       JTable table = new JTable(model);
 41.       table.setRowSelectionAllowed(false);
 42.
 43.       // set up renderers and editors
 44.
 45.       table.setDefaultRenderer(Color.class, new ColorTableCellRenderer());
 46.       table.setDefaultEditor(Color.class, new ColorTableCellEditor());
 47.
 48.       JComboBox moonCombo = new JComboBox();
 49.       for (int i = 0; i <= 20; i++)
 50.          moonCombo.addItem(i);
 51.
 52.       TableColumnModel columnModel = table.getColumnModel();
 53.       TableColumn moonColumn = columnModel.getColumn(PlanetTableModel.MOONS_COLUMN);
 54.       moonColumn.setCellEditor(new DefaultCellEditor(moonCombo));
 55.       moonColumn.setHeaderRenderer(table.getDefaultRenderer(ImageIcon.class));
 56.       moonColumn.setHeaderValue(new ImageIcon("Moons.gif"));
 57.
 58.       // show table
 59.
 60.       table.setRowHeight(100);
 61.       add(new JScrollPane(table), BorderLayout.CENTER);
 62.    }
 63.
 64.    private static final int DEFAULT_WIDTH = 600;
 65.    private static final int DEFAULT_HEIGHT = 400;
 66. }
 67.
 68. /**
 69.  * The planet table model specifies the values, rendering and editing properties for the
 70.  * planet data.
 71.  */
 72. class PlanetTableModel extends AbstractTableModel
 73. {
 74.    public String getColumnName(int c)
 75.    {
 76.       return columnNames[c];
 77.    }
 78.
 79.    public Class<?> getColumnClass(int c)
 80.    {
 81.       return cells[0][c].getClass();
 82.    }
 83.
 84.    public int getColumnCount()
 85.    {
 86.       return cells[0].length;
 87.    }
 88.
 89.    public int getRowCount()
 90.    {
 91.       return cells.length;
 92.    }
 93.
 94.    public Object getValueAt(int r, int c)
 95.    {
 96.       return cells[r][c];
 97.    }
 98.
 99.    public void setValueAt(Object obj, int r, int c)
100.    {
101.       cells[r][c] = obj;
102.    }
103.
104.    public boolean isCellEditable(int r, int c)
105.    {
106.       return c == PLANET_COLUMN || c == MOONS_COLUMN || c == GASEOUS_COLUMN ||
107.          c == COLOR_COLUMN;
108.    }
109.
110.    public static final int PLANET_COLUMN = 0;
111.    public static final int MOONS_COLUMN = 2;
112.    public static final int GASEOUS_COLUMN = 3;
113.    public static final int COLOR_COLUMN = 4;
114.
115.    private Object[][] cells = {
116.          { "Mercury", 2440.0, 0, false, Color.YELLOW, new ImageIcon("Mercury.gif") },
117.          { "Venus", 6052.0, 0, false, Color.YELLOW, new ImageIcon("Venus.gif") },
118.          { "Earth", 6378.0, 1, false, Color.BLUE, new ImageIcon("Earth.gif") },
119.          { "Mars", 3397.0, 2, false, Color.RED, new ImageIcon("Mars.gif") },
120.          { "Jupiter", 71492.0, 16, true, Color.ORANGE, new ImageIcon("Jupiter.gif") },
121.          { "Saturn", 60268.0, 18, true, Color.ORANGE, new ImageIcon("Saturn.gif") },
122.          { "Uranus", 25559.0, 17, true, Color.BLUE, new ImageIcon("Uranus.gif") },
123.          { "Neptune", 24766.0, 8, true, Color.BLUE, new ImageIcon("Neptune.gif") },
124.          { "Pluto", 1137.0, 1, false, Color.BLACK, new ImageIcon("Pluto.gif") } };
125.
126.    private String[] columnNames = { "Planet", "Radius", "Moons", "Gaseous", "Color",
127.       "Image" };
128. }
129.
130. /**
131.  * This renderer renders a color value as a panel with the given color.
132.  */
133. class ColorTableCellRenderer extends JPanel implements TableCellRenderer
134. {
135.    public Component getTableCellRendererComponent(JTable table, Object value,
136.          boolean isSelected, boolean hasFocus, int row, int column)
137.    {
138.       setBackground((Color) value);
139.       if (hasFocus) setBorder(UIManager.getBorder("Table.focusCellHighlightBorder"));
140.       else setBorder(null);
141.       return this;
142.    }
143. }
144.
145. /**
146.  * This editor pops up a color dialog to edit a cell value
147.  */
148. class ColorTableCellEditor extends AbstractCellEditor implements TableCellEditor
149. {
150.    public ColorTableCellEditor()
151.    {
152.       panel = new JPanel();
153.       // prepare color dialog
154.
155.       colorChooser = new JColorChooser();
156.       colorDialog = JColorChooser.createDialog(null, "Planet Color", false, colorChooser,
157.             new ActionListener() // OK button listener
158.                {
159.                   public void actionPerformed(ActionEvent event)
160.                   {
161.                      stopCellEditing();
162.                   }
163.                }, new ActionListener() // Cancel button listener
164.                {
165.                   public void actionPerformed(ActionEvent event)
166.                   {
167.                      cancelCellEditing();
168.                   }
169.                });
170.       colorDialog.addWindowListener(new WindowAdapter()
171.          {
172.             public void windowClosing(WindowEvent event)
173.             {
174.                cancelCellEditing();
175.             }
176.          });
177.    }
178.
179.    public Component getTableCellEditorComponent(JTable table, Object value,
180.       boolean isSelected, int row, int column)
181.    {
182.       // this is where we get the current Color value. We store it in the dialog in case
183.       // the user starts editing
184.       colorChooser.setColor((Color) value);
185.       return panel;
186.    }
187.
188.    public boolean shouldSelectCell(EventObject anEvent)
189.    {
190.       // start editing
191.       colorDialog.setVisible(true);
192.
193.       // tell caller it is ok to select this cell
194.       return true;
195.    }
196.
197.    public void cancelCellEditing()
198.    {
199.       // editing is canceled--hide dialog
200.       colorDialog.setVisible(false);
201.       super.cancelCellEditing();
202.    }
203.
204.    public boolean stopCellEditing()
205.    {
206.       // editing is complete--hide dialog
207.       colorDialog.setVisible(false);
208.       super.stopCellEditing();
209.
210.       // tell caller is is ok to use color value
211.       return true;
212.    }
213.
214.    public Object getCellEditorValue()
215.    {
216.       return colorChooser.getColor();
217.    }
218.
219.    private JColorChooser colorChooser;
220.    private JDialog colorDialog;
221.    private JPanel panel;
222. }
javax.swing.table.TableCellRenderer 1.2
Component getTableCellRendererComponent(JTable table, Object value, boolean selected, boolean hasFocus, int row, int column)returns a component whose
paintmethod is invoked to render a table cell.Parameters:
tableThe table containing the cell to be rendered
valueThe cell to be rendered
selectedtrueif the cell is currently selectedhasFocustrueif the cell currently has focusrow,columnThe row and column of the cell
javax.swing.table.TableColumn 1.2
void setCellRenderer(TableCellRenderer renderer)sets the cell editor or renderer for all cells in this column.
void setHeaderRenderer(TableCellRenderer renderer)sets the cell renderer for the header cell in this column.
void setHeaderValue(Object value)sets the value to be displayed for the header in this column.
javax.swing.DefaultCellEditor 1.2
DefaultCellEditor(JComboBox comboBox)constructs a cell editor that presents the combo box for selecting cell values.
javax.swing.table.TableCellEditor 1.2
Component getTableCellEditorComponent(JTable table, Object value, boolean selected, int row, int column)returns a component whose
paintmethod renders a table cell.Parameters:
tableThe table containing the cell to be rendered
valueThe cell to be rendered
selectedtrueif the cell is currently selectedrow, columnThe row and column of the cell
javax.swing.CellEditor 1.2
boolean isCellEditable(EventObject event)returns
trueif the event is suitable for initiating the editing process for this cell.boolean shouldSelectCell(EventObject anEvent)starts the editing process. Returns
trueif the edited cell should be selected. Normally, you want to returntrue, but you can returnfalseif you don’t want the editing process to change the cell selection.void cancelCellEditing()cancels the editing process. You can abandon partial edits.
boolean stopCellEditing()stops the editing process, with the intent of using the result. Returns
trueif the edited value is in a proper state for retrieval.Object getCellEditorValue()returns the edited result.
void addCellEditorListener(CellEditorListener l)void removeCellEditorListener(CellEditorListener l)adds or removes the obligatory cell editor listener.
Every computer user who uses a hierarchical file system has encountered tree displays. Of course, directories and files form only one of the many examples of treelike organizations. Many tree structures arise in everyday life, such as the hierarchy of countries, states, and cities shown in Figure 6-15.
As programmers, we often have to display these tree structures. Fortunately, the Swing library has a JTree class for this purpose. The JTree class (together with its helper classes) takes care of laying out the tree and processing user requests for expanding and collapsing nodes. In this section, you will learn how to put the JTree class to use.
As with the other complex Swing components, we must focus on the common and useful cases and cannot cover every nuance. If you want to achieve an unusual effect, we recommend that you consult Graphic Java 2: Mastering the JFC, Volume II: Swing, 3rd ed., by David M. Geary, Core Java Foundation Classes by Kim Topley, or Core Swing: Advanced Programming by Kim Topley (Pearson Education 1999).
Before going any further, let’s settle on some terminology (see Figure 6-16). A tree is composed of nodes. Every node is either a leaf or it has child nodes. Every node, with the exception of the root node, has exactly one parent. A tree has exactly one root node. Sometimes you have a collection of trees, each of which has its own root node. Such a collection is called a forest.
In our first example program, we simply display a tree with a few nodes (see Figure 6-18 on page 408). As with many other Swing components, you provide a model of the data, and the component displays it for you. To construct a JTree, you supply the tree model in the constructor:
TreeModel model = . . .;
JTree tree = new JTree(model);
Note
There are also constructors that construct trees out of a collection of elements:
JTree(Object[] nodes)
JTree(Vector<?> nodes)
JTree(Hashtable<?, ?> nodes) // the values become the nodes
These constructors are not very useful. They merely build a forest of trees, each with a single node. The third constructor seems particularly useless because the nodes appear in the seemingly random order given by the hash codes of the keys.
How do you obtain a tree model? You can construct your own model by creating a class that implements the TreeModel interface. You see later in this chapter how to do that. For now, we stick with the DefaultTreeModel that the Swing library supplies.
To construct a default tree model, you must supply a root node.
TreeNode root = . . .;
DefaultTreeModel model = new DefaultTreeModel(root);
TreeNode is another interface. You populate the default tree model with objects of any class that implements the interface. For now, we use the concrete node class that Swing supplies, namely, DefaultMutableTreeNode. This class implements the MutableTreeNode interface, a subinterface of TreeNode (see Figure 6-17).
A default mutable tree node holds an object, the user object. The tree renders the user objects for all nodes. Unless you specify a renderer, the tree simply displays the string that is the result of the toString method.
In our first example, we use strings as user objects. In practice, you would usually populate a tree with more expressive user objects. For example, when displaying a directory tree, it makes sense to use File objects for the nodes.
You can specify the user object in the constructor, or you can set it later with the setUserObject method.
DefaultMutableTreeNode node = new DefaultMutableTreeNode("Texas");
. . .
node.setUserObject("California");
Next, you establish the parent/child relationships between the nodes. Start with the root node, and use the add method to add the children:
DefaultMutableTreeNode root = new DefaultMutableTreeNode("World");
DefaultMutableTreeNode country = new DefaultMutableTreeNode("USA");
root.add(country);
DefaultMutableTreeNode state = new DefaultMutableTreeNode("California");
country.add(state);
Figure 6-18 illustrates how the tree will look.
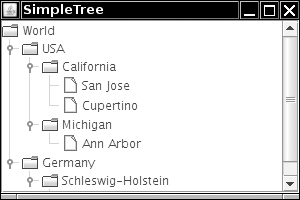
Link up all nodes in this fashion. Then, construct a DefaultTreeModel with the root node. Finally, construct a JTree with the tree model.
DefaultTreeModel treeModel = new DefaultTreeModel(root);
JTree tree = new JTree(treeModel);
Or, as a shortcut, you can simply pass the root node to the JTree constructor. Then the tree automatically constructs a default tree model:
JTree tree = new JTree(root);
Listing 6-8 contains the complete code.
Example 6-8. SimpleTree.java
 1. import java.awt.*;
 2.
 3. import javax.swing.*;
 4. import javax.swing.tree.*;
 5.
 6. /**
 7.  * This program shows a simple tree.
 8.  * @version 1.02 2007-08-01
 9.  * @author Cay Horstmann
10.  */
11. public class SimpleTree
12. {
13.    public static void main(String[] args)
14.    {
15.       EventQueue.invokeLater(new Runnable()
16.          {
17.             public void run()
18.             {
19.                JFrame frame = new SimpleTreeFrame();
20.                frame.setDefaultCloseOperation(JFrame.EXIT_ON_CLOSE);
21.                frame.setVisible(true);
22.             }
23.          });
24.    }
25. }
26.
27. /**
28.  * This frame contains a simple tree that displays a manually constructed tree model.
29.  */
30. class SimpleTreeFrame extends JFrame
31. {
32.    public SimpleTreeFrame()
33.    {
34.       setTitle("SimpleTree");
35.       setSize(DEFAULT_WIDTH, DEFAULT_HEIGHT);
36.
37.       // set up tree model data
38.
39.       DefaultMutableTreeNode root = new DefaultMutableTreeNode("World");
40.       DefaultMutableTreeNode country = new DefaultMutableTreeNode("USA");
41.       root.add(country);
42.       DefaultMutableTreeNode state = new DefaultMutableTreeNode("California");
43.       country.add(state);
44.       DefaultMutableTreeNode city = new DefaultMutableTreeNode("San Jose");
45.       state.add(city);
46.       city = new DefaultMutableTreeNode("Cupertino");
47.       state.add(city);
48.       state = new DefaultMutableTreeNode("Michigan");
49.       country.add(state);
50.       city = new DefaultMutableTreeNode("Ann Arbor");
51.       state.add(city);
52.       country = new DefaultMutableTreeNode("Germany");
53.       root.add(country);
54.       state = new DefaultMutableTreeNode("Schleswig-Holstein");
55.       country.add(state);
56.       city = new DefaultMutableTreeNode("Kiel");
57.       state.add(city);
58.
59.       // construct tree and put it in a scroll pane
60.
61.       JTree tree = new JTree(root);
62.       add(new JScrollPane(tree));
63.    }
64.
65.    private static final int DEFAULT_WIDTH = 300;
66.    private static final int DEFAULT_HEIGHT = 200;
67. }
When you run the program, the tree first looks as in Figure 6-19. Only the root node and its children are visible. Click on the circle icons (the handles) to open up the subtrees. The line sticking out from the handle icon points to the right when the subtree is collapsed, and it points down when the subtree is expanded (see Figure 6-20). We don’t know what the designers of the Metal look and feel had in mind, but we think of the icon as a door handle. You push down on the handle to open the subtree.
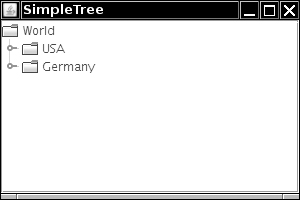
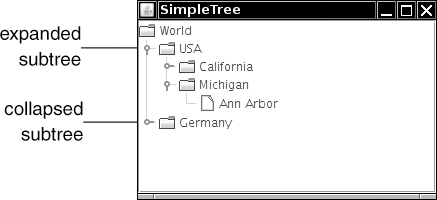
Note
Of course, the display of the tree depends on the selected look and feel. We just described the Metal look and feel. In the Windows look and feel, the handles have the more familiar look—a “-” or “+” in a box (see Figure 6-21).
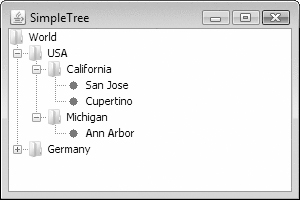
You can use the following magic incantation to turn off the lines joining parents and children (see Figure 6-22):
tree.putClientProperty("JTree.lineStyle", "None");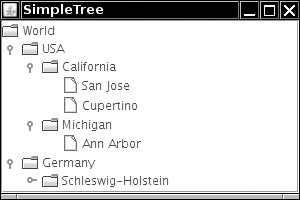
Conversely, to make sure that the lines are shown, use
tree.putClientProperty("JTree.lineStyle", "Angled");Another line style, "Horizontal", is shown in Figure 6-23. The tree is displayed with horizontal lines separating only the children of the root. We aren’t quite sure what it is good for.
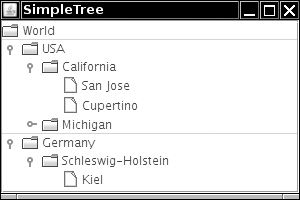
By default, there is no handle for collapsing the root of the tree. If you like, you can add one with the call
tree.setShowsRootHandles(true);
Figure 6-24 shows the result. Now you can collapse the entire tree into the root node.
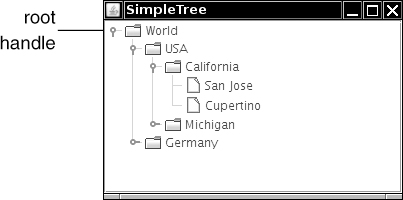
Conversely, you can hide the root altogether. You do that to display a forest, a set of trees, each of which has its own root. You still must join all trees in the forest to a common root. Then, you hide the root with the instruction
tree.setRootVisible(false);
Look at Figure 6-25. There appear to be two roots, labeled “USA” and “Germany.” The actual root that joins the two is made invisible.
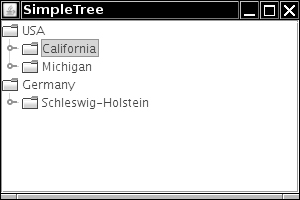
Let’s turn from the root to the leaves of the tree. Note that the leaves have a different icon from the other nodes (see Figure 6-26).
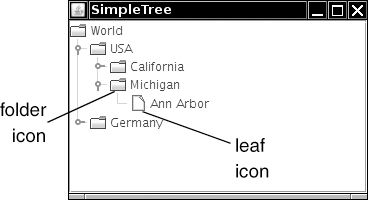
When the tree is displayed, each node is drawn with an icon. There are actually three kinds of icons: a leaf icon, an opened nonleaf icon, and a closed nonleaf icon. For simplicity, we refer to the last two as folder icons.
The node renderer needs to know which icon to use for each node. By default, the decision process works like this: If the isLeaf method of a node returns true, then the leaf icon is used. Otherwise, a folder icon is used.
The isLeaf method of the DefaultMutableTreeNode class returns true if the node has no children. Thus, nodes with children get folder icons, and nodes without children get leaf icons.
Sometimes, that behavior is not appropriate. Suppose we added a node “Montana” to our sample tree, but we’re at a loss as to what cities to add. We would not want the state node to get a leaf icon because conceptually only the cities are leaves.
The JTree class has no idea which nodes should be leaves. It asks the tree model. If a childless node isn’t automatically a conceptual leaf, you can ask the tree model to use a different criterion for leafiness, namely, to query the “allows children” node property.
For those nodes that should not have children, call
node.setAllowsChildren(false);
Then, tell the tree model to ask the value of the “allows children” property to determine whether a node should be displayed with a leaf icon. You use the setAsksAllowsChildren method of the DefaultTreeModel class to set this behavior:
model.setAsksAllowsChildren(true);
With this decision criterion, nodes that allow children get folder icons, and nodes that don’t allow children get leaf icons.
Alternatively, if you construct the tree by supplying the root node, supply the setting for the “asks allows children” property in the constructor.
JTree tree = new JTree(root, true); // nodes that don't allow children get leaf icons
javax.swing.JTree 1.2
JTree(TreeModel model)constructs a tree from a tree model.
JTree(TreeNode root)JTree(TreeNode root, boolean asksAllowChildren)constructs a tree with a default tree model that displays the root and its children.
Parameters:
rootThe root node
asksAllowsChildrentrueto use the “allows children” node property for determining whether a node is a leafvoid setShowsRootHandles(boolean b)If
bistrue, then the root node has a handle for collapsing or expanding its children.void setRootVisible(boolean b)If
bis true, then the root node is displayed. Otherwise, it is hidden.
javax.swing.tree.TreeNode 1.2
boolean isLeaf()returns
trueif this node is conceptually a leaf.boolean getAllowsChildren()returns
trueif this node can have child nodes.
javax.swing.tree.MutableTreeNode 1.2
void setUserObject(Object userObject)sets the “user object” that the tree node uses for rendering.
javax.swing.tree.TreeModel 1.2
boolean isLeaf(Object node)returns
trueifnodeshould be displayed as a leaf node.
javax.swing.tree.DefaultTreeModel 1.2
void setAsksAllowsChildren(boolean b)If
bistrue, then nodes are displayed as leaves when theirgetAllowsChildrenmethod returnsfalse. Otherwise, they are displayed as leaves when theirisLeafmethod returnstrue.
javax.swing.tree.DefaultMutableTreeNode 1.2
DefaultMutableTreeNode(Object userObject)constructs a mutable tree node with the given user object.
void add(MutableTreeNode child)adds a node as the last child of this node.
void setAllowsChildren(boolean b)If
bistrue, then children can be added to this node.
javax.swing.JComponent 1.2
void putClientProperty(Object key, Object value)adds a key/value pair to a small table that each component manages. This is an “escape hatch” mechanism that some Swing components use for storing look-and-feel–specific properties.
In the next example program, you see how to edit a tree. Figure 6-27 shows the user interface. If you click the Add Sibling or Add Child button, the program adds a new node (with title New) to the tree. If you click the Delete button, the program deletes the currently selected node.
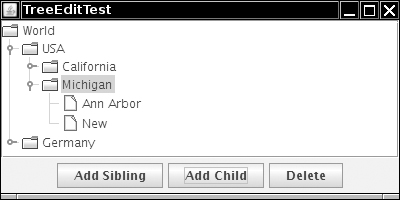
To implement this behavior, you need to find out which tree node is currently selected. The JTree class has a surprising way of identifying nodes in a tree. It does not deal with tree nodes, but with paths of objects, called tree paths. A tree path starts at the root and consists of a sequence of child nodes—see Figure 6-28.
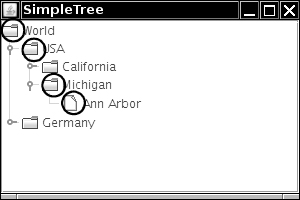
You might wonder why the JTree class needs the whole path. Couldn’t it just get a TreeNode and keep calling the getParent method? In fact, the JTree class knows nothing about the TreeNode interface. That interface is never used by the TreeModel interface; it is only used by the DefaultTreeModel implementation. You can have other tree models in which the nodes do not implement the TreeNode interface at all. If you use a tree model that manages other types of objects, then those objects might not have getParent and getChild methods. They would of course need to have some other connection to each other. It is the job of the tree model to link nodes together. The JTree class itself has no clue about the nature of their linkage. For that reason, the JTree class always needs to work with complete paths.
The TreePath class manages a sequence of Object (not TreeNode!) references. A number of JTree methods return TreePath objects. When you have a tree path, you usually just need to know the terminal node, which you get with the getLastPathComponent method. For example, to find out the currently selected node in a tree, you use the getSelectionPath method of the JTree class. You get a TreePath object back, from which you can retrieve the actual node.
TreePath selectionPath = tree.getSelectionPath();
DefaultMutableTreeNode selectedNode
   = (DefaultMutableTreeNode) selectionPath.getLastPathComponent();
Actually, because this particular query is so common, there is a convenience method that gives the selected node immediately.
DefaultMutableTreeNode selectedNode
   = (DefaultMutableTreeNode) tree.getLastSelectedPathComponent();
This method is not called getSelectedNode because the tree does not know that it contains nodes—its tree model deals only with paths of objects.
Note
Tree paths are one of two ways in which the JTree class describes nodes. Quite a few JTree methods take or return an integer index, the row position. A row position is simply the row number (starting with 0) of the node in the tree display. Only visible nodes have row numbers, and the row number of a node changes if other nodes before it are expanded, collapsed, or modified. For that reason, you should avoid row positions. All JTree methods that use rows have equivalents that use tree paths instead.
Once you have the selected node, you can edit it. However, do not simply add children to a tree node:
selectedNode.add(newNode); // NO!
If you change the structure of the nodes, you change the model but the associated view is not notified. You could send out a notification yourself, but if you use the insertNodeInto method of the DefaultTreeModel class, the model class takes care of that. For example, the following call appends a new node as the last child of the selected node and notifies the tree view.
model.insertNodeInto(newNode, selectedNode, selectedNode.getChildCount());
The analogous call removeNodeFromParent removes a node and notifies the view:
model.removeNodeFromParent(selectedNode);
If you keep the node structure in place but you changed the user object, you should call the following method:
model.nodeChanged(changedNode);
The automatic notification is a major advantage of using the DefaultTreeModel. If you supply your own tree model, you have to implement automatic notification by hand. (See Core Java Foundation Classes by Kim Topley for details.)
Caution
The DefaultTreeModel class has a reload method that reloads the entire model. However, don’t call reload simply to update the tree after making a few changes. When the tree is regenerated, all nodes beyond the root’s children are collapsed again. It is quite disconcerting to your users if they have to keep expanding the tree after every change.
When the view is notified of a change in the node structure, it updates the display but it does not automatically expand a node to show newly added children. In particular, if a user in our sample program adds a new child node to a node for which children are currently collapsed, then the new node is silently added to the collapsed subtree. This gives the user no feedback that the command was actually carried out. In such a case, you should make a special effort to expand all parent nodes so that the newly added node becomes visible. You use the makeVisible method of the JTree class for this purpose. The makeVisible method expects a tree path leading to the node that should become visible.
Thus, you need to construct a tree path from the root to the newly inserted node. To get a tree path, you first call the getPathToRoot method of the DefaultTreeModel class. It returns a TreeNode[] array of all nodes from a node to the root node. You pass that array to a TreePath constructor.
For example, here is how you make the new node visible:
TreeNode[] nodes = model.getPathToRoot(newNode);
TreePath path = new TreePath(nodes);
tree.makeVisible(path);
Note
It is curious that the DefaultTreeModel class feigns almost complete ignorance about the TreePath class, even though its job is to communicate with a JTree. The JTree class uses tree paths a lot, and it never uses arrays of node objects.
But now suppose your tree is contained inside a scroll pane. After the tree node expansion, the new node might still not be visible because it falls outside the viewport. To overcome that problem, call
tree.scrollPathToVisible(path);
instead of calling makeVisible. This call expands all nodes along the path, and it tells the ambient scroll pane to scroll the node at the end of the path into view (see Figure 6-29).
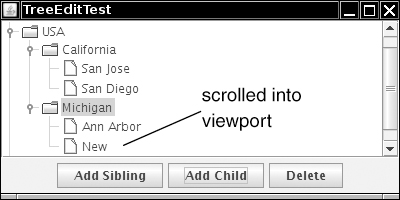
By default, tree nodes cannot be edited. However, if you call
tree.setEditable(true);
then the user can edit a node simply by double-clicking, editing the string, and pressing the ENTER key. Double-clicking invokes the default cell editor, which is implemented by the DefaultCellEditor class (see Figure 6-30). It is possible to install other cell editors, using the same process that you have seen in our discussion of table cell editors.
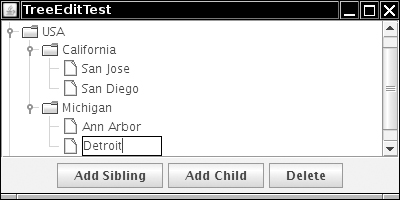
Listing 6-9 shows the complete source code of the tree editing program. Run the program, add a few nodes, and edit them by double-clicking them. Observe how collapsed nodes expand to show added children and how the scroll pane keeps added nodes in the viewport.
Example 6-9. TreeEditTest.java
  1. import java.awt.*;
  2. import java.awt.event.*;
  3. import javax.swing.*;
  4. import javax.swing.tree.*;
  5.
  6. /**
  7.  * This program demonstrates tree editing.
  8.  * @version 1.03 2007-08-01
  9.  * @author Cay Horstmann
 10.  */
 11. public class TreeEditTest
 12. {
 13.    public static void main(String[] args)
 14.    {
 15.       EventQueue.invokeLater(new Runnable()
 16.          {
 17.             public void run()
 18.             {
 19.                JFrame frame = new TreeEditFrame();
 20.                frame.setDefaultCloseOperation(JFrame.EXIT_ON_CLOSE);
 21.                frame.setVisible(true);
 22.             }
 23.          });
 24.    }
 25. }
 26.
 27. /**
 28.  * A frame with a tree and buttons to edit the tree.
 29.  */
 30. class TreeEditFrame extends JFrame
 31. {
 32.    public TreeEditFrame()
 33.    {
 34.       setTitle("TreeEditTest");
 35.       setSize(DEFAULT_WIDTH, DEFAULT_HEIGHT);
 36.
 37.       // construct tree
 38.
 39.       TreeNode root = makeSampleTree();
 40.       model = new DefaultTreeModel(root);
 41.       tree = new JTree(model);
 42.       tree.setEditable(true);
 43.
 44.       // add scroll pane with tree
 45.
 46.       JScrollPane scrollPane = new JScrollPane(tree);
 47.       add(scrollPane, BorderLayout.CENTER);
 48.
 49.       makeButtons();
 50.    }
 51.
 52.    public TreeNode makeSampleTree()
 53.    {
 54.       DefaultMutableTreeNode root = new DefaultMutableTreeNode("World");
 55.       DefaultMutableTreeNode country = new DefaultMutableTreeNode("USA");
 56.       root.add(country);
 57.       DefaultMutableTreeNode state = new DefaultMutableTreeNode("California");
 58.       country.add(state);
 59.       DefaultMutableTreeNode city = new DefaultMutableTreeNode("San Jose");
 60.       state.add(city);
 61.       city = new DefaultMutableTreeNode("San Diego");
 62.       state.add(city);
 63.       state = new DefaultMutableTreeNode("Michigan");
 64.       country.add(state);
 65.       city = new DefaultMutableTreeNode("Ann Arbor");
 66.       state.add(city);
 67.       country = new DefaultMutableTreeNode("Germany");
 68.       root.add(country);
 69.       state = new DefaultMutableTreeNode("Schleswig-Holstein");
 70.       country.add(state);
 71.       city = new DefaultMutableTreeNode("Kiel");
 72.       state.add(city);
 73.       return root;
 74.    }
 75.
 76.    /**
 77.     * Makes the buttons to add a sibling, add a child, and delete a node.
 78.     */
 79.    public void makeButtons()
 80.    {
 81.       JPanel panel = new JPanel();
 82.       JButton addSiblingButton = new JButton("Add Sibling");
 83.       addSiblingButton.addActionListener(new ActionListener()
 84.          {
 85.             public void actionPerformed(ActionEvent event)
 86.             {
 87.                DefaultMutableTreeNode selectedNode = (DefaultMutableTreeNode) tree
 88.                      .getLastSelectedPathComponent();
 89.
 90.                if (selectedNode == null) return;
 91.
 92.                DefaultMutableTreeNode parent = (DefaultMutableTreeNode)
 93.                   selectedNode.getParent();
 94.
 95.                if (parent == null) return;
 96.
 97.                DefaultMutableTreeNode newNode = new DefaultMutableTreeNode("New");
 98.
 99.                int selectedIndex = parent.getIndex(selectedNode);
100.                model.insertNodeInto(newNode, parent, selectedIndex + 1);
101.
102.                // now display new node
103.
104.                TreeNode[] nodes = model.getPathToRoot(newNode);
105.                TreePath path = new TreePath(nodes);
106.                tree.scrollPathToVisible(path);
107.             }
108.          });
109.       panel.add(addSiblingButton);
110.
111.       JButton addChildButton = new JButton("Add Child");
112.       addChildButton.addActionListener(new ActionListener()
113.          {
114.             public void actionPerformed(ActionEvent event)
115.             {
116.                DefaultMutableTreeNode selectedNode = (DefaultMutableTreeNode) tree
117.                      .getLastSelectedPathComponent();
118.
119.                if (selectedNode == null) return;
120.
121.                DefaultMutableTreeNode newNode = new DefaultMutableTreeNode("New");
122.                model.insertNodeInto(newNode, selectedNode, selectedNode.getChildCount());
123.
124.                // now display new node
125.
126.                TreeNode[] nodes = model.getPathToRoot(newNode);
127.                TreePath path = new TreePath(nodes);
128.                tree.scrollPathToVisible(path);
129.             }
130.          });
131.       panel.add(addChildButton);
132.
133.       JButton deleteButton = new JButton("Delete");
134.       deleteButton.addActionListener(new ActionListener()
135.          {
136.             public void actionPerformed(ActionEvent event)
137.             {
138.                DefaultMutableTreeNode selectedNode = (DefaultMutableTreeNode) tree
139.                      .getLastSelectedPathComponent();
140.
141.                if (selectedNode != null && selectedNode.getParent() != null) model
142.                      .removeNodeFromParent(selectedNode);
143.             }
144.          });
145.       panel.add(deleteButton);
146.       add(panel, BorderLayout.SOUTH);
147.    }
148.
149.    private DefaultTreeModel model;
150.    private JTree tree;
151.    private static final int DEFAULT_WIDTH = 400;
152.    private static final int DEFAULT_HEIGHT = 200;
153. }
javax.swing.JTree 1.2
gets the path to the currently selected node, or the path to the first selected node if multiple nodes are selected. Returns
nullif no node is selected.Object getLastSelectedPathComponent()gets the node object that represents the currently selected node, or the first node if multiple nodes are selected. Returns
nullif no node is selected.void makeVisible(TreePath path)expands all nodes along the path.
void scrollPathToVisible(TreePath path)expands all nodes along the path and, if the tree is contained in a scroll pane, scrolls to ensure that the last node on the path is visible.
javax.swing.tree.TreeNode 1.2
TreeNode getParent()returns the parent node of this node.
TreeNode getChildAt(int index)looks up the child node at the given index. The index must be between 0 and
getChildCount()-1.int getChildCount()returns the number of children of this node.
Enumeration children()returns an enumeration object that iterates through all children of this node.
javax.swing.tree.DefaultTreeModel 1.2
void insertNodeInto(MutableTreeNode newChild, MutableTreeNode parent, int index)inserts
newChildas a new child node ofparentat the given index and notifies the tree model listeners.void removeNodeFromParent(MutableTreeNode node)removes
nodefrom this model and notifies the tree model listeners.void nodeChanged(TreeNode node)notifies the tree model listeners that
nodehas changed.void nodesChanged(TreeNode parent, int[] changedChildIndexes)notifies the tree model listeners that all child nodes of
parentwith the given indexes have changed.void reload()reloads all nodes into the model. This is a drastic operation that you should use only if the nodes have changed completely because of some outside influence.
Sometimes you need to find a node in a tree by starting at the root and visiting all children until you have found a match. The DefaultMutableTreeNode class has several convenience methods for iterating through nodes.
The breadthFirstEnumeration and depthFirstEnumeration methods return enumeration objects whose nextElement method visits all children of the current node, using either a breadth-first or depth-first traversal. Figure 6-31 shows the traversals for a sample tree—the node labels indicate the order in which the nodes are traversed.
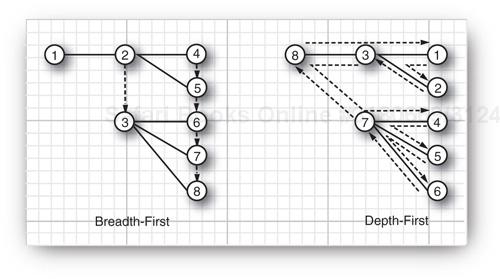
Breadth-first enumeration is the easiest to visualize. The tree is traversed in layers. The root is visited first, followed by all of its children, then followed by the grandchildren, and so on.
To visualize depth-first enumeration, imagine a rat trapped in a tree-shaped maze. It rushes along the first path until it comes to a leaf. Then, it backtracks and turns around to the next path, and so on.
Computer scientists also call this postorder traversal because the search process visits the children before visiting the parents. The postOrderTraversal method is a synonym for depthFirstTraversal. For completeness, there is also a preOrderTraversal, a depth-first search that enumerates parents before the children.
Here is the typical usage pattern:
Enumeration breadthFirst = node.breadthFirstEnumeration();
while (breadthFirst.hasMoreElements())
   do something with breadthFirst.nextElement();
Finally, a related method, pathFromAncestorEnumeration, finds a path from an ancestor to a given node and then enumerates the nodes along that path. That’s no big deal—it just keeps calling getParent until the ancestor is found and then presents the path in reverse order.
In our next example program, we put node enumeration to work. The program displays inheritance trees of classes. Type the name of a class into the text field on the bottom of the frame. The class and all of its superclasses are added to the tree (see Figure 6-32).
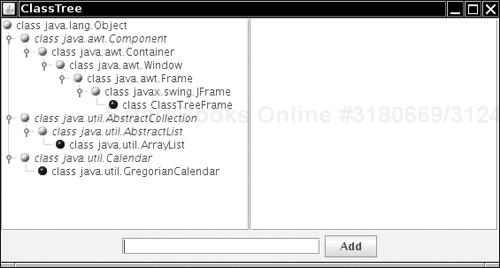
In this example, we take advantage of the fact that the user objects of the tree nodes can be objects of any type. Because our nodes describe classes, we store Class objects in the nodes.
Of course, we don’t want to add the same class object twice, so we need to check whether a class already exists in the tree. The following method finds the node with a given user object if it exists in the tree.
   public DefaultMutableTreeNode findUserObject(Object obj)
   {
      Enumeration e = root.breadthFirstEnumeration();
      while (e.hasMoreElements())
      {
         DefaultMutableTreeNode node = (DefaultMutableTreeNode) e.nextElement();
         if (node.getUserObject().equals(obj))
            return node;
      }
      return null;
}In your applications, you will often need to change the way in which a tree component draws the nodes. The most common change is, of course, to choose different icons for nodes and leaves. Other changes might involve changing the font of the node labels or drawing images at the nodes. All these changes are made possible by installing a new tree cell renderer into the tree. By default, the JTree class uses DefaultTreeCellRenderer objects to draw each node. The DefaultTreeCellRenderer class extends the JLabel class. The label contains the node icon and the node label.
Note
The cell renderer does not draw the “handles” for expanding and collapsing subtrees. The handles are part of the look and feel, and it is recommended that you not change them.
You can customize the display in three ways.
You can change the icons, font, and background color used by a
DefaultTreeCellRenderer. These settings are used for all nodes in the tree.You can install a renderer that extends the
DefaultTreeCellRendererclass and vary the icons, fonts, and background color for each node.You can install a renderer that implements the
TreeCellRendererinterface, to draw a custom image for each node.
Let us look at these possibilities one by one. The easiest customization is to construct a DefaultTreeCellRenderer object, change the icons, and install it into the tree:
DefaultTreeCellRenderer renderer = new DefaultTreeCellRenderer();
renderer.setLeafIcon(new ImageIcon("blue-ball.gif")); // used for leaf nodes
renderer.setClosedIcon(new ImageIcon("red-ball.gif")); // used for collapsed nodes
renderer.setOpenIcon(new ImageIcon("yellow-ball.gif")); // used for expanded nodes
tree.setCellRenderer(renderer);
You can see the effect in Figure 6-32. We just use the “ball” icons as placeholders—presumably your user interface designer would supply you with appropriate icons to use for your applications.
We don’t recommend that you change the font or background color for an entire tree—that is really the job of the look and feel.
However, it can be useful to change the font for individual nodes in a tree to highlight some of them. If you look carefully at Figure 6-32, you will notice that the abstract classes are set in italics.
To change the appearance of individual nodes, you install a tree cell renderer. Tree cell renderers are very similar to the list cell renderers we discussed earlier in this chapter. The TreeCellRenderer interface has a single method:
Component getTreeCellRendererComponent(JTree tree, Object value, boolean selected,
   boolean expanded, boolean leaf, int row, boolean hasFocus)
The getTreeCellRendererComponent method of the DefaultTreeCellRenderer class returns this—in other words, a label. (The DefaultTreeCellRenderer class extends the JLabel class.) To customize the component, extend the DefaultTreeCellRenderer class. Override the getTreeCellRendererComponent method as follows: Call the superclass method, so that it can prepare the label data. Customize the label properties, and finally return this.
class MyTreeCellRenderer extends DefaultTreeCellRenderer
{
   public Component getTreeCellRendererComponent(JTree tree, Object value, boolean selected,
      boolean expanded, boolean leaf, int row, boolean hasFocus)
   {
      super.getTreeCellRendererComponent(tree, value, selected, expanded, leaf, row, hasFocus);
      DefaultMutableTreeNode node = (DefaultMutableTreeNode) value;
      look at node.getUserObject();
      Font font = appropriate font;
      setFont(font);
      return this;
   }
};
Caution
The value parameter of the getTreeCellRendererComponent method is the node object, not the user object! Recall that the user object is a feature of the DefaultMutableTreeNode, and that a JTree can contain nodes of an arbitrary type. If your tree uses DefaultMutableTreeNode nodes, then you must retrieve the user object in a second step, as we did in the preceding code sample.
Caution
The DefaultTreeCellRenderer uses the same label object for all nodes, only changing the label text for each node. If you change the font for a particular node, you must set it back to its default value when the method is called again. Otherwise, all subsequent nodes will be drawn in the changed font! Look at the code in Listing 6-10 to see how to restore the font to the default.
We do not show an example for a tree cell renderer that draws arbitrary graphics. If you need this capability, you can adapt the list cell renderer in Listing 6-3; the technique is entirely analogous.
The ClassNameTreeCellRenderer in Listing 6-10 sets the class name in either the normal or italic font, depending on the ABSTRACT modifier of the Class object. We don’t want to set a particular font because we don’t want to change whatever font the look and feel normally uses for labels. For that reason, we use the font from the label and derive an italic font from it. Recall that only a single shared JLabel object is returned by all calls. We need to hang on to the original font and restore it in the next call to the getTreeCellRendererComponent method.
Also, note how we change the node icons in the ClassTreeFrame constructor.
javax.swing.tree.DefaultMutableTreeNode 1.2
Enumeration breadthFirstEnumeration()Enumeration depthFirstEnumeration()Enumeration preOrderEnumeration()Enumeration postOrderEnumeration()returns enumeration objects for visiting all nodes of the tree model in a particular order. In breadth-first traversal, children that are closer to the root are visited before those that are farther away. In depth-first traversal, all children of a node are completely enumerated before its siblings are visited. The
postOrderEnumerationmethod is a synonym fordepthFirstEnumeration. The preorder traversal is identical to the postorder traversal except that parents are enumerated before their children.
javax.swing.tree.TreeCellRenderer 1.2
Component getTreeCellRendererComponent(JTree tree, Object value, boolean selected, boolean expanded, boolean leaf, int row, boolean hasFocus)returns a component whose
paintmethod is invoked to render a tree cell.Parameters:
treeThe tree containing the node to be rendered
valueThe node to be rendered
selectedtrueif the node is currently selectedexpandedtrueif the children of the node are visibleleaftrueif the node needs to be displayed as a leafrowThe display row containing the node
hasFocustrueif the node currently has input focus
Most commonly, a tree component is paired with some other component. When the user selects tree nodes, some information shows up in another window. See Figure 6-33 for an example. When the user selects a class, the instance and static variables of that class are displayed in the text area to the right.
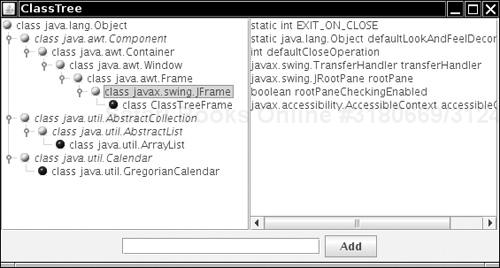
To obtain this behavior, you install a tree selection listener. The listener must implement the TreeSelectionListener interface, an interface with a single method:
void valueChanged(TreeSelectionEvent event)
That method is called whenever the user selects or deselects tree nodes.
You add the listener to the tree in the normal way:
tree.addTreeSelectionListener(listener);
You can specify whether the user is allowed to select a single node, a contiguous range of nodes, or an arbitrary, potentially discontiguous, set of nodes. The JTree class uses a TreeSelectionModel to manage node selection. You need to retrieve the model to set the selection state to one of SINGLE_TREE_SELECTION, CONTIGUOUS_TREE_SELECTION, or DISCONTIGUOUS_TREE_SELECTION. (Discontiguous selection mode is the default.) For example, in our class browser, we want to allow selection of only a single class:
int mode = TreeSelectionModel.SINGLE_TREE_SELECTION;
tree.getSelectionModel().setSelectionMode(mode);
Apart from setting the selection mode, you need not worry about the tree selection model.
Note
How the user selects multiple items depends on the look and feel. In the Metal look and feel, hold down the CTRL key while clicking an item to add the item to the selection, or to remove it if it was currently selected. Hold down the SHIFT key while clicking an item to select a range of items, extending from the previously selected item to the new item.
To find out the current selection, you query the tree with the getSelectionPaths method:
TreePath[] selectedPaths = tree.getSelectionPaths();
If you restricted the user to a single selection, you can use the convenience method getSelectionPath, which returns the first selected path, or null if no path was selected.
Caution
The TreeSelectionEvent class has a getPaths method that returns an array of TreePath objects, but that array describes selection changes, not the current selection.
Listing 6-10 shows the complete source code for the class tree program. The program displays inheritance hierarchies, and it customizes the display to show abstract classes in italics. You can type the name of any class into the text field at the bottom of the frame. Press the ENTER key or click the Add button to add the class and its superclasses to the tree. You must enter the full package name, such as java.util.ArrayList.
This program is a bit tricky because it uses reflection to construct the class tree. This work is contained inside the addClass method. (The details are not that important. We use the class tree in this example because inheritance trees yield a nice supply of trees without laborious coding. If you display trees in your own applications, you will have your own source of hierarchical data.) The method uses the breadth-first search algorithm to find whether the current class is already in the tree by calling the findUserObject method that we implemented in the preceding section. If the class is not already in the tree, we add the superclasses to the tree, then make the new class node a child and make that node visible.
When you select a tree node, the text area to the right is filled with the fields of the selected class. In the frame constructor, we restrict the user to single item selection and add a tree selection listener. When the valueChanged method is called, we ignore its event parameter and simply ask the tree for the current selection path. As always, we need to get the last node of the path and look up its user object. We then call the getFieldDescription method, which uses reflection to assemble a string with all fields of the selected class.
Example 6-10. ClassTree.java
  1. import java.awt.*;
  2. import java.awt.event.*;
  3. import java.lang.reflect.*;
  4. import java.util.*;
  5. import javax.swing.*;
  6. import javax.swing.event.*;
  7. import javax.swing.tree.*;
  8.
  9. /**
 10.  * This program demonstrates cell rendering and listening to tree selection events.
 11.  * @version 1.03 2007-08-01
 12.  * @author Cay Horstmann
 13.  */
 14. public class ClassTree
 15. {
 16.    public static void main(String[] args)
 17.    {
 18.       EventQueue.invokeLater(new Runnable()
 19.          {
 20.             public void run()
 21.             {
 22.                JFrame frame = new ClassTreeFrame();
 23.                frame.setDefaultCloseOperation(JFrame.EXIT_ON_CLOSE);
 24.                frame.setVisible(true);
 25.             }
 26.          });
 27.    }
 28. }
 29.
 30. /**
 31.  * This frame displays the class tree, a text field and add button to add more classes
 32.  * into the tree.
 33.  */
 34. class ClassTreeFrame extends JFrame
 35. {
 36.    public ClassTreeFrame()
 37.    {
 38.       setTitle("ClassTree");
 39.       setSize(DEFAULT_WIDTH, DEFAULT_HEIGHT);
 40.
 41.       // the root of the class tree is Object
 42.       root = new DefaultMutableTreeNode(java.lang.Object.class);
 43.       model = new DefaultTreeModel(root);
 44.       tree = new JTree(model);
 45.
 46.       // add this class to populate the tree with some data
 47.       addClass(getClass());
 48.
 49.       // set up node icons
 50.       ClassNameTreeCellRenderer renderer = new ClassNameTreeCellRenderer();
 51.       renderer.setClosedIcon(new ImageIcon("red-ball.gif"));
 52.       renderer.setOpenIcon(new ImageIcon("yellow-ball.gif"));
 53.       renderer.setLeafIcon(new ImageIcon("blue-ball.gif"));
 54.       tree.setCellRenderer(renderer);
 55.
 56.       // set up selection mode
 57.       tree.addTreeSelectionListener(new TreeSelectionListener()
 58.          {
 59.             public void valueChanged(TreeSelectionEvent event)
 60.             {
 61.                // the user selected a different node--update description
 62.                TreePath path = tree.getSelectionPath();
 63.                if (path == null) return;
 64.                DefaultMutableTreeNode selectedNode = (DefaultMutableTreeNode) path
 65.                      .getLastPathComponent();
 66.                Class<?> c = (Class<?>) selectedNode.getUserObject();
 67.                String description = getFieldDescription(c);
 68.                textArea.setText(description);
 69.             }
 70.          });
 71.       int mode = TreeSelectionModel.SINGLE_TREE_SELECTION;
 72.       tree.getSelectionModel().setSelectionMode(mode);
 73.
 74.       // this text area holds the class description
 75.       textArea = new JTextArea();
 76.
 77.       // add tree and text area
 78.       JPanel panel = new JPanel();
 79.       panel.setLayout(new GridLayout(1, 2));
 80.       panel.add(new JScrollPane(tree));
 81.       panel.add(new JScrollPane(textArea));
 82.
 83.       add(panel, BorderLayout.CENTER);
 84.
 85.       addTextField();
 86.    }
 87.
 88.    /**
 89.     * Add the text field and "Add" button to add a new class.
 90.     */
 91.    public void addTextField()
 92.    {
 93.       JPanel panel = new JPanel();
 94.
 95.       ActionListener addListener = new ActionListener()
 96.          {
 97.             public void actionPerformed(ActionEvent event)
 98.             {
 99.                // add the class whose name is in the text field
100.                try
101.                {
102.                   String text = textField.getText();
103.                   addClass(Class.forName(text)); // clear text field to indicate success
104.                   textField.setText("");
105.                }
106.                catch (ClassNotFoundException e)
107.                {
108.                   JOptionPane.showMessageDialog(null, "Class not found");
109.                }
110.             }
111.          };
112.
113.       // new class names are typed into this text field
114.       textField = new JTextField(20);
115.       textField.addActionListener(addListener);
116.       panel.add(textField);
117.
118.       JButton addButton = new JButton("Add");
119.       addButton.addActionListener(addListener);
120.       panel.add(addButton);
121.
122.       add(panel, BorderLayout.SOUTH);
123.    }
124.
125.    /**
126.     * Finds an object in the tree.
127.     * @param obj the object to find
128.     * @return the node containing the object or null if the object is not present in the tree
129.     */
130.    @SuppressWarnings("unchecked")
131.    public DefaultMutableTreeNode findUserObject(Object obj)
132.    {
133.       // find the node containing a user object
134.       Enumeration<TreeNode> e = (Enumeration<TreeNode>) root.breadthFirstEnumeration();
135.       while (e.hasMoreElements())
136.       {
137.          DefaultMutableTreeNode node = (DefaultMutableTreeNode) e.nextElement();
138.          if (node.getUserObject().equals(obj)) return node;
139.       }
140.       return null;
141.    }
142.
143.    /**
144.     * Adds a new class and any parent classes that aren't yet part of the tree
145.     * @param c the class to add
146.     * @return the newly added node.
147.     */
148.    public DefaultMutableTreeNode addClass(Class<?> c)
149.    {
150.       // add a new class to the tree
151.
152.       // skip non-class types
153.       if (c.isInterface() || c.isPrimitive()) return null;
154.
155.       // if the class is already in the tree, return its node
156.       DefaultMutableTreeNode node = findUserObject(c);
157.       if (node != null) return node;
158.
159.       // class isn't present--first add class parent recursively
160.
161.       Class<?> s = c.getSuperclass();
162.
163.       DefaultMutableTreeNode parent;
164.       if (s == null) parent = root;
165.       else parent = addClass(s);
166.
167.       // add the class as a child to the parent
168.       DefaultMutableTreeNode newNode = new DefaultMutableTreeNode(c);
169.       model.insertNodeInto(newNode, parent, parent.getChildCount());
170.
171.       // make node visible
172.       TreePath path = new TreePath(model.getPathToRoot(newNode));
173.       tree.makeVisible(path);
174.
175.       return newNode;
176.    }
177.
178.    /**
179.     * Returns a description of the fields of a class.
180.     * @param the class to be described
181.     * @return a string containing all field types and names
182.     */
183.    public static String getFieldDescription(Class<?> c)
184.    {
185.       // use reflection to find types and names of fields
186.       StringBuilder r = new StringBuilder();
187.       Field[] fields = c.getDeclaredFields();
188.       for (int i = 0; i < fields.length; i++)
189.       {
190.          Field f = fields[i];
191.          if ((f.getModifiers() & Modifier.STATIC) != 0) r.append("static ");
192.          r.append(f.getType().getName());
193.          r.append(" ");
194.          r.append(f.getName());
195.          r.append("
");
196.       }
197.       return r.toString();
198.    }
199.
200.    private DefaultMutableTreeNode root;
201.    private DefaultTreeModel model;
202.    private JTree tree;
203.    private JTextField textField;
204.    private JTextArea textArea;
205.    private static final int DEFAULT_WIDTH = 400;
206.    private static final int DEFAULT_HEIGHT = 300;
207. }
208.
209. /**
210.  * This class renders a class name either in plain or italic. Abstract classes are italic.
211.  */
212. class ClassNameTreeCellRenderer extends DefaultTreeCellRenderer
213. {
214.    public Component getTreeCellRendererComponent(JTree tree, Object value, boolean selected,
215.          boolean expanded, boolean leaf, int row, boolean hasFocus)
216.    {
217.       super.getTreeCellRendererComponent(tree, value, selected, expanded, leaf,
218.                                          row, hasFocus);
219.       // get the user object
220.       DefaultMutableTreeNode node = (DefaultMutableTreeNode) value;
221.       Class<?> c = (Class<?>) node.getUserObject();
222.
223.       // the first time, derive italic font from plain font
224.       if (plainFont == null)
225.       {
226.          plainFont = getFont();
227.          // the tree cell renderer is sometimes called with a label that has a null font
228.          if (plainFont != null) italicFont = plainFont.deriveFont(Font.ITALIC);
229.       }
230.
231.       // set font to italic if the class is abstract, plain otherwise
232.       if ((c.getModifiers() & Modifier.ABSTRACT) == 0) setFont(plainFont);
233.       else setFont(italicFont);
234.       return this;
235.    }
236.
237.    private Font plainFont = null;
238.    private Font italicFont = null;
239. }
In the final example, we implement a program that inspects the contents of an object, just like a debugger does (see Figure 6-34).
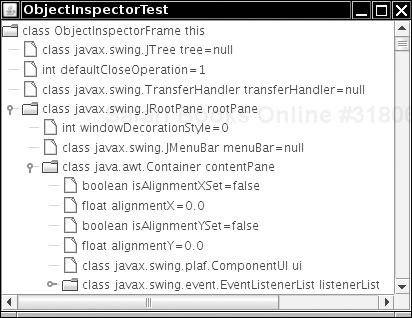
Before going further, compile and run the example program. Each node corresponds to an instance field. If the field is an object, expand it to see its instance fields. The program inspects the contents of the frame window. If you poke around a few of the instance fields, you should be able to find some familiar classes. You’ll also gain some respect for how complex the Swing user interface components are under the hood.
What’s remarkable about the program is that the tree does not use the DefaultTreeModel. If you already have data that are hierarchically organized, you might not want to build a duplicate tree and worry about keeping both trees synchronized. That is the situation in our case—the inspected objects are already linked to each other through the object references, so there is no need to replicate the linking structure.
The TreeModel interface has only a handful of methods. The first group of methods enables the JTree to find the tree nodes by first getting the root, then the children. The JTree class calls these methods only when the user actually expands a node.
Object getRoot()
int getChildCount(Object parent)
Object getChild(Object parent, int index)
This example shows why the TreeModel interface, like the JTree class itself, does not need an explicit notion of nodes. The root and its children can be any objects. The TreeModel is responsible for telling the JTree how they are connected.
The next method of the TreeModel interface is the reverse of getChild:
int getIndexOfChild(Object parent, Object child)
Actually, this method can be implemented in terms of the first three—see the code in Listing 6-11.
The tree model tells the JTree which nodes should be displayed as leaves:
boolean isLeaf(Object node)
If your code changes the tree model, then the tree needs to be notified so that it can redraw itself. The tree adds itself as a TreeModelListener to the model. Thus, the model must support the usual listener management methods:
void addTreeModelListener(TreeModelListener l)
void removeTreeModelListener(TreeModelListener l)
You can see implementations for these methods in Listing 6-11.
When the model modifies the tree contents, it calls one of the four methods of the TreeModelListener interface:
void treeNodesChanged(TreeModelEvent e)
void treeNodesInserted(TreeModelEvent e)
void treeNodesRemoved(TreeModelEvent e)
void treeStructureChanged(TreeModelEvent e)
The TreeModelEvent object describes the location of the change. The details of assembling a tree model event that describes an insertion or removal event are quite technical. You only need to worry about firing these events if your tree can actually have nodes added and removed. In Listing 6-11, we show you how to fire one event: replacing the root with a new object.
Tip
To simplify the code for event firing, we use the javax.swing.EventListenerList convenience class that collects listeners. See Volume I, Chapter 8 for more information on this class.
Finally, if the user edits a tree node, your model is called with the change:
void valueForPathChanged(TreePath path, Object newValue)
If you don’t allow editing, this method is never called.
If you don’t need to support editing, then constructing a tree model is easily done. Implement the three methods
Object getRoot()
int getChildCount(Object parent)
Object getChild(Object parent, int index)
These methods describe the structure of the tree. Supply routine implementations of the other five methods, as in Listing 6-11. You are then ready to display your tree.
Now let’s turn to the implementation of the example program. Our tree will contain objects of type Variable.
Note
Had we used the DefaultTreeModel, our nodes would have been objects of type DefaultMutableTreeNode with user objects of type Variable.
For example, suppose you inspect the variable
Employee joe;
That variable has a type Employee.class, a name "joe", and a value, the value of the object reference joe. We define a class Variable that describes a variable in a program:
Variable v = new Variable(Employee.class, "joe", joe);
If the type of the variable is a primitive type, you must use an object wrapper for the value.
new Variable(double.class, "salary", new Double(salary));
If the type of the variable is a class, then the variable has fields. Using reflection, we enumerate all fields and collect them in an ArrayList. Because the getFields method of the Class class does not return fields of the superclass, we need to call getFields on all superclasses as well. You can find the code in the Variable constructor. The getFields method of our Variable class returns the array of fields. Finally, the toString method of the Variable class formats the node label. The label always contains the variable type and name. If the variable is not a class, the label also contains the value.
Note
If the type is an array, then we do not display the elements of the array. This would not be difficult to do; we leave it as the proverbial “exercise for the reader.”
Let’s move on to the tree model. The first two methods are simple.
public Object getRoot()
{
   return root;
}

public int getChildCount(Object parent)
{
   return ((Variable) parent).getFields().size();
}
The getChild method returns a new Variable object that describes the field with the given index. The getType and getName method of the Field class yield the field type and name. By using reflection, you can read the field value as f.get(parentValue). That method can throw an IllegalAccessException. However, we made all fields accessible in the Variable constructor, so this won’t happen in practice.
Here is the complete code of the getChild method:
public Object getChild(Object parent, int index)
{
   ArrayList fields = ((Variable) parent).getFields();
   Field f = (Field) fields.get(index);
   Object parentValue = ((Variable) parent).getValue();
   try
   {
      return new Variable(f.getType(), f.getName(), f.get(parentValue));
   }
   catch (IllegalAccessException e)
   {
      return null;
   }
}
These three methods reveal the structure of the object tree to the JTree component. The remaining methods are routine—see the source code in Listing 6-11.
There is one remarkable fact about this tree model: It actually describes an infinite tree. You can verify this by following one of the WeakReference objects. Click on the variable named referent. It leads you right back to the original object. You get an identical subtree, and you can open its WeakReference object again, ad infinitum. Of course, you cannot store an infinite set of nodes. The tree model simply generates the nodes on demand as the user expands the parents.
This example concludes our discussion on trees. We move on to the table component, another complex Swing component. Superficially, trees and tables don’t seem to have much in common, but you will find that they both use the same concepts for data models and cell rendering.
Example 6-11. ObjectInspectorTest.java
  1. import java.awt.*;
  2. import java.lang.reflect.*;
  3. import java.util.*;
  4. import javax.swing.*;
  5. import javax.swing.event.*;
  6. import javax.swing.tree.*;
  7.
  8. /**
  9.  * This program demonstrates how to use a custom tree model. It displays the fields of
 10.  * an object.
 11.  * @version 1.03 2007-08-01
 12.  * @author Cay Horstmann
 13.  */
 14. public class ObjectInspectorTest
 15. {
 16.    public static void main(String[] args)
 17.    {
 18.       EventQueue.invokeLater(new Runnable()
 19.          {
 20.             public void run()
 21.             {
 22.                JFrame frame = new ObjectInspectorFrame();
 23.                frame.setDefaultCloseOperation(JFrame.EXIT_ON_CLOSE);
 24.                frame.setVisible(true);
 25.             }
 26.          });
 27.    }
 28. }
 29.
 30. /**
 31.  * This frame holds the object tree.
 32.  */
 33. class ObjectInspectorFrame extends JFrame
 34. {
 35.    public ObjectInspectorFrame()
 36.    {
 37.       setTitle("ObjectInspectorTest");
 38.       setSize(DEFAULT_WIDTH, DEFAULT_HEIGHT);
 39.
 40.       // we inspect this frame object
 41.
 42.       Variable v = new Variable(getClass(), "this", this);
 43.       ObjectTreeModel model = new ObjectTreeModel();
 44.       model.setRoot(v);
 45.
 46.       // construct and show tree
 47.
 48.       tree = new JTree(model);
 49.       add(new JScrollPane(tree), BorderLayout.CENTER);
 50.    }
 51.
 52.    private JTree tree;
 53.    private static final int DEFAULT_WIDTH = 400;
 54.    private static final int DEFAULT_HEIGHT = 300;
 55. }
 56.
 57. /**
 58.  * This tree model describes the tree structure of a Java object. Children are the objects
 59.  * that are stored in instance variables.
 60.  */
 61. class ObjectTreeModel implements TreeModel
 62. {
 63.    /**
 64.     * Constructs an empty tree.
 65.     */
 66.    public ObjectTreeModel()
 67.    {
 68.       root = null;
 69.    }
 70.
 71.    /**
 72.     * Sets the root to a given variable.
 73.     * @param v the variable that is being described by this tree
 74.     */
 75.    public void setRoot(Variable v)
 76.    {
 77.       Variable oldRoot = v;
 78.       root = v;
 79.       fireTreeStructureChanged(oldRoot);
 80.    }
 81.
 82.    public Object getRoot()
 83.    {
 84.       return root;
 85.    }
 86.
 87.    public int getChildCount(Object parent)
 88.    {
 89.       return ((Variable) parent).getFields().size();
 90.    }
 91.
 92.    public Object getChild(Object parent, int index)
 93.    {
 94.       ArrayList<Field> fields = ((Variable) parent).getFields();
 95.       Field f = (Field) fields.get(index);
 96.       Object parentValue = ((Variable) parent).getValue();
 97.       try
 98.       {
 99.          return new Variable(f.getType(), f.getName(), f.get(parentValue));
100.       }
101.       catch (IllegalAccessException e)
102.       {
103.          return null;
104.       }
105.    }
106.
107.    public int getIndexOfChild(Object parent, Object child)
108.    {
109.       int n = getChildCount(parent);
110.       for (int i = 0; i < n; i++)
111.          if (getChild(parent, i).equals(child)) return i;
112.       return -1;
113.    }
114.
115.    public boolean isLeaf(Object node)
116.    {
117.       return getChildCount(node) == 0;
118.    }
119.
120.    public void valueForPathChanged(TreePath path, Object newValue)
121.    {
122.    }
123.
124.    public void addTreeModelListener(TreeModelListener l)
125.    {
126.       listenerList.add(TreeModelListener.class, l);
127.    }
128.
129.    public void removeTreeModelListener(TreeModelListener l)
130.    {
131.       listenerList.remove(TreeModelListener.class, l);
132.    }
133.
134.    protected void fireTreeStructureChanged(Object oldRoot)
135.    {
136.       TreeModelEvent event = new TreeModelEvent(this, new Object[] { oldRoot });
137.       EventListener[] listeners = listenerList.getListeners(TreeModelListener.class);
138.       for (int i = 0; i < listeners.length; i++)
139.          ((TreeModelListener) listeners[i]).treeStructureChanged(event);
140.    }
141.
142.    private Variable root;
143.    private EventListenerList listenerList = new EventListenerList();
144. }
145.
146. /**
147.  * A variable with a type, name, and value.
148.  */
149. class Variable
150. {
151.    /**
152.     * Construct a variable
153.     * @param aType the type
154.     * @param aName the name
155.     * @param aValue the value
156.     */
157.    public Variable(Class<?> aType, String aName, Object aValue)
158.    {
159.       type = aType;
160.       name = aName;
161.       value = aValue;
162.       fields = new ArrayList<Field>();
163.
164.       // find all fields if we have a class type except we don't expand strings and null values
165.
166.       if (!type.isPrimitive() && !type.isArray() && !type.equals(String.class) && value != null)
167.       {
168.          // get fields from the class and all superclasses
169.          for (Class<?> c = value.getClass(); c != null; c = c.getSuperclass())
170.          {
171.             Field[] fs = c.getDeclaredFields();
172.             AccessibleObject.setAccessible(fs, true);
173.
174.             // get all nonstatic fields
175.             for (Field f : fs)
176.                if ((f.getModifiers() & Modifier.STATIC) == 0) fields.add(f);
177.          }
178.       }
179.    }
180.
181.    /**
182.     * Gets the value of this variable.
183.     * @return the value
184.     */
185.    public Object getValue()
186.    {
187.       return value;
188.    }
189.
190.    /**
191.     * Gets all nonstatic fields of this variable.
192.     * @return an array list of variables describing the fields
193.     */
194.    public ArrayList<Field> getFields()
195.    {
196.       return fields;
197.    }
198.
199.    public String toString()
200.    {
201.       String r = type + " " + name;
202.       if (type.isPrimitive()) r += "=" + value;
203.       else if (type.equals(String.class)) r += "=" + value;
204.       else if (value == null) r += "=null";
205.       return r;
206.    }
207.
208.    private Class<?> type;
209.    private String name;
210.    private Object value;
211.    private ArrayList<Field> fields;
212. }
javax.swing.tree.TreeModel 1.2
returns the root node.
int getChildCount(Object parent)gets the number of children of the
parentnode.Object getChild(Object parent, int index)gets the child node of the
parentnode at the given index.int getIndexOfChild(Object parent, Object child)gets the index of the
childnode in theparentnode, or −1 ifchildis not a child ofparentin this tree model.boolean isLeaf(Object node)returns
trueifnodeis conceptually a leaf of the tree.void addTreeModelListener(TreeModelListener l)void removeTreeModelListener(TreeModelListener l)adds or removes listeners that are notified when the information in the tree model changes.
void valueForPathChanged(TreePath path, Object newValue)is called when a cell editor has modified the value of a node.
Parameters:
pathThe path to the node that has been edited
newValueThe replacement value returned by the editor
Figure 6-35 shows all text components that are included in the Swing library. You already saw the three most commonly used components, JTextField, JPasswordField, and JTextArea, in Volume I, Chapter 9. In the following sections, we introduce the remaining text components. We also discuss the JSpinner component that contains a formatted text field together with tiny “up” and “down” buttons to change its contents.
All text components render and edit data that are stored in a model object of a class implementing the Document interface. The JTextField and JTextArea components use a PlainDocument that simply stores a sequence of lines of plain text without any formatting.
A JEditorPane can show and edit styled text (with fonts, colors, etc.) in a variety of formats, most notably HTML; see the “Displaying HTML with the JEditorPane” section beginning on page 472. The StyledDocument interface describes the additional requirements of styles, fonts, and colors. The HTMLDocument class implements this interface.
The subclass JTextPane of JEditorPane also holds styled text as well as embedded Swing components. We do not cover the very complex JTextPane in this book but instead refer you to the very detailed description in Core Swing: Advanced Programming by Kim Topley. For a typical use of the JTextPane class, have a look at the StylePad demo that is included in the JDK.
Most of the intricacies of the Document interface are of interest only if you implement your own text editor. There is, however, one common use of the interface: for tracking changes.
Sometimes, you want to update a part of your user interface whenever a user edits text, without waiting for the user to click a button. Here is a simple example. We show three text fields for the red, blue, and green component of a color. Whenever the content of the text fields changes, the color should be updated. Figure 6-36 shows the running application of Listing 6-12.
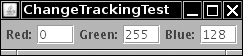
First of all, note that it is not a good idea to monitor keystrokes. Some keystrokes (such as the arrow keys) don’t change the text. More important, the text can be updated by mouse gestures (such as “middle mouse button pasting” in X11). Instead, you should ask the document (and not the text component) to notify you whenever the data have changed, by installing a document listener:
textField.getDocument().addDocumentListener(listener);
When the text has changed, one of the following DocumentListener methods is called:
void insertUpdate(DocumentEvent event)
void removeUpdate(DocumentEvent event)
void changedUpdate(DocumentEvent event)
The first two methods are called when characters have been inserted or removed. The third method is not called at all for text fields. For more complex document types, it would be called when some other change, such as a change in formatting, has occurred. Unfortunately, there is no single callback to tell you that the text has changed—usually you don’t much care how it has changed. There is no adapter class, either. Thus, your document listener must implement all three methods. Here is what we do in our sample program:
DocumentListener listener = new DocumentListener()
   {
      public void insertUpdate(DocumentEvent event) { setColor(); }
      public void removeUpdate(DocumentEvent event) { setColor(); }
      public void changedUpdate(DocumentEvent event) {}
   }
The setColor method uses the getText method to obtain the current user input strings from the text fields and sets the color.
Our program has one limitation. Users can type malformed input, such as "twenty", into the text field or leave a field blank. For now, we catch the NumberFormatException that the parseInt method throws, and we simply don’t update the color when the text field entry is not a number. In the next section, you see how you can prevent the user from entering invalid input in the first place.
Note
Instead of listening to document events, you can also add an action event listener to a text field. The action listener is notified whenever the user presses the ENTER key. We don’t recommend this approach, because users don’t always remember to press ENTER when they are done entering data. If you use an action listener, you should also install a focus listener so that you can track when the user leaves the text field.
Example 6-12. ChangeTrackingTest.java
 1. import java.awt.*;
 2. import javax.swing.*;
 3. import javax.swing.event.*;
 4.
 5. /**
 6.  * @version 1.40 2007-08-05
 7.  * @author Cay Horstmann
 8.  */
 9. public class ChangeTrackingTest
10. {
11.    public static void main(String[] args)
12.    {
13.       EventQueue.invokeLater(new Runnable()
14.          {
15.             public void run()
16.             {
17.                ColorFrame frame = new ColorFrame();
18.                frame.setDefaultCloseOperation(JFrame.EXIT_ON_CLOSE);
19.                frame.setVisible(true);
20.             }
21.          });
22.    }
23. }
24.
25. /**
26.  * A frame with three text fields to set the background color.
27.  */
28. class ColorFrame extends JFrame
29. {
30.    public ColorFrame()
31.    {
32.       setTitle("ChangeTrackingTest");
33.
34.       DocumentListener listener = new DocumentListener()
35.          {
36.             public void insertUpdate(DocumentEvent event)
37.             {
38.                setColor();
39.             }
40.
41.             public void removeUpdate(DocumentEvent event)
42.             {
43.                setColor();
44.             }
45.
46.             public void changedUpdate(DocumentEvent event)
47.             {
48.             }
49.          };
50.
51.       panel = new JPanel();
52.
53.       panel.add(new JLabel("Red:"));
54.       redField = new JTextField("255", 3);
55.       panel.add(redField);
56.       redField.getDocument().addDocumentListener(listener);
57.
58.       panel.add(new JLabel("Green:"));
59.       greenField = new JTextField("255", 3);
60.       panel.add(greenField);
61.       greenField.getDocument().addDocumentListener(listener);
62.
63.       panel.add(new JLabel("Blue:"));
64.       blueField = new JTextField("255", 3);
65.       panel.add(blueField);
66.       blueField.getDocument().addDocumentListener(listener);
67.
68.       add(panel);
69.       pack();
70.   }
71.
72.   /**
73.    * Set the background color to the values stored in the text fields.
74.    */
75.   public void setColor()
76.   {
77.      try
78.      {
79.         int red = Integer.parseInt(redField.getText().trim());
80.         int green = Integer.parseInt(greenField.getText().trim());
81.         int blue = Integer.parseInt(blueField.getText().trim());
82.         panel.setBackground(new Color(red, green, blue));
83.      }
84.      catch (NumberFormatException e)
85.      {
86.         // don't set the color if the input can't be parsed
87.      }
88.   }
89.
90.   private JPanel panel;
91.   private JTextField redField;
92.   private JTextField greenField;
93.   private JTextField blueField;
94. }
javax.swing.text.Document 1.2
int getLength()returns the number of characters currently in the document.
String getText(int offset, int length)returns the text contained within the given portion of the document.
Parameters:
offsetThe start of the text
lengthThe length of the desired string
void addDocumentListener(DocumentListener listener)registers the listener to be notified when the document changes.
javax.swing.event.DocumentEvent 1.2
Document getDocument()gets the document that is the source of the event.
javax.swing.event.DocumentListener 1.2
void changedUpdate(DocumentEvent event)is called whenever an attribute or set of attributes changes.
void insertUpdate(DocumentEvent event)is called whenever an insertion into the document occurs.
void removeUpdate(DocumentEvent event)is called whenever a portion of the document has been removed.
In the last example program, we wanted the program user to type numbers, not arbitrary strings. That is, the user is allowed to enter only digits 0 through 9 and a hyphen (-). The hyphen, if present at all, must be the first symbol of the input string.
On the surface, this input validation task sounds simple. We can install a key listener to the text field and then consume all key events that aren’t digits or a hyphen. Unfortunately, this simple approach, although commonly recommended as a method for input validation, does not work well in practice. First, not every combination of the valid input characters is a valid number. For example, --3 and 3-3 aren’t valid, even though they are made up from valid input characters. But, more important, there are other ways of changing the text that don’t involve typing character keys. Depending on the look and feel, certain key combinations can be used to cut, copy, and paste text. For example, in the Metal look and feel, the CTRL+V key combination pastes the content of the paste buffer into the text field. That is, we also need to monitor that the user doesn’t paste in an invalid character. Clearly, trying to filter keystrokes to ensure that the content of the text field is always valid begins to look like a real chore. This is certainly not something that an application programmer should have to worry about.
Perhaps surprisingly, before Java SE 1.4, there were no components for entering numeric values. Starting with the first edition of Core Java, we supplied an implementation for an IntTextField, a text field for entering a properly formatted integer. In every new edition, we changed the implementation to take whatever limited advantage we could from the various half-baked validation schemes that were added to each version of Java. Finally, in Java SE 1.4, the Swing designers faced the issues head-on and supplied a versatile JFormattedTextField class that can be used not just for numeric input, but also for dates and for even more esoteric formatted values such as IP addresses.
Let’s get started with an easy case: a text field for integer input.
JFormattedTextField intField = new JFormattedTextField(NumberFormat.getIntegerInstance());
The NumberFormat.getIntegerInstance returns a formatter object that formats integers, using the current locale. In the U.S. locale, commas are used as decimal separators, allowing users to enter values such as 1,729. Chapter 5 explains in detail how you can select other locales.
As with any text field, you can set the number of columns:
intField.setColumns(6);
You can set a default value with the setValue method. That method takes an Object parameter, so you’ll need to wrap the default int value in an Integer object:
intField.setValue(new Integer(100));
Typically, users will supply inputs in multiple text fields and then click a button to read all values. When the button is clicked, you can get the user-supplied value with the getValue method. That method returns an Object result, and you need to cast it into the appropriate type. The JFormattedTextField returns an object of type Long if the user edited the value. However, if the user made no changes, the original Integer object is returned. Therefore, you should cast the return value to the common superclass Number:
Number value = (Number) intField.getValue();
int v = value.intValue();
The formatted text field is not very interesting until you consider what happens when a user provides illegal input. That is the topic of the next section.
Consider what happens when a user supplies input to a text field. The user types input and eventually decides to leave the field, perhaps by clicking on another component with the mouse. Then the text field loses focus. The I-beam cursor is no longer visible in the text field, and keystrokes are directed toward a different component.
When the formatted text field loses focus, the formatter looks at the text string that the user produced. If the formatter knows how to convert the text string to an object, the text is valid. Otherwise it is invalid. You can use the isEditValid method to check whether the current content of the text field is valid.
The default behavior on loss of focus is called “commit or revert.” If the text string is valid, it is committed. The formatter converts it to an object. That object becomes the current value of the field (that is, the return value of the getValue method that you saw in the preceding section). The value is then converted back to a string, which becomes the text string that is visible in the field. For example, the integer formatter recognizes the input 1729 as valid, sets the current value to new Long(1729), and then converts it back into a string with a decimal comma: 1,729.
Conversely, if the text string is invalid, then the current value is not changed and the text field reverts to the string that represents the old value. For example, if the user enters a bad value, such as x1, then the old value is restored when the text field loses focus.
Note
The integer formatter regards a text string as valid if it starts with an integer. For example, 1729x is a valid string. It is converted to the number 1729, which is then formatted as the string 1,729.
You can set other behaviors with the setFocusLostBehavior method. The “commit” behavior is subtly different from the default. If the text string is invalid, then both the text string and the field value stay unchanged—they are now out of sync. The “persist” behavior is even more conservative. Even if the text string is valid, neither the text field nor the current value are changed. You would need to call commitEdit, setValue, or setText to bring them back in sync. Finally, there is a “revert” behavior that doesn’t ever seem to be useful. Whenever focus is lost, the user input is disregarded, and the text string reverts to the old value.
Note
Generally, the “commit or revert” default behavior is reasonable. There is just one potential problem. Suppose a dialog box contains a text field for an integer value. A user enters a string " 1729", with a leading space and then clicks the OK button. The leading space makes the number invalid, and the field value reverts to the old value. The action listener of the OK button retrieves the field value and closes the dialog box. The user never knows that the new value has been rejected. In this situation, it is appropriate to select the “commit” behavior and have the OK button listener check that all field edits are valid before closing the dialog box.
The basic functionality of formatted text fields is straightforward and sufficient for most uses. However, you can add a couple of refinements. Perhaps you want to prevent the user from entering nondigits altogether. You achieve that behavior with a document filter. Recall that in the model-view-controller architecture, the controller translates input events into commands that modify the underlying document of the text field; that is, the text string that is stored in a PlainDocument object. For example, whenever the controller processes a command that causes text to be inserted into the document, it calls the “insert string” command. The string to be inserted can be either a single character or the content of the paste buffer. A document filter can intercept this command and modify the string or cancel the insertion altogether. Here is the code for the insertString method of a filter that analyzes the string to be inserted and inserts only the characters that are digits or a − sign. (The code handles supplementary Unicode characters, as explained in Chapter 3. See Chapter 12 for the StringBuilder class.)
public void insertString(FilterBypass fb, int offset, String string, AttributeSet attr)
   throws BadLocationException
{
   StringBuilder builder = new StringBuilder(string);
   for (int i = builder.length() - 1; i >= 0; i--)
   {
      int cp = builder.codePointAt(i);
      if (!Character.isDigit(cp) && cp != '-')
      {
         builder.deleteCharAt(i);
         if (Character.isSupplementaryCodePoint(cp))
         {
            i--;
            builder.deleteCharAt(i);
         }
      }
   }
   super.insertString(fb, offset, builder.toString(), attr);
}
You should also override the replace method of the DocumentFilter class—it is called when text is selected and then replaced. The implementation of the replace method is straightforward—see Listing 6-13.
Now you need to install the document filter. Unfortunately, there is no straightforward method to do that. You need to override the getDocumentFilter method of a formatter class, and pass an object of that formatter class to the JFormattedTextField. The integer text field uses an InternationalFormatter that is initialized with NumberFormat.getIntegerInstance(). Here is how you install a formatter to yield the desired filter:
JFormattedTextField intField = new JFormattedTextField(new
      InternationalFormatter(NumberFormat.getIntegerInstance())
      {
         protected DocumentFilter getDocumentFilter()
         {
            return filter;
         }
         private DocumentFilter filter = new IntFilter();
      });
Note
The Java SE documentation states that the DocumentFilter class was invented to avoid subclassing. Until Java SE 1.3, filtering in a text field was achieved by extending the PlainDocument class and overriding the insertString and replace methods. Now the PlainDocument class has a pluggable filter instead. That is a splendid improvement. It would have been even more splendid if the filter had also been made pluggable in the formatter class. Alas, it was not, and we must subclass the formatter.
Try out the FormatTest example program at the end of this section. The third text field has a filter installed. You can insert only digits or the minus (-) character. Note that you can still enter invalid strings such as "1-2-3". In general, it is impossible to avoid all invalid strings through filtering. For example, the string "-" is invalid, but a filter can’t reject it because it is a prefix of a legal string "-1". Even though filters can’t give perfect protection, it makes sense to use them to reject inputs that are obviously invalid.
There is another potentially useful mechanism to alert users to invalid inputs. You can attach a verifier to any JComponent. If the component loses focus, then the verifier is queried. If the verifier reports the content of the component to be invalid, the component immediately regains focus. The user is thus forced to fix the content before supplying other inputs.
A verifier must extend the abstract InputVerifier class and define a verify method. It is particularly easy to define a verifier that checks formatted text fields. The isEditValid method of the JFormattedTextField class calls the formatter and returns true if the formatter can turn the text string into an object. Here is the verifier:
class FormattedTextFieldVerifier extends InputVerifier
{
   public boolean verify(JComponent component)
   {
      JFormattedTextField field = (JFormattedTextField) component;
      return field.isEditValid();
   }
}
You can attach it to any JFormattedTextField:
intField.setInputVerifier(new FormattedTextFieldVerifier());
However, a verifier is not entirely foolproof. If you click on a button, then the button notifies its action listeners before an invalid component regains focus. The action listeners can then get an invalid result from the component that failed verification. There is a reason for this behavior: Users might want to click a Cancel button without first having to fix an invalid input.
The fourth text field in the example program has a verifier attached. Try entering an invalid number (such as x1729) and press the TAB key or click with the mouse on another text field. Note that the field immediately regains focus. However, if you click the OK button, the action listener calls getValue, which reports the last good value.
Besides the integer formatter, the JFormattedTextField supports several other formatters. The NumberFormat class has static methods
getNumberInstance
getCurrencyInstance
getPercentInstance
that yield formatters of floating-point numbers, currency values, and percentages. For example, you can obtain a text field for the input of currency values by calling
JFormattedTextField currencyField = new JFormattedTextField(NumberFormat.getCurrencyInstance());
To edit dates and times, call one of the static methods of the DateFormat class:
getDateInstance
getTimeInstance
getDateTimeInstance
For example,
JFormattedTextField dateField = new JFormattedTextField(DateFormat.getDateInstance());
This field edits a date in the default or “medium” format such as
Aug 5, 2007
You can instead choose a “short” format such as
8/5/07
by calling
DateFormat.getDateInstance(DateFormat.SHORT)
Note
By default, the date format is “lenient.” That is, an invalid date such as February 31, 2002, is rolled over to the next valid date, March 3, 2002. That behavior might be surprising to your users. In that case, call setLenient(false) on the DateFormat object.
The DefaultFormatter can format objects of any class that has a constructor with a string parameter and a matching toString method. For example, the URL class has a URL(String) constructor that can be used to construct a URL from a string, such as
URL url = new URL("http://java.sun.com");Therefore, you can use the DefaultFormatter to format URL objects. The formatter calls toString on the field value to initialize the field text. When the field loses focus, the formatter constructs a new object of the same class as the current value, using the constructor with a String parameter. If that constructor throws an exception, then the edit is not valid. You can try that out in the example program by entering a URL that does not start with a prefix such as "http:".
Note
By default, the DefaultFormatter is in overwrite mode. That is different from the other formatters and not very useful. Call setOverwriteMode(false) to turn off overwrite mode.
Finally, the MaskFormatter is useful for fixed-size patterns that contain some constant and some variable characters. For example, Social Security numbers (such as 078-05-1120) can be formatted with a
new MaskFormatter("###-##-####")The # symbol denotes a single digit. Table 6-3 shows the symbols that you can use in a mask formatter.
You can restrict the characters that can be typed into the field by calling one of the methods of the MaskFormatter class:
setValidCharacters
setInvalidCharacters
For example, to read in a letter grade (such as A+ or F), you could use
MaskFormatter formatter = new MaskFormatter("U*");
formatter.setValidCharacters("ABCDF+- ");
However, there is no way of specifying that the second character cannot be a letter.
Note that the string that is formatted by the mask formatter has exactly the same length as the mask. If the user erases characters during editing, then they are replaced with the placeholder character. The default placeholder character is a space, but you can change it with the setPlaceholderCharacter method, for example,
formatter.setPlaceholderCharacter('0'),By default, a mask formatter is in overtype mode, which is quite intuitive—try it out in the example program. Also note that the caret position jumps over the fixed characters in the mask.
The mask formatter is very effective for rigid patterns such as Social Security numbers or American telephone numbers. However, note that no variation at all is permitted in the mask pattern. For example, you cannot use a mask formatter for international telephone numbers that have a variable number of digits.
If none of the standard formatters is appropriate, it is fairly easy to define your own formatter. Consider 4-byte IP addresses such as
130.65.86.66
You can’t use a MaskFormatter because each byte might be represented by one, two, or three digits. Also, we want to check in the formatter that each byte’s value is at most 255.
To define your own formatter, extend the DefaultFormatter class and override the methods
String valueToString(Object value)
Object stringToValue(String text)
The first method turns the field value into the string that is displayed in the text field. The second method parses the text that the user typed and turns it back into an object. If either method detects an error, it should throw a ParseException.
In our example program, we store an IP address in a byte[] array of length 4. The valueToString method forms a string that separates the bytes with periods. Note that byte values are signed quantities between −128 and 127. (For example, in an IP address 130.65.86.66, the first octet is actually the byte with value −126.) To turn negative byte values into unsigned integer values, you add 256.
public String valueToString(Object value) throws ParseException
{
   if (!(value instanceof byte[]))
      throw new ParseException("Not a byte[]", 0);
   byte[] a = (byte[]) value;
   if (a.length != 4)
       throw new ParseException("Length != 4", 0);
   StringBuilder builder = new StringBuilder();
   for (int i = 0; i < 4; i++)
   {
      int b = a[i];
      if (b < 0) b += 256;
      builder.append(String.valueOf(b));
      if (i < 3) builder.append('.'),
   }
   return builder.toString();
}
Conversely, the stringToValue method parses the string and produces a byte[] object if the string is valid. If not, it throws a ParseException.
public Object stringToValue(String text) throws ParseException
{
   StringTokenizer tokenizer = new StringTokenizer(text, ".");
   byte[] a = new byte[4];
   for (int i = 0; i < 4; i++)
   {
      int b = 0;
      try
      {
         b = Integer.parseInt(tokenizer.nextToken());
      }
      catch (NumberFormatException e)
      {
         throw new ParseException("Not an integer", 0);
      }
      if (b < 0 || b >= 256)
         throw new ParseException("Byte out of range", 0);
      a[i] = (byte) b;
   }
   return a;
}
Try out the IP address field in the sample program. If you enter an invalid address, the field reverts to the last valid address.
The program in Listing 6-13 shows various formatted text fields in action (see Figure 6-37). Click the Ok button to retrieve the current values from the fields.
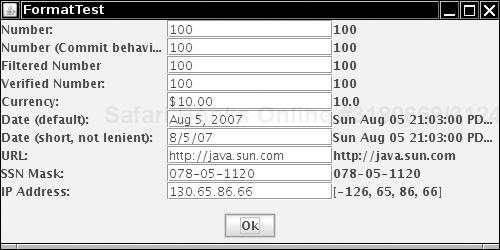
Note
The “Swing Connection” online newsletter has a short article describing a formatter that matches any regular expression. See http://java.sun.com/products/jfc/tsc/articles/reftf/.
Example 6-13. FormatTest.java
  1. import java.awt.*;
  2. import java.awt.event.*;
  3. import java.net.*;
  4. import java.text.*;
  5. import java.util.*;
  6. import javax.swing.*;
  7. import javax.swing.text.*;
  8.
  9. /**
 10.  * A program to test formatted text fields
 11.  * @version 1.02 2007-06-12
 12.  * @author Cay Horstmann
 13.  */
 14. public class FormatTest
 15. {
 16.    public static void main(String[] args)
 17.    {
 18.       EventQueue.invokeLater(new Runnable()
 19.          {
 20.             public void run()
 21.             {
 22.                FormatTestFrame frame = new FormatTestFrame();
 23.                frame.setDefaultCloseOperation(JFrame.EXIT_ON_CLOSE);
 24.                frame.setVisible(true);
 25.             }
 26.          });
 27.    }
 28. }
 29.
 30. /**
 31.  * A frame with a collection of formatted text fields and a button that displays the
 32.  * field values.
 33.  */
 34. class FormatTestFrame extends JFrame
 35. {
 36.    public FormatTestFrame()
 37.    {
 38.       setTitle("FormatTest");
 39.       setSize(WIDTH, HEIGHT);
 40.
 41.       JPanel buttonPanel = new JPanel();
 42.       okButton = new JButton("Ok");
 43.       buttonPanel.add(okButton);
 44.       add(buttonPanel, BorderLayout.SOUTH);
 45.
 46.       mainPanel = new JPanel();
 47.       mainPanel.setLayout(new GridLayout(0, 3));
 48.       add(mainPanel, BorderLayout.CENTER);
 49.
 50.       JFormattedTextField intField =
 51.          new JFormattedTextField(NumberFormat.getIntegerInstance());
 52.       intField.setValue(new Integer(100));
 53.       addRow("Number:", intField);
 54.
 55.       JFormattedTextField intField2 =
 56.          new JFormattedTextField(NumberFormat.getIntegerInstance());
 57.       intField2.setValue(new Integer(100));
 58.       intField2.setFocusLostBehavior(JFormattedTextField.COMMIT);
 59.       addRow("Number (Commit behavior):", intField2);
 60.
 61.       JFormattedTextField intField3 = new JFormattedTextField(new InternationalFormatter(
 62.             NumberFormat.getIntegerInstance())
 63.          {
 64.             protected DocumentFilter getDocumentFilter()
 65.             {
 66.                return filter;
 67.             }
 68.
 69.             private DocumentFilter filter = new IntFilter();
 70.          });
 71.       intField3.setValue(new Integer(100));
 72.       addRow("Filtered Number", intField3);
 73.
 74.       JFormattedTextField intField4 =
 75.          new JFormattedTextField(NumberFormat.getIntegerInstance());
 76.       intField4.setValue(new Integer(100));
 77.       intField4.setInputVerifier(new FormattedTextFieldVerifier());
 78.       addRow("Verified Number:", intField4);
 79.
 80.       JFormattedTextField currencyField = new JFormattedTextField(NumberFormat
 81.             .getCurrencyInstance());
 82.       currencyField.setValue(new Double(10));
 83.       addRow("Currency:", currencyField);
 84.
 85.       JFormattedTextField dateField = new JFormattedTextField(DateFormat.getDateInstance());
 86.       dateField.setValue(new Date());
 87.       addRow("Date (default):", dateField);
 88.
 89.       DateFormat format = DateFormat.getDateInstance(DateFormat.SHORT);
 90.       format.setLenient(false);
 91.       JFormattedTextField dateField2 = new JFormattedTextField(format);
 92.       dateField2.setValue(new Date());
 93.       addRow("Date (short, not lenient):", dateField2);
 94.
 95.       try
 96.       {
 97.          DefaultFormatter formatter = new DefaultFormatter();
 98.          formatter.setOverwriteMode(false);
 99.          JFormattedTextField urlField = new JFormattedTextField(formatter);
100.          urlField.setValue(new URL("http://java.sun.com"));
101.          addRow("URL:", urlField);
102.       }
103.       catch (MalformedURLException e)
104.       {
105.          e.printStackTrace();
106.       }
107.
108.       try
109.       {
110.          MaskFormatter formatter = new MaskFormatter("###-##-####");
111.          formatter.setPlaceholderCharacter('0'),
112.          JFormattedTextField ssnField = new JFormattedTextField(formatter);
113.          ssnField.setValue("078-05-1120");
114.          addRow("SSN Mask:", ssnField);
115.       }
116.       catch (ParseException exception)
117.       {
118.          exception.printStackTrace();
119.       }
120.
121.       JFormattedTextField ipField = new JFormattedTextField(new IPAddressFormatter());
122.       ipField.setValue(new byte[] { (byte) 130, 65, 86, 66 });
123.       addRow("IP Address:", ipField);
124.    }
125.
126.    /**
127.     * Adds a row to the main panel.
128.     * @param labelText the label of the field
129.     * @param field the sample field
130.     */
131.    public void addRow(String labelText, final JFormattedTextField field)
132.    {
133.       mainPanel.add(new JLabel(labelText));
134.       mainPanel.add(field);
135.       final JLabel valueLabel = new JLabel();
136.       mainPanel.add(valueLabel);
137.       okButton.addActionListener(new ActionListener()
138.          {
139.             public void actionPerformed(ActionEvent event)
140.             {
141.                Object value = field.getValue();
142.                Class<?> cl = value.getClass();
143.                String text = null;
144.                if (cl.isArray())
145.                {
146.                   if (cl.getComponentType().isPrimitive())
147.                   {
148.                      try
149.                      {
150.                         text = Arrays.class.getMethod("toString", cl).invoke(null, value)
151.                               .toString();
152.                      }
153.                      catch (Exception ex)
154.                      {
155.                         // ignore reflection exceptions
156.                      }
157.                   }
158.                   else text = Arrays.toString((Object[]) value);
159.                }
160.                else text = value.toString();
161.                valueLabel.setText(text);
162.             }
163.          });
164.    }
165.
166.    public static final int WIDTH = 500;
167.    public static final int HEIGHT = 250;
168.
169.    private JButton okButton;
170.    private JPanel mainPanel;
171. }
172.
173. /**
174.  * A filter that restricts input to digits and a '-' sign.
175.  */
176. class IntFilter extends DocumentFilter
177. {
178.    public void insertString(FilterBypass fb, int offset, String string, AttributeSet attr)
179.          throws BadLocationException
180.    {
181.       StringBuilder builder = new StringBuilder(string);
182.       for (int i = builder.length() - 1; i >= 0; i--)
183.       {
184.          int cp = builder.codePointAt(i);
185.          if (!Character.isDigit(cp) && cp != '-')
186.          {
187.             builder.deleteCharAt(i);
188.             if (Character.isSupplementaryCodePoint(cp))
189.             {
190.                i--;
191.                builder.deleteCharAt(i);
192.             }
193.          }
194.       }
195.       super.insertString(fb, offset, builder.toString(), attr);
196.    }
197.
198.    public void replace(FilterBypass fb, int offset, int length, String string,
199.                        AttributeSet attr)
200.          throws BadLocationException
201.    {
202.       if (string != null)
203.       {
204.          StringBuilder builder = new StringBuilder(string);
205.          for (int i = builder.length() - 1; i >= 0; i--)
206.          {
207.             int cp = builder.codePointAt(i);
208.             if (!Character.isDigit(cp) && cp != '-')
209.             {
210.                builder.deleteCharAt(i);
211.                if (Character.isSupplementaryCodePoint(cp))
212.                {
213.                   i--;
214.                   builder.deleteCharAt(i);
215.                }
216.             }
217.          }
218.          string = builder.toString();
219.       }
220.       super.replace(fb, offset, length, string, attr);
221.    }
222. }
223.
224. /**
225.  * A verifier that checks whether the content of a formatted text field is valid.
226.  */
227. class FormattedTextFieldVerifier extends InputVerifier
228. {
229.    public boolean verify(JComponent component)
230.    {
231.       JFormattedTextField field = (JFormattedTextField) component;
232.       return field.isEditValid();
233.    }
234. }
235.
236. /**
237.  * A formatter for 4-byte IP addresses of the form a.b.c.d
238.  */
239. class IPAddressFormatter extends DefaultFormatter
240. {
241.    public String valueToString(Object value) throws ParseException
242.    {
243.       if (!(value instanceof byte[])) throw new ParseException("Not a byte[]", 0);
244.       byte[] a = (byte[]) value;
245.       if (a.length != 4) throw new ParseException("Length != 4", 0);
246.       StringBuilder builder = new StringBuilder();
247.       for (int i = 0; i < 4; i++)
248.       {
249.          int b = a[i];
250.          if (b < 0) b += 256;
251.          builder.append(String.valueOf(b));
252.          if (i < 3) builder.append('.'),
253.       }
254.       return builder.toString();
255.    }
256.
257.    public Object stringToValue(String text) throws ParseException
258.    {
259.       StringTokenizer tokenizer = new StringTokenizer(text, ".");
260.       byte[] a = new byte[4];
261.       for (int i = 0; i < 4; i++)
262.       {
263.          int b = 0;
264.          if (!tokenizer.hasMoreTokens()) throw new ParseException("Too few bytes", 0);
265.          try
266.          {
267.             b = Integer.parseInt(tokenizer.nextToken());
268.          }
269.          catch (NumberFormatException e)
270.          {
271.             throw new ParseException("Not an integer", 0);
272.          }
273.          if (b < 0 || b >= 256) throw new ParseException("Byte out of range", 0);
274.          a[i] = (byte) b;
275.       }
276.       if (tokenizer.hasMoreTokens()) throw new ParseException("Too many bytes", 0);
277.       return a;
278.    }
279. }
javax.swing.JFormattedTextField 1.4
JFormattedTextField(Format fmt)constructs a text field that uses the specified format.
JFormattedTextField(JFormattedTextField.AbstractFormatter formatter)constructs a text field that uses the specified formatter. Note that
DefaultFormatterandInternationalFormatterare subclasses ofJFormattedTextField.AbstractFormatter.Object getValue()returns the current valid value of the field. Note that this might not correspond to the string that is being edited.
void setValue(Object value)attempts to set the value of the given object. The attempt fails if the formatter cannot convert the object to a string.
void commitEdit()attempts to set the valid value of the field from the edited string. The attempt might fail if the formatter cannot convert the string.
boolean isEditValid()checks whether the edited string represents a valid value.
int getFocusLostBehavior()void setFocusLostBehavior(int behavior)gets or sets the “focus lost” behavior. Legal values for
behaviorare the constantsCOMMIT_OR_REVERT,REVERT,COMMIT, andPERSISTof theJFormattedTextFieldclass.
javax.swing.JFormattedTextField.AbstractFormatter 1.4
abstract String valueToString(Object value)converts a value to an editable string. Throws a
ParseExceptionifvalueis not appropriate for this formatter.abstract Object stringToValue(String s)converts a string to a value. Throws a
ParseExceptionifsis not in the appropriate format.DocumentFilter getDocumentFilter()override this method to provide a document filter that restricts inputs into the text field. A return value of
nullindicates that no filtering is needed.
javax.swing.text.DefaultFormatter 1.3
boolean getOverwriteMode()void setOverwriteMode(boolean mode)gets or sets the overwrite mode. If
modeistrue, then new characters overwrite existing characters when editing text.
javax.swing.text.DocumentFilter 1.4
void insertString(DocumentFilter.FilterBypass bypass, int offset, String text, AttributeSet attrib)is invoked before a string is inserted into a document. You can override the method and modify the string. You can disable insertion by not calling
super.insertStringor by callingbypassmethods to modify the document without filtering.Parameters:
bypassAn object that allows you to execute edit commands that bypass the filter
offsetThe offset at which to insert the text
textThe characters to insert
attribThe formatting attributes of the inserted text
void replace(DocumentFilter.FilterBypass bypass, int offset, int length, String text, AttributeSet attrib)is invoked before a part of a document is replaced with a new string. You can override the method and modify the string. You can disable replacement by not calling
super.replaceor by callingbypassmethods to modify the document without filtering.Parameters:
bypassAn object that allows you to execute edit commands that bypass the filter
offsetThe offset at which to insert the text
lengthThe length of the part to be replaced
textThe characters to insert
attribThe formatting attributes of the inserted text
void remove(DocumentFilter.FilterBypass bypass, int offset, int length)is invoked before a part of a document is removed. Get the document by calling
bypass.getDocument()if you need to analyze the effect of the removal.Parameters:
bypassAn object that allows you to execute edit commands that bypass the filter
offsetThe offset of the part to be removed
lengthThe length of the part to be removed
javax.swing.text.MaskFormatter 1.4
MaskFormatter(String mask)constructs a mask formatter with the given mask. See Table 6-3 on page 453 for the symbols in a mask.
String getValidCharacters()void setValidCharacters(String characters)gets or sets the valid editing characters. Only the characters in the given string are accepted for the variable parts of the mask.
String getInvalidCharacters()void setInvalidCharacters(String characters)gets or sets the invalid editing characters. None of the characters in the given string are accepted as input.
char getPlaceholderCharacter()void setPlaceholderCharacter(char ch)gets or sets the placeholder character that is used for variable characters in the mask that the user has not yet supplied. The default placeholder character is a space.
String getPlaceholder()void setPlaceholder(String s)gets or sets the placeholder string. Its tail end is used if the user has not supplied all variable characters in the mask. If it is
nullor shorter than the mask, then the placeholder character fills remaining inputs.boolean getValueContainsLiteralCharacters()void setValueContainsLiteralCharacters(boolean b)gets or sets the “value contains literal characters” flag. If this flag is
true, then the field value contains the literal (nonvariable) parts of the mask. If it isfalse, then the literal characters are removed. The default istrue.
A JSpinner is a component that contains a text field and two small buttons on the side. When the buttons are clicked, the text field value is incremented or decremented (see Figure 6-38).
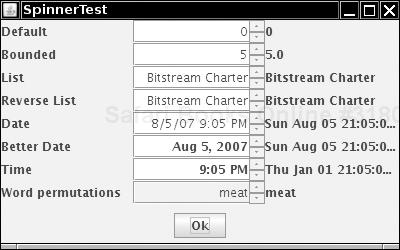
The values in the spinner can be numbers, dates, values from a list, or, in the most general case, any sequence of values for which predecessors and successors can be determined. The JSpinner class defines standard data models for the first three cases. You can define your own data model to describe arbitrary sequences.
By default, a spinner manages an integer, and the buttons increment or decrement it by 1. You can get the current value by calling the getValue method. That method returns an Object. Cast it to an Integer and retrieve the wrapped value.
JSpinner defaultSpinner = new JSpinner();
. . .
int value = (Integer) defaultSpinner.getValue();
You can change the increment to a value other than 1, and you can also supply lower and upper bounds. Here is a spinner with starting value 5, bounded between 0 and 10, and an increment of 0.5:
JSpinner boundedSpinner = new JSpinner(new SpinnerNumberModel(5, 0, 10, 0.5));
There are two SpinnerNumberModel constructors, one with only int parameters and one with double parameters. If any of the parameters is a floating-point number, then the second constructor is used. It sets the spinner value to a Double object.
Spinners aren’t restricted to numeric values. You can have a spinner iterate through any collection of values. Simply pass a SpinnerListModel to the JSpinner constructor. You can construct a SpinnerListModel from an array or a class implementing the List interface (such as an ArrayList). In our sample program, we display a spinner control with all available font names.
String[] fonts = GraphicsEnvironment.getLocalGraphicsEnvironment().getAvailableFontFamilyNames();
JSpinner listSpinner = new JSpinner(new SpinnerListModel(fonts));
However, we found that the direction of the iteration was mildly confusing because it is opposite from the user experience with a combo box. In a combo box, higher values are below lower values, so you would expect the downward arrow to navigate toward higher values. But the spinner increments the array index so that the upward arrow yields higher values. There is no provision for reversing the traversal order in the SpinnerListModel, but an impromptu anonymous subclass yields the desired result:
JSpinner reverseListSpinner = new JSpinner(
   new SpinnerListModel(fonts)
   {
      public Object getNextValue()
      {
         return super.getPreviousValue();

      }
      public Object getPreviousValue()
      {
         return super.getNextValue();
      }
   });
Try both versions and see which you find more intuitive.
Another good use for a spinner is for a date that the user can increment or decrement. You get such a spinner, initialized with today’s date, with the call
JSpinner dateSpinner = new JSpinner(new SpinnerDateModel());
However, if you look carefully at Figure 6-38, you will see that the spinner text shows both date and time, such as
8/05/07 7:23 PM
The time doesn’t make any sense for a date picker. It turns out to be somewhat difficult to make the spinner show just the date. Here is the magic incantation:
JSpinner betterDateSpinner = new JSpinner(new SpinnerDateModel());
String pattern = ((SimpleDateFormat) DateFormat.getDateInstance()).toPattern();
betterDateSpinner.setEditor(new JSpinner.DateEditor(betterDateSpinner, pattern));
Using the same approach, you can also make a time picker.
JSpinner timeSpinner = new JSpinner(new SpinnerDateModel());
pattern = ((SimpleDateFormat) DateFormat.getTimeInstance(DateFormat.SHORT)).toPattern();
timeSpinner.setEditor(new JSpinner.DateEditor(timeSpinner, pattern));
You can display arbitrary sequences in a spinner by defining your own spinner model. In our sample program, we have a spinner that iterates through all permutations of the string “meat”. You can get to “mate”, “meta”, “team”, and another 20 permutations by clicking the spinner buttons.
When you define your own model, you should extend the AbstractSpinnerModel class and define the following four methods:
Object getValue()
void setValue(Object value)
Object getNextValue()
Object getPreviousValue()
The getValue method returns the value stored by the model. The setValue method sets a new value. It should throw an IllegalArgumentException if the new value is not appropriate.
Caution
The setValue method must call the fireStateChanged method after setting the new value. Otherwise, the spinner field won’t be updated.
The getNextValue and getPreviousValue methods return the values that should come after or before the current value, or null if the end of the traversal has been reached.
Caution
The getNextValue and getPreviousValue methods should not change the current value. When a user clicks on the upward arrow of the spinner, the getNextValue method is called. If the return value is not null, it is set by a call to setValue.
In the sample program, we use a standard algorithm to determine the next and previous permutations. The details of the algorithm are not important.
Listing 6-14 shows how to generate the various spinner types. Click the Ok button to see the spinner values.
Example 6-14. SpinnerTest.java
  1. import java.awt.*;
  2. import java.awt.event.*;
  3. import java.text.*;
  4. import java.util.*;
  5. import javax.swing.*;
  6.
  7. /**
  8.    A program to test spinners.
  9. */
 10. public class SpinnerTest
 11. {
 12.    public static void main(String[] args)
 13.    {
 14.       SpinnerFrame frame = new SpinnerFrame();
 15.       frame.setDefaultCloseOperation(JFrame.EXIT_ON_CLOSE);
 16.       frame.setVisible(true);
 17.    }
 18. }
 19.
 20. /**
 21.    A frame with a panel that contains several spinners and
 22.    a button that displays the spinner values.
 23. */
 24. class SpinnerFrame extends JFrame
 25. {
 26.    public SpinnerFrame()
 27.    {
 28.       setTitle("SpinnerTest");
 29.       setSize(DEFAULT_WIDTH, DEFAULT_HEIGHT);
 30.       JPanel buttonPanel = new JPanel();
 31.       okButton = new JButton("Ok");
 32.       buttonPanel.add(okButton);
 33.       add(buttonPanel, BorderLayout.SOUTH);
 34.
 35.       mainPanel = new JPanel();
 36.       mainPanel.setLayout(new GridLayout(0, 3));
 37.       add(mainPanel, BorderLayout.CENTER);
 38.
 39.       JSpinner defaultSpinner = new JSpinner();
 40.       addRow("Default", defaultSpinner);
 41.
 42.       JSpinner boundedSpinner = new JSpinner(new SpinnerNumberModel(5, 0, 10, 0.5));
 43.       addRow("Bounded", boundedSpinner);
 44.
 45.       String[] fonts = GraphicsEnvironment
 46.          .getLocalGraphicsEnvironment()
 47.          .getAvailableFontFamilyNames();
 48.
 49.       JSpinner listSpinner = new JSpinner(new SpinnerListModel(fonts));
 50.       addRow("List", listSpinner);
 51.
 52.       JSpinner reverseListSpinner = new JSpinner(
 53.          new
 54.             SpinnerListModel(fonts)
 55.             {
 56.                public Object getNextValue()
 57.                {
 58.                   return super.getPreviousValue();
 59.                }
 60.                public Object getPreviousValue()
 61.                {
 62.                   return super.getNextValue();
 63.                }
 64.             });
 65.       addRow("Reverse List", reverseListSpinner);
 66.
 67.       JSpinner dateSpinner = new JSpinner(new SpinnerDateModel());
 68.       addRow("Date", dateSpinner);
 69.
 70.       JSpinner betterDateSpinner = new JSpinner(new SpinnerDateModel());
 71.       String pattern = ((SimpleDateFormat) DateFormat.getDateInstance()).toPattern();
 72.       betterDateSpinner.setEditor(new JSpinner.DateEditor(betterDateSpinner, pattern));
 73.       addRow("Better Date", betterDateSpinner);
 74.
 75.       JSpinner timeSpinner = new JSpinner(
 76.          new SpinnerDateModel(
 77.             new GregorianCalendar(2000, Calendar.JANUARY, 1, 12, 0, 0).getTime(),
 78.                null, null, Calendar.HOUR));
 79.       addRow("Time", timeSpinner);
 80.
 81.       JSpinner permSpinner = new JSpinner(new PermutationSpinnerModel("meat"));
 82.       addRow("Word permutations", permSpinner);
 83.    }
 84.
 85.    /**
 86.       Adds a row to the main panel.
 87.       @param labelText the label of the spinner
 88.       @param spinner the sample spinner
 89.   */
 90.   public void addRow(String labelText, final JSpinner spinner)
 91.   {
 92.      mainPanel.add(new JLabel(labelText));
 93.      mainPanel.add(spinner);
 94.      final JLabel valueLabel = new JLabel();
 95.      mainPanel.add(valueLabel);
 96.      okButton.addActionListener(new
 97.         ActionListener()
 98.         {
 99.            public void actionPerformed(ActionEvent event)
100.            {
101.               Object value = spinner.getValue();
102.               valueLabel.setText(value.toString());
103.            }
104.         });
105.   }
106.
107.   public static final int DEFAULT_WIDTH = 400;
108.   public static final int DEFAULT_HEIGHT = 250;
109.
110.   private JPanel mainPanel;
111.   private JButton okButton;
112. }
113.
114. /**
115.    A model that dynamically generates word permutations
116. */
117. class PermutationSpinnerModel extends AbstractSpinnerModel
118. {
119.    /**
120.       Constructs the model.
121.       @param w the word to permute
122.    */
123.    public PermutationSpinnerModel(String w)
124.    {
125.       word = w;
126.    }
127.
128.    public Object getValue()
129.    {
130.       return word;
131.    }
132.
133.    public void setValue(Object value)
134.    {
135.       if (!(value instanceof String))
136.          throw new IllegalArgumentException();
137.       word = (String) value;
138.       fireStateChanged();
139.    }
140.
141.    public Object getNextValue()
142.    {
143.       int[] codePoints = toCodePointArray(word);
144.       for (int i = codePoints.length - 1; i > 0; i--)
145.       {
146.          if (codePoints[i - 1] < codePoints[i])
147.          {
148.             int j = codePoints.length - 1;
149.             while (codePoints[i - 1] > codePoints[j]) j--;
150.             swap(codePoints, i - 1, j);
151.             reverse(codePoints, i, codePoints.length - 1);
152.             return new String(codePoints, 0, codePoints.length);
153.          }
154.       }
155.       reverse(codePoints, 0, codePoints.length - 1);
156.       return new String(codePoints, 0, codePoints.length);
157.    }
158.
159.    public Object getPreviousValue()
160.    {
161.       int[] codePoints = toCodePointArray(word);
162.       for (int i = codePoints.length - 1; i > 0; i--)
163.       {
164.          if (codePoints[i - 1] > codePoints[i])
165.          {
166.             int j = codePoints.length - 1;
167.             while (codePoints[i - 1] < codePoints[j]) j--;
168.             swap(codePoints, i - 1, j);
169.             reverse(codePoints, i, codePoints.length - 1);
170.             return new String(codePoints, 0, codePoints.length);
171.          }
172.       }
173.       reverse(codePoints, 0, codePoints.length - 1);
174.       return new String(codePoints, 0, codePoints.length);
175.   }
176.
177.   private static int[] toCodePointArray(String str)
178.   {
179.      int[] codePoints = new int[str.codePointCount(0, str.length())];
180.      for (int i = 0, j = 0; i < str.length(); i++, j++)
181.      {
182.         int cp = str.codePointAt(i);
183.         if (Character.isSupplementaryCodePoint(cp)) i++;
184.         codePoints[j] = cp;
185.      }
186.      return codePoints;
187.   }
188.
189.   private static void swap(int[] a, int i, int j)
190.   {
191.      int temp = a[i];
192.      a[i] = a[j];
193.      a[j] = temp;
194.   }
195.
196.   private static void reverse(int[] a, int i, int j)
197.   {
198.      while (i < j) { swap(a, i, j); i++; j--; }
199.   }
200.
201.   private String word;
202. }
javax.swing.JSpinner 1.4
constructs a spinner that edits an integer with starting value 0, increment 1, and no bounds.
JSpinner(SpinnerModel model)constructs a spinner that uses the given data model.
Object getValue()gets the current value of the spinner.
void setValue(Object value)attempts to set the value of the spinner. Throws an
IllegalArgumentExceptionif the model does not accept the value.void setEditor(JComponent editor)sets the component that is used for editing the spinner value.
javax.swing.SpinnerNumberModel 1.4
SpinnerNumberModel(int initval, int minimum, int maximum, int stepSize)SpinnerNumberModel(double initval, double minimum, double maximum, double stepSize)these constructors yield number models that manage an
IntegerorDoublevalue. Use theMIN_VALUEandMAX_VALUEconstants of theIntegerandDoubleclasses for unbounded values.Parameters:
initvalThe initial value
minimumThe minimum valid value
maximumThe maximum valid value
stepSizeThe increment or decrement of each spin
javax.swing.SpinnerListModel 1.4
SpinnerListModel(Object[] values)SpinnerListModel(List values)these constructors yield models that select a value from among the given values.
javax.swing.SpinnerDateModel 1.4
SpinnerDateModel()constructs a date model with today’s date as the initial value, no lower or upper bounds, and an increment of
Calendar.DAY_OF_MONTH.SpinnerDateModel(Date initval, Comparable minimum, Comparable maximum, int step)Parameters:
initvalThe initial value
minimumThe minimum valid value, or
nullif no lower bound is desiredmaximumThe maximum valid value, or
nullif no upper bound is desiredstepThe date field to increment or decrement of each spin. One of the constants
ERA,YEAR,MONTH,WEEK_OF_YEAR,WEEK_OF_MONTH,DAY_OF_MONTH,DAY_OF_YEAR,DAY_OF_WEEK,DAY_OF_WEEK_IN_MONTH,AM_PM,HOUR,HOUR_OF_DAY,MINUTE,SECOND, orMILLISECONDof theCalendarclass
java.text.SimpleDateFormat 1.1
String toPattern()1.2gets the editing pattern for this date formatter. A typical pattern is
"yyyy-MM-dd". See the Java SE documentation for more details about the pattern.
javax.swing.AbstractSpinnerModel 1.4
Object getValue()gets the current value of the model.
void setValue(Object value)attempts to set a new value for the model. Throws an
IllegalArgumentExceptionif the value is not acceptable. When overriding this method, you should callfireStateChangedafter setting the new value.Object getNextValue()Object getPreviousValue()computes (but does not set) the next or previous value in the sequence that this model defines.
Unlike the text components that we discussed up to this point, the JEditorPane can display and edit styled text, in particular HTML and RTF. (RTF is the “rich text format” that is used by a number of Microsoft applications for document interchange. It is a poorly documented format that doesn’t work well even between Microsoft’s own applications. We do not cover RTF capabilities in this book.)
Frankly, the JEditorPane is not as functional as one would like it to be. The HTML renderer can display simple files, but it chokes at many complex pages that you typically find on the Web. The HTML editor is limited and unstable.
A plausible application for the JEditorPane is to display program help in HTML format. Because you have control over the help files that you provide, you can stay away from features that the JEditorPane does not display well.
Note
For more information on an industrial-strength help system, check out JavaHelp at http://java.sun.com/products/javahelp/index.html.
The program in Listing 6-15 contains an editor pane that shows the contents of an HTML page. Type a URL into the text field. The URL must start with http: or file:. Then, click the Load button. The selected HTML page is displayed in the editor pane (see Figure 6-39).

The hyperlinks are active: If you click a link, the application loads it. The Back button returns to the previous page.
This program is in fact a very simple browser. Of course, it does not have any of the comfort features, such as page caching or bookmark lists, that you expect from a commercial browser. The editor pane does not even display applets!
If you click the Editable checkbox, then the editor pane becomes editable. You can type in text and use the BACKSPACE key to delete text. The component also understands the CTRL+X, CTRL+C, and CTRL+V shortcuts for cut, copy, and paste. However, you would have to do quite a bit of programming to add support for fonts and formatting.
When the component is editable, hyperlinks are not active. Also, with some web pages you can see JavaScript commands, comments, and other tags when edit mode is turned on (see Figure 6-40). The example program lets you investigate the editing feature, but we recommend that you omit that feature in your programs.
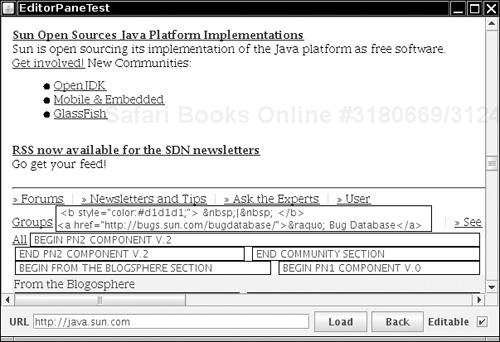
Tip
By default, the JEditorPane is in edit mode. You should call editorPane.setEditable(false) to turn it off.
The features of the editor pane that you saw in the example program are easy to use. You use the setPage method to load a new document. For example,
JEditorPane editorPane = new JEditorPane();
editorPane.setPage(url);
The parameter is either a string or a URL object. The JEditorPane class extends the JTextComponent class. Therefore, you can call the setText method as well—it simply displays plain text.
Tip
The API documentation is unclear about whether setPage loads the new document in a separate thread (which is generally what you want—the JEditorPane is no speed demon). However, you can force loading in a separate thread with the following incantation:
AbstractDocument doc = (AbstractDocument) editorPane.getDocument();
doc.setAsynchronousLoadPriority(0);
To listen to hyperlink clicks, you add a HyperlinkListener. The HyperlinkListener interface has a single method, hyperlinkUpdate, that is called when the user moves over or clicks on a link. The method has a parameter of type HyperlinkEvent.
You need to call the getEventType method to find out what kind of event occurred. There are three possible return values:
HyperlinkEvent.EventType.ACTIVATED
HyperlinkEvent.EventType.ENTERED
HyperlinkEvent.EventType.EXITED
The first value indicates that the user clicked on the hyperlink. In that case, you typically want to open the new link. You can use the second and third values to give some visual feedback, such as a tooltip, when the mouse hovers over the link.
Note
It is a complete mystery why there aren’t three separate methods to handle activation, entry, and exit in the HyperlinkListener interface.
The getURL method of the HyperlinkEvent class returns the URL of the hyperlink. For example, here is how you can install a hyperlink listener that follows the links that a user activates:
editorPane.addHyperlinkListener(new
   HyperlinkListener()
   {
      public void hyperlinkUpdate(HyperlinkEvent event)
      {
         if (event.getEventType() == HyperlinkEvent.EventType.ACTIVATED)
         {
            try
            {
               editorPane.setPage(event.getURL());
            }
            catch (IOException e)
            {
               editorPane.setText("Exception: " + e);
            }
         }
      }
   });
The event handler simply gets the URL and updates the editor pane. The setPage method can throw an IOException. In that case, we display an error message as plain text.
The program in Listing 6-15 shows all the features that you need to put together an HTML help system. Under the hood, the JEditorPane is even more complex than the tree and table components. However, if you don’t need to write a text editor or a renderer of a custom text format, that complexity is hidden from you.
Example 6-15. EditorPaneTest.java
  1. import java.awt.*;
  2. import java.awt.event.*;
  3. import java.io.*;
  4. import java.util.*;
  5. import javax.swing.*;
  6. import javax.swing.event.*;
  7.
  8. /**
  9.  * This program demonstrates how to display HTML documents in an editor pane.
 10.  * @version 1.03 2007-08-01
 11.  * @author Cay Horstmann
 12.  */
 13. public class EditorPaneTest
 14. {
 15.    public static void main(String[] args)
 16.    {
 17.       EventQueue.invokeLater(new Runnable()
 18.          {
 19.             public void run()
 20.             {
 21.                JFrame frame = new EditorPaneFrame();
 22.                frame.setDefaultCloseOperation(JFrame.EXIT_ON_CLOSE);
 23.                frame.setVisible(true);
 24.             }
 25.          });
 26.    }
 27. }
 28.
 29. /**
 30.  * This frame contains an editor pane, a text field and button to enter a URL and load
 31.  * a document, and a Back button to return to a previously loaded document.
 32.  */
 33. class EditorPaneFrame extends JFrame
 34. {
 35.    public EditorPaneFrame()
 36.    {
 37.       setTitle("EditorPaneTest");
 38.       setSize(DEFAULT_WIDTH, DEFAULT_HEIGHT);
 39.
 40.       final Stack<String> urlStack = new Stack<String>();
 41.       final JEditorPane editorPane = new JEditorPane();
 42.       final JTextField url = new JTextField(30);
 43.
 44.       // set up hyperlink listener
 45.
 46.       editorPane.setEditable(false);
 47.       editorPane.addHyperlinkListener(new HyperlinkListener()
 48.          {
 49.             public void hyperlinkUpdate(HyperlinkEvent event)
 50.             {
 51.                if (event.getEventType() == HyperlinkEvent.EventType.ACTIVATED)
 52.                {
 53.                   try
 54.                   {
 55.                      // remember URL for back button
 56.                      urlStack.push(event.getURL().toString());
 57.                      // show URL in text field
 58.                      url.setText(event.getURL().toString());
 59.                      editorPane.setPage(event.getURL());
 60.                   }
 61.                   catch (IOException e)
 62.                   {
 63.                      editorPane.setText("Exception: " + e);
 64.                   }
 65.                }
 66.             }
 67.          });
 68.       // set up checkbox for toggling edit mode
 69.
 70.       final JCheckBox editable = new JCheckBox();
 71.       editable.addActionListener(new ActionListener()
 72.          {
 73.             public void actionPerformed(ActionEvent event)
 74.             {
 75.                editorPane.setEditable(editable.isSelected());
 76.             }
 77.          });
 78.
 79.       // set up load button for loading URL
 80.
 81.       ActionListener listener = new ActionListener()
 82.          {
 83.             public void actionPerformed(ActionEvent event)
 84.             {
 85.                try
 86.                {
 87.                   // remember URL for back button
 88.                   urlStack.push(url.getText());
 89.                   editorPane.setPage(url.getText());
 90.                }
 91.                catch (IOException e)
 92.                {
 93.                   editorPane.setText("Exception: " + e);
 94.                }
 95.             }
 96.          };
 97.
 98.       JButton loadButton = new JButton("Load");
 99.       loadButton.addActionListener(listener);
100.       url.addActionListener(listener);
101.
102.       // set up back button and button action
103.
104.       JButton backButton = new JButton("Back");
105.       backButton.addActionListener(new ActionListener()
106.          {
107.             public void actionPerformed(ActionEvent event)
108.             {
109.                if (urlStack.size() <= 1) return;
110.                try
111.                {
112.                   // get URL from back button
113.                   urlStack.pop();
114.                   // show URL in text field
115.                   String urlString = urlStack.peek();
116.                   url.setText(urlString);
117.                   editorPane.setPage(urlString);
118.                }
119.                catch (IOException e)
120.                {
121.                   editorPane.setText("Exception: " + e);
122.                }
123.             }
124.          });
125.
126.       add(new JScrollPane(editorPane), BorderLayout.CENTER);
127.
128.       // put all control components in a panel
129.
130.       JPanel panel = new JPanel();
131.       panel.add(new JLabel("URL"));
132.       panel.add(url);
133.       panel.add(loadButton);
134.       panel.add(backButton);
135.       panel.add(new JLabel("Editable"));
136.       panel.add(editable);
137.
138.       add(panel, BorderLayout.SOUTH);
139.   }
140.
141.   private static final int DEFAULT_WIDTH = 600;
142.   private static final int DEFAULT_HEIGHT = 400;
143. }
In the following sections, we discuss three classes for indicating the progress of a slow activity. A JProgressBar is a Swing component that indicates progress. A ProgressMonitor is a dialog box that contains a progress bar. A ProgressMonitorInputStream displays a progress monitor dialog box while the stream is read.
A progress bar is a simple component—just a rectangle that is partially filled with color to indicate the progress of an operation. By default, progress is indicated by a string “n%”. You can see a progress bar in the bottom right of Figure 6-41.
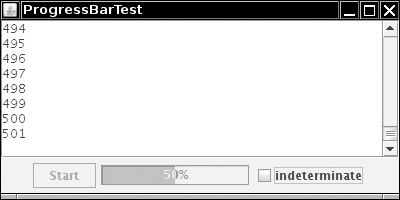
You construct a progress bar much as you construct a slider, by supplying the minimum and maximum value and an optional orientation:
progressBar = new JProgressBar(0, 1000);
progressBar = new JProgressBar(SwingConstants.VERTICAL, 0, 1000);
You can also set the minimum and maximum with the setMinimum and setMaximum methods.
Unlike a slider, the progress bar cannot be adjusted by the user. Your program needs to call setValue to update it.
If you call
progressBar.setStringPainted(true);
the progress bar computes the completion percentage and displays a string “n%”. If you want to show a different string, you can supply it with the setString method:
if (progressBar.getValue() > 900)
   progressBar.setString("Almost Done");
The program in Listing 6-16 shows a progress bar that monitors a simulated time-consuming activity.
The SimulatedActivity class increments a value current ten times per second. When it reaches a target value, the activity finishes. We use the SwingWorker class to implement the activity and update the progress bar in the process method. The SwingWorker invokes the method from the event dispatch thread, so that it is safe to update the progress bar. (See Volume I, Chapter 14 for more information about thread safety in Swing.)
Java SE 1.4 added support for an indeterminate progress bar that shows an animation indicating some kind of progress, without giving an indication of the percentage of completion. That is the kind of progress bar that you see in your browser—it indicates that the browser is waiting for the server and has no idea how long the wait might be. To display the “indeterminate wait” animation, call the setIndeterminate method.
Listing 6-16 shows the full program code.
Example 6-16. ProgressBarTest.java
  1. import java.awt.*;
  2. import java.awt.event.*;
  3. import java.util.List;
  4.
  5. import javax.swing.*;
  6.
  7. /**
  8.  * This program demonstrates the use of a progress bar to monitor the progress of a thread.
  9.  * @version 1.04 2007-08-01
 10.  * @author Cay Horstmann
 11.  */
 12. public class ProgressBarTest
 13. {
 14.    public static void main(String[] args)
 15.    {
 16.       EventQueue.invokeLater(new Runnable()
 17.          {
 18.             public void run()
 19.             {
 20.                JFrame frame = new ProgressBarFrame();
 21.                frame.setDefaultCloseOperation(JFrame.EXIT_ON_CLOSE);
 22.                frame.setVisible(true);
 23.             }
 24.          });
 25.    }
 26. }
 27.
 28. /**
 29.  * A frame that contains a button to launch a simulated activity, a progress bar, and a
 30.  * text area for the activity output.
 31.  */
 32. class ProgressBarFrame extends JFrame
 33. {
 34.    public ProgressBarFrame()
 35.    {
 36.       setTitle("ProgressBarTest");
 37.       setSize(DEFAULT_WIDTH, DEFAULT_HEIGHT);
 38.
 39.       // this text area holds the activity output
 40.       textArea = new JTextArea();
 41.
 42.       // set up panel with button and progress bar
 43.
 44.       final int MAX = 1000;
 45.       JPanel panel = new JPanel();
 46.       startButton = new JButton("Start");
 47.       progressBar = new JProgressBar(0, MAX);
 48.       progressBar.setStringPainted(true);
 49.       panel.add(startButton);
 50.       panel.add(progressBar);
 51.
 52.       checkBox = new JCheckBox("indeterminate");
 53.       checkBox.addActionListener(new ActionListener()
 54.          {
 55.             public void actionPerformed(ActionEvent event)
 56.             {
 57.                progressBar.setIndeterminate(checkBox.isSelected());
 58.                progressBar.setStringPainted(!progressBar.isIndeterminate());
 59.             }
 60.          });
 61.       panel.add(checkBox);
 62.       add(new JScrollPane(textArea), BorderLayout.CENTER);
 63.       add(panel, BorderLayout.SOUTH);
 64.
 65.       // set up the button action
 66.
 67.       startButton.addActionListener(new ActionListener()
 68.          {
 69.             public void actionPerformed(ActionEvent event)
 70.             {
 71.                startButton.setEnabled(false);
 72.                activity = new SimulatedActivity(MAX);
 73.                activity.execute();
 74.             }
 75.          });
 76.    }
 77.
 78.    private JButton startButton;
 79.    private JProgressBar progressBar;
 80.    private JCheckBox checkBox;
 81.    private JTextArea textArea;
 82.    private SimulatedActivity activity;
 83.
 84.    public static final int DEFAULT_WIDTH = 400;
 85.    public static final int DEFAULT_HEIGHT = 200;
 86.
 87.    class SimulatedActivity extends SwingWorker<Void, Integer>
 88.    {
 89.       /**
 90.        * Constructs the simulated activity that increments a counter from 0 to a
 91.        * given target.
 92.        * @param t the target value of the counter.
 93.        */
 94.       public SimulatedActivity(int t)
 95.       {
 96.          current = 0;
 97.          target = t;
 98.       }
 99.
100.       protected Void doInBackground() throws Exception
101.       {
102.          try
103.          {
104.             while (current < target)
105.             {
106.                Thread.sleep(100);
107.                current++;
108.                publish(current);
109.             }
110.          }
111.          catch (InterruptedException e)
112.          {
113.          }
114.          return null;
115.       }
116.
117.       protected void process(List<Integer> chunks)
118.       {
119.          for (Integer chunk : chunks)
120.          {
121.             textArea.append(chunk + "
");
122.             progressBar.setValue(chunk);
123.          }
124.       }
125.
126.       protected void done()
127.       {
128.          startButton.setEnabled(true);
129.       }
130.
131.       private int current;
132.       private int target;
133.    }
134. }
A progress bar is a simple component that can be placed inside a window. In contrast, a ProgressMonitor is a complete dialog box that contains a progress bar (see Figure 6-42). The dialog box contains a Cancel button. If you click it, the monitor dialog box is closed. In addition, your program can query whether the user has canceled the dialog box and terminate the monitored action. (Note that the class name does not start with a “J”.)

You construct a progress monitor by supplying the following:
The parent component over which the dialog box should pop up.
An object (which should be a string, icon, or component) that is displayed on the dialog box.
An optional note to display below the object.
The minimum and maximum values.
However, the progress monitor cannot measure progress or cancel an activity by itself. You still need to periodically set the progress value by calling the setProgress method. (This is the equivalent of the setValue method of the JProgressBar class.) When the monitored activity has concluded, call the close method to dismiss the dialog box. You can reuse the same dialog box by calling start again.
The biggest problem with using a progress monitor dialog box is the handling of cancellation requests. You cannot attach an event handler to the Cancel button. Instead, you need to periodically call the isCanceled method to see if the program user has clicked the Cancel button.
If your worker thread can block indefinitely (for example, when reading input from a network connection), then it cannot monitor the Cancel button. In our sample program, we show you how to use a timer for that purpose. We also make the timer responsible for updating the progress measurement.
If you run the program in Listing 6-17, you can observe an interesting feature of the progress monitor dialog box. The dialog box doesn’t come up immediately. Instead, it waits for a short interval to see if the activity has already been completed or is likely to complete in less time than it would take for the dialog box to appear.
You control the timing as follows. Use the setMillisToDecideToPopup method to set the number of milliseconds to wait between the construction of the dialog object and the decision whether to show the pop-up at all. The default value is 500 milliseconds. The setMillisToPopup is your estimation of the time the dialog box needs to pop up. The Swing designers set this value to a default of 2 seconds. Clearly they were mindful of the fact that Swing dialogs don’t always come up as snappily as we all would like. You should probably not touch this value.
Example 6-17. ProgressMonitorTest.java
  1. import java.awt.*;
  2. import java.awt.event.*;
  3.
  4. import javax.swing.*;
  5.
  6. /**
  7.  * A program to test a progress monitor dialog.
  8.  * @version 1.04 2007-08-01
  9.  * @author Cay Horstmann
 10.  */
 11. public class ProgressMonitorTest
 12. {
 13.    public static void main(String[] args)
 14.    {
 15.       EventQueue.invokeLater(new Runnable()
 16.          {
 17.             public void run()
 18.             {
 19.                JFrame frame = new ProgressMonitorFrame();
 20.                frame.setDefaultCloseOperation(JFrame.EXIT_ON_CLOSE);
 21.                frame.setVisible(true);
 22.             }
 23.          });
 24.    }
 25. }
 26.
 27. /**
 28.  * A frame that contains a button to launch a simulated activity and a text area for the
 29.  * activity output.
 30.  */
 31. class ProgressMonitorFrame extends JFrame
 32. {
 33.    public ProgressMonitorFrame()
 34.    {
 35.       setTitle("ProgressMonitorTest");
 36.       setSize(DEFAULT_WIDTH, DEFAULT_HEIGHT);
 37.
 38.       // this text area holds the activity output
 39.       textArea = new JTextArea();
 40.
 41.       // set up a button panel
 42.       JPanel panel = new JPanel();
 43.       startButton = new JButton("Start");
 44.       panel.add(startButton);
 45.
 46.       add(new JScrollPane(textArea), BorderLayout.CENTER);
 47.       add(panel, BorderLayout.SOUTH);
 48.
 49.       // set up the button action
 50.
 51.       startButton.addActionListener(new ActionListener()
 52.          {
 53.             public void actionPerformed(ActionEvent event)
 54.             {
 55.                startButton.setEnabled(false);
 56.                final int MAX = 1000;
 57.
 58.                // start activity
 59.                activity = new SimulatedActivity(MAX);
 60.                activity.execute();
 61.
 62.                // launch progress dialog
 63.                progressDialog = new ProgressMonitor(ProgressMonitorFrame.this,
 64.                      "Waiting for Simulated Activity", null, 0, MAX);
 65.                cancelMonitor.start();
 66.             }
 67.          });
 68.
 69.       // set up the timer action
 70.
 71.       cancelMonitor = new Timer(500, new ActionListener()
 72.          {
 73.             public void actionPerformed(ActionEvent event)
 74.             {
 75.                if (progressDialog.isCanceled())
 76.                {
 77.                   activity.cancel(true);
 78.                   startButton.setEnabled(true);
 79.                }
 80.                else if (activity.isDone())
 81.                {
 82.                   progressDialog.close();
 83.                   startButton.setEnabled(true);
 84.                }
 85.                else
 86.                {
 87.                   progressDialog.setProgress(activity.getProgress());
 88.                }
 89.             }
 90.          });
 91.    }
 92.
 93.    private Timer cancelMonitor;
 94.    private JButton startButton;
 95.    private ProgressMonitor progressDialog;
 96.    private JTextArea textArea;
 97.    private SimulatedActivity activity;
 98.
 99.    public static final int DEFAULT_WIDTH = 300;
100.    public static final int DEFAULT_HEIGHT = 200;
101.
102.    class SimulatedActivity extends SwingWorker<Void, Integer>
103.    {
104.       /**
105.        * Constructs the simulated activity that increments a counter from 0 to a
106.        * given target.
107.        * @param t the target value of the counter.
108.        */
109.       public SimulatedActivity(int t)
110.       {
111.          current = 0;
112.          target = t;
113.       }
114.
115.       protected Void doInBackground() throws Exception
116.       {
117.          try
118.          {
119.             while (current < target)
120.             {
121.                Thread.sleep(100);
122.                current++;
123.                textArea.append(current + "
");
124.                setProgress(current);
125.             }
126.          }
127.          catch (InterruptedException e)
128.          {
129.          }
130.          return null;
131.       }
132.
133.       private int current;
134.       private int target;
135.    }
136. }
The Swing package contains a useful stream filter, ProgressMonitorInputStream, that automatically pops up a dialog box that monitors how much of the stream has been read.
This filter is extremely easy to use. You sandwich in a ProgressMonitorInputStream between your usual sequence of filtered streams. (See Volume I, Chapter 12 for more information on streams.)
For example, suppose you read text from a file. You start out with a FileInputStream:
FileInputStream in = new FileInputStream(f);
Normally, you would convert in to an InputStreamReader:
InputStreamReader reader = new InputStreamReader(in);
However, to monitor the stream, first turn the file input stream into a stream with a progress monitor:
ProgressMonitorInputStream progressIn = new ProgressMonitorInputStream(parent, caption, in);
You supply the parent component, a caption, and, of course, the stream to monitor. The read method of the progress monitor stream simply passes along the bytes and updates the progress dialog box.
You now go on building your filter sequence:
InputStreamReader reader = new InputStreamReader(progressIn);
That’s all there is to it. When the file is read, the progress monitor automatically pops up (see Figure 6-43). This is a very nice application of stream filtering.
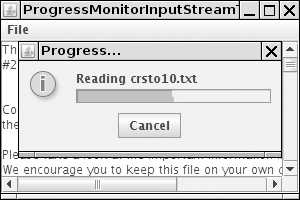
Caution
The progress monitor stream uses the available method of the InputStream class to determine the total number of bytes in the stream. However, the available method only reports the number of bytes in the stream that are available without blocking. Progress monitors work well for files and HTTP URLs because their length is known in advance, but they don’t work with all streams.
The program in Listing 6-18 counts the lines in a file. If you read in a large file (such as “The Count of Monte Cristo” in the gutenberg directory of the companion code), then the progress dialog box pops up.
If the user clicks the Cancel button, the input stream closes. Because the code that processes the input already knows how to deal with the end of input, no change to the programming logic is required to handle cancellation.
Note that the program doesn’t use a very efficient way of filling up the text area. It would be faster to first read the file into a StringBuilder and then set the text of the text area to the string builder contents. However, in this example program, we actually like this slow approach—it gives you more time to admire the progress dialog box.
To avoid flicker, we do not display the text area while it is filling up.
Example 6-18. ProgressMonitorInputStreamTest.java
  1. import java.awt.*;
  2. import java.awt.event.*;
  3. import java.io.*;
  4. import java.util.*;
  5. import javax.swing.*;
  6.
  7. /**
  8.  * A program to test a progress monitor input stream.
  9.  * @version 1.04 2007-08-01
 10.  * @author Cay Horstmann
 11.  */
 12. public class ProgressMonitorInputStreamTest
 13. {
 14.    public static void main(String[] args)
 15.    {
 16.       EventQueue.invokeLater(new Runnable()
 17.          {
 18.             public void run()
 19.             {
 20.                JFrame frame = new TextFrame();
 21.                frame.setDefaultCloseOperation(JFrame.EXIT_ON_CLOSE);
 22.                frame.setVisible(true);
 23.             }
 24.          });
 25.    }
 26. }
 27.
 28. /**
 29.  * A frame with a menu to load a text file and a text area to display its contents. The text
 30.  * area is constructed when the file is loaded and set as the content pane of the frame when
 31.  * the loading is complete. That avoids flicker during loading.
 32.  */
 33. class TextFrame extends JFrame
 34. {
 35.    public TextFrame()
 36.    {
 37.       setTitle("ProgressMonitorInputStreamTest");
 38.       setSize(DEFAULT_WIDTH, DEFAULT_HEIGHT);
 39.
 40.       textArea = new JTextArea();
 41.       add(new JScrollPane(textArea));
 42.
 43.       chooser = new JFileChooser();
 44.       chooser.setCurrentDirectory(new File("."));
 45.
 46.       JMenuBar menuBar = new JMenuBar();
 47.       setJMenuBar(menuBar);
 48.       JMenu fileMenu = new JMenu("File");
 49.       menuBar.add(fileMenu);
 50.       openItem = new JMenuItem("Open");
 51.       openItem.addActionListener(new ActionListener()
 52.          {
 53.             public void actionPerformed(ActionEvent event)
 54.             {
 55.                try
 56.                {
 57.                   openFile();
 58.                }
 59.                catch (IOException exception)
 60.                {
 61.                   exception.printStackTrace();
 62.                }
 63.             }
 64.          });
 65.
 66.       fileMenu.add(openItem);
 67.       exitItem = new JMenuItem("Exit");
 68.       exitItem.addActionListener(new ActionListener()
 69.          {
 70.             public void actionPerformed(ActionEvent event)
 71.             {
 72.                System.exit(0);
 73.             }
 74.          });
 75.       fileMenu.add(exitItem);
 76.    }
 77.
 78.    /**
 79.     * Prompts the user to select a file, loads the file into a text area, and sets it as
 80.     * the content pane of the frame.
 81.     */
 82.    public void openFile() throws IOException
 83.    {
 84.       int r = chooser.showOpenDialog(this);
 85.       if (r != JFileChooser.APPROVE_OPTION) return;
 86.       final File f = chooser.getSelectedFile();
 87.
 88.       // set up stream and reader filter sequence
 89.
 90.       FileInputStream fileIn = new FileInputStream(f);
 91.       ProgressMonitorInputStream progressIn = new ProgressMonitorInputStream(this,
 92.             "Reading " + f.getName(), fileIn);
 93.       final Scanner in = new Scanner(progressIn);
 94.
 95.       textArea.setText("");
 96.
 97.       SwingWorker<Void, Void> worker = new SwingWorker<Void, Void>()
 98.          {
 99.             protected Void doInBackground() throws Exception
100.             {
101.                while (in.hasNextLine())
102.                {
103.                   String line = in.nextLine();
104.                   textArea.append(line);
105.                   textArea.append("
");
106.                }
107.                in.close();
108.                return null;
109.             }
110.          };
111.       worker.execute();
112.    }
113.
114.    private JMenuItem openItem;
115.    private JMenuItem exitItem;
116.    private JTextArea textArea;
117.    private JFileChooser chooser;
118.
119.    public static final int DEFAULT_WIDTH = 300;
120.    public static final int DEFAULT_HEIGHT = 200;
121. }
javax.swing.JProgressBar 1.2
JProgressBar(int direction)JProgressBar(int min, int max)JProgressBar(int direction, int min, int max)constructs a slider with the given direction, minimum, and maximum.
Parameters:
directionOne of
SwingConstants.HORIZONTALorSwingConstants.VERTICAL. The default is horizontalmin,maxThe minimum and maximum for the progress bar values. Defaults are 0 and 100
int getMaximum()void setMinimum(int value)void setMaximum(int value)gets or sets the minimum and maximum values.
int getValue()void setValue(int value)gets or sets the current value.
String getString()void setString(String s)gets or sets the string to be displayed in the progress bar. If the string is
null, then a default string “n%” is displayed.boolean isStringPainted()void setStringPainted(boolean b)gets or sets the “string painted” property. If this property is
true, then a string is painted on top of the progress bar. The default isfalse; no string is painted.boolean isIndeterminate()1.4void setIndeterminate(boolean b)1.4gets or sets the “indeterminate” property. If this property is
true, then the progress bar becomes a block that moves backward and forward, indicating a wait of unknown duration. The default isfalse.
javax.swing.ProgressMonitor 1.2
ProgressMonitor(Component parent, Object message, String note, int min, int max)constructs a progress monitor dialog box.
Parameters:
parentThe parent component over which this dialog box pops up
messageThe message object to display in the dialog box
noteThe optional string to display under the message. If this value is
null, then no space is set aside for the note, and a later call tosetNotehas no effectmin,maxThe minimum and maximum values of the progress bar
void setNote(String note)changes the note text.
void setProgress(int value)sets the progress bar value to the given value.
void close()closes this dialog box.
boolean isCanceled()returns
trueif the user canceled this dialog box.
javax.swing.ProgressMonitorInputStream 1.2
ProgressMonitorInputStream(Component parent, Object message, InputStream in)constructs an input stream filter with an associated progress monitor dialog box.
Parameters:
parentThe parent component over which this dialog box pops up
messageThe message object to display in the dialog box
inThe input stream that is being monitored
We conclude the discussion of advanced Swing features with a presentation of components that help organize other components. These include the split pane, a mechanism for splitting an area into multiple parts with boundaries that can be adjusted, the tabbed pane, which uses tab dividers to allow a user to flip through multiple panels, and the desktop pane, which can be used to implement applications that display multiple internal frames.
Split panes split a component into two parts, with an adjustable boundary in between. Figure 6-44 shows a frame with two split panes. The components in the outer split pane are arranged vertically, with a text area on the bottom and another split pane on the top. That split pane’s components are arranged horizontally, with a list on the left and a label containing an image on the right.
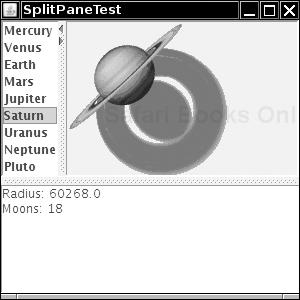
You construct a split pane by specifying the orientation, one of JSplitPane.HORIZONTAL_SPLIT or JSplitPane.VERTICAL_SPLIT, followed by the two components. For example,
JSplitPane innerPane = new JSplitPane(JSplitPane.HORIZONTAL_SPLIT, planetList, planetImage);
That’s all you have to do. If you like, you can add “one-touch expand” icons to the splitter bar. You see those icons in the top pane in Figure 6-44. In the Metal look and feel, they are small triangles. If you click one of them, the splitter moves all the way in the direction to which the triangle is pointing, expanding one of the panes completely.
innerPane.setOneTouchExpandable(true);
The “continuous layout” feature continuously repaints the contents of both components as the user adjusts the splitter. That looks classier, but it can be slow. You turn on that feature with the call
innerPane.setContinuousLayout(true);
In the example program, we left the bottom splitter at the default (no continuous layout). When you drag it, you only move a black outline. When you release the mouse, the components are repainted.
The straightforward program in Listing 6-19 populates a list box with planets. When the user makes a selection, the planet image is displayed to the right and a description is placed in the text area on the bottom. When you run the program, adjust the splitters and try out the one-touch expansion and continuous layout features.
Example 6-19. SplitPaneTest.java
  1. import java.awt.*;
  2.
  3. import javax.swing.*;
  4. import javax.swing.event.*;
  5.
  6. /**
  7.  * This program demonstrates the split pane component organizer.
  8.  * @version 1.03 2007-08-01
  9.  * @author Cay Horstmann
 10.  */
 11. public class SplitPaneTest
 12. {
 13.    public static void main(String[] args)
 14.    {
 15.       EventQueue.invokeLater(new Runnable()
 16.          {
 17.             public void run()
 18.             {
 19.                JFrame frame = new SplitPaneFrame();
 20.                frame.setDefaultCloseOperation(JFrame.EXIT_ON_CLOSE);
 21.                frame.setVisible(true);
 22.             }
 23.          });
 24.    }
 25. }
 26.
 27. /**
 28.  * This frame consists of two nested split panes to demonstrate planet images and data.
 29.  */
 30. class SplitPaneFrame extends JFrame
 31. {
 32.    public SplitPaneFrame()
 33.    {
 34.       setTitle("SplitPaneTest");
 35.       setSize(DEFAULT_WIDTH, DEFAULT_HEIGHT);
 36.
 37.       // set up components for planet names, images, descriptions
 38.
 39.       final JList planetList = new JList(planets);
 40.       final JLabel planetImage = new JLabel();
 41.       final JTextArea planetDescription = new JTextArea();
 42.
 43.       planetList.addListSelectionListener(new ListSelectionListener()
 44.          {
 45.             public void valueChanged(ListSelectionEvent event)
 46.             {
 47.                Planet value = (Planet) planetList.getSelectedValue();
 48.
 49.                // update image and description
 50.
 51.                planetImage.setIcon(value.getImage());
 52.                planetDescription.setText(value.getDescription());
 53.             }
 54.          });
 55.
 56.       // set up split panes
 57.
 58.       JSplitPane innerPane = new JSplitPane(JSplitPane.HORIZONTAL_SPLIT, planetList,
 59.             planetImage);
 60.
 61.       innerPane.setContinuousLayout(true);
 62.       innerPane.setOneTouchExpandable(true);
 63.
 64.       JSplitPane outerPane = new JSplitPane(JSplitPane.VERTICAL_SPLIT, innerPane,
 65.             planetDescription);
 66.
 67.       add(outerPane, BorderLayout.CENTER);
 68.    }
 69.
 70.    private Planet[] planets = { new Planet("Mercury", 2440, 0), new Planet("Venus", 6052, 0),
 71.          new Planet("Earth", 6378, 1), new Planet("Mars", 3397, 2),
 72.          new Planet("Jupiter", 71492, 16), new Planet("Saturn", 60268, 18),
 73.          new Planet("Uranus", 25559, 17), new Planet("Neptune", 24766, 8),
 74.          new Planet("Pluto", 1137, 1), };
 75.    private static final int DEFAULT_WIDTH = 300;
 76.    private static final int DEFAULT_HEIGHT = 300;
 77. }
 78.
 79. /**
 80.  * Describes a planet.
 81.  */
 82. class Planet
 83. {
 84.    /**
 85.     * Constructs a planet.
 86.     * @param n the planet name
 87.     * @param r the planet radius
 88.     * @param m the number of moons
 89.     */
 90.    public Planet(String n, double r, int m)
 91.    {
 92.       name = n;
 93.       radius = r;
 94.       moons = m;
 95.       image = new ImageIcon(name + ".gif");
 96.    }
 97.
 98.    public String toString()
 99.    {
100.       return name;
101.    }
102.
103.    /**
104.     * Gets a description of the planet.
105.     * @return the description
106.     */
107.    public String getDescription()
108.    {
109.       return "Radius: " + radius + "
Moons: " + moons + "
";
110.    }
111.
112.    /**
113.     * Gets an image of the planet.
114.     * @return the image
115.     */
116.    public ImageIcon getImage()
117.    {
118.       return image;
119.    }
120.
121.    private String name;
122.    private double radius;
123.    private int moons;
124.    private ImageIcon image;
125. }
javax.swing.JSplitPane 1.2
JSplitPane(int direction)JSplitPane(int direction, boolean continuousLayout)JSplitPane(int direction, Component first, Component second)JSplitPane(int direction, boolean continuousLayout, Component first, Component second)constructs a new split pane.
Parameters:
directionOne of
HORIZONTAL_SPLITorVERTICAL_SPLITcontinousLayouttrueif the components are continuously updated when the splitter is movedfirst, secondThe components to add
boolean isOneTouchExpandable()void setOneTouchExpandable(boolean b)gets or sets the “one-touch expandable” property. When this property is set, the splitter has two icons to completely expand one or the other component.
boolean isContinuousLayout()void setContinuousLayout(boolean b)gets or sets the “continuous layout” property. When this property is set, then the components are continuously updated when the splitter is moved.
void setLeftComponent(Component c)void setTopComponent(Component c)These operations have the same effect, to set
cas the first component in the split pane.void setRightComponent(Component c)void setBottomComponent(Component c)These operations have the same effect, to set
cas the second component in the split pane.
Tabbed panes are a familiar user interface device to break up a complex dialog box into subsets of related options. You can also use tabs to let a user flip through a set of documents or images (see Figure 6-45). That is what we do in our sample program.
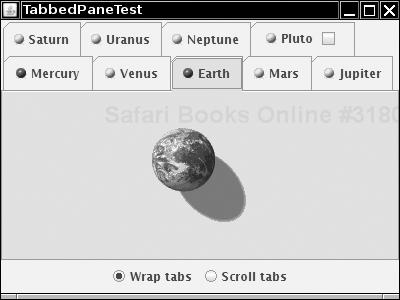
To create a tabbed pane, you first construct a JTabbedPane object, then you add tabs to it.
JTabbedPane tabbedPane = new JTabbedPane();
tabbedPane.addTab(title, icon, component);
The last parameter of the addTab method has type Component. To add multiple components into the same tab, you first pack them up in a container, such as a JPanel.
The icon is optional; for example, the addTab method does not require an icon:
tabbedPane.addTab(title, component);
You can also add a tab in the middle of the tab collection with the insertTab method:
tabbedPane.insertTab(title, icon, component, tooltip, index);
To remove a tab from the tab collection, use
tabPane.removeTabAt(index);
When you add a new tab to the tab collection, it is not automatically displayed. You must select it with the setSelectedIndex method. For example, here is how you show a tab that you just added to the end:
tabbedPane.setSelectedIndex(tabbedPane.getTabCount() - 1);
If you have a lot of tabs, then they can take up quite a bit of space. Starting with Java SE 1.4, you can display the tabs in scrolling mode, in which only one row of tabs is displayed, together with a set of arrow buttons that allow the user to scroll through the tab set (see Figure 6-46).
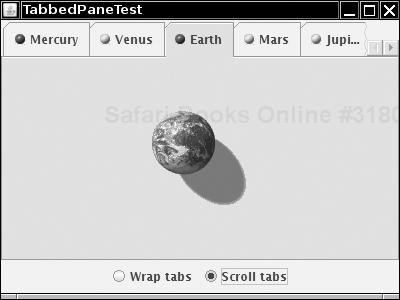
You set the tab layout to wrapped or scrolling mode by calling
tabbedPane.setTabLayoutPolicy(JTabbedPane.WRAP_TAB_LAYOUT);
tabbedPane.setTabLayoutPolicy(JTabbedPane.SCROLL_TAB_LAYOUT);
The tab labels can have mnemonics, just like menu items. For example,
int marsIndex = tabbedPane.indexOfTab("Mars");
tabbedPane.setMnemonicAt(marsIndex, KeyEvent.VK_M);
Then the M is underlined, and program users can select the tab by pressing ALT+M.
As of Java SE 6, you can add arbitrary components into the tab titles. First add the tab, then call
tabbedPane.setTabComponentAt(index, component);
In our sample program, we add a “close box” to the Pluto tab (because, after all, some astronomers do not consider Pluto a real planet). This is achieved by setting the tab component to a panel containing two components: a label with the icon and tab text, and a checkbox with an action listener that removes the tab.
The example program shows a useful technique with tabbed panes. Sometimes, you want to update a component just before it is displayed. In our example program, we load the planet image only when the user actually clicks a tab.
To be notified whenever the user clicks on a new tab, you install a ChangeListener with the tabbed pane. Note that you must install the listener with the tabbed pane itself, not with any of the components.
tabbedPane.addChangeListener(listener);
When the user selects a tab, the stateChanged method of the change listener is called. You retrieve the tabbed pane as the source of the event. Call the getSelectedIndex method to find out which pane is about to be displayed.
public void stateChanged(ChangeEvent event)
{
   int n = tabbedPane.getSelectedIndex();
   loadTab(n);
}
In Listing 6-20, we first set all tab components to null. When a new tab is selected, we test whether its component is still null. If so, we replace it with the image. (This happens instantaneously when you click on the tab. You will not see an empty pane.) Just for fun, we also change the icon from a yellow ball to a red ball to indicate which panes have been visited.
Example 6-20. TabbedPaneTest.java
  1. import java.awt.*;
  2. import java.awt.event.*;
  3.
  4. import javax.swing.*;
  5. import javax.swing.event.*;
  6.
  7. /**
  8.  * This program demonstrates the tabbed pane component organizer.
  9.  * @version 1.03 2007-08-01
 10.  * @author Cay Horstmann
 11.  */
 12. public class TabbedPaneTest
 13. {
 14.    public static void main(String[] args)
 15.    {
 16.       EventQueue.invokeLater(new Runnable()
 17.          {
 18.             public void run()
 19.             {
 20.
 21.                JFrame frame = new TabbedPaneFrame();
 22.                frame.setDefaultCloseOperation(JFrame.EXIT_ON_CLOSE);
 23.                frame.setVisible(true);
 24.             }
 25.          });
 26.    }
 27. }
 28.
 29. /**
 30.  * This frame shows a tabbed pane and radio buttons to switch between wrapped and scrolling
 31.  * tab layout.
 32.  */
 33. class TabbedPaneFrame extends JFrame
 34. {
 35.    public TabbedPaneFrame()
 36.    {
 37.       setTitle("TabbedPaneTest");
 38.       setSize(DEFAULT_WIDTH, DEFAULT_HEIGHT);
 39.
 40.       tabbedPane = new JTabbedPane();
 41.       // we set the components to null and delay their loading until the tab is shown
 42.       // for the first time
 43.
 44.       ImageIcon icon = new ImageIcon("yellow-ball.gif");
 45.
 46.       tabbedPane.addTab("Mercury", icon, null);
 47.       tabbedPane.addTab("Venus", icon, null);
 48.       tabbedPane.addTab("Earth", icon, null);
 49.       tabbedPane.addTab("Mars", icon, null);
 50.       tabbedPane.addTab("Jupiter", icon, null);
 51.       tabbedPane.addTab("Saturn", icon, null);
 52.       tabbedPane.addTab("Uranus", icon, null);
 53.       tabbedPane.addTab("Neptune", icon, null);
 54.       tabbedPane.addTab("Pluto", null, null);
 55.
 56.       final int plutoIndex = tabbedPane.indexOfTab("Pluto");
 57.       JPanel plutoPanel = new JPanel();
 58.       plutoPanel.add(new JLabel("Pluto", icon, SwingConstants.LEADING));
 59.       JToggleButton plutoCheckBox = new JCheckBox();
 60.       plutoCheckBox.addActionListener(new ActionListener()
 61.       {
 62.          public void actionPerformed(ActionEvent e)
 63.          {
 64.             tabbedPane.remove(plutoIndex);
 65.          }
 66.       });
 67.       plutoPanel.add(plutoCheckBox);
 68.       tabbedPane.setTabComponentAt(plutoIndex, plutoPanel);
 69.
 70.       add(tabbedPane, "Center");
 71.
 72.       tabbedPane.addChangeListener(new ChangeListener()
 73.          {
 74.             public void stateChanged(ChangeEvent event)
 75.             {
 76.
 77.                // check if this tab still has a null component
 78.
 79.                if (tabbedPane.getSelectedComponent() == null)
 80.                {
 81.                   // set the component to the image icon
 82.
 83.                   int n = tabbedPane.getSelectedIndex();
 84.                   loadTab(n);
 85.                }
 86.             }
 87.          });
 88.
 89.       loadTab(0);
 90.
 91.       JPanel buttonPanel = new JPanel();
 92.       ButtonGroup buttonGroup = new ButtonGroup();
 93.       JRadioButton wrapButton = new JRadioButton("Wrap tabs");
 94.       wrapButton.addActionListener(new ActionListener()
 95.          {
 96.             public void actionPerformed(ActionEvent event)
 97.             {
 98.                tabbedPane.setTabLayoutPolicy(JTabbedPane.WRAP_TAB_LAYOUT);
 99.             }
100.          });
101.       buttonPanel.add(wrapButton);
102.       buttonGroup.add(wrapButton);
103.       wrapButton.setSelected(true);
104.       JRadioButton scrollButton = new JRadioButton("Scroll tabs");
105.       scrollButton.addActionListener(new ActionListener()
106.          {
107.             public void actionPerformed(ActionEvent event)
108.             {
109.                tabbedPane.setTabLayoutPolicy(JTabbedPane.SCROLL_TAB_LAYOUT);
110.             }
111.          });
112.       buttonPanel.add(scrollButton);
113.       buttonGroup.add(scrollButton);
114.       add(buttonPanel, BorderLayout.SOUTH);
115.    }
116.
117.    /**
118.     * Loads the tab with the given index.
119.     * @param n the index of the tab to load
120.     */
121.    private void loadTab(int n)
122.    {
123.       String title = tabbedPane.getTitleAt(n);
124.       ImageIcon planetIcon = new ImageIcon(title + ".gif");
125.       tabbedPane.setComponentAt(n, new JLabel(planetIcon));
126.
127.       // indicate that this tab has been visited--just for fun
128.
129.       tabbedPane.setIconAt(n, new ImageIcon("red-ball.gif"));
130.    }
131.
132.    private JTabbedPane tabbedPane;
133.
134.    private static final int DEFAULT_WIDTH = 400;
135.    private static final int DEFAULT_HEIGHT = 300;
136. }
javax.swing.JTabbedPane 1.2
JTabbedPane(int placement)constructs a tabbed pane.
Parameters:
placementOne of
SwingConstants.TOP,SwingConstants.LEFT,SwingConstants.RIGHT, orSwingConstants.BOTTOMvoid addTab(String title, Component c)void addTab(String title, Icon icon, Component c)void addTab(String title, Icon icon, Component c, String tooltip)adds a tab to the end of the tabbed pane.
void insertTab(String title, Icon icon, Component c, String tooltip, int index)inserts a tab to the tabbed pane at the given index.
void removeTabAt(int index)removes the tab at the given index.
void setSelectedIndex(int index)selects the tab at the given index.
int getSelectedIndex()returns the index of the selected tab.
Component getSelectedComponent()returns the component of the selected tab.
String getTitleAt(int index)void setTitleAt(int index, String title)Icon getIconAt(int index)void setIconAt(int index, Icon icon)Component getComponentAt(int index)void setComponentAt(int index, Component c)gets or sets the title, icon, or component at the given index.
int indexOfTab(String title)int indexOfTab(Icon icon)int indexOfComponent(Component c)returns the index of the tab with the given title, icon, or component.
int getTabCount()returns the total number of tabs in this tabbed pane.
int getTabLayoutPolicy()void setTabLayoutPolicy(int policy)1.4gets or sets the tab layout policy.
policyis one ofJTabbedPane.WRAP_TAB_LAYOUTorJTabbedPane.SCROLL_TAB_LAYOUT.int getMnemonicAt(int index)1.4void setMnemonicAt(int index, int mnemonic)gets or sets the mnemonic character at a given tab index. The character is specified as a
VK_X constant from theKeyEventclass. −1 means that there is no mnemonic.Component getTabComponentAt(int index)6void setTabComponentAt(int index, Component c)6gets or sets the component that renders the title of the tab with the given index. If this component is null, the tab icon and title are rendered. Otherwise, only the given component is rendered in the tab.
int indexOfTabComponent(Component c)6returns the index of the tab with the given title component.
void addChangeListener(ChangeListener listener)adds a change listener that is notified when the user selects a different tab.
Many applications present information in multiple windows that are all contained inside a large frame. If you minimize the application frame, then all of its windows are hidden at the same time. In the Windows environment, this user interface is sometimes called the multiple document interface (MDI). Figure 6-47 shows a typical application that uses this interface.
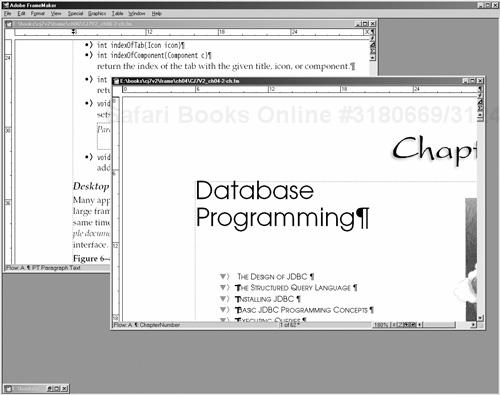
For some time, this user interface style was popular, but it has become less prevalent in recent years. Nowadays, many applications simply display a separate top-level frame for each document. Which is better? MDI reduces window clutter, but having separate top-level windows means that you can use the buttons and hotkeys of the host windowing system to flip through your windows.
In the world of Java, where you can’t rely on a rich host windowing system, it makes a lot of sense to have your application manage its frames.
Figure 6-48 shows a Java application with three internal frames. Two of them have decorations on the border to maximize and iconify them. The third is in its iconified state.
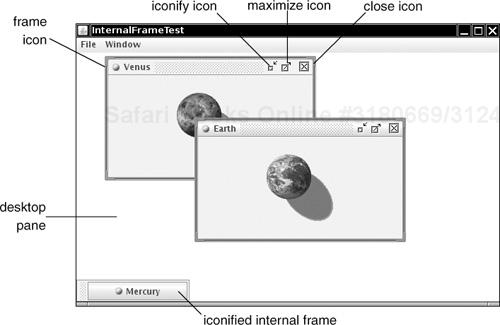
In the Metal look and feel, the internal frames have distinctive “grabber” areas that you use to move the frames around. You can resize the windows by dragging the resize corners.
To achieve this capability, follow these steps:
Use a regular
JFramewindow for the application.Add the
JDesktopPaneto theJFrame.desktop = new JDesktopPane(); add(desktop, BorderLayout.CENTER);
Construct
JInternalFramewindows. You can specify whether you want the icons for resizing or closing the frame. Normally, you want all icons.JInternalFrame iframe = new JInternalFrame(title, true, // resizable true, // closable true, // maximizable true); // iconifiable
Add components to the frame.
iframe.add(c, BorderLayout.CENTER);
Set a frame icon. The icon is shown in the top-left corner of the frame.
iframe.setFrameIcon(icon);
Set the size of the internal frame. As with regular frames, internal frames initially have a size of 0 by 0 pixels. Because you don’t want internal frames to be displayed on top of each other, use a variable position for the next frame. Use the
reshapemethod to set both the position and size of the frame:iframe.reshape(nextFrameX, nextFrameY, width, height);
As with
JFrames, you need to make the frame visible.iframe.setVisible(true);
Add the frame to the
JDesktopPane.desktop.add(iframe);
You probably want to make the new frame the selected frame. Of the internal frames on the desktop, only the selected frame receives keyboard focus. In the Metal look and feel, the selected frame has a blue title bar, whereas the other frames have a gray title bar. You use the
setSelectedmethod to select a frame. However, the “selected” property can be vetoed—the currently selected frame can refuse to give up focus. In that case, thesetSelectedmethod throws aPropertyVetoExceptionthat you need to handle.try { iframe.setSelected(true); } catch (PropertyVetoException e) { // attempt was vetoed }You probably want to move the position for the next internal frame down so that it won’t overlay the existing frame. A good distance between frames is the height of the title bar, which you can obtain as
int frameDistance = iframe.getHeight() - iframe.getContentPane().getHeight()
Use that distance to determine the next internal frame position.
nextFrameX += frameDistance;
nextFrameY += frameDistance;
if (nextFrameX + width > desktop.getWidth())
   nextFrameX = 0;
if (nextFrameY + height > desktop.getHeight())
   nextFrameY = 0;
In Windows, there are standard commands for cascading and tiling windows (see Figures 6-49 and 6-50). The Java JDesktopPane and JInternalFrame classes have no built-in support for these operations. In Listing 6-21, we show you how to implement these operations yourself.
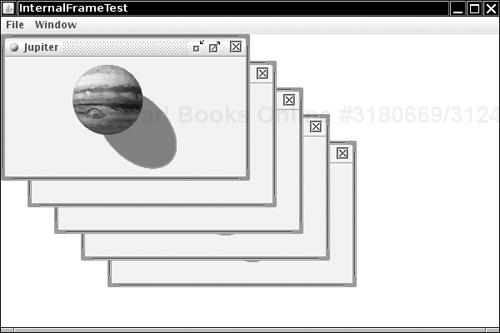
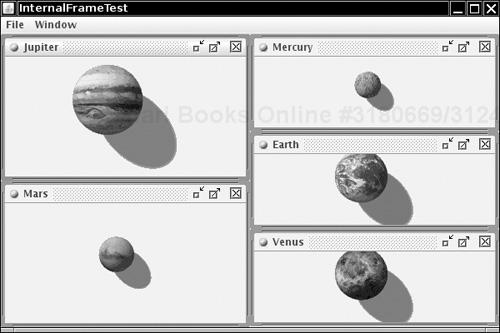
To cascade all windows, you reshape windows to the same size and stagger their positions. The getAllFrames method of the JDesktopPane class returns an array of all internal frames.
JInternalFrame[] frames = desktop.getAllFrames();
However, you need to pay attention to the frame state. An internal frame can be in one of three states:
Icon
Resizable
Maximum
You use the isIcon method to find out which internal frames are currently icons and should be skipped. However, if a frame is in the maximum state, you first set it to be resizable by calling setMaximum(false). This is another property that can be vetoed, so you must catch the PropertyVetoException.
The following loop cascades all internal frames on the desktop:
for (JInternalFrame frame : desktop.getAllFrames())
{
   if (!frame.isIcon())
   {
      try
      {
         // try to make maximized frames resizable; this might be vetoed
         frame.setMaximum(false);
         frame.reshape(x, y, width, height);
         x += frameDistance;
         y += frameDistance;
         // wrap around at the desktop edge
         if (x + width > desktop.getWidth()) x = 0;
         if (y + height > desktop.getHeight()) y = 0;
      }
      catch (PropertyVetoException e)
      {}
   }
}
Tiling frames is trickier, particularly if the number of frames is not a perfect square. First, count the number of frames that are not icons. Then, compute the number of rows as
int rows = (int) Math.sqrt(frameCount);
Then the number of columns is
int cols = frameCount / rows;
except that the last
int extra = frameCount % rows
columns have rows + 1 rows.
Here is the loop for tiling all frames on the desktop:
int width = desktop.getWidth() / cols;
int height = desktop.getHeight() / rows;
int r = 0;
int c = 0;
for (JInternalFrame frame : desktop.getAllFrames())
{
   if (!frame.isIcon())
   {
      try
      {
         frame.setMaximum(false);
         frame.reshape(c * width, r * height, width, height);
         r++;
         if (r == rows)
         {
            r = 0;
            c++;
            if (c == cols - extra)
            {
               // start adding an extra row
               rows++;
               height = desktop.getHeight() / rows;
             }
         }
      }
      catch (PropertyVetoException e)
      {}
   }
}
The example program shows another common frame operation: moving the selection from the current frame to the next frame that isn’t an icon. Traverse all frames and call isSelected until you find the currently selected frame. Then, look for the next frame in the sequence that isn’t an icon, and try to select it by calling
frames[next].setSelected(true);
As before, that method can throw a PropertyVetoException, in which case you keep looking. If you come back to the original frame, then no other frame was selectable, and you give up. Here is the complete loop:
JInternalFrame[] frames = desktop.getAllFrames();
for (int i = 0; i < frames.length; i++)
{
   if (frames[i].isSelected())
   {
      // find next frame that isn't an icon and can be selected
      int next = (i + 1) % frames.length;
      while (next != i)
      {
         if (!frames[next].isIcon())
         {
            try
            {
               // all other frames are icons or veto selection
               frames[next].setSelected(true);
               frames[next].toFront();
               frames[i].toBack();
               return;
            }
            catch (PropertyVetoException e)
            {}
         }
         next = (next + 1) % frames.length;
      }
   }
}Now that you have seen all these veto exceptions, you might wonder how your frames can issue a veto. The JInternalFrame class uses a general JavaBeans mechanism for monitoring the setting of properties. We discuss this mechanism in full detail in Chapter 8. For now, we just want to show you how your frames can veto requests for property changes.
Frames don’t usually want to use a veto to protest iconization or loss of focus, but it is very common for frames to check whether it is okay to close them. You close a frame with the setClosed method of the JInternalFrame class. Because the method is vetoable, it calls all registered vetoable change listeners before proceeding to make the change. That gives each of the listeners the opportunity to throw a PropertyVetoException and thereby terminate the call to setClosed before it changed any settings.
In our example program, we put up a dialog box to ask the user whether it is okay to close the window (see Figure 6-51). If the user doesn’t agree, the window stays open.
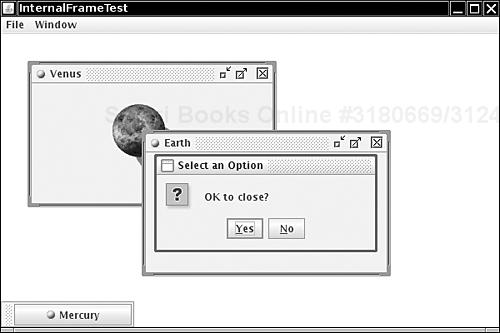
Here is how you achieve such a notification.
Add a listener object to each frame. The object must belong to some class that implements the
VetoableChangeListenerinterface. It is best to add the listener right after constructing the frame. In our example, we use the frame class that constructs the internal frames. Another option would be to use an anonymous inner class.iframe.addVetoableChangeListener(listener);
Implement the
vetoableChangemethod, the only method required by theVetoableChangeListenerinterface. The method receives aPropertyChangeEventobject. Use thegetNamemethod to find the name of the property that is about to be changed (such as"closed"if the method call to veto issetClosed(true)). As you see in Chapter 8, you obtain the property name by removing the"set"prefix from the method name and changing the next letter to lower case.Use the
getNewValuemethod to get the proposed new value.String name = event.getPropertyName(); Object value = event.getNewValue(); if (name.equals("closed") && value.equals(true)) { ask user for confirmation }Simply throw a
PropertyVetoExceptionto block the property change. Return normally if you don’t want to veto the change.class DesktopFrame extends JFrame implements VetoableChangeListener { . . . public void vetoableChange(PropertyChangeEvent event) throws PropertyVetoException { . . . if (not ok) throw new PropertyVetoException(reason, event); // return normally if ok } }
If you use internal frames, you should not use the JDialog class for dialog boxes. Those dialog boxes have two disadvantages:
They are heavyweight because they create a new frame in the windowing system.
The windowing system does not know how to position them relative to the internal frame that spawned them.
Instead, for simple dialog boxes, use the showInternalXxxDialog methods of the JOptionPane class. They work exactly like the showXxxDialog methods, except they position a lightweight window over an internal frame.
As for more complex dialog boxes, construct them with a JInternalFrame. Unfortunately, you then have no built-in support for modal dialog boxes.
In our sample program, we use an internal dialog box to ask the user whether it is okay to close a frame.
int result = JOptionPane.showInternalConfirmDialog(
   iframe, "OK to close?", "Select an Option", JOptionPane.YES_NO_OPTION);;
Note
If you simply want to be notified when a frame is closed, then you should not use the veto mechanism. Instead, install an InternalFrameListener. An internal frame listener works just like a WindowListener. When the internal frame is closing, the internalFrameClosing method is called instead of the familiar windowClosing method. The other six internal frame notifications (opened/closed, iconified/deiconified, activated/deactivated) also correspond to the window listener methods.
One criticism that developers have leveled against internal frames is that performance has not been great. By far the slowest operation is to drag a frame with complex content across the desktop. The desktop manager keeps asking the frame to repaint itself as it is being dragged, which is quite slow.
Actually, if you use Windows or X Windows with a poorly written video driver, you’ll experience the same problem. Window dragging appears to be fast on most systems because the video hardware supports the dragging operation by mapping the image inside the frame to a different screen location during the dragging process.
To improve performance without greatly degrading the user experience, you can set “outline dragging” on. When the user drags the frame, only the outline of the frame is continuously updated. The inside is repainted only when the user drops the frame to its final resting place.
To turn on outline dragging, call
desktop.setDragMode(JDesktopPane.OUTLINE_DRAG_MODE);
This setting is the equivalent of “continuous layout” in the JSplitPane class.
Note
In early versions of Swing, you had to use the magic incantation
desktop.putClientProperty("JDesktopPane.dragMode", "outline");to turn on outline dragging.
In the sample program, you can use the Window -> Drag Outline checkbox menu selection to toggle outline dragging on or off.
Note
The internal frames on the desktop are managed by a DesktopManager class. You don’t need to know about this class for normal programming. It is possible to implement different desktop behavior by installing a new desktop manager, but we don’t cover that.
Listing 6-21 populates a desktop with internal frames that show HTML pages. The File -> Open menu option pops up a file dialog box for reading a local HTML file into a new internal frame. If you click on any link, the linked document is displayed in another internal frame. Try out the Window -> Cascade and Window -> Tile commands.
Example 6-21. InternalFrameTest.java
  1. import java.awt.*;
  2. import java.awt.event.*;
  3. import java.beans.*;
  4. import javax.swing.*;
  5.
  6. /**
  7.  * This program demonstrates the use of internal frames.
  8.  * @version 1.11 2007-08-01
  9.  * @author Cay Horstmann
 10.  */
 11. public class InternalFrameTest
 12. {
 13.    public static void main(String[] args)
 14.    {
 15.       EventQueue.invokeLater(new Runnable()
 16.          {
 17.             public void run()
 18.             {
 19.                JFrame frame = new DesktopFrame();
 20.                frame.setDefaultCloseOperation(JFrame.EXIT_ON_CLOSE);
 21.                frame.setVisible(true);
 22.             }
 23.          });
 24.    }
 25. }
 26.
 27. /**
 28.  * This desktop frame contains editor panes that show HTML documents.
 29.  */
 30. class DesktopFrame extends JFrame
 31. {
 32.    public DesktopFrame()
 33.    {
 34.       setTitle("InternalFrameTest");
 35.       setSize(DEFAULT_WIDTH, DEFAULT_HEIGHT);
 36.
 37.       desktop = new JDesktopPane();
 38.       add(desktop, BorderLayout.CENTER);
 39.
 40.       // set up menus
 41.
 42.       JMenuBar menuBar = new JMenuBar();
 43.       setJMenuBar(menuBar);
 44.       JMenu fileMenu = new JMenu("File");
 45.       menuBar.add(fileMenu);
 46.       JMenuItem openItem = new JMenuItem("New");
 47.       openItem.addActionListener(new ActionListener()
 48.          {
 49.             public void actionPerformed(ActionEvent event)
 50.             {
 51.                createInternalFrame(new JLabel(new ImageIcon(planets[counter] + ".gif")),
 52.                      planets[counter]);
 53.                counter = (counter + 1) % planets.length;
 54.             }
 55.          });
 56.       fileMenu.add(openItem);
 57.       JMenuItem exitItem = new JMenuItem("Exit");
 58.       exitItem.addActionListener(new ActionListener()
 59.          {
 60.             public void actionPerformed(ActionEvent event)
 61.             {
 62.                System.exit(0);
 63.             }
 64.          });
 65.       fileMenu.add(exitItem);
 66.       JMenu windowMenu = new JMenu("Window");
 67.       menuBar.add(windowMenu);
 68.       JMenuItem nextItem = new JMenuItem("Next");
 69.       nextItem.addActionListener(new ActionListener()
 70.          {
 71.             public void actionPerformed(ActionEvent event)
 72.             {
 73.                selectNextWindow();
 74.             }
 75.          });
 76.       windowMenu.add(nextItem);
 77.       JMenuItem cascadeItem = new JMenuItem("Cascade");
 78.       cascadeItem.addActionListener(new ActionListener()
 79.          {
 80.             public void actionPerformed(ActionEvent event)
 81.             {
 82.                cascadeWindows();
 83.             }
 84.          });
 85.       windowMenu.add(cascadeItem);
 86.       JMenuItem tileItem = new JMenuItem("Tile");
 87.       tileItem.addActionListener(new ActionListener()
 88.          {
 89.             public void actionPerformed(ActionEvent event)
 90.             {
 91.                tileWindows();
 92.             }
 93.          });
 94.       windowMenu.add(tileItem);
 95.       final JCheckBoxMenuItem dragOutlineItem = new JCheckBoxMenuItem("Drag Outline");
 96.       dragOutlineItem.addActionListener(new ActionListener()
 97.          {
 98.             public void actionPerformed(ActionEvent event)
 99.             {
100.                desktop.setDragMode(dragOutlineItem.isSelected() ?
101.                      JDesktopPane.OUTLINE_DRAG_MODE : JDesktopPane.LIVE_DRAG_MODE);
102.             }
103.          });
104.       windowMenu.add(dragOutlineItem);
105.    }
106.
107.    /**
108.     * Creates an internal frame on the desktop.
109.     * @param c the component to display in the internal frame
110.     * @param t the title of the internal frame.
111.     */
112.    public void createInternalFrame(Component c, String t)
113.    {
114.       final JInternalFrame iframe = new JInternalFrame(t, true, // resizable
115.             true, // closable
116.             true, // maximizable
117.             true); // iconifiable
118.
119.       iframe.add(c, BorderLayout.CENTER);
120.       desktop.add(iframe);
121.
122.       iframe.setFrameIcon(new ImageIcon("document.gif"));
123.
124.       // add listener to confirm frame closing
125.       iframe.addVetoableChangeListener(new VetoableChangeListener()
126.          {
127.             public void vetoableChange(PropertyChangeEvent event) throws PropertyVetoException
128.             {
129.                String name = event.getPropertyName();
130.                Object value = event.getNewValue();
131.
132.                // we only want to check attempts to close a frame
133.                if (name.equals("closed") && value.equals(true))
134.                {
135.                   // ask user if it is ok to close
136.                   int result = JOptionPane.showInternalConfirmDialog(iframe, "OK to close?",
137.                         "Select an Option", JOptionPane.YES_NO_OPTION);
138.
139.                   // if the user doesn't agree, veto the close
140.                   if (result != JOptionPane.YES_OPTION) throw new PropertyVetoException(
141.                         "User canceled close", event);
142.                }
143.             }
144.          });
145.
146.       // position frame
147.       int width = desktop.getWidth() / 2;
148.       int height = desktop.getHeight() / 2;
149.       iframe.reshape(nextFrameX, nextFrameY, width, height);
150.
151.       iframe.show();
152.
153.       // select the frame--might be vetoed
154.       try
155.       {
156.          iframe.setSelected(true);
157.       }
158.       catch (PropertyVetoException e)
159.       {
160.       }
161.
162.       frameDistance = iframe.getHeight() - iframe.getContentPane().getHeight();
163.
164.       // compute placement for next frame
165.
166.       nextFrameX += frameDistance;
167.       nextFrameY += frameDistance;
168.       if (nextFrameX + width > desktop.getWidth()) nextFrameX = 0;
169.       if (nextFrameY + height > desktop.getHeight()) nextFrameY = 0;
170.    }
171.
172.    /**
173.     * Cascades the non-iconified internal frames of the desktop.
174.     */
175.    public void cascadeWindows()
176.    {
177.       int x = 0;
178.       int y = 0;
179.       int width = desktop.getWidth() / 2;
180.       int height = desktop.getHeight() / 2;
181.
182.       for (JInternalFrame frame : desktop.getAllFrames())
183.       {
184.          if (!frame.isIcon())
185.          {
186.             try
187.             {
188.                // try to make maximized frames resizable; this might be vetoed
189.                frame.setMaximum(false);
190.                frame.reshape(x, y, width, height);
191.
192.                x += frameDistance;
193.                y += frameDistance;
194.                // wrap around at the desktop edge
195.                if (x + width > desktop.getWidth()) x = 0;
196.                if (y + height > desktop.getHeight()) y = 0;
197.             }
198.             catch (PropertyVetoException e)
199.             {
200.             }
201.          }
202.       }
203.    }
204.
205.    /**
206.     * Tiles the non-iconified internal frames of the desktop.
207.     */
208.    public void tileWindows()
209.    {
210.       // count frames that aren't iconized
211.       int frameCount = 0;
212.       for (JInternalFrame frame : desktop.getAllFrames())
213.          if (!frame.isIcon()) frameCount++;
214.       if (frameCount == 0) return;
215.
216.       int rows = (int) Math.sqrt(frameCount);
217.       int cols = frameCount / rows;
218.       int extra = frameCount % rows;
219.       // number of columns with an extra row
220.
221.       int width = desktop.getWidth() / cols;
222.       int height = desktop.getHeight() / rows;
223.       int r = 0;
224.       int c = 0;
225.       for (JInternalFrame frame : desktop.getAllFrames())
226.       {
227.          if (!frame.isIcon())
228.          {
229.             try
230.             {
231.                frame.setMaximum(false);
232.                frame.reshape(c * width, r * height, width, height);
233.                r++;
234.                if (r == rows)
235.                {
236.                   r = 0;
237.                   c++;
238.                   if (c == cols - extra)
239.                   {
240.                      // start adding an extra row
241.                      rows++;
242.                      height = desktop.getHeight() / rows;
243.                   }
244.                }
245.             }
246.             catch (PropertyVetoException e)
247.             {
248.             }
249.          }
250.       }
251.    }
252.
253.    /**
254.     * Brings the next non-iconified internal frame to the front.
255.     */
256.    public void selectNextWindow()
257.    {
258.       JInternalFrame[] frames = desktop.getAllFrames();
259.       for (int i = 0; i < frames.length; i++)
260.       {
261.          if (frames[i].isSelected())
262.          {
263.             // find next frame that isn't an icon and can be selected
264.             int next = (i + 1) % frames.length;
265.             while (next != i)
266.             {
267.                if (!frames[next].isIcon())
268.                {
269.                   try
270.                   {
271.                      // all other frames are icons or veto selection
272.                      frames[next].setSelected(true);
273.                      frames[next].toFront();
274.                      frames[i].toBack();
275.                      return;
276.                   }
277.                   catch (PropertyVetoException e)
278.                   {
279.                   }
280.                }
281.                next = (next + 1) % frames.length;
282.             }
283.          }
284.       }
285.    }
286.
287.    private JDesktopPane desktop;
288.    private int nextFrameX;
289.    private int nextFrameY;
290.    private int frameDistance;
291.    private int counter;
292.    private static final String[] planets = { "Mercury", "Venus", "Earth", "Mars", "Jupiter",
293.          "Saturn", "Uranus", "Neptune", "Pluto", };
294.
295.    private static final int DEFAULT_WIDTH = 600;
296.    private static final int DEFAULT_HEIGHT = 400;
297. }
javax.swing.JInternalFrame 1.2
JInternalFrame()JInternalFrame(String title)JInternalFrame(String title, boolean resizable)JInternalFrame(String title, boolean resizable, boolean closable)JInternalFrame(String title, boolean resizable, boolean closable, boolean maximizable)JInternalFrame(String title, boolean resizable, boolean closable, boolean maximizable, boolean iconifiable)constructs a new internal frame.
Parameters:
titleThe string to display in the title bar
resizabletrueif the frame can be resizedclosabletrueif the frame can be closedmaximizabletrueif the frame can be maximizediconifiabletrueif the frame can be iconifiedboolean isResizable()void setResizable(boolean b)boolean isClosable()void setClosable(boolean b)boolean isMaximizable()void setMaximizable(boolean b)boolean isIconifiable()void setIconifiable(boolean b)gets or sets the
resizable,closable,maximizable, andiconifiableproperties. When the property istrue, an icon appears in the frame title to resize, close, maximize, or iconify the internal frame.boolean isIcon()void setIcon(boolean b)boolean isMaximum()void setMaximum(boolean b)boolean isClosed()void setClosed(boolean b)gets or sets the
icon,maximum, orclosedproperty. When this property istrue, the internal frame is iconified, maximized, or closed.boolean isSelected()void setSelected(boolean b)gets or sets the
selectedproperty. When this property istrue, the current internal frame becomes the selected frame on the desktop.void moveToFront()void moveToBack()moves this internal frame to the front or the back of the desktop.
void reshape(int x, int y, int width, int height)moves and resizes this internal frame.
Parameters:
x, yThe top-left corner of the frame
width, heightThe width and height of the frame
Container getContentPane()void setContentPane(Container c)gets or sets the content pane of this internal frame.
JDesktopPane getDesktopPane()gets the desktop pane of this internal frame.
Icon getFrameIcon()void setFrameIcon(Icon anIcon)gets or sets the frame icon that is displayed in the title bar.
boolean isVisible()void setVisible(boolean b)gets or sets the “visible” property.
void show()makes this internal frame visible and brings it to the front.
java.beans.VetoableChangeListener 1.1
void vetoableChange(PropertyChangeEvent event)is called when the
setmethod of a constrained property notifies the vetoable change listeners.
java.beans.PropertyChangeEvent 1.1
String getPropertyName()returns the name of the property that is about to be changed.
Object getNewValue()returns the proposed new value for the property.
java.beans.PropertyVetoException 1.1
PropertyVetoException(String reason, PropertyChangeEvent event)constructs a property veto exception.
Parameters:
reasonThe reason for the veto
eventThe vetoed event
You have now seen how to use the complex components that the Swing framework offers. In the next chapter, we turn to advanced AWT issues: complex drawing operations, image manipulation, printing, and interfacing with the native windowing system.