
9
Fine-tune task scheduling
In this chapter
In Part 3, ”Advanced scheduling techniques,” you’ll complete a full project life cycle (planning, tracking progress, and responding to variance), as you did in Part 2, “Simple scheduling basics.” In Part 3, however, you’ll dive deeper into the Project Online desktop client feature set to handle more complex needs. This chapter and Chapter 10, “Fine-tune task details,” introduce you to a broad feature set that focuses on a deeper level of task management. This chapter looks at core task scheduling features, including task links, constraints, and task types.
![]() Tip
Tip
As you fine-tune a schedule, watch for blue highlighting (background cell shading) to appear on changed values throughout a plan immediately after you make a change to a value used in a calculation for a task, resource, or assignment. This automatic change highlighting helps you identify the impact of adjusting task relationships (or any other action that causes a date change in a plan) on the schedule. Change highlighting remains visible until you perform another editing action or save the file.
This chapter guides you through procedures related to seeing task relationships by using Task Path, adjusting task link relationships, controlling task scheduling by using constraints, interrupting work on a task, adjusting working time for individual tasks, controlling task scheduling by using task types, and seeing task schedule details by using the Task Inspector.
See task relationships by using Task Path
When fine-tuning task relationships, you need to keep track of the predecessor tasks that affect the scheduling of their successor tasks. In complex plans, visually identifying predecessor and successor relationships is not always easy. This is especially true when a single task has multiple predecessors or successors.
The Task Path feature applies color formatting to the Gantt bars of the selected task’s predecessor and successor tasks. Task Path can also distinguish a task’s driving predecessors (the predecessor tasks that directly determine, or drive, the start date of the task) from that task’s other predecessors. (Predecessor tasks that can slip without rescheduling their successor tasks are said to have slack—see Chapter 10.) The Task Path feature can also do the same for driving successor tasks.
The distinct color highlighting applied to driving predecessor and successor tasks is especially useful when you’re focused on managing the overall duration of a sequence of linked tasks. Without Task Path formatting applied, determining the path of related tasks on a Gantt chart can be difficult. In Figure 9-1, you can see the standard formatting, which does not distinguish predecessor or successor tasks on a Gantt chart.
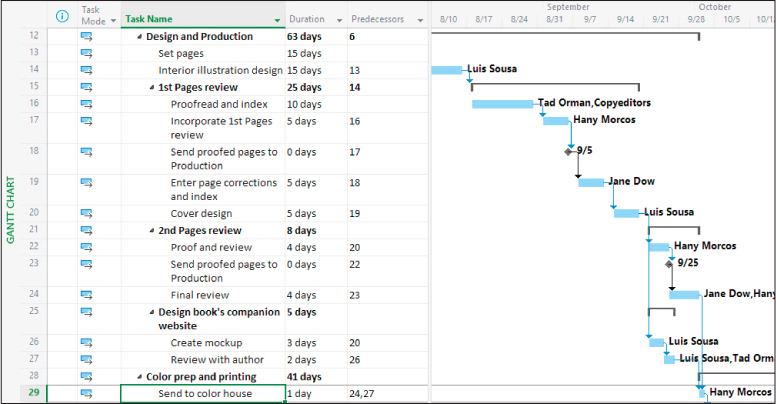
FIGURE 9-1 In this Gantt Chart view, all tasks have the same bar and link colors, regardless of predecessor and successor task relationships.
To identify the chain of a task’s predecessor tasks, turn on Task Path predecessor formatting, as displayed in Figure 9-2.
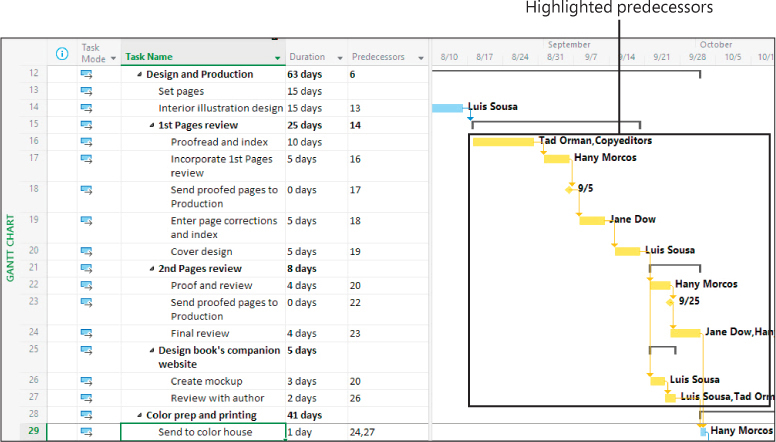
FIGURE 9-2 Task Path formatting applies a gold highlight to the Gantt bars of task 29’s predecessor tasks.
A task can have a long chain of predecessor tasks, but which of these directly drive the scheduling of the task? Task Path can visually distinguish these driving predecessors too, as shown in Figure 9-3.
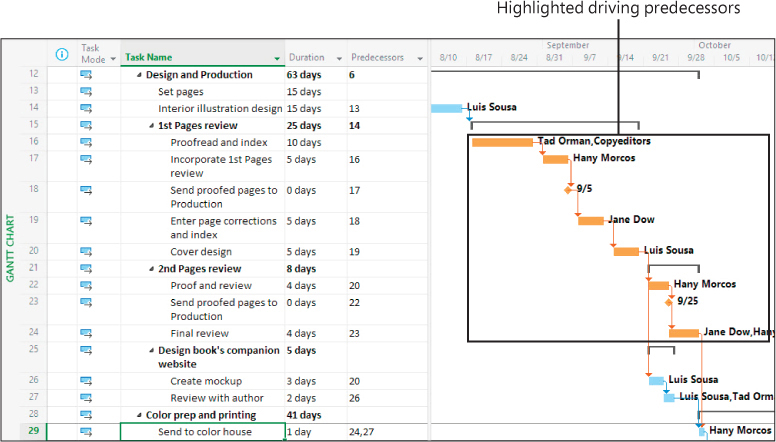
FIGURE 9-3 Task Path formatting applies a dark orange highlight to the Gantt bars of task 29’s driving predecessor tasks.
Some predecessor tasks directly drive the scheduling of a task and are its driving predecessors. Other predecessor tasks might have some amount of slack between them and the selected task. With Task Path highlighting applied, you can more easily see which tasks are currently determining the scheduling of the selected task. Any schedule changes to these driving predecessor tasks affect the selected task.
In addition to predecessor highlighting, you can use Task Path to highlight the selected task’s successor tasks, illustrated in Figure 9-4.
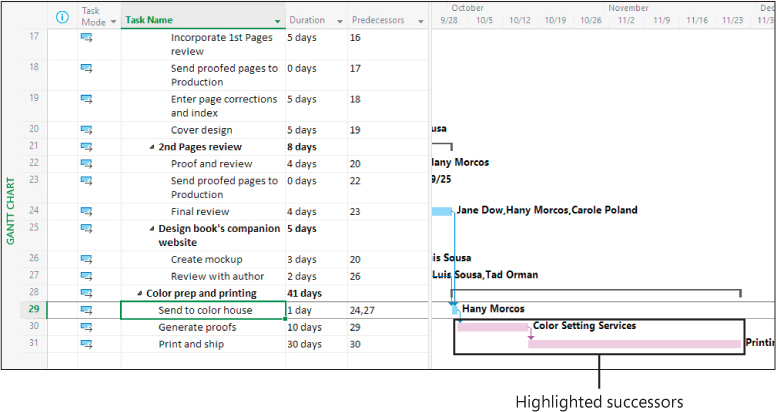
FIGURE 9-4 Task Path formatting applies a light purple highlight to the Gantt bars of task 29’s successor tasks.
Project applies a light purple highlight formatting to the Gantt bars of a task’s successor tasks.
To apply Task Path formatting to a task’s predecessor or successor tasks
In a Gantt chart view, select a task name.
On the Gantt Chart Format tab, in the Bar Styles group, select the Task Path button and then select the options you want.
To turn off all Task Path formatting
On the Gantt Chart Format tab, in the Bar Styles group, select the Task Path button and select Remove Highlighting.
![]() Tip
Tip
To turn off specific Task Path formatting, select the Task Path button and select each highlighted option you want to turn off.
Adjust task link relationships
You might recall from Chapter 4, “Build a task list,” that Project uses four types of task dependencies, or relationships:
Finish-to-start (FS) The finish date of the predecessor task determines the start date of the successor task.
Start-to-start (SS) The start date of the predecessor task determines the start date of the successor task.
Finish-to-finish (FF) The finish date of the predecessor task determines the finish date of the successor task.
Start-to-finish (SF) The start date of the predecessor task determines the finish date of the successor task.
When you link tasks in Project by using the Link Tasks button on the Task tab, in the Schedule group, Project gives those tasks a finish-to-start relationship, by default. This is fine for many tasks, but you will most likely change some task relationships as you fine-tune a plan. For example, the following tasks require relationships other than finish-to-start:
You can start setting pages as soon as you start illustration work on a book project (a start-to-start relationship, as Figure 9-5 shows). This reduces the overall time required to finish the two tasks because they are completed in parallel.

FIGURE 9-5 With a start-to-start relationship, the start date of the predecessor task determines the start date of the successor task.
Planning the editorial work for a book can begin before the manuscript is complete, but it cannot be finished until the manuscript is complete. You want the two tasks to finish at the same time (a finish-to-finish relationship, as Figure 9-6 shows).

FIGURE 9-6 With a finish-to-finish relationship, the finish date of the predecessor task determines the finish date of the successor task.
Task relationships should reflect the sequence in which work needs to be performed. After you’ve established the correct task relationships, you can fine-tune your schedule by entering overlap (lead time) or delay (lag time) between the finish or start dates of predecessor and successor tasks.
When two tasks have a finish-to-start relationship:
Lead time causes the successor task to begin before its predecessor task concludes.
Lag time causes the successor task to begin sometime after its predecessor task concludes.
Consider an example of how lead and lag time affect task relationships. Assume that you initially planned three tasks—copyedit, author review, and copyedit incorporation—by using Project’s default finish-to-start relationships, shown in Figure 9-7.

FIGURE 9-7 Project’s default task relationship is finish-to-start (FS).
Before task 2 can begin, you need to allow an extra day for the copyedited manuscript to be shipped to the author. You don’t want to add a day to the duration of task 1 because no real work will occur on that day. Instead, you enter a 1-day lag between tasks 1 and 2, as illustrated in Figure 9-8.

FIGURE 9-8 To add a delay between the end of the predecessor and the start of the successor, add lag time to the relationship.
However, task 3 can start as soon as task 2 is halfway completed. To make this happen, you enter 50 percent lead time between tasks 2 and 3, illustrated in Figure 9-9.
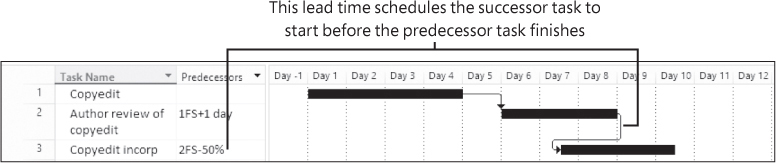
FIGURE 9-9 To add overlap between the end of the predecessor and the start of the successor, add lead time to the relationship.
You can enter lead and lag time as units of time, such as 2 days, or as a percentage of the duration of the predecessor task, such as 50%. Enter lag time in positive units, and enter lead time in negative units (for example, –2d or –50%). You can apply lead or lag time to any type of task relationship: finish-to-start, start-to-start, or any other type.
![]() Tip
Tip
Adjusting relationships between tasks and entering lead or lag times where appropriate are excellent techniques to fine-tune task relationships so that you get the results you want. However, Project cannot automatically make such schedule adjustments for you. As a project manager, you must analyze the sequences and relationships of your tasks and use your best judgment when making such adjustments.
Places where you can enter lead or lag time include the Task Information dialog (available from the Task tab), the Predecessors column in the Entry table, the Task Form (displayed by selecting the Details command on the View tab in the Split View group), and the Task Dependency dialog (opened by double-clicking a link line between Gantt bars).
To change the type of task relationship between tasks
Select a successor task that you want to change.
On the Task tab, in the Properties group, select the Information button to open the Task Information dialog, which contains details about the currently selected task.
 Tip
TipDouble-clicking a task name is a quick way to open the Task Information dialog.
Select the Predecessors tab.
On the Predecessors tab, in the Type column for the predecessor task, select the relationship type you want between the tasks and then select OK.
Select OK to close the Task Information dialog.
To add lead or lag time between linked tasks
Select the successor task to which you want to add lead or lag time.
On the Task tab, in the Properties group, select the Information button.
In the Task Information dialog, select the Predecessors tab and then do either of the following:
In the Lag field for a predecessor task, enter the lead value you want. Lead values are entered as negative lag values. Lead can be a number of working days (for example, –2d) or a percentage of the duration of the predecessor task (for example, –25%).
In the Lag field for a predecessor task, enter the lag value you want. Lag values are entered as positive values. Lag can be a number of working days (for example, 3d) or a percentage of the duration of the predecessor task (for example, 50%).
Control task scheduling by using constraints
Every task that you enter into Project has some type of constraint applied to it. A constraint determines the degree to which an automatically scheduled task can be rescheduled. You can manage the constraint details of automatically scheduled tasks. When working with a manually scheduled task, however, you cannot change the constraint type or set a constraint date: Project doesn’t schedule manually scheduled tasks, so constraints have no effect. For more information about manually scheduled tasks and automatically scheduled tasks, see Chapter 4.
Constraints fall into three categories:
Flexible constraints Project can change the start and finish dates of a task. Project’s default constraint type causes tasks to start as soon as possible. This type of flexible constraint is called As Soon As Possible, or ASAP. No constraint date is associated with flexible constraints. Project does not display any special indicator in the Indicators column for flexible constraints.
Semi-flexible constraints With this type of constraint, a task has a start or finish date boundary. However, within that boundary, Project has the scheduling flexibility to change the start and finish dates of a task. For example, consider a task that must finish no later than June 20, 2025, but that could finish before this date. Semi-flexible constraints are sometimes called soft constraints or moderate constraints. When a semi-flexible constraint has been applied to a task, Project displays a special constraint indicator (which looks like a calendar) in the Indicators column.
Inflexible constraints With this type of constraint, a task must begin or end on a certain date. For example, you can specify that a task must end on November 14, 2025. Inflexible constraints are sometimes called hard constraints. When an inflexible constraint has been applied to a task, Project displays a constraint indicator in the Indicators column. As Figure 9-10 shows, you can point to a constraint indicator to display the constraint details in a ScreenTip.
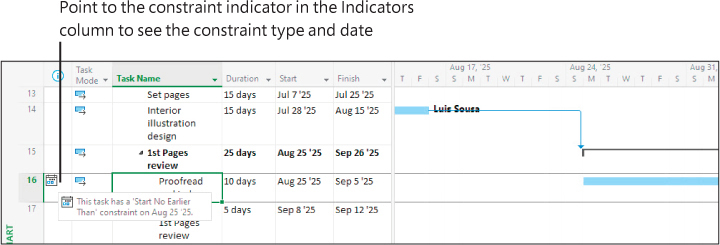
FIGURE 9-10 Use the ScreenTip to get the constraint’s details.
Project uses eight types of task constraints, as you can see in the following table:
Constraint Category | Constraint Type | Description |
|---|---|---|
Flexible | As Soon As Possible (ASAP) | Project schedules a task to occur as soon as it can occur. This is the default constraint type applied to all new tasks when you’re scheduling from the project’s start date. No constraint date is assigned for an ASAP constraint. |
Flexible | As Late As Possible (ALAP) | Project schedules a task to occur as late as it can occur. This is the default constraint type applied to all new tasks when you’re scheduling from the project’s finish date. No constraint date is assigned for an ALAP constraint. |
Semi-flexible | Start No Earlier Than (SNET) | Project schedules a task to start on or after the constraint date you specify. Use this constraint type to ensure that a task will not be scheduled to start before a specific date. |
Semi-flexible | Start No Later Than (SNLT) | Project schedules a task to start on or before the constraint date you specify. Use this constraint type to ensure that a task will not start after a specific date. |
Semi-flexible | Finish No Earlier Than (FNET) | Project schedules a task to finish on or after the constraint date you specify. Use this constraint type to ensure that a task will not finish before a specific date. |
Semi-flexible | Finish No Later Than (FNLT) | Project schedules a task to finish on or before the constraint date you specify. Use this constraint type to ensure that a task will not finish after a specific date. |
Inflexible | Must Start On (MSO) | Project schedules a task to start on the constraint date you specify. Use this constraint type to ensure that a task will start on an exact date. |
Inflexible | Must Finish On (MFO) | Project schedules a task to finish on the constraint date you specify. Use this constraint type to ensure that a task will finish on an exact date. |
These three constraint categories have different effects on task scheduling:
Flexible constraints These constraints, such as As Soon As Possible (ASAP), allow tasks to be scheduled without any limitations other than their predecessor and successor relationships and the project’s start date (for ASAP task constraints) or finish date (for As Late As Possible, or ALAP, task constraints). With these constraint types, no fixed start or end dates are imposed on tasks. Use these constraint types whenever possible. See Figure 9-11 for a flexible ASAP constraint example.

FIGURE 9-11 The As Soon As Possible (ASAP) constraint gives you the maximum scheduling flexibility.
For example, consider a schedule in which tasks A and B are linked and task B has an ASAP constraint applied. As the duration of task A shrinks or grows, the start date of task B is automatically adjusted accordingly.
Semi-flexible constraints These constraints, such as Start No Earlier Than or Start No Later Than (SNET or SNLT), limit the rescheduling of a task within the date boundary you specify. See Figure 9-12 for an illustration of an SNET constraint.
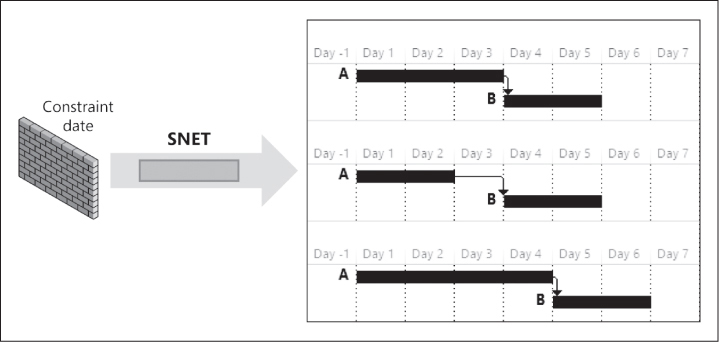
FIGURE 9-12 The Start No Earlier Than (SNET) constraint limits your scheduling flexibility, starting at the constraint date.
With an SNET type of constraint, tasks A and B are linked and task B has an SNET constraint set to day 4. If task A’s duration decreases, the start of task B is unaffected. However, if task A’s duration extends, Project adjusts task B’s start date automatically.
Inflexible constraints These constraints, such as Must Start On (MSO), prevent the rescheduling of a task, as shown in Figure 9-13. Use these constraint types only when absolutely necessary.
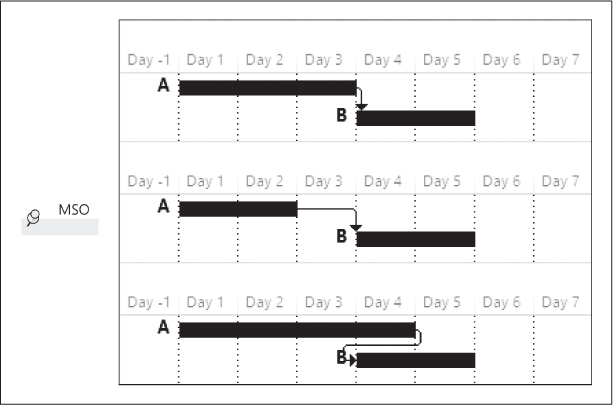
FIGURE 9-13 A Must Start On (MSO) constraint “pins” the start date of a task to a specific date, with no scheduling flexibility.
In this example, tasks A and B are linked, and task B has an MSO constraint set to day 4. Whether task A’s duration decreases or increases, the start of task B is unaffected.
The type of constraint you apply to the tasks in your plans depends on what you need from Project. Use inflexible constraints only if the start or finish date of a task is fixed by factors beyond the control of the project team. Examples of such tasks include handoffs to clients and the end of a funding period. For tasks without such limitations, use flexible constraints. Flexible constraints provide the most discretion in adjusting start and finish dates, and they allow Project to adjust dates if your plan changes. For example, if you’re using ASAP constraints and the duration of a predecessor task changes from 4 days to 2 days, Project adjusts, or pulls in, the start and finish dates of all successor tasks. However, if a successor task has an inflexible constraint applied, Project cannot adjust its start or finish dates.
Keep a few other points in mind when applying constraints to tasks:
Entering a finish date for a task (for example, in the Finish column) applies a Finish No Earlier Than constraint to the task.
Entering a Start date for a task (for example, in the Start column) or dragging a Gantt bar directly on the Gantt chart applies a Start No Earlier Than constraint to the task.
In many cases, entering a deadline date is a better alternative than entering a semi-flexible or inflexible constraint. You’ll work with deadline dates in Chapter 10.
Unless you specify a time, Project schedules a constraint date’s start or finish time by using the Default start time or Default end time value that is set on the Schedule tab of the Project Options dialog. (To open this dialog, select the File tab to display the Backstage view, and then select Options.) The default start time is 8:00 AM. If you want a constrained task to be scheduled to start at a different time, enter that time along with the start date. For example, if you want to schedule a task to start at 10:00 AM on July 21, 2025, enter July 21 25 10AM in the Constraint date field.
If you must apply semi-flexible or inflexible constraints to tasks in addition to task relationships, you might create what’s called negative slack. For example, assume that you have a successor task that has a finish-to-start relationship with its predecessor task. If you enter a Must Start On constraint for the successor task earlier than the finish date of the predecessor task, this results in negative slack and a scheduling conflict. By default, the constraint date applied to the successor task overrides the relationship. However, if you prefer, you can set Project to honor relationships over constraints. To do so, in the Project Options dialog, on the Schedule tab, clear the Tasks will always honor their constraint dates checkbox.
If you must schedule a project from a finish date instead of a start date, some constraint behaviors differ. For example, the As Late As Possible constraint type then becomes the default for new tasks (instead of the As Soon As Possible constraint type). Pay close attention to constraints when scheduling from a finish date to make sure that you create the effect you intend.
To apply a task constraint
Select the name of the task to which you want to apply a constraint.
 Important
The task must be automatically scheduled; task constraints do not apply to manually scheduled tasks.
On the Task tab, in the Properties group, select Information.
TipDouble-clicking a task name is a quick way to open the Task Information dialog.
In the Task Information dialog, select the Advanced tab.
In the Constraint type box, select the constraint type you want.
All constraint types except As Soon As Possible and As Late As Possible require a constraint date. In the Constraint date box, enter or select the date you want, and then select OK.
To remove a task constraint
Select a task that has had a constraint applied.
On the Task tab, in the Properties group, select the Information button.
In the Task Information dialog, select the Advanced tab.
In the Constraint type box, select As Soon As Possible or (if scheduling from the project finish date) As Late As Possible and select OK.
TipThe Constraint date will automatically return to NA after you select OK.
Interrupt work on a task
When initially planning project tasks, you might know that work on a certain task will be interrupted. Instead of listing a task twice to account for a known interruption in work, you can split the task into two or more segments. You might want to split a task in these situations:
You anticipate an interruption in a task. This might be the case, for example, if the facility where a task must be performed will not be accessible midway through the task’s duration.
A task is unexpectedly interrupted. After a task is underway, a resource might have to stop work on the task because some other issue has taken priority. When the other issue is resolved, the resource can resume work on the task.
As Figure 9-14 shows, you use the Split Task command and drag the mouse pointer within a Gantt bar to split the task into multiple segments.
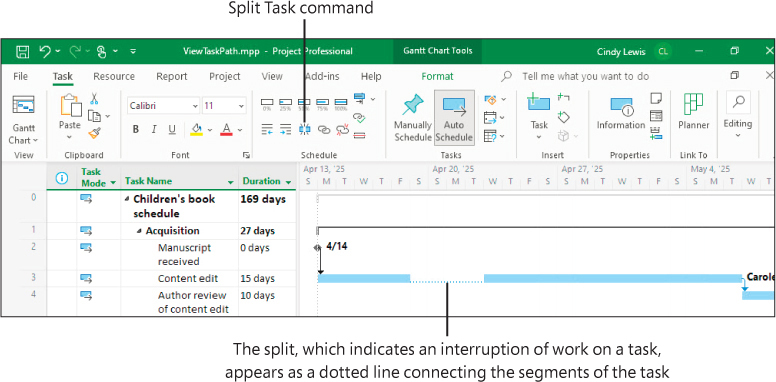
FIGURE 9-14 Split a task to account for an interruption of work on the task.
After you split a task, Project draws a dotted line between the two segments of the task in Gantt chart views.
Keep a few other tips in mind when splitting tasks:
You can drag a segment of a split task either left or right to reschedule the split.
The time of the task split, represented by the dotted line, is not counted in the duration of the task. No work occurs during the split.
You can hide the dotted line between segments by clearing the Show bar splits checkbox in the Layout dialog. (You can access this dialog by selecting the Layout button in the Format group on the Gantt Chart Format tab.)
If the duration of a split task changes, the last segment of the task increases or decreases accordingly.
If a split task is rescheduled (for example, if its start date changes), the entire task is rescheduled, splits and all. The task keeps the same pattern of segments and splits.
Leveling resources or manually contouring assignments over time can cause tasks to split. You contour assignments in Chapter 11, “Fine-tune resource and assignment details,” and level resources in Chapter 12, “Fine-tune the Project plan.”
To split a task into multiple segments
If the task’s Gantt bar is not visible in the chart portion of the Gantt chart view, select the task name and then, on the Task tab, in the Editing group, select Scroll to Task.
On the Task tab, in the Schedule group, select the Split Task button (which looks like a broken Gantt bar) to display a ScreenTip and change the mouse pointer to task-splitting mode.
Move the mouse pointer over the Gantt bar of the task (but don’t select) until the start of the split you want appears in the ScreenTip.
Select, and then drag the mouse pointer to the right until the start date that you want for the new segment appears in the ScreenTip. Release the mouse button.
![]() Tip
Tip
If you initially don’t get the result you want, you can undo the split (press Ctrl+Z) and try again.
To reschedule the second segment of a split task
Drag the second or later segment of the task to the new start date that you want.
![]() Tip
Tip
If you drag the first segment of a split task, you reschedule the entire task and introduce an SNET constraint on the task. To adjust the split between the first and second segments of a split task, drag the second segment, not the first.
To rejoin two segments of a split task
Drag the start of the later segment to the finish of the earlier segment until the two segments rejoin into one segment.
Adjust working time for individual tasks
Occasionally, you want a specific task to occur at a time that differs from the working time of the project calendar. Or perhaps you want a task to occur at a time outside the assigned resource’s normal working time, as determined by the resource’s calendar. To accomplish this, you apply a task calendar to such tasks. As with the project calendar, you specify which base calendar to use as a task calendar. You might need a task calendar in these situations:
You’re using the Standard base calendar as your project calendar, with 8:00 AM to 5:00 PM as your normal working hours, and you have a task that must run overnight.
You have a task that must occur on a specific weekday.
You have a task that must occur over a weekend.
Project treats tasks differently from resources: It doesn’t create calendars as you create tasks. (If you need a refresher on resource calendars, see Chapter 5, “Set up resources.”) When you need a task calendar, you assign a base calendar to the task. This base calendar might be one that Project provides or a new base calendar that you create.
![]() Tip
Tip
One benefit of creating a new calendar by copying the Standard base calendar is that all the working-day exceptions from the Standard calendar that you’ve already entered, such as holidays, also appear in the new calendar. Any future changes made to either calendar do not affect the other calendar, however.
For tasks that have both a task calendar and resource assignments, Project schedules work during the working times that are common between the task calendar and resource calendars. If the calendars have no common working time, Project alerts you when you apply the task calendar or assign a resource to the task.
When you apply a task calendar to a task, you can choose to ignore resource calendars for all resources assigned to the task. Project then schedules the resources to work on the task according to the task calendar, not their own resource calendars (for example, to work 24 hours per day).
To create a new base calendar
On the Project tab, in the Properties group, select the Change Working Time button to open the Change Working Time dialog.
In the Change Working Time dialog, select Create New Calendar to open the Create New Base Calendar dialog shown in Figure 9-15.
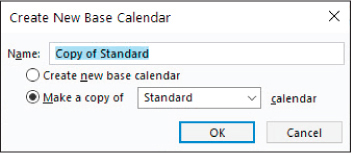
FIGURE 9-15 When creating a new base calendar, give it a name that will make sense to anyone who works with it.
In the Name box, enter the name of the new base calendar and then do either of the following:
To create a new calendar with working times of Monday through Friday, 8:00 AM to 5:00 PM, select Create new base calendar.
To create a new calendar that initially matches an existing base calendar, select the Make a copy of option and then select the base calendar you want from the list.
Select OK.
To enter the working time details for this new calendar, in the Change Working Time dialog, on the Exceptions and Work Weeks tabs, enter the specific working time exceptions or global changes you want for this calendar.
Select OK to close the Change Working Time dialog.
To apply a base calendar to a task
Select the name of the task to which you want to apply the base calendar.
On the Task tab, in the Properties group, select the Information button to open the Task Information dialog displayed in Figure 9-16.
Select the Advanced tab.
In the Calendar box, select the base calendar from the list of available base calendars.
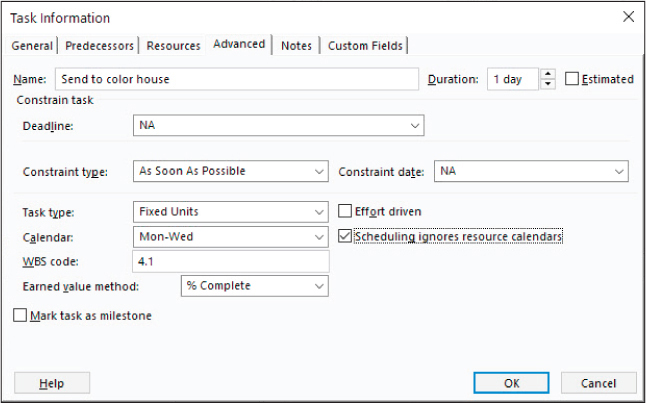
FIGURE 9-16 Use the Calendar field in the Task Information dialog to apply a base calendar to a task.
Select Scheduling ignores resource calendars to schedule assigned resources to follow the specified task calendar.
Select OK to close the dialog. Project applies the base calendar to the task; for this task, the base calendar is its task calendar. A calendar icon appears in the Indicators column, reminding you that this task has a task calendar applied to it.
To see the calendar details, point to the calendar icon. A ScreenTip appears, showing the calendar details, as Figure 9-17 shows.
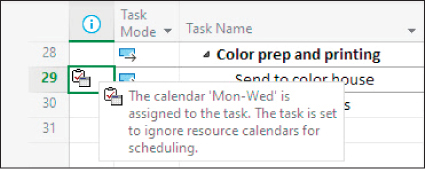
FIGURE 9-17 Use the ScreenTip to see the calendar’s name.
Control task scheduling by using task types
You might recall from Chapter 6, “Assign resources to tasks,” that Project uses the following formula to calculate a task’s work value:
Duration × Assignment Units = Work
Each value in this formula corresponds to a task type. A task type determines which of the three values remains fixed if the other two values change. You can change a task’s type to better control its scheduling as you change its work, duration, or assignment units values.
The default task type is fixed units: if you change a task’s duration, Project recalculates work. Likewise, if you change a task’s work, Project recalculates the duration. In either case, the units value is not affected.
The two other task types are fixed duration and fixed work. For these task types, when Project responds to schedule changes, it records the highest units value per assignment in a field called Peak.
For a fixed-work task:
You can change the assignment units value; Project recalculates the duration.
You can change the duration value; Project recalculates peak units. The assignment units value is not affected.
![]() Important
Important
You cannot turn off effort-driven scheduling for a fixed-work task. If you need a refresher on effort-driven scheduling, see “Control work when adding or removing resource assignments,” in Chapter 6.
For a fixed-duration task:
You can change the assignment units value; Project recalculates work.
You can change the work value; Project recalculates peak units. The assignment units value is not affected.
![]() Important
Important
You cannot change the task type of a manually scheduled task; the effect of changing the task type on the scheduling of a task as described here applies only to automatically scheduled tasks. If you need a refresher on manually scheduled tasks, see Chapter 4.
You can change a task type at any time. Note that characterizing a task type as fixed does not mean that its duration, assignment units, or work values are unchangeable. You can change any value for any task type.
Which is the right task type to apply to each of your tasks? It depends on how you want Project to schedule that task. See Figure 9-18 for a summary of changing values and the results based on task type.
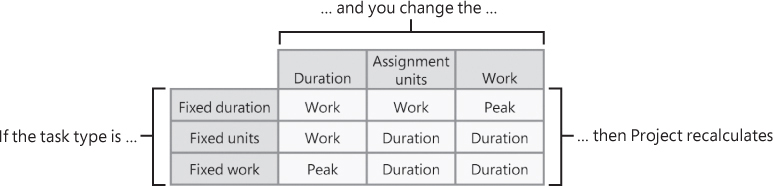
FIGURE 9-18 This table summarizes the effects of changing any value for any task type; it works like a multiplication table.
These pointers summarize how changing values causes a recalculation:
If you have a fixed-duration task, work is recalculated, unless you change work— then Project recalculates peak units.
If you have a fixed-units task, duration is recalculated, unless you change duration—then Project recalculates work.
If you have a fixed-work task, duration is recalculated, unless you change duration—then Project recalculates peak units.
Changing a task type has no immediate effect on a plan. To better see the effect of task types, consider an example of how task types determine the way tasks are rescheduled in response to a change in duration, work, or assignment units.
Consider the new book plan, which can be shown in a customized Task Usage view (with the addition of the Peak field) with the Task Form visible. With this view combination, you can see work, duration, assignment units, and peak values. This example focuses on task 8, Copyedit. As Figure 9-19 shows, its task type is fixed units, the default task type.
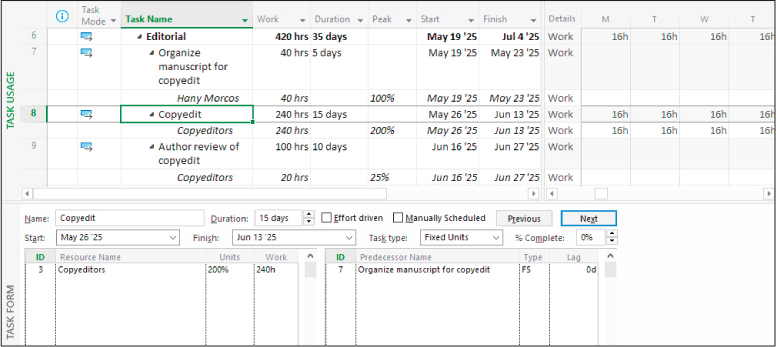
FIGURE 9-19 In this customized split view, you can see the selected task’s work, duration, assignment units, and peak values.
Task 8, with the default task type of Fixed Units, has a total work value of 240 hours, a resource assignment units value of 200% (that’s the equivalent of two full-time copyeditors), and a duration of 15 days. When you increase the task’s duration to 20 days, you can observe the effects on the other values.
After the task’s duration is changed to 20 days, Project increases the work to 320 hours. Change highlighting is applied to the Work and Finish date values as shown in Figure 9-20.
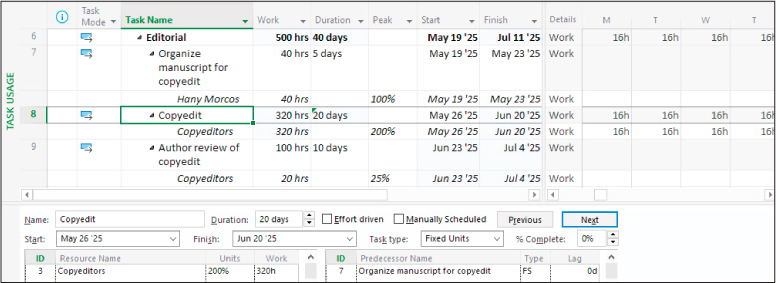
FIGURE 9-20 With a fixed-units task type, a change to duration causes Project to recalculate work.
As expected, the assignment units values did not change with this fixed-units type of task.
Now look at what happens when you start with the original 15-day duration task and 240 hours of work but this time make it a fixed-duration task and change its work value. After you change the task’s work to 320 hours, Project updates peak units but keeps the duration the same, as Figure 9-21 shows.
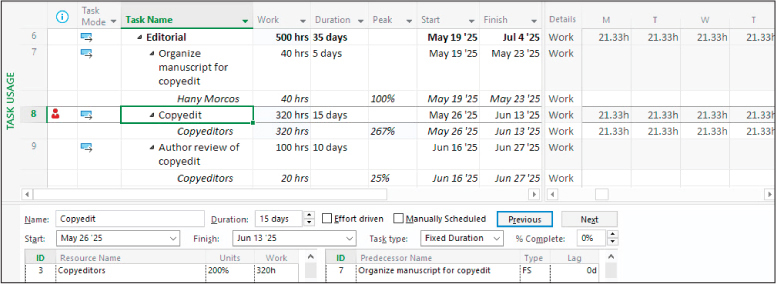
FIGURE 9-21 With a fixed-duration task type, a change to work causes Project to recalculate peak units.
The copyeditors’ increased peak units value of 267% appears in the Peak field. This value accounts for the schedule change, while Project preserves the original assignment units value of 200%, as shown in the Task Form.
Changing a task’s default task type lets you “lock in” how Project handles one of the three assignment calculation variables as either of the other two variables changes. However, you always have the final word on how a task responds to changed assignment calculation variables with the Actions button displayed in Figure 9-22. (If you need a refresher on the Actions button, see Chapter 6.)
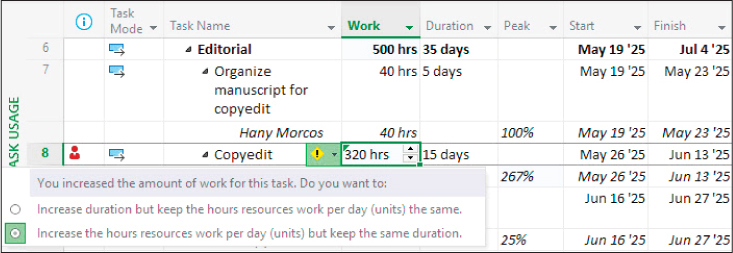
FIGURE 9-22 Regardless of the task’s type, you can fine-tune how Project responds to a scheduling adjustment by using the Actions button.
As you fine-tune your plans in Project, you might find times when you simply need to use the Actions button to make a quick adjustment to Project’s response to a schedule change. Other times, you might want to change a task type to more consistently control how Project handles its scheduling.
To view or change a task type
Select the name of the task whose task type you want to change. The task must be automatically scheduled; task types do not apply to manually scheduled tasks.
On the Task tab, in the Properties group, select Information.
In the Task Information dialog, select the Advanced tab.
In the Task type field, do either of the following:
Note the current task type.
Select the new task type that you want.
TipIf desired, you can modify the effort-driven setting along with the task type in this dialog. To confirm your choice, be sure to select the checkbox until it is empty (with Effort driven off) or checked (with Effort driven on). As a reminder, this setting can be changed only for fixed units and fixed-duration task types.
Select OK to close the Task Information dialog.
![]() Tip
Tip
You can also view the task type in the Task Form. When your plan is in a task-focused view, display the Task Form by selecting Details on the View tab, in the Split View group.
See task schedule details by using the Task Inspector
The Task Inspector succinctly reveals the scheduling factors that affect the selected task, as Figure 9-23 shows. These factors include predecessor task relationships, resource calendars, task calendars, or a combination of factors. In some cases, the Task Inspector includes options to resolve schedule issues such as resource overallocation. You resolve resource overallocations in Chapter 12.
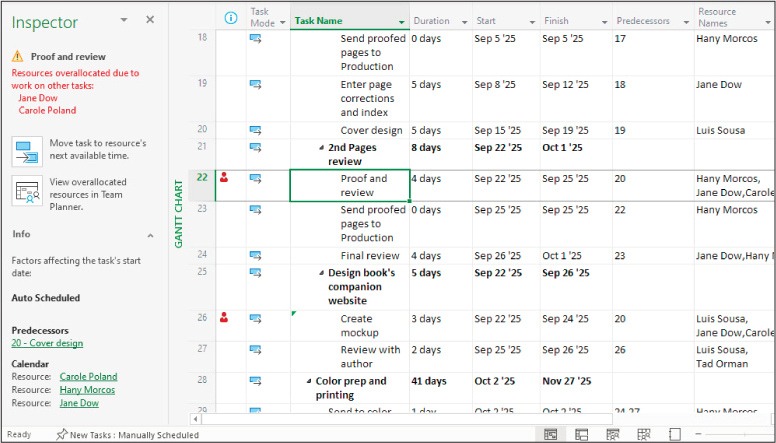
FIGURE 9-23 The Task Inspector displays details about the selected task, in addition to options under Actions to address schedule problems.
For example, consider a task, Proof and review (task 22), whose predecessor is task 20, Cover design. The Inspector shows that Project has proposed two actions to resolve the resource overallocation: Move task to resources’ next available time and View overallocated resources in Team Planner.
![]() Tip
Tip
The Team Planner view, as suggested in the Inspector, is available in Project Online desktop client or Project Professional only, not in Project Standard. For more details about Team Planner, refer to Chapter 11.
You can select items recommended in the Inspector that have a hyperlink to get details about those items. For example, you can select the assigned resource’s name under Calendars to see that resource’s calendar. You don’t need to use the Task Inspector to change task details, but it can be a handy tool.
To display schedule details of a task with the Task Inspector
Display a task-centric view such as a Gantt chart view.
On the Task tab, in the Tasks group, select Inspect to open the Inspector pane.
Select a task. In the Inspector you can view the scheduling factors that affect the selected task.
Skills review
In this chapter, you learned how to
See task relationships by using Task Path
Adjust task link relationships
Control task scheduling by using constraints
Interrupt work on a task
Adjust working time for individual tasks
Control task scheduling by using task types
See task schedule details by using the Task Inspector

Practice tasks
The practice files for these tasks are located in the ProjectDesktopSBSCh09 folder. For practice file download instructions, see the introduction to this book.
![]() Important
Important
If you’re running Project Online desktop client or Project Professional, make sure that Project is not connected to Project Web App and is instead set to Computer mode. For more information, see Appendix C, “Integration with Microsoft 365 solutions for collaboration.”
See task relationships by using Task Path
The scenario: at Lucerne Publishing, at an upcoming team meeting, you want to demonstrate some of the more complex task dependencies in a new children’s book plan. Open the ViewTaskPath plan and perform the following tasks:
Apply the Task Path command to task 29, Send to color house. Highlight first the predecessors and then add the driving predecessors.
Select task 24, Final review, to move the Task Path. Notice that all the highlighted tasks represent driving predecessors. You may turn off and turn on predecessors to confirm.
Remove all highlighting and then turn on driven successors. See Figure 9-24 for the resulting Task Path formatting.
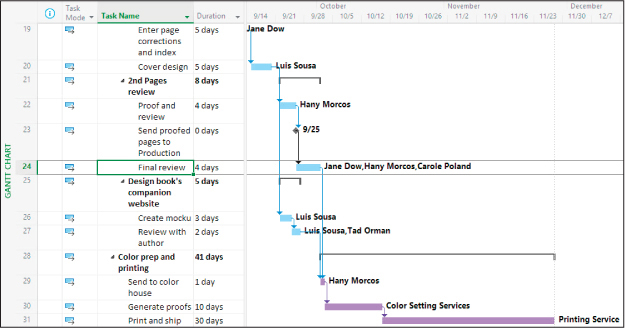
FIGURE 9-24 With Task Path highlighting applied, you can more clearly distinguish task relationships in a Gantt chart view.
Adjust task link relationships
The scenario: editorial and design work on a new children’s book is about to begin. At this stage, you have an initial plan with task names, durations, relationships, and resource assignments. Now you want to fine-tune those task relationships. Open the ScheduleTasksAdvanced plan and perform the following tasks:
Add lag between task 31, Print and ship, and its predecessor, task 30, Generate proofs, so that task 31 starts 3 working days after task 30 finishes.
Overlap task 10, Copyedit incorp, with its predecessor, task 9, Author review of copyedit, when task 9 is at the 25 percent remaining point of its duration. Hint: Remember that lead is entered as negative lag time, as Figure 9-25 shows.
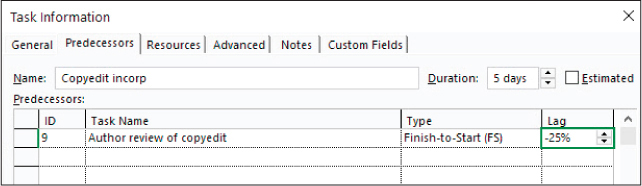
FIGURE 9-25 Project treats a negative lag value as lead time.
Change the task relationship between task 14, Interior illustration design, and its predecessor, task 13, Set pages, to start-to-start (SS). See Figure 9-26 for the results of steps 2 and 3.
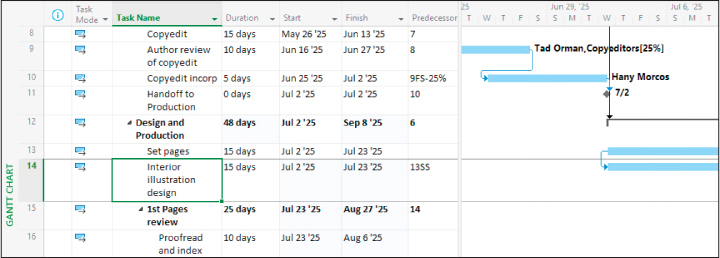
FIGURE 9-26 This is what finish-to-start with lead time and start-to-start task relationships look like in a Gantt Chart view.
Control task scheduling by using constraints
The scenario: a task in the new children’s book plan cannot start quite as early as you had expected. Tad Orman, the children’s book author, needs to proofread his book—this work is accounted for in task 16, Proofread and index. However, Tad has informed you that, because of his travel schedule, he will be unable to start his review before July 21, which is later than currently scheduled. Continuing in the ScheduleTasksAdvanced plan, perform the following tasks:
Apply a Start No Earlier Than (SNET) constraint of July 21, 2025 to task 16, Proofread and index.
Point to the icon in the Indicators column to see the constraint details in a ScreenTip, shown in Figure 9-27.
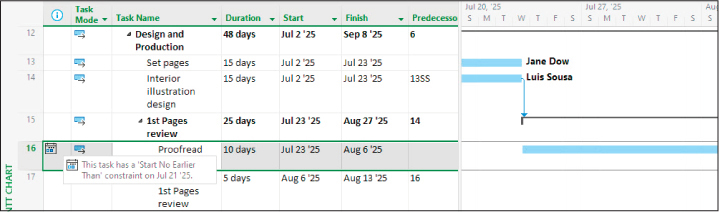
FIGURE 9-27 After applying the SNET constraint, point to the constraint indicator to see its details.
Interrupt work on a task
The scenario: you’ve learned that work on a task in the new children’s book plan will be interrupted. You want to account for this in the plan by recording the interruption, during which no work should be scheduled, but keep the assigned work values on the task unchanged. Continuing in the ScheduleTasksAdvanced plan, perform the following task:
Split task 3, Content edit, so that its first segment runs through the end of the day on Friday, April 18, 2025, and its second segment begins on Thursday, April 24. The results of the split are illustrated in Figure 9-28.
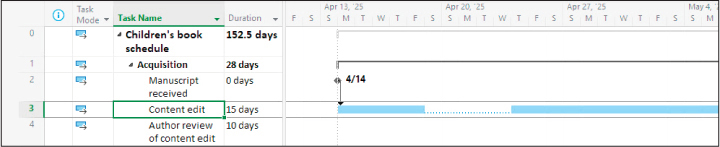
FIGURE 9-28 The segments of a split task are connected by a dotted line.
Adjust working time for individual tasks
The scenario: you need to record that a task in the new children’s book project has a more restrictive working time than the rest of the tasks. The plan includes a task for the handoff of final book proofs to a full-color proof and print firm, which then prepares the book for commercial printing. However, this firm does this type of work only Mondays through Wednesdays. Continuing in the ScheduleTasksAdvanced plan, perform the following tasks:
Create a new base calendar named Mon-Wed Task Calendar. Set its weekly work settings so that Monday, Tuesday, and Wednesday are normal workdays, but Thursday and Friday (and weekends) are nonworking days.
Apply the Mon-Wed Task Calendar base calendar to task 29, Send to color house, and select Scheduling Ignores Resource Calendars.
The task calendar causes Project to reschedule the task to the next available working day, which is the following Monday. A calendar icon appears in the Indicators column, reminding you that this task has a task calendar applied to it.
As Figure 9-29 shows, pointing to the calendar icon in the Indicators column displays the task’s calendar details in a ScreenTip.
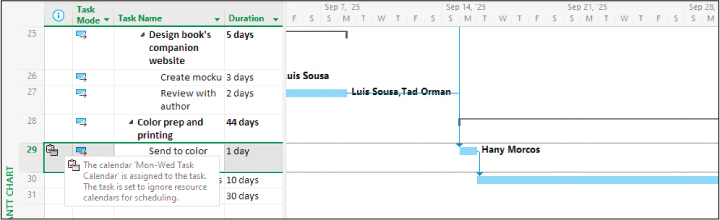
FIGURE 9-29 After applying the base calendar to the task, point to the calendar indicator to see its name.
Control task scheduling by using task types
Scenario: the default task type of Fixed Units works for most of the tasks in the new book plan. However, you want to keep the duration fixed for one task. Continuing in the ScheduleTasksAdvanced plan, perform the following tasks:
Display the Task Usage view with the Task Form in the lower pane, and then select task 24, Final review, in the Task Usage view displayed in Figure 9-30.
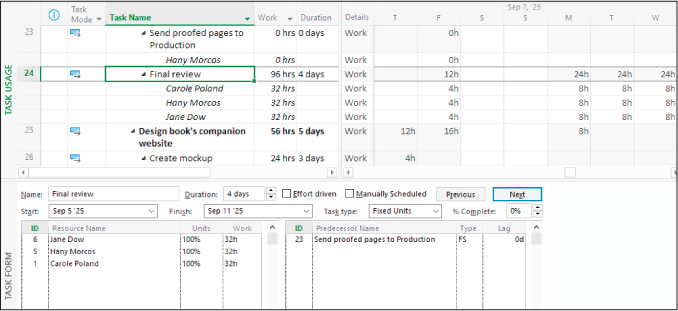
FIGURE 9-30 This split view includes the selected task’s essential scheduling values, in addition to its task type.
You can see that task 24 is set to Fixed Units and has a total work value of 96 hours, a resource assignment units total value of 300%, and a duration of 4 days.
Change task 24 to Fixed Duration and then, in the Task Usage view, increase the total work to 120 hours as shown in Figure 9-31.
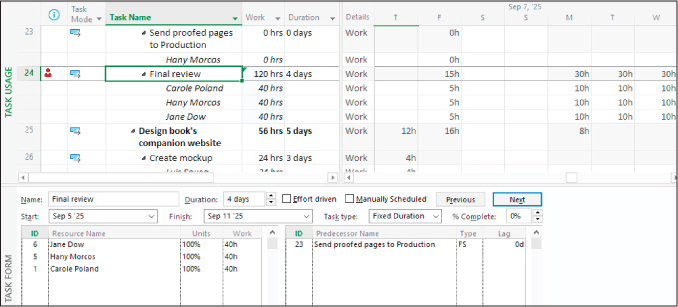
FIGURE 9-31 After adding work to the fixed-duration task, note the schedule changes indicated with change highlighting (light blue background cell shading).
As expected, the duration didn’t change, but the total work increased. Consequently, the assigned resources are overallocated; their peak units (not visible in this view, but see the next set of practice tasks) are now 125 percent each. The resources can handle this level of overallocation for this task.
See task schedule details by using the Task Inspector
The scenario: you use the Task Inspector here to investigate some questions that came up at the team meeting about what’s driving the scheduling of a couple of tasks. Continuing in the ScheduleTasksAdvanced plan, perform the following tasks:
Ensure that task 24, Final review, is still selected in the Task Usage view, and then display the Task Inspector shown in Figure 9-32 to view additional information about this task.
You can see some of the details, including the peak units based on adding work on the task in the previous practice task. Notice that Project is providing additional actions that you can take to resolve the overallocation of resources who are working beyond their capacity. As the project manager, you are aware of this situation and will work with the affected resources accordingly.
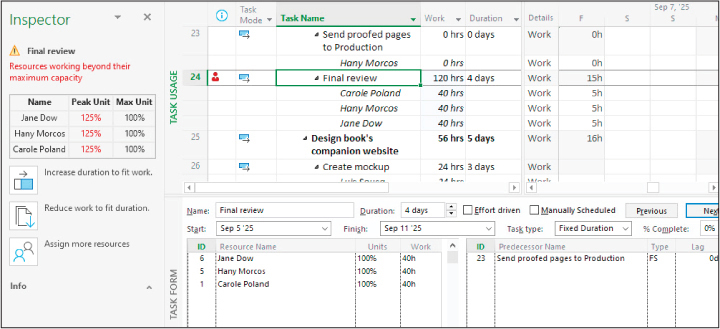
FIGURE 9-32 Use the Task Inspector to see details and troubleshoot scheduling issues for the selected task.
Select task 22, Proof and review, and review details about this task in the Task Inspector shown in Figure 9-33.
Project indicates that one resource, Hany Morcos, is overallocated because of work on other tasks. Task 22 ends on the same day Hany starts work on task 24, causing the overallocation. Hany is aware of this overallocation and can manage the work on that day. Task 23 does not contribute to Hany’s overallocation since the work value is 0 hrs.
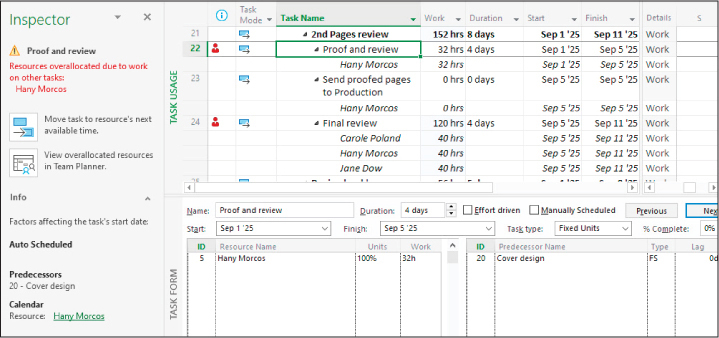
FIGURE 9-33 In the Actions area, the Task Inspector pane includes remedies to some scheduling problems, such as overallocated resources. (Note that the Team Planner feature shown here is available in Project Online desktop client or Project Professional only, not in Project Standard.)
In the Task Inspector, select the resource name Hany Morcos to view the resource calendar.
Close the Change Working Time dialog, and then close the Task Inspector.