
18
Customize Project
In this chapter
This chapter describes some of the ways you can customize Project Online desktop client to suit your preferences. As in most Microsoft programs, Project uses the ribbon interface, which offers good customization options. Project has other customization features, such as the Organizer and global template, that are unique to the app. In addition, Project has customization features, such as the capability to record Microsoft Visual Basic for Applications (VBA) macros, that are similar to features in other Microsoft Office (Microsoft 365) programs.
This chapter guides you through procedures related to sharing custom elements between plans, recording and running macros, editing macros, and customizing the ribbon and Quick Access Toolbar.
![]() Important
Important
Some of the actions you perform in this chapter can affect your overall settings in Project, regardless of the specific plan you’re using. To keep your Project environment unaffected or at the “factory settings” throughout this chapter, we include steps to undo some actions.
Share custom elements between plans
Project uses a global template, named Global.mpt, that provides the built-in views, tables, reports, and other elements you see in Project. The first time you display a view, table, or similar element in a plan, it’s copied automatically from the global template to that plan. Thereafter, the element resides in the plan. Any subsequent customization of that element in the plan (for example, changing the fields displayed in a table) applies only to that one plan and does not affect the global template. The global template is installed as part of Project; you normally don’t work with it directly.
Initially, the global template contains the specific definitions of all views, tables, and other elements. For example, the global template determines that the default Usage table contains one set of fields and not others. The elements that the global template provides include the following:
Views
Reports
Tables
Filters
Calendars
Groups
In addition, you can copy modules (VBA macros), import or export maps and custom fields to the global template, or share them between plans.
When you customize a built-in element such as a view, the customized element remains in the plan where it was customized. With views and tables, you have the option to replace the version of that element in the global template with your own customized view or table. However, if you create a new element, such as a new view, that new element is copied to the global template and thereafter becomes available in all other plans you work with. If you don’t want a new element to be copied to your global template, you can change this behavior.
One exception here is calendars. When you create a custom calendar, it remains only in the plan where it was created. A customized standard calendar that meets your needs in one plan might redefine working times in other plans in ways you didn’t intend. For this reason, Project has the Organizer feature, which you can use to share custom calendars (and other elements) between plans in a controlled way.
The complete list of elements you can copy between plans by using the Organizer is indicated by the names of the tabs in the Organizer dialog (see Figure 18-1).
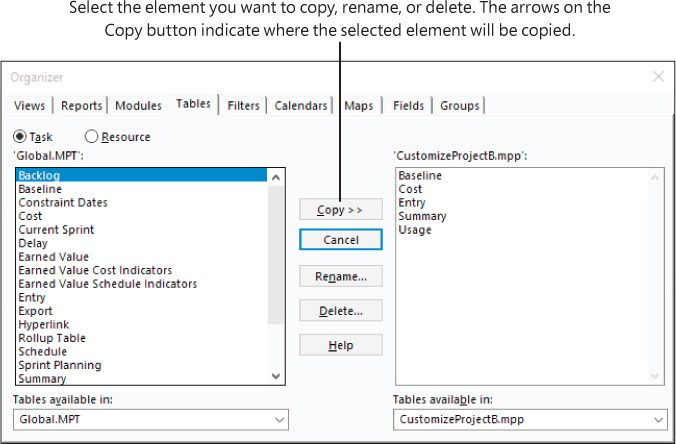
FIGURE 18-1 In the Organizer dialog, you can copy elements between plans or between a plan and the global template.
Most tabs of the Organizer dialog have a similar structure: elements in the global template appear on the left side of the dialog, and the elements that have been used in the active plan at any time (for example, views displayed) appear on the right. You use the tabs and two sides of the Organizer dialog to copy elements between the global template and a plan. Alternatively, instead of using the global template, you can select another open plan to copy elements between plans.
Selecting an element on the left side of the dialog and then selecting the Copy button copies that element to the plan listed on the right. Conversely, selecting an element on the right side of the dialog and then selecting the Copy button copies that element to the file listed on the left (the global template, by default).
You can use Project extensively and never need to touch the global template. When you do work with the global template, you normally do so through the Organizer. Some actions you can accomplish with the global template include the following:
Copy one customized element, such as a custom report, from one plan to another
Create a customized element, such as a custom calendar, and make it available in all plans you work with by copying the custom calendar into the global template
Replace a customized element, such as a view or table, in a plan by copying the original, unmodified element from the global template to the plan in which you’ve customized the same element
As you customize views, tables, and other elements, you might find the Organizer to be a useful feature for managing your customized elements and the built-in elements in Project.
![]() Tip
Tip
A view can contain other elements, such as a table, filter, or group. If you want to copy a customized view that uses other customized elements, you must copy the customized view and its customized elements between plans. You do so using the various element tabs of the Organizer dialog.
To copy an element between two plans
Open the two plans between which you want to copy an element.
Select the File tab to display the Backstage view, select Info, and then select Organizer to open the Organizer dialog.
At the bottom of the Organizer dialog, in the <Element Name> available in boxes, select the names of the plans between which you want to copy an element.
Next, select the tab of the type of element you want to copy.
On either the left or the right side of the Organizer dialog, select the element you want to copy from its plan to the other plan. On the Tables, Filters, Fields, or Groups tab, you might first need to select Task or Resource to display the element you want to copy. The two arrow symbols on the Copy button switch direction when you select an element on either side of the dialog and point toward the plan to which you will copy the selected element.
Select the Copy button.
Select Close to close the Organizer dialog.
To copy a customized element to the global template
Open the plan that contains the customized element (such as a view).
Open the Organizer dialog.
Select the tab of the type of element you want to copy.
Verify that Global.MPT appears on the left side of the dialog. If it doesn’t, in the <Element Name> available in box on the left side of the dialog, select Global.MPT.
On the right side of the dialog, select the custom element you want to copy to the global template. The two arrow symbols (>>) on the Copy button switch direction (<<) when you select an element on the right side of the dialog.
Select the Copy button.
Select Close to close the Organizer dialog.
To prevent customized elements from automatically being added to the global template
Select the File tab to display the Backstage view, and then select Options to open the Project Options dialog.
Display the Advanced page.
Under Display, clear the Automatically add new views, tables, filters and groups to the global checkbox and then select OK.
Record and run macros
Many activities that you perform in Project are repetitive. To save time, you can record a macro that captures keystrokes and mouse actions for later playback. The macro is recorded in Visual Basic for Applications (VBA), the built-in macro programming language for Project and other Microsoft Office (Microsoft 365) programs such as Excel. You can take sophisticated actions with VBA, or you can record and play back simple macros without ever directly seeing or working with VBA code.
What kinds of repetitive activities might you want to capture in a macro? Here’s one example. Creating a graphic image snapshot of a view is a great way to share project details with others. However, the details you initially capture likely will become obsolete quickly as the plan is updated. Capturing updated snapshots is a repetitive task that’s ideal for automation through a macro. When this task is automated, you can quickly generate a new GIF image snapshot of a plan and save the GIF image to a file. From there, you can attach the GIF image file to an email message, publish it to a website, insert it into a document, or share it in other ways.
By default, the global template stores the macros that you create. Because the global template is open whenever Project is running, its macros are always available to you in Project; the plan for which you originally created the macro need not be open to run the macro in other plans. You can also use the Organizer to copy macros between plans. For example, you can use the Organizer to copy a VBA module that contains the macro from the global template to another plan so that you can give it to a friend.
When a macro is stored in a plan, that macro can be used in any plan when the plan that contains the macro is open.
When you begin recording a macro, you first record information about the macro in the Record Macro dialog shown in Figure 18-2.
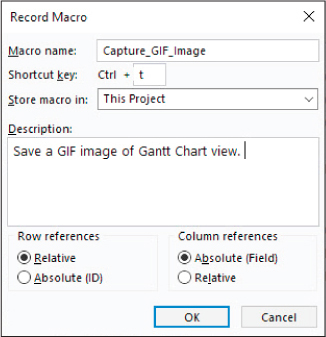
FIGURE 18-2 When you record a new macro, you give it a name and more in the Record Macro dialog.
Macro names must begin with a letter and cannot contain spaces. To improve the readability of your macro names, you can use an underscore (_) in place of a space. For example, instead of naming a macro CaptureGIFImage, you can name it Capture_GIF_Image.
When recording a macro, you can assign the macro a keyboard shortcut key. You can’t use a Ctrl+ combination that’s already reserved by Project, so combinations such as Ctrl+F (the keyboard shortcut for Find) and Ctrl+G (Go To) are unavailable.
Project doesn’t literally record and play back every mouse movement and passing second while you record a macro. Instead, Project records only the results of the keystrokes and mouse actions that you make. Don’t feel that you must rush to complete the recording of the macro.
After you record a macro, you run it from the Macros dialog, as displayed in Figure 18-3, or its shortcut key, if you assigned one.

FIGURE 18-3 Recorded macros appear in the Macros dialog; from here, you can run, edit, or delete macros.
![]() Important
Important
Your security-level setting in Project affects Project’s capability to run macros that you record or receive from others. You might not have set the security level directly; it might’ve been set when you installed Project or was set by a system policy within your organization. You can check your macro security settings in the Trust Center. On the View tab, in the Macros group, select the Macros arrow and then select Macro Security.
To record a macro
On the View tab, in the Macros group, select the Macros arrow (not the button), and then select Record Macro to open the Record Macro dialog.
Enter a name, a description, and other options you want, and then select OK. Project begins recording the new macro.
Perform the actions you want recorded in the macro.
When you’re ready to stop recording the macro, on the View tab, in the Macros group, select the Macros arrow and then select Stop Recording.
To run a macro
On the View tab, in the Macros group, select the Macros button to open the Macros dialog.
In the Macro Name box, select a macro name and then select Run.
![]() Tip
Tip
If you assigned a Ctrl+ keyboard shortcut to the macro, you can also run the macro by pressing its key combination.
To delete a macro
Open the Macros dialog.
In the Macro name box, select a macro name and then select Delete.
Confirm the deletion, and then select Close.
Edit macros
After you’ve recorded a macro, it might work perfectly fine the way you recorded it, or it might benefit from some adjustments to its code. By editing the macro’s code, you can give the macro functionality that you cannot capture when recording the macro, such as dismissing an alert. As Figure 18-4 shows, a macro’s code resides in a VBA module, and you work with the code in the VBA environment, commonly called the Visual Basic Editor. If you view the VBA module’s code, you might recognize some code values that correspond to whatever actions you recorded in the macro, such as FilterApply (applies a filter) and EditCopyPicture (copies a picture).
A full explanation of the VBA language is beyond the scope of this book, but here’s one example of the power of VBA for automating tasks. Let’s say you’ve recorded a macro that includes saving a GIF image file of a view. When you initially save the file while recording the macro, the process works fine.
However, when you subsequently run the macro, it’s interrupted by a dialog that asks you to verify whether you want to replace the existing GIF image file with a file of the same name.
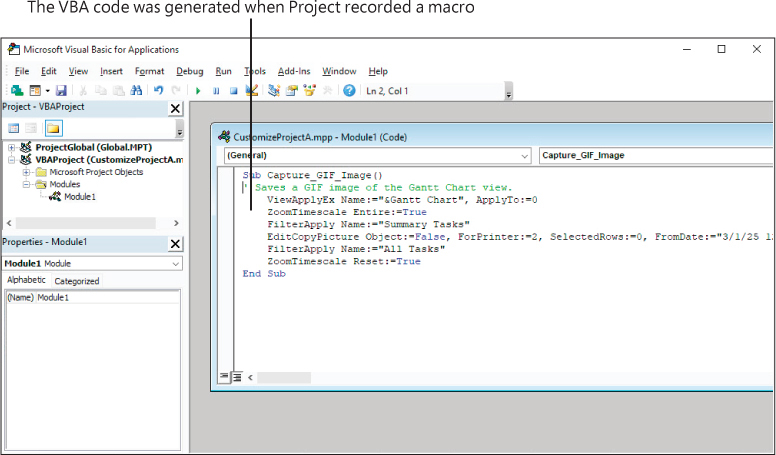
FIGURE 18-4 In this sample code from a recorded macro, you might generally recognize what the code strings do even if you don’t know VBA in detail.
You can use a single line of VBA code to avoid the interruption every time you run the macro. You can see the inserted code, Application.Alerts False, in Figure 18-5.
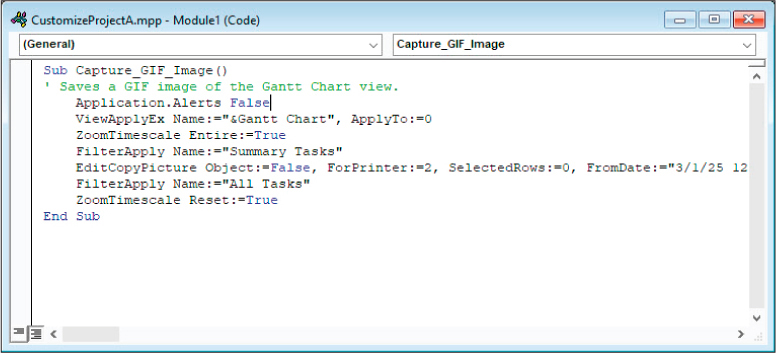
FIGURE 18-5 In this sample code from a recorded macro, an added line of code suppresses the display of a dialog.
In the GIF image file example, this line of code suppresses the dialog you received when running the macro. Instead, the macro causes Project to accept the default option of replacing the existing GIF image file with one of the same name.
![]() Tip
Tip
The VBA language and Visual Basic Editor are standard in Project and many apps. Although the specific details of each app differ, the general way in which you use VBA is the same in each app. VBA automation is a powerful tool you can master, and you can use that knowledge in many Microsoft Office (Microsoft 365) programs.
Consider some additional tips for working with VBA macros in Project:
VBA is a rich and well-documented programming language. If you want to take a closer look at VBA in Project, try this: On the View tab, in the Macros group, select the Macros arrow and then select Visual Basic. The Microsoft Visual Basic for Applications window (referred to as the Visual Basic Editor) opens. In the Visual Basic Editor, on the Help menu, select Microsoft Visual Basic for Applications Help.
While working in a module, you can get help on specific items such as objects, properties, and methods. Select a word, and then press the F1 key.
As you type in the Visual Basic Editor, selection boxes and ScreenTips might appear. The Visual Basic Editor uses such tools and feedback to help you correctly enter text in a module.
To close the Visual Basic Editor and return to Project, on the File menu, select Close and Return to Microsoft Project.
To edit a macro
On the View tab, in the Macros group, select Macros.
Select the name of a macro and then select Edit. Project loads the module that contains the macro in the Visual Basic Editor.
Edit the VBA code.
When you’re done editing the macro, on the File menu in the Visual Basic Editor, select Close and Return to Microsoft Project. The Visual Basic Editor closes and you return to the plan.
Customize the ribbon and Quick Access Toolbar
As with other Microsoft programs, you have several choices for how you work with Project. Some of the many customization settings include the following:
Add frequently used commands to the Quick Access Toolbar
Customize commands on the ribbon
See Figure 18-6 for examples of these customizations.
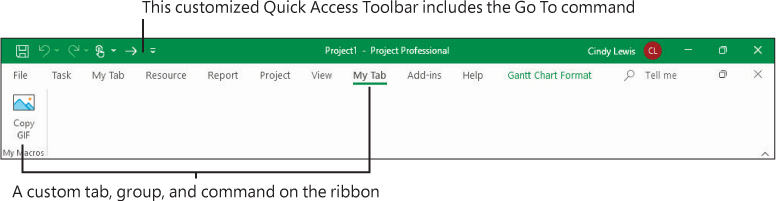
FIGURE 18-6 A customized Quick Access Toolbar and a custom tab that contains a custom command.
The customizations you make to the Quick Access Toolbar and ribbon are normally available to you regardless of the plan you have open in Project. If you prefer, you can make a customized Quick Access Toolbar available only to a specific plan.
You can customize the Quick Access Toolbar in multiple ways:
Right-click or long-press (tap and hold) any command on the ribbon and, in the shortcut menu that appears, select Add To Quick Access Toolbar.
Select the Customize Quick Access Toolbar arrow and then select an item in the list of common commands.
Use the Project Options dialog to add, reorder, or remove commands from the Quick Access Toolbar (see Figure 18-7).
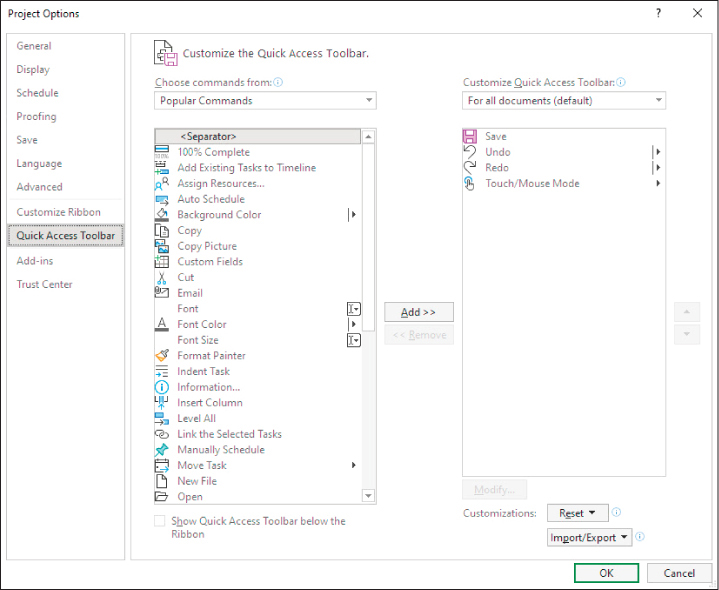
FIGURE 18-7 Use the Quick Access Toolbar page of the Project Options dialog to add, remove, or reorder commands on the Quick Access Toolbar.
As Figure 18-8 shows, you use the Customize Ribbon page of the same Project Options dialog to customize the ribbon.
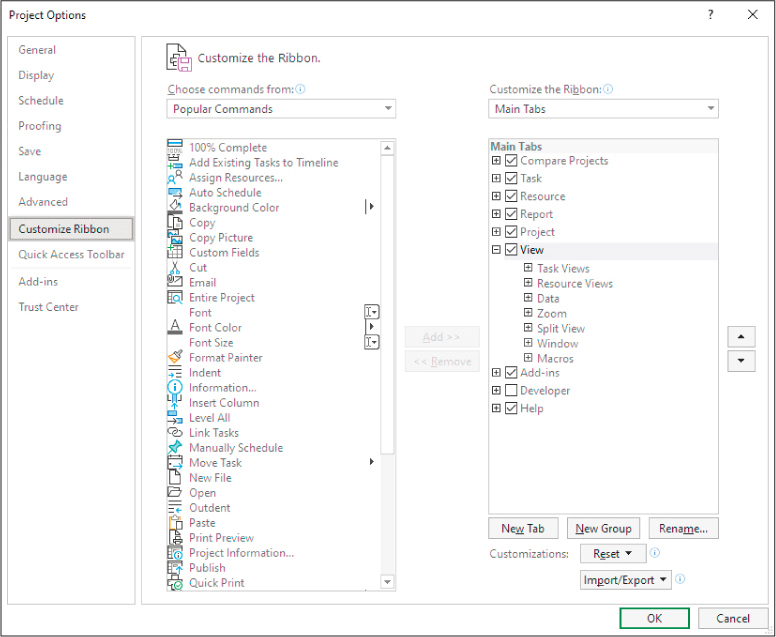
FIGURE 18-8 Use the Customize Ribbon page of the Project Options dialog to customize the ribbon.
On the Customize Ribbon page, you can add or remove commands from any tab, or you can create new tabs. You can also remove all customizations from the ribbon or Quick Access Toolbar and reset them back to their original appearance by using a single command in the Project Options dialog.
![]() Tip
Tip
You can share a customized ribbon with other Project users. The Customize Ribbon page of the Project Options dialog includes the Import/Export command for this purpose.
To quickly add or remove a single command to or from the Quick Access Toolbar
Do either of the following:
To add a command to the Quick Access Toolbar, right-click the command where it appears on the ribbon and then select Add to Quick Access Toolbar.
To remove a command from the Quick Access Toolbar, right-click the command where it appears in the Quick Access Toolbar and, in the shortcut menu that appears, select Remove from Quick Access Toolbar.
To customize the Quick Access Toolbar
Select the File tab to display the Backstage view, and then select Options to open the Project Options dialog.
In the Project Options dialog, display the Quick Access Toolbar page.
 Tip
TipYou can also select the arrow at the right end of the Quick Access Toolbar and then select More Commands to display the Quick Access Toolbar page of the Project Options dialog.
On the left side of the dialog, in the Choose commands from box, select the category of commands you want.
By default, the Quick Access Toolbar applies to all plans you work with in Project. To set the customized Quick Access Toolbar to apply only to a specific open plan, in the Customize Quick Access Toolbar box, select the name of the plan to which you want it to apply.
In the list of available commands (in the large box on the left side of the dialog), select the command that you want to add to the Quick Access Toolbar and then select Add.
To reorder the commands on the Quick Access Toolbar, in the list of Quick Access Toolbar commands (in the large box on the right side of the dialog), select a command and then use the up and down arrow buttons to the right of the box to move it.
When you’ve finished your customization, select OK.
To reset the Quick Access Toolbar to its original appearance
On the Quick Access Toolbar page of the Project Options dialog, select the Reset button and then select Reset only Quick Access Toolbar.
To customize the ribbon
In the Project Options dialog, display the Customize Ribbon page.
TipYou can also right-click the ribbon and then select Customize the Ribbon to display the Customize Ribbon page of the Project Options dialog.
Perform any of the following customizations:
To reorder the commands on a specific tab, in the list of ribbon commands (in the large box on the right side of the dialog), select a command and then use the up and down arrow buttons to the right of the box to move it.
To remove a command, in the list of ribbon commands (on the right side of the dialog), do one of the following:
Select the command and select Remove.
Right-click the command and, in the shortcut menu that appears, select Remove.
To create a new tab or a new group on the selected tab, select the New Tab or New Group button. Then select the Rename button to give the new tab or group a name.
To add a command to a custom tab, first select the custom tab’s group (on the right side of the dialog). Then select a command in the list of available commands (on the left side of the dialog) and select Add.
TipCommands that are dimmed on the Customize Ribbon page cannot be reordered or removed from the ribbon.
When you’ve finished your customization, select OK.
To reset the ribbon to its original appearance
On the Customize Ribbon page of the Project Options dialog, do either of the following:
To reset a tab on the ribbon back to its original appearance, select the tab in the list of ribbon commands (on the right side of the dialog), select Reset, and then select Reset only selected Ribbon tab.
To reset the complete ribbon back to its original appearance, select Reset and then select Reset all customizations. This action also resets the Quick Access Toolbar.
Skills review
In this chapter, you learned how to
Share custom elements between plans
Record and run macros
Edit macros
Customize the ribbon and Quick Access Toolbar

Practice tasks
The practice files for these tasks, CustomizeProjectA and CustomizeProjectB, are located in the ProjectDesktopSBSCh18 folder. For practice file download instructions, see the introduction to this book.
![]() Important
Important
If you’re running Project Online desktop client or Project Professional, make sure that Project is not connected to Project Web App and is instead set to Computer mode. For more information, see Appendix C, “Integration with Microsoft 365 solutions for collaboration.”
Share custom elements between plans
The scenario: at Lucerne Publishing, you previously created a calendar to apply to a task in a plan. Another plan includes the same type of task with the same calendar requirements. You want to use the task calendar in this other plan. Open the CustomizeProjectA plan in Project and perform the following tasks:
In the CustomizeProjectA plan, point to the Calendar indicator of task 44. Note the ScreenTip, as Figure 18-9 shows: the task has the Mon-Wed Task Calendar applied.
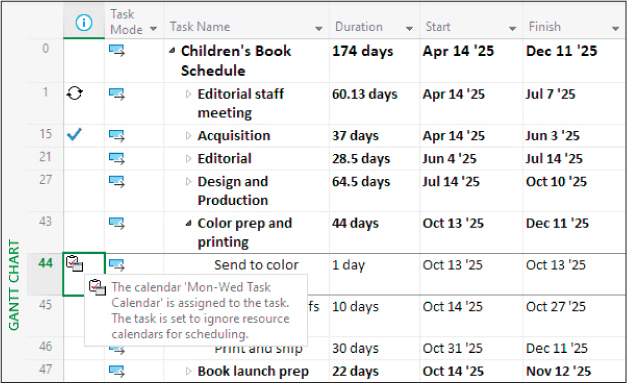
FIGURE 18-9 This plan contains the custom calendar you need to copy to another plan.
Open CustomizeProjectB.
Use the Organizer to copy the Mon-Wed Task Calendar from CustomizeProjectA to CustomizeProjectB, as shown in Figure 18-10.
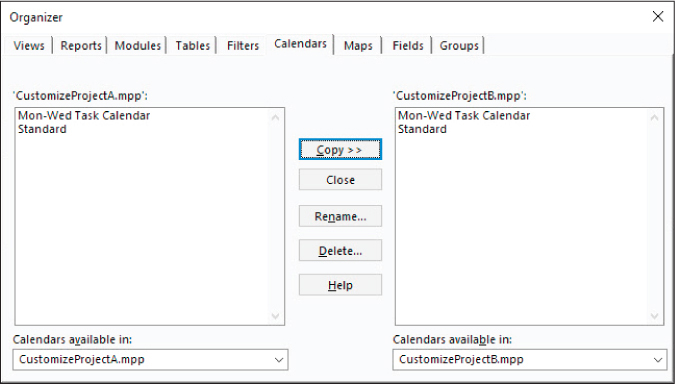
FIGURE 18-10 After you copy the calendar, it appears as a Calendar element in both plans.
Save and close CustomizeProjectB. Leave CustomizeProjectA open.
Record and run macros
The scenario: you frequently generate a GIF image snapshot of a plan for sharing with the team. You want to automate this task. Continuing in the CustomizeProjectA plan, perform the following tasks:
Open the Record Macro dialog. Name the macro Capture_GIF_Image, don’t use a shortcut key, store the macro in the open plan CustomizeProjectA, and replace the default Description text with Saves a GIF image of the Gantt Chart view. See Figure 18-11 for the filled in Record Macro dialog.

FIGURE 18-11 After you enter this information in the Record Macro dialog, you’re ready to record the macro.
Select OK to start recording the macro, and then perform the following actions:
On the View tab, in the Task Views group, select Gantt Chart. Do this even though the Gantt Chart is currently displayed. This way, the Gantt Chart selection will be captured in the macro regardless of what view is initially displayed.
On the View tab, in the Zoom group, select Entire Project.
On the View tab, in the Data group, in the Filter box, select Summary Tasks.
On the Task tab, in the Clipboard group, select the Copy arrow and then select Copy Picture to open the Copy Picture dialog.
Under Render image, select To GIF image file, browse to the Ch18 folder (or your preferred location for saving), and use the default file name and select OK.
Select OK to close the Copy Picture dialog.
On the View tab, in the Data group, in the Filter box, select No Filter.
On the View tab, in the Zoom group, select Zoom, and then select Zoom to open the Zoom dialog.
Select Reset and then select OK.
On the View tab, in the Macros group, select the Macros arrow and then select Stop Recording.
Now run the macro from the Macros dialog. When prompted, overwrite the GIF image file.
Edit macros
The scenario: you work in the Visual Basic Editor to fine-tune and enhance the macro you recorded in the previous set of practice tasks and then run it. Continuing in the CustomizeProjectA plan, perform the following tasks:
Open the Macros dialog.
Edit the Capture_GIF_Image macro in the Visual Basic Editor.
At the beginning of the ViewApplyEX line, press Enter to add a new line above it.
In the new line, enter Application.Alerts False with no closing punctuation, as Figure 18-12 shows.
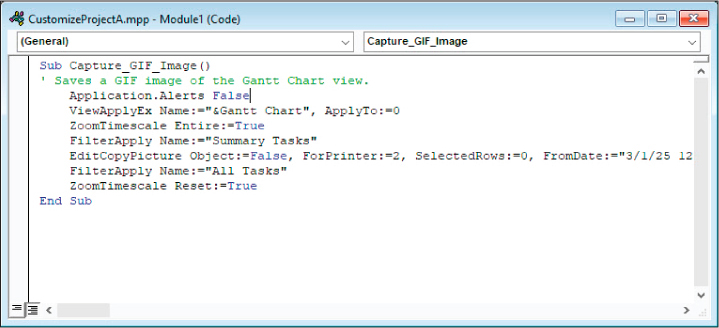
FIGURE 18-12 After you edit the macro code, you no longer see the prompt to overwrite the previously saved GIF image.
Close the Visual Basic Editor.
Run the macro. This time, you don’t see the prompt to overwrite the previously saved GIF image.
Customize the ribbon and Quick Access Toolbar
The scenario: you want to make the custom macro that generates a GIF image snapshot of a plan accessible via a custom tab. Continuing in the CustomizeProjectA plan, perform the following tasks:
Add the Go To command to the end of the Quick Access Toolbar. You can add the command either for all plans or just for the CustomizeProjectA plan.
Add a new tab named My Tab and a new group named My Macros to the ribbon. Position the new tab after the View tab.
Add the Capture_GIF_Image macro to the My Tab tab, in the My Macros group. Rename the macro Copy GIF and assign it to the picture symbol in the second row of symbols. See Figure 18-13 for an example of this ribbon customization.
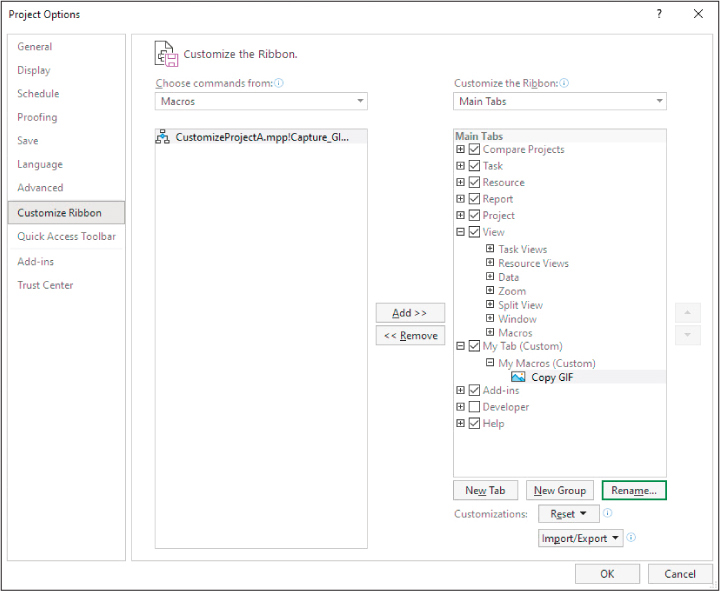
FIGURE 18-13 Your custom ribbon, group, and command look like this in the Project Options dialog.
Select OK to close the Project Options dialog and display your custom tab (see Figure 18-14).

FIGURE 18-14 Your custom ribbon, group, and command now look like this in the ribbon.
On the My Tab tab, in the My Macros group, select Copy GIF. Your macro runs.
TipThe customized Quick Access toolbar and custom ribbon tab will be available when you work with other plans in Project. To restore your computer to factory settings, follow the instructions in this chapter to reset these items to their original appearance.