
Chapter 2
The Final Cut Pro Interface

Introduction
This chapter introduces the Final Cut Pro interface and explains its general operation. Chapters are divided into sections that group similar tips together. Near the end is a section on troubleshooting, in the event bad things happen. (All screen shots are from Final Cut Pro 10.6.3.)
54 Download the Final Cut Pro User Guide
Help files exist as online files and as a download.
Download the complete Final Cut Pro User Guide to your computer. This reference can be viewed, searched, and annotated. As well, all links referenced in it are clickable.
The complete Final Cut Pro User Guide is available online or as a download.
The downloaded book file is stored in Applications > Books. The PDF can be stored wherever you want. Apple updates it with every new version. To get your free copy:
Open Final Cut.
Choose Help > Final Cut Pro Help.
At the bottom of the Help page, click a link to download a PDF version or a version for Apple Books.
Note
I prefer the PDF version because it is easy to search and annotate, and it can be stored anywhere.
The Final Cut Pro Interface
This section explains how to use what you see on the screen.
Get to Know the Interface
The main areas of the Final Cut Pro user interface, shown in FIGURE 2.1, include:
Library List (shortcut: Cmd+’). Located in the top-left corner, this sidebar displays all open libraries and associated events.
Browser (shortcut: Cmd+1 to select). Located next to the Library List, this displays all currently open media. Press Control+Cmd+1 to show/hide this.
Timeline (shortcut: Cmd+2 to select). Located at the bottom of the interface, this displays the clips you are editing into a project.
Viewer (shortcut: Cmd+3 to select). Located in the upper center of the interface this displays whatever clip is active in the Browser or Timeline.
Inspector (shortcut: Cmd+4). This panel is where you make changes to whatever is selected; just about everything in Final Cut can be selected.
Effects browser (shortcut: Cmd+5). This contains audio and video effects that can be applied to clips in the timeline. However, many effects are located outside of the Effects browser.
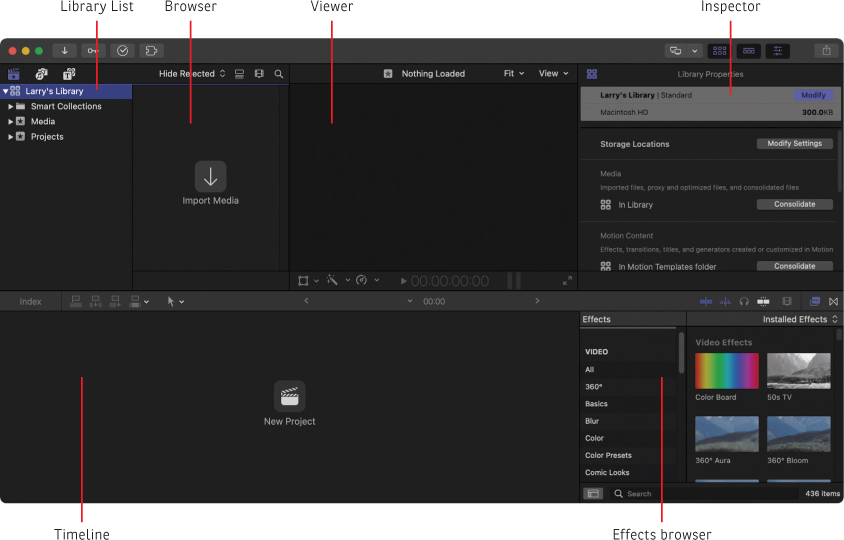
FIGURE 2.1 The Final Cut Pro interface.
When the skimmer is active, the playhead is ignored. To use the playhead, turn the skimmer off (S).
Playhead. Visible only in a clip or timeline, this vertical line moves during playback. By definition, this displays exactly one frame—the frame under the vertical line.
Skimmer (shortcut: S). Visible only in a clip or timeline, this is a high-speed way to review clips. This is useful to review clips in the Browser, Media Import window, or timeline.
55 Modify the Final Cut Interface
The interface is designed for a single screen but can be modified.
The Final Cut interface is fully assembled, meaning that although you can’t separate interface elements, like the Browser, you can make small changes such as sizing panels or the entire screen.
As the arrows in FIGURE 2.2 illustrate, drag a vertical or horizontal edge to resize a panel. Most panels can be resized.
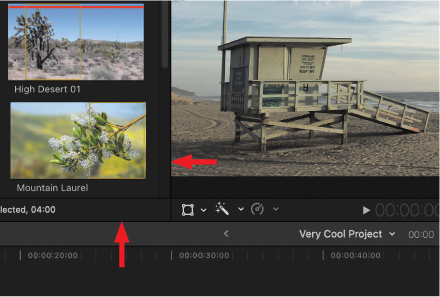
FIGURE 2.2 Resize a panel by dragging a horizontal or vertical edge.
You can enable or disable portions of the interface by clicking a button; see FIGURE 2.3. For example, click one of the three icons in the top-left corner to:
Toggle the Library List (red arrow) open or closed.
Toggle the Photos, Music, Apple TV, or Sound Effects browsers.
Toggle the Titles or Generator browser.

FIGURE 2.3 These three horizontal buttons toggle different browsers. Blue indicates the active browser.
The buttons in the top right of the interface allow you to select which portions of the interface to display, as shown by the labels in FIGURE 2.4:
Display the selected interface on a second connected computer monitor (see Tip 60, Expand the Interface with Two Computer Monitors). This icon is hidden if a second monitor is not connected.
Toggle the Browser open or closed (shortcut: Control+Cmd+1).
Toggle the timeline open or closed (shortcut: Control+Cmd+2).
Toggle the Inspector open or closed (shortcut: Cmd+4).
Share (export) a project (shortcut: Cmd+E).

FIGURE 2.4 These buttons reveal or hide different interface elements. The menu determines what’s displayed on a second monitor.
56 Workspaces—Hidden Enablers of Productivity
Use the workspaces Apple built or create your own.
Apple ships with four prebuilt interfaces (called workspaces) that are optimized for specific tasks. You can find them in Window > Workspaces. Although you can create these workspaces yourself (see Tip 55, Modify the Final Cut Interface), using the Workspace menu (or its keyboard shortcut) gets you there faster.
Default (shortcut: Cmd+0). This is the standard Final Cut Pro interface that you see when you open the application.
Organize (shortcut: Control+Shift+1). This turns off the timeline and enlarges both the Browser and Inspector. It is optimized for organizing media and adding metadata and keywords.
Color & Effects (shortcut: Control+Shift+2). This turns off the Browser and opens the video scopes, Inspector, and Effects browser (FIGURE 2.5).
Dual Displays (shortcut: Control+Shift+3). This assumes a second computer monitor is attached to your computer displaying whatever interface element is selected in the Dual Monitor menu (see Tip 60, Expand the Interface with Two Computer Monitors).
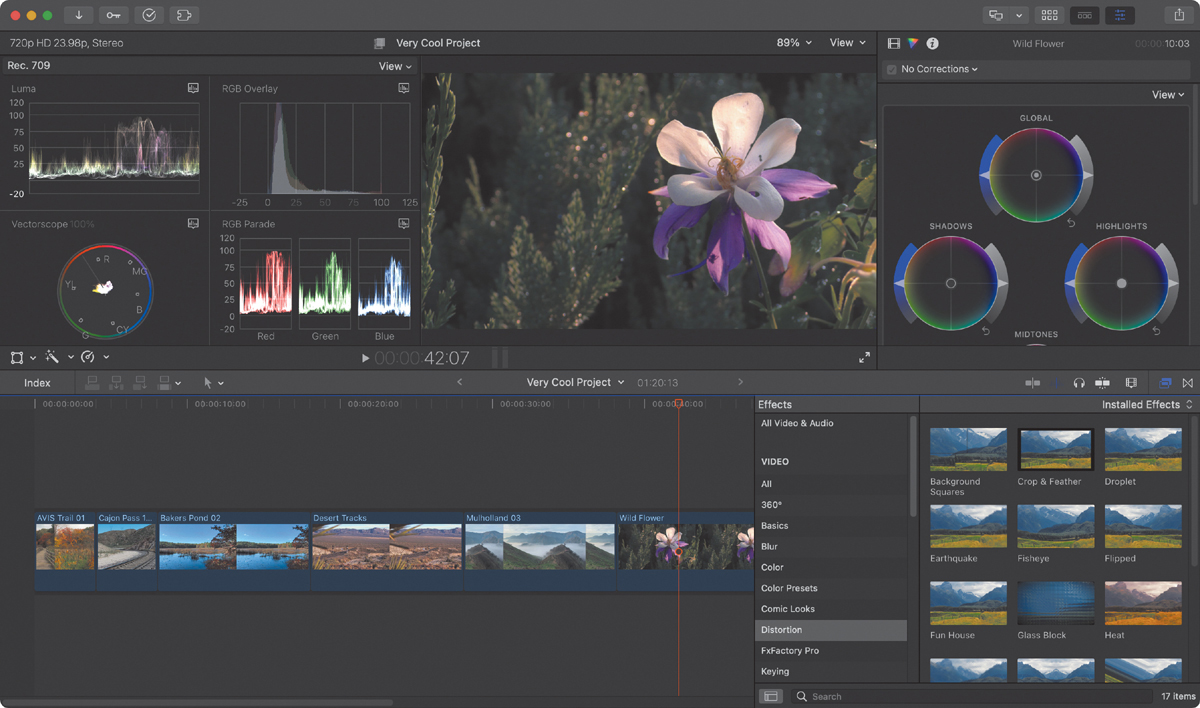
FIGURE 2.5 The Color & Effects workspace showing, clockwise from top left: video scopes, Viewer, Inspector with color wheels, Effects browser, and timeline.
57 What Can You Put in a Workspace?
Quite a lot, actually, and much of it is turned off by default.
Final Cut supports multiple displays: the main computer monitor, a second computer monitor, and a dedicated video monitor. All are somewhat customizable; see FIGURE 2.6. We will cover these options in separate tips.
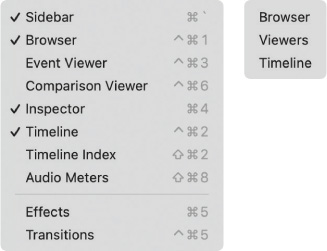
FIGURE 2.6 Display options in Window > Show in Workspace (left) and Window > Show in Secondary Display (right).
Final Cut supports multiple displays with a somewhat customizable interface.
58 Create Your Own Custom Workspace
FCP supports an unlimited number of custom workspaces.
Once you’ve dragged, pushed, hidden, or displayed interface elements to attain interface nirvana, it’s time to save it as a custom workspace.
Choose Window > Workspaces > Save Workspace; see FIGURE 2.7.
Give the file a name and click Save.
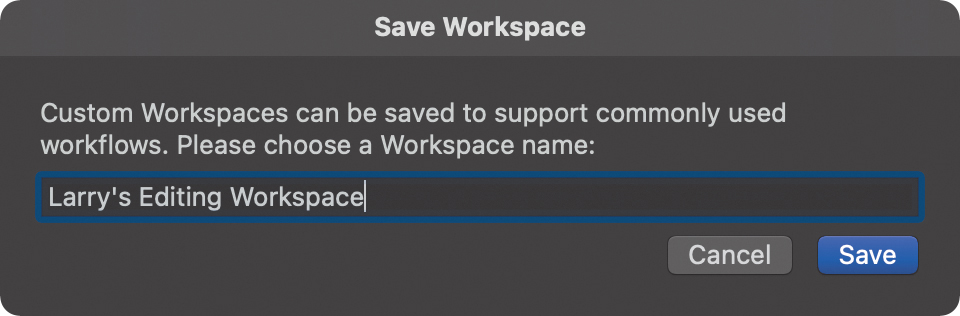
FIGURE 2.7 The Save Custom Workspace dialog.
Your new custom workspace shows up at the top of the Workspace list. Although there’s no technical limit to the number of custom workspaces, practically it doesn’t make sense to wade through dozens of them.
59 Create a Custom Workspace Keyboard Shortcut
This also can create shortcuts for any application.
FCP doesn’t provide keyboard shortcuts for user-modified/saved workspaces. However, you can create them in System Preferences > Keyboard > Shortcuts; see FIGURE 2.8.
Open System Preferences > Keyboard (top red arrow).
Click Shortcuts (middle red arrow).
Click App Shortcuts (bottom red arrow).
Click the plus icon.
In the dialog, choose Final Cut Pro from the Application menu.
Enter the menu name precisely as it appears in the menu, dots and all.
Enter the key combination you want to use as a shortcut in the Keyboard Shortcut field.
Click Add to close the dialog; then quit System Preferences.
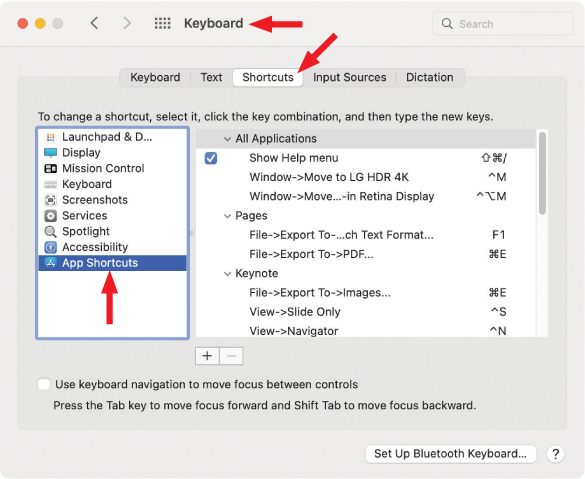
FIGURE 2.8 Create custom keyboard shortcuts in System Preferences > Keyboard > Shortcuts.
Create custom shortcuts for any app using System Preferences > Keyboard > Shortcuts.
Every app I use on a daily basis uses at least one of these custom shortcuts. They are invaluable.
60 Expand the Interface with Two Computer Monitors
This menu controls what’s shown on a second monitor.
Final Cut supports spreading its interface across two computer monitors. When you connect a second monitor, the icon shown in FIGURE 2.9 appears (red arrow).
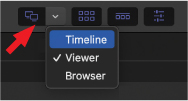
FIGURE 2.9 This icon enables a second computer monitor and what it will display.
Click the white chevron next to the two-monitor icon to choose what to display on the second monitor:
Timeline (with video scopes)
Viewer (full screen with playback controls)
Browser (with Library List)
Click the two-monitor icon (red arrow) to switch Final Cut from using a single to dual display. Click this icon again to turn off the second display. It turns blue when a second monitor is active.
61 Play Video on a Calibrated Video Monitor
Final Cut supports video playback to a separate monitor.
Note
There’s a difference between a computer monitor and a video monitor. Final Cut supports both.
There are computer monitors and video monitors. Video monitors are optimized and calibrated for video playback and generally connected via HDMI or SDI. Calibrated video monitors are strongly encouraged for color-critical SDR and HDR editing.
If you connect a video monitor, Final Cut can play the timeline directly to it full screen. This includes the Apple Pro Display XDR. Playing the Viewer to a computer monitor does not provide the same color accuracy; see Tip 60, Expand the Interface with Two Computer Monitors.
Connect the device, then choose it from the menu at the bottom of Final Cut Pro > Preferences > Playback; see FIGURE 2.21.
Choose Window > AV Output and make sure the correct device is checked.
62 The Background Tasks Window
Here’s how to control Final Cut’s background activity.
One of the reasons Final Cut Pro is so fast is that it pushes a lot of its work to the background. This means while you concentrate on playing and editing clips, FCP waits. Then, when you pause to think, FCP jumps into action. “In the background” means that the computer is working behind the scenes without disturbing what you are doing. If the computer is busy in the foreground, background activity stops. This allows the full resources of the computer to concentrate on you.
Watch and control this activity using the Background Tasks window. Using this isn’t required, but it’s there if you are curious. To open this window, click the icon indicated by the red arrow in FIGURE 2.10 or press Cmd+9.
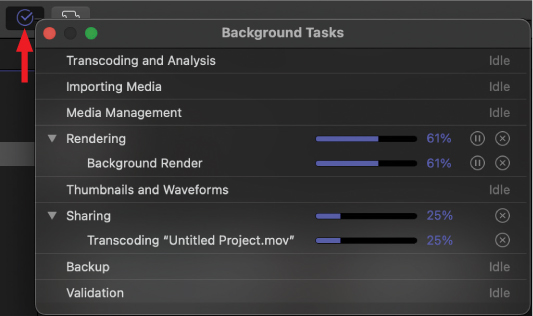
FIGURE 2.10 The Background Tasks window.
Running tasks display a small triangle to the left of the process name.
To see more details, click the triangle next to the name.
To pause a task, click the Pause (two parallel lines) button on the right.
To cancel a task, click the “x” in a circle, also on the right.
63 Interface Icon Colors Are Significant
Blue means active.
Final Cut uses a variety of interface colors to indicate status; see FIGURE 2.11.
Blue means something is active.
Gray means it is inactive.
White means the text is for information or labeling.
Yellow means a clip, or clip range, is selected or that the Range tool is active.
FIGURE 2.11 Blue icons indicate active elements; gray are inactive and white are labels.
64 There Is One Inspector—with Multiple Faces
The icon and contents of the Inspector change based on selection.
To open or close the Inspector panel, press Cmd+4.
The Inspector is where you make changes—to just about everything. There’s exactly one Inspector, located in the top right of the interface. However, the Inspector assumes a different name, icon, and function depending upon what is selected. For example, the Video Inspector is active when a video clip is selected. The Inspector can take ten different forms; see FIGURE 2.12.
FIGURE 2.12 A Photoshop composite of the ten Inspector icons: (left to right) Library, Generator, Transition, Text Animation, Text Formatting, Video, Color, Audio, Info, and Share Metadata. The Library and Transition Inspectors are shown as active (blue). In real life, only one Inspector icon is active (blue) at a time.
The active Inspector displays a blue icon at the top of the Inspector. Switch between different Inspectors by clicking its icon.
65 Change the Height of the Inspector
Double-click the Inspector title bar to change its height.
Here are three tips to change the Inspector display:
To open or close the Inspector, click the Inspector icon (top red arrow in FIGURE 2.13), or press Cmd+4.
To enlarge the Inspector so it fills the screen vertically, double-click the title bar (middle red arrow). Double-click again to shrink it back to half-height (shortcut: Control+Cmd+4).
To hide or reveal a parameter group, move the cursor to the right of the group name. Click Show to show details for that parameter, and click Hide to hide them (lower red arrow).
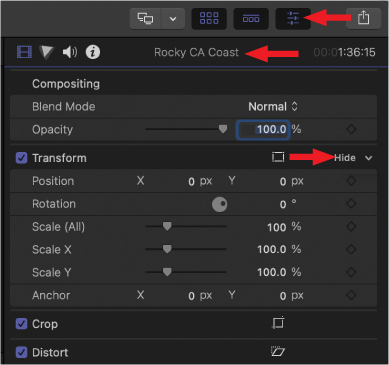
FIGURE 2.13 Double-click the title bar to enlarge/shrink the Inspector. Click Hide or Show to reveal individual parameter groups.
66 A Shortcut to Sharing
This shortcut speeds exports.
Apple calls exporting sharing. This is true, I guess, but it strikes me as unnecessarily cute. The most obvious way to export a project is to use File > Share. But a faster way is to use the Share icon; see FIGURE 2.14.
FIGURE 2.14 The Share icon lists current destination options.
The Share icon lists current export destinations. Change these using Final Cut Pro > Preferences > Destinations; see Tip 75, Optimize Destination Preferences.
Open the project you want to share into the timeline.
Make sure the timeline is active.
Choose your export option from this menu.
For details on how to configure this menu, see Tip 483, The Share Icon.
67 The Hidden Extensions Icon
This icon appears only when you install at least one extension.
A hidden feature in Final Cut Pro is workflow extensions. These are software tools from third-party developers that connect into and extend the features of Final Cut Pro. You are using a third-party app inside FCP. Workflow extensions are available from:
ADD (Audio Design Desk)
APM Music
CatDV
EVO ShareBrowser
Frame.io
KeyFlow Pro
Primestream
Postlab Merge
Ripple Training
Shutterstock
Simon Says
Universal Production Music
FontAudition-X
Once you install at least one extension, you’ll see the icon in the top-left corner of the FCP interface (shown by the red arrow in FIGURE 2.15). If you install more than one, you’ll also see the menu.
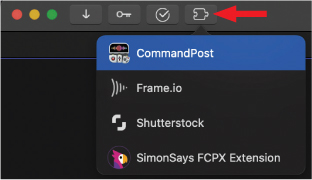
FIGURE 2.15 The Workflow Extension icon and installed extensions menu.
Optimize Preferences
Preferences customize Final Cut Pro to the way you want to work.
68 Optimize General Preference Settings
Not all preferences are created equal. Here are some to change.
To display preference settings, choose Final Cut Pro > Preferences. There are five preference panels. Over the next several tips, I’ll show you how I optimize mine. When it comes to the General preferences panel, see FIGURE 2.16; there are two settings to consider:
Dialog Warnings. When FCP displays a warning, there’s often a button that says “Don’t show this again.” If you click one of these by mistake, click Reset All to reset the warnings.
Color Correction. This defaults to the Color Board. I will confess, it took me about six years to make my peace with the Color Board. I can now use it successfully, but I prefer to use the Color Wheels. Changing this setting means that whenever you create a new color correction, Final Cut defaults to whatever you select.
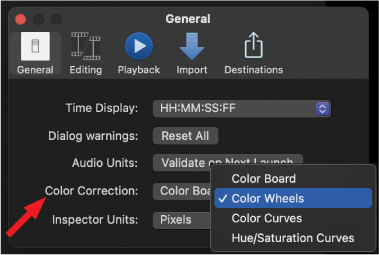
FIGURE 2.16 The General preferences panel.
Change any of these preferences at any time; however, changing a preference setting does not affect any existing media or projects.
69 A Quick Note on Measurements
Final Cut offers two different measurement systems.
At the bottom of the General preferences window (FIGURE 2.17) is Inspector Units with two measurement options: Pixels and Percentages.
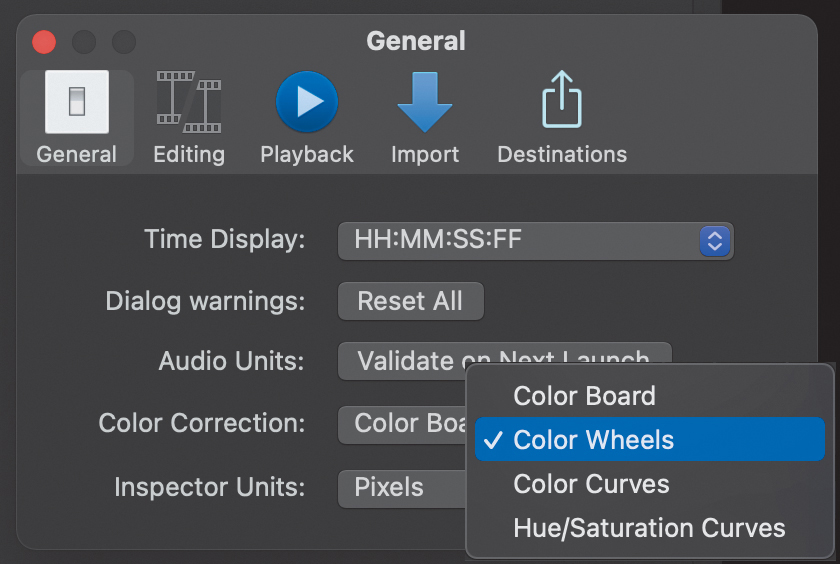
FIGURE 2.17 The General preferences window showing the two measurement options.
When Percentages is chosen (see the red arrow in FIGURE 2.18), some settings are expressed as a percentage. Although percentages are helpful, I prefer pixels.
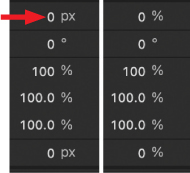
FIGURE 2.18 Note the difference in the top line when the Units preference setting is changed.
70 Optimize Editing Preferences
I recommend changing three of these settings.
The next preferences panel is Editing; see FIGURE 2.19. Most of these settings are fine, though you should be aware of what they do.
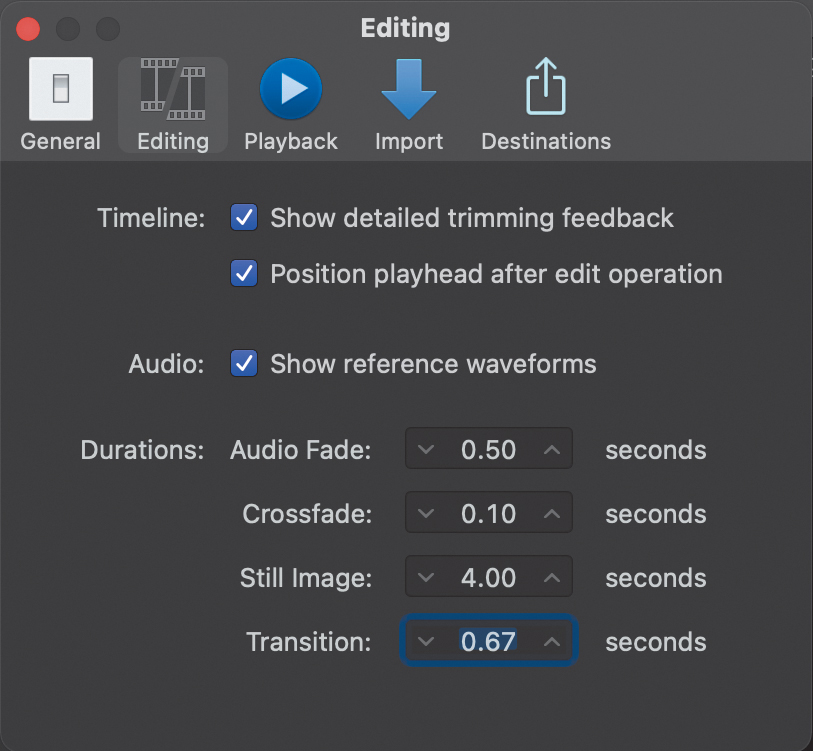
FIGURE 2.19 The Editing preferences panel.
Show detailed trimming feedback. This displays the Trim Edit window when trimming clips; see Tip 227, The Trim Edit Window. I recommend you select this.
Position playhead after edit operation. When selected and you edit a clip to the timeline, the playhead jumps to the end of the newly edited clip. If unselected, the playhead remains in its current position. I recommend you select this.
Show reference waveforms; see FIGURE 2.20. This is handy when editing audio clips with low levels. When selected, Final Cut displays ghost images of audio waveforms in the timeline as though that audio were at full level. These “ghosts” help you make more accurate audio edits. This is a display-only function; nothing about the audio is changed. If audio editing is new to you, select this.
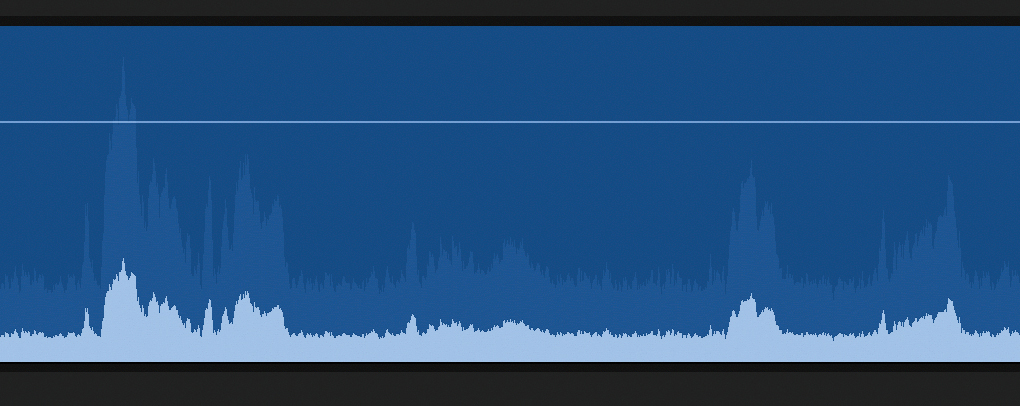
FIGURE 2.20 Look carefully and you’ll see ghosted waveforms that show what the levels would look like at full volume.
Durations timing. The default transition can be applied using keyboard shortcuts. These settings determine duration defaults. Changing these settings does not change any transitions already applied to timeline clips. Still Image sets the default import duration of stills, Photoshop files, and still frames. The only duration I suggest you change is Transition. I find the default duration of one second is too long. So I shorten it to 0.67.
71 Optimize Playback Preferences
These defaults are fine—with one change.
The Playback preferences panel, as shown in FIGURE 2.21, has excellent defaults, except I recommend selecting all the options, including If a frame drops, stop playback and warn. Dropped frames are always serious. It is important to know what caused them, then fix it before things get worse.
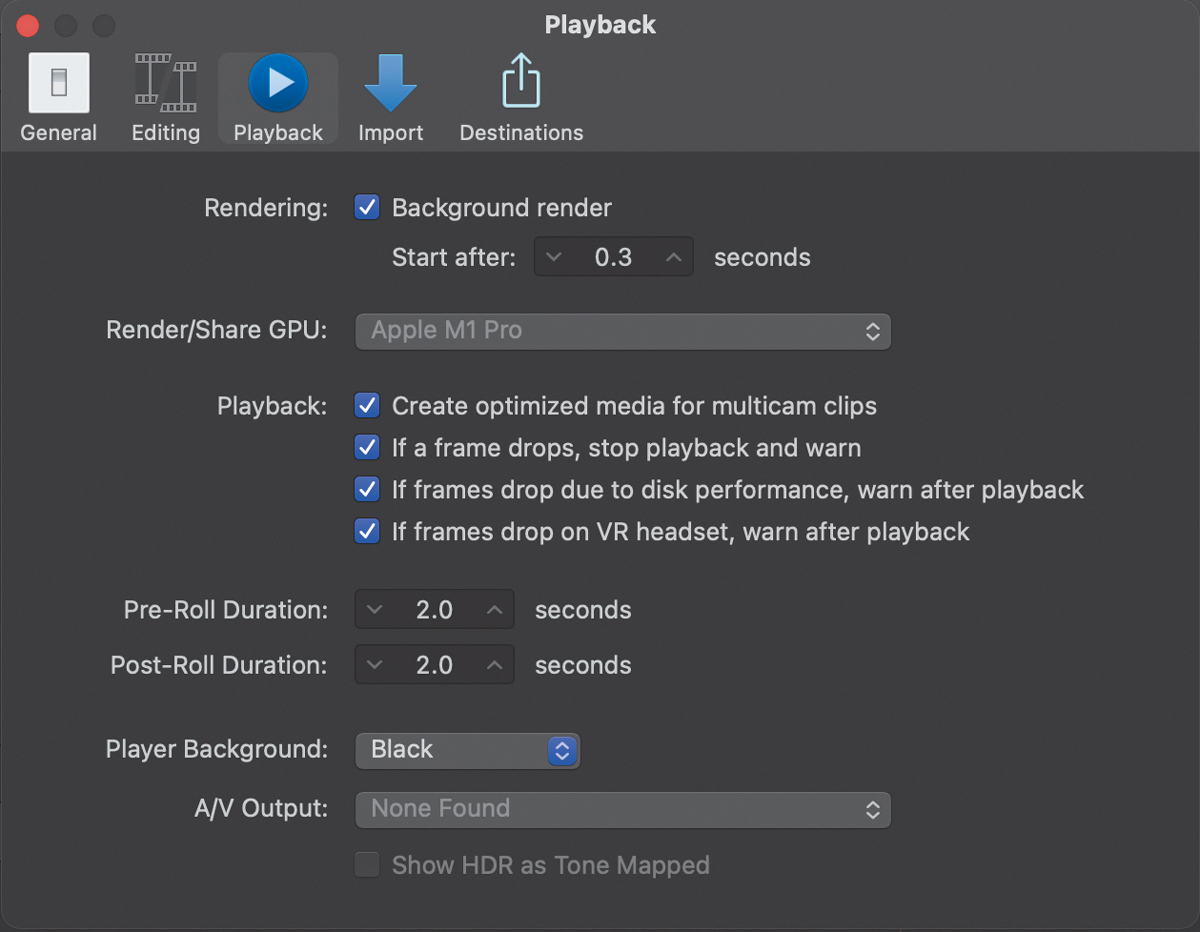
FIGURE 2.21 The Playback preferences panel.
Rendering means Final Cut is calculating new media. It stops automatically whenever you play, edit, or trim a clip. Most of the time, the default render settings are fine. However, if you have an older system and rendering interferes with your work, change Start After to 5 seconds. If that doesn’t help, unselect Background render and render a project as necessary from the Modify menu.
72 What Do Dropped Frame Errors Mean?
Dropped frame warnings are never good.
A dropped frame warning in Final Cut means that, for some reason, one or more frames of media were not able to play successfully in real time. Dropped frame warnings should never be ignored or turned off, as they can impact the quality of the final, exported project.
There are five main causes of dropped frames:
Dropped frame warnings should never be ignored or turned off.
A stock footage clip has problems (this is the most typical).
The storage system is too slow to play the media you are editing, for example, if you are playing ProRes 422 files off a USB-A thumb drive.
The CPU is not fast enough to play the media you are editing, for example, editing H.264 media on an older computer system.
The effects applied to a clip are too complex to play without rendering.
A multicam clip is too large or complex to play in real time.
The solutions are fairly simple:
Convert the stock footage clip to ProRes 422 or replace it.
Move your media to faster storage.
Optimize the camera source media to the default format of ProRes 422.
Render effects before playing them (Modify > Render All).
Use proxies, rather than camera source, for editing multicam clips.
In all cases, never ignore dropped frame errors.
73 Use a High-Quality Audio Monitor
Macs include good speakers. Monitor speakers are better.
Just as you can connect an external high-quality video monitor to precisely display your video, you can also connect high-quality audio monitor speakers. Currently, I’m using a pair of Yamaha HS5 monitor speakers connected to a Focusrite Scarlet 2i2, which then connects to my computer via USB-A. The sound is stunning.
To enable this, select System Preferences > Sound, as shown in FIGURE 2.22, and check the audio interface you are using for your system. Final Cut uses the system audio settings for recording and playback.
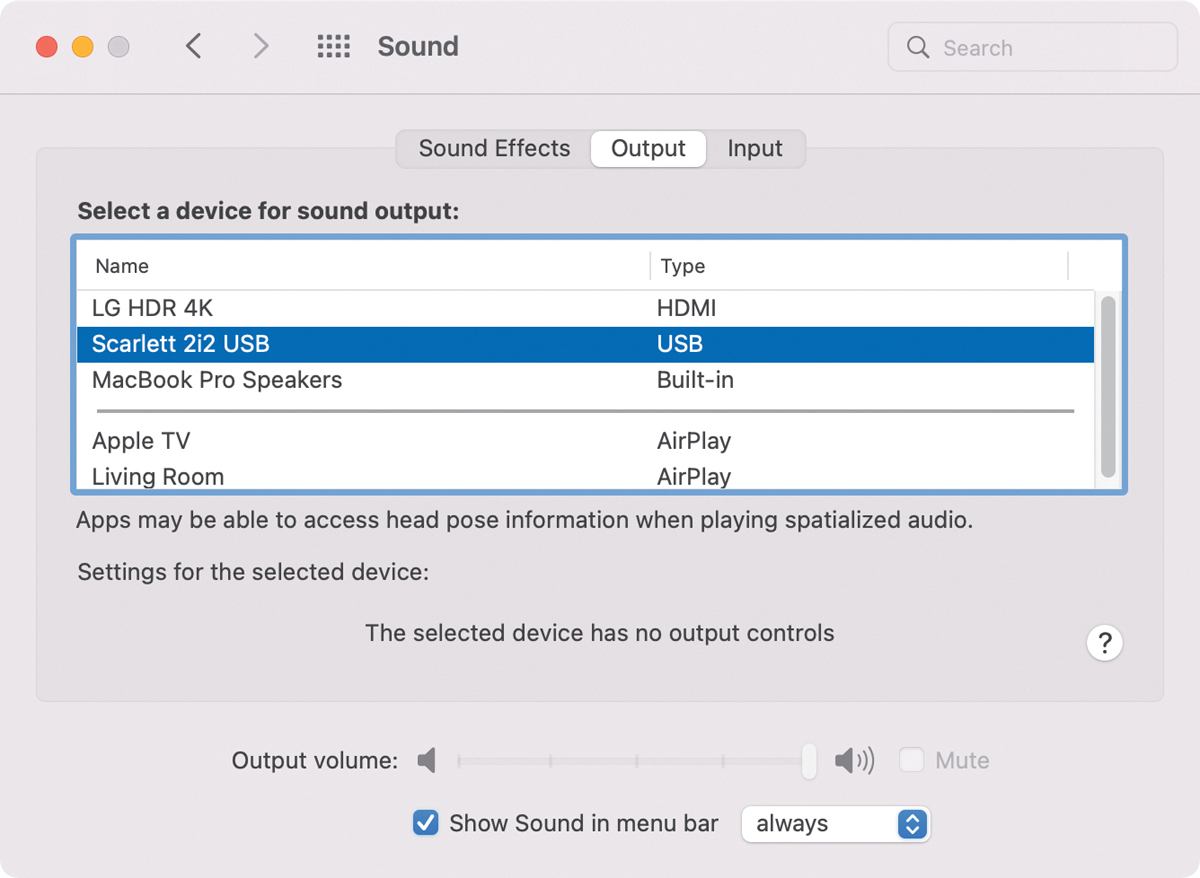
FIGURE 2.22 System Preferences > Sound, with the Scarlet 2i2 audio interface selected for output.
74 Optimize Import Preferences
The default settings will get in your way.
The Import preferences panel, as shown in FIGURE 2.23, determines how the media you import using the Media Import window, and media that you drag into FCP, are handled.
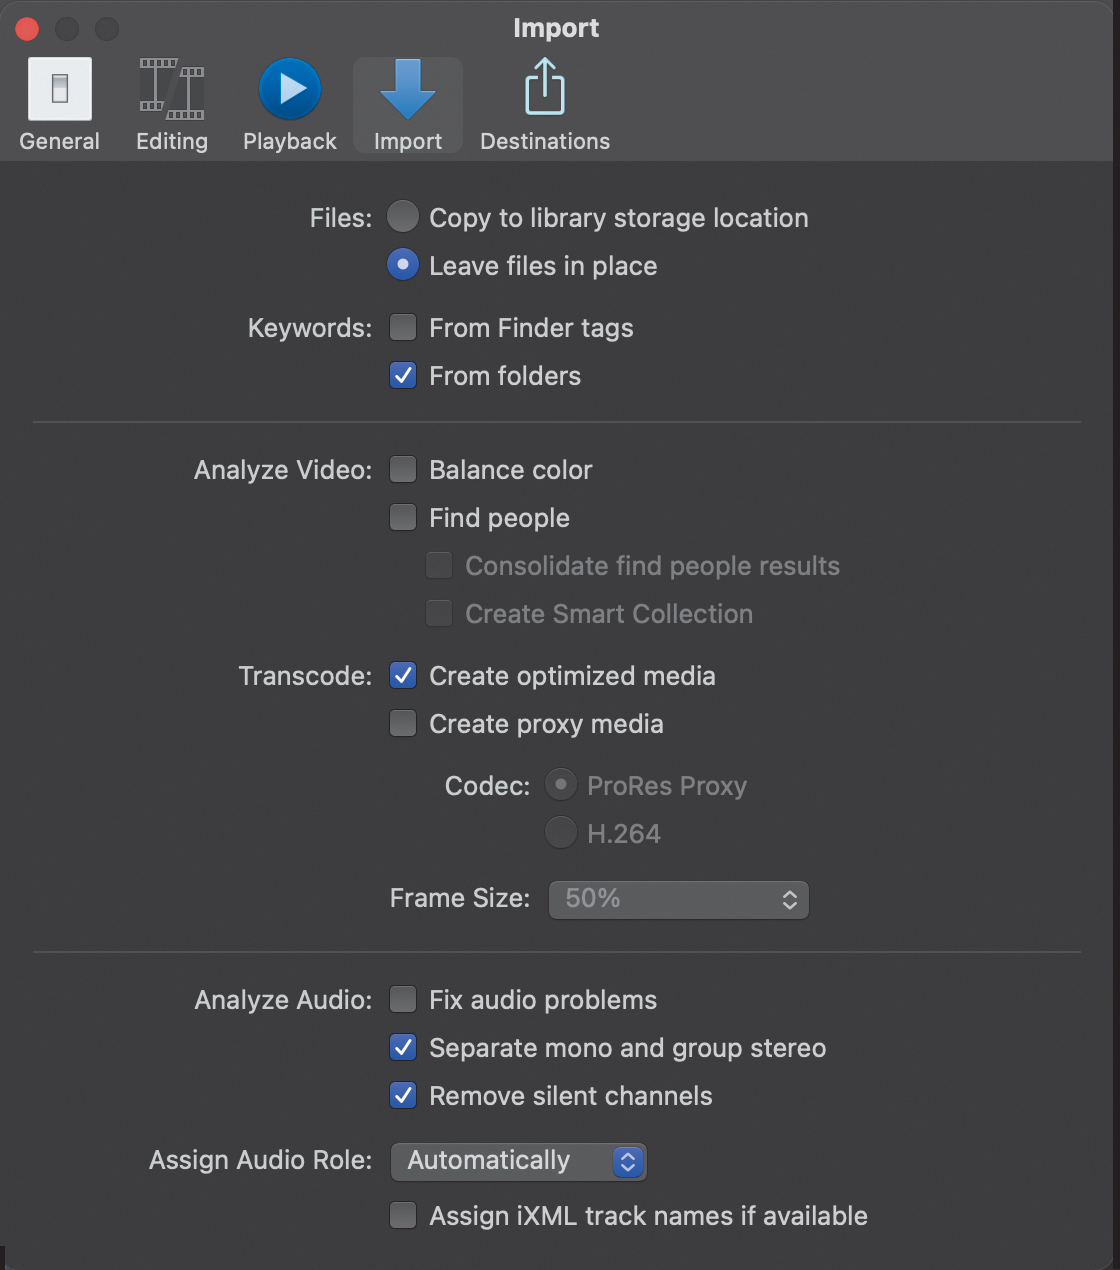
FIGURE 2.23 The Import preferences panel. This is discussed more fully in Chapter 3.
Import preferences also change whenever you change settings in the Media Import window.
I’ll explain these in more detail in Chapter 3, “Libraries & Media,” but I want to include them here with the rest of Final Cut’s preferences. Figure 2.23 shows the settings I use.
75 Optimize Destination Preferences
Every editor’s needs are different, but I prefer simplicity.
The Destination preferences window, as shown in FIGURE 2.24, determines the default options when you choose File > Share. Every editor is different, and I’m grateful that Apple provided a wide range of options here. However, all my projects are exported as a high-quality ProRes 422 or 4444 file, suitable for any conceivable need, as well as archiving.
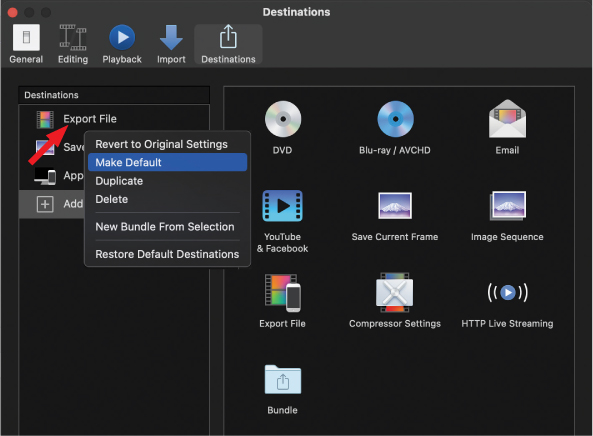
FIGURE 2.24 The Destinations preferences panel, showing potential destinations on the right and the hidden menu that appears when an active destination on the left is right-clicked.
Then, from that exported project file, I create as many compressed versions as are necessary—though I use other software for that. There’s no sense tying up Final Cut—even though exporting happens in the background—for a task that can be batch processed and better controlled using other software tools.
To set a destination as default (shortcut: Cmd+E), right-click and choose Make Default from the menu.
To add a destination, drag it from the right pane to the left.
To adjust the default settings for a destination, select the destination on the left, then adjust them on the right. These settings become the defaults the next time you choose that destination.
To remove a destination, right-click the icon and choose Delete from the menu.
The stacking order in the left panel determines the display order in File > Share and the Share icon in the interface. To change the stacking order, drag titles up or down.
The Browser
The Browser is where you organize and review project elements before and during editing. It can be displayed in the main interface or on a separate computer monitor.
76 The Browser Settings Menu
This menu controls the display and operation of the Browser.
The Browser is where you view all the elements you can access for editing. Its display is controlled by the Browser settings menu in the top-right corner; see FIGURE 2.25:
The top slider adjusts the size of thumbnails in the Browser.
The second slider adjusts whether you see a single thumbnail (All) or a film strip with thumbnails at time increments set by this slider.
Grouping and sorting are different ways of organizing clips in the Browser.
Waveforms displays or hides audio waveforms for clips with audio in the Browser. They are off by default.
Continuous Playback is a time-saving feature, but it’s off by default.
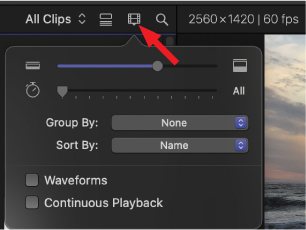
FIGURE 2.25 The Browser settings icon (red arrow) and the pane itself.
That brings us to the Continuous Playback option. When this is selected, when you play a clip in the Browser and the playhead reaches the end of the clip, it automatically starts playing the next clip. This continuous playback occurs whether you are playing at normal speed or fast-forward (see Tip 192: Playback Shortcuts).
Continuous playback is a great way to review and log a series of clips without touching the keyboard or mouse.
Note
View > Playback > Loop Playback must be turned off for continuous playback to work.
77 Eight Ways to Sort Browser Clips
By default, clips are sorted by the date they were created.
Final Cut seems to obsess about when clips were created. It’s the default sort option in the Browser, as if everything we shoot is in chronological order.
If this drives you as crazy as it does me, click the small Browser settings menu icon at the top of the interface, as shown in FIGURE 2.26, and choose a sorting option that works better for you. I use file names. They can be sorted in ascending or descending order.
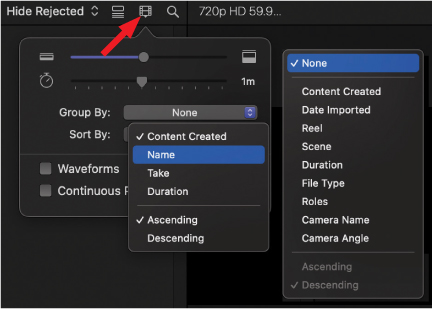
FIGURE 2.26 Click the Browser settings menu icon, then choose from the Sort By menu (left) or Group By menu (right).
Note
Sort By can be changed only in Filmstrip mode, not List mode. In List mode, click a column heading to sort by it; click again to reverse the sort order.
78 Group Clips in the Browser
Don’t like sorting? Try grouping!
Instead of sorting the clips within the Browser, you may want to group clips based on similar characteristics. Again, the Browser settings menu comes to the rescue. Click the small icon indicated by the red arrow in Figure 2.26 to display the Browser settings menu. There are nine different ways to group and display clips in the Browser.
These four fields use data supplied by you:
Reel
Scene
Camera name
Camera angle
These are simple text fields. Enter any data that helps you sort clips; the data doesn’t actually need to relate to the field name.
79 Display Audio Waveforms in the Browser
Audio waveforms display the volume of the audio in a clip.
Enabling audio waveforms in the Browser, as shown in FIGURE 2.27, makes it easy to quickly set an In or Out by looking at the waveform without playing the clip over and over (see Tip 194, Marking a Clip Sets the In and Out). However, this display setting is off by default in the Browser to avoid cluttering the Browser.
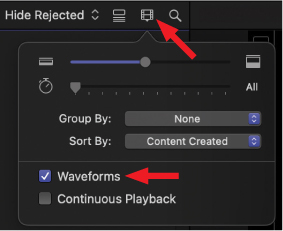
FIGURE 2.27 In the Browser settings menu (top arrow) select Waveforms to display audio waveforms for clips in the Browser.
Waveforms are displayed, as shown in FIGURE 2.28, under all Browser clips that contain audio. If you edit music, the waveform also makes it easy to see the beats.

FIGURE 2.28 The audio waveform displayed in a clip.
80 The Hidden Meaning of Clip Color Lines
Browser clip colors highlight clip status.
Ever wonder what those color bars displayed in Browser clips mean? FIGURE 2.29 illustrates:
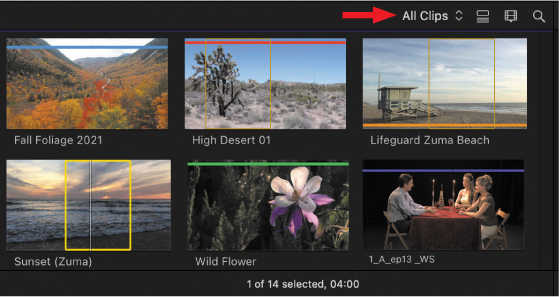
FIGURE 2.29 The different color bars in the Browser, which can also apply to regions within a clip, indicate a clip’s status.
Blue. A clip with at least one keyword applied.
Red. A rejected clip.
Orange: A clip used in the currently active project in the timeline.
Yellow box: A clip marked with an In and Out.
Green: A favorite clip.
Purple. A clip that has analysis keyframes applied.
81 Turn Off Those Color Lines in the Browser
Here’s how to hide those red, green, blue, and orange lines.
If the horizontal color lines in the Browser are bothering you, as shown in FIGURE 2.29, turn most of them off using View > Browser > Marked Ranges. (Unselecting turns them off.) The orange Used Clip indicator is disabled/enabled using View > Browser > Used Media Ranges.
82 Deleted Browser Clips Are Not Actually Deleted
They are simply hidden.
Press Delete to hide a clip. Press Cmd+Delete to actually delete it from the library, but not from your hard disk.
When you select a clip in the Browser and press the Delete key, the clip disappears from the Browser. Except…it isn’t actually deleted. It’s hidden. As Figure 2.29 illustrates, when you delete a clip, it’s flagged as “Rejected.” Normally, it also disappears.
However, when you change the Browser settings menu to All Clips, those rejected clips now appear with a red bar at the top. If you want to resurrect the clip, select it and press U. That “un-rejects” it.
To actually delete a clip, select it and press Cmd+Delete. That removes it from Final Cut but not from your hard disk.
83 Browser Badges—Explained
These badges indicate special kinds of clips.
When you add, import, or drag a clip into the Browser, most of the time it just sits there. But sometimes, a small badge appears, most of the time in the top-left corner. FIGURE 2.30 shows what those badges mean.
FIGURE 2.30 1. No badge, selected range; 2. Compound clip; 3. Audition clip; 4. Compound clip; 5. Multicam clip; 6. High-frame rate clip; 7. Synced clip; and 8. Clip still stored on camera.
84 Even Browser Clip Edges Share Secrets
Look more closely at the edges of clips in the Browser.
If your clips are longer than a few seconds, slide the second slider in the Browser settings menu, as shown in FIGURE 2.30, to the right to increase the number of thumbnails shown per clip. Then, if you look closely at clips in the Browser, you’ll notice something different about the edges; see FIGURE 2.31.
A torn edge on the right of a thumbnail in the Browser indicates a Browser clip that continues to the line below.
A torn edge on the left of a thumbnail in the Browser indicates a Browser clip that continues from the line above.
A clean edge of a thumbnail in the Browser indicates the start or end of a Browser clip.
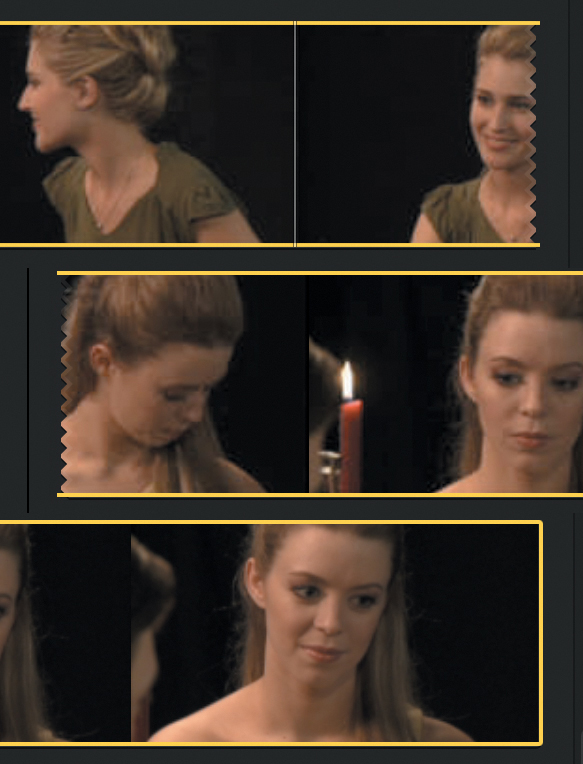
FIGURE 2.31 From top to bottom: a clip continued on the next line, a clip continued from the line above, and the end of a clip.
85 The Skimmer: A Tool I Love to Hate
The skimmer is useless—except when I really, really need it.
I have this love/hate relationship with the skimmer. I love using it in the Browser and Media Import window. It makes reviewing clips fast and easy. But when I move the skimmer down to the timeline, it makes editing almost impossible. It jumps all over, and I end up putting clips or cuts in the wrong place.
Toggle the skimmer on or off by pressing S. This shortcut is great, because I turn it on in the Browser and turn it off in the timeline.
But there’s another secret that’s really useful: Skimmer Info, illustrated in FIGURE 2.32. To turn it on, press Control+Y. When enabled, this displays the name of the currently skimmed clip in the Browser, along with the timecode location of the playhead or skimmer, whichever is active. This is useful for logging or when a client sends a paper edit with timecode locations written on it.
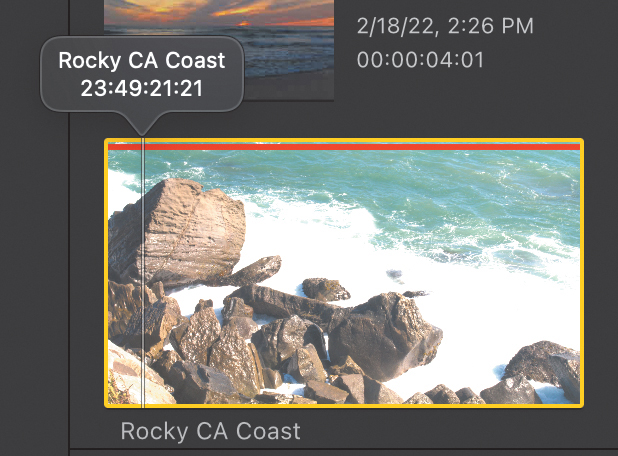
FIGURE 2.32 Skimmer info, the info bubble above the clip, includes the file name and the timecode of the position of the skimmer or playhead. It is visible only in the Browser.
Press S to toggle the skimmer on or off.
This display is a great way to make sure you are setting Browser clip Ins and Outs in the right place.
86 Top-Secret Hidden Browser Clip Menu
Create new projects faster.
Right-click any clip in the Browser to reveal this hidden clip menu; see FIGURE 2.33. Each of these options also appears in the menu bar at the top of the application.
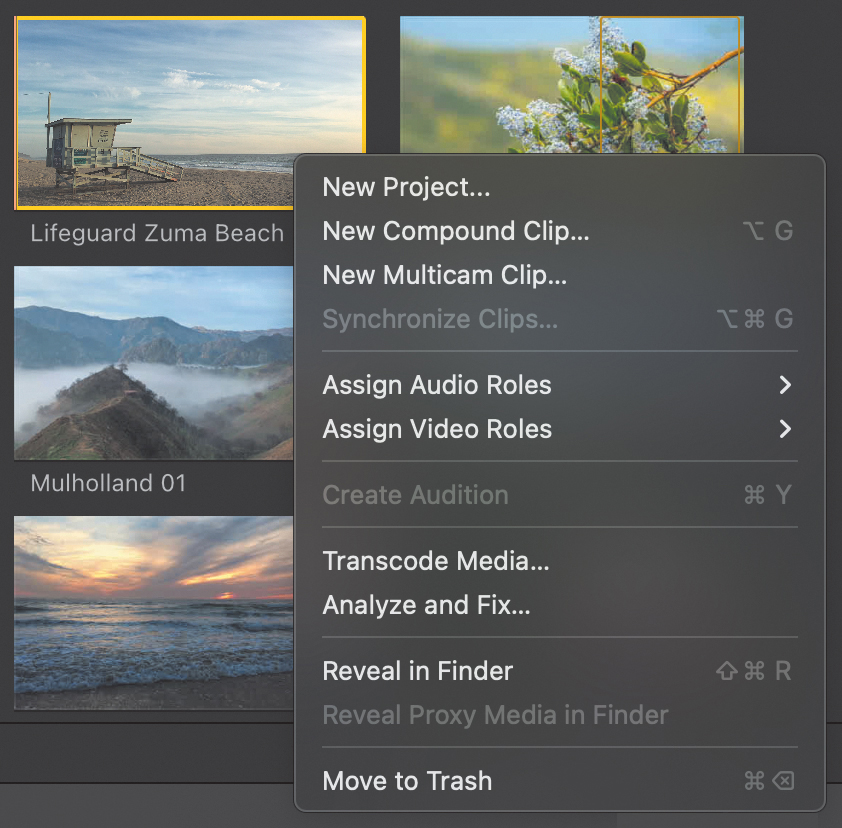
FIGURE 2.33 Right-click any Browser clip to reveal this contextual menu filled with common media management options.
Note
OK, all this menu is, really, is another contextual menu. But isn’t it much more exciting to think of this as a special, top-secret, hidden menu that only you and I know about? Of course it is.
However, there’s one big benefit to using New Project from this menu. If you create a new project using this option, Final Cut creates a new project that matches the specs of the selected clip, opens that project, and edits that clip into the project as the first clip.
This is a fast way to create a project with the specs you need without knowing the details about those specs in the first place.
87 A Hidden Project Menu
Manage projects faster from inside the Browser.
Right-click a project in the Browser, and you’ll see the menu shown in FIGURE 2.34.
Play. Opens a project into the timeline and plays it.
Open Project. Opens a project into the timeline, but doesn’t play it. This is the same as double-clicking the project icon in the Browser.
Share Project. This is a fast way to export the project to one of your current destinations.
Move to Trash. Removes the project from the library. I tend to use the keyboard shortcut: Cmd+Delete.
Tip 142, Don’t Duplicate a Project—Create a Snapshot, describes why snapshots are the best option for backing up a project. Avoid using Duplicate.
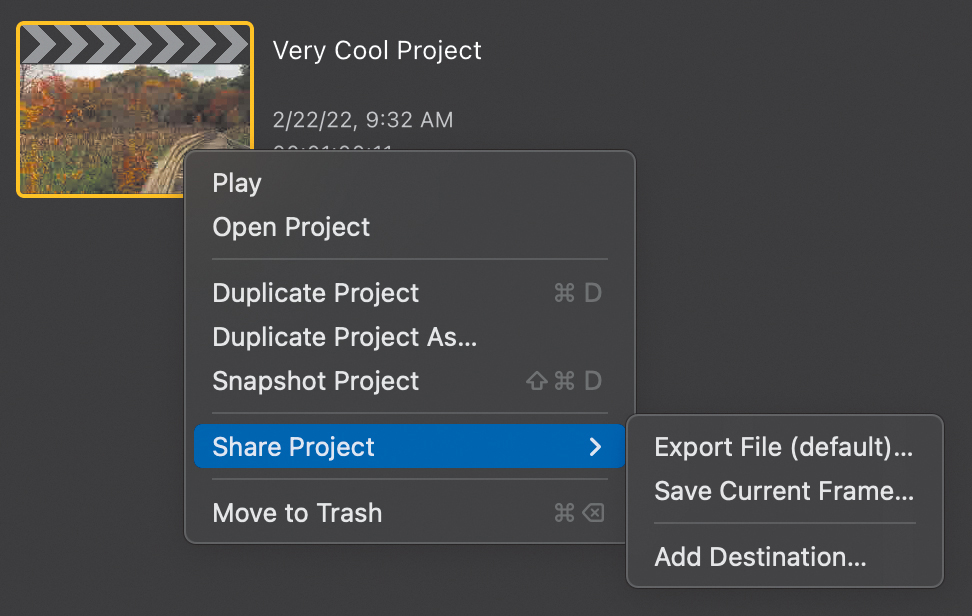
FIGURE 2.34 Right-click a project name or icon in the Browser to reveal this menu. Avoid using both versions of Duplicate Project.
88 View Clip Labels (Metadata) in Browser
A wealth of information is only one click away.
Normally, you view clips in the Browser using thumbnails. However, if you click the icon indicated by the top red arrow in FIGURE 2.35, the display switches to list view.
Each column can be sorted by clicking the column header to select it. Click the header again to reverse the sort order.
Change column widths, similar to Microsoft Excel or Numbers, by dragging the small vertical dividers in the column headers.
Change the position of columns by dragging the column header to a new position.
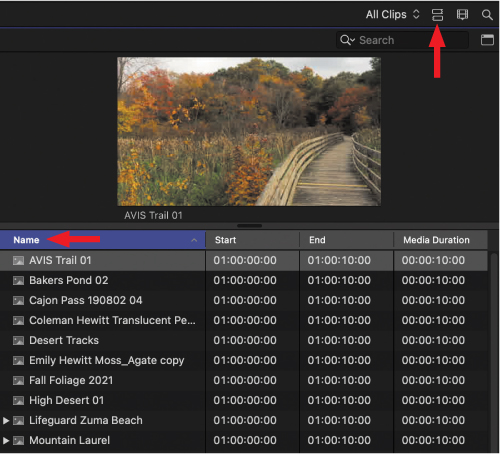
FIGURE 2.35 The Browser metadata list.
89 Hidden Browser Metadata Fields
Only a small portion of available metadata is displayed.
Although the Browser displays a lot of metadata in list view, it is only a fraction of the data that Final Cut tracks for each clip. To see more options, right-click any column header; see FIGURE 2.36.
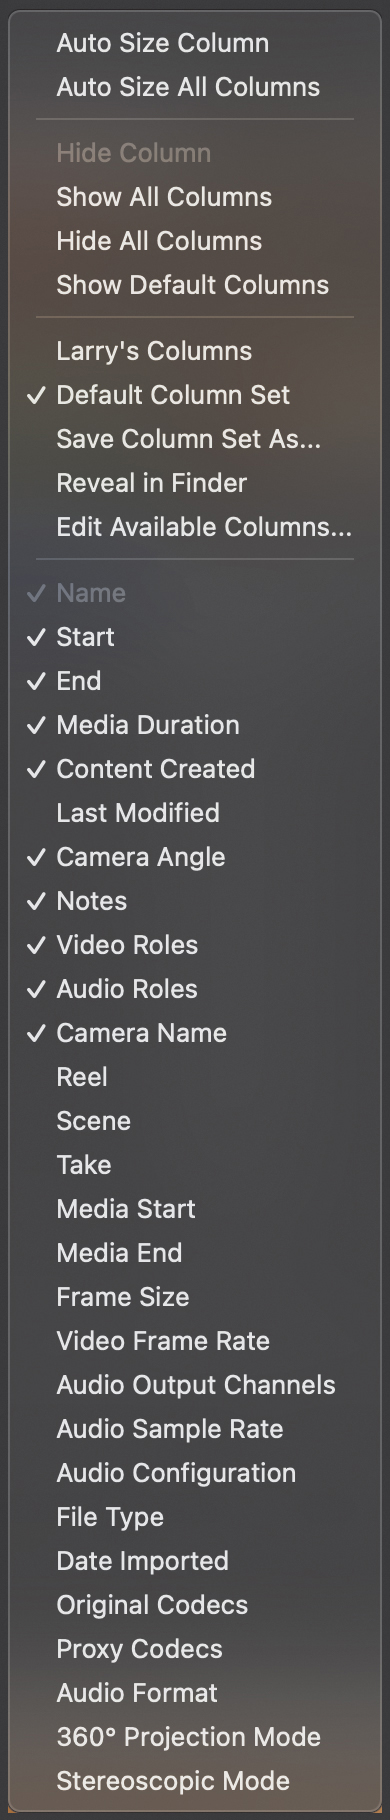
FIGURE 2.36 This lists the different data that can be displayed in Browser list view. (Checked means currently displayed.)
This reveals almost 30 potential display columns. If an item is selected, it’s displayed in the Browser. To change the display, select or unselect the fields you want.
The choices at the top of this menu help you manage the columns. In fact, rearrange the columns as you see fit, then save the arrangement as a custom column set. I use a custom column set when reviewing media prior to editing.
By the way, enabling Last Modified is a great way to find out the last time you changed a project.
Note
The only disadvantage to all this data is that it is hard to see it in the normal FCP interface. Instead, display the Browser using a second computer monitor (see Tip 60: Expand the Interface with Two Computer Monitors.)
90 Different Ways to View the Browser
All gathered together in one place.
There are lots of ways to configure the Browser so it shows what you need. We’ve already looked at the Browser settings menu. However, you will also find these options in the View > Browser menu; see FIGURE 2.37.
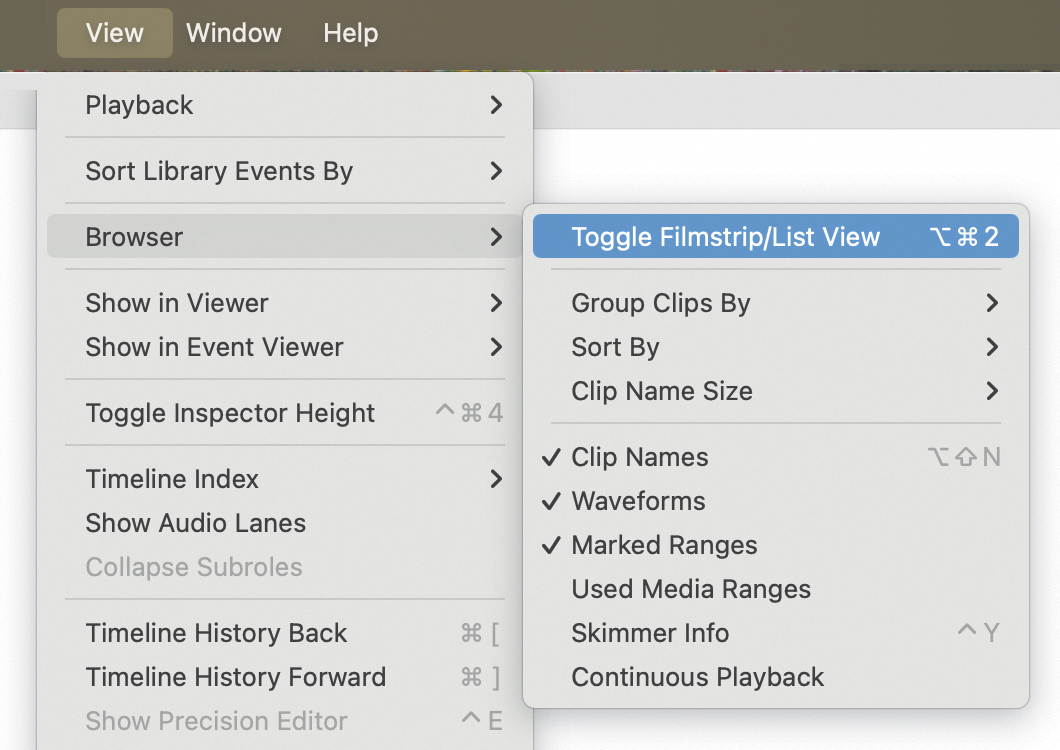
FIGURE 2.37 The View > Browser menu.
Although some of these options are the same as the Browser settings menu, for example, for grouping and sorting, many are unique to this menu.
91 The Photos, Music, Apple TV & Audio Sidebars
These sidebars may, or may not, be useful for you.
When FCP was first released, these, um, things were called browsers. Along the way they got renamed to sidebars. Whatever you call them, you can find them by clicking the middle icon at the top left of the interface; see FIGURE 2.38. (It’s the icon in blue.)
Photos. This displays all shared images in the Photos application. However, I find it easier to use Photos for my personal images and to store images for a project in a separate folder.
Music. This displays the contents of your Music library, which could then be added to the timeline. The problem is that you almost certainly don’t own the rights to the music inside it, which will get you in legal trouble. Sharing a library with another editor does not transfer any files in the Music folder. Worse, you can’t archive Music files easily when you archive your library. Instead, store the music you need for your project in a separate folder outside the Music application. This makes accessing, sharing, and backing up the music for your project much easier.
Apple TV. This displays all non-copy-protected files in your Apple TV library. As with Photos, I don’t use Apple TV for any media that will be used in Final Cut. I always store media files outside any Apple applications.

FIGURE 2.38 The list of browsers in the Photos, Music, Apple TV, and Audio sidebars.
Note
To clarify: Photos is in a sidebar. The images are displayed in a browser.
Note
The Music folder also displays any audio projects shared from either GarageBand (use Share > Song to Music) or Logic Pro (use File > Share > Song to Music).
The Sound Effects sidebar is very cool, and I’ll discuss it in the next tip.
92 The Sound Effects Sidebar
Hundreds of royalty-free sound effects are ready for your project.
The Sound Effects sidebar is really cool; see FIGURE 2.39. First, download the extra media from Apple. (See Tip 123, But Wait…There’s More!) Apple provides these free sound effects for use in any video project, royalty-free.
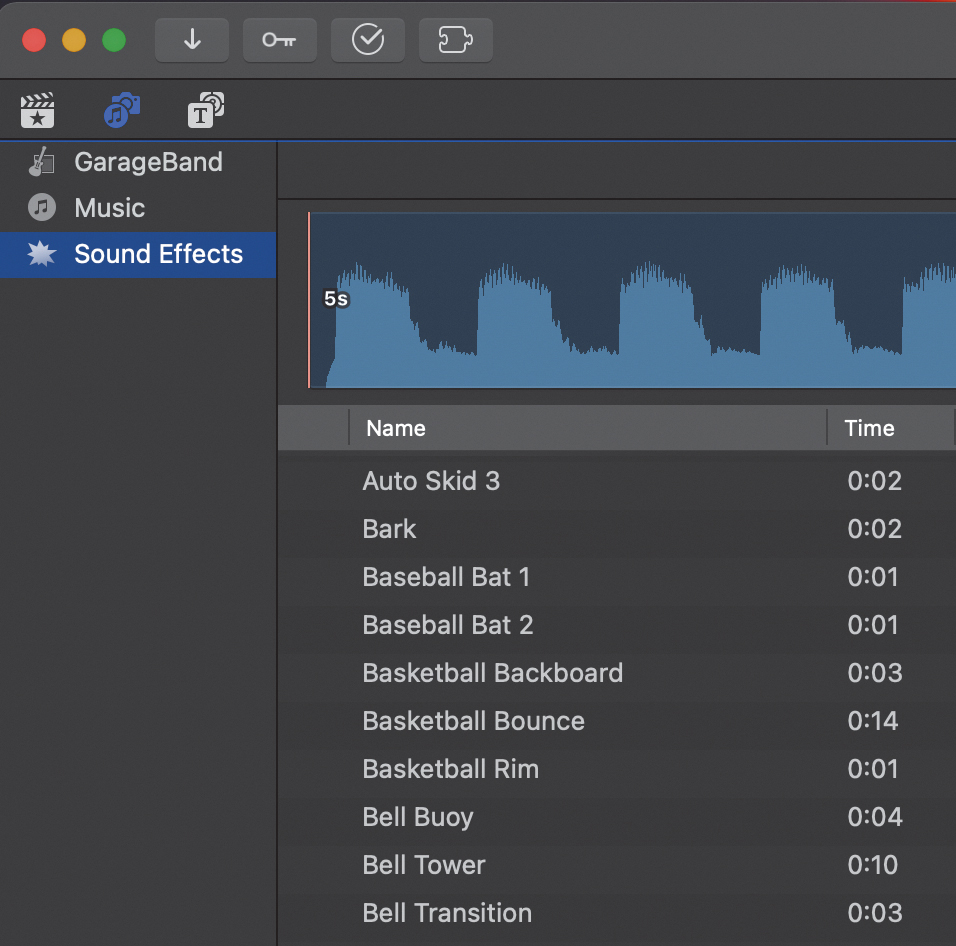
FIGURE 2.39 The Sound Effects browser, with a small sample of its hundreds of sound effects. All are royalty free.
Once they’re installed, click the middle sidebar icon in the top left of the interface, then click Sound Effects. Scroll through the list of files—or search for something using the Search box in the top-right corner of the panel—to find something you like.
Play or skim the waveform to hear what it sounds like.
If you like it, drag the waveform into the timeline. The clip will be colored green, as are all audio clips, and placed where audio clips are displayed—below the Primary Storyline. This extensive library of effects can, when used in moderation, ahem, improve almost every project.
The Timeline
The timeline is the heart of every edit. It’s where you turn a collection of diverse clips into a story.
93 Why Doesn’t the Timeline Scroll?
It’s one of the great mysteries of life.
Why doesn’t the Final Cut timeline scroll? I don’t know. It’s a mystery. I’ve asked Apple this exact question—for ten years now—so far with no answer. It’s the number-one requested feature for Final Cut.
But there’s a great workaround: CommandPost (www.commandpost.io). CommandPost is a free and open source native macOS application that acts as a bridge between control surfaces and software that doesn’t natively support control surfaces, such as Apple’s Final Cut Pro and Adobe After Effects.
CommandPost is an essential, and free, utility for Final Cut Pro.
As well, CommandPost supports scrolling the timeline, exporting the contents of the Timeline Index, and providing a wide variety of customizable automation tools. I’ve used it for years.
94 Manage Projects with This Hidden Menu
However, don’t use Duplicate Project!
Click the name of your project at the top center of the timeline to reveal five more options for managing a project; see FIGURE 2.40. However, I strongly recommend you never use the first one, Duplicate Project. (See Tip 142, Don’t Duplicate a Project—Create a Snapshot.)
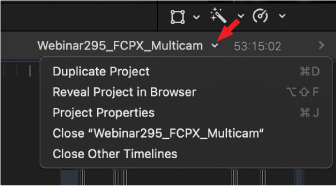
FIGURE 2.40 Click the project name to reveal this menu. The only option I recommend you not use is Duplicate Project.
Most of these options are self-evident. However, the two Close options require an explanation. Even though only one project is visible in the timeline, once you open a project from the Browser into the timeline, FCP loads it into memory and doesn’t remove it, even if you switch to another project. The benefit is the speed with which FCP can display an open project back into the timeline.
Never duplicate a project; always use project snapshots.
For projects that are small, say less than a few hundred clips, these open projects aren’t a problem. But if you are editing several massive projects, closing any projects that you are not editing will free RAM for other uses.
Project files are stored in the Library, and the Library is always saving your changes. So when you close a project, you are simply releasing RAM. The project is not removed from the Library, nor deleted from your storage.
95 Switch Projects Faster Using Timeline History Chevrons
The Timeline History remembers all open projects.
Once you open a project in the timeline, it stays open, even if you open another project into the timeline. (Most of the time, this is a good thing. See Tip 94, Manage Projects with This Hidden Menu.) One benefit is that switching between projects—once you know how—is almost instantaneous.
The timeline history chevrons are the secret to the switch; see FIGURE 2.41. Think of these as selecting projects on a slider, where the first project you opened is on the left, and the most recent project you opened is on the right. Click the arrows to instantly navigate to an earlier project (left chevron) or a later one (right chevron). Click and hold a chevron to see the open projects in that direction. The two arrows contain different lists, so be sure to check both.
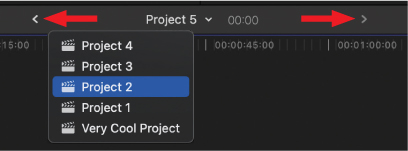
FIGURE 2.41 The timeline history arrows indicated, yup, by the red arrows.
This is easier to use than to explain. I use these—and their keyboard shortcuts—a lot.
96 Timeline Control Icons
These icons customize the timeline.
The icons in the top left of the timeline control editing. (Chapter 4, “Basic Editing,” covers these in detail.) The icons in the top right, as shown in FIGURE 2.42, determine what controls are active in the timeline. The following is a key to the numbers in the figure.
FIGURE 2.42 Timeline icons.
1 Enables/disables skimming (shortcut: S).
2 Enables/disables audio skimming (shortcut: Shift+S).
3 Solos selected timeline clips (shortcut: Option+S).
4 Enables/disables Snapping (shortcut: N).
5 Opens the Timeline Display control panel.
6 Opens the Effects browser (shortcut: Cmd+5).
7 Opens the Transitions browser (shortcut: Control+Cmd+5).
All of these are covered in more detail in other tips.
97 Timecode Displays Location
Timecode is the foundation of video editing.
Timecode is a label that uniquely identifies each frame of video in a clip or project. Although most audio doesn’t use timecode, timecode is essential for video. Final Cut uses timecode to determine where each clip starts and ends, how long it runs, and where it fits in the project. Timecode is what makes edits frame-accurate. Without timecode, you could still edit by counting frames, but it wouldn’t be as fast or convenient.
Timecode is a label that uniquely identifies each frame of video in a clip or project.
Timecode is displayed as four pairs of numbers: HH:MM:SS:FF, which stands for HOURS:MINUTES:SECONDS:FRAMES. Although timecode can represent real time, most often it does not.
FIGURE 2.43 shows the three timecode displays in Final Cut:
Playhead (skimmer) location. Large white numbers (36:23) centered under the Viewer.
Project duration. Smaller white numbers (1:00:00) to the right of the project name.
Selected clip or range duration. Yellow numbers (4:19) that appear only when something is selected in the timeline.
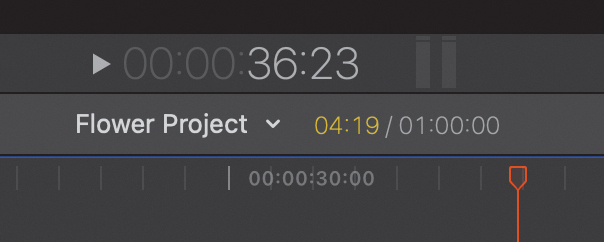
FIGURE 2.43 The three timecode displays in Final Cut.
98 The Timecode Display Holds Secrets
The timecode display can take you places.
The timecode display at the bottom center of the Viewer shows the current location of the playhead (skimmer).
Hidden in the timecode display at the bottom of the Viewer is a powerful navigational tool; see FIGURE 2.44. Normally, the timecode displays white numbers that show the current position of the playhead.

FIGURE 2.44 The three states of the timecode display, from top to bottom: current position, ready for data entry, and the jump location.
However, if you click the white numbers, the timecode field empties and switches to data-entry mode (shortcut: Cmd+D). Enter the timecode location you want to jump to, then press Return. Assuming your project contains media that extends to that location, the playhead will instantly jump there.
99 Two Floating Timecode Windows
These floating timecode windows serve as location maps.
Final Cut has two floating timecode windows: one for the project and the other for source media. You can move these wherever you want. In most cases, I drag them to my second monitor. Grab a corner to resize either of them.
Choose Window > Project Timecode to open the Project Timecode window; see FIGURE 2.45. This displays the current location of the playhead in the timeline. Right-click the numbers to copy the timecode to the clipboard.
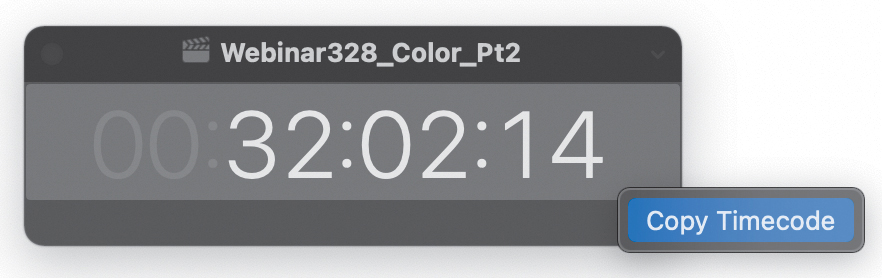
FIGURE 2.45 The floating Project Timecode window. Right-click to copy the timecode to the clipboard.
Choose Window > Source Timecode to open the Source Timecode window; see FIGURE 2.46. This displays the location of all source media in the timeline under the playhead. (I find this window to be the most useful.)

FIGURE 2.46 The floating Source Timecode window.
Right-click in the Source Timecode window to:
Copy only the timecode of the selected clip in this window to the clipboard.
Copy the file name and the timecode of the selected clip in this window to the clipboard.
Copy the file name and the timecode of clips in this window to the clipboard.
I don’t use the Project Timecode window often because it is easy to see the current timecode display under the Viewer. However, I regularly use the Source Timecode window to check the sync between clips.
100 Moving Around the Timeline
Final Cut does the math, while you avoid using punctuation.
Imagine your playhead is somewhere in the timeline, but you want to get it somewhere else, fast. Of course you could drag it. How boring. The keyboard is faster.
To move the playhead to a specific timecode location, press Control+P, enter the new timecode location, and press Return.
To move a specific distance, press the plus (+) key to jump forward or the minus (–) key to jump back, then type the amount of time you want to jump. (For example, type +512 to jump 5 seconds and 12 frames forward. Or type –2306 to jump back 23 seconds and 6 frames.)
In either case, you don’t need to click in the timecode field or add punctation.
The Viewer
The Viewer is a dynamic window where you view clips under the playhead, or skimmer, in the Browser or timeline. It can be displayed in the main interface or on a separate computer monitor.
101 Even the Viewer Has a View Menu
This is not the same as the View menu in the menu bar.
In the top-right corner of the Viewer is the View menu; see FIGURE 2.47. Click the word View to reveal an array of ways to modify the Viewer. Many of these are explained in their own tip. Here, I’ll just show how to access the menu.
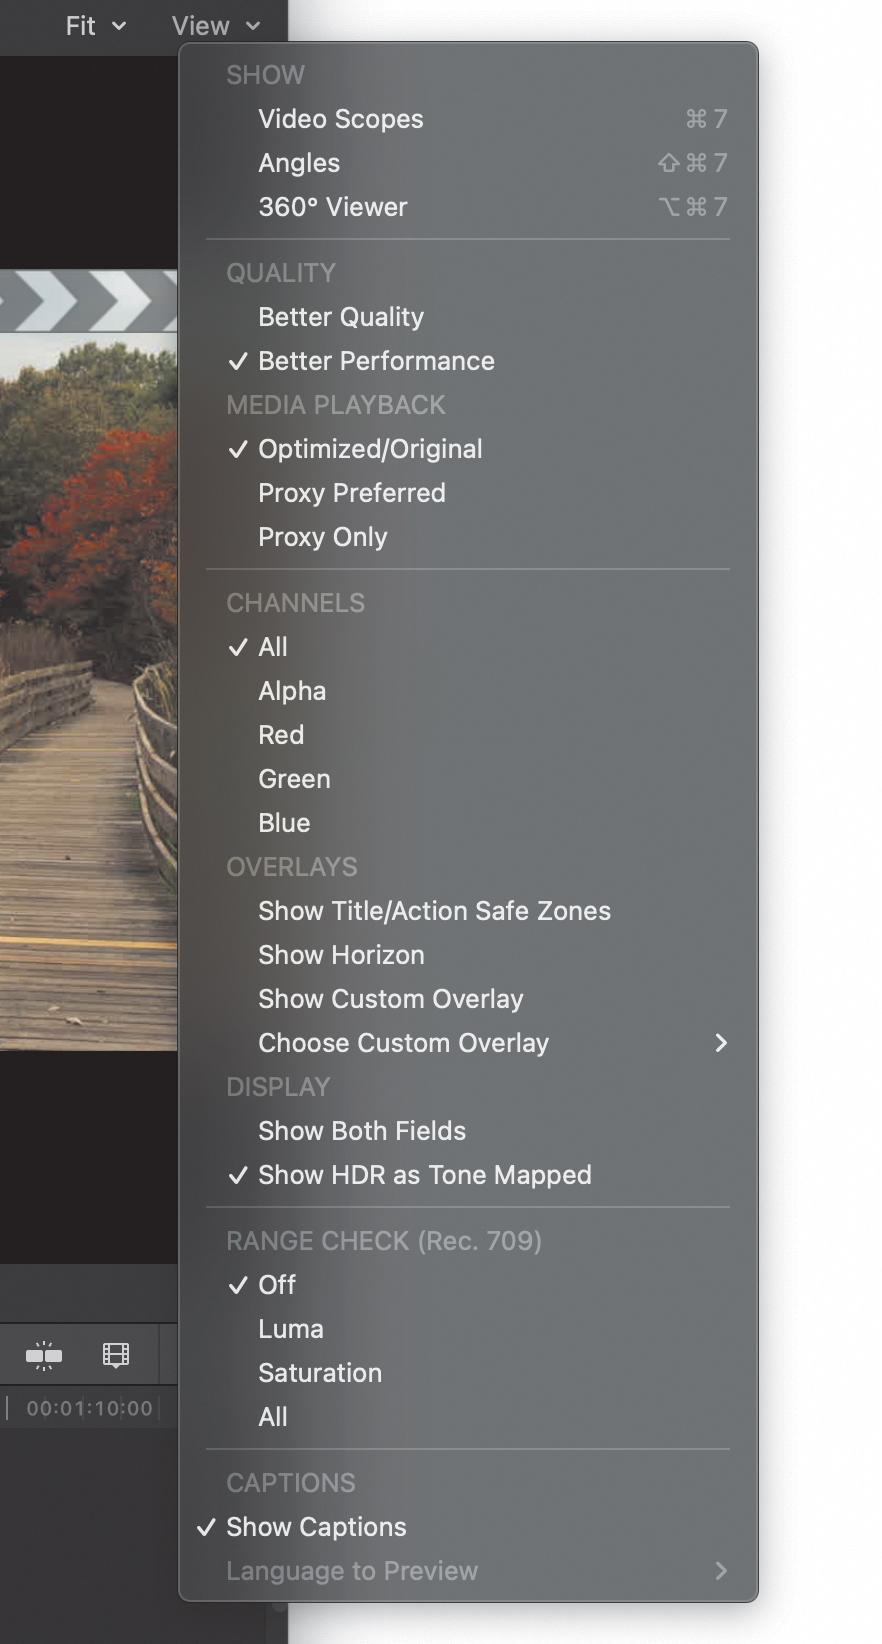
FIGURE 2.47 The View menu in the Viewer. This is not the same as the View menu in the menu bar.
Although you can’t set preferences for these options, I did assign keyboard shortcuts to several. For example, in the Command Editor, I searched for Show Title and found the Show Title/Action Safe Zones command. I assigned this the apostrophe key (’). Now, whenever I need to see Action Safe or Title Safe, I press an apostrophe. I also created a shortcut for Show Custom Overlays.
102 Enlarge the Viewer Full Screen
Here’s how to toggle the Viewer to full screen and back.
Assuming you don’t own a dedicated video monitor—and you’d know if you did because you spent the money for it—here’s a way to toggle the Viewer full screen.
In the lower-right corner of the Viewer are two diagonal arrows; see FIGURE 2.48. Click the arrows to enlarge the Viewer full screen (shortcut: Shift+Cmd+F). Press Esc to reduce its size to normal.
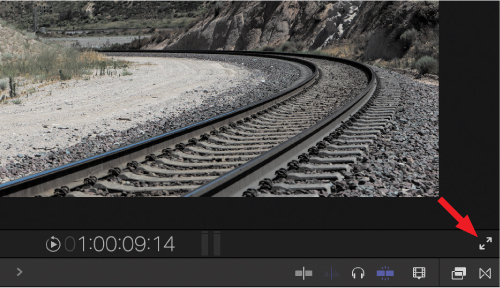
FIGURE 2.48 Click the diagonal arrows to expand the Viewer to full screen. Press Esc to bring it back.
103 Display Action Safe and Title Safe Zones
These safe zones help assure proper framing for titles and effects.
In the old days of TV, when picture tubes ruled the world, the image shown on a TV in the home was cropped compared to the original image at the broadcast network. This was caused by how television picture tubes worked. This cropping varied by picture tube and age.
As a media creator, you have no control over how your final project is viewed.
So decades ago, television engineers created two “safe zones”—Action Safe and Title Safe—so that the production folks creating a show could frame shots so that even a badly misaligned TV set in the home still displayed the essential elements of the picture.
These standards are still followed today because of one simple fact: As a media creator, you have no control over how the final image will be seen by the viewer. It is not unusual for edges of an image to be cropped due to a misaligned projector, a bad monitor, poorly designed HTML code, or…anything, actually. You have no control.
Final Cut indicates these safe zones using thin gold rectangles; see FIGURE 2.49. Here are the rules:
Full frame. The entire image must fill the frame, with no blank edges.
Action Safe. Keep all essential action, actors, and other key visual elements inside Action Safe.
Title Safe. Keep all essential titles, logos and other important graphics inside Title Safe.
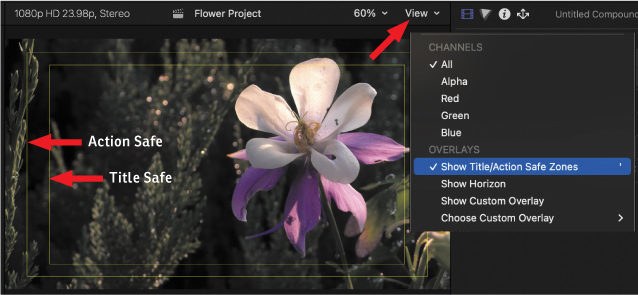
FIGURE 2.49 Action Safe is 5% in from all edges. Title Safe is 10% in. These boundaries are still followed in professional media today for framing titles and effects. Action Safe should be used for framing web projects.
Note
Safe zone rectangles display in the Viewer but don’t export.
These framing rules apply for all projects except those for the web. The web uses a slightly looser rule: Because you don’t know how people will view your projects, keep all essential elements and text inside Action Safe (that’s the outer rectangle) while still filling the entire frame with an image.
104 Better Quality vs. Better Performance
The View menu does not alter image quality during editing or final export.
One of the more confusing options in the View menu is the choice between Better Quality and Better Performance. I mean, do I really need to choose?
No. Not at all. This controls a display feature of the timeline.
As shown in FIGURE 2.50, these two options determine how the CPU prioritizes its time. When you select Better Quality, the CPU prioritizes image quality. When you select Better Performance, the CPU prioritizes real-time playback. The real difference is whether you want to save time rendering while you edit. Personally, I set this to Better Performance. The slight dip in image quality is more than offset by time savings in not waiting for rendering to complete.
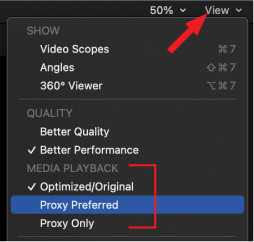
FIGURE 2.50 Both of these options affect timeline playback only, not export.
This setting doesn’t affect the final export. FCP always renders and exports everything at best quality.
105 Custom Viewer Overlays
Like the safe zones, these display in the Viewer but don’t export.
There’s an option in the Viewer > View menu that I find myself using every week: Overlays. Overlays appear in the Viewer, like the watermark overlay in FIGURE 2.51, but don’t export. I use the Overlays option to make sure text in the project doesn’t conflict with a watermark or to protect an image shot in 16:9 within a 4:3 frame.

FIGURE 2.51 This custom overlay appears in the Viewer but doesn’t export.
Create an overlay using any image editing program, then save it as a PNG or TIFF file with a transparent background. (I recommend PNG.) Create any image you want—keep in mind this will be visible in the Viewer, so try to keep the overlay elements minimal so they don’t block the video below it.
To choose an overlay, go to the View menu in the Viewer (not the menu bar) and choose Custom Overlay (red arrow in FIGURE 2.52). If you added an overlay already, it will appear in the list. Otherwise, choose Add Custom Overlay and select it in the Finder.
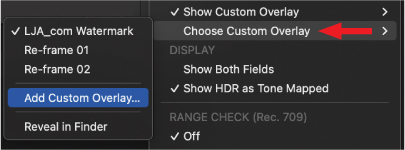
FIGURE 2.52 This View menu adds new overlays or selects one you’ve already used.
To enable or disable the overlay display, choose View > Show Custom Overlay. (Unselecting an option turns it off.) Or select the opacity you want for the overlay image; see FIGURE 2.53.
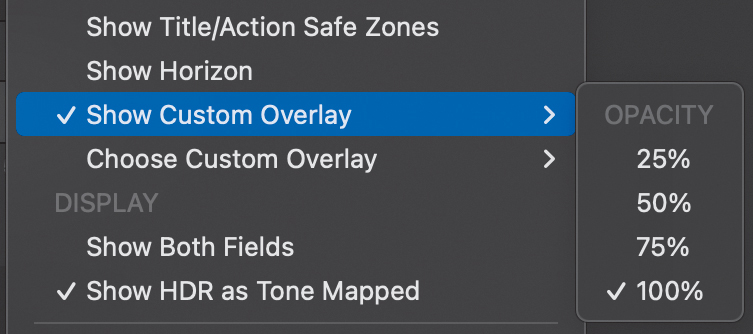
FIGURE 2.53 Turn overlays on or off, as well as adjust their opacity, in this menu.
As another example, I created an overlay that I use to reframe 16:9 shots into 4:3 or 9:16 (vertical) images; see FIGURE 2.54.
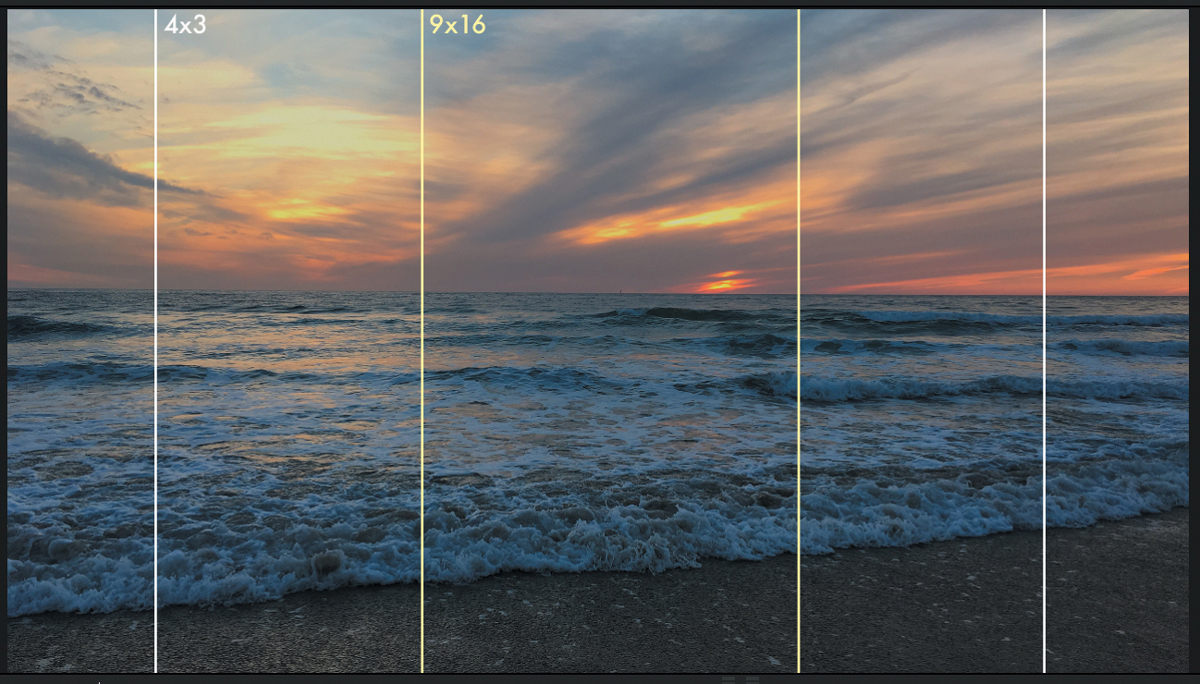
FIGURE 2.54 This is a custom overlay that I use for reframing 16:9 shots into 4:3 or 9:16.
106 How to Enable Proxies
Proxies provide efficiency and speed for large frame size and multicam projects.
Note
Tip 162, Create Proxies After Importing Media, explains how to create proxies.
Chapter 1, “Video Fundamentals,” discussed the benefits of creating proxy media for projects with large frame sizes, multicam editing, or running Final Cut on slower systems. What I didn’t mention was how to enable proxies: Go to the View menu in the top-right corner of the Viewer, as shown in FIGURE 2.55, and look at the options in the Media Playback section of the menu.

FIGURE 2.55 The proxy options in the Viewer > View menu.
In the past, we could choose only between viewing the source/optimized file or the proxy file. Recently Apple added a much more useful choice: Proxy Preferred.
Optimized/Original. This default setting plays the highest quality version of the media.
Proxy Preferred. This plays proxy files, if they exist, and source files if they don’t.
Proxy Only. This plays proxy files if they exist and displays a giant red flag in the Viewer if they don’t.
Proxies provide efficiency and speed for large frame size and multicam projects.
If you want the best performance, choose Proxy Preferred, then make sure you create proxy files. If you want the highest image quality, choose Optimized/Original. If you are editing proxy files and try to export them, Final Cut will warn you; see FIGURE 2.56.
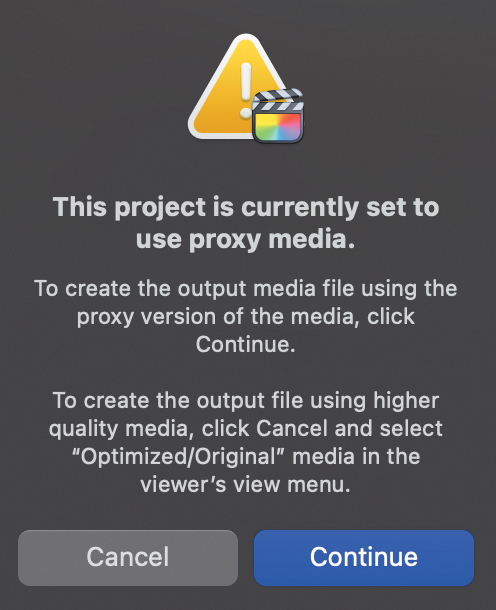
FIGURE 2.56 Final Cut warns you before exporting a proxy file by accident (left).
107 How to View Transparency
Transparency, for clips or projects, is stored in the alpha channel.
The default display setting for clips is 100% full screen and 100% opaque; see FIGURE 2.57. That’s fine for most edits; we want to see the image.
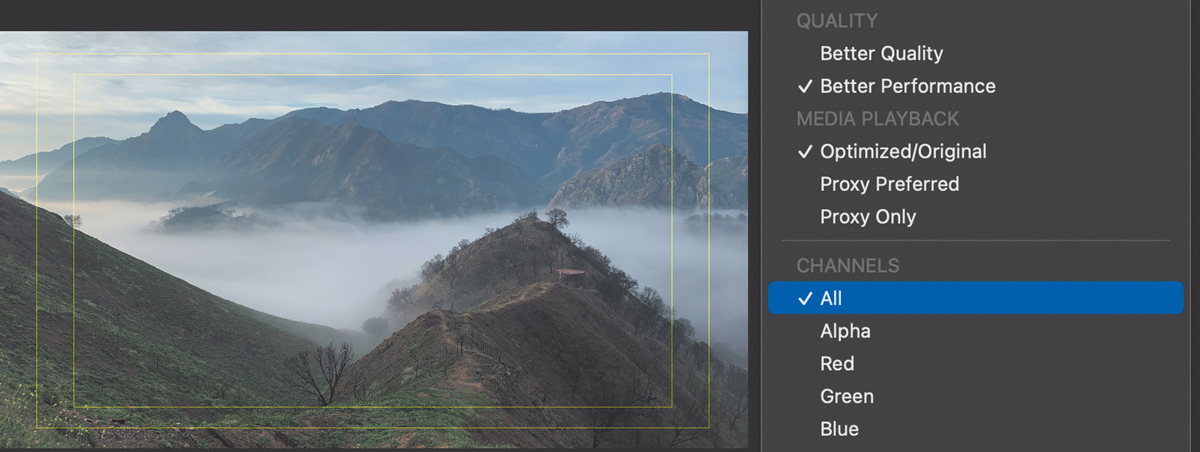
FIGURE 2.57 A typical image with safe zones displayed.
Note
To see the full color image, select Viewer > View > Channels > All.
But once we move into effects, we often want to combine multiple images in the frame or add titles. These require transparency. The “alpha channel” stores which pixels in a clip or project are opaque, which are translucent, and which are transparent. (All title clips, for example, are transparent except for the text itself.)
To view transparency, go to Viewer > View and choose Channels > Alpha; see FIGURE 2.58. Normally, the screen will be solid white, which means the entire image is opaque.
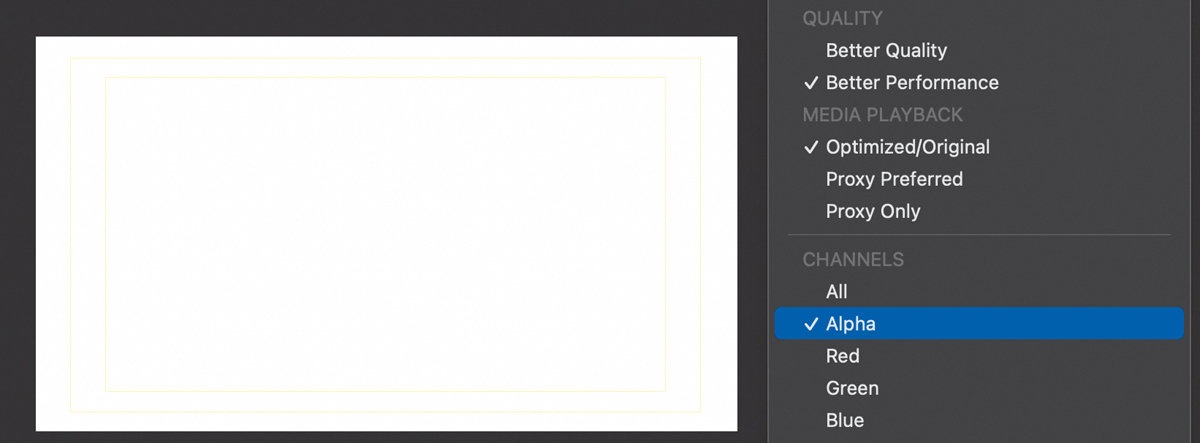
FIGURE 2.58 A solid white alpha channel indicates a full-screen clip with no transparency.
However, if we scale a clip to 50%, meaning that the image fills only half the frame, as shown in FIGURE 2.59, there are large black edges around the clip.
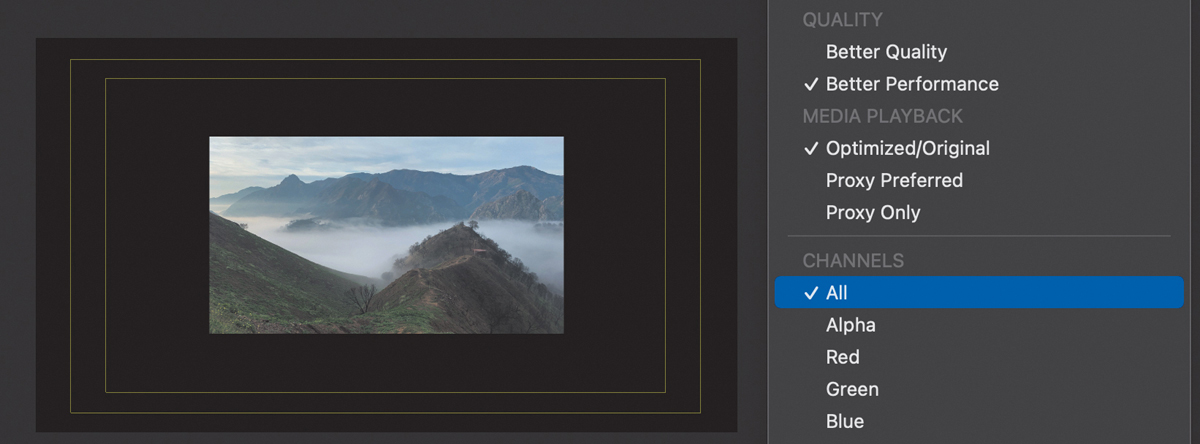
FIGURE 2.59 A clip scaled to 50%. Notice All is selected in Channels; the safe zone display is on, and black edges appear around the clip.
When you view the alpha channel for that scaled clip, as shown in FIGURE 2.60, you see that the clip displays white (opaque), while the background displays black (transparent). Shades of gray indicate translucency.
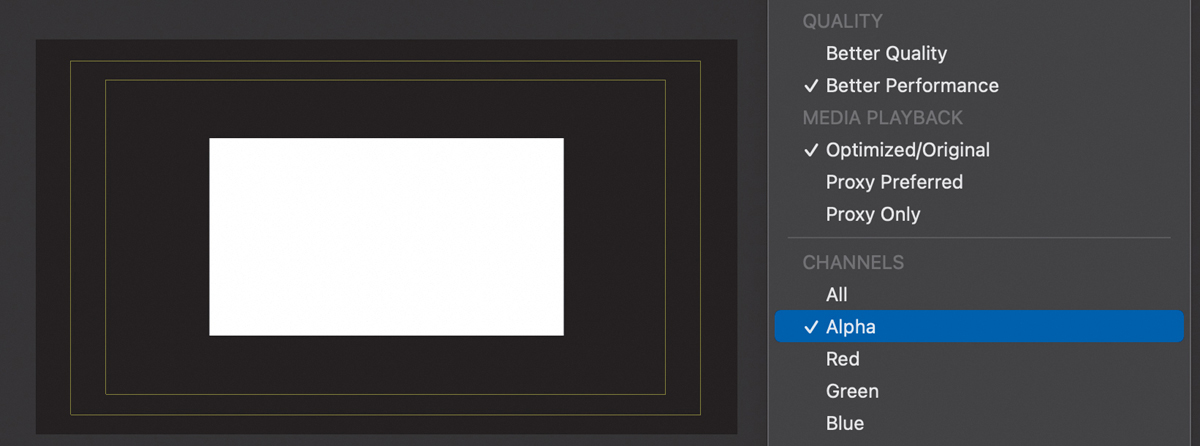
FIGURE 2.60 When Alpha is selected, white indicates opaque areas, black indicates transparent areas, and gray (not shown) indicates translucency.
108 Make the Viewer Background Transparent
Use a checkerboard background when you need to see transparency.
In addition to viewing the alpha channel, the Viewer has another trick to help you see transparency: the Viewer background. By changing Final Cut Pro > Preferences > Playback, as shown in FIGURE 2.61, you can make the Viewer background display black, white, or a checkerboard.

FIGURE 2.61 Changing these backgrounds won’t affect export. All backgrounds export as black.
Change this setting to make the Viewer background display a checkerboard. Similar to Photoshop, this makes it easier to see transparency in the frame.
Note
If you export using a codec that supports alpha channels, such as ProRes 4444, the background will be black, but the alpha channel will also be included so that transparency data is retained with the clip.
109 The Little Red Box in the Viewer
This icon indicates you are zoomed in to the Viewer too far.
Zooming in to the Viewer is useful to see fine details in an image to place an effect. But accidentally hiding a portion of the image can drive you nuts during editing. When this little red box appears in the Viewer, as shown in FIGURE 2.62, it means that you are zoomed in to the image in the Viewer so closely that the Viewer cannot display the entire image. The red box acts as both a warning and a navigation tool.
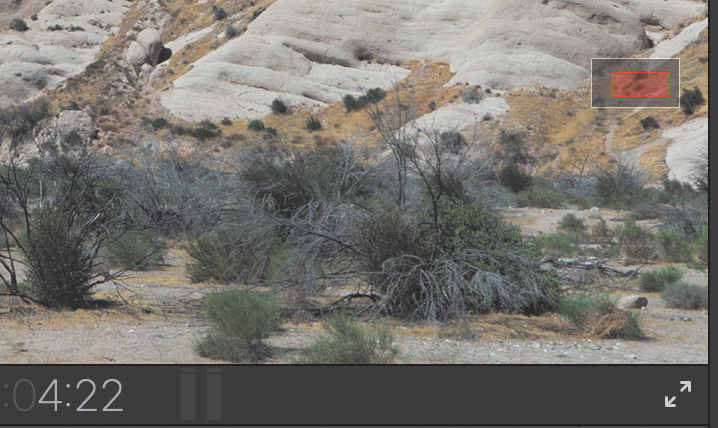
FIGURE 2.62 This red box appears when the entire image is too big to fit in the Viewer. Drag the red box to navigate.
Zooming in to the Viewer does not change the image size in the timeline.
To navigate inside the Viewer, drag the red box.
To remove the red box, press Shift+Z. (Or change the percent menu in the top-right corner of the Viewer to Fit.) The entire image now displays inside the Viewer.
Hidden Viewers
Two special-purpose displays can make editing and color grading easier. But they are off by default and not easy to find.
110 The Event Viewer
The Event Viewer previews whatever clip is selected in the Browser.
A hidden viewer in Final Cut is the Event Viewer; see FIGURE 2.63. One of the benefits of the Viewer is that it displays whatever clip is active in the Browser or timeline. However, it is often helpful to have two onscreen windows: one to show the Browser clip and the other to show the timeline. The Event Viewer is often referred to as a preview monitor.
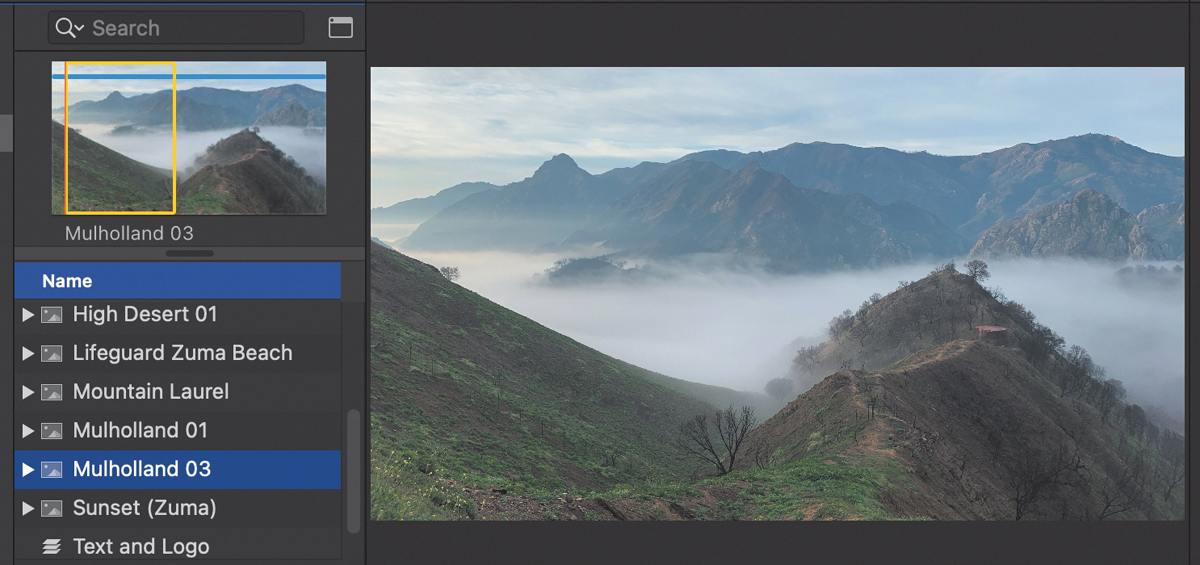
FIGURE 2.63 The Event Viewer displays and plays Browser clips.
To open it, choose Window > Show in Workspace > Event Viewer (shortcut: Control+Cmd+3). This display may be a bit cramped on a smaller monitor. The Event Viewer provides preview and playback of Browser clips.
Once opened, skim or play any Browser clip in the Event Viewer. The key benefit is that a larger image helps match action between shots, or carefully evaluate the image for unwanted elements—such as mic booms—before editing it into the timeline.
If you need it, it’s there. If you don’t, it remains hidden so it doesn’t take up screen space.
111 The Comparison View
This displays still frames to compare differences between shots.
The Comparison View is designed to assist with matching shots during color grading. However, it is stored in an unusual place: Window > Show in Workspace > Comparison View (shortcut: Control+Cmd+6). Unlike the Event Viewer, the Comparison View shows only still frames.
This displays a window, as shown in FIGURE 2.64, to the left of the Viewer. By default, it shows the Out of the preceding clip on the left, along with the frame under the timeline playhead on the right. Click Next Edit to view the In of the next clip. This makes it easy to compare successive shots to determine whether colors and actions transition smoothly.
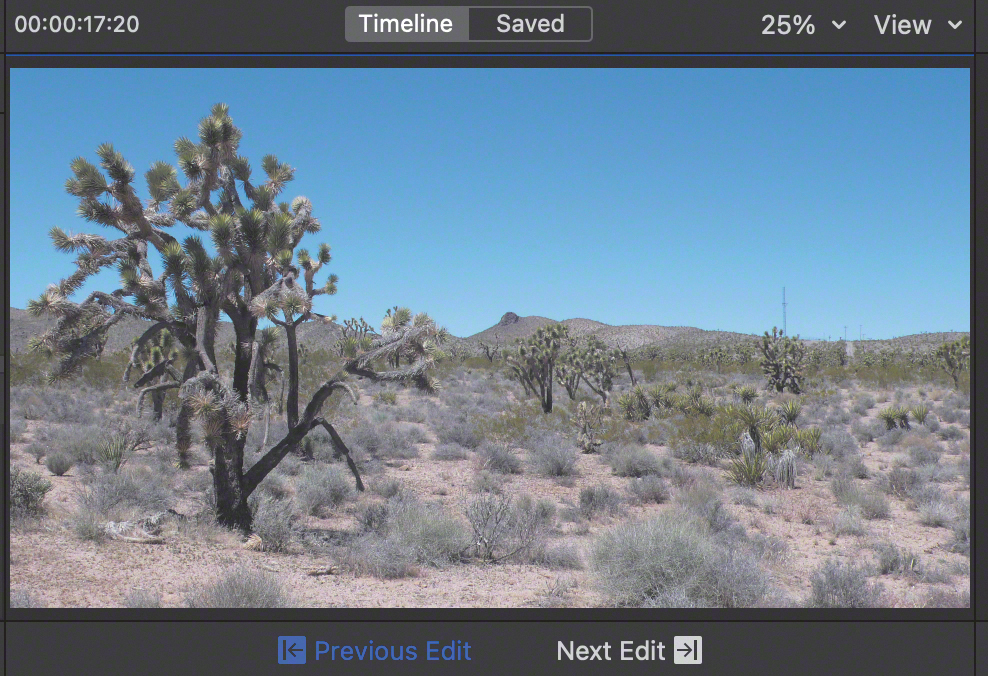
FIGURE 2.64 The Comparison View shows still frames to compare shots.
But there’s a second option: Comparing still frames from key scenes in a project. Click the Saved button at the top, then click Save Frame at the bottom. This captures a still image of the frame under the playhead. In the Saved screen, click Frame Browser. This displays the comparison stills, as shown in FIGURE 2.65, taken for this project. Final Cut stores up to 30 stills.
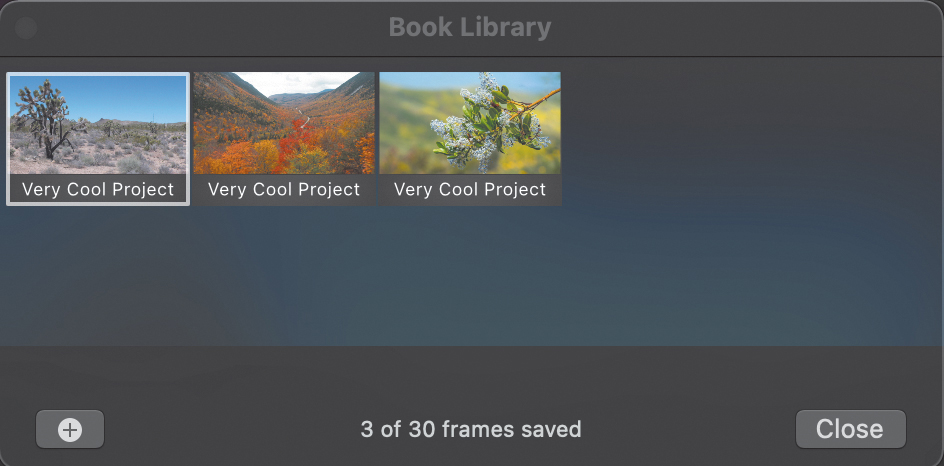
FIGURE 2.65 The Frame Browser in the Comparison View. Click a still frame to display it.
Click a still frame to display it in the Comparison View. Now, move the playhead around the timeline to compare the frame under the playhead with the selected frame to help maintain color consistency.
Troubleshooting
Here are a variety of tips to help you fix problems before you get an ulcer.
112 Four Troubleshooting Techniques
Here’s what to do first when your Mac acts flakey.
Macs are solid, reliable, high-performance machines. However, every so often, one decides to take leave of its senses. Here are four things to try before you contact Apple Support:
Trashing Final Cut Pro preferences does not delete any libraries, projects, or media.
Quit Final Cut and restart your computer. It surprises me how many times a simple restart gets everything working properly again.
Re-render your project. Most Final Cut problems are caused by bad render files or bad media.
To delete render files:
Select your project in the Browser.
Choose File > Delete Generated Project Files.
Select Delete Render Files.
Final Cut will then rebuild any necessary render files when you next open the project into the timeline.
Trash FCP preference files. Preference files control every aspect of Final Cut, far more than just the preference files you can set manually. Trashing them resets Final Cut to Apple’s defaults and cleans up a lot of weirdness that creeps in over time.
To trash preferences:
Quit Final Cut.
Press and hold both the Option and Cmd keys while restarting FCP from the Dock.
Click the blue Delete Preferences button, as shown in FIGURE 2.66.
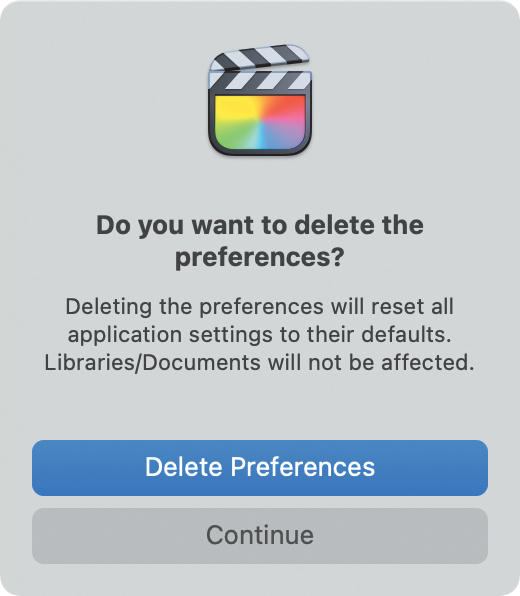
FIGURE 2.66 Click the blue Delete Preferences button to reset Final Cut to Apple’s default settings.
Trashing preferences resets customized preference settings, but not keyboard shortcuts, to their default settings. This means you’ll need to re-customize preferences after trashing.
As a caution, resetting preferences also empties the Recent Library list displayed when you choose File > Open Library. Don’t panic! This did not delete your libraries or media; it simply removed the file names from this list. Go to the Finder and double-click the Library file to open it. Once you open it, the library will return, again, to this list.
Boot into Recovery Mode and run First Aid on both internal hard drives. Hidden inside your Mac is a special volume called the Recovery volume. This holds a limited version of macOS along with several repair utilities.
Use one of the following methods to start up into Recovery:
For Intel Macs, restart your Mac while pressing and holding Cmd+R. Keep holding this until the thermometer scrolls halfway across the screen. Wait until the main window appears.
For Apple silicon Macs, press and hold the power button until you see “Loading Startup Options.”
After a bit—the process is not instantaneous—a window appears asking what you want to do.
Click Run Disk Utility. Click the Options icon, then click Continue.
On the left side of Disk Utility, one or two “Macintosh HD” drives appear, depending upon which version of the macOS you are running. Each of these is a separate volume.
Select each volume in turn, then click the First Aid button. This runs a series of repair utilities on your internal drives. This process can take several minutes, so be patient. If other drives are listed, ignore them. When you’ve repaired one or both Macintosh HD drives, restart your system without touching the keyboard.
Ideally, one of these steps returns your system to normal. If not, it’s time to call Apple Support. Assisting you is what they are there for.
113 When Final Cut Pro Unexpectedly Quits
Yes, this happens to me too.
Here I am, happily writing a book about Final Cut, when the application crashes, displaying the screen you see in FIGURE 2.67.
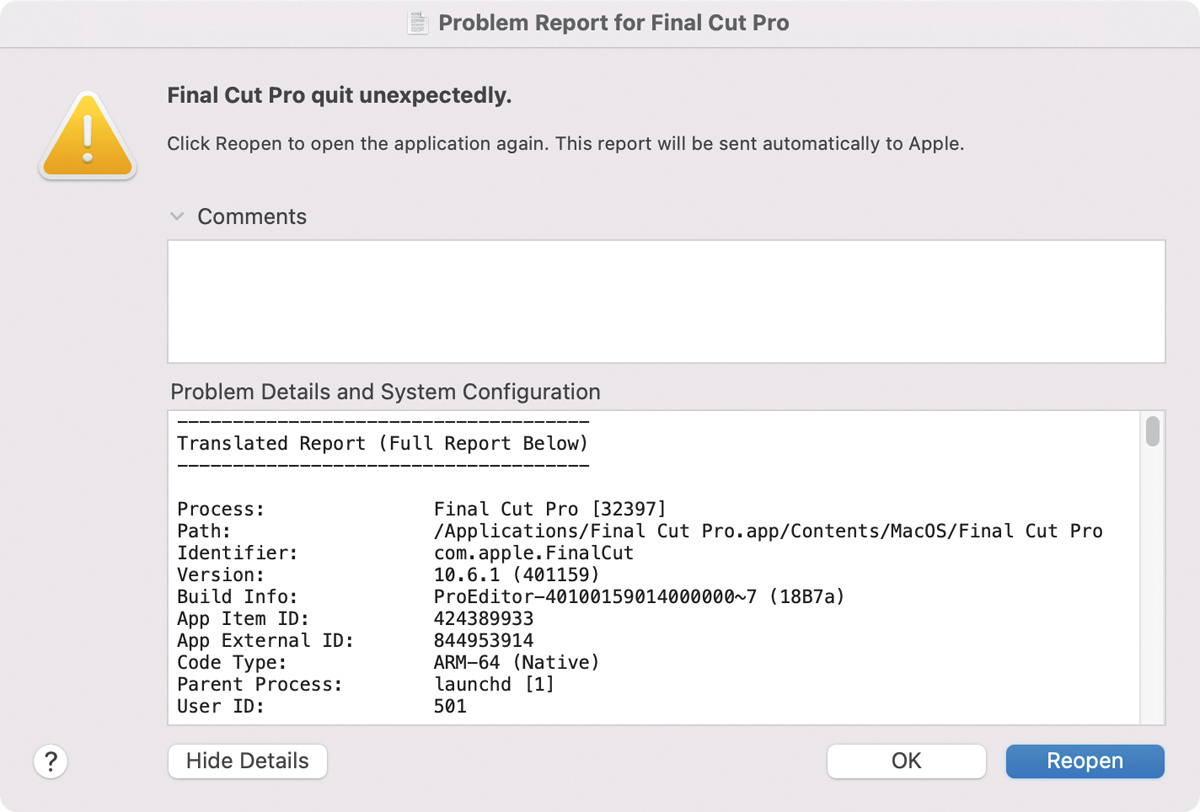
FIGURE 2.67 This report appears when Final Cut crashes. It is automatically sent to Apple after a crash.
Although this is frustrating, there’s actually good news here. First, because of the speed with which FCP saves your work, everything you were doing up until the moment of the crash is most likely safely saved. (I’ve experienced this personally, and it is very reassuring.)
Next, Final Cut creates a system report that describes in deep technical detail the type of crash, what you were doing when it crashed, and the state of your system at the time. It also creates this report when you delete FCP preferences. (None of this, by the way, contains any personally identifiable information. It is anonymous.) This crash report is then sent automatically to Apple so it can research this issue further.
Finally, if you want to resume your work with Final Cut, click Reopen, and FCP reopens and loads whichever libraries were open at the time of the crash.
My recommendation, though, is that when Final Cut crashes, restart your computer. Yes, this takes a bit more time, but it resets your system to a known-good state allowing Final Cut Pro to run more smoothly.
114 How to Trash Third-Party Plug-ins
Third-party plug-ins are generally stored in one of three places.
You can’t trash the plug-ins that Apple ships with Final Cut. But you can trash plug-ins created by other developers. They are generally stored in one of three places, depending upon where the developer decided to store their files.
[Home Directory] > Movies > Motion Templates
Macintosh HD > Library > Plug-ins > FXPlug
Macintosh HD > Library > Application Support > ProApps > Plugins
If the plug-in is stored in a folder, delete the entire folder. If the plug-in you want to delete isn’t there, contact the developer for instructions.
115 Fix a Yellow Alert
Sometimes, the FCP database doesn’t update fast enough.
If you see a yellow “missing media” alert in Final Cut, you may not be missing media. This may be a database problem where Final Cut did not make an update fast enough. This may happen when using external files, such as Photoshop documents or Motion projects.
If this happens to you, try this:
Select everything on the timeline (shortcut: Cmd+A).
Copy it to the clipboard (shortcut: Cmd+C).
Click anywhere in the timeline to deselect everything.
The yellow alert should disappear.
116 Does Zapping PRAM Still Work?
Um, no.
On older computers and operating systems, a troubleshooting technique used to be “zapping the PRAM.” On older systems, this sometimes helped. On newer systems, not so much. In fact, this doesn’t work at all for Apple silicon Macs.
Zapping PRAM works only on older Intel-based Macs.
Apple support writes: “NVRAM (nonvolatile random-access memory) is a small amount of memory that your Mac uses to store certain settings and access them quickly. PRAM (Parameter RAM) stores similar information, and the steps for resetting NVRAM and PRAM are the same.
“Settings that can be stored in NVRAM include sound volume, display resolution, startup-disk selection, time zone, and recent kernel panic information. The settings stored in NVRAM depend on your Mac and the devices that you’re using with your Mac.”
Note
Resetting PRAM does not work for Apple silicon Macs.
To reset both NVRAM and PRAM:
Shut down your Mac.
Restart it and immediately press and hold Option+Cmd+P+R.
Keep pressing those keys for about 20 seconds, or until you hear a second restart chime. (Not all systems play the chime.)
This resets those stored settings. You will probably need to reselect your default printer after doing this.
117 Saving Is Automatic—So Are Backups
Final Cut saves instantly and creates backups automatically.
I’ve had Final Cut crash a fraction of second after I changed something in the timeline. Every time that’s happened, whatever I did was already safely saved to disk. So, yup, Final Cut saves your latest changes the instant you make them.
For that, I’m very grateful.
Final Cut saves and backs up library files—automatically.
It also automatically backs up the library database every 15 minutes, unless no changes were made during that time. By default, these backups are stored in [Home Directory] > Movies > Final Cut Backups.
It is important to note that the library database does not include any media. Media should be backed up separately, outside of Final Cut. The library database does include the names and contents of all events, the names and locations of all clips and associated metadata, and the contents of every project. In other words, it includes everything needed to go back to an earlier version and start editing—except the media itself.
118 Restoring from a Backup
Restoring isn’t hard, but you should know your options.
Your worst nightmare just occurred—the project you are editing just became trash. Now what? Restore from a backup.
Backups are always made of the library, not projects. So when you restore, you are switching to an earlier version of your current library. This older library includes an earlier version of the project you are currently editing.
You can restore a library in two ways:
Backups are simply copies of normal libraries that are time-stamped and stored in a specific place.
If the trashed project is open, choose File > Open Library > From Backup. This displays a list of all the backups that exist for the current library. Pick a version of the library that you know is good.
If the trashed project won’t open, backup files are stored in [Home Directory] > Movies > Final Cut Backups. Inside it are folders for each library that has backups. These are simply copies of normal libraries that are time-stamped and stored in a specific place. There’s nothing unusual about them.
In either case, double-click the backup library you want to open and start editing.
119 How to Change Where Final Cut Stores Backups
Final Cut stores library backups in the Movies folder.
By default, Final Cut always makes backups of the library file and stores them in [Home Directory] > Movies > FCP Backups. However, you can change this to a different location or turn off backups for that library altogether.
To do so:
Select the Library you want to adjust in the Library sidebar (to the left of the Browser).
The Library inspector displays information about the library similar to that shown in FIGURE 2.68.
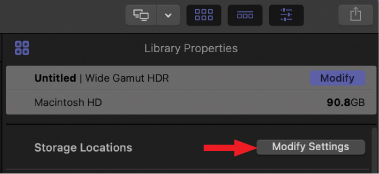
FIGURE 2.68 The Inspector > Library Properties window.
Choose Storage Locations > Modify Settings to open the dialog shown in FIGURE 2.69.
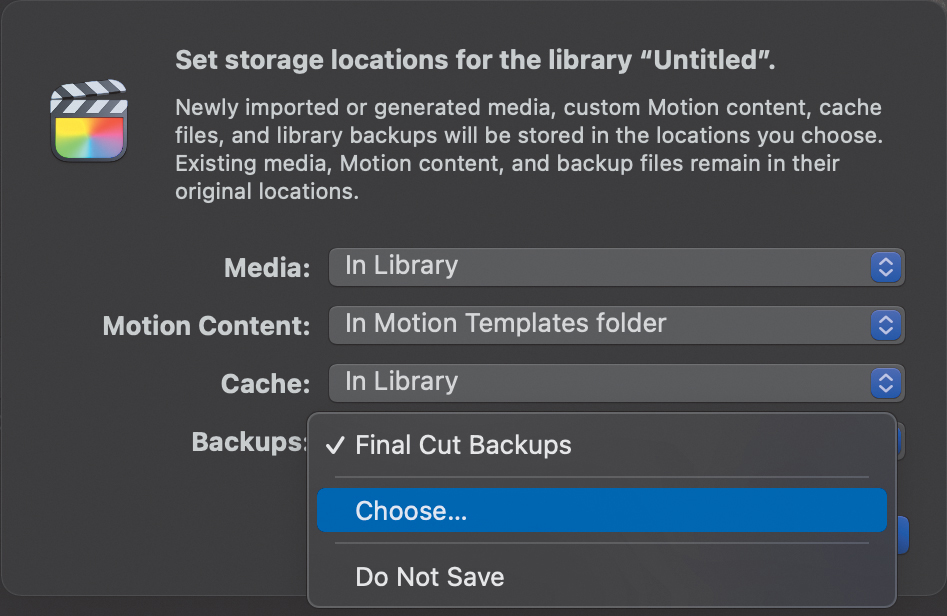
FIGURE 2.69 The Library Storage Locations window. Change backup locations using the Backups menu.
Select Choose from the Backups menu and pick a different storage location. Or choose Do Not Save to turn off backups entirely for that Library.
Note
While turning off backups saves storage space, the risk of losing all your work does not make this option attractive.
120 Monitor Your Mac Using Activity Monitor
This essential utility lets you see what’s happening under the hood.
Without question, Activity Monitor is my favorite Mac utility; see FIGURE 2.70. You’ll find this in Applications > Utilities. This essential tool displays stats for CPU activity, energy (battery), memory, local storage, and network activity.
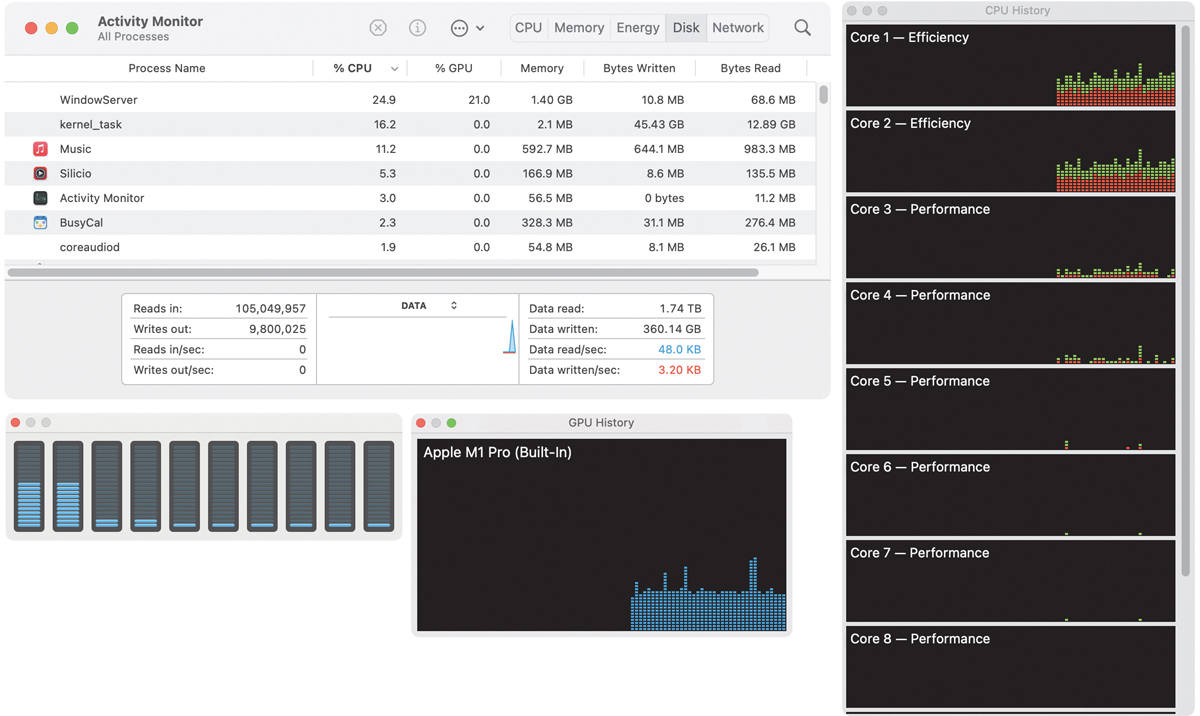
FIGURE 2.70 Activity monitor (top left), CPU history (top right), CPU activity (lower left), and GPU activity (low center).
Once you open it, choose Window > Activity Monitor to display the main window. The top portion of the window displays the processes (think “software”) currently running on your system. Leave this top section alone! (There is no problem scrolling through the list at the top to see what’s running, but don’t click any of the buttons at the top or attempt to stop any of these processes, unless you really enjoy watching things blow up!)
Click CPU (at the top) to monitor CPU activity between different applications. (Maximum CPU % = the number of cores times 100%.)
Click Memory to monitor how RAM is allocated between applications.
Click Energy to monitor battery use, charge, and application energy use (applies only to laptops).
Click Disk to monitor the speed of file transfers on locally attached storage.
Click Network to monitor network traffic bandwidth and which applications are currently accessing the network.
When monitoring Disk or Network activity, look in the lower-right corner. Data received indicates the speed of data coming into your computer (reads). Data sent indicates the speed of data leaving your computer (writes).
Note
Recently, it was discovered that Activity Monitor does not accurately report how work is shared between the CPU cores, especially on Apple silicon systems. Nor does it report work done using hardware acceleration for media. I’m sure this will be updated, but Apple is not in a hurry about it.
Go to the Window menu, at the top, to display real-time graphs showing:
CPU Activity
CPU History
GPU History
I use this utility daily—I’m endlessly fascinated by what the computer is doing behind the scenes.
121 Archive Active Versions of Final Cut
This potentially provides future access to older programs.
Before I share these steps, let me say that archiving is a fraught mess. There’s no good, reliable way to guarantee that the projects you sweated over will open two years from now. They may. But not always. (See Tip 493, Export an XML File.) FCP, the macOS, and plug-ins all change. The tech industry never looks back.
For projects you expect to work on again in the future, you may want to archive the version of Final Cut that created it. According to an Apple Knowledge Base article, to back up the currently installed Final Cut Pro application:
Note
Before you revert to an earlier version, archive or delete the version of Final Cut Pro currently stored in your Applications folder. Also, if you revert to an earlier version of Final Cut Pro, it may also require an earlier version of the macOS, so keep a note of which version of Final Cut Pro uses which version of the macOS. You can have only one version of Final Cut installed at a time.
Create a new folder in the Applications folder, and name it after the application (for example, “Final Cut Pro 10.6.3”). To check your version of Final Cut Pro, open the application and choose About Final Cut Pro from the Final Cut Pro menu.
Select the Final Cut Pro application in the Applications folder. Choose File > Compress “Final Cut Pro.” It will take a few minutes to compress.
Move the resulting Final Cut Pro.zip file into the folder you created in step 1.
Move the folder containing the ZIP file to a backup drive.
These ZIP files can be stored anywhere.
122 The Dock Holds Secrets
Open Libraries faster from the Dock.
The Dock looks innocent, just sitting there on your screen. But if you right-click it, options appear; see FIGURE 2.71.
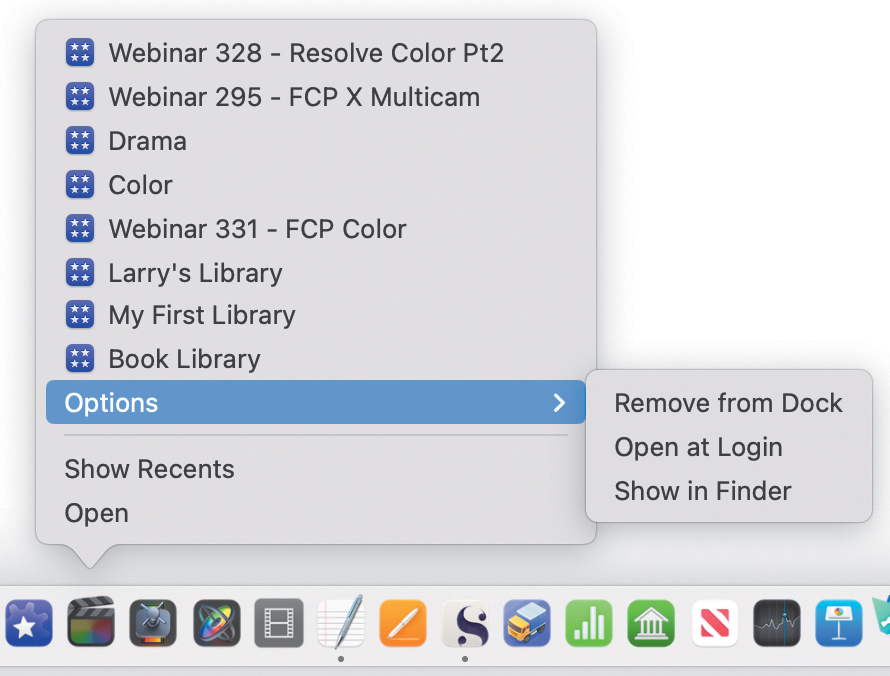
FIGURE 2.71 Any recent library can be launched from the Dock.
Use the Dock to open a specific library, launch Final Cut when you log in to your computer, or other options. The Dock gets you started faster.
123 But Wait…There’s More!
Here’s how to get free sound effects for Final Cut Pro!
Hidden in plain sight in Final Cut is a special download that contains royalty-free sound effects, music, and other stuff.
To access it, go to Final Cut Pro > Download Additional Content.
This opens System Preferences > Software Update; see FIGURE 2.72. If new content is available, a link displays. Otherwise, this panel will be empty.
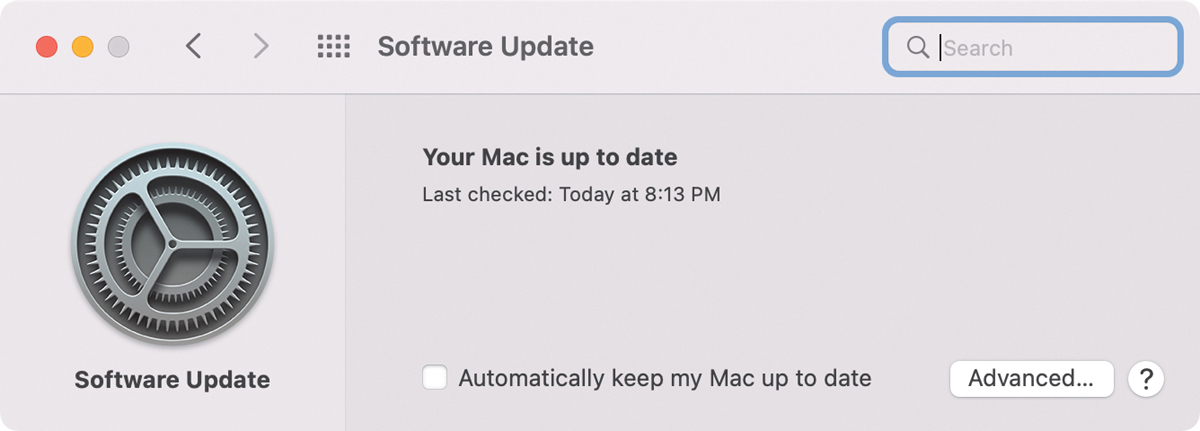
FIGURE 2.72 The Software Update panel is empty. Sigh…
The downloaded content is located in the Sound Effects browser.
Chapter 2—Interface Shortcuts
CATEGORY | SHORTCUT | WHAT IT DOES |
|---|---|---|
Interface | Cmd+Tab Cmd+H Control+Cmd+F Shift+Cmd+F Shift+Z Cmd+[plus] / [minus] Cmd+[ - or - Cmd+] S Cmd+1 Cmd+2 Cmd+3 Cmd+4 Cmd+5 Cmd+6 Cmd+7 Cmd+9 Control+P Control+Cmd+1 Shift+Cmd+2 | Fast switching between apps Hide Final Cut Pro Display interface full screen Display Viewer full screen Fit image into Viewer or fit project into timeline Zoom into or out of Viewer or timeline Timeline History go back—or—go forward Enable/disable the Skimmer Make the Browser active Make the timeline active Make the Viewer active Toggle the Inspector open/closed Toggle the Effects browser open/closed Go to Color Inspector Show/hide the video scopes Open Background Tasks window Jump playhead to specific timecode location Toggle display of the Library List and Browser on or off Toggle Timeline Index open/closed |
Chapter Wrap
Far too often, we click buttons or choose from menus without understanding why. When you treat editing software like it’s a magic box, bad things happen. Worse, when something goes wrong, you don’t know how to fix it.
Experience teaching thousands of students convinces me that when you take the time to understand how and why an application works the way it does, you become much more successful in creating effective projects.