
Chapter 6
Audio

Introduction
It is said—and I agree—that the best way to improve the quality of a film is to improve the quality of its sound. Yet audio scares many editors—mostly because they don’t understand it. This is a shame, because audio can do so much for video, much more cheaply and easily.
Keep in mind that the most valuable piece of audio mixing equipment is between your ears. When mixing, we need to do more than watch the meters. We need to carefully listen to the audio in our projects to make sure the sound and picture are working together to enhance the story.
In this chapter, we look at the full range of Final Cut audio tools—from edit to final mix.
Definitions for This Chapter
Audio clip. A media clip containing one or more channels of audio. It may, or may not, be linked to a video clip. Audio clips use different codecs from video. Also, except for BWF files (Broadcast WAV), audio clips don’t contain timecode. AIF and WAV are the two most popular uncompressed, high-quality audio formats.
Channel. This contains the recording of one mic, or the sound destined for one speaker. An audio clip can contain multiple channels.
Component. Apple’s name for an audio channel.
dB (deciBel). The technical measure of audio volume on an instant-by-instant basis. One dB is equal to the minimum change in audio level that is perceivable by an 18-year-old person with normal human hearing. However, don’t assume that 0 dB is dead quiet. In most cases, it means “full volume.” Yup, audio is measured in negative numbers.
Loudness. The technical measure of audio volume over time, which is more representative of how our ears hear sound. Loudness is measured in Loudness Unit Full Scale (LUFS) or Loudness K-weighted Full Scale (LKFS). These two measures are identical, just with different labels. 1 LU equals 1 dB.
Waveform. The visual representation of the amplitude (or volume) of an audio clip over time.
Mono. An audio clip containing exactly one channel.
Stereo. An audio clip containing two discrete channels, played simultaneously, with channel 1 providing the sound for the left speaker and channel 2 feeding the right speaker.
Dual-Channel Mono. An audio clip containing two or more discrete mono channels, where there is no sense of “left and right.” Typical examples are an interviewer (channel 1) and guest (channel 2). Or dialogue between four actors where each actor wears their own mic and is recorded to their own channel. This is the most common audio format used in video production and editing.
Surround. A distribution format (for example, after an audio mix) where five (plus subwoofer) or seven (plus subwoofer) audio channels are combined into one audio clip.
Double-system. This records video on a camera, while recording audio on a separate digital recorder. The big benefit to this is high-quality audio without constraining the movement of the camera. The disadvantage is that these clips require syncing during the editing process.
Sync (or synced).
A linked clip containing audio and video.
The process of linking audio to a video clip.
Coordinating and monitoring the timing of multiple clips (that is, multicam).
Level (also gain and volume). The measure of the loudness of a sound, measured in decibels (dB). Although these terms are technically different—gain refers to input, and volume refers to output—for this chapter we’ll use them interchangeably; and we’ll mostly use level.
Pan. In a stereo or surround mix, pan determines where a sound is placed in space between two or more speakers.
Crossfade. The audio equivalent of a dissolve, where one clip fades out as the other clip fades in.
Absolute level. This measures exactly how loud a sound is. Audio meters display the absolute levels of an audio clip.
Relative level. This measures how much a sound level is changed compared to the level at which it was recorded. Audio mixing deals with relative levels.
Distortion. Audio that was recorded, or exported, at such a loud level that the audio sounds awful. Distorted audio, in general, can’t be repaired. It is bad.
Room Tone. The sound a room or set makes when no one is talking; for example, air conditioning, traffic noise, birds chirping, that sort of thing. Room tone is recorded during production to fill audio gaps created during editing.
Mix. The process of blending the sounds from project audio clips such that the blend sounds pleasing. The audio mix is one of the last steps in the editing process.
Stem. A component of a finished mix. There are three principal stems: dialogue, sound effects, and music.
Keyframe. Keyframes are used to automate a parameter change during playback, such as levels or pan. We always use keyframes in pairs.
The best way to improve the quality of a video is to improve the quality of its audio.
Audio Prep
These basic audio concepts and hardware support what we can do with audio in Final Cut Pro. They also apply to any other audio or video application.
286 Human Hearing and Sample Rate
Sample rate determines frequency response.
Normal human hearing is a range from 20 Hz to 20,000 Hz. (Normal is defined as the hearing of an 18-year-old.) As we get older, we lose the ability to hear high-frequency sounds. Everything we hear is pitched somewhere along this range. There isn’t a set of frequencies for noise with another set of frequencies for speech. All sounds are contained within this single frequency range.
Human speech is, roughly, 100–6,500 Hz for men and 200–8,000 Hz for women (roughly five octaves).
Vowels are low-frequency sounds.
Consonants are higher-frequency sounds.
The deepest note on a piano is 27.5 Hz. The highest note is 4,186 Hz.
When the frequency doubles, the tone goes up an octave. (The opposite is also true.)
When the audio level increases by 6 dB, the volume doubles. (The opposite is also true.)
As a general guide, record audio for video at a 48,000 (48K) sample rate and 16-bit depth. Mix audio at 32-bit depth.
Sample rate determines the frequency response. Most audio for video is recorded at 48,000 samples per second. The Nyquist theorem (yes, there will be a test) states that to calculate the maximum frequency of an audio recording, divide the sample rate in half. So 48,000 samples per second equals a maximum frequency of 24,000 Hz, which exceeds human hearing. (Another common sample rate, used by CD audio to reduce file size, is 44,100 samples per second.)
287 What Does Audio Bit Depth Determine?
It’s a volume thing.
Just as digital video uses bit depth (to define color and grayscale ranges), so does audio. Audio bit depth determines the signal-to-noise ratio (SNR) and the dynamic range (the difference between the softest and loudest passages) of an audio clip. Bit depth applies only to Linear PCM (uncompressed) audio, such as WAV and AIFF. Compressed formats, such as AAC, AC3, or MP3, don’t use bit depth. Audio bit depths range from 8–32 bit.
In general, record audio using 16-bit depth. Mix audio at 32-bit depth. I would not recommend doing any audio work at less than 16-bit depth.
288 Which to Pick: Speakers or Headphones
Monitor speakers are best, but headphones can work in a pinch.
It’s the age-old question: Should I mix on speakers or headphones? Based on conversations with every audio engineer I’ve asked, the answer is unanimous: use monitor speakers for the final mix. Headphones are so precise that you spend hours correcting problems that no one else will hear. However, once the mix is done, it’s good practice to listen to it on a variety of devices… just in case there’s a problem.
However, note the term monitor speakers. These are speakers designed to provide a flat frequency response from below 100 Hz to over 16,000 Hz. Flat is the key word. When you are mixing, you want to hear what’s actually in your audio, not artifacts (such as bass boost) introduced by cheap consumer speakers.
Personally, I’m a big fan of Yamaha HS5 and HS8 monitor speakers. I’m listening to a pair of HS5s as I write this. They have clean sound, rich bass, and a clarity that makes it easy to hear what’s in my audio and what I need to fix. There are many other good choices for monitor speakers.
Headphones are fine for editing, but for the final mix, use monitor speakers.
In general, don’t mix with subwoofers, unless you know the project will play on a system with subwoofers. Also, do a final listening pass using cheap speakers to replicate small TV speakers, or mobile devices, just to make sure the essential audio can still be heard.
Headphones are fine for editing, but for the final mix, use monitor speakers.
289 What’s a Waveform?
The visual representation of audio volume over time.
In the “olden days” audio editors would edit audio using magnetic tape, slowly dragging the tape across the playhead of the audio tape recorder to determine where to make an edit. We’d mark that spot with a grease pencil (hence the term marked). It was slow, painstaking, and until you developed the skill, remarkably error-prone. I know, I started my career editing audio tape.
Waveforms make editing audio so much easier! A waveform is shown in FIGURE 6.1. Where the blue “waves” are tall, the audio is loud. Where they are short, the audio is soft. Where there’s a gap (left red arrow), the actor is pausing for breath between sentences. Between sentences is always a good place to make an edit.
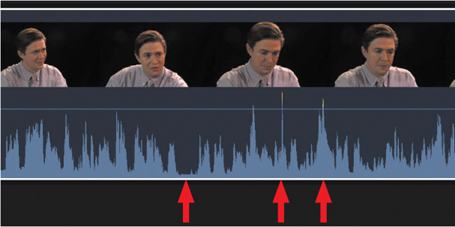
FIGURE 6.1 The waveform displays a visual representation of the volume (amplitude) of an audio clip. Valleys (left arrow) are good places to make edits.
In this waveform, the levels are consistently good—not too soft and, except for two places (the two right arrows), not too loud. (The middle arrow points to a waveform with a red top, which probably indicates a cough or laugh or other overly loud sound that is most likely distorted.)
The thin horizontal line is the audio level control. We’ll cover that later in this chapter.
Where the waveform is tall (right red arrow), the audio is loud, but not dangerously so. Audio close to the maximum level (center red arrow) is called peaking. Those levels require watching during the mix.
So to read a waveform, look at its overall height throughout the clip to see how consistent the. audio levels are, watch for valleys as places to make an edit, and check peaks to make sure the audio isn’t distorted.
290 Supported Audio Formats
Be careful editing or mixing MP3 audio.
Final Cut Pro supports a wide range of audio formats:
AAC
AIFF
BWF
CAF
MP3
MP4
RF64
WAV
The default audio format for Final Cut is WAV. This, like AIF, is uncompressed and provides the highest-possible quality. BWF is the only format that can include timecode.
Note
Apple’s website for technical details on each of these formats: support.apple.com/guide/final-cut-pro/supported-media-formats-ver2833f855/mac
291 Audio Import Settings
Better audio starts at import.
Improving audio quality starts when it is recorded, but that requires a separate book. In terms of editing, pay attention during import. In the lower-right side of the Media Import window are several audio options; see FIGURE 6.2.
Fix audio problems. Final Cut includes a suite of tools to fix common audio problems, including raising low audio levels, reducing background noise, and removing hum. Since problem clips in the timeline can be analyzed and fixed later (see Tip 331, Automatic Audio Enhancements), I don’t recommend using this option during import. You can remove these fixes later, but it takes time.
Separate mono and group stereo. Final Cut analyzes and marks the channel assignment for audio clips as mono, stereo, dual-channel mono, and surround.
Remove silent channels. Many cameras record more than two audio channels. If an audio clip has more than two audio channels and one or more of them are empty, Final Cut removes the channel and flags the clip as “Autoselected.”
Assign Audio Role. Final Cut analyzes the audio clip and assigns a role automatically based upon whether FCP thinks the clip is dialogue, sound effects, or music. The default role is Dialogue. Roles are easily changed later. I leave this set to Automatically except when I want an audio clip assigned a specific, custom role.
Assign iXML track names if available. Some high-end audio recording devices allow naming audio channels on the digital recorder used on set. Those names are saved in iXML format. FCP can read these labels and assign them as subroles to specific audio components (channels) in the clip. Leaving this on does no harm, even if you don’t need it.

FIGURE 6.2 These are my recommended audio import options.
My preferences are shown in Figure 6.2.
292 Timeline Settings Affect Audio Display
The timeline minimizes audio waveforms. Here’s how to change it.
When you first drag a synced clip to the timeline, the audio waveforms are pretty hard to see. That’s because Final Cut thinks that what you really want to see is the picture. Sigh…how foolish. Go to the top-right corner of the timeline and click the icon shown by the red arrow in FIGURE 6.3.
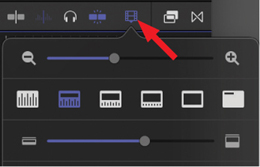
FIGURE 6.3 The Timeline Settings dialog. These icons determine the height of the video and waveform display. The lower slider determines the height of the clip.
When you click one of these six icons, the display height of the waveform changes; see FIGURE 6.4. These don’t affect audio levels, just how the clips look in the timeline. My display preference is the blue icon in Figure 6.3.

FIGURE 6.4 The range of display options matching the icons in Timeline Settings.
293 What an iXML File Looks Like
I was curious, so I tracked one down.
iXML files are created on the set by a dedicated audio technician using professional audio recorders that allow the tech to assign each input source a name. These names are imported as subroles by Final Cut. After import, the editor can change the name as needed.
FIGURE 6.5 shows what an iXML file looks like. Each of the channels in the clip is labeled based on the source of the audio.

FIGURE 6.5 Typical channel and subrole labeling for an iXML audio file.
294 Sync Double System Audio Automatically
Syncing connects two separate clips into one.
Final Cut can automatically sync audio and video clips. A typical example is double-system sound where one video clip is synced to one or more audio clips.
Similar to multicam syncing, audio clips are synced using audio content, timecode, date/time created, start of first clip, or first marker. If both the camera and audio clip contain similar audio, the easiest way to sync is for Final Cut to match the audio automatically. Depending upon the lengths of the clips, this could take from a few seconds to a few minutes.
Sync audio clips using audio content, timecode, date/time created, start of first clip, or first marker.
To automatically sync clips:
Select the clips you want to sync in the Browser. Remember, while you can sync an unlimited number of audio clips, you can include only one video clip.
Choose Clip > Synchronize Clips (shortcut: Option+Cmd+G)
Or—right-click one of the selected clips and choose Synchronize Clips.
Here are the key choices in the dialog that appears; see FIGURE 6.6.
Leave “Use audio for synchronization” selected so that Final Cut syncs on the audio in the clips.
Leave “Disable audio components on AV clips” selected if you don’t want to hear the audio from the video clip. Most of the time, you don’t.

FIGURE 6.6 The automatic synchronize clips dialog.
Note
If you need to sync more than one video clip, use a multicam clip.
Click OK.
The synced clip appears in the Browser, ready to edit.
295 Sync Double System Sound Manually
Manual syncing provides more options to determine sync points.
Although multicam editing syncs multiple video clips with multiple audio clips (see Chapter 5, “Advanced Editing”), a typical audio example is syncing one video clip to one or more audio clips recorded using a separate audio recorder. Similar to multicam syncing, clips are synced using audio content, timecode, date/time created, start of first clip, or first marker. Generally, timecode or first markers are the best options because they are the fastest.
To sync clips manually:
In the Browser, set a marker on the sync point (generally a clapper slate) for each clip.
Once marked, select the clips you want to sync in the Browser.
Remember, although you can select an unlimited number of audio clips, you can include only one video clip.
Choose Clip > Synchronize Clips (shortcut: Option+Cmd+G).
Or—right-click one of the selected clips and choose Synchronize Clips.
Here are the key choices in the dialog that appears next; see FIGURE 6.7:
Give the new synced clip a name and event location. (You may want to store synced clips in their own event to make them easier to find.)
Deselect Use audio for synchronization.
You do this because not all clips have audio or the audio doesn’t match.
Select Disable audio components on AV clips.
You do this because you want to use audio from the audio clips, not video. This mutes, but does not remove, the audio attached to the video clip.
Set Synchronization to First Marker (though you can use other options, if needed).
Configure the video settings as needed.

FIGURE 6.7 The manual clip synchronization dialog.
Click OK to create the synced clip.
The synced clip appears in the Browser, ready to edit.
296 Manually Adjust Audio Clip Sync
This is similar to adjusting a multicam clip—but easier.
It is not unusual to need to shift the contents of a synced clip a few frames to get the alignment precisely correct. Fortunately, this is easy to do.
Select the synced clip in the Browser.
Choose Clip > Open Clip.
The synced clip opens in the timeline where each clip is on its own layer; see FIGURE 6.8. Here, you see two audio clips synced to a video clip, but the clapper slate alignment is off.

FIGURE 6.8 The alignment of the clap is off a frame or two for each clip. Use [comma]/[period] to manually shift each clip one frame at a time.
To adjust the alignment, select each clip then press [comma] or [period] to shift the clip left or right one frame at a time.
To close the clip for editing, open a project into the timeline.
Once aligned, a synced clip behaves the same as any other clip.
Note
Unlike video, audio clips are not limited to moving in whole frame increments. Press Option+, [comma] or Option+. [period] to move the selected audio clip in subframe increments.
297 Record a Voice-over
Use for temp tracks or production.
Most of the time, we work with the audio we are given. Still, editors are frequently called upon to record voiceovers, or temp tracks, to add to a project. Final Cut makes this easy.
Choose Window > Record Voiceover (shortcut: Option+Cmd+8) to display the voiceover control panel; see FIGURE 6.9.
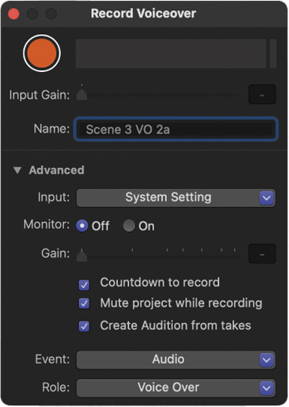
FIGURE 6.9 The Record Voiceover panel controls audio inputs, what the file is named, and where the file is stored, along with playback settings.
Set the input from the drop-down list.
This defaults to the system audio inputs, but the menu allows selecting from any connected audio source.
Turn Monitor off to prevent feedback if you are using a mic close to your computer.
Adjust the other settings based upon your personal preference.
I do a lot of voice-over work, and I’ve learned that I never get a reading right on the first take. So I just start recording and keep recording until I get it right. While writing the script and during rehearsal before recording, I make sure the voiceover fits for time. Once recording starts, I first work to get the reading right, then edit it for time.
I also make sure to store voice-overs in their own event, with a unique role assigned to them.
Note
If System Preferences > Accessibility > Zoom is enabled, Option+Cmd+8 is used by macOS to zoom the screen. In that case, create a custom shortcut for Final Cut.
Edit Audio
Editing audio is almost the same as editing video except, most of the time, we are editing audio that’s connected to video and it’s located in a different section of the timeline.
298 Audio Editing Basics
Editing audio is just like editing video—without the pictures.
Audio is edited similar to video. You preview the clip in the Browser, mark it with an In and/or Out, and edit it to the timeline the same as video. Trimming is a bit different, as are the effects. But playback and export, too, are the same.
All connected audio clips are placed below the Primary Storyline, just as all connected video clips are placed above it. Like video, audio clips are connected to the Primary Storyline, and, as with video, the same keyboard shortcuts and trim tools work the same with audio.
Audio is attached to either video (synced) or a separate clip. Audio does not contain timecode, except for Broadcast WAV (BWF) files. One audio clip can hold one or many channels of audio. Audio waveforms can be displayed in the Browser (off by default) or timeline (on by default).
In other words, you already know everything you need to know to add audio to your projects. There’s nothing wildly divergent here. Still, there are a few differences.
FIGURE 6.10 shows the three main colors of an audio clip:
Blue: Dialogue
Teal: Sound effects
Green: Music
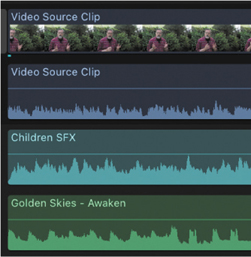
FIGURE 6.10 The three principal colors for audio clips: Blue (dialogue), Teal (sound effects), and Green (music).
Roles determine these colors. The default role is Dialogue. This means that if Final Cut can’t figure out the clip type during import, it assigns it a Dialogue role. Although the timeline groups audio clips by role, roles are easily changed at any time during an edit. (See the “Audio Roles” section later in this chapter.)
299 Edit Audio to the Timeline
Adding audio clips creates a connected clip—just like adding video.
Editing audio clips to the timeline is like editing video as a connected clip.
Position the playhead (skimmer) in the timeline.
Select the audio clip in the Browser.
Press Q.
Or—click the Connected edit icon
Or—drag the clip into the timeline, which ignores the position of the playhead (skimmer).
Moving, trimming, and deleting audio clips outside the Primary Storyline are identical to editing and trimming video.
300 Trim Audio Separately from Video
This is the most useful audio editing tip in the book.
Many of the audio clips added to the timeline are bundled with a video clip. We call this synced audio. Although you can see the audio, it is impossible to edit directly without also editing the video.
So here’s the secret: Double-click any audio waveform to separate the audio from the video while still keeping it linked; see FIGURE 6.11. Instantly, the audio separates from the video. Yet, and this is the important part, the audio remains linked. Linked means it can’t get out of sync with the video.

FIGURE 6.11 The left image shows audio nested with video. The right image shows audio expanded, but still linked, to the video.
Double-click the waveform again to nest the audio back with the video.
This is such an important point. We almost always want to edit or trim audio separately from the video. Yet it is critical that audio not get out of sync. This solves that problem.
301 Expand vs. Detach Audio?
Expanded audio is still linked, detached audio is not.
Select a synced audio and video clip, then look in the Clip menu. Although there are lots of choices, two key ones are Expand Audio and Detach Audio. What’s the difference? Sync.
Never detach audio simply to trim it.
When you expand audio, the waveform separates from the video for trimming separately from the video; see FIGURE 6.12. However, that audio is still synced to the video. If you change the position of either the audio or the video, the other side of the synced clip moves with it.

FIGURE 6.12 Expanded audio (left) and detached audio (right). Notice the connection link (red arrow) for the connected clip.
When you detach audio, the audio becomes a connected clip, no longer locked to the video. There’s a connection to the video, but it is no longer guaranteed to be in sync. In fact, it is impossible to resync the audio once it is detached. (Well, OK, yes you can, but you would need to create a synced or compound clip. Not easy; see Tip 303, How to Sync Out-of-Sync Audio.)
You expand audio when you want to trim or adjust it. You detach audio when you want to delete the audio, delete the video, or purposefully move the audio clip somewhere else in the project.
In short, never detach audio simply to trim it.
302 When Should You Break Apart Clip Items?
In general, don’t do this for audio editing.
Clip > Break Apart Clip Items is generally not used for audio editing, for the same reason that detaching audio is not recommended. It takes the individual tracks inside an audio clip and converts them into connected clips.
This menu choice is best used for:
Deconstructing compound clips
Deconstructing synced clips
Deconstructing connected storylines.
Don’t use Break Apart Clip Items for audio clips.
In other words, this option is best for taking apart those timeline elements that you first put together.
303 How to Sync Out-of-Sync Audio
This condition is rare, but fixable.
Most of the time, when recording audio and video, everything is in perfect sync. That’s because the camera and mic are relatively close to each other. However, not always. For example, when recording in a venue where the camera is on the other side of the stadium from the mics, audio and video may be a few frames out of sync. Or if your gear malfunctions. Or, well, if the gremlins were especially active that day. In other words, you have a sync problem.
Here’s how to fix it:
Select the errant clip.
Choose Clip > Break Apart Clip Items.
Before you do anything else, put the playhead where it crosses all components. Select each component one at a time and put a marker (shortcut: M) on it. This provides a sync point so that if you royally screw things up, you can get back to where you started.
While watching the video playback, select the component that is out of sync and press [comma] or [period] to move it one frame at a time until it is back in sync. Pick the adjustment that seems to make the sync look the best.
Repeat this process for each out-of-sync audio clip.
When everything is back in sync, select all the clips and choose File > New > Compound Clip (shortcut: Option+G).
This packages all the loose clips into a single compound clip that you can use for editing without risking sync.
Use compound clips to collect individual elements into a single clip for editing.
Note
Unlike video, audio clips are not limited to moving in whole-frame increments. Press Option+[comma] or Option+[period] to move the selected audio clip in subframe increments.
If you decide later that things are still out of sync, open the compound clip and adjust the clips again.
304 Trim Audio Clips in the Primary Storyline
Most synced audio is edited into the Primary Storyline.
There are four types of audio edits in the Primary Storyline:
Where the two clips touch.
Where there’s a gap between the two clips; see FIGURE 6.14.

FIGURE 6.14 An audio trim with a gap creates silence, which is generally covered by room tone, sound effects, or music. An overlap (right) means you can hear audio from both clips.
Where there’s an overlap.
Where the audio and video edit at different times, called a split edit. (See Tip 305, Split Trims Edit Audio Separately.)
Double-click the audio waveform to expand it from the clip; then, using the Arrow tool (shortcut: A), drag the edge of an audio clip. Gaps leave silence. Overlapping clips means you can hear audio from both clips. Both are acceptable edits; it depends upon what you want to hear and what you don’t.
Almost all projects have multiple tracks of audio playing at once: dialogue, ambient sound (room tone or exterior natural sound), sound effects, and/or music. Overlapping edits are normal between layers.
305 Split Trims Edit Audio Separately
A split trim is where the audio and video edit at different times.
To me, the most important trim is a split trim; see FIGURE 6.15. (These are also called a split edit, L-cut, or J-cut due to the shape the edit forms in the timeline.) This is where the audio and video edit at different times. This means we see one thing but hear something different. Split edits are generally created in the Primary Storyline.

FIGURE 6.15 A split edit with the audio edit rolled to the right of the video edit.
To create a split edit:
Display waveforms in the timeline.
Double-click the audio waveform to expand it from the video.
Select the Trim tool (most split edits are roll trims to avoid leaving gaps).
Drag either the video or audio edit point to a new location.
Note
Although you can—and often will—ripple trim audio to leave a gap, leaving a gap in the video would create a flash of black.
To remove a split edit:
Select both clips around the edit point.
Choose Trim > Align Audio to Video.
This shifts the timing of the audio edit to match the timing of the video edit for that clip.
306 Trim Connected Audio Clips
Most stand-alone audio is edited as a connected clip.
Trimming a connected audio clip is the same as trimming a connected video clip. As illustrated in FIGURE 6.16:
To move a connected clip, click in its center and drag.
To trim a connected clip, select an edge (edit point) and drag.

FIGURE 6.16 Drag an edge to trim a connected clip. Drag the clip to move it.
A variety of keyboard shortcuts can help. First, select the edge, clip, or clips you want to move:
To move the selected item one frame left/right, press [comma]/[period].
To move the selected item ten frames left/right, press Shift+[comma]/[period].
To change the duration of the clip, press Control+D and enter the new duration using timecode.
307 Unlike Video, Trim Audio to the Subframe
Final Cut edits audio to 1/80th of a frame.
Video frames are discrete images that change every 30th of a second (or whatever frame rate you are using). You can’t edit a portion of a video frame. Audio, however, is not so limited. Because audio is recorded using samples (see Tip 286, Human Hearing and Sample Rate), there is much more flexibility in trimming audio.
As an example, zoom in to the timeline until you can’t zoom anymore; see FIGURE 6.17. At the top of the timeline is a gray bar that is almost impossible to see. That indicates the duration of a frame. The left arrow marks the start of the frame; the right arrow marks the end.

FIGURE 6.17 Start of video frame (left arrow), end of video frame (right arrow). Audio is trimmed into the middle of the frame.
Because audio is sample-based, not frame-based, you can trim the start, or end, of an audio clip to the middle of a frame (middle arrow), which video can’t do. This helps get rid of a pop or click at the start of a clip.
Note
For more precision, press Option+[comma] or Option+[period] to move the selected audio edit point in subframe increments.
308 Audio Configuration Settings Affect Editing
These settings are located in the Audio Inspector.
The Audio Inspector is presented more completely in the “Audio Inspector” section, but, for now, I need to introduce the Audio Configuration portion because it affects editing.
Dual Mono is the most common configuration for camera source audio.
Select an audio clip in the Browser or timeline.
Go to the Audio Inspector (top red arrow).
Scroll down to Audio Configuration.
This displays the audio channels (tracks) inside the selected audio clip. The menu at the top of the clip (see FIGURE 6.18) shows options for a clip with two channels.
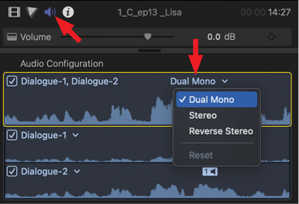
FIGURE 6.18 The Audio Inspector (blue icon, top arrow) adjusts audio settings. The Channel Configuration menu tells Final Cut how to process the separate channels.
Dual Mono (or Mono). Select when the audio on each channel is unrelated to other channels. Typical examples are interviewer on one channel, guest on the other. Or individual actors, each on their own channel. This is the most common configuration for camera source audio.
Stereo. Select when there is a spatial relationship (left/right) between the two tracks. This is the most common setting for music and many sound effects.
Reverse Stereo. Select when the stereo audio channels were accidentally reversed.
Various combinations. Many external audio recorders, when recording multiple tracks, will record both stereo and mono files. Live performances are a good example. These options will vary by clip.
Surround 5.1. Select when the audio file is mixed for 5.1 surround. This is never encountered when editing original sources, but it is often encountered when working with final mixes. FCP supports only 5.1 surround, not 7.1.
Select the setting that most closely represents the clip. If there isn’t perfect match, select Mono (or Dual Mono).
This provides the greatest flexibility when it comes time to mix.
FIGURE 6.19 illustrates the options for an audio clip with more than two channels.

FIGURE 6.19 With more channels come more configuration options.
309 Display Audio Components
Audio components display individual audio channels in the timeline.
Accessing audio components is one of the most powerful audio editing features in Final Cut. An audio component is a single audio channel (think “microphone”) in the audio clip. By displaying these individual channels in the timeline, you can edit, trim, mute, or adjust the level of individual channels, without any risk of losing sync.
If necessary, set the appropriate audio configuration in the Audio Inspector; see Tip 308, Audio Configuration Settings Affect Editing.
Choose Clip > Expand Audio Components (shortcut: Control+Option+S); see FIGURE 6.20.

FIGURE 6.20 With audio components displayed, channel 1 is shortened, with a selected muted range. Channel 2 is active for the entire clip.
To trim a component, drag the edge.
To mute a component, select it and press V.
To mute a portion of a component, select the range with the Range tool and press V.
To change the audio level, drag the thin horizontal line in the audio clip up or down.
To hide the components, choose Clip > Collapse Audio Components (shortcut: Control+Option+S).
310 Automatically Apply a Crossfade
Crossfades smoothly blend the outgoing audio with the incoming.
Adding a dissolve to video is easy. Select the edit point and press Cmd+T. That doesn’t work for audio. Look more closely at the Transition browser; there isn’t a single audio transition there. That’s because audio transitions are both simpler and more complex than video.
They are simpler because the only way to create an audio transition is to change audio levels. They are more complex because there are often multiple audio tracks that need to transition at the same time.
Automatic cross-fades require handles and apply only to audio clips touching in the Primary Storyline.
Still, there is a fast way to dissolve between audio clips. It’s called a cross-fade, where one clip fades out as the other clip fades in. This works only for audio clips that are touching in the Primary Storyline.
Select both audio clips (not just the edit point).
Choose Modify > Adjust Audio Fades > Crossfade.
Or—press Option+T.
Both clips expand their audio and the length of each clip is extended by the duration of the fade.
The default Crossfade duration is added to each clip by moving the fade dots. This duration is set using Preferences > Editing; see FIGURE 6.21.
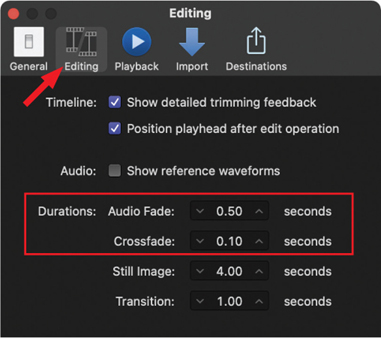
FIGURE 6.21 Audio Fade starts from the existing edge of a clip. Crossfade creates handles then adds the fade. Both use the fade dots.
You can manually tweak each fade dot (explained in Tip 311, Apply an Audio Transition Manually) to further adjust the duration.
311 Apply an Audio Transition Manually
Unlike video, there are no prebuilt audio transitions.
Although fades are used to smooth edits in dialogue, they are used more frequently with sound effects and music. Just as with video, you need handles to create an audio transition. Regardless of what type of clip you have, you create an audio transition the same way:
If necessary, double-click any synced audio track to expand it.
Drag the edit points so they overlap; see FIGURE 6.22.

FIGURE 6.22 Drag a fade dot in the top corner of each clip to fade the audio from full volume to silent.
Drag the small “fade dot” at the top of each clip to fade out/in between clips to create the transition duration you need. Most audio fades are either really short or really long.
The shaded portion of each clip shows the shape and duration of the fade. To remove a fade, drag the fade dot back to the edge of a clip.
312 A Faster Way to Create an Audio Fade
This keyboard shortcut applies a preset duration to an audio fade.
There is a faster way to add fades, but it isn’t enabled by default.
Choose Preferences > Editing and enter the Audio Fade duration you want to use as a default setting; see Figure 6.21.
Choose Commands > Customize and search for “Audio Fades.”
Set Apply Audio Fades to the shortcut you want to use. (In my case, I set this to Option+A.)
Now, whenever you want to quickly apply an audio fade, select the clips, then press Option+A. Ta-Dah! Fades appear at the end of all selected clips. (This applies the fade to the end of a clip; it doesn’t overlap clips or create handles.) This is best used for music or sound effects transitions for clips outside the Primary Storyline.
Audio fades start at the existing edge of an audio clip and don’t require handles.
These audio fades are fully adjustable by dragging the fade dot. This shortcut simply applies an audio fade quickly, based upon the fade duration in Preferences.
313 Change the Shape of an Audio Fade
Once you’ve applied an audio fade, you can change its shape.
Right-click any fade dot to reveal four different fade types; see FIGURE 6.23.
Linear. This makes a “straight” transition from start to finish. This sounds best when fading to or from black. If you apply this to a cross-fade, the audio level will drop about 3 dB in the middle of the fade due to how audio levels are calculated.
S-Curve. This sounds best with transitions longer than two seconds. It starts and ends slowly.
+3 dB. This is the default transition. It sounds best when cross-fading between clips.
–3 dB. This is a specialized fade best used when you want to minimize a sound, like a breath, at the start of the fade.
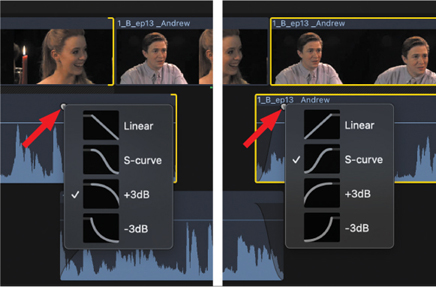
FIGURE 6.23 The four shapes for fade dots. Shapes depend whether they are located at the beginning or end of a clip.
Each fade dot can have its own shape. The shape of the fade is illustrated by the shadow displayed at the end of the audio clip. Fades have different shapes depending upon their location (start or end of a clip).
314 Enable Audio Skimming
Audio skimming lets you quickly review an audio clip.
Just as you can skim video clips, you can skim audio clips. However, audio skimming is off by default.
To enable audio skimming, turn on skimming (shortcut: S).
Click the icon (indicated by the red arrow in FIGURE 6.24) in the top-right corner of the timeline (shortcut: Shift+S).

FIGURE 6.24 Click this icon to enable clip skimming, after skimming is turned on.
Drag across a clip to review the audio.
Final Cut automatically “pitch shifts” the audio so that it doesn’t sound squeaky as you skim.
Final Cut automatically “pitch shifts” audio when skimming so that it doesn’t sound squeaky.
315 Turn On Clip Skimming
Clip skimming solos one clip, without playing any others.
Many times, when building visual effects or layering audio, you will have many clips playing at once in the timeline. Sometimes, though, you just need to see, or hear, one clip in that group, without hearing anything else. Clip skimming makes that possible.
To enable clip skimming, turn on skimming (shortcut: S).
If you want to hear a clip, enable audio skimming (shortcut: Shift+S).
If you want to see a specific video clip, choose View > Clip Skimming (shortcut: Option+Cmd+S).
Now when you drag across a clip, you’ll see or hear only that clip and nothing else.
316 Retime Audio to Match Dialogue
This is a common situation when replacing dialogue using ADR.
Sometimes we need to match the timing between existing audio and newly recorded audio. This happens frequently when replacing dialogue using automatic dialogue replacement (ADR). ADR is the process of recording, or re-recording, dialogue in a studio to replace noisy or missing dialogue on set or to change a voice. Key to successful ADR is matching the timing of the new audio clip to the existing audio clip.
Chapter 10, “Special Cases,” covers how to retime video clips. Here, though, you can use the same function—combined with pitch shifting—to retime audio clips.
You can retime audio as well as video using the Retime Editor (Cmd+R).
FIGURE 6.25 shows a video clip with two new recordings under it.
Select one of the new recordings and press Cmd+R to display the Retime Editor.
Drag the black vertical line, the thumb, at the top-right edge of the color bar to change the speed of a clip.
Blue indicates a clip running faster than normal; orange indicates slower.
Adjust until the dialogue matches.
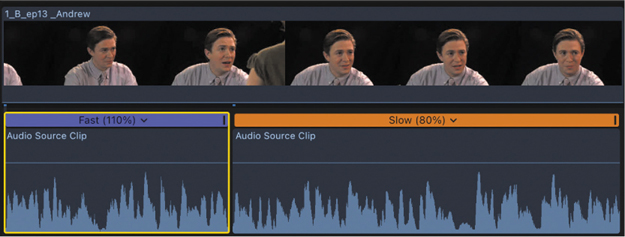
FIGURE 6.25 Drag the black vertical line at the top-right side of the Retime Editor to change the playback speed of an audio clip.
Even though the audio is running at a different speed, Final Cut adjusts the pitch so it sounds normal.
317 Retime Audio to Stretch a Closing Chord
Sometimes, edited music ends a bit too abruptly.
Most music fades out naturally. But maybe caused by an edit, the ending is too abrupt. Here’s a way to use retiming to fix this. (Chapter 10 covers video speed changes in more detail.)
Cut the audio clip just as the final chord starts (see FIGURE 6.26) so there’s only a few frames left.

FIGURE 6.26 Stretch the last few frames of a music clip to create a more natural fade. Notice a fade dot, with a linear curve, was also added.
Press Cmd+R to display the Retime Editor.
Drag the black line, the thumb, at the top-right corner of the cut portion to extend the audio as needed.
Drag a fade dot to add a natural fade to the end of the music. For best results switch the curve to Linear.
Final Cut shifts the pitch of the music in the slowed section to match the untouched music before it. If the pitch doesn’t shift, enable it using Modify > Retime > Preserve Pitch.
Levels & Pan
When editing video, we spend most of our time trimming. When editing audio, we spend most of our time adjusting levels. This section covers that process in detail.
318 Display and Read Audio Meters
They are the key to accurately measuring audio levels.
No, the only audio meters in Final Cut aren’t those midget green things under the Viewer; see FIGURE 6.27. Those are simply audio meter proxies. To display the audio meters, do any of the following:
Click those tiny meter proxies under the Viewer.
Choose Window > Show in Workspace > Audio Meters.
Press Shift+Cmd+8.

FIGURE 6.27 No, these green midgets are not the official audio meters. They are just small proxies to remind you that there is audio in your project.
The audio meters in Final Cut can display mono, stereo, or surround 5.1 audio, depending upon what is selected; see FIGURE 6.28. However, a project can output only stereo or surround 5.1 audio.
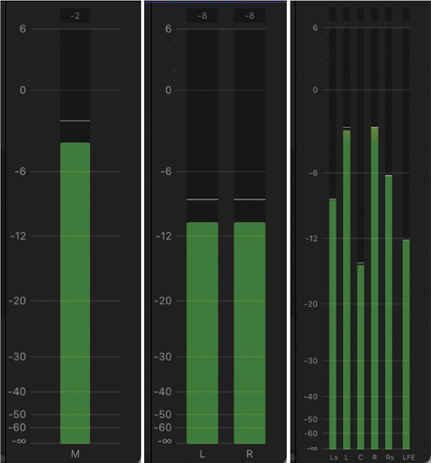
FIGURE 6.28 The three types of audio meters in Final Cut: mono (left), stereo (middle), and surround 5.1. Projects can output only stereo or surround.
Click the small audio meters under the Viewer to toggle the big audio meters on or off.
In Figure 6.28:
The green bars display the absolute volume of a channel (mono, stereo, or surround).
The audio meters show the sum of all audio playing at that instant.
Final Cut measures audio in dBFS (deciBels, full-scale).
The white bar, called the peak hold indicator, freezes the maximum volume for the last few seconds, or until the audio loudness exceeds the level it is currently displaying.
The number at the top of the mono and stereo bars indicates the maximum audio level during playback in dBs. This value resets whenever you restart playback.
Every 6 dB change doubles or halves the volume.
The absolute maximum level of audio is 0 dB. (Yes, I know, it makes me giggle too.)
If the audio goes over 0 dB during playback, a red indicator glows indicating a distortion condition, the affected channel, and how many dBs over 0 the audio is.
During export, audio levels must not exceed 0 dB. Otherwise, permanent distortion occurs. During editing, levels often exceed 0 until audio levels are set during the final audio mix.
319 Set Audio Levels
Audio levels are the most important setting for any audio clip.
Setting audio levels is your most important audio control.
Yes, there are hundreds of useful audio effects, but the most important control you have over audio are the volume levels. They are so important, in fact, that there are a number of different ways to set levels.
Drag the thin horizontal line up (to make levels louder) or down; see FIGURE 6.29. (The line is blue when it is not selected, yellow when it is.)
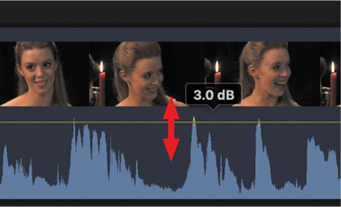
FIGURE 6.29 Drag the horizontal line in a clip to change audio levels. Here, they are increasing by 3 dB. (Negative numbers indicate lower volume.)
Press and hold Cmd, while dragging the audio line to “gear down” to make more precise audio level changes.
Select the clip(s) to adjust and press Control+[minus]/[plus] to make levels softer/louder in 1 dB increments.
Select the clip(s) to adjust and press Control+Option+L, then enter a specific audio level to create an absolute level adjustment.
Select the clip(s) to adjust and press Control+Cmd+L, then enter a specific audio level to create a relative level adjustment.
Select the clip(s) to adjust and adjust the Volume slider in the Audio Inspector. (I’ll explain the Audio Inspector in the next section.)
Note
Dragging the audio level line affects only one clip. The other controls support changing levels for all selected clips.
320 Absolute vs. Relative Audio Levels
Changing levels is relative; measuring levels is absolute.
“But wait a minute! Go back to Figure 6.29. You said that audio levels can’t exceed 0 dB. Yet there they are: +3 dB! That is illegal, right?” Um, no. But good question.
When measuring audio levels, there are two different yardsticks (meter sticks?). One is “absolute,” and the other is “relative.”
When you adjust the levels of a clip, you are adjusting the volume of the clip relative to the level at which it was recorded. However, unlike adjusting a clip, the levels displayed by the audio meters are absolute. These display the precise level of your audio as it is playing at that instant.
Absolute audio level change (shortcut: Control+Option+L). This sets audio levels regardless of the current audio volume of the selected audio clip. If any keyframes are applied, an absolute adjustment deletes the keyframes. For example, use the shortcut to set selected clips to a specific level of –6 dB. If one clip is at –4 dB and a second clip is at 0 dB before the change, they both become –6 dB after the change.
Relative audio level change (shortcut: Control+Cmd+L). This sets audio levels based on the audio levels of the selected clip before the adjustment. A relative adjustment retains keyframes. For example, use the shortcut to raise the level of one or more selected clips a relative amount of 4 dB. If one clip is at –4 dB and a second clip is at 0 dB before the change, the first clip will become 0 dB and the second clip will become +4 dB after the change.
The audio meters show absolute audio levels. Clip level changes are relative.
Applying a relative adjustment to audio clips with keyframes is a fast and easy way to increase or decrease the overall amplitude of the clip while maintaining the keyframe adjustments.
321 Adjust Audio Levels with the Range Tool
The Range tool offers another cool way to adjust audio levels.
This technique adjusts levels across a range, meaning a section of one clip or spread across multiple clips. If you want to adjust entire clips, the Volume slider in the Audio Inspector is a better option.
Select a range within the timeline using the Range tool.
Any size range, across any number of clips, is permitted.
Choose Modify > Audio Volume and select Up, Down, Absolute, or Relative. (My preference is Relative.)
This adjusts every clip in the selected range by the same amount.
This option adjusts levels by adding keyframes at the beginning and end of the range, as well as the beginning and end of every clip inside the range, then moving the volume line up or down.
322 A Shortcut to Change Audio Levels
Keyboard shortcuts save time—as long as you remember them.
Select the audio clip, or clips, whose levels you want to change, then press Control+[plus]/[minus]. This raises, or lowers, the volume of the selected clips by 1 dB.
323 Add and Modify Keyframes
Keyframes automate change during playback.
We use keyframes in pairs to automate a parameter change during playback; for example, to change the audio level from one value to another. Because keyframes create change, it helps to think of keyframes in pairs: a starting position and an ending position. We can, and often do, use more than two, but thinking about them in pairs helps in understanding what they do.
To create a level keyframe, Option-click the thin horizontal line in the audio waveform; see FIGURE 6.30.

FIGURE 6.30 Option-click the audio level line to set a keyframe. Drag the keyframe to change the level.
To change the level, drag the keyframe vertically.
To change the level more slowly, Cmd-drag the keyframe.
To change the timing of a keyframe, drag it horizontally.
To constrain the movement of a keyframe, press and hold Shift while dragging. (If you start to drag vertically, Shift-dragging allows only vertical movement. If you start to drag horizontally, movement is constrained horizontally.)
To delete one keyframe, right-click it and select Delete from the menu.
To delete multiple keyframes, select them with the Range tool, right-click one of the selected keyframes, and choose Delete from the menu.
Keyframes are used extensively for setting audio levels and visual effects.
Figure 6.30 illustrates that to decrease the level, you need to set two keyframes: a starting position (0 dB) and an ending position (–8 dB). The numbers indicate the amount of change in dB as the keyframe is repositioned.
Audio Inspector
The Audio Inspector is where you make changes to audio clips. These include levels, pan, audio repair, channel configuration, and effects.
324 Introducing the Audio Inspector
This is where you make changes to—you guessed it—audio.
The Audio Inspector (see FIGURE 6.32) has five sections:
Volume. This slider sets the clip volume for whatever clip(s) are selected. If a range is set, it ignores the range.
Audio Enhancements. These fix problems such as EQ, voice isolation, low audio levels, audio hum, and excessive noise.
Pan. This adjusts where a sound is placed in space; in a stereo clip, between the two speakers.
Effects. This is empty until you add effects to a clip. Audio effects are covered later in this chapter in the section “Audio Mixing & Effects.”
Audio Configuration. This was discussed earlier in this chapter. It determines how multichannel audio is processed by Final Cut.
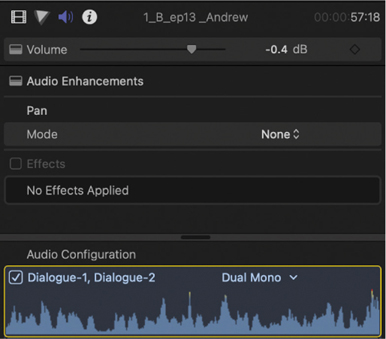
FIGURE 6.32 The components of the Audio Inspector. Click the speaker icon at the top left to open.
325 Set Audio Levels Faster
The Audio Inspector Volume slider adjusts multiple clips at once.
Although adjusting levels on a clip-by-clip basis is easy, there is a faster way: the Volume slider. (See FIGURE 6.33.)

FIGURE 6.33 Change clip levels by moving the Volume slider or entering a number. Sliding left lowers the volume.
Select the clips you want to adjust, then drag the Volume slider to make an absolute audio adjustment. In other words, all selected clips now have the same level.
The Volume slider works only with whole clips. It ignores any selected ranges. However, if there are existing keyframes in a clip, when you drag the Volume slider, it sets a new keyframe at the position of the playhead (skimmer) and adjusts only that keyframe. In general, if you add keyframes, don’t use the Volume slider.
326 Pan Places a Sound in Space
Here are my thoughts on panning audio.
Pan adjusts where a sound appears in space. In stereo terms, it’s where a sound appears between the left and right speakers. Before I show you how to adjust pan, I want to explain when not to use it.
By definition a mono clip plays equally loudly from the left and right speakers, giving the illusion the speaker is directly in front of you. You should use mono (a center pan) for audio where one person is speaking. I also use mono for my web projects, which include interviews, podcasts, talking heads, webinars, and other programs where there is no real “left/right” required for the sound.
Larry’s rule: “Just because you can [create stereo] doesn’t mean you should.”
Why? Because mono audio takes half the space of stereo, it downloads faster, it has no phase cancellation, and there are no hassles creating the mix. For simple spoken-word shows, I also center any theme or bumper music. (Keep “Larry’s rule” in mind: “Just because you can [create stereo] doesn’t mean you should.”)
But when spatial placement makes sense, when you want to hear an actor walk from the left side of the screen to the right, pan is the answer. However, pan requires recording the source audio in mono. Mono provides the maximum flexibility when placing sounds in space during the mix.
327 How to Pan Audio
Pan is most useful for stereo mixes.
Only mono clips can be panned. Here’s how:
Select the clip you want to adjust in the timeline.
In the Audio Inspector, change Mode from None to Stereo Left/Right; see FIGURE 6.34.

FIGURE 6.34 None means no change to the clip’s audio pan settings as recorded. Stereo Left/Right displays the pan slider. Ignore the other settings, which refer to surround panning.
Drag the pan slider left or right to change the spatial location of the sound. Your ears will tell you when the placement is right. (You can either move the slider or enter a numeric value.)
To reset audio settings, click the small hooked arrow to the right of the word “Volume” or “Pan.”
To hide the Pan controls, click the word “Hide.”
Just because a clip has two channels does not make it stereo.
328 Convert Multichannel Audio to Dual Mono
Mono channel audio is the best option for audio editing and mixing.
Just because a clip has two channels does not make it stereo. Equally, just because a clip has more than two channels does not make it surround. More often than not, multichannel clips are simply a collection of mono audio tracks stored in a single clip.
Typical examples are recording a dramatic scene with each actor on their own mic, or the interview host on one channel and the guest on a second.
Recording multichannel mono audio is the best option for audio editing and mixing.
However, frequently when Final Cut imports a two-channel clip, it assumes it is stereo. Or a multichannel clip is assumed to be surround. These are easy errors to fix. Here’s how:
Select the multichannel clip(s) in the timeline, not the Browser.
Open the Audio Inspector (Cmd+4).
In Audio Configuration (see FIGURE 6.35), change Stereo to Dual Mono.
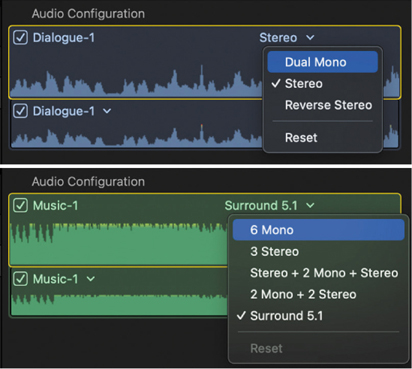
FIGURE 6.35 Use Audio Configuration to convert audio channels to mono, stereo, or surround.
If there are more than two channels, set this to the top line, for example, 6 Mono.
329 Audio Configuration Does More
Use it to mute, or review, audio channels.
Although the principal use of Audio Configuration is to determine how audio channels are configured, you can use it for more; see FIGURE 6.36.
To mute a channel, deselect its checkbox on the left.
To hear what’s in a channel, turn on audio skimming (shortcut: Shift+S), then skim the channel with your cursor. (Skimming a clip will also display levels in the Audio Meters.)
To modify roles, click the down-pointing chevron next to the channel name.

FIGURE 6.36 A clip with a muted channel 1 and the cursor skimming in channel 2.
330 Automatic Audio Enhancements
These improve audio quality “magically.”
Final Cut has three automatic audio tools that can enhance your audio: Loudness, Background Noise Removal, and Hum Removal. Audio can be analyzed during import, which I don’t recommend (see Tip 159, Choose the Right Media Import Settings—Part 4) or after import using the “magic wand”; see FIGURE 6.37. Audio enhancement works on the audio component, not clip, level.

FIGURE 6.37 Click the “magic wand” tool in the lower-left corner of the Viewer to access enhancement options.
To enhance a clip after import:
Select the clip in the timeline that you want to enhance. (If you don’t select a clip, FCP will enhance the active clip under the playhead.)
Click the magic wand icon in the lower-left corner of the Viewer. Final Cut then analyzes all the components in the selected clip; see FIGURE 6.38.

FIGURE 6.38 A green check mark indicates an audio component was analyzed. In this case, no audio problems were found.
Note
If you want to repair a single audio channel inside a clip, select the clip in the timeline and choose Clip > Expand Audio Components (Control > Option > S). Then, select just the channel you want to repair and use the magic wand to enhance audio.
Once analysis is complete, access the enhancement controls in the Audio Inspector.
A green check mark indicates the component was analyzed with no fix needed; see Figure 6.38.
A blue check mark appears if there was a problem that was corrected during import.
A yellow warning appears if the problem is significant. Click the checkbox (for example, Noise Removal in FIGURE 6.39) to apply a fix.

FIGURE 6.39 The automatic Audio Enhancement controls. Green indicates no problem. Yellow indicates a problem. Click a checkbox next to the name to fix.
A red warning appears if the problem is severe.
331 Adjust Automatic Audio Enhancements
You can adjust any correction that Final Cut applies.
I am always dubious about tools that “automatically” correct something. They rarely do as good a job as you can do yourself—provided, that is, that you know what you are doing. However, if audio is foreign territory to you, these adjustments are a good place to start. Why? Because you can modify or disable them if a clip doesn’t sound right. (Neither Equalization nor Voice Isolation are part of the automatic enhancement tools. They need to be applied separately.)
After you enhance a clip (see Figure 6.39), open the Audio Inspector and click Show next to Audio Enhancements. (Show doesn’t appear until a clip is analyzed.)
Before you use the automatic tools, apply Voice Isolation to reduce noise and remove hum.
Click a checkbox to enable, or disable, an effect:
Equalization. Click the Flat pop-up menu and select a different “sound” for the clip, or click the small icon next to it to display the Graphic Equalizer. (See Tip 351, The Graphic Equalizer Shapes Sound.)
Voice Isolation. This prioritizes human speech over other parts of the audio signal. It also does a good job removing hum.
Loudness. Drag the Amount slider to adjust audio compression. Drag the Uniformity slider to adjust the dynamic range.
Noise Removal. This is a misnomer. This reduces noise; it doesn’t eliminate it. Drag this until your dialogue is understandable. Totally removing the noise makes the voice sound awful.
Hum Removal. This removes hum caused by mic lines and power cables getting too friendly. Set this to match the power frequency in your country. In the United States, use 60 Hz. Hum removal works great.
In general, I suggest using these tools to reduce, not remove, noise and remove hum. EQ and loudness are better handled using roles, which is covered later in the “Roles” section of this chapter.
332 Improve Speech Clarity
Final Cut applies machine learning to improve speech.
Like EQ, Voice Isolation is activated manually in the Audio Inspector. Click the checkbox to enable it; see FIGURE 6.40.

FIGURE 6.40 Click the checkbox to enable voice isolation. Drag the slider to adjust.
According to Apple: “Voice Isolation prioritizes any detectable human voices over other parts of the audio signal. Voice Isolation requires macOS Monterey 12.3 or later.” There’s no “right” setting. Drag the slider until the voice sounds good to you.
Not only does this reduce noise, but it also eliminates hum more effectively than the audio enhancement tools.
333 Final Cut Pro Supports 5.1 Surround Sound
But! Don’t use it for surround mixing.
Final Cut can import, edit, and export media containing 5.1 surround sound; see FIGURE 6.41. That’s very helpful when you need to change titles, captions, or visuals connected with a surround mix. Just don’t try to actually mix surround sound.

FIGURE 6.41 The surround panner in Final Cut Pro. It looks beautiful. Don’t use it.
The audio interface and mixing support just isn’t there. Instead, export your audio elements using XML (see Chapter 9, “Share & Export”) and move them into Avid ProTools, Adobe Audition, or another professional-grade audio workstation. Trying to do a surround mix in Final Cut isn’t worth the work.
Don’t use Final Cut to mix surround sound.
Roles
Roles label clips by what they do, for example, titles or dialogue. They provide a powerful way to manage clips in groups. They are worth the time to learn.
334 Understanding Roles
Roles are labels that define clips.
Roles are confusing and intimidating. I know it took me a while to get comfortable with them. At their core, roles are labels applied to clips. Those labels group similar clips together so we can modify them as a single “thing.” Roles are especially important for audio and captions.
Roles are applied either automatically during import or manually after import. TABLE 6.1 illustrates the three role categories: Video, Audio, and Captions.
TABLE 6.1 Default Role Categories and Roles
VIDEO | AUDIO | CAPTIONS |
|---|---|---|
Titles | Dialogue | CEA-608 |
Video | Effects | iTT |
- - | Music | SRT |
Each role can have up to ten subroles. For Titles, for example, you could add English, French, Spanish, and Chinese. For Audio, I always add a Final Mix subrole.
Roles are created using Modify > Edit Roles; see FIGURE 6.42.
To add a custom role, click the plus icon next to the category.
To add a custom subrole, roll over the role, then choose Subrole.
To delete a custom role or subrole, roll over it, then click the minus button.
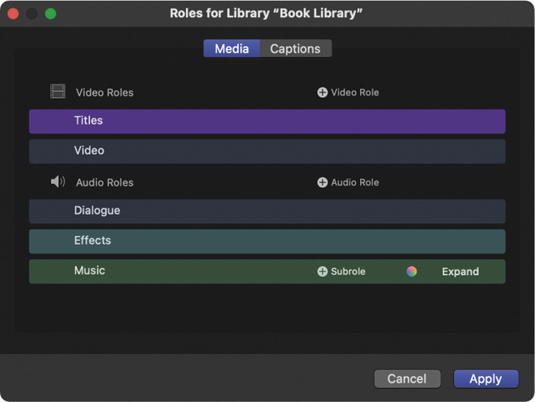
FIGURE 6.42 The Edit Roles window.
Note
To change the color of a role, click the color wheel to the right of the role name. (For example, the wheel in the Music role.)
You can assign roles to clip components, but not clip ranges. Custom roles and subroles are stored in the library, not the clip. You can’t delete a default role. Roles are also used in compound, multicam, and synced clips. You can also display role names in the timeline using the Timeline menu. (See Tip 222, The Timeline Clip Menu.)
335 What Can You Do with Roles?
Roles organize and control media.
Here are some of the things you can do with roles:
Organize clips in the Browser
Organize clips in the timeline
Hide clips by role
Use focus to emphasize clips
Control which clips export
Switch between title languages
Switch between caption languages
Create audio stems
Create audio submixes
Assign different roles to different components in the same clip
Roles organize and control clips and other project elements.
336 Assign Roles to Clips
Most roles, other than Dialogue, are assigned manually.
Theoretically, Final Cut should assign the correct role to a clip during import. But when FCP isn’t sure, it assigns the generic Dialogue role. Fortunately, Apple made changing roles easy and—to show how important roles are to Final Cut—they also made access to roles ubiquitous.
To change a role or subrole, select a clip or group of clips in the Browser or timeline, then do one of the following:
Choose Modify > Assign Audio Role, Assign Video Role, or Assign Caption Role depending upon the type of clip you selected.
Right-click the clip in the Browser and assign the appropriate role.
Right-click the clip in the timeline and assign the appropriate role.
Go to the Info Inspector and assign the appropriate role.
Go to the Audio Inspector and assign the appropriate role in Audio Configuration.
Choose Timeline Index > Roles and click the Edit Roles button at the bottom.
You can also apply a keyboard shortcut (see TABLE 6.2).
TABLE 6.2 Role Keyboard Shortcuts
ROLE | SHORTCUT | COLOR |
|---|---|---|
Titles | Control+Option+T | Purple |
Video | Control+Option+V | Blue |
Dialogue | Control+Option+D | Blue |
Effects | Control+Option+E | Teal |
Music | Control+Option+M | Green |
Roles are labels applied to clips so you can easily manage them in groups.
Like I said, Apple makes it really easy to apply and change roles.
337 Switch Languages Using the Timeline Index
Using roles does not change the edit, but can change the display.
FIGURE 6.43 illustrates a timeline with roles assigned. (Yup, it looks the same as if roles weren’t assigned.) But this illustrates a typical use. This is a short video destined for two markets: English and Spanish. Notice the two title tracks on top.
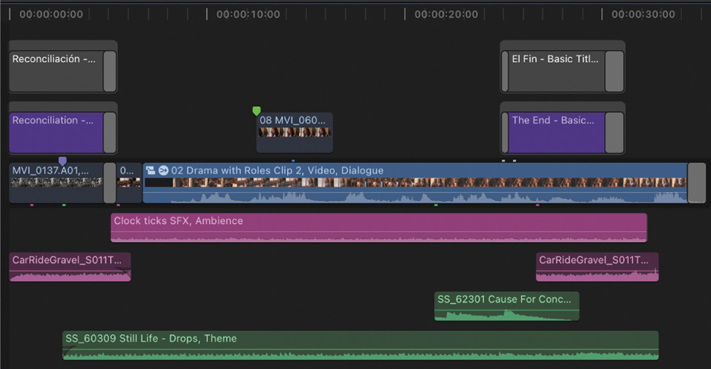
FIGURE 6.43 A short scene with titles in two languages: English and Spanish.
You and I both know that when you create two different versions of the same project, they never stay in sync. I’ll change something in one project, then forget to change it in the other. Roles solve that.
I created and assigned an English subrole to the English titles and a Spanish subrole to the Spanish titles. The key part, though, is that both languages are in the same project timeline.
Open the Timeline Index (shortcut: Option+Cmd+2); see FIGURE 6.44. I can instantly switch from one language to another—for preview, client review, or export—by selecting which title language I want to display. No more duplicate projects. All languages are in one project, managed by roles.

FIGURE 6.44 Enable, or disable, each title language using the Timeline Index.
Note
You could use this same technique to change caption languages, or switch between narration in different languages, all in the same project.
338 Organize the Timeline Using Roles
The Timeline Index is key to organizing clips.
It’s important to remember that changing roles doesn’t change your edit. But it does change how your clips are organized, displayed, and/or exported. Also, most of the time, roles help you figure out what’s going on. Here’s another example.
Notice how, by default, Final Cut groups clips by role? Dialogue on top, then effects, then music. Click the Show Audio Lanes button, shown in Figure 6.44, and Final Cut adds labels; see FIGURE 6.45. When you show audio lanes, clips are grouped into separate categories. Click one of the Audio Lane buttons (top arrow) to group just that role.

FIGURE 6.45 Enabling Audio Lanes (bottom arrow) groups clips by role, then labels the roles in the timeline. Click a single lane button (top arrow) to group just the clips in that role.
You can also change the stacking order of Audio roles by dragging the role name (for example, Music) up or down in the Timeline Index. This is useful when, say, you want to move music clips closer to the Primary Storyline so you can see the placement of dialogue clips to adjust music cue timing.
339 Display Subroles Using the Timeline Index
Display, group, enable, or disable clips by subrole.
Click a subrole button (right arrow in FIGURE 6.46) to display subroles. You can see the list on the left: Ambience and Spot SFX for Effects, along with Sting, and Theme for Music. To disable a subrole, deselect it.

FIGURE 6.46 Display subroles using the subrole button (right arrow). Disable/enable subroles using the checkbox.
Disabling a role or subrole carries through to export.
340 Focus on Specific Clips Using Roles
Display what you need to see and minimize the rest.
Let’s say you need to spend time adjusting the music cues. Open the Timeline Index and click the focus dot (left arrow); see FIGURE 6.47. This minimizes nonmusic tracks (right arrow) so you can concentrate on the tunes. This is an especially helpful technique in large projects with lots of layers.

FIGURE 6.47 Music holds the focus (green dot, left arrow), while both dialogue and Spot SFX are muted (not selected).
To help keep things organized, I also enabled audio lanes for both effects and music and disabled the Spot SFX subrole and the Dialogue role. Now, not only do I have more room, but distracting audio is muted so I can concentrate on the music. Turning dozens, even hundreds, of clips back on again now requires only one or two mouse clicks.
341 Create Audio Stems & Submixes
Stems are a combination of roles and compound clips.
When the edit is complete and it’s time for the final audio mix, roles can help create submixes or “stems.” A stem is an audio clip containing fully mixed dialogue or effects or music. Stems are essential when re-editing a finished project for trailers or international versions. When creating stems, every clip must be assigned to an appropriate role.
Open the Timeline Index.
Click Show Audio Lanes.
Select all audio clips with the same role (for example, Dialogue, Effects, or Music).
Choose File > New > Compound Clip (shortcut: Option+G).
Name the compound clip something obvious and click OK.
FIGURE 6.48 illustrates two compound clip stems: Effects and Music. You can then apply audio effects, such as EQ or Limiting, to the clips with the same role. This is a much more effective way to mix a project than dealing with individual clips.

FIGURE 6.48 (Top) Creating a compound clip. (Bottom) Two stems created from compound clips.
In most mixes, I separate the male and female voices into two dialogue compound clips (submixes) using subroles. This is so I can apply one set of EQ settings for the men and a separate set for the women. See Tip 350, Use EQ to Enhance Voice Clarity, for my recommended settings.
Audio Mixing & Effects
Audio mixing is the final stage in any project. It’s generally done at the same time as color grading. While Final Cut has great audio editing, its audio mixing capability is very weak. Still, when you need it, here’s how it works.
342 Audio Mixing in Final Cut Pro
There is nothing about mixing audio in Final Cut Pro that I like.
Final Cut is an amazing editing program. It’s my go-to editing application. I’ve used it for more than 20 years, and I’m a big fan. But as an audio mixing tool, it’s a disaster. It is awkward, inflexible, and offers very limited signal routing.
Note
The Fairlight audio mixer in DaVinci Resolve is also excellent.
So before I show how to add effects and create mixes, let me share how I mix my projects. If it’s a simple project, say, one narrator, no music or effects, I might create the final audio mix in Final Cut. (Though generally not.) But if it involves multiple actors, sound effects, and music cues, I will edit the finished video in Final Cut. Then, I export the audio elements as an XML file and do the final audio mix in Adobe Audition or Avid ProTools. Life is too short to waste time mixing audio in Final Cut.
Final Cut Pro is great at audio and video editing, but very, very poor at audio mixing.
Audio mixing is as deep and complex as video editing. There are full-time audio careers creating music, television programs, stage plays, audio books…the creative audio we love. These tips focus on just a few power tools designed to improve audio for video.
343 Where to Set Audio Levels for a Final Mix
At no time should audio levels in the final mix exceed 0 dB. Never. Not once.
Regardless of the software you use to mix your audio, the same mixing rules apply. The most important rule is: At no time during export should audio levels ever exceed 0 dB. Doing so, even for a very short duration, causes distortion. It sounds bad. And it get projects rejected when analyzed for audio quality control.
When mixing, there are two types of audio levels:
Peak. This measures the moment-by-moment maximum level of audio playback. Most video editors watch peak levels, which are measured in dB. Final Cut displays peak audio in the audio meters and measures it as dBFS (deciBels Full Scale).
Average. This averages audio levels over a short period of time to provide a more nuanced representation of audio levels. These are measured in LUFS or LKFS. There’s a 15–20 dB difference between peaks and average levels. Audio engineers and professional distribution outlets tend to use average levels.
At no time during export should audio levels ever exceed 0 dB.
For example:
YouTube prefers average levels around –14 LUFS.
Apple prefers podcasts around –16 LUFS.
Broadcast prefers average levels around –24 LUFS.
Netflix prefers average levels around –27 LUFS.
When setting levels, here’s what I recommend:
Audio levels are additive. The more clips playing at the same time, the louder the audio.
Set project peaks between –3 to –6 dB. This works out to about –15 LUFS.
When recording audio, record around –12 dB. This provides head room in case a speaker gets excited and is loud enough to minimize background noise.
For the final mix, set timeline audio peaks to bounce between –3 to –6 dB.
344 Apply, Modify, and Remove Audio Effects
Most Final Cut audio effects are based upon filters from Logic.
Apple Logic is a music creation tool that is used by professional musicians around the world. Many of its audio filters are excellent and shared with Final Cut.
There are more than 120 audio effects in FCP, far too many for this book to cover. However, there are six audio effects that are especially useful when mixing audio for video: adjusting audio pitch, creating a telephone effect, Fat EQ, Graphic Equalizer, Space Designer, and Limiter.
To apply an effect, drag it from the Audio section of the Effects browser (Cmd+5) and drop it on top of a clip.
To adjust an effect, select the clip in the timeline and adjust it in the Audio Inspector. Specific settings vary by effect.
To remove an effect, select the clip in the timeline, then delete its name from the Audio Inspector.
345 Create a Default Audio Effect
By default, the Channel EQ is the default audio effect.
If you find yourself using the same audio effect a lot, make it the default. Then, you can apply it to any selected clip, or group of clips, with a single keyboard shortcut.
The default audio effect is Channel EQ. The shortcut is Option+Cmd+E.
Right-click the effect and choose Make Default Audio Effect; see FIGURE 6.49.
To apply the default audio effect, press Option+Cmd+E.
To remove a default audio effect, the same as any other effect, delete its name in the Audio Inspector.

FIGURE 6.49 Right-click an audio effect in the Effects browser to set it as the default effect.
346 The Stacking Order of Audio Effects Is Important
Audio effects process from top to bottom in the Audio Inspector.
When you add audio effects to a clip, and it is not uncommon to add more than one effect to a clip, the effects process from the top to the bottom in the Audio Inspector. Here are a few rules to follow:
Apply a noise reduction filter first. Although there is a Denoiser filter in Final Cut, better ones are available from Izotope, Waves, and FXFactory. Minimizing noise means the remaining filters are processing the sound you care about.
Add any EQ or other special effects.
Place the Limiter filter (or any compression) at the bottom of the stack. (With Final Cut, I prefer to use the Limiter filter.) Because the Limiter filter guarantees that audio levels will not exceed the level you specify, it’s important that no effects are added after (below) the Limiter.
The order in which you apply audio effects affects the quality of the final mix.
347 The Audio Animation Bar
Use this to change audio effects in the timeline.
The Audio Animation bar (shortcut: Control+A) simplifies changing audio effect order and adjusting keyframes in the timeline. Although not as useful as the Audio Inspector, it’s worth knowing about. There’s an animation bar hidden in every audio clip.
Select an audio clip in the timeline.
Press Control+A.
This displays the Audio Animation bar; see FIGURE 6.50.

FIGURE 6.50 The Audio Animation bar allows enabling, disabling, or rearranging audio effects in the timeline. You can also use it to quickly move keyframes, though setting them is best done in the Audio Inspector.
To enable/disable an effect, uncheck it.
To move a keyframe, drag it.
To change the stacking order of effects, drag one up or down.
To close the Audio Animation bar, press Control+A.
348 Adjust Audio Pitch
Need to shift a voice or music up or down a few steps?
Here’s how to change the pitch of a voice or music clip:
Open the Effects browser (shortcut: Cmd + 5) and search for “Pitch.”
From the choices, drag Pitch on top of the clip.
In the Inspector (see FIGURE 6.51), every whole number change in Amount represents a one-half step change in musical pitch.

FIGURE 6.51 Every whole number change in Amount represents a half-step change in pitch. Negative numbers shift the pitch lower.
349 Create a “Voice Heard Over the Telephone” Effect
This is a special case of using EQ.
To create the sound of a voice over an old-fashioned, low-quality telephone:
Open the Effects browser (Cmd+5) and search for “Telephone.”
Drag it on top of the clip you want to change.
In the Audio Inspector, change the effect menu to Warm Carbon Mic; see FIGURE 6.52.

FIGURE 6.52 This telephone effect setting creates the sound of an old-fashioned phone.
350 Use EQ to Enhance Voice Clarity
Adjusting frequencies is the best way to improve speech intelligibility.
Final Cut has an effect called Voice Over Enhancement. This has presets for male and female voices. It works decently. However, there are EQ tools in FCP that provide more and better control.
Vowels are low-frequency sounds, which give a voice its character, warmth, and sexiness. Consonants are higher-frequency sounds, which make speech intelligible. For example, the difference between hearing an F or an S depends upon whether you hear a hiss. If you hear it, you hear an S. If not, you hear an F. That hiss centers around 6,200 Hz.
Most dialogue benefits from boosting low frequencies to improve warmth, then boosting highs to improve crispness and clarity. We use the Fat EQ filter to make these changes; see FIGURE 6.53.

FIGURE 6.53 Click the icon (red arrow) to display the Fat EQ controls.
Open the Effects browser (shortcut: Cmd + 5) and search for Fat EQ; see FIGURE 6.54.
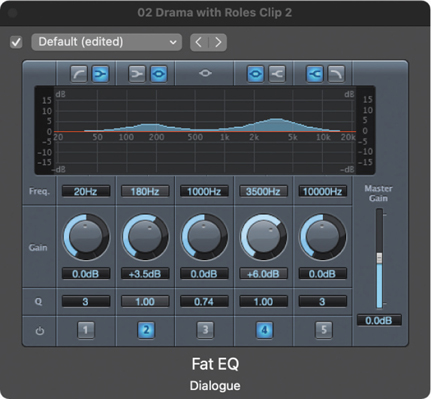
FIGURE 6.54 The Fat EQ filter adjusts frequencies in ranges. Q defines the sharpness of the curve.
Drag the filter on the dialogue clips you want to change.
Open the Audio Inspector and click the icon indicated by the red arrow.
Make adjustments according to TABLE 6.3.
Table 6.3 shows EQ settings for female and male voices. Q defines the width of the frequency spread; lower is wider.
TABLE 6.3 EQ Settings to Improve Speech Clarity
GENDER | FREQUENCY | EQ BOOST | Q |
|---|---|---|---|
Male | 180 | +2-4 dB | 1 |
Male | 3500 | +3-7 dB | 1 |
Female | 400 | +2-4 dB | 1 |
Female | 4500 | +3-7 dB | 1 |
351 The Graphic Equalizer Shapes Sound
After levels, EQ provides the greatest flexibility to shape audio.
Adjusting EQ (equalization) means to adjust specific frequencies in an audio clip to emphasize one thing more than another. (We call this shaping sound.) For example, boosting bass improves the “thump” of explosions, or boosting highs improves the twitter of a bird.
The Graphic Equalizer, like the Fat EQ filter, simplifies adjusting frequency ranges.
Open the Effects browser (shortcut: Cmd+5) and search for “AUGraphic Equalizer.”
Drag the filter on the dialogue clips you want to change.
Open the Audio Inspector and click the icon indicated by the red arrow; see FIGURE 6.55.

FIGURE 6.55 Click the icon to open the AUGraphicEQ interface.
As shown in FIGURE 6.56, drag a blue dot down to lower that frequency range.
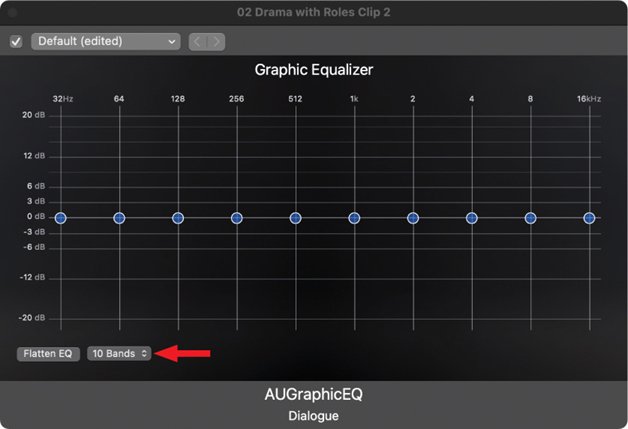
FIGURE 6.56 Click the Bands menu to change frequency resolution. Click Flatten EQ to reset all settings.
Drag it up to boost it.
Switch between frequency resolutions using the 10 or 31 band menu.
Click Flatten EQ to reset the curve.
Press Control and drag to create a curve between frequencies.
352 Space Designer Creates the Sound of a Space
This is especially useful for green-screen work.
Space Designer creates reverb that sounds like different spaces. For example, reverb in the woods, a closet, and a cathedral each sound different. If you are shooting on location in a church, you don’t need Space Designer. But if you are shooting that church scene on a green-screen stage or adding ADR audio later, Space Designer can help sell that location to an audience.
However, Space Designer has the most intimidating interface of any effect I’ve ever seen. After using Space Designer for more than a decade, I still don’t understand how the interface works. Why? Because it has an extremely useful menu!
Open the Effects browser (shortcut: Cmd+5) and search for “Space Designer.”
Drop the filter on the dialogue clips you want to change.
Open the Audio Inspector and click the icon indicated by the red arrow; see FIGURE 6.57.

FIGURE 6.57 Click the icon to open the Space Designer interface.
Oh. My. Goodness…! (See FIGURE 6.58.) The Space Designer interface. Don’t worry. You don’t need it.

FIGURE 6.58 The totally inscrutable, yet highly intriguing, Space Designer interface.
Instead, click the Default menu at the top left; see FIGURE 6.59. Then, pick the size and shape space you need. The spatial effects this creates are amazing.

FIGURE 6.59 The Space Designer menu is filled with close to 100 settings for different interior and exterior spaces.
353 The Limiter Effect
This is the most useful audio effect in Final Cut Pro.
The go-to audio level controller for many audio engineers is a compressor. Although I use compressors when mixing in Audition or ProTools, when I’m mixing in Final Cut, I use the Limiter effect.
The Limiter dynamically raises the soft passages in an audio clip, while limiting the maximum audio level. No other filter provides this control. If I can apply only one filter to a dialogue clip, I use this one. (If I can use two, the second is EQ.) The difference this makes in adjusting levels is magical. Most of the time when using the Limiter, you won’t need to use audio keyframes at all, except, perhaps, for extremes.
Open the Effects browser (shortcut: Cmd+5) and search for “Limiter.”
Apply the Limiter filter from the Logic section of the Effects browser. Choose Levels > Logic> Limiter—this is important; there are other limiters in Final Cut that are not as flexible.
Open the Audio Inspector and click the icon indicated by the red arrow; see FIGURE 6.60.

FIGURE 6.60 Click the icon to reveal the Limiter interface.
Set Output to –3 dB (this limits the maximum volume to –3 dB or, roughly, –14 LKFS).
Set Release to any number larger than 500.
Play the timeline and adjust the gain so that Reduction is bouncing between 1.5 and 3 dB.
In FIGURE 6.61, the softest audio was raised 14 dB, while the louder sounds were prevented from exceeding –3 dB, all while assuring there was no distortion.

FIGURE 6.61 The Limiter effect. Adjust the gain until the Reduction meter is bouncing between 1.5–3 dB.
The difference this filter makes in dialogue is simply amazing!
Chapter 6—Audio Shortcuts
CATEGORY | SHORTCUT | WHAT IT DOES |
|---|---|---|
Trimming | R V Control+D [Comma]/[period] Shift+[comma]/[period] Option+[comma]/[period] Shift+Option+[comma]/[period] | Select Range tool Toggle clip visibility (audibility) Enter a new duration Shift selected object left/right one frame Shift selected object left/right ten frames Nudge selected audio one subframe left/right Nudge selected audio multiple subframes left/right |
Editing | Control+S Control+Option+S Control+Shift+S Shift+Cmd+G Option+T S Shift+S Option+Cmd+S Option+Cmd+G Option+G Option+Cmd+E | Expand/collapse audio channel Expand audio components Detach audio from video Break apart clip items Apply the default cross-fade to selected clips Enable/disable skimming Enable/disable audio skimming (requires skimming enabled) Enable/disable clip skimming Synchronize selected Browser clips Create a compound clip Apply the default audio effect |
Shortcuts with no key assigned |
| Apply audio fade Trim > Align Audio to Video |
Levels | Control+A Control+[plus]/[minus] Cmd-drag Control+Option+L Control+Cmd+L Option+Up/Down keys | Audio Animation editor Increase or decrease selected clip’s audio levels ±1 dB “Gears down” dragging audio level line for more precise adjustment Enter a specific absolute audio level for the selected clip(s) Enter a specific relative audio level for the selected clip(s). Nudge one or more selected audio keyframes ±1 dB |
Effects | Option+Cmd+E | Apply the default audio effect (Channel EQ) |
Chapter Wrap
Audio is a mixed bag in Final Cut. FCP’s audio editing tools are first-class, as are the audio effects. Roles are clever and powerful. But for audio mixing, Final Cut is sorely lacking. For mixing simple one-person podcasts or talking head interviews, Final Cut is OK. But for any projects with challenging audio mixes, edit the project in Final Cut, then export an XML file and mix it in ProTools or Audition or a professional-grade audio workstation. Then, bring the finished stereo or surround mix back into Final Cut to export with the finished video.