13 Reproduction and archiving
This chapter starts by relating photography with the printing presses used for printing pictures in large quantities for publication in magazines, newspapers, books, etc. Printing and photography have had a long-standing association. Today, many of the pre-press stages are handled by digital means, controlled by computers. Furthermore, modern digital photography also allows for making images widely available electronically; thus, the electronic distribution and sharing of images is discussed in several sections of this chapter. Once in the form of digital data, images can easily be manipulated and transmitted to clients and agents, or published on the Internet. In the section on multimedia we describe how photography is combined with audio-visual projections, sound and lighting effects to create new forms of image representation. Preservation, storage and archiving are the focus of the last sections of the chapter. Ensuring image longevity presents various challenges. While a number of these challenges are common in silver-based and digital media, many of them are inherent to the type of media and their uses. Storing photographic films, prints and digital media under controlled environmental conditions, handling them with care and migrating digital image files from old to newer media are all techniques that help to prolong the lifespan of photographs.
Reproduction of the printed page
Three systems
Traditionally the three main methods of reproduction in the printing trade are letterpress, photogravure and lithography. Letterpress uses a raised printing surface (Figure 13.1), like the keys on a typewriter (typography). The surface is inked and then pressed on to the receptive surface, such as paper, to obtain an image in reverse. Letterpress is the oldest form of printing, originally
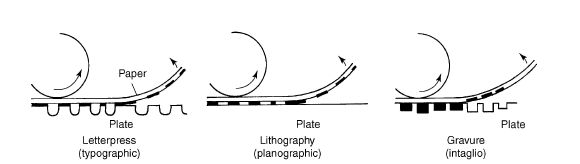
Figure 13.1 The three main methods of ink-printed reproduction. Although lithography here is shown transferring ink direct to paper, normally the ink image is taken off on to a large rubber roller, which then meets the paper. This is called offset lithography.
used for letter forms and later for pictures hand engraved on wooden or metal blocks – with areas to print pale being etched or gouged out. It is still used for a few hand-made limited edition art books, design posters and cards. The printing media vary and may include hand-made paper, paper made from silk or other unusual material. A new form of letterpress, using photopolymer plates adhered to a high base, has been introduced for rendering digitally made art as well as traditional typography.
Photogravure works in the reverse way. Areas to print dark are etched into metal, then filled with a thin ink and the whole top surface wiped clean. It was originally developed to provide a way of producing permanent photographs. Because of the rich tonal range it produced, which was the result of variable depth on the etched plate, photogravure was used by many art photographers of the nineteenth and early twentieth centuries, such as Alfired Stieglitz and Alvin Langdon Coburn, whose work was often seen in the art magazine Camera Work. Rotogravure or simply gravure also uses etched plates, but they are industrially produced. It is an intaglio printing process that uses a rotary printing cylinder which is rather slightly etched compared to photogravure’s etching. When the gravure surface comes into contact with absorbent paper, the ink filling each hollowed-out cell is transferred into the paper fibres (Figure 13.1). Gravure cylinders are expensive and relatively slow to prepare, but they can give high-quality results, with a continuous-tone effect on only average paper. Because they stand up to very large printing runs, they are used for some weekly magazines, newspaper supplements, etc. Gravure is also chosen for some art books. But cost of plate preparation, and what is often a short print run on high-quality paper, again makes the resulting publication expensive.
Lithography originated about 200 years ago when artists drew on the flat surface of limestone – a porous rock. It is based on the fact that greasy ink and water repel one another. Today, photolithography (or offset lithography) uses a thin porous metal sheet treated so that the areas to print dark will not retain moisture. The surface is then wetted, rolled over with greasy ink (which only holds in the non-porous areas) and printed on to paper. As Figure 13.2 shows, on the press the thin litho sheet is wrapped around the outside of a cylinder. It comes into contact with a water damping roller, then greasy ink rollers and finally a larger rubber roller, which transfers the ink from plate to paper. This ‘offsetting’ means that the litho plate never comes into direct contact with the paper, card, tin, etc. It can print at speed with minimum wear. High-volume offset lithography is used today for the production of newspapers, brochures, posters, packaging and books (including this one), which include text as well as photographs and graphics. Note that none of the systems described above lends itself to equipment cheap enough and small enough to allow desktop unit printing. For this you must turn to devices such as dye-sublimation, laser or inkjet printers (see page 189).

Figure 13.2 Principle of offset photolithography press. D, dampening roller; G, roller carrying greasy ink; O, large rubber offsetting roller transfers image ink to moving paper; P, printing plate with image.
Halftone printing
As you can see from Figure 13.1, letterpress and lithography printing are all-or-nothing processes. The paper either receives a full loading of ink or remains white. To reproduce the range of greys in a photograph, tones are turned into a

Figure 13.3 Halftone printed images appear to have a range of greys but in fact these are made up of pure black and pure white dots, in different proportions. The pattern below is about 16 times coarser than would be used normally. View the page from about 6 m away to see these patches as a grey scale.

Figure 13.4 In traditional halftone printing methods, a screen was put in perfect contact with an unexposed high-contrast negative film. A given camera exposure was creating varying dot sizes on the high-contrast negative in response to the amount of light that was transmitted from areas of the original. The halftone negative was then printed on a light-sensitive printing surface.
fine pattern of dots of different sizes. Take a look at any black and white photograph in this book through a magnifier and you will find that a mid-grey area is really a mosaic of black dots and clear spaces, about 50:50 in ratio. Darker tones contain more black than white, while pale greys are the reverse. A fraction of each image pixel is covered with ink so that the ‘averaged’ reflectance of the pixel corresponds to the image’s grey level. This clever use of pure black and white gives a wide range of ‘halftones’. The process is based on the eye’s inability to resolve very fine detail. Dot patterns of about 133 per inch (5-6 per millimetre) or finer merge into what appears to be an even tone at normal reading distance (see Figure 9.15). The same eyesight limitation is exploited when spotting prints and in additive screen colour films.
To turn the continuous tones of a monochrome photograph into a halftone image for printing, the picture used to be (camera) copied on to high-contrast film, through a glass screen carrying a fine soft-edged ruled grid, and positioned in front of the emulsion. Shadow parts of the original picture were recorded as a pattern of small dots, while highlight areas spread into a pattern of large ones (more light to pass through the screen in these parts; Figure 13.3). This halftone negative was then contact printed on to the appropriate printing surface, made temporarily light sensitive (Figure 13.4). Later this was treated to form a raised (letterpress) or hardened (lithography) surface, ready for the press to reproduce the original image with ink dots.
Today, a halftone dot image is still said to be ‘screened’, but this is now generated electronically by computer software. Your photograph, scanned in or otherwise supplied as a digital file, and with its data moderated by the software program, controls a fine laser beam in an ‘image-setter’ machine. Here the screened image is scan-exposed on to high-contrast film or light-sensitized printing plate material (platesetters). The halftone image pixel is subdivided

Figure 13.5 The picture on the left is an image screened at 300 lines per inch. The picture on the right is a magnified part of the image, screened at 40 lines per inch. For reading distances, 40 lines per inch is considered ‘coarse screening’. It clearly shows up the structure of reproduction and destroys tonal accuracy and fine detail. © Sophie Triantaphillidou.
into an array of n × n subpixels; it is the subpixels that are later individually inked. Common graphic arts scanners divide each pixel into a 12 × 12 array of subpixels. Ink can be then deposited from 0 to 144 of them, giving 145 different grey levels. The problem, however, is that the ink spot must be very small and hence the writer’s resolution very high. A 300 lines per inch screen image requires a printer resolution of 300 × 12 or 3600 dots per inch. Digital methods offer a vast range of dots per inch settings. The more dots in the screened image the finer the tonal accuracy and detail shown. Modern platesetters may have resolution as great at 5000 dots per inch. However, a major limiting factor here is the paper your halftone reproduction will be printed on. The pages of this book are printed on a paper that will take 150 lines to the inch. If it were printed on cheaper stock (or on newsprint, which is still more absorbent), such fine ink dots would smudge and clog together, destroying tone separation. Coarser screens of about 80 lines may be the best that newsprint will accept, and consequently fine detail will suffer. Screens for huge poster images can be scaled up to something as coarse as 10 lines, because results will be viewed from great distances (see Figure 13.5).

Figure 13.5 Four-colour printing, greatly magnified. Top: when each screen is set to the best angle, most dots of colour fall adjacent, not on top of each other. Patterns formed are also least assertive (central area here represents even, dark grey). Bottom: if one or more separations are made with screen rulings at incorrect angles, a patchy moiré pattern results. View this page from distance.
Colour separation
To print a colour photograph by any of these mechanical printing processes the monochrome procedure has to take place at least four times. The image is ‘colour separated’ into red, green and blue records by photographing digitally, or by scanning an existing colour print or transparency through filters of these colours (see Chapter 7). Each RGB screened separation is then inverted (i.e. the negative of the red record is a cyan image, etc.) and printed in cyan, magenta or yellow inks respectively, superimposed together with a fourth, pale, image in black ink. The black printer gives added tone and body to shadows and better contrast, as shown in Figure 13.7. It is exposed, without filter, at the same time as the other separations, or generated by combining digital data from the other three. Printing colours are designated CMYK. The ‘K’ stands for black, but uses its last letter instead of the first to avoid confusion with blue. Printing inks are semi-transparent so that they can be printed on top of each other and produce various hues. For example, red is produced by magenta and yellow dots on top of each other. When you view all these coloured and black dots on the printed page your eye’s limited resolution fuses them into a dominant hue in each area, just like viewing screened additive colour film or images on displays.
To minimize the formation of assertive moiré patterns as well as to prevent the dots’ centres from completely coinciding, the screens are rotated at different angles between the making of each separation (Figure 13.6). This produces the complex mixture of so-called four-colour dots you can see through a magnifying glass from reproduced colour photographs. Otherwise, the newer six-colour reproduction printing also adds orange and green inks; this addition results in wider colour gamuts and therefore more vivid colour reproductions.
Bear in mind that computer monitors and TVs create colours by mixtures of RGB phosphors (in cathode-ray tube (CRT) display technology) or RGB filters (in liquid crystal display (LCD) and plasma display technologies) (see page 183). At the printed reproduction stage CMYK inks cannot exactly match every possible colour displayed by RGB, such as the most saturated primary hues. This difference is a problem when you are manipulating colour images

Figure 13.7 How four-colour reproduction of a digital image file is built up. Top row: the cyan, magenta and yellow channels are printed separately. (Notice the printer’s colour control patches, right, later trimmed off.) Bottom row: the black printing image (left). Cyan, magenta and yellow images printed together but without the black (middle). The three colours plus black (right). Notice the extra body this gives to shadows, impossible from three-coloured inks alone. © Olivier Moullard.
and judging results on a computer workstation monitor. You need to use a colour management system (CMS; page 227), by which you smooth out mismatches when RGB data will later be converted to CMYK separations, similarly between various components of your equipment chain – digital camera back, monitor, scanner, desktop printer, etc.
Duotone reproduction
Monochrome remains the ‘poor relation’ of photomechanical reproduction: most modern improvements have benefited colour. However, it is possible to greatly improve the reproduction of a black and white photograph by running the paper through the press twice and printing (in register) from two versions of the same halftone image. One version may carry delicate highlight detail down to darker midtones; the other is paler but with more contrast, carrying well-separated tones from midtones into rich black shadows. Collectively, this duotone printing gives good tone separation over a much wider range of values than is possible from one impression alone. (It is similar to the effect of the black printer in colour reproduction and multiple build-up of dye in gum-bichromate printing.)
Anything from two to four or more impressions can be used, with corresponding increase in cost and ever smaller improvements in image reproduction. The separations can differ in density, contrast and the ‘colour’ of the ink in which they are printed. Inks can be different shades of neutral grey, black, brownish black, etc. When superimposed, these will reproduce most of the subtleties of even a rich chlorobromide photographic paper.
Monochrome can also be reproduced using four-colour printing techniques. This makes sense when high-quality black and white and colour pictures must be printed on the same sheet. For monochrome the yellow, magenta and cyan impressions all carry the same image, and, together with the black printer, build up a good tone range in visually neutral density. However, unlike duotone, any misregistration or ‘drift’ during a printing run can introduce startling bits of colour or casts into a colourless illustration.
Figure 13.8 This black and white photograph is reproduced using four-colour printing. Four-colour printed images show improved tonal range and ‘warmer’ overall tone reproduction compared to single tone reproduction. © Sophie Triantaphillidou.
Supplying photographs for reproduction
Despite the numerous picture editing and manipulation possibilities available for image optimization and the production of good-looking prints, you still get the best quality output by having a technically good original in the first place. You may supply images for reproduction in digital or in analogue form. Nowadays nearly all commercially printed pictures are supplied for publication as digital image files.
Supplying images in digital form
The form of images captured digitally should adhere to requirements specified by the publishers. Depending on the medium in which your images will be reproduced (e.g. book, newspaper), the requirements will differ. There are no universal specifications for digital image submission but publishers usually provide their own set of guidelines. The Digital Image Submission Criteria (DISC™) is an industry group, made up of many of the top publishers and printers in the USA, which tries to help standardization of digital image submission throughout the printing industries. Generally, specifications include:
1. Size, resolution and bit depth. The image size, in megabytes (MB), will depend on the printed image size, the required resolution and bit depth. Often, image size is also specified in camera megapixels (MP). A fairly high-quality standard will be 50 MB, or approximately 16 MP, at 300 dots per inch (i.e. 150 line screen for halftone screening) and 24 bits per pixel (i.e. 8 bits per colour channel). Line art (bitonal or 1 bit per pixel) is required at much higher resolutions than colour images, typically at 1200 or 2400 dots per inch.
2. File format/compression. RAW or/and TIFF uncompressed files are most often demanded, although in some cases JPEG files compressed at high quality - level 8 - may be preferred. The RAW files may be required in Adobe Digital Negative format. Whenever possible, shoot in RAW and keep your ‘master’ RAW files safe, as you might be asked for copies of them in case the publishers need to perform in-house enhancements.
3. Colour space and colour profiles. Most publishers ask you to choose the Adobe RGB (1998) colour space, which is the preferred colour space in the industry; otherwise, standard RGB (sRGB) is used. Be aware that, after submission, your RGB files will be converted to CMYK for reproduction. Gamut mismatches between RGB and CMYK colour spaces might give rise to different reproductions of your images than those you might expect (see Chapter 8). For this reason, along with the RGB files, you can choose to supply separated CMYK files. This, however, will need some communication between you and the printers or the publishers. An embedded profile often needs to be available.
4. Processing. View your images at 100% to ‘clean’ them from any pixel-to-pixel defects. Do this manually using cloning or stamp tools. Image sharpening should be kept to a minimum or, even better, avoid it altogether. Do not resize or interpolate; this is usually done by the publishers. Finally, flatten the images before submission (no layers) and remove any extra channels, selections or masks.
5. Metadata and media. Make sure that you accompany your images with appropriate metadata to mark your identity. Often, standard fields in the metadata are required by publishers, such as photographer’s name, address, copyright notice, keywords, etc. In Photoshop you can complete relevant information in the metadata fields in the ‘File Info’ dialogue box (Figure 13.9). Files are most often submitted on CD-ROM - preferred in the ISO 9660 format (see page 389) - in a single session, or on DVD. If you need to transmit files instead of delivering them you will probably have to ZIP them or use JPEG compression.

Figure13.9 In Image Info data panels you can complete information relevant to your photographs and save them as Extensible Metadata Platform (XMP) files, a labelling technology that allows you to embed information about an image file, known as metadata, into the file itself. The Adobe XMP standard is compatible with Exchangeable Image File Format (EXIF) data, generated by most digital cameras.
Supplying images in analogue form
If your images are still captured on film it is best to provide the originals for maintaining quality. For images produced using conventional photography, try to meet all the following requirements:
1. Size. Avoid large differences in size between original and final reproduction. To take an extreme example, a 35 mm transparency for a 12-sheet poster or a 12 × 15 in. (305 × 381 mm) print for a 2 × 2.5 in. (51 × 64 mm) book illustration is difficult to handle. Adjustments may even mean having to go through an intermediate copying stage, with consequent loss of quality. Remember, too, in shooting, that when the final reproduction will be small you should keep your picture content broad and simple.
2. Form. Colour originals are still preferred in the form of transparencies, partly for their greater saturation and colour fdelity and partly just because of long-standing print technology bias. Original transparencies always tend to reproduce better than duplicates. If you have prints, do not supply them mounted - they may have to be wrapped around a scanner drum.
3. Grain and surface. Image graininess depends mostly on the original’s emulsion speed and the reproduction ratio. It may be worth enlarging your picture or reducing it to final size to see what contribution grain will make to detail or mood. Do not submit prints with a surface finish texture such as lustre or stipple. The pattern may interfere with the screening process. Glossy (especially when glazed) gives greatest tonal range, especially in the shadows.
4. Contrast. Film has a longer tone range than the contrast that can be reproduced by photomechanical printing, especially on cheap paper and/or using a coarse screen. So try to limit contrast, preferably by shadow-filling when lighting. If you have to send in a high-contrast image, indicate whether you want the printer to bias best reproduction towards highlight or shadow areas, since you cannot have both. However, do not send in flat grey prints for reproduction either. It is important to keep well-separated tones, especially in shadow and highlight detail. Printing on excessively low-contrast bromide paper tends to merge tones within either or both these extremes. It is often better to print on slightly harder paper but dodge and burn-in. In general, a rich tone range print which looks good in photographic terms will reproduce best.
5. Exposure and colour balance. Pitch the exposure of slides and transparencies to give sufficient detail and saturation in highlight areas, even if this means dense shadows. With negative/positive materials avoid the kind of detail-free grey or distorted colour shadows in prints resulting from underexposed negatives. Colour shots with a colour cast may just be possible to improve in colour reproduction but at the cost of general tone and colour accuracy. Always take care in selecting your best originals to send for reproduction. Make sure that your lightbox, or top viewing light for prints, gives a known correct colour temperature and is sufficiently bright. When you judge a transparency on a lightbox always mask off glare from around the edges of the picture using wide opaque card. This makes a great difference to the overall contrast and the detail you can see in the film’s darkest areas.
6. Labelling. Photographs need to be clearly labelled for submission and accompanied with copyright notice and, when appropriate, with model and property release forms (see Chapter 15). Publishers often require an image description/caption for all images, which may include location information, details of any unique photographic techniques, details on the photographed subjects, etc.
Picture libraries
Picture libraries (stockphoto agencies in the USA) are agencies that negotiate a fee for a photograph on the photographer’s behalf in exchange for a percentage of this fee and sometimes the copyright of the images. You can place your images on one or more picture libraries, which often specialize in particular genres or themes – for example, travel and tourism, flashion, reportage, family, sport, etc. Several focus on certain genres of photography. The agency markets the images. It is responsible for finding customers (or clients), who pay either to use the images multiple times (royalty firee) or pay each time the image is used. You have to apply to join an agency and, once approved, you will provide your images. You might fund your own photographic project or develop projects in collaboration with the agency to meet the agency’s needs.
Picture libraries may accept images in both digital or analogue from (transparencies or prints); however, today most agencies require submissions in digital form and accept only images scanned from film or shot digitally. Submission requirements (i.e. image sizes and resolution, file formats, etc.) follow the digital image submission requirements of the printing industries, listed in the previous section. There are agencies that operate only on the Internet, in which case approved photographers upload their images through the agency’s website.
Images on the Internet
The Internet is one of the most popular media for photographers to display their work and make it accessible to larger audiences. The web is a common space where you can share your images efficiently and inexpensively with other people. You can place pictures online by simply signing up to a photo-sharing service, such as Flickr, Photobucket, Kodak Gallery and Picasa (Figure 13.11), or use a popular social networking website, such as Facebook and Twitter’s Twitpic, which have become large spaces for consumer image sharing. Most

Figure 13.10 Sample spreads of a promotional brochure of the UK picture library ONIMAGE showcasing the images represented by the agency.

Figure 13.11 Photo-sharing services, such as Flickr, allow you to post, organize, archive and share your images on the Internet. Photographs © Sophie Triantaphillidou
photo-sharing services offer free photo posting and additional services, such as photo printing for printing photo-albums, designing your own postcards or photo selling. Using a photo service requires no knowledge of website development. You can easily post images on the web server by following the photo service software instructions and add information and tags to facilitate other users to locate them. If you choose, you may make your photo collection viewable only to those who have permission.
Publishing on your website
Although photo services offer ease in publishing your photographs online they do not allow much fexibility on how they are displayed. If you are serious about making your work available on the Internet, it is best to create a website with your portfolio (Figure 13.12). Photographers prefer to make choices on how their images are displayed as their online presentation can be thought of as an integral part of their artistic or professional style. There are various online portfolio website providers for photographers that offer you, for a monthly fee, ways to create, update and maintain your online portfolio without the need for web coding. You can design your website using available templates that incorporate features specifically designed for photographers’ work. Alternatively, if you prefer to personalize fully the way of showing your photographic work, you may create your own website from scratch, or pay a professional web designer to do it for you. If you do not have extensive web design experience, creating your own website can be challenging and time consuming. Today’s websites can be sophisticated and require knowledge of a set of software applications and advanced techniques. If you are thinking of a professional career in photography, employing a professional web designer to create your website is an investment.

Figure 13.12 A photographer’s web page. © Ulrike Leyens.
An Internet-minded person can also help with placing your website at the top of lists in photography web searches.
Whether you create your own portfolio website or pay someone else to do it for you, think of the layout and presentation. It is a good idea to visit various photographers’ websites for inspiration. Photographs are usually grouped by theme – for example, reportage, landscapes, portraits, etc. – or by project tile. Pictures in a group are displayed as series of thumbnails which, when clicked upon, are presented one by one in larger size. The viewer may either navigate though images in a group using forward and previous arrows, or buttons, or be presented with slide shows. Some photographers prefer to accompany their photos with titles or captions that provide relevant information, whereas some others let the images speak for themselves. In the latter case additional web pages with image information should be made available to enable people using search engines to find your work. Make sure that you also publish your contact details so that you can be contacted by those who might be interested in your work. The choice of background colour and borders is also personal. Keep in mind that coloured backgrounds will affect not only the overall ‘mood’ the website conveys, but also the perceived colours in the images. Neutral backgrounds are the best choice if you want the viewer to concentrate on the photographic content. Remember that the lighter the background, the darker and more contrasty the image is perceived by the viewer.
Image size is always a compromise on the web and, although small image sizes mean fast downloading of the website content, tiny thumbnails are a disadvantage, especially images with detail, and therefore may discourage viewers from looking at the bigger picture. The choice of image dimensions is made according to average network speeds and monitor dimensions, but care also has to be given to image aesthetics. Common monitor resolutions range between 72 and 96 dpi (see Chapter 7), so resize and save your images accordingly. There are only a small number of image file formats that are supported by all web browsers, the most common being PNG, GIF and JPEG (see Chapter 8). The majority of photographs in online portfolios are JPEG files, compressed at a perceptually lossless quality level (with JPEG quality 10, or higher). A compromise between image quality (and therefore file size) and downloading speed also has to be made when choosing compression level.
Use a File Transfer Protocol (FTP) program or a file management utility to place your images online. Once your portfolio website is live, email your friends and clients the web address. You can also submit the link to various websites that are set to promote photography in your region or country. Such organizations often organize online photographic exhibitions (virtual exhibitions), which are also a good way to promote your photographic work. Online exhibitions may be set around a specific theme or you might be just given the chance to show what you like. You are usually asked to send electronically a specified number of images, of a given image size, resolution and file format, and often a short explanation about the images.
Image display and colour
Consistent colour reproduction of images published on the Internet requires a colour space that is compatible with the display tone (i.e. luminance and contrast) and colour characteristics (i.e. white point and RGB primaries). It also depends on the viewing environment. The sRGB colour space was developed in the 1990s to facilitate consistent colour reproduction of images on the Internet. Its RGB primaries are based on the most common CRT display phosphor primaries, and the encoding of the gamma function, which largely governs the displayed image contrast, is based on the default CRT display gamma (see Chapter 7). Although LCD is now the predominant display technology, sRGB is still the suggested colour space for images on the Internet. Currently, LCDs are manufactured (or can be set up) so that they mimic the CRT colour and tone reproduction characteristics. It is therefore recommended that you save your web images in sRGB and encourag the visitors of your website to set their displays and display viewing conditions according to the sRGB standard (see Figure 13.13) for correct image viewing. Although it is often difficult (if not impossible) to achieve the exact required viewing conditions, displays should be, at least, placed away from windows and be prevented from direct light to avoid refections. Bear in mind that LCDs are less prone to refections than the CRT displays due to their matt faceplates, but the image contrast is viewing angle dependent. Otherwise, most modern LCDs can – theoretically – be set up to the sRGB standard, just by making the appropriate selection in the display set-up menu. This, however, does not guarantee consistent displayed tones and colours. There are various reasons why a display cannot be correctly set up just with the press of a button, amongst which are the incorrect setting of the luminance and contrast settings and the age of the display. There are a number of software utilities that allow for visual calibration of the display gamma (which should be set to 2.2 for sRGB and generally the Internet and digital photography), which you might recommend to the visitors of your website to ensure that images are viewed at least with the appropriate contrast (Figure 13.14).

Figure 13.13 Specifications for sRGB reference display and recommended viewing (ambient) conditions. The reference red, green and blue displayed phosphors are based on the ITU-R BT.709-2 reference primaries. Specifications for the reference viewing environments are based on ISO 3664. The reference observer is the CIE 1931 two-degree standard observer from ISO/CIE 10527.
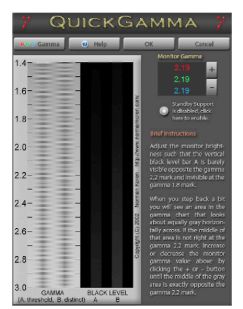
Figure 13.14 A number of software utilities can be used to visually set up monitors to specific parameters, such as optimal brightness and contrast, target colour temperature and target gamma. With free software such as QuickGamma, the individual gamma value of a monitor can be adjusted visually to match a desired gamma value, such as 2.2 for sRGB image viewing.
Multimedia
Computers and appropriate software applications allow the presentation of still photography to be integrated with video, sound, lighting, LCD projection and various interactive devices. Audio-visual (AV), originally the use of banks of 35 mm slide projectors, was well established as a powerful way of creating spectacular, high-quality forms of image presentation for conferences, exhibitions, prestige tour introductions for visitors to museums, etc. This form of imagery presentation has now been replaced by controlled LCD or video projectors. With the use of editing software, which can, for example, dissect a digital image and allocate its parts digitally to several projectors, digital projection has changed the production of multimedia shows. High-quality still images, moving images, sound and effects commands can all be played out directly from your computer’s hard disk.
At the same time, interactive forms of presentation are possible, both in an audience situation and the kind of one-to-one programme (often on CD or DVD) by which individuals view material on a computer screen and relate with it through displayed touch-sensitive response panels. Interactive elements may include voice command, touch screen, touch tablet and mouse manoeuvring, text entry and video capture of the user. If you are an ambitious photographer working in either a commercial or fine art field, it is important to keep in touch with future multimedia developments. Knowledge here will help you build new markets for your photography. It also enables you to present your work in the most effective form of installation at gallery shows or hand out examples of your work on CDs or DVDs.
Permanence, storage and archiving
Image permanence is a major concern not only shared by photographers, photographic agents and clients, but also by curators of photographic collections and archives, who are often responsible for heritages of great historical value. The fact is that no image lasts forever, but as a professional photographer you have to make sure that your work will last for a guaranteed number of years or, at least, sufficient time for its intended purpose. Storage and preservation of photographs is a very different matter in photographic and in digital media. The world ‘archival’ was used to describe photographic material with a long lifespan, typically 100 years. This is the minimum period that conventional photographic media with archival properties are expected to last, provided that they are kept in appropriate conditions. However, the subject of image permanence has become very complex with the introduction of digital photography. Much less is known about the stability of digital prints as well as the media used to store digital image files. Digital media have expected lifetimes that are much less than 100 years. Apart from the physical and chemical degradation, digital media also suffer from the problem of obsolescence. Therefore, the term ‘life expectancy’ is more commonly used today instead of the term ‘archival’, especially when we refer to the longevity of digital prints and digital image storage media.
Silver halide-based media
The longevity of silver halide-based media depends on the photographic medium itself, the chemical processing and the subsequent storage conditions. Fibre-based printing papers, especially silver-enriched premium weight types, provide better image stability than resin-coated material. Printed photographs are generally more susceptible to degradation than negatives, while fine-grain film is more susceptible than large-grain. Colour photographic media are more at risk than black and white. Photographic materials have to be properly developed, fixed and washed to avoid later yellowing and fading on storage (see Langford’s Basic Photography). There are types of developers, stop bath solutions and fixers that advantage film or print longevity. So, if you are keen to produce images on photographic media with archival properties, you should probably consult manufacturers’ specifications and choose processing solutions accordingly. You can improve the archival properties of black and white materials by using certain toning treatments, for example brown or sepia toning (see Langford’s Basic Photography). These are more commonly applied after processing to prints to change the tone of a black and white image, but can also be applied on films and photographic plates to enhance the stability of the silver image. Be aware that toning solutions may contain toxic chemicals that are commonly found in photographic darkrooms, so take the appropriate precautions when you use them. Also, immersing thoroughly washed print material in gold protective toning treatments provides print protection while changing the image tones only slightly.
According to work published by the Image Permanence Institute (IPI) of the Rochester Institute of Technology (RIT) in the USA, there are three categories of environmental-induced types of deterioration in photographic media. Biological decay involves living organisms, such as mould and bacteria, that damage films and prints. Mould, once present and if left untreated, eventually destroys all pictorial information. Mechanical decay is related to changes in the structure of the photographic image, such as its size and shape. Over-absorption of moisture from photographic media found in humid environments causes swelling; equally, lack of humidity and dryness in the atmosphere cause shrinking and cracks. Finally, chemical decay changes the chemistry of the photographic image. Incorrect processing – for example, leaving residual chemicals or final prints with an unfavourable pH value – causes fading of the image dyes in colour materials. This is known as dark fading, a fading process which involves chemical reactions that depend on the structure of the dyes. The dark fading of image dyes is also influenced by various environmental factors, such as temperature, relative humidity and common atmospheric gases. Other general effects of polluting gases include yellowing and fading of the image at the edges, orange or red spots. Dye fading of old photographic prints stored in the dark used to result in a magenta or pink cast, because the yellow and cyan dyes (especially those predating the 1970s) faded faster than the magenta dye (Figure 13.15). Light fading of the photographic dyes is the fading that results from exposure to light and UV

Figure 13.15 The pink cast in the right image is a simulation of the cyan and yellow dyes fading faster than the magenta dye in old photographic prints, stored in the dark. © Sophie Triantaphillidou.
radiation. The fading of dyes depends on the intensity, duration and type of radiation. Light fading takes place when you are viewing and displaying your images – for example, when displaying prints on the wall, especially close to windows, or when projecting slides. Similarly to dark fading, different dyes are affected differently by light. Under the influence of light, cyan dyes are generally more stable and magenta are the weakest; thus, photographic faded prints affected by light fading generally have a blue-green cast (Figure 13.16).

Figure 13.16 The blue-green cast in the bottom image is a simulation of the effects of light fading on photographic and digital prints: magenta dye fades faster than the cyan and yellow dyes when exposed to light. © Sophie Triantaphillidou.
Storage and environmental conditions play a crucial role in the longevity of photographs and influence all types of decay listed above. High temperatures and humid environments aggravate harmful effects (encourage mould growth, structural and chemical changes), whereas lower temperatures and humidity levels as well as dark storage greatly improve media stability. There are several international standards (ISO) that propose recommendations for storing photographic media. In general, when storing photographs make sure that the temperature does not exceed 21°C and the relative humidity (RH) is in the range of 30-50%. For archival storage, lower temperatures and humidity levels are recommended (typically from 7 to 0°C at 30% relative humidity), as well as the use of sealable polypropylene bags – equipped with a humidity indicator – to protect the material from harmful atmospheric gases.
Digital prints
The problem with digital images is that, unless they are rendered, they do not actually exist except as a bunch of numbers, stored under contemporary file formats in contemporary digital storage media. When you consider the preservation, storage and life expectancy of digital images, it is a good idea to differentiate between rendered or printed images, and digital image files and media.
Preservation of digital prints is important, especially knowing that the longevity of digital image files suffers from rapid changes of technologies and media obsolescence. Photographs produced by digital colour printers are printed in materials that differ in composition from conventional photographic materials and in their response to environmental factors that damage them. Keep in mind that high temperatures and humidity, long exposure to light, atmospheric pollutants and mould are common factors affecting image permanence in both conventional and digital prints, although not to the same degree. The permanence of digital prints varies widely with the technology or recording, printing material and characteristics of the colourants used to produce them (see Chapter 7). For photo-quality printing choose inkjet prints, as they generally provide better image stability than thermal transfer prints, of which the permanence has not been well documented. Electrophotographic prints are reasonably stable, as the pigment particles in the toner are fused into the paper base, which is usually uncoated (not photo quality).
The structure of your inkjet print will partially govern its future integrity. Inks may be made from dyes (similar to those used in traditional photographic prints) or pigments (which are also used in toners). Pigments tend to be more stable, as they are generally less sensitive to water, humidity and high temperatures than dyes (see page 192). For many years the shortcomings of pigment-based media were related to image quality issues, including reduced colour gamut, when compared with dye-based media. Today, the image quality of pigment-based ink/media is rapidly approaching, and in some cases exceeding, that of dye-based inks. Dye-based inks, on the other hand, contain molecular colourants that penetrate the surface. Early generations had very poor display life (often less than 10 years) but, as printing technologies and dye chemistry advance rapidly, print display life has increased tenfold, while still preserving the rich colours inherent to dyes.
The choice of paper is also important. Although uncoated (plain) paper offers greater ink stability, you cannot use it for photo-quality prints. Acid-firee, buffered and lignin-free paper bases are recommended for better print longevity. Inkjet paper, coated with swellable polymer coating, suffers less from degradation caused by atmospheric pollutants than porous paper (with no protective polymer), which in turn is more resistant to moisture and humidity. The use of fluorescent brighteners (also called UV brighteners), which are added to many inkjet papers (and to nearly all plain papers) to make them appear ‘whiter’ than they really are, is an issue regarding inkjet paper stability, as they lose activity when exposed to light and UV radiation (Figure 13.17). It is therefore recommended that for long-term permanence papers with brighteners should be avoided.
Generally, more and more inkjet paper manufacturers claim ‘archival’ properties of their papers (typically up to 200 years). Yet there are no standard measures for inkjet print longevity and no standard recommendations for their storage. Longevity claims vary with manufacturer and product. It is often argued that in accelerating fading procedures (tests that involve exposure of images to intense light to predict fading rates), not all manufacturers follow the same methodologies and therefore the predicted fading rates are not comparable. Until universal guidelines are published, follow the recommendations specified for conventional colour prints. Keep inkjet prints in dark conditions to protect them from light fading, away from air pollutants, in low temperatures and humidity levels.
Digital storage
The longevity of your digital images depends to some extent on the storage medium, the conditions under which the medium is kept, the file formats you use to store your image data and the image encoding (or colour space encoding). Unfortunately, even if you ensure best media and storing conditions, the success in securing the longevity of your photographs is only partial, as it is impossible to rely upon the hardware and software used to store the digital images being available in the future. Modern storage media have two life expectancies: one refers to the physical and chemical lifetime and the other to the expected time of obsolescence. It is important you have an understanding of the media for image storage conditions and the preservation requirements for each of them. Storage media have varying suitability according to the storage capacity required and preservation or access needed.
Storage media
Magnetic storage media use magnetically coated surfaces to store information. They are rewritable media and information is accessed (read and written) by magnetic heads. The most common magnetic image storage devices are hard disks (fixed or portable) and magnetic tapes (commonly in cartridges and cassettes). On hard disk, digital information is accessed randomly and thus very rapidly; in magnetic tapes, this occurs sequentially. Although the reliability of magnetic media has improved substantially in recent years, make sure you still purchase your hard disks from reputable suppliers. The very rapid increase in disk space and data access speeds for hard disks makes them very suitable as ‘working’ as well as archival storage media. Magnetic tapes are much cheaper than hard disks, have very large data capacity (up to 1.5 TB), but short lifespan. This is why they are recommended for keeping additional copies (back-ups) in image archiving – where large amounts of data are in hand and where rapid and frequent access is not required – provided that tapes are replaced frequently (ideally annually). Until recently, the longevity of magnetic media was not one of their advantages, their very weakness being the way they read and write information. However, with the advances of technology, magnetic media, and especially hard disks, have become more and more secure. Hard disk drive manufacturers usually give a 3- to 5-year warranty. You should ensure storage of magnetic media away from high-intensity magnetic fields. Hard disks require a certain range of air pressure to operate properly and very high levels of humidity can cause damage of the heads and corrosion. Normal use can eventually lead to failure of these rather fragile devices, so make sure that you back-up
Figure 13.17 The bottom image is a simulation of inkjet print yellowing caused by the weakening of the UV brighteners incorporated in the paper. © Sophie Triantaphillidou.
your images frequently. Magnetic tapes should be best kept in cool conditions, good-quality air and at maximum 50% relative humidity for best preservation. Binder degradation can cause uneven tape transport and layer separation. You should handle tapes with care, as they are thin and fragile.
The most popular storage for digital images is optical disk storage, including types such as CD, CD-R, CD-RW, DVD, DVD-R and DVD-RW. Optical disk drives use laser diodes to illuminate the information engraved as pits on the disk’s reflective layer(s) (the land). The laser beam is reflected back from the reflective metallic surface (aluminium or gold) to a sensor which ‘reads’ the information. Fast random access is the result of the continuous sequence of sectors on the spiral layout of the disks. The basic structures of CD, CD-R and DVD-R are shown in Figure 13.18. CD and DVD are read-only storage media, CD-R, DVD-R and DVD+R are recordable once, and CD-RW, DVD-RW and DVD+RW can be used for re-recording digital information. They are removable media, which can be duplicated and handled quite easily. CDs are preferred for image archiving because of their write-once capability, which provides high security from data erasure or modifcation. Use the ISO 9660 for recording on CD media, as it ensures access of the stored data from all current computer platforms and operating systems. The ISO 9660 is a standard published by the International Organization for Standardization (ISO) in 1988, which defines a method of organizing computer files for CD-ROM media. An extension to ISO 9660, the Joliet system format, allows longer file names and non-ASCII character sets. DVDs may also use the ISO 9660 file system, although the Universal Disk Format (UDF), based on the ISO 13346 standard, is more appropriate on DVDs. It has better support for the larger storage media and is more suitable to the needs of modern operating systems. CD and DVD writers are common and inexpensive nowadays. CD-type disks can store over 600 MB, a capacity which is rather limited for contemporary image sizes, but they cost very little. DVDs are more recent optical storage media, with the capacity to store 4.7-18 GB.
Although optical media have long physical and chemical lifetimes (often stated as long as 75-100 years, which is rather exaggerated) and generally are more robust than magnetic media, they are still subject to deterioration, which may result from poor storing conditions and handling. Large and rapid temperature fuctuations can cause layer separation, lack of planarity,

Figure 13.18 Cross-sections of CD (top left), CD-R (top right) and DVD-R (bottom).
cracking and pinholes. Pollutants and high humidity levels can cause corrosion and mould. Writable disks are susceptible to light exposure that degrades the dye layers. Keep your CDs and DVDs in cool environments (ISO recommendation 21°C) and maximum 50% relative humidity.
Other image storage media include Flash cards and solid state disks (SSD) that have very fast data access and are used mostly as temporary storage devices. The life expectancy of such media is difficult to obtain, so do not use them for archiving your photographs. Otherwise, as an alternative to in-house storage of your digital images, or indeed for extra safety, consider ‘trusting’ your image files to long-term digital storage providers. These are institutions or companies which, for a monthly or yearly fee, will take care of the storage and maintenance of your images. Remote storage is becoming more and more popular, especially from institutions that hold large amounts of digital information.
Data storage and migration
If you are interested in the longevity of your image data, you need to store one copy of each image in a form as close as possible to the original capture (see Chapter 8). This enables you to always refer back to your ‘master’ copy. You need to understand, however, that your original captured image might not be optimized for a specific output (display or print). Nevertheless, this is the best your capturing device can give you. If you choose to archive only an optimized copy, be aware that you will probably have a loss in quality (for example, the colour gamut of the image might be compressed by saving it to the sRGB colour space), but you have the advantage of a ready-to-use image. Save your master copy in the native RGB space of your capturing device – if this choice is available by the manufacturer. If you decide to save only an optimized version of the image file, it is recommended that you choose Adobe RGB (1998) for print and sRGB for display media.
The requirements of a file format for archiving are that an open standard, non-proprietary file format and preferably no compression is used – although lossless compression may be acceptable. Uncompressed Tagged Image File Format (TIFF) is one of the most popular choices for archiving images (see Chapter 8). TIFF is thoroughly documented and it is easily converted between various operating systems and platforms. The first version of TIFF specifications was published in 1986. Since then, the structure of TIFF has been expanded around a basic frame, which makes older versions backwards compatible (thus it has been tested sufficiently and has had a relatively long lifespan). The current TIFF 6 version was released in 1992. The latest update to the TIFF format was in 2002, and gives the choice of ZIP and JPEG compression to TIFF, both of which are better avoided if you are concerned with longevity. Although TIFF has not been standardized, it is a de facto standard. Two different file format specifications that are based on TIFF have been standardized: TIFF/EP (ISO 12234-2:2001) and TIFF/IT (ISO 12639:2004). In 2004, Adobe proposed the Digital Negative (DNG) format as a non-proprietary file format for storing camera RAW files (see Chapter 8) that can be used by a wide range of hardware and software vendors. The specification of the latest DNG version 1.3.0.0 was published in June 2009. Like most RAW file formats, the DNG file holds the RAW data in a TIFF-based format. DNG is an extension of the TIFF standard which includes metadata – information that describes how this RAW data is to be interpreted. DNG is quickly becoming a choice for image archiving purposes. Otherwise, the Portable Network Graphics (PNG) file format is an open source image format working towards offcial standardization, and is considered as a possible replacement for TIFF.
As mentioned earlier, preservation and long-term access to your digital image data depends not only upon the physical lifespan of the storing media and conditions, but also the lifespan of the file formats, the hardware and the software used to read the information. One recommendation is that digital data should be periodically transferred from old storage to new media. This process is known as data migration. It is suggested that permanence of digital storage should be considered as a measure of the renewal period. There is no degradation in the migration process, since digital information, unlike any other form of information, has the advantage of duplication without a loss. Depending on the amount of data you hold, this might not be the simplest solution. However, be aware that most existing media and file formats are unlikely to be around in 20 or so years, so consider your migration strategies if you are keen to save your photographs. The migration of digital information is the only solution in archiving situations for the preservation of visual heritage.
SUMMARY
- The three traditional systems of reproducing photographs on the printed page are letterpress (raised surface), lithography (water repelling greasy ink) and gravure (ink-retaining hollows). Pre-press preparation is predominantly by digital methods today.
- For letterpress or litho reproduction, continuous-tone photographs are converted into a fine pattern of halftone dots. Your eye’s limited resolution reads purely black and white dots as a full-tone range, according to ratio and distribution.
- Duotone reproduction of black and white pictures enriches tone range and density but needs at least two halftone separations and two runs through the press. The finer the halftone screen ruling, the greater the detail, provided that it suits the paper being used.
- To reproduce full colour requires at least four separations, printing in yellow, magenta, cyan and black inks (screens rotated to different angles). Scanners convert picture information into a stream of signals representing the four separations. While in digital form images can be masked for contrast and colour, retouched and screened, then re-exposed back on to process film as halftone dot separations.
- Digital images supplied for reproduction must originate from high-quality digital cameras or scanners; they must be stored at 300 dpi, 8 bits per pixel. TIFF, RAW or high-quality JPEG compressed files are preferred. Choose Adobe RGB, ‘clean’ them at 100% viewing resolution and avoid sharpening. Accompany the images with metadata.
- Photographic originals supplied for reproduction should not have major differences from the final size, be in appropriate form for being drum scanned, avoid surface texture, have a tone range appropriate to the style of image, and avoid underexposed shadow detail or burnt-out highlights.
- Picture libraries are agencies that negotiate a fee on the photographer’s behalf in exchange for a percentage. Once you have joined an agency you can provide your own photographs or work in collaboration with the agency to produce projects that meet the agency’s demands.
- The Internet is a useful space for sharing images by uploading them on photo-sharing photo services or, better, by displaying them on your own website. Choose the design and colours in your website so that they refect your personal style. Be aware of the effect the background colours have on the photographic content. Disseminate your URL to friends, clients and organizations that are set to promote photography.
- Multimedia integrates photography, video, audio, etc. in computer-controlled presentations. Multimedia installations include interactive presentations – a smart way to present your photographic work.
- For best preservation, traditional photographic media need to be properly processed, thoroughly washed and stored in dark environments, away from polluting gases, at low temperatures – preferably fireezing – and low relative humidity levels. Bad storage conditions result in biological, structural and chemical decay of prints and films. Colour images suffer greater deterioration than black and white due to the fragility of their dyes.
- Digital print stability varies with printing technology and printing media. Inkjet prints produce the most lasting photo-quality prints, but they have not yet proved to be stable media despite claims to the contrary from manufacturers. Print using pigments instead of dyes if you care about image stability. Follow the storage conditions recommended for conventional prints to extend the lifespan of your prints.
- Digital image longevity depends on the storage medium, the conditions under which the medium is kept, file formats and image encoding. Digital storage media have a physical lifetime and a time of obsolescence. If kept in good storage conditions and handled with care, the time of obsolescence is often shorter than their physical lifetime.
- Magnetic storage media use magnetized surfaces to store digital data, which are written and read with magnetic heads. They store large amounts of data. Hard disks have fast access but are fragile; they are good as working storages. Magnetic tapes are cheap, but have slow access; use them for back-ups but remember to renew them frequently. Keep magnetic media away from strong magnetic fields, in cool conditions, good-quality air and at a maximum of 50% relative humidity for best preservation.
- Optical storage media, such as CD and DVD types, are the most robust. Data are engraved on reflective surfaces and read using a laser that illuminates the reflective medium and a light sensor that reads the reflected light. CDs, recorded using the ISO 9660 method, are the preferred media for archiving, but do not hold the large amounts of data that DVDs do. Keep optical media away from pollutants, store them in cool (and if writable dark) environments and at low relative humidity.
- TIFF is the preferred file format for archiving digital images; it has been tested by time, and is compatible with all software and hardware. DNG, which is becoming more and more employed for RAW image file storage, and PNG formats are becoming more popular.
- The preservation of digital image information requires periodical transfer from old storage and file formats to new media. Data migration can be laborious and complicated, but it is necessary if you care about keeping your digital photographs for more than a few years.
PROJECTS
1 Take a good look at an image printed on a newspaper using a magnifying loop. Notice the patterns that result from screening and halftoning. Observe how different colours are reproduced and decide whether black and white text and pictures are produced in the same flashion as colour pictures. Then change printed medium. Check with your magnifier images printed on a poster and later some printed in a good photographic book. Make a note of the differences in screen patterns, if any.
2 Visit the websites of various photographers. Try to navigate through the images and decide which designs and layouts are more suited to your photographic work and to your taste. Notice the differences that background lightnesses, colours and image sizes make to the photographic content, and check whether you prefer images presented on their own or with accompanying text. Once you have seen many sites, make quick sketches of the website you would like to build to display your photographs.
3 The next time you come across old photographic prints observe any structural changes, changes in the emulsion and the colours. Look for different types of decay, such as colour casts, colour spots and yellowing, and try to relate them to different causes of deterioration.