
6
Character animation
■ From concept sketch to finalized animated body parts, just how does a Flash animator get from point A to point B? What is the workflow when it comes to animating characters in Flash? This chapter looks at several real world examples of actual characters, how they were built and why.
IT’S TIME TO GET DOWN AND DIRTY. IN PREVIOUS chapters we looked at how to achieve a wide variety of design styles, transformations and motion effects. But the concept of how to bring all these techniques together to create a successfully animated character can remain a mystery. When is it advantageous to nest certain animations and why? How can swapping symbols be effective? What exactly does the Sync feature do? What is the most effective way to synchronize a character’s mouth and lips to a voice-over soundtrack?
These questions and more are explained in the following pages. So roll up your sleeves and get ready for a fun ride into the world of Flash character animation.
2.5D basics
TWEENING IS A GREAT WAY TO ADD A QUICK SIMPLE animation to your Flash movie. But what if you could push the tweening method to its limits and give more realism to your character? What if you could harness its simplicity and make it work in ways not too many other Flash users have considered? What if you have learned everything there is to know about tweening, go back to the first 10% of that knowledge and take a left turn? Where would that take you?
In this example, I’m going to reveal a truly killer Flash animation technique that will actually create a 3D optical illusion known to fool even the most discerning eye. The cool thing is you never leave the Flash environment and remain in the 2D realm. You are now in a dimensional limbo. If it’s still 2D but looks like 3D, then what exactly is it? Welcome to what is commonly referred to as “2.5D animation.”
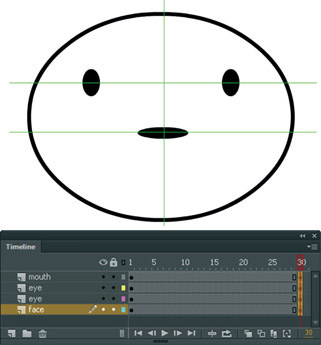
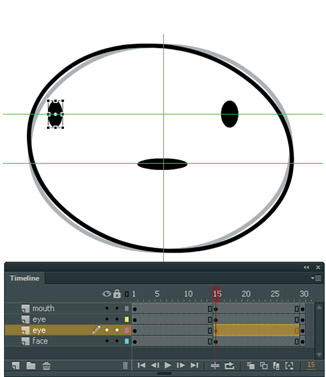
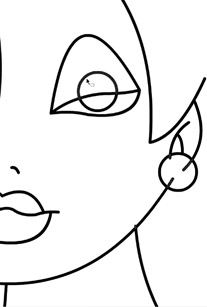
1 Let’s start with a few basic shapes that resemble eyes and a mouth on a face. You can add some horizontal and vertical guides to help keep these objects aligned with each other. Before you start editing these shapes, insert keyframes a few frames down the Timeline across all layers. You will see why this extra time is useful later.
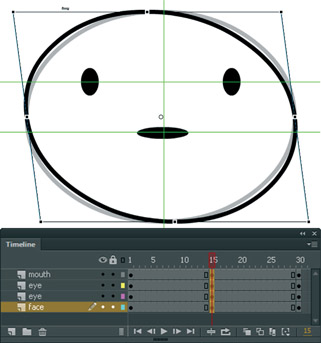
2 Insert keyframes across all layers between the first and last frames of your Timeline. Start with the head symbol by skewing it with the Free Transform tool ![]() . Since you will be creating the illusion of the head turning to the left, skew this shape by clicking and dragging just outside the bounding box in this direction.
. Since you will be creating the illusion of the head turning to the left, skew this shape by clicking and dragging just outside the bounding box in this direction.
3 Next, select the left eye symbol and position it close to the left edge of the head shape. Use the Free Transform tool to reduce its width slightly, creating the illusion of the eye moving away from us around the surface of the head.
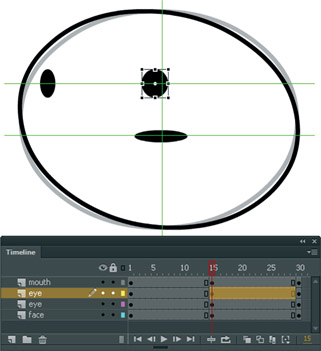
4 Move the other eye over as well but scale it slightly wider as it gets closer to the middle of the head. At this rotation, if it were truly mapped to the surface of a three-dimensional sphere, it would be at its widest at the point where it is closest to us.
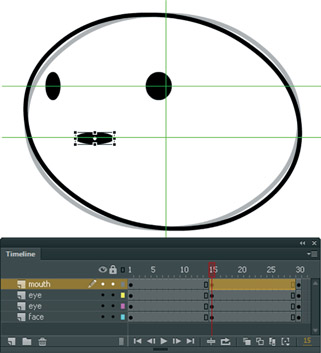
5 Next, move the mouth over in the same direction and scale its width slightly smaller like you did for the first eye. You might want to push the mouth closer to the left edge to provide more space between the mouth and the right eye. This trick will help make it feel as if the mouth is truly wrapping around the head like the left eye is starting to do.

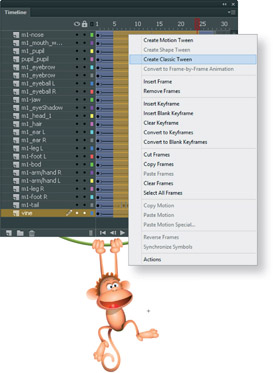
6 Now all you have to do is apply Classic tweens to all the layers. Drag across all layers to select them and apply a Classic tween from the context menu or Properties panel. Remember when you added keyframes to the final frame in step 1? Now all you need to do is apply Classic tweens to the latter half of your Timeline to return the head to its original position.
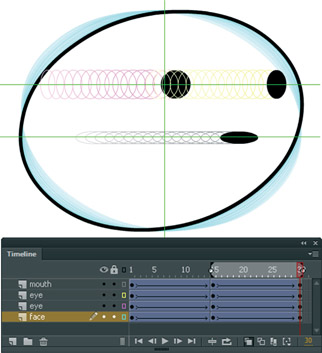
7 Repeat the same procedure but in the opposite direction to make the head appear to turn to the right. Experiment by making the head move from left to right by removing the keyframes in the middle of the Timeline.
Hot Tip

Don’t be afraid to push the limits of this technique. I see my students attempt this style of animation, and all too often they hardly move the features across the face enough to make the illusion convincing. Play back your animation frequently to test the overall effect. You can always add or remove frames if the animation is too slow or too fast. Add a little easing to make it look even more realistic.
2.5D advanced
“THE MAGIC BRUSH”: ORIGINAL SHORT COPYRIGHT MUDBUBBLE ANIMATION
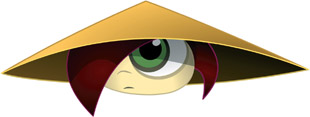
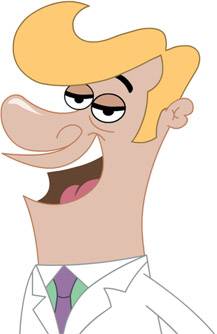
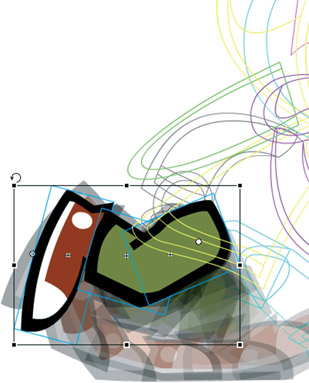
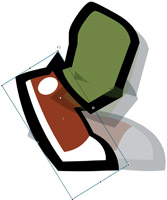
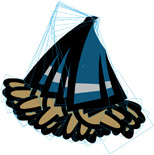
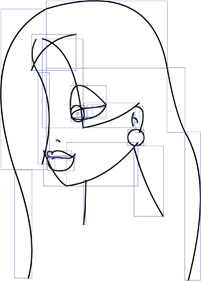
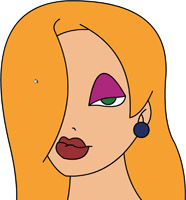
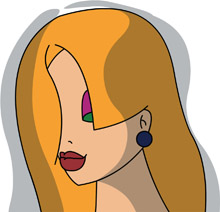
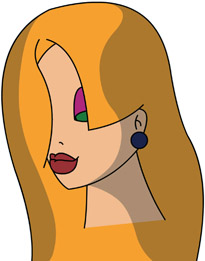
LET’S APPLY THE SAME technique as explained in the previous example to a more sophisticated character. This character is comprised of several individual objects, all of which were designed and composed with this animation technique in mind. The spacial relationship of each object to each other is important as they will all need to move, skew and scale together but at varied amounts. The effect is based on the whole being greater than the sum of its parts. There’s nothing overly sophisticated about creating this technique, but the result can look very complex on the surface.
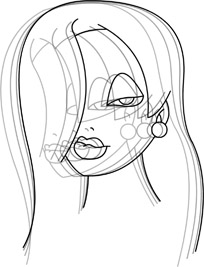
1 The first step is to make sure all objects have been converted to symbols and you have edited their center point to your desired location this technique to be successful, it’s often useful to design your characters in three-quarter view as opposed to a profile view or facing us directly.
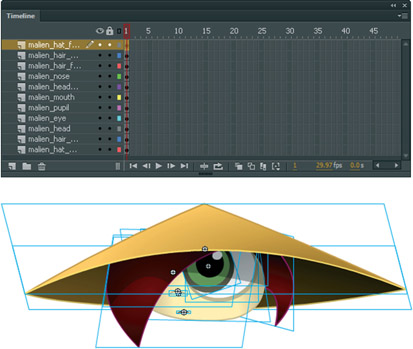
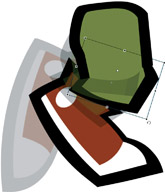
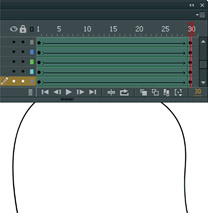
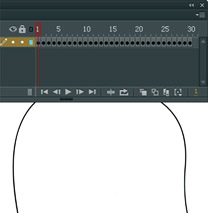
2 If you want to create a seamless loop by making the head eventually return to this same exact position, select a frame (across all layers) somewhere down the Timeline and add a keyframe (F6). It pays to think ahead because you have avoided having to copy and paste the keyframes from frame 1 later. Select another frame (across all layers) an equal distance between your first and last keyframes.
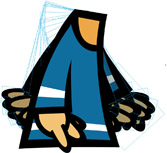
3 This middle frame is where you will edit your character. Start by using the Free Transform tool ![]() to skew the symbol instances. Here I have skewed the hat, which is comprised of two separate symbols, a front and a back. Selecting and skewing them together ensures that they remain aligned which each other. It’s helpful to lock all other layers temporarily while you apply the transformations.
to skew the symbol instances. Here I have skewed the hat, which is comprised of two separate symbols, a front and a back. Selecting and skewing them together ensures that they remain aligned which each other. It’s helpful to lock all other layers temporarily while you apply the transformations.
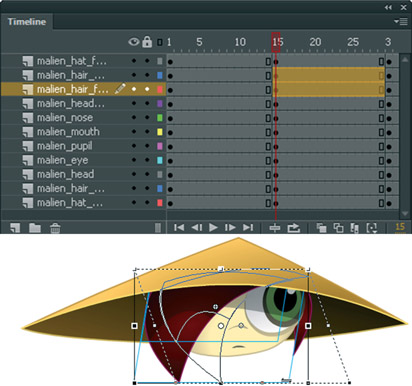
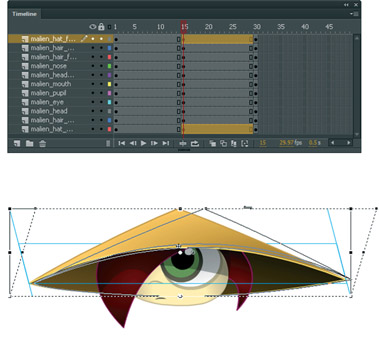
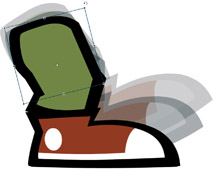
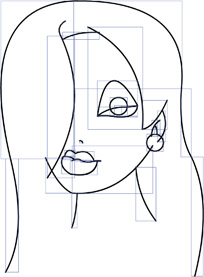
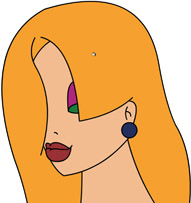
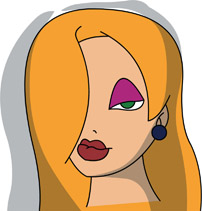
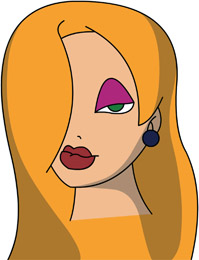
4 Next, skew the hair to the right from its bottom edge. Since you want to convey this object coming around the front of the character’s face, move it over to the right and scale it horizontally to make it slightly wider than it is in the first frame. Moving and scaling horizontally creates the illusion that it is moving not only across the face, but also slightly towards us as well.
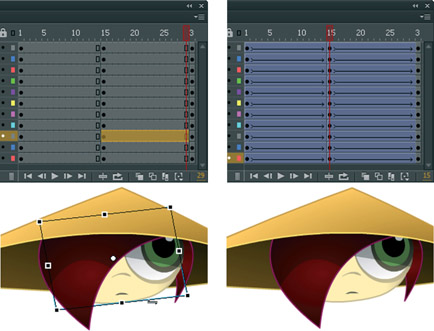
5 Repeat this process for each object, combining various amounts of skewing, scaling and positioning. The smaller symbol representing the hair on the right side is the only symbol in this example that gets positioned to the left. Moving it behind the head emphasizes the illusion that the head is a sphere that objects can seemingly “wrap” around.
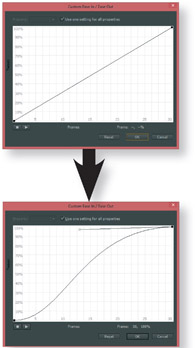
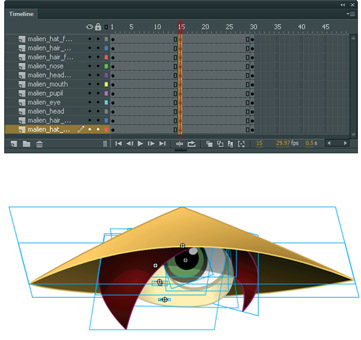
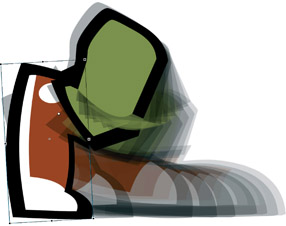
6 The final touch is to add easing using the Custom Ease panel. The straight path represents no easing. The “S”-shaped path represents easing in and out within a single tween.
Hot Tip

Character design is critical for this effect to be successful. Keep it simple and stylized because the more anatomically correct your character is, the harder it will be to animate in this style.
2.5D monkey
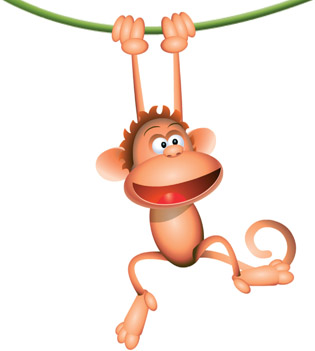
MONKEY: MUDBUBBLE ANIMATION
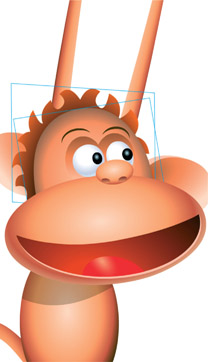
THE KEY TO REALISM LIES WITHIN THE shading. The same 2.5D animation technique is being used here, but this time the graphics are drawn using gradients to promote an even more convincing faux three-dimensional effect.
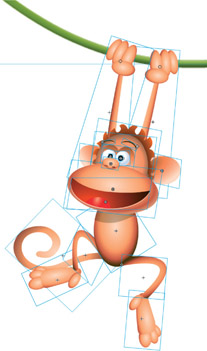
1 Start with the character at a three-quarter angle in frame 1. Let’s call this “point A.”
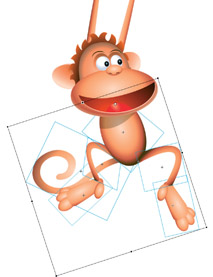
2 In your last frame, create what we’ll call “point B.” The challenge is getting from point A to point B through the use of tweens.
3 Using the Free Transform tool ![]() , rotate, skew and move each symbol into its “point B” position. Here the mouth symbols are transformed first.
, rotate, skew and move each symbol into its “point B” position. Here the mouth symbols are transformed first.
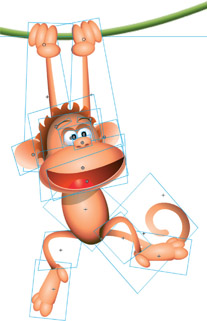
4 Next, transform the nose, eyes, pupils and eyebrows. Pay close attention to the spacial relationship between each of these objects and our perspective at this new angle.
5 The head and hair symbols are rotated and positioned accordingly. At this angle, we see more of the hair from the left side and less on the right.

6 The ears play a pivotal role in this effect. At this new angle, we can see more of the left ear and less of the right ear.
7 Once the head symbols are transformed and positioned where you want them, lock their layers, select all the body parts and rotate them.
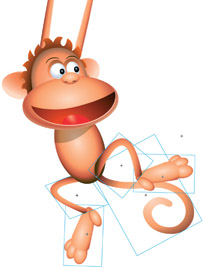
8 Next, adjust the legs and tail individually by selecting and rotating them.
9 Select everything except the arms and hands and move the monkey over using the right arrow key. Hold down ![]() to move in ten-pixel increments.
to move in ten-pixel increments.
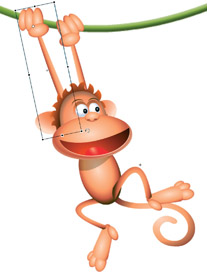
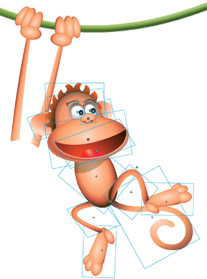
10 Rotate the arms so that they align with the monkey’s new position. Their center point is positioned where the hands grab the vine to make the rotation even easier.
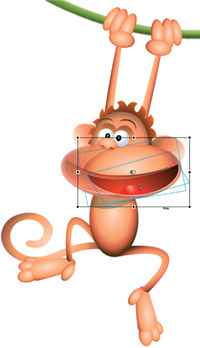
11 Apply motion tweens to each layer and play back your animation. Final adjustments are usually necessary at this stage.
Hot Tip

Check out the “Using Gradients” topic in Chapter 2 to learn how to create and edit the radial gradients used in this example.
Lip syncing (swap method)
LIP SYNCING IS AN ART FORM in its own right. It is the art of making a character speak to a pre-recorded vocal soundtrack. This technique involves the creation of various mouth shapes and matching them to the appropriate dialog. This technique can also be very time-consuming, especially if your dialog is very long. You can be as simple or as complex as you want. There’s a big difference between South Park and Disney-style animation when it comes to matching mouths to sounds. There are two basic methods of lip syncing in Flash, which we will look at here.
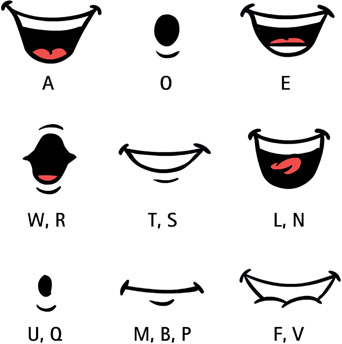
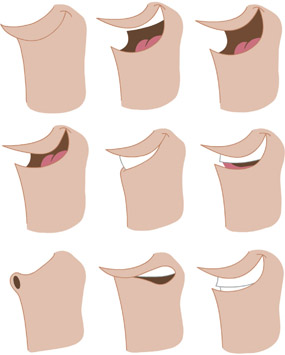
1 Here are the standard mouth shapes to use as a guide. Each shape corresponds to a specific sound or range of sounds. Each sound is noted below each shape. For most animation styles, you do not need to create a different mouth for each letter of the alphabet. In most situations, certain mouths can be reused for a variety of sounds.
2 Using the standard mouth shapes as your guide, draw your character’s mouth shapes, taking into consideration the design and angle of your character. After drawing each mouth, convert each one into a Graphic symbol.

3 Based on the design of your character, your next step will likely be to put the mouth symbol on its own layer making it easier to edit for animation.
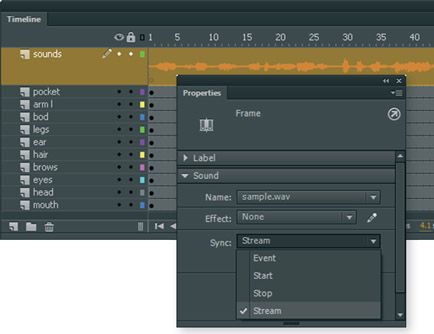
4 The next step is to import your sound into Flash. Sound formats supported are our sound into Flash Sound formats supported are WAV, MP3, AIFF and AU. Go to File > Import to Stage and locate the sound file on your hard drive. Once the sound is imported, create a new layer in your Timeline and select a frame. Using the Sound drop-down menu in the Properties panel, select the sound you just imported. Next, set the sound from the default “Event” to “Stream.”
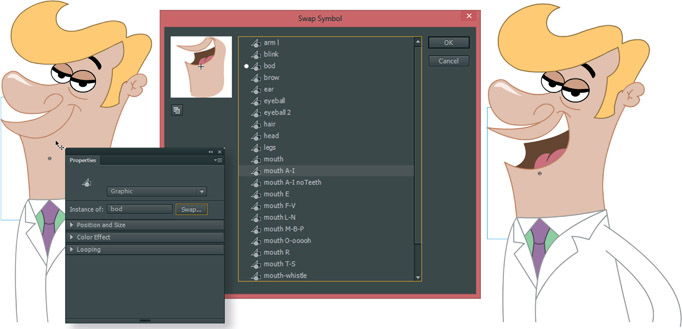
5 On the main Timeline where main Timeline where your character resides you can animate the mouth talking by creating keyframes and using the “Swap Symbols” method via the Properties Inspector. The Swap Symbol panel will open, allowing you to scroll through your Library.
6 Click once to preview each Library item and click OK to replace the instance on the stage with this symbol. It helps to name your mouth symbols starting with the same three letters as they will be sorted by name in the Swap Symbol panel, making it easier to find the mouth you want.
7 Click OK to swap the symbol instance on the stage with this new symbol from the Library.
Hot Tip

When you name each mouth symbol, include a description of what dialog sounds it should represent. This naming simplifies the process of choosing the appropriate symbol by allowing your eyes to scan down the list of names in the Library without needing to select each symbol to see the thumbnail.
Lip syncing (nesting method)
THROUGH YEARS OF ANIMATING IN Flash, I have developed what I think is an even better and faster way to lip sync a character. A few years ago I was working in a full production environment with teams of animators producing several series for television and the Web. Most of these episodes were 22 minutes in length with several characters and plenty of dialog. Lip syncing quickly became the most dreaded of tasks. Using the Swap Symbols method is certainly a useful approach, but when you have 22 minutes of lip syncing to do and only two days to finish it, finding a faster method becomes a production necessity. The Swap Symbols method requires a minimum of four mouse clicks for each swap.
- Select the symbol instance.
- Click the “Swap” button.
- Select the new symbol.
- Click “OK.”
Over the course of thousands of frames and symbol swaps, those clicks can add up to an enormous amount. Shaving off just one click per mouth shape can, over time, save valuable production costs (not to mention an animator’s sanity).
These situations are when “nesting” really shows its strength and versatility. By nesting all your individual mouths into a single symbol, you can control the instance of this symbol with the Properties panel. This method eliminates the need to swap symbols and also saves time.
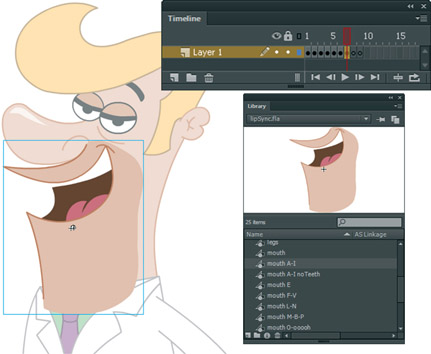
1 The first step is to place all your mouth shapes into a Graphic symbol. I recommend editing an existing symbol on the stage to help you align your additional mouths to the character on the main Timeline. Double-click the mouth symbol on the stage to enter Edit Mode. Create a blank keyframe for each additional mouth. If your mouths already exist as symbols, open your Library ![]() and drag each mouth to its own keyframe. Use the Onionskin tool to help align each one.
and drag each mouth to its own keyframe. Use the Onionskin tool to help align each one.
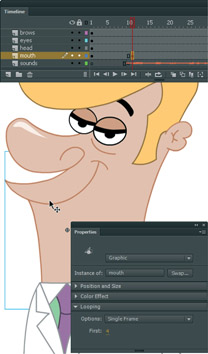
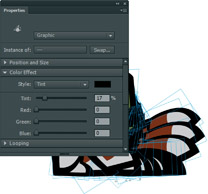
2 Back on the main Timeline, open the Properties panel and select your “mouth” symbol containing all of your mouth shapes. As a Graphic symbol, the Properties panel will allow you options to control the instance.
3 Add a keyframe to the mouth layer, select the mouth instance and in the Properties panel select Single Frame. In the Frame input box, type in the frame number that corresponds to the mouth shape needed based on the sound at that keyframe.

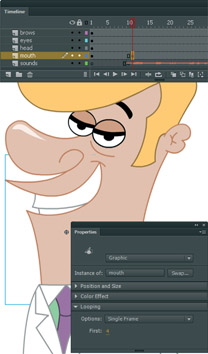
4 Scrub the Timeline (drag the playhead back and forth) to hear the next sound. Repeat the same process by adding keyframes, and typing in the corresponding frame number for the mouth shape needed.
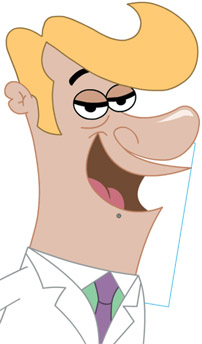
5 The convenience of nesting is obvious when you transform (rotate, scale, flip horizontally or vertically, etc.) your character; all nested assets are transformed as well.
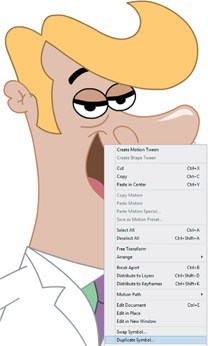
6 Often you may need a custom mouth animation; for example, a mouth that whistles. Right-click over your mouth and select Duplicate Symbol. Give it a descriptive name.
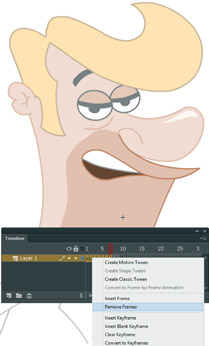
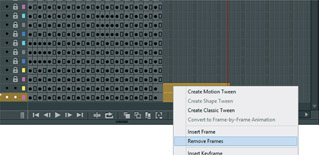
7 Remove the unneeded symbols by selecting them and choosing “Remove Frames” from the right-click context menu. Keep the symbol that closely represents a whistle shape.
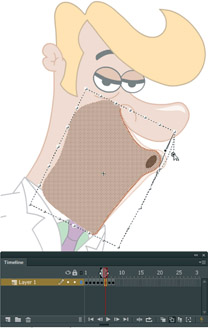
8 Animate the whistling mouth as a short loop. Here I used the Envelope tool to distort my original mouth shape after breaking it apart.
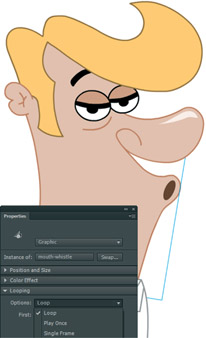
9 On the main Timeline, add a keyframe and select the “whistle” symbol containing your new animation. In the Properties panel select “Loop” from the drop-down menu.
Hot Tip

When designing your character, it’s important to conceptualize how the character’s features may work. Some mouths are designed so that they are independent of the jaw and nose, while other mouths are an integral part of these features. So ultimately your mouth may be drastically different in terms of design, yet follow these basic standards.
To sync or not to sync
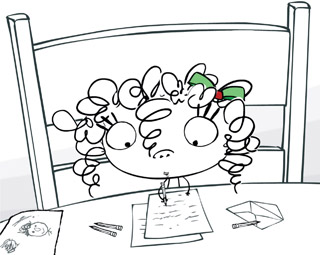
ANDREA ROSE GEORGENES: MUDBUBBLE HOLIDAY ANIMATION
TO SYNCHRONIZE A NESTED ANIMATION inside a Graphic symbol with the main Timeline, select the Sync option in the Property Inspector. Sync is a feature that is available when a Motion tween is applied. Select a keyframe with a Motion tween to find the Sync option in the Properties panel. What Sync means for nested animations is that the nested frames will be synchronized with the main Timeline.
In Flash CS3, Sync was inconsistently on or off depending on how you applied a Classic tween; if you applyed a tween from the drop-down menu in the Properties panel, then Sync was UNCHECKED. If you applied a Classic tween via the right-click context menu, then Sync was CHECKED. The Sync feature was indicated on the Timeline when a keyframe is followed by a vertical line.
Flash CC consistently turns on the Sync feature by default no matter how the Motion tween is applied. So when would you use Sync? When would you want to avoid it? Let’s first take a look at a situation where Sync would not be useful.
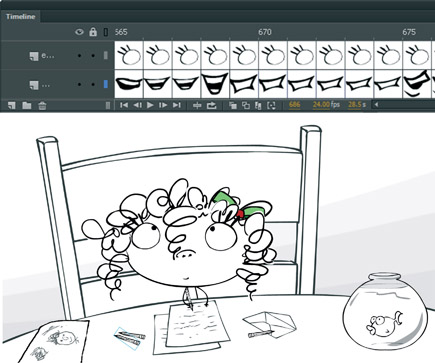
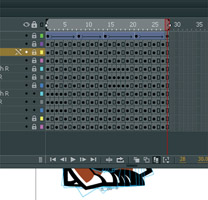
1 In order for you to see the effectiveness of the Sync feature, you need to work with a nested animation. A mouth symbol with several mouths on diferent keyframes will do just fine. Thumbnail views of each frame were displayed using the Frame View drop-down menu in the upper-right corner of the Timeline panel (to the right of the frame numbers) to select Previews. This view is a handy way to see the contents of each frame
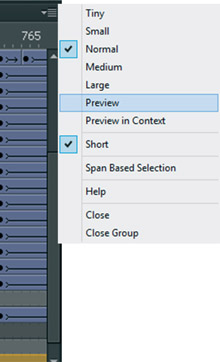
2 The Frame View drop-down menu offers several choices for you to customize the way your Timeline looks. My personal favorite is the “Short” setting, which lowers the overall height of each layer.
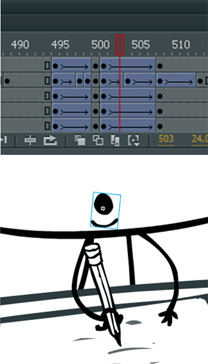
3 You can take lip syncing a bit further by tweening the mouth on the main Timeline. Tweening on the parent level adds a second layer of animation since this mouth symbol contains nested mouths as well.

4 Using the Free Transform tool ![]() , scale and/or skew the mouth depending on the vocal sound and apply a Classic tween. Sync is an option when Classic tweens are applied as shown in the next step.
, scale and/or skew the mouth depending on the vocal sound and apply a Classic tween. Sync is an option when Classic tweens are applied as shown in the next step.
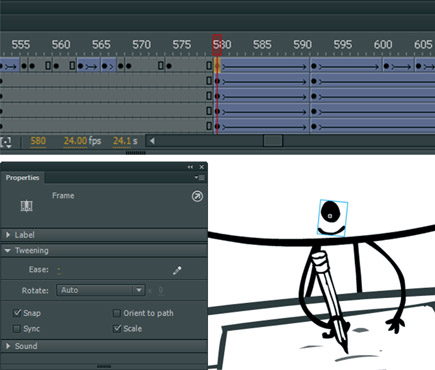
5 When you apply a Classic tween and want the ability to control the frames nested inside graphic symbols, select a keyframe in the tween and turn off the Sync feature via the Properties panel. Note that this only applies to Classic tweens in CS4+ and not the Motion Model.
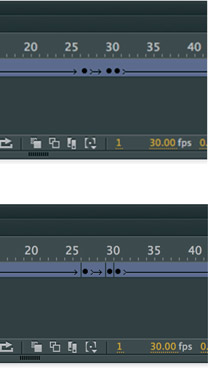
6 In the Timeline, the top image indicates a keyframe with Sync turned on. The bottom image indicates a keyframe with Sync turned off.
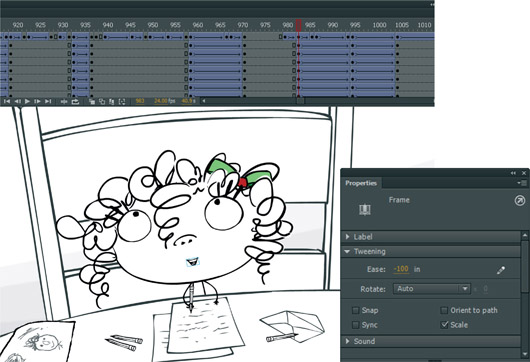
7 Having the ability to assign a specific frame number is critical for lip syncing. If Sync is selected, you will not be able to edit the current frame number. Once Sync is turned off, then you are free to change the frame number pertaining to the nested animation.
Hot Tip

Check out the “Extending Flash” chapter, specifically the AnimPro Slider by Warren Fuller and the FrameSync extension by Justin Putney. They are very useful extensions for controlling nested Graphic symbol animations and, personally, my favorite tools for Flash.
Sync (Classic tweens)
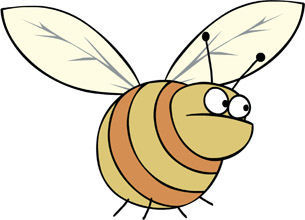
BEE AND DOG CHARACTERS: MUDBUBBLE
ONE DAY THE CLIENT ASKS FOR you to animate their company’s character logo across their website splash page. You use several keyframes and Motion tweens to animate their character (nested inside a symbol) along a motion guide and deliver the final version to your client and await their feedback. Unfortunately the client changes their mind and asks if you could change the bee character to a dog with a jet pack instead. Do you have to do the entire animation over again? No, because you can always swap out the bee symbol for another symbol. But you have to swap out each instance of the bee for every keyframe you made in the animation. What a drag! The more keyframes on the Timeline, the more monotonous and frustrating this task can be.
Sync to the rescue!
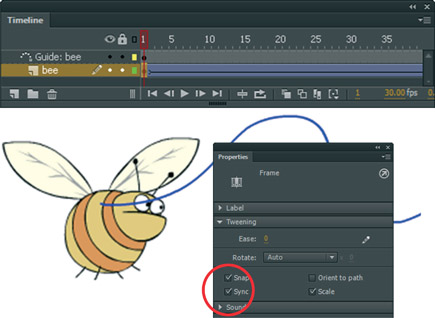
1 Let’s start with a simple animation involving a nested character animation in a Graphic symbol motion tweened along a guided path. Apply a Classic tween by right-clicking over the keyframe in frame 1 and selecting Create Classic Tween. Select frame 1 and turn on the Sync option in the Properties panel.
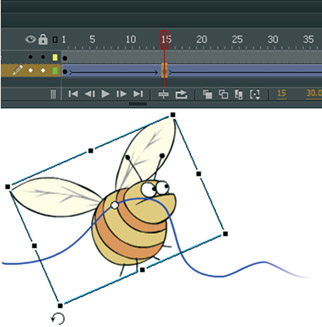
2 Insert a keyframe somewhere in the Classic tween. Use the Free Transform tool ![]() to rotate the symbol. Feel free to scale or skew the symbol as well. Because the first keyframe is “Synced,” all subsequent keyframes will have Sync turned on by default as well.
to rotate the symbol. Feel free to scale or skew the symbol as well. Because the first keyframe is “Synced,” all subsequent keyframes will have Sync turned on by default as well.
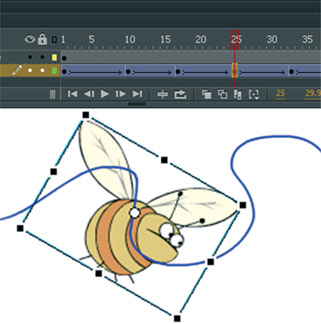
3 Continue to insert keyframes every few frames and transform your symbol by rotating and scaling. The idea here is to make this simple Classic tween relatively complex for the example purposes.
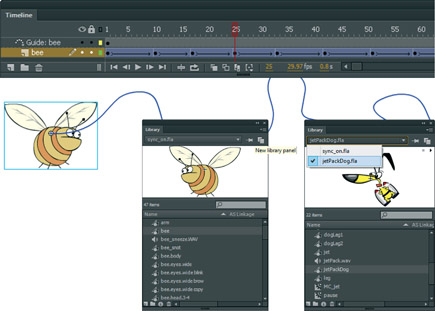
4 You just about finish the animation when the phone rings and your client informs you that they want to change the bee to a totally different character. Thanks to Sync, your time and hard work will not be wasted. Go to File > Import > Open External Library and navigate to an FLA containing the replacement symbol and click Open. You can also click the New Library panel button to open the Library of an FLA already open in Flash. A new Library panel will open displaying the symbols and assets contained in the selected FLA. Click and drag the preferred symbol from the external Library to the Library of your current document.
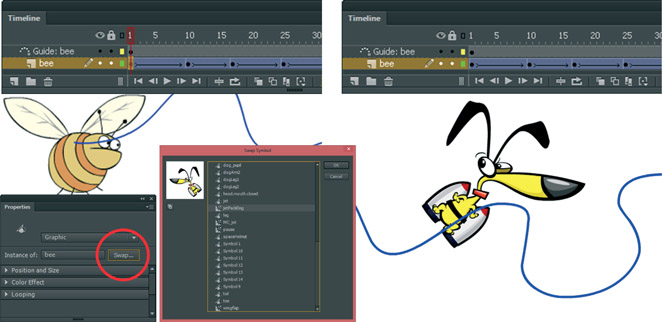
5 Select the bee character in the first frame of your Classic tween. In the Properties panel click the Swap button and locate the new symbol you just added to your Library and click OK.
6 Since every keyframe in the Classic tween has the Sync option selected, your entire animation will be updated across all keyframes. Crisis averted, go and make yourself another cup of coffee, catch up on your email overflow and get back to your client in a little while. Make sure to sound out of breath when you call them to tell them the changes have been made (just kidding).
Hot Tip

Use the Sync option to control different symbols within the same Classic tween. Turn off Sync for certain keyframes if you want to swap to another symbol for that keyframe. Turn on Sync to keep the same symbol in sync with the main Timeline. This method will not work with Movie Clip symbols. Use only Graphic symbols because only Graphic symbols can be synced to other Timelines using the Sync feature. Movie Clips have Timelines that are independent of all other Timelines and need ActionScript to be synced to other Timelines.
Sync (Motion tweens)
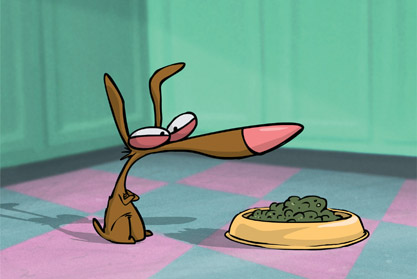
“DOG FOOD” COPYRIGHT 2008 MUDBUBBLE LLC
THE MOTION TWEEN CHANGES EVERYTHING when it comes to tweens and what we can do with them. If you remember 1 thing about them, remember this: the Motion tween is object-based while the Classic tween is frame-based which means much of what we used to do in previous versions was in the Timeline when it involved animation: creating and removing keyframes, applying tweens, creating and applying motion guides, copying and pasting frames, etc.
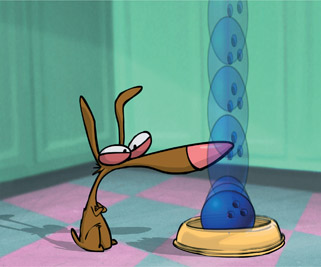
With Motion tweens, most tasks are applied to the object on the stage while Flash does most of the work for us. For this particular animation, the joke is always on the dog. Each of his meals are dropped into his dish and each time the meal is different (as well as revolting and inedible). I knew this scene will be reused, so it was critical to build it in a way that made it easy to swap out the object that falls into the bowl. If you thought using the Sync feature to swap symbols across animations couldn’t be easier, think again.
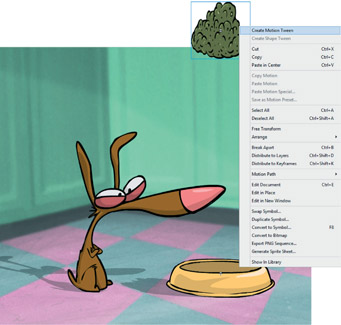
1 The first step is to draw the object that is to land in the bowl and convert it to a symbol. Position the symbol above the bowl and almost off the top edge of the stage. Since the Motion tween is object-based, right-click over the symbol and select “Create Motion Tween.” Flash will automatically create a motion span in this layer and insert a duration of frames equal to a full second based on the document’s frame rate which will likely be plenty of time as this animation won’t last beyond 1 second.
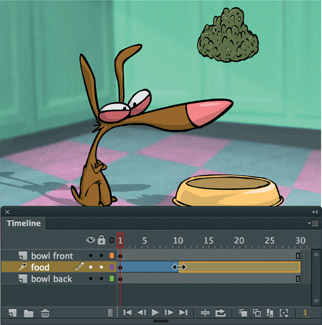
2 Insert some time before the animation actually starts, which was always a bit cumbersome when using Classic tweens. With the Motion tween all you need to do is click and drag the left edge of the motion span and drag it to a new frame. Position the frame indicator somewhere around frame 15, hold down the ![]() key and drag the symbol vertically so that it ends up inside the dog bowl.
key and drag the symbol vertically so that it ends up inside the dog bowl.
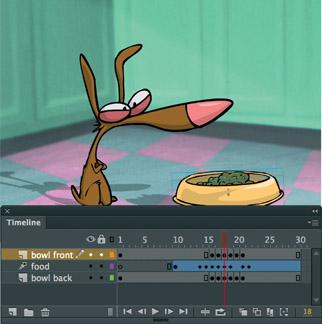
3 To provide the illusion of weight to the dog food, additional keyframes and positions were added as well as some squashing and stretching. To make the effect even more convincing, the dog bowl itself can be animated as if it is reacting to the impact of the food.
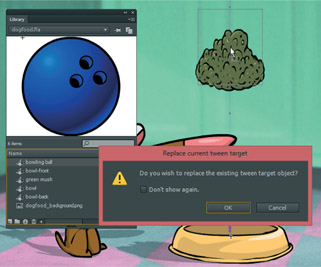
4 Once you have the animation complete, swapping out the current symbol for an alternative symbol is surprisingly easier than using the Sync method from previous examples. Thanks to the Motion tween, all you need to do is open the Library panel, find the symbol you wish to use in place of the current symbol and drag it to the stage (make sure the layer with the motion span is selected). Flash will prompt you to confirm that you want to replace the existing tween target object. Click OK.
5 Your new object has now been applied to the entire motion span, replacing the original object across all keyframes and properties. Using this technique has obvious advantages over the Sync method; instead of selecting the first keyframe in a Classic tween and swapping out the symbol from the Library, the Motion tween method is a simple case of dragging a new object to the stage containing the animation.

6 You can even select the span and press the ![]() key to remove the object entirely from the animation. All of the Motion tween data is retained, allowing you to drag a new object to the stage or copy and paste a new object into the existing span.
key to remove the object entirely from the animation. All of the Motion tween data is retained, allowing you to drag a new object to the stage or copy and paste a new object into the existing span.
Hot Tip

To remove frames or cut frames from within a span, Ctrl-drag (Windows) or Command-drag (Macintosh) to select the frames and choose Remove Frames or Cut Frames from the span context menu.
To extend the presence of a tweened object on stage beyond either end of its tween, Shift-drag either end frame of its tween span. Flash adds frames to the end of the span without tweening those frames.
Hinging body parts
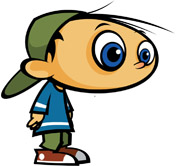
BOY CHARACTER: COPYRIGHT MUDBUBBLE PRODUCTIONS
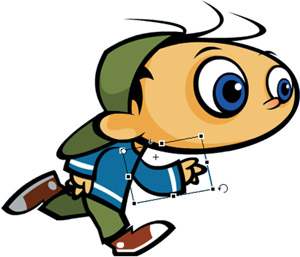
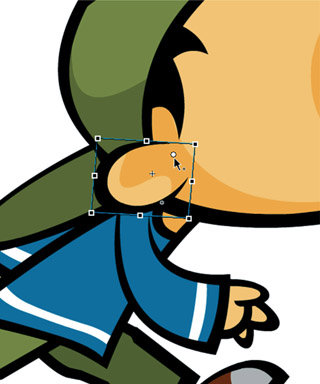
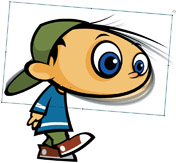
WITH FREE TRANSFORM, we can edit the center point of a symbol instance, thus editing the point on which the symbol rotates or “hinges” itself. Any simulation to inverse kinematics is purely coincidental. This technique does not allow you to link objects together in a chain like the Bones tool does but can be useful for manipulating objects individually.
1 Select the Free Transform tool ![]() and then click on one of your symbols on your stage. The center point of the symbol is now represented by a solid white circle. Simply click and drag this circle to a new location. In my example, I moved the center point of the arm to where the shoulder is (approximately).
and then click on one of your symbols on your stage. The center point of the symbol is now represented by a solid white circle. Simply click and drag this circle to a new location. In my example, I moved the center point of the arm to where the shoulder is (approximately).
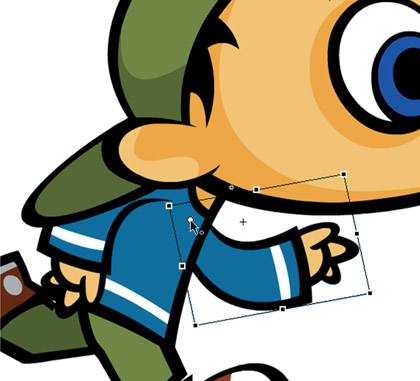
2 With the same tool rotate the arm symbol. It will hinge based on its new center point, making it easier to position each arm movement in relation to the body symbol.
3 Repeat this process for each body part you want hinged. As you can see I even hinged the ear symbol as well. Now you can start animating by creating additional keyframes and apply Motion tweens throughout your Timeline.
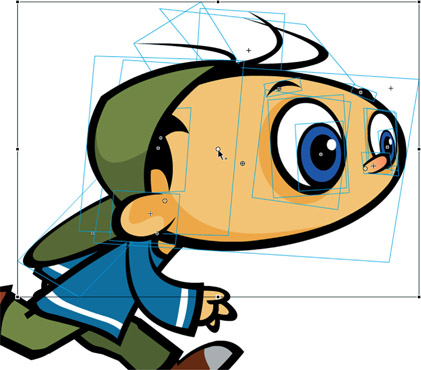
4 You can select multiple symbols across multiple layers and hinge them as if they were one single object. With the Free Transform tool still selected, hold down the ![]() key and click on multiple symbols on the stage. The center point will now be relative to the center point of all the symbols selected.
key and click on multiple symbols on the stage. The center point will now be relative to the center point of all the symbols selected.
5 This technique can be very useful for hinging the head of a character which may contain multiple symbols (eyes, mouth, nose, hair, etc.).
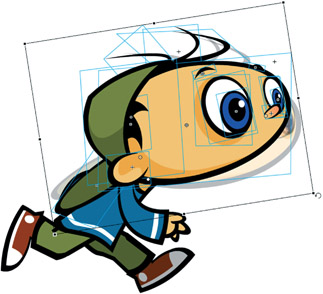
6 The center point for each individual symbol will be retained, but the center point representing multiple selected symbols will not be remembered once they are deselected.
Hot Tip

To select multiple objects, it is often easier to click and drag with the Selection tool across the objects on stage. Make sure you set the center point for each symbol on frame 1 of your Timeline. If the center point is different between keyframes where a Motion tween is applied, your symbol will drift unexpectedly.
Closing the gaps
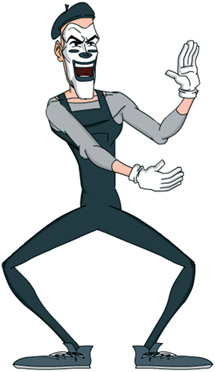
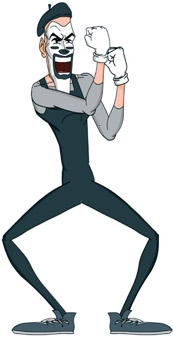
EVIL MIME CHARACTER: YAHOO! SUPER MESSENGERS/MUDBUBBLE
FORM FOLLOWS FUNCTION IN Flash. The more stylized the design, the more flexibility you will have when it comes to adding motion. On the other hand, the more anatomically correct your character is designed, the less you can get away with when the time comes to animate it.
Sometimes a project comes along where the design style demands realism. As a result, the animation technique demands attention to detail, which can be limiting to a certain degree. One particular issue is the unsightly gap that is often created when bending arms and legs at their respective joints. The solution: “caps.” At least that’s what I like to call them. An elbow cap for the arms and a knee cap for the legs can solve the dreaded gap problem.
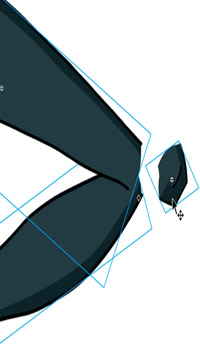
1 The Evil Mime character for the Yahoo! Super Messengers project was designed in a very anatomically correct style. This style caused some problems during the animation process, specifically the joints between limbs. When the arms or legs are in their original positions (as they were drawn originally), there’s no gap.
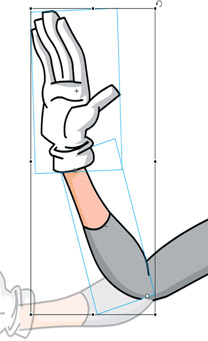
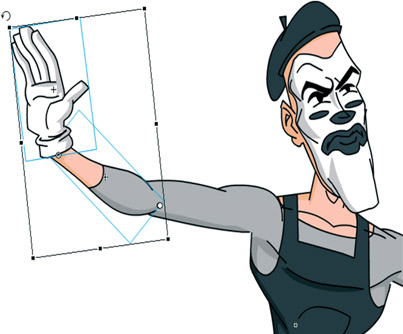
2 Once the arm is bent, the gap appears between the forearm and upper arm symbols. The gap is a problem inherent with this style of line work.
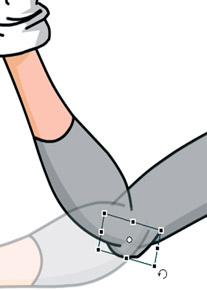
3 The solution is to add a new symbol in the form of an elbow. This new cap can be used as filler to hide that ugly gap between limbs when rotating.
4 Use the Free Transform tool ![]() to skew the cap symbol, so it aligns with both arm symbols bridging the gap between them, so to speak.
to skew the cap symbol, so it aligns with both arm symbols bridging the gap between them, so to speak.
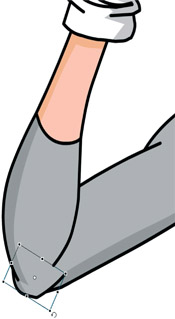
5 The leg, like the arm, works quite well when in a straight position. The upper thigh blends perfectly into the calf and shin.
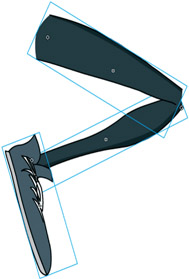
6 The problem arises when these body parts are pushed to their anatomical limit when rotated and bent at the knee (or lack thereof).
7 Once again, adding a knee cap symbol solves this problem quite nicely.
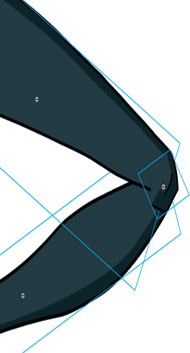
8 Position the knee cap in between the upper and lower leg symbols and align as necessary. Use the Free Transform tool ![]() to skew and scale the knee so that it fits properly.
to skew and scale the knee so that it fits properly.
9 It may seem like a lot of work to add elbow and knee caps, and subsequently more layers to your Flash document. But in the end, the results of your hard work and attention to detail will not go unnoticed.
Hot Tip

Cut-out style characters like this one are perfect for animating when linked together in a chain-like fashion.
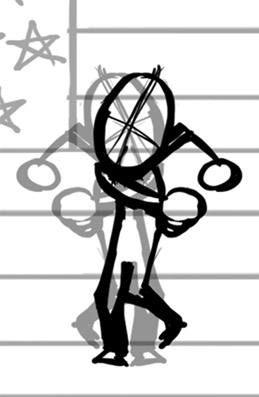
Bitmap animation (Jib Jab)

THIS LAND: JIB JAB MEDIA
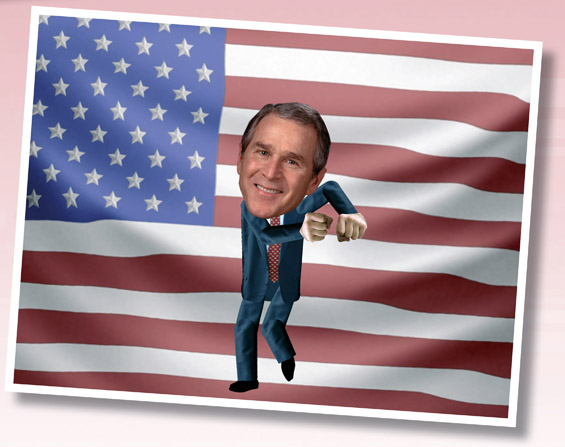
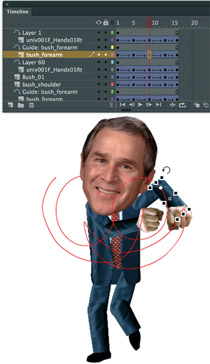
JIB JAB MEDIA GAINED WIDESPREAD notoriety for its election year shorts “This Land” and “Good to be in DC,” which featured George W. Bush and John Kerry during the 2004 Presidential campaign and were viewed online more than 80 million times.
The Jib Jab team uses both Photoshop and Flash to create the majority of their animation, and the process involves sketching, photography, Photoshop collage and, of course, Flash animation.
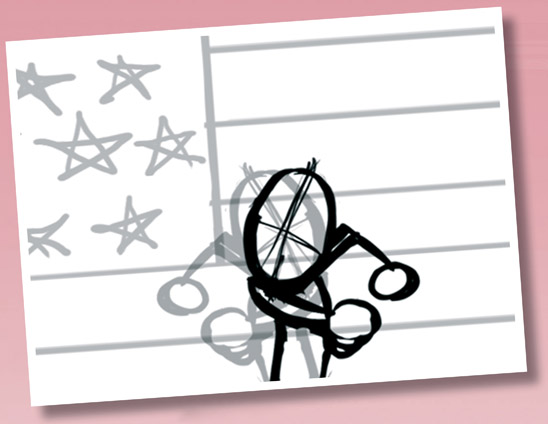
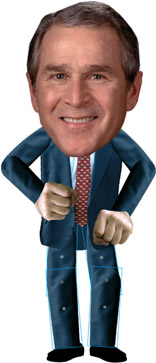
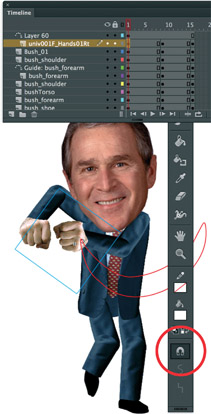
In this tutorial, you’ll be instructed on how to make a President Bush dance cycle. You’ll need a photo of President Bush’s head, a camera and an understanding of tweens, guide layers and the basics of character animation.
Special thanks to Aaron Simpson (www.coldhardflash.com), and Gregg and Evan Spiridellis (www.jibjab.com) for their generous contribution to this book. This is Flash animation gold.
1 For this type of animation, you should define the proportions and the action your character will be executing. Start by drawing the first pose for your character.
2 Sketch the second pose and when you’re finished, you should have a clear idea of the photos you’ll need to animate.
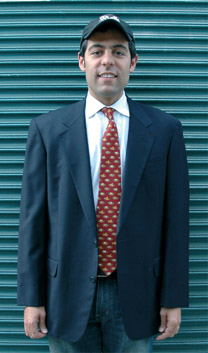
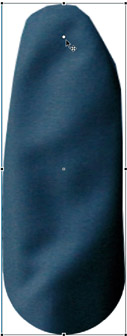
3 Photograph a front view of a jacket, shirt and tie and then a separate photo of a fist. In this situation, you can reuse the arms as legs, and create a vector foot.
4 Open your photograph file in Photoshop. Press ![]() to enter Quick Mask mode and using a hard edge brush, select the area you want to animate separately.
to enter Quick Mask mode and using a hard edge brush, select the area you want to animate separately.
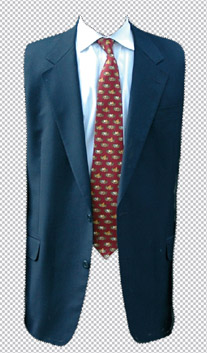
5 Here’s the body section after cutting it out with the Quick Mask feature. Make sure the background is transparent.
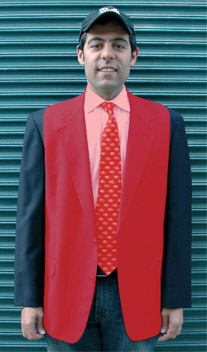
6 You should only build one arm, as we’ll flip these assets and reuse them on the opposite side. Here the arm was cut out using another Quick Mask.
7 The arm looks too thin on the shoulder area. Press ![]() to enter Transform mode and click the Warp icon, then manipulate the Bezier handles to give it a cylindrical shape.
to enter Transform mode and click the Warp icon, then manipulate the Bezier handles to give it a cylindrical shape.
8 Next, select a circle where you want the elbow joint to be and save that selection in a new channel.
9 Here is the lower arm graphic after being cut out from the overall arm.
10 Here the upper arm receives a little more transforming with the Warp tool for good measure.
Hot Tip

Check out Steve Caplin’s How to Cheat in Photoshop for some of the best tips and tricks for how to extend your Photoshop knowledge. It’s a great companion book to have next to this one.
PSD Importer (Jib Jab)
HERE WE SEE how the PSD Importer has evolved in Flash CC. You have the ability to import PSD files straight into Flash! This feature is great at integrating Photoshop and Flash seamlessly.
THIS LAND: JIB JAB MEDIA
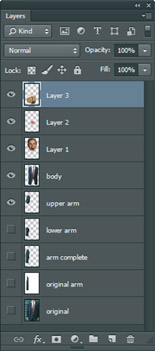
1 Here is how the layers look in the Photoshop file. Many of the images have transparent backgrounds. Transparency is one of the many features preserved when importing.
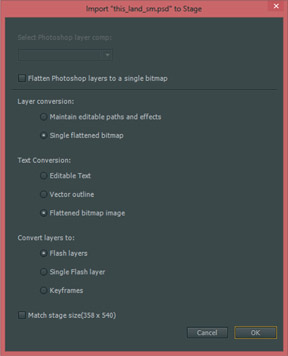
2 In Flash go to File > Import and navigate to your PSD file. The PSD Importer wizard will launch automatically. Your options include the ability to flatten the PSD to a single bitmap, convert layers as single flattened bitmaps or retain editability of any paths or effects, convert text fields to vector outlines or flattened bitmaps and convert layers to Flash layers or keyframes.
3 You may prefer to convert your images to symbols after importing. Keep your Library organized by using symbol names the same as the names of your images.
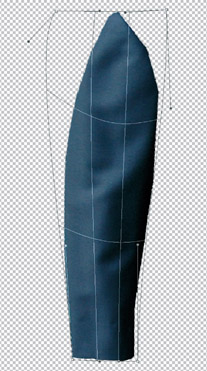
4 Edit the center point of each symbol using the Free Transform tool ![]() .
.
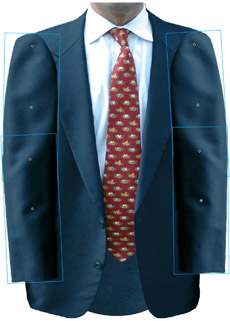
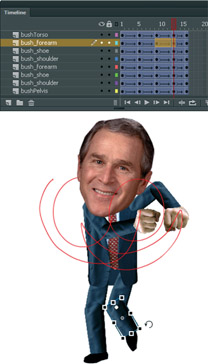
5 The shoulder should rotate where it meets the torso, and the forearm should rotate at the elbow.
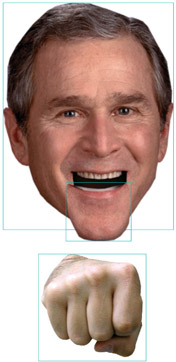
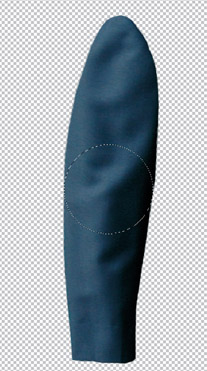
6 The image of President Bush is easily found by doing an image search on the web. Assets like the hands can be shot with your own camera and edited in Photoshop.
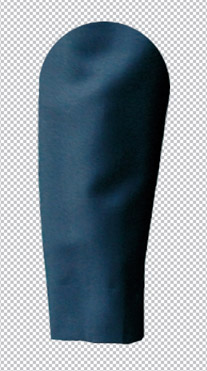
7 Reuse the arm assets for the legs by copying and pasting them to new layers. Then scale and stretch the copied version and align it to your character as the thigh and calf.
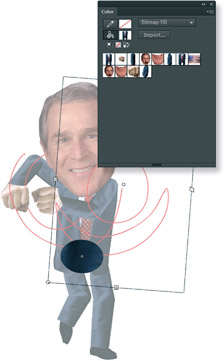
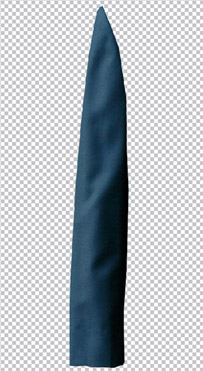
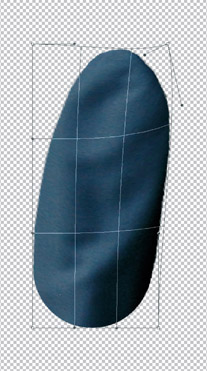
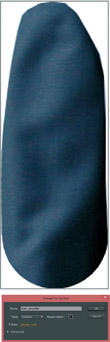
8 The pelvis area was created with a shape and a bitmap fill from one of the imported bitmap images. Use the Gradient Transform tool ![]() to scale it to show only the blue fabric.
to scale it to show only the blue fabric.

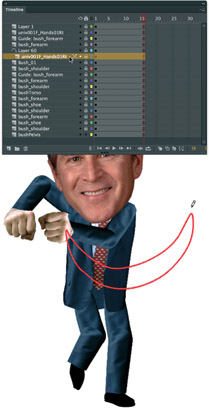
9 In frame 1, pose your character based on your initial sketch. You can choose to have your sketch to the side or directly underneath your symbols. Whichever way you prefer, the main objective is to position your character in this same gesture. In your second keyframe, pose your character in its final state using your sketch as a guide. You can’t flip your symbols horizontally or you will ruin the Motion tween.
Hot Tip

Besides File > Import, you can also drag and drop a PSD file onto the Flash stage to invoke the PSD Importer wizard. Always maintain RGB color values in Photoshop to preserve their consistency when importing into Flash.
Motion guides (Jib Jab)
THIS LAND: JIB JAB MEDIA
MOTION GUIDE LAYERS let you create paths along which you can tween instances of symbols, grouped objects or text blocks. You can link as many layers as you want to a Motion Guide layer and have multiple objects follow the same path. A normal layer that is linked to a Motion Guide layer becomes a guided layer.
Motion guides are useful because, without them, a normal Motion tween is linear, meaning it moves in a straight line only. If your object needs to move along a curve, a Motion Guide is necessary.
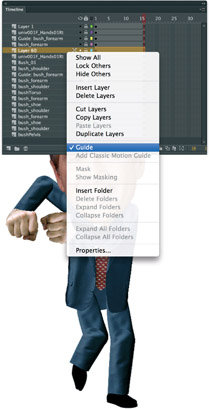
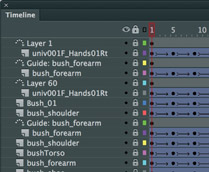
1 Create a Motion Guide layer by adding a normal layer, right-clicking over it and then selecting Guide from the context menu.
2 Drag the layer you want to be guided to the Guide layer to link it. The layer icon will now be offset.
3 Make sure Snap is selected (magnet icon) and drag your symbol until it snaps to your Motion guide.
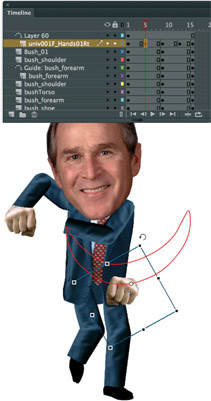
4 Add additional keyframes as necessary and snap your object to the path. Use the Free Transform tool ![]() to rotate your symbol as well.
to rotate your symbol as well.
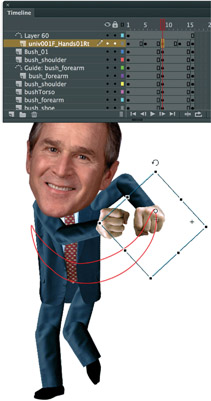
5 In your last frame, snap your symbol to the end of your Motion guide and add your final transformation.
6 Add a Motion guide for each additional object you need to animate along an arc and draw the appropriate path needed.
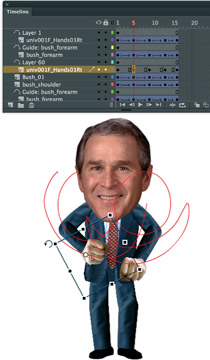
7 Using a combination of Motion guides, paths, transformation and tweens, you can animate any object along in any direction you prefer.
8 The legs and feet do not need to be guided along a Motion path since they only move in linear directions.
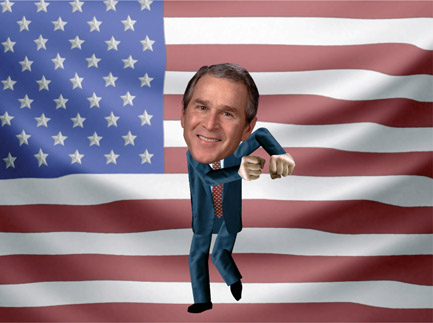
9 The final step is to place your character in its intended environment by adding a background. The American flag shown here was edited in Photoshop and imported into a layer below all the other layers.
Hot Tip

Test your work often by using Ctrl + Enter. Flash will generate an SWF file and play it for you within the Flash authoring environment. This SWF can be found in the same directory where you saved your FLA file.
Walk cycle
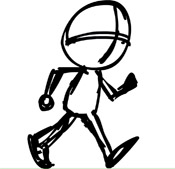
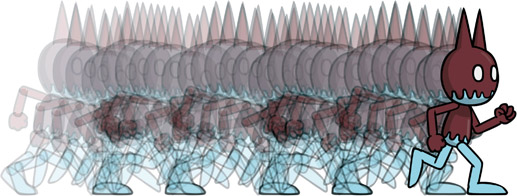
MUDBUBBLE BOY
LET’S FACE IT, AS AN ANIMATOR YOU ARE eventually going to be faced with the task of making somebody or something walk. For whatever reason, newcomers to animation regard walk cycles as extremely difficult. Why? I won’t lie to you, they are. Well, in an anatomically accurate way they can be very challenging. As an animator, you will find it nearly impossible to avoid the walk cycle, so it may be best to face your fear head-on right now. You just might learn that walk cycles aren’t all that difficult to accomplish. There are several ways to make the task of animating a walk cycle very difficult or relatively easy. Let’s examine the easy way.
The best way to create a walk cycle in Flash is to animate the character walking in place, as if on a conveyor belt. The main idea here is to drag an instance of this looping walk cycle animation to the stage and use a Motion tween to animate the character walking across the scene. We’ll get more into that after we tackle the actual walk cycle.
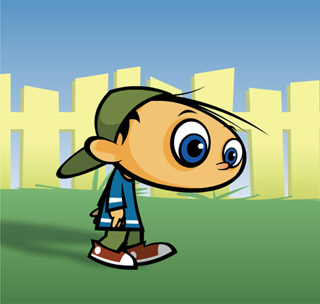
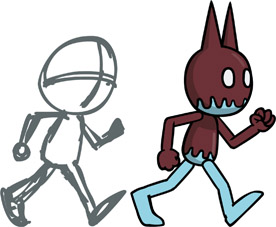
1 Design your character in three-quarter view. At this angle the character is simply easier to animate, especially when it comes to walk cycle animations. Next, convert your entire character and all its parts into a Graphic symbol. You will be working entirely inside this symbol to create your walk cycle.
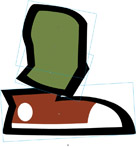
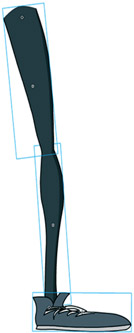
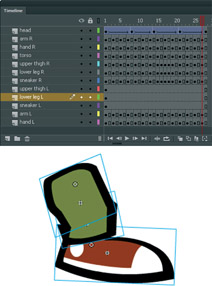
2 Let’s concentrate on just one leg for now. In fact, turn all other layers off so that only one leg of your character is visible. This character’s leg is made up of three different symbols: an upper thigh, a lower leg and a sneaker. This straightforward setup is flexibility enough for a simple walk cycle.
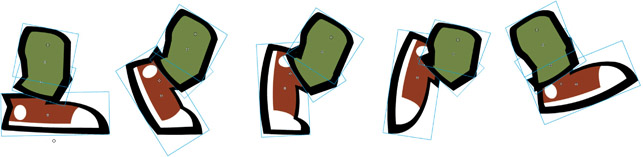
3 Position the leg into several major walk positions using keyframes. Start with the leg planted firmly on the ground. The next position is the foot still on the ground but bent so that the heel is up off the ground. Then create another keyframe and position the leg just before it is lifted off the ground. Next, position the leg completely off the ground and in its most rearward position. The final keyframe shows the leg is in its most forward position off the ground. Use the Free Transform ![]() tool to rotate each leg symbol until it is in the desired position. Notice there are several slightly different shapes to his sneaker based on the amount of weight (or lack of) being placed upon it. When it is fully compressed on the ground its bottom edge is flat. Just before it’s lifted off the ground, it is bent just after the toe. When it is entirely off the ground, its bottom edge is slightly rounded. These may seem like very insignificant details, but in the grand scheme of things, they can make all the difference.
tool to rotate each leg symbol until it is in the desired position. Notice there are several slightly different shapes to his sneaker based on the amount of weight (or lack of) being placed upon it. When it is fully compressed on the ground its bottom edge is flat. Just before it’s lifted off the ground, it is bent just after the toe. When it is entirely off the ground, its bottom edge is slightly rounded. These may seem like very insignificant details, but in the grand scheme of things, they can make all the difference.
4 Notice that I didn’t use the same sneaker for every frame. Depending on the position of the leg, I duplicated the original symbol, gave it a new name and edited its shape to reflect its new position. This type of detail is what I love to add to my animations and I really feel, as subtle as it may be, it adds a lot to the overall look and feel of the character’s movements.
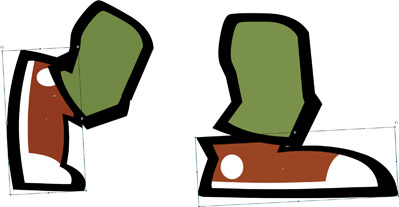
5 Turn on the Onionskin tool and adjust the playhead brackets, so you can use your established leg positions as references. Create keyframes across all layers that contain your leg symbols.
6 Use the Free Transform tool ![]() to rotate and move each leg symbol into an intermediate position relative to the keyframes you already created. The number of frames between the major leg positions will determine the characteristics of the walk cycle.
to rotate and move each leg symbol into an intermediate position relative to the keyframes you already created. The number of frames between the major leg positions will determine the characteristics of the walk cycle.
7 Experiment with the frames between each leg position. Adding more frames when the foot is sliding back along the ground will create the effect of the character gripping the surface. Add fewer frames while the leg is returning to its initial position.
8 Feel free to experiment with the amount of frames between each of your leg positions. You can have more frames for when the foot is sliding back along the ground (so it travels more slowly) and fewer frames while the leg is off the ground (so it travels more quickly), returning it quickly to its initial position. This change in speed can create the illusion that the character is heavy, or perhaps carrying something heavy. If you do the opposite and have the foot slide quickly across the ground and slowly when off the ground, it may suggest your character is on a slippery surface, such as ice.
9 Play back your animation constantly, so you can get real-time visual feedback as to your process. This type of animation work is trial and error and depends on your personal animation style to get the walk cycle to look and feel good to you. Don’t get frustrated; it simply takes practice. Sometimes it helps to not mechanical assembly think of it as an actual leg. Try to imagine it’s not a leg at all but some kind of like a basic pulley or lever system. This thought process can make animating less daunting and a lot more fun. Open the ‘leg_simulation.fla’ from the downloaded source ZIP file. This FLA contains an example of a walk cycle experiment. I made it to show how a walk cycle can be thought of in mechanical terms. It was a fun experiment because it removes the intimidation factor that is associated with animating a walk cycle.
Hot Tip

Before you start, it may be a good idea to put down your stylus and go for a walk. I’m sure the fresh air won’t hurt, but the intention is for you to study how your body moves during the act of walking. As an animator you will find that studying from real life will be your greatest resource. Notice your right leg and left arm move in the same direction with each other. Same thing happens with your left leg and right arm. It is details like these that your animation will benefit from.
ONCE YOU ARE FINISHED creating enough keyframes and leg positions, and you are satisfied with the movement of your leg, we can now move on to the other leg. Since you already animated one leg, there is no reason to start from scratch with the second leg (unless the other leg is designed differently). Therefore, delete the other leg entirely from the stage. Seriously, go ahead and delete it. We don’t need it any more. Trust me.
10 Hold down the ![]() key to select multiple layers and drag them to the trashcan icon or click on the trashcan icon to delete them from the Timeline.
key to select multiple layers and drag them to the trashcan icon or click on the trashcan icon to delete them from the Timeline.
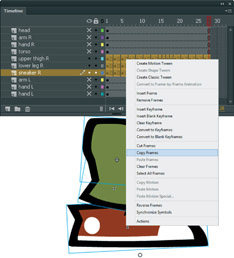
11 Select the entire range of frames and layers of the leg you previously animated. Right-click (Control + click) over the highlighted area and select “Copy Frames” from the context menu.
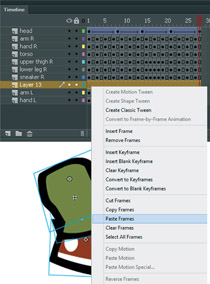
12 Add a new layer below your existing leg, select the entire range of frames, right-click over them and select “Paste Frames” from the context menu.
13 Lock all layers except these three you just copied and pasted. Select the first half of this duplicated leg animation by clicking and dragging across layers and frames.
14 Click and drag the entire section of highlighted frames down the Timeline and place it after the latter half of the animation.
15 Select this entire range of frames and layers by clicking and dragging across all of them.
16 Click and drag this entire range of frames and layers to the left until they start on frame 1. Remove the residual frames by selecting them and “Removing” them from the right-click context menu.
17 Using Edit Multiple Frames, select the new leg symbols and use the arrow keys to nudge them to the right and up slightly. Nudging will help separate the two leg assemblies.
18 Apply a color tint to the leg symbols using black with about 30% strength. The tint gives the illusion the back leg is in shadow and helps create a sense of depth.
19 Animate the arm and hands by rocking them back and forth. You can use frame-by-frame or Motion tweens depending on your needs.

20 As we did with the leg animations, animate just one of your character’s arms and then copy and paste its keyframes into a new layer(s) to achieve the second arm. Select the first half of your arm/hand animation and place it after the latter half of the animation.
21 Select and drag the entire arm/hand animation, so it starts again on frame 1 and remove the residual frames that are left behind.
22 Turn on Edit Multiple Frames again and select this entire range of arm/hand symbols. Click on them once with the Selection tool and apply the same color tint as the legs.
23 With Edit Multiple Frames still turned on, use the arrow keys to nudge them up and to the right slightly.
24 You can add to your walk cycle animation by adding some motion to its head and body. It comes down to personal preference and your individual animation style.
Hot Tip

Be careful when using the Edit Multiple Frames feature. Make sure only the layers you want to edit are unlocked and all other layers are locked to avoid accidents.
Advanced walk cycle


Contributed by Ben Palczynski
VIKING CHARACTER: BEN PALCZYNSKI
THIS EXAMPLE SHOWS A traditional walk cycle animation where each frame is drawn completely by hand. What makes this particular animation advanced is that it requires not only drawing skills, but a sense of rhythm and timing. Ben makes it look easy, but with some dedication and practice, you can achieve great results.
One of the most well-known and highly-praised resources for character animation is The Animator’s Survival Kit (Richard Williams). Williams explains everything you could ever want to know about all kinds of walk cycles, and it’s a reference no animator should be without.
1 Pick a starting point to draw. The initial step as the front foot contacts the ground will do. It helps to use a horizontal guide to help keep things aligned and level.
2 Now draw the halfway position where the standing leg is straight and central. Turn on the Onionskin tool to use the previous drawing as your reference for scale and alignment.
3 Continue drawing the key main poses using the Onionskin tool to reference your previous keyframes.
4 Now do the poses in between these positions. The more keyframes and poses you add, the smoother and slower your animation will be. Experiment with frame rate and number of keyframes for your walk cycle.
5 Turn Onionskin on over the whole animation, so you can look for the arcs of motion to check that things are generally lined up. If something is jittering in your animation, having Onionskin on can help you spot where the problem is.
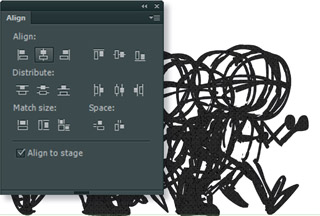
6 Next, center the drawings so you can create a nested loop. Combine any layers you have for each frame, turn on Edit Multiple Frames and span all keyframes using the Frame Indicator brackets. Use the Align panel to center them all.
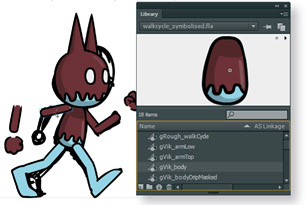
7 Place these keyframes in a symbol if they aren’t already. Draw your character or drag pre-made body parts from the Library into a new layer above your walk cycle. Align each body part according to each sketch for each keyframe.
8 Drag this nested walk cycle to a new layer on the main Timeline and Motion tween it across the stage.

9 The head “turn” uses the same “globe” technique as shown in Chapter 4.
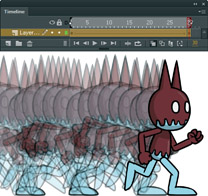
10 To prevent your character’s feet from slipping along the surface as it walks across the stage, set the symbol to graphic and playback to loop. Turn on the Onionskin tool and make sure that the feet overlap fully when they’re placed on the ground. The advantage of having the walk cycle nested in a single symbol is the ability to scale the walk cycle quickly and easily. You can also flip the walk cycle horizontally to make the character walk in either direction.


Hot Tip

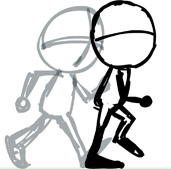
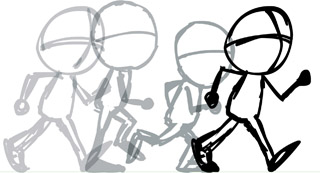
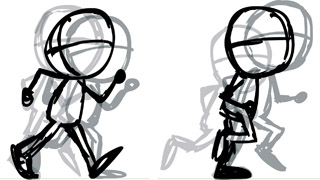
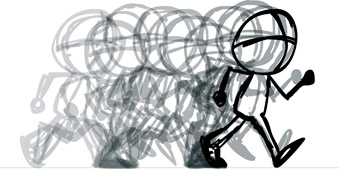
When animating a walk cycle, it’s sometimes a good idea to start off by animating the character literally walking across the screen, one image positioned after another like the thumbnails along the top and bottom of these pages. Lining them up might help you fine-tune the overall mechanics and the ryhthm of your walk cycle.
Walk cycle examples
Contributed by Colter Avara
www.tumblrdorfscastle.tumblr.com
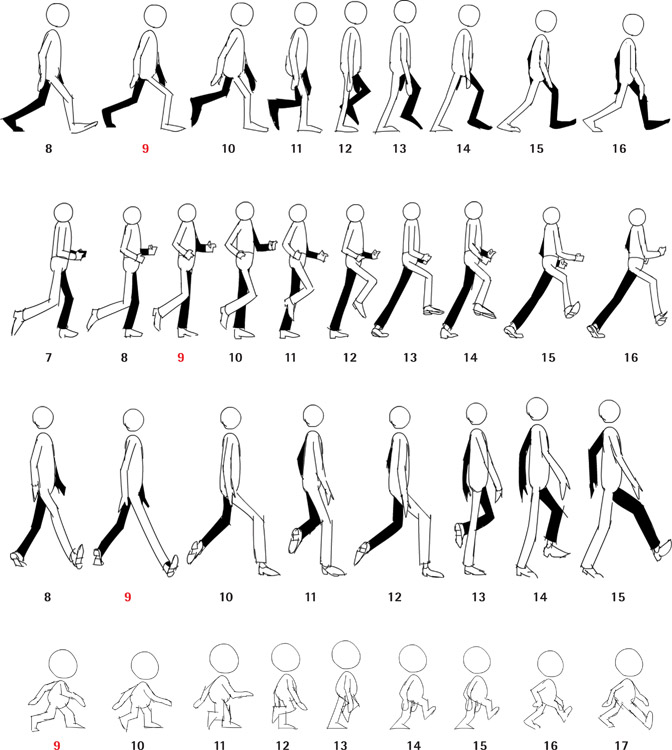
COLTER AVARA IS A friend and talented designer. Recently he was experimenting with walk cycles and sent them to me for feedback. I loved them so much I asked if he’d let me provide them as examples. Colter’s walk cycles are wonderful animations created in Flash using traditional frame-by-frame animation. He started with the initial contact pose, the passing position pose and then the ending contact pose. Then he worked backwards by drawing in the keyframes in between each of the key poses.
1 Timing is key! Most cartoony walks can be animated on 8’s (a key pose on every 8th frame), which is actually 3 steps per second at 24 fps. Most people walk on 12’s (a key pose on every 12th frame), which is 2 steps per second, but it varies. Everyone walks differently. Check your own walk sometime, and while you’re at it study real people and try to observe as much from real life as possible. First you’ll want to create keyframes 1, 5 and 9.

2 You’ll then draw opposing contact poses on frames 1 and 9. Contact poses are points in a walk where your character’s heel first makes contact with the ground. Once you’ve drawn in frames 1 and 9, you’ll then draw a passing position on frame 5. Passing positions are mid-points where the stepping leg passes the balancing leg during a walk. These poses can really set the tone of a walk, so experiment!
Hot Tip

The numbers below each of the walk cycle poses indicate the frames where each pose resides. The frame numbers in red indicate a key pose. In some cases the actual walk cycles contain more frames than could fit on these pages. Locate the source files for these examples and play the timeline to see the complete walk cycle animations as Colter intended.
Anticipation
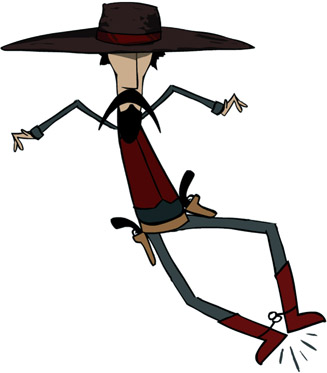
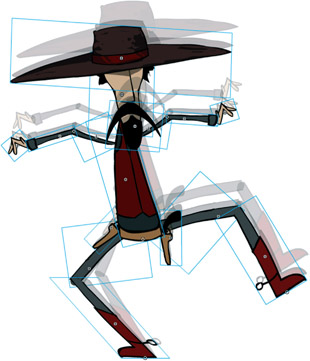
COWBOY: MUDBUBBLE
BY DEFINITION, ANTICIPATION IS THE preparation for a particular action or movement. It can also be used in animation to attract the viewer’s attention to a specific event that is about to occur. An example of anticipation would be an archer pulling an arrow back along its bow or a baseball player raising his arm to throw a ball.
Anticipation can also be used to build suspense in a scene. It tells the viewer something is about to happen, and the longer the anticipation is, the more suspenseful it can be.
Anticipation is critical to making believable animation. Without anticipation, your animation may appear too abrupt and unnatural. It is important as an animator to study from life and notice how we move and react anatomically.
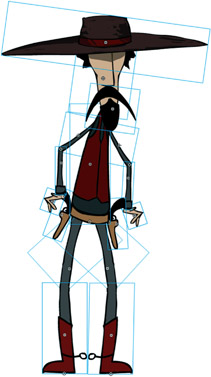
1 Here the character is in its initial position. Not much going on in terms of action, but we can assume he might do something due to the slight tension in his stance and his hands being in close proximity to both holstered guns.
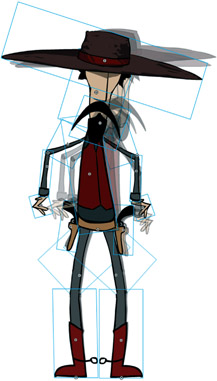
2 To anticipate the action, animate the cowboy in the opposite direction he will be moving. Make a new keyframe across all layers where the next position change will occur and use the Free Transform tool ![]() to rotate and position your character. Apply a Motion tween and some easing out to imply physical tension within our character.
to rotate and position your character. Apply a Motion tween and some easing out to imply physical tension within our character.
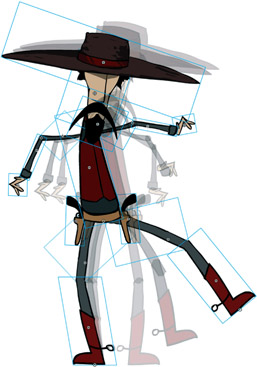
3 Sometimes an animation requires more than one keyframe position to achieve the right movement and gesture. For this particular animation I used four different gestures for the anticipation animation, each with a Motion tween and some easing applied.
4 The first step shows the character still on one foot, but also leaning back a little further and crouching lower with all his weight on this one leg. This stance is obviously not a comfortable gesture that could be held for very long. Hence the anticipation that something is about to happen.
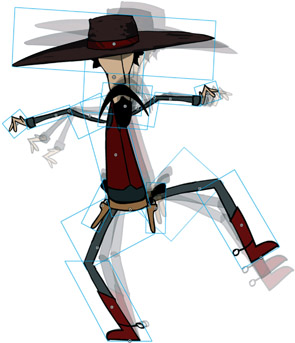
5 Here I am pushing the envelope by adding even more tension in the character’s overall gesture. There’s no doubt he is about to react in a very physical way.
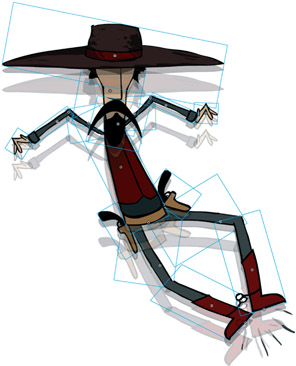
6 Sir Isaac Newton showed us for every action there is an opposite but equal reaction. In keeping with this law of motion, animate the character moving in the opposite direction and ultimately performing the anticipatory action.
Hot Tip

Refer to the topic in this chapter on “Hinging body parts” to help you rotate symbols based on a customized center point.
Drawing upon oneself
Contributed by Laith Bahrani
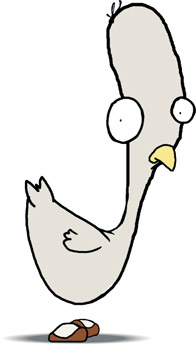
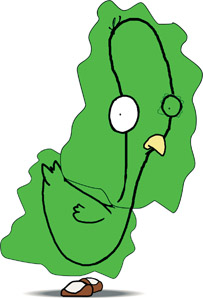
CHICKEN CHARACTER: LAITH BAHRANI
THE MOST COMMON TECHNIQUE I use to make a character or an object appear as if it’s drawing itself into the scene is purely frame-by-frame animation anyone can achieve. Although the effect can be quite labor intensive, it can also be visually effective if you want to achieve a very organic hand-drawn effect. The basic principle involves starting with a finished drawing; over a series of keyframes, cut away bits of the drawing with the Lasso tool. Work backwards starting on what will eventually be the end keyframe of the animation. When you play back the animation from frame 1, the drawing will appear to draw itself. The same effect can be achieved by using a mask to reveal the character or object. I find this works best on areas of color as opposed to lines. Let’s look at how you can incorporate both techniques to animate a chicken character who appears to draw itself.
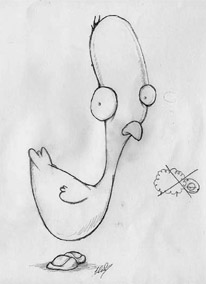
1 The first step to animating the chicken character is to spend decades studying and sketching this wonderful species of bird. As you can see I skipped this part and just scanned in the first chicken I drew. Resize the scanned sketch into a workable and desirable size in Photoshop and then import it into Flash.
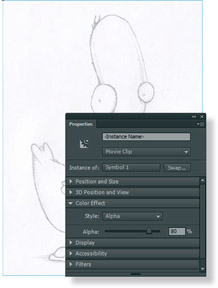
2 With the scanned sketch imported and on the stage, convert it to a Movie Clip. The scanned sketch will be the drawing guide and drawing over it is how I do a lot of my characters. Adjust the alpha of this “guide” to about 50% so that the contrast of the lines you draw over it will be clearer.
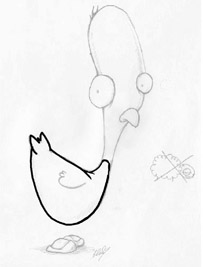
3 Build the chicken character up in layers, keeping individual parts on separate layers. The techniques of splitting a character up are fairly universal and logical – head/body/arms/legs/eyes/mouth (or in this case beak). Create a new layer (above the guide) and using the Paintbrush tool, draw the outline of the chicken’s body.
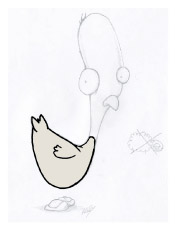
4 When you’ve drawn the body outline, fill it with a color. Next click on the filled color area to select it, cut it using ![]() , create a new layer underneath the outline and paste the fill using
, create a new layer underneath the outline and paste the fill using ![]()
![]() . Create one more layer, above the others, and draw the wing as an outline only. This process gives you three layers for the body: for the outline, for the fill and for the wing.
. Create one more layer, above the others, and draw the wing as an outline only. This process gives you three layers for the body: for the outline, for the fill and for the wing.
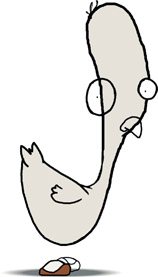
5 Create the head and other parts in the same manner. Add a new layer for each new body-errr-chicken part, keeping them all separate. Remember to cut and paste each color fill to individual layers as well. If you are familiar with character animation, then you are already used to working with multiple layers and layer folders.

6 Now lock all the layers except for the body outline layer; having all other layers locked helps ensure you only work on the appropriate area. Insert a keyframe in frame 2. Select the Lasso tool ![]() and cut away a small portion of the line.
and cut away a small portion of the line.
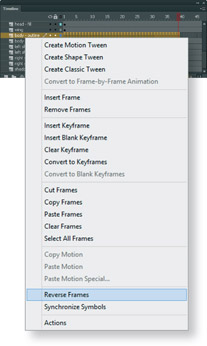
7 Repeat this procedure of adding keyframes and removing small portions of your line work until they are completely removed. Select the entire range of keyframes, right-click over them and select “Reverse Frames” from the context menu. Repeat this process for all other outline layers.
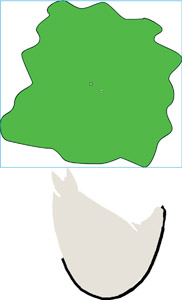
8 To create the effect of each color fill being “drawn” in, add a new layer above the body layer and convert it to a mask layer. In this layer create an irregular shape and convert it to a symbol.
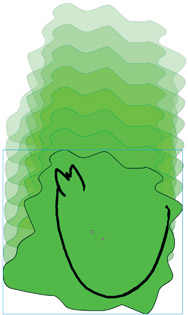
9 Insert a keyframe in the mask layer in a frame at the end of your Timeline. Position the symbol containing your shape, so it completely covers your fill color for the chicken’s body. Apply a Motion tween to animate the mask so it “reveals” this color fill.
10 Add a mask layer and create new mask shapes for each color fill. Motion tween each one into position to reveal each chicken part. Lock all layers or publish your movie to see your animation effect
Hot Tip

Instead of using the Lasso tool to select and delete a small portion of your line work, you may want to try using the Eraser tool or the pressure-sensitive eraser on the opposite end of your stylus (if you have one). In terms of style and pacing it’s worth keeping in mind that if you cut big pieces away at each keyframe the line will appear quickly and could look a bit jumpy.
Tradigital animation
THE FUSION OF TRADITIONAL AND DIGITAL animation has given us “tradigital” animation. I don’t know who invented the term, but the effect was first shown to me by Ibis Fernandez (flashfilmmaker.com), a well known and talented animator who blew me away when he sent me a sample of this technique a few years ago. Up until that point in my career, I had been using Flash for four years and thought I knew every trick in the book. It was clear to me I had more to learn.
Tradigital animation is the result of traditional animation techniques translated by the use of digital tools. The end result may look traditional, but the process is very different and less time-consuming. When a client deadline is looming, traditional animation goes out the window. A common argument among traditionalists is that tweens are too easy to use and often become relied upon for every aspect of an animation. Dependence on tweens alone may result in your animation looking very mechanical and stiff. So where do you draw the line (sorry, bad pun)? What technique should you use? Motion tweens? Shape tweens? Frame by frame?
Answer: All of the above. Don’t limit yourself to just one technique if you don’t have to. Use the technique that the action calls for, even if it means combining two or more techniques. What is so impressive about this particular technique is the fluidity of the movement you can achieve. Draw image “A” and then image “B” with the Line (or Pencil) tool; then with each line segment on its own layer, shape tween from “A” to “B.” Merge all your layers, clean up your lines, add some fills and shading – voila! You’re a “tradigitalist.”
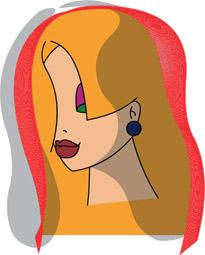
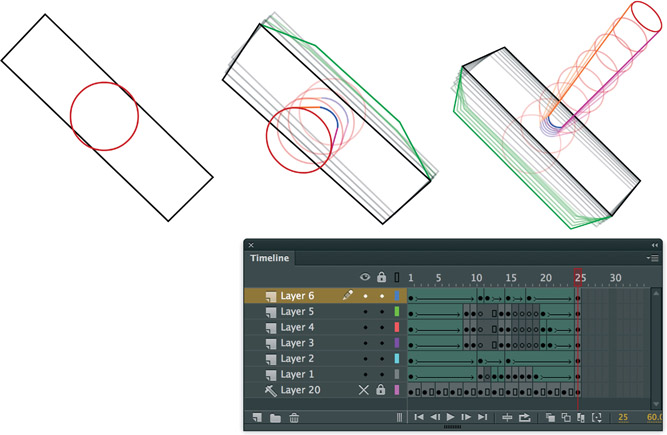
1 For this technique to be a success, you need two different drawings of your character or object. Object Drawing mode is highly recommended here as each stroke will remain as a separate object that can still be edited. It is also critical because you will later distribute each stroke to its own layer.
2 Insert a blank keyframe (F7) in a new frame (frame 30 will do), and draw the new angle of your character or object. The trick here is to use the same number of strokes as you did in the first drawing. You could also choose to insert a keyframe (F6) and edit the same strokes to reflect your new angle.
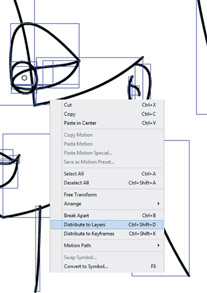
3 For both drawings, select all of your strokes, right-click over them and select Distribute to Layers from the context menu. Since this process will create a whole new set of layers for each drawing, you will need to select all the keyframes for one drawing and drag them to the other drawing’s layers.
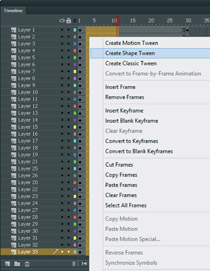
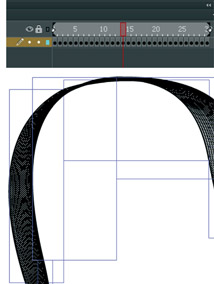
4 Drag across all layers, right-click and select Create Shape Tween from the context menu. Previous versions of Flash didn’t offer this option in the context menu. If you are using an older version of Flash, apply the Shape tween using the Properties panel or drop-down menus. Now is the time to add easing if preferred.
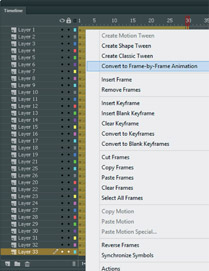
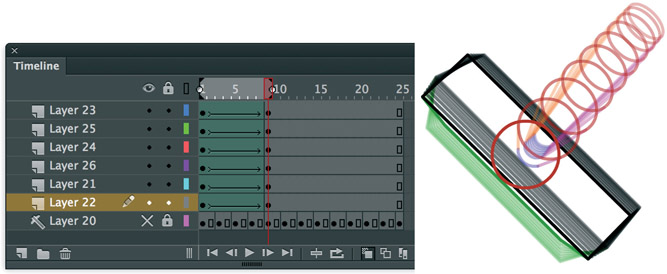
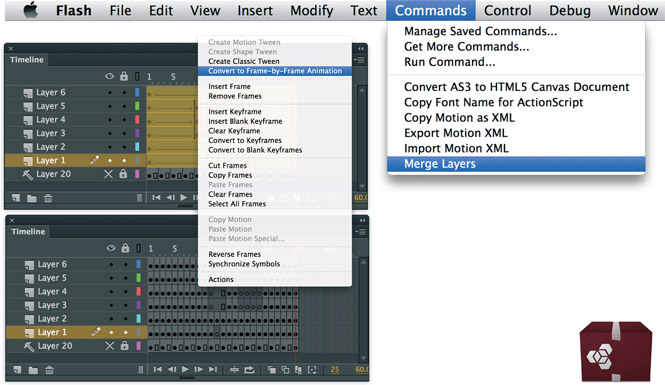
5 Next you need to prepare your layers for merging. Drag across all layers and frames, selecting them all in gold. Right-click over the highlighted area and select Convert to Frame-by-Frame Animation from the context menu to convert the entire animation to keyframes and remove the tween spans in a single command.
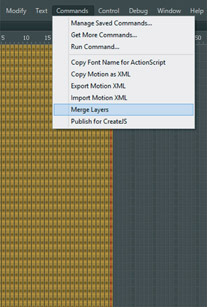
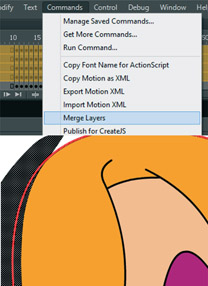
6 Make sure you have the Merge Layers extension installed (included with the downloaded example files). Make sure all layers and keyframes are selected and go to Commands > Merge Layers. This extension will run the JSFL command that will compress all keyframes and layers to one single layer for you.
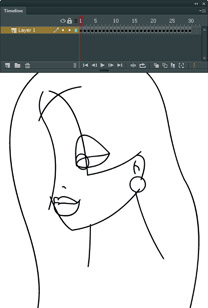
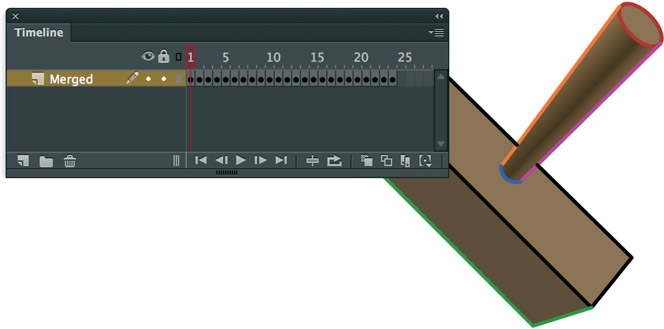
7 You can delete all the old layers as they will all be empty after the merge. Go to File > Save As and save this file with a new name which is important because you may decide to make some changes to your image at some point in the future. After all layers are merged, making changes becomes very difficult.
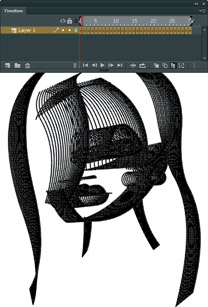
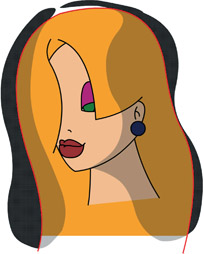
8 Next, you need to break apart strokes from the Object Drawing mode. Why? Because if you have overlapping strokes and want to add color fills to your image, it needs to be flattened one step further for editing. Turn on the Edit Multiple Frames feature and adjust the frame indicator brackets to span all keyframes. Break apart ![]() to merge all strokes.
to merge all strokes.
9 Use the Selection tool while holding down the Shift key to select all unwanted strokes and delete them. In this situation it is simply a fact of life that, as an animator, eventually you will have to perform the tedious chore of cleaning up after yourself or even worse, someone else’s work.
10 As tedious as the last step was, here’s your reward, a very slick looking animation that looks like it was made using three dimensions. But it gets even better when you add color and shading.
Hot Tip

David Wolfe has created a ‘Merge Layers’ extension for Flash that is available to download. Techniques like the ‘tradigital’ topic would take at least five times longer to create without the use of a Merge Layers extension.
11 Once all your strokes are connected and cleaned up, mix your colors and start filling. You will need to apply all color fills across all keyframes by hand. Flash has no automatic way of doing this for you.
12 Occasionally you may find an area of your image will not accept the fill color. Usually the cause is a gap between strokes that is hard to see. Make sure Snap is turned on and use the Selection tool to drag their end points until they “snap” together.
13 Let’s take this effect to the next level by adding shading. Add two new layers above your animation and draw two shapes in each new layer. Use the color black mixed with about 30% alpha. Make sure the brush has Smoothing set to 100. The fewer vector points the better.
14 Insert a keyframe in both layers in your last frame of your animation. Move the left shape about 20 pixels to the left and the right shape the same distance to the right. Use the Selection tool to bend their outlines to reflect the new contour of your character and apply Shape tweens.
15 Remember the previously saved version of this animation? Open it and find the layers containing the outline strokes of your character. Select them and Copy/Paste Frames into a new document. You will use these strokes to “cut” away the shading you will not need.
16 Select all frames and layers, right-click over the highlighted area and select Convert to Frame-by-Frame Animation. Merge all layers using the Merge Layers JSFL extension (Commands > Merge Layers).
17 Turn on the Edit Multiple Frames feature and make sure the Frame Indicator brackets span all keyframes. Select all ![]() and break apart
and break apart ![]() all Drawing Model objects to merge all the strokes together.
all Drawing Model objects to merge all the strokes together.
18 Copy all frames of your outline from the previous step and paste them into a new layer above your shading layers. Make sure all other layers are locked, turn on Edit Multiple Frames, select all strokes and change their color to bright red or something in contrast to the character itself.
19 Turn off Edit Multiple Frames, and unlock the two layers containing the shading animations. Select all frames across all three of these layers and go to Commands > Merge Layers to compress them down to one layer. Delete the remaining empty layers.
20 Use the Selection tool to click anywhere outside the shapes to deselect them. Select the shaded area outside of your character’s outline and delete it. Repeat this procedure for every keyframe.
21 The final step is to double-click the red stroke (double-clicking selects all segments in the stroke), and delete it. Repeat this step for every keyframe until you are left with just the shading shapes inside the contours of the original character.
22 Next, test your movie and sit back to enjoy the fruits of your labor. This technique is great when you want to add some realism and drama to your shot. But remember to plan ahead carefully to avoid having to spend more time making revisions.


Hot Tip

Shape tweening in Flash is a ‘Voodoo’ science. Results can often be unexpected depending on the amount of vector points that comprise the object(s). The biggest tip is to keep your shapes as simple as possible if you need to tween them. Simplicity is why in step 14 I chose to insert a keyframe and work with the exact same shapes from frame 1. I know they will have exactly the same number of points and increase the chances of my Shape tween being successful. If any of the shapes ‘implode’ during the Shape tween, you may have edited them a bit too much.
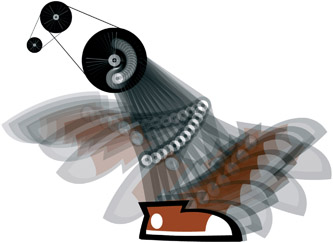
Brush animation
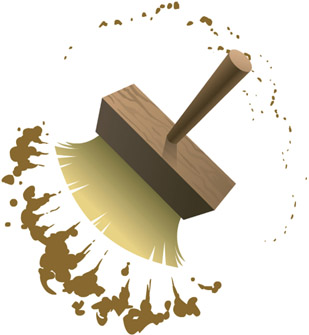
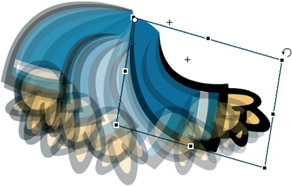
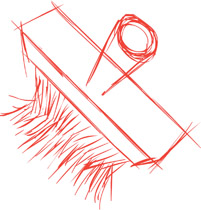
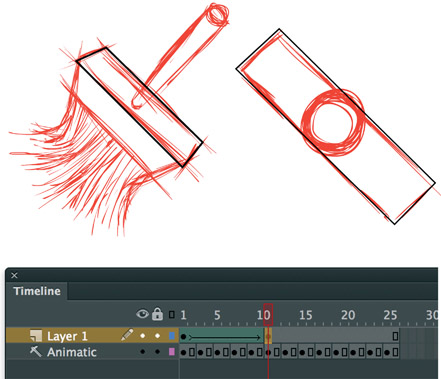
ONE OF MY JOB RESPONSIBILITIES AS a Creative Director for GSN Games is creating Flash animations for our Flash game titles. For some of these animations I have created ambient effects such as explosions, flying birds, floating clouds and rolling fog to name a few. This example deconstructs the creation of a very specific effect animation for a solitaire game where a brush is needed to provide the transition effect for the game cards. As the game is launched and the cards are dealt across the screen, the brush is programmatically moved across the screen to “dust off” the back of the cards to reveal their face value. The original brush reference was drawn at a single angle and sent to me by our staff illustrator in the form of a layered Adobe Photoshop file. It was my job to envision the brush at a different angle and animate it as if it were directly in front of the user. This animation was one of the more complicated effects for me to create because it required several hours of hand-drawn animation combined with a little Flash ingenuity.
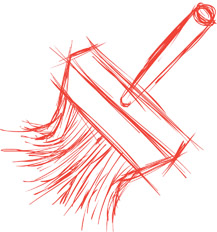
1 Coincidentally I used the Brush ![]() tool to sketch the brush image at the angle shown above. At this stage I kept my drawings loose as I was only trying to achieve the basic motion of the brush.
tool to sketch the brush image at the angle shown above. At this stage I kept my drawings loose as I was only trying to achieve the basic motion of the brush.
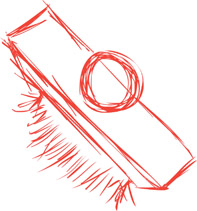
2 With the Onionskin tool turned on I inserted a blank keyframe ![]()
![]() and sketched the brush at a slightly different angle. I started with circular butt end of the handle and continued drawing the rest of the brush.
and sketched the brush at a slightly different angle. I started with circular butt end of the handle and continued drawing the rest of the brush.
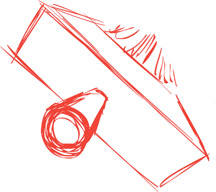
3 The next frame the brush was drawn at an angle where the butt-end of the handle is almost completely facing us. The top plane representing the body of the brush is almost facing us at a 90 degree angle.
4 Here the brush angle has rotated enough to see its opposite side.
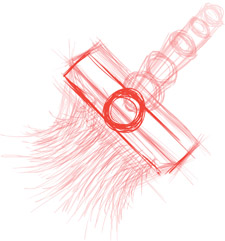
5 The Onionskin tool is useful for making sure the alignment of the handle is in check during this phase. I used the circular end of the handle as my visual aid to keep the brush aligned throughout the rotation in each frame.
6 With the animatic stage completed I created a new layer. This next step borrows from the tradigital technique from the example on the previous pages. Concentrating on just one plane of the handle, I drew a rectangle using the Rectangle ![]() tool with black as my stroke color and no color as my fill in frame 1. Using the Selection
tool with black as my stroke color and no color as my fill in frame 1. Using the Selection ![]() tool, I clicked and dragged each corner of the rectangle to create the perspective using the sketch as my guide. In frame 10 I inserted a blank keyframe
tool, I clicked and dragged each corner of the rectangle to create the perspective using the sketch as my guide. In frame 10 I inserted a blank keyframe ![]() and drew another rectangle using just strokes in the shape of the plane with the sketch as a guide.
and drew another rectangle using just strokes in the shape of the plane with the sketch as a guide.
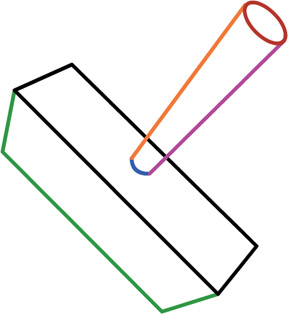
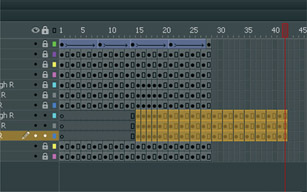
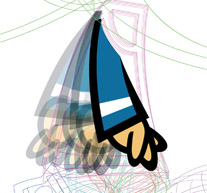
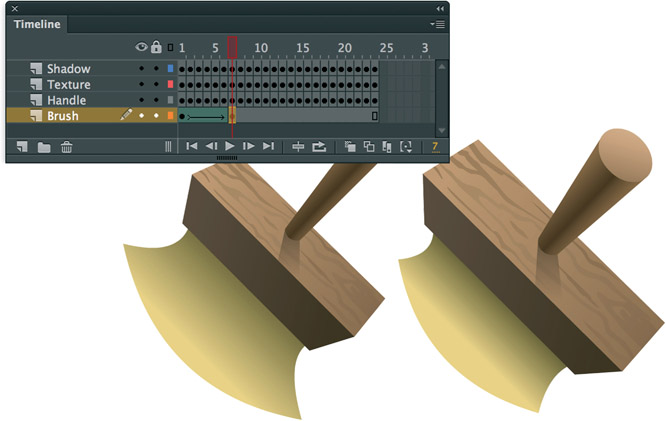
7 Repeat step 6 by inserting new layers for every new stroke or plane. To complete the body of the brush I used a total of 6 new layers. The different strokes for each layer are shown above in different colors for illustration purposes.
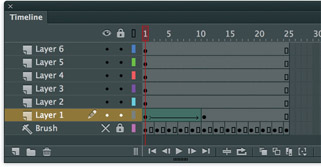
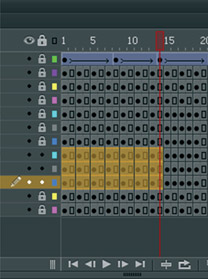
8 Here is how the timeline layers look at this stage of the process. Each layer contains a different segment of the brush. The reason for keeping the strokes on separate layers is to make it easy to animate each stroke using Shape Tweens in the following steps. In most cases a layer will contain more than 1 stroke segment which is OK. The idea is to limit the number of vector points to as few as possible to ensure the Shape tweens have a better chance of working in the next steps.
Hot Tip

I’ve been using Flash for over 13 years, and you might think that after all this time I would be bored of using the program. Truth is I constantly set challenges for myself in an effort to become a better designer and animator, and this brush animation is a perfect example of raising my own bar.
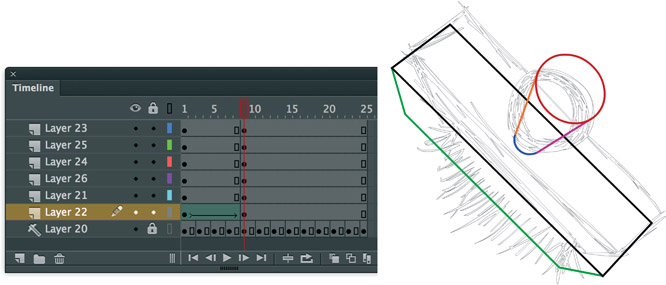
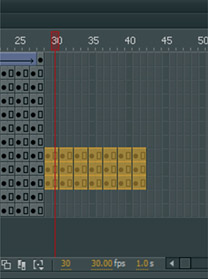
9 Keyframes are inserted across each layer on frame 9. This frame is where I want to have the tween span ultimately end. My decision to animate to this point is based on the angle of the brush in this frame. As seen above, the brush angle in the original sketch is at an angle right before it travels past its own axis. In the following frame we begin to see the opposite side of the brush as the handle moves past us down to the left. I know from experience that shape tweening vector points beyond this angle will be problematic. In an effort to worry about only the things I can control, I chose to animate the first half of the brush movement and worry about how to animate the latter half later.
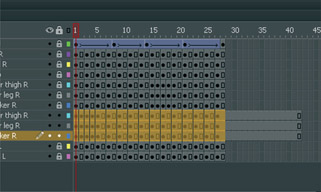
10 With each stroke in place on frame 10, apply shape tweens across each of the layers between the keyframes. Playback your animation to see the brush appear to change angle across a faux 3 dimensional space. At this point I chose to apply an easing in value of -100 to create a more realistic motion.
11 I continued the rest of the brush animation using the same process as described in the previous steps. Keyframes were inserted, lines were drawn and shape tweens were added using the original animatic as my guide. With the brush animation complete, my timeline consisted of mostly shape tweens and a few keyframes. Blank keyframes were the result of when the brush was at an angle where neither of its sides could be seen.
12 The next step was to merge all the layers down to a single layer. The reason for merging is to have each stroke on the same layer so that the Fill ![]() tool can be used to fill the closed shapes. To merge all keyframes across all layers manually would be painfully redundant work. Since Flash doesn’t have a native feature for this specific task, we luckily have David Wolfe to thank for his handy Merge Layers extension that is available on his website toonmonkey.com/extensions.html. With the extension installed it can be accessed from the Commands menu. Select the entire range of frames and layers and then choose Commands > Merge Layers.
tool can be used to fill the closed shapes. To merge all keyframes across all layers manually would be painfully redundant work. Since Flash doesn’t have a native feature for this specific task, we luckily have David Wolfe to thank for his handy Merge Layers extension that is available on his website toonmonkey.com/extensions.html. With the extension installed it can be accessed from the Commands menu. Select the entire range of frames and layers and then choose Commands > Merge Layers.
Hot Tip

I wasn’t sure when I started this effect if it was going to work out or even look good. The important thing is to start somewhere and keep it simple. I enjoy challenging myself because with failure or success comes learning, either way.
13 With all of the strokes merged into a single layer, I could now use the Fill ![]() tool to add color to the brush handle. Here I mixed a couple of brown colors to add shading as well as a linear gradient for the handle to create the illusion of it being round. I manually added color to the brush on every keyframe.
tool to add color to the brush handle. Here I mixed a couple of brown colors to add shading as well as a linear gradient for the handle to create the illusion of it being round. I manually added color to the brush on every keyframe.

14 Using the Selection ![]() tool, I manually selected the strokes from each frame and deleted them, leaving behind just the fill colors.
tool, I manually selected the strokes from each frame and deleted them, leaving behind just the fill colors.

15 Here I added some texture to simulate wood and a small shadow being cast by the handle to create a stronger illusion of this being a 3D object. This step was not necessary, but I like going the extra mile to take my animations to the next level.
16 The next challenge was to create and animate the bristles of the brush. In an effort to keep things simple, I used the Rectangle ![]() tool to draw a simple square fill. I then used the Selection tool
tool to draw a simple square fill. I then used the Selection tool ![]() to manipulate the corners and sides to look like the shape in the image above. I inserted a keyframe
to manipulate the corners and sides to look like the shape in the image above. I inserted a keyframe ![]() in frame 7 and using the Selection tool again I manipulated the shape as seen in the 2nd image above. I then applied a Shape Tween to these frames to animate the shape. The reason I limited the animation to 7 frames was to help prevent the shape tween from breaking apart which can happen when the shape is transformed too much from one frame to the next. The remaining bristles animation was created the same way using shape tweens across short sequences of frames.
in frame 7 and using the Selection tool again I manipulated the shape as seen in the 2nd image above. I then applied a Shape Tween to these frames to animate the shape. The reason I limited the animation to 7 frames was to help prevent the shape tween from breaking apart which can happen when the shape is transformed too much from one frame to the next. The remaining bristles animation was created the same way using shape tweens across short sequences of frames.

17 Once the overall bristle animation was complete, I selected all the frames in the layer across all the shape tweens and converted them to keyframes. Next I used the Selection ![]() tool and selected a small portion of the shape.
tool and selected a small portion of the shape.
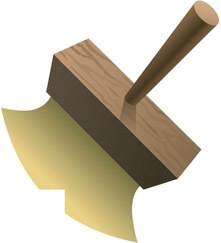
18 With the shape selected I pressed the ![]() key to create a notch in the shape allowing me to now manipulate it further.
key to create a notch in the shape allowing me to now manipulate it further.

19 Using the Selection ![]() tool, I dragged the corners to create a thin notch as shown above.
tool, I dragged the corners to create a thin notch as shown above.
Hot Tip

It’s difficult to see, but the solid colors in the brush handle are really linear gradients. I sometimes like to create gradients with subtle variances in color values to help create the illusion of various amounts of light reflecting off each surface. It’s a tiny detail that adds a lot to the overall effect.
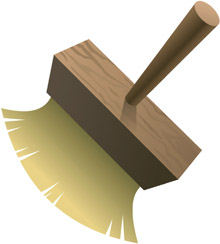
20 Repeat steps 18 and 19 to add additional notches in the shape to create the illusion of bristles.
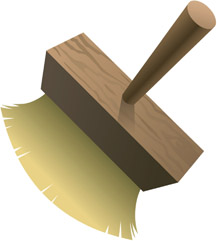
21 Go to the next keyframe in the timeline and repeat steps 18-20, but in this keyframe the notches should be slightly thinner.
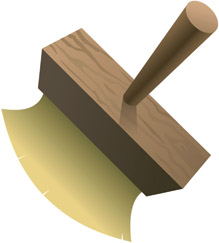
22 In the next keyframe the same steps are applied, but the notches should be smaller and fewer in number. The idea is that the bristles are coming together and the spaces between them are going away over time.
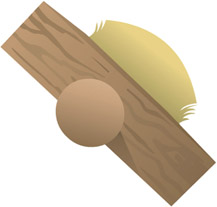
23 As the brush changes direction, so do the bristles. As the bristles extend away from the brush handle, the notches begin to appear. Repeat steps 18-20 to create the illusion of bristles once again.
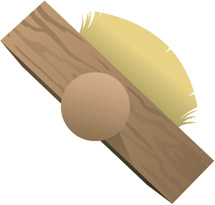
24 In this keyframe I only needed to add a small number of notches. The animation is very quick during playback, and not much detail can be discerned by the human eye.
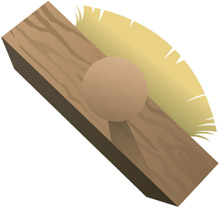
25 Here is the keyframe where the bristles are spread out the most. This frame contains the biggest notches and the largest number of them as well.
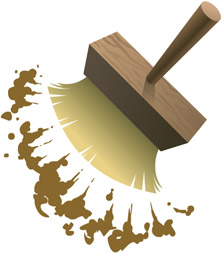
26 The final step was to add the dust animation. Using the Brush ![]() tool, I drew the dust as solid shapes using the brown color as seen above.
tool, I drew the dust as solid shapes using the brown color as seen above.
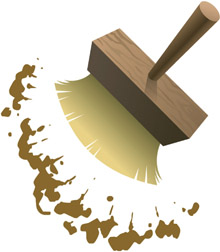
27 With each keyframe I drew the dust over again using the Onionskin tool as my guide. In this keyframe the dust is slightly smaller in volume
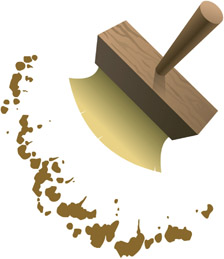
28 Over time the dust begins to disappear. The trick to making dust look real is to slowly animate the edge of the dust closest to the brush faster than the leading edge of the dust.
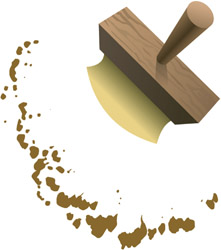
29 With the trailing edge of the dust moving faster, more of the dust particles break apart and start to disappear from the direction where they are originating from.

31 Here the dust is mostly small blobs, continually getting smaller and breaking apart.
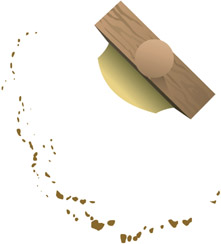
32 In the final keyframe the dust is almost completely gone. Open the example file if you haven’t done so already, and in the last scene you will find the dust animation.
Hot Tip

Keep it simple! I was unsure how to animate the bristles and decided to start with a basic rectangle shape to make the animation process much simpler. Having drawn and animated each individual bristle would look realistic but is not necessary. The dust animation was also not very difficult because I kept it as simple solid shapes drawn with the Brush tool. The trick here was to not overthink the design.
Embracing challenges
“Absolutely! That shouldn’t be a problem. I’ll get started right away.”
I was totally lying.
That’s how I ended many phone conversations at the start of a new client project. I remember sounding very confident and convincing. I even made myself believe in me. But in full disclosure, I often had absolutely no idea how I was going to execute what the client wanted. Upon hanging up the phone I would enter panic mode. What the client asked for and how I was going to create it was a complete mystery to me. I couldn’t fathom how to draw a straight line from concept to final execution and do so within a specified duration of time as requested. I was in way over my head with multiple clients throughout a large portion of my design and animation career.
This was exactly where I wanted to be.
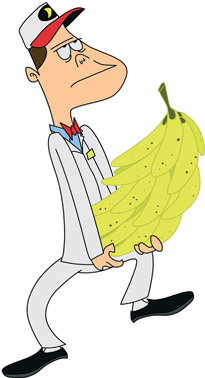
I’m not sure why I enjoyed this masochistic approach to my design career. Common sense should have prevailed as I could have politefully declined these jobs and perhaps even helped each client by referring someone else more capable. It was arguably an irresponsible act accepting a client job as it could’ve hurt my career and reputation if I was unable to deliver what the client expected of me. It was, for all intents and purposes a selfdestructive work style.
But I became a better designer and animator because of it. Somehow I found ways to complete each project successfully and meet the clients’ expectations, if not exceed them. Taking on these kinds of challenges forced me to push myself beyond my comfort zone. I had to be inventive and take risks.
I’m no athlete, but I do recognize that athletes perform better as a result of pushing themselves beyond their limits. A long distance runner starts his journey one mile at a time. The only way to complete a marathon is to push the limits of how far he can run which was also my approach as a designer and animator. I never accepted complacency because it was boring. Playing it safe was a dull place to be. Taking on design challenges that were seemingly impossible was like inspirational fuel. It was exciting and scary all rolled up into a ball of determination that kept me focused and above all, challenged.
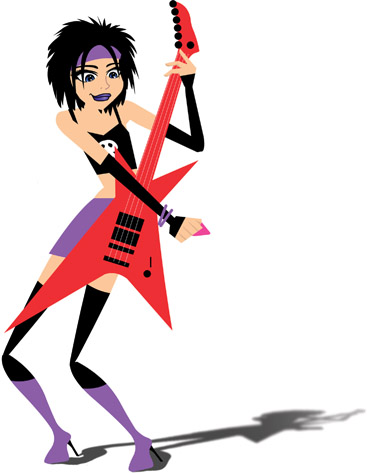
The best way to improve your skills as artists, designers and animators is to push yourself beyond what you think you are capable of. Failure is always a possibility, but we learn from our mistakes. I know my limitations, and I have many. But I used these limitations to push myself by finding different ways to solve problems.